

Page 1

Gladiator RG200 – User guide
Important notice!
Read this information carefully so you can use
the telephone in the right and safe way:
the mobile telephone EVOLVE Gladiator RG200
gained the certification IP67, i.e. it is, with the
exactly define conditions (norm IEC 60529,
temperature from 15°C to 35°C, pressure 86-106
kPa, 1 m water column during 30 minutes) water
and dust resistant. However neither this norm
guarantees the absolute water-resistance of the
device
therefore keep the earphone socket, SIM slot
and microUSB port clean and carefully sealed up
to maintain the water-resistance and “dustresistance”
in view of the fact that there are many different
ways of using, like e.g. if the USB cable is or
isn´t connected, we aren´t responsible for any
damage caused by the liquid
do not use the phone outside during the storm;
we aren´t responsible for any potential damage
of the device or the health related with this way
of using
do not dip the phone groundlessly into the water
and do not needlessly submit it to very low or
too high temperatures
1
Page 2

protect the phone from the moisture and the
steam. If the moisture gets into it, it can cause
its overheating, short circuit or the damage of
the whole device
if the phone falls into the water, do not press
the buttons of the keypad and immediately open
it with the dry cloth
this phone is a complicated electronic device;
therefore protect it from the shocks and the
influence of the magnetic field
do not pierce the loudspeaker, do not put any
things into the holes, do not paint the phone
with the dye – all these activities influence the
functionality and the tightness of the phone
if the phone is after the service intervention, its
resistance against the dust and water can be
lowered
the description of using the cell phone and
user´s interface can vary from this manual due
to the firmware version of your device and
specific conditions of the mobile operator
repairing and the service are possible to
accomplish only in the authorized service place
for the phones EVOLVE (for more visit
www.evolve-europe.com), otherwise you can
damage your phone and it is not under warranty
anymore
Important commercial law statement
no part of this manual can be copied, extended
2
Page 3

or changed without prior written agreement of
the producer.
the producer/distributor reserves the right to
make changes in this product against the state
written in this manual without prior warning,
because the product goes through the continual
progress and improving.
the producer, distributors nor sellers are not
responsible for any lose of data or direct or
indirect damage caused in connection with the
phone operation, no matter how they occurred.
the content of this manual is provided without
the guarantee. The producer doesn´t provide
any guarantee of accuracy or reliability of this
manual´s content. The exceptions can be made
by the local law.
the producer reserves the right to change or
completely withdraw this manual without prior
warning.
General notice
Battery
If you store the battery, keep it in a cold, well airventilated place out of the direct sun reach.
Battery capacity
Making a phone call, display underlight and playing
games discharge the battery more than usual. Long
phone calls lower the phone operation time in the
stand-by mode.
3
Page 4
Notice for the charger!
At the first switch on, charge the battery for 12
hours at least. You will get its maximal capacity
and provide the maximal life time of battery.
The charger
Do not recharge the phone in the following
situations: at the direct sun shine, at the
temperatures in the range -10°C to 45°C, in the
humid or dust environment, near the electronic
devices as the television, radio (it could cause the
picture or sound interference).
Battery
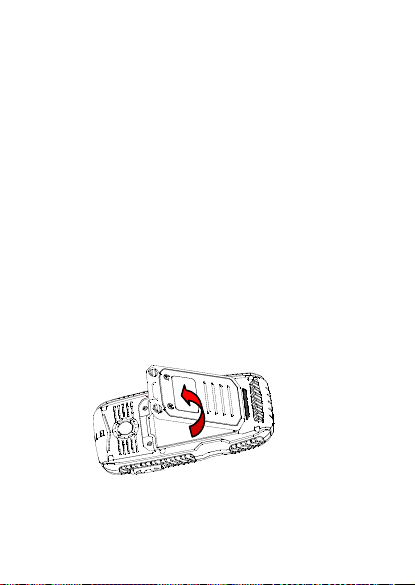
Inserting and taking the battery out
Turn the mobile phone the back side up; according
to the schema below loosen both cover locks of
the battery space by turning. Take off the battery
cover.
Pick up the battery and take it out of the battery
space, as it is shown on the following picture.
4
Page 5
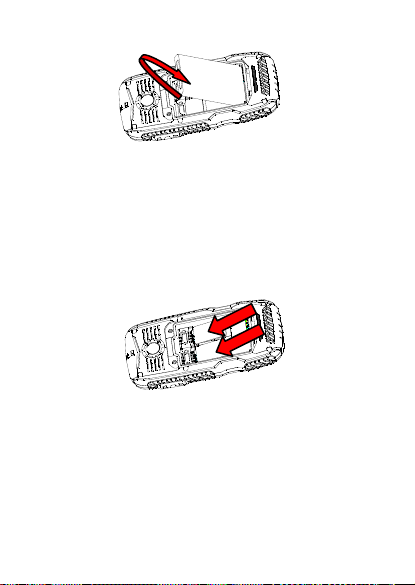
Inserting the SIM card
Turn the mobile phone off, take off the battery
space cover and take out the battery. Put the SIM
card or the SIM cards with the right orientation
into the slot and put back the battery and insert
back the battery space cover.
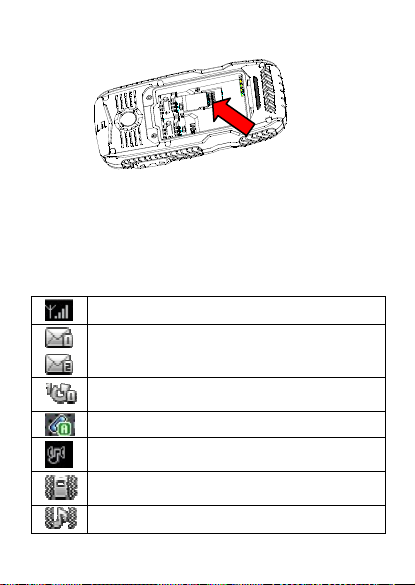
Inserting and taking the memory card out
Turn off the mobile phone, take off the battery
space cover and take out the battery. Open the
lock of the memory card holder, insert the card
with the right orientation according to the schema
shown below and close the lock of the memory
card holder again.
5
Page 6
Connecting and disconnecting the earphones
Open the USP port cover on the left side of the
phone and plug the earphones into the socket. At
disconnecting, do not pull the earphones cable,
pull the connector.
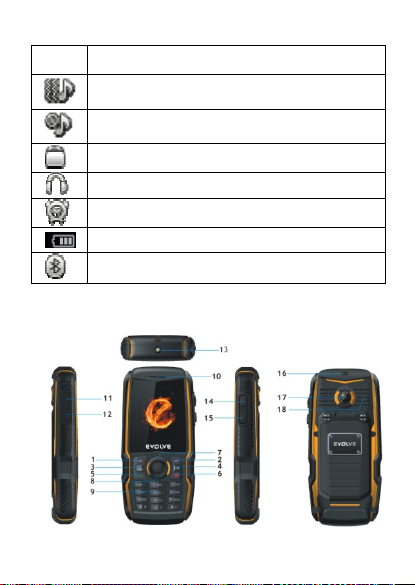
State information line
Indication of the signal strength for SIM1
Indication of received unread text message
on SIM1 and SIM 2
Indication
forwarding
Indication of missed calls on SIM 1
Actual ringing type:
Vibration
Actual warning type:
Vibration
Actual warning type:
of all calls unconditional
6
Page 7
Design and functions
Vibration and ringing
Actual warning type:
Vibration, then ringing
Actual warning type:
Silent mode
Indication of keypad lock
Indication of earphones connection
Indication of (pre)set alarm
Indication of actual battery state
Indication of active Bluetooth
7
Page 8

Keys Functions
k
Left
1
functional
key
Right
2
functional
key
Fast access
3
to the calls
records
4 FM Switching on the FM radio.
Green
5
receiver
Red
6
receiver
OK; menu opening; entering
the main menu by short
pressing in the stand-by
mode, switching on the
torch by long pressing.
Delete; bac
phone list by short pressing
in the stand-by mode.
Showing the list of dialled,
incoming and missed calls.
Making a phone call,
choosing the number from
the list or by direct
entering you can dial it by
pressing the green key;
answering the call by
pressing the green key;
calling up the call history
by pressing the green key in
the stand-by mode.
Ending a phone call; a
leave to the stand-by
mode; switching on/off the
display underlight by short
pressing the red key;
switching on/off the phone
8
; entering the
after
Page 9
Navigation
7
keys
8 OK
Numeric
9
keys
by long pressing the red
key.
Directional key
speed option
Directional key up/down:
speed choice
OK; showing menu by short
pressing; showing the
unread messages by next
short pressing. Switching
on/off the torch by long
pressing.
Writing the numbers,
letters and symbols;
activating the matched
menu by short pressing the
numeric keys; activating
speed dialling by long
pressing the numbers 2 -9
(it must be preset);
switching over the symbol
inserting methods by short
pressing # in the editing
interface; showing the
symbol menu by short
pressing the key * ;
inserting the symbols +, p,
w, by long pressing the key
0 at entering the numbers.
9
left/right:
Page 10

10 Microphone
11 USB port
Earphones
12
socket
13 LED light
Vol um e
14
control
15
keys
Hang up
16
opening
Photo
17
camera
Dialling the call
Direct call dialling
The internal call
In the time, when the phone is in the stand-by
mode, start entering the individual digits of the
required telephone numbers using the keys
(including the appropriate regional country code if
it is required). Then press the key with the green
receiver, choose between the SIM1 and SIM2 and
make a phone call.
The international call
For making the international call just add the
Voice recording during the
call.
For connecting the USB
cable.
The earphones serve for
listening to the music.
Switching on/off the
light.
Setting the volume.
The hole for fixing to the
hanging.
For taking the photos and
video recording.
10
LED
Page 11

symbol “+” to the beginning of the dialled number
and the country code of the appropriate country.
Then just add the dialled number.
Receiving the call
You receive the call by pressing the key with the
green receiver. If you make a call from the phone,
it is not possible to dial another call from the
other SIM card.
The main menu structure
Call log
Showing the history of the dialled calls from
SIM1/SIM2
Music player
Playlist: showing the actual list of music
My list: showing the last played music and the
most often played music.
Music: the overview of the whole musical pieces.
Setting: setting the parameters for the music
player.
Services
WAP – access to the WAP service
Data account: GSM Data and GPRS
Telephone list
Searching: searching for the particular contact
Add new contact: you can add new contacts
11
Page 12

either to the phone or to the SIM card
Speed dialling: by using the function of speed
dialling you can save the whole telephone numbers
for their easy and speed dialling for the numeric
keys 2 -9 . If you press long the appropriate
numeric key in the stand-by mode the phone
number saved under this shortcut choice will be
dialled.
The list of the unwanted (Blacklist): it serves for
showing the list of the blocked numbers, their
adding of taking away and checking the list of the
rejected calls.
Delete all: delete all information about the
contacts.
Copy all: this function serves for copying all the
contacts from the SIM card to the phone or from
the phone to the SIM card.
Move all: this function serves for moving all the
contacts from the SIM card to the phone of from
the phone to the SIM card.
Settings: checking the memory status and setting
of the individual files, the business v-card, and the
vCard version and for deleting all the records.
Messages
Write SMS: you can choose if the SMS will be sent
from the SIM1/SIM2, insert the patterns, add the
number and the name of the contact, and so on.
Then it is possible to insert the bookmark and
change the inserting method.
12
Page 13

Inbox: here you can browse received messages SMS
and MMS;
Sent items: here are saved sent messages.
Concepts: serves for saving the unfinished saved
messages.
Patterns: you can edit or delete the patterns in
the text messages or the user´s patterns in MMS;
using the patterns it is possible to write the
message directly.
Message setting: setting the parameters
connected with the text and multimedia messages.
Set the right network parameters before sending
MMS in the server profile. Make sure that your SIM
card supports the GPRS connection and that the
MMS support is activated. Consult the potential
problems with your telephone operator.
File manager
After opening the file manager the content of your
phone memory and microSD card will be loaded.
Alarm clock:
a. alarm clock setting
Choose the required alarm clock and open the
interface for its setting. You can turn on/off the
alarm clock, set the time and other parameters.
b. alarm clock activation
In the moment when the set alarm clock time
arrives, the sound signal will be heard according to
the setting.
13
Page 14

Multimedia
Picture browser: Here are saved the photos taken
by the mobile phone.
Video recorder
Video camera/player settings: enables set the
needed parameters
Restore standard settings: restores all settings to
the default ones.
Digital answering machine: if the content of the
answering machine isn´t empty, choose one of the
recordings.
Photo camera:
Photo camera setting: enables to set the needed
photo camera parameters.
FM radio
Station: shows all the actual tuned stations on the
list.
Frequency setting: the option serves for the
manual station entering.
Automatic searching: automatically searches for
FM band and updates the list of the saved radio
stations.
Settings: here you can set the necessary FM radio
parameters.
Recording: by using this option you will record the
14
Page 15

broadcast of the actually listened station.
Connect: serves for saving the broadcast record at
parallel listening to the FM radio.
Files list: it´s used for the broadcast programmes
recordings management saved in the files Connect.
Note: for the FM radio reception it is necessary to
connect the earphones that serve as the antenna
to the phone.
Planning FM radio recording: after activating this
function, the phone will automatically turn on in
the set time and recording will take place.
Phone setting: enables setting of the important
phone characteristics
Call setting: setting calls, main SIM card and other
options for calling.
Connectivity settings
Bluetooth
Switching on:
Activating/deactivating the Bluetooth function. If
the Bluetooth is switched off, all the Bluetooth
connections are ended and you cannot send and
receive data through the Bluetooth connection
Audio device searching: the system automatically
searches the Bluetooth hands-free device
accessible in the surroundings
My device: shows the parameters of your device.
Active devices: the list of the devices that are
actually paired
Settings: setting the visibility of your phone, the
15
Page 16

names of the devices, and so on.
About the device: showing the information about
the Bluetooth name, its address and the supported
services.
Note: the files transmitted via Bluetooth are saved
in the file Received.
Network settings
Network selection: search the available network
or choose the right network from the list that is
offered by the phone.
Preferences: choose the preferred network that
the phone will preferentially register to.
Security setting
Security settings for SIM1/SIM2
Lock SIM1/SIM2: This function can prevent
unauthorized people from using your SIM cards.
After activating the PIN code of the SIM cards, this
PIN must be entered at every switching on;
without its entering it is possible to make the free
SOS calls to the emergency call number only
(usually 112).
Note: the PIN code is the kind of password
conjoined with the SIM card. If you entered
incorrectly three times in succession, the SIM card
gets locked. In this case you need so called PUK
code to unlock the SIM card. You´ve got the PUK
code together with the SIM card and the PIN code.
If you haven´t got it, contact your phone
16
Page 17

operator.
Calls blocking: this function requires the SIM card
support.
Change password: here you can change the
password.
Phone key: This function serves for locking the
phone. The device is then protected against the
manipulation by the unauthorised people. The
factory preset password is 0000 (four zeros). If the
phone key is activated, it is necessary to enter the
correct PIN at every turning on, otherwise it is not
possible to use the phone, neither for the SOS call.
Automatic keypad lock: After activating this
function, the phone automatically locks its keypad
when changeover to the stand-by mode after the
preset time period.
Change password: According to the instructions on
the display you can change the phone lock
password.
Factory settings recovery:
Factory preset password is 0000 (four zeros).
After its entering you can activate the recovery of
the factory default settings. Then all the
parameters will change to the default factory
settings and all of the user´s settings are lost.
17
Page 18

Problems solving
If you have a problem during using the phone,
check the solution options according to the
following table. If you can´t find the solution,
contact the sales assistant or the service. Don´t
try to dismantle and repair the phone, you can
lose the guarantee.
The list of service places for using the guarantee
and the conditions of the “Service without
worries” is available at www.evolve-europe.com
Your packet with the phone that you send to the
service should include: the device packed against
damage caused by transport (bubble wrap) – valid
warranty card, event. the invoice containing IMEI
of the device – the described defect – your contact
(address, telephone number, email).
Problem Cause
The phone
can´t be
switched on
The key for
switching on the
phone wasn´t
pressed long
enough.
The battery is low. Recharge the battery.
The battery has a
wrong contact.
Solving
Press the key for
switching on for 3
seconds at least (or
longer).
Take the battery out
and insert it again. Pull
the battery out and
clean all of its contacts
18
Page 19

A short time
of the standby mode
The
recharging
failure
The phone
call can´t be
made
before inserting back.
The SIM card has
failed.
The battery´s
output weakens
with time.
Long playing
games, listening to
the music, the
Bluetooth
unnecessarily
turned on, and so
on.
The contact is
faulty.
The charging
voltage is too low.
The wrong charger. Use the right charger.
The SIM card
failure.
The dialling
mistake.
The credit is used
up.
Check or replace the
SIM card.
Replace the battery.
Reduce the length of
playing or listening,
turn off the actually
unnecessary function of
the phone.
Check the contacts;
change the cable or the
charger.
At first, charge about
half an hour, then
disconnect the charger
and again re-connect it
and charge the battery
completely.
Check or change the
SIM card.
Dial the number again.
Contact the operator.
19
Page 20

The partial
call failure
The SMS
can´t be
sent
The wrong
PIN
The
automatic
locking
failure
The mobile
phone keeps
switching off
itself
The phone
isn´t ringing
at the
incoming call
You h ave t he
wrong number.
The wrong setting. Check the call blocking.
The service for
your SIM card isn´t
activated or the
SMS centre number
isn´t set up.
You h ave e nt e re d
the wrong PIN code
three times.
Entering the wrong
code (forgetting
the code).
The battery is low. Recharge the battery.
The failure in
settings.
The coincidental
failure.
The volume is
lowered to the
minimum.
Check the phone
number.
Contact the operator
and get the SMS centre
number.
Contact the operator.
Contact the authorized
cell phones service.
Check if the function
for automatic switching
off isn´t active.
Switch the phone on
again.
Set the volume again.
20
Page 21

ABACUS Electric s.r.o. reserves the right to revise
this document or withdraw its validity anytime and
without prior notice and is not responsible, if the
device was used in a different way than it was
recommended above.
2200
DECLARATION OF CONFORMITY:
Hereby, the company ABACUS Electric s.r.o.
declares that this model EVOLVE Gladiator RG200
is in compliance with the requirements of the
norms and regulations, relevant for the given type
of device. The complete text of Declaration of
conformity can be found at ftp.evolve-
europe.com/ce
Copyright © 2012-2013 ABACUS Electric s.r.o.
All rights reserved. Design and specification can be
changed without prior notice.
21
 Loading...