

Page 1
CD-DS100R-01
Recessed Door Sensor
Vie w the e xpand ed manu al:
htt p://a eot.e c/spp rt/re cesse d
Fro m Aeot ec by Ae on Labs' Intel lig en ce s er ies comes
the Re ces sed Door Sens or. Invisi bly insta lle d, it sits
wi th in a doo r and i ts fr am e to pro vide all th e
infor mat io n n ee ded by a Z-Wave syst em for secu rit y,
safet y, and amb ian ce , and it does i t al l wi tho ut a lte ri ng
a room' s aes th eti cs.
Your R ece ss ed Do or S ens or i s compr ise d of t wo p art s:
the larg er Main Sen sor an d the sma ll er Mag netic
Senso r.
Sep arate the Main Sen sor's tw o sec tio ns by fi rs t
re mo vi ng it s l id an d th en re mo vi ng it s i nt er na l
com ponents .
Remov e the cle ar batt ery ins ula tor by pulling it away
fro m the Main Se nso r.
Install your Recessed D oor Sensor
Wit h the Mai n Se nso r powe red an d ac tiv ate d, it is now
tim e to in lay it w ith in y our selec ted doo rf ram e an d to als o
insta ll th e Magne tic S en sor.
Top of th e door
Sid e of the do or
Pre pare a sp ac e fo r t he Mai n S ens or by d ri lli ng a ho le
into your doo rfram e us ing a 19 mm wide dri ll bit . The
hole sh oul d be 6 5 mm de ep.
Ste p 1
1
3
Aeotec R ece ssed Do or Sens or
2
Fami liari se yoursel f with you r door se nsor
Using a s lot -h ead sc rewdr ive r, r emo ve th e Ma in
Senso r's li d by pre ssi ng gen tl y agai nst it s expo sed
conne cto r.
Qui ck Star t
The ins tal la tio n of your Rec ess ed Door Sen sor has two
major step s: the ins talla tio n of th e M ai n S en sor and th e
in sta ll ati on o f th e Ma gne ti c Se nso r. P ow er ed b y
batte rie s, your door sens or wi ll us e w irele ss te chn ology
to ta lk t o you r Z-Wave n et wor k onc e in sta lled.
Prepare the Main S ensor
The firs t st ep in ins tal li ng y ou r Re ce sse d D oor Senso r is
to ac ti va
te th e Ma in Se ns or.
1.
2.
3.
Note: Ens ur e that the Ma in Sensor 's but ton al ign s with
the b utton h ole of its li d.
Bef ore beg inn ing i t is imp ort ant to sele ct a sui tab le
pos ition for y ou r Rec essed D oor Sen sor. F or the f oll ow ing
ins truct ions, you r Rec essed D oor S en sor s hou ld b e:
Ins talled at t he to p of a door o r the s id e of do or.
Posit ion ed awa y from me tal that coul d i nte rf ere wi th
its magn eti c fu nct io nal ity. T his i nc lud es y our d oo r's
plate , han dl e or lo ck me ch ani sm.
Ins ta lle d in a suit abl e lo catio n to e nsu re a c le ar( at
least 1 mm) s ep ara tio n wh en th e doo r is c los ed.
Posit ion ed e xac tly abo ve o r bes id e the h ole yo u'l l la ter
in your d oor f or t he in sta ll ati on of t he M agn etic Se nso r.
The rect ang ul ar are as hig hligh ted abov e are t he most
appro pri at e ins tal la tio n posit ion s.
Recessed Door Sensor
Vie w the e xpand ed manu al:
htt p://a eot.e c/spp rt/re cesse d
Fro m Aeot ec by Ae on Labs' Intel lig en ce s er ies comes
the Re ces sed Door Sens or. Invisi bly insta lle d, it sits
wi th in a d oo r a nd it s f rame to p rov ide al l t he
infor mat io n n ee ded by a Z-Wave syst em for secu rit y,
safet y, and amb ian ce , and it does i t al l wi tho ut a lte ri ng
a room' s aes th eti cs.
Your R ece ss ed Do or S ens or i s compr ise d of t wo p art s:
the la rg er Mai n Sensor an d the sma ller Mag net ic
Senso r.
The l arger Mai n Sen so r
Sep arate the Main Sen sor's tw o sec tio ns by fi rs t
re mo vi ng it s l id an d th en re mo vi ng it s i nt er na l
com ponents .
Remov e the cle ar batt ery ins ula tor by pulling it away
fro m the Main Se nso r.
Install your Recessed D oor Sensor
Wit h the Main Se nso r powe red an d ac tiv ate d, it is now
tim e to in lay it w ith in y our selec ted doo rf ram e an d to als o
insta ll th e Magne tic S en sor.
Top of th e door
Sid e of the do or
Pre pare a sp ac e fo r t he Mai n S ens or by d ri lli ng a ho le
into your doo rfram e us ing a 19 mm wide dri ll bit . The
hole sh oul d be 6 5 mm de ep.
Ste p 1
65m m deep
19m m
Dri ll bit
Doo rfram e
1
3
Aeotec R ece ssed Do or Sens or
2
Fami liari se yoursel f with you r door se nsor
Mai n Senso r
LED
Scr ew Hole
Z-W ave B utt on Ho le
Using a s lot -h ead sc rewdr ive r, r emo ve th e Ma in
Senso r's li d by pre ssi ng gen tl y agai nst it s expo sed
conne cto r.
Qui ck Star t
The ins tal la tio n of your Rec ess ed Door Sen sor has two
major step s: the ins talla tio n of th e M ai n S en sor and th e
in sta ll ati on o f th e Ma gne ti c Se nso r. P ow er ed b y
batte rie s, your door sens or wi ll us e w irele ss te chn ology
to ta lk t o you r Z-Wave n et wor k onc e in sta lled.
Prepare the Main S ensor
The firs t st ep in ins tal li ng y ou r Re ce sse d D oor Senso r is
to ac ti va
te th e Ma in Se ns or.
1.
2.
3.
Wi th th e batt er y i nsu lato r r emove d, re in ser t t he
inter nal compone nts into the Ma in S en sor 's enc losur e
befor e reat ta chi ng it s lid. Th e Main Sens or wi ll now
look as i t did p ri or to s tep 1 .
4.
Note: Ens ur e that the Ma in Sensor 's but ton al ign s with
the b utton h ole of its li d.
Bef ore beg inn ing i t is imp ort ant to sele ct a sui tab le
pos ition f or you r Reces sed D oo r Sen so r. For t he fol low ing
ins truct ions, y our Reces sed D oor Sen sor s hould b e:
Ins talled at t he to p of a door o r the s id e of do or.
Posit ion ed awa y from me tal that coul d i nte rf ere wi th
its magn eti c fu nct io nal ity. T his i nc lud es y our d oo r's
plate , han dl e or lo ck me ch ani sm.
Ins ta lle d in a suit abl e lo catio n to e nsu re a c le ar( at
least 1 mm) s ep ara tio n wh en th e doo r is c los ed.
Posit ion ed e xac tly abo ve o r bes id e the h ole yo u'l l la ter
in your d oor f or t he in sta ll ati on of t he M agn etic Se nso r.
The rect ang ul ar are as hig hligh ted abov e are t he most
appro pri at e ins tal la tio n posit ion s.
Scr ew Hole
DS-100-R
Product
Description
Specications
Installation
PRODUCT OVERVIEW
Wireless Recessed Door Sensor
The Evolve Recessed Door Sensor is battery-powered with an extremely small form factor and
aesthetical design. It’s simple – the door sensor will send radio signals to associated Evolve
devices within its own Z-Wave network when the main unit separates from the smaller unit. A bidirectional mounting plate and push button allow for stress-free user installation and just like the
Evolve Wireless Sensor, this device has tamper prevention capabilities and low-battery alerts.
• SKU: DS-100-R
• Supported Networks:
- Z-Wave – Signal (Frequency) 908.42 MHz
• Range: Up to 100 ft. indoors and 300 ft. outdoors.
• Power Requirements: 2 Year Lithium Battery (CR-2)
• Weight: 0.48 lbs. (main body)
• Dimensions: 2.5” H x 1.625” W x 0.75” D (main body)
Familiarize yourself with your door sensor.
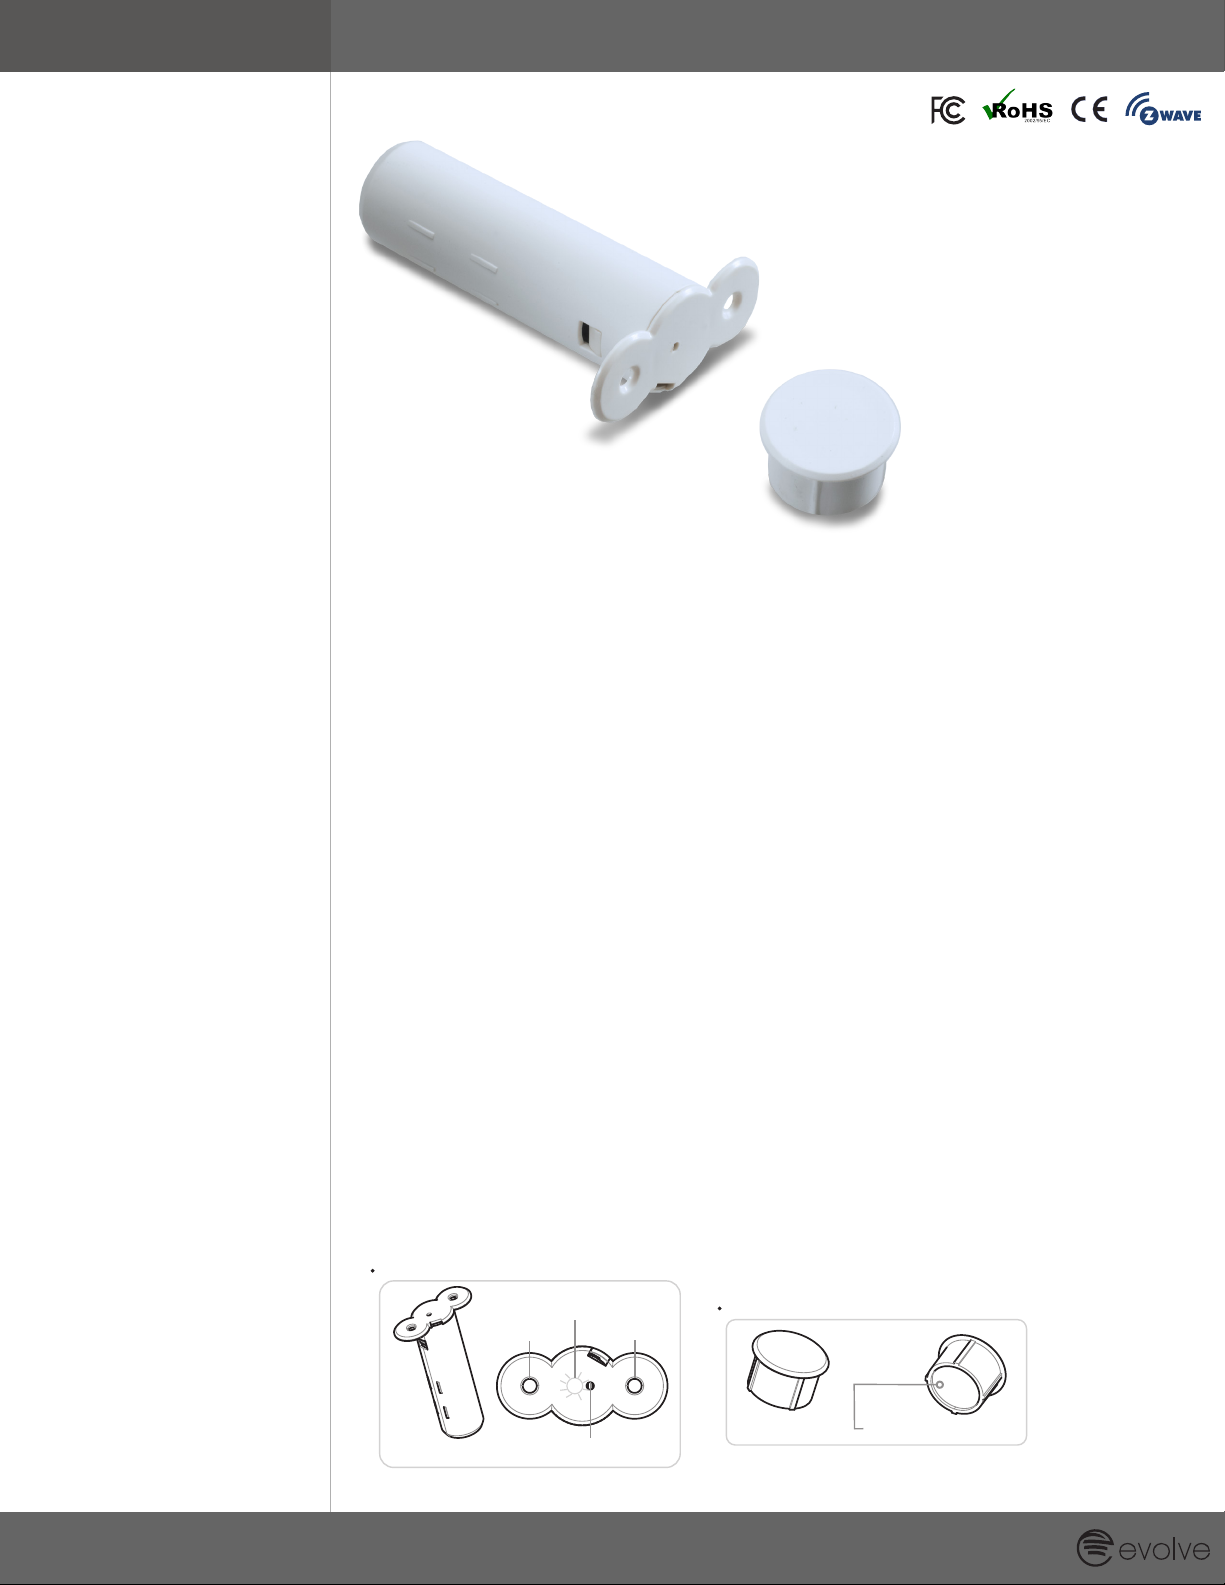
Your Recessed Door Sensor is comprised of two parts: the larger Main Sensor and the smaller
Magnetic Sensor.
The l arger Mai n Sen so r
Scr ew Hole
LED
Scr ew Hole
The M agnet ic Sens or
Mai n Senso r
Z-W ave B utt on Ho le
Mag netic S ensor
A magn et in the p lasti c shell
Page 2
CD-DS100R-01
Install your Recessed D oor Sensor
Wit h the Mai n Se nso r powe red an d ac tiv ate d, it is now
tim e to in lay it w ith in y our selec ted doo rf ram e an d to als o
insta ll th e Magne tic S en sor.
Drill a cor respo ndi ng ho le in you r d oor. Th e h ol e s hou ld be
15 m m dee p. As s ta ted , th e pos it ion o f this h ole s houl d ali gn
exa ctly wit h th e o ne hol e yo u j ust cr eat ed in t he doo rfr am e.
Again , use a 1 9m m wid e dri ll b it.
Ste p 2
15m m deep
19m m
Dri ll bit
Doo r
Ins er t th e Mai n Se nsor in to t he h ole you cr ea ted i n th e
doorf ram e th en se cur e it u sin g two s cr ews .
Ste p 3
Wit h you r doo r and doo rfr ame pre par ed and the dri ll holes
cre ated, it 's n ow t im e to mou nt b ot h pa rts of y ou r Re cesse d
Door Se nso r.
Using a s lot -h ead sc rewdr ive r, r emo ve th e Ma in
Senso r's li d by pre ssi ng gen tl y agai nst it s expo sed
conne cto r.
Qui ck Star t
The ins tal la tio n of your Rec ess ed Door Sen sor has two
major step s: the ins talla tio n of th e M ai n S en sor and th e
in sta ll ati on o f th e Ma gne ti c Se nso r. P ow er ed b y
batte rie s, your door sens or wi ll us e w irele ss te chn ology
to ta lk t o you r Z-Wave n et wor k onc e in sta lled.
Prepare the Main S ensor
The firs t st ep in ins tal li ng y ou r Re ce sse d D oor Senso r is
to ac ti va
te th e Ma in Se ns or.
1.
Note: Ens ur e that the Ma in Sensor 's but ton al ign s with
the b utton h ole of its li d.
Bef ore beg inn ing i t is imp ort ant to sele ct a sui tab le
pos ition for y ou r Rec essed D oor Sen sor. F or the f oll ow ing
ins truct ions, you r Rec essed D oor S en sor s hou ld b e:
Sep arate the Main Sen sor's tw o sec tio ns by fi rs t
re mo vi ng it s l id an d th en re mo vi ng it s i nt er na l
com ponents .
Install your Recessed D oor Sensor
Wit h the Mai n Se nso r powe red an d ac tiv ate d, it is now
tim e to in lay it w ith in y our selec ted doo rf ram e an d to als o
insta ll th e Magne tic S en sor.
Top of th e door
Sid e of the do or
Drill a cor respo ndi ng ho le in you r d oor. Th e h ol e s hou ld be
15 m m dee p. As s ta ted , th e pos it ion o f this h ole s houl d ali gn
exa ctly wit h th e o ne hol e yo u j ust cr eat ed in t he doo rfr am e.
Again , use a 1 9m m wid e dri ll b it.
Ste p 2
15m m deep
19m m
Dri ll bit
Doo r
Ins er t th e Mai n Se nsor in to t he h ole you cr ea ted i n th e
doorf ram e th en se cur e it u sin g two s cr ews .
Ste p 3
Wit h you r doo r and doo rfr ame pre par ed and the dri ll holes
cre ated, it 's n ow t im e to mou nt b ot h pa rts of y ou r Re cesse d
Door Se nso r.
Sec ure wit h screw s
Don e
Place a smal l amount of whit e glue (PVA ) in sid e the hole
you cre at ed for th e Ma gneti c Se nso r. Th en plac e th e senso r
over and i nt o t he hole , and inse rt it b y tap pi ng gently on it
with a ru bbe r ha mme r.
Ste p 4
3
Using a s lot -h ead sc rewdr ive r, r emo ve th e Ma in
Senso r's li d by pre ssi ng gen tl y agai nst it s expo sed
conne cto r.
Qui ck Star t
The ins tal la tio n of your Rec ess ed Door Sen sor has two
major step s: the ins talla tio n of th e M ai n S en sor and th e
in sta ll ati on o f th e Ma gne ti c Se nso r. P ow er ed b y
batte rie s, your door sens or wi ll us e w irele ss te chn ology
to ta lk t o you r Z-Wave n et wor k onc e in sta lled.
Prepare the Main S ensor
The firs t st ep in ins tal li ng y ou r Re ce sse d D oor Senso r is
to ac ti va
te th e Ma in Se ns or.
1.
2.
Note: Ens ur e that the Ma in Sensor 's but ton al ign s with
the b utton h ole of its li d.
Bef ore beg inn ing i t is imp ort ant to sele ct a sui tab le
pos ition for y ou r Rec essed D oor Sen sor. F or the f oll ow ing
ins truct ions, you r Rec essed D oor S en sor s hou ld b e:
Ins talled at t he to p of a door o r the s id e of do or.
Posit ion ed awa y from me tal that coul d i nte rf ere wi th
its magn eti c fu nct io nal ity. T his i nc lud es y our d oo r's
plate , han dl e or lo ck me ch ani sm.
Ins ta lle d in a suit abl e lo catio n to e nsu re a c le ar( at
least 1 mm) s ep ara tio n wh en th e doo r is c los ed.
Posit ion ed e xac tly abo ve o r bes id e the h ole yo u'l l la ter
in your d oor f or t he in sta ll ati on of t he M agn etic Se nso r.
Sep arate the Main Sen sor's tw o sec tio ns by fi rs t
re mo vi ng it s l id an d th en re mo vi ng it s i nt er na l
com ponents .
Remov e the cle ar batt ery ins ula tor by pulling it away
fro m the Main Se nso r.
Install your Recessed D oor Sensor
Wit h the Mai n Se nso r powe red an d ac tiv ate d, it is now
tim e to in lay it w ith in y our selec ted doo rf ram e an d to als o
insta ll th e Magne tic S en sor.
Top of th e door
Sid e of the do or
Pre pare a sp ac e fo r t he Mai n S ens or by d ri lli ng a ho le
into your doo rfram e us ing a 19 mm wide dri ll bit . The
hole sh oul d be 6 5 mm de ep.
Ste p 1
65m m deep
19m m
Drill a cor respo ndi ng ho le in you r d oor. Th e h ol e s hou ld be
15 m m dee p. As s ta ted , th e pos it ion o f this h ole s houl d ali gn
exa ctly wit h th e o ne hol e yo u j ust cr eat ed in t he doo rfr am e.
Again , use a 1 9m m wid e dri ll b it.
Ste p 2
15m m deep
19m m
Dri ll bit
Doo r
Ins er t th e Mai n Se nsor in to t he h ole you cr ea ted i n th e
doorf ram e th en se cur e it u sin g two s cr ews .
Ste p 3
Wit h you r doo r and doo rfr ame pre par ed and the dri ll holes
cre ated, it 's n ow t im e to mou nt b ot h pa rts of y ou r Re cesse d
Door Se nso r.
Sec ure wit h screw s
Don e
Place a smal l amount of whit e glue (PVA ) in sid e the hole
you cre at ed for th e Ma gneti c Se nso r. Th en plac e th e senso r
over and i nt o t he hole , and inse rt it b y tap pi ng gently on it
with a ru bbe r ha mme r.
Ste p 4
Tap wit h hamme r Don e
Using a s lot -h ead sc rewdr ive r, r emo ve th e Ma in
Senso r's li d by pre ssi ng gen tl y agai nst it s expo sed
conne cto r.
Qui ck Star t
The ins tal la tio n of your Rec ess ed Door Sen sor has two
major step s: the ins talla tio n of th e M ai n S en sor and th e
in sta ll ati on o f th e Ma gne ti c Se nso r. P ow er ed b y
batte rie s, your door sens or wi ll us e w irele ss te chn ology
to ta lk t o you r Z-Wave n et wor k onc e in sta lled.
Prepare the Main S ensor
The firs t st ep in ins tal li ng y ou r Re ce sse d D oor Senso r is
to ac ti va
te th e Ma in Se ns or.
1.
2.
3.
Note: Ens ur e that the Ma in Sensor 's but ton al ign s with
the b utton h ole of its li d.
Bef ore beg inn ing i t is imp ort ant to sele ct a sui tab le
pos ition for y ou r Rec essed D oor Sen sor. F or the f oll ow ing
ins truct ions, you r Rec essed D oor S en sor s hou ld b e:
Ins talled at t he to p of a door o r the s id e of do or.
Posit ion ed awa y from me tal that coul d i nte rf ere wi th
its magn eti c fu nct io nal ity. T his i nc lud es y our d oo r's
plate , han dl e or lo ck me ch ani sm.
Ins ta lle d in a suit abl e lo catio n to e nsu re a c le ar( at
least 1 mm) s ep ara tio n wh en th e doo r is c los ed.
Posit ion ed e xac tly abo ve o r bes id e the h ole yo u'l l la ter
in your d oor f or t he in sta ll ati on of t he M agn etic Se nso r.
The rect ang ul ar are as hig hligh ted abov e are t he most
appro pri at e ins tal la tio n posit ion s.
The gap bet we en the tw o pa rt s of y our sen so r mu st be
at lea st 1mm . I f t hey are n ot, re-a ffi x th e M ain Se ns or
poten tia ll y by al ter in g its h ole .
Ste p 5
Mag netic
Sen sor
Mai n Senso r
1mm
Drill a cor respo ndi ng ho le in you r d oor. Th e h ol e s hou ld be
15 m m dee p. As s ta ted , th e pos it ion o f this h ole s houl d ali gn
exa ctly wit h th e o ne hol e yo u j ust cr eat ed in t he doo rfr am e.
Again , use a 1 9m m wid e dri ll b it.
Ste p 2
15m m deep
19m m
Dri ll bit
Doo r
Wit h you r doo r and doo rfr ame pre par ed and the dri ll holes
PRODUCT OVERVIEW
Installation Cont’d
The installation of your Recessed Door Sensor has two major steps: the installation of the Main
Sensor and the installation of the Magnetic Sensor. Powered by batteries, your door sensor will
use wireless technology to talk to your Evolve network once installed.
Prepare the Main Sensor
1. The rst step in installing your
Recessed Door Sensor is to
activate the Main Sensor.
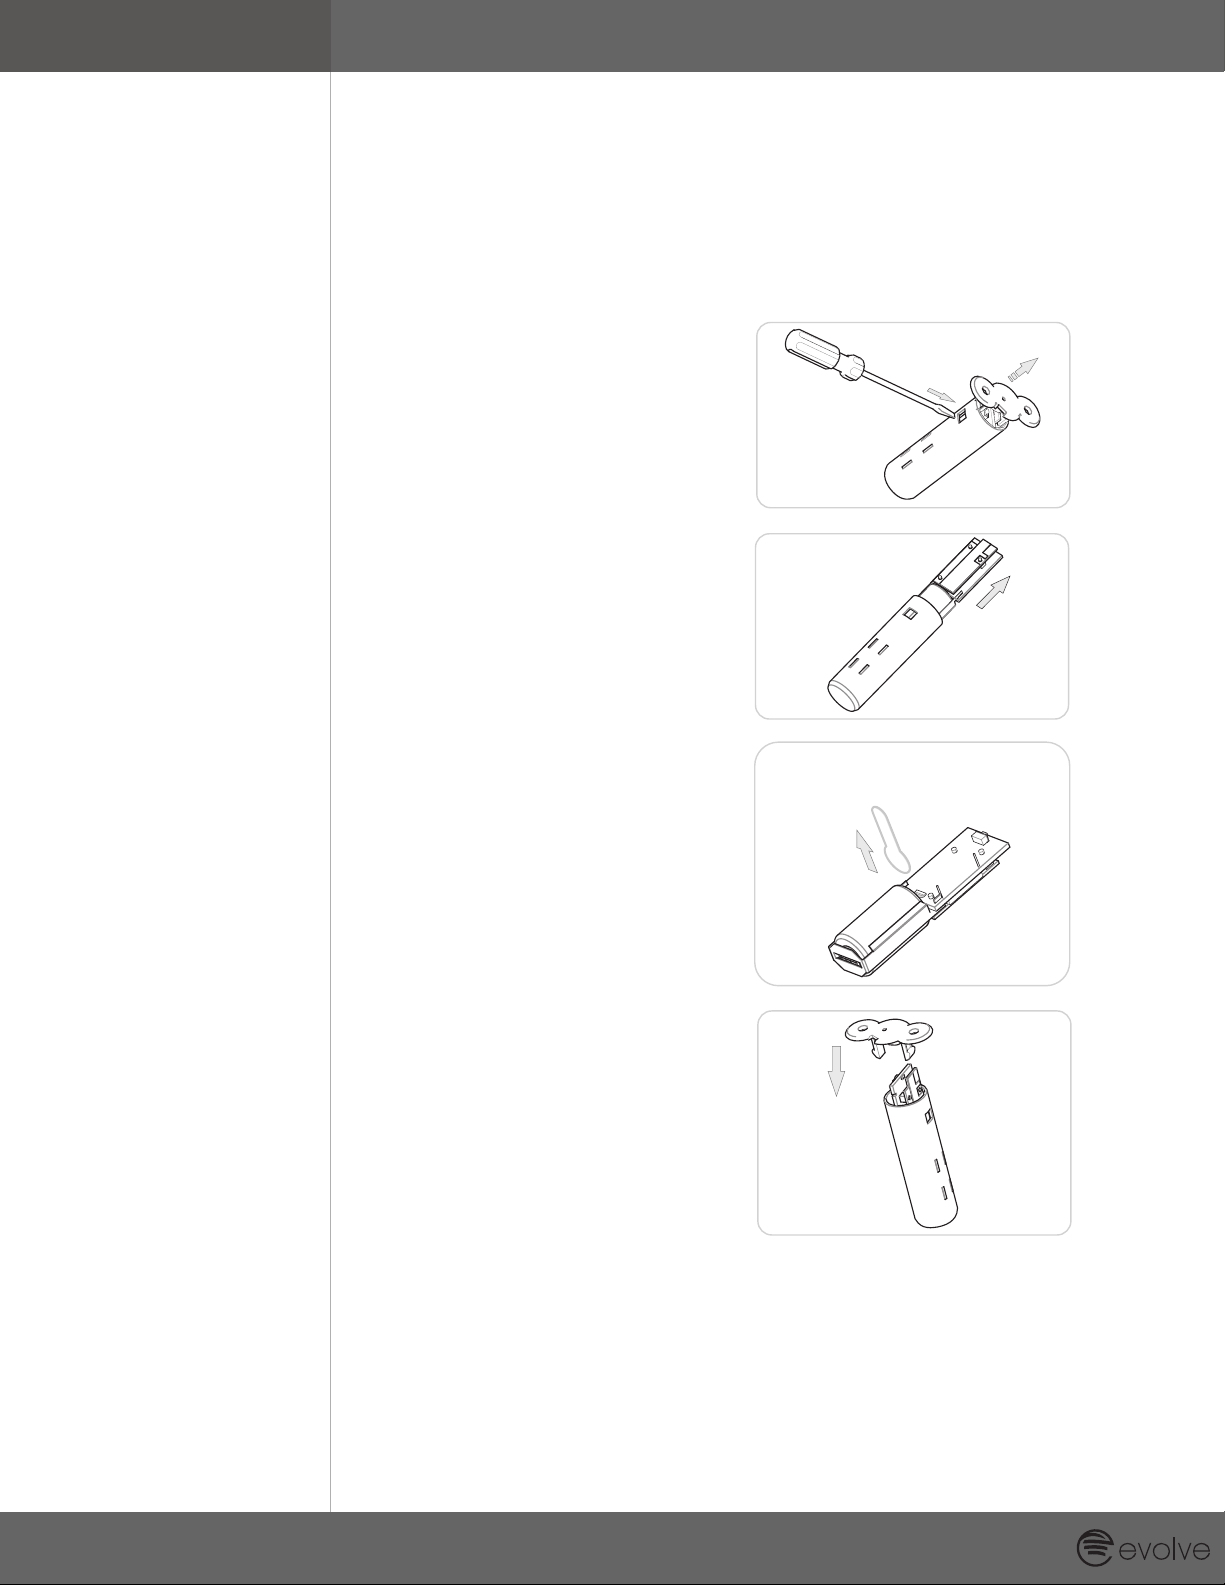
Using a slot-head screwdriver,
remove the Main Sensor’s lid
by pressing gently against its
exposed connector.
2. Separate the Main Sensor’s two
sections by rst removing its lid
and then removing its internal
components.
3. Remove the clear battery
insulator by pulling it away from
the Main Sensor.
4. With the battery insulator
removed, reinsert the internal
components into the Main
Sensor’s enclosure before
reattaching its lid. The Main
Sensor will now look as it did
prior to step 1.
Note: Ens ur e that the Ma in Sensor 's but ton al ign s with
the b utton h ole of its li d.
Page 3
CD-DS100R-01
Install your Recessed D oor Sensor
Wit h the Mai n Se nso r powe red an d ac tiv ate d, it is now
tim e to in lay it w ith in y our selec ted doo rf ram e an d to als o
insta ll th e Magne tic S en sor.
Drill a cor respo ndi ng ho le in you r d oor. Th e h ol e s hou ld be
15 m m dee p. As s ta ted , th e pos it ion o f this h ole s houl d ali gn
exa ctly wit h th e o ne hol e yo u j ust cr eat ed in t he doo rfr am e.
Again , use a 1 9m m wid e dri ll b it.
Ste p 2
15m m deep
19m m
Dri ll bit
Doo r
Ins er t th e Mai n Se nsor in to t he h ole you cr ea ted i n th e
doorf ram e th en se cur e it u sin g two s cr ews .
Ste p 3
Wit h you r doo r and doo rfr ame pre par ed and the dri ll holes
cre ated, it 's n ow t im e to mou nt b ot h pa rts of y ou r Re cesse d
Door Se nso r.
Sec ure wit h screw s
Don e
Place a smal l amount of whit e glue (PVA ) in sid e the hole
you cre at ed for th e Ma gneti c Se nso r. Th en plac e th e senso r
over and i nt o t he hole , and inse rt it b y tap pi ng gently on it
with a ru bbe r ha mme r.
Ste p 4
Tap wit h hamme r Don e
Note: Ens ur e that the Ma in Sensor 's but ton al ign s with
the b utton h ole of its li d.
Bef ore beg inn ing i t is imp ort ant to sele ct a sui tab le
pos ition f or you r Reces sed D oo r Sen so r. For t he fol low ing
ins truct ions, y our Reces sed D oor Sen sor s hould b e:
Ins talled at t he to p of a door o r the s id e of do or.
Posit ion ed awa y from me tal that coul d i nte rf ere wi th
its magn eti c fu nct io nal ity. T his i nc lud es y our d oo r's
plate , han dl e or lo ck me ch ani sm.
Ins ta lle d in a suit abl e lo catio n to e nsu re a c le ar( at
least 1 mm) s ep ara tio n wh en th e doo r is c los ed.
Posit ion ed e xac tly abo ve o r bes id e the h ole yo u'l l la ter
in your d oor f or t he in sta ll ati on of t he M agn etic Se nso r.
Install your Recessed D oor Sensor
Wit h the Mai n Se nso r powe red an d ac tiv ate d, it is now
tim e to in lay it w ith in y our selec ted doo rf ram e an d to als o
insta ll th e Magne tic S en sor.
Top of th e door
Sid e of the do or
Pre pare a sp ac e fo r t he Mai n S ens or by d ri lli ng a hole
into your doo rfram e us ing a 19 mm wide dri ll bit . The
hole sh oul d be 6 5 mm de ep.
Ste p 1
Drill a cor respo ndi ng ho le in you r d oor. Th e h ol e s hou ld be
15 m m dee p. As s ta ted , th e pos it ion o f this h ole s houl d ali gn
exa ctly wit h th e o ne hol e yo u j ust cr eat ed in t he doo rfr am e.
Aga in, use a 1 9mm wide dr ill b it .
Ste p 2
15m m deep
19m m
Dri ll bit
Doo r
Ins er t th e Mai n Se nsor in to t he h ole you cr ea ted i n th e
doorf ram e th en se cur e it u sin g two s cr ews .
Ste p 3
Wit h you r doo r and doo rfr ame pre par ed and the dri ll holes
cre ated, it 's n ow t im e to mou nt b ot h pa rts of y ou r Re cesse d
Door Se nso r.
Sec ure wit h screw s
Don e
Place a smal l amount of whit e glue (PVA ) in sid e the hole
you cre at ed for th e Ma gneti c Se nso r. Th en plac e th e senso r
over and i nt o t he hole , and inse rt it b y tap pi ng gently on it
with a ru bbe r ha mme r.
Ste p 4
Tap wit h hamme r Don e
Note: Ens ur e that the Ma in Sensor 's but ton al ign s with
the b utton h ole of its li d.
Bef ore beg inn ing i t is imp ort ant to sele ct a sui tab le
pos ition f or you r Reces sed D oo r Sen so r. For t he fol low ing
ins truct ions, y our Reces sed D oor Sen sor s hould b e:
Ins talled at t he to p of a door o r the s id e of do or.
Posit ion ed awa y from me tal that coul d i nte rf ere wi th
its magn eti c fu nct io nal ity. T his i nc lud es y our d oo r's
plate , han dl e or lo ck me ch ani sm.
Ins ta lle d in a suit abl e lo catio n to e nsu re a c le ar( at
least 1 mm) s ep ara tio n wh en th e doo r is c los ed.
Posit ion ed e xac tly abo ve o r bes id e the h ole yo u'l l la ter
in your d oor f or t he in sta ll ati on of t he M agn etic Se nso r.
The rect ang ul ar are as hig hligh ted abov e are t he most
appro pri at e ins tal la tio n posit ion s.
The gap bet we en the tw o pa rt s of y our sen so r mu st be
at lea st 1mm . I f t hey are n ot, re-a ffi x th e M ain Se ns or
poten tia ll y by al ter in g its h ole .
Ste p 5
Mag netic
Sen sor
Mai n Senso r
1mm
Mag netic
Sen sor
Mai n Senso r
Drill a cor respo ndi ng ho le in you r d oor. Th e h ol e s hou ld be
15 m m dee p. As s ta ted , th e pos it ion o f this h ole s houl d ali gn
exa ctly wit h th e o ne hol e yo u j ust cr eat ed in t he doo rfr am e.
Again , use a 1 9m m wid e dri ll b it.
Ste p 2
Drill a cor respo ndi ng ho le in you r d oor. Th e h ol e s hou ld be
15 m m dee p. As s ta ted , th e pos it ion o f this h ole s houl d ali gn
exa ctly wit h th e o ne hol e yo u j ust cr eat ed in t he doo rfr am e.
Again , use a 1 9m m wid e dri ll b it.
Ste p 2
15m m deep
19m m
Dri ll bit
Doo r
Ins er t th e Mai n Se nsor in to t he h ole you cr ea ted i n th e
doorf ram e th en se cur e it u sin g two s cr ews .
Ste p 3
Wit h you r doo r and doo rfr ame pre par ed and the dri ll holes
cre ated, it 's n ow t im e to mou nt b ot h pa rts of y ou r Re cesse d
Door Se nso r.
PRODUCT OVERVIEW
Installation Cont’d
With the Main Sensor powered and activated, it is now time to inlay it within your selected
doorframe and to also install the Magnetic Sensor.
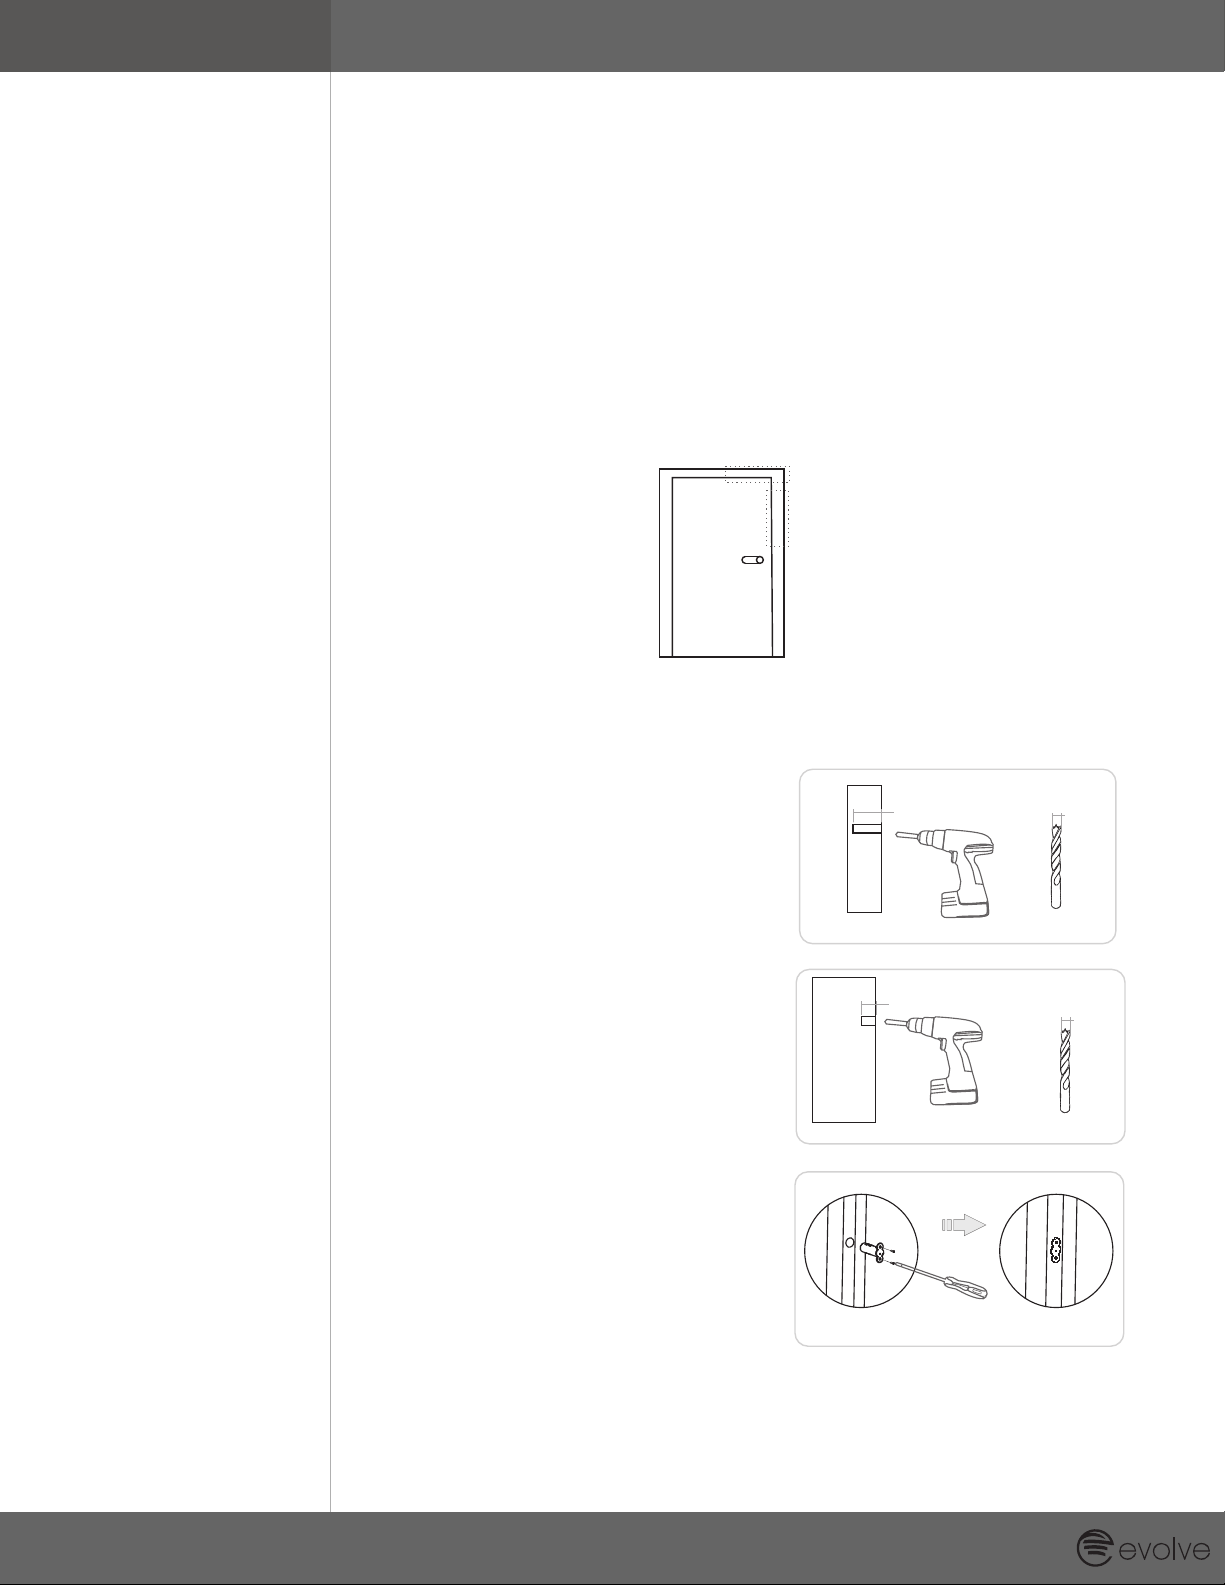
Before beginning it is important to select a suitable position for your Recessed Door Sensor. For
the following instructions, your Recessed Door Sensor should be:
• Installed at the top of a door or the side of door.
• Positioned away from metal that could interfere with its magnetic functionality. This includes
your door’s plate, handle or lock mechanism.
• Installed in a suitable location to ensure a clear (at least 1mm) separation when the door is
closed.
• Positioned exactly above or beside the hole you’ll later drill in your door for the installation of
the Magnetic Sensor.
Top of th e door
The rect ang ul ar are as hig hligh ted abov e are t he most
appro pri at e ins tal la tio n posit ion s.
Sid e of the do or
1. Prepare a space for the Main
Sensor by drilling a hole into
your doorframe using a 19mm
wide drill bit. The hole should be
65 mm deep.
2. Drill a corresponding hole in
your door. The hole should
be 15mm deep. As stated, the
position of this hole should
align exactly with the hole you
just created in the doorframe.
Again, use a 19mm wide drill bit.
With your door and doorframe
prepared and the drill holes
created, it’s now time to mount
both parts of your Recessed
Door Sensor.
3. Insert the Main Sensor into
the hole you created in the
doorframe then secure it using
two screws.
65m m deep
Doo rfram e
15m m deep
Doo r
Sec ure wit h screw s
19m m
Dri ll bit
19m m
Dri ll bit
Don e
Page 4
CD-DS100R-01
Drill a cor respo ndi ng ho le in you r d oor. Th e h ol e s hou ld be
15 m m dee p. As s ta ted , th e pos it ion o f this h ole s houl d ali gn
exa ctly wit h th e o ne hol e yo u j ust cr eat ed in t he doo rfr am e.
Again , use a 1 9m m wid e dri ll b it.
Ste p 2
15m m deep
19m m
Dri ll bit
Doo r
Ins er t th e Mai n Se nsor in to t he h ole you cr ea ted i n th e
doorf ram e th en se cur e it u sin g two s cr ews .
Ste p 3
Wit h you r doo r and doo rfr ame pre par ed and the dri ll holes
cre ated, it 's n ow t im e to mou nt b ot h pa rts of y ou r Re cesse d
Door Se nso r.
Sec ure wit h screw s
Don e
Place a smal l amount of whit e glue (PVA ) in sid e the hole
you cre at ed for th e Ma gneti c Se nso r. Th en plac e th e senso r
over and i nt o t he hole , and inse rt it b y tap pi ng gently on it
with a ru bbe r ha mme r.
Ste p 4
15m m deep
19m m
Dri ll bit
Doo r
Sec ure wit h screw s
Don e
Tap wit h hamme r Don e
The gap bet we en the tw o pa rt s of y our sen so r mu st be
at lea st 1mm . I f t hey are n ot, re-a ffi x th e M ain Se ns or
poten tia ll y by al ter in g its h ole .
Ste p 5
PRODUCT OVERVIEW
Installation Cont’d
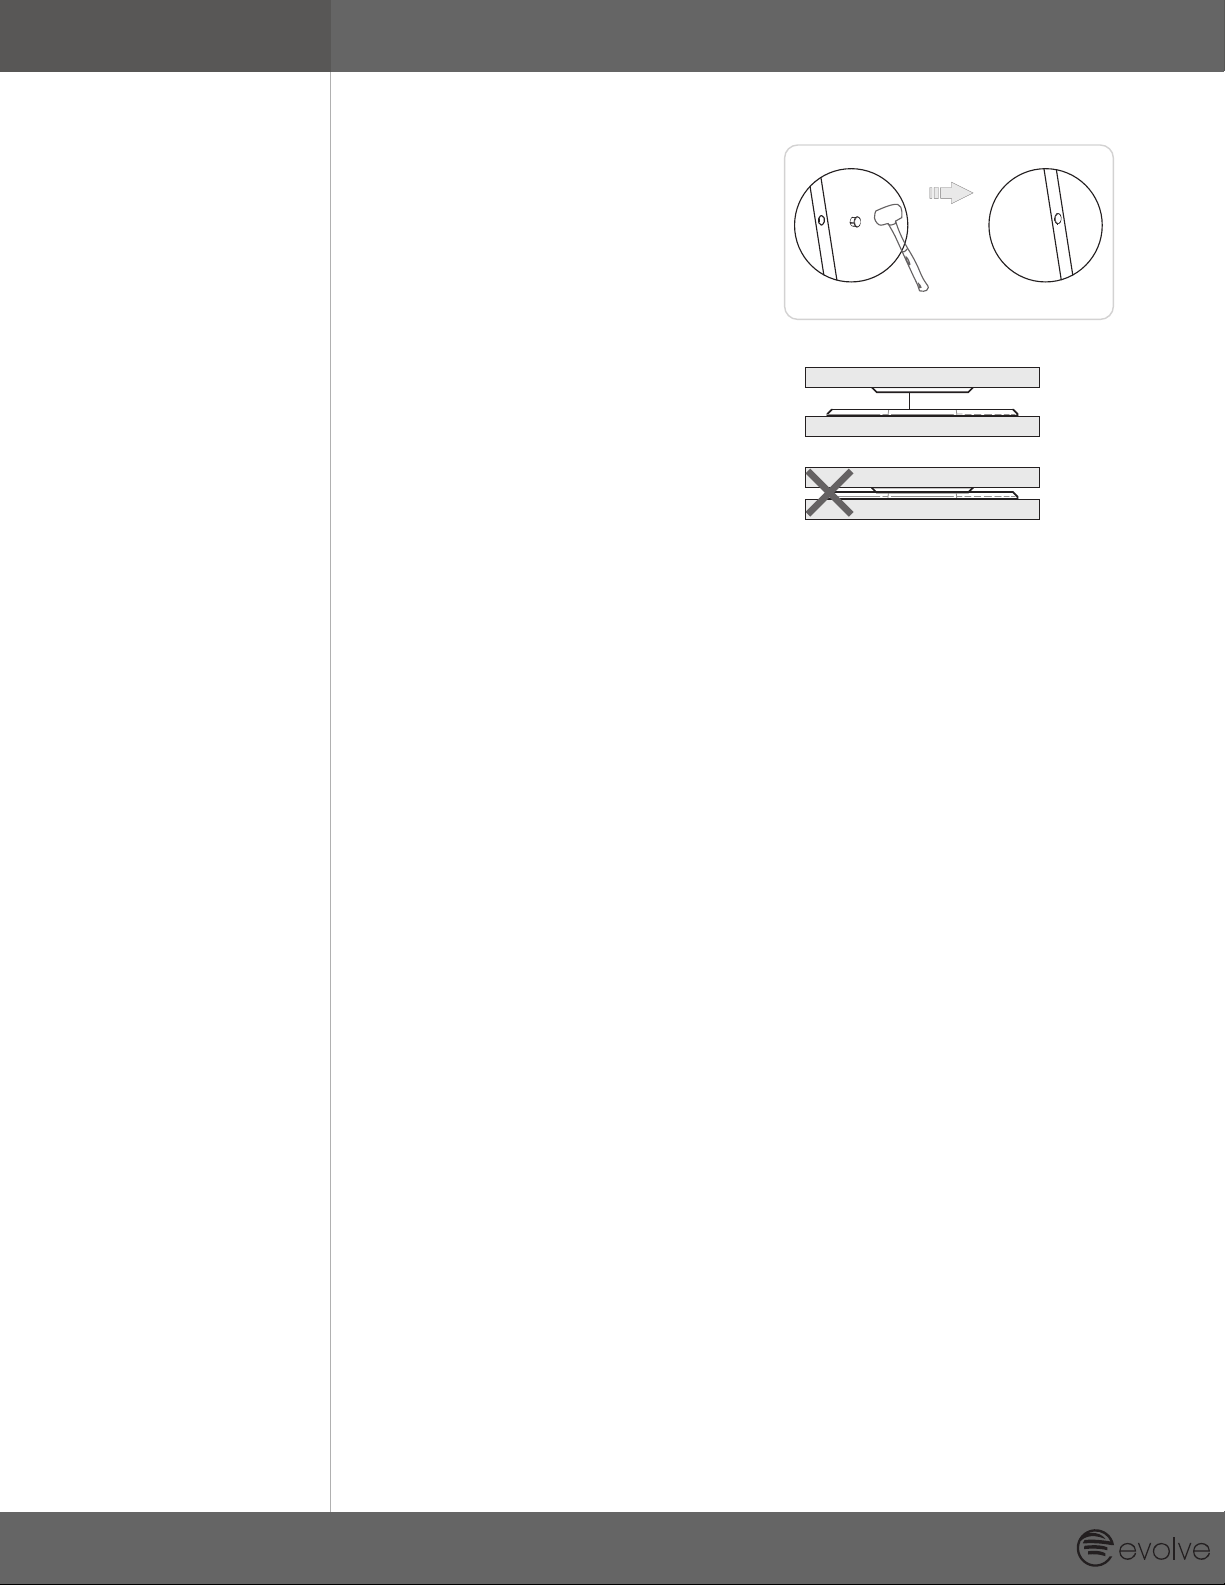
4. Place a small amount of white
glue (PVA) inside the hole you
created for the Magnetic Sensor.
Then place the sensor over
and into the hole, and insert it
by tapping gently on it with a
rubber hammer.
5. The gap between the two parts
of your sensor must be at least
1mm. If they are not, re-ax
the Main Sensor potentially by
altering its hole.
Tap wit h hamme r Don e
1mm
Mag netic
Sen sor
Mai n Senso r
Mag netic
Sen sor
Mai n Senso r
 Loading...