

Page 1
Dual HD DVB-T receiver/recorder
Delta HD
www.evolveo.com
Page 2
DUAL HD DVB-T recorder
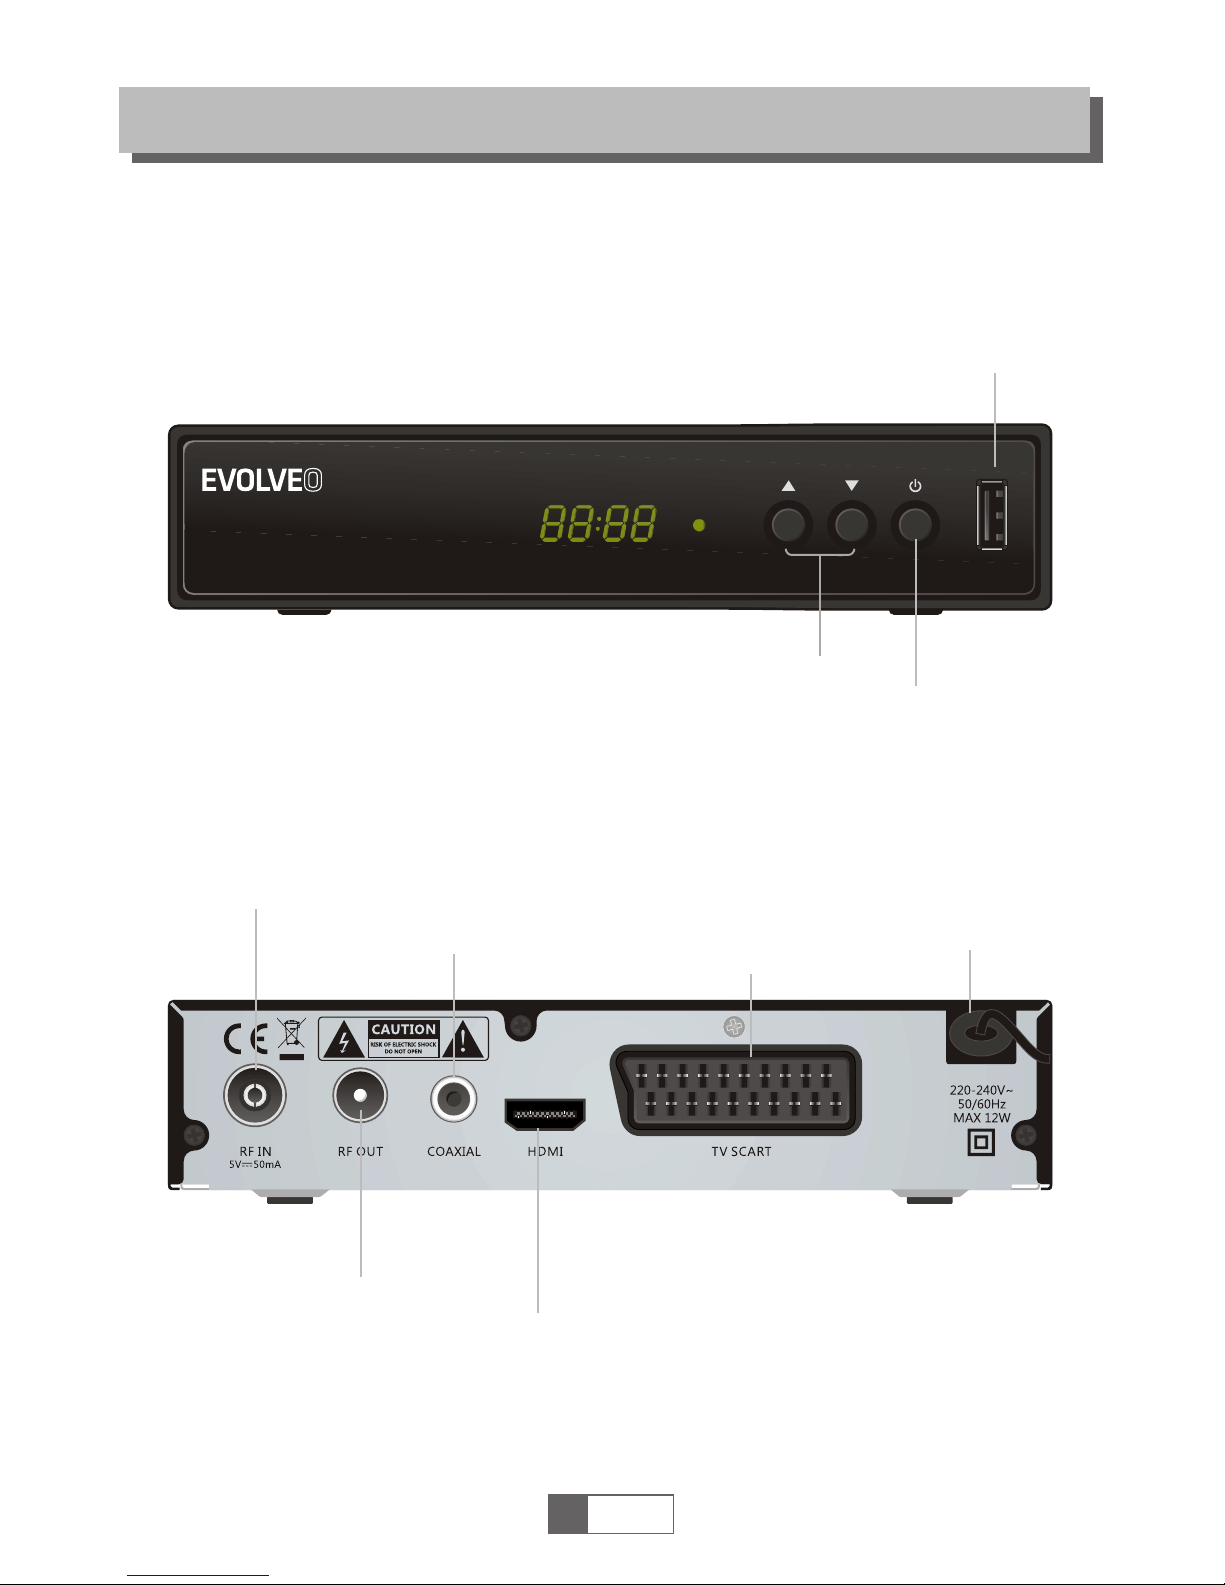
Front panel
Rear panel
INTRODUCTION
1
English
1
USB port
Power bu tton
AC MainsCoaxial Digital Audio
TV aerial
for an external TV a erial
RF Loop through
for an external device
HDMI Output
TV Scart
for connection to the TV
TV chann el
up/dow n
Page 3
1
English
2
INTRODUCTION
STANDBY
INFO
SUBTITLE
OK
EPG
AUDIOUSB
TV/RADIO
BACK
VOL+
VOL-
CH+
CH-
TTX TIMER
FAV
MUTE
MEDIA
RES
EXIT
MENU
RECORD
Remote control
26
1
2
3
4
5
6
15
18
19
12
20
21
22
7
8
9
10
11
13
14
16
17
23
24
26
25
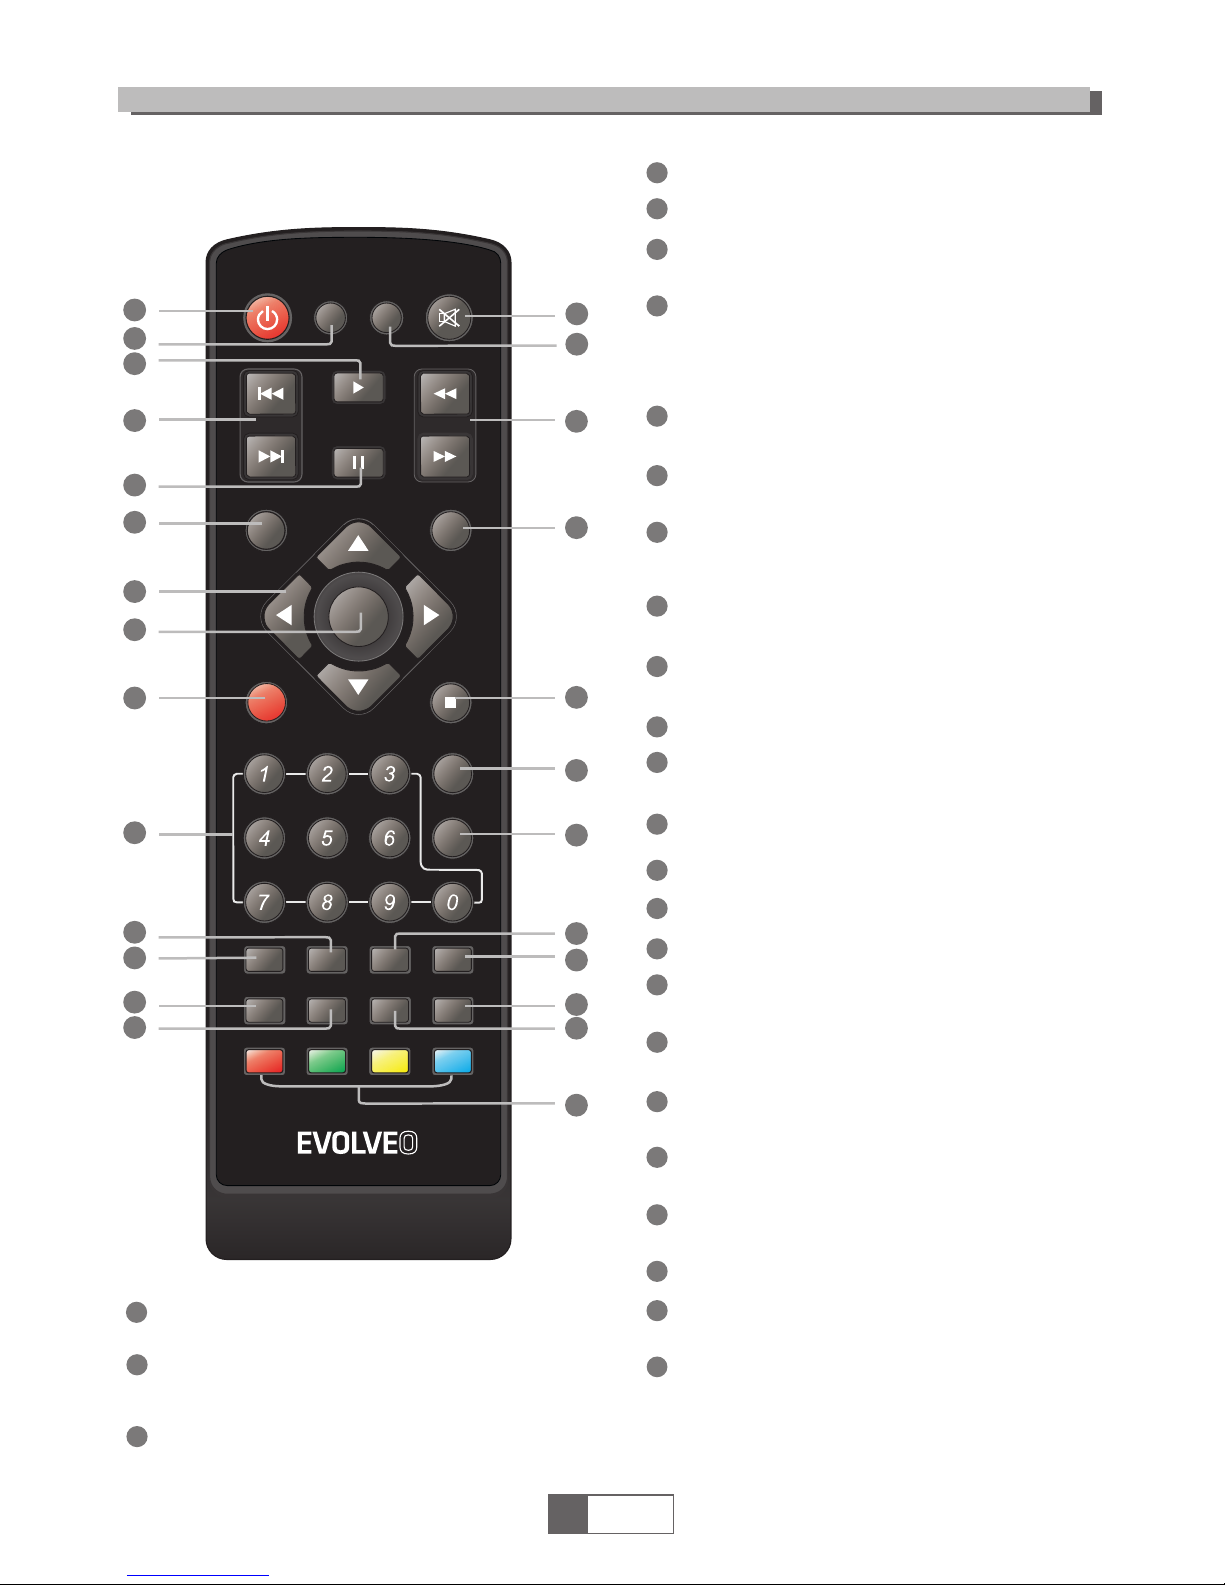
OK button
(Confirm a selection within a me nu )
Numeric entry
(Enter numeric values and sele ct t he c ha nn el
directly by entering it's numb er )
AUDIO
(Select audio mode and audio tra ck )
SUBTITLE (On/Off Subtitle)
TTX (Open interactive service)
8
9
11
10
12
13
15
14
1
2
3
4
5
6
7
16
17
18
19
20
21
22
23
24
25
BACK
(Switch to previous channel)
EPG
(Open up Electronic Program Guid e Me nu )
STANDBY
(switch the STB on and standby)
INFO
(Press for current channel infor ma ti on /
Operation guide )
PLAY
Cursor/CH+, -/VOL+,(Cursor: Navigation button s us ed t o na vi ga te
menu's items)
(CH+/-: Channel Up and Down)
(VOL+/-: Volume Up and Down)
RECORD
(Record the TV program)
Search backward /forward
FAV
(Open the Favorite list)
RED/GREEN/YELLOW/BLUE Buttons
(For interactive function/Su bm en u
function buttons)
PAUSE(Pause/Active TimeShift function)
Previous/Next
STOP
(Stop program playback or reco rd in g)
TV/RADIO
(Switch between TV and Radio)
MUTE (Turn off/on the volume)
MEDIA
(Enter Recorder menu)
USB
(Enter File Manager)
TIMER
(Timer wake-up)
Menu
(Open and close the menu screen)
EXIT (Exit from menu)
RES
Page 4
RF OU T
RF IN
COAXIAL
HDM I
TV SC ART
L/R LINE
OUT
220-240V~ 50/60Hz
5V 50mA
RF OU T
RF IN
COAXIAL
HDM I
TV SC ART
L/R LINE
OUT
220-240V~ 50/60Hz
5V 50mA
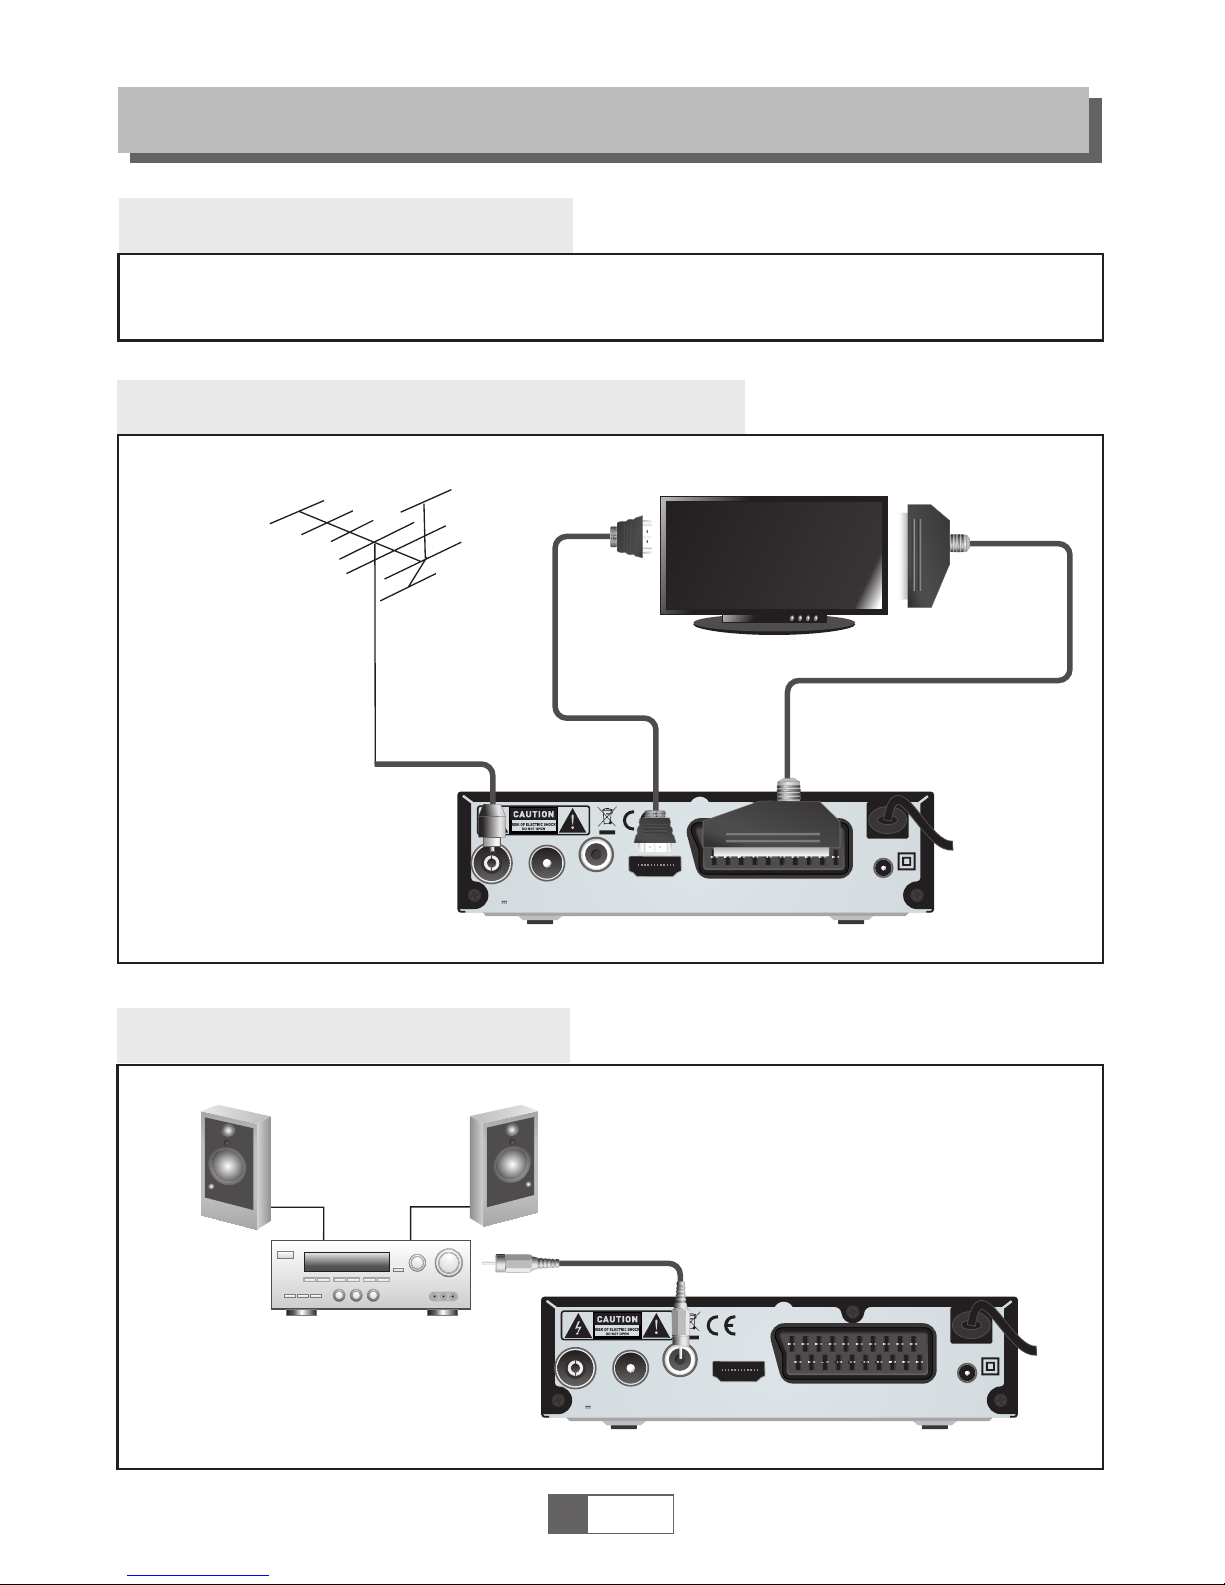
SYSTEM CONNECTION
There are many different types of TV and other equipment that you can connect to the settop box
In this manual you will see some o f th e mo st c om mo n wa ys t o co nn ec t yo ur equipment.
General
Connecting a HiFi system
Connecting the TV
1
English
3
RF cable
HDMI cable
Coaxial cable
HiFi
Antenna
SCART cable
Page 5
Welcome
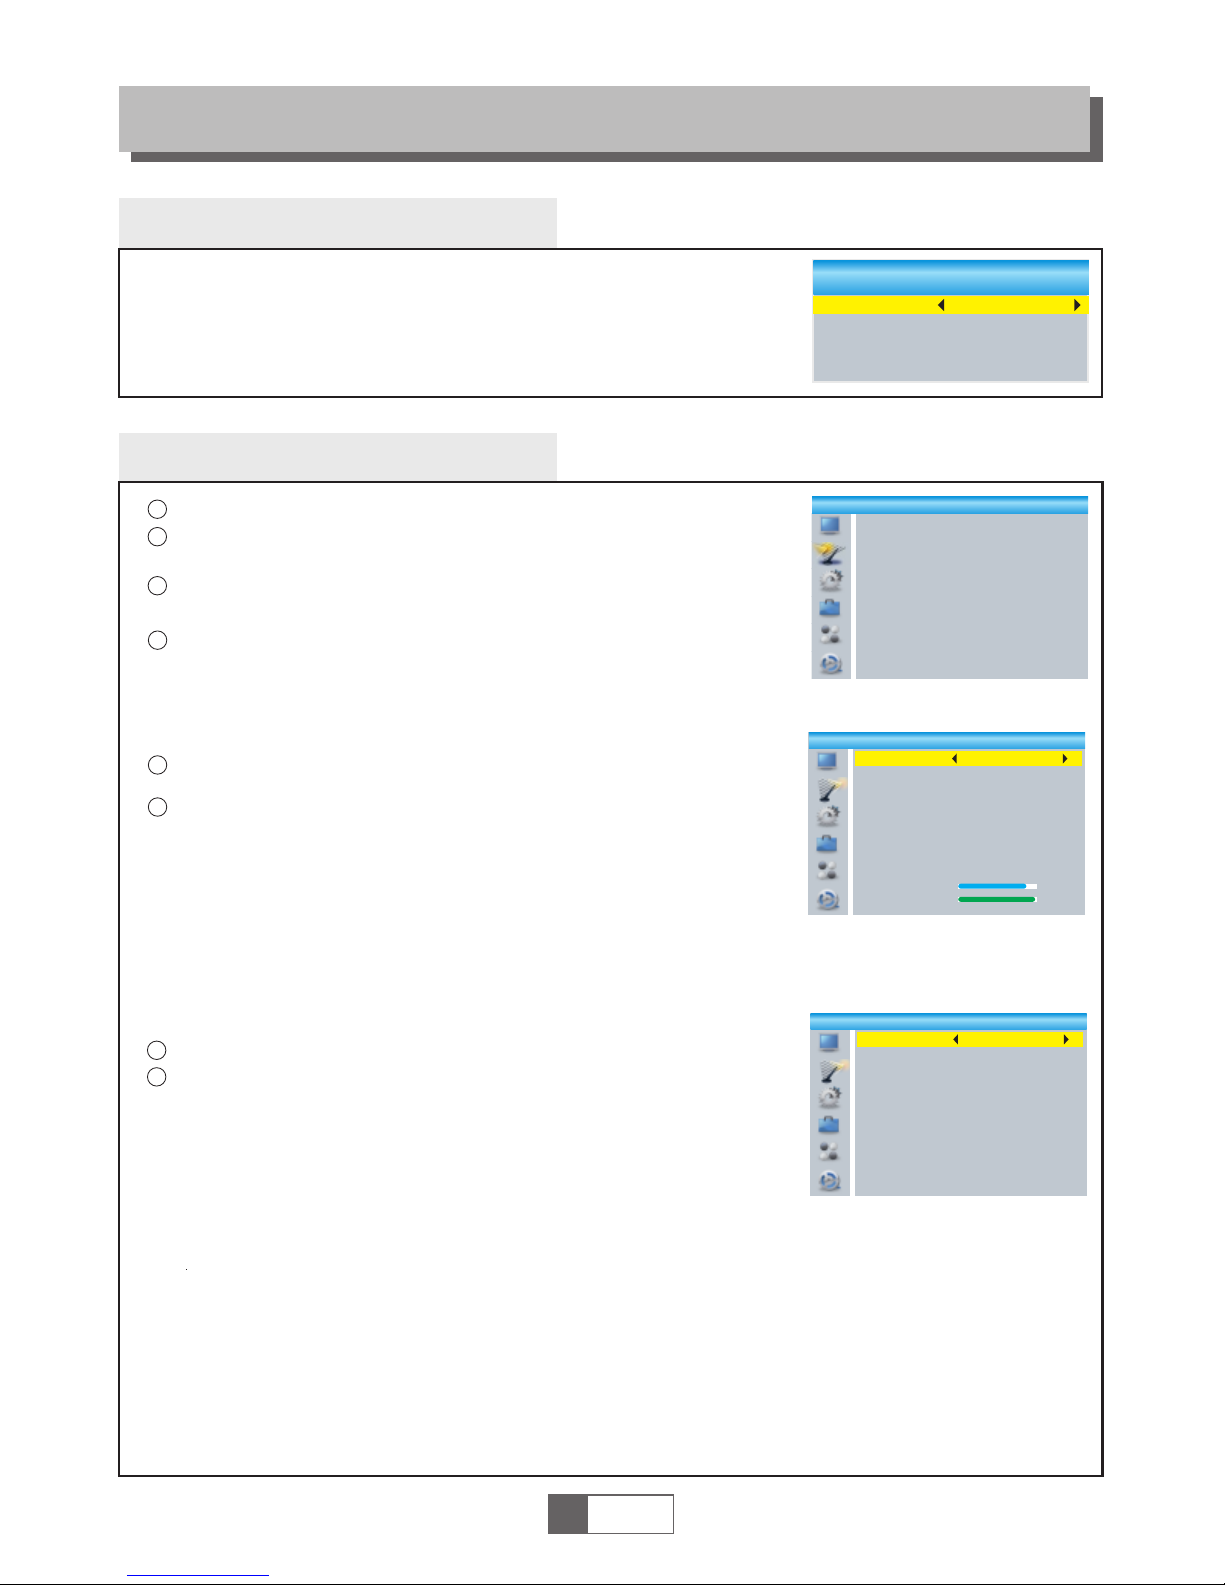
If you use the STB for the first time, the "Welcome" menu appears.
Press cursor button to setup the Regio n, L an gu ag e, D is pl ay M od e
and Aspect Mode.
Highlight "OK" and press the "OK" bu tt on t o st ar t ch an ne l se ar ch .
GETTING STARTED
Installation
Select " Channel Scan", press the "OK" button to enter the
Channel Scan menu.
Press cursor button to set Scan mode, Scan Band ,Channel No.,
Frequency and Bandwidth, then highlight "Search", press "OK"
button to start channel scan .
1
1
2
2
4
Press the cursor button to set "FTA Only", then highlight "Search",
press the "OK" button to start auto scan .
1
2
3
1
English
4
Wel com e
Reg ion
Lan guage
Dis play Mo de
Asp ect Mod e
Cze ch
Eng lish
720 p@50H Z
4:3 LB
OK
Auto Scan
Channel Scan
LCN
Press the "MENU" button to enter main menu.
Press "UP"or " DOWN " button to highlight "Installation", press
"RIGHT" button to enter the Installation menu.
Press "UP" or "DOWN" cursor button to highlight the desired item
and press "OK"button to enter the sub-menu .
Press "EXIT" button to exit.
Select the "Auto Scan", press "OK" button to enter the Auto Scan menu.
If LCN( Logical Channel Number) Select function is activated, you can't change the original
number of TV channels by scanning .
You can activate/disactivate the LCN function by setting the "LCN " to on/off.
Cha nnel Sc an
Aut o Scan
LCN
Ins talla tion
Aut o Scan
FTA Onl y
Sea rch
No
Cha nnel Sc an
Sca n Mode
Sca n Band
Ch No .
Fre quenc y
Ban dwidt h
Sea rch
By cha nnel
UHF
CH37 (666000KHz)
6660 00KHz
8MHz
Sig nal Int ensit y
Sig nal Qua lity
81%
97%
Page 6
Accessing the Electronic Program Guide (EPG)
OPERATION
Changing Channels
There are three ways of channel se le ct io n - st ep pi ng t hr ou gh t he c hannel list, selection by number
and from the on-screen channel l is t.
Stepping through the channel l is t:
To move through the channel list, press the upward ar ro w or d ow nw ar d ar ro w ke y on t he
remote control.
Selected by number:
Enter the channel number directly by pre ss in g nu me ri c bu tt on s ,a nd p ress the "OK" button
to select desired channel.
Selected by on-screen channe ls l is t:
You can also sel ec t th e re qu ired channel directly from on-screen channel list. Th is i s
displayed using the STB's main menu. See "Edit Channel" in this manual for operat io n de ta il .
1
2
3
Accessing the EPG of all channel s:
1
2
3
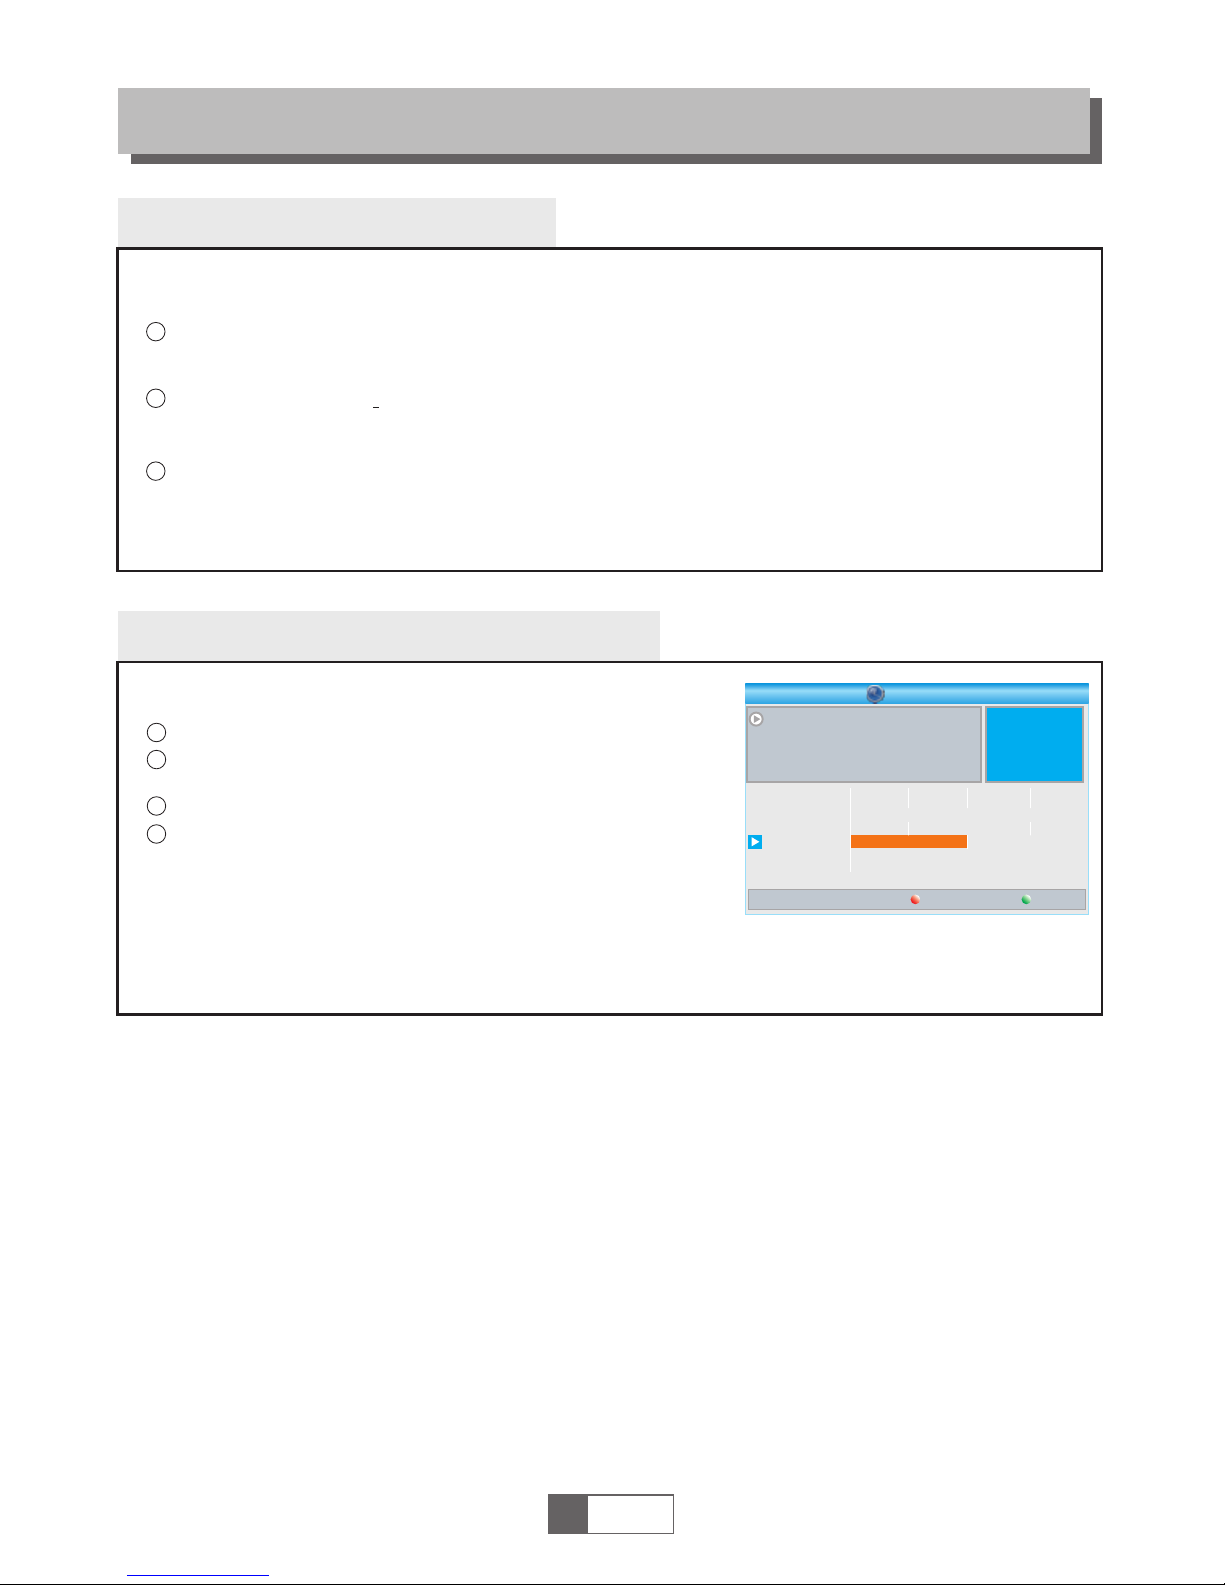
Press "EPG" button to enter EPG menu .
Press cursor button to switch betwee n ch an ne l li st , ev en ts
schedule of the selected chann el a nd n ow /n ex t ev en ts .
Press "Green" button to Timer the eve nt s.
Press "Red" button to display " Time Ba r" m en u.
4
1
English
5
000 8
000 9
001 0
0011
001 2
Int ereco n
BBC P arl
BBC F O
CBe ebie
301
001 0 BBC FOU R
The R ecor
Aun tie's Wa r on Smut
Thi s is CBee bies!
The R ecor
Com mons Qu estio ns
Pro ms on FOU R
Aun tie's Wa r on Smut
01: 30-02 -30
Tim erTim e
EPG
3/1 9
01: 30 02: 00 02 :30 03 :00
01: 39 xx/x x/xxx x
Page 7
Edit Channel menu
EDIT CHANNEL
TV Channel list
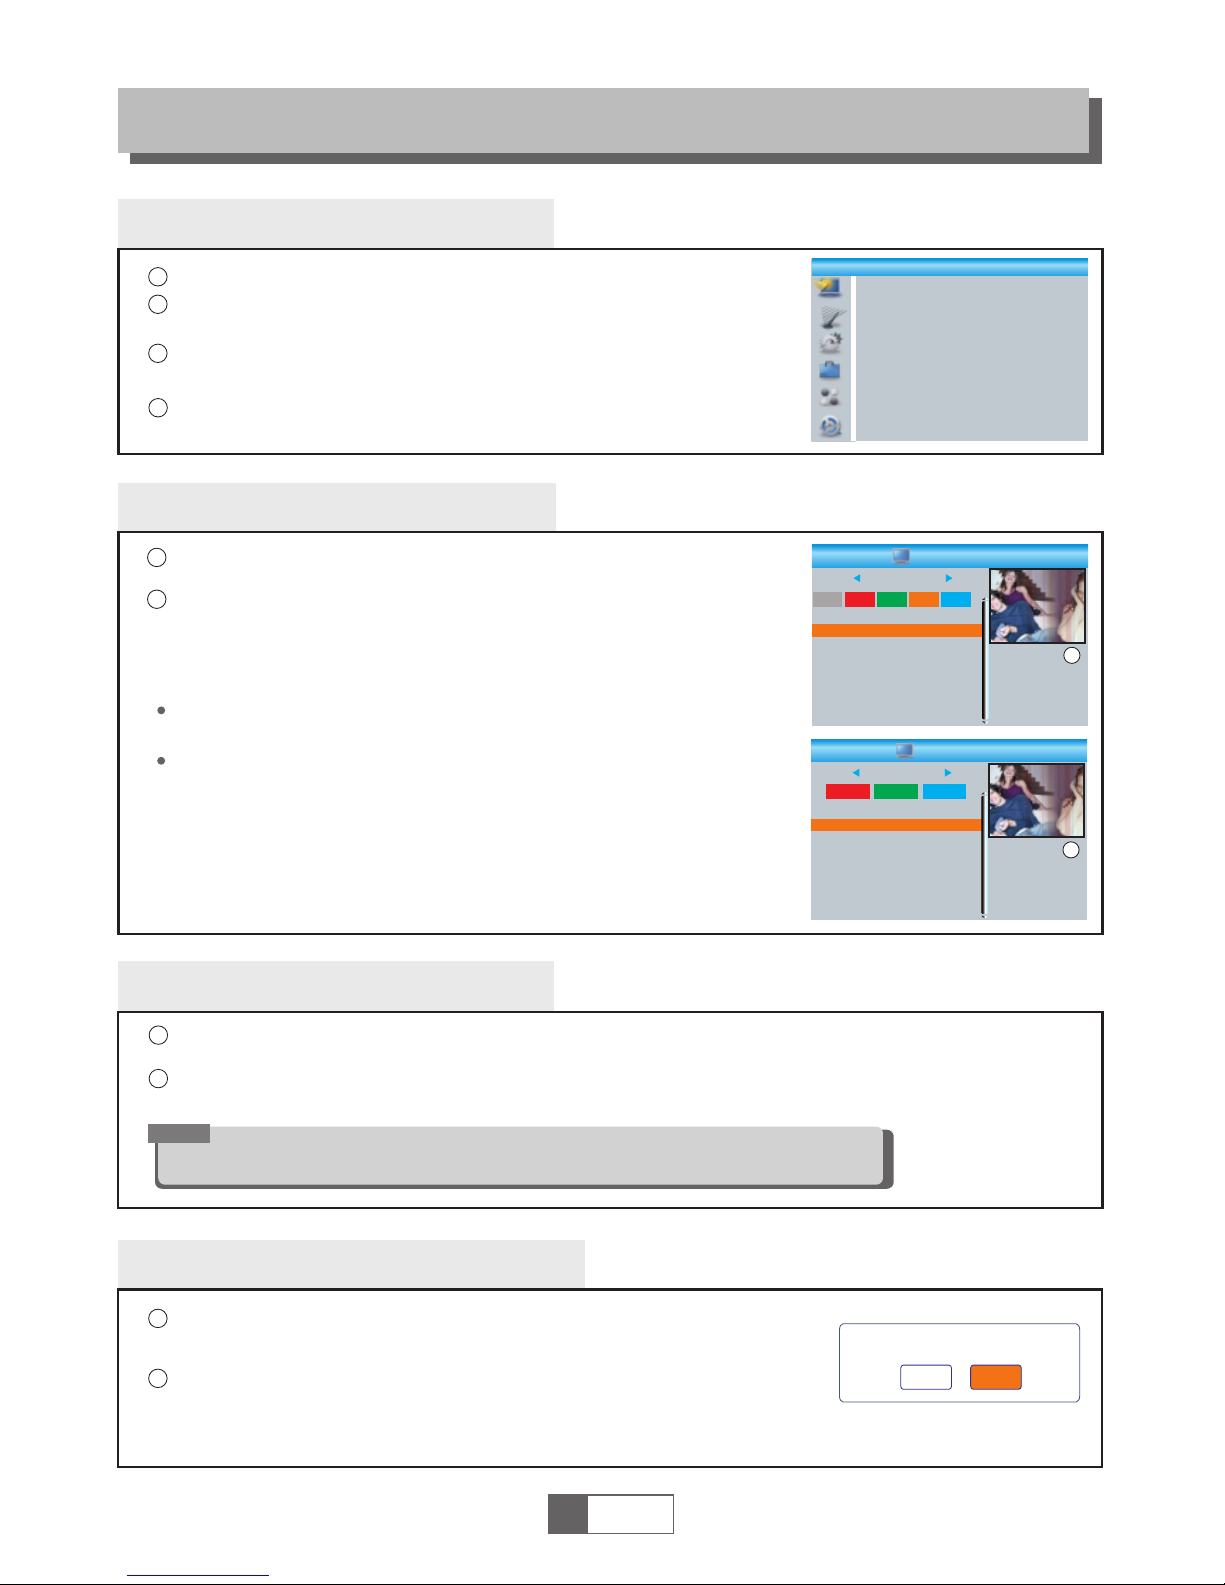
In the Edit Channel menu, select "TV Cha nn el L is t" , pr es s "O K"
button to enter TV channel list menu.
1
2
Use this menu to favor, lock, skip, mo ve , so rt, delete and rename
channel.
Press "FAV" button, the n pr ess "OK" button to edit the FAV
function.
Press "UP" or "DOWN" bu tt on to highlight channel , pr ess the "OK"
button to preview the d es ired TV channel .
1
English
6
4
1
2
3
Press the "MENU" button to enter main menu.
Press "UP" or "DOWN " button to highlight "Edit Channel", press
"RIGHT" button to enter the Edit Channel menu.
Press "UP" or "DOWN" cursor button to highlight the desired item
and press "OK" button to enter the sub-menu .
Press "EXIT" button to exit.
Sor t
YooPl ay Ga
xxx xxxxx
xxx xxx
xxx x
xxx
TV Ch annel L ist
FAV
Loc k
Ski p
Mov e
Edi t
All T V
000 1 No Name
000 2 YooPlay Ga
000 3 E4+1
000 4 UKTV Hi stor
000 5 SKY THRE E
000 6 Sky Spt s Ne
000 7 Sky New s
000 1 No Name
000 2 YooPlay Ga
000 3 E4+1
000 4 UKTV Hi stor
000 5 SKY THRE E
000 6 Sky Spt s Ne
000 7 Sky New s
i
Radio Channel list
In the Edit Channel menu, select "Ra di o Ch an ne l Li st ", p re ss " OK" button to enter the Radio
Channel list menu.
Press "UP" or "DOWN" bu tt on to highlight channel p re ss the "OK" button to liste n the desired Radio
channel.
1
2
NOTE:
Basical ly, the op eration o f "Radio Chan nel List" i s the same as " TV Channe l List",
but there i s one point d ifferen t: In "Radi o Channel L ist" mode , there is no v ideo
informa tion, so it w il l always di splay Rad io's logo i n the right s ide previ ew window.
Delete All
1
2
Warning! Do you rea lly w ant t o delete
all chan nel s?
Yes
No
Press "color" button, then pres s "O K" b utton to edit the
corresponding function.
TV Ch annel L ist
Rad io Chan nel Lis t
Del ete All
Edi t Chann el
Ren ame
Del ete
YooPl ay Ga
xxx xxxxx
xxx xxx
xxx x
xxx
Edi t Chann el
All T V
i
A warning window appears.
Select "Yes", press "OK" button to delete all channels.
Select "No", Press "OK" button to cancel d el et in g.
In the Edit Channel menu, select "De le te Al l" , pr es s "O K" b ut to n.
You are asked to input a password(the default password is"0000").
Page 8
System setup menu
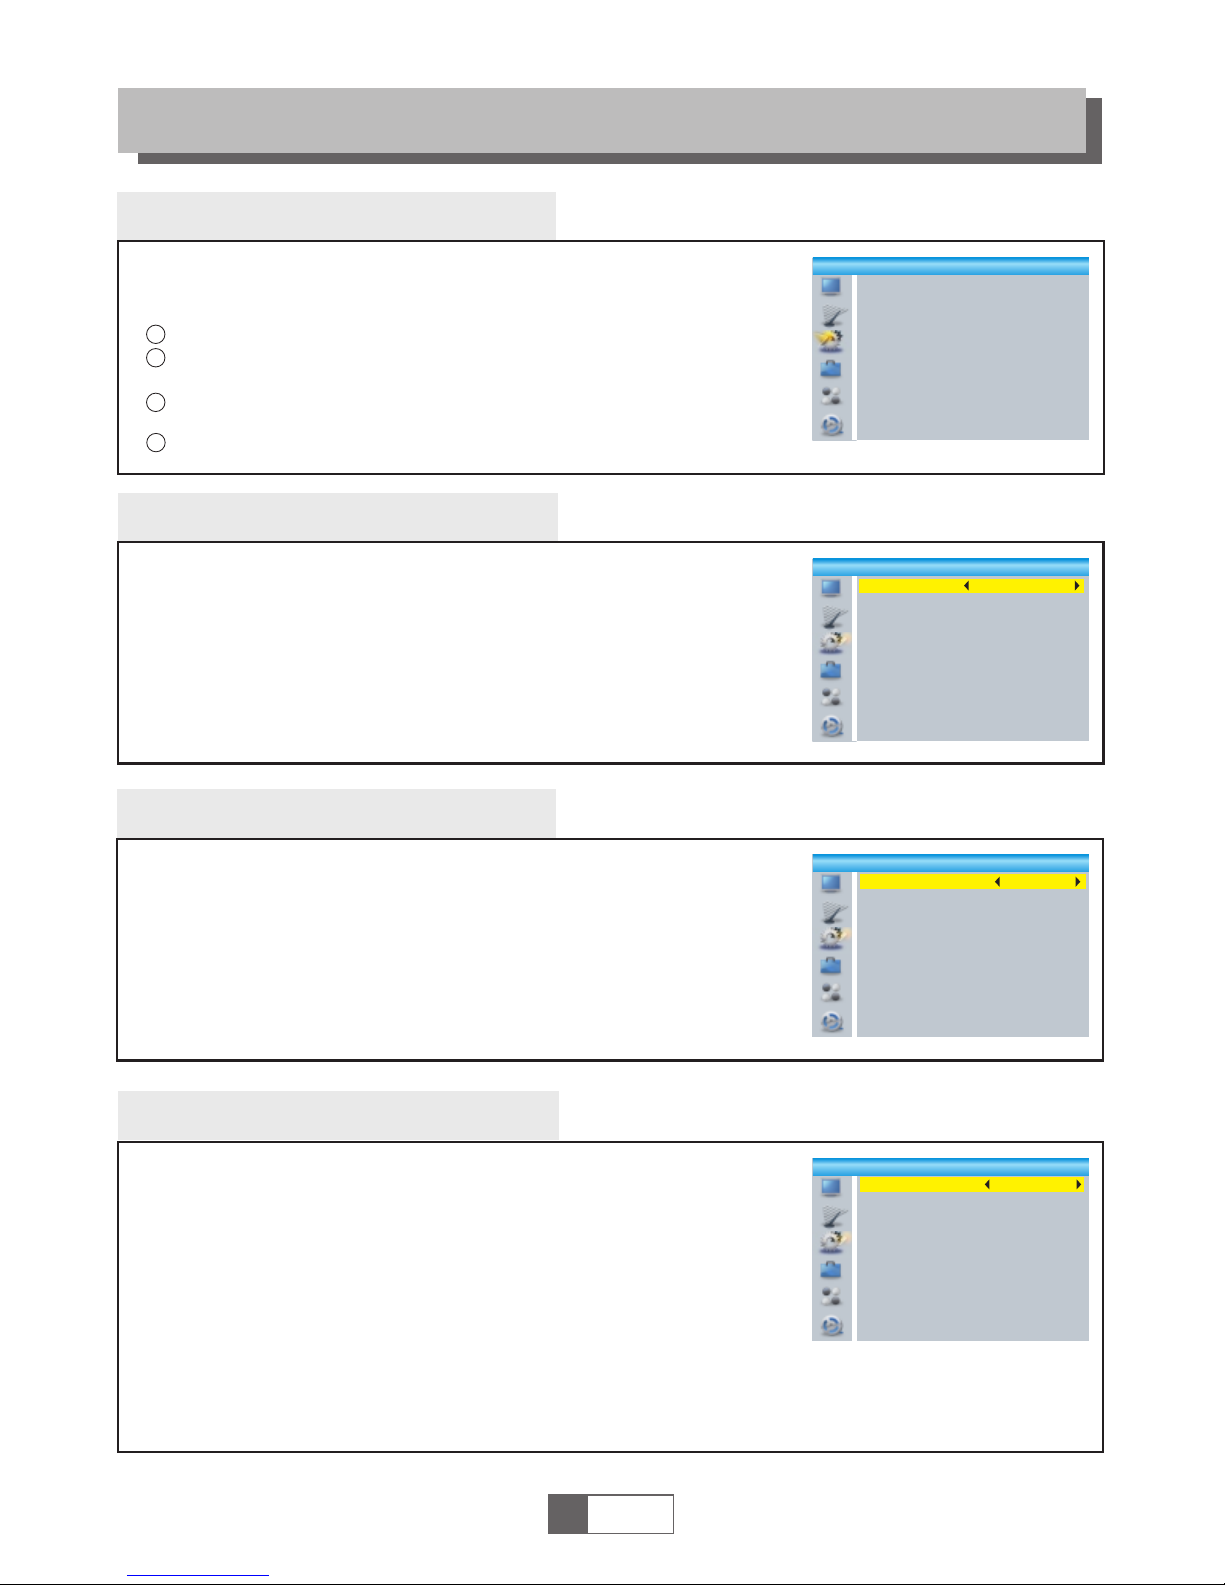
System setup menu allows us to set Lan gu ag e, TV System, Local Time
Setting, Timer Setting, Parental Lo ck , OS D Se tt in g, F av or it e, Au to
Description Setting, Multivi ew S et ti ng a nd O th er.
Language
This menu allows you to set Langua ge .
SYSTEM SETUP
TV System
This menu allows us to set Video Resolution, Aspect Mode,
Video Out and Digital Audio Out.
Local Time Setting
This menu allows you to set the region a nd t im e.
GMT Usage:
This menu is used for open the usage of GMT.
The options are : By Region/User Def in e/ Off
GMT Offset: This menu is valid only when selec te d "U se r De fi ne "
in GMT Usage menu .
The GMT offset range is "-11:30 ~ +12:00 ", i nc re as in g
half hour progressively.
Date:
Time:
"Date" and "Time" menus are valid only when selected "Off " in G MT Usage menu.
Press numeric button to input the time .
Region:
This menu is used for changing the r eg io n se tt in g.
Aspect Mode:
Auto/4:3PS/4:3LB/16:9
Video Out:
Digital Audio Out:
SCART CVBS+ HDMI/ SCART RGB
Video Resolution:
LPCM Out/ BS Out
1
English
7
Vid eo Res oluti on
Asp ect Mod e
Vid eo Out
Dig ital Audio Ou t
720 p@50H z
4:3 LB
SCA RT RGB
LPC M Out
TV Sy stem
4
1
2
3
Press the "MENU" button to enter mai n me nu .
Press "UP" or "DOWN" button to highlig ht " Sy st em S et up ",
press "RIGHT" button to enter the System Set up m en u.
Press "UP" or "DOWN" cursor button to high li gh t th e de si re d
item and press "OK" button to enter the sub- me nu .
Press "EXIT" button to exit.
Lan guage
Fir st Audio
Sec ond Audio
Sub title L angua ge
Tele text
Sub title
Eng lish
Eng lish
Ger man
Eng lish
Eng lish
On
Lan guage
Sys tem Set up
Lan guage
TV Sy stem
Loc al Time S etti ng
Tim er Set ting
Par ental L ock
OSD S ettin g
Fav orite
Aut o Descr iptio n Setti ng
Mul tivie w Setti ng
Oth er
Reg ion
GMT U sage
GMT O ffset
Sum mer Tim e
Dat e
Tim e
Cze ch
By Re gion
GMT +01:0 0
Off
xxx x/xx/ xx
01: 51
Loc al Time S etting
xxx x,xxx ,xxxx
Summer Time:
The options are: On/Off
By Source/By Native/480i/480 p/ 57 6i /5 76 p/
720p@50Hz/720p@60Hz/ 10 80 i@ 50 Hz /
1080i@60Hz/1080p@5 0H z/ 10 80 p@ 60 Hz
Page 9
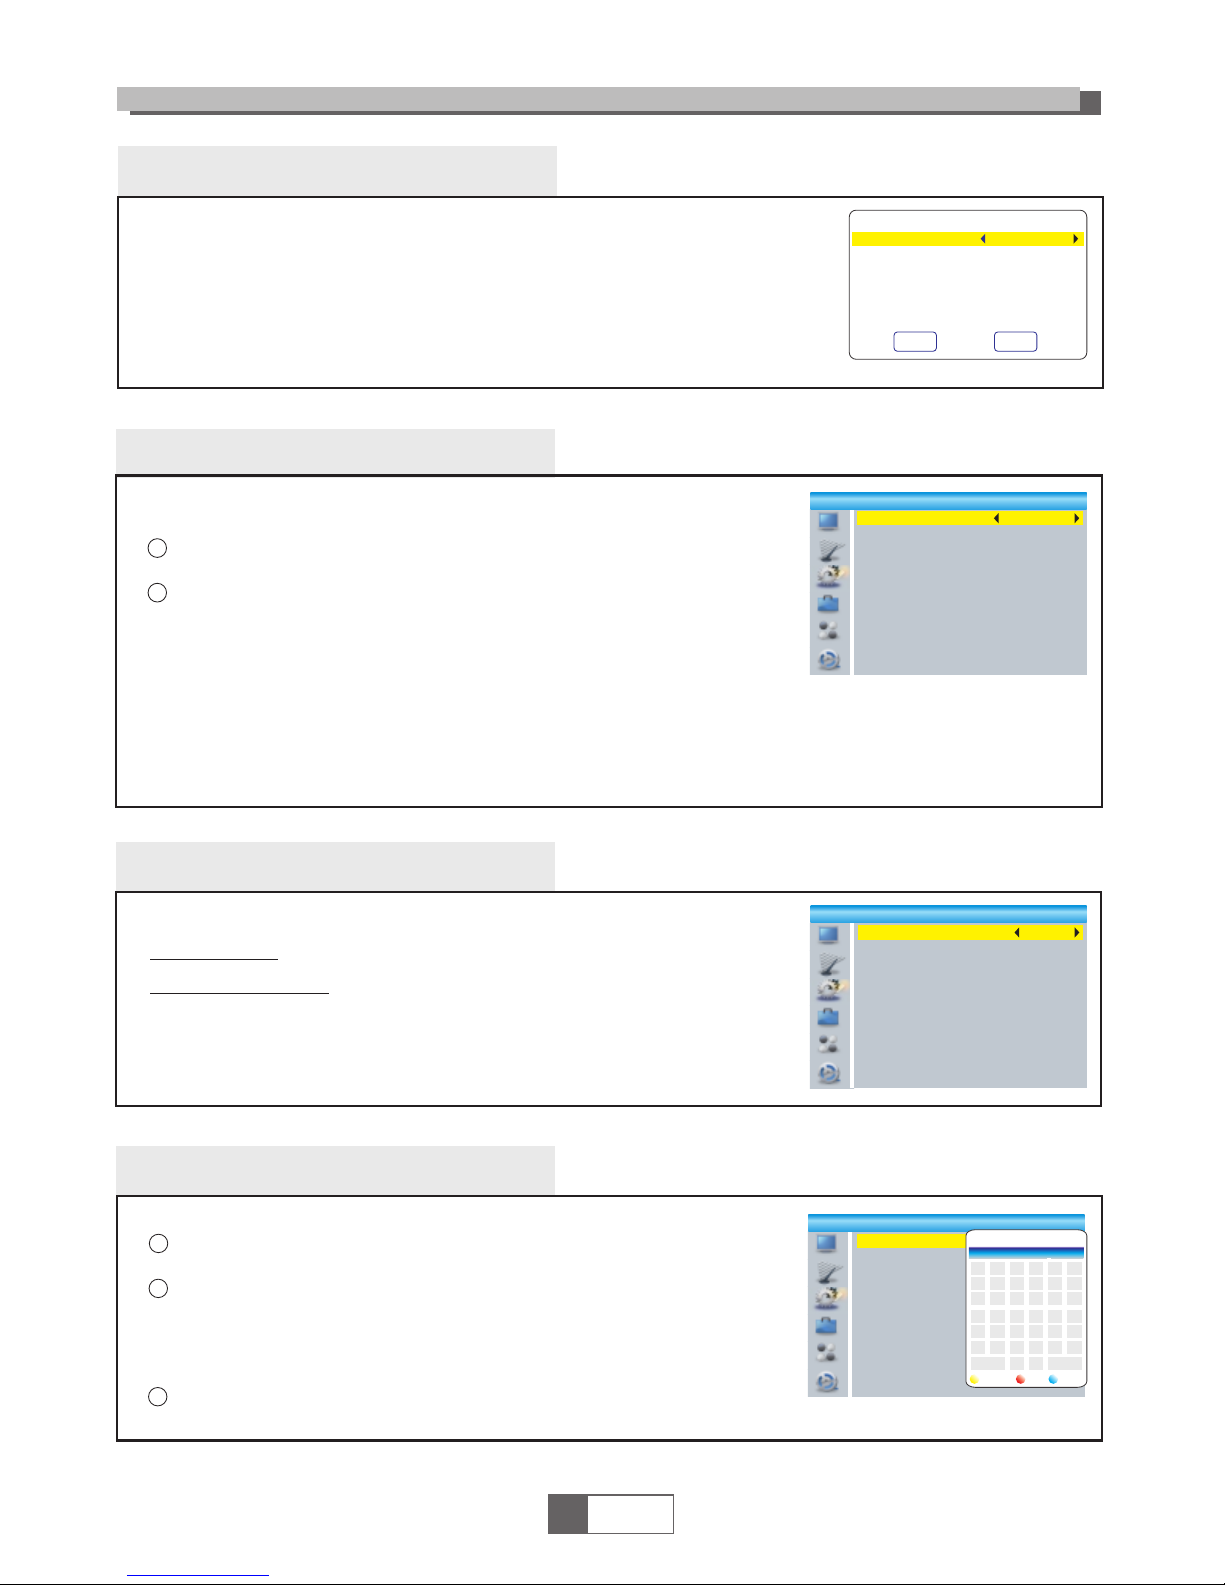
OSD Setting
This menu allows you to set OSD Timeout and OSD Transparency .
This menu allows you to rename the favorite group.
OSD Timeout:
1-10
OSD Transparency:
To set the OSD transparency to Off/10%/20%/30%/
40%.
SYSTEM SETUP
Parental Lock
In "System Setup" menu, select "Parental Lock" and press "OK" button,
you are asked to input a password(the default password is"0000").
After inputting the correct password by pressing numeric buttons,
the parental lock menu appears.
1
2
Menu Lock:
New Password:
To change the password.
Confirm Password: To confirm the new password.
Rating Lock:
Off/ AGE 4/AGE5/AGE6/AGE7/AGE8/AGE9/AGE10/AGE11/AGE12/
AGE13/AGE14/AGE15/AGE16/AGE17/AGE18
1
English
8
To lock the Edit channel/ Installation menu. When you
want to enter these menus, you must input the password.
You can set menu lock to on/off.
This menu allows you to protect menu and channel, and change the
Password.
Favorite
In Channel menu, select "Favorite", press "OK" button to enter
Favorite menu.
Select desired group, press "OK" button to open the mock keypad.
Input letter and numeric one by one by pressing the cursor button
and press "OK" button to confirm. After finishing input, highlight
"OK" on mock keypad to confirm, you change Favorite group name
successfully.
Press "EXIT" button to quit the group rename menu.
1
2
3
Men u Lock
Rat ing Loc k
New P asswo rd
Con firm Pa sswor d
Off
Off
--- -
--- -
Par ental L ock
OSD T imeo ut
OSD Tr anspa rency
5
Off
OSD S ettin g
1
2
3
4
5
6
7
8
Fav orite
Fav g roup 1
Fav g roup 2
Fav g roup 3
Fav g roup 4
Fav g roup 5
Fav g roup 6
Fav g roup 7
Fav g roup 8
CAP S
A
Fav g roup 1
G
M
S
Y
4
SP
Ren ame
Del
OK
B C D E F
K LHJI
N
T
Z
5
O
U
0
6
?
P
V
1
7
<-
Q
W
2
8
OK
R
X
3
9
Timer Setting
This menu allows us to set the program timer. You can set 8 timers.
Timer Mode:
Timer Service:
Wakeup Channel:
Wakeup Date:
On Time:
Duration:
Off/Once/Daily/Weekly/Monthly
Channel/Record
You can select a desired channel as the wakeup channel.
Press numeric button to input date.
Press numeric button to input the time.
Press numeric button to input the duration time.
Sav e
Can cel
Cur rent Ti me/da te: 01: 36PM xx /xx/x xxx
Tim er Mode
Tim er Serv ice
Wake up Chan nel
Wake up Date
On Ti me
Dur ation
Dai ly
Cha nnel
BBC F OUR
xx/ xx/xx xx
xx: xx
xx: xx
Page 10
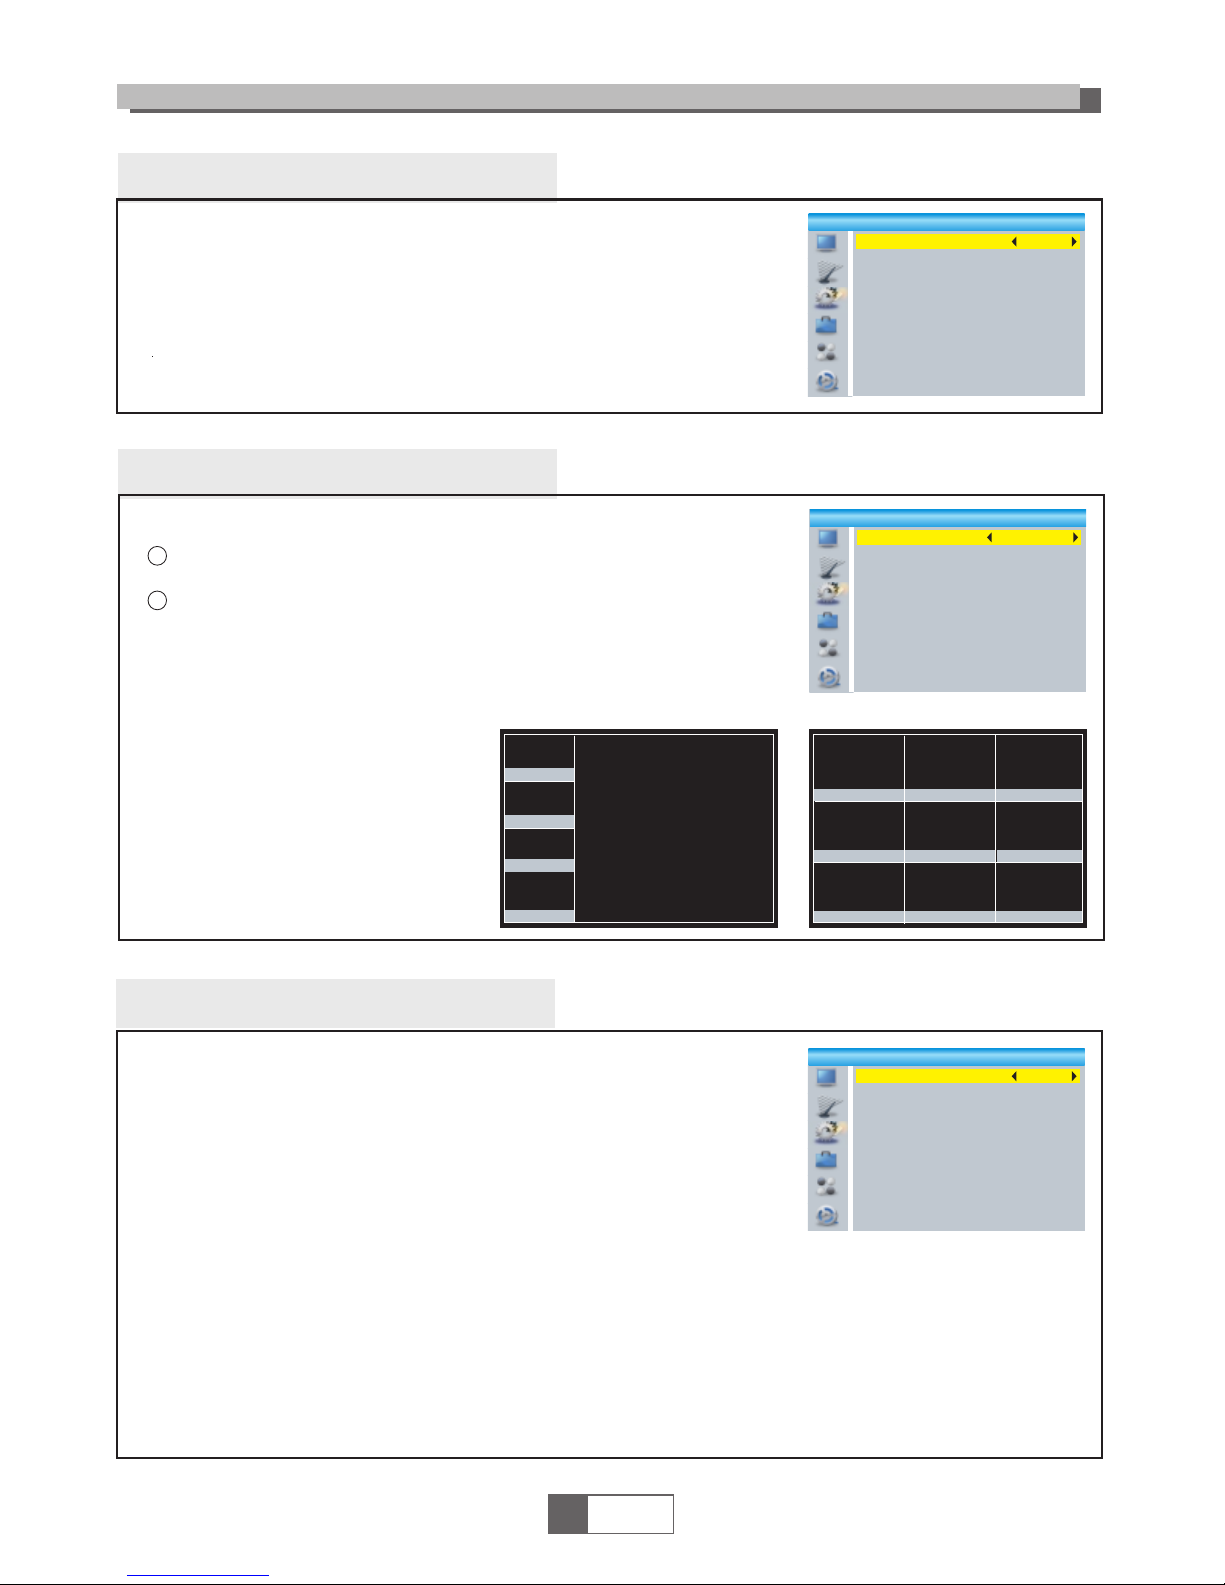
Other
No command to STB on front panel or Remoter in 30 Min- 3 hours and no timer event,
the STB will enter standby mode automatically.
If Off is selected, the STB can't enter standby mode automatically.
LNB P ower
Cha nnel Pl ay Type
Bee per
Aut o Stand by
Off
All
Off
Off
Oth er
SYSTEM SETUP
Auto Description Setting
On/Off
On/Off
-3~3
AD Service:
Use AD as default:
AD Volume Offset:
AD Se rvice
Use AD as def ault
AD Vol ume Of fset
On
Off
0
Aut o Descr iptio n Setti ng
LNB Power:
Channel Play Type:
Beeper:
Auto Standby:
This menu allows us to set LNB Power, Channel Play Type, Beeper and
Auto Standby.
When "LNB Power" is selected "On", the STB will provide 5V power
to antenna.
It will not provide when selected "Off".
On/Off
All/Free/Scrambled
On/Off
30Min/1 Hour/2 Hour/3 Hour/Off
This menu allows us to set AD Service, Use AD as default and
AD Volume Offset:
1
English
9
Multiview Setting
Mul tivie w Setti ng
4+1 Pictu res
Mul tivie w Setti ng
Multiview Setting:
4+1 Pictures/3x3 Pictures
This menu allows us to set Multiview
In "System Setup" menu, select "Multiview Setting" and press "OK"
button, you can select your desired item4+1Picturesor 3x3 Pictures .
After you select your desired item, press "EXIT" button to exit the main
menu,then press "BLUE" button to enter multiview.
1
2
Chan nel 1
Chan nel 4
Chan nel 7
Chan nel 5
Chan nel 6
Chan nel 8
Chan nel 9
Chan nel 2
Chan nel 3
Chan nel1
Chan nel 4
Channel 5
Chan nel 1
Chan nel 2
Chan nel3
4+1 Pictures
3x3 Pictures
Page 11
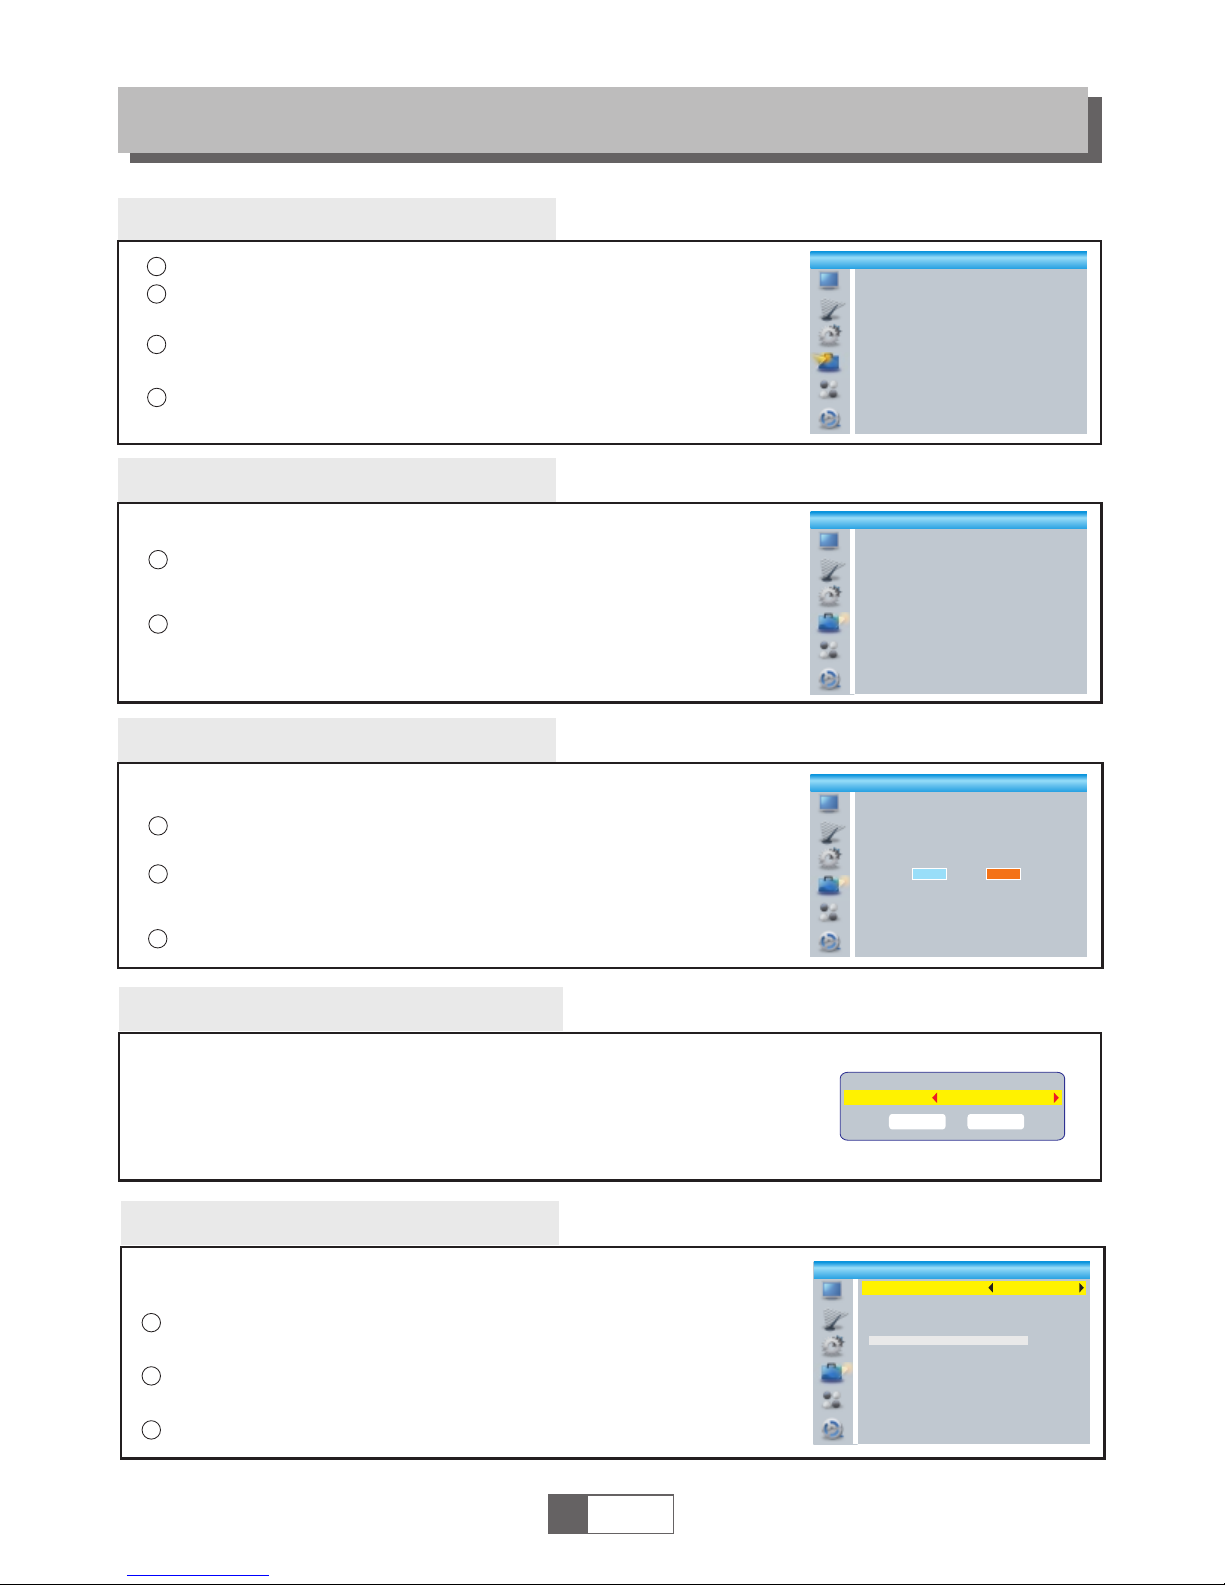
Tools main menu
Information
In "Tools" menu, select "Information", press "OK" button to open
information window.
Press "EXIT" button to exit.
1
2
This menu can display some parameters information in this STB.
Factory Setting
This menu allows you to re-set the STB back to factory settings,
clear all existed channels.
In the "Tools" menu, select "Factory Default", press "OK" button.
You are asked to input a password(the default password is"0000").
1
2
A confirmation window is displayed.
Select "Yes" to return back to factory settings and clear all channels.
Select "No" to cancel back to factory settings.
Press "EXIT" button to exit .
4
1
2
3
Press the "MENU" button to enter main menu.
Press "UP" or " DOWN " button to highlight "Tools", press "RIGHT"
button to enter the Tools menu.
Press "UP" or "DOWN" cursor button to highlight the desired item
and press "OK" button to enter the sub-menu.
Press "EXIT" button to exit.
3
Tool s
Inf ormat ion
Fac tory Se tting
Upg rade By U SB
Rem ove USB d evice s afely
Inf ormat ion
x.x .x
xxx xx
xxx xx
x.x .x
x.x .x
xxx
xxx xx
xxx xx
xxx
xxx
Fac tory Se tting
This ope ration will lo ad default and e rase all
the chan nels that user a dded, contin ue?
Yes No
Remove USB device safely
In "Tools" menu, select "Remove USB de vi ce s af el y" ,
Press "OK" button to confirm. Then a window is displayed.
Press "OK" button again.
Dis k Remov e
Rem ove
OK
USB D isk A-3 GB
Can cel
1
English
10
Software Upgrade
Press "EXIT" button to exit.
Enter "Tools" menu, select "Upgrad e by U SB ", p re ss " OK " bu tt on ,
Software Upgrade menu is shown .
1
2
Press cursor button to select the desi re d it em , th en h ig hl ig ht
"Start" and press "OK" button to start upg ra de .
3
We offer the functions for user to upgrade software by USB .
Upg rade by U SB
Upg rade Mo de
Upg rade Fi le
Sta rt
All code
No Fi le
0%
Page 12
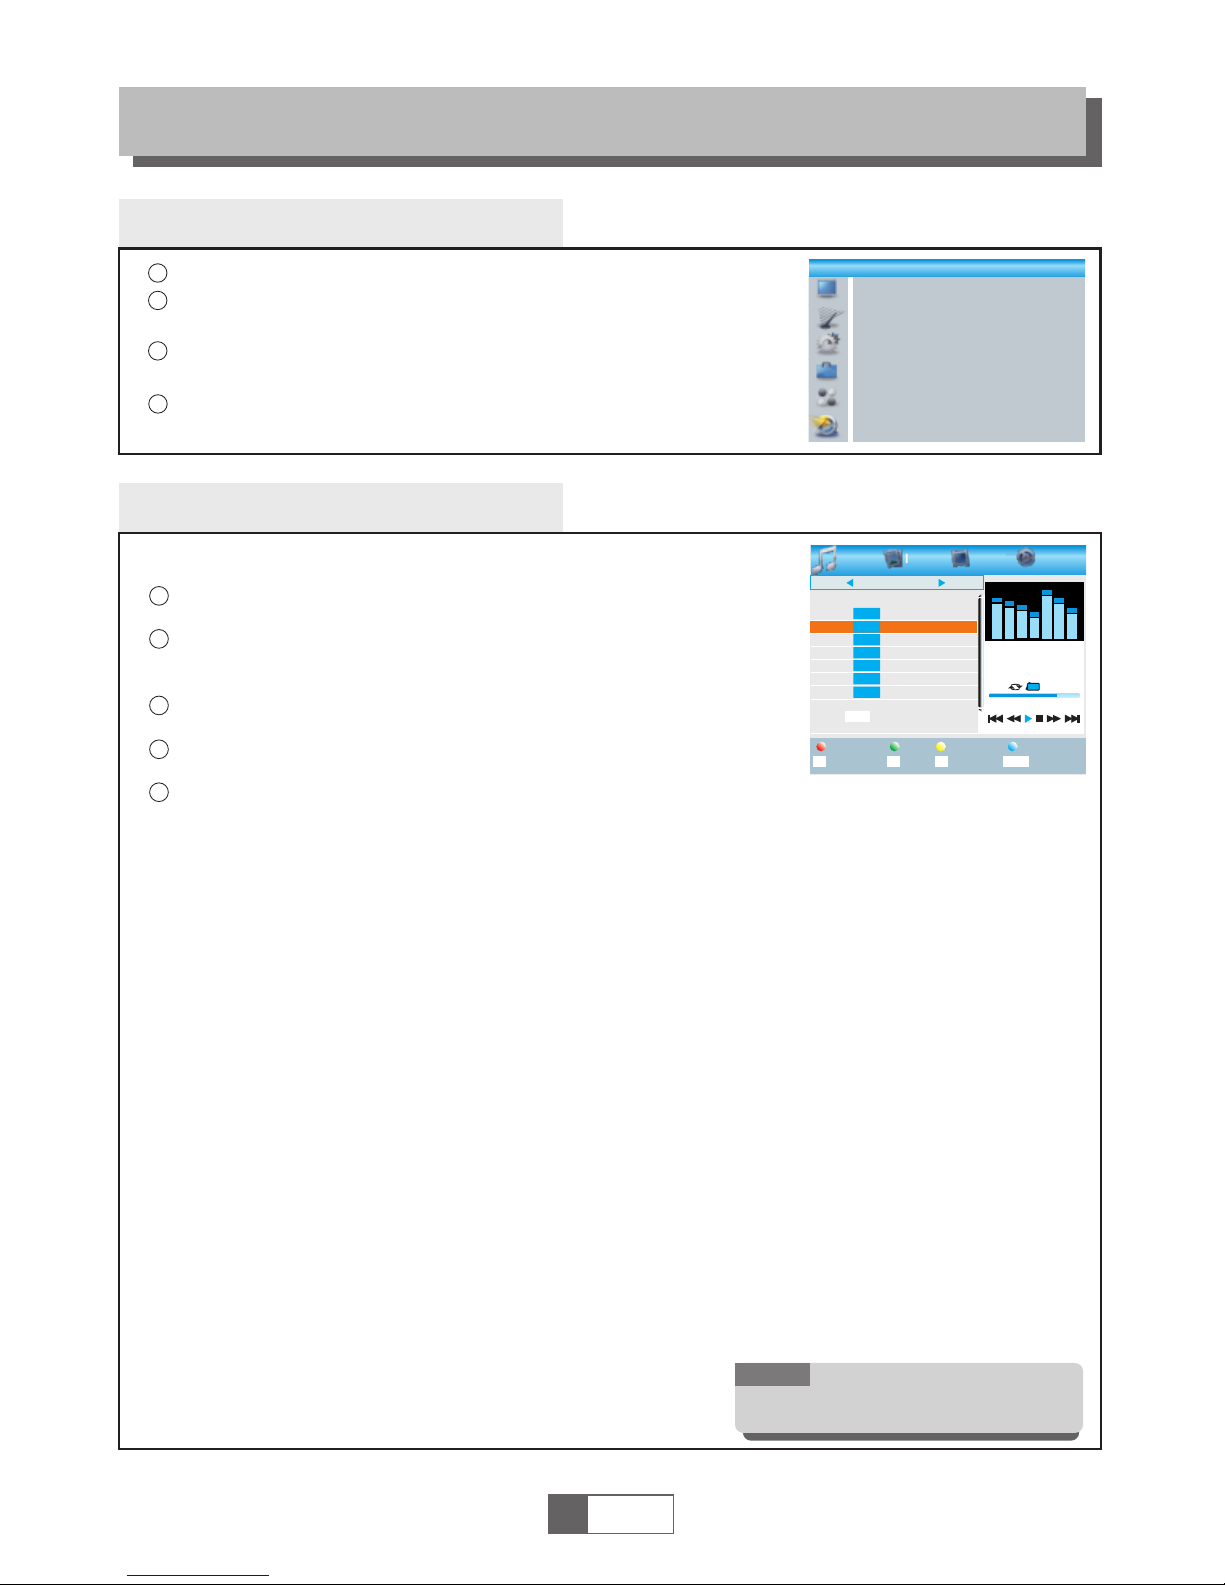
REC main menu
RECORDING
1
English
11
4
1
2
3
Press the "MENU" button to enter main me nu .
Press "UP"or "DOWN" button to highli gh t "R EC ", p re ss
"RIGHT" button to enter the REC menu.
Press "UP" or "DOWN" cursor button to high li gh t th e de si re d it em
and press "OK"button to enter the sub- me nu .
Press "EXIT" button to exit.
Media Player
3
In "REC" menu, select "Media Playe r" , pr es s "O K" b ut to n to e nt er
Media Player menu.
First you enter media player win do w, th e hi gh li gh t is o n th e
USB/HDD device. Press "Down" b ut to n to m ov e th e hi gh li gh t to
directory and file field.
Press "1" button ,you can switch TAB between
Music/Image/Video/Record.
Press "UP" or "DOWN" cursor button to sele ct a d es ir ed i te m,
and press "OK" button to play the desi re d fi le s.
Press "EXIT" button to exit.
1
2
This function allows you to play fil es f ro m US B po rt .
REC
Med ia Play er
PVR S torag e Infor matio n
PVR S ettin g
Music:
Image:
Press "RED" button to show Play List.
Move the highlight to the file whi ch y ou w an t to a dd t o pl ay l is t, t he n press
"Green" button to add. It will mark a favo ri te i co n on t he f il e.
Press "Yellow" button to add all file of current directory to play list. Press again to
delete all file of current direc to ry f ro m th e pl ay l is t.
Press "Blue" button to enter to edit sub -m en u.
Press "2" button to open the sort wind ow.
You can sort by Name/Time/Size/Favorite.
Press "INFO" button to set repeat mode. The option is Repeat Folder/
Random Folder/Repeat One.
Return to parent directory.
4
5
Press "Red" button to show play li st .
Move the highlight to the file which y ou w an t to a dd t o pl ay l is t, t he n pr es s
"Green" button to add. It will mark a favo ri te i co n on t he f il e.
Press "Yellow" button to add all file of current directory to play list. Press again to
delete all file of current direc to ry f ro m th e pl ay l is t.
Press "Blue" button to enter to edit sub -m en u.
Press "2" button to open the sort wind ow.
You can sort by Name/Time/Size/Favorite.
Press "INFO" button to open image setu p
Press "3" button to view image in
multi view mode
Return to parent directory.
"RED" button:
"GREEN" button:
"YELLOW" button:
"BLUE" button:
"2" button:
"INFO" button:
"EXIT" button:
"RED" button:
"GREEN" button:
"YELLOW" button:
"BLUE" button:
"2" button:
"INFO" button:
"3" button:
"EXIT" button:
I swe ar.mp3
331 9KB
00: 03:32
00: 03:15 0 0:03: 32
1
2
3
4
5
6
7
Mus ic
840 .mpg
I swe ar.mp3
Why. mp3
Lon ely.mp 3
Bec ause. mp3
Ros e.jpg
Fly. jpg
USB 1
/..
Play List
Switch
Repeat
Sort
MP G
MP 3
MP 3
MP 3
MP 3
JP G
JP G
INF O
2
1
FAV FAV All Edit
Exit
EXI T
Ima ge Video Rec ord
i
NOTE:
When you browse p ictures ,
press "RED" but to n or "GREEN" butt on,
you can view 3D pic tu res.
Page 13
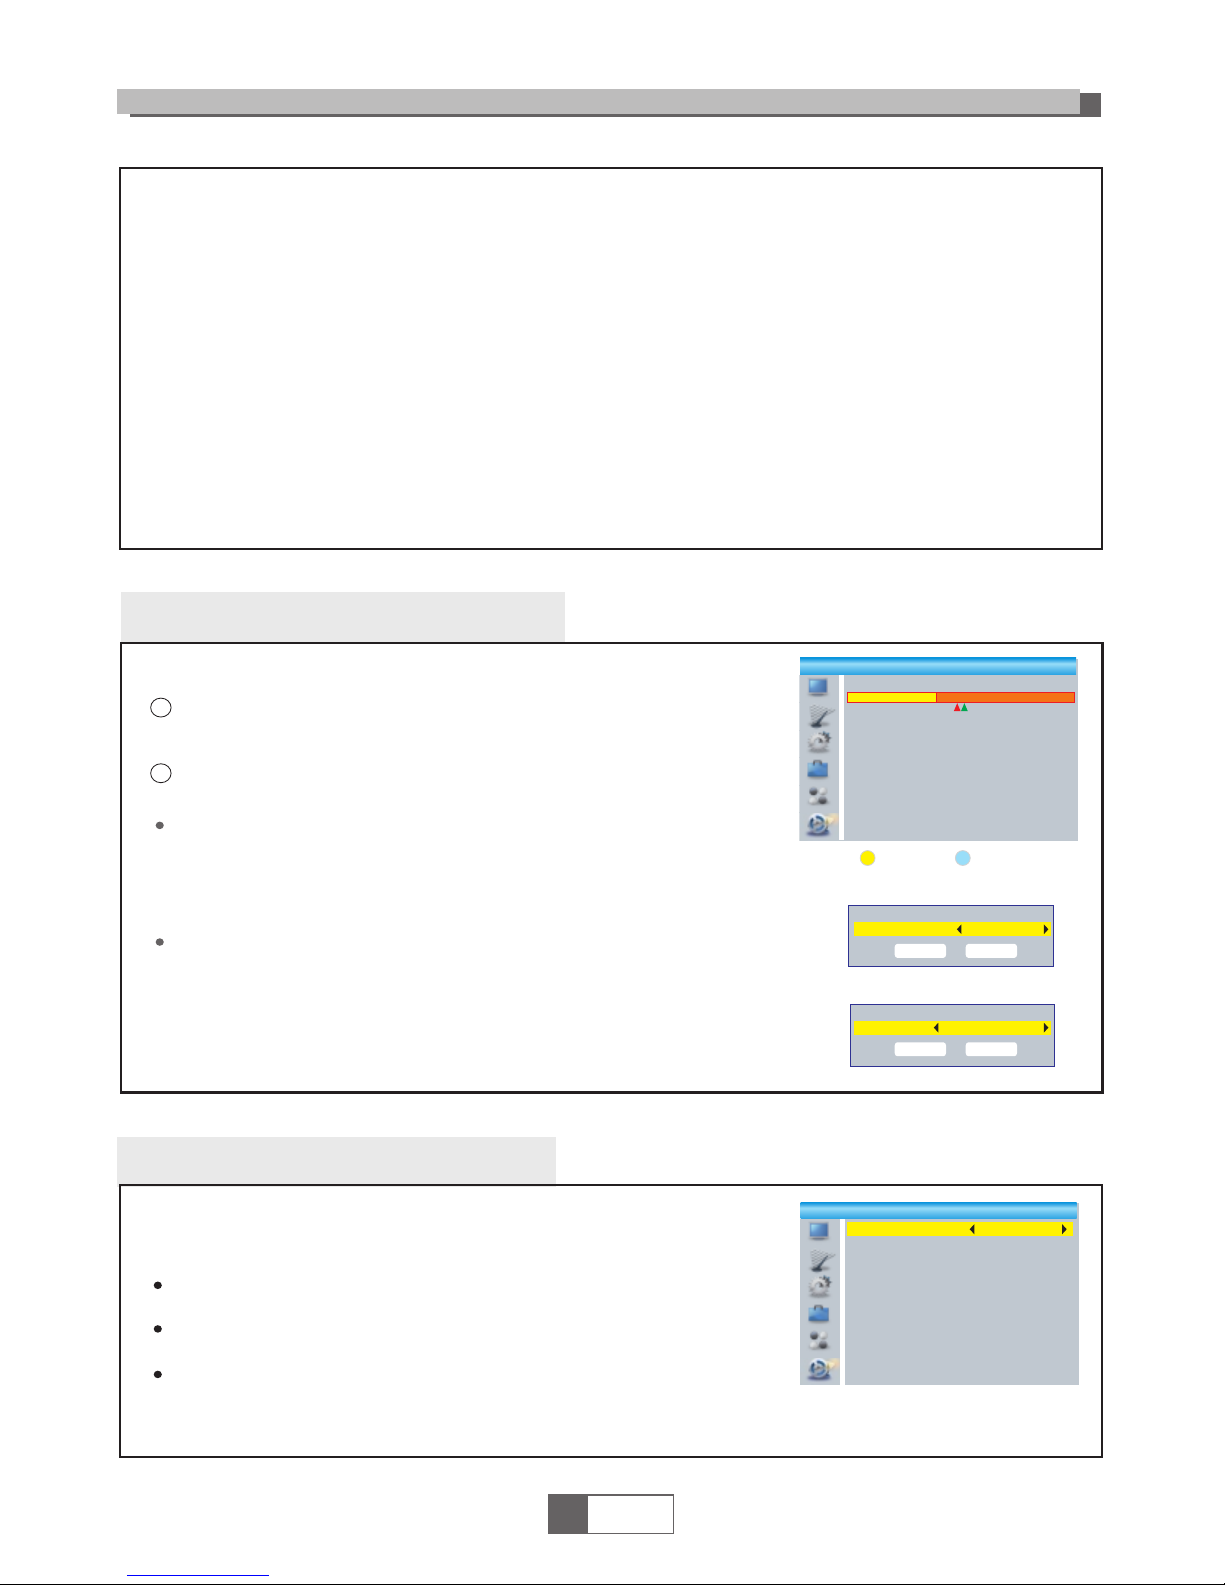
This menu allows us to set the PVR Setting .
Press "UP" or "DOWN" cursor button to sele ct d es ir ed i te m,
press "LEFT" or "RIGHT" cursor button to cha ng e th e se tt in g.
TimeShift AUTO/Pause/Off
Timeshift to Record On/Off
PS Record On/Off
PVR Setting
1
English
12
REC
PVR Storage Information
In "REC" menu, select "HDD Informati on ", p re ss " OK "
button to open HDD information w in do w.
Press "EXIT" button to exit.
This menu can display some param et er s of R em ov ab le D is k.
1
2
PVR S torag e Infor matio n
USB D isk A: xxxG byt es
Volu me
Tota l Size
Fre e Size
Rec S ize
TMS S ize
Fil e Syste m
xxx x
xxx x
xxx x
xxx x
xxx x
xxx
For mat DVR S et
Timesh ift
Timesh ift to Record
PS Record
Pause
Off
Off
PVR S ettin g
DVR Set REC & TMS/Record/Timeshift
Press BLUE button to open DVR Set menu .
Press "LEFT" or "RIGHT" cursor button to cha ng e DV R Type.
Select "OK" to confirm. Select "Cancel " to c an ce l.
Press YELLOW button to open Format menu.
Press "LEFT" or "RIGHT" cursor button to cha ng e Di sk M od e.
Select "OK" to format. Select "Cancel" t o ca nc el .
Format FAT/NTFS
DVR S et
DVR Ty pe
OK
REC & TMS
Can cel
For mat
Dis k Mode
OK
FAT
Can cel
Record:
Press "Red" button to open rename wi nd ow.
Move the highlight to the progra m wh ic h yo u wa nt t o lo ck . Pr es si ng "Green"
button, it will ask you to input passw or d. D ef au lt p as sw or d is " 00 00". After
input correct password, the prog ra m is l oc ke d. I f yo u wa nt t o un lo ck t he
program, press the "Green" button ag ai n.
Press "Yellow" button to make a delete mark on the program which
you want to delete.
Return to parent directory.
Video:
Press "Blue" button to enter to edit sub -m en u.
Press "2" button to open the sort. You can s or t by N am e/ Time/Size.
Return to parent directory.
"BLUE" button:
"2" button:
"EXIT" button:
"RED" button:
"GREEN" button:
"YELLOW" button:
"EXIT" button:
Page 14
TIMESHIFT/RECORDING
TimeShift
Plugging an external Mass Stor ag e De vi ce o n th e US B po rt g iv es y ou access to Time Shift/Record
a broadcasted programme.
Pause a broadcast programme an d co nt in ue w at ch in g it l at er ( TimeShift )
Record a broadcasted program m
When the space available on the Ma ss S to ra ge D ev ic e ru ns o ut , re cording operation of
broadcasting will stop.
Initiate
Trickmodes
Stop the TimeShift
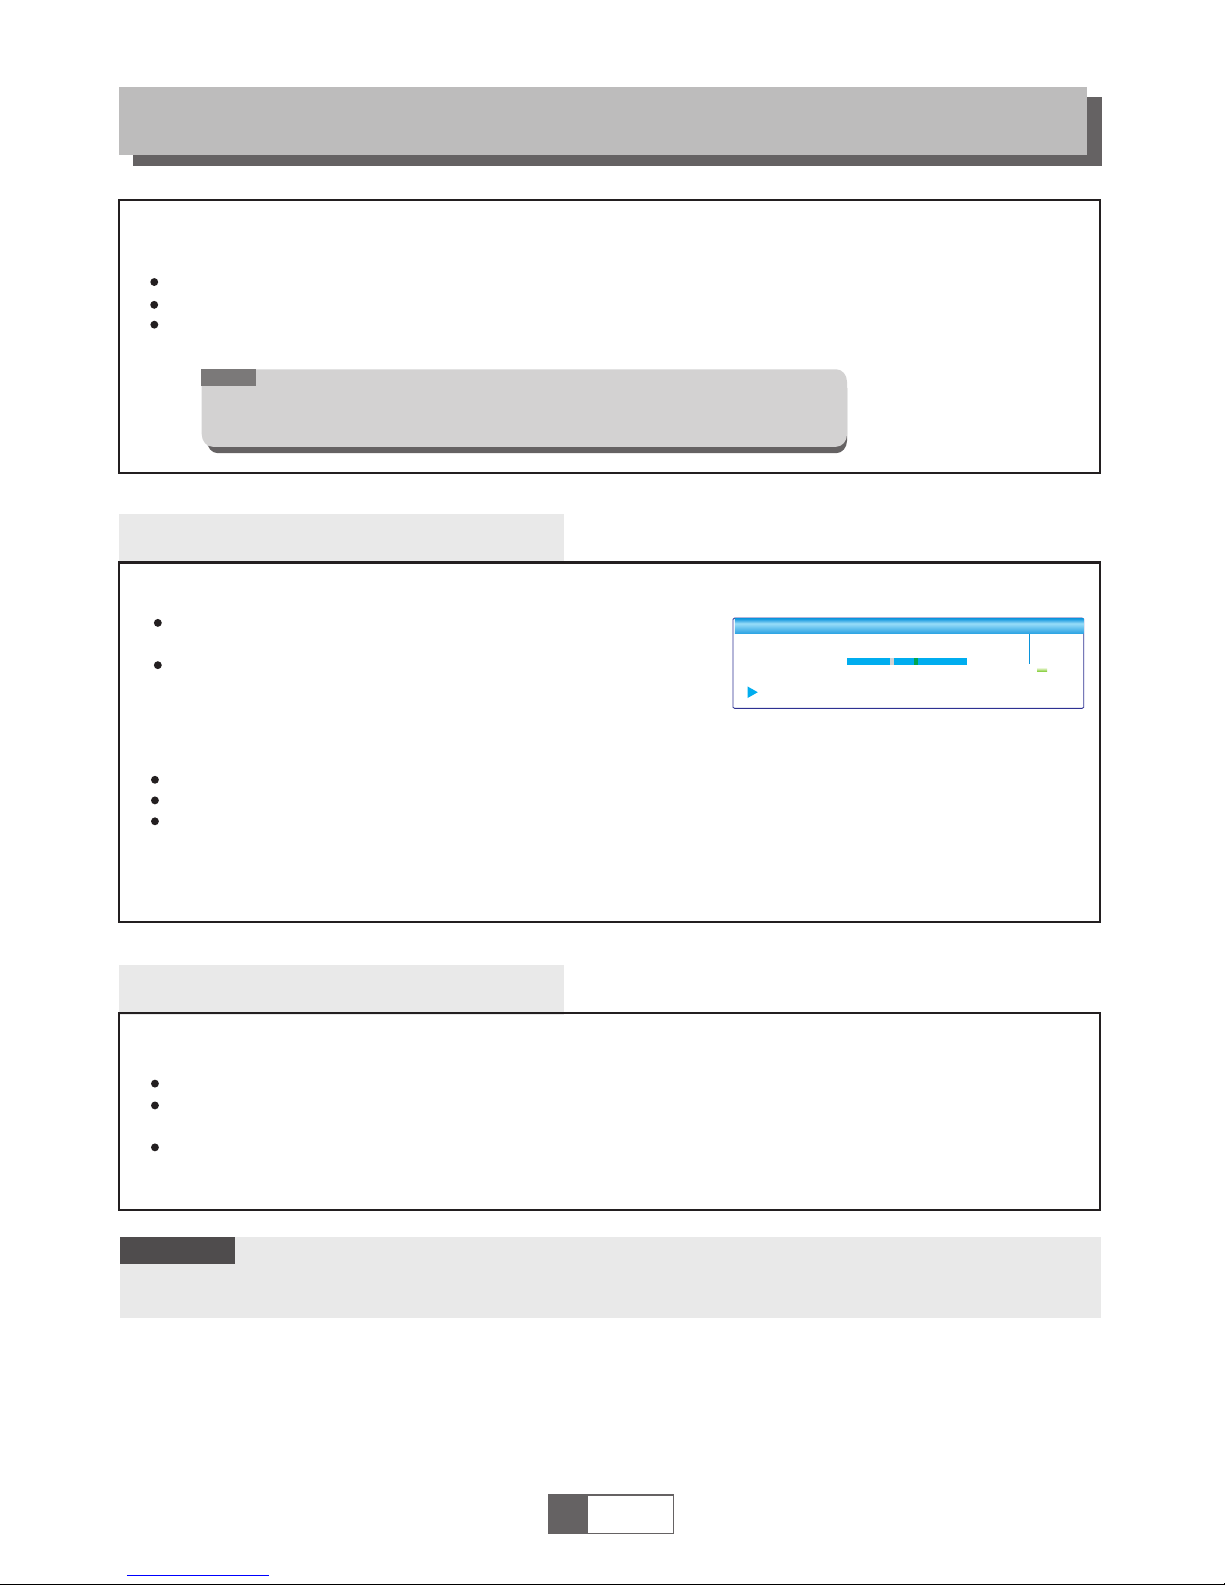
TimeShift can be done in viewing mode by pressing the
"PAUSE" button.
Press "RIGHT" or "LEFT" button to move the cur so r to
the time you desired to view. Press " OK " bu tt on t o co nf ir m.
During the playback, it is possi bl e to p er fo rm t he f ol lo wi ng actions :
Press "PAUSE" button to pause the playback
Press "FORWARD" button to fast forwar d th e pl ay ba ck
Press "BACKWARD" button to rewind the playback
Recording
Instant record
In viewing mode, press "RECORD " bu tt on t o in st an ta ne ou sl y start a record on the current channel.
Press "RECORD" button again ca n in pu t du ra ti on .
Press "STOP" button to stop recording, then a confirmation window appears.
Select "Yes" to stop recording. Select "No" to continue recording.
Press "STOP" button to stop TimeShift.
BB C FOU R
Play 0 0:02:37 00:07:12
TS
2%
03 /19
01 :36
1
English
13
NOTE:
Please use USB 2. 0 disk when rec or ding or TimeSh ift.
For TimeShift an d recording f eature, you nee d take bigger siz e USB flash
drive or HDD (>2G B) for record ing.
Please select famous brand USB 2 .0 U SB H DD o r US B st ic k fo r Re co rd in g and Timeshift, such as SAMSUNG,
HITACHI and SONY. Some USB devices maybe can't be supported due to its quality.
NOTE:
Page 15
In some region, the digital terrestrial signal may be weak. So you'd better use the antenna in
which the booster was built, for watching the weak signal channels.
TROUBLESHOOTING
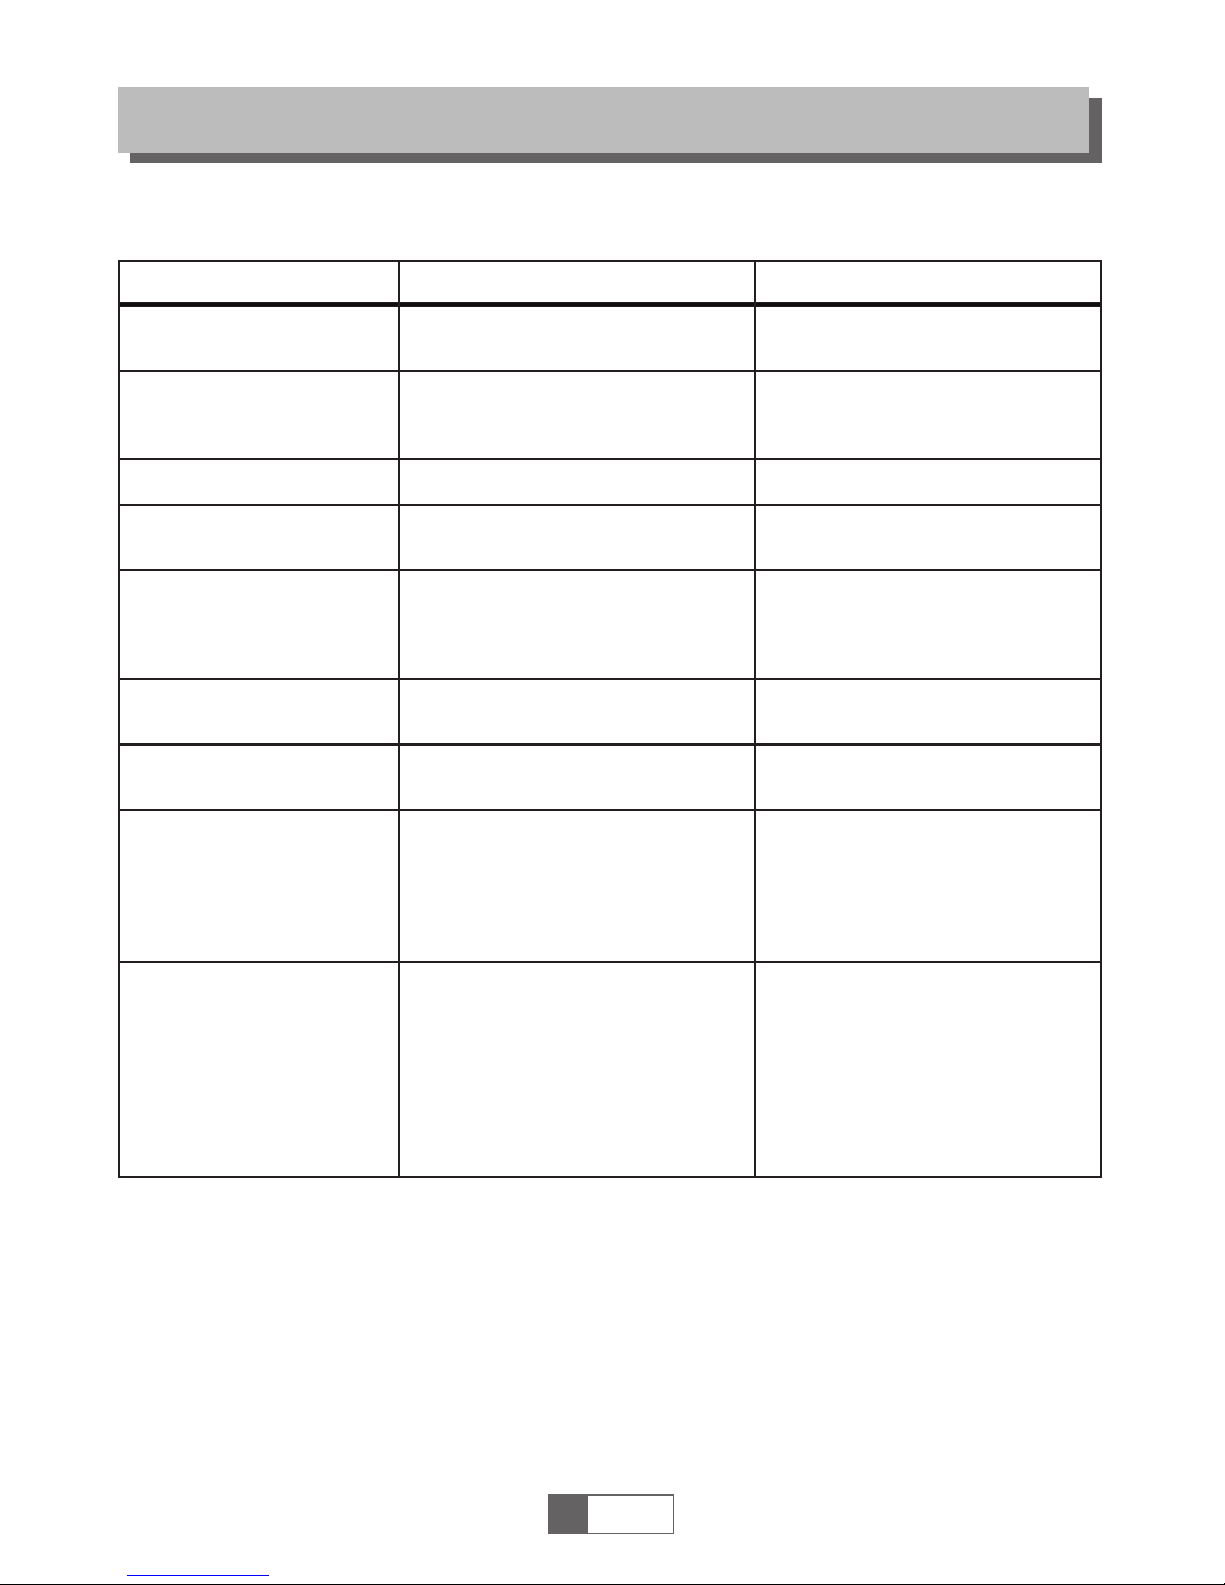
Problem
Standby light not lit
No signal found
No picture or sound
Scrambled channel
message
No response to remote
control
Forgotten channel lock
code
Forgotten menu lock
code
The remote control will
not operate your STB
After moving the STB to
another room you find you
are no longer able to
receive digital reception
Possible cause What to do
Mains lead unplugged
Mains fuse blown
Aerial is disconnected
Aerial is damaged/misali gn ed
Out of digital signal area
Scart/AV is not selected on your TV
Channel is scrambled
Receiver off
Handset not aimed correctly
Front panel obstructed
Hand set batteries exhausted
(1) The batteries in your remote
control need replacing
(2) There is an obstruction
blocking the signal path
between the remote control
and the box.
The aerial feed former new point
may come through a distributio n
system which may reduce the
digital signal now receive d by t he
box.
Check mains lead
Check fuse
Check aerial lead
Check aerial
Check with dealer
Reduce to another channel
Select alternative channel
Plug in and turn on plug
Aim handset at front panel
Check for obstructions
Replace handset batteries
Re-install channels to cance l
channel lock
Contact help line
(1) Replace the batteries
(2) Check that there is nothing in
the way of the path between
the remote control and the
receiver
Try a direct feed from the antenna
1
English
14
Page 16
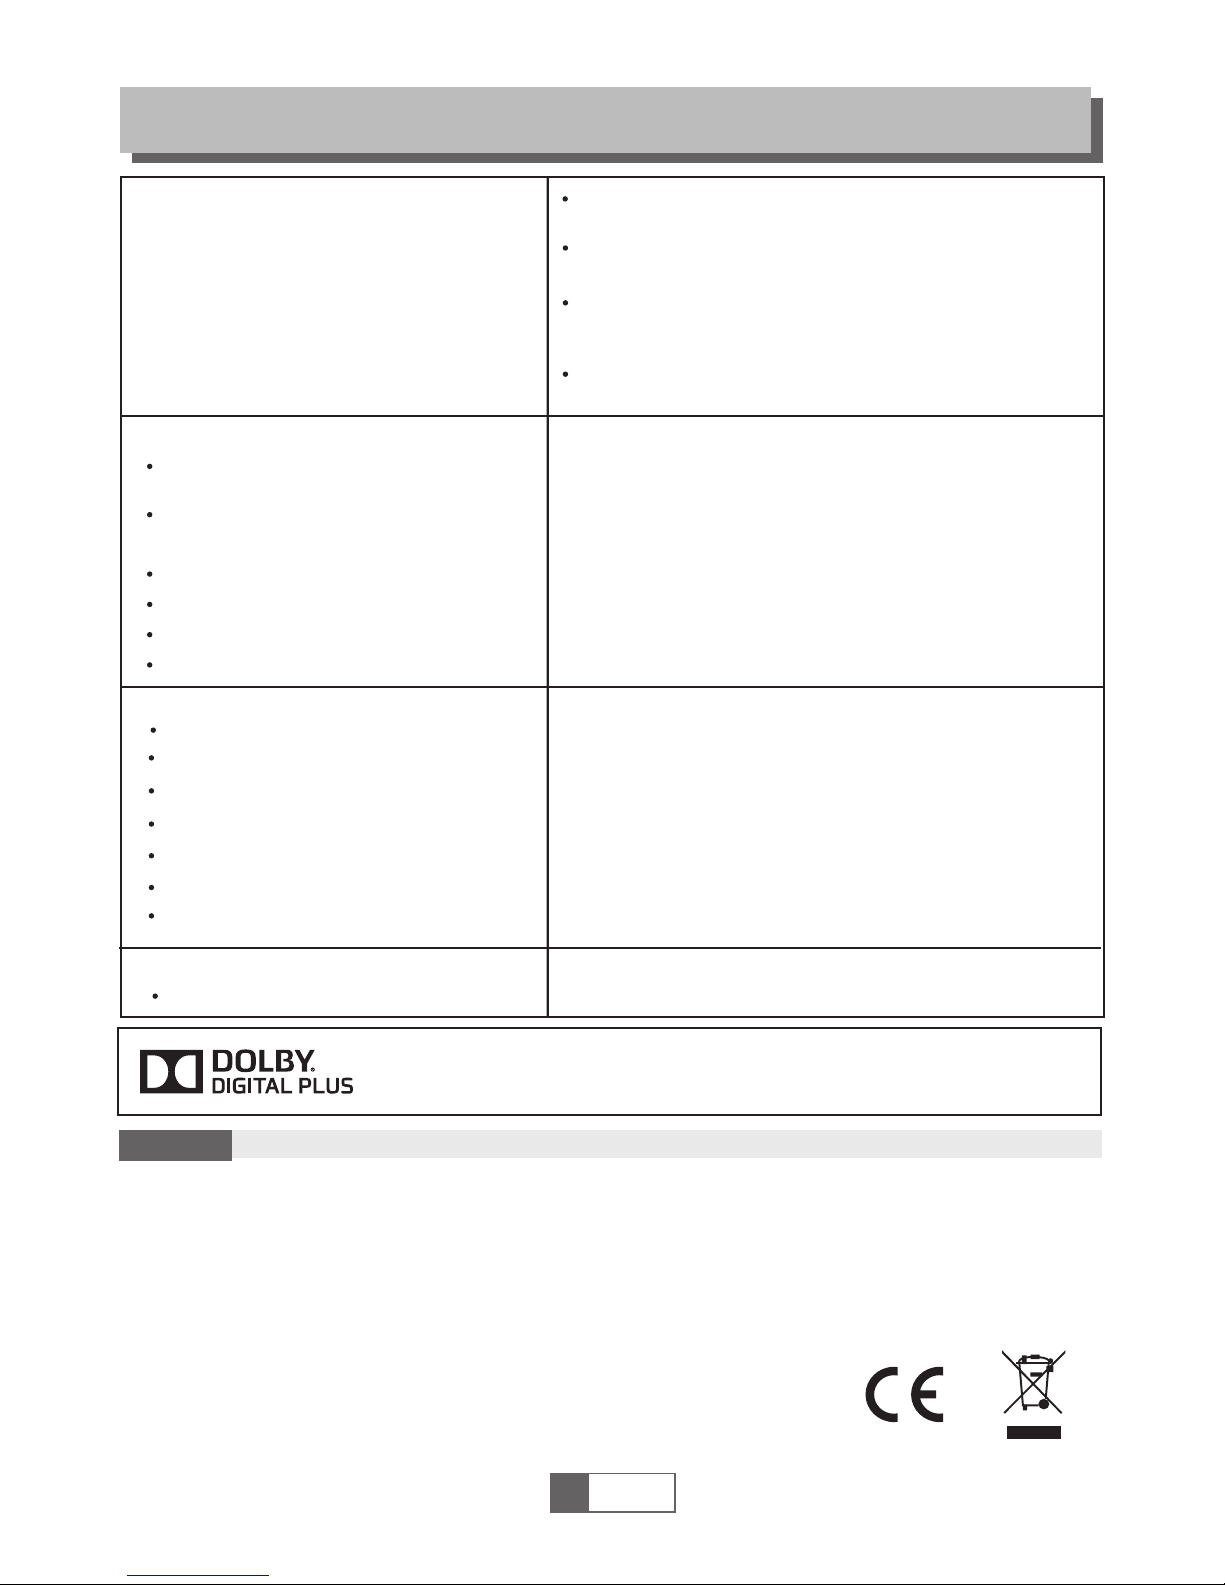
TU NER & CHANN EL
RF INPUT CONNECTOR x1
(IEC-TYPE, IEC169-2, FEMALE)
RF OUTPUT CONNECTOR x1
(IEC-TYPE, IEC169-2, MALE (LOOPTHROUGH)
FREQUENCY RANGE:
174MHz~230MHz(VHF)
470MHz ~862MHz (UHF)
SIGNAL LEVEL:
-15 ~ -70 dbm
DE CODER
Video decoder
Audio decoder
VIDEO FORMATS
MODULATION
VIDEO OUTPUT
INPUT RATE
MAX. 48Mbit/s
4:3/16:9 SWITCHABLE
HDMI, SCART
QPSK,16QAM,64QAM
CO NNECTIO N
MAIN POWER CABLE
TUNER
SCART
SPDIF
FIXED TYPE
ANTENNA INPUTx1, RF OUTPUT x1
COAXIAL x1
PO WER SUPPLY
INPUT VOLTAGE
220-240V~, 50/60Hz
TO TV x1
1
English
16
MPEG-2 MP@HL, AVC/H.264 HP @L4.1
MPEG-4 ASP SUPPORTED
MPEG-1 Layer 1,2/PCM/HE-AAC V1.0
ICE958 SPDIF/DOLBY D+/DOLBY D
SPECIFICATIONS
Design and specifications ar e subject to change without notice.
NOTE:
HDMI
HDMI OUTPUT x1
DATA PORT
USB slot
ANALOG AUDIO OU TPUT
Down Mix Stereo output (Left and Right) x1
Manufactured under license from Dolby Laboratories. Dolby and
the double-D symbol are trademarks of Dolby Laboratories.
DE CLARATION OF CON FO RMITY
Hereby, the company ABACUS Electric s.r.o. declare s that EVOLVEO Delta HD
(EAN: 8594161336983) is in compliance with the requirements of the norms and regulations,
relevant for the given type of device.
The complete text of Declaration of Conformity can be found on ftp://ftp.evolveo.com/ce
Copyright © Abacus Electric s.r.o.
www.evolveo.com
All rights reserved.
Design and specification can b e changed without prior notice.
 Loading...