

Page 1

USER MANUAL
BAMBOO GTR
CARBON GTR
Page 2

CONGRATULATIONS ON
YOUR PURCHASE!
From all of us at Evolve, we wanted
to thank you for choosing us. We are
stoked to welcome you to the Evolve
community!
Evolve Skateboards are an exciting
product and will provide you with endless
fun. Please read ALL the information
below before you begin using your
equipment.
WWW.EVOLVESKATEBOARDS.COM
Page 3

Page 4

CONTENTS
BAMBOO GTR 6
CARBON GTR 8
FOOT PLACEMENT 10
REMOTE 11
DO NOT RIDE BEFORE READING 12
WARNING MESSAGES 14
CHARGING THE BOARD 16
CHARGING THE REMOTE 17
TURNING THE BOARD ON / OFF 18
TURNING THE REMOTE ON / OFF 19
REMOTE SCREEN GUIDE 21
REMOTE MENU CONTROLS 22
PAIRING/SYNCING THE REMOTE 23
CHANGING SPEED MODES ON THE REMOTE 24
SAFETY SWITCH 26
HOW TO ACCELERATE 27
HOW TO BRAKE 28
Page 5

CONTROLLING THE BOARD 29
CHANGING WHEEL AND GEAR SETTINGS 30
SELECT KMH OR MPH 31
BATTERY INDICATOR DISPLAY 32
CHANGE BATTERY INDICATOR DISPLAY 33
LOW BATTERY WARNINGS ON THE REMOTE 34
TRIP METER 35
AUTO SAFE FUNCTION 36
POWER SAVE FUNCTION 37
SPEED LIMITER 38
R2 TRIGGER RESET PROCEDURE 39
OTHER REMOTE OPERATION FUNCTIONS AND TIPS 42
HEAT PROTECTION WARNING 43
ERROR CODES 44
MAINTENANCE GUIDE 45
BATTERY CARE 46
TROUBLE SHOOTING 47
Page 6
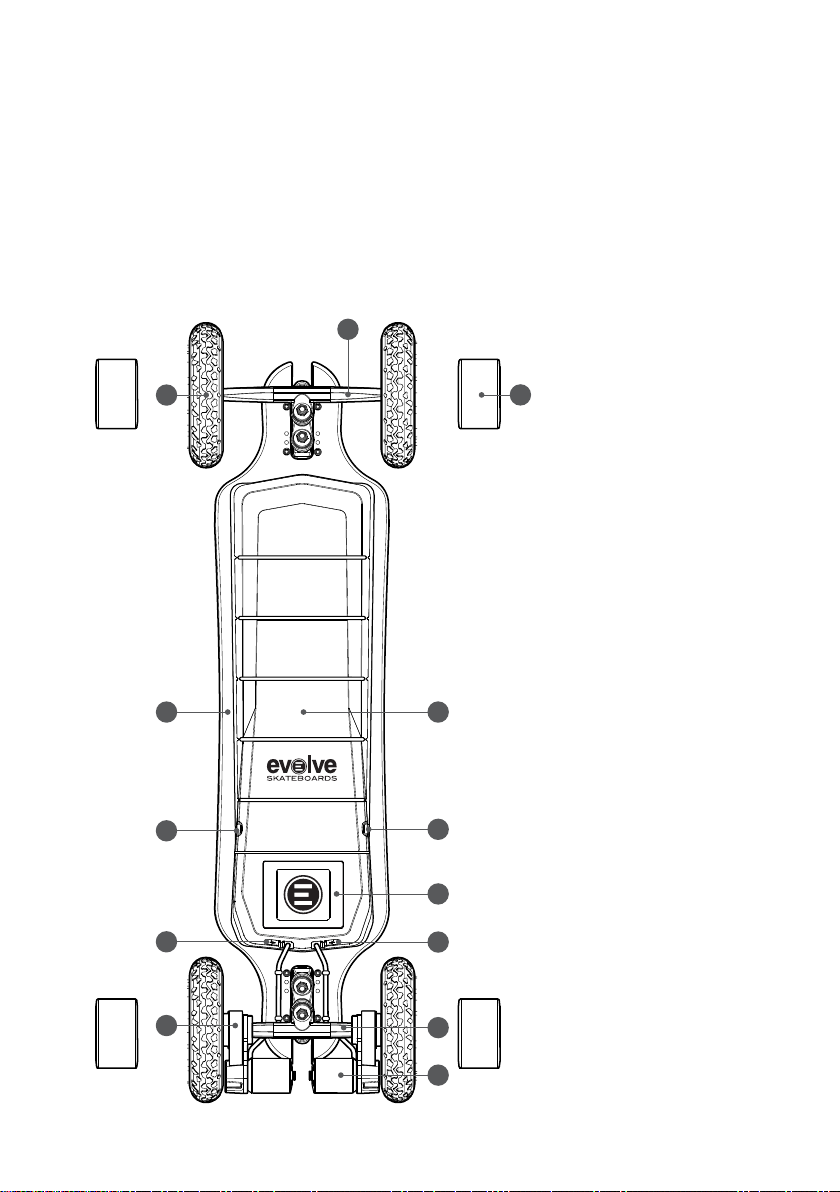
BAMBOO GTR
6
11
12
1. Battery
2. Motor Controller
3. Charger port
4. ON/OFF switch
5. USB ports
10
1
6. Front truck
7. Rear truck
8. Motors
4
3
9. Belt
10. Deck
2
11. All Terrain Wheels
5
5
12. Street Wheels
9
7
8
/6
Page 7
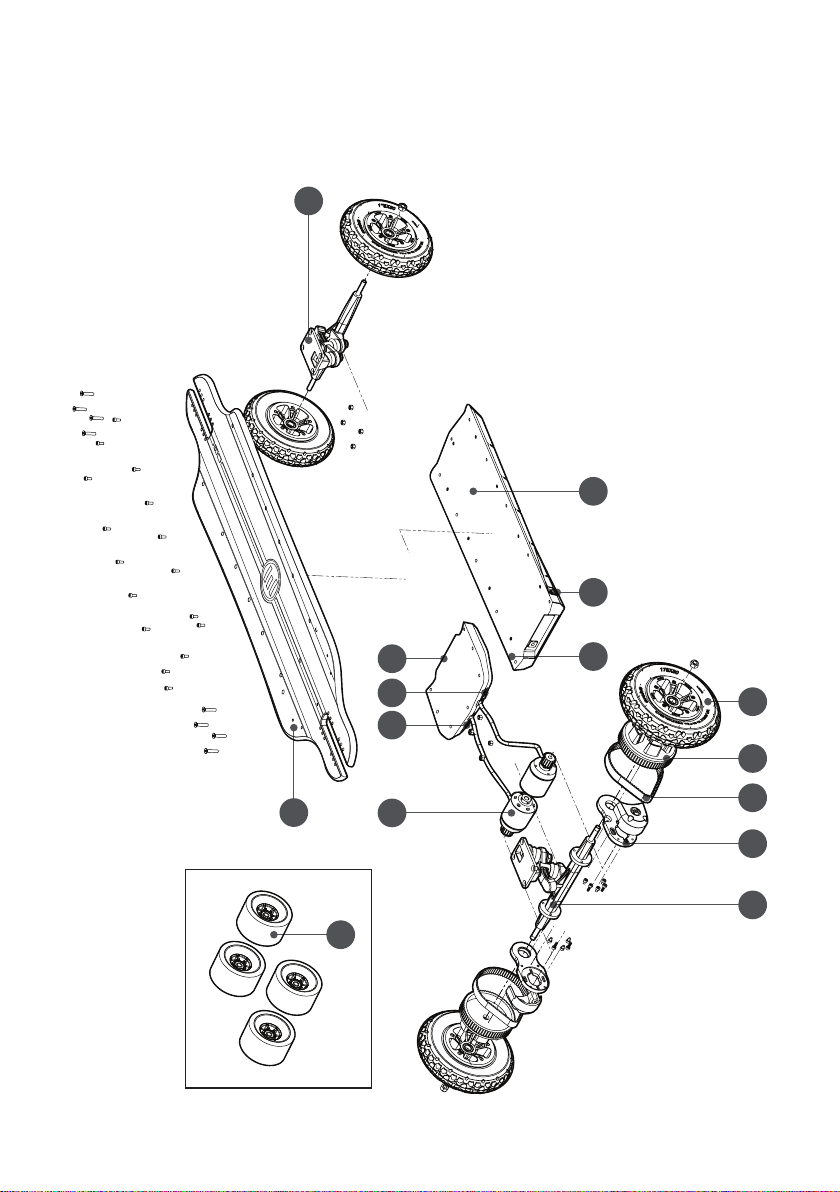
Wheels
Wheels
8. Motors
9. Belt
10. Deck
11. Motor Plate
12. Drive Gear
13. All Terrain
6
14. Street
10
Controller
1. Battery
2. Motor
8 255
3. Charger port
4. ON/OFF
4 13
switch
5. USB ports
6. Front truck
7. Rear truck
13
12
9
11
7
14
BAMBOO GTR
/7
Page 8
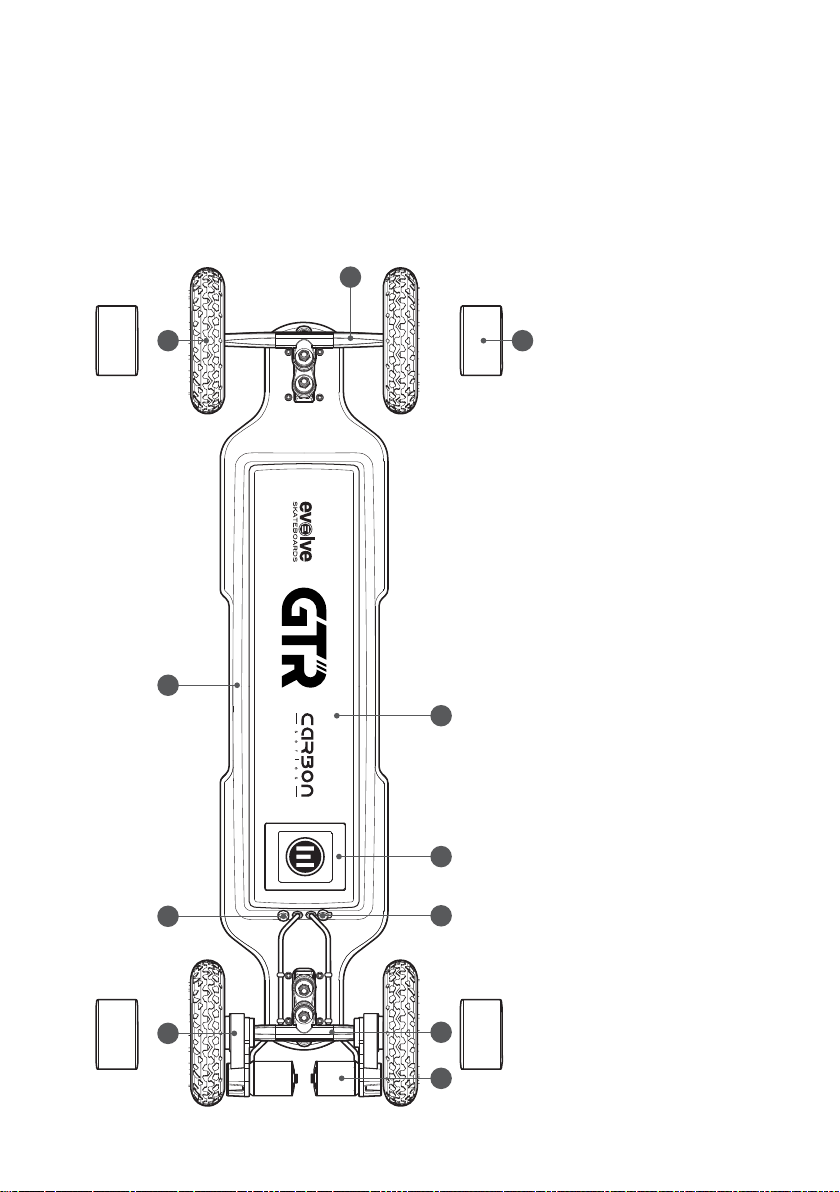
CARBON GTR
5
10 11
9
1
1. Battery
2. Motor Controller
3. ON/OFF switch
4. Charger port
5. Front truck
6. Rear truck
7. Motors
8. Belt
9. Deck
2
10. All Terrain Wheels
3
8
4
6
7
/8
11. Street Wheels
Page 9
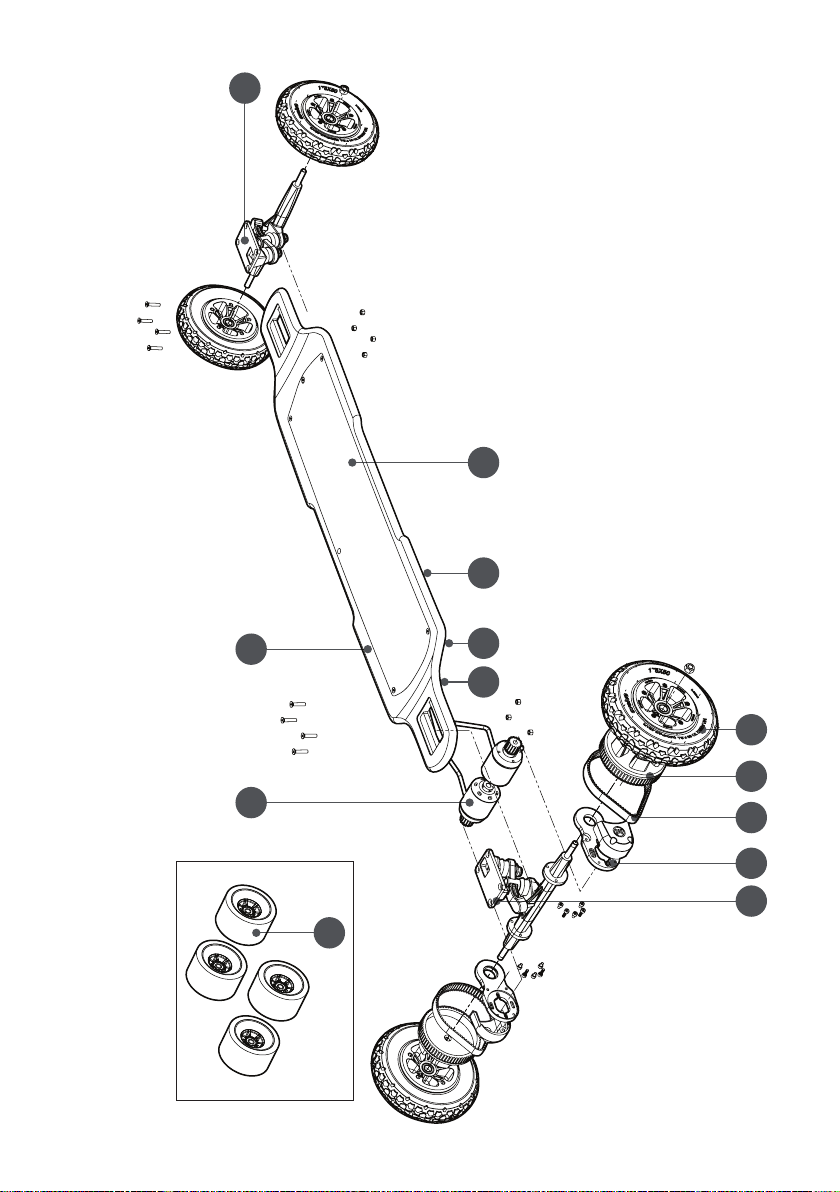
5
Wheels
Wheels
8. Deck
9. Motor Plate
10. Belt
11. Drive Gear
12. All Terrain
13. Street
Controller
switch
1. Battery
2. Motor
3. ON/OFF
4. Charger port
5. Front truck
6. Rear truck
7. Motors
34 12
7 8
13
CARBON GTR
/9
121110
96
Page 10
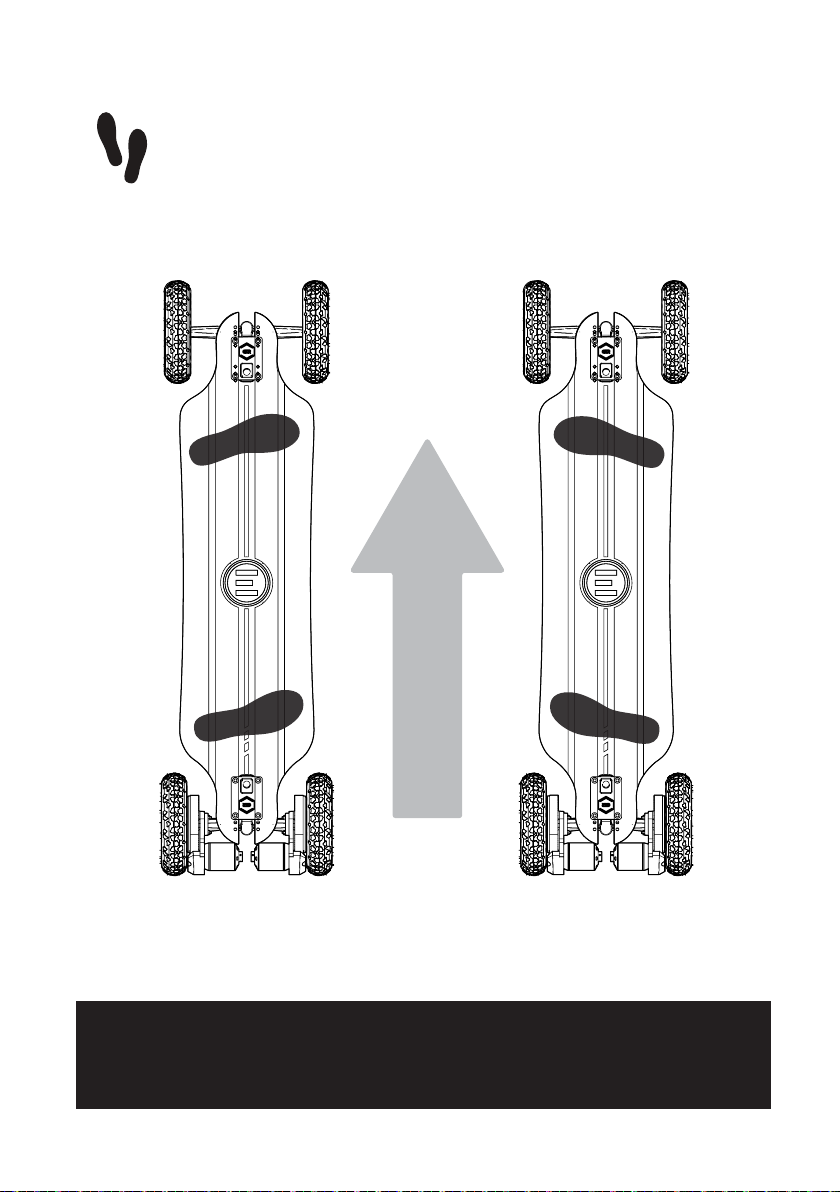
FOOT PLACEMENT
L
R
DIRECTION OF TRAVEL
R
L
REGULAR GOOFY
FOOT PLACEMENT DOES VARY PERSON TO PERSON. THE CLOSER YOUR FRONT
FOOT IS TO THE FRONT TRUCK, THE MORE CONTROL YOU WILL HAVE.
/10
Page 11
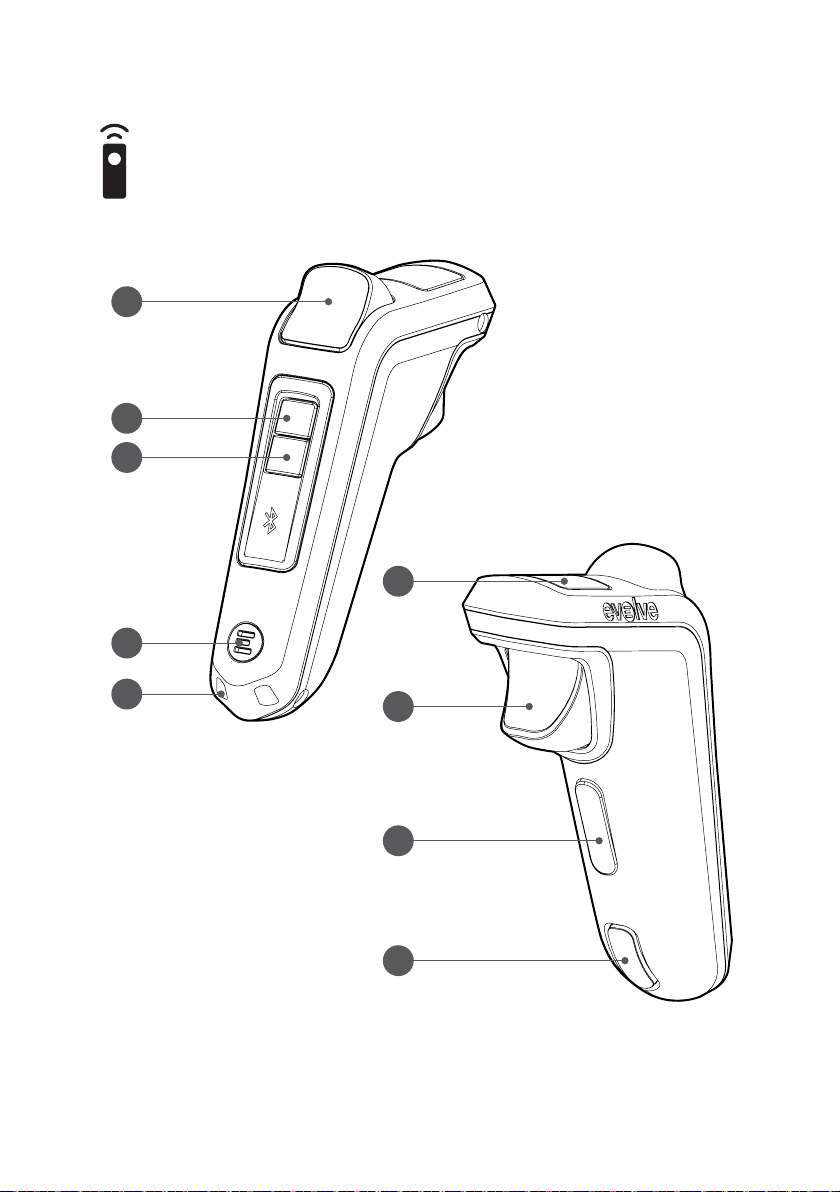
REMOTE
A
B
C
D
F
E
A. Brake
B. Mode 1 Button
C. Mode 2 Button
D. On/Off Button
E. Lanyard Loop
F. LCD Screen
G. Accelerator
H. Safety Switch
I. Charge Port
G
H
I
/11
Page 12
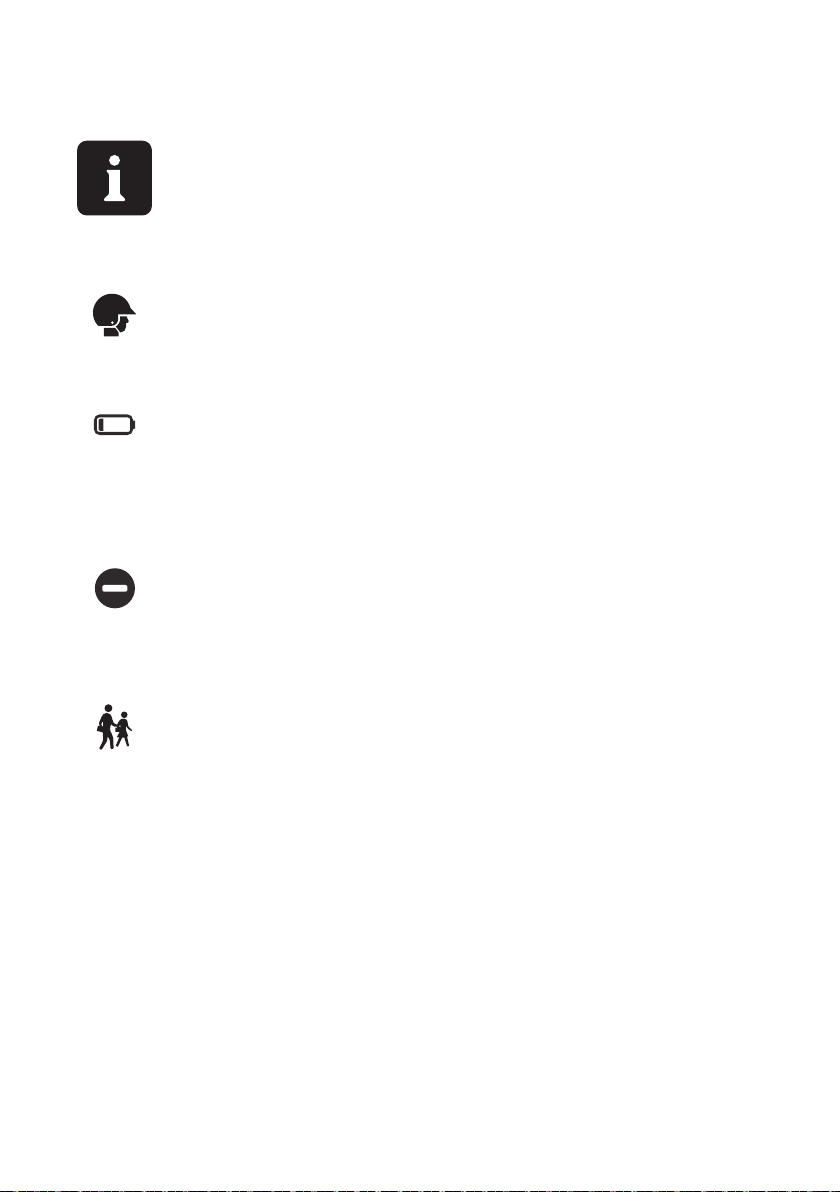
DO NOT RIDE BEFORE READING
ALWAYS wear a helmet and relevant safety equipment
when riding the board.
ALWAYS ride your board at speeds at which you are
comfortable without power or brakes. Due to a low
battery on your board or remote your board can lose
brakes and power during your ride.
ALWAYS obey and check the local road rules in your
area for where you can ride. Do not ride on busy roads
with line markings.
ALWAYS respect pedestrians!!!
/12
Page 13
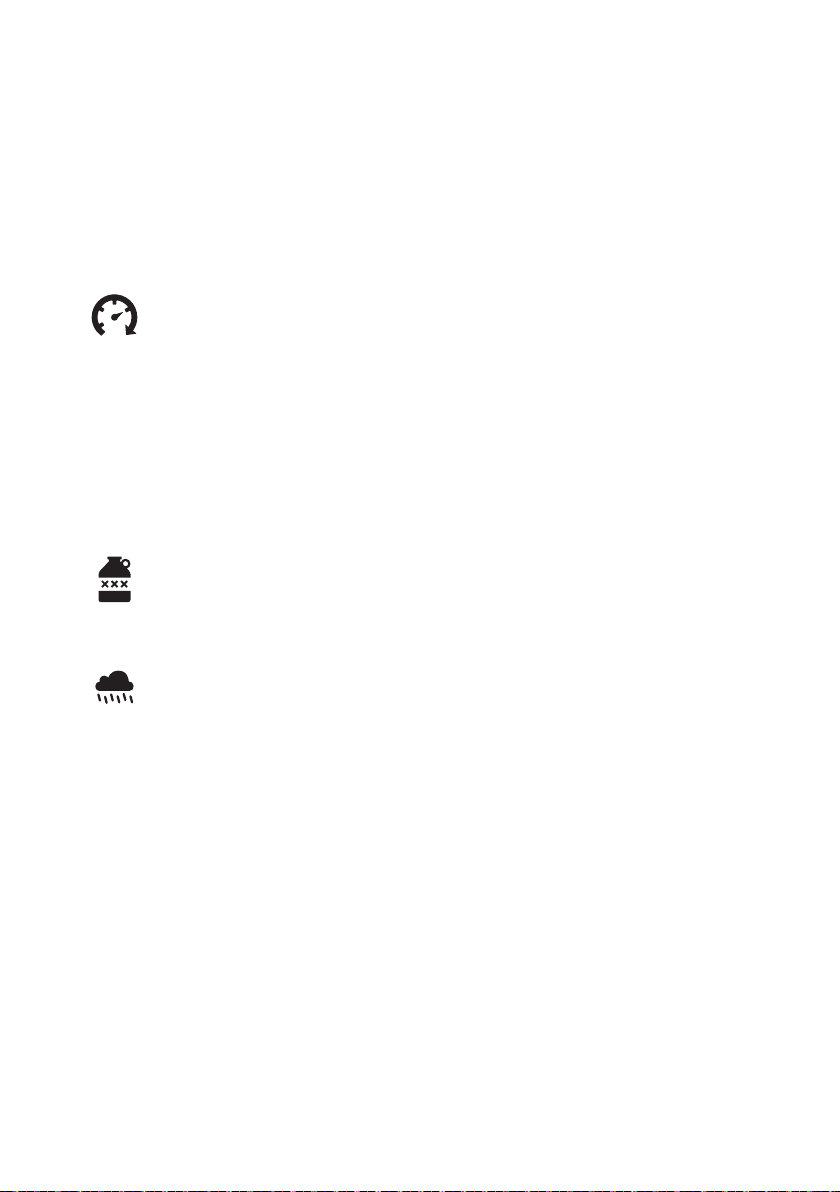
PRO and GTR modes are very powerful and the remote
acceleration and brakes are highly sensitive. Be sure
to be very gentle with these controls to avoid being
thrown off the board.
Start by trying to move as slowly as possible within
these speed modes while using both the brake and
accelerator.
DO NOT RIDE the board if you are under the inuence
of drugs or alcohol.
DO NOT RIDE the board in wet conditions. The board
may slide from under your feet causing injury.
/13
Page 14
WARNING MESSAGES
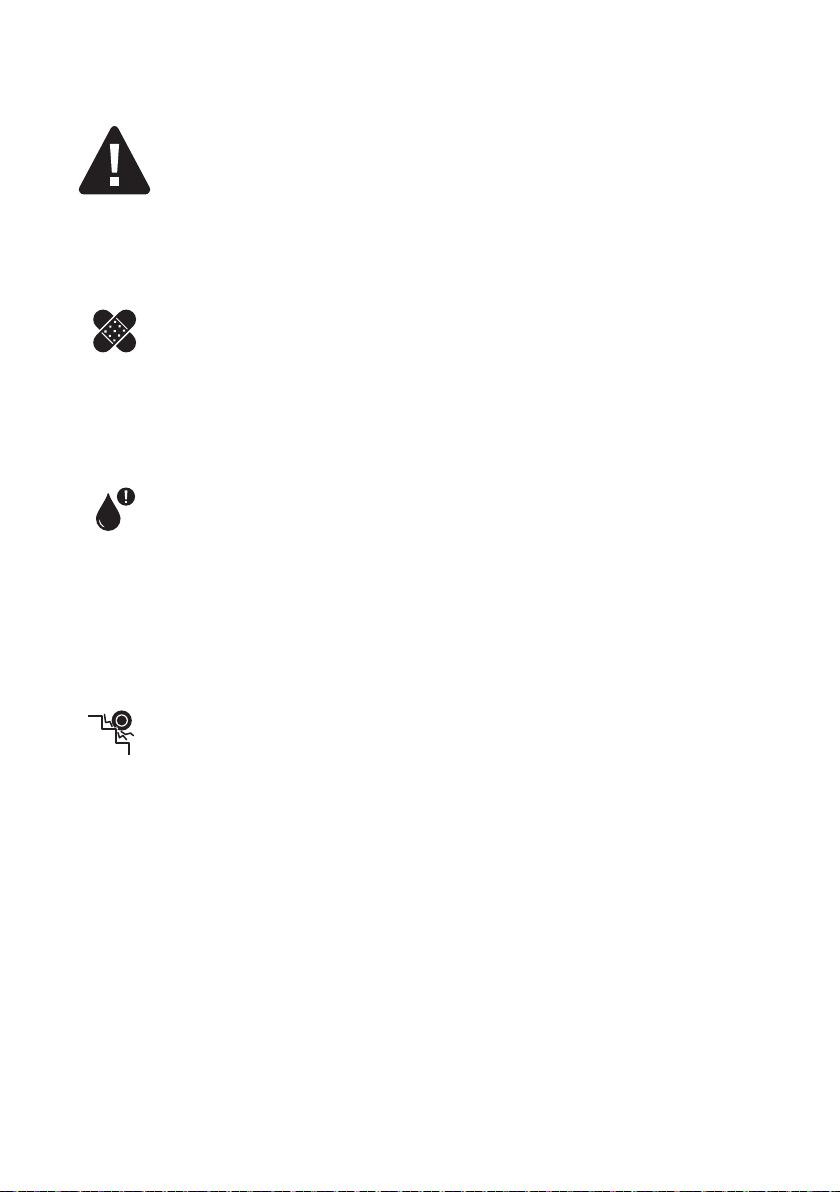
INJURIES
Whenever you ride an Evolve board, you risk serious
injury or even death from loss of control, collisions or
falls. To ride safely, you must read ALL instructions,
safety messages and warnings in this manual.
AVOID WATER
The board is not waterproof. The electronics, bearings
and other components may be damaged due to water.
Riding in wet conditions is very dangerous and may
cause injury.
WATER DAMAGE IS NOT COVERED BY WARRANTY.
ABUSE
Do not jump on the board, do not ride off gutters or
curbs, do not smash the board into hard objects, do
not drop the board on the ground for starting operation.
Although the product has been made to handle rigorous
riding, it is still an electrical product and needs to be
handled with care and respect.
ABUSE TO THE BOARD AS LISTED ABOVE IS NOT
COVERED BY WARRANTY.
/14
Page 15

RIDING ON HILLS
Riding on hills can be extremely dangerous; what goes
up must come down! So if you ride up an insanely
steep hill and you intend to ride down this same hill,
you must know how to control your speed without the
use of the electric brakes. This is because there could
be a malfunction with the brakes.
Although the GTR boards can climb hills of up to
25-degree gradient, riding continuously on an insanely
steep hill will put massive stress on the electronics.
We have installed current protections within our
electronics, however if you feel the board slowing down
on a steep hill this is because the protection is kicking
in and giving you warning it’s working too hard. At
this time, you must consider stopping to avoid risking
damage to the electronics.
DAMAGE TO ELECTRONICS THROUGH STRAIN ON
MOTORS IS NOT COVERED BY WARRANTY.
/15
Page 16
CHARGING THE BOARD
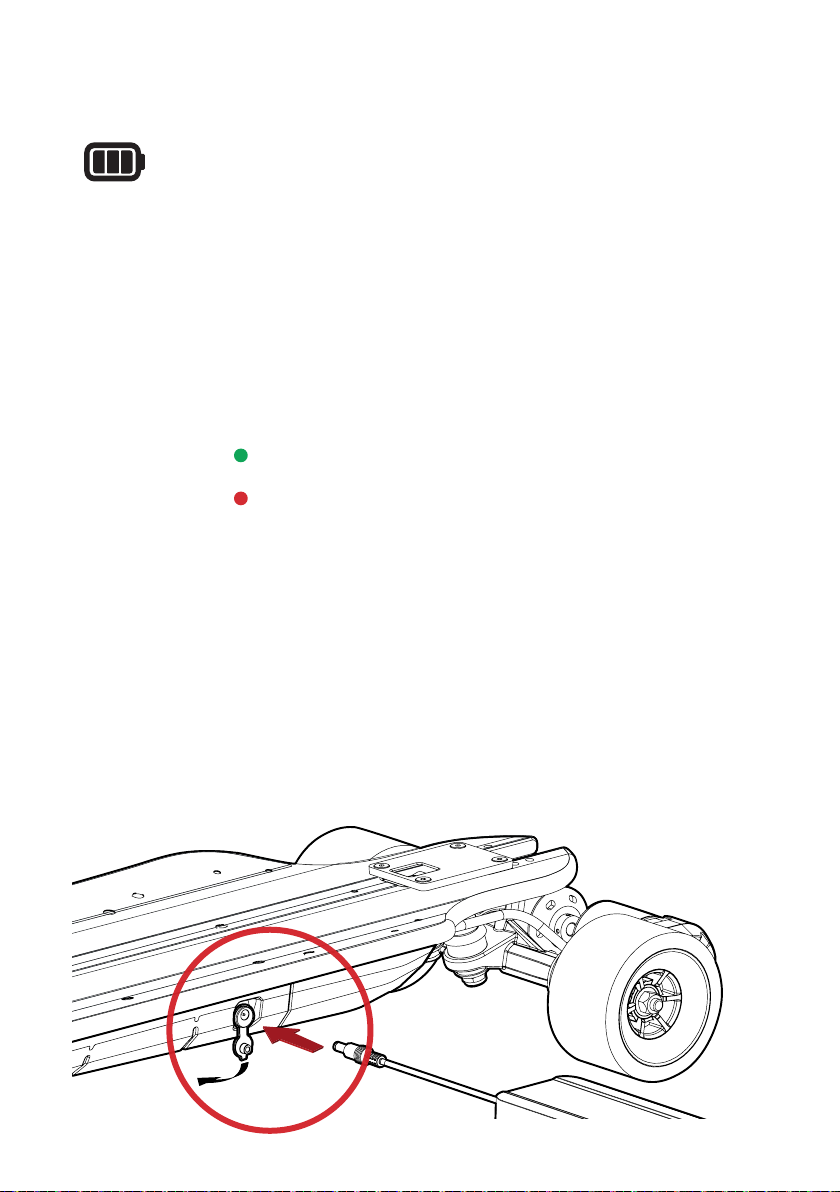
BEFORE USING the board, allow the battery to be FULLY
CHARGED.
Connect power to the charger by inserting the charger plug
into a power point. Now remove the rubber grommet from the
charger port on the board and insert the charger plug.
The charger will show:
GREEN LIGHT = FULLY CHARGED
RED LIGHT = CHARGING
Once the board is fully charged (the light on the charger will
turn green) remove the charge plug from the board, re-install
the rubber grommet on the board and remove the plug from the
power point.
/16
Page 17
CHARGING THE REMOTE
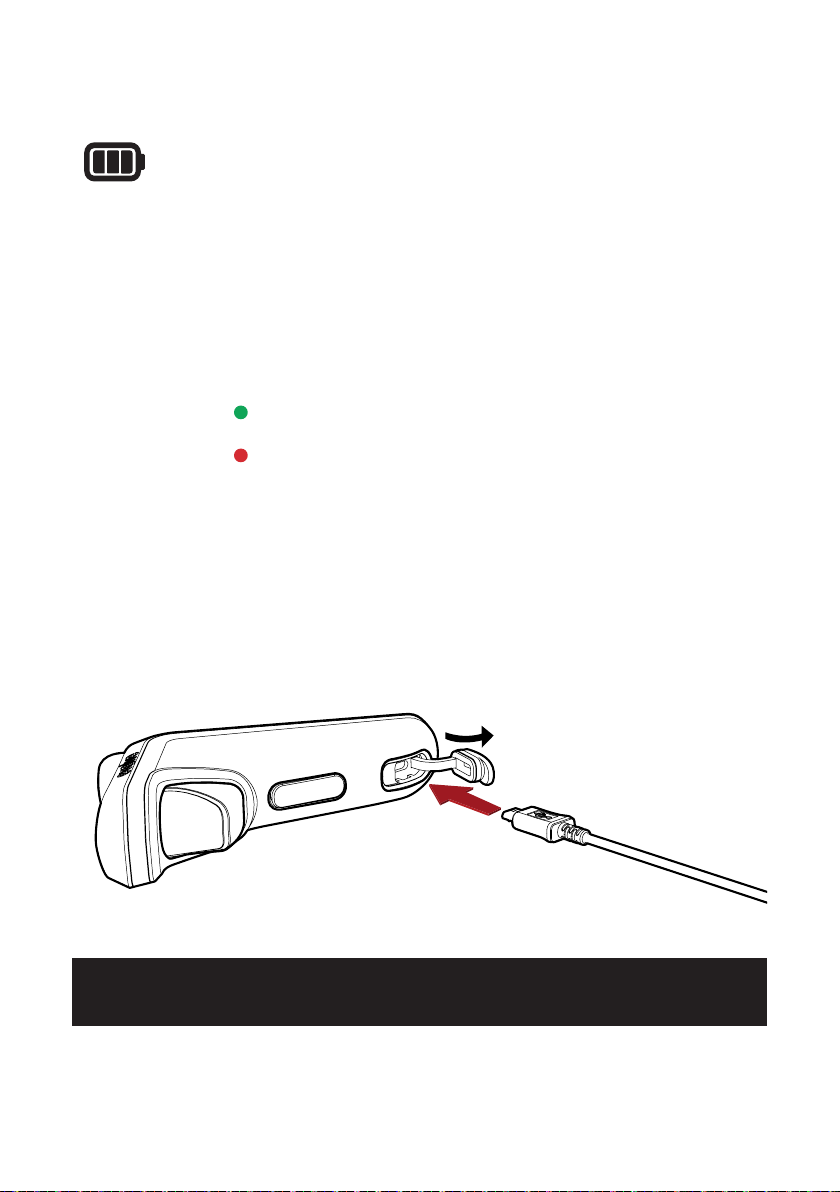
To charge the remote, simply dislodge the rubber grommet
covering the charge port and insert the Micro-USB plug of the
charge cable carefully into the charge port of the remote, and the
USB plug end into a suitable USB port.
The remote will show:
GREEN LIGHT = FULLY CHARGED
RED LIGHT = CHARGING
Once the remote is fully charged remove the Micro-USB plug
from the remote and re-install the rubber grommet on the
remote.
NOTE - THE REMOTE MAY NOT COME FULLY CHARGED.
/17
Page 18
TURNING THE BOARD ON / OFF
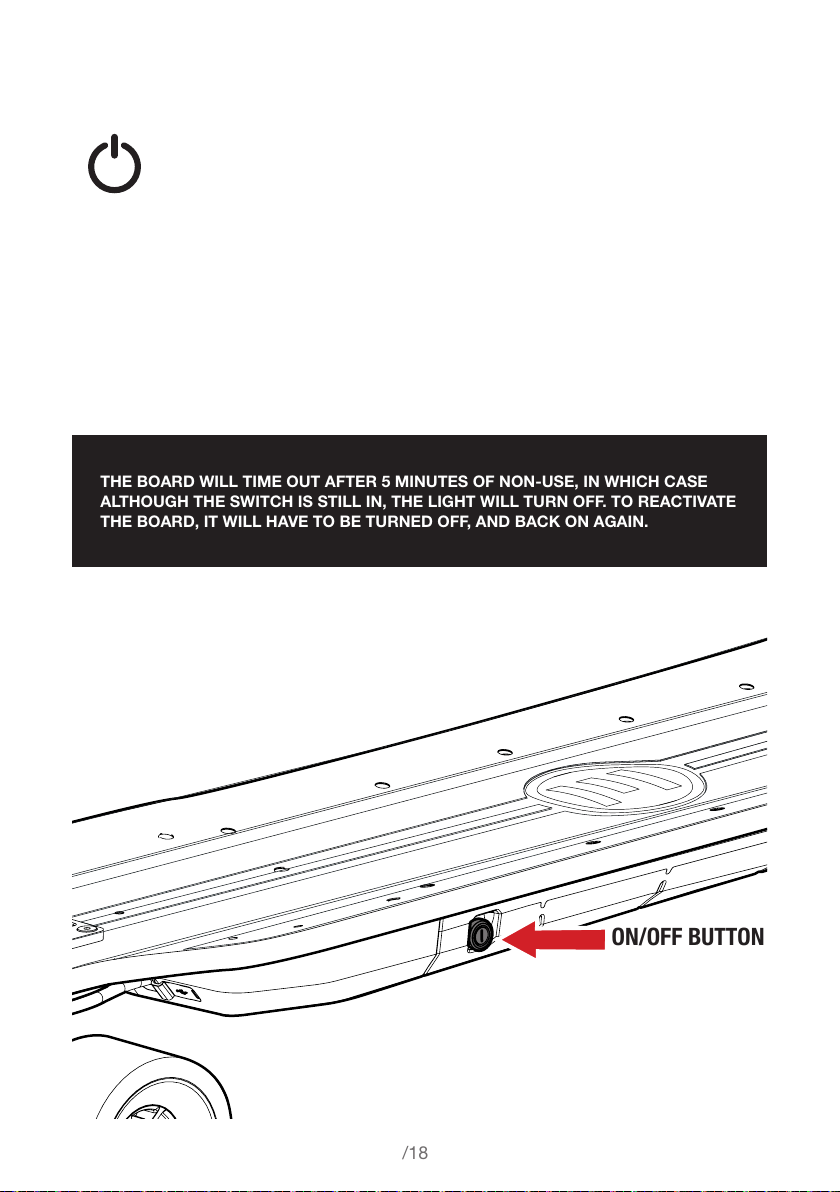
To turn the board on, press the ON/OFF BUTTON in. It will
illuminate to a solid blue light indicating the board is on.
To turn the board off, simply press the ON/OFF BUTTON in
again and the light will turn off as the button returns to the off
position.
THE BOARD WILL TIME OUT AFTER 5 MINUTES OF NON-USE, IN WHICH CASE
ALTHOUGH THE SWITCH IS STILL IN, THE LIGHT WILL TURN OFF. TO REACTIVATE
THE BOARD, IT WILL HAVE TO BE TURNED OFF, AND BACK ON AGAIN.
/18
ON/OFF BUTTON
Page 19
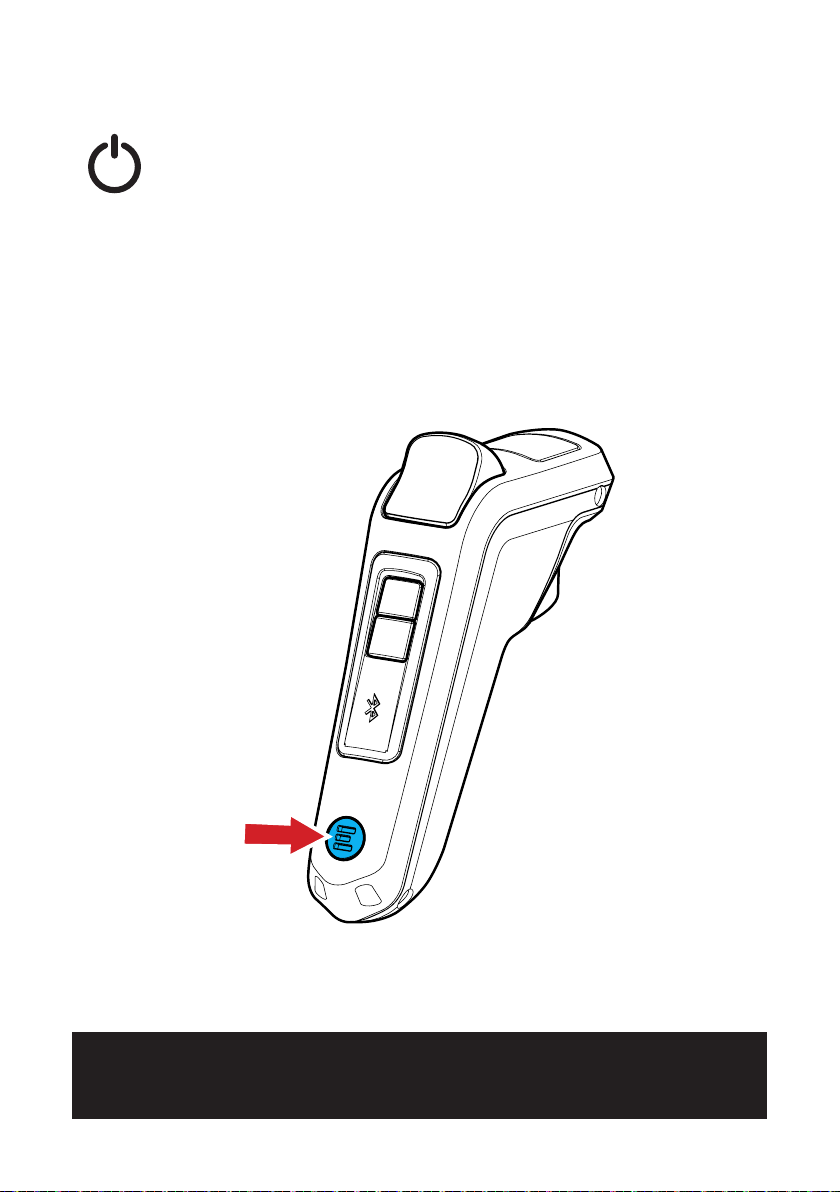
TURNING THE REMOTE ON / OFF
To turn the remote ON, quickly press the ON/OFF BUTTON one
time, the remote will vibrate once and the LCD screen will power
on, displaying the Evolve logo. The ON/OFF BUTTON will light
up on the remote and display the default screen.
To turn the remote off, press and hold the ON/OFF BUTTON for
one second or until the screen and ON/OFF light turn off.
ON/OFF BUTTON
FOR BEST CONNECTION, TURN THE BOARD ON 1ST AND THE REMOTE 2ND.
/19
Page 20
Page 21
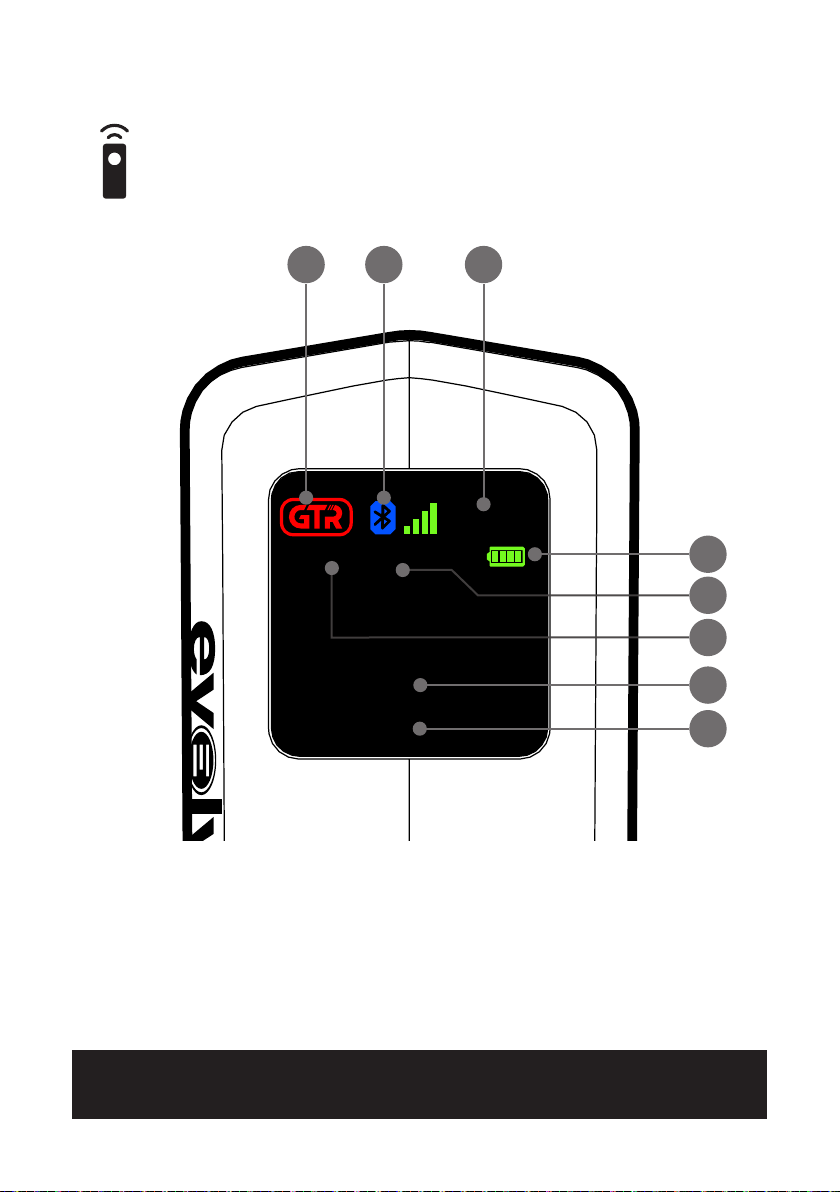
REMOTE SCREEN GUIDE
A
175mm
Trip:
B C
90%
66T
0
0.0 km
km/h
D
E
F
G
H
A. Speed mode
B. Bluetooth Connection
C. Board Battery
D. Remote Battery
NOTE – DEFAULT SCREEN SHOWN
E. Gear Setting
F. Wheel Setting
G. Speedometer
H. Trip Meter
/21
Page 22
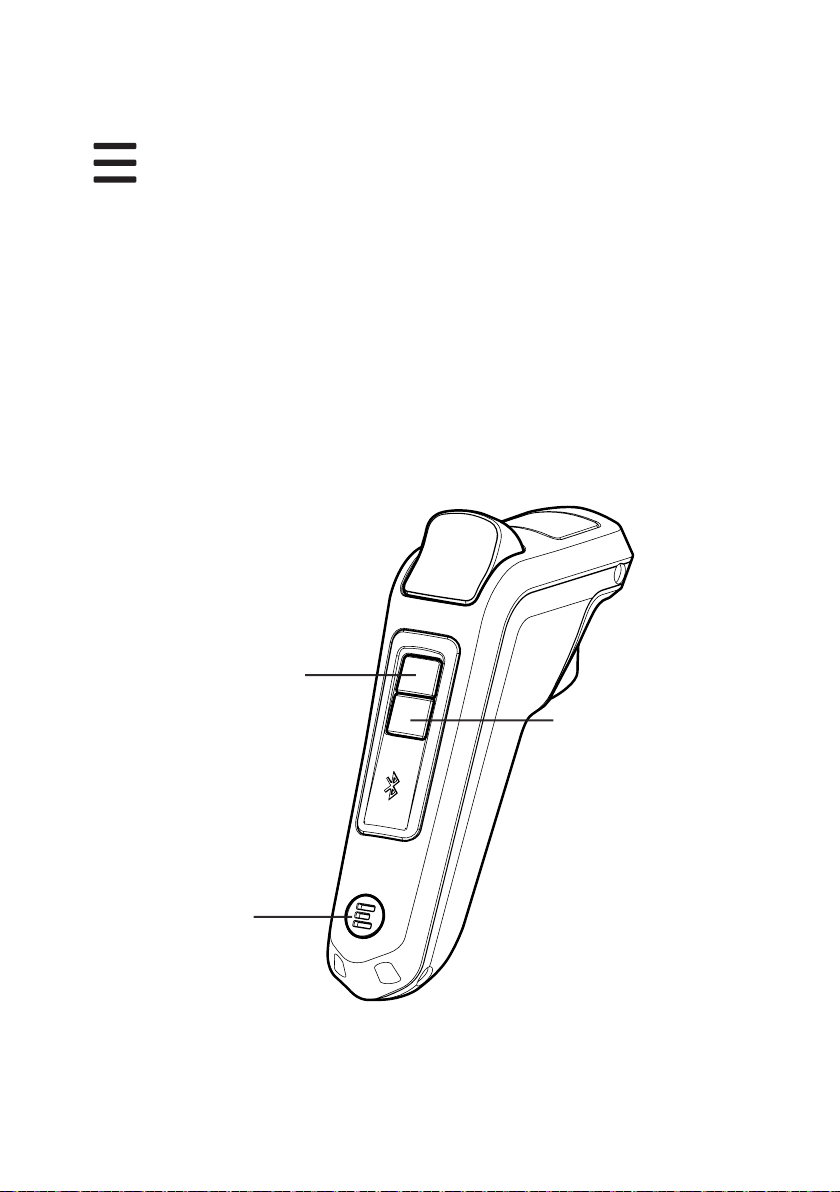
REMOTE MENU CONTROLS
To access the menu, turn the remote on, then double tap the
ON/OFF BUTTON.
When in the menu use MODE 1 and MODE 2 to navigate/scroll
through menu lists.
Use the ON/OFF BUTTON to conrm selections.
MODE 1
BUTTON
Scroll Up
ON/OFF
BUTTON
Confirm Selection
MODE 2
BUTTON
Scroll Down
/22
Page 23
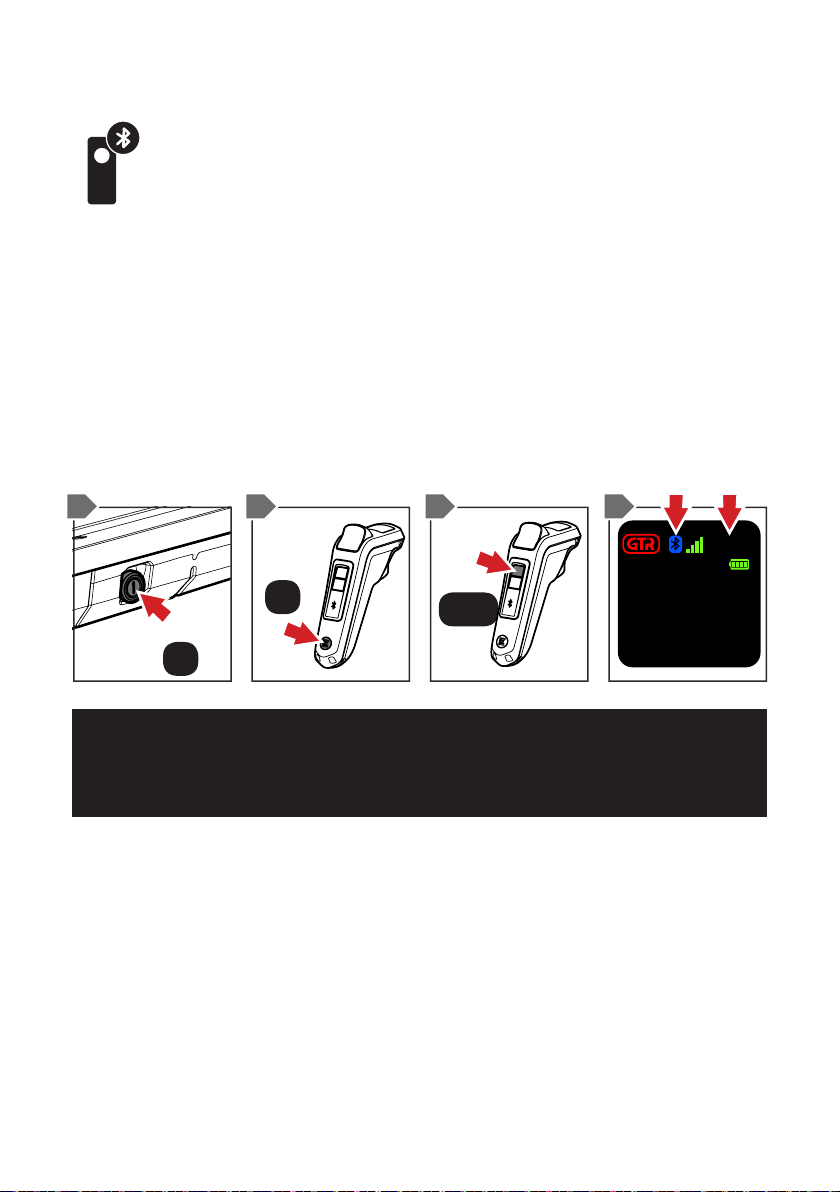
PAIRING / SYNCING THE REMOTE
1. Turn the skateboard on.
2. Turn the remote on.
3. Press and hold the MODE 1 BUTTON on the remote for one
second or until the Bluetooth symbol begins to ash.
4. Once paired, the Bluetooth symbol will switch to a solid
symbol and the battery display will show a reading. This
means you are ready to ride!
1 2 43
66T
0
0.0 km
90%
km/h
ON / OFF
x1
ON / OFF
x1
NOTE – ONCE THE REMOTE AND BOARD ARE SYNCED TOGETHER, THE NEXT
TIME YOU USE YOUR BOARD IT WILL AUTOMATICALLY SYNC. THERE ARE ALSO
BARS NEXT TO THE BLUETOOTH SYMBOL TO INDICATE SIGNAL STRENGTH.
MODE 1
1 Sec
17 5mm
Trip:
TIP – Make sure not to touch the acceleration or brake triggers
as the remote is pairing to the board. Once paired, lift the
wheels off the ground and accelerate. Then brake to test that
the control is clean and smooth. If there are any delays in the
control, turn both the board and remote off and retry the above
process.
/23
Page 24
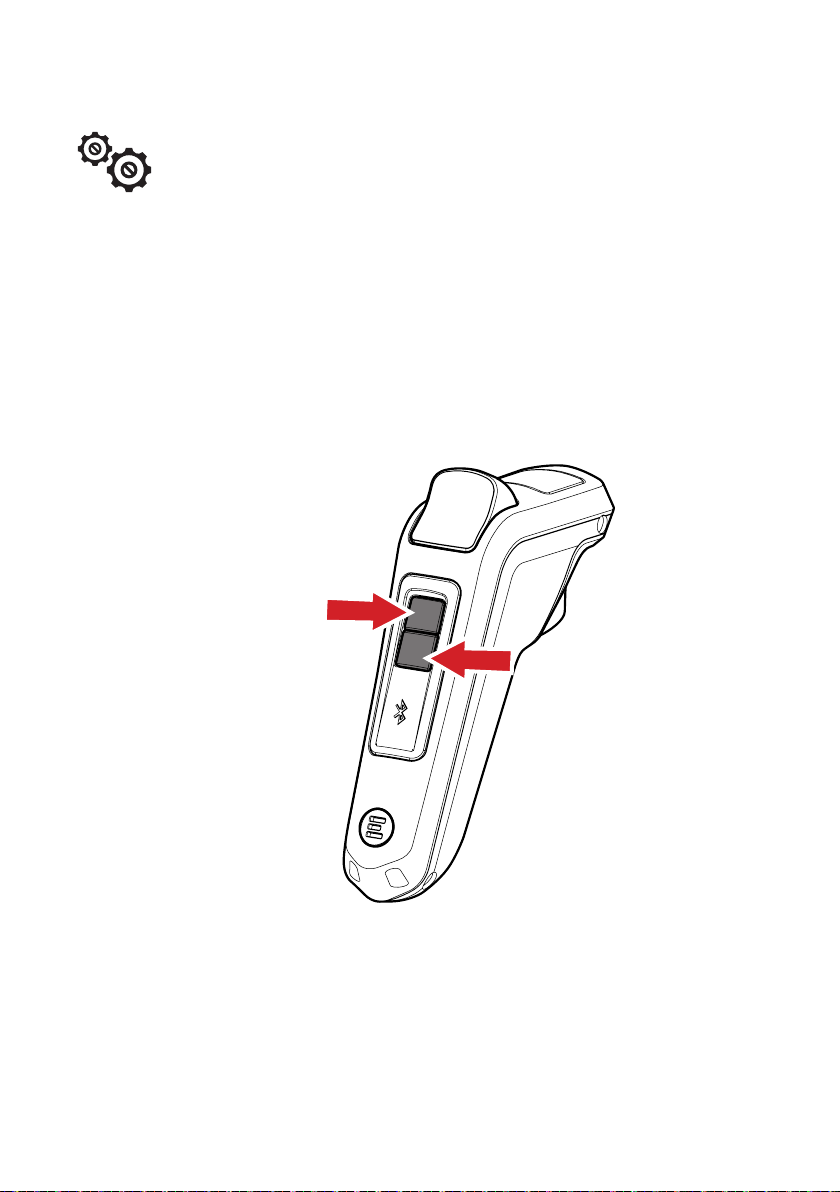
CHANGING SPEED MODES ON THE REMOTE
Once your remote is on and paired to your skateboard it will
begin in ‘SAFE MODE’ as the rst speed mode setting.
Now press either MODE 1 or MODE 2 button once, this will
change the speed from SAFE MODE to the previous speed
setting of your last ride.
MODE 1 BUTTON
MODE 2 BUTTON
Each time you press the MODE 1 BUTTON, this will INCREASE
the speed mode from ECO MODE through to CUST MODE.
Each time the MODE 2 BUTTON is pressed it will DECREASE
the speed mode from CUST MODE through to ECO MODE.
/24
Page 25
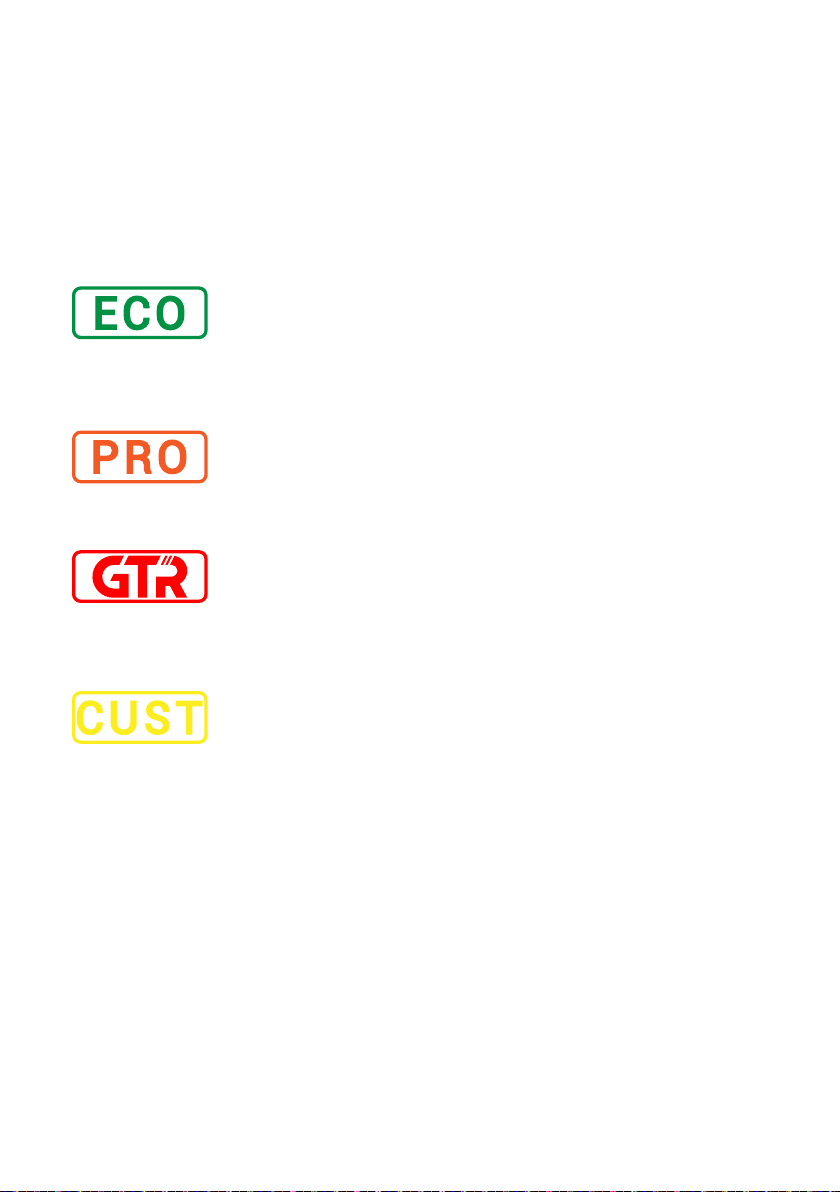
Each time you press the MODE 1 or MODE 2 button to change
your speed settings the remote will vibrate one time giving
warning the speed mode has changed.
The speed mode is clearly displayed in the top left corner of
your LCD screen.
ECO SPEED MODE
Economical cruising mode with 75% of top
speed. Best for beginners and longest ride
times.
PRO SPEED MODE
Fast acceleration, can reach top speed, good
for smaller hills and short grass.
GTR SPEED MODE
Insane acceleration, reaches top speed quickly,
will tackle any hill, dirt tracks and grassy
terrain.
CUSTOM SPEED MODE
Custom mode allows you to set the power
curve that’s just right for your riding style. The
power curve can be adjusted via the EXPLORE
BY EVOLVE APP which is available on the
ITUNES App Store or on the Android Play
Store.
TIP - Use the speed change buttons as you would gears on a
bike. Cycle through them according to the riding situation, for
example: Select PRO or GTR MODE for an approaching hill,
then cycle back down to PRO or ECO MODE once you have
reached the top of the hill. CUSTOM MODE is your individual
power curve preference, whether its weak acceleration or insane
acceleration, this is your go to mode that best suits your riding
experience.
/25
Page 26

SAFETY SWITCH
The SAFETY SWITCH is located under the accelerator trigger.
It must be pressed by your 2nd and/or 3rd nger as you engage
the accelerator trigger to begin riding. The speed mode display
on the LCD screen will turn a solid color once you press in the
SAFETY SWITCH.
IF YOU DO NOT PRESS THE SAFETY SWITCH IN AS YOU
ENGAGE THE ACCELERATOR TRIGGER, THE BOARD WILL
NOT MOVE.
Once you begin moving and reach speeds of 3-5km/hr or
above, you will be able to ride freely without engaging the
SAFETY SWITCH during acceleration, braking or neutral trigger
movements. When you come to a stop or reach 0km/hr, the
SAFETY SWITCH reactivates. You must press in the SAFETY
SWITCH the next time you wish to use the accelerator trigger
again.
The SAFETY SWITCH can be disabled or re-enabled by going
to the ‘Options’ menu and changing ‘Dead Man’ to ‘off’ or ‘on’.
/26
Page 27
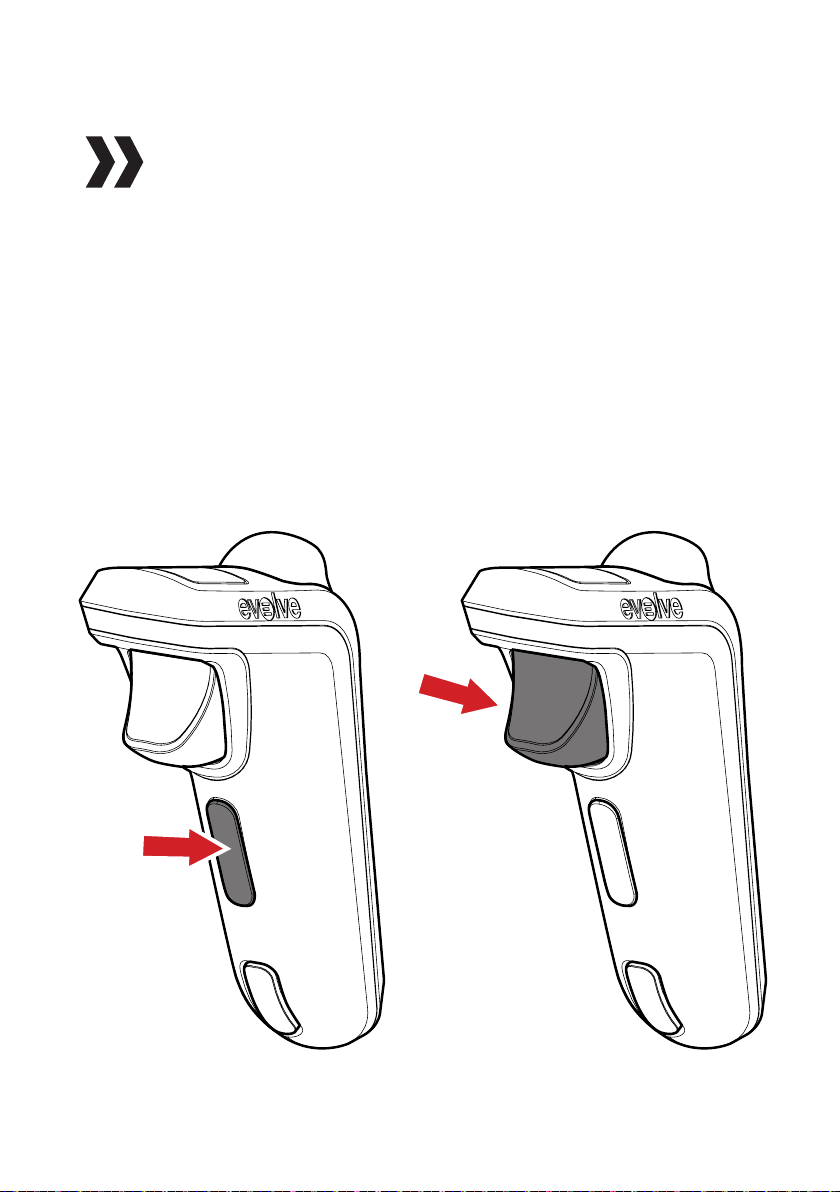
HOW TO ACCELERATE
With the safety switch depressed, pull the ACCELERATOR
trigger slowly and you will begin to move forward. The further
you pull the trigger in, the faster you will go.
Once over 5km/h you can release the safety switch. For more
information refer to the SAFETY SWITCH section.
TIP - Have your weight positioned on the front foot when you
accelerate, this stops the board flying out from under your feet!
SAFETY
SWITCH
ACCELERATOR
/27
Page 28
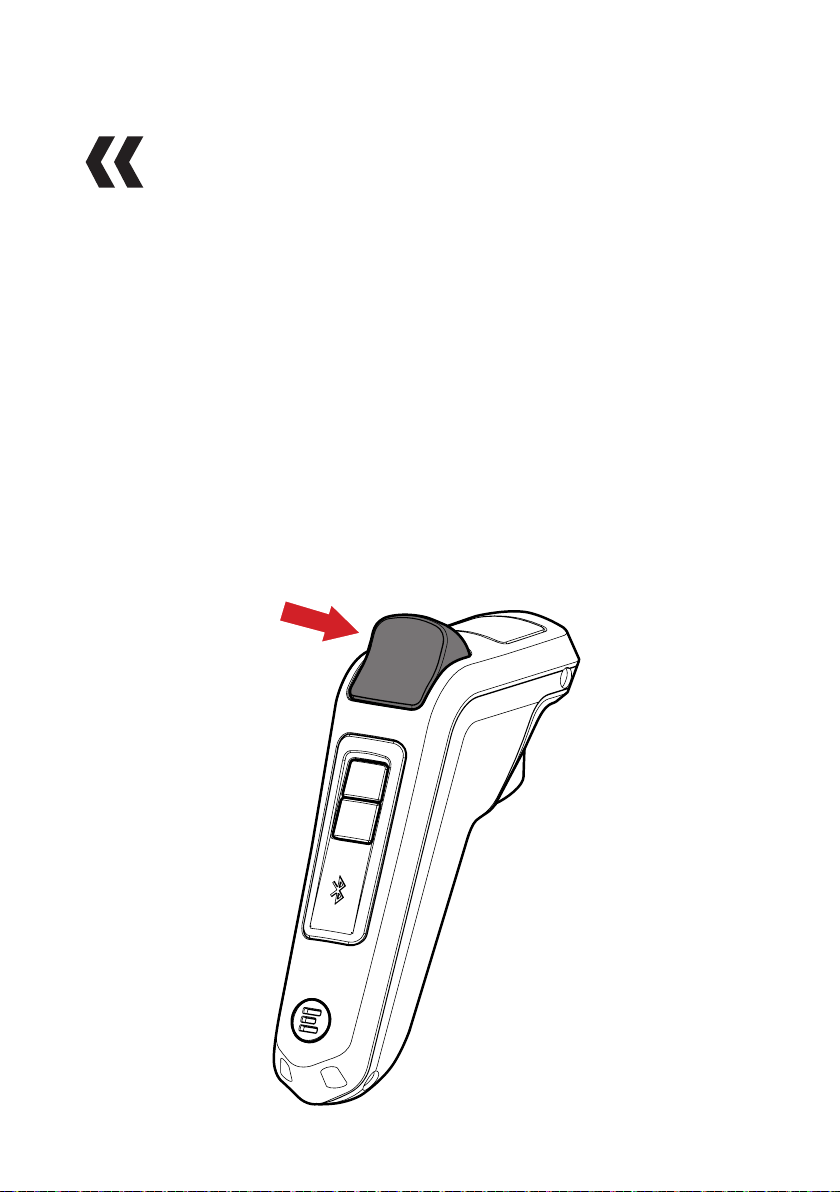
HOW TO BRAKE
Push the brake trigger forward SLOWLY and you will begin to
slow down. The further you push the trigger, the stronger the
braking will be.
When riding very slowly the brakes will be softer than when
you are riding at a higher speed. Have your weight on the back
foot when you apply the brake function to stop you from ying
forward when applying the brakes.
TIP – The brake trigger takes precedence over all other
remote functions and if pressed will cut acceleration, prevent
acceleration or changing modes and will not allow you to turn off
the remote.
BRAKE
/28
Page 29

CONTROLLING THE BOARD
The board is controlled by a combination of the rider and
remote. The rider operates the remote which controls
accelerating and braking.
Turning and stability is dependent on the rider.
To turn the board the rider must lean in the direction they wish to
turn. To keep stable, it is recommended to stay relaxed, so that
your body can absorb bumps and movements created by the
terrain or remote input.
It is recommended to move your weight toward your front foot
whilst accelerating and towards your rear foot whilst braking to
account for the forces created by such actions.
Evolve Skateboards highly recommend starting in ECO MODE
when learning to ride the board and use the remote. Be sure
to be very gentle with the trigger control to avoid being thrown
off the board. Start by trying to move as slowly as possible
within these speed modes when using both the brakes and
acceleration.
Slowly progress through the speed modes when comfortable.
PRO AND GTR MODES ARE VERY POWERFUL AND THE
TRIGGER IS HIGHLY SENSITIVE.
/29
Page 30
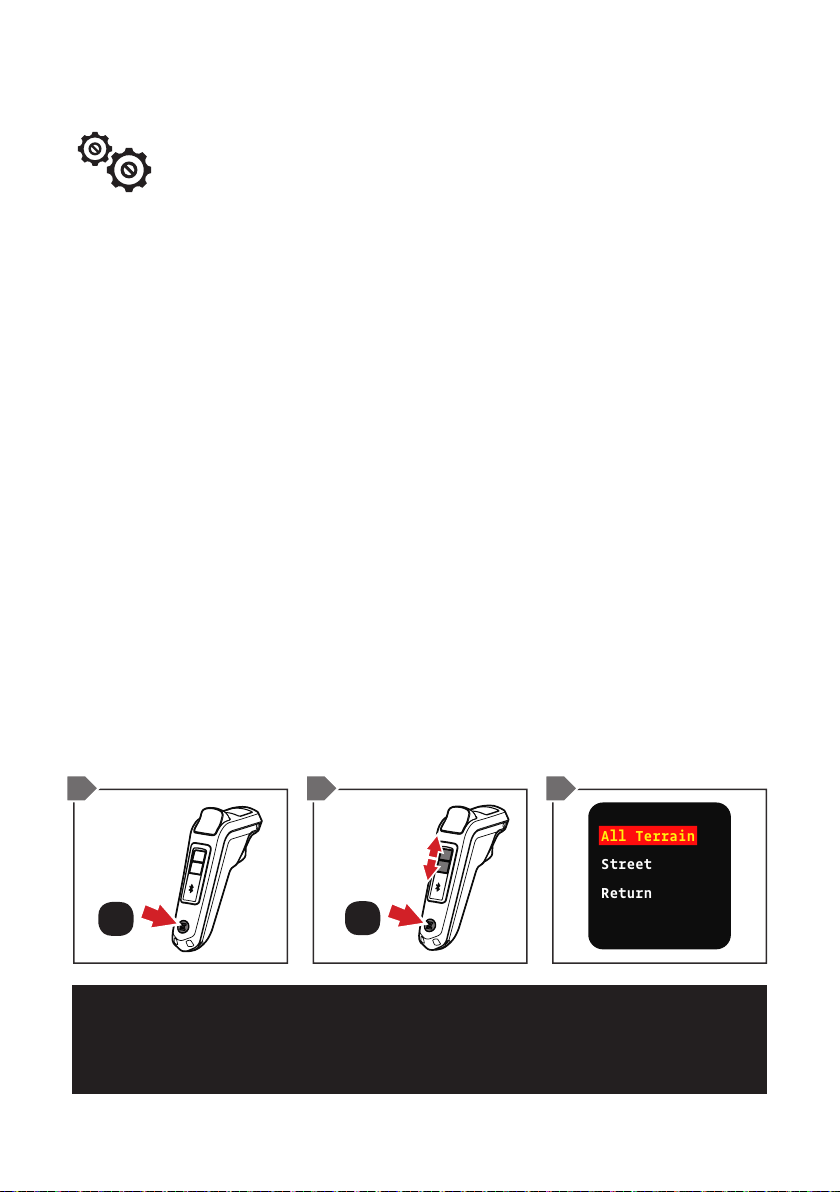
CHANGING WHEEL AND GEAR SETTINGS
All Terrain
Street
Return
Be sure to select the right wheel and gear combination you
are riding with, as this will give you an accurate speed and trip
distance display on your remote. The wheel and gear settings
are displayed in the top left corner of the LCD screen.
1. From the default screen, double-tap the ON/OFF BUTTON.
This will now display the menu screen.
2. Wheel Setting will be the rst option, press the ON/OFF
BUTTON to select it. The LCD screen will display All Terrain
wheel and gear sizes and Street wheel and gear sizes.
Conrm if you are using either All Terrain wheels or Street
wheels, then move the highlighted box to your selection by
pressing either MODE 1 or MODE 2 BUTTON then press the
ON/OFF BUTTON.
3. Use the MODE BUTTONs to scroll through to the correct
wheel and gear size. Press the ON/OFF BUTTON to select
correct wheel and gear option. Once selected you will now be
back in the default screen.
1 2/3 2
SCROLL
ON / OFF
x2
NOTE – THE STREET BOARDS ALL COME WITH 32T GEAR AS STANDARD. THE
AT BOARDS COME WITH 66T GEAR AS STANDARD. OTHER GEAR SIZES AND
WHEELS ARE AVAILABLE ON EVOLVE WEBSITES.
ON / OFF
x1
/30
Page 31
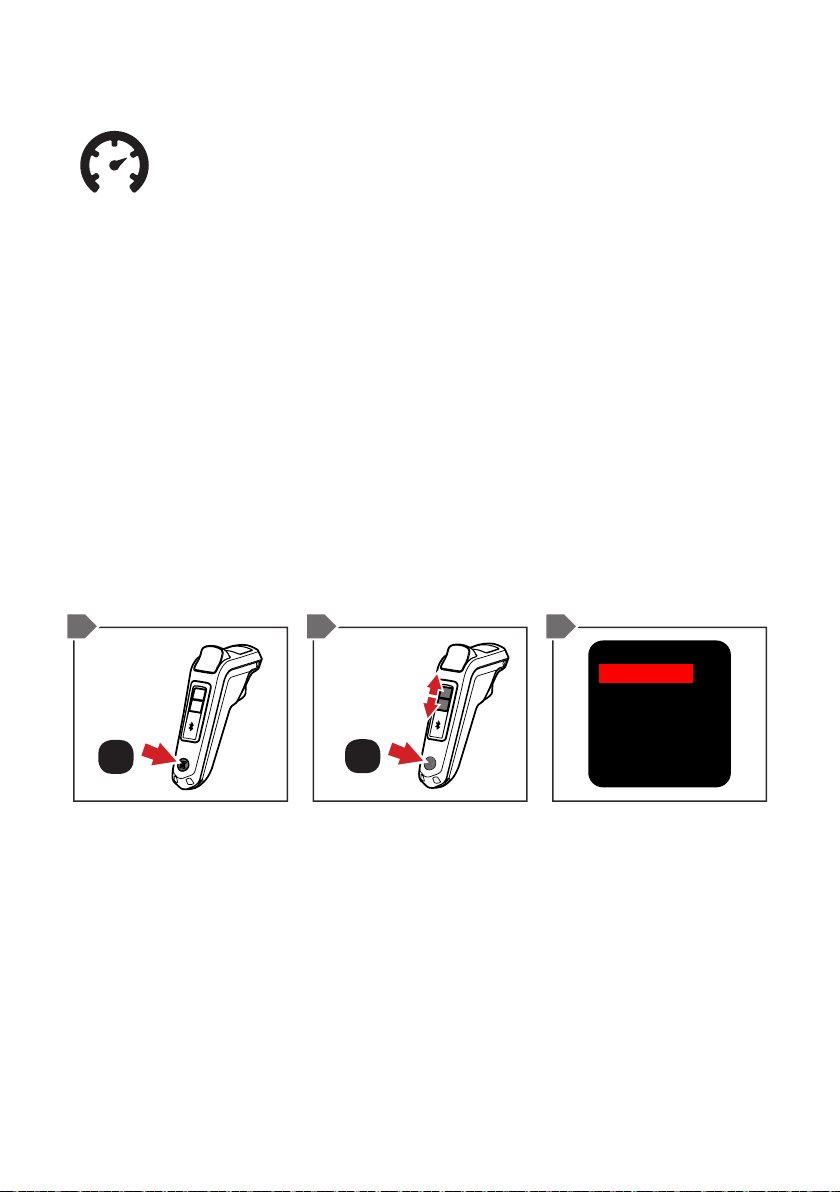
SELECT KMH OR MPH
1. From the default screen, double-tap the ON/OFF BUTTON.
This will now display the menu screen.
2. Scroll down by pressing the MODE 2 BUTTON until you
reach ‘Options’, then press the ON/OFF BUTTON.
3. Press the ON/OFF BUTTON to change the unit of
measurement for your region (KMH or MPH).
4. Once selected, press the MODE 2 button to move the
highlighted box to the ‘Return’ selection, then press the ON/
OFF BUTTON. This will now take you back to the default
screen with the preferred unit of measurement.
1 2/4 3
Unit: km
Battery: Bar
DeadMan: ON
Powersave: ON
Return
ON / OFF
x2
SCROLL
ON / OFF
x1
/31
Page 32
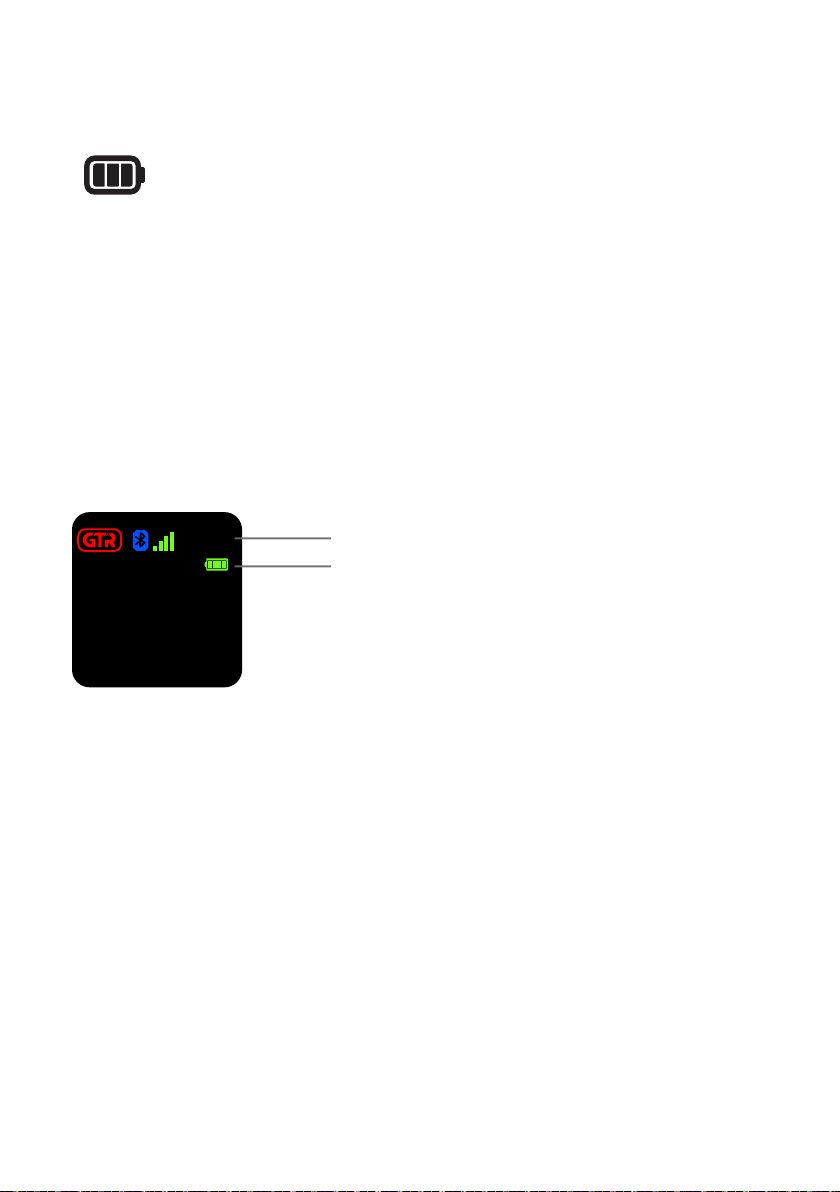
BATTERY INDICATOR DISPLAY
When the remote is connected to the board, it will display how
much battery is left in the skateboard and remote in real time.
The battery of the skateboard is displayed as a small percentage
symbol (%) in the top right-hand corner of the LCD screen,
and as a small battery bar under the percentage symbol for the
remote battery.
17 5mm
Trip:
66T
0
0.0 km
90%
km/h
SKATEBOARD BATTERY %
REMOTE BATTERY %
/32
Page 33
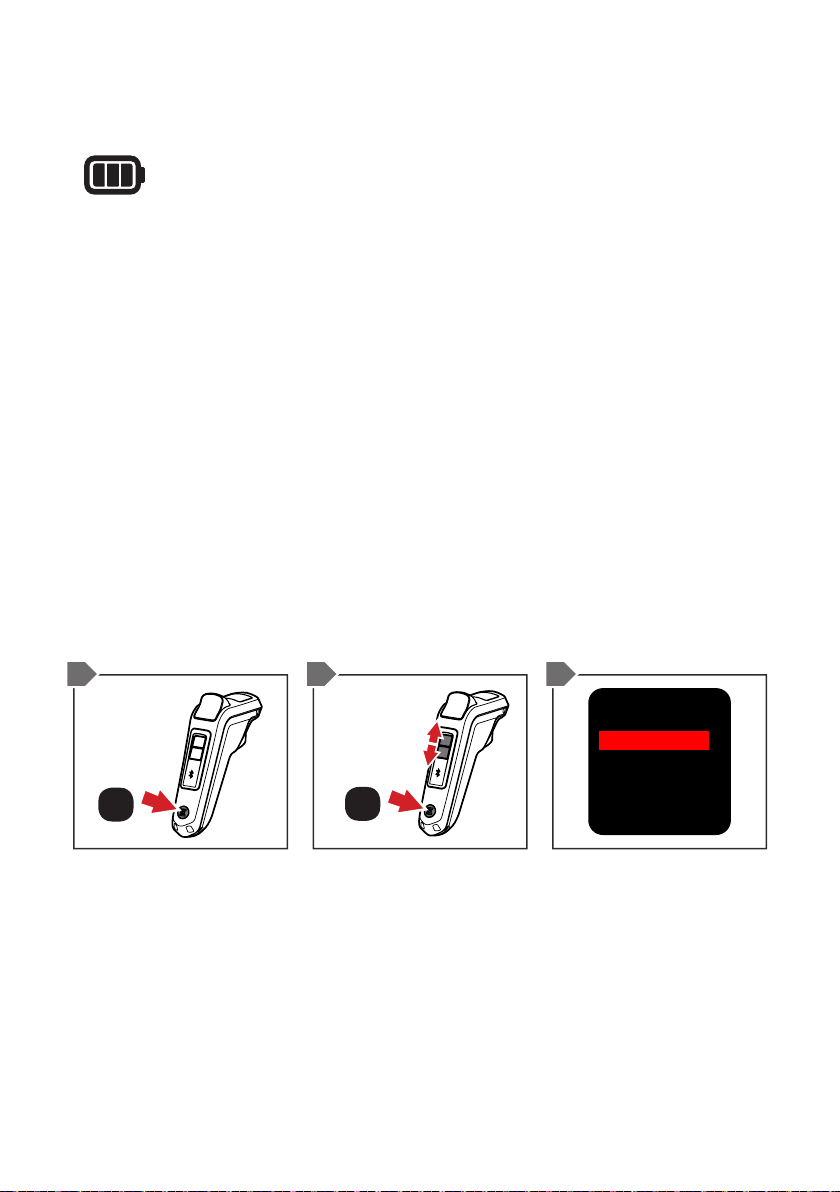
CHANGE BATTERY INDICATOR DISPLAY
You have the option to change the skateboard battery
percentage display to a skateboard battery bar if you prefer.
1. Double-tap the ON/OFF BUTTON. This will now display the
menu screen.
2. Scroll down by pressing the MODE 2 BUTTON until you
reach ‘Options’, then press the ON/OFF BUTTON.
3. Use the MODE BUTTONs to scroll through to the ‘Battery’
selection then press the ON/OFF BUTTON to change from
‘Dig’ (percentage) to ‘Bar’ or vice versa.
4. Scroll down by pressing the MODE 2 BUTTON until you
reach ‘Return’, then press the ON/OFF BUTTON. This will
take you back to the default screen with the new battery
display.
1 2/4 3
Unit: km
Battery: Bar
DeadMan: ON
Powersave: ON
Return
ON / OFF
x2
SCROLL
ON / OFF
x1
TIP - As you ride your skateboard and use your remote, the
skateboard battery meter and remote battery meter will slowly
deplete. If you ride up hills, accelerate heavily, and ride over
grass you should expect the battery to drain faster than if you
were riding on flat, smooth surfaces. To get the longest ride
times, ride holding a set speed, avoiding start/stop riding. This is
the most efficient way to ride.
/33
Page 34

LOW BATTERY WARNINGS ON THE REMOTE
There are low battery warnings set on the remote that provide
you with notice of when to expect the skateboard to run out of
power. See below at what stage the warnings come on:
1. At 10% the remote will vibrate quickly one time.
2. At 5% the remote will vibrate once every 5 seconds.
3. At 1% the remote will vibrate for 5 seconds with a brief pause
then continue to vibrate.
4. At 0% the remote will continue to vibrate then go into ECO
MODE. During this time you will not be able to use PRO or
GTR speed modes as the battery is virtually at.
NOTE – THE AUTO ECO MODE WILL PREVENT THE BOARD FROM TURNING OFF
SUDDENLY WHEN THE BATTERY IS VERY LOW ON VOLTAGE AND THE RIDER IS
TRYING TO STILL RIDE THE BOARD IN THE FASTER CURRENT SPEED MODES.
THIS PROTECTS BOTH THE RIDER AND BATTERY.
IF THE RIDER CHOOSES TO IGNORE THE LOW BATTERY WARNINGS, THE
BATTERY METER SOFTWARE WILL ALLOW THE RIDER TO CONTINUE TO USE
THE BOARD FOR A SHORT TIME AFTER THE BATTERY METER GOES TO 0%.
/34
Page 35
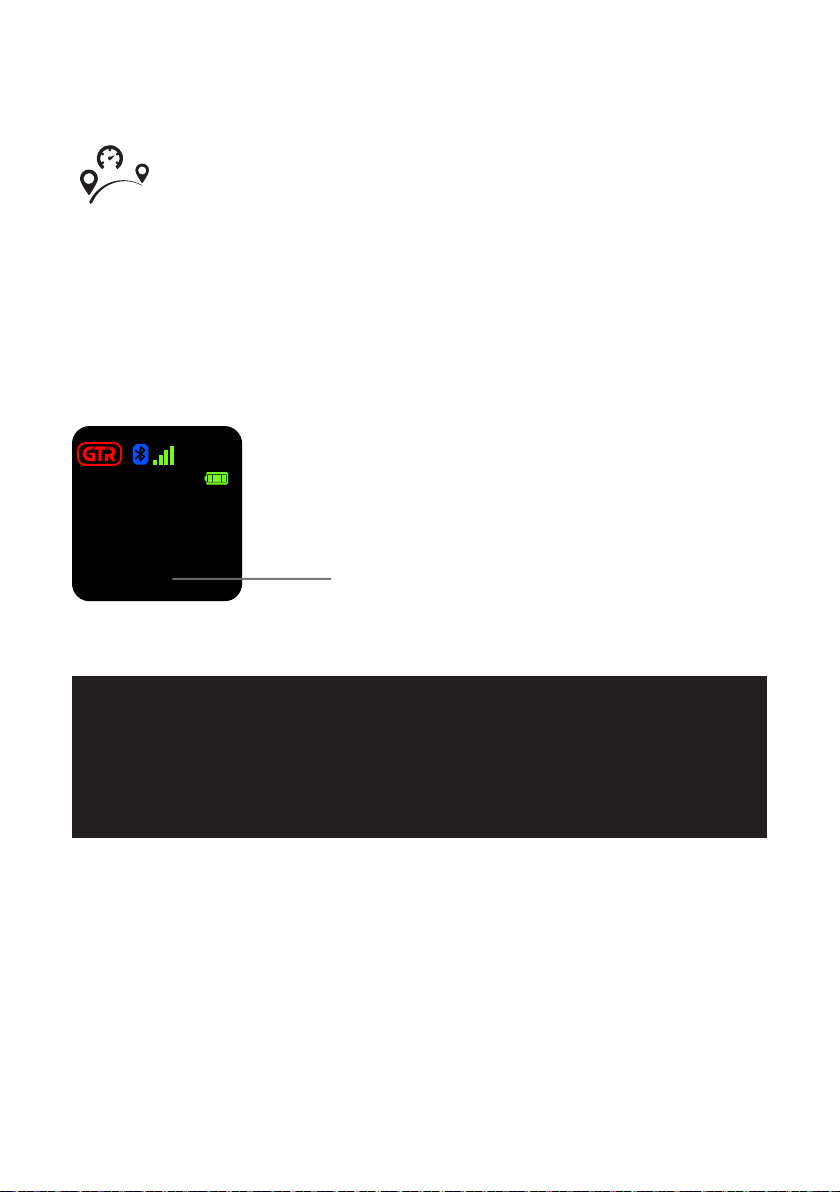
TRIP METER
The trip display will show your distance travelled for your current
ride only.
Once you turn your board off the trip meter will reset itself and
return to 0 value.
90%
17 5mm
Trip:
66T
0
km/h
0.0 km
NOTE - FOR BEST ACCURACY, BE SURE TO HAVE SELECTED THE CORRECT
WHEEL AND GEAR SETTING SIZE ON YOUR REMOTE. IF THE INCORRECT
SELECTION IS BEING USED ON THE REMOTE, THE REMOTE WILL GIVE THE
INCORRECT SPEED AND TRIP DISTANCES.
TRIP METER
REFER TO CHANGING WHEEL AND GEAR SETTINGS FOR MORE INFORMATION.
/35
Page 36

AUTO SAFE FUNCTION
The auto safe function is a feature of the remote that is designed
to detect any potential issues with the control of the board.
This can relate to anything to do with the battery performance,
motor controller performance and remote operational control.
The auto ‘Safe’ mode will be activated if any of the above is
disturbed, even if it’s minor, the remote will detect and make the
control go to safe mode.
If the safe mode does come on when riding, the remote will
vibrate for one second giving you warning and the control
feeling will have weak acceleration and braking strength. If there
is a genuine error with the skateboard, error messages will be
displayed in the ‘Product Info’ screen.
To get out of the auto ‘Safe’ mode function, simply press the
MODE 1 button to then be taken back to the previous speed
setting you were riding.
/36
Page 37

POWER SAVE FUNCTION
To maximize the battery run time in the remote, there is a power
save function that makes the remote screen turn off when the
remote is at a low angle.
Power save will automatically activate one minute after the
remote is turned on.
When the rider lifts the remote to a more level position, it will
turn back on.
To deactivate/reactivate this function, go into the ‘Options’
section of the remote menu and change the settings for ‘Power
Save’.
/37
Page 38
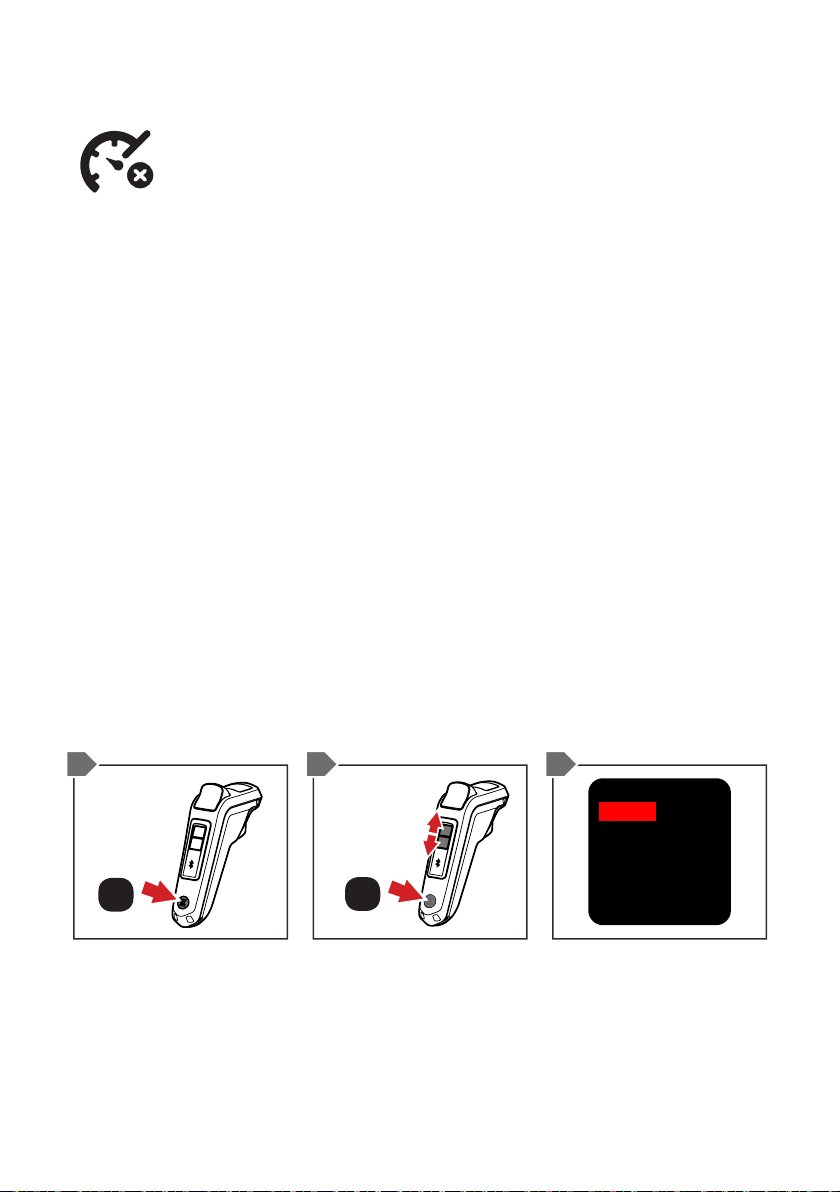
SPEED LIMITER
The speed limiter has been designed to cap top speeds for
certain country laws as well as for those riders who are happy
only to ride at a certain speed. The power and torque is still
exactly the same when the limiter is activated, however the top
speed is limited. To access the speed limiter, follow these steps:
1. Double click the ON/OFF BUTTON on your remote. This will
bring you into the main menu screen.
2. Scroll down by pressing the MODE 2 BUTTON until you
reach ‘Speed limit’, then press the ON/OFF BUTTON.
3. Scroll to the desired speed limit - 32km/hr, 25km/hr, 20km/hr
or OFF, then press the ON/OFF BUTTON to select. A green
tick will then be placed next to the selected speed setting.
Please note, the speed limit selection will also be displayed on
the home screen as a yellow colour on the KM/HR display and a
white colour when the speed limiter is turned off.
1 2 3
SCROLL
ON / OFF
x2
ON / OFF
x1
/38
32km/h
25km/h
20km/h
√
OFF
Return
Page 39
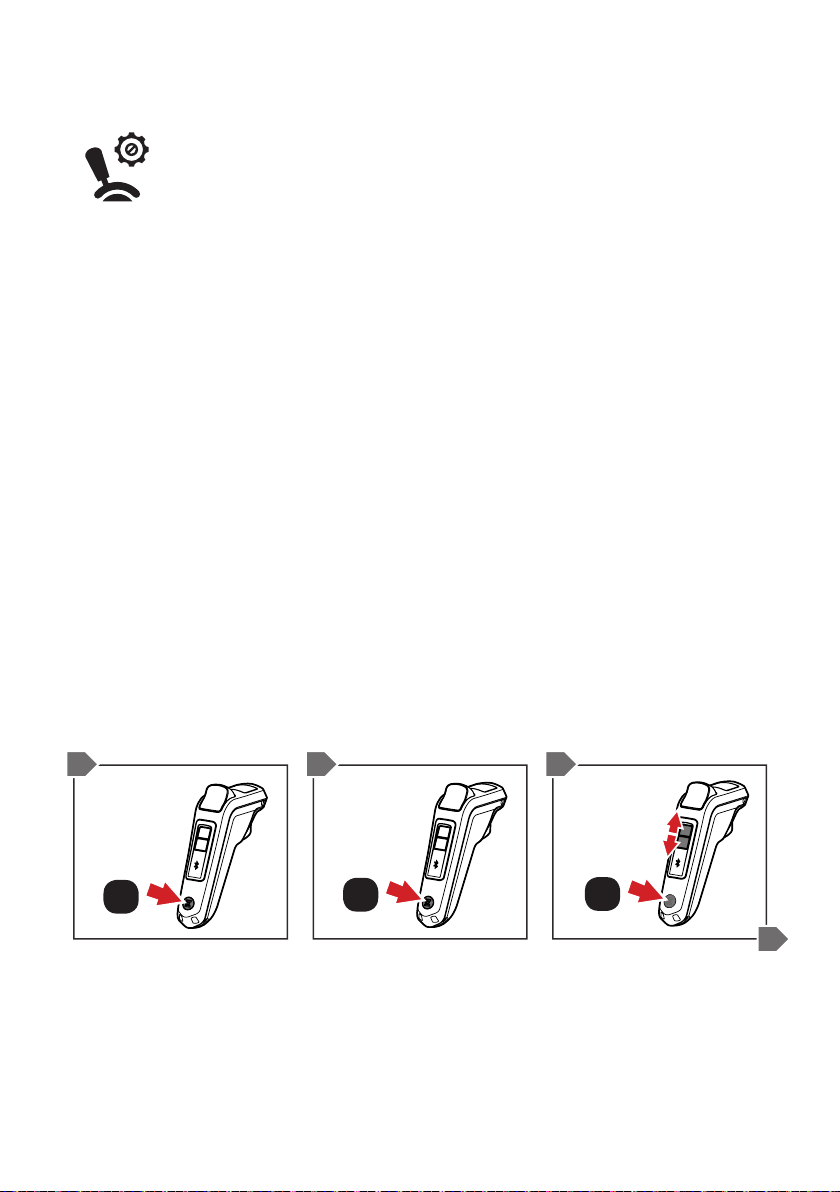
R2 TRIGGER RESET PROCEDURE
If for some reason you are experiencing symptoms such as
difculty changing speed modes, unable to turn the remote off
before the board and ability to brake but not accelerate, this is
usually caused by knocks to the remote which then moves the
triggers from its original position within the remote case.
In most cases this can be resolved by resetting the acceleration
and brake trigger settings bringing it back to factory settings.
In the event the trigger settings are required to be reset, use the
following steps:
1. Ensure the skateboard is turned off. Press the ON/OFF
BUTTON on the remote.
2. From the default screen, double click the ON/OFF BUTTON
to enter the remote menu.
3. Using the MODE 2 BUTTON, scroll down to highlight
‘Product Info’ and select by clicking the power button once.
1 2 3
ON / OFF
x1
ON / OFF
x2
/39
SCROLL
ON / OFF
x1
Page 40
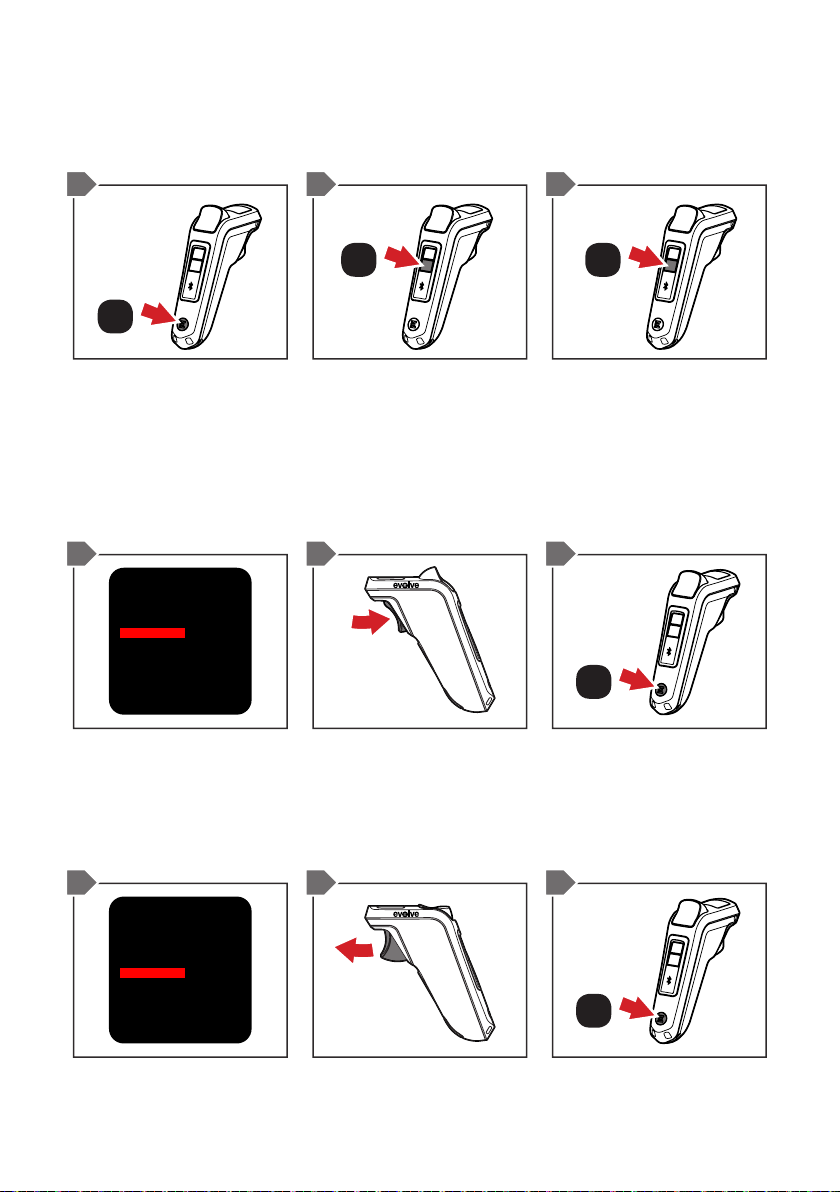
4. Perform the following sequence of button presses:
Double click
ON/OFF BUTTON.
A
Double click
MODE 2.
B
MODE 2 MODE 2
Double click
MODE 2 again.
C
x2 x2
ON / OFF
x2
The remote should now be in the trigger setting screen
5. With ‘Set ACC Min’ highlighted, pull and hold the
ACCELERATOR TRIGGER all the way in. Press the ON/OFF
BUTTON once to set the value.
A
Acc Trigger: XXXX
Brake Trigger:XXXX
Throttle: X
Set Acc Min: XXXX
Set Acc Max: XXXX
Set Brake Min: XXXX
Set Brake Max: XXXX
return
B
PULL &
HOLD
C
ON / OFF
x1
6. With ‘Set ACC Max’ highlighted, release the ACCELERATOR
TRIGGER all the way and press the ON/OFF BUTTON once
to set the value.
A
Acc Trigger: XXXX
Brake Trigger:XXXX
Throttle: X
Set Acc Min: XXXX
Set Acc Max: XXXX
Set Brake Min: XXXX
Set Brake Max: XXXX
return
B
RELEASE
C
ON / OFF
x1
/40
Page 41
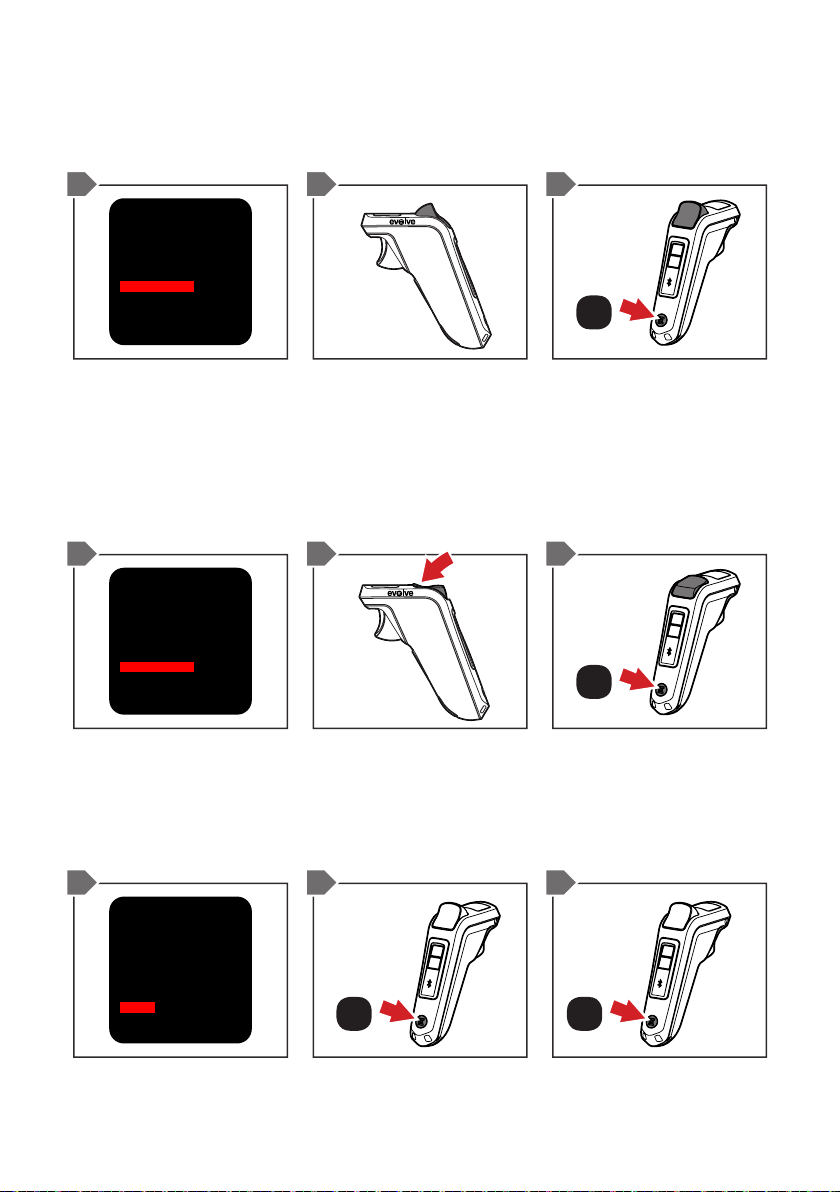
7. With ‘Set Brake Min’ highlighted, release the BRAKE LEVER
entirely and press the ON/OFF BUTTON once to set the
value.
A
Acc Trigger: XXXX
Brake Trigger:XXXX
Throttle: X
Set Acc Min: XXXX
Set Acc Max: XXXX
Set Brake Min: XXXX
Set Brake Max: XXXX
return
B
C
ON / OFF
x1
8. With ‘Set Brake Max’ highlighted, press and hold the BRAKE
LEVER all the way in. Press the ON/OFF BUTTON once to
set this value. Once the ON/OFF BUTTON is pressed the
BRAKE LEVER can be released.
A
Acc Trigger: XXXX
Brake Trigger:XXXX
Throttle: X
Set Acc Min: XXXX
Set Acc Max: XXXX
Set Brake Min: XXXX
Set Brake Max: XXXX
return
B
C
PUSH &
HOLD
ON / OFF
x1
9. With ‘return’ highlighted, press the ON/OFF BUTTON once
to exit the trigger screen. Turn the remote off by holding the
power button for 1 – 2 seconds.
A
Acc Trigger: XXXX
Brake Trigger:XXXX
Throttle: X
Set Acc Min: XXXX
Set Acc Max: XXXX
Set Brake Min: XXXX
Set Brake Max: XXXX
return
B
C
ON / OFF ON / OFF
x1 x1
The remote trigger limits have now been set.
/41
Page 42

OTHER REMOTE OPERATION FUNCTIONS
AND TIPS
• If you accidentally press both the accelerator trigger and
brake trigger at the same time, the brake function will work
and cancel out the accelerator.
• If you hold down the accelerator and brake triggers then let
the brake trigger go it will not accelerate.
• As you are riding and holding down the accelerator or brake
trigger, you will not be able to change speed modes or turn
the remote off until you let the triggers go.
• When the Safety Switch is enabled and you kick push the
skateboard to start, you can avoid pressing in the Safety
Switch, this is also good for battery efciency.
• Get to know the vibration warnings on your remote, these
can be useful during your ride.
• The LCD screen is much easier to see when there is less
direct sunlight.
• The R2 remote will turn off after 5 minutes of non use to save
on battery life.
• Avoid riding with your thumb positioned on the brake trigger
as you are accelerating, this may cancel out the accelerator
when you are not ready for it
/42
Page 43

HEAT PROTECTION WARNING
To protect the entire electric system from over heating, we
have created software that is designed to reduce the board
performance. This forces it to cool down and prevent the rider
continuing to put stress on the electric system.
If ever the system does reach this protection mode, the remote
will automatically go to PRO speed mode and will vibrate one
time and the km/hr reading will change to a red colour. During
this time you will not be able to change speed modes above
PRO speed until the board cools down to a safe temperature.
/43
Page 44

ERROR CODES
If ever the board experiences an operational issue, an error
message will be detected by the remote and displayed in the
‘More Info’ screen.
See below the list of Error Codes:
‘BATT ERR’
This error code may be displayed if there is an error in
communication between the BMS and motor controller. In the
event this occurs, the board will limit the speed mode to SAFE
MODE to reduce the risk of damage to the battery.
‘MAINTAIN BATT’
This error code may be displayed if a cell in the battery is
detected as being ‘out of balance’. In the event this occurs, the
board will limit the speed mode to SAFE to reduce the risk of
damage to the battery.
‘MOTOR # ERR’
This error code may be displayed if an error has been detected
from one, or both, of the motors in operation. The error will
indicate ‘Motor1 Err’, ‘Motor2 Err’ or ‘Motor1&2 Err’.
IF EVER THE BOARD DOES EXPERIENCE AN OPERATIONAL
ISSUE, PLEASE CONTACT YOUR LOCAL EVOLVE SKATEBOARDS
SUPPORT TEAM FOR ASSISTANCE.
/44
Page 45

MAINTENANCE GUIDE
If you regularly clean and maintain your electric longboard, it will
last a long time and ride at its best:
• Always clean your bearings for best roll and quietest/
smoothest ride. Bearings get dirty and affect ride quality
which may reduce battery performance and cause possible
bearing failure.
• Always check all screws/nuts throughout the skateboard are
tight (truck nuts, wheel nuts etc). You are responsible for this.
• Rotate the wheels on the skateboard as you would do so with
any longboard skateboard, as the drive wheels will wear the
fastest.
• Regularly clean & check the belt and drive gear for any
damage. Replace if necessary.
• Always store your board at room temperature.
• Clean your board from dust and dirt so its looks and rides as
new at all times. Use a damp & dry cloth to clean.
• Be sure to keep your All Terrain tyres between 30-45 PSI tyre
pressure when riding. If the tyres run lower than this PSI then
your ride times will reduce due to having at tyres.
NOTE -YOU ARE RESPONSIBLE FOR ALL MAINTENANCE RELATING TO THE
EQUIPMENT, FAILURE OF ANY PART DUE TO LACK OF MAINTENANCE IS NOT
COVERED BY WARRANTY.
/45
Page 46

BATTERY CARE
Your battery and therefore your board, should always be stored
at room temperature. Excessive heat can permanently affect
or damage the battery. The board does have heat protection
software in place should this occur whilst riding to prevent the
battery from overheating.
If left in a hot car, hot environment or exposed to other factors
that may cause excessive heat, the heat protection software
can’t reduce temperatures, and your battery may be affected.
Cold temperatures will affect battery life and power output. If
you are riding in low temperatures you may experience lower
range, top speed and acceleration. Exposing the battery to
excessively low temperatures may have a permanent effect or
cause damage.
The battery cannot charge past 42 volts as the charger has
voltage cutoff detection installed, however we recommend
removing it from charge once the charger shows green.
If you will not be using your battery for a prolonged period
of 3 MONTHS OR MORE, it is recommended to STORE IT
BETWEEN 40 AND 50%. Leaving it fully charged and unused
can result in permanent loss of total capacity. If the battery is
stored near depleted for a prolonged period it may drop to an
unrecoverable voltage.
/46
Page 47

TROUBLE SHOOTING
This manual is a quick start guide only. For detailed information
regarding tips, maintenance and trouble-shooting, please visit
WWW.EVOLVESKATEBOARDS.COM. Here you will nd links to
your local distributor for detailed information.
WARRANTY
THIS BOARD IS COVERED BY A 12 MONTH MANUFACTURERS WARRANTY
(TIME PERIOD MAY BE DIFFERENT IN OTHER COUNTRIES SUCH AS USA AND
EUROPE) THAT COVERS DEFECTS IN WORKMANSHIP AND MATERIAL. THIS DOES
NOT COVER MISUSE, PERISHABLE ITEMS (SUCH AS WHEELS, TYRES, TUBES,
BEARINGS, BELTS), NEGLECT, ABUSE, ACCIDENT OR RIDING IN WATER AND
SHIPPING DAMAGE.
FOR WARRANTY CLAIMS AND DETAILS, PLEASE VISIT YOUR LOCAL
DISTRIBUTOR WEBSITE FOR INSTRUCTIONS. PLEASE KEEP YOUR SHIPPING
BOX IN CASE THE BOARD EVER NEEDS TO BE RETURNED.
Please contact your local distributor for ALL maintenance and
trouble shooting questions.
You will also nd many video tutorials on the distributor website.
WWW.EVOLVESKATEBOARDS.COM
/47
Page 48

/48
 Loading...