

Page 1
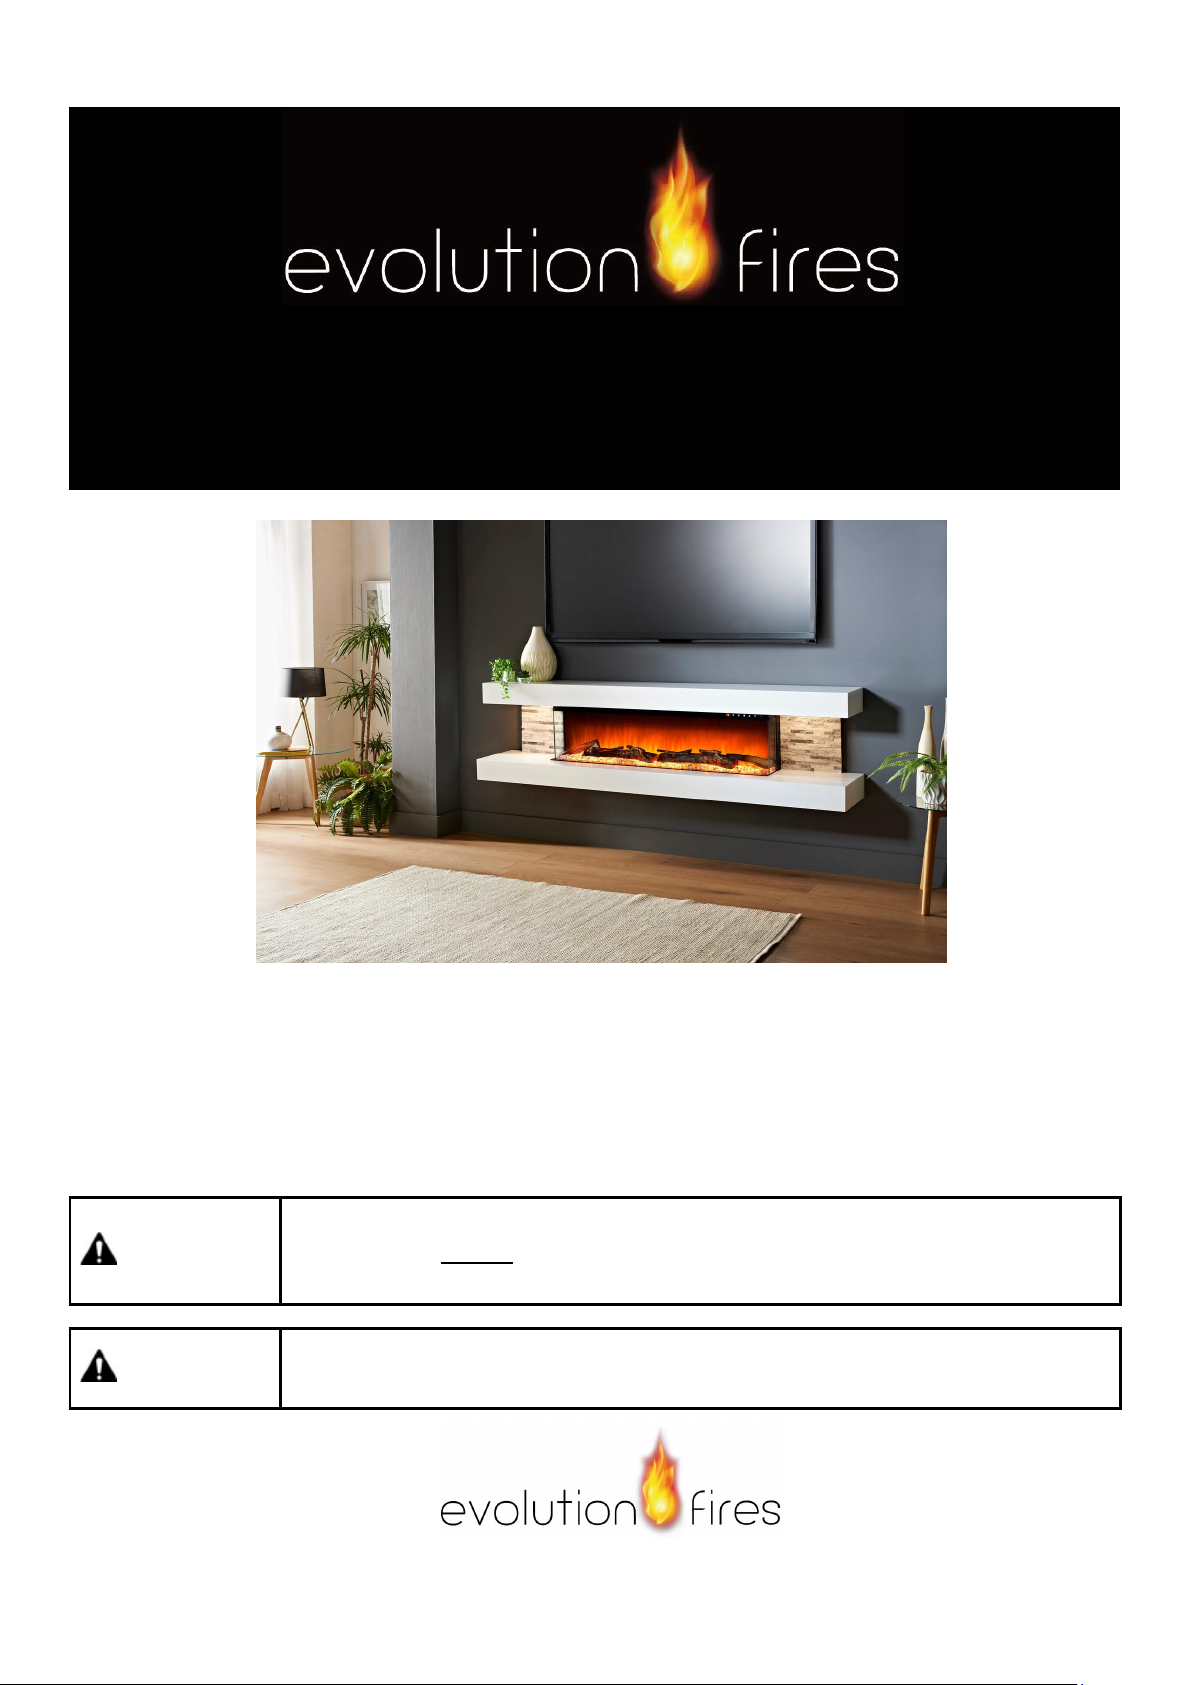
Electric Fireplace
AC 110V-120V 50Hz 1500 W
WARNING
Read and understand this entire owner’smanual,includingall safety
information,beforeplugging in or using this product. Failure to do so could
result in fire, electric shock, or serious personal injury.
CAUTION
Keep this owner’s manual for future reference. If you sell or give this
product away, make sure this manual accompanies this product.
OWNER’S� MANUAL
VEGAS 72
Page 2
1
IMPORTANT SAFETY INFORMATION!
WARNING
When using electrical appliances basic precautions should always be followed to reduce the
risk of fire, electric shock and injury to persons, including thefollowing:
Read all instructions before using this heater.
This heater is hot when in use. To avoid burning,donottouchhotsurface.Ifprovided,use
handles when moving this heater. Keep combustible materials, such as furniture, pillows,
bedding, papers, clothes, and curtains at least 1 m from the front of the heater and keep them
away from the sides and rear. In order to avoid overheating, do not cover the heater.
Extreme caution is necessary when any heater is used near children or the infirm and
whenever the heater is leftoperatingandunattended.
Always unplug heater when not in use.
Do not operate any heater with a damaged cord or plug or after the heater malfunctions, has
been dropped damaged in any manner, return heatertoauthorizedservicefacilityfor
examination, electrical or mechanical adjustment, or repair.
Indoor use only, do not use outdoors.
This heater is not intended for use in bathrooms, laundry areas and similarindoorlocations.
Never locate heater where it may fall into a bathtub or other water container.
Do not run cord under carpeting. Do not cover cord with throw rugs, runners, or similar
coverings. Arrange cord away from traffic area and where it will not be tipped over.
To disconnect heater, turn controls to off, then remove plug fromoutlet.
Do not inset or allow foreign objects to enter any ventilation or exhaust opening as this may
cause an electric shock or fire, or damage the heater.
To prevent a possible fire, do not block air intakes or exhaust in any manner. Do not use on soft
surfaces, like a bed, where openings many become blocked.
A heater has hot and arcing or sparking parts inside. Do not use it in areas where gasoline, or
flammable liquids are used or stored.
Use this heater only as describes in this manual. Any other use not recommended by the
manufacturer may cause fire, electric shock, or injury to persons.
DANGER-HIGH Temperatures may be generated under certain abnormal conditions. Do not
partially or fully cover or obstruct the front of this heater.
Replacement of the lamps should be done onlywhiletheheaterisdisconnectedfromthe
supply circuit.
This appliance is not intended for use by persons (including children) with reduced physical,
sensory or capabilities, or lack of experienceandknowledge,unlesstheyhavebeengiven
supervision or instruction concerning use of the appliance by a person responsible for their
safety.Children should be supervised to ensure that they do not play with the appliance.
CAUTION: In order to avoid a hazard due to inadvertent resetting of the thermal cut-out, this
appliance must not be supplied through an external switching device, such as a timer, or
connected to a circuit that is regularly switched on and off by theutility.
Page 3
2
Preparation
This product includes a GLASS panel! Always use extreme caution when handling
glass. Failure to do so could result in personal injury or property damage.
Remove all parts and hardware from the carton and place them on a clean, soft, dry surface. Parts and
assembly steps are grouped for wall-hanging or recessing use. Check the parts list to make sure
nothing is missing. Dispose of packaging materials properly. Please recycle wheneverpossible.
You will need the following tools (not included): Phillips screwdriver; stud finder; level ; tape measure;
electric drill; 1/4” wood drill bit, hammer.
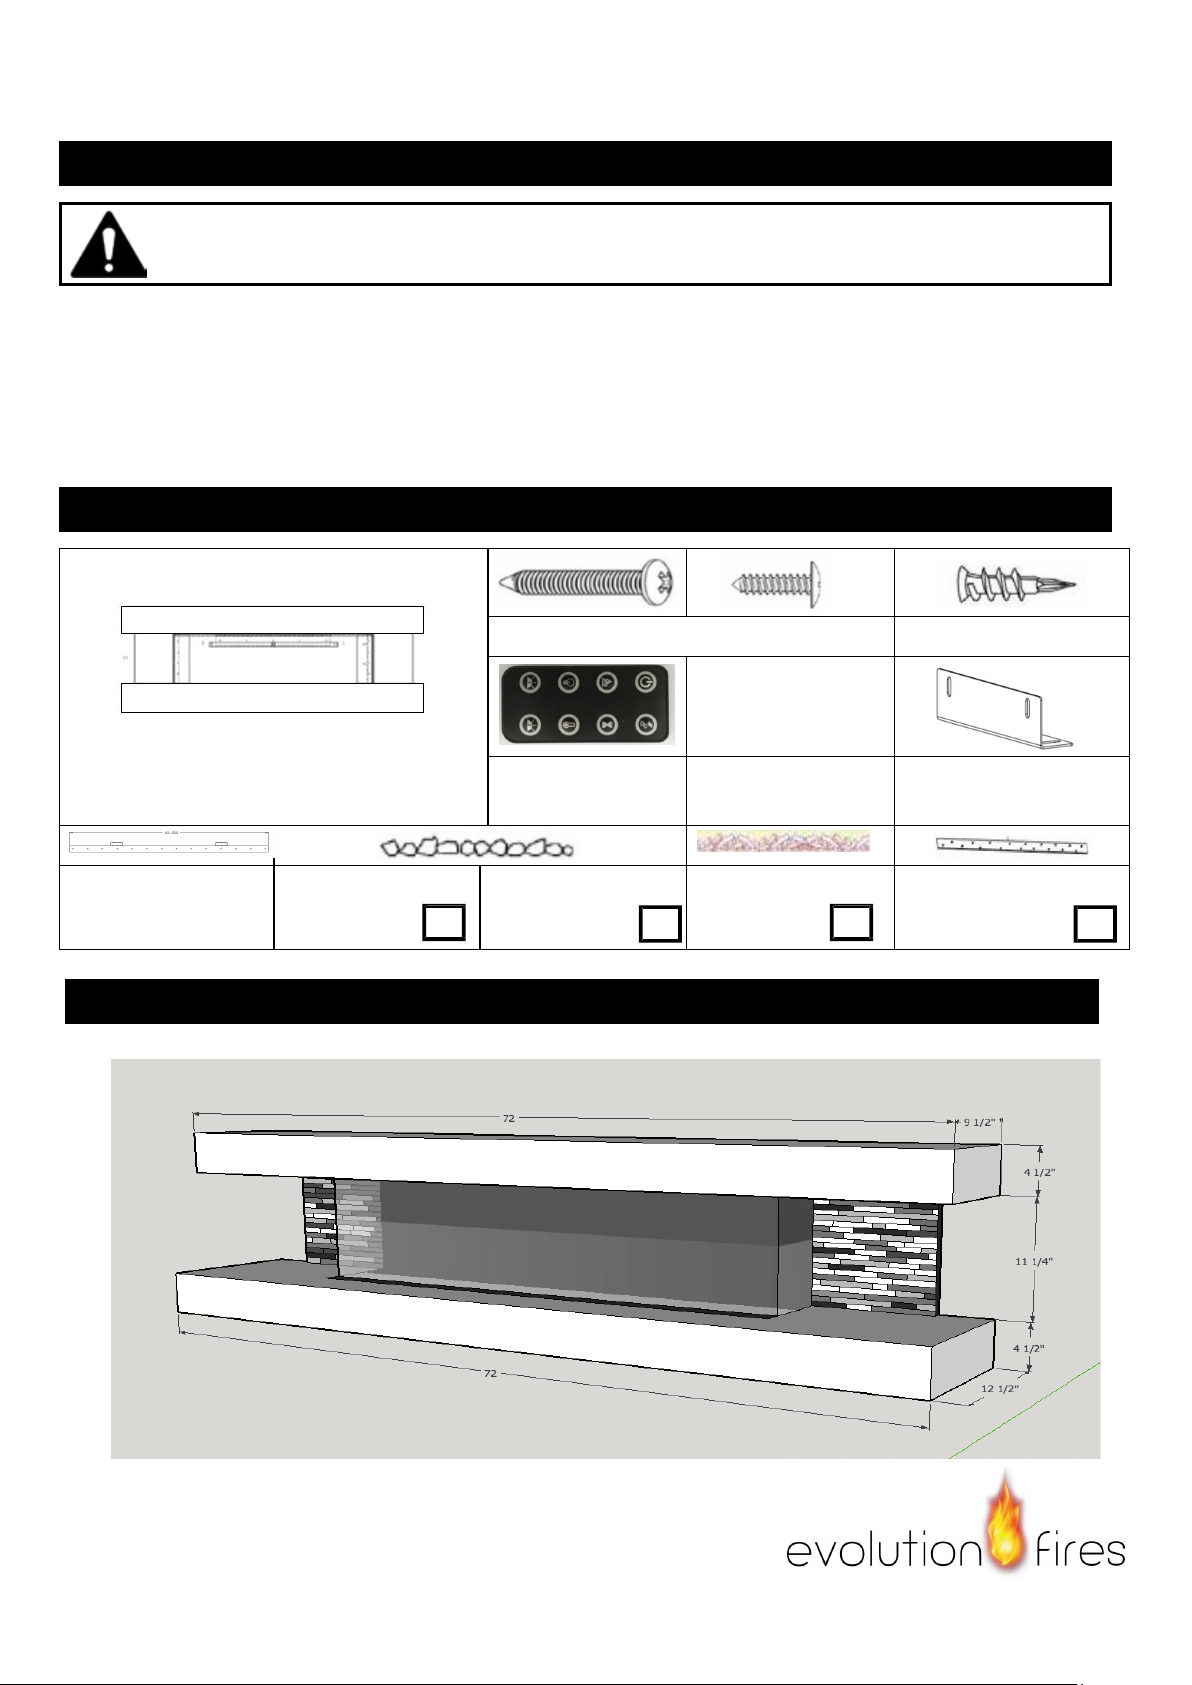
Parts and Hardware
A – Fireplace
B –WoodScrews C –Drywallanchors
Remote Control
F-Metal br
acket
G-Wall Bracket
Fixed on back of firebox
H-Small
Decorative
Crystals
H-Big
Decorative
Crystals
I-Log set J-Plastic Tray
Specification and Dimension
Page 4
3
Installation and Assembly
Your appliance is a wall-mounted, recessed and/or mantel installed appliance. Select a suitable
location that is
not susceptible to moisture and is away from drapes, furniture and high trafficareas.
NOTE: Follow all National and local electrical codes.
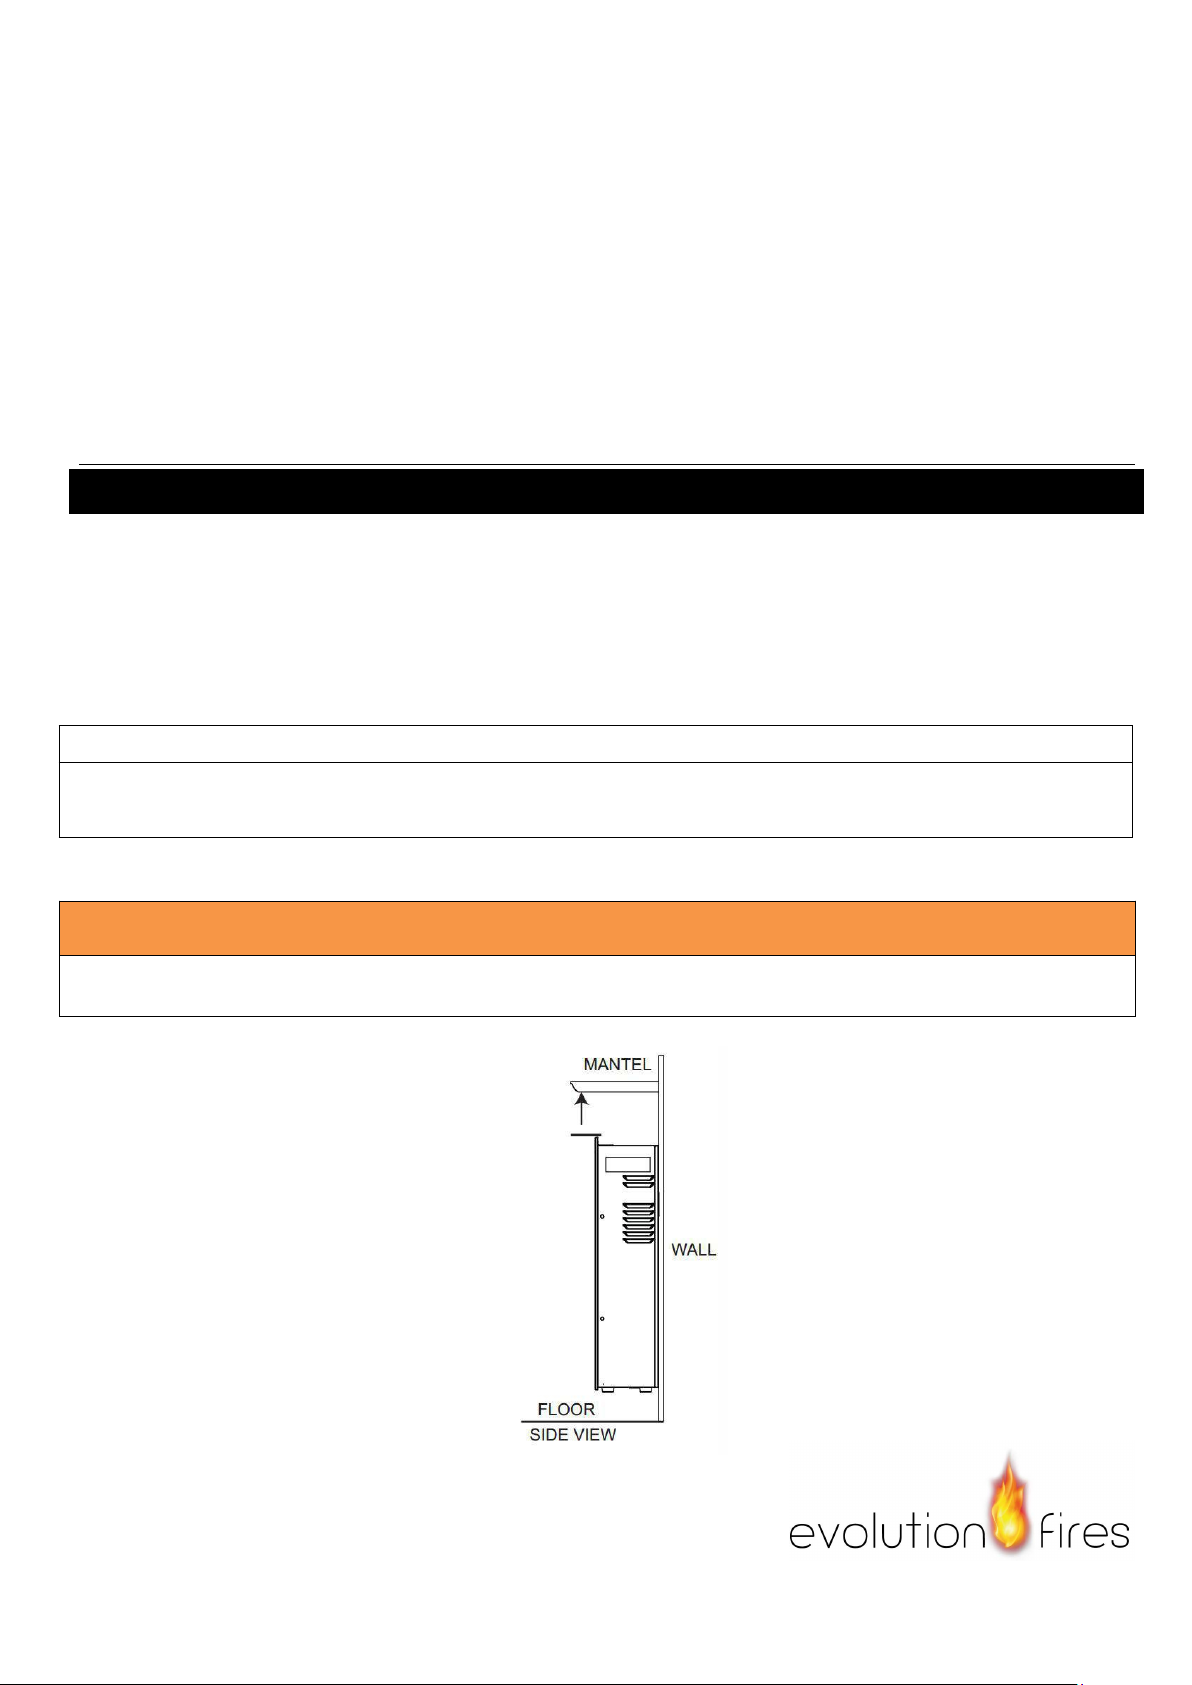
MINIMUM CLEARANCE TO COMBUSTIBLES
Measurements are taken from the glass front.
Bottom 0" Top 0" to mantel
Sides 0" Top 0" to ceiling
Back 0"
MINIMUM MANTEL CLEARANCES
WARNING
WHEN USING PAINT OR LACQUER TO FINISH THE MANTEL, THE PAINT OR LACQUER MUSTBE
HEAT RESISTANT TO PREVENT DISCOLOURATION.
0” (0 mm)
Page 5
4
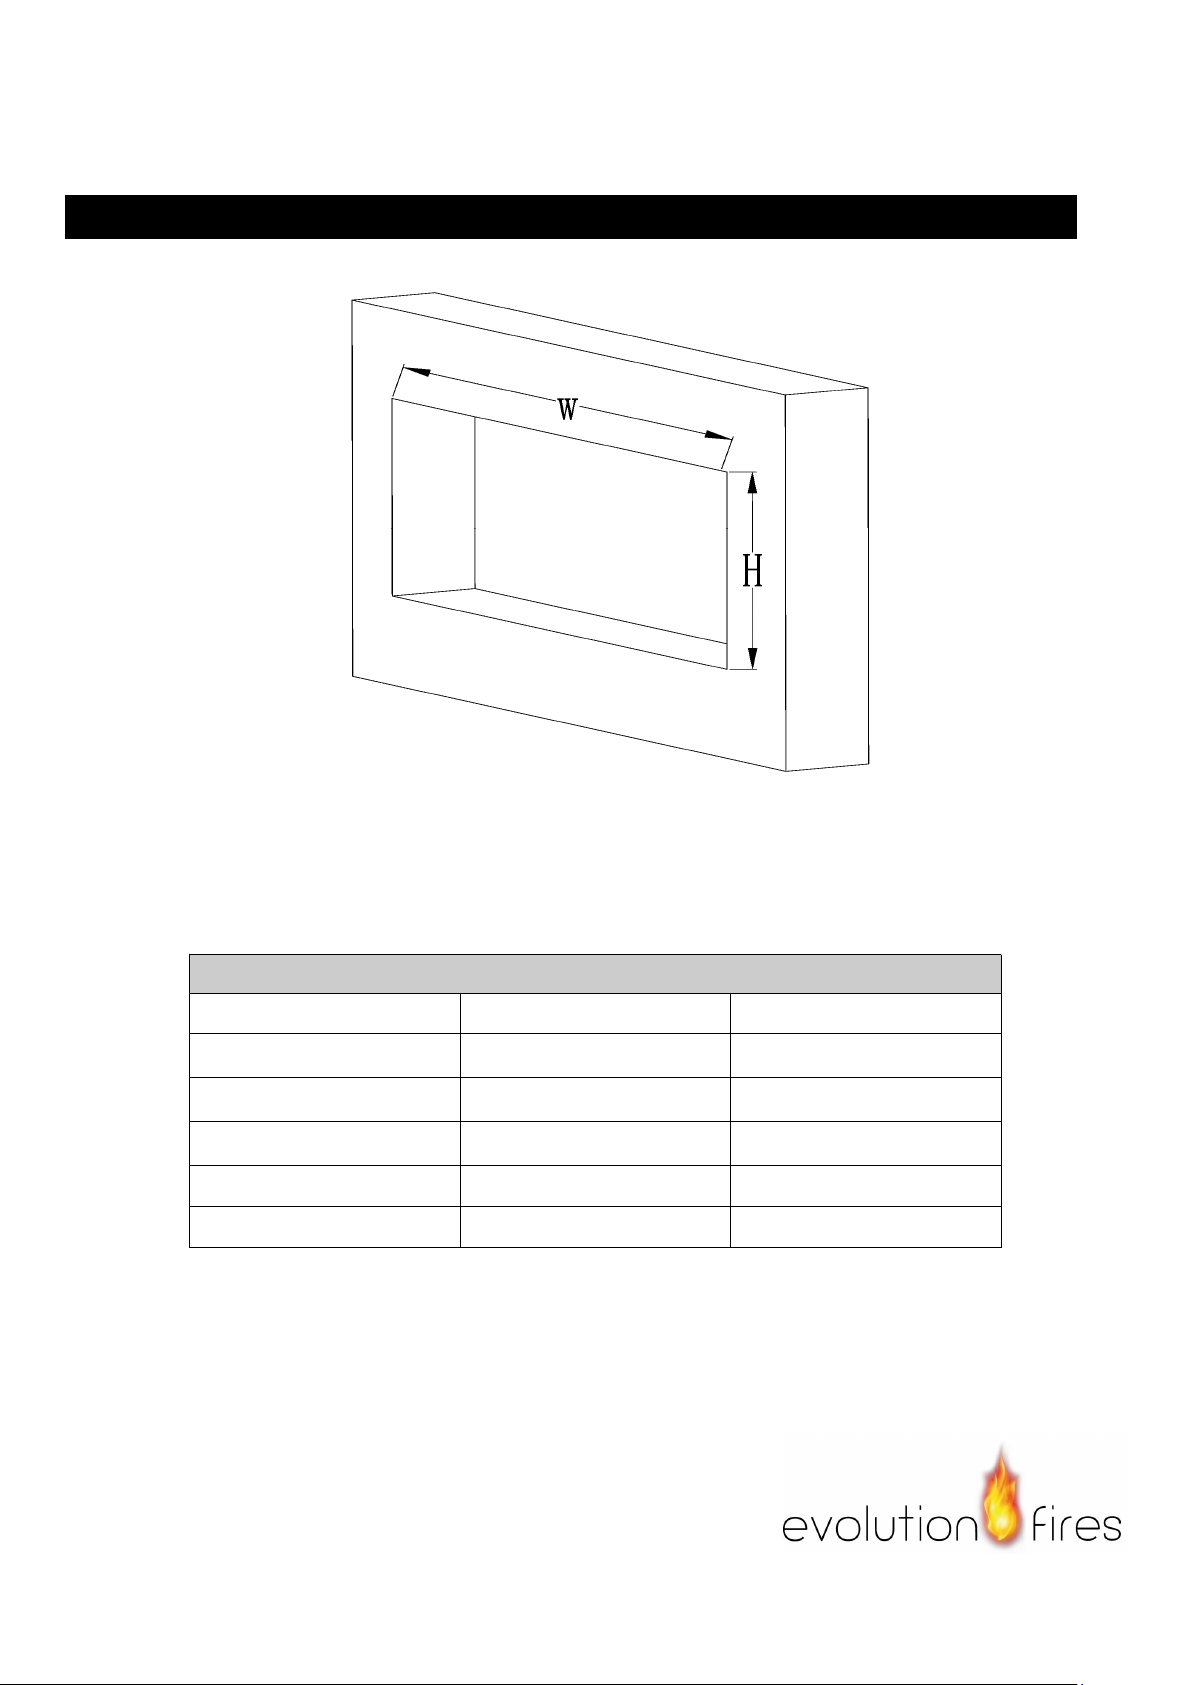
Engine Only Recessed To Wall Installation
Hole Size
(A)
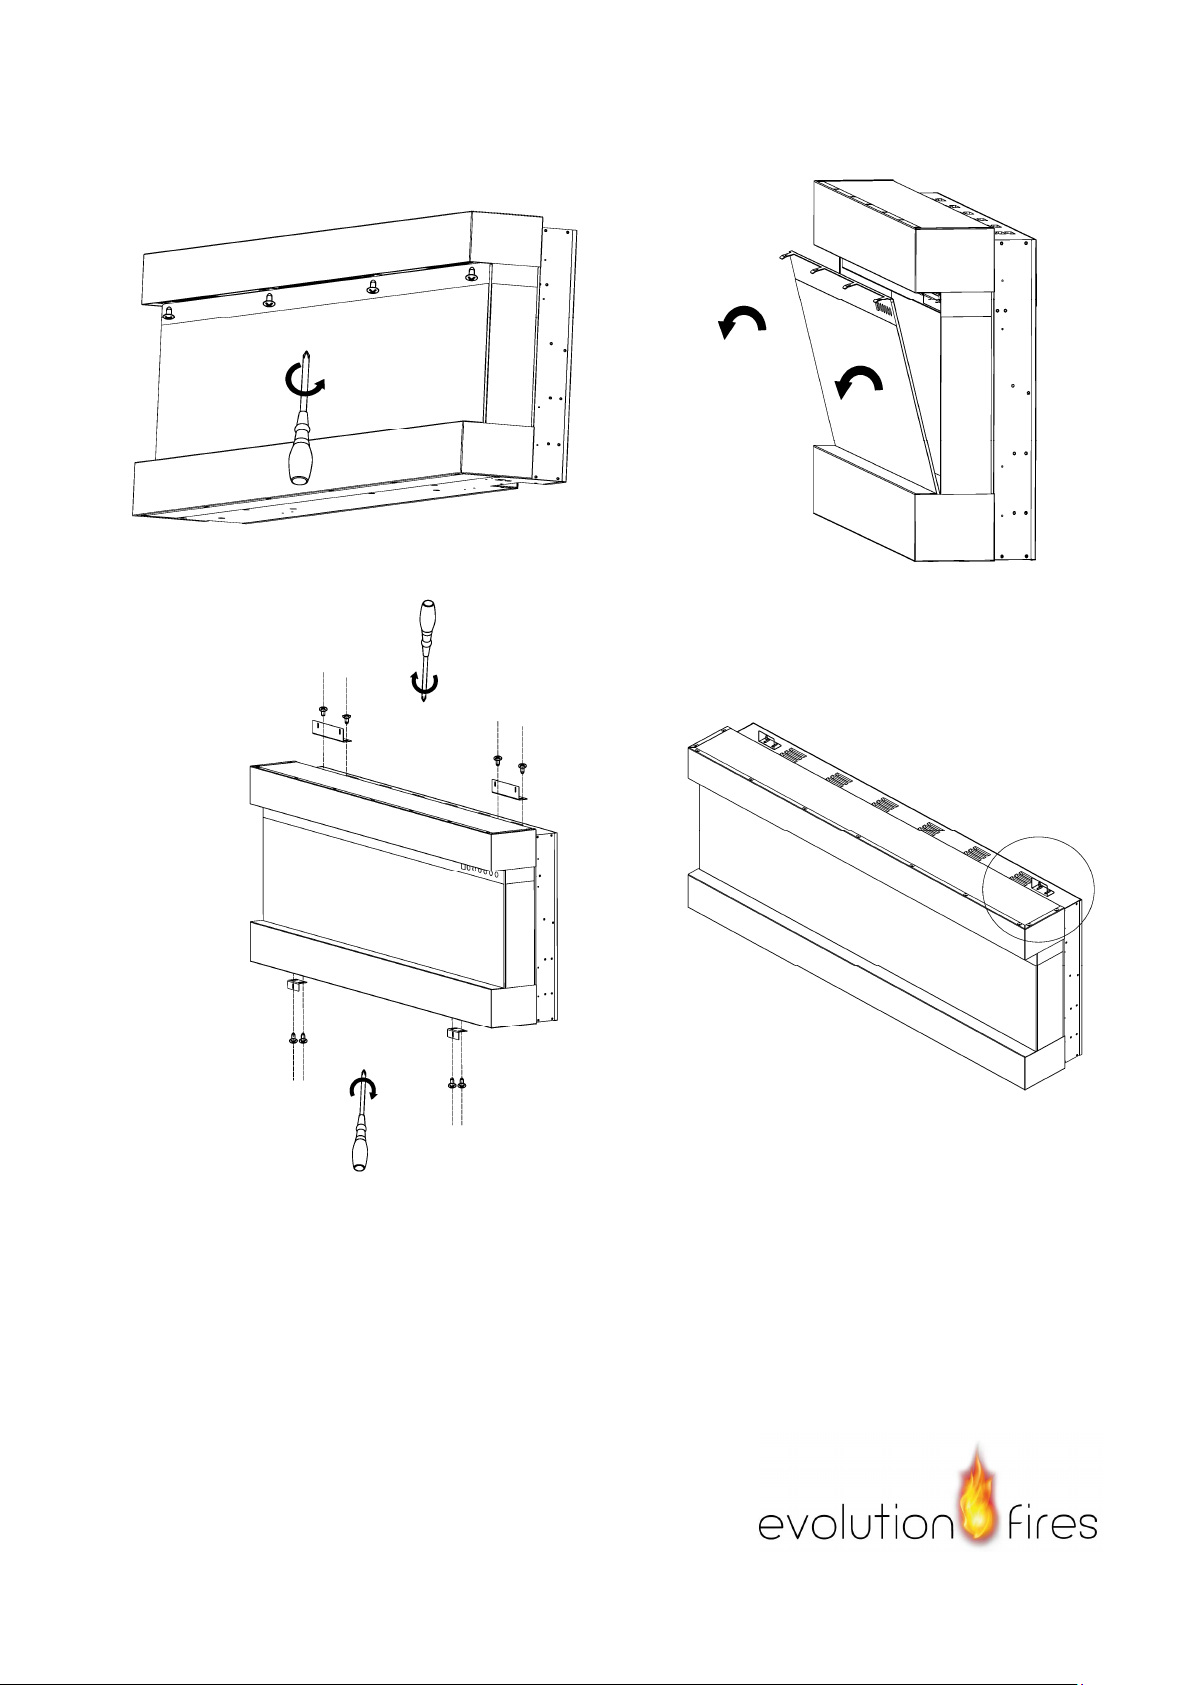
STEP A. Selection a dry wall to open a hole for fireplace box. Size of hole as below chart
Figure ( A )
STEP B. Using the screw driver to take off the screws from the front Figure (B)
STEP C. Have two adult people to pull of the glass panel and take it out Figure (C)
Framing Hole Size
Model Number
WH
BEF-36WM
35.9” (91.2CM) 18.84” (47.86CM)
BEF-42WM
42.71” (108.3CM) 18.84” (47.86CM)
BEF-50WM
49.29” (125.2CM) 18.84” (47.86CM)
BEF-60WM
59.29” (150.6CM) 18.84” (47.86CM)
BEF-72WM
71.25” (181CM) 18.84” (47.86CM)
Page 6
5
(B) (C)
(D) (E)
STEPD.Fix the metal brackets to the BOTTOM and the TOP of the
fireplace box. Figure(D,E)
NOTE:Metal brackets can be use as movable, please adjust to the best location as need
Page 7
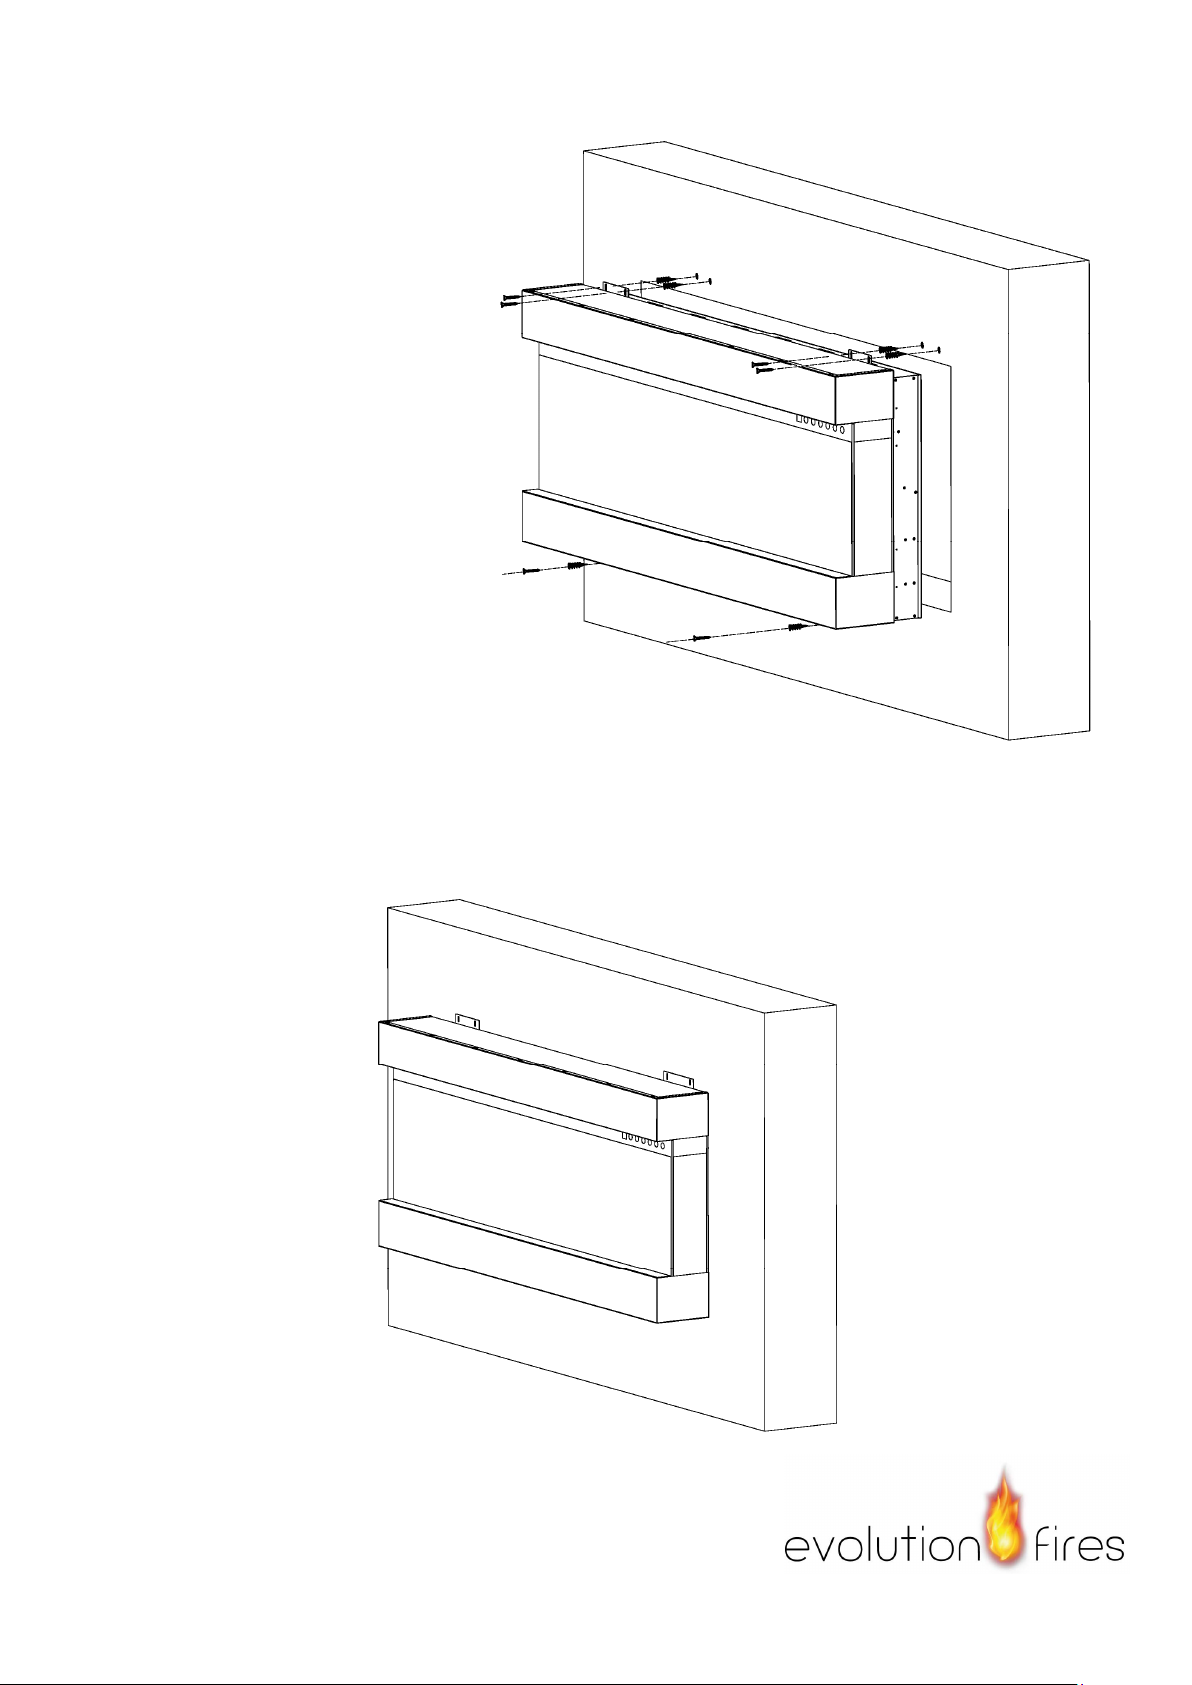
(F)
STEP F. Your Electric fireplace will be looks as below after installation
STEP E. Have two adult people
to lift of the fireplace box and put
it inside of the wall opening hole.
Using the screw driver to fix all
wood screws and drywall anchors
through the metal brackets to
the wall and fixing tightly.
NOTE: Making sure that all screws
and drywall anchors are well
screwed.
Page 8
7
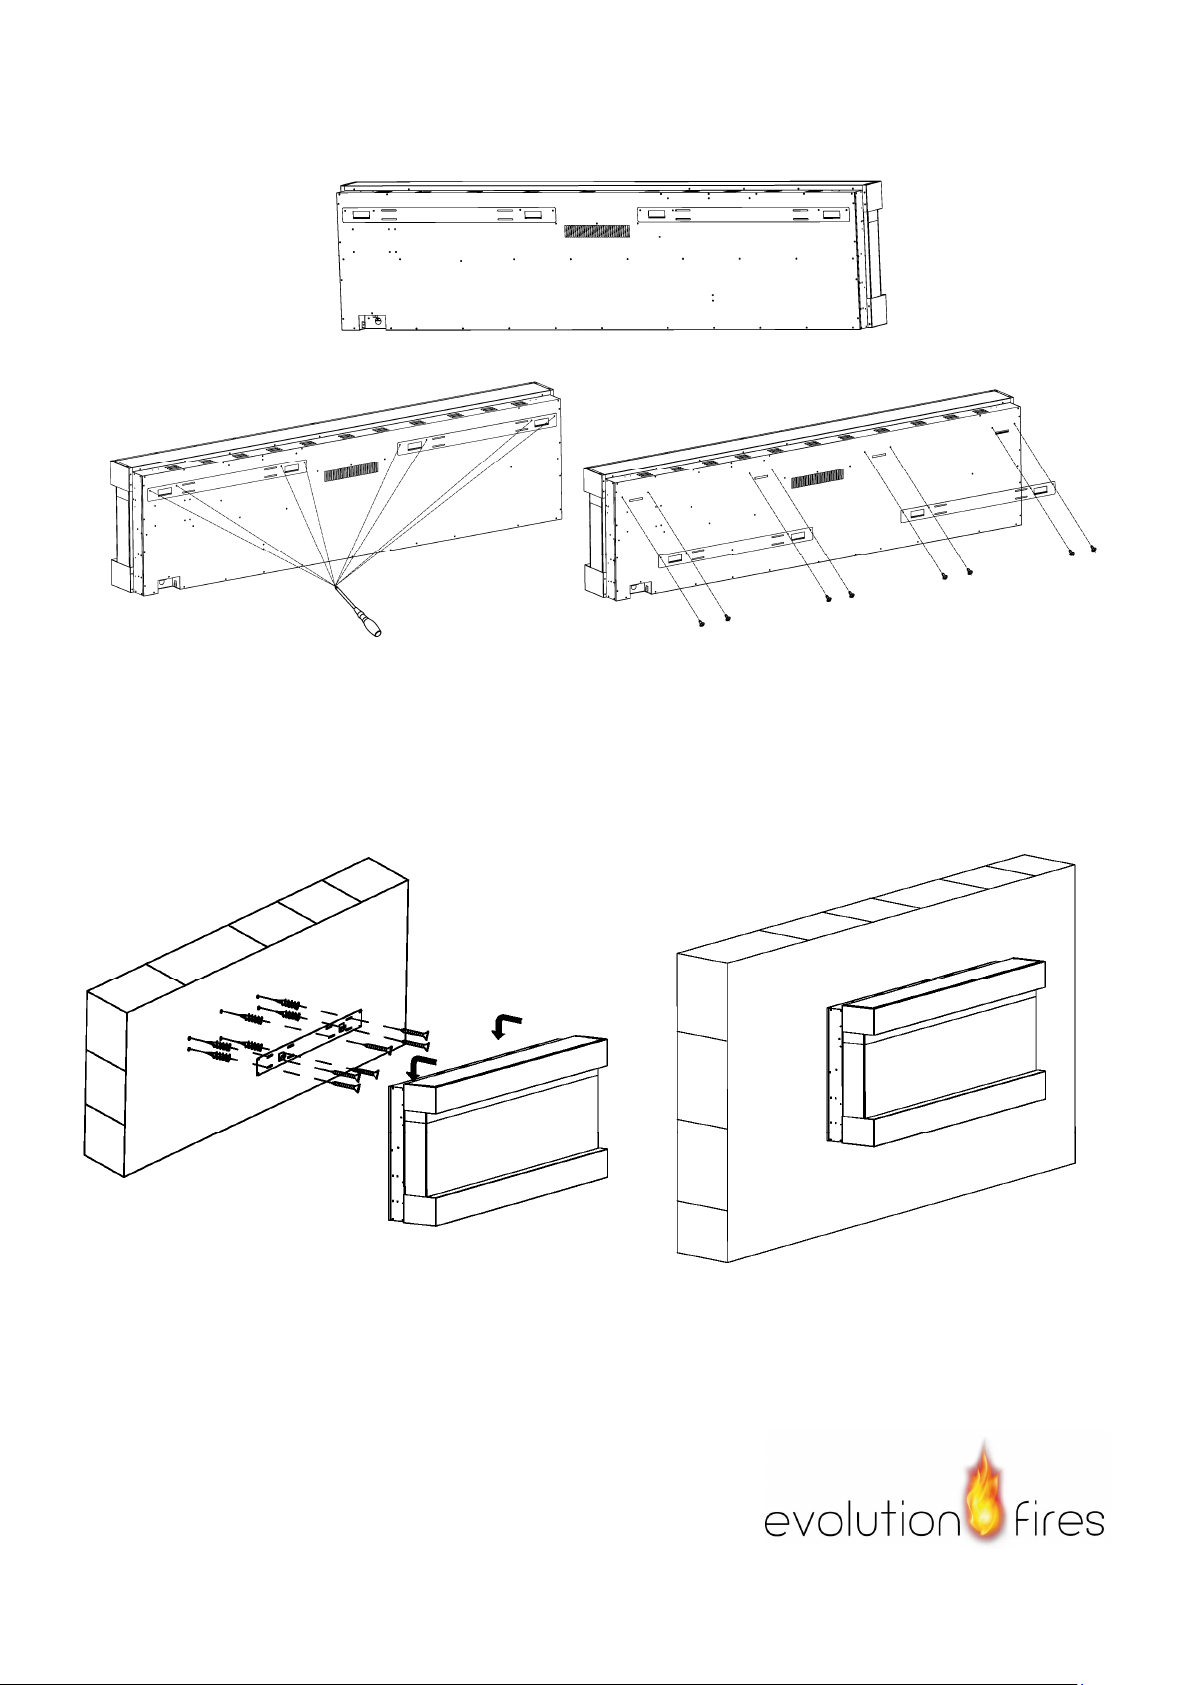
Wall Mounted Installation
Due to the many different materials used on different walls, it is highly
recommended that you consult your local builder before you install this appliance on
the wall.
A.Select a location that is not prone to m
oisture and is located at least 36" (914mm)
away from combustible materials such as curtain drapes, furniture, bedding, paper,
etc.
B.Have two people hold the appliance against the wall to determine the final
location.
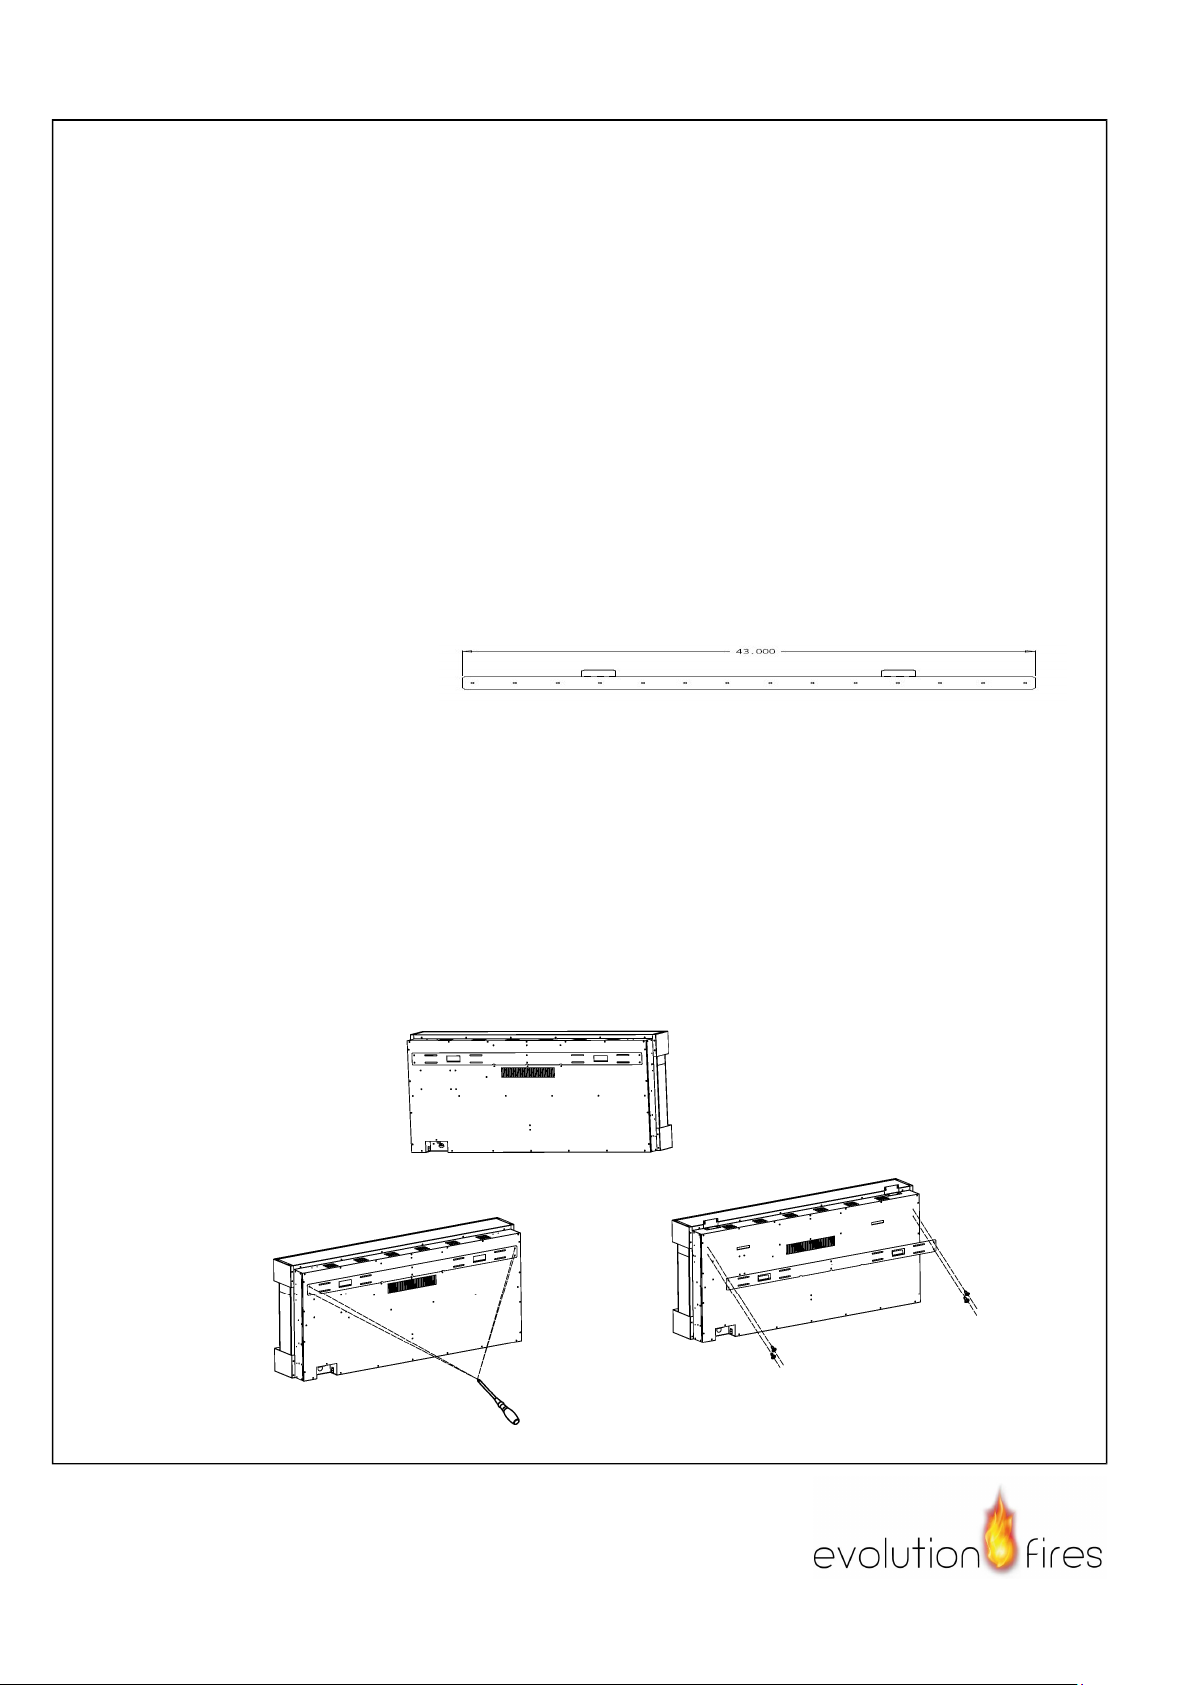
C.Place unit face down on a soft, non abrasive surface. Remove the bracket from
the bac
k of the unit by removing the screws, refer to Figure 1.
D.Mark out location, then mount the bracket(s) onto the wall using the supplied
s
crews. This bracket
MUST have the hooks facing upward and be level. NOTE:Itisstrongly
recommended that t
he
mounting bracket (
G) be
S
crewedintothe wall studs
Where possible. If the wall
Studs cannot be used, ensure
That the supplied plastic anchors are used to affix the bracket to the wall and
the bracket is adequately secured.
E. With the wall m
ounting bracket installed have two people lift the appliance up and
insert the two hooks
on the bracket into the two slots on the back of the appliance.
F. Check the appliance for
stability ensuring that the bracket will not pull free from
the wall.
BEF-36WM/BEF-42WM/BEF-50WM Wall Bracket Illustrated
Page 9
8
BEF-60WM/BEF-72WM Wall Bracket Illustrated
Page 10
9
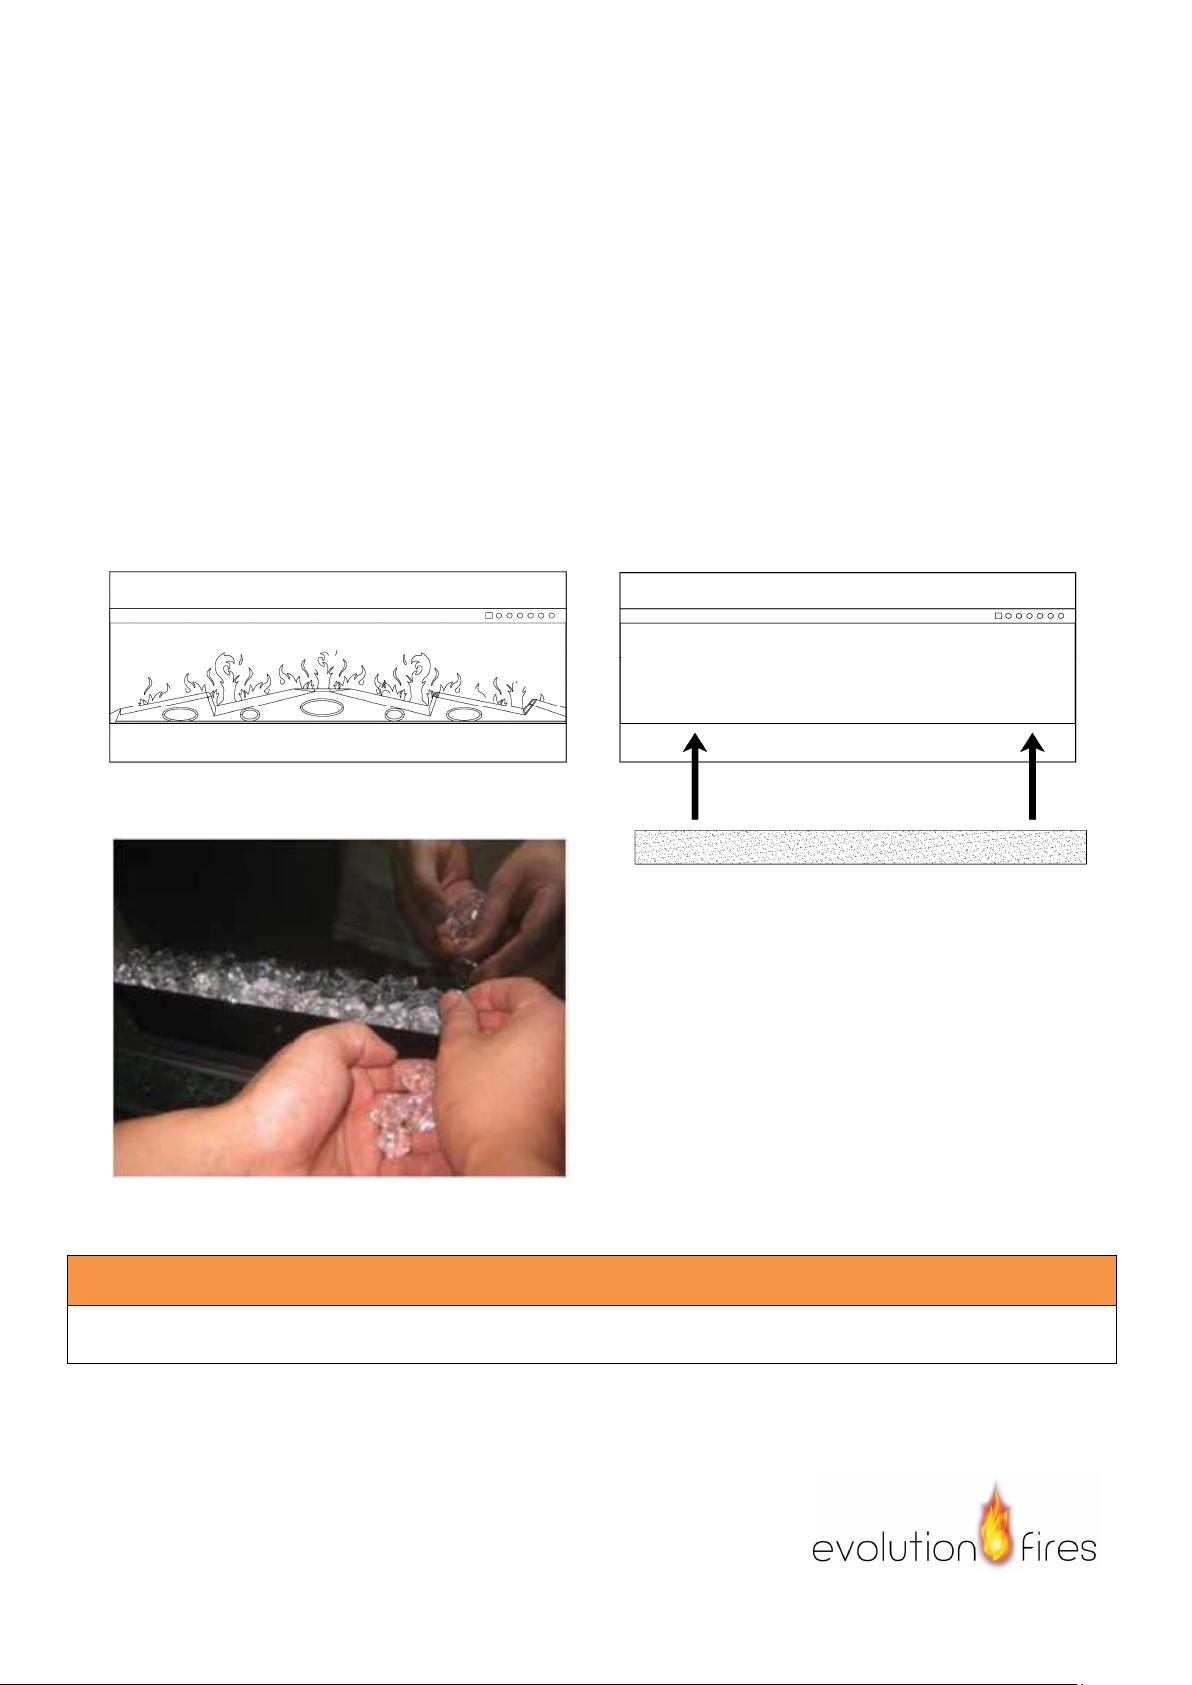
Log-set / Crystal Ember Installation
(NOTE:Please make the installationaccordingtotheemberswhich you bought or selected.)
A.
Glass front must be removed and the appliance must be mounted in its final location
before the log-set / crystal / pebble embers are installed.
B.
If yourfireplace come with log-set, You do not need to do anythingjust use as it is . Figure1.
C.
To switch to Crystals, firstly take the Log-set out of the fireplace slot, then Place the plastic tray
( J ) to the fireplace designed place.Then carefullyplacecrystalembersintotheplastictray as
illustrated. Apply an even layer from side to side. Figure 2, Figure 3.
Figure 1
Figure 2
Figure 3. (Crystal medias)
HARD WIRING INSTALLATION
HARD WIRING CONNECTION
If it is necessary to hard wire this appliance, a qualified electrician must remove the cord connection, and wire
WARNING
TURN OFF THE APPLIANCE COMPLETELY AND LET COOLBEFORESERVICING.ONLYAQUALIFIEDSERVICE
PERSON SHOULD SERVICE AND REPAIR THIS ELECTRIC APPLIANCE.
Page 11
10
the appliance directly to the house hold wiring.
This appliance must be electrically connected and grounded in accordance with local codes, if hard wired. In
the absence of local codes, use the current CSA C22.1 CANADIAN ELECTRICAL CODE in Canada or the
current ANSI/NFPA 70 NATIONAL ELECTRICAL CODE in the United States.
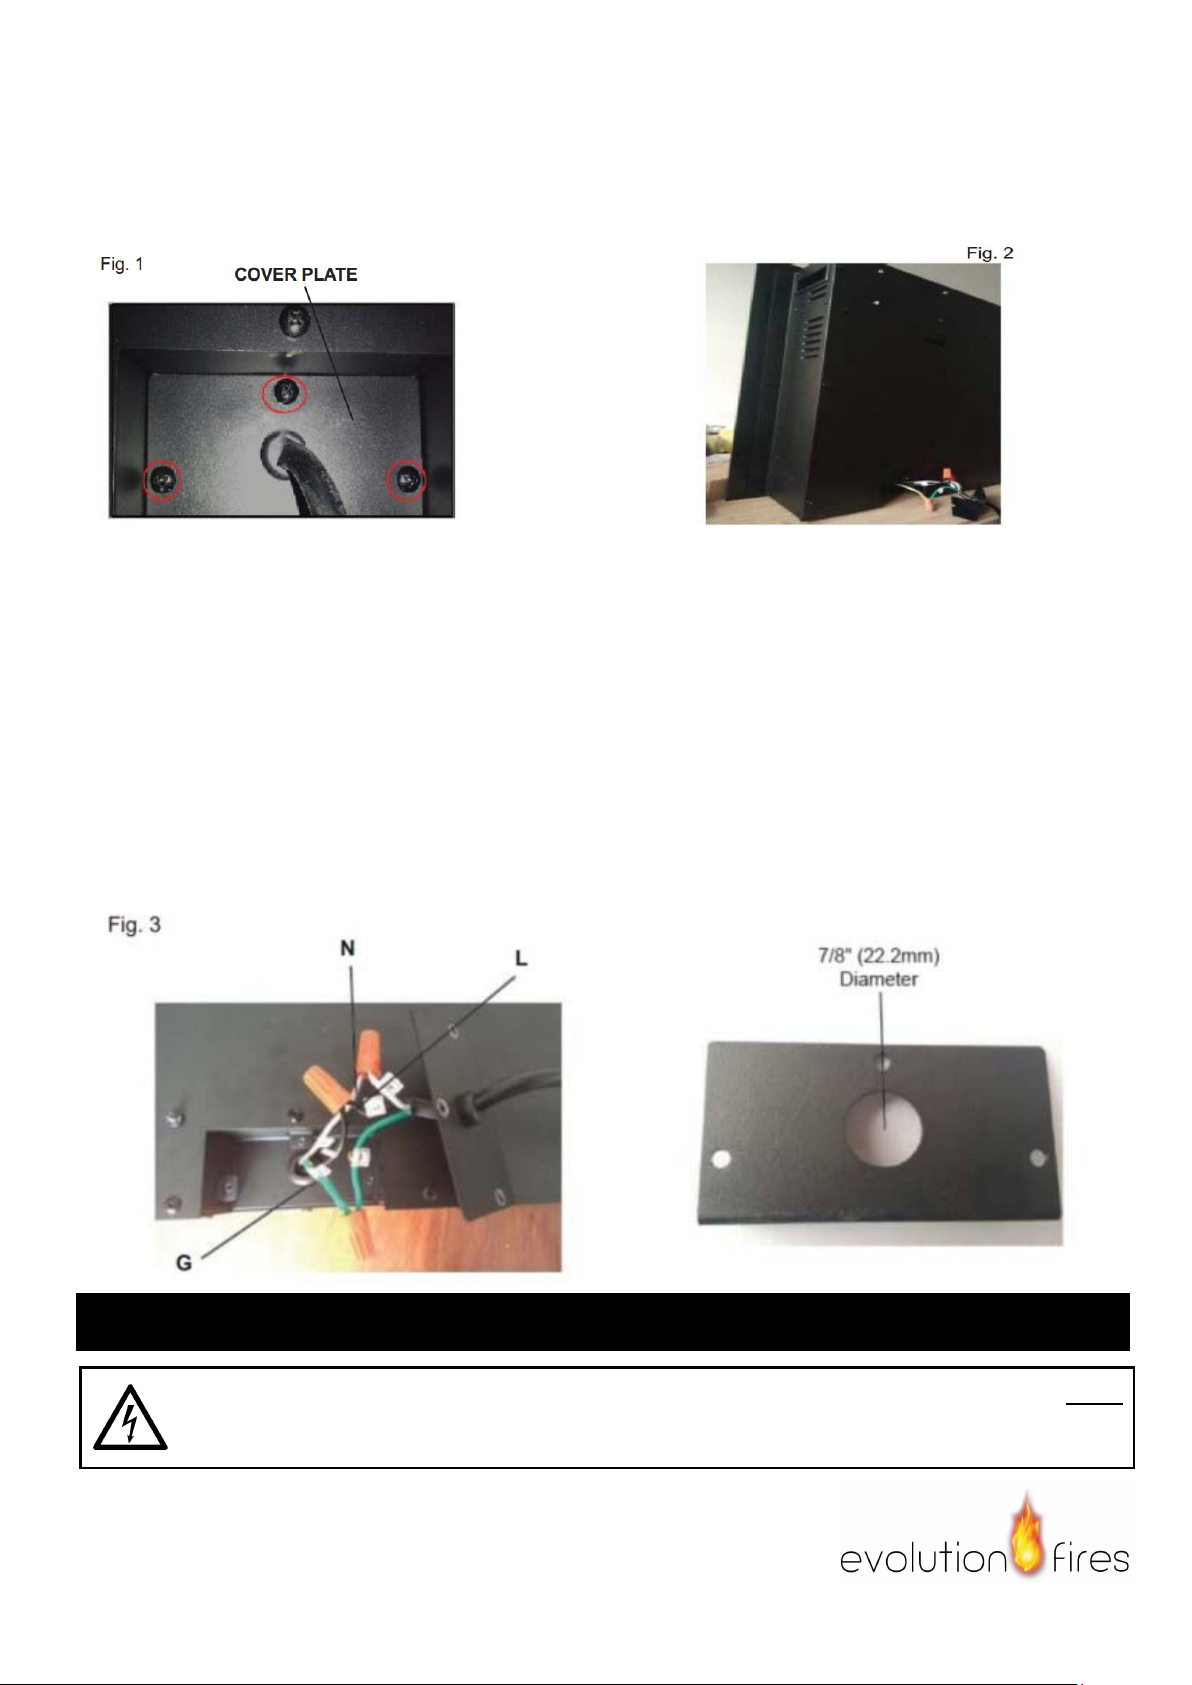
A. Remove the cover plate from the right side B. Remove the wire connectors from the power
bottom of the appliance by removing the three cord. The power cord may be discarded.
screws, as shown above.
C. Take the new cover plate, supplied in the hardware bag. Punch out the 7/8" (22.2mm) hole and install
aboxconnectorthrough,intothejunctionbox.Snaptheboxconnectorclampontothesupplywires.
D. Using the wire connectors, connect the ground green wires (G), the common white wires (N)
together, then the hot black wires (L) and then the refer to Figure 3.
E. Reinstall the cover plate using the three screws, as shown in Figure 1.
Operation
Read and understand this entire owner’s manual, including all safety information,before
plugging in or using this product. Failure to do so could result in electric shock, fire, serious
injury, or death.
Figure ( H )
Page 12
11
Power
Plug the power cord into a 110~120 Volt 15 Amp grounded outlet (see IMPORTANT SAFETY INFORMATION
on Pages 2 and 3). Make sure the outlet is in good condition and that the plug is not loose. NEVER exceed the
maximum amperage for the circuit. DO NOT plug other appliances into the same circuit.
Methods of Operation
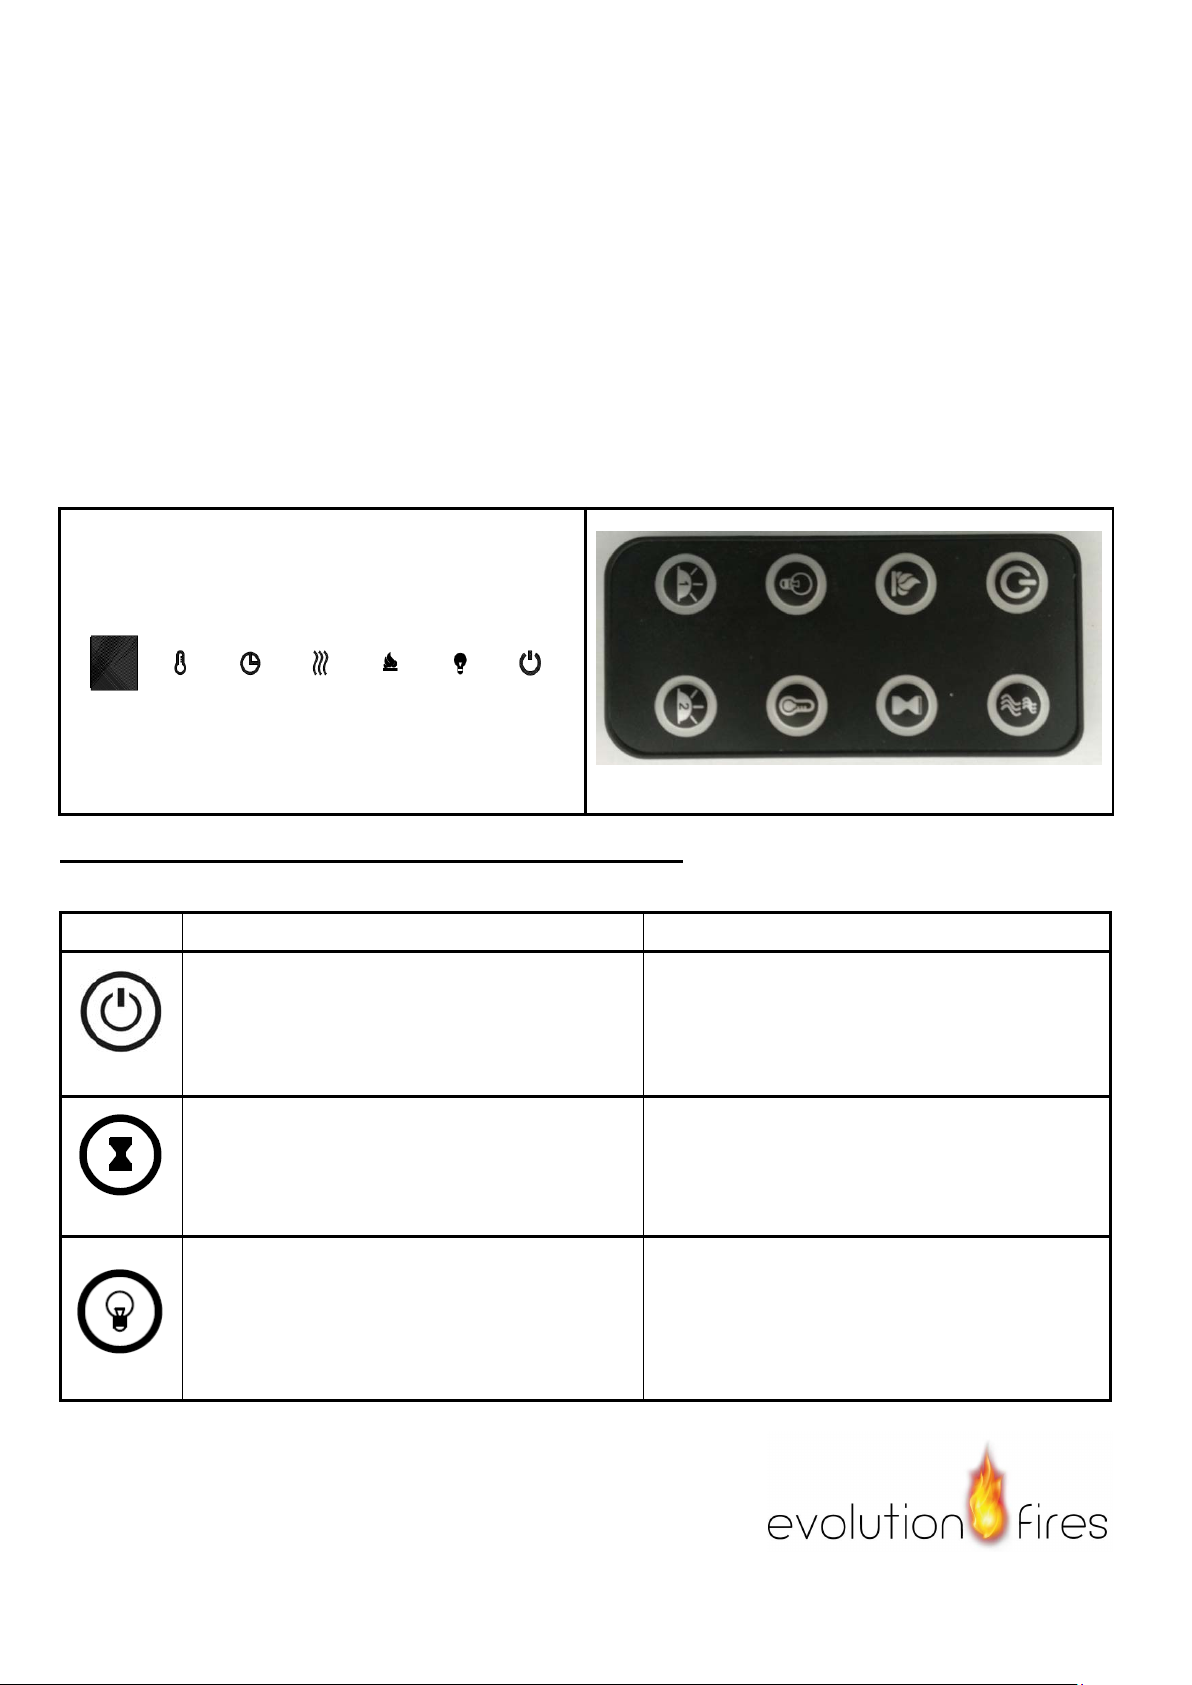
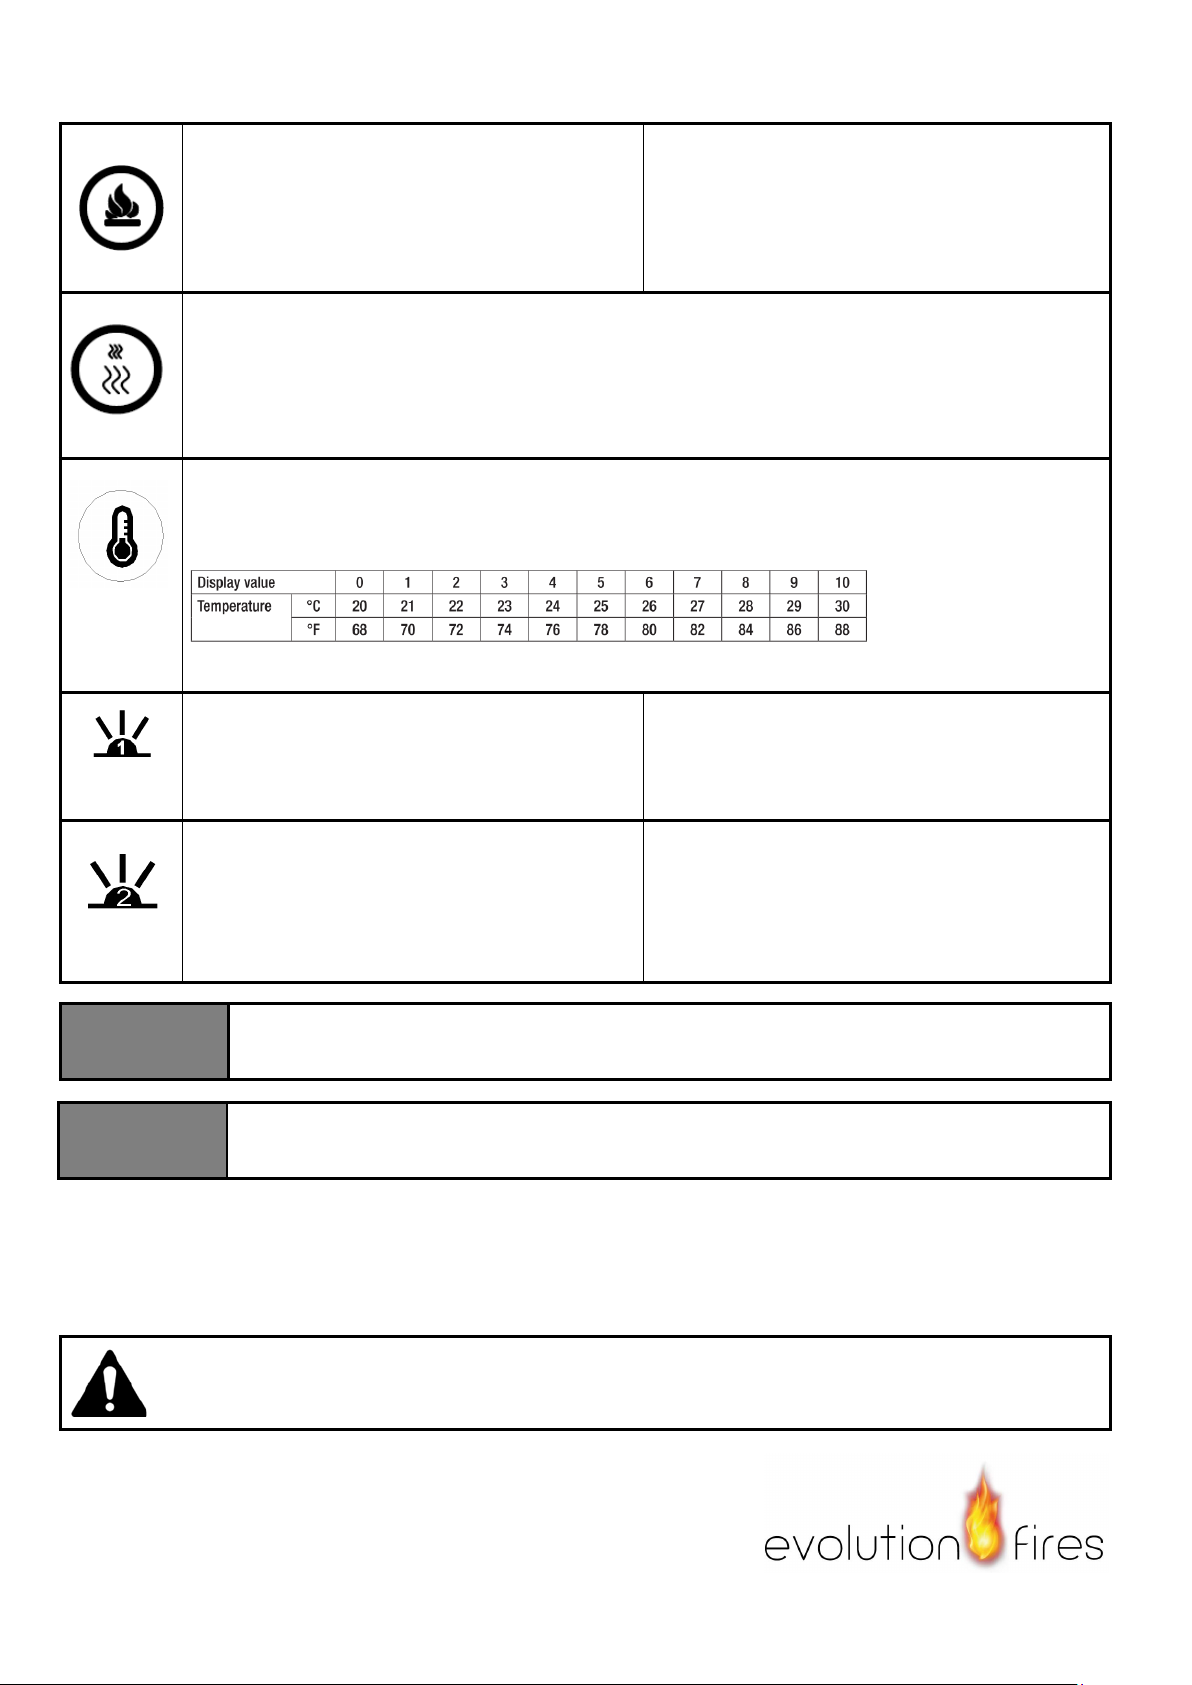
This electric fireplace can be operated by the TOUCH PANEL, located on the right side panel of the fireplace
(see figure below), or by the battery-powered REMOTE CONTROL.
The operation and functions of the two methods are the same.
Before operating, please review the IMPORTANT SAFETY INFORMATION on Pages 2 and 3, and heed all
warnings.
Remote Control &Control Panel Operation
BUTTON FUNCTION ACTION & INDICATION
POWER
ON:Enablescontrolpanelfunctionsand
remote control. Turns on flame effect.
OFF:Disablescontrolpanelfunctionsand
remote control. Turns off flame effect.
1. Press once.Indicatorlightturnson. Power
turns on. All functions enabled.
2. Press again.Flameeffectturnsoff.Unit
goes to standby . All functions turn off.
TIMER
TIMER button:Controlstimersettingstoturn
off fireplace at selected time.
Settings range from 0.5 hours to 7.5 hours.
1. Press once.Indicatorlightturnson. Timeris
set to 0.5 hours.
2. Press again until desired setting is
reached.Indicatorlightsshowsetting.
FLAME
FLAME button:Makesflameeffectdimmer
and brighter.
NOTE: Flame effect stays on until power
button is turned off. Flame effect must be on
for fireplace to turn on.
1. Press once.Flamebrightnesseffectgets
changing.
2. Press again. until desired setting is reached.
Page 13
12
COLOR
COLOR button:Makesthe colorflameeffect
changing.
NOTE: color effect stays on until power button
is turned off. Color flame effect must be on for
fireplace to turn on.
1. Press once.Flamecoloreffectgets
changing.
2. Press again until desired setting is
reached.total 3 colors.
HEATER
HEATER button:Turnsheateronandoff.
NOTE: The heater only works when the flame effect is on. If the flame effect is off, the heater
will not turn on.
NOTE: To p r e v e nt o v e rh ea ti ng , t he he a t e r b l ow s co ol a ir f or 1 0 s e c o nd s
Temperatu
re
1. Press once: Touch panel indicator becomes active.
2. Press again until desired setting is reached. Digital display shows setting circles as
belows.
NOTE: Press the button for 5 seconds to switch between °C and °F
LED Ember light button ( 1 ): Makes the
color on bottom effect changing.
NOTE: Ember color effect stays on until
power button is turned off.
1.Pressonce.Embercoloreffectgets
changing.
2. Press again. until desired setting is
reached, in total 10 colors recycling.
LED Bottom light button ( 2 ): Makes the
color on bottom effect changing /flash
changing automatically.
NOTE: Ember color effect stays on until
power button is turned off.
1. Press once.Embercoloreffectgets
changing automatically.
2. Press again. Ember color effect gets
with flash changing automatically .
NOTICE
When the fireplace is first turned on, a slight odor may be present. This is normal and
should not occur again unless the fireplace is not used for a long period of time.
NOTICE
To improve operation, aim the remote control at the front of the fireplace. DO NOT press
the buttons too quickly.Givetheunittimetorespondtoeachcommand.
Remote Control Battery Information
This remote control uses two CR2025 battery (included).
Instructions for battery installation are on the Remote Control battery compartment.
NEVER dispose of batteries in fire. Failure to observe this precaution may result in an
explosion.Disposeofbatteriesatyourlocalhazardousmaterialprocessingcenter.
Page 14
13
Care and Maintenance
Cleaning
ALWAYS turn the fireplace OFF and unplug the power cord from the outlet before cleaning,
performing maintenance, or moving this fireplace. Failure to do so could result in electric shock,
fire, or personal injury.
NEVER immerse in water or spray with water. Doing so could result in electric shock, fire, or
personal injury.
Metal:
Buff using a soft cloth, slightly dampened with a citrus oil-based product.
DO NOT use brass polish or household cleaners as these products will damage the metal trim.
Glass:
Use a good quality glass cleaner sprayed onto the cloth or towel. Dry thoroughly with a paper towel or
lint-free cloth.
NEVER use abrasive cleansers, liquid sprays, or any cleaner that could scratch the surface.
Vents:
Use a vacuum or duster to remove dust and dirt from the fireplace and vent areas.
Plastic:
Wipe gently with a slightly damp cloth and a mild solution of dish soap and warm water.
NEVER use abrasive cleansers, liquid sprays, or any cleaner that could scratch the surface.
Maintenance
Risk of electric shock! DO NOT OPEN any panels ! No user-serviceable parts inside!
ALWAYS turn the fireplace OFF and unplug the power cord from the outlet before cleaning,
performing maintenance, or moving this fireplace. Failure to do so could result in electric shock,
fire, or personal injury.
Electrical and Moving Parts:
The fan motors are lubricated at the factory and will not require lubrication.
Electrical components are integrated in the fireplace and are not serviceable by the consumer.
Storage:
Store fireplace in a clean dry place when not in use.
WARNING! NO SERVICING of the internal or electrical parts should be performed by the
consumer. Do not service the unit yourself.
Page 15

14
 Loading...