

Evolution Aqua evoUV Series, evo30, evo15, evo55, evo75 Installation And Operating Manual
...Page 1
EVO1291120171MAN
UK/EU English
Affix serial number here
INSTALLATION AND OPERATING MANUAL
Complete instructions for all models of evoUV
15 25 30 55 75
WARNING:
• Ensure that the unit is switched off at the mains before you attempt to conduct
any type of maintenance on the evoUV.
• Ensure the unit is installed in the recommended orientation, see page 9.
• Ensure that the end cap is tight before running the unit.
• After replacing bulbs or before tightening the end cap, make sure that the O-Rings
are in the correct position, and the bulb sockets are dry.
• If the electrical connections get wet, dry thoroughly before switching power on.
• Do not attempt to tamper or access the electrical connections inside the evoUV,
as doing so will invalidate the warranty.
Evolution Aqua Ltd. - Evolution House - Kellet Close - Wigan - Lancashire - United Kingdom - WN5 0LP
Page 2
WARNING: PLEASE READ THE FOLLOWING
SAFETY INFORMATION FIRST.
IMPORTANT SAFETY INFORMATION
- Never look directly at an illuminated UV bulb.
- Do not run this unit dry.
- Do not cover this unit.
- Please ensure that the unit is full of water before switching it on.
- Always isolate the unit from mains electricity and turn off any water supply before carrying out
any maintenance.
- Always disconnect all pond appliances from the mains supply before putting your hands into
the water.
- Use in the area of the garden pond only if the installation complies with the relevant wiring
regulations.
- Power must be supplied through a Residual Current Device (RCD) with a residual operating
current not exceeding 30mA.
- This unit must be earthed when earth wire is fitted.
- Never use a fuse larger than 3 amps on the power lead.
- The unit must not be submerged in water.
- The unit should be mounted in the recommended position for damp / wet environments.
- If the quartz sleeve is cracked, replace it immediately.
- The unit must be either fully frost protected or taken inside during Winter months.
- Young children should always be supervised near water.
PRODUCT INFORMATION
- Rating UK and EU:
evo15 and evo25: 220-240V, 50Hz.
evo30, evo55, evo75 and evo110: 220-240V, 50/60Hz.
- Rating in USA only:
All models: 100-277V, 50/60Hz.
- Class 1, IPX5 (IP64 for evo110 only).
- All components are CE compliant.
Disposal Of Your Old Product
Your product is designed and manufactured with high quality material and components,
which can be recycled and reused. When this crossed-out wheeled bin symbol is
attached to a product, it means the product is covered by the European Directive
2002/96/EC. Please contact your local authority about correct disposal for electrical
and electronic equipment. Our WEE Registration Number is WEE/FE1471RR.
Please act according to your local rules and do not dispose of your old products with
your normal household waste. The correct disposal of your old product will help prevent
potential negative consequences for the environment and human health.
Page 3

INTRODUCING EVOLUTION AQUA’S evoUV
Congratulations on purchasing an Evolution Aqua evoUV. Our range of evoUV pond
clarifiers have been manufactured using the latest technology and design techniques.
evoUVs have been designed to clear green water which is caused by single celled
green algae, and prevent it from returning. evoUVs will work alongside many different
filtration systems but when used alongside Evolution Aqua’s pond filtration systems, the
evoUV will deliver crystal clear and healthy pond water.
Please read this instruction manual carefully from start to finish before attempting to
install your evoUV.
UNBOXING THE evoUV
On opening the box, you can see that the UV bulb and quartz sleeve are packed
separately for safe transit. Please refer to pages 7 and 8 of this manual for instructions
on how to install the bulb and quartz sleeve. Quartz Sleeve O-Rings and End Cap
Sealing Rings are packed in a small bag inside the box.
On the evo110 the stainless steel mounting brackets are located in the cardboard end
fitment, please remove these and fit to the evo110 as instructed on page 9.
Please take time to familiarise yourself with your evoUV and its components.
CONTENTS
evoUV Diagram and components list PAGE 4
Flow Rates PAGE 6
Installing the quartz sleeve PAGE 7
Installing the UV bulb PAGE 8
Positioning and Mounting the evoUV PAGE 9
Connection to Your Pipework PAGE 11
Connection to the Electricity Supply PAGE 15
UV Bulb Replacement PAGE 16
Replacing / Cleaning the Quartz Sleeve PAGE 17
In Built Protection PAGE 18
Trouble Shooting PAGE 19
Frequently Asked Questions PAGE 20
Guarantee PAGE 21
3
Page 4
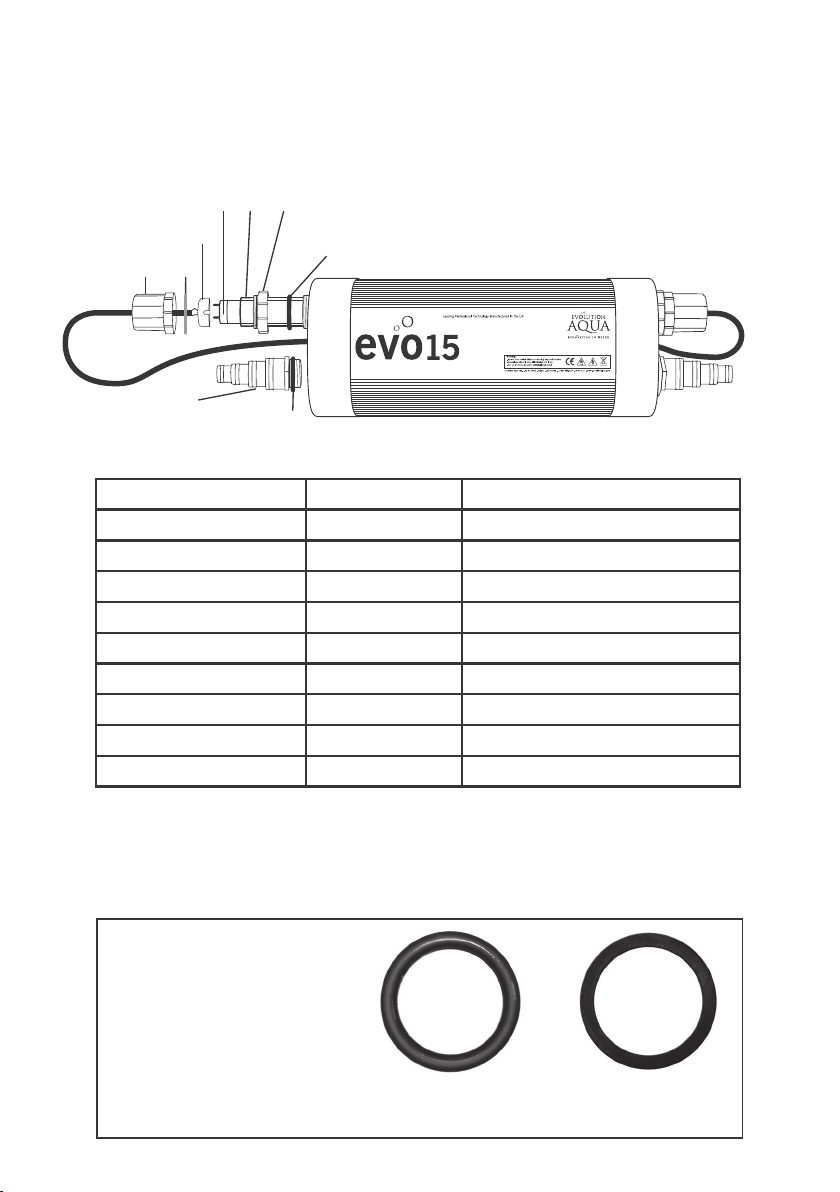
evoUV DIAGRAMS AND COMPONENTS LIST
Please familiarise yourself with the components shown in the diagram below:
(C)(D) (H)
(F)
(G)
(I)
(B)
Professional UV Clarifier
INLET / OUTLET
(E)
(A)
Description Diagram Code EA Order Code
1½” Hosetail A HOSETAIL15TH
End Cap B EVOCONNUT
UV Bulb C Available from your EA Dealer*
Quartz Sleeve D Available from your EA Dealer*
Hosetail O-Ring E EVOUVORINGHOSET
Bulb Socket F LAMPHOLDER-T8
Quartz Sleeve O-Ring G EVOUVORINGZ
Locking Nut H EVO-M/F
End Cap Sealing Ring I EVOUVOFLATWASHER
*For optimum performance, the electronic ballast has been configured for UV
bulbs supplied by Evolution Aqua. When sourcing replacement UV Bulbs or quartz
sleeves always buy components supplied by Evolution Aqua from your nearest
Evolution Aqua stockist.
IDENTIFYING THE O-RingS
These O-Rings are packed in
a small bag inside the box.
QTY X 2: Quartz Sleeve
O-Rings (G)
QTY x 2: End Cap
Sealing Rings (I)
Round
O-Ring
Quartz Sleeve
O-Ring (G)
Flat
Washer
End Cap Sealing
Ring (I)
4
Page 5
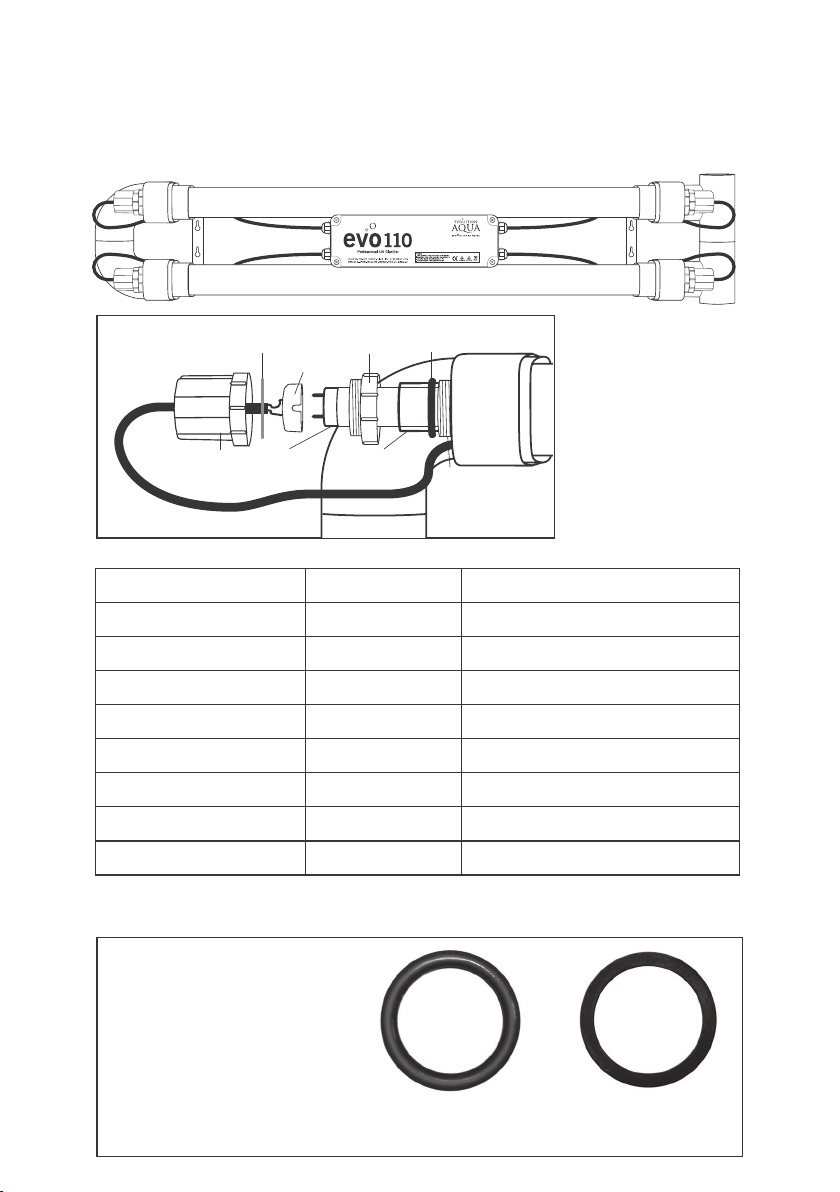
evoUV DIAGRAMS AND COMPONENTS LIST (evo110)
(B)
(C)
(F)
(I)
(D)
Thread
(G)
(H)
Please familiarise yourself with the components shown in the diagram below:
*For optimum
performance, the
electronic ballast has
been configured for
UV bulbs supplied by
Evolution Aqua. When
sourcing replacement UV
Bulbs or quartz sleeves
always buy components
supplied by Evolution
Aqua from your nearest
Evolution Aqua stockist.
Description Diagram Code EA Order Code
End Cap B EVOCONNUT
UV Bulb C Available from your EA Dealer*
Quartz Sleeve D Available from your EA Dealer*
Hosetail O-Ring E EVOUVORINGHOSET
Bulb Socket F LAMPHOLDER-T8
Quartz Sleeve O-Ring G EVOUVORINGZ
Locking Nut H EVO-M/F
End Cap Sealing Ring I EVOUVOFLATWASHER
For European models two 2" imperial to 63mm metric reducers are supplied.
IDENTIFYING THE O-RingS
Round
O-Ring
Quartz Sleeve
O-Ring (G)
Flat
Washer
End Cap Sealing
Ring (I)
These O-Rings are packed in
a small bag inside the box.
QTY X 4: Quartz Sleeve
O-Rings (G)
QTY x 4: End Cap
Sealing Rings (I)
5
Page 6
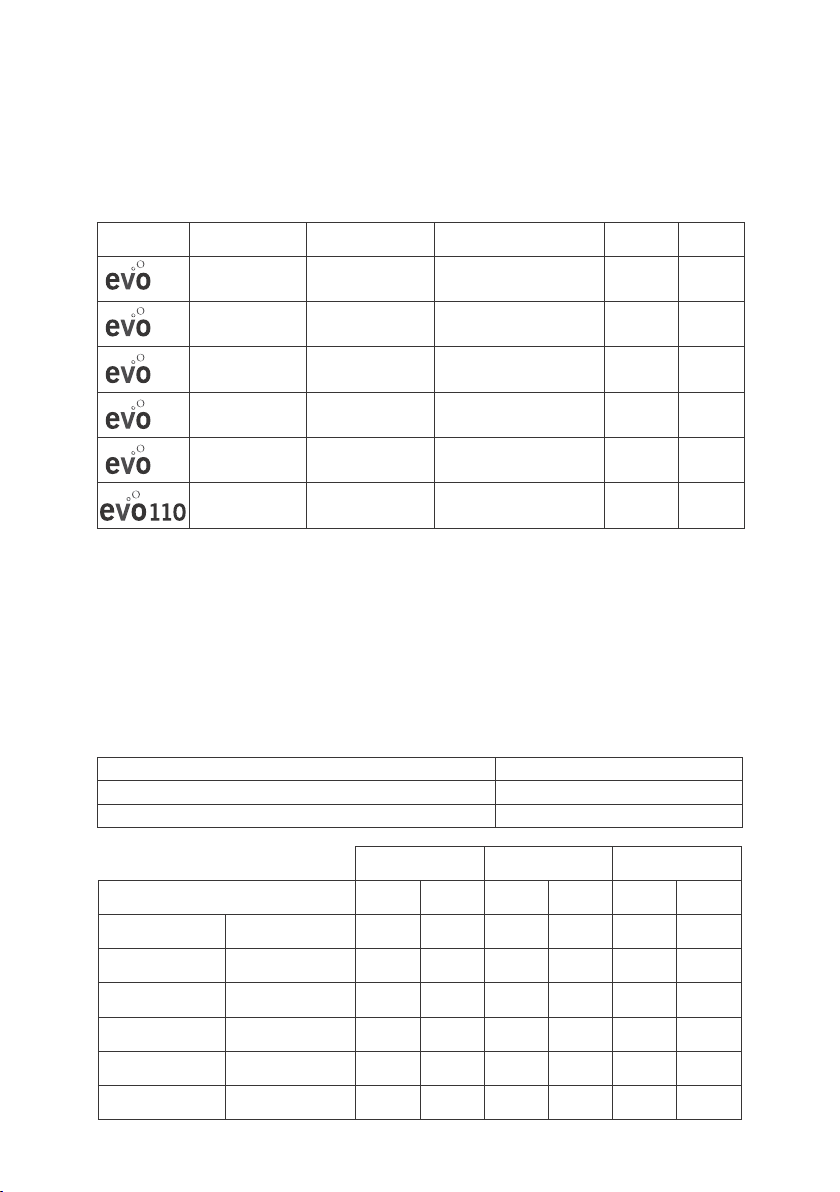
FLOW RATES
75
Please note: For optimum performance we recommend that you pass the entire
volume of your pond through the evoUV unit once every 2 to 3 hours.
We do not recommend the use of pumps with operating pressures in excess of 3 bar.
Model Max. pond size Max. flow rate Bulb power
15
25
30
55
15,000 Litres
3,300 UK Gallons
3,963 US Gallons
20,000 Litres
4,400 UK Gallons
5,284 US Gallons
30,000 Litres
6,600 UK Gallons
7,925 US Gallons
55,000 Litres
12,100 UK Gallons
14,530 US Gallons
75,000 Litres
16,500 UK Gallons
19,815 US Gallons
75,000 Litres
16,500 UK Gallons
19,815 US Gallons
7,500 Litres/hr
1,650 UK Gallons/hr
1,982 US Gallons/hr
10,000 Litres/hr
2,200 UK Gallons/hr
2,642 US Gallons/hr
15,000 Litres/hr
3,300 UK Gallons/hr
3,962 US Gallons/hr
20,000 Litres/hr
4,400 UK Gallons/hr
5,284 US Gallons/hr
25,000 Litres/hr
5,500 UK Gallons/hr
6,605 US Gallons/hr
25,000 Litres/hr
5,500 UK Gallons/hr
6,605 US Gallons/hr
15W (1 x 15W T8) 1½"
25W (1 x 25W T8) 1½"
30W (1 x 30W T8) 1½"
55W (1 X 55W T8) 1½"
75W (1 X 75W T8) 1½"
110W (2 X 55W T8) 2"
Inlet /
Outlet
Fittings
supplied
2 x 1½"
Threaded
Hosetails
2 x 1½"
Threaded
Hosetails
2 x 1½"
Threaded
Hosetails
2 x 1½"
Threaded
Hosetails
2 x 1½"
Threaded
Hosetails
No
Fittings
Supplied
Your evoUV will keep your pond clear of green water up to its maximum capacity.
However, it is important to note that there are factors that affect how you select the
right size of evoUV for your pond.
You will need to take into consideration such things as stocking levels, sunlight /
shade, daily sunshine amounts etc. This is not always possible to calculate, and if
this is the case, use the tables below as a guide. It must be stressed however,
that these are only guidelines, and you should take advice from your local
Evolution Aqua dealer
USA - Southern States / Mediterranean 3 Watts UV per 1,000 litres
Northern Europe including UK 2 Watts UV per 1,000 litres
USA - Northern States / Canada 1 Watts UV per 1,000 litres
6
<
7,500 Litres
<
15,000 Litres
<
20,000 Litres
<
30,000 Litres
<
55,000 Litres
<
75,000 Litres
POND SIZE
<
<
<
<
<
<
<
<
<
12,100 UK Gallons
<
14,530 US Gallons
<
16,500 UK Gallons
<
19,815 US Gallons
1,650 UK Gallons
1,982 US Gallons
3,300 UK Gallons
3,963 US Gallons
4,400 UK Gallons
5,284 US Gallons
6,600 UK Gallons
7,925 US Gallons
POND IS IN
FULL SHADE
LOW
STOCK
HIGH
STOCK
evo15 evo15 evo15 evo15 evo15 evo25
evo15 evo25 evo15 evo25 evo25 evo30
evo25 evo30 evo30 evo30 evo30 evo55
evo30 evo55 evo55 evo55 evo55 evo55
evo55
evo75 /
evo110*
evo75 /
evo110*
evo75 /
evo110*
POND IS IN
PART SHADE
LOW
STOCK
evo75 /
evo110*
evo75 /
evo110*
*evo110 offers even more UV per volume than the evo75 for more demanding situations
HIGH
STOCK
evo75 /
evo110*
evo75 /
evo110*
POND IS IN
FULL SUN
LOW
STOCK
evo75 /
evo110*
evo75 /
evo110*
HIGH
STOCK
evo75 /
evo110*
evo75 /
evo110*
Page 7
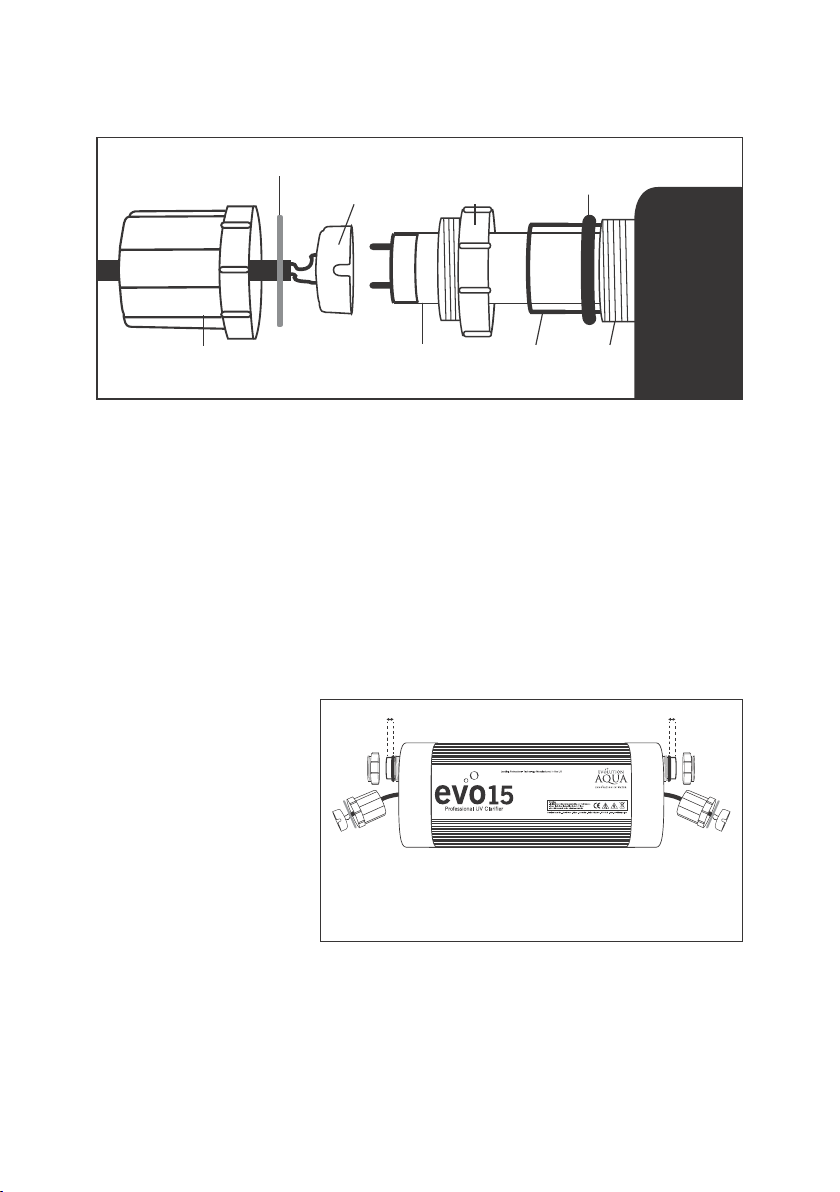
INSTALLING THE QUARTZ SLEEVE
Quartz
Quartz
Sleeve
O-Ring (G)
Thread
evoUV
Body
End Cap Sealing Ring (I)
Bulb Socket (F)
End Cap (B) UV Bulb (C)
Locking
Nut (H)
Sleeve (D)
1. Starting at one end of the unit, unscrew the black end cap (B). You will notice
that this black end cap houses the bulb socket (F).
2. Unscrew the white locking nut (H) from the same end.
3. Repeat steps 1 and 2 at the other end of the unit.
4. Take the quartz sleeve (D) from the packaging box and slide it through the evoUV
until it finds the hole at the far end of the unit.
5. Take the quartz sleeve O-Ring (G) and fit it around one end of the quartz sleeve.
6. Slide this quartz sleeve O-Ring (G) towards the thread on the evoUV body,
ensuring that equal amounts of quartz sleeve are visible at each end of the unit.
7. Fit the quartz sleeve
O-Ring (G) at the
EQUAL AMOUNTS MUST BE VISIBLE
other end of the quartz
sleeve, again ensuring
that equal amounts
of quartz sleeve are
visible at each end of
the unit.
8. Now screw the white
locking nut (H) back
IMPORTANT: Ensure that equal amounts of the
quartz sleeve are visible at each end of the unit
before fitting the locking nuts.
into position.
9. Ensure the locking nut is HAND TIGHTENED to prevent causing damage to the
O-Ring. No tools are needed.
10. Repeat steps 8 and 9 at the other end of the unit.
11. The quartz sleeve is now in position ready to take the UV bulb.
HAND TIGHTEN FITTINGS ONLY - DO NOT USE TOOLS
7
Page 8
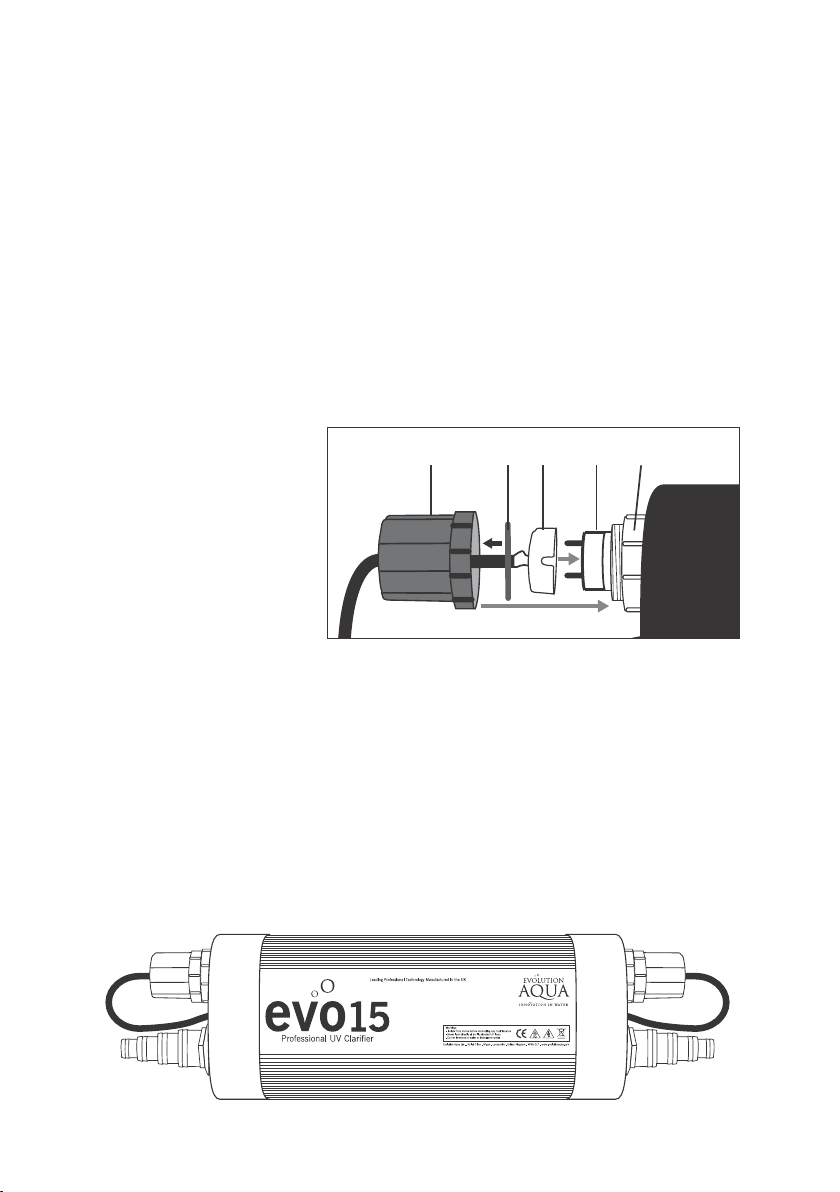
INSTALLING THE UV BULB
1. Remove all packaging from the UV bulb (C).
2. Slide the UV bulb (C) carefully through the quartz sleeve (D) that you have
just fitted, as per the instructions on page 6.
3. While holding one of the black end caps (B) gently push the cable through the
end cap which will make it easier to fit the bulb socket (F) in step 5.
IMPORTANT: Do not pull the cable by holding just the bulb socket.
4. Fit the End Cap Sealing Ring (I) over the bulb socket and locate it into the end
cap so it is seated on the inside lip of the end cap.
IMPORTANT: Ensure the end cap sealing ring is not twisted and it remains in
this location throughout the installation.
5. In no particular order,
align the UV bulb
pins with the holes in
the bulb socket and
carefully push the bulb
socket firmly onto the
UV bulb pins. You may
need to hold the other
end of the UV bulb to
help you fit the socket.
6. Ensure the UV bulb socket is firmly connected to the UV bulb.
7. Repeat steps 3 to 6 at the other end of the unit.
8. Now at one end of the unit, slide the black end cap (checking that the sealing ring
in position) over the bulb socket while carefully holding the cable to prevent the
bulb connector disconnecting from the UV bulb.
9. Screw this end cap onto the thread on the white locking nut (H) already
connected to the UV body. HAND TIGHTEN ONLY.
10. Repeat steps 8 and 9 at the other end of the unit.
11. Check that all of the fittings are hand tightened. No tools are needed.
(B) (I) (F) (C) (H)
8
Illustration shows a finished evoUV set-up
Page 9
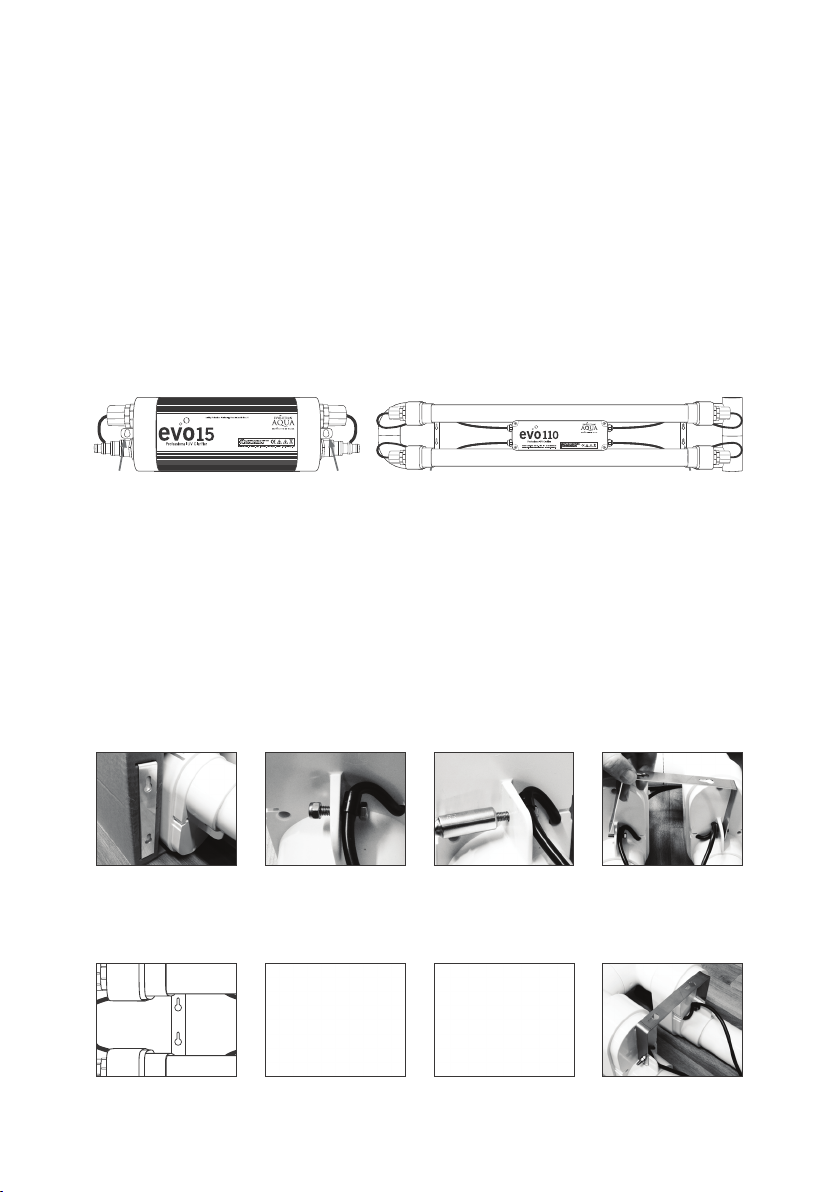
POSITIONING AND MOUNTING THE evoUV
If you are going to position your evoUV outside or in an area where it is likely to get
splashed regularly with water, then you must mount the unit the correct way up,
as shown in the illustration below. If your evoUV will be positioned in a
permanently dry environment then it can be installed in any position.
Your evoUV must not be submerged in water or placed in a position where water
may collect around the unit. The electrics within the evoUV units are sealed in a
water tight unit. evoUV has an IP rating of X5, the evo110 model is IP64.
Please ensure that there is enough space at one end of the evoUV to enable bulb /
quartz sleeve removal and maintenance.
MOUNTING
BRACKETS
MOUNTING
BRACKETS
MOUNTING
BRACKETS
MOUNTING
BRACKETS
Fix your evoUV into position using the stainless steel brackets provided.
The brackets come pre-fitted on evo15, 25, 30, 55 and 75 models.
PLEASE NOTE: Wall mounting screws and washers are not provided.
Fitting evo110 mounting brackets
Two stainless steel mounting brackets are included with the evo110. These are
located within the cardboard packaging end fitment. Hex screws and nuts are
pre-installed in position to secure the brackets to the unit. Follow the steps below to
undertake this. PLEASE NOTE: Wall mounting screws and washers are not provided.
Remove brackets
from both cardboard
packaging end
fitments.
Screws and nuts are
pre-installed in position
where the brackets
need to go.
At one end of the UV,
unscrew the nuts only
but leave the screws
and cable holder in
place.
With the nuts off, fit the
bracket over the screw
threads with drill holes
facing upwards - ready
for wall mounting.
Double check the
brackets are the correct
way up to help with
wall mounting.
Using an 8mm spanner
to hold the screw
heads, tighten up the
nuts to secure the
bracket.
Repeat the process for
the bracket at the other
end of the UV.
Your evo110 is now
ready to be mounted to
the wall.
9
Page 10
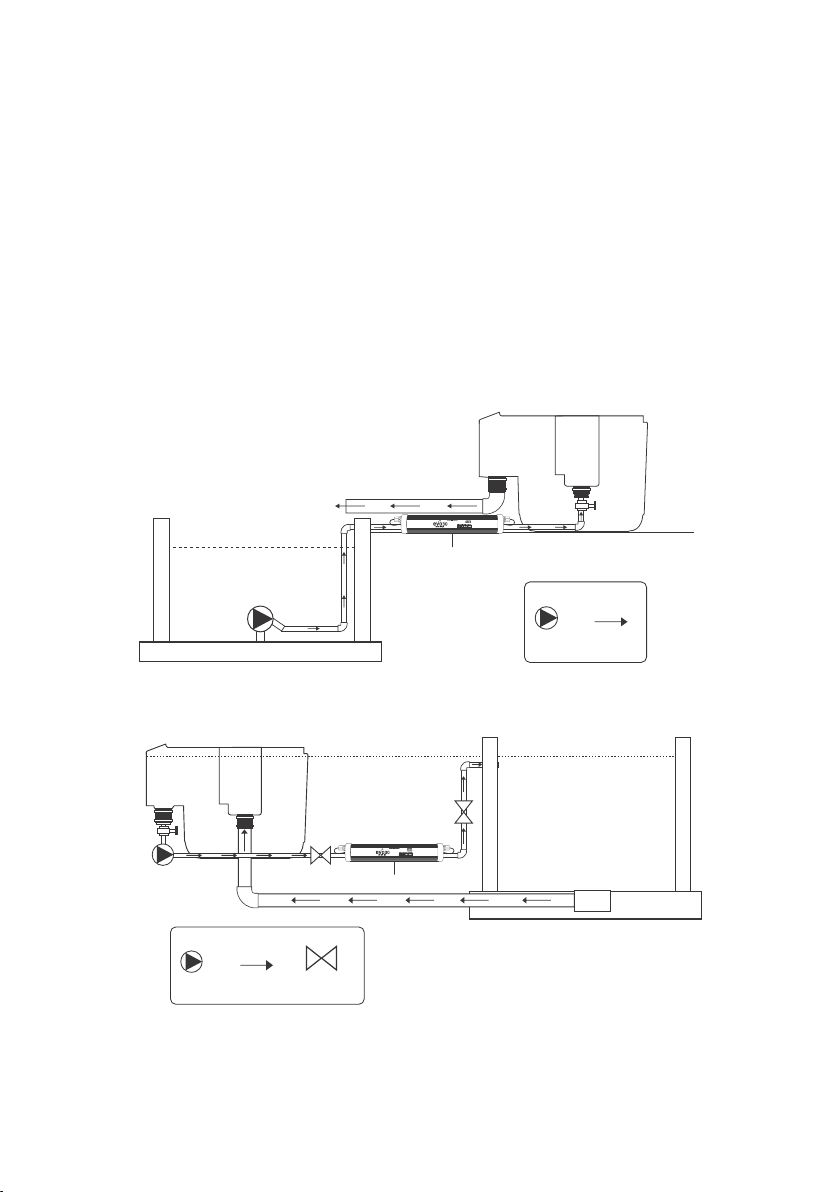
POSITIONING AND MOUNTING THE evoUV
If installing the unit prior to or without a pond filter, we would recommend the use
of a pre-filter on the water pump to prevent excess solids from being pumped into
the unit. The evoUV may be connected to the water flow on any pumped line, this
could be, for instance, a skimmer line or any other additional pumped line. The two
most common forms of set up are pump fed and gravity fed, shown below:
Most evoUV are designed to take 1½" threaded fittings.
Note: evo110 is 2" plain fittings only.
*If your evoUV will be positioned in a permanently dry environment then it can be
installed in any position.
Pump Fed Installation
POND
FILTER
MAINS
POWER
LEAD
EVOUV
SYMBOL KEY:
PUMP
DIRECTION OF
WATER FLOW
WATER
PUMP
POND
10
Gravity Fed Installation
WATER LEVEL
POND
FILTER
POND
MAINS
POWER
WATER
PUMP
SYMBOL KEY:
PUMP
DIRECTION OF
WATER FLOW
BALL VALVE /
SERVICE VALVE
EVOUV
LEAD
PLEASE NOTE:
On Gravity Fed systems it is recommended to install a ball valve either side of the
evoUV for maintenance.
Page 11
CONNECTION TO YOUR PIPEWORK (evo15, 25, 30, 55, 75 only)
IMPORTANT: Do not overtighten fittings.
The two universal hosetails supplied with the evoUV, should be screwed into the
inlet / outlet at either end of the unit. Hosetails should be tightened using hand
pressure only. Ensure that the O-Rings are in position before assembling. Please
note that there is no correct direction of flow through the unit, either end of the unit
may be used as the inlet or outlet.
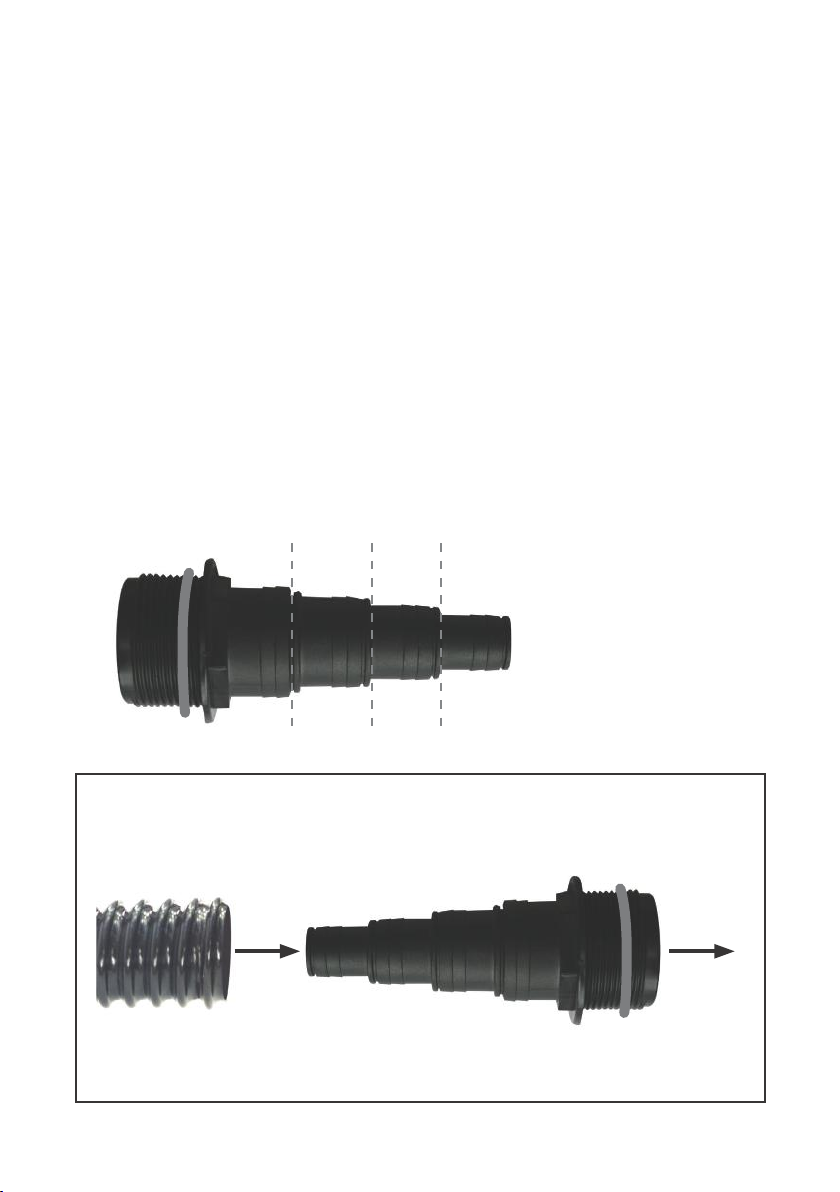
Connection with flexible hose
The evoUV is supplied with two universal hosetails to take ¾”, 1”, 1¼”, and
1½” diameter flexible hose. If you are using one of the two larger sizes, the smaller
sections of the hosetails must be cut off to ensure sufficient water flow and to prevent
possible damage to the pump. We recommend that you use the largest diameter hose
available. The hosetails should be trimmed away from the unit as shown in the diagram
below. Once the hosetails have been trimmed, attach them to the unit as shown below.
Secure the flexi-hose to the hosetail with a stainless steel hose clip (not provided).
CUT
CUT CUT
1½” 1¼” 1” ¾”
CUT AND REMOVE
UNWANTED HOSETAILS
CONNECTION TO FLEXIBLE HOSE
Use these fittings to connect 1½" Flexible Hose to an evoUV.
Use a stainless steel hose clip (not supplied) to secure the hose to the fitting.
DO NOT OVERTIGHTEN HOSETAIL
Screw into
evoUV
(Hand tight only)
EA FITTING CODE:
HOSETAIL15TH
Threaded Hosetail Fitting
O-Ring
11
Page 12

CONNECTION TO YOUR PIPEWORK (evo15, 25, 30, 55, 75 only)
IMPORTANT: DO NOT OVERTIGHTEN FITTINGS
Connection using rigid pipe
The unit may also be rigid plumbed by the use of an adaptor (not supplied).
OPTION 1 - CONNECTION TO 1½" PRESSURE PIPE
Use these fittings to connect the evoUV to 1½" Pressure Pipe.
DO NOT OVERTIGHTEN FITTINGS
Screw into
evoUV
EA PIPEWORK CODE:
U10-050
1½" Pressure Pipe
1½" Straight Connector Converter
EA FITTING CODE:
K82-23-55
Threaded Male to Plain Female
OPTION 2 - VERSATILE CONNECTION TO 1½" PRESSURE PIPE
Use these fittings for a versatile option to connect 1½" Pressure Pipe.
This option allows for easy removal of the evoUV.
DO NOT OVERTIGHTEN FITTINGS
EA PIPEWORK CODE:
U10-050
1½" Pressure Pipe
EA FITTING CODE:
K82-78-55
1½" Single Union
Threaded Male to Plain Female
Screw into
evoUV
12
Page 13
CONNECTION TO YOUR PIPEWORK (evo110)
IMPORTANT: DO NOT OVERTIGHTEN FITTINGS
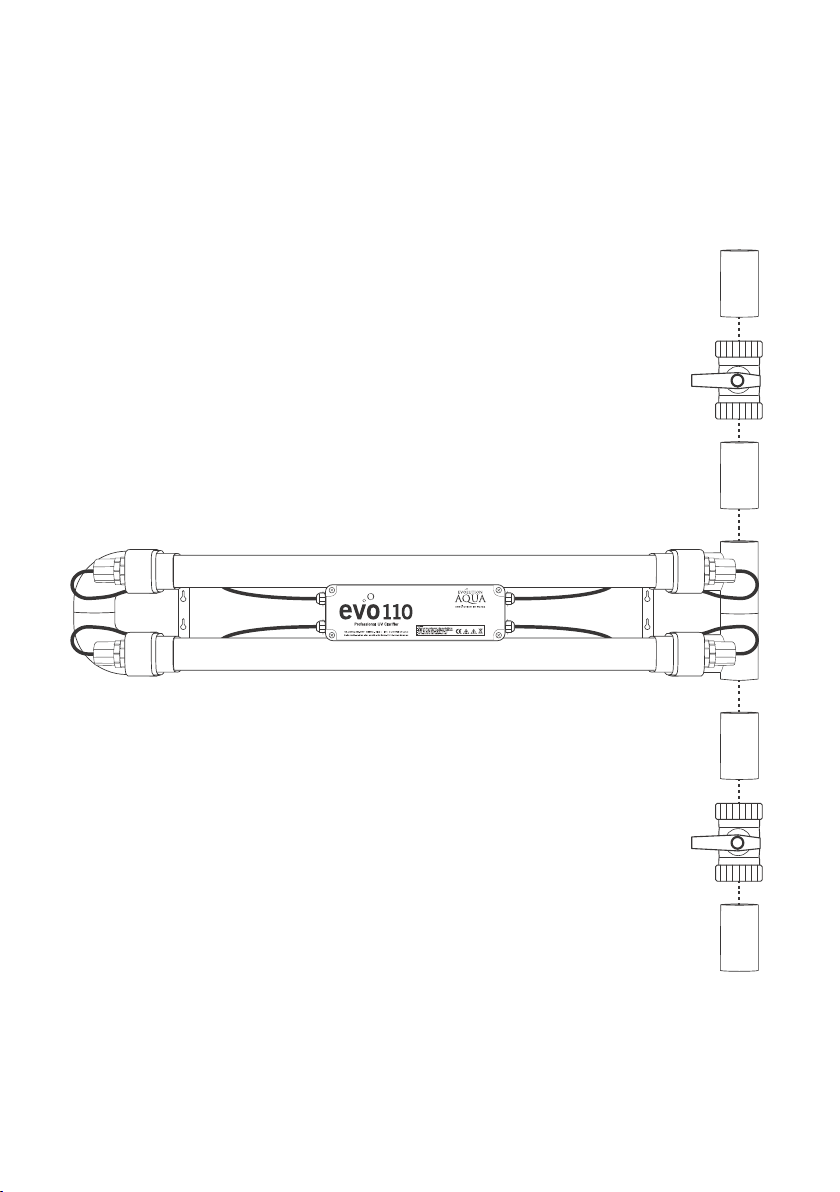
CONNECTION USING RIGID PIPE
All fittings connected to the evo110 should be
glued using solvent weld adhesive.
EA CODE: S79-0-500
We recommend using a 2" Double Union Ball
Valve glued to a length of 2" Pressure Pipe at
each end of the UV. This will enable you to
isolate the UV during maintenance.
EUROPEAN MODELS (NOT UK)
European adapter fittings are supplied with EU
models to allow connection to 63mm pipe.
EA PIPEWORK CODE:
U10-0632"
2" Pressure Pipe
EA CODE:
K25-50-63"
2" Double
Union
Ball Valve
EA PIPEWORK CODE:
U10-0632"
2" Pressure Pipe
EA PIPEWORK CODE:
U10-0632"
2" Pressure Pipe
EA CODE:
K25-50-63"
2" Double
Union
Ball Valve
EA PIPEWORK CODE:
U10-0632"
2" Pressure Pipe
13
Page 14
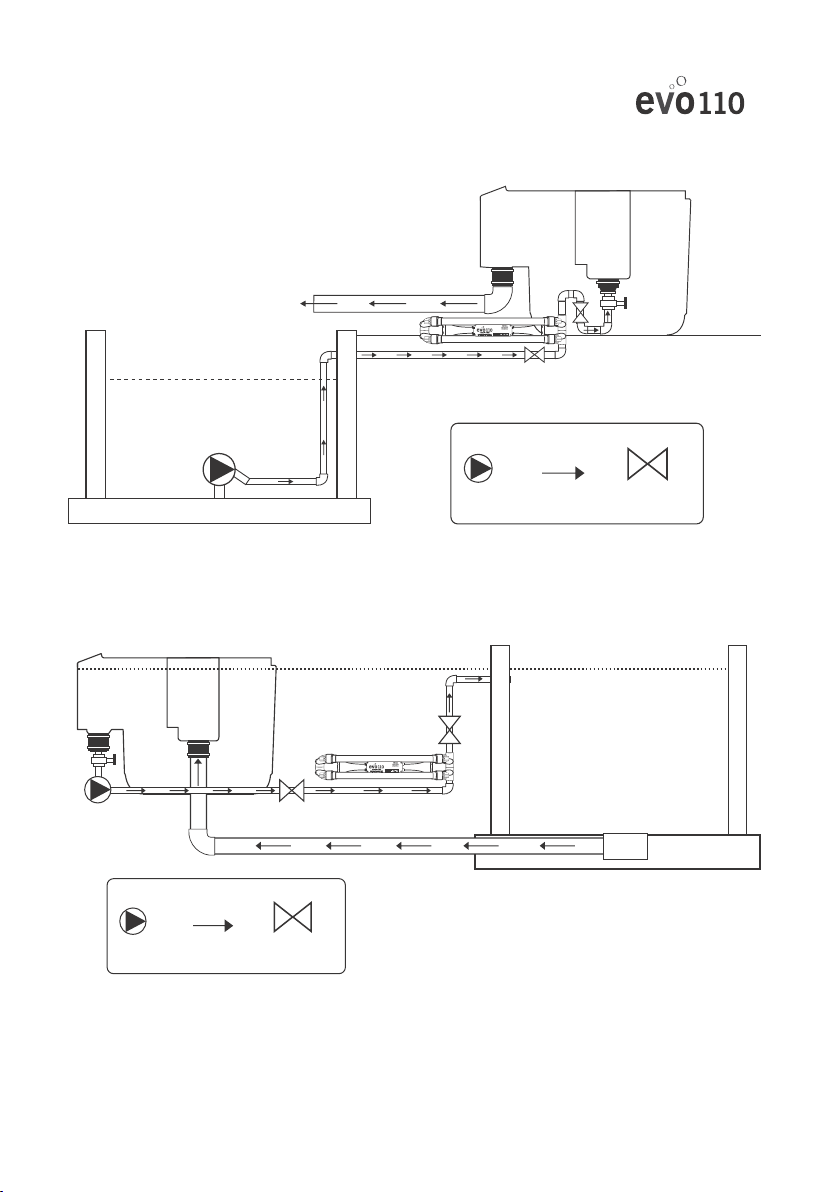
EVO 110 CONNECTION TO PIPEWORK
Pump Fed Installation
POND
SYMBOL KEY:
WATER
PUMP
PUMP
Gravity Fed Installation
POND
FILTER
DIRECTION OF
WATER FLOW
POND
FILTER
BALL VALVE /
SERVICE VALVE
WATER LEVEL
14
POND
WATER
PUMP
SYMBOL KEY:
PUMP
DIRECTION OF
WATER FLOW
BALL VALVE /
SERVICE VALVE
PLEASE NOTE:
On Gravity Fed systems it is recommended to install a ball valve either side of the
evoUV for maintenance.
Page 15
CONNECTION TO THE ELECTRICITY SUPPLY
Electrical installations must be done by a qualified electrician.
Do not attempt to tamper with or access the electrical control box or casing
inside the evoUV, as doing so will invalidate the warranty.
The power supply must meet the specifications on the product.
The cores in the supply cable are coloured in accordance with the following code:
Brown = Live. Blue = Neutral. Earth = Green/Yellow
(WHERE FITTED).
Do not use the supply cable to lift the evoUV as this may cause
damage.
WARNING - A Residual Current Device (RCD), also known as the
Residual Current Circuit Breaker (RCCB), with a tripping current not
exceeding 30mA must be installed in the supply circuit. A means
of disconnection from the supply having a contact separation of at
least 3mm in all poles must be incorporated in the wiring.
Caution: Use in the area of the garden pond only if the installation complies with
the relevant wiring regulations. Please consult a qualified electrician.
Caution: Always disconnect all pond appliances from the mains supply before
putting your hands into the water.
All electrical installations and wiring must be adequately protected to prevent
any damage.
Enough electrical cable is supplied with the unit to connect to the mains electric.
This unit must be connected to permanent wiring. A switch with 3mm contact
separation must be provided in the fixed wiring to provide disconnection from the
electricity supply.
15
Page 16

UV BULB REPLACEMENT
ALWAYS ISOLATE THE UNIT FROM ANY ELECTRICITY AND WATER SUPPLIES
BEFORE CARRYING OUT MAINTENANCE ON THE UNIT.
TO REMOVE A UV BULB:
It is not necessary to stop the water circulating through the evoUV to change
the bulb.
1. Disconnect the electricity supply.
2. Unscrew the black end cap at one end of the unit. Take care not to unscrew the
white locking nut also.
3. Carefully slide the black end cap over the wire to reveal the bulb socket.
Take care not to lose the end cap sealing ring.
4. Disconnect the bulb socket.
5. Repeat steps 2 to 4 at the other end of the evoUV.
6. With the end caps out of the way, carefully slide out the UV bulb.
WARNING: If the end caps / electrical connections get wet during this procedure,
please ensure that they are thoroughly dried before re-connecting.
TO INSTALL A NEW UV BULB:
Follow the instructions on page 8 to fit a new UV bulb.
IMPORTANT: After checking all the fittings are correctly tightened you can switch
your unit back on.
16
As already mentioned, it is essential that the unit is protected from frost during
the winter months, or disconnected from water and electricity supplies and stored
indoors. During the spring and summer season, the quartz sleeve, which separates
the UV bulb from the water passing through the unit, will need to be cleaned two or
three times. This is essential, as dirt or limescale building up on the quartz sleeve
will inhibit the penetration of the ultraviolet light into the water and affect the
efficient working of the unit.
Page 17

REPLACING / CLEANING QUARTZ SLEEVE
ALWAYS ISOLATE THE UNIT FROM ANY ELECTRICITY AND WATER SUPPLIES
BEFORE CARRYING OUT MAINTENANCE ON THE UNIT.
TO REMOVE A QUARTZ SLEEVE:
PLEASE NOTE: Removing the quartz sleeve will cause water to flow out of the unit.
1. Remove the UV bulb as described on page 16.
2. With the electricity supply disconnected, evoUV isolated and UV Bulb removed,
unscrew the locking nut at one end of the evoUV.
3. Carefully remove the quartz sleeve O-Ring and keep safe.
4. Unscrew the locking nut from the other end and remove the quartz sleeve O-Ring
and keep safe.
5. Carefully remove the quartz sleeve taking care not to allow it to drop inside the
UV body.
6. To drain any water that may be left in the unit, we would recommend that you
unscrew the mounting bracket(s), disconnect the unit from the pipework, and tilt
the unit to drain the chamber of water.
7. Clean the sleeve and polish with a soft cloth or paper towel. If you live in a hard
water area, you may get limescale on the quartz sleeve; this can be easily
removed by using vinegar or a cold water descaler.
WARNING: If the end caps / electrical connections get wet during this procedure,
please ensure that they are thoroughly dried before re-connecting.
TO RE-INSTALL A QUARTZ SLEEVE:
Follow the instructions on pages 7 and 8 to re-install the quartz sleeve and UV bulb.
IMPORTANT: After checking all the fittings are correctly tightened you can switch
your unit back on.
TROUBLESHOOTING
During this procedure or if you notice water leaking from around the end caps you
should check the following:
1. Check the O-Ring is undamaged.
2. Check there are no cracks and breaks in the quartz sleeve.
3. Check that the locking nut is compressing the O-Ring to form a water tight seal.
4. Check that the end caps are sufficiently tight.
5. All components are clean and free from dirt and debris.
*Please note that the items list 1-5 are service items and therefore not subject to a
claim under warranty. The service items listed are available from your EA stockist.
17
Page 18
IN BUILT PROTECTION
The evoUV range of pond clarifiers have thermal overload protection which
automatically shuts down and then enables a fast re-start when the problem
has been cleared. This may be as a result of water in the end caps. Please see
the troubleshooting section.
Thermal Overload Protection This will automatically switch off the unit should the temperature exceed the
maximum operating temperature limits.
Automatic start up and shut down protection -
This protects the electrical components in the event of a power surge.
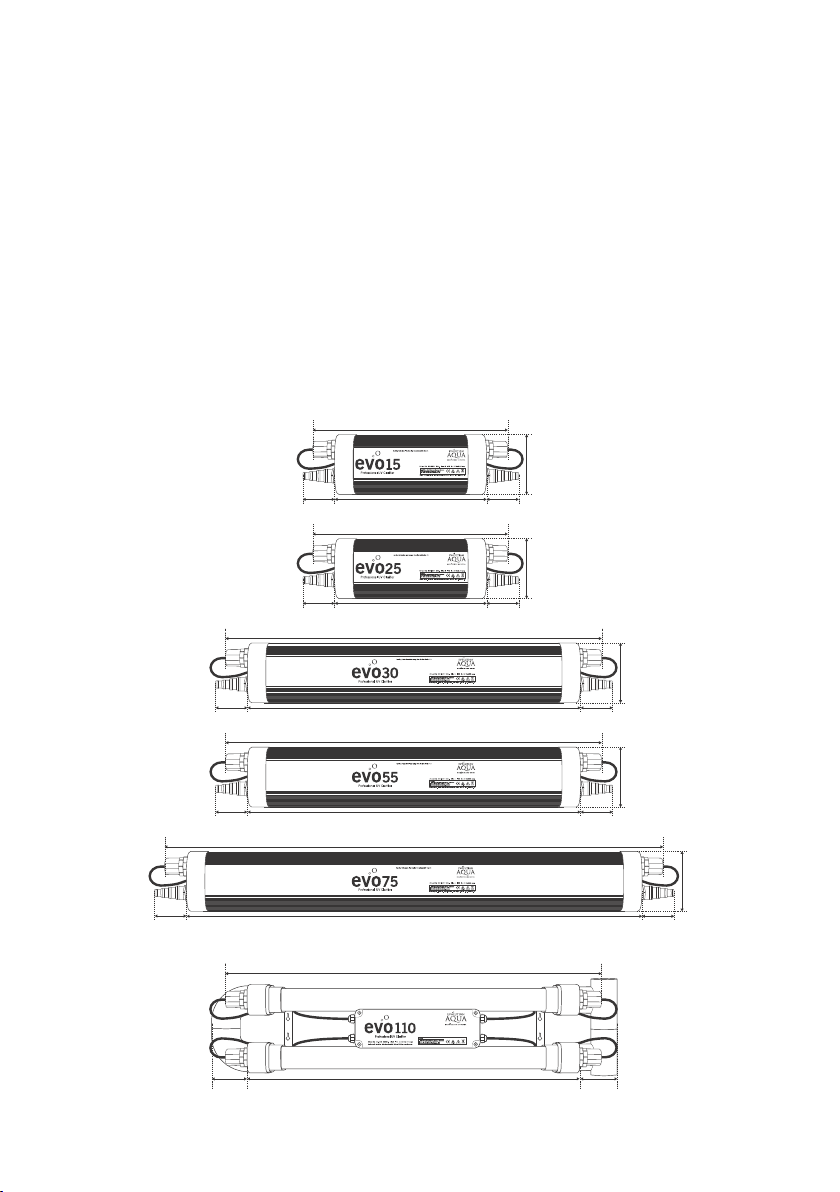
DIMENSIONS
530mm
100mm 100mm
380mm
530mm
380mm100mm 100mm
980mm
830mm100mm 100mm
980mm
830mm100mm 100mm
1280mm
1130mm100mm
ALL UNITS ARE 88mm DEEP
980mm
167mm
167mm
167mm
167mm
167mm
100mm
18
835mm
evo110 UNITS ARE 160mm DEEP
110mm110mm
Page 19

TROUBLE SHOOTING
My pond water is not clear, is this due to the evoUV not working correctly?
Koi, goldfish and other pond inhabitants can cause murky water by stirring up the
bottom of the pond. This murky water should not be confused with suspended algae.
Always check all your pond filtration is working and is being maintained correctly
prior to checking the evoUV. Mechanical filtration is necessary.
If the UV bulb is not lit, then you need to investigate the power to your unit.
• Has your RCD tripped? If yes, check your wiring and reset.
• Examine the UV bulb for signs of failure, and replace if necessary.
• Is the UV bulb fitted correctly? Unscrew the end caps and ensure correct fitting as
per the instructions as described in this manual.
• Are the end caps dry? If not, allow to dry thoroughly. We recommend the use of a
hair-dryer for this.
The unit worked well when I first installed it but recently my pond has gradually
gone green again – what is wrong?
Quartz sleeve may have become dirty and requires cleaning. Also make sure you have
the right model for your pond size. Ensure your pond filtration is removing fish waste
and debris efficiently. Dirt in ponds will affect the efficiency of the evoUV. Check that
your pond water volume is pumping through the evoUV every 2 to 3 hours.
Only after you have carried out these checks should you contact your Evolution Aqua
dealer, who will then be able to advise you further.
The unit appears to be leaking from the end fittings?
This could possibly be caused by an incorrectly fitted, damaged or overtightened
O-Ring on the quartz sleeve. Please check the quartz sleeve O-Ring, reposition it or if
necessary replace it with a new one.
19
Page 20

FREQUENTLY ASKED QUESTIONS
How often should I change the UV bulb?
The evoUV bulb has an effective lifespan of 9000 hours, but it is an accepted
practice to replace a UV bulb once a year, at the start of every pond season.
How long after I install the unit will my pond become clear?
There are many factors which affect how long your evoUV will take to clear your
pond, such as the levels of nutrients available to the algae, the water temperature
and the level of sunlight. Assuming that you have installed the correct size unit,
most ponds should clear within 3-14 days. However, this may take up to six weeks
in some instances.
Does the evoUV harm fish, plants or wildlife?
Ultraviolet bulbs leave no residues, and only affect the water pumped through
the unit. Unlike many chemical treatments, your evoUV will not harm plants and
animals living in the main pond.
Is the evoUV suitable for salt water use?
The evoUV is manufactured from materials that will not corrode in salt water,
however the stainless steel bracket will. Use alternative mounting means when using
evoUV on saltwater systems.
Can I use my evoUV if I am using any treatments for my fish?
Always check the manufacturer’s instructions before using any water treatment as
they will tell you whether it’s recommended that the evoUV can be switched off
or on.
20
How long can I leave the unit running?
evoUVs have been designed and manufactured to the highest standards, and should
be run 24 hours a day, every day, from mid March to early October, depending on
the weather conditions. If the unit is frost protected it may be left running throughout
the winter. Otherwise, the unit should be removed, drained and stored safely for
the winter.
Can I bury the unit underground?
No. The evoUV, although weatherproof, is not suitable for installing in any situation
that may be subject to immersion in water.
Can it be used with ozone?
Yes. The evoUV is safe to use with ozone units, however, the O-Rings on the
hosetails are not. When using ozone units please use rigid pipe.
When replacing the bulb I cannot locate it into the bulb socket at the opposite end
of the evoUV?
Please follow the procedure for cleaning / replacing the quartz sleeve. This will
explain the correct procedure for removing both end caps and sockets and explain
the method for easy installation.
Page 21

GUARANTEE
This product is guaranteed against defects in material and workmanship for 2 years
from the date of purchase, under normal usage. The guarantee DOES NOT APPLY
in case of improper use, negligence, lack of maintenance or accidental damage to
the evoUV. If the evoUV fails due to a manufacturing fault within this period it will
be either repaired or replaced free of charge. Liability is limited to replacement of
the faulty product only; no other costs will be reimbursed. This guarantee is not
transferable and does not affect your statutory rights. This guarantee does not confer
any rights other than those expressly set out above. This guarantee does not cover
the evoUV bulb or quartz sleeve.
Do not attempt to tamper with or access the electrical control box or casing inside
the evoUV, as doing so will invalidate the warranty.
The manufacturer or supplier shall not be responsible, or held liable for any
damages caused by defective components or materials of this product; or for loss
incurred by interruption of service; or any consequential/incidental damages and
expenses arising from the production, sale use or misuse of this product or any other
consequential loss.
Any warranty claim must be accompanied by a valid, dated proof of purchase.
Evolution Aqua and its dealers shall not be held liable for any loss of fish, plants or
any other livestock as a result of any failure or defect of this product.
The installation and use of your product outside of our recommendations as printed
in this manual may also void the warranty.
Evolution Aqua Ltd
Evolution House
Kellet Close
Wigan
Lancashire
United Kingdom
WN5 0LP
t: +44 (0) 1942 216554
f: +44 (0) 1942 418489
e: [email protected]
w: www.evolutionaqua.com
21
Page 22
POND FILTER
Readers’ poll
✓
POND
PRODUCT
OF THE YEAR
2016
OF THE YEAR
AQUA 2017
■
Hassle free way to clean Nexus filtration systems
■
Automates the cleaning process of the Nexus
■
Easily fits onto Nexus filters (post 2006 models)
■
Control box automatically operates valves and pumps
■
Adjustable timer controls the frequency of the cycle
■
Easy to set up for multiple cleaning cycles
■
Manual cycle can be carried out at touch of a button
■
Bacteria and enzymes delivered in gel-like balls
■
Maintains crystal clear and healthy water
■
Breaks down ammonia and nitrite
■
Cleans up organic waste
■
Reduces filter maintenance and cleaning
■
Suitable for use in all types of ponds
■
Add to filter for best results
■
Available in 500ml, 1litre and 2 litre
■
Mechanical, biological and UV filtration
■
Automatic cleaning - even when you're not there
■
Simple to install, easy to maintain
■
Integrated air pump built into control box
■
620mm (w) x 655mm (h) x 740mm (d)
■
Available with or without UV
■
Spec in Granite Green or Grey colour
■
Easy maintenance
■
Reduced backwashing of pressure filters
■
Simple installation with flexible connectors
■
Patented pondflow regulation system
■
Large waste collection which is easy to clean
■
Robust one piece mould with no welded joints
■
Can be installed on pump or gravity fed set-ups
■
575mm (w) x 945mm (h) x 860mm (d)
Page 23

COMPLETE THIS FORM & SEND IT TO US TODAY.
TO REGISTER YOUR 2 YEAR evoUV WARRANTY.
Your evoUV comes with a 2 year warranty. You can register your warranty with us,
by simply completing the information below and return this form to us by post, email
or by fax. This gives you peace of mind for a full 2 years.
Complete this form, cut it out and return it using one of the following methods:
Scan and email this form to:
Post this in an envelope to:
Evolution House,
Kellet Close, Wigan,
Lancashire,
United Kingdom,
Fax a copy of this form to:
+44 (0) 1942 418489
WN5 0LP
Your Name:
Your Address:
Postcode:
Country:
o
:
Tel N
o
:
Mobile N
Email:
Purchased From:
Date of Purchase: / /
Model of evoUV:
Serial Number:
Other Evolution Aqua products I use: (please tick)
Nexus 220 Nexus 320 EazyPod EazyPod Complete Cetus Sieve Dechlorinator
AirPumps Perfect Pumps Pumps Pure Products Treatments EA Foods
Please send me information about other Evolution Aqua products including: (please tick)
Nexus 220 Nexus 320 EazyPod EazyPod Complete Cetus Sieve Dechlorinator
AirPumps Perfect Pumps Pumps Pure Products Treatments EA Foods
I have read and accept the terms and conditions of the guarantee,
and I understand the obligations of the Customer under this warranty.
Signature: Date: / /
Evolution Aqua Ltd. may contact you in the future with product updates or offers, which may be of interest to you.
If you do not wish to receive this information please tick this box.
Page 24
Evolution Aqua are the award winning pond filtration manufacturer who put
innovation, research and development at the top of their agenda. With a proven
track record for delivering the latest technology to the aquatics and fish farming
markets - we are the first choice for everyone from the general hobbyist to the
serious fishkeeper. Find out more about the evoUV and all of our other innovative
products at www.evolutionaqua.com. The difference is clear.
Evolution Aqua Ltd
Evolution House
Kellet Close
Wigan
Lancashire
United Kingdom
WN5 0LP
t: +44 (0) 1942 216554
f: +44 (0) 1942 418489
e: [email protected]
w: www.evolutionaqua.com
 Loading...