

Page 1
MODEL NO.: 478
USER MANUAL
Important: Keep these instructions for future reference.
Safety
Cozy Fashion
Page 2
WARNING
Thank you for choosing Dream On Me and congratulations on joining The DOM Family, a
family that has been transforming lives for 30 years! We appreciate your feedback and
wish you the very best in the coming years with your new addition. If you have any
questions or concerns please don’t hesitate to reach out and a trusted DOM
representative will assist you. Thank you again for entrusting us to supply you with the
safest, functional and affordable baby products and accessories. Feel free to follow us on
Facebook and Instagram for further opportunities and offers.
Failure to follow these warnings and the assembly instructions could result
in serious injury or death.
• ADULT ASSEMBLY REQUIRED.
• NEVER LEAVE CHILD UNATTENDED. Always keep child in view while in stroller.
• AVOID SERIOUS INJURY from falling or sliding out. Always use seat belt. After
fastening buckles, adjust belts to get a snug fit around your child.
• AVOID FINGER ENTRAPMENT: Use care when folding and unfolding the stroller.
Be certain the stroller is fully erected and latched before allowing your child near
the stroller.
• NEVER USE STROLLER ON STAIRS or escalators. You may suddenly lose control
of the stroller or your child may fall out. Also, use extra care when going up or
down a step or curb.
• DO NOT place items with a string around your child’s neck, suspend strings from
this product, or attach strings to toys.
• USE OF THE STROLLER with a child weighing more than 40 lb (18 kg) or taller
than 45 inches(114.3cm) will cause excessive wear and stress on the stroller. Use
the stroller with only one child at a time.
• TO PREVENT A HAZARDOUS, UNSTABLE CONDITION, never place purses,
shopping bags, parcels or accessory items on the handle. Never place anything
on the canopy.
• TO PREVENT A HAZARDOUS, UNSTABLE CONDITION, do not place more than
10 lb (4.5 kg) total in the storage basket.
• DO NOT use storage basket as a child carrier.
• DO NOT ALLOW your child to stand on the basket. It may collapse and cause
injury.
• NEVER PLACE child in the stroller with head toward footrest.
• NEVER ALLOW YOUR STROLLER to be used as a toy.
• DISCONTINUE USING YOUR STROLLER should it become damaged or broken.
• STROLLER TO BE USED only at walking speed product not intended for use
while jogging, skating, etc.
• CAREGIVER MUST always help child get into and out of the stroller.
02
Page 3
WARNING
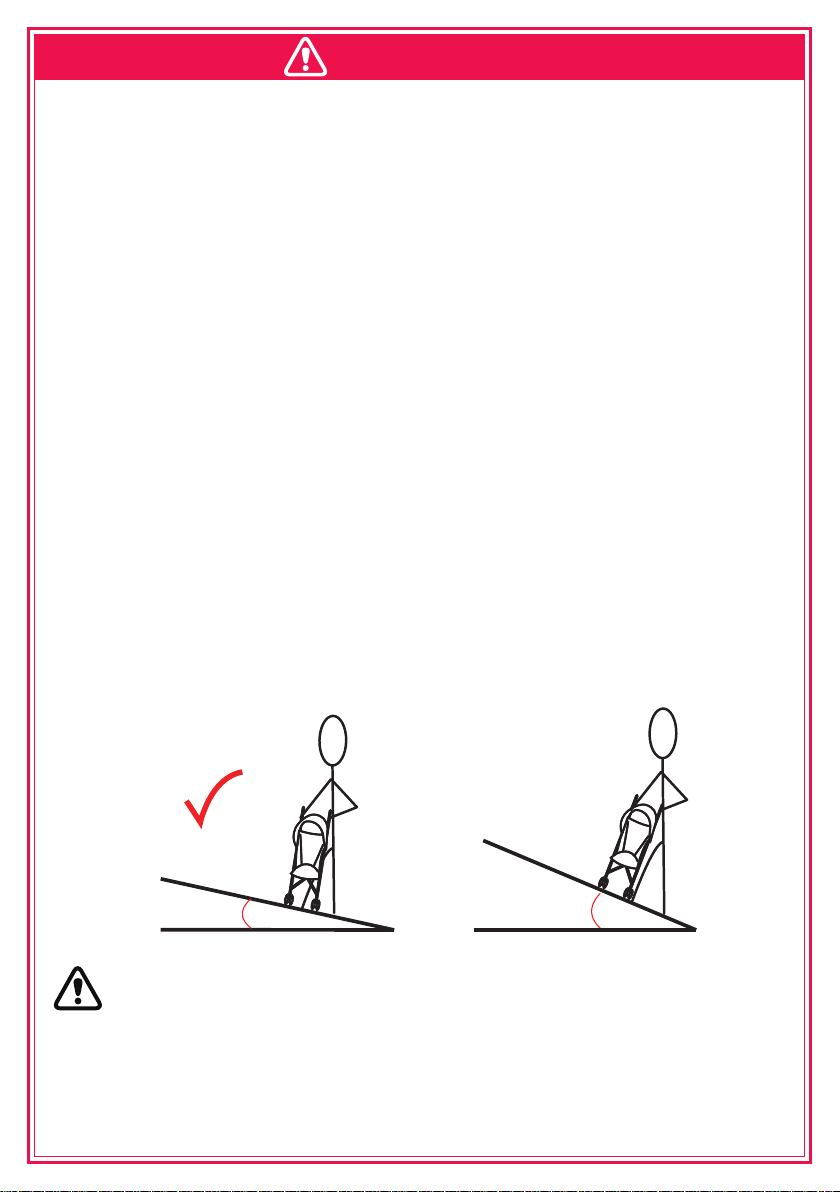
THE STROLLER IS DESIGNED FOR USE ON FLAT OR GENTLY SLOPING SURFACES, AND MAY BE
UNSTABLE ON HIGHER SLOPING AND UNEVEN SURFACES. USERS SHOULD BE AWARE OF
THE POSSIBILITY OF THE STROLLER ROLLING AWAY OR TIPPING OVER.
• PUSH THE STROLLER HOLDING BOTH HANDS.
• THE STROLLER CAN BE STEERED IN THE DESIRED DIRECTION - ALLOWING
THE FRONT WHEELS TO SWIVEL WILL MAKE THIS EASIER.
• THE FRONT WHEELS MAY WOBBLE OR OSCILLATE WHEN WALKING FAST.
LOCKING THE FRONT SWIVEL WHEELS WILL FIX THEM IN POSITION.
• THE STROLLER CAN BE TAKEN UP CURBS BY EITHER PUSHING DOWN ON
THE HANDLE BAR, THEREBY RAISING THE FRONT WHEELS AND MOUNTING
THEM ON THE CURB. OR, YOU CAN TURN THE STROLLER AROUND AND
PULL THE STROLLER UP THE CURB.
• CAUTION IS REQUIRED WHEN PUSHING THE STROLLER ACROSS STEEP
SLOPES OR UNEVEN SURFACES THIS MAY CAUSE STROLLER TO BECOME
UNSTABLE AND FALL OVER. ALWAYS HOLD THE HANDLE BAR FIRMLY.
• WHENEVER YOU STOP, ALWAYS APPLY THE BRAKES BEFORE YOU LEAVE
THE STROLLER.
• DO NOT HANG BAGS OR GOODS FROM THE HANDLE BAR, AS THIS COULD
CAUSE THE STROLLER TO TIP OVER. USE THE STORAGE BASKET.
X
12° or less more than 12°
WARNING
• THE UPRIGHT POSITIONS ARE NOT SUITABLE FOR A CHILD UNDER 6 MONTHS OLD.
• THE LOWEST RECLINE POSITION SHOULD BE USED TO TRANSPORT BABIES. THE BACKREST CAN BE
ADJUSTED TO A MORE UPRIGHT POSITION AS THE CHILD GROWS OLDER AND IS ABLE TO SUPPORT
ITS HEAD WITHOUT ASSISTANCE.
03
Page 4
CARE AND MAINTENANCE
• To prolong the life of your stroller, keep it clean and do not leave it in the
direct sunlight or in the car for extended periods of time.
• Removable fabric covers and trims may be cleaned using warm water
with a household soap or mild detergent. Allow it to dry fully, preferably
away from the direct sunlight.
• Non removable fabric covers and trims may be spot cleaned using a
damp sponge with soap or a mild detergent. Allow it to dry completely
before folding or storing it away.
• In some climates, the covers and trims may be affected by mold and
mildew. To help prevent this occurring, do not fold or store the product if it
is damp or wet.
• Always store the product in a well ventilated area.
• When using your stroller at the beach, completely clean your stroller
afterwards to remove any sand and salt from the mechanisms and wheels.
Sand and salt will cause premature wear and corrosion.
• If there are compression marks on the tires, use a domestic hair dryer to
gently warm (DO NOT OVERHEAT) the tire and the compression marks
should slowly disappear.
• Always check parts regularly for tightness of screws, nuts, and other
fasteners. Tighten if required. To maintain the safety of your Infinity Stroller,
seek prompt repairs for bent, torn, worn or
broken parts by contacting Evolur.
Dream On Me Inc.
1532 S Washington Ave, Piscataway TWP, NJ 08854
Tel: 732-752-7220
Fax: 732-752-7221
MADE ZHONG SHAN, CHINA
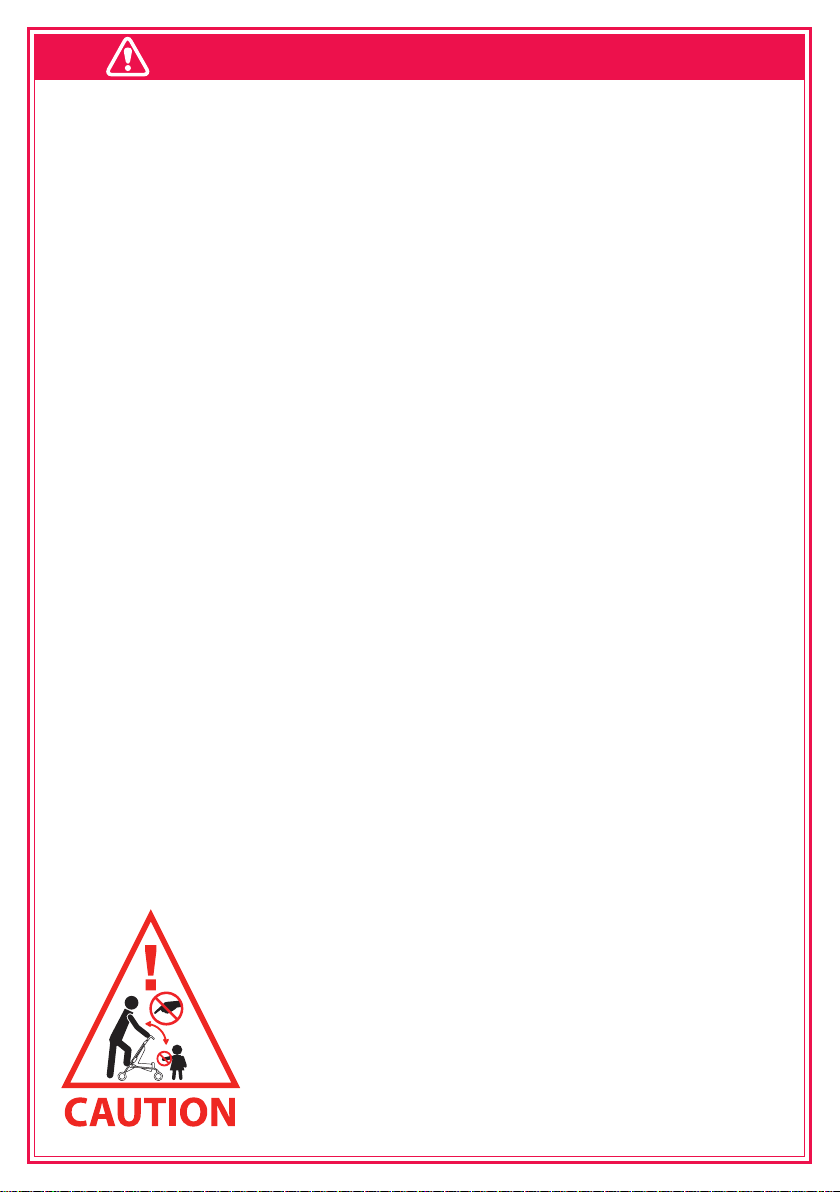
This CAUTION Symbol is shown at certain steps in
this Instruction Manual to highlight the danger
of being injured by moving parts.
04
Page 5
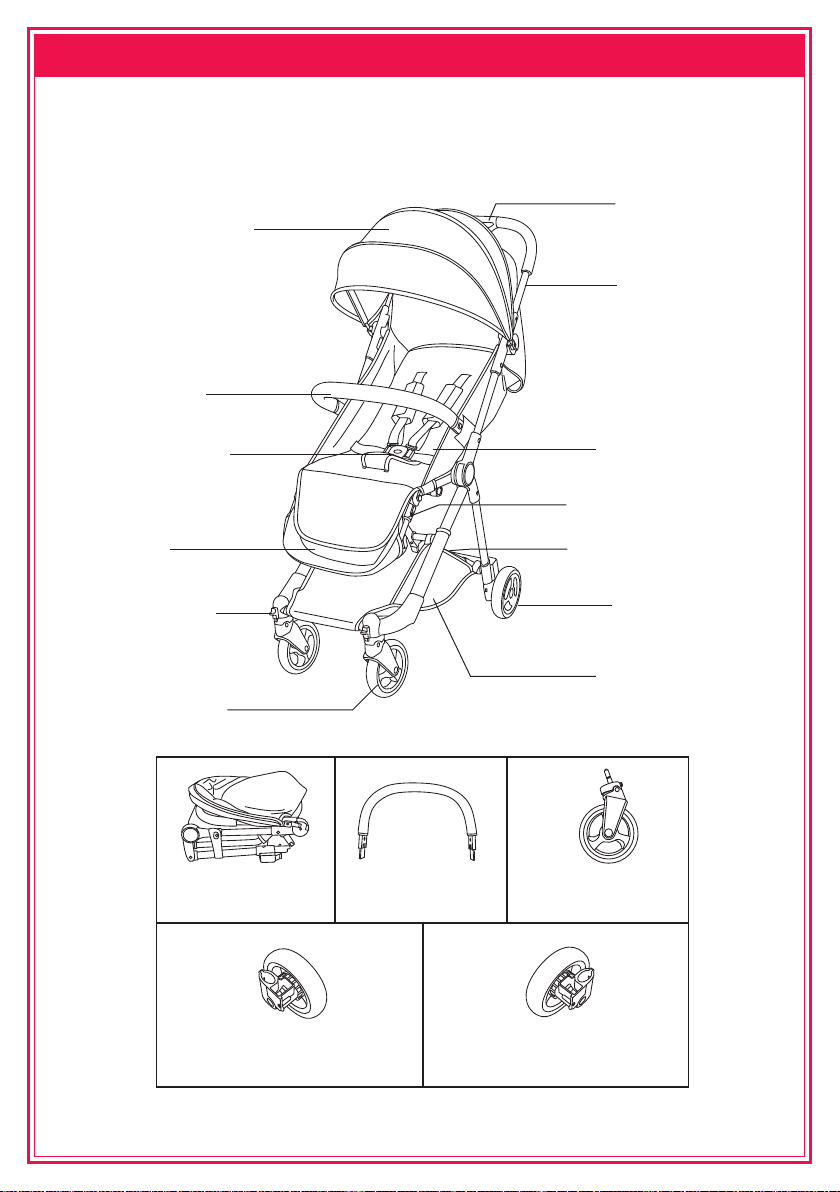
Parts list
Please check to make sure that all of the following parts listed are
included in the box when opened. If there are any missing parts,
please contact Evolur before using the Infinity Stroller.
Fold Handle
Canopy
Handle
Bumper Bar
Safety Buckle
Footrest
Swivel Lock
Front Wheel
Frame
x1
Bumper Bar x1
Seat
Adjust button
Brake Pedal
Rear Wheel
Basket
Front Wheel x2
Rear Wheel (R) x1
05
Rear Wheel
(L) x1
Page 6
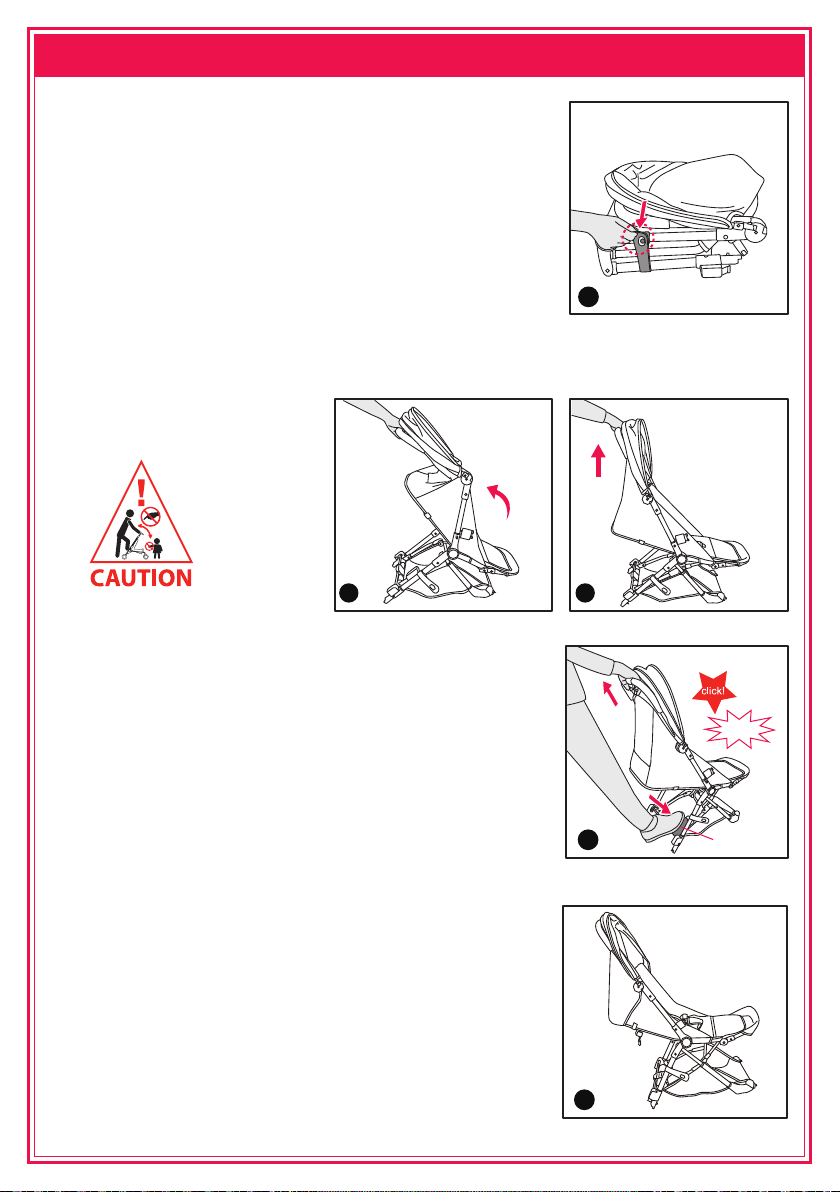
1. To Open Stroller
(1) Open storage latch, refer to Fig. A
A
(2) Lift up the handle of stroller, refer to Fig. B
B
& C
(3) Hold the Gray Lock Pedal, then lift handle of
stroller up until hear a “Click”, refer to Fig D.
CHECK that the stroller is completely latched
open every time you open the stroller and before
continuing with the rest of the assembly steps.
C
咔嚓
D
Lock Pedal
锁定踏板
06
E
Page 7
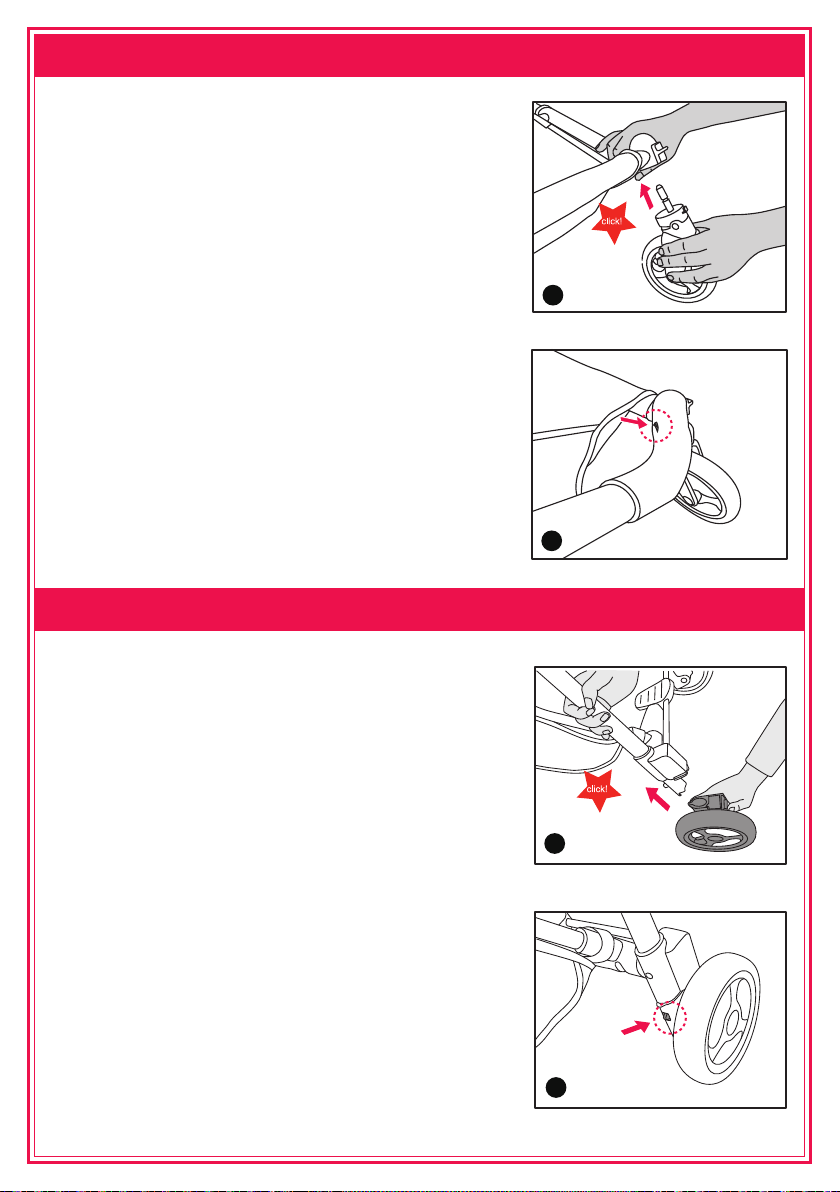
2. Front Wheels
(4) Slide each front wheel into the mounting
post at the front of the stroller until you hear a
"click" (Fig. A). Pull each wheel to CHECK
and ensure that they are secure.
For easy transport or storage, Push the wheel
release tab on the inside of the stroller frame
and pull the wheel off of the stroller (Fig. B).
3. Rear Wheels
A
B
(5) Attach the rear wheels (L&R) to the
stroller as in Fig. A. CHECK that wheel is
securely attached by pulling on the wheel.
For easy transportation and storage,
remove the rear wheels by pushing the
button shown in Fig. B.
7
A
B
Page 8
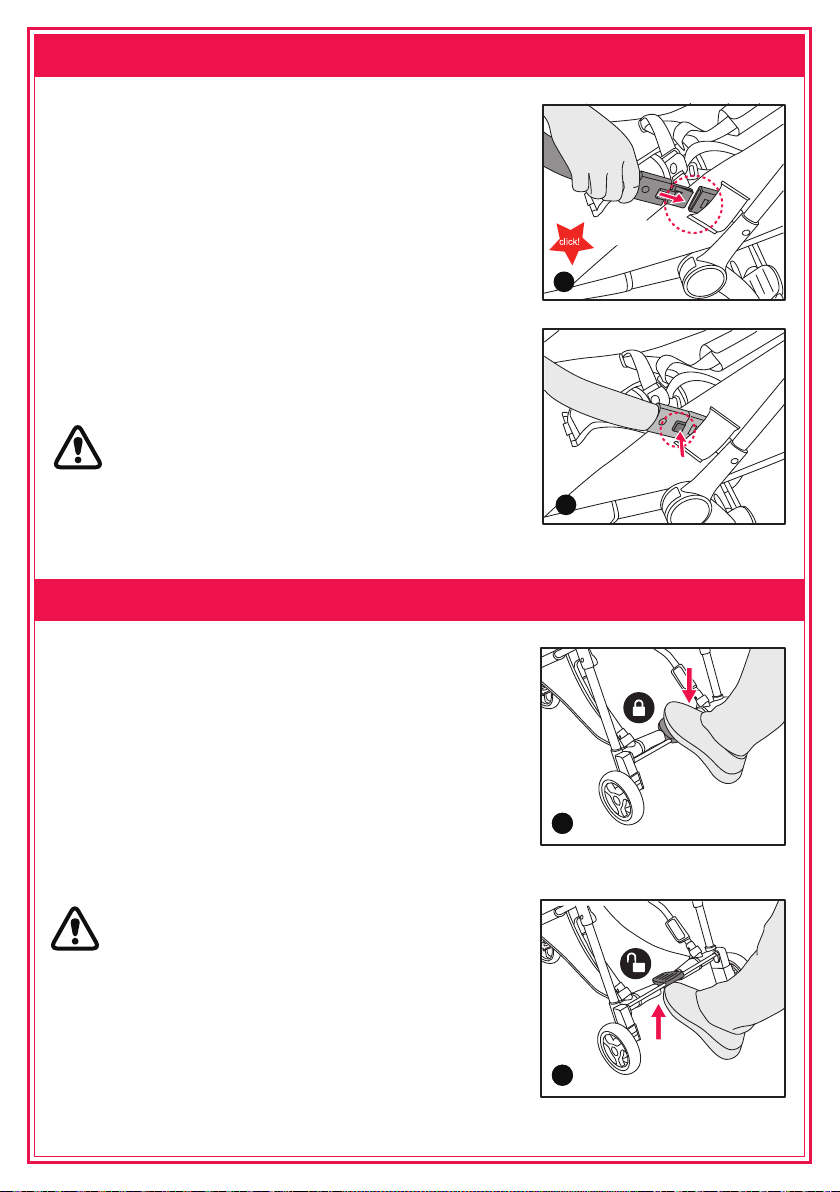
4. To Use Bumper Bar
(6) Assembling and removing the
Bumper Bar:
Push the bumper in each slot to install until
it clicks into place, as shown in Fig A.
Press the buttons on the sides of the
Bumper Bar together and pull it off to
remove it, as shown in Fig B.
WARNING: WHEN A CHILD
IS IN THE STROLLER, KEEP THE BUMPER
BAR ATTACHED TO THE FRAME AT ALL
TIMES.
5.
Using The Brakes
A
B
(7) Parking and loosening the breaks:
Push the breaks levers down to park, as
shown in Fig. A
Push up the breaks to loosen the breaks,
as shown in Fig. B
WARNING: ALWAYS
APPLY THE BRAKES WHEN THE
STROLLER IS STATIONARY.
8
ABA
B
Page 9
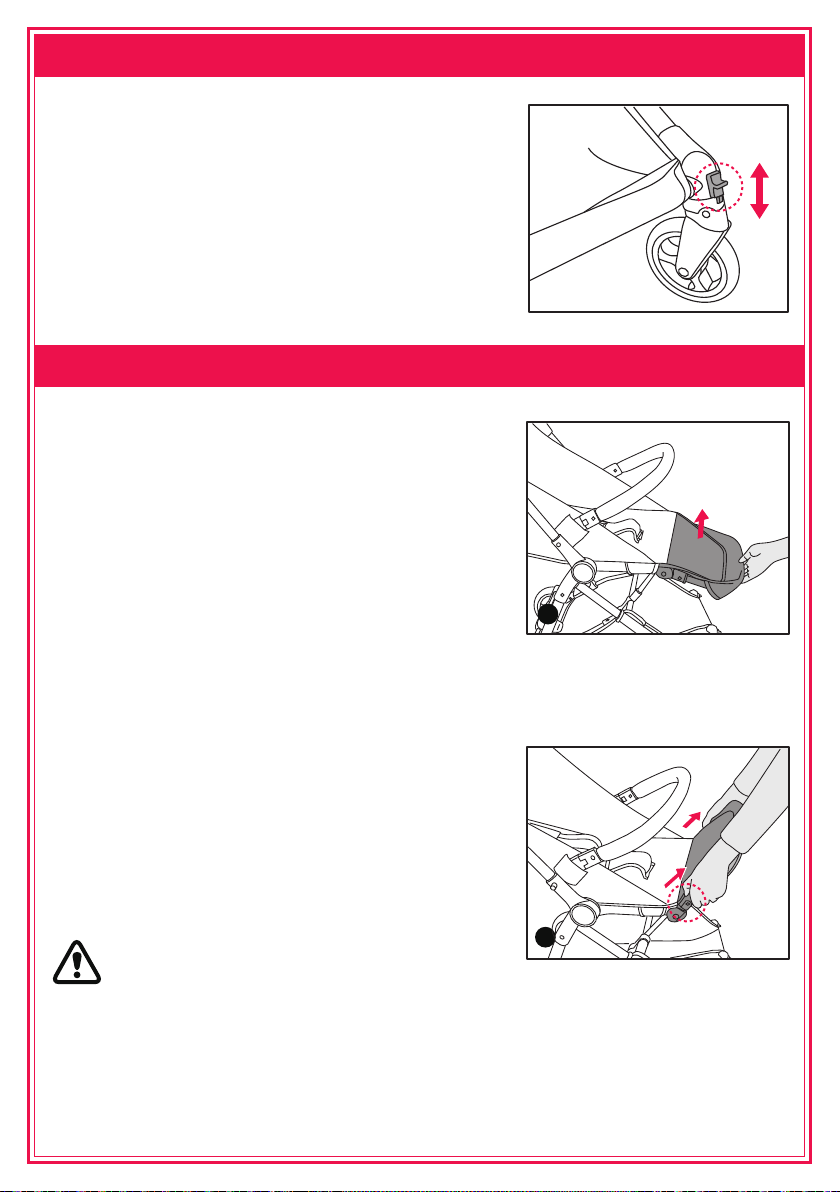
6. Swivel Wheel
(8) Push the swivel lock switch down to lock
the front wheel in position. Push the swivel
lock switch up to allow the wheel to swivel.
7.
Footrest Height Adjustment
(9) Pick up the foot rest to higher position,
as shown in Fig. A
A
Pull pieces on both sides of the footrest and
lowering the footrest to the lower position, as
shown in Fig B.
WARNING:
FEATURE IS PROVIDED FOR YOUR CHILDS
COMFORT. THE FOOTREST IS NOT DESIGNED
TO SUPPORT EXTRA WEIGHT. DO NOT ALLOW
CHILDREN TO STAND OR SIT ON THE FOOTREST.
THE FOOTREST
9
B
Page 10
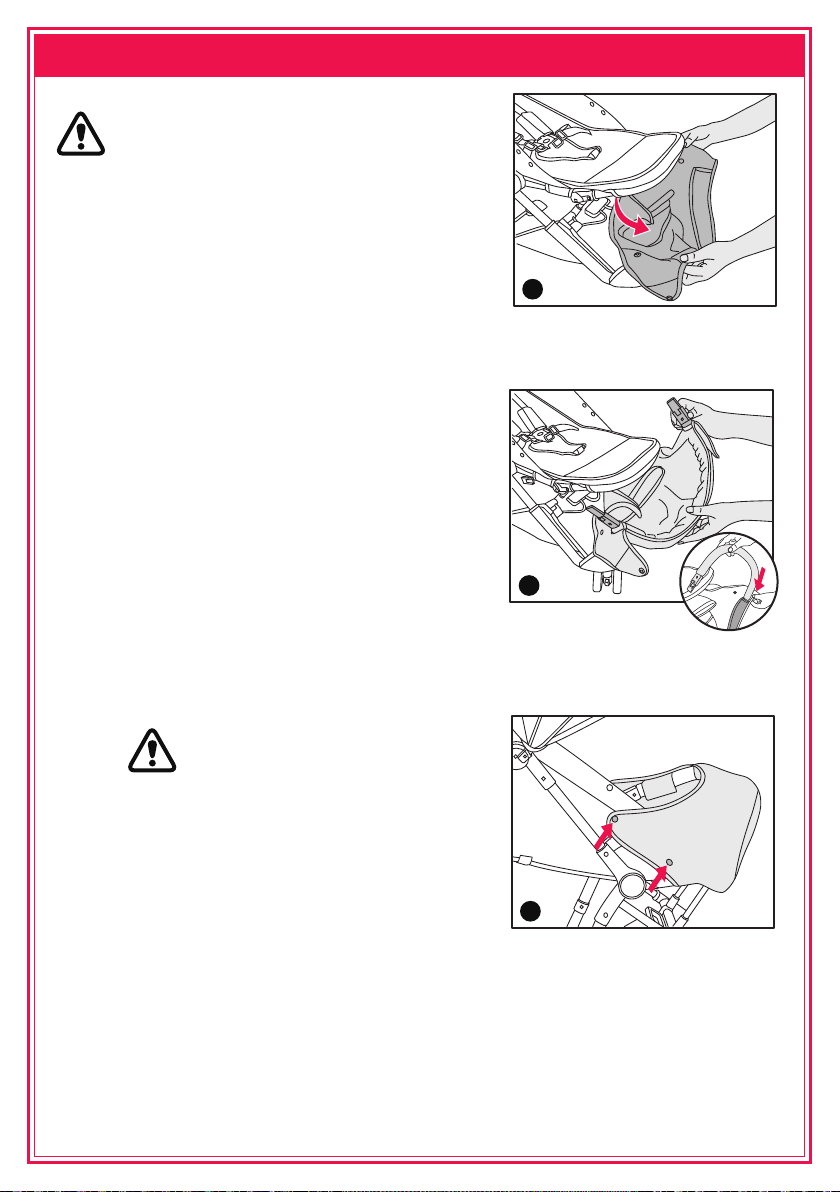
8.
FOOT BARRIER
WARNING:
For 0 ~ 6 MONTHS BABY, THE FOOT BARRIER
HAVE TO BE USED.
(10) The Foot Barrier is under the Footrest,
take it out as shown in Fig. A.
Put the bumper bar go through the Foot
Barrier, then attach the bumper bar to stroller
frame, as shown in Fig B.
Attached the Foot barrier to the side of the
seat with the two Snaps at each side, as
shown in Fig. C.
A
B
WARNING:
Child may slip into leg openings and strangle.
Never use in reclined position unless the foot
barrier is set up in position.
10
C
Page 11
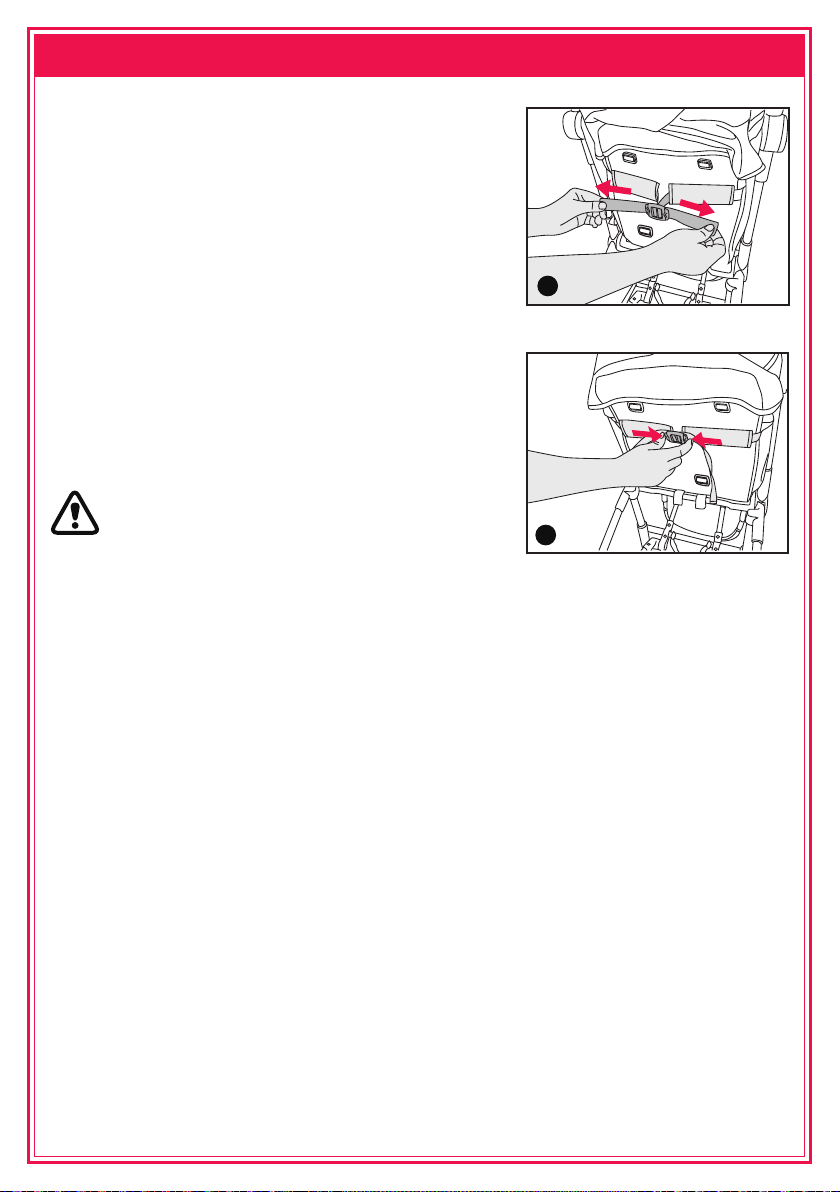
9.
Adjusting The Backrest
(11) Adjustment of the reclined and upright
position:
Pull the 2 straps as shown in Fig. A to make the
backrest move to the upright position.
Pull down the buckle as shown in Fig. B to
recline the backrest.
A
WARNINGS:
• THE UPRIGHT POSITIONS ARE NOT SUITABLE
FOR USE WITH CHILDREN LESS THAN 6
MONTHS OLD.
• THE LOWEST RECLINE POSITION SHOULD BE
USED TO TRANSPORT BABIES. THE BACKREST CAN BE ADJUSTED TO
MORE UPRIGHT POSITION AS THE CHILD GROWS OLDER AND IS ABLE
TO SUPPORT ITS HEAD WITHOUT ASSISTANCE.
NOTE: IF THE CHILD IS SITTING IN THE SEAT, SUPPORT THE BACKREST
AS IT RECLINES. IF YOU HAVE DIFFICULTY ADJUSTING THE BACKREST
YOU MAY NEED TO REMOVE THE CHILD FROM THE SEAT TO ALLOW YOU
TO RAISE OR LOWER THE BACKREST WITH EASE.
B
11
Page 12
10.
Securing Your Child To The Harness
WARNING:
USE THE HARNESS AT ALL TIMES.
When not in use, disconnect shoulder straps from the waist
strap and buckle to prevent strangulation.
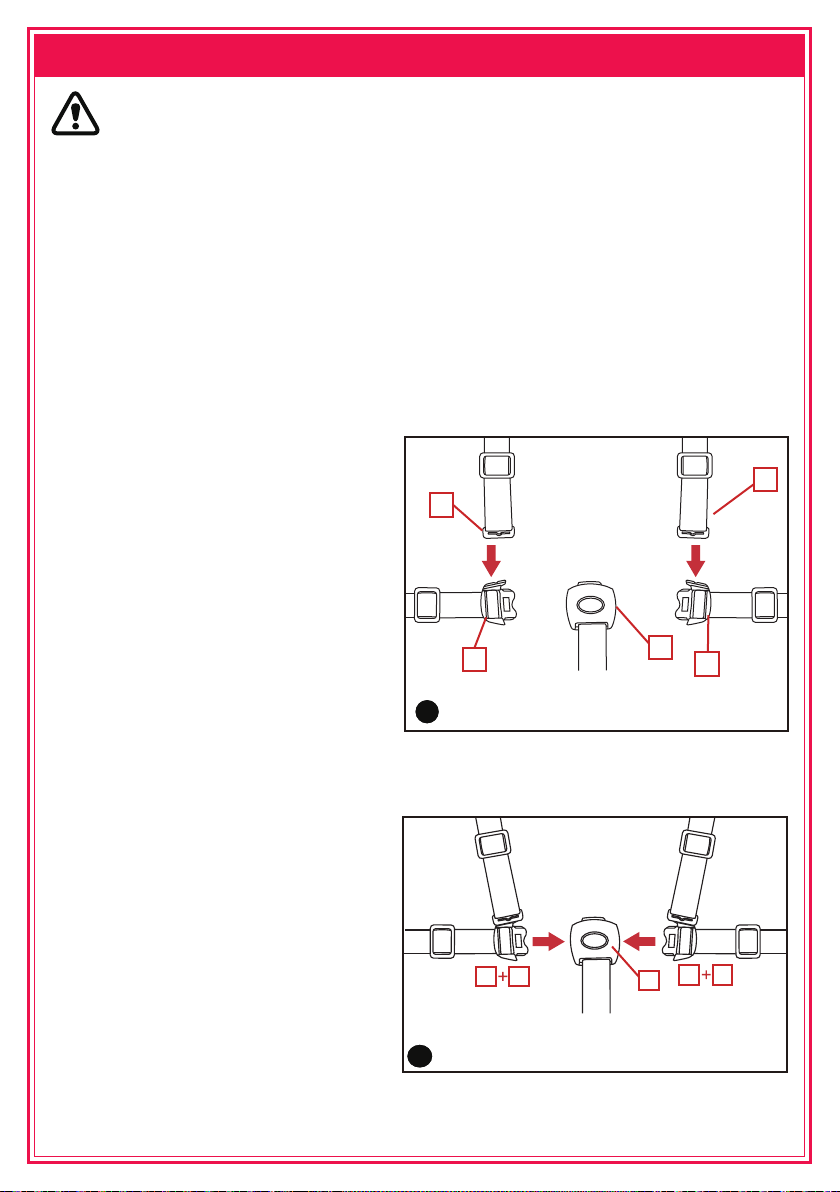
A five point harness is provided to restrain your child. Buckle tongues separate
for added safety. To reconnect buckle tongues and to secure the child in the
harness, please follow the steps below carefully.
(12) Position the shoulder strap
tongue. 1 on the top of the waist
buckle and 2 on the sides (Fig A).
1
Waist
strap
13A
Shoulder straps
2
Crotch strap
Buckle
housing
3
2
1
Waist
strap
(13) Push both buckle tongues
(1+2) into the buckle housing (3)
until the buckle tongues lock into
position (Fig B).
Shoulder
straps
Waist
strap
B
12
Shoulder
1
straps
2
Buckle
housing
2
1
Crotch strap
3
Page 13
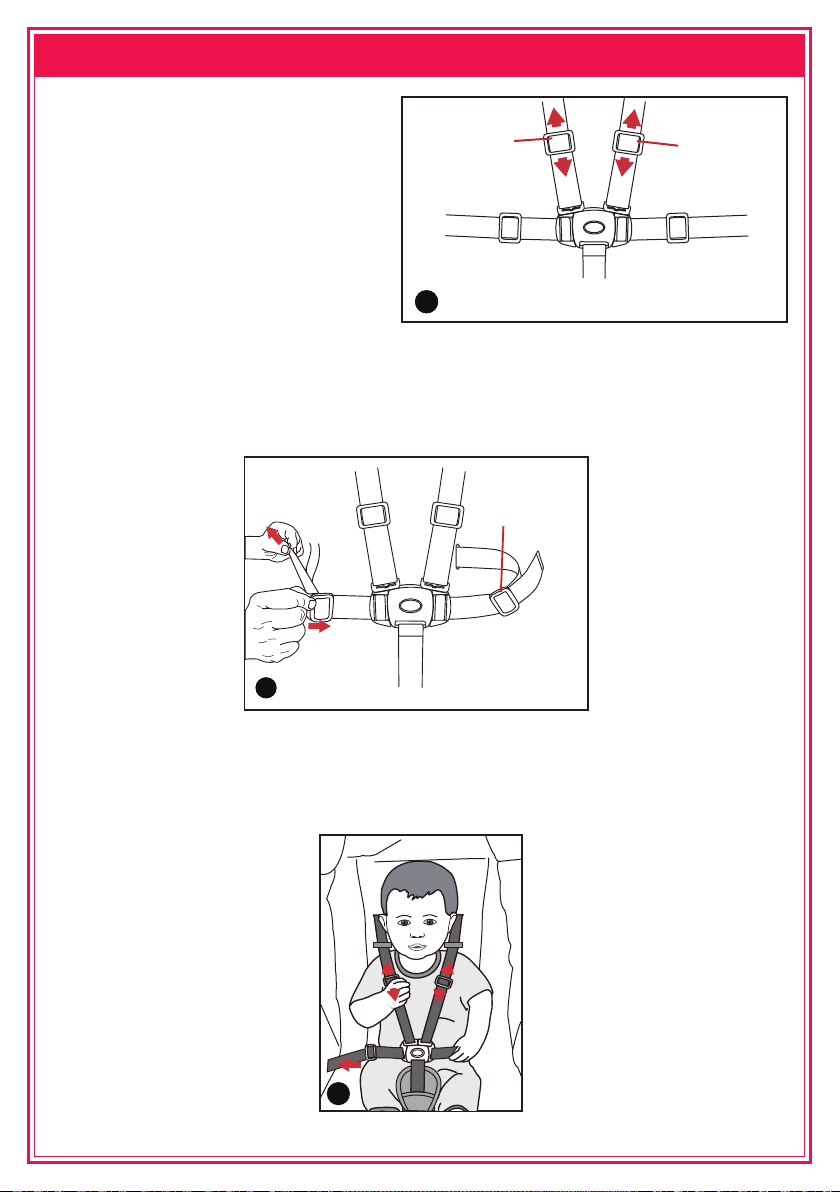
11.
Securing Your Child To Harness
(14) Tighten or loosen shoulder
and crotch straps by sliding up
an down the bar sliders (Fig C).
Bar Slider
Bar Slider
Waist
strap
C
Crotch strap
Waist
strap
(15) To tighten or loosen the waist straps, hold and lift the 4 bar sliders,
then pull the harness strap to adjust to the desired fit. The waist strap
needs to fit firmly around the child (Fig D).
3 Bar
Sliders
D
(16) To tighten or loosen the shoulder straps, slide the 3 bar sliders up or
down to adjust to the desired fit. Always adjust the harness strap when
changing the seating positions of the child (Fig E).
E
13
Page 14
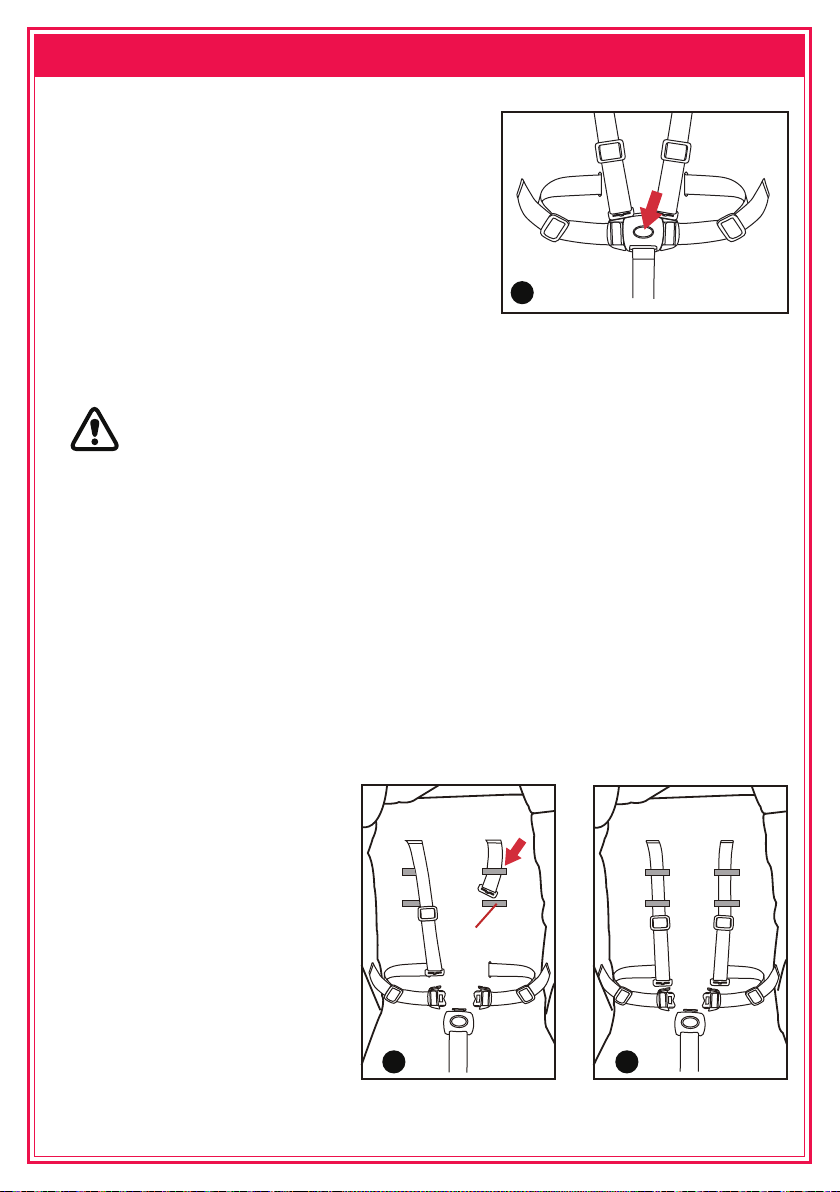
12.
Securing Your Child To Harness
(17) To release the buckle, squeeze the top
button on the buckle housing with enough
pressure so that the buckle tongues can be
released (Fig. F).
F
CAUTION: DO NOT SLIDE 3 BAR SLIDER OVER
THE SEWN TAB ON SHOULDER HARNESS.
(18) The stroller seat has 3 sets of harness slots at different heights to
accommodate the child. To change the shoulder harness height, push
the shoulder harness tongue out of the current harness slot and through
fabric slots.
To reposition harness, pull the shoulder harness buckle tongue through
the desired slot (Fig G/H).
Fabric Slots
G H
14
Page 15
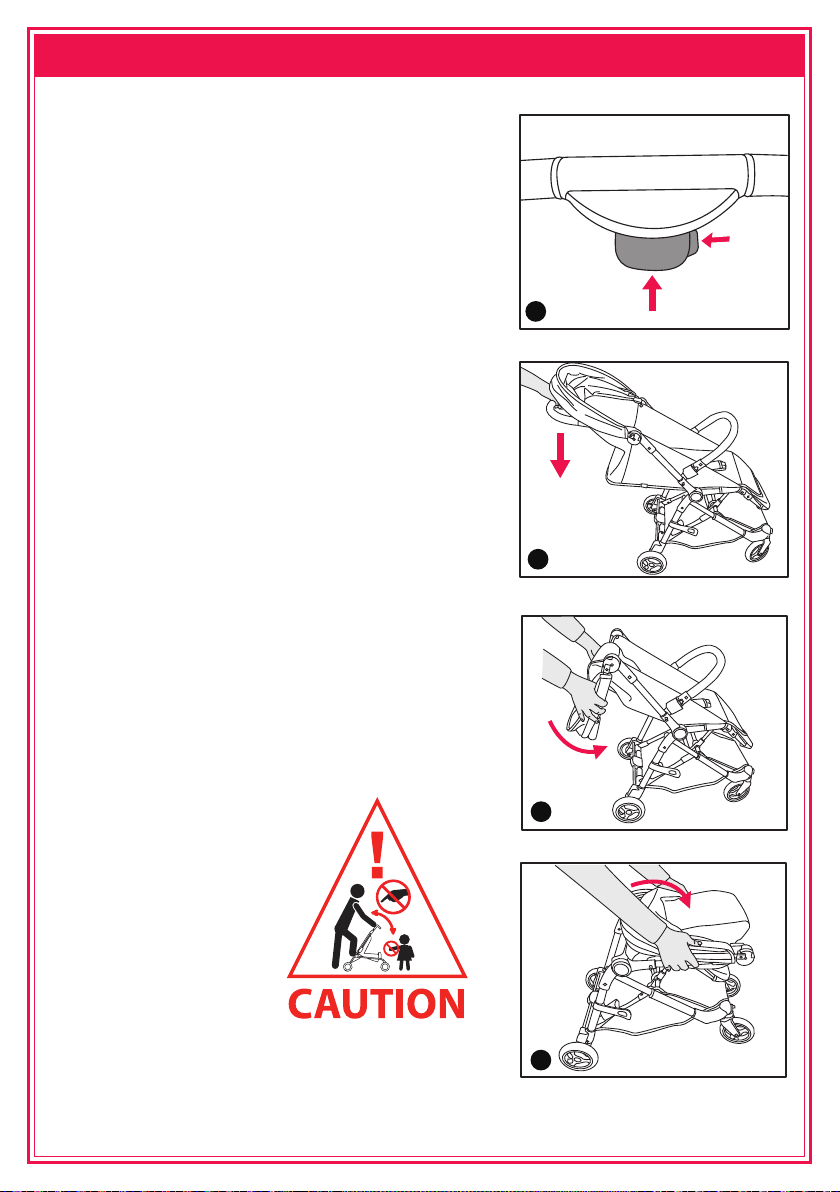
13.
To Fold The Stroller
Note: before folding, make sure that
the stroller is in the upright position.
(19) Squeeze the button 1 and then
squeeze button 2. Then, fold the handle
bar downward (Fig A/B).
(20) Pull the handle towards the back of
the seat, and then forward into the seat as
shown in Fig. C. Then, follow Fig. D and
continue on the next page for the rest on
the instructions.
1
A
B
2
15
C
D
Page 16
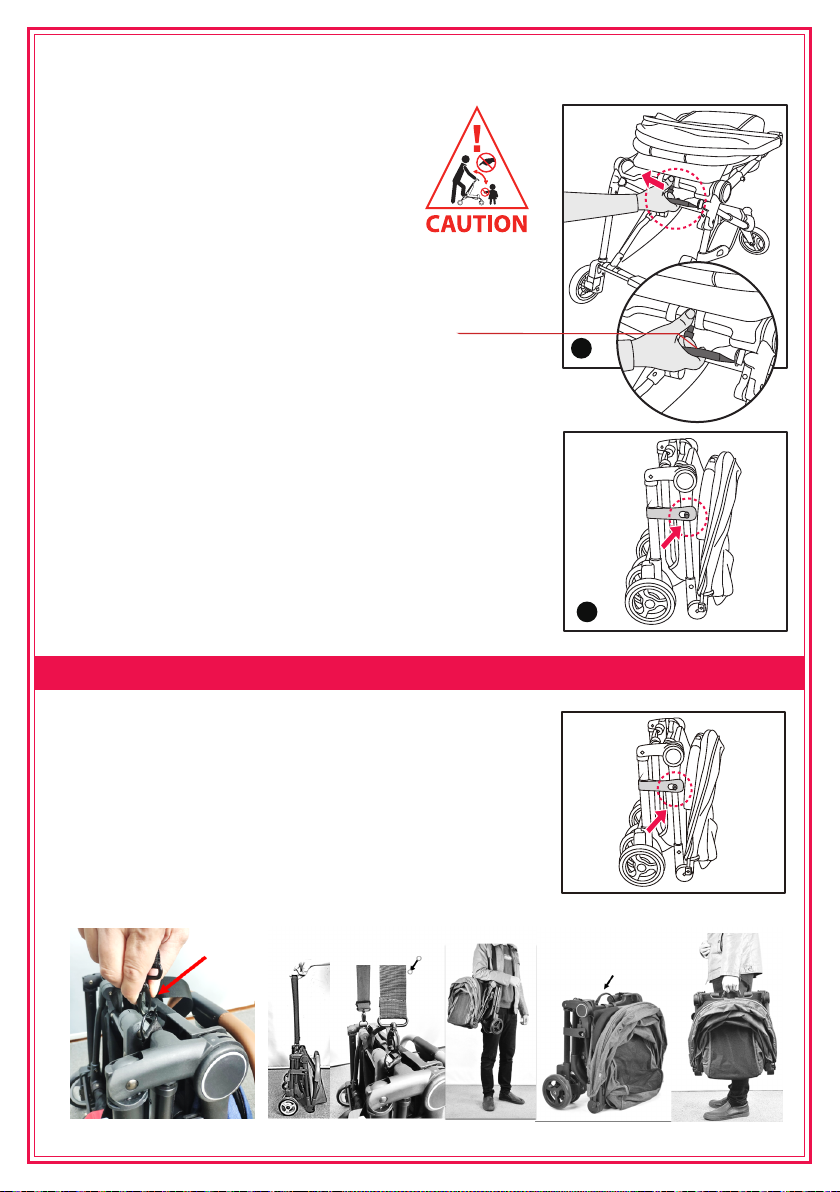
(21) Pull up on the handle and
let the frame collapse. (Fig E).
Handle
(22) Make sure the storage
latch clicks into place. Stroller
can stand up after fold (Fig F).
14. To Lift and Carry The Stroller
To lift or carry the stroller, ensure that the
storage latch is engaged.
Press the spring hook to attach the shoulder
strap on stroller at both sides and you can carry
the stroller on your shoulder conveniently.
E
F
Spring hook
Shoulder strap
16
Handle
 Loading...