


HYBRID 10R
User manual / Mode d’emploi

Hybrid 10R Manual Ver. 1.00 Page 2
ATTENTION !
Avant d’utiliser votre matériel, nous vous recommandons de lire l’ensemble des instructions de ce manuel.
ATTENTION !
Cet appareil produit une lumière intense et puissante. Risque pour les yeux. Ne regardez pas directement dans
le faisceau.
DANGER !
Risque de chocs électriques.
Il est important d’utiliser le câble d’alimentation secteur fourni (câble avec terre).
Toujours débrancher l’appareil avant une intervention technique ou avant son entretien.
Ne pas brancher cet appareil sur un bloc de puissance variable type “ Dimmer pack”.
Afin de réduire et d’éviter tout risque d’électrocution ou d’incendie, ne pas utiliser cet appareil dans un milieu
humidité ou sous la pluie.
ATTENTION !
Risque de brûlure.
Il est important d’éviter tout contact avec l’appareil en fonctionnement et au moins 30 minutes après son
utilisation. L’extérieur de l’appareil peut devenir très chaud.
Ne pas utilisez le projecteur avec une température ambiante supérieure de 40°C.
Afin de préserver la durée de vie de votre lampe, il est nécessaire de respecter un délai de refroidissement avant
de couper l’alimentation électrique générale de l’appareil.
ATTENTION !
Risque d’incendie.
Il est important de garder éloigner tous matériaux combustibles et inflammables de l’appareil en
fonctionnement. Ne pas éclairer de surfaces proches du projecteur, il est important de garder une distance de
sécurité d’au moins 5m.
Ne pas positionner de filtre, de cache, ou tout autre masque directement sur, ou devant l’optique du projecteur.

Hybrid 10R Manual Ver. 1.00 Page 3
DANGER !
Cet appareil présente des risques importants de blessures. Il est important de manipuler et d’utiliser cet appareil
de façon professionnelle.
Cet appareil evolite doit être installé avec des crochets solides et de dimension adéquate au poids supporté.
L’appareil doit être vissé aux crochets et serré convenablement afin d’éviter toute chute due aux vibrations
produites par la machine en fonctionnement. L’accroche de l’appareil doit être sécurisée par une élingue de
sécurité. Assurez-vous également que la structure (ou point d’accroche) peut supporter au moins 10X le poids
de l’appareil accroché.
L’appareil doit être installé par une personne qualifiée et doit être placée hors de portée du public.
En cas de problème de fonctionnement, arrêtez immédiatement l’appareil. Ne pas essayer de le réparer soimême. Contactez votre revendeur ou faites appel à un réparateur spécialisé et agréé. Il n’y a aucune pièce
remplaçable par l’utilisateur.

Hybrid 10R Manual Ver. 1.00 Page 4
Table des matières
Français………………………………………………………………………………….…………. 2
Introduction………………………………………………………….......... 5
Description du produit…………………………………………………... 5
Installation…………………………………………………………………… 5
o Accroche………………………………………………………………………….. 5
o Connexion DMX……………………………………………………….………. 6
Configuration…………………………………………………………………. 6
o Panneau de contrôle / Navigation dans les menus……………. 6
o Mode Automatique………………………………………………………….. 7
o Mode DMX………………………………………………………………………. 7
o Protocol DMX…………………………………………………………………… 8
o Mode Maître / Esclave………………………………………………………13
Entretien et maintenance………………………………………………14
o Nettoyage………………………………………………………………………….14
o Maintenance……………………………………………………………………..14
Caractéristiques techniques…………………………………………..14
English………………………………………………………………………………………………. 15
Introduction…………………………………………………………...........17
Device description …………………………………………………........17
Installation…………………………………………………………………. …14
o Rigging……………………………………………………………………………….14
o DMX connection……………………………………………………….……….18
SET UP……….………………………………………………………….……….18
o Control panel………………………………………………………..……….….18
o Auto Mode ………….……………………………………………………….…..19
o DMX Mode………………………………………………………………………..19
o DMX Protocol…………………………………………………………………….20
o Master/Slave Mode…..…………………………………………………….…26
Maintenance & Service..……………………………………………..…26
o Cleaning …………………………………………………………………..……….26
o Troubleshooting.…………………………………………………………….….26
Technical Specifications……………………………………………….…27

Hybrid 10R Manual Ver. 1.00 Page 5
Introduction
Toute s no s féli citat ion s po ur l ’ac hat de ce proj ecteu r e vo lite .
Ce p rojecteur profe ssio nnel est doté des der nière s avan cées tec hnol ogiq ue s, e t a été c onçu pou r
un us age profes sion nel. Sa qua lité et s a fi abil ité s ont le ré sult at d ’un e fab ricat ion soig née et
suiv ant u n ca hier des char ges p ré cis . Ce proj ecte ur i nte lli ge nt re spec te le s norme s eur opéen ne e n
vigu eur : EN 2014 /30 /E U, EN 2011 /65/ EU, EN 20 14/ 35/E U.
Description du produit
> Jeu de lumière hybride (Beam/Wash/Spot)
> Utilisation avec Lampe à arc court type 10R 280W
> 16/24 canaux DMX
> Roue de 13 gobos métals fixes + ouvert
> Roue de 9 gobos verres rotatifs + ouvert
> 13 couleurs
> Shutter avec effet Stroboscopique 1-10 flashes par seconde
> Sélection de couleur avec effet “Rainbow” et effet ”Gobo Shake”
> Mouvements PAN & TILT avec moteurs pas à pas ultra-rapides
> 15 moteurs pas à pas pilotés par microprocesseur
> Prisme 8 facettes circulaires rotatif
> Prisme 6 facettes linéaires rotatif
> Contrôle en DMX et Mode Automatique avec fonction maître/Esclave
> Mode détection musicale
> Adressage DMX et navigation simplifiée dans les menus grâce à sa roue de navigation et son écran LCD rétroéclairé.
> Contrôle de la lampe par DMX
> Livrée en flightcase sur-mesures
Installation
o Accroche
Ce projecteur asservi evolite doit être installé avec des crochets solides et de dimension adéquate au poids
supporté. L’appareil doit être vissé aux crochets et serré convenablement afin d’éviter toute chute due aux
vibrations produites par la machine en fonctionnement. L’accroche de l’appareil doit être sécurisée par une
élingue de sécurité. Assurez-vous également que la structure (ou point d’accroche) peut supporter au moins 10X
le poids de l’appareil accroché.
L’appareil doit être installé par une personne qualifiée et doit être placée hors de portée du public.
Sécurisez la fixation du projecteur avec une élingue de sécurité homologuée pour le poids du projecteur.
Hybrid 10R Manual Ver. 1.00 Page 6
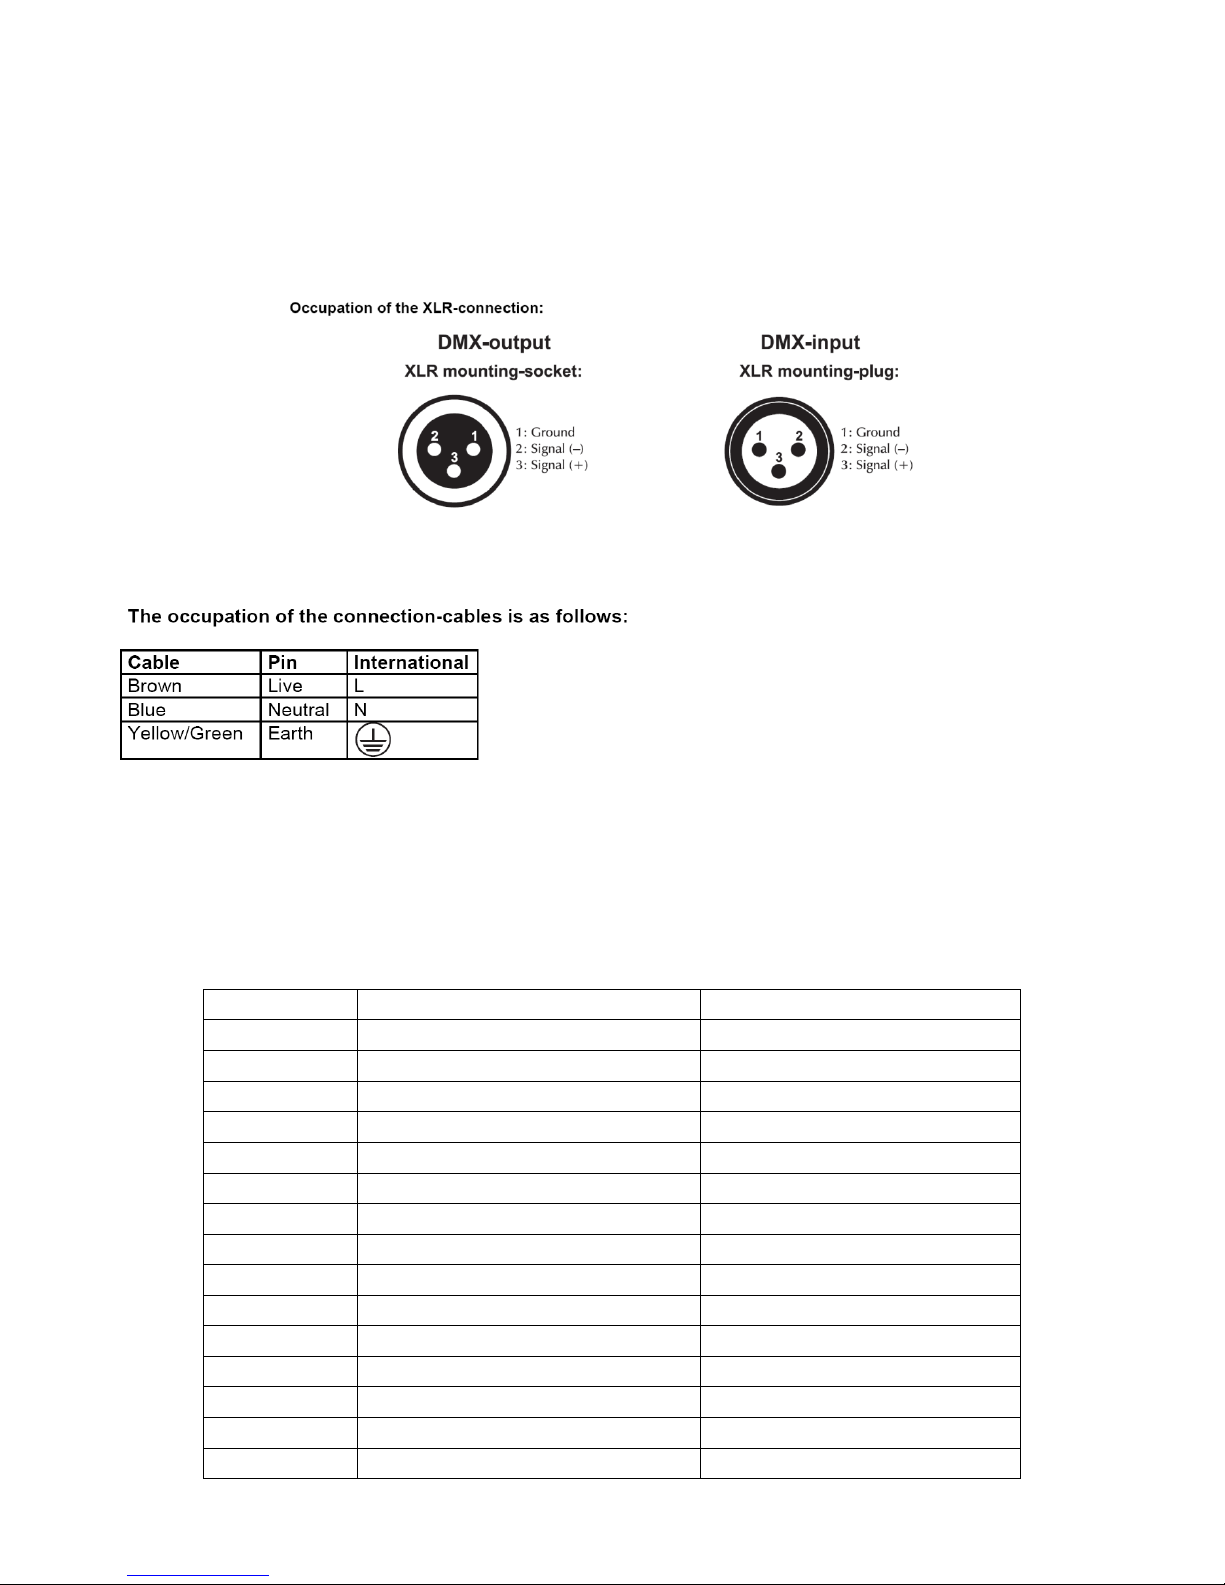
o Connexion DMX
Il est fortement conseillé d’utiliser des câbles DMX de bonne qualité. Utiliser du câble torsadé blindé.
o Connexion du câble d’alimentation secteur
La terre ou « Earth » doit toujours être connecté .Les câbles d’alimentation doivent être homologués et conformes au Standard IEC.
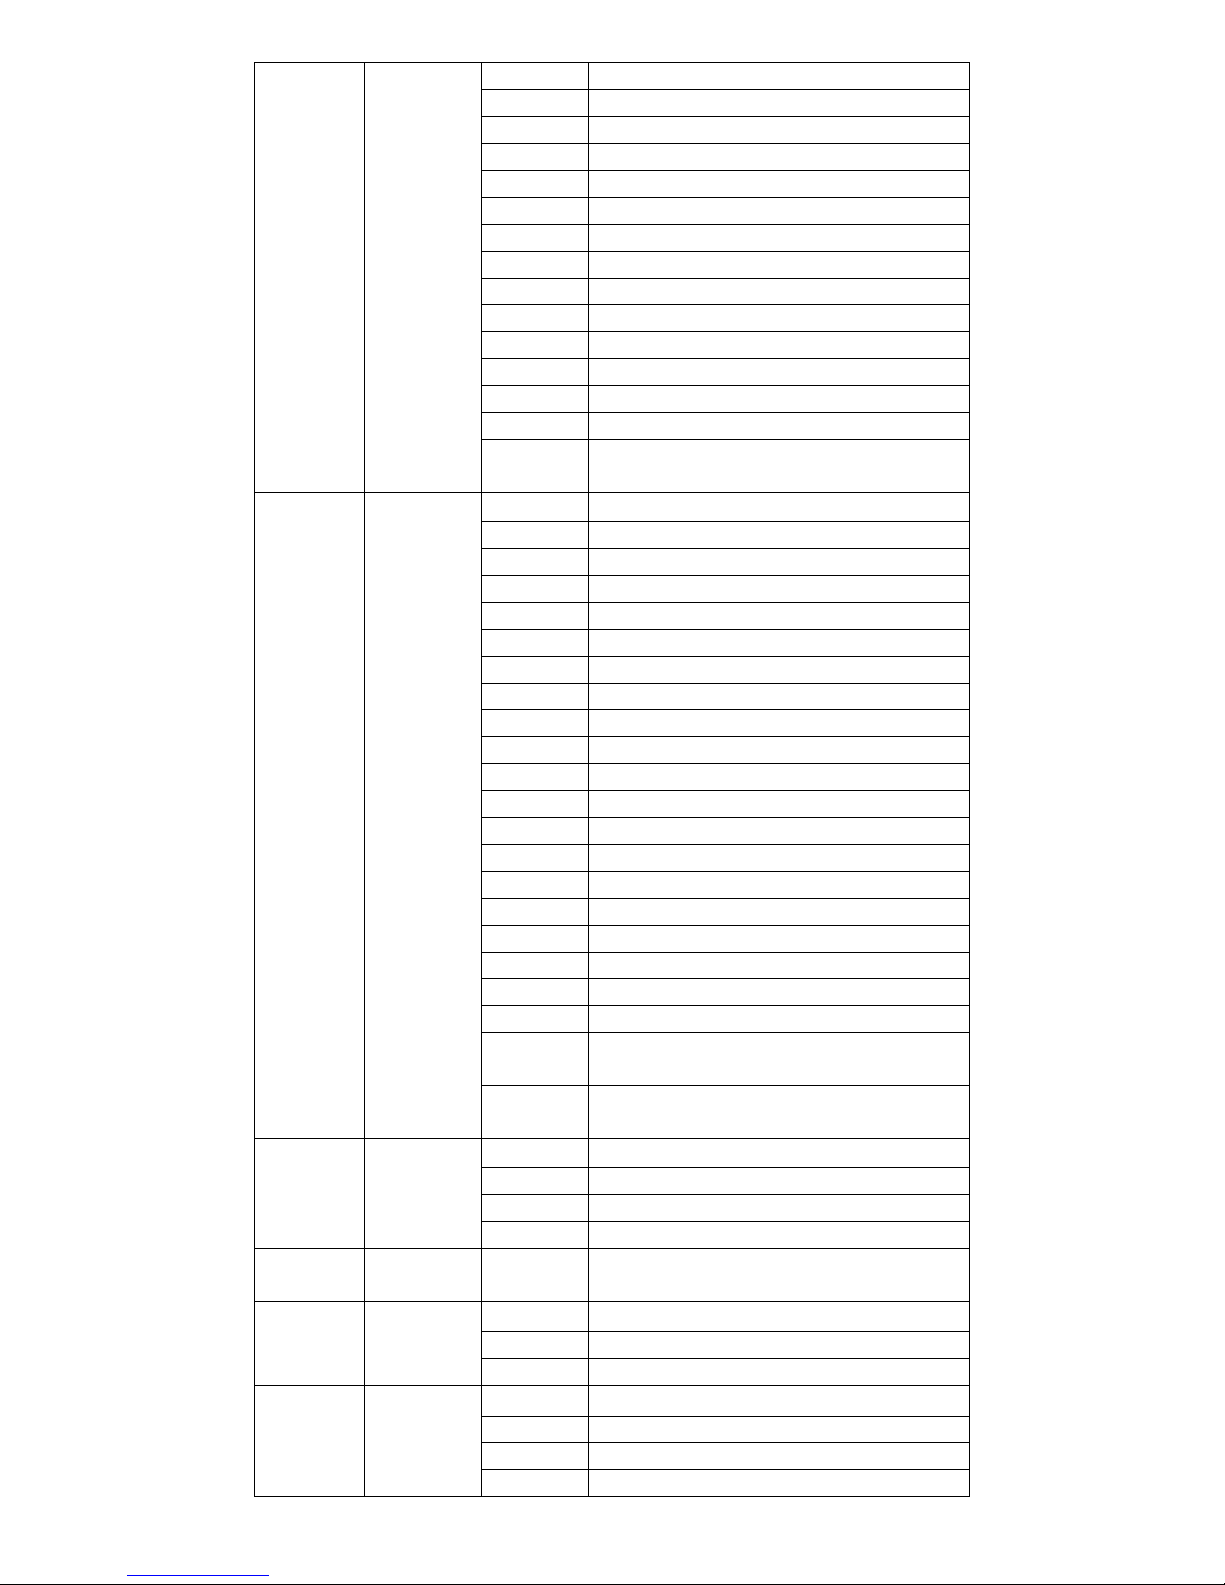
Panneau de contrôle :
Menu Principal
DMX
Adresse DMX
1-512
Nombre de canaux DMX
16Ch/24Ch
MODE
En attente du DMX
Oui/Non
Mode Maitre /esc.
Maitre / Esclave
Mode Son
Oui / Non
Sensibilite du mic.
0-100
Focus manuel
0-255
PARAM.
Inversion PAN
Oui/Non
Inversion TILT
Oui/Non
Pan en mémoire
Oui/Non
Tilt en mémoire
Oui/Non
Reset roue de couleur
Oui/Non
Reset roue de Gobo
Oui/Non
Reglage des positions
Pan
Tilt
Shutter

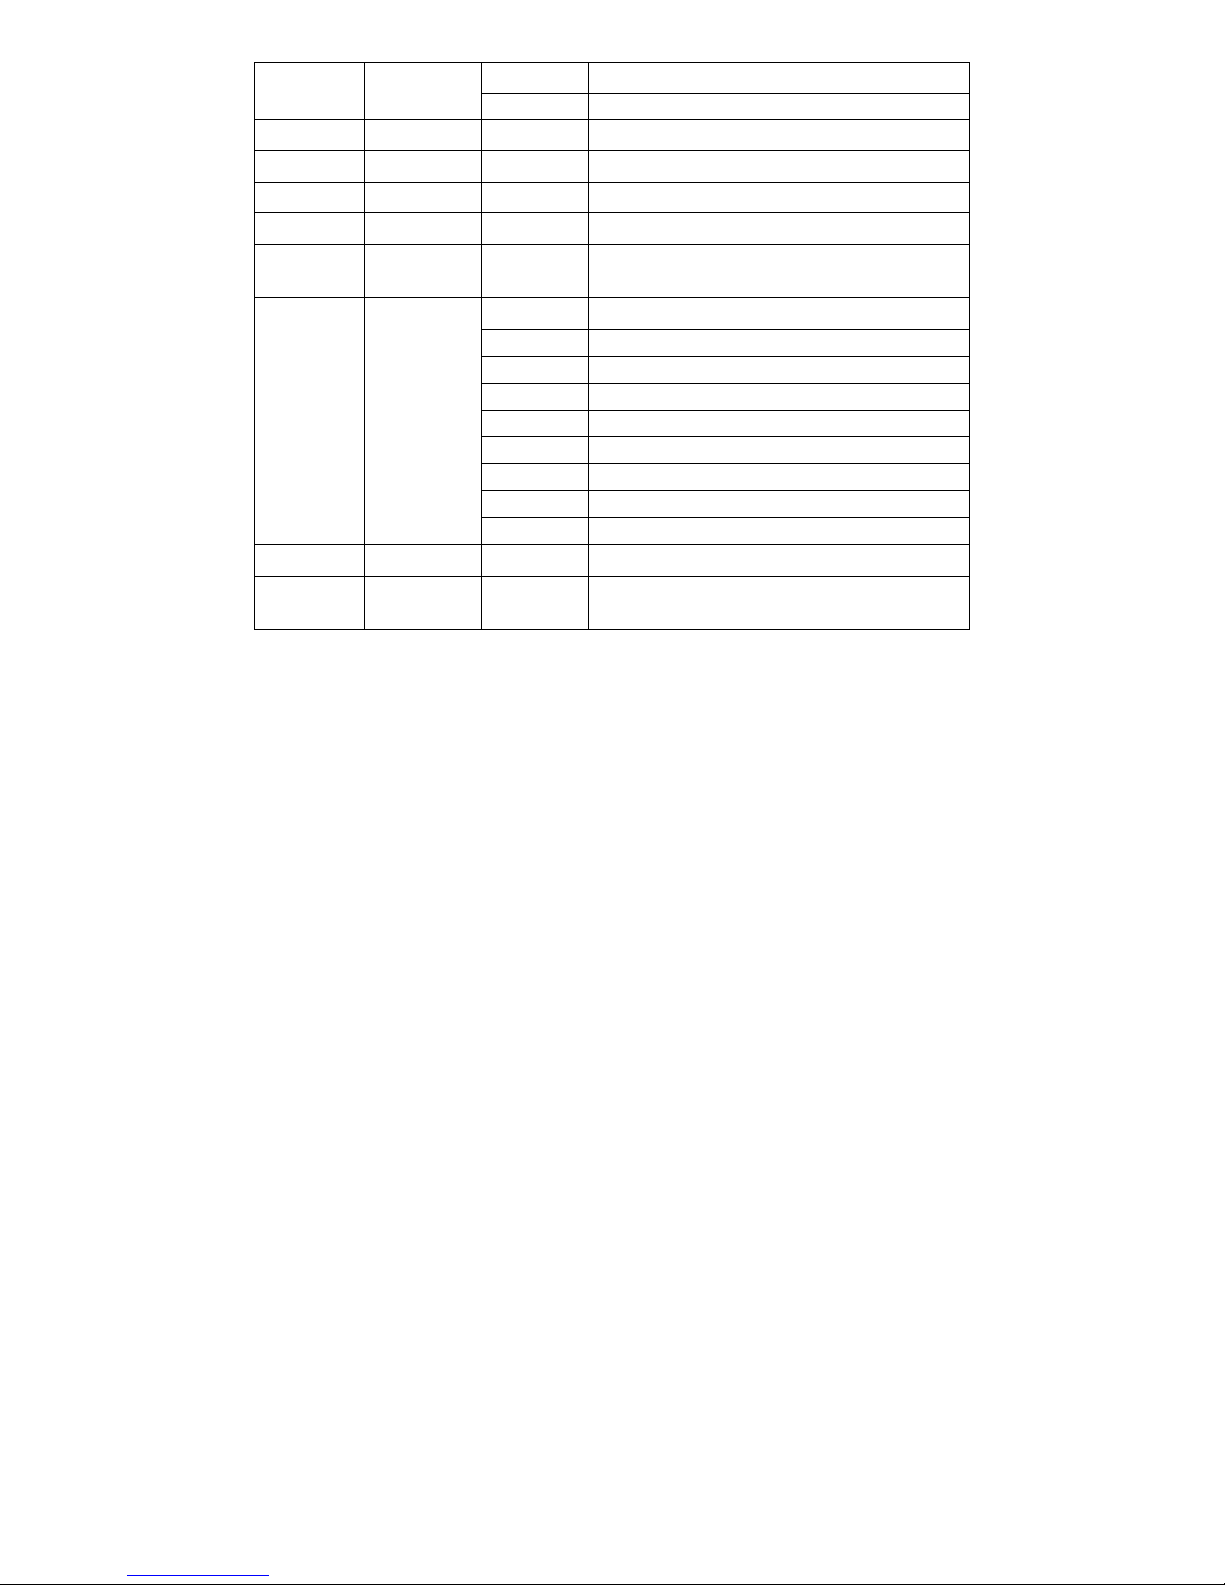
Hybrid 10R Manual Ver. 1.00 Page 7
Couleur
Gobo1
Gobo2
Prism 1
Prism2
Frost
Focus
LAMPE
Contrôle manuel
Allumage / Extinction
Default
Allumage / Extinction
Contrôle par DMX
Oui/Non
ECRAN
Eclairage
Allume / Eteint
Intensité
1-10
Inverser écran Auto
Inverser écran
Oui/Non
Langage
Eng/Fre
TEST
Test Auto
Test Manuel
INFO
Durée lampe
Raz Lampe
Version du logiciel
RSET
Pan/Tilt
Oui/Non
Shutter/Prisme/Frost/Focus
Oui/Non
Roue de couleur
Oui/Non
Roue de gobos
Oui/Non
Tous
Oui/Non
o Mode Automatique
Dans le menu principal, sélectionnez « Mode AUTO » puis « Auto 1 ou2 » si vous désirez un fonctionnement 100% automatique avec
défilement des programmes internes, ou « Son » pour un fonctionnement automatique avec détection sonore ( micro interne).
Ces modes automatiques sont très pratiques lorsqu’il vous faut faire une installation rapide avec un résultat immédiat.
o Mode DMX
Chaque appareil peut-être contrôlé individuellement grâce à un contrôleur DMX-512 standard.
Il faut « adresser » chaque appareil grâce au menu « Adresse DMX ». L’adresse renseignée est alors l’adresse de base, adresse à partir
de laquelle l’appareil va répondre.
Selon le mode de contrôle DMX sélectionné (16 canaux ou 24 canaux), Le contrôleur DMX utilisé aura besoin de 16 ou 24 canaux DMX
pour contrôler l’Hybrid 10R.
Si deux l’Hybrid 10R sont adressées à la même adresse DMX ; ils se comporteront alors de manière identique, répondants aux mêmes
canaux DMX.
Note : En mode 16 canaux DMX, il faudra adresser la 2eme l’Hybrid 10R à l’adresse 17.

Hybrid 10R Manual Ver. 1.00 Page 8
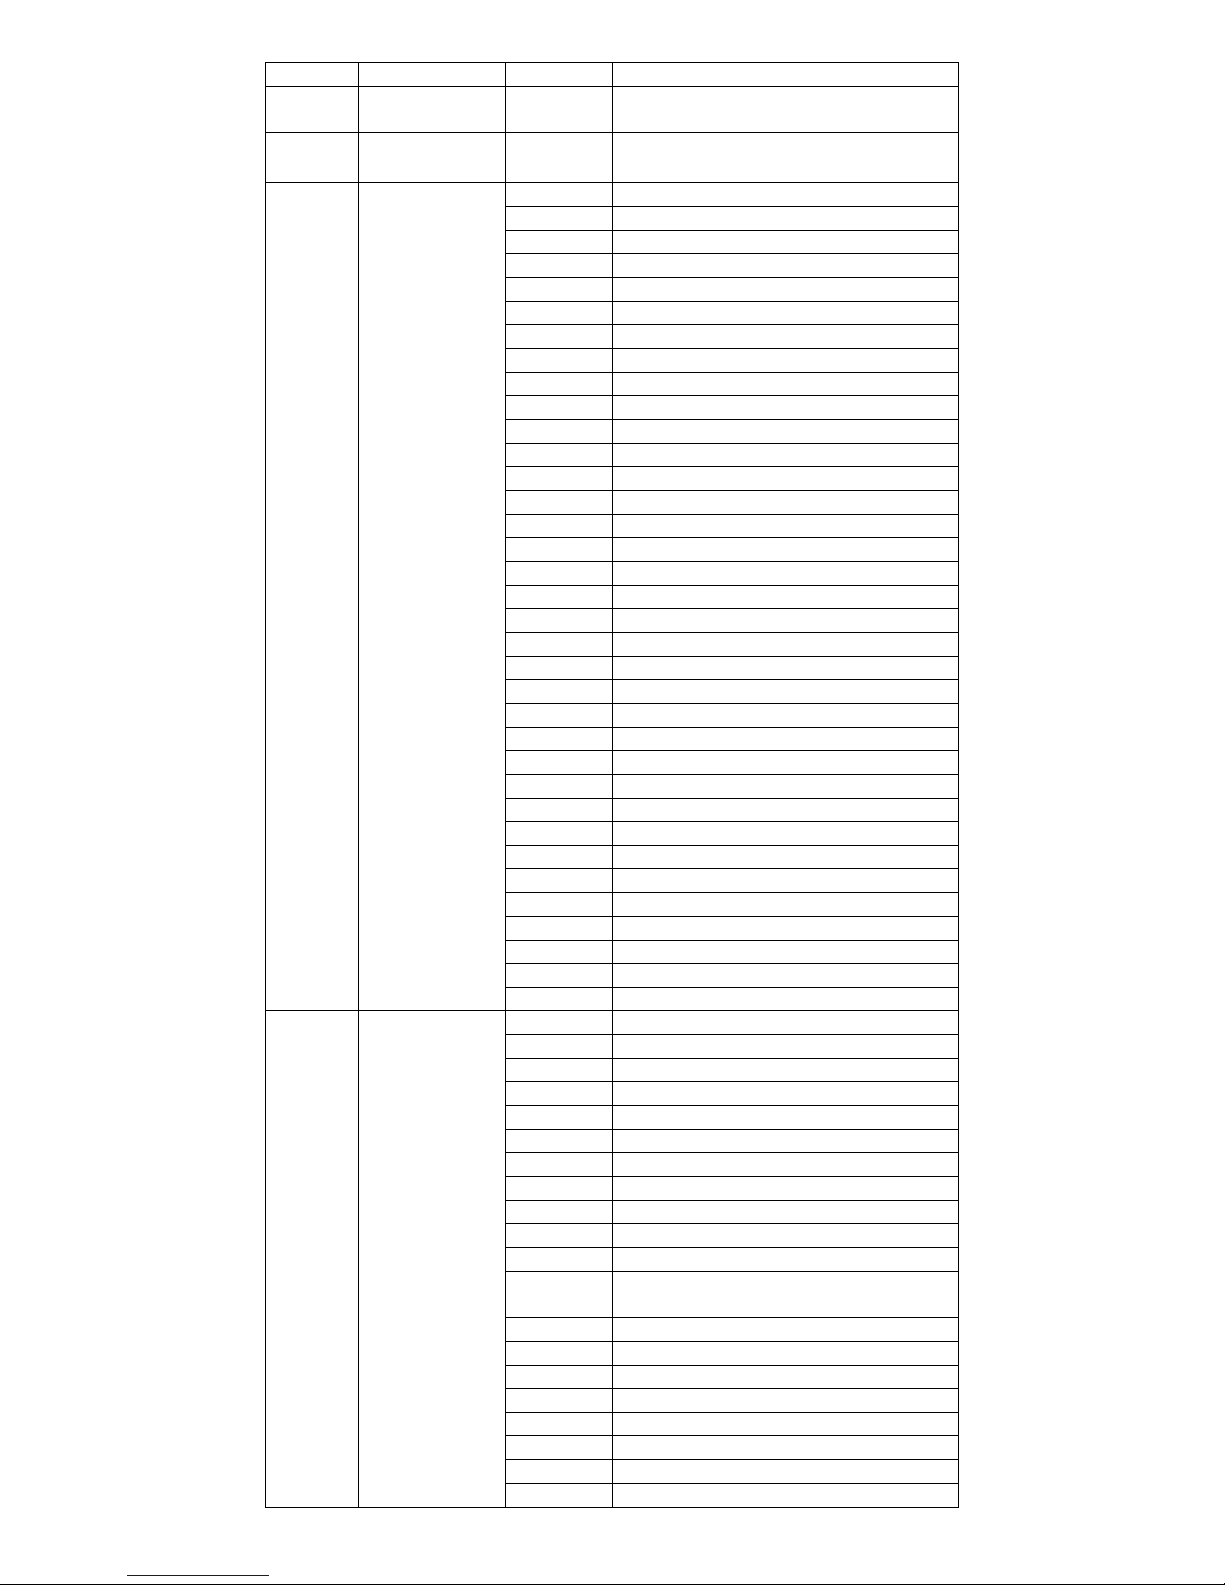
o Protocol DMX 16 canaux:
Canal
Fonction
Valeur
Description
CH1
Pan
0--255
Pan
CH2
Tilt
0--255
Tilt
CH3
Vitesse Pan /
Tilt
0--255
Vitesse Pan / tilt
CH4
Macro
Function
0--19
Pas de fonction
20--24
Mode éco (230W)
25--129
Pas de fonction
130--139
Allumage lampe
140--149
Reset Pan / tilt
150--159
Pas de fonction
160--169
Reset Effets
170--199
Pas de fonction
200--209
Reset Total
210--229
Pas de fonction
230--239
Extinction lampe
240--255
Pas de fonction
CH5
Roue de
couleurs
0--8
Blanc
9--17
18--26
Bleu
27--35
Jaune
36--44
Vert
45--53
Magenta
54--62
Azur
63--71
Rouge
72--80
Vert foncé
81--89
Ambre
90--98
Bleu
99--107
Orange
108--116
UV
117--127
Bleu
128--129
Blanc
130--134
Bleu, UV
135--138
UV, orange
139--143
Orange, bleu
144--147
Bleu, amber
148--152
Ambre, Vert foncé
153--157
Vert foncé, rouge
158--161
Rouge, Azure
162--166
Azure, Magenta
167--171
Magenta, Vert
172--176
Vert, Jaune
177--180
Jaune, Bleu foncé
181--185
Bleu foncé, Blanc chaud
186--189
Blanc chaud, Blanc
190--220
Rotation auto de la roue de
couleur de rapide à lent
221--250
Rotation auto de la roue de

Hybrid 10R Manual Ver. 1.00 Page 9
couleur de lent à rapide
CH6
Pas de fonction
0--255
Pas de fonction
CH7
Gobos fixes
0--3
Pas de fonction
4--9
Gobo1
10--15
Gobo2
16--21
Gobo3
22--27
Gobo4
28--33
Gobo5
34--39
Gobo6
40--45
Gobo7
46--51
Gobo8
52--57
Gobo9
68--63
Gobo10
64--69
Beam1
70--75
Beam2
76--87
Beam3
88--95
Gobo1 shaking, de lent à rapide
96--103
Gobo2 shaking, de lent à rapide
104--111
Gobo3 shaking, de lent à rapide
112--119
Gobo4 shaking, de lent à rapide
120--127
Gobo5 shaking, de lent à rapide
128--135
Gobo6 shaking, de lent à rapide
136--143
Gobo7 shaking, de lent à rapide
144--151
Gobo8 shaking, de lent à rapide
152--159
Gobo9 shaking, de lent à rapide
160--167
Gobo10 shaking, de lent à
rapide
168--175
Beam1
176--183
Beam2
184--199
Beam3
200--255
Rotation continue roue de
gobos de lent à rapide
CH8
Gobos rotatifs
0--8
Pas de fonction
9--17
Gobo1
18--26
Gobo2
27--35
Gobo3
36--44
Gobo4
45--53
Gobo5
54--62
Gobo6
63--71
Gobo7
72--80
Gobo8
81--89
Gobo9
90--97
Gobo1 shaking, de lent à rapide
98--106
Gobo2 shaking, de lent à rapide
107--115
Gobo3 shaking, de lent à rapide
116--124
Gobo4 shaking, de lent à rapide
125--133
Gobo5 shaking, de lent à rapide
134--142
Gobo6 shaking, de lent à rapide
143--151
Gobo7 shaking, de lent à rapide
152--160
Gobo8 shaking, de lent à rapide
161--169
Gobo9 shaking, de lent à rapide
170--179
Gobo9 shaking (stop)
180--217
Rotation continue roue de

Hybrid 10R Manual Ver. 1.00 Page 10
gobos de rapide à lent
218--255
Rotation continue roue de
gobos de lent à rapide
CH9
Rotation Gobo
0--127
Pas de fonction
128--191
Rotation anti-horaire de lent à
rap.
192--193
Pas de rotation
194--255
Rotation horaire de rap. à lent
CH10
Prisme
0--19
Pas de fonction
20--75
Prisme linéaire 6 facettes
76--255
Prisme circulaire 8 facettes
CH11
Rotation
Prisme
0--127
Index
128--191
Rotation horaire de rap. à lent
192--193
No function
194--255
Rotation anti-horaire de lent à
rap.
CH12
Frost
0--64
Pas de rotation
65--255
Frost
CH13
Zoom In
0--255
Zoom
CH14
Focus
0--255
Focus
CH15
Strobe
0--31
Shutter fermé
32--63
Shutter ouvert
64--95
Strob de lent à rapide
96--127
Shutter ouvert
128--143
Strob de lent à rapide + effets
144--159
Strob de rapide à lent + effets
160--191
Shutter ouvert
192--223
Strobe aléatoire de lent à
rapide
224--255
Shutter ouvert
CH16
Dimmer
0--255
Dimmer
o Protocol DMX 24 canaux:
Canal
Fonction
Valeur
Description
CH1
Pan
0--255
Pan
CH2
Pan Fin
0--255
Pan fin
CH3
Tilt
0--255
Tilt
CH4
Tilt Fin
0--255
Tilt fin
CH5
Vitesse
Pan / tilt
0--255
Vitesse Pan / tilt
CH6
Fonctions
Macro
0--19
Pas de fonction
20--24
Mode éco (230W)
25--129
Pas de fonction
130--139
Allumage lampe
140--149
Reset Pan / tilt
150--159
Pas de fonction
160--169
Reset Effets
170--199
Pas de fonction
200--209
Reset Total

Hybrid 10R Manual Ver. 1.00 Page 11
210--229
Pas de fonction
230--239
Extinction lampe
240--255
Pas de fonction
CH7
Roue de
couleurs
0--8
Blanc
9--17
18--26
Bleu
27--35
Jaune
36--44
Vert
45--53
Magenta
54--62
Azur
63--71
Rouge
72--80
Vert foncé
81--89
Ambre
90--98
Bleu
99--107
Orange
108--116
UV
117--127
Bleu
128--129
Blanc
130--134
Bleu, UV
135--138
UV, orange
139--143
Orange, bleu
144--147
Bleu, amber
148--152
Ambre, Vert foncé
153--157
Vert foncé, rouge
158--161
Rouge, Azure
162--166
Azure, Magenta
167--171
Magenta, Vert
172--176
Vert, Jaune
177--180
Jaune, Bleu foncé
181--185
Bleu foncé, Blanc chaud
186--189
Blanc chaud, Blanc
190--220
Rotation auto de la roue de couleur de
rapide à lent
221--250
Rotation auto de la roue de couleur de
lent à rapide
251--255
Blanc
CH8
Pas de
fonction
0--255
Pas de fonction
CH9
Pas de
fonction
0--255
Pas de fonction
CH10
Gobos
fixes
0--3
Pas de fonction
4--9
Gobo1
10--15
Gobo2
16--21
Gobo3
22--27
Gobo4
28--33
Gobo5
34--39
Gobo6
40--45
Gobo7
46--51
Gobo8
52--57
Gobo9
68--63
Gobo10
64--69
Beam1
70--75
Beam2
Hybrid 10R Manual Ver. 1.00 Page 12
76--87
Beam3
88--95
Gobo1 shaking, de lent à rapide
96--103
Gobo2 shaking, de lent à rapide
104--111
Gobo3 shaking, de lent à rapide
112--119
Gobo4 shaking, de lent à rapide
120--127
Gobo5 shaking, de lent à rapide
128--135
Gobo6 shaking, de lent à rapide
136--143
Gobo7 shaking, de lent à rapide
144--151
Gobo8 shaking, de lent à rapide
152--159
Gobo9 shaking, de lent à rapide
160--167
Gobo10 shaking, de lent à rapide
168--175
Beam1
176--183
Beam2
184--199
Beam3
200--255
Rotation continue roue de gobos de lent
à rapide
CH11
Gobos
rotatifs
0--8
Pas de fonction
9--17
Gobo1
18--26
Gobo2
27--35
Gobo3
36--44
Gobo4
45--53
Gobo5
54--62
Gobo6
63--71
Gobo7
72--80
Gobo8
81--89
Gobo9
90--97
Gobo1 shaking, de lent à rapide
98--106
Gobo2 shaking, de lent à rapide
107--115
Gobo3 shaking, de lent à rapide
116--124
Gobo4 shaking, de lent à rapide
125--133
Gobo5 shaking, de lent à rapide
134--142
Gobo6 shaking, de lent à rapide
143--151
Gobo7 shaking, de lent à rapide
152--160
Gobo8 shaking, de lent à rapide
161--169
Gobo9 shaking, de lent à rapide
170--179
Gobo9 shaking (stop)
180--217
Rotation continue roue de gobos de
rapide à lent
218--255
Rotation continue roue de gobos de lent
à rapide
CH12
Rotation
Gobo
0--127
Pas de fonction
128--191
Rotation anti-horaire de lent à rap
192--193
Stop
194--255
Rotation horaire de rap. à lent
CH13
Pas de
fonction
0--255
Pas de fonction
CH14
Prisme
0--19
Pas de fonction
20--75
Prisme linéaire 6 facettes
76--255
Prisme circulaire 8 facettes
CH15
Rotation
Prisme
0--127
Pas de fonction
128--191
Rotation horaire de rap. à lent
192--193
Pas de fonction
194--255
Rotation anti-horaire de lent à rap.
Hybrid 10R Manual Ver. 1.00 Page 13
CH16
Frost
0--64
Pas de fonction
65--255
Frost
CH17
Zoom
0--255
Zoom
CH18
Zoom Fin
0--255
Zoom fin
CH19
Focus
0--255
Focus
CH20
Focus Fin
0--255
Focus fin
CH21
Pas de
fonction
0--255
Pas de fonction
CH22
Strobe
0--31
Shutter fermé
32--63
Shutter ouvert
64--95
Strob de lent à rapide
96--127
Shutter ouvert
128--143
Strob de lent à rapide + effets
144--159
Strob de rapide à lent + effets
160--191
Shutter ouvert
192--223
Strobe aléatoire de lent à rapide
224--255
Shutter ouvert
CH23
Dimmer
0--255
Dimmer
CH24
Pas de
fonction
0--255
Pas de fonction
o Mode Maître / Esclave
L’a ppar eil est au t omat iq u em e nt dé s ig n é en “M ai t re” s ’il e s t e n m ode AUTO .
Dans le menu principal, sélectionnez «MODE AUTO» puis « Auto » si vous désirez un fonctionnement 100% automatique avec
défilement des programmes internes. Pour un fonctionnement automatique avec détection sonore (micro interne), sélectionnez
« Musical » puis valider avec la touche ENTER.
L’appareil « Esclave » se trouve automatiquement configuré en ESCLAVE s’il n’est pas sélectionné en « Maître ».
Dès qu’il reçoit un signal DMX provenant de l’appareil « Maître », il réagira en « Esclave ».

Hybrid 10R Manual Ver. 1.00 Page 14
Entretien et maintenance
o Nettoyage
Un nettoyage extérieur de l’appareil doit être fait régulièrement. Les lentilles doivent être nettoyées pour une luminosité optimum. Si
l’appareil est installé dans un environnement poussiéreux ou avec de la fumée cet entretien régulier est très important. Il est possible
qu’un nettoyage des optiques par l’intérieur soit également nécessaire. Débranchez l’appareil avant toute intervention !
Utilisez un chiffon doux et propre avec très peu de liquide vitre. Toujours bien sécher les parties nettoyées.
o Maintenance
DANGER !
Risque de chocs électriques.
Toujours débrancher l’appareil avant une intervention technique ou avant son entretien.
Voici quelques suggestions si vous rencontrez des problèmes avec votre appareil.
L’appareil ne fonctionne pas du tout.
o Vérifiez le cordon d’alimentation et le fusible.
o Assurez-vous que votre prise soit bien alimentée.
L’appareil ne répond pas ou pas correctement aux commandes DMX.
o Vérifiez vos câbles DMX
o Vérifiez votre adressage DMX
o Essayez un autre contrôleur DMX
o Vérifiez que vos câbles DMX ne passent pas à proximité de câbles haute tension, ce qui pourrait créer des
interférences.
Ne réagit pas au son
o Vérifiez le mode de fonctionnement choisi
o Vérifiez qu’il n’y a pas de câble DMX branché sur DMX IN
o Tapotez directement sur le microphone pour tester sa réactivité.
La lampe de s’allume pas
o Vérifiez que le «dimmer» est ouvert
o Vérifiez que le «Shutter» est ouvert
o Vérifier que la lampe est « ON »
Caractéristiques techniques
Modèle
HYBRID 10R
Lampe
10R 280W
Tension d’alimentation
230v 50Hz
Connecteur d’alimentation
Embase type Neutrik True1
Consommation électrique
300 W
Protocol de contrôle
DMX 512
Nombre de canaux DMX
16 /24
Homologations
CE / RoHs / EN 2014 /30/EU, E N 201 1/65 /EU, EN 2 014/ 35/E U
Dimensions du produit et poids net :
590x250x370 17,6 kg

Hybrid 10R Manual Ver. 1.00 Page 15
WARNING !
Before use, and before installing this fixture, read carefully this user manual, and follow the safety precautions
listed on this page.
WARNING !
Very high level light output. DO NOT LOOK INTO THE BEAM.
DANGER !
Hazardous voltage. Risk of electric shock!
Use only Neutrik type True1 power cable.
ALWAYS disconnect the fixture from power for servicing, for cleaning or installing.
Do not connect this unit on a dimmer power pack.
Protect the unit from rain or moisture.
WARNING !
Burn Hazard. Do not touch. Very hot surface
The fixture becomes hot during use and remains hot 30 min after use. Do not touch the unit.
WARNING !
Fire Hazard!
Keep flammable materials away from the fixture. Do not operate the fixture with ambient temperature over
40°C.
Do not place any filter on the head of the fixture. Keep any combustible materials away from the unit: At least
5 meters.

Hybrid 10R Manual Ver. 1.00 Page 16
DANGER !
Safety Hazard. Risk of injury.
This evolite unit must be installed by professional people. If suspended, make sure the structure and the
hardware used for this suspension is secured. This Hardware must support at least 10 times the weight of the
device suspended.
Ensure public is not looking at the beam. Do not try to repair the fixture by yourself. Contact a professional repair
service.

Hybrid 10R Manual Ver. 1.00 Page 17
Introduction
Tha n k yo u fo r s el e ct ing thi s pr o fe s sio nal fi x tu re f r om evol i te
Thi s n e w i nte l li g ent Mo vi ng Be am wi ll pro vid e yo u re l ia b il i ty, l at est fea ture s, and pr ofes s io n al li ghti ng
effe c ts f or a lo ng pe riod o f t i me .
Thi s e v olit e fi xtu re is c omp l yi n g with Eu rop ean sta ndar d s: EN 201 4/30 /EU, EN 2 011/ 65/E U, EN
201 4/35 /EU.
Device description
Features
> Professional hybrid moving head
> 3 different effects: Beam/Wash/Spot
> Fit with 280W short arc lamp (10R type)
> Lamp included
> 16/24 DMX channels
> 13 metal fix Gobos + open
> 9 glass rotating gobos + open
> 13 colors + white
> Shutter with strob effect
> PAN & TILT Movements with fast step motors
> Pan movement range 530 degree
> Mechanical multi-step focus with three different angles (15 degrees, 18 degrees and 22 degrees).
>15 high quality stepping-motor controlled by microprocessors
> 8 facets circular prism
> 6 facets linear prism
> Lamp controlled by DMX
> Control modes: DMX & Auto, Sound detection
> Easy-to-use touch sensitive menu with LCD screen
Installation
o Rigging
The installation of the projector has to be built and constructed in a way that it can hold 10 times the weight for 1 hour without any
harming deformation.
IMPORTANT! OVERHEAD RIGGING REQUIRES EXTENSIVE EXPERIENCE, including calculating working load limits, installation material
being used, and periodic safety inspection of all installation material and the projector. If you lack these qualifications, do not attempt
the installation yourself, but instead use a professional structural rigger. Improper installation can result in bodily injury and or damage
to property. The projector had to be installed out of the reach of people

Hybrid 10R Manual Ver. 1.00 Page 18
Always secure your fixture with a safety cable!
o DMX 512 connection
The wires must not come into contact with each other, otherwise the fixture will not work at all or properly. Please note the starting
address depends upon which controller is being used. Only use a DMX cable and 3-pin XLR-plugs and connectors in order to connect
the controller with the fixture or one fixture to another
Connection with the mains.
The earth has to be connected. The device must only be connected with an electric installation carried out in compliance with IEC
standards.
SET UP
Main Menu
DMX
Dmx Address
1-512
Dmx Channel Mode
16Ch/24Ch
MODE
Wait for DMX signal
Yes/No
Master / Slave Mode
Master/Slave
Sound Mode
On/Off
Sound Sens
0-100
Manual Focus
0-255
SET
Pan reverse
Yes/No
Tilt reverse
Yes/No
Pan memory
Yes/No
Tilt memory
Yes/No
Reset Color wheel
Yes/No
Reset Gobo wheel
Yes/No

Hybrid 10R Manual Ver. 1.00 Page 19
Motors Offset
Pan
Tilt
Shutter
Color
Gobo1
Gobo2
Prism 1
Prism2
Frost
Focus
LAMP
Manual Lamp control
On/Off
Default
On/Off
DMX Lamp Control
Yes/No
DISP
Backlight
On/Off
Backlight Dimmer
1-10
Auto display reverse
Display reverse
Yes/No
Language
Eng/Fre
TEST
Auto Test
Manual Test
INFO.
Lamp Time
Reset Time
Software Version
RESET
Pan/Tilt
Yes/No
Shutter/Prism/Frost/Focus
Yes/No
Color Wheel
Yes/No
Gobo
Yes/No
All
Yes/No
o Auto Mode
Auto mode is selected in the main menu.
The Hybrid 10R provides 2 Auto modes:
1- Sound Auto Mode : Internal programs will be processed with the music detection ( built-in microphone)
2- Auto Mode : internal program will be processed automatically .
o DMX Mode
DMX mode is selected in the main menu (make sure fixture is not in Auto Mode).
You can control the fixtures individually via your DMX-controller
Just select the fixture address, knowing that this address will be the start address. ( 1st DMX channel).
The Hybrid 10R provides 2 DMX modes:
1- 16 channels DMX mode
2- 24 channels DMX mode.
These 2 modes are selected in the main menu by the OPTION function.
Note. If 2 Hybrid 10R are addressed with same DMX value, they will move exactly the same way.

Hybrid 10R Manual Ver. 1.00 Page 20
o 16 channels DMX-protocol
Channel
Function
Data
Function Description
CH1
Pan
0--255
Pan
CH2
Tilt
0--255
Tilt
CH3
Pan/Tilt Speed
0--255
From fast to slow
CH4
Marco
Function
0--19
No function
20--24
Half power
25--129
No function
130-139
Lamp on
140--149
Pan/Tilt reset
150--159
No function
160--169
All motors reset
170--199
No function
200--209
Fixture reset
210--229
No function
230--239
Lamp off
240--255
No function
CH5
Color Wheel
0--3
White
4--12
Red, stops arbitrarily
13--21
Dark blue, stops arbitrarily
22--0
Yellow, stops arbitrarily
31--39
Yellow green, stops arbitrarily
40--48
Magenta, stops arbitrarily
49--57
Blue green, stops arbitrarily
58--66
Orange red, stops arbitrarily
67--75
Green, stops arbitrarily
76--84
Brown yellow, stops arbitrarily
85--93
Light blue, stops arbitrarily
94--102
Dark blue, stops arbitrarily
103--112
Brown , stops arbitrarily
113--120
UV, stops arbitrarily
121--129
White, stops arbitrarily
130--134
Red
135--138
Dark blue
139--143
Yellow
144--147
Yellow green
148--152
Magenta
153--157
Blue green
158--161
Orange red
162--166
Green
167--171
Brown yellow
172--176
Light blue
177--180
Dark blue
181--185
Brown
186--189
UV
190--215
From fast to slow
216--217
Stop
218--243
From slow to fast
244--255
Random running
CH6
Gobo Changing
Speed
0--255
Gobo change speed
CH7
Static Gobo
Wheel
0--3
No function
4--9
Gobo 1
10--15
Gobo 2
16--21
Gobo 3
22--27
Gobo 4

Hybrid 10R Manual Ver. 1.00 Page 21
28--33
Gobo 5
34--39
Gobo 6
40--45
Gobo 7
46--51
Gobo 8
52--57
Gobo 9
58--63
Gobo 10
64--69
Gobo 11
70--75
Beam 1
76--78
Beam 2
79--81
Beam 3
Gobo shaking, from slow to fast
82--89
Gobo 1 shaking, from slow to fast
90--97
Gobo 2 shaking, from slow to fast
98--105
Gobo 3 shaking, from slow to fast
106--113
Gobo 4 shaking, from slow to fast
114--121
Gobo 5 shaking, from slow to fast
122--129
Gobo 6 shaking, from slow to fast
130--137
Gobo 7 shaking, from slow to fast
138--145
Gobo 8 shaking, from slow to fast
146--153
Gobo 9 shaking, from slow to fast
154--161
Gobo10 shaking, from slow to fast
162--169
Gobo 11 shaking, from slow to fast
170--177
Beam 1, from slow to fast
178--185
Beam 2, from slow to fast
186--193
Beam 3, from slow to fast
194--199
White
200--220
Gobos changing, from fast to slow
221--222
Stop
223--243
Gobos changing, from slow to fast
244--255
Random running
CH8
Rotating Gobo
Wheel
Channel 12 gobo index function
0--4
No function
5--7
Gobo 1
8--10
Gobo 2
11--13
Gobo 3
14---16
Gobo 4
17--19
Gobo 5
20--22
Gobo 6
23--25
Gobo 7
26--28
Gobo 8
29--31
Gobo 9
Channel 12 gobo bi-directional rotation
function
32--34
Gobo 1
35--37
Gobo 2
38--40
Gobo 3
41--43
Gobo 4
44--46
Gobo 5
47--49
Gobo 6
50--52
Gobo 7
53--55
Gobo 8
56--59
Gobo 9
Gobo shaking, from slow to fast.
Channel 12 gobo index function
60--67
Gobo 1 shaking, from slow to fast
68--75
Gobo 2 shaking, from slow to fast
76--83
Gobo 3 shaking, from slow to fast
84--91
Gobo 4 shaking, from slow to fast
92--99
Gobo 5 shaking, from slow to fast
100--107
Gobo 6 shaking, from slow to fast
108--115
Gobo 7 shaking, from slow to fast

Hybrid 10R Manual Ver. 1.00 Page 22
116--123
Gobo 8 shaking, from slow to fast
124--129
Gobo 9 shaking, from slow to fast
Gobo shaking, from slow to fast
Channel 12 gobo index function
130--137
Gobo 1 shaking, from slow to fast
138--145
Gobo 2 shaking, from slow to fast
146--153
Gobo 3 shaking, from slow to fast
154--161
Gobo 4 shaking, from slow to fast
162--169
Gobo 5 shaking, from slow to fast
170--177
Gobo 6 shaking, from slow to fast
178--185
Gobo 7 shaking, from slow to fast
186--193
Gobo 8 shaking, from slow to fast
194--199
Gobo 9 shaking, from slow to fast
200--220
Gobos changing, from fast to slow
221--222
Stop
223--243
Gobos changing, from slow to fast
244--255
Random running
CH9
Gobo Index,
Rotation
0--255
Gobo index fine
CH10
Prism
0--19
No function
Channel 15 index function
20--49
6-facet linear prism
Channel 15 gobo bi-directional rotation
function
50--75
6-facet linear prism
Channel 15 index function
76--104
8-facet circular prism
Channel 15 bi-directional rotation
function
105--127
8-facet circular prism
6-facet linear prism plus gobo
combination effect
128--135
Combination 1
136--143
Combination 2
144--151
Combination 3
152--159
Combination 4
160--167
Combination 5
168--175
Combination 6
176--183
Combination 7
184--191
Combination 8
192--199
Combination 9
8-facet circular prism plus gobo
combination effect
200--207
Combination 1
208--215
Combination 2
216--223
Combination 3
224--231
Combination 4
232--239
Combination 5
240--247
Combination 6
248--255
Combination 7
CH11
Prism Index,
Rotation
0--255
Prism index, rotation
CH12
Frost
0--64
No function
65--255
Liner frost
CH13
Zoom In
0—255
Liner zoom in
CH14
Focus
0--255
Focus
CH15
Strobe
0--31
Strobe close
32--63
Strobe open
64--95
Strobe from slow to fast
96--127
Strobe open

Hybrid 10R Manual Ver. 1.00 Page 23
128--143
Strobe from fast to slow, strobe effects
144--159
Strobe from slow to fast, open slow and
off fast
160--191
Strobe open
192--223
Strobe random, from slow to fast
224--255
Strobe open
CH16
Dimmer
0--255
Liner dimmer
o 24 channels DMX-protocol
Channel
Function
Data
Function Description
CH1
Pan
0--255
Pan
CH2
Pan Fine
0--255
Pan fine
CH3
Tilt
0--255
Tilt
CH4
Tilt Fine
0--255
Tilt fine
CH5
Pan/Tilt Speed
0--255
From fast to slow
CH6
Marco
Function
0--19
No function
20--24
Half power
25--129
No function
130-139
Lamp on
140--149
Pan/Tilt reset
150--159
No function
160--169
All motors reset
170--199
No function
200--209
Fixture reset
210--229
No function
230--239
Lamp off
240--255
No function
CH7
Color Wheel
0--3
White
4--12
Red, stops arbitrarily
13--21
Dark blue, stops arbitrarily
22--0
Yellow, stops arbitrarily
31--39
Yellow green, stops arbitrarily
40--48
Magenta, stops arbitrarily
49--57
Blue green, stops arbitrarily
58--66
Orange red, stops arbitrarily
67--75
Green, stops arbitrarily
76--84
Brown yellow, stops arbitrarily
85--93
Light blue, stops arbitrarily
94--102
Dark blue, stops arbitrarily
103--112
Brown , stops arbitrarily
113--120
UV, stops arbitrarily
121--129
White, stops arbitrarily
130--134
Red
135--138
Dark blue
139--143
Yellow
144--147
Yellow green
148--152
Magenta
153--157
Blue green
158--161
Orange red
162--166
Green
167--171
Brown yellow
172--176
Light blue
177--180
Dark blue
181--185
Brown
186--189
UV
190--215
From fast to slow
216--217
Stop
218--243
From slow to fast
Hybrid 10R Manual Ver. 1.00 Page 24
244--255
Random running
CH8
Color Wheel
Fine
0--255
Color wheel fine
CH9
Gobo Changing
Speed
0--255
Gobo change speed
CH10
Static Gobo
Wheel
0--3
No function
4--9
Gobo 1
10--15
Gobo 2
16--21
Gobo 3
22--27
Gobo 4
28--33
Gobo 5
34--39
Gobo 6
40--45
Gobo 7
46--51
Gobo 8
52--57
Gobo 9
58--63
Gobo 10
64--69
Gobo 11
70--75
Beam 1
76--78
Beam 2
79--81
Beam 3
Gobo shaking, from slow to fast
82--89
Gobo 1 shaking, from slow to fast
90--97
Gobo 2 shaking, from slow to fast
98--105
Gobo 3 shaking, from slow to fast
106--113
Gobo 4 shaking, from slow to fast
114--121
Gobo 5 shaking, from slow to fast
122--129
Gobo 6 shaking, from slow to fast
130--137
Gobo 7 shaking, from slow to fast
138--145
Gobo 8 shaking, from slow to fast
146--153
Gobo 9 shaking, from slow to fast
154--161
Gobo10 shaking, from slow to fast
162--169
Gobo 11 shaking, from slow to fast
170--177
Beam 1, from slow to fast
178--185
Beam 2, from slow to fast
186--193
Beam 3, from slow to fast
194--199
White
200--220
Gobos changing, from fast to slow
221--222
Stop
223--243
Gobos changing, from slow to fast
244--255
Random running
CH11
Rotating Gobo
Wheel
Channel 12 gobo index function
0--4
No function
5--7
Gobo 1
8--10
Gobo 2
11--13
Gobo 3
14---16
Gobo 4
17--19
Gobo 5
20--22
Gobo 6
23--25
Gobo 7
26--28
Gobo 8
29--31
Gobo 9
Channel 12 gobo bi-directional rotation
function
32--34
Gobo 1
35--37
Gobo 2
38--40
Gobo 3
41--43
Gobo 4
44--46
Gobo 5
47--49
Gobo 6
50--52
Gobo 7
53--55
Gobo 8

Hybrid 10R Manual Ver. 1.00 Page 25
56--59
Gobo 9
Gobo shaking, from slow to fast.
Channel 12 gobo index function
60--67
Gobo 1 shaking, from slow to fast
68--75
Gobo 2 shaking, from slow to fast
76--83
Gobo 3 shaking, from slow to fast
84--91
Gobo 4 shaking, from slow to fast
92--99
Gobo 5 shaking, from slow to fast
100--107
Gobo 6 shaking, from slow to fast
108--115
Gobo 7 shaking, from slow to fast
116--123
Gobo 8 shaking, from slow to fast
124--129
Gobo 9 shaking, from slow to fast
Gobo shaking, from slow to fast
Channel 12 gobo index function
130--137
Gobo 1 shaking, from slow to fast
138--145
Gobo 2 shaking, from slow to fast
146--153
Gobo 3 shaking, from slow to fast
154--161
Gobo 4 shaking, from slow to fast
162--169
Gobo 5 shaking, from slow to fast
170--177
Gobo 6 shaking, from slow to fast
178--185
Gobo 7 shaking, from slow to fast
186--193
Gobo 8 shaking, from slow to fast
194--199
Gobo 9 shaking, from slow to fast
200--220
Gobos changing, from fast to slow
221--222
Stop
223--243
Gobos changing, from slow to fast
244--255
Random running
CH12
Gobo Index,
Rotation
0--255
Gobo index fine
CH13
Gobo Index
0--255
Gobo index fine
CH14
Prism
0--19
No function
Channel 15 index function
20--49
6-facet linear prism
Channel 15 gobo bi-directional rotation
function
50--75
6-facet linear prism
Channel 15 index function
76--104
8-facet circular prism
Channel 15 bi-directional rotation
function
105--127
8-facet circular prism
6-facet linear prism plus gobo
combination effect
128--135
Combination 1
136--143
Combination 2
144--151
Combination 3
152--159
Combination 4
160--167
Combination 5
168--175
Combination 6
176--183
Combination 7
184--191
Combination 8
192--199
Combination 9
8-facet circular prism plus gobo
combination effect
200--207
Combination 1
208--215
Combination 2
216--223
Combination 3
224--231
Combination 4
232--239
Combination 5
240--247
Combination 6

Hybrid 10R Manual Ver. 1.00 Page 26
248--255
Combination 7
CH15
Prism Index,
Rotation
0--255
Prism index, rotation
CH16
Frost
0--64
No function
65--255
Liner frost
CH17
Zoom In
0—255
Liner zoom in
CH18
Zoom Fine
0--255
Zoom fine
CH19
Focus
0--255
Focus
CH20
Focus zooming
0--255
Focus zooming
CH21
0--255
No function
CH22
Strobe
0--31
Strobe close
32--63
Strobe open
64--95
Strobe from slow to fast
96--127
Strobe open
128--143
Strobe from fast to slow, strobe effects
144--159
Strobe from slow to fast, open slow and
off fast
160--191
Strobe open
192--223
Strobe random, from slow to fast
224--255
Strobe open
CH23
Dimmer
0--255
Liner dimmer
CH24
No function
o Master/ Slave Mode
The “Master” unit is the unit set up in Auto Mode. The Slave unit will be automatically set up as “Slave” if receiving DMX
signal and NOT “Auto Mode” selected.
Maintenance & service
o Cleaning
The cleaning of internal must be carried out periodically to optimize light output. Cleaning frequency depends on the environment in
which the fixture operates: damp, smoky or particularly dirty surrounding can cause greater accumulation of dirt on the fixture’s
optics.
Clean with soft cloth using normal glass cleaning fluid.
Always dry the parts carefully.
Clean the external optics at least every 20 days. Clean the internal optics at least every 30/60 days
o Troubleshooting
Following are a few common problems that may occur during operation. Here are some suggestions for easy troubleshooting:
The fixture does not work, no light
o Check the connection of power and main fuse.
o Measure the mains voltage on the main connector.
Not responding to DMX controller
o DMX LED should be on. If not, check DMX connectors, cables to see if link properly.
o If the DMX LED is on and no response to the channel, check the address settings and DMX polarity.
o If you have intermittent DMX signal problems, check the pins on connectors or on PCB of the fixture or the previous
one.
o Try to use another DMX controller.
o Check if the DMX cables run near or run alongside to high voltage cables that may cause damage or interference to
DMX interface circuit.
Some fixtures don’t respond to the easy controller
o You may have a break in the DMX cabling.
o Check the LED for the response of the master/ slave mode signal.

Hybrid 10R Manual Ver. 1.00 Page 27
No response to the sound
o Make sure the fixture does not receive DMX signal.
o Check microphone to see if it is good by tapping the microphone.
No light out
o Please check if « shutter » is OPEN
o Please check if LAMP is « ON »
Technical Specifications
Model
HYBRID 10R
Lamp
10R 280W
Power supply
230v 50Hz
Power supply connector
True1
Power consumption
300 W
Control protocol
DMX 512
DMX channels
16 /24
Certifications
CE / RoHs / EN 2014 /30/EU, E N 201 1/65 /EU, EN 201 4/35 /EU
Product dimensions and N.W.
590x250x370mm 17.6 kg

Hybrid 10R Manual Ver. 1.00 Page 28
www.evolite-pro.com
Importé par / Imported by
EVOLITE – MSC
7 avenue du 1er Mai
91120 Palaiseau / FRANCE
infos@msc-distribution.com
Tel : +33 1 69 34 80 62
 Loading...