

Page 1

User manual
Evolio Quattro HD
Page 2

(1). Introduction
Congratulations on the purchase of the Tablet !
This device is built-in high performance Wifi receiver module, G-sensor, also can bring you
into the portable media Tablet world and fulfilled your entertainment needs. It can support
picture, video, music, E-book, games, online chat and other functions, moreover, various
settings will fully show your individuality.
This manual contains important safety and operating information in order to prevent
accidents, please read this manual thoroughly and keep it for future reference.
(2). Safety precautions
To use this Tablet safely, please read and follow the instructions in this manual carefully
before use.
Never use the Tablet while driving or when operating any vehicle, as this could cause an
accident. It is also against the law in many areas. Take care when using the Tablet
outdoors, especially when crossing the street.
Do not listen to music at very high volumes using the earphones as this can
permanently damage your hearing.
Keep the Tablet clean and never store it next to a heat source or in dirty, humid or wet
places. Keep it out of direct sunlight.
Do not put the Tablet in high temperature places (over 40ºC), especially not in a car with
the windows closed in summer.
Keep the Tablet away from strong magnetic fields.
Please don’t turn on the device in where the wireless equipment is forbidden or when
the usage of the device will cause interference and danger.
Press the Tablet’s buttons gently. Pressing them or the screen too hard can damage the
Tablet.
Do not use the Tablet in an electronics-prohibited area, such as in an airplane.
Do not use the Tablet in an extremely dry environment, as this can lead to static
discharge, which can damage the Tablet.
Do not subject the product to harsh impacts.
Do not drop the appliance. This may result in damage to the product.
Do not attempt to dismantle or repair this unit yourself, Repairs should only be
performed by qualified personnel only.
We will not be responsible for any memory loss caused by product damage, repairs or
other reasons.
Disconnect the appliance from the power source when cleaning.
In order to prevent program failure, never disconnect the Tablet suddenly from a PC
during downloading, uploading or formatting to prevent program failure.
Use a slightly damp, lint-free cloth to clean this appliance. Do not dismantle the Tablet or
use alcohol, thinner or benzene to clean the surface of the Tablet .
Page 3
(3). Charging the battery
Important: The battery must be charged for at least 4 hours before using it for the first time.
(4). Switching on/off
To switch on the Tablet PC, press and hold the Power button. When startup window
appears, release the button. The system initialization may take several minutes. Please wait
patiently.
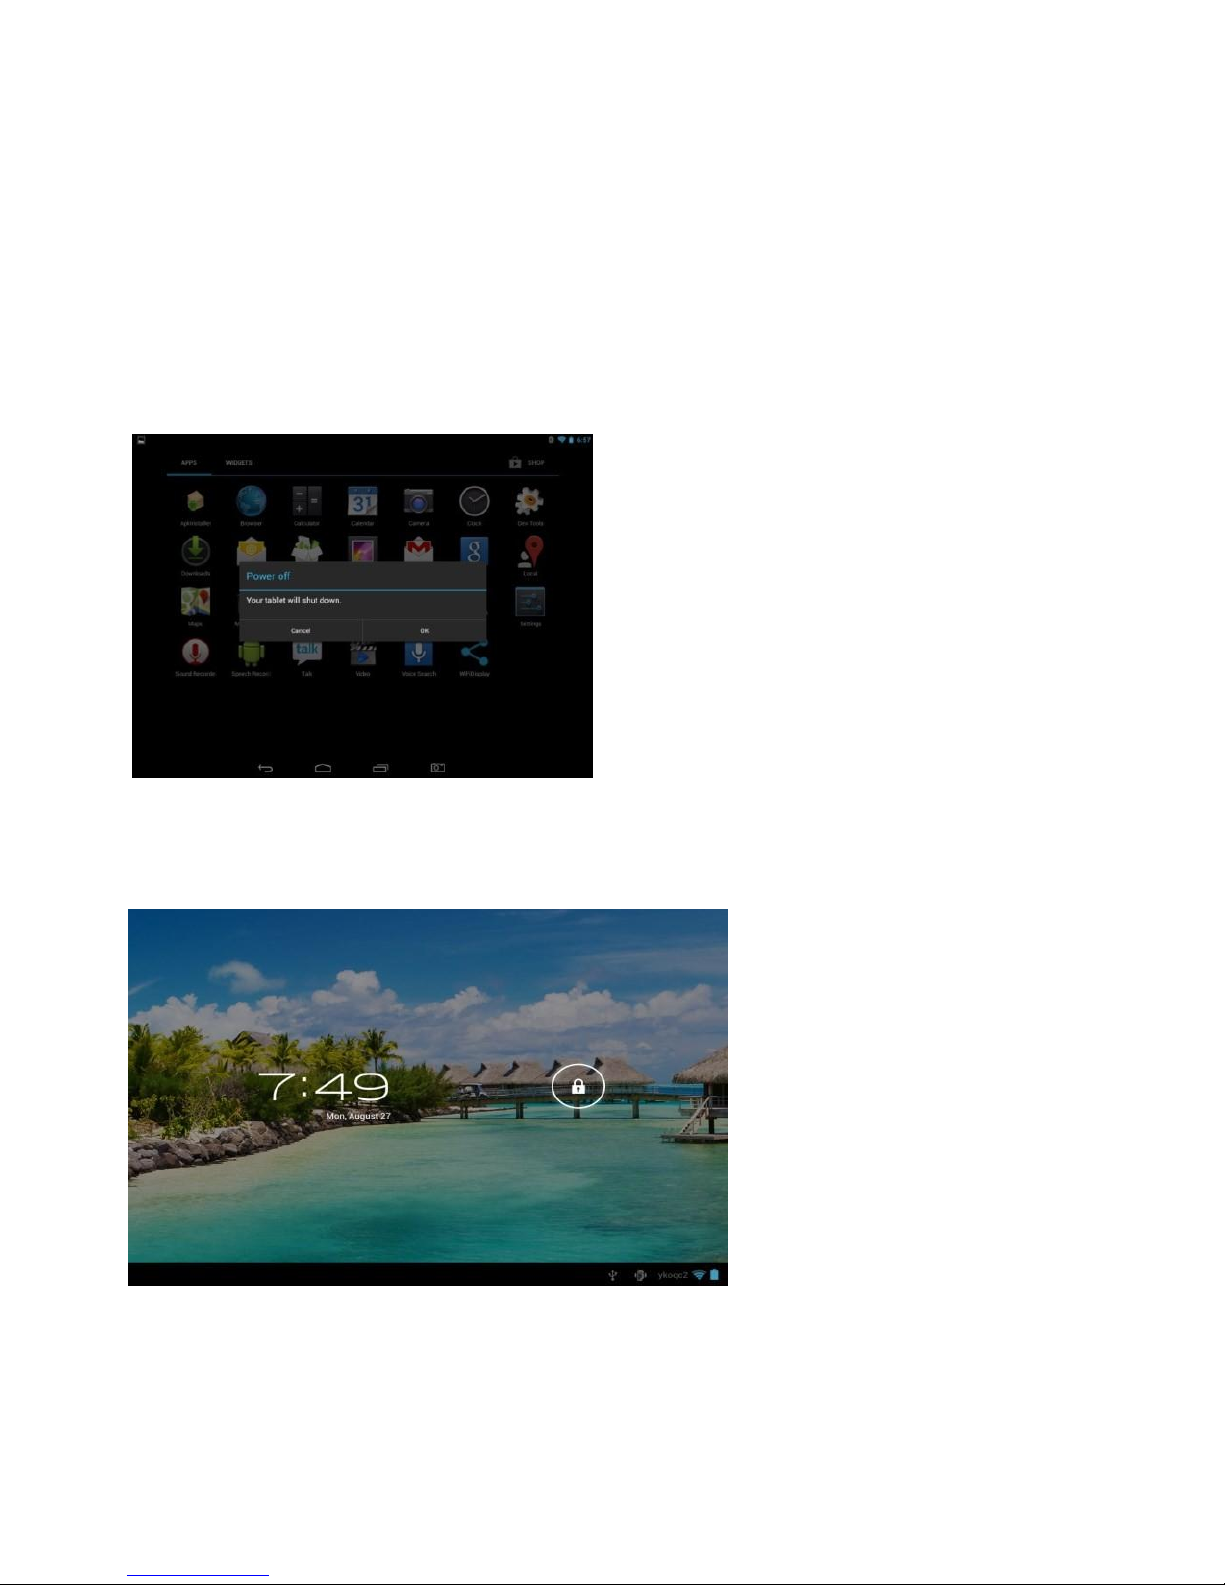
To switch off the tablet PC, press and hold the power button, when "power off " message
appears, release the button. Touch the message, then press OK.
(5).Unlocking the screen
If you do not use the screen during certain period of time, the screen will be locked.
To unlock the screen, press the power button once and drag “Lock” image right.
(6).Restarting the device
If the screen does not response
to key press or tap, press the
reset button (located in the hole)
using any thin object (paper clip,
pin, etc.) to restart your Tablet
PC or keep power button for
long time
(7).Factory reset
To delete all data and restore
your Tablet PC to factory
defaults, touch“Settings” >“Backup&reset” >“Factory data reset” >“Reset tablet”
Page 4
(8). Home page
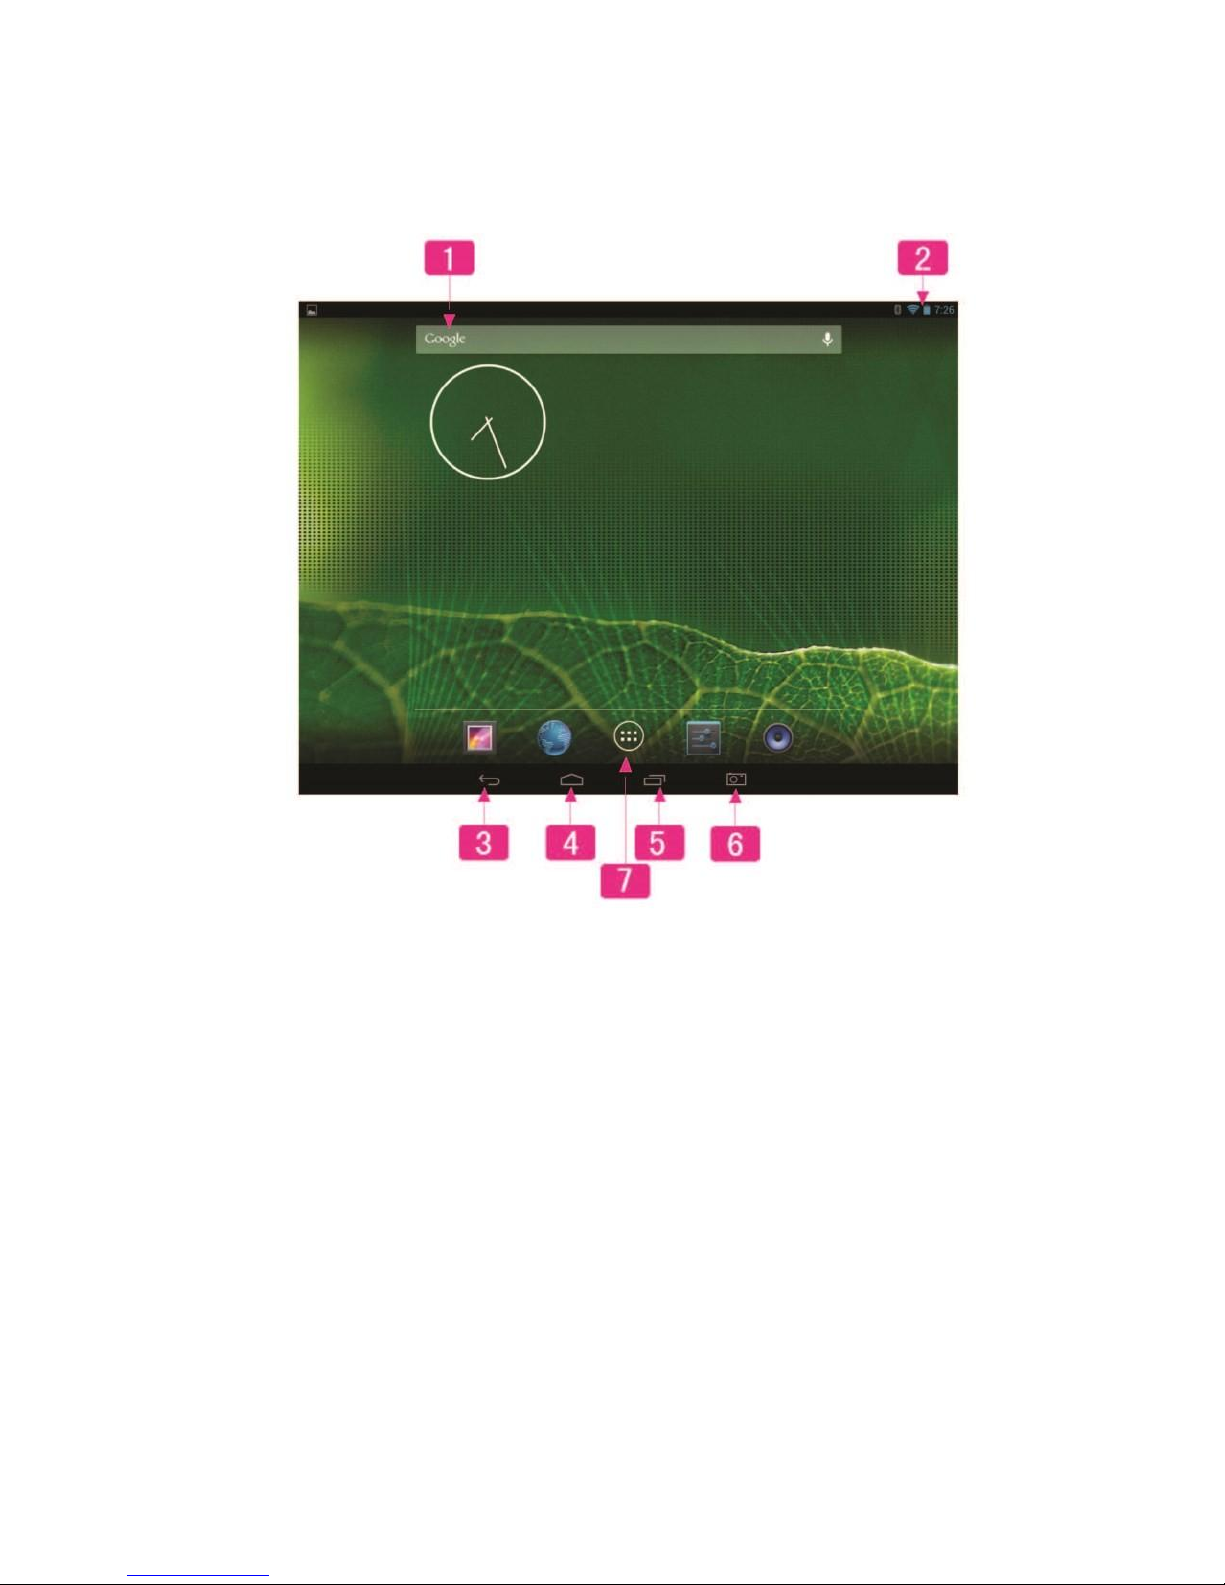
The Home screen gives you an overview of the contents of your device and gives you
access to all of it’s available functions and applications
1.Google Search
2.Notification bar
3. Back icon
4. Home icon
5. Recent Apps
6.screenshots icon
7. LauncherTab
(9) . Functions Operation
Click the related program icons to enter corresponding functions.
9.1 Music
Click ‘Music’ icon to open the music application. This application is used to play and store
MP3 audio files.
Page 5

9.2 Video
Click ‘Vide’, you will see all video files in this application. Click the video files and play it.
9.3 Photo
Click ‘Photo’, you will see all photos in this application. Click the photo files and review it.
9.4 Browser
Click ‘Browser’ icon to open ‘web browser’ application and freely browse the internet.
(Before you enter into website, please check you connect the wifi)
9.5 Camera
Click ‘Camera’ icon to open camera application. You can take a photo or make the video
recording.
9.6 Calculator
Click ‘Calculator’ icon to open the calculator application. This calculator is used to perform
advanced mathematical operations. Use the number pad to enter the numbers.
9.7 Calendar
Click ‘Calendar’ icon to open the calendar application. You can personalize and add your
memorandum.
9.8 Clock
Click ‘Clock’ icon to open the Clock application. You can personalize and program several
types of alarms.
9.9 Downloads
Click ‘Download’ icon to open the download, you will see all the files under downloading.
9.10 Email
Click ‘Email’ icon to open the email application and go directly to your personal e-mail
software. This application is compatible with most e-mail software and is used to easily
read, send and receive e-mails.
9.11 Explorer
Click ‘Explorer’ icon to open your tablet’s navigator and have access to the contents of
your Micro SD or device’s internal memory.
9.12 2 Search
Click ‘Search’ icon to open the search application. From here, you can search
Web/Apps/Music.
Page 6
(10).Settings
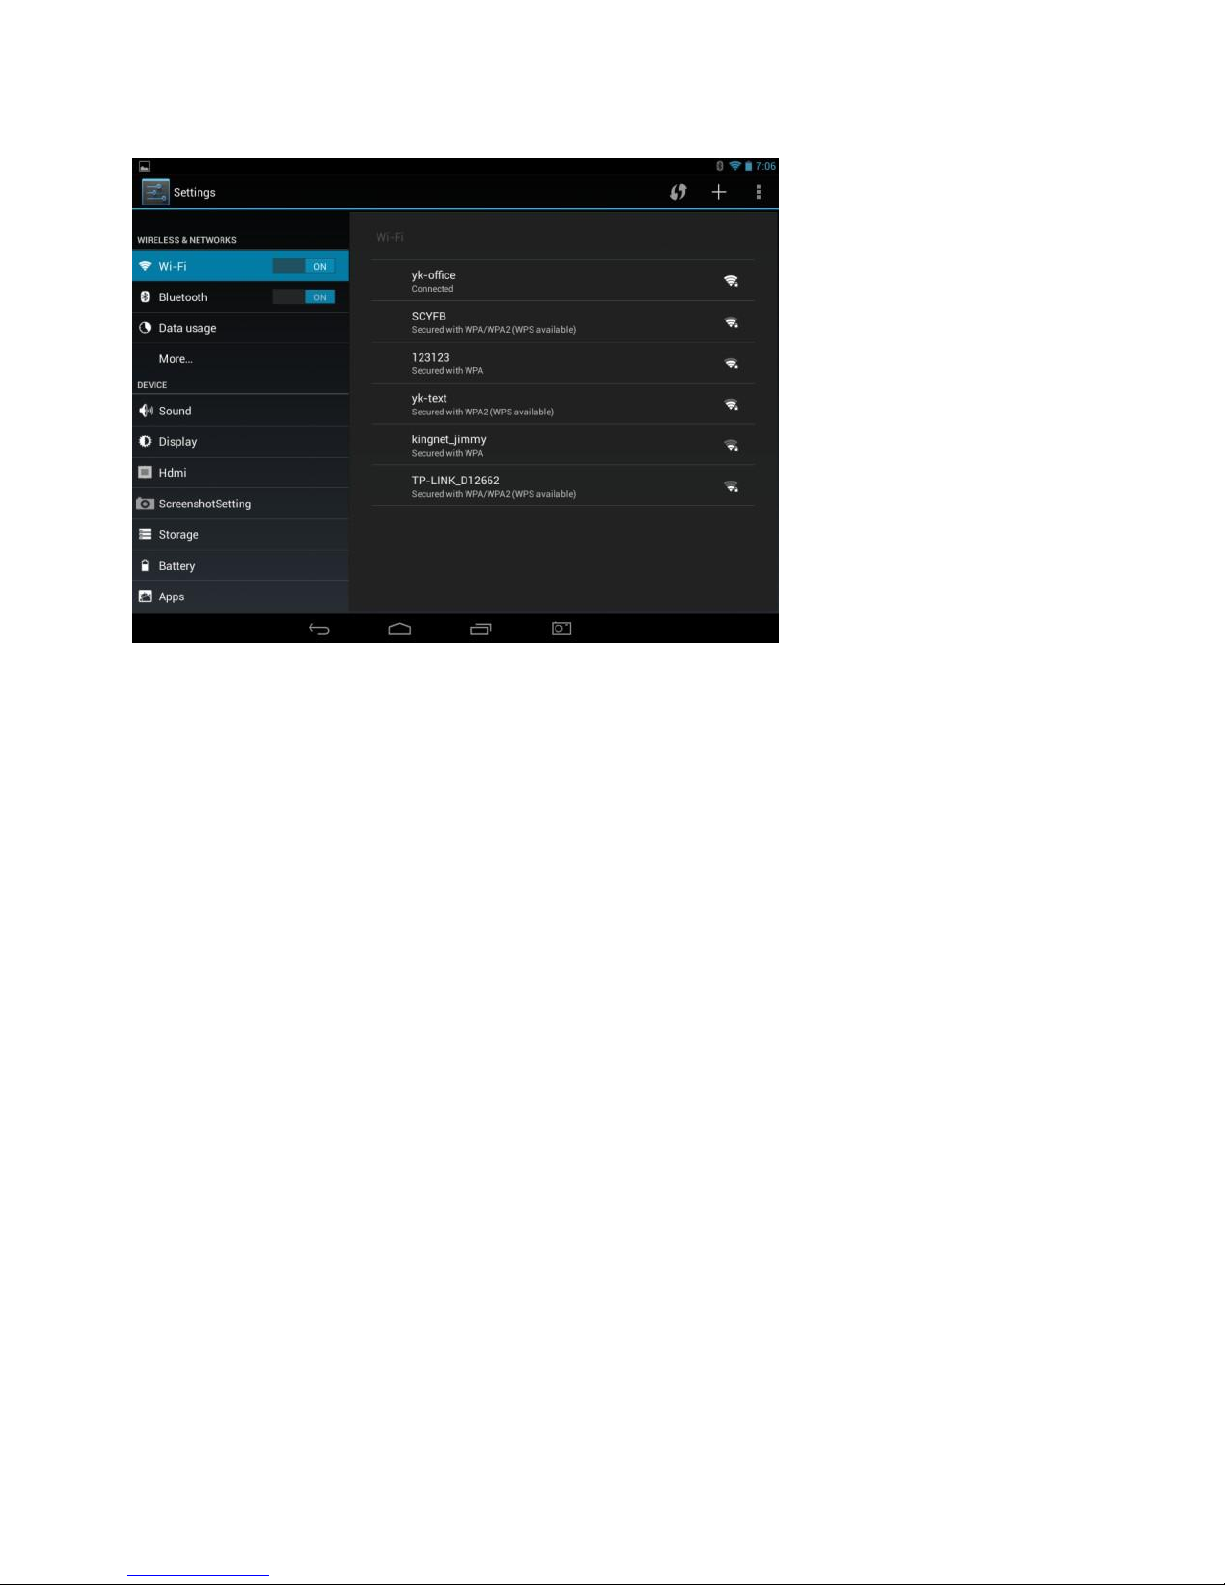
10.1 Wifi
Turn on the wifi and connect it.
10.2 Data usage
Set data usage cycle.
10.3 Sound
Set the volumes, system sounds
10.4 Display
Set the brightness, wallpaper, screensaver etc.
10.5 HDMI
Set the HDMI turn off or turn on
10.6 Storage
Show all storage and space of apps in internal memory/ SD card/USB disk.
10.7 Battery
Show battery usage data.
10.8 Apps
Show all apps you installed.
10.9 Accounts & Sync
Sync your accounts you setup.
Page 7

10.10 Location services
Determine your location by Intel.
10.11 Security
Set the screen security/Encryption/Passwords etc.
10.12 Language & Input
Set the language of device and input language you want.
10.13 Backup & reset
Backup data or recover factory data reset.
10.14 Date & Time
Set the date & time of device.
10.15 Accessibility
Set the font, auto-rotate etc.
10.16 Developer options
Show pointer location, screen updates, CPU usage etc.
10.17 About tablet
Show the model number, version etc.
(11) Wireless networks
Prior to starting an Internet-application, activate Wi-Fi connection and set up Wi-Fi network.
1.Touch the icon "Settings” > “Wi-Fi”. Select Wi-Fi item and set the switch to on position.
2. The device will automatically start searching for available networks and will display them
on the right panel.
3. Select any network from the list and press “Connect”. If the network you selected is
protected by WEP-protocol, type the security key, then press “Connect” button.
When the connection is successfully created, “Connected to” (Network name) message will
appear on the screen.
Page 8
(12) USB Connections
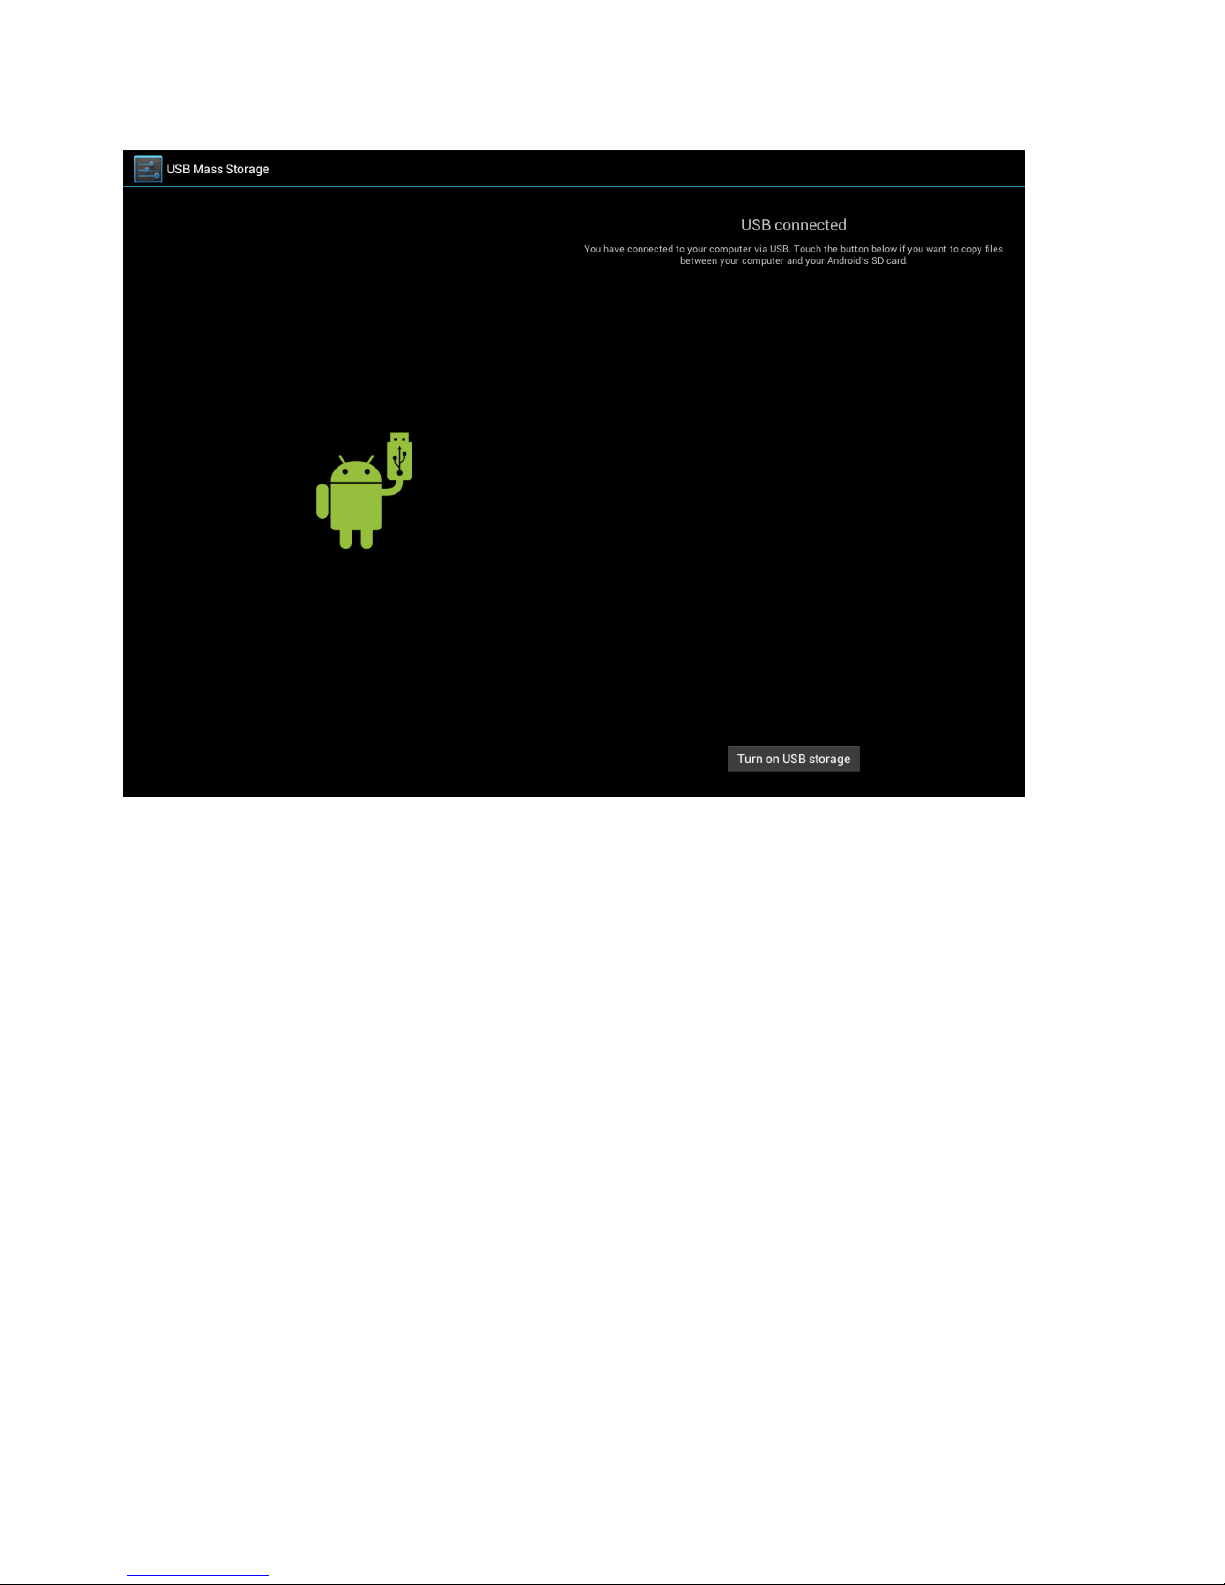
You can connect your device to your computer, use it as a removable disk and open any
files saved on your device.
When you see above picture, press ‘Turn on USB storage’ to connect with computer.
(13) Installation of application
Install the third party application procedure
You can gain the third party application which match the Android system from internet, and
install it by yourself in the device. Copy the application into SD card, and insert in the device
1. Click “Explorer” application , choose the application you need to install.
2. Hold the application you need to install. It popup install, click install apk.
3. Finish the installation as guide, it will operate.
Note: The third party procedure searched from internet to use on the system are all suffixed
with .apk.
Page 9
(14) Uninstall
Uninstall application procedure
1. Click setting icon in main interface.
2. Click manage application procedure, list all the application procedures installed in the
system.
3. Click the APK you want to uninstall, click uninstall.
4. Click confirm to finish uninstallation.
Skill: The procedure manager installed by system has many convinent methods
to uninstall, after opening procedure manager, click uninstall, it will list
all the application procedures installed by system.
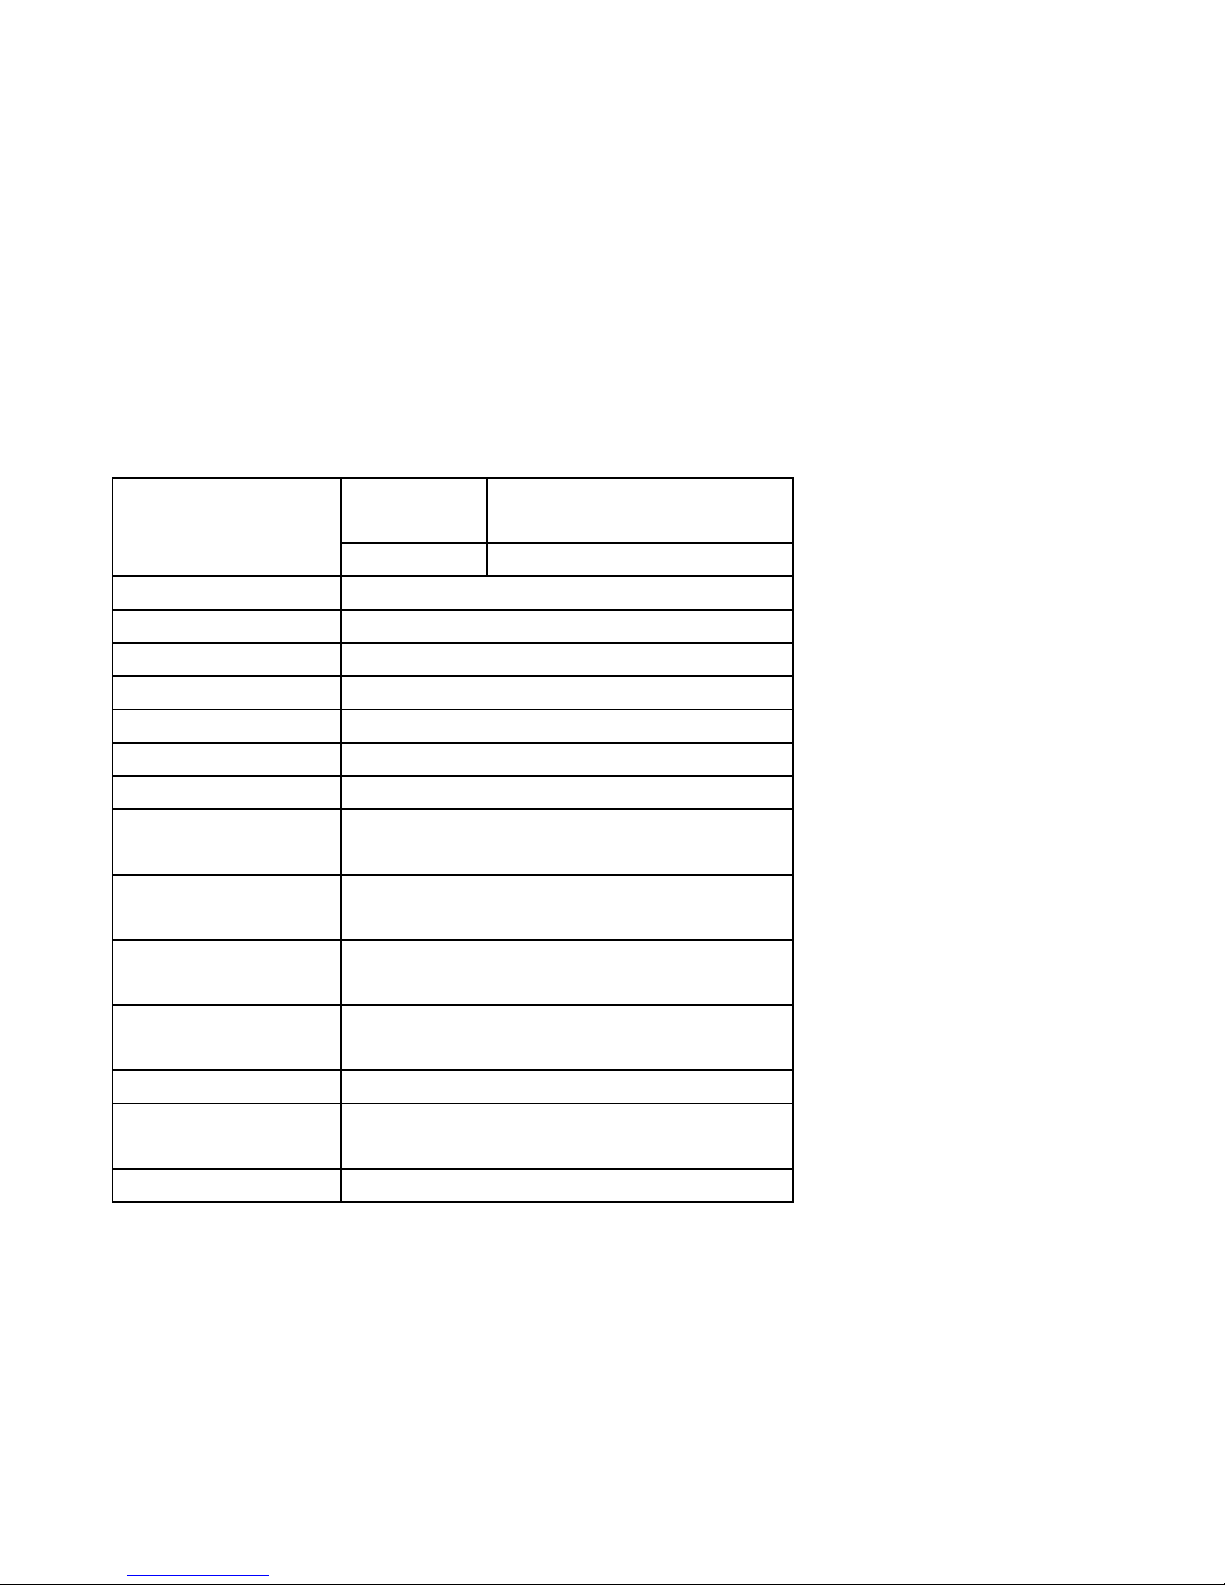
(15). Specifications
LCD Display
Size
7’’ IPS Capacitive touch
panel
Resolution
1024x600
Solution
Allwinner A31s quad core
OS
Android 4.2
CPU
ARM Cortex A7 1GHz
RAM
512MB, DDR3
Wifi
802.11b/g/n
Camera
Front 0.3M
Built-in Flash
8 GB
Capacity
Expansion
Support Micro SD Card , capacity
128MB~32GB
Power Supply
Built-in 3000mAH Lithium rechargeable
battery DC 5V@2A
Audio format
MP3/WMA/APE/FLAC/AAC/OGG/AC3/
WAV
Video format
Max.1280*720.MKV/AVI/RM/RMVB/FL
V/ WMV9/ MP4
Picture format
JPEG /BMP/ GIF/ PNG
Working
temperature
-5 ~ 42 ℃
Languages
Multiple languages
Page 10
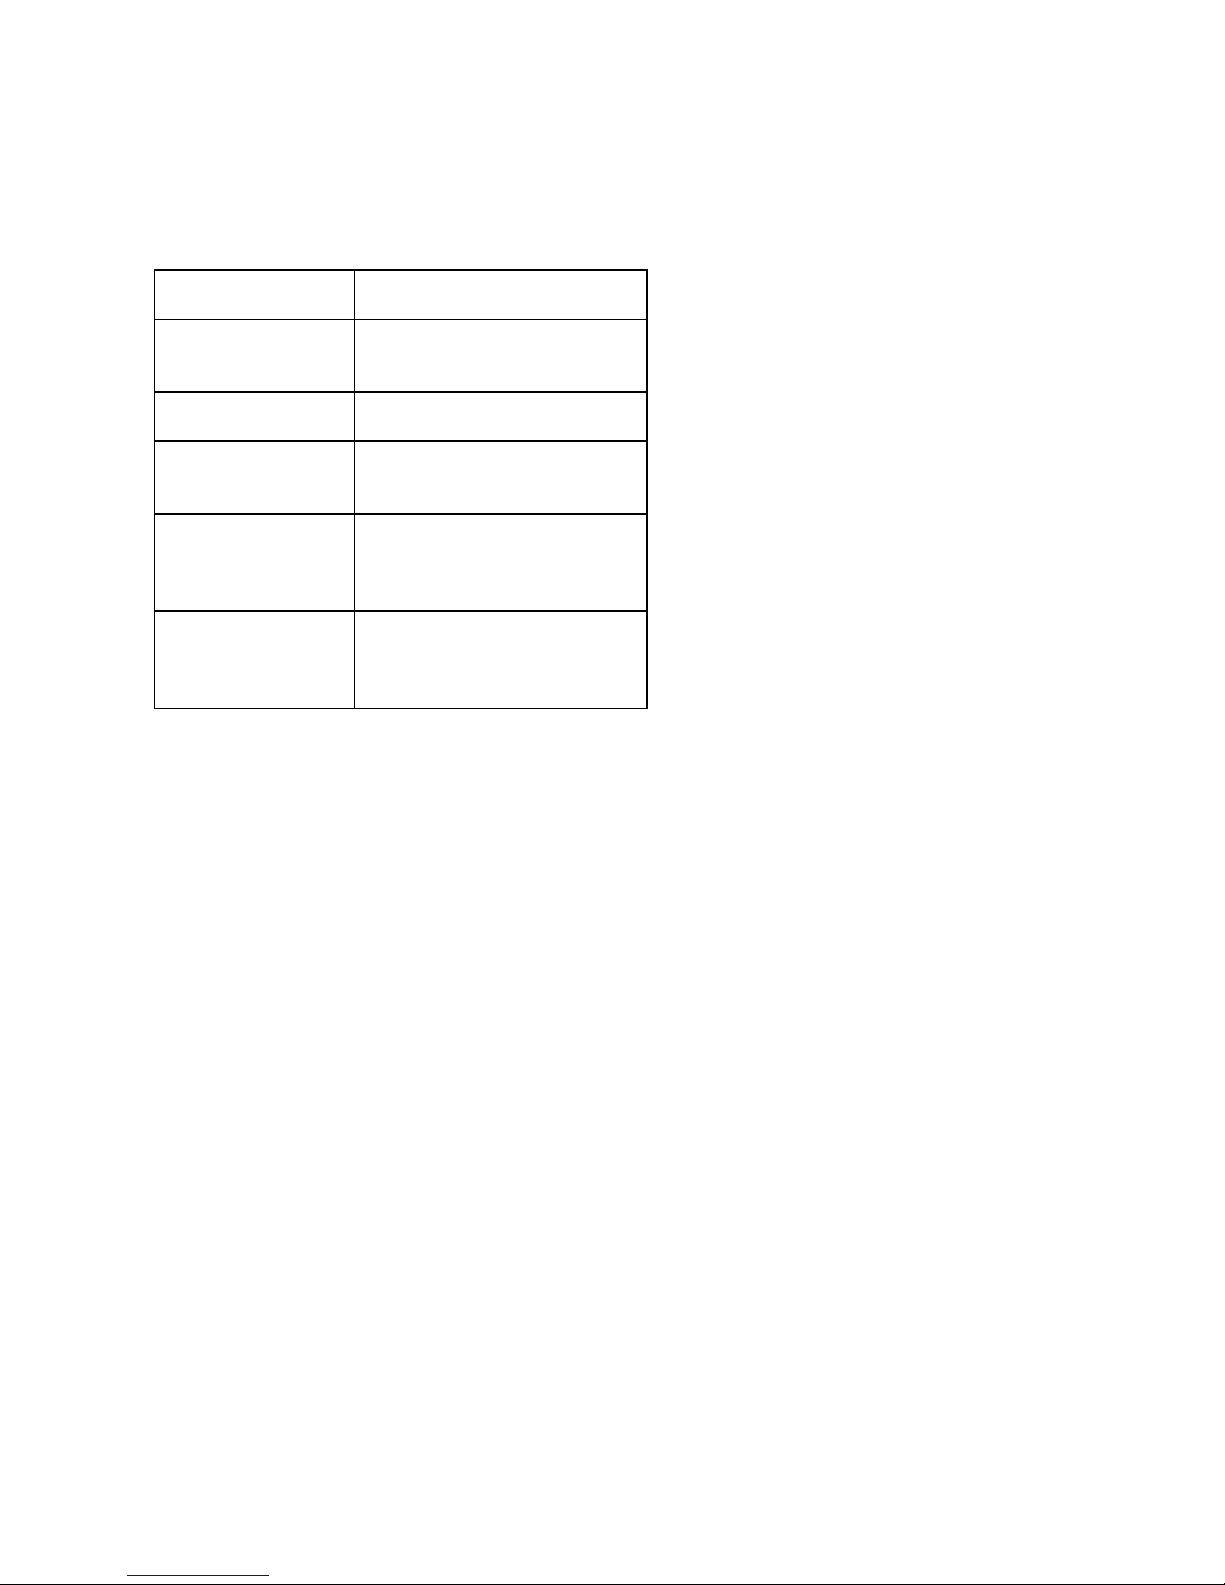
Problem
Solution
The device will turn
itself off after a few
seconds
Check that the battery is charged.
No volume is heard
Adjust the volume level
Check if audio file is broken
Screen is hard to see
in bright light.
Adjust the screen brightness in
the system menu. Avoid using the
reader in direct sunlight.
Data on the screen is
corrupted or
a
program is
Use thin object like a paper clip to
perform a reset to restart the
device
Can't copy file into the
device
Check if the device is connected
to the computer correctly.
Check if the memory space is full.
Check if the USB cable is broken
(16). Troubleshooting
 Loading...