

Page 1

0
Page 2

1
Cuprins
1.1 Înţelegerea caracteristicilor Hardware/ 4
1.2 Conectarea la curent direct şi încărcarea bateriei/ 5
1.3 Utilizarea aparatului întrun vehicul/ 6
1.4. Conectarea încărcătorului de maşină/ 6
2.1. Prima pornire p/ 7
2.2. Pornire /Oprire modul de hibernare/ 8
2.3. Operarea dispozitivului/ 9
2.4. Meniul principal/ 9
2.5. Introducerea unui card microSD/ 10
3.1. Utilizarea setărilor dispozitivului/ 10
3.2. Volumul p/ 10
3.3. Dată/ Ora p/ 11
3.4. Lumină de fundal p/ 12
3.5. Limba p/ 12
3.6. Calibrare/ 13
3.7. Despre/ 13
3.8. Navi Path/ 14
3.9. Setări USB/ 14
4.1. Receiver GPS/ 16
5.1. Pornire și ieșire din Music Play/ 16
5.2. Pregătirea fișierelor de muzică/ 16
5.3. Control redare muzică/ 16
6.1. Pornire și ieșire din muzic player/ 18
6.2.Control Redare Video/ 19
7.1. Vizualizare imagine Picture Viewer/ 20
7.2. Control redare vizualizare imagini/ 20
8.1. Vizualizare fisier document/ 21
8.2. Control redare vizualizare document/ 21
9.1. Resetarea sistemului/ 21
9.2. Depanare/ 22
9.3. Întreținerea dispozitivului/ 23
9.4. Măsuri de siguranță/ 24
9.5. Specificații tehnice/ 26
Page 3

2
Contents
1.1. Understanding Hardware Features/ 28
1.2. Connecting to Car charger and Charging the Battery (Optional)/ 30
1.3. Using Your Device in a Vehicle/ 31
1.4. Connecting the Car Charger/ 31
2.1. Performing the Initial Start Up/ 32
2.2. Turning On and Off / sleeping mode/ 32
2.3. Operating the Device/ 33
2.4. Main Menu/ 34
3.1. Using Device Settings/ 36
3.2. Volume/ 36
3.4. Backlight / 37
3.5. Language/ 38
3.6. Calibrate/ 38
3.7. About/ 38
3.8. NAVI Path/ 39
3.9. USB Setting/ 40
4.1. GPS Receiver/ 41
5. Music Player/ 42
5.1. Starting and Exiting Music Player/ 42
5.2. Preparing the Music Files for You Device/ 43
5.3. Music Playback Control/ 43
6. Video Player/ 44
6.1. Starting and Exiting Video Player/ 44
6.2. Video Playback Control / 45
7. Picture Viewer/ 45
7.2. Picture Viewer Playback Control/ 46
8.1. Viewing a document file/ 46
8.2. Document Viewer Playback Control/ 46
9.1. Resetting Your System/ 47
9.2. Troubleshooting/ 47
9.3. Maintaining Your Device/ 49
10. Regulations Statements/ 50
11. Safety Precautions/ 51
12. Tehnical specifications/ 54
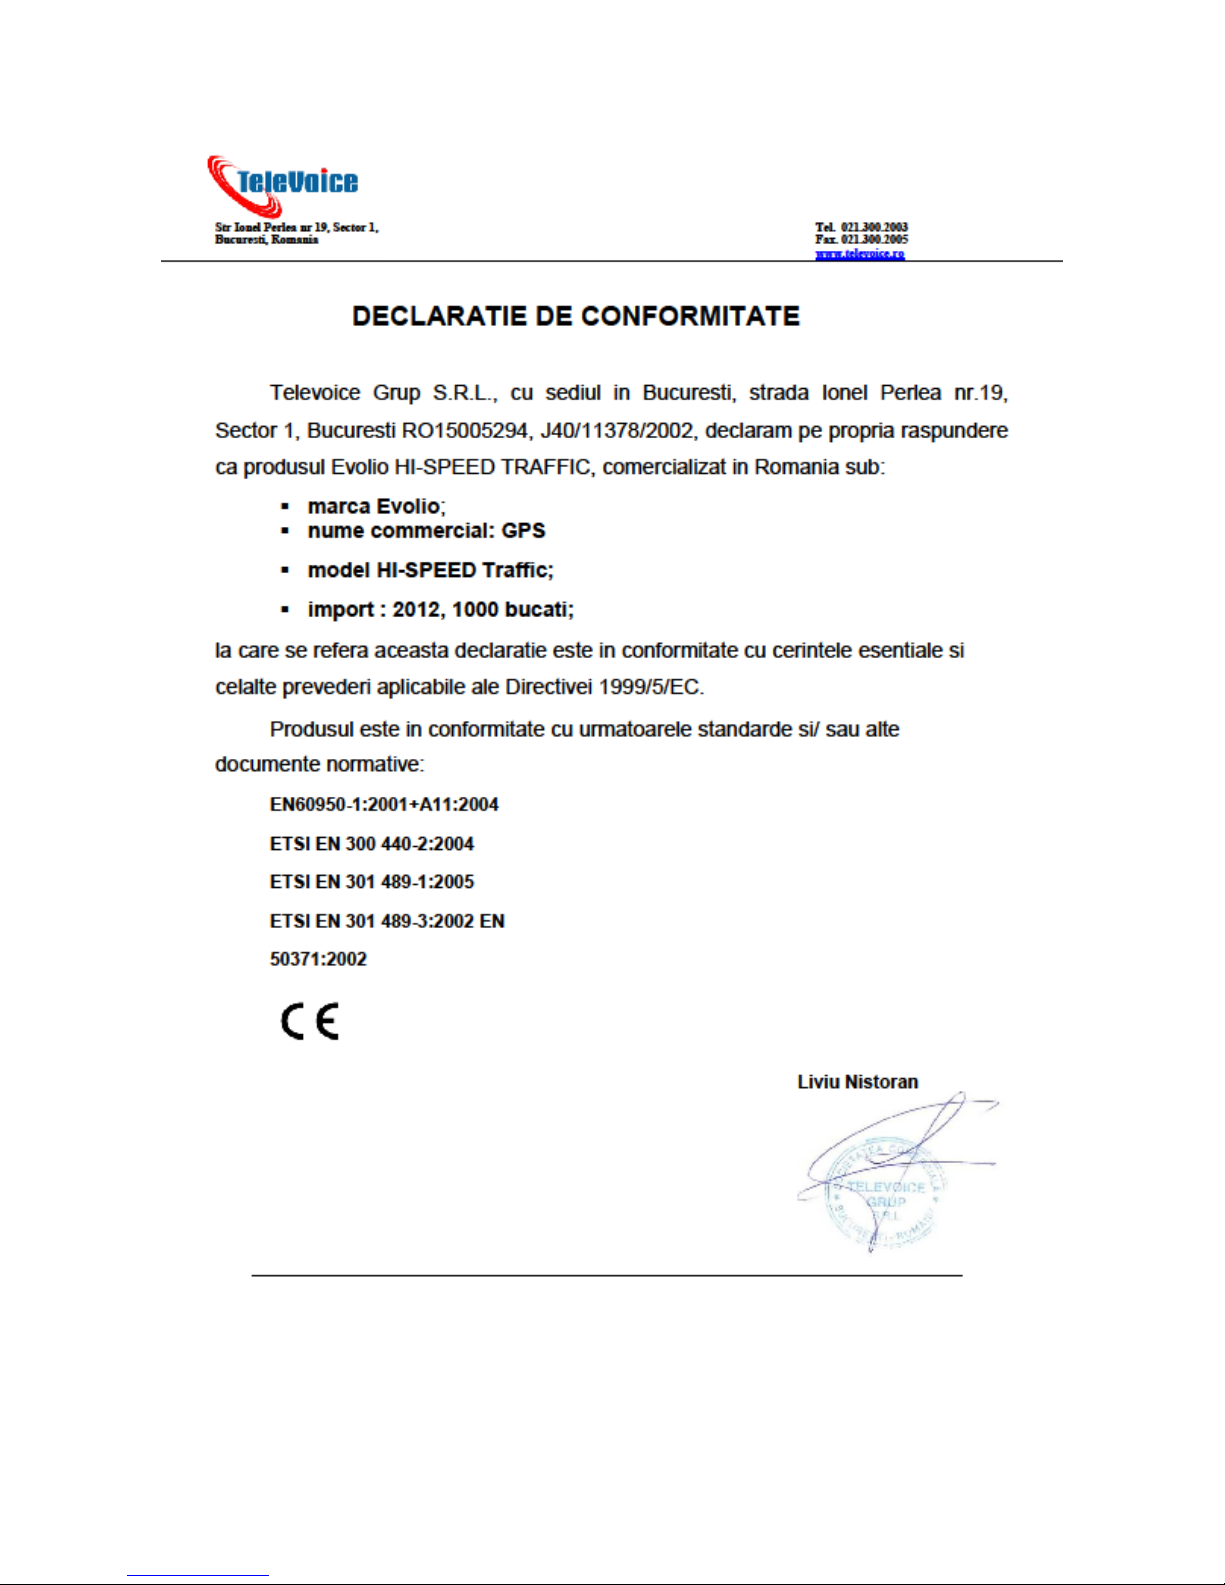
13. Declaration of Conformity/ 55
Page 4

3
Măsuri de precauţie şi informaţii
DESIGNUL ȘI SPECIFICAȚIILE SUNT SUPUSE MODIFICĂRII FĂRĂ PREAVIZ!
. Pentru siguranţa dumneavoastră, nu operaţi funcţiile de control al
produsului în timp ce conduceţi.
. Utilizaţi produsul cu prudenţă. Produsul trebuie folosit doar ca un ajutor de
navigare. Nu este pentru măsurarea direcţiei, distanţei, locaţiei sau topografie.
. Ruta calculată se va utiliza ca referinţă. Stă în responsabilitatea
utilizatorului să urmărească semnele de circulaţie precum şi reglementările
locale de pe drum.
. Când coborâţi din maşină, nu lăsaţi aparatul pe bord expus direct razelor de
soare. Supraîncălzirea bateriilor poate cauza defecţiune şi/ sau pericol.
. Semnalele de satelit GPS nu pot trece prin materiale solide (cu excepţia
sticlei).
Când vă aflaţi într-un tunel sau clădire, poziţionarea GPS nu este
disponibilă.
. Este nevoie de minimum 4 semnale de satelit GPS pentru a determina
poziţia GPS actuală. Recepţia de semnal poate fi afectată de situaţii cum ar
fi vremea nefavorabilă sau obstacolele (de exemplu, copaci şi clădiri înalte).
. Alte aparate wireless în vehicul pot interfera cu recepţia semnalului satelit şi
să cauzeze recepţie instabilă.
. Este nevoie de un suport de maşină. Asiguraţi-vă să puneţi aparatul într-un
loc corespunzător, astfel încât să nu obstrucţioneze vederea şoferului sau să
cauzeze declanșarea airbagurilor.
Page 5
4
1.1 Înţelegerea caracteristicilor Hardware
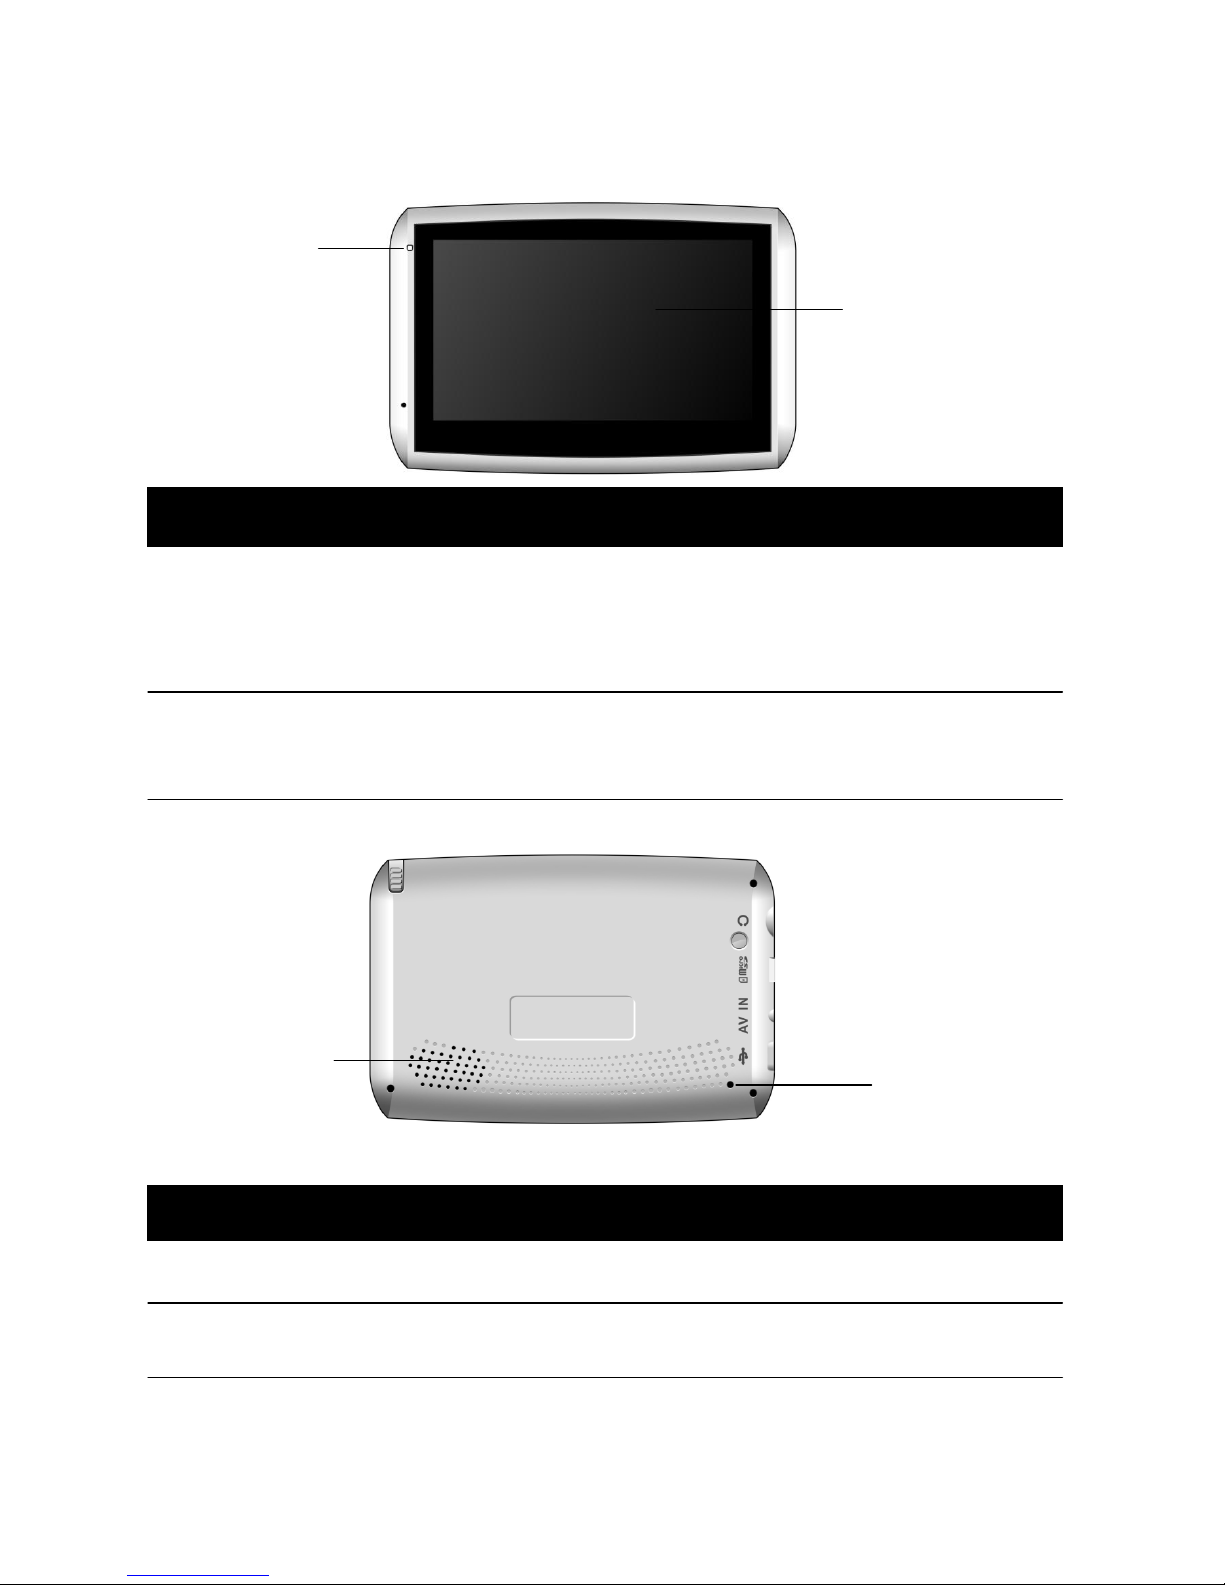
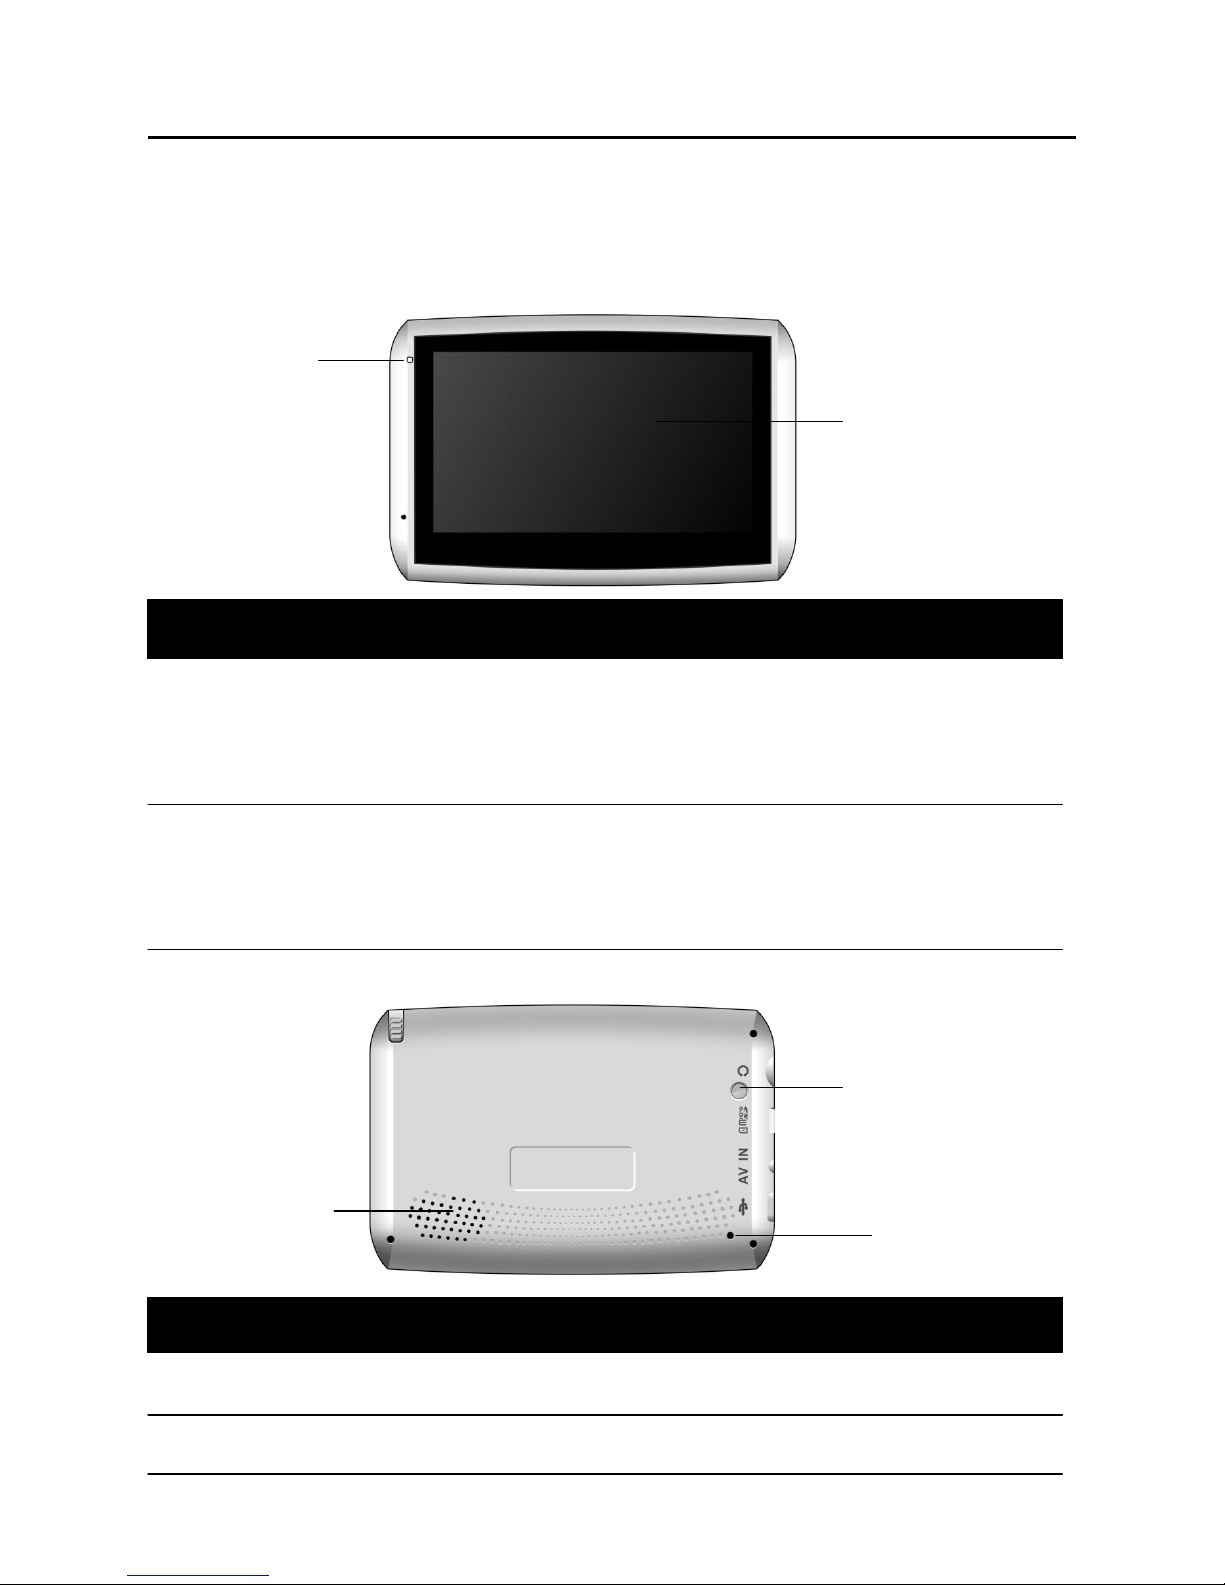
Componente faţă
1 Touch screen Afişajul aparatului Dumneavoastră. Atingeţi
ecranul cu vârful degetului pentru a selecta
meniul de comenzi sau să introduceţi informaţii.
2 Indicatorul de încărcare Ledul este aprins pentru a indica încărcarea
bateriei şi devine verde când este încărcată.
Componente spate
1 Difuzor Muzică, sunete şi voce
2 Tasta resetare Restartează sistemul
1
2
Ref Componentă Descriere
Ref Componentă Descriere
1
2
Page 6
5
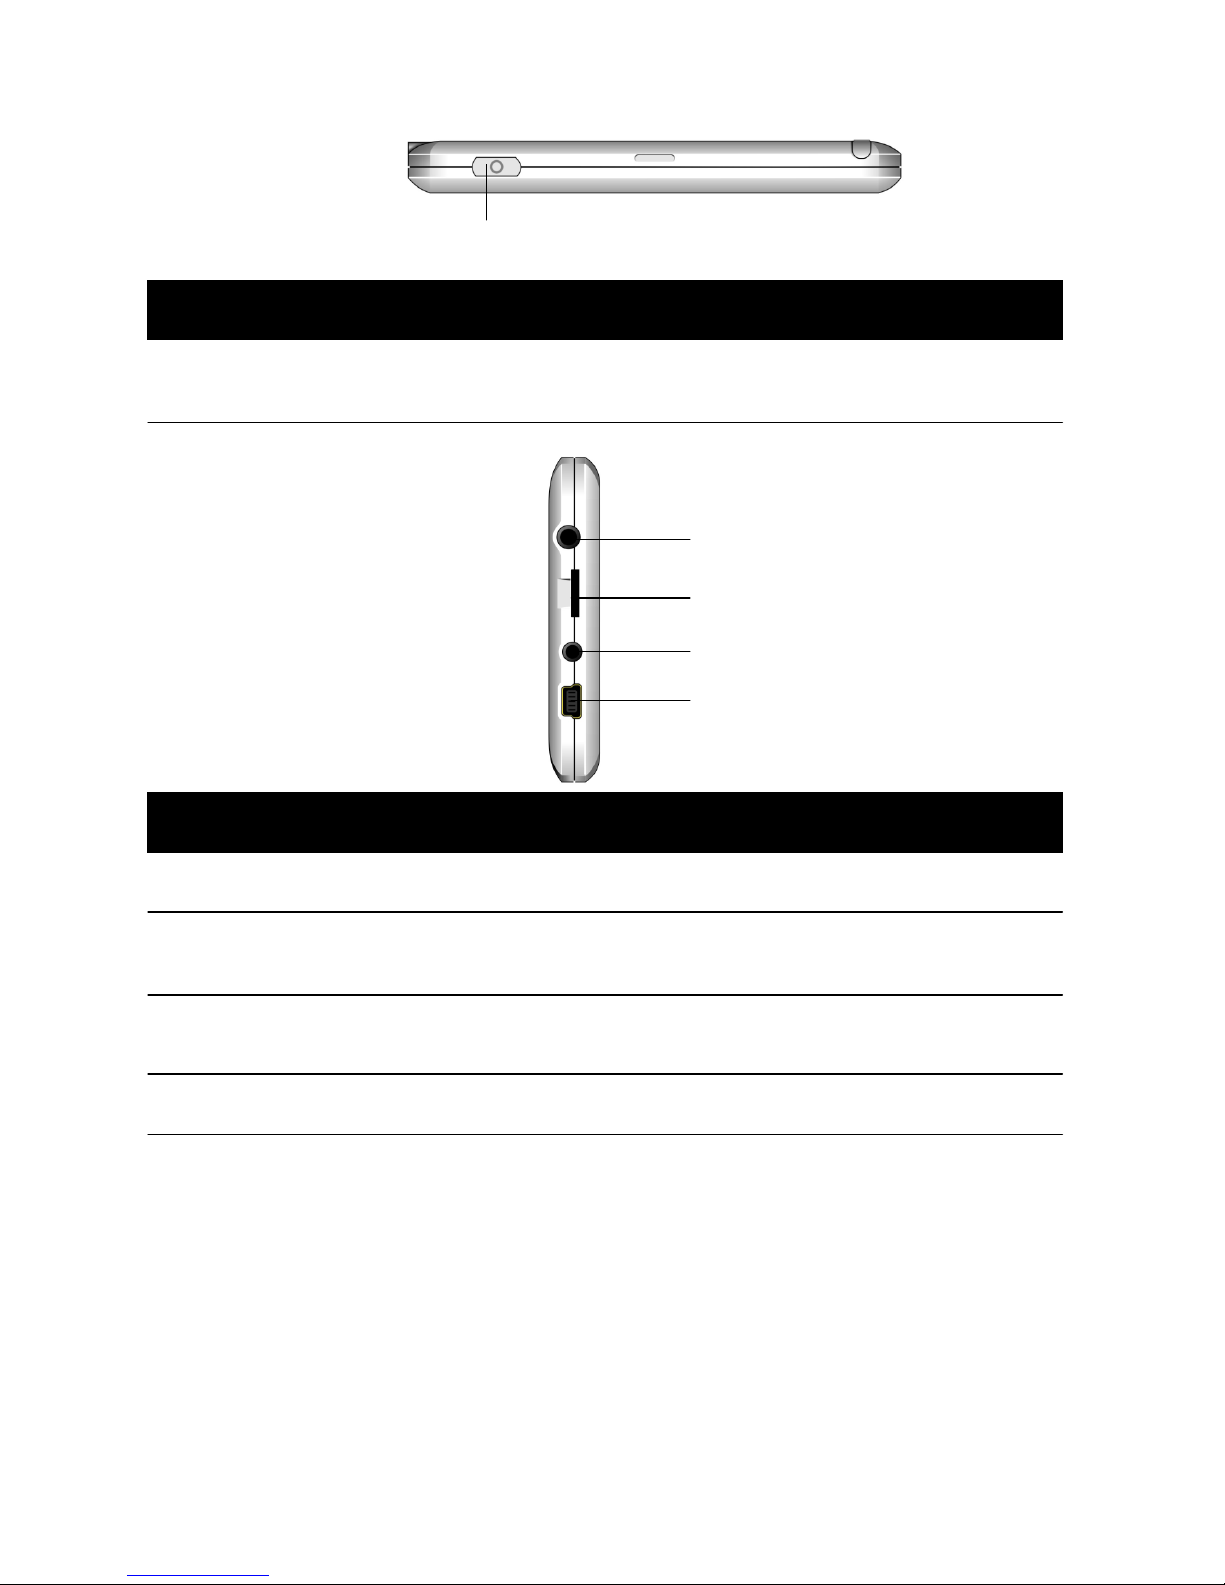
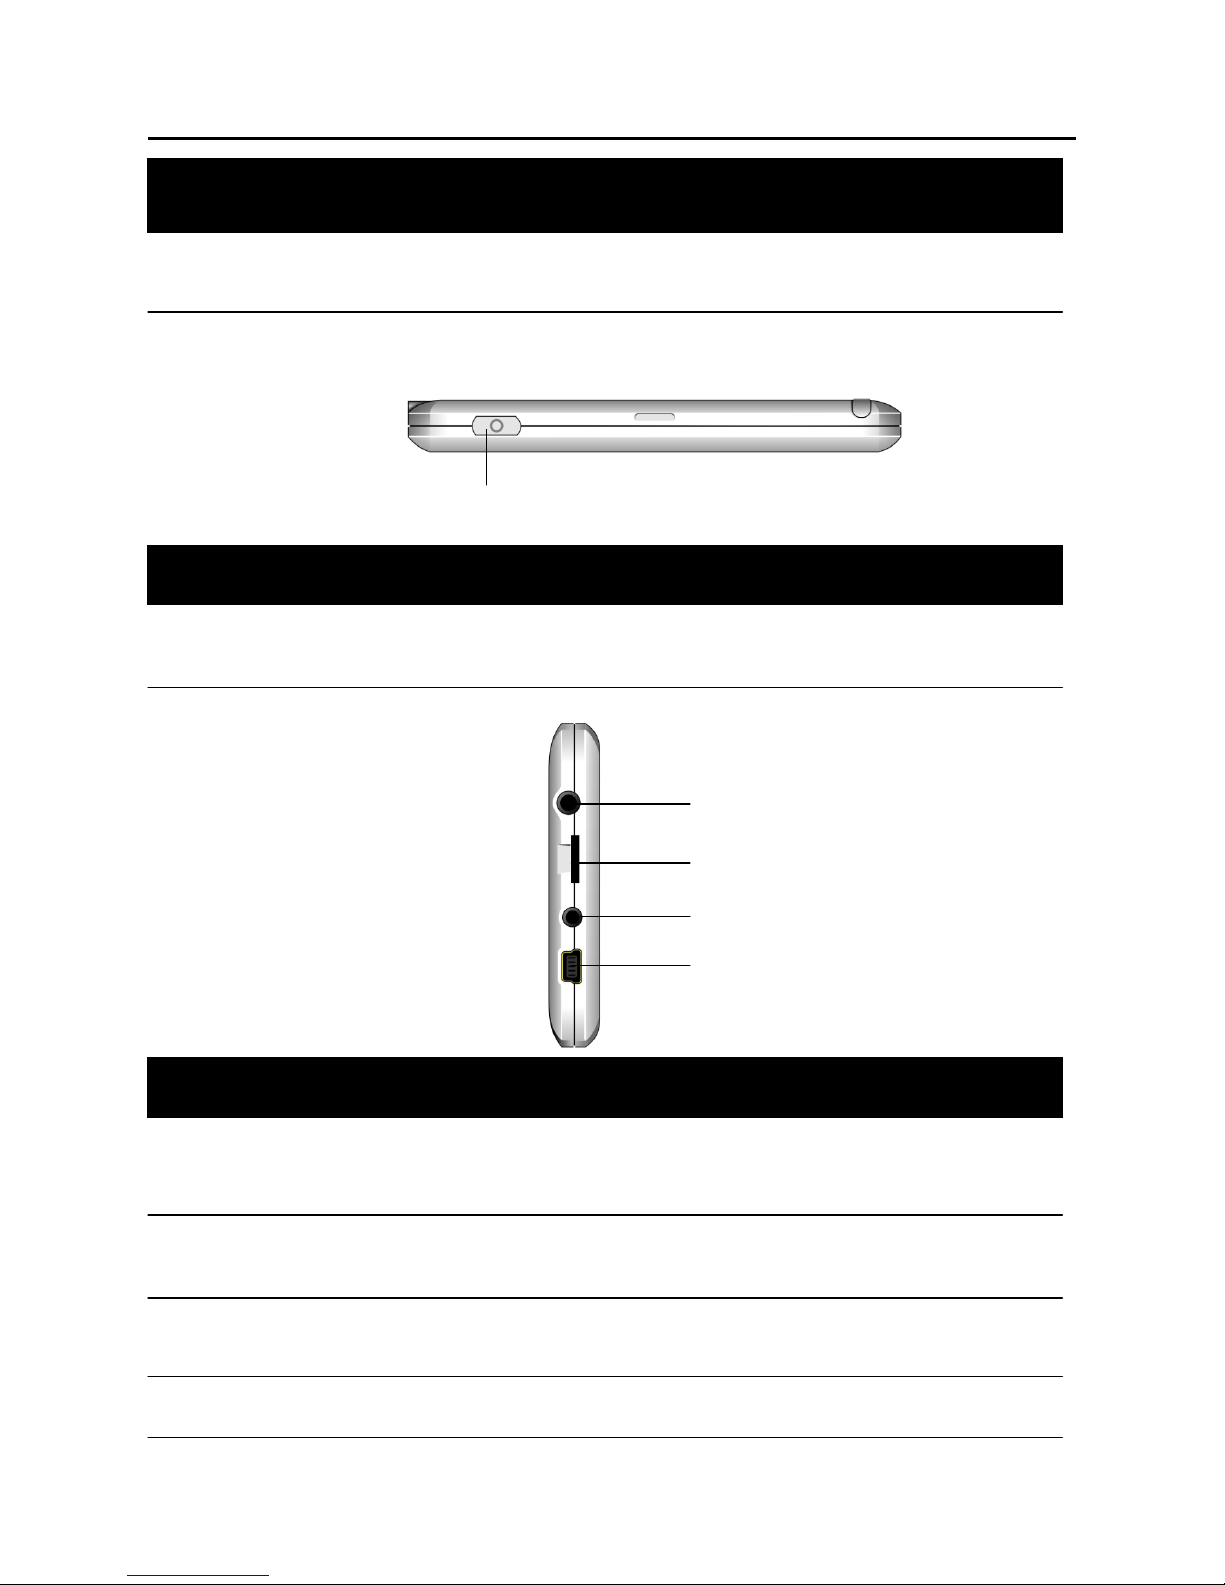
Componente superioare
1 Comutator ON/OFF Porniți și opriți dispozitivul
Componente laterale
1 Slot card micro SD Acceptă un card microSD pentru a accesa date.
2 Slot USB Conectare cablu USB
3 Mufa pentru căşti Conectare la căşti stereo
4 Conector AVIN
1.2 Conectarea la curent direct şi încărcarea bateriei
Când bateria se încarcă pentru prima oară, trebuie lăsată la încărcat cel puţin 8
ore.
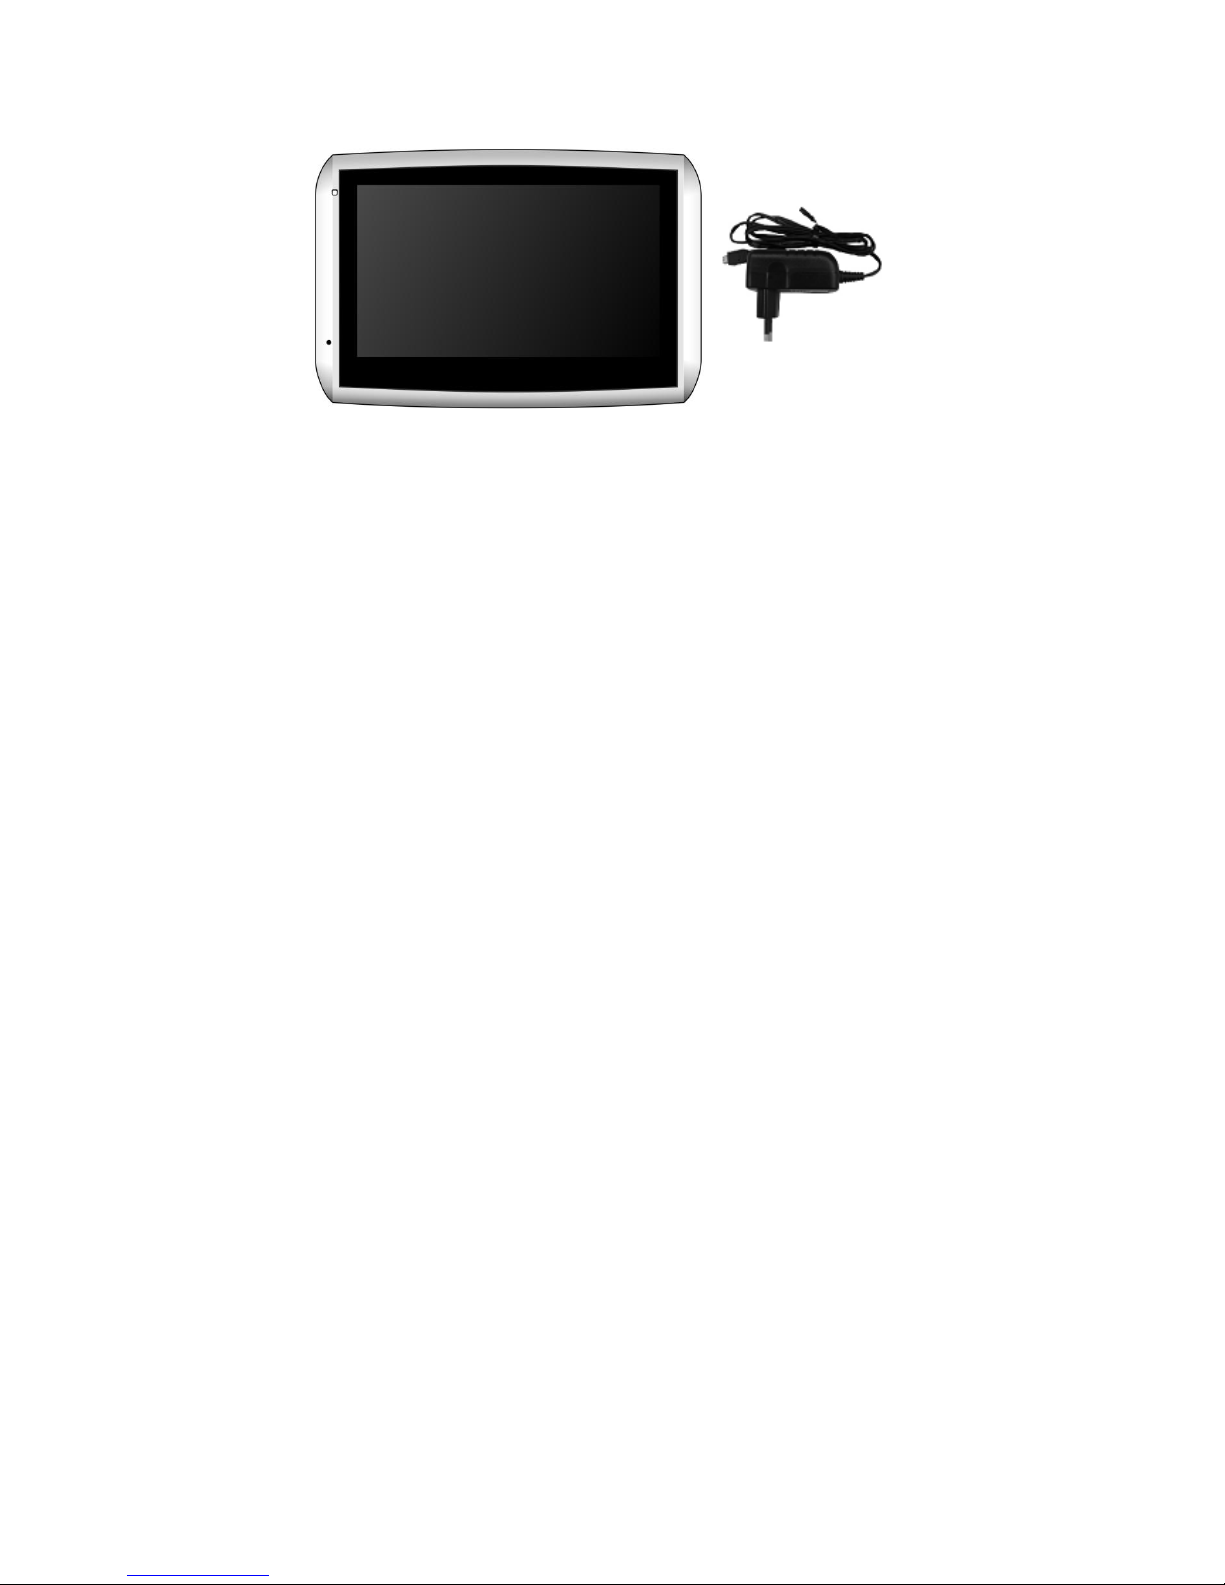
1. Glisaţi şi faceţi clic pe convertorul de conectare la adaptorul de curent direct
Car charger.
2. Conectaţă adaptorul la partea de jos a aparatului.
1
Ref Componentă Descriere
1
2
3
Ref Componentă Descriere
4
Page 7
6
3. Conectaţi adaptorul la o priză de perete.
Indicatorul de încărcare este aprins. Nu deconectaţi aparatul de la curent până
când bateria nu este încărcată pe deplin atunci când indicatorul devine de
culoarea verde. Acesta va dura câteva ore.
OBSERVAŢIE:
. Nu porniţi aparatul imediat după ce l-aţi conectat la adaptor. Dacă trebuie să
porniţi aparatul din nou, aşteptaţi cel puţin un minut.
. Aparatul Dumneavoastră poate fi încărcat şi atunci când este conectat la un
calculator desktop prin cablu USB.
ATENŢIE: Pentru performanţe optime în cazul bateriei de litiu, luaţi în
considerare următoarele:
. Nu încărcaţi bateria întrun loc în care temperatura este mare (exemplu raze
solare directe).
. Nu este nevoie de descărcarea totală a bateriei înainte de încărcare. Se poate
încărca înainte să fie descărcată complet.
. Dacă produsul nu se foloseşte pentru o perioadă mai lungă, asiguraţi-vă sa
încărcaţi bateria cel puţin odată la două săptămâni. Descărcarea totală a
acumulatorului poate afecta performanţele de încărcare.
1.3 Utilizarea aparatului întrun vehicul
Un suport de maşină şi un încărcător de mașină sunt furnizate împreună cu
aparatul.
ATENŢIE: Selectaţi o locaţie pentru suportul de maşină. Nu puneţi suportul
într-un loc în care să blocheze câmpul vizual al şoferului.
Page 8
7
Dacă parbrizul maşinii este acoperit cu un strat reflectorizant, poate fi nevoie de
o antenă exterioară (opţională).
Suportul de maşină constă într-un suport şi un stand. Utilizaţi suportul pentru a
fixa aparatul în vehicul. Asiguraţi-vă că antena de GPS are vedere clară spre
cer.
Pentru poziţionarea iniţială, rămăneţi pe loc intr-un spatiu deschis fara cladiri
inalte sau copaci. GPS-ul poate avea nevoie de câteva minute să-şi caute
locaţia iniţială.
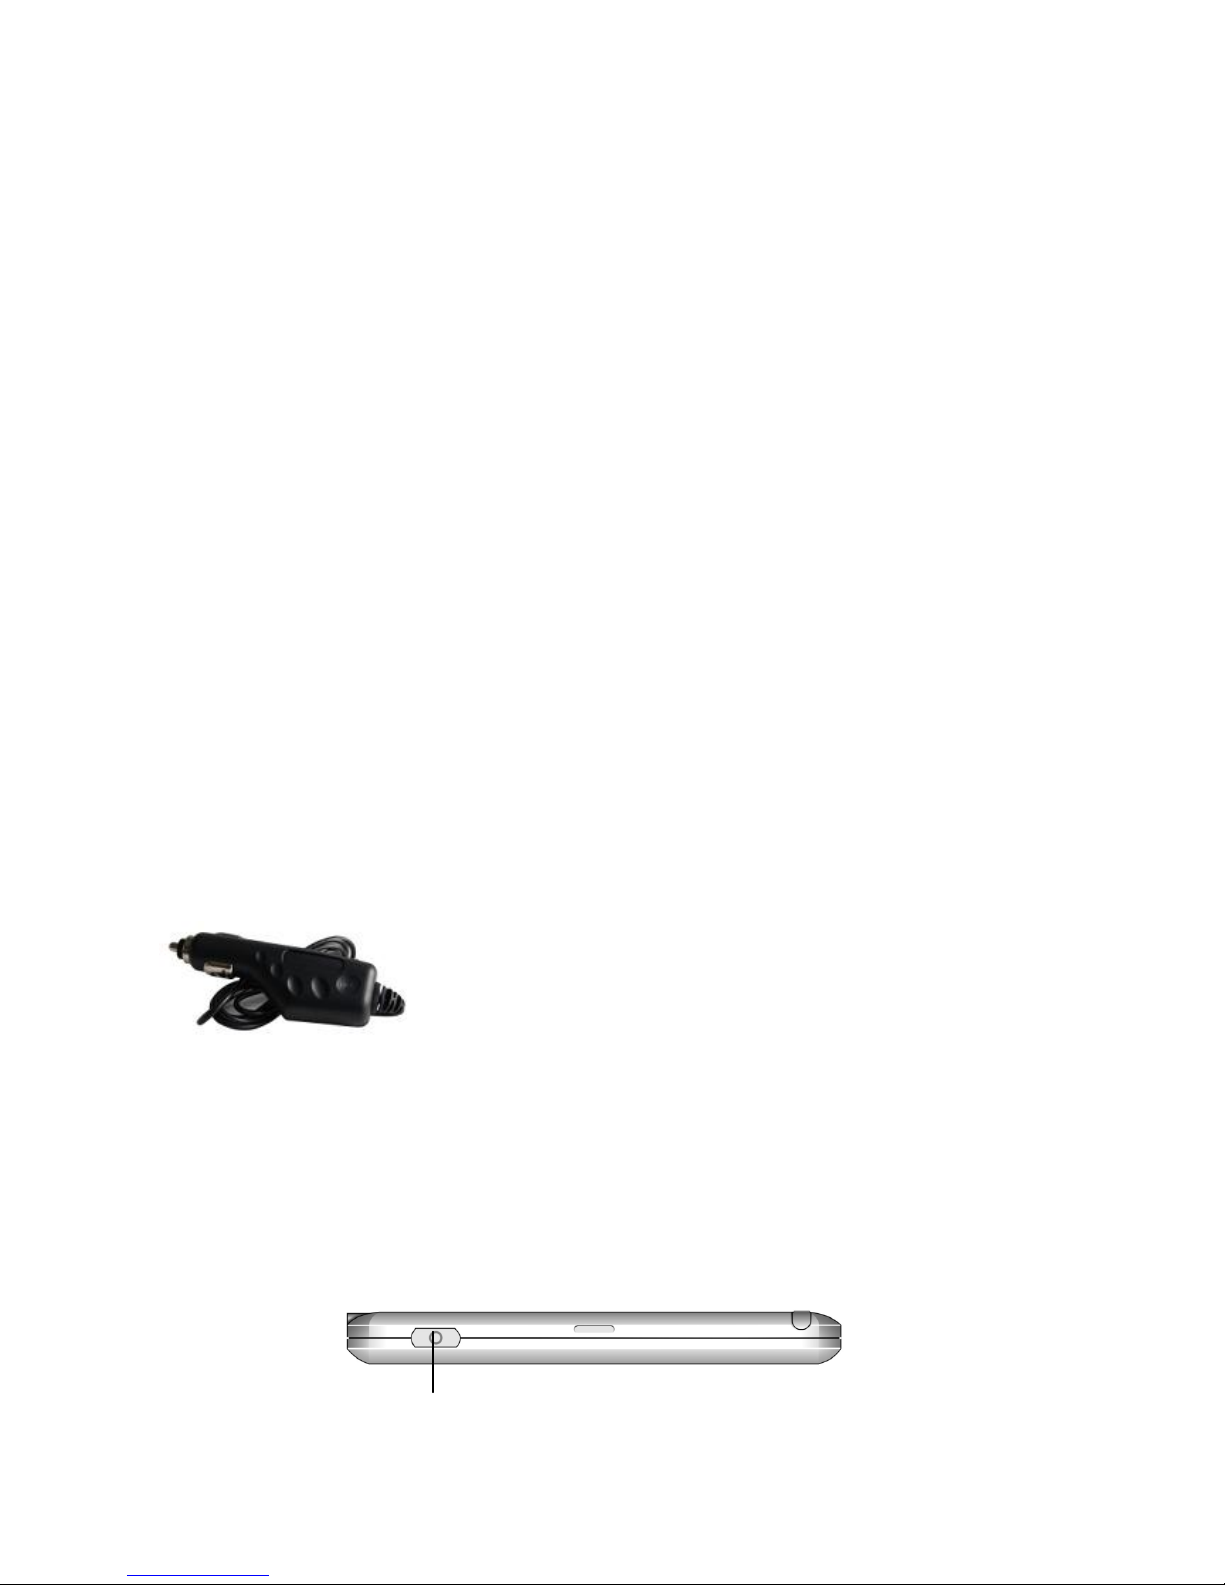
1.4 Conectarea încărcătorului de maşină
Încărcătorul de maşină asigură curentul pentru aparat, atunci când acesta este
utilizat în maşină.
ATENŢIE: Pentru a proteja dispozitivul dumneavoastră de supratensiune,
conectaţi aparatul doar după ce motorul a fost pornit.
1. Conectaţi un capăt al încărcătorului la priza dispozitivului.
2.Conectaţi celălalt capăt la bricheta maşinii pentru a asigura curent şi încărcare
pentru aparat. Indicatorul încărcătorului de maşină devine verde pentru a indica
încărcarea dispozitivului.
2.1 Prima pornire
1.Apăsaţi tasta ON/OFF timp de câteva secunde.
ON/OFF
Page 9
8
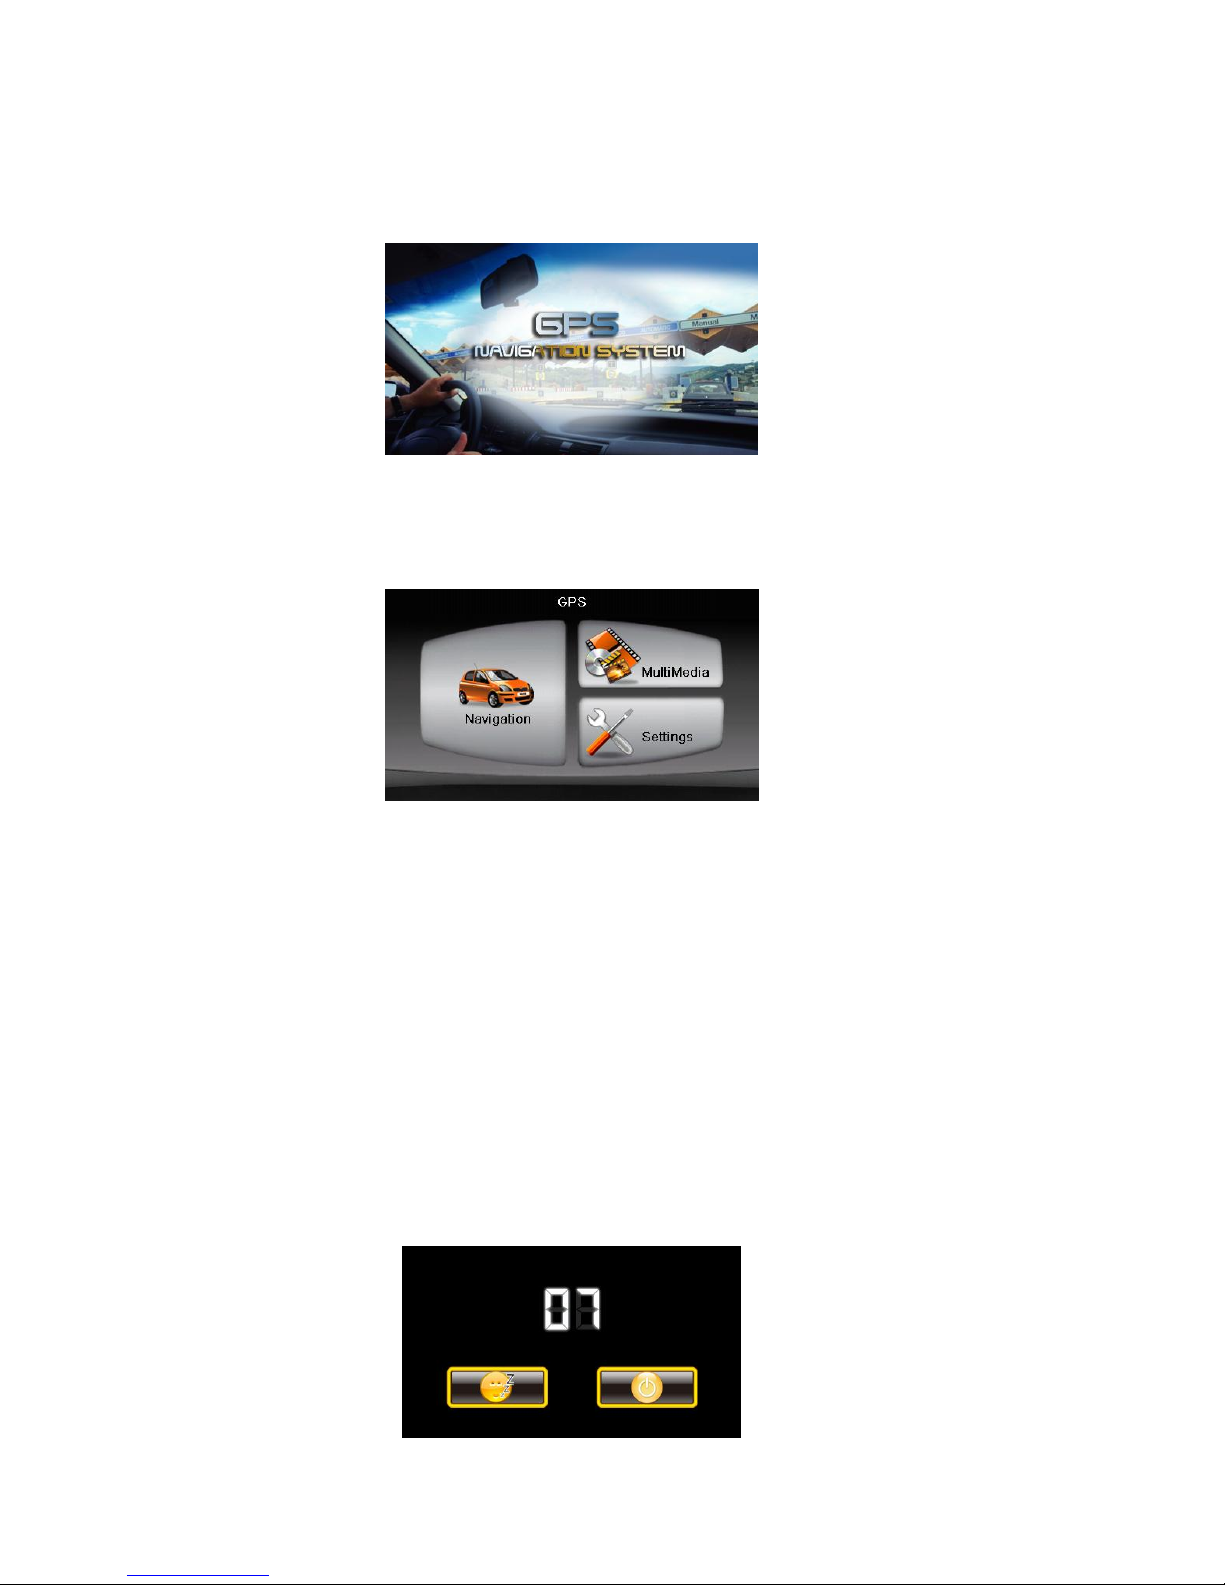
2. Dispozitivul dumneavoastră va porni în mod automat. Conectaţi încărcătorul
aşa cum este descris în următoarea secţiune.
3. Apare deschiderea de ecran.
4. Apare meniul principal, aşa cum se arată ma jos. Acum se poate utiliza
dispozitivul.
5. Încărcaţi bateria înainte de a o folosi pentru prima dată.
2.2 Pornire /Oprire modul de hibernare
1. Utilizaţi tasta ON/OFF pentru a porni şi opri dispozitivul.
2. Dacă doriţi să opriţi dispozitivul, apăsaţi tasta ON/OFF timp de câteva
secunde.
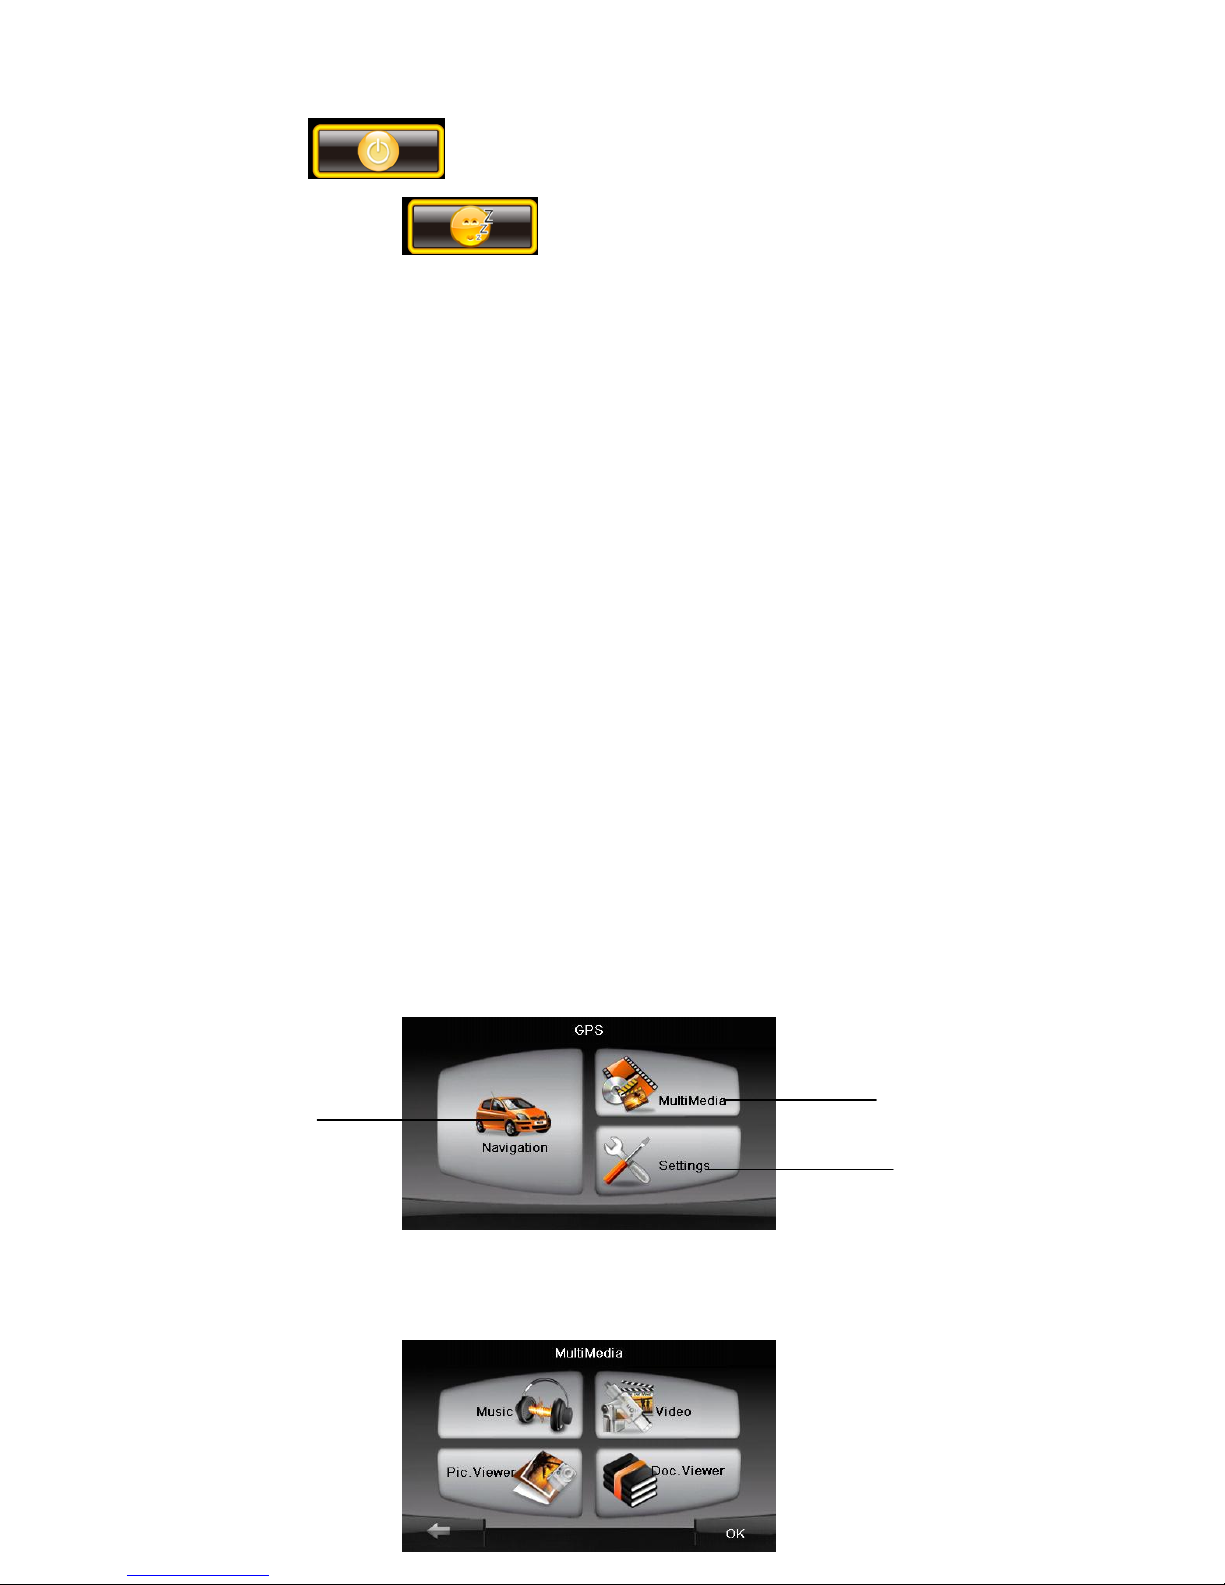
Pe dispozitiv va apărea meniul de oprire.
Page 10
9
Apăsaţi tasta , dispozitivul se opreşte.
3. Dacă apăsaţi tasta , dispozitivul intră în stare de sleeping. Odată
ce reporniţi sistemul, se va relua activitatea.
2.3 Operarea dispozitivului
Pentru a comunica cu dispozitivul, atingeţi ecranul cu vârful degetului. Puteţi
efectua următoarele acţiuni:
. Tap: Atingeţi ecranul cu vârful degetului pentru a deschide fişiere sau opţiuni.
. Drag: Ţineţi degetul pe ecran şi trageţi sus/jos/stânga/dreapta sau pe ecran.
. Tap and hold: Puneţi şi ţineţi degetul până se efectuează acţiunea dorită sau
ca rezultat se arată meniul.
2.4 Meniul principal
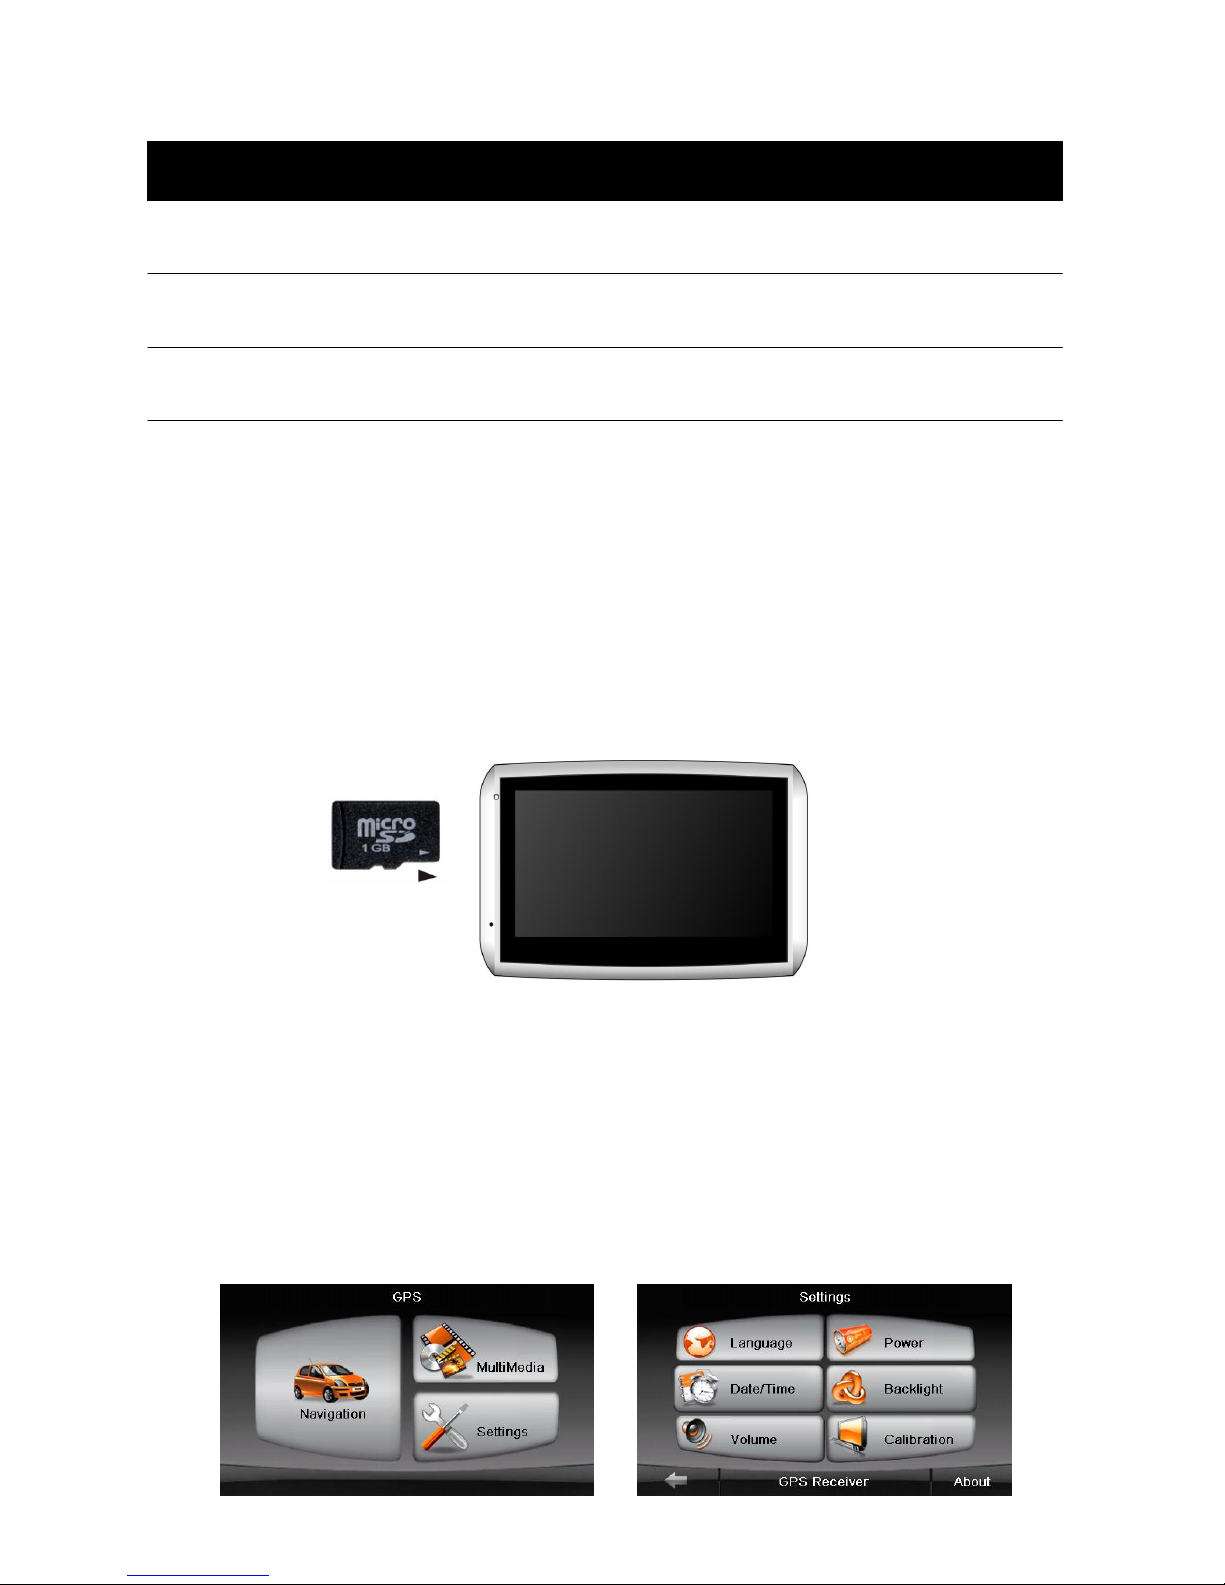
La prima pornire al dispozitivului, apare Meniul principal. Activaţi o tastă pentru a
începe sarcina sau a deschide alt punct de meniu.
Cum ar fi tasta "Multi Media", intraţi în submeniu.
1 2 3
Page 11
10
1 Navigaţie Începeţi navigarea
2 Setări Setări dispozitiv
3 Multi Media Music şi Video player şi altele
2.5 Introducerea unui card microSD
Dispozitvul dumneavoastră are un slot pentru card microSD unde puteţi
introduce opţional un card Secure Digital.Pentru a utiliza un card microSD,
introduceţi-l în lăcaş, cu conectorul înspre slot şi eticheta cu faţa înspre
dispozitiv. Pentru a scoate cardul, siguraţi-vă că nicio aplicaţie nu accesează
cardul, apoi apăsaţi uşor partea de sus a cardului pentru a-l elibera şi trageţi-l
din slot.
OBSERVAŢIE:
. Siguraţi-vă că niciun obiect străin nu a intrat în slot.
. Ţineţi cardul microSD întro cutie bine protejată pentru a evita praful şi
umiditatea atunci când nu îl folosiţi.
3.1 Utilizarea setărilor dispozitivului
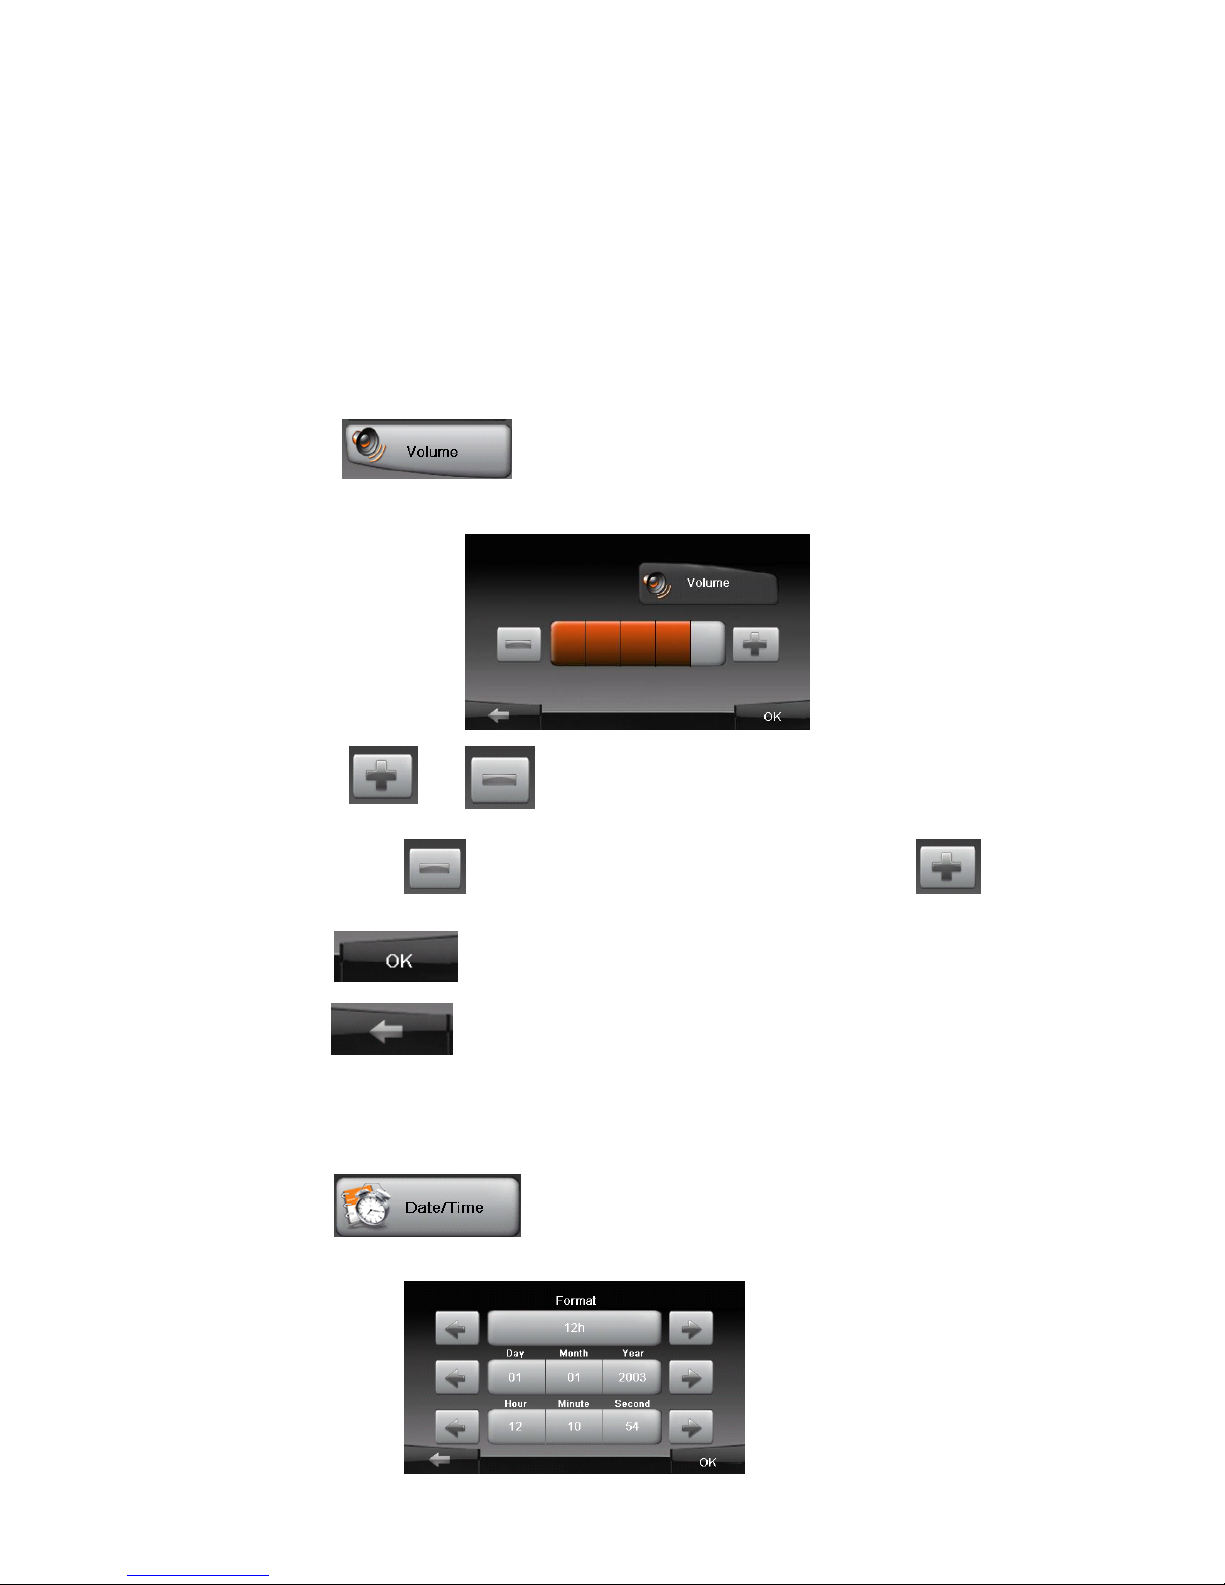
Pentru a deschide meniul de Setări dispozitv, apăsaţi tasta Setări din meniul
principal.
Ref Denumire tastă Descriere Pentru informaţii detailate
Page 12
11
Meniul Setările dispozitivului apare precum se arată mai sus. Următoarele
secţiuni descriu aceste taste şi funcţiile lor.
Puteţi personaliza setările dispozitivului, cum ar fi lumină fundal, volum, dată şi
ora. Odată ce aţi schimbat setările, noile setări vor rămâne până când le veţi
schimba din nou.
3.2 Volumul
1. Atingeţi tasta din meniul Setări dispozitiv. Funcţia de volum
apare cum se arată mai jos.
2. Atingeţi tasta şi pentru a ajusta volumul. Pentru a reduce
volumul, atingeţi tasta . Pentru a mări volumul, atingeţi tasta .
3. Atingeţi tasta pentru a confirma modificările.
4. Atingeţi tasta pentru a ieşi de la modificări şi mergeţi înapoi la
ecranul de Setări dispozitiv.
3.3 Dată/ Ora
1. Atingeţi tasta din meniul Setări dispozitv. Funcţia de
Data/Ora apare cum se arată mai jos.
Page 13
12
2. Atingeţi icoana necesară pentru a face modificări prin clik pe şi
în calendar, confirmaţi ajustările făcute cum ar fi: an, lună şi zi.
3. La fel daţi clik pe şi pe calendar, puteţi face uşor modificări la oră,
minute sau secunde.
4. Atingeţi tasta pentru a salva modificările şi pentru a vă întoarce la
meniul anterior.
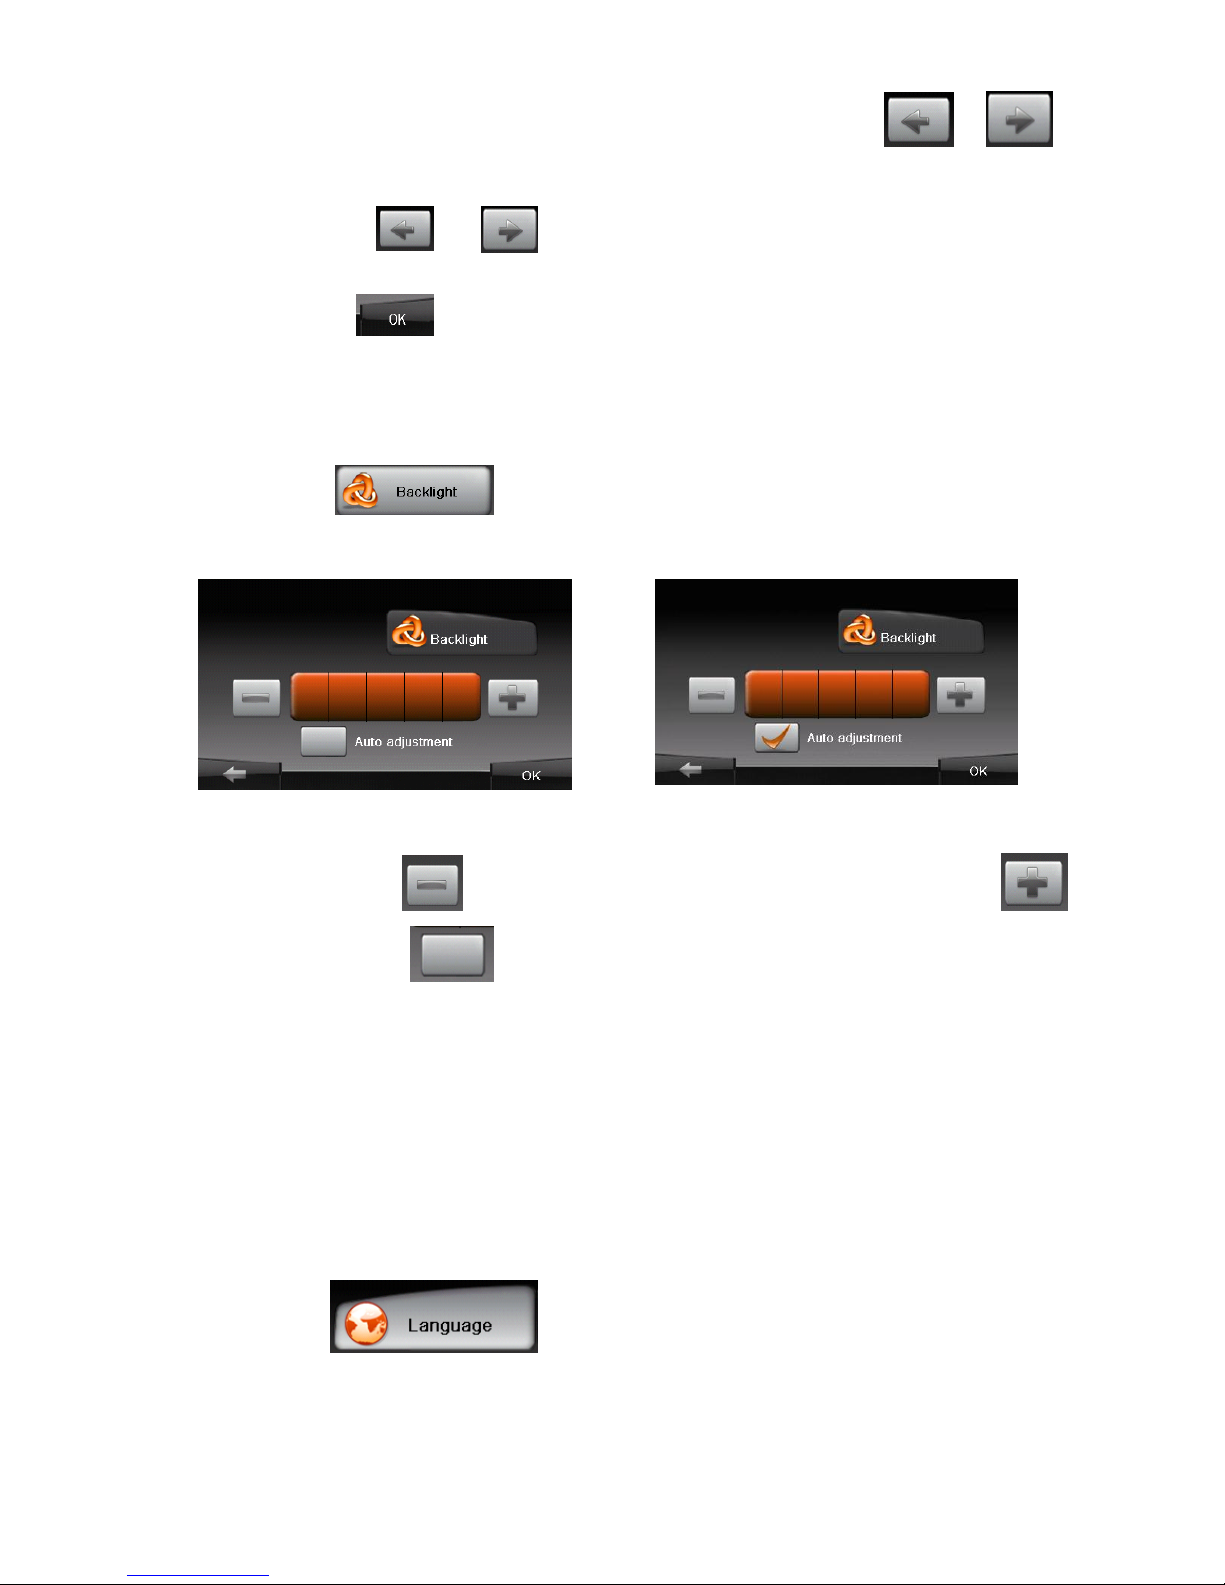
3.4 Lumină de fundal
1.Atingeţi tasta din meniul de Setări dispozitiv. Funcţia de
lumină fundal apare precum se arată mai jos.
2. Atingeţi tasta pentru a ajusta lumina de fundal. Pentru a reduce lumina de
fundal, atingeţi tasta .Pentru a mări lumina de fundal, atingeţi tasta
3. Când apăsaţi tasta dispozitivul va intra în stare de auto ajustare
lumina de fundal.
În cazul în care mediul în care vă aflaţi este foarte luminos, afişajul va fi foarte
deschis, dacă mediul este întunecos afisajul devine întunecat. Când dipsozitvul
se deschide şi nu îl operaţi o perioadă, dispozitivul se va întuneca pentru a intra
în mod economisire energie.
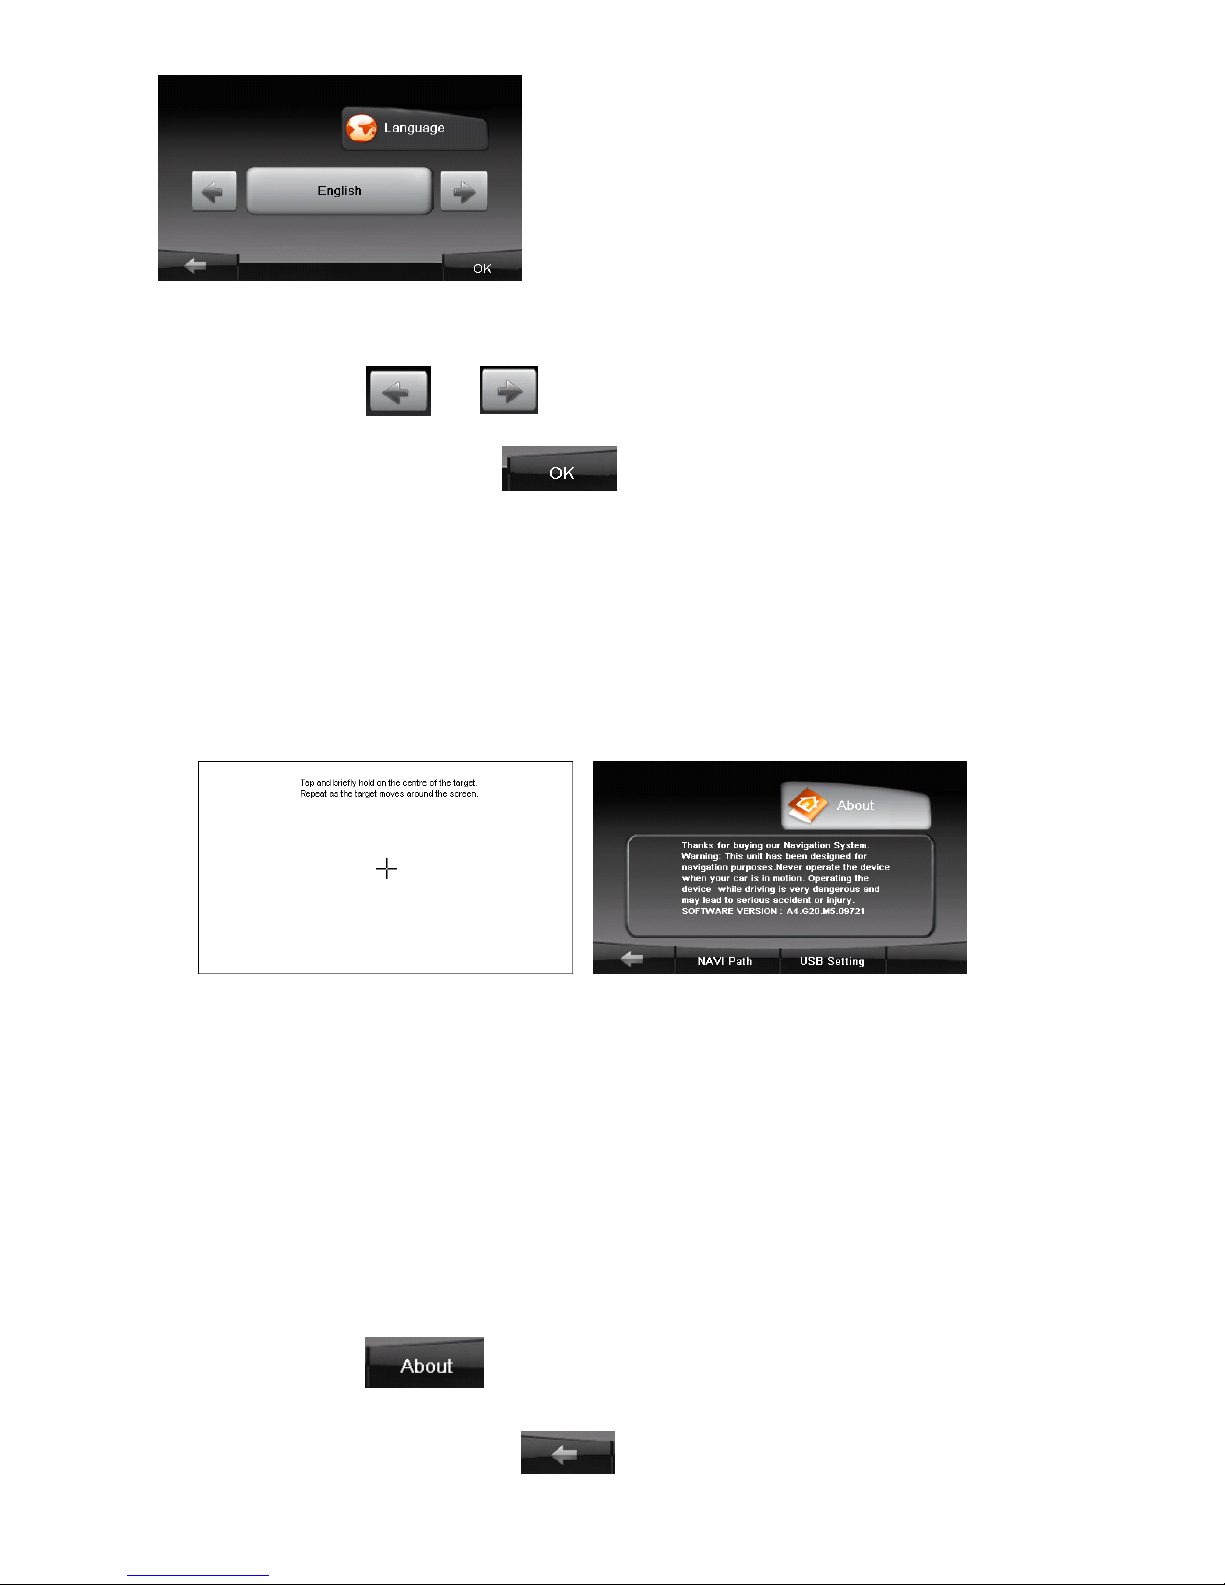
3.5 Limba
1. Atingeţi tasta din meniul Setări dispozitiv. Apare funcţia de
limbă, cum se arată mai jos.
Page 14
13
2. Atingeţi tastele şi pentru a selecta limba.
3. După acesta, atingeţi tasta pentru a ieşi.
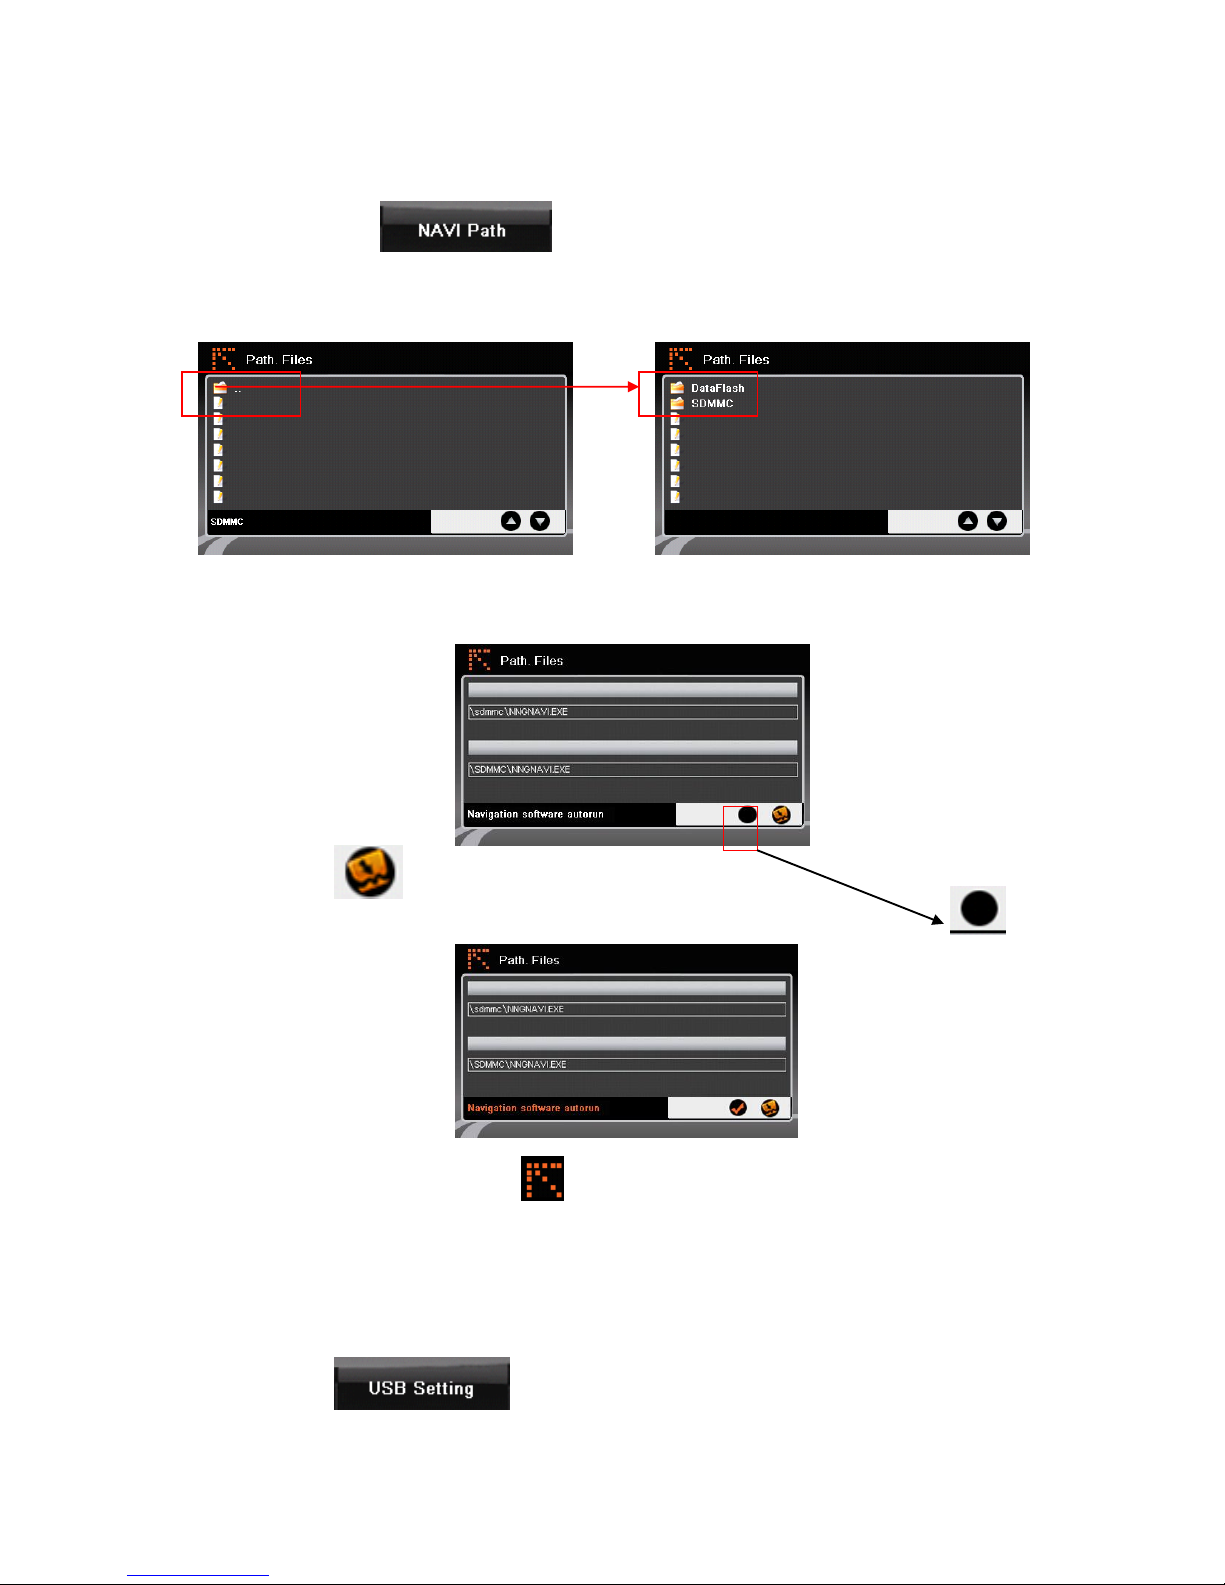
3.6 Calibrare
Puteţi calibra ecranul tactil, dacă acesta nu răspunde corect la comenzile
Dumneavoastră.
1. Atingeţi tasta“calibrare” din meniul Setări dispozitiv. Meniul Funcţiei de
calibrare apare cum se arată jos la stânga.
2. Atingeţi şi menţineţi degetul, iar ţinta se mişcă în stânga-sus. Dacă atingeţi
din nou şi menţineţi degetul în centrul ţintei, acesat se mută în Următoarea
poziţie stânga jos.
3. Ţinta se mişcă până la 5 poziţii (stânga sus, stânga jos, dreapta sus, dreapta
jos, centru) în ordine, formând un întreg. Dacă apăsaţi şi menţineţi ţinta de
fiecare dată, după un circuit, ţinta dispare, dispozitivul face procesul de calibrare
şi revine la meniul de Setări dispozitiv.
3.7 Despre
1. Atingeţi tasta în meniul de Setări dispozitiv. Funcţia Despre
apare aşa cum se arată în dreapta sus.
2. După realizare, atingeţi tasta pentru a ieşi.
Page 15
14
3.8 NAVI Path
1. Atingeţi tastaTap din meniu Despre funcţie şi apare meniul de
fişiere, precum urmează.
2. Atingeţi fişierul pentru a găsi locaţia de aplicaţie navigare, precum .exe file.
Atingând acest .exe file, PND-ul întră în următorul meniu.
3. Atingeţi tasta pentru a confirma.
4. Dacă doriţi să apară harta direct la repornire, atingeţi tasta
5. După realizare atingeţi tasta pentru a vă întoarce.
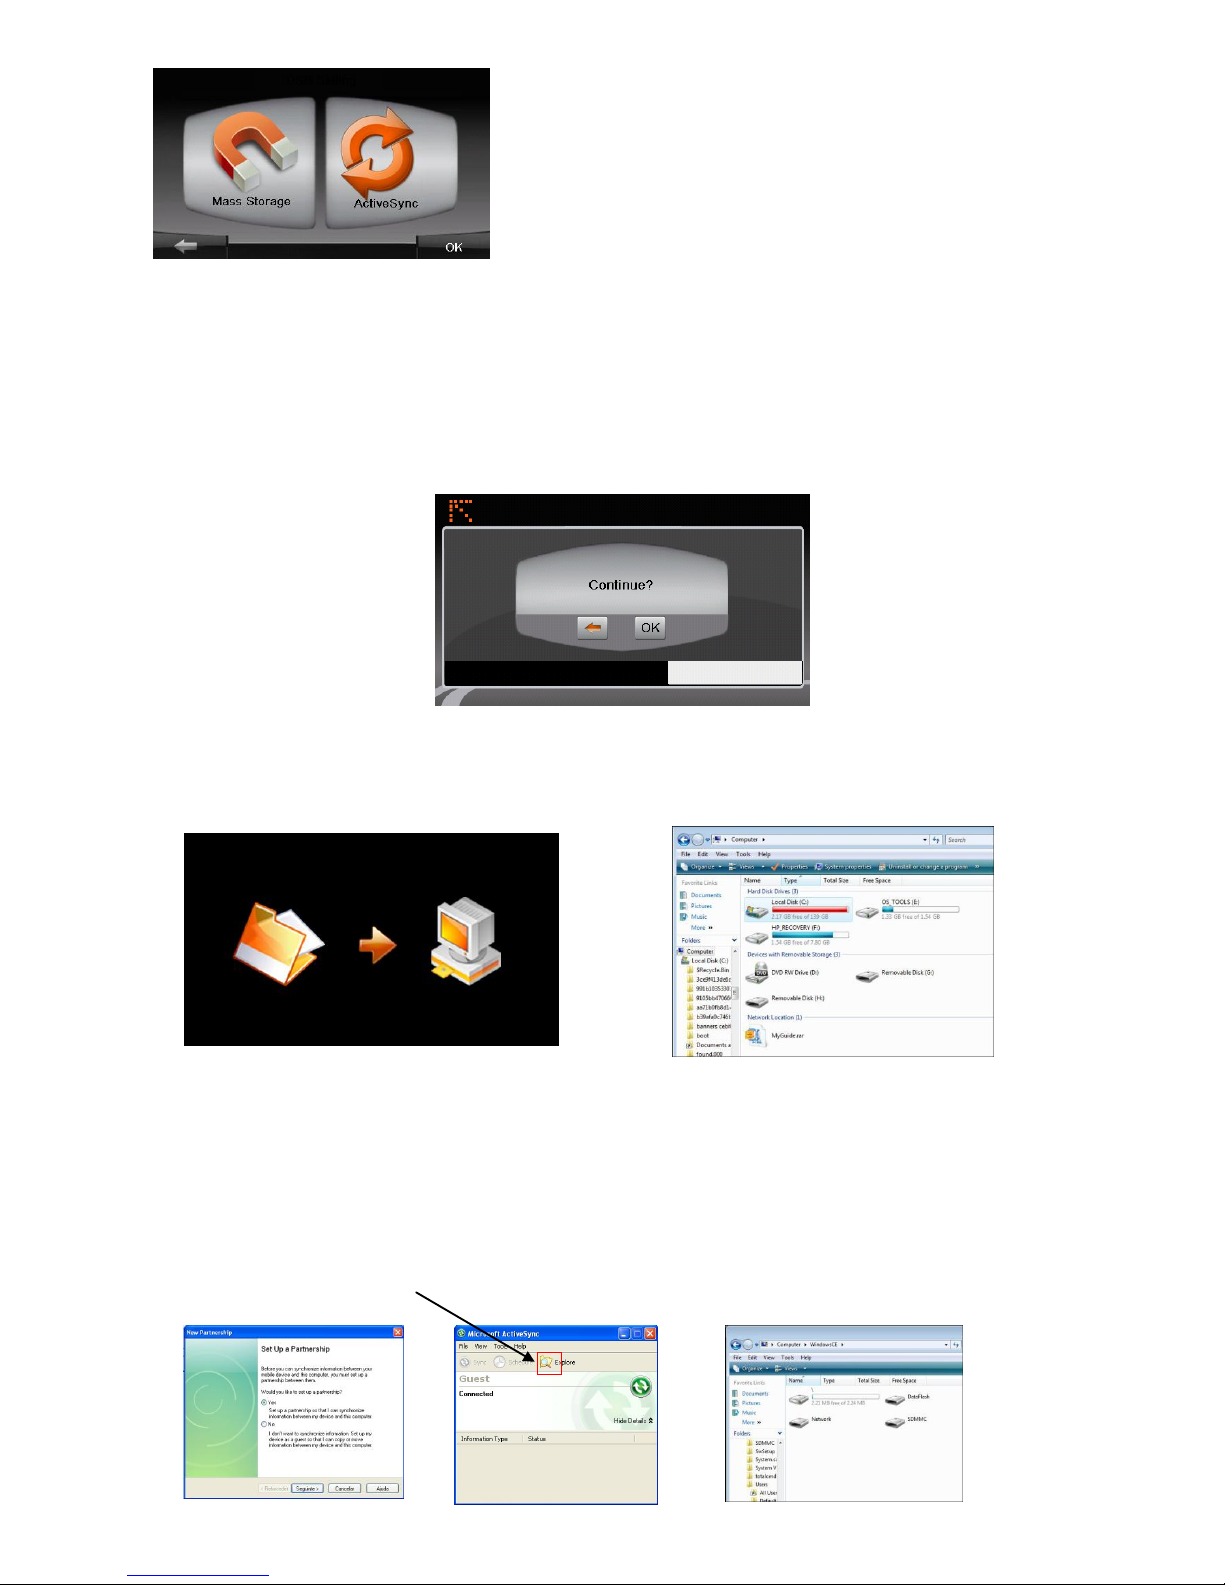
3.9 Setări USB
Vă rugăm să conectaţi PND-ul la PC cu un cablu USB.
1.Atingeţi tasta din meniul Despre funcţii. Meniul de setări
USB apare cum se arată mai jos.
Page 16
15
Există două stiluri de setare: Mass storage(stocare de masă) & Active Sync.
a. Mass storage:
Când selectaţi această variantă, pe PND apare următorul meniu. Atingeţi tasta
“OK” pentru a salva setările.
Acum apare doar meniul în jos şi poate fi folosit ca un card de memorie. Puteţi
naviga pe card şi să stocaţi fişiere de pe PC cum ar fi hărţi de navigare.
b. ActiveSync:
Vă rugăm să întrerupeţi conexiunea cu PC-ul, reporniţi dispozitivul şi selectaţi
ActiveSync, conectaţi PND-ul la PC prin cablu USB.
Prima dată vă rugăm să ţineţi cont de schimbare şi urmaţi paşii pentru instalarea
conexiunii. Atingeţi tasta “browse”(căutare), apoi deschideţi meniul de dispozitiv.
Page 17
16
Acum puteţi copia în sau de pe PND pe PC şi PND-ul poate funcţiona alături de
PC.
4.1 Receiver GPS
OBSERVAŢIE: Această pagină este pentru informaţie. Puteţi viziona numărul de
semnale de satelit, pe care le recepţionează unitatea precum şi puterea acestor
semnale.
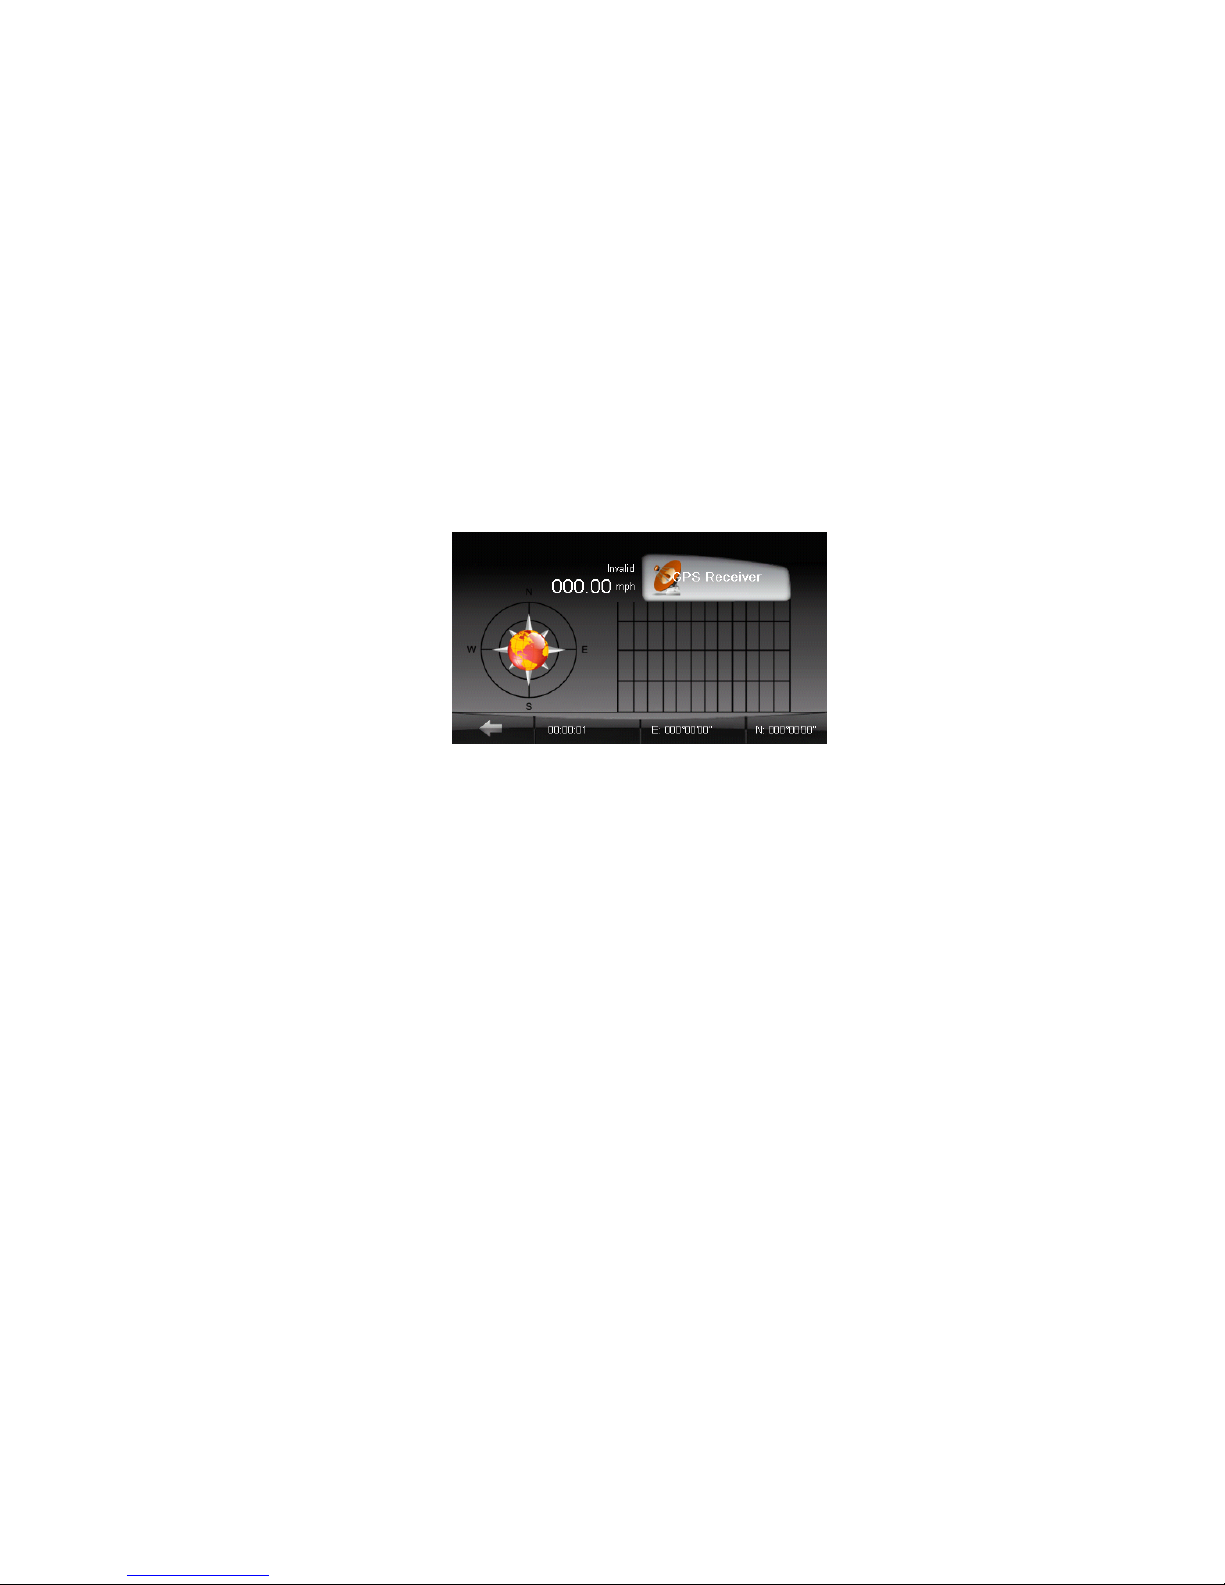
1. Atingeţi tasta “GPS Receiver” în meniul de Setări dispozitiv.
2. Apare meniul de Funcţii GPS Receiver aşa cum se arată mai jos.
Această pagină vă oferă poziţia dumneacoastră actuală în grade de longitudine
şi latitudine, viteza actuală şi poziţia dumneavoastră de exemplu 3D fixat sau
Fixat invalid etc.
Cercul busolei prezinta semnalele satelitilor pe care unitatea-i primeşte şi
diagramă de bare de mai jos prezinta puterea semnalului de la fiecare din
aceste sateliţi.
5.1 Pornirea şi ieşirea din Music Player
Programul de Music Player transformă dispozitvul întrun Music Player.
Dispune de:
. Redare fişiere de muzică,
. Funcţii control redare muzică cum ar fi redare, pauză, stop, următorul şi
anteriorul,
. 17 presetare profile egalizator audio,
. Redarea include funcţia de redare selecţie unică, repetare, repetare unică,
prelevare redare, secvenţă normală şi secvenţa aleatorie,
. Suport lista redare.
Page 18
17
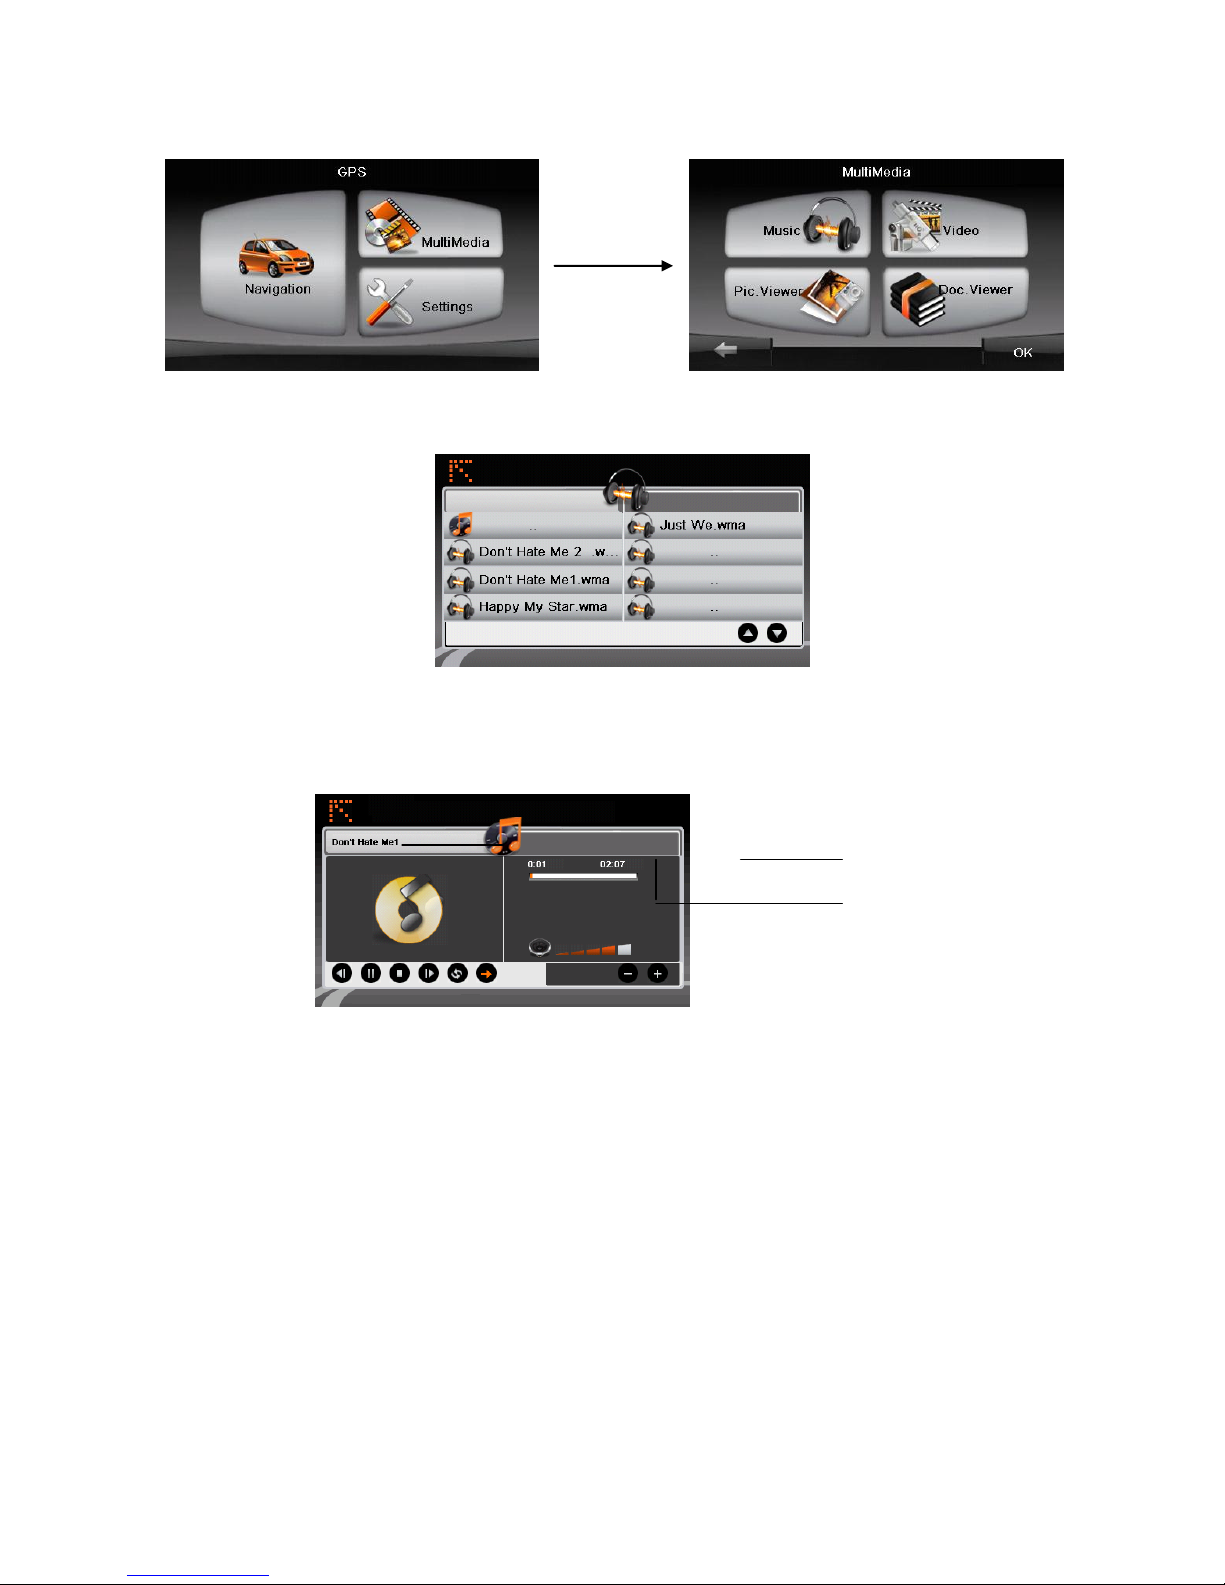
1. Atingeţi tasta Multi Media din meniul principal pentru afişarea submeniului.
2. Atingeţi tasta “Music” pentru a intra în fişierele acestui meniu. Toate fişierele
de muzică apar în lista de meniu.
3. Atingeţi un fişier de muzică si apare panoul de control de la Music player pe
ecran, de unde puteţi controla cu uşurinţă player-ul, atingând tastele de control;
şi selectând funcţia de redare Music start playing.
5.2 Pregătirea fişierelor de muzică pentru dispozitivul Dumneavoastră
Înainte să doriţi redarea unui fişier de muzică, trebuie să dispuneţi de acestea.
Procedaţi în felul următor:
1. Folosiţi Active Sync pentru a copia fişierele de muzică de pe calculator pe un
card microSD.
2. Introduceţi cardul microSD în PND.
5.3 Control redare muzică
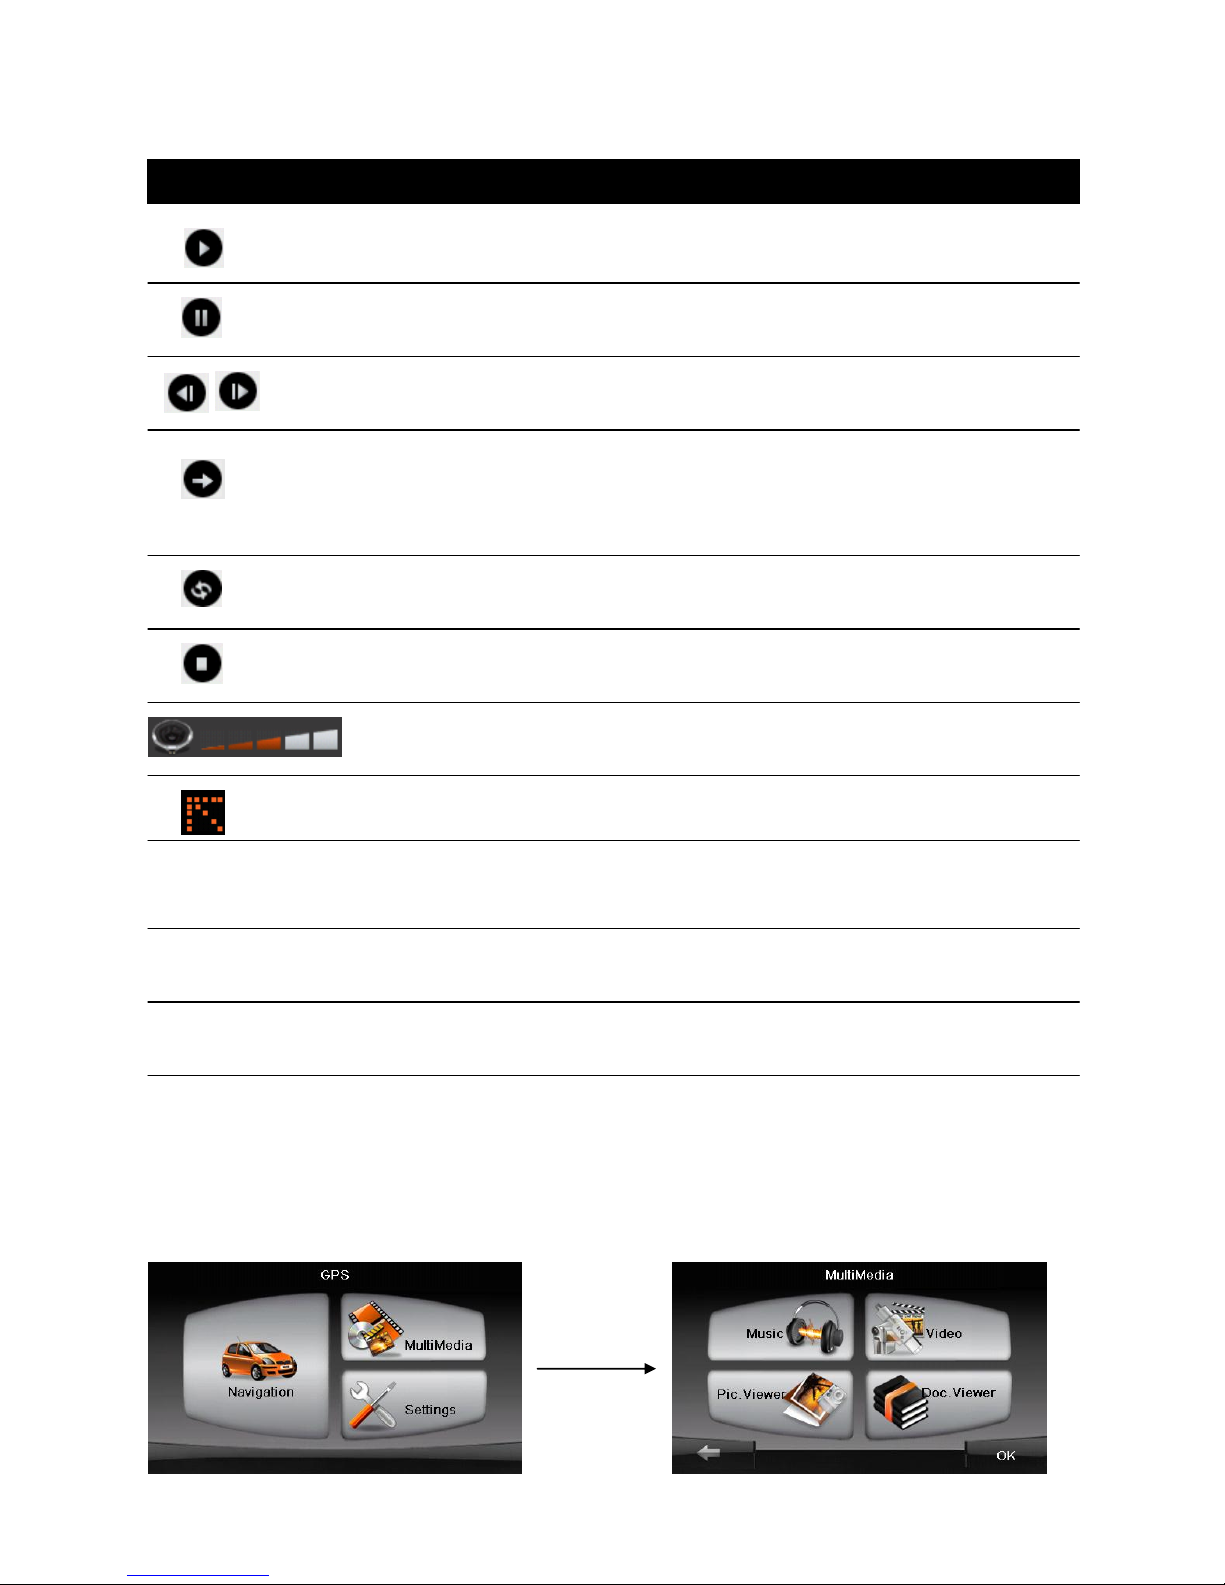
Puteţi controla Music Player-ul cu ajutorul tastelor de control. A se vedea tabelul
1 2 3
Page 19
18
de mai jos pentru detalii:
play redare melodie curentă
Pause pauză în redarea melodiei curente
Previous/Next redă melodia anterioară sau următoare
Random Redare continuă toate melodiile
songs
Replay Redare continua melodie curentă
Stop Stop redare melodie curentă
Volume Reducere sau mărire volum
Exit Închide programul şi revine la lista de meniu
1 Song name Arată fişierul melodiei curente
2 Play Time
3 Total time
6.1 Pornirea şi ieşirea din Video Player
1. Atingeţi tasta Multi Media din meniul principal pentru a afişa submeniul.
Control Denumire Descriere
Page 20
19
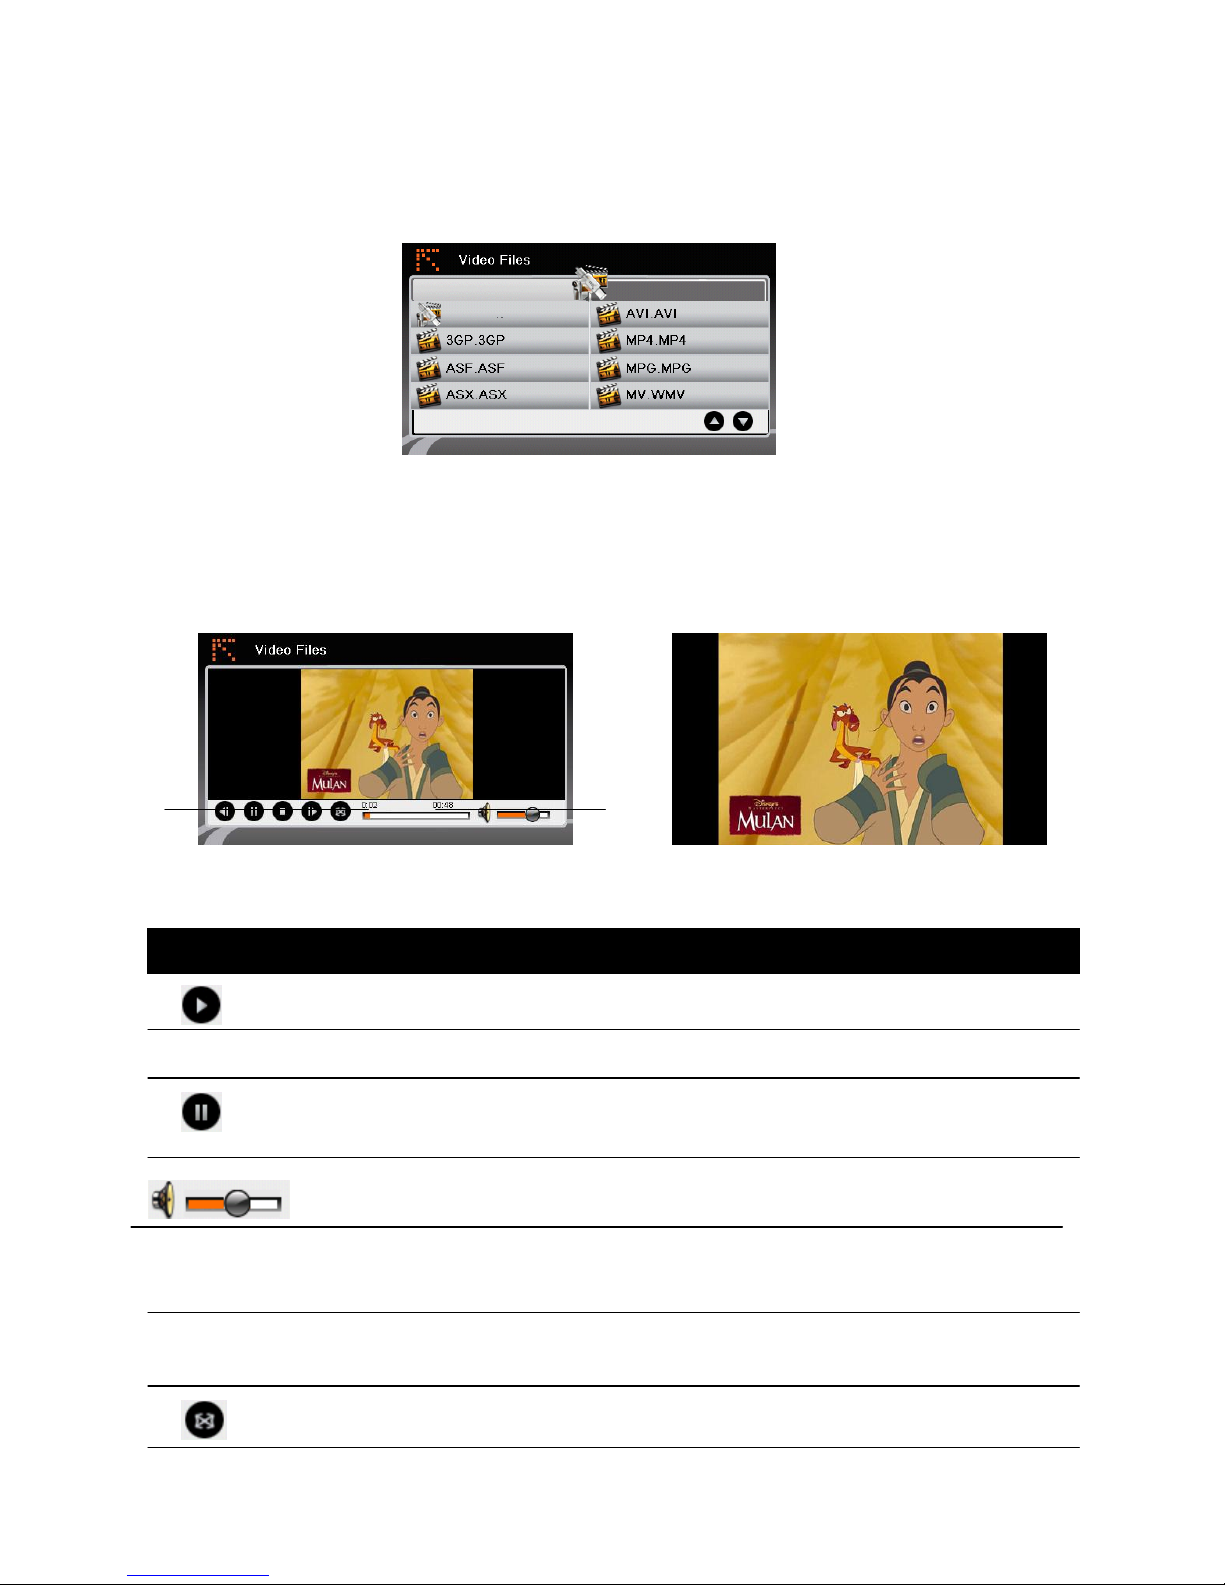
2. Atingeţi tasta Video pentru a intra în meniul de fişiere. Toate fişierele Video
apar în lista de meniu.
3. Atingeţi unul dintre fişiere Video din panoul de control al Video player-ului şi
se poate selecta Redarea Video.
4. Atingeţi tastele de control, şi puteţi controla cu uşurinţă player-ul.
6.2 Control redare video Full screen
play redare video curent
Pause pauză redare video curent
Volume Mărirea sau reducere volum.
1 Play Time
2 Total time
Full screen Ecran complet
Control Denumire Descriere
2
1
Page 21
20
Stop Stop redare video curent
Previous/Next Redare video anterior sau următor
Exit Închide programul şi revine la lista de meniu
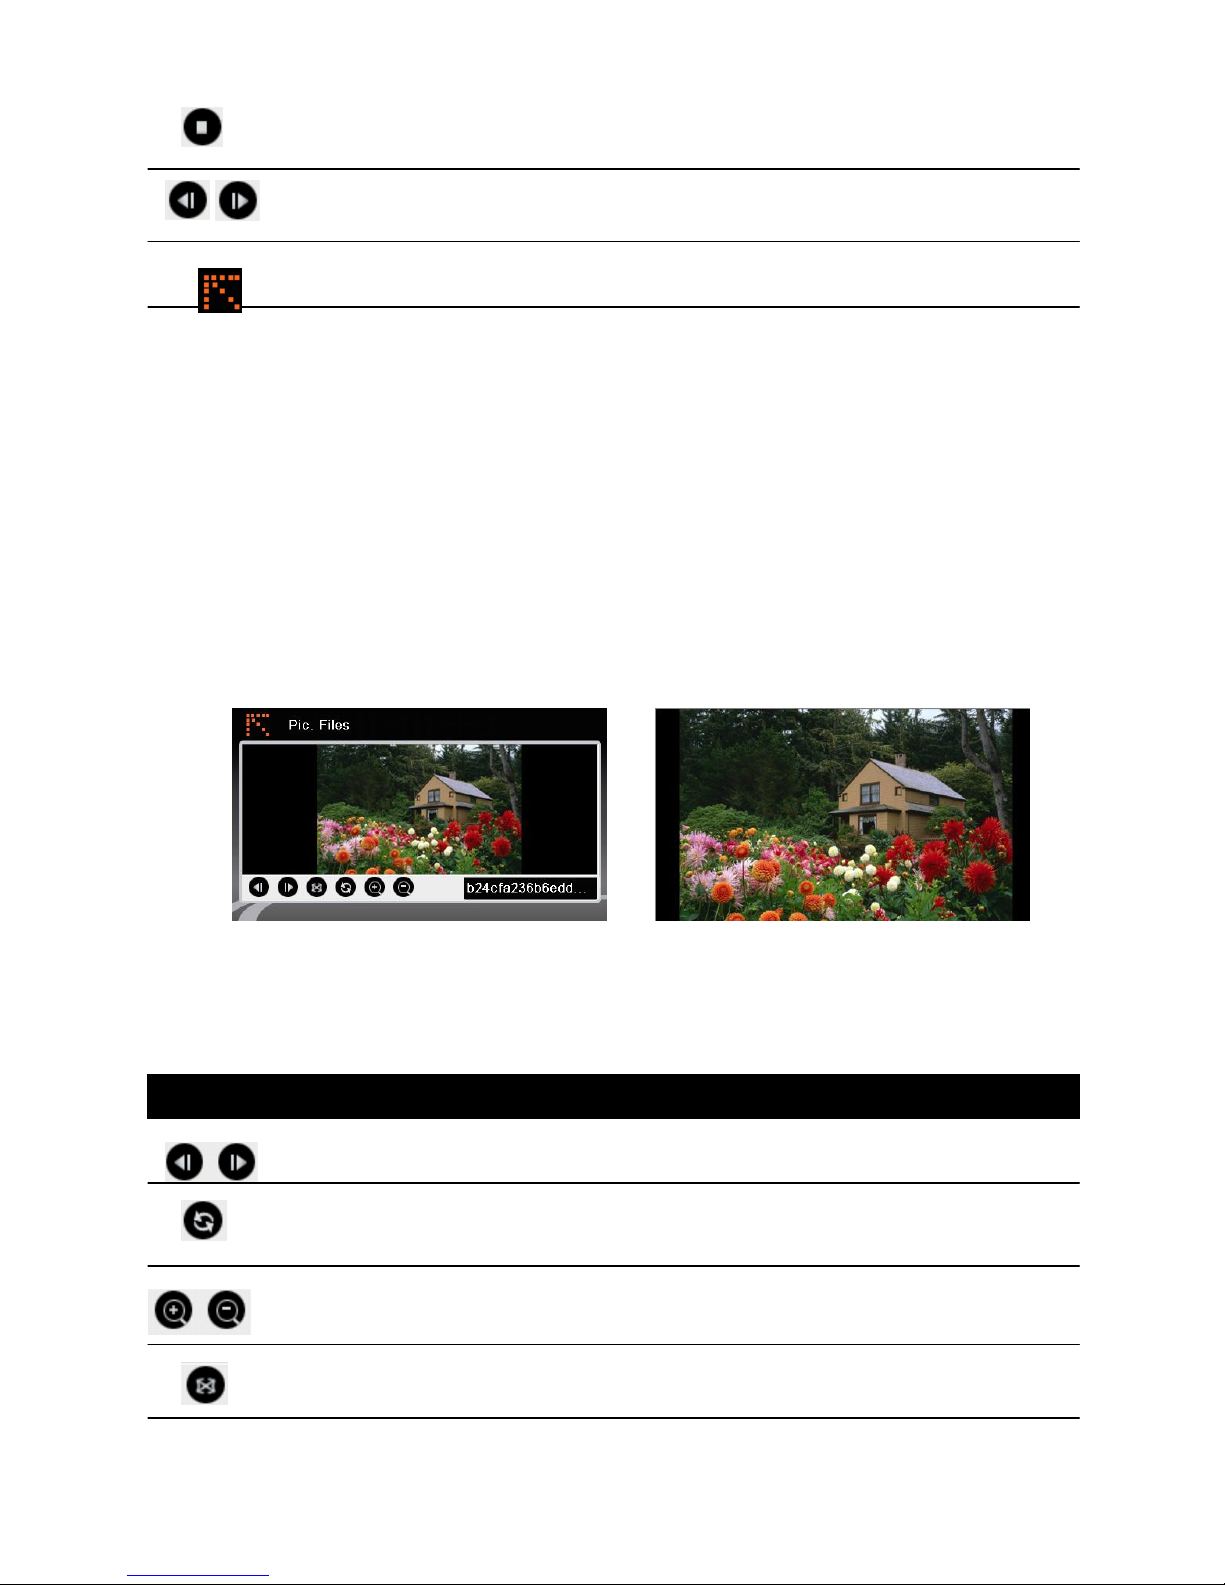
7.1 Vizualizare imagine Picture Viewer
1. Atingeţi tasta“ Multi Media” din meniu principal pentru afişarea submeniului.
2. Atingeţi tasta “Pic. Viewer” pentru a intra în lista de meniu. Toate fişierele de
imagine apar în lista de meniu.
3. Atingeţi un fişier de imagine iar sistemul deschide meniul de imagini şi arată
imaginea selectată.
7.2 Control redare vizionalizare imagini
Previous/Next Redă fişierul anterior sau următor.
Twist Întoarce ecranul foto
Zoom in/out Zoom
Full screen Ecran complet
Control Denumire Descriere
Page 22
21
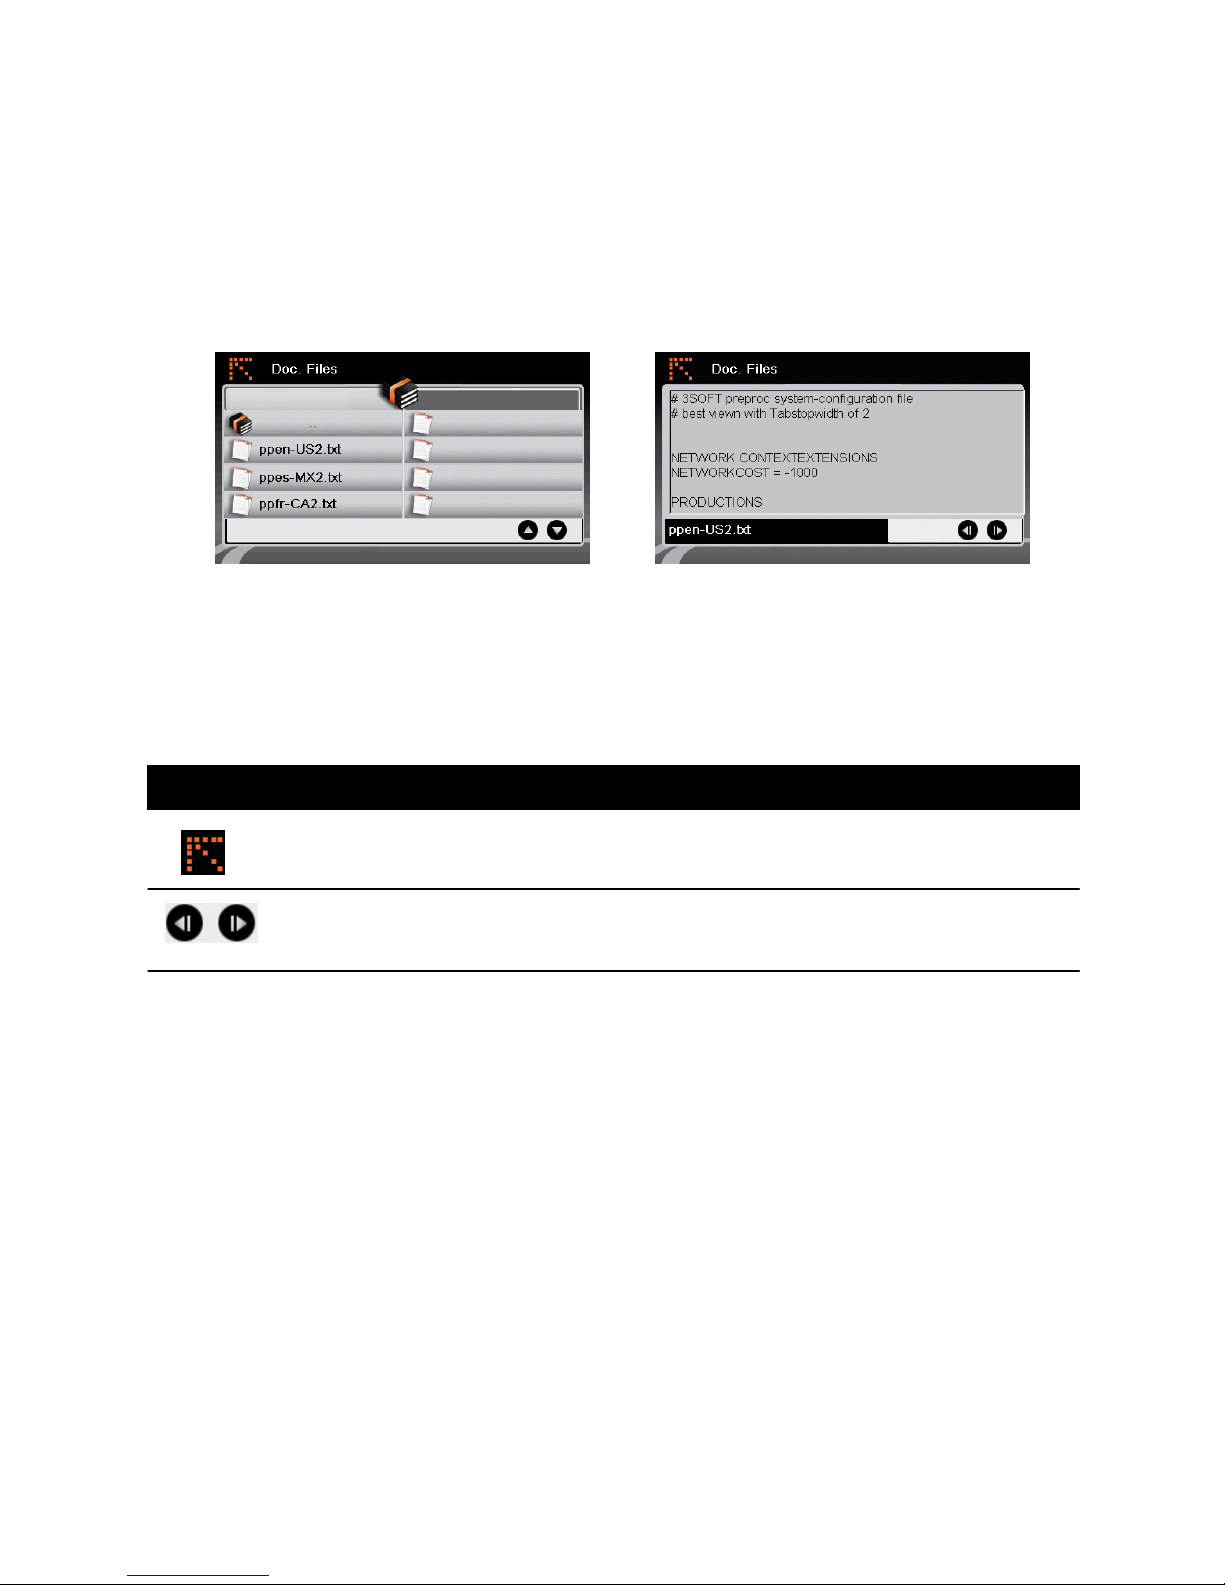
8.1 Vizionalizare fişier document:
1. Atingeţi tasta “Multi Media” din meniul principal pentru a afişa submeniul.
2.Atingeţi tasta “Doc. Viewer ” pentru a intra în listele de meniu. Toate fişierele
de document vor fi afişate în listele de meniu.
3. Atingeţi unul dintre acestea, sistemul va deschide meniul de documente şi va
arăta documentul selectat.
8.2 Control redare vizionalizare document.
Exit Înapoi la fişiere.
Previous/Next Redă fişierul anterior sau următor.
Depanare
Acest capitol vă oferă soluţii pentru cele mai frecvente probleme pe care le
puteţi întâlni. Deasemenea vă dă instrucţiuni referitoare la îngrijirea
dispozitivului Dumneavoastră.
OBSERVAŢIE: dacă întâlniţi probleme, pe care nu le puteţi rezolva, contactaţi
un centru de service autorizat pentru asistenţă.
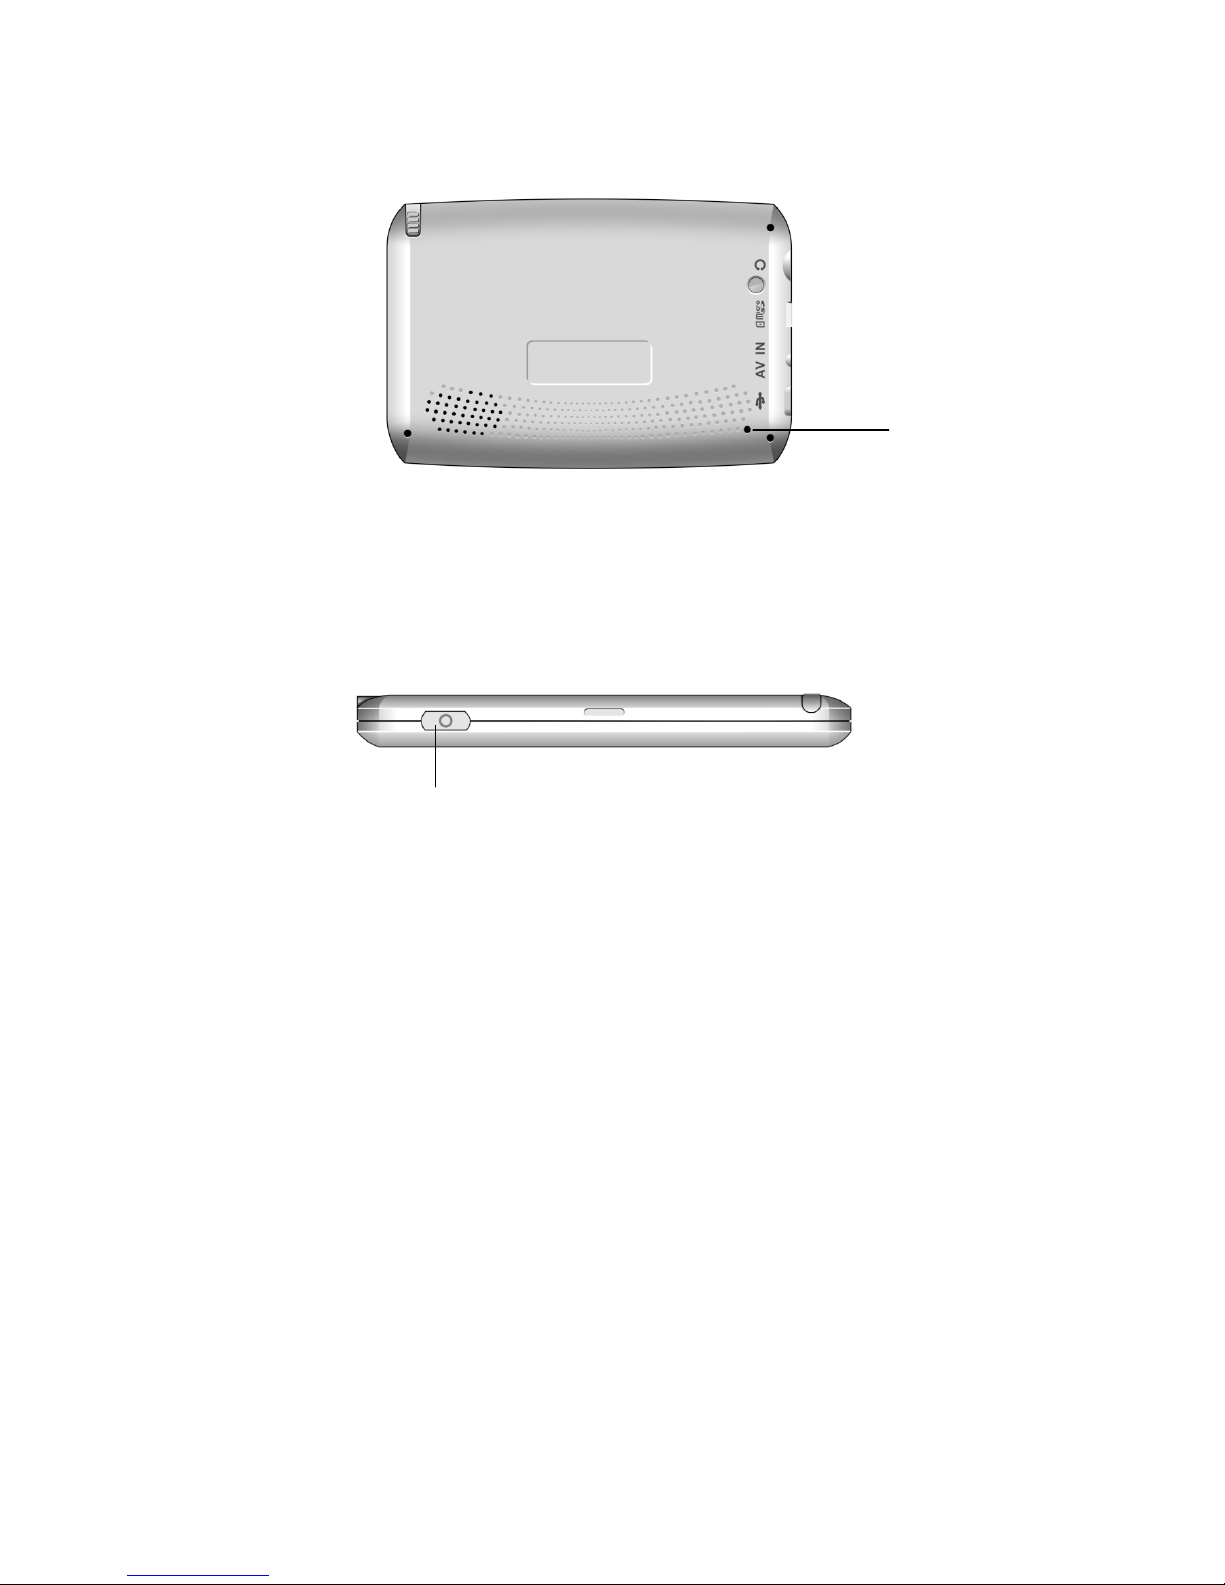
9.1 Resetarea sistemului
Ocazinal, poate fi nevoie de restarea dispozitivului. De exemplu, ar trebui să
resetaţi sistemul dacă nu răspunde la comenzi sau pare să se fi " blocat" .
Introduceţi o tijă mică, cum ar fi o agrafă de birou îndreptată, în butonul de
Control Denumire Descriere
Page 23
22
resetare al dispozitivului. Acesta se numeşte "soft reset." Ar trebui să apară
meniul principal după soft reset.
Dacă dispozitivul încă nu răspunde după un soft reset, puteţi urma următorii
paşi pentru a face un "hard reset."
1. Deconectaţi toate cablurile, inclusiv adaptorul AC, de la dispozitiv.
2. Apăsaţi butonul ON/OFF în poziţia OFF.
3. Aşteptaţi 1 minut apoi apăsaţi butonul înapoi în poziţia ON.
4. Dispozitivul trebuie să pornească.
9.2 Depanare
Probleme de alimentare.Nu se aprinde când se foloseşte cu baterie.
Puterea rămasă a bateriei poate fi prea mică pentru a alimenta dispozitivul.
Conectaţi adaptorul AC la dispozitvul Dumneavoastră şi la curent. Apoi porniţi
dispozitivul.
Probelme de ecran.
Dacă ecranul nu răspunde după ce aţi apăsat butonul de alimentare, încercaţi
următoarele pentru a rezolva problema.
. Conectaţi adaptorul AC la dispozitv şi la sursă de curent extern.
. Resetaţi sistemul.
Ecranul răspunde încet
. Asiguraţi-vă că dispozitvul nu se descarcă. Dacă problema persistă, resetaţi
sistemul.
Ecranul se blochează
ON/OFF
RESET
Page 24

23
. Resetaţi sistemul.
Ecranul se poate citi cu dificultate
. Asiguraţi-vă că iluminatul de fundal este pornit.
. Mutaţi-vă întro locaţie mai luminoasă.
Răspuns incorect la atingere
. Recalibraţi ecranul tactil.
Probleme de conectare.Probleme conectare cablu
. Asiguraţi-vă că dispozitivul şi computerul sunt pornite înainte să încercaţi să
stabiliţi o conexiune.
. Asiguraţi-vă de conectarea corectă al cablului în protul USB al computerului şi
al dispozitivului. Conectaţi cablul USB direct la computer nu introduceţi cablul
într-un alt suport USB.
.Resetaţi dispozitivul înaite să conectaţi cablul. Întotdeauna deconectaţi
dispozitivul înainte să reporniţi computerul.
Probleme de GPS
Când nu există semnale disponibile, luaţi în considerare următoarele:
. Asiguraţi-vă că antena de GPS are vedere clară la cer.
. Ţineţi cont de faptul că recepţia GPS poate fi afectată de:
-Vreme nefavorabilă
-Obstacole dense (exemplu copaci şi clădiri înalte)
-Alte dispozitive wireless în maşină
-Ferestre auto reflectorizante
9.3 Întreţinerea dispozitivului
Îngrijirea dispozitvului va asigura operare fără probleme şi reduce riscul de
deterioare pentru dispozitivul Dumneavoastră.
. Ţineţi departe dispozitvul de umiditate excesivă şi temperaturi extreme.
. Evitaţi expunerea dispozitvului la raze solare directe sau lumină ultravioletă
puternică pentru perioade lungi de timp.
. Nu amplasaţi nimic deasupra dispozitvului sau nu aruncaţi obiete pe dispozitiv.
. Nu scăpaţi dispozitvul sau nu-l expuneţi la şocuri severe.
. Nu expuneţi dispozitivul la schimbări de temperatură bruşte şi serioase.
Acesta ar putea cauza condens de umiditate în interiorul dispozitivului, care ar
Page 25

24
putea deteriora dispozitivul. În caz de condens lăsaţi apratul să se usuce
complet înainte de utilizare.
. Aceţi grijă să nu vă aşezaţi pe dispozitiv. Vă recomandăm să nu purtaţi
dispozitivul în buzunarul din spate din acest motiv.
. Suprafaţa ecranului poate fi zgâriat cu uşurinţă. Evitaţi atingerea ecranului cu
obiecte ascuţite. Pot fi utilizate folii de protecţie neadezive speciale pentru
dispozitve portabile cu ecrane LCD pentru a proteja ecranul de zgârieturi
minore.
. Niciodată nu curăţaţi aparatul când este pornit. Utilizaţi o cârpă moale, fără
scame, umezită cu apă pentru a şterge ecranul şi exteriorul dispozitivului.
. Nu utilizaţi hârtie pentru a curăţa ecranul.
.Nu încercaţi să desfaceţi, reparaţi sau să modificaţi dispozitivul.
Dezasamblarea, modificarea sau încercarea de a repara aparatul poate cauza
daune dispozitivului şi chiar răni sau prejudicii proprietăţii şi va anula orice
garanţie.
. Nu depozitaţi şi nu transportaţi lichide inflamabile, gaze şi materiale explozibile
în acelaşi compartiment cu dispozitivul Dumneavoastră, componentele sau
accesoriile acestuia.
9.4 Măsuri de siguranţă
Despre încărcare
. Utilizaţi doar adaptorul AC furnizat cu dispozitivul dumneavoastră. Utilizarea
unui alt tip de adaptor AC va avea ca rezultat defecţiune şi/sau pericol.
. Utilizaţi baterie specială pentru echipament.
Despre adaptorul AC
. Nu utilizaţi adaptorul într-un mediu cu umiditate ridicată. Niciodată nu atingeţi
adaptorul dacă aveţi mâinile ude.
. Asiguraţi ventilaţie adecvată în jurul adaptorului când este în folosinţă sau se
încarcă bateria. Nu acoperiţi adaptorul AC cu hârtie sau alte obiecte care pot
reduce răcirea. Nu folosiţi adaptorul AC în timp ce este transportat.
.Conectaţi adaptorul la sursa de curent. Nevoile de voltaj sunt pe cutia
Page 26

25
produsului/sau ambalaj.
. Nu utilizaţi adaptorul dacă cordonul este distrus.
.Nu încercaţi să reparaţi unitatea. Nu există părţi reparabile înăuntru.
Înlocuiţi unitatea dacă este distrusă sau expusă la umiditate excesivă.
Producătorul nu poate fi tras la răspundere pentru modificări făcute de către
utilizator şi consecinţele acestora, care pot schimba conformitatea produsului
cu marca CE.
Despre baterie
. Utilizaţi un încărcător specific aprobat de către producător.
ATENŢIE: Această unitate conţine baterie de litiu-ion neinlocuibil.
Bateria poate exploda, împrăştiind substanţe chimice periculoase. Pentru a
reduce riscurile de foc sau arsurile, nu desfaceţi, zdrobiţi, găuriţi sau expuneţi
la foc.
. Aruncaţi bateriile folosite în conformitate cu instrucţiunile.
. Înlocuiţi bateria cu acelaşi tip de baterie recomandat de către producător.
. Bateria trebuie reciclată sau aruncată în mod corect.
. Utilizarea bateriei doar în echipamentul adecvat.
Page 27
26
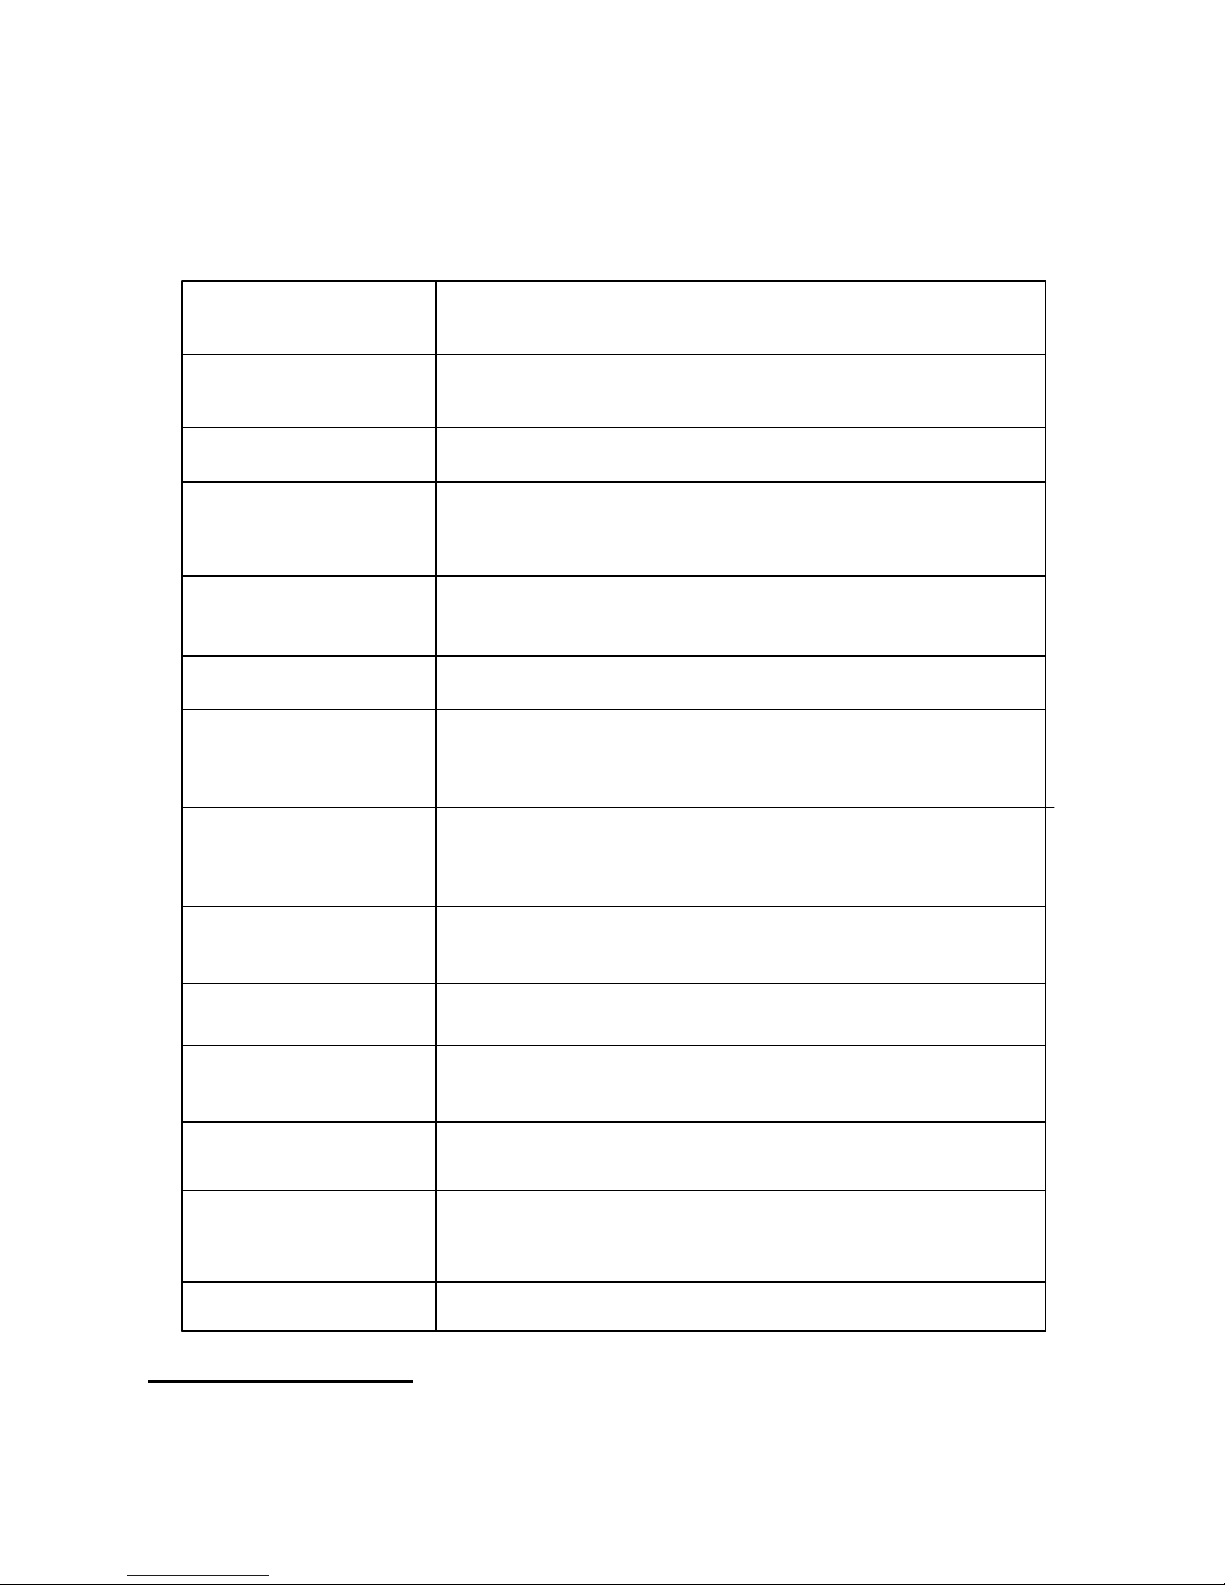
Specificații tehnice:
Soft de navigație: iGO Primo 2, Full Europa
CPU SIRF Atlas V – 644 MHz
Sistem operare Microsoft WinCE 6.0
Antena încoporată (64 canale)
Memorie 128MB DDR2
4GB FLASH EPROM
Memorie extensibila microSD card
Rezoluție Display HD – 800 x 480 px
Greutate 185 gr.
Display Ultraluminos – 250 Lux, 5 inch
Difuzor încorporat 1.0 W
Căști 3.5mm Jack
USB micro USB
Baterie Li-POL
Dimensiune 135 mm x 90 mm x 13,5 mm
TMC Internă
Page 28

27
Precautions and Notices
. For your own safety, do not operate the controls of the product while driving.
. Use this product prudently. The product is intended to be used only as a
navigation aid. It is not for precise measurement of direction, distance,
location or topography.
. The calculated route is for reference only. It is the user's responsibility to
follow the traffic signs and local regulations along the roads.
. When you get off the car, do not leave your device on the dashboard that is
subject to direct sunlight. The overheating of the battery can cause
malfunction and/or danger.
. GPS is operated by the United States government, which is solely
responsible for the performance of GPS. Any change to the GPS system can
affect the accuracy of all GPS equipments.
. GPS satellite signals cannot pass through solid materials (except glass).
When you are inside a tunnel or building, GPS positioning is not available.
. A minimum of 4 GPS satellite signals is needed to determine current GPS
position. Signal reception can be affected by situations such as bad weather
or dense overhead obstacles (e.g. trees and tall buildings).
. Other wireless devices in the vehicle might interfere with the reception of
satellite signals and cause the reception to be unstable.
. A car holder is needed when using the device in a car. Be sure to place
the device in an appropriate place, so as not to obstruct the driver's view or
deployment of air bags.
Page 29
28
Getting Started
1.1 Understanding Hardware Features
NOTE: Depending upon the specific model purchased, the color of your device
exactly match the device shown in this manual.
Front Components
1 Touch Screen Displays the output of your device. Tap the
Screen with your fingertip to select menu
commands or enter information.
2 Charge Indicator Glows bright amber to indicate that the battery is
charging, and turns green when the battery is
fully charged.
Back Components
1 Speaker Sends out music, sounds and voice.
3 backlight window
1
2
Ref Component Description
Ref Component Description
1
2
3
Page 30
29
Getting Started
3 Reset Button Restart system.
Top Components
1 ON/OFF Switch The main power/battery cut off switch.
Side Components
1 microSD Slot Accepts a microSD (Secure Digital) card for
accessing data such as Music.
2 Mini-USB Connector Connects to the USB cable.
3 Headphone Connector Connects to stereo headphones.
4 AVIN Connector
Ref Component Description
1
Ref Component Description
1
2
3
Ref Component Description
4
Page 31
30
Getting Started
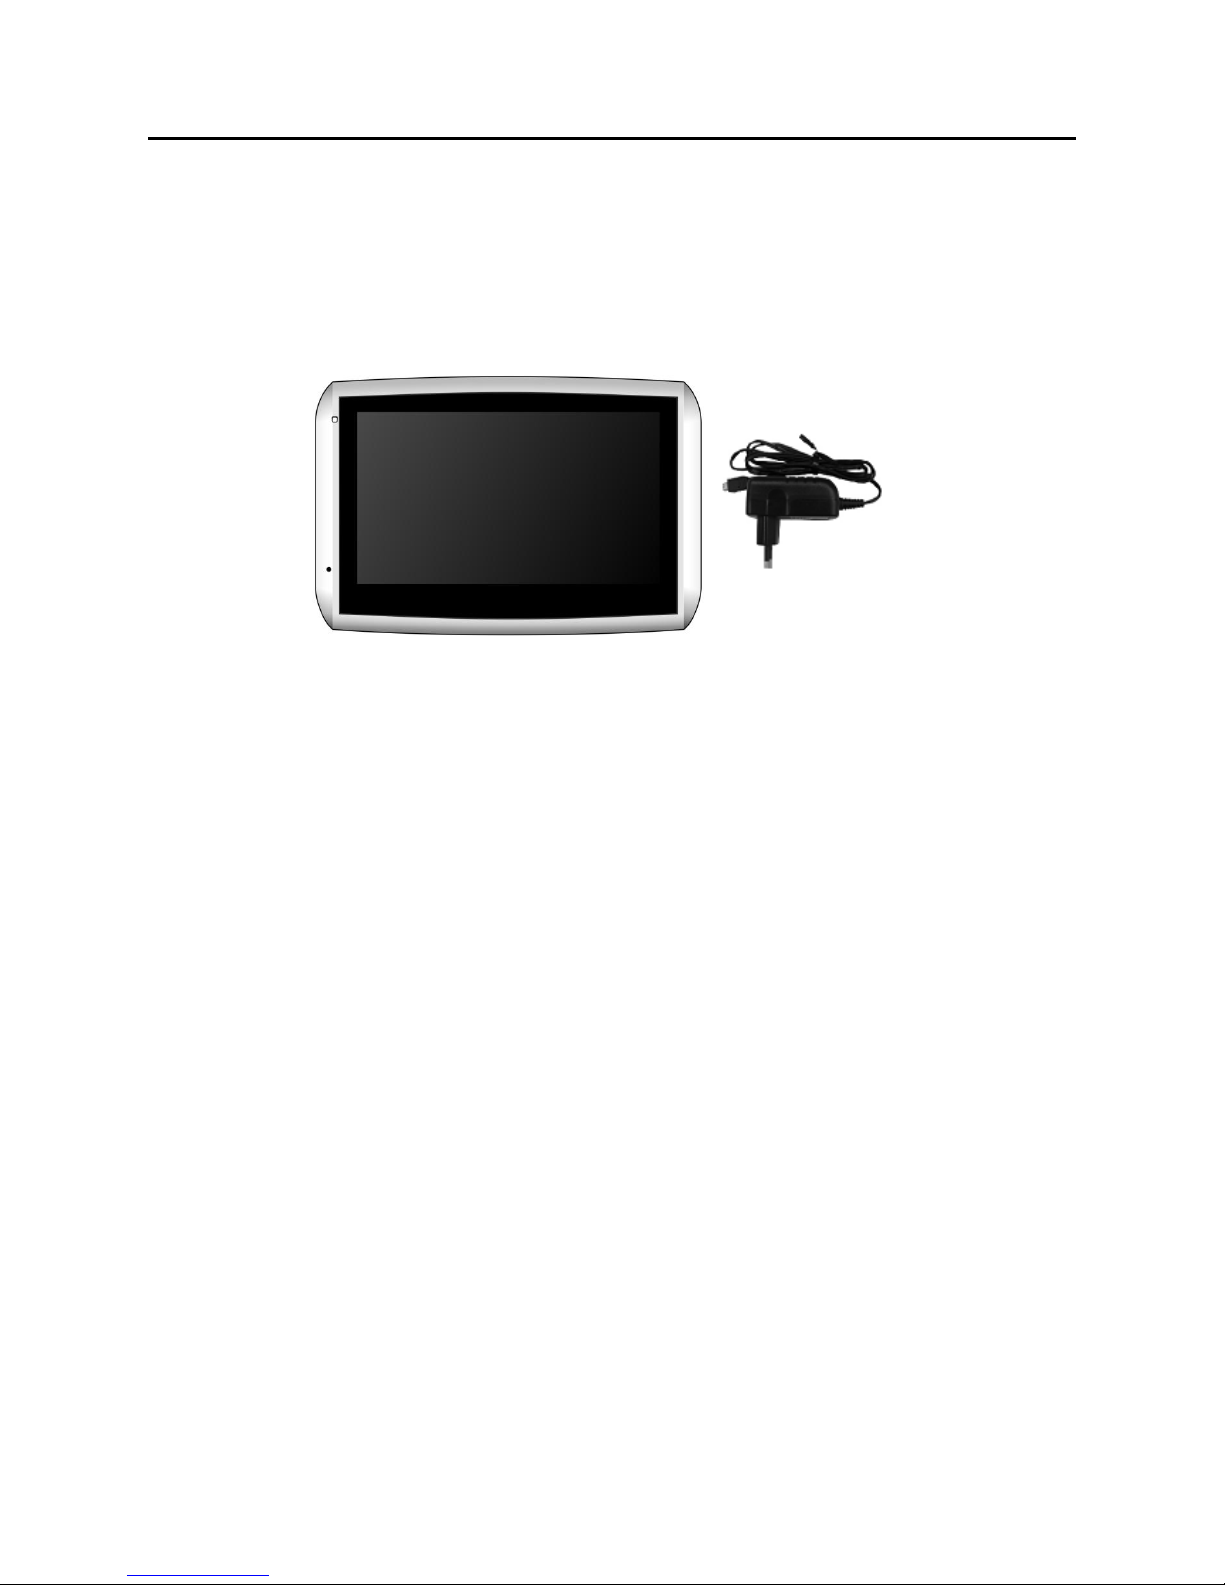
1.2 Connecting to Car charger and Charging the Battery (Optional)
When charging the battery for the first time, you should charge it for at least 8
hours.
1. Slide and click the connector converter onto the Car charger.
2. Connect the adapter cable to the bottom of your device.
3. Plug the Car charger into a wall outlet.
The charge indicator glows red when charging is in progress. Do not disconnect
your device from Car charger until the battery is fully charged, when the charge
indicator turns amber. This will take a couple of hours.
NOTE:
. Do not immediately turn on your device after connecting the Car charger to
charge a power-depleted battery. If you need to turn on the device again, wait
for at least one minute.
. Depending on your region of purchase, the connector converter may not look
exactly the same as the picture shown.
. Your device can also be charged when it is connected to a desktop computer
via the USB cable.
CAUTION: For optimal performance of the lithium battery, take note of the
following:
. Do not charge the battery where the temperature is high (e.g. in direct
sunlight).
. There is no need to fully discharge the battery before charging. You can charge
the battery before it is discharged.
. If you will not use the product for a long period of time, be sure to fully charge
the battery at least once every two weeks. Over discharge of the battery can
affect the charging performance.
Page 32
31
Getting Started
1.5 Using Your Device in a Vehicle
A car holder and a car charger are supplied with your device.
Using the Car Holder
CAUTION:
. Select an appropriate location for the car holder. Never place the holder where
the driver's field of vision is blocked.
. If the car's windshield is tinted with a reflective coating, an external antenna
(optional) may be needed to route the antenna to the top of the car through a
window. When closing the car window, be careful not to pinch the antenna
cable. (Cars with an anti-jam window design may automatically leave
adequate space as needed.)
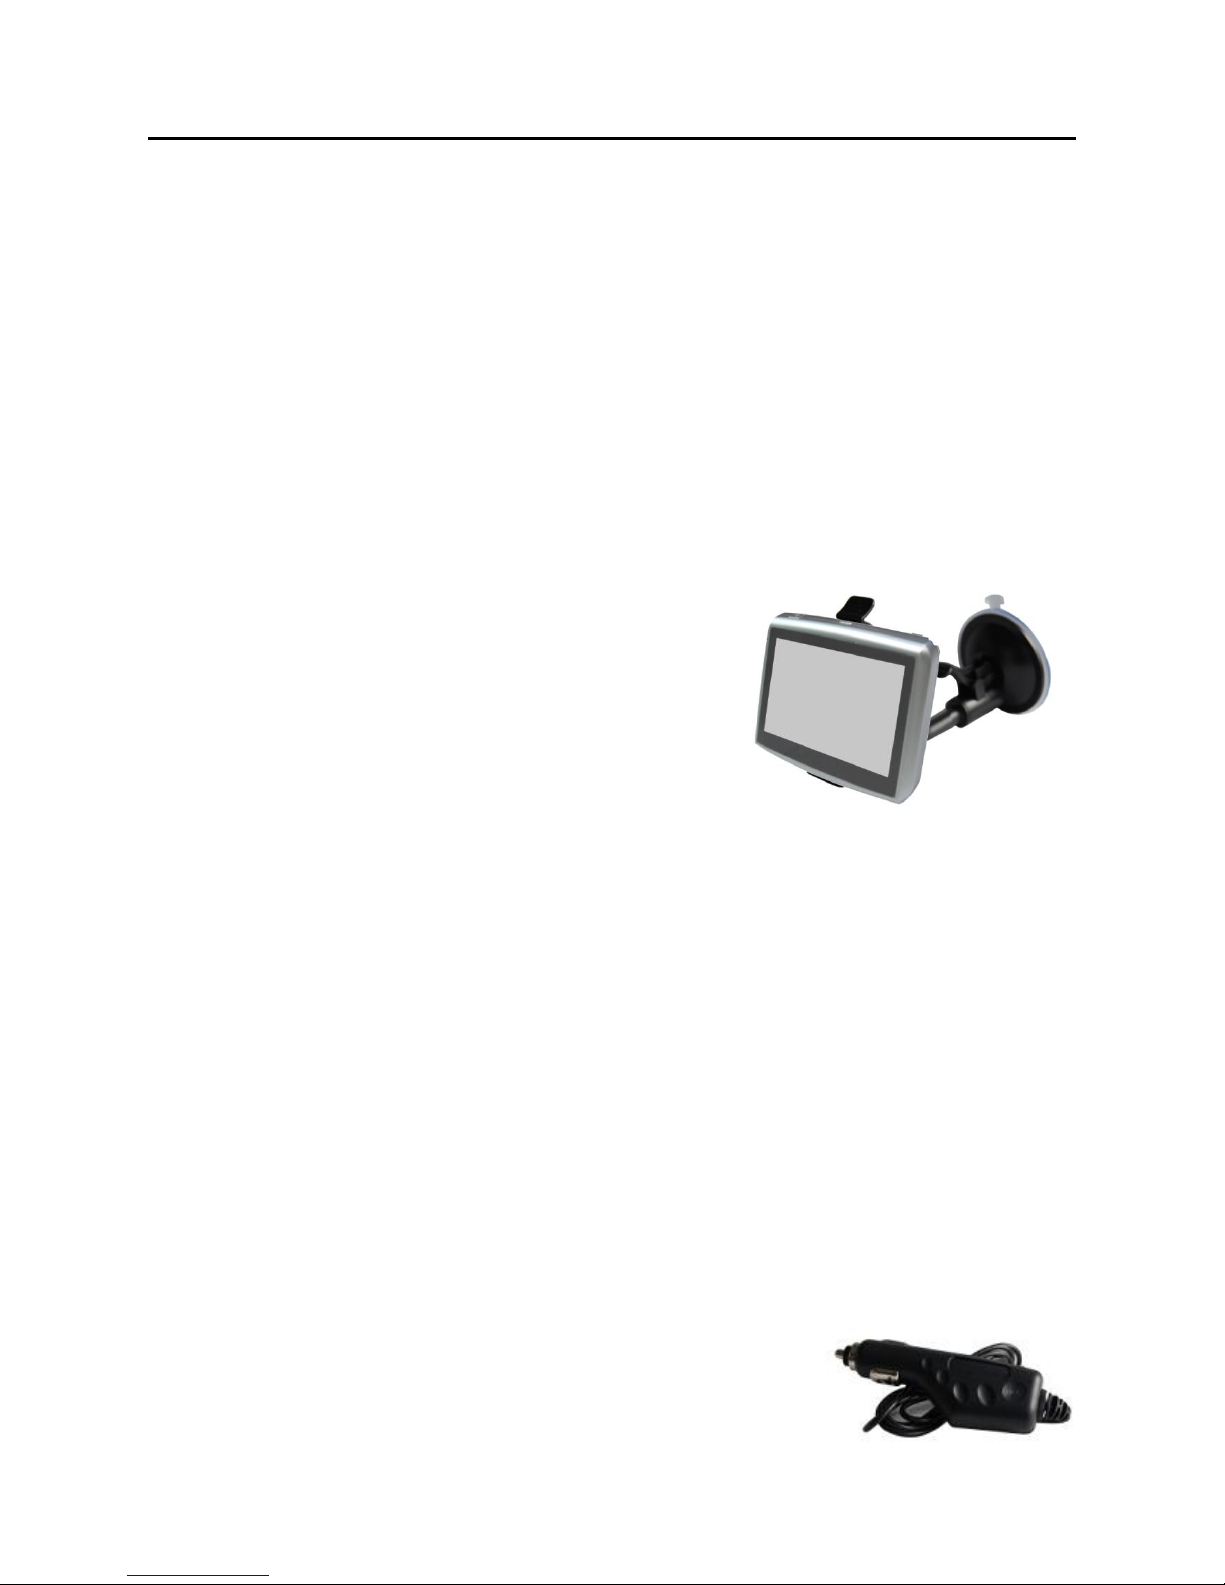
The car holder consists of a bracket and a stand.
Use the car holder to fix your device in a
vehicle. Make sure that the GPS antenna has a
clear view of the sky. (See the document
supplied with the car holder for the installation
instruction.)
For initial positioning, remain at the same spot with a clear view of the sky. The
GPS may take a few minutes to find its current location initially.
NOTE: Depending upon the specific model purchased, the car holder supplied
with your device may not look exactly the same as the picture shown.
1.6 Connecting the Car Charger
The car charger supplies power to your device when you are using the device
in a car.
CAUTION: To protect your device against sudden surges in current, connect the
car charger only after the car engine has been started.
1. Connect one end of the car charger to the power connector of your device.
2. Connect the other end to the cigarette lighter in the car to power and
charge your device. The indicator on the car charger
lights in green to indicate that power is being
supplied to your device.
Page 33
32
Operating Basics
2.1 Performing the Initial Start Up
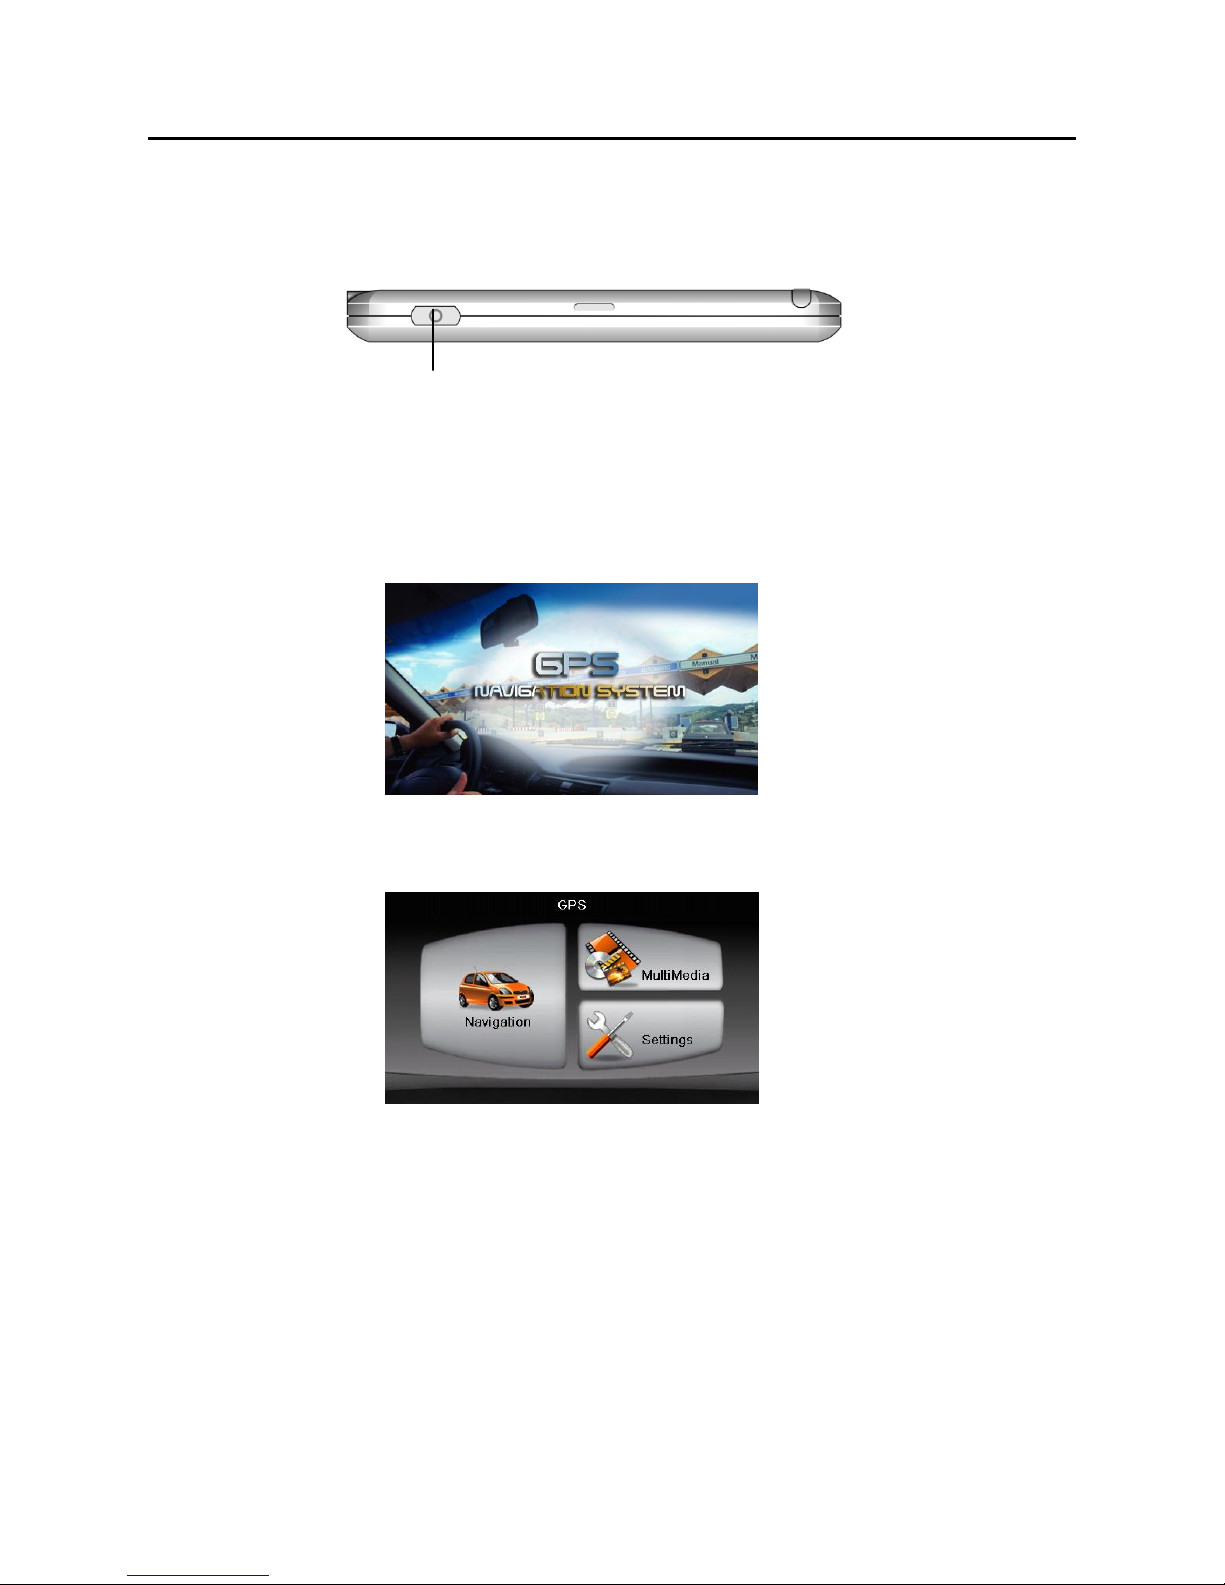
1. Press the ON/OFF button for several seconds.
2. Your device will automatically turn on. Connect the car charger as described
in the next section.
3. The Opening screen appears.
4. The Main Menu appears as shown below. You can now use your device.
5. Fully charge the battery before using your device for the first time.
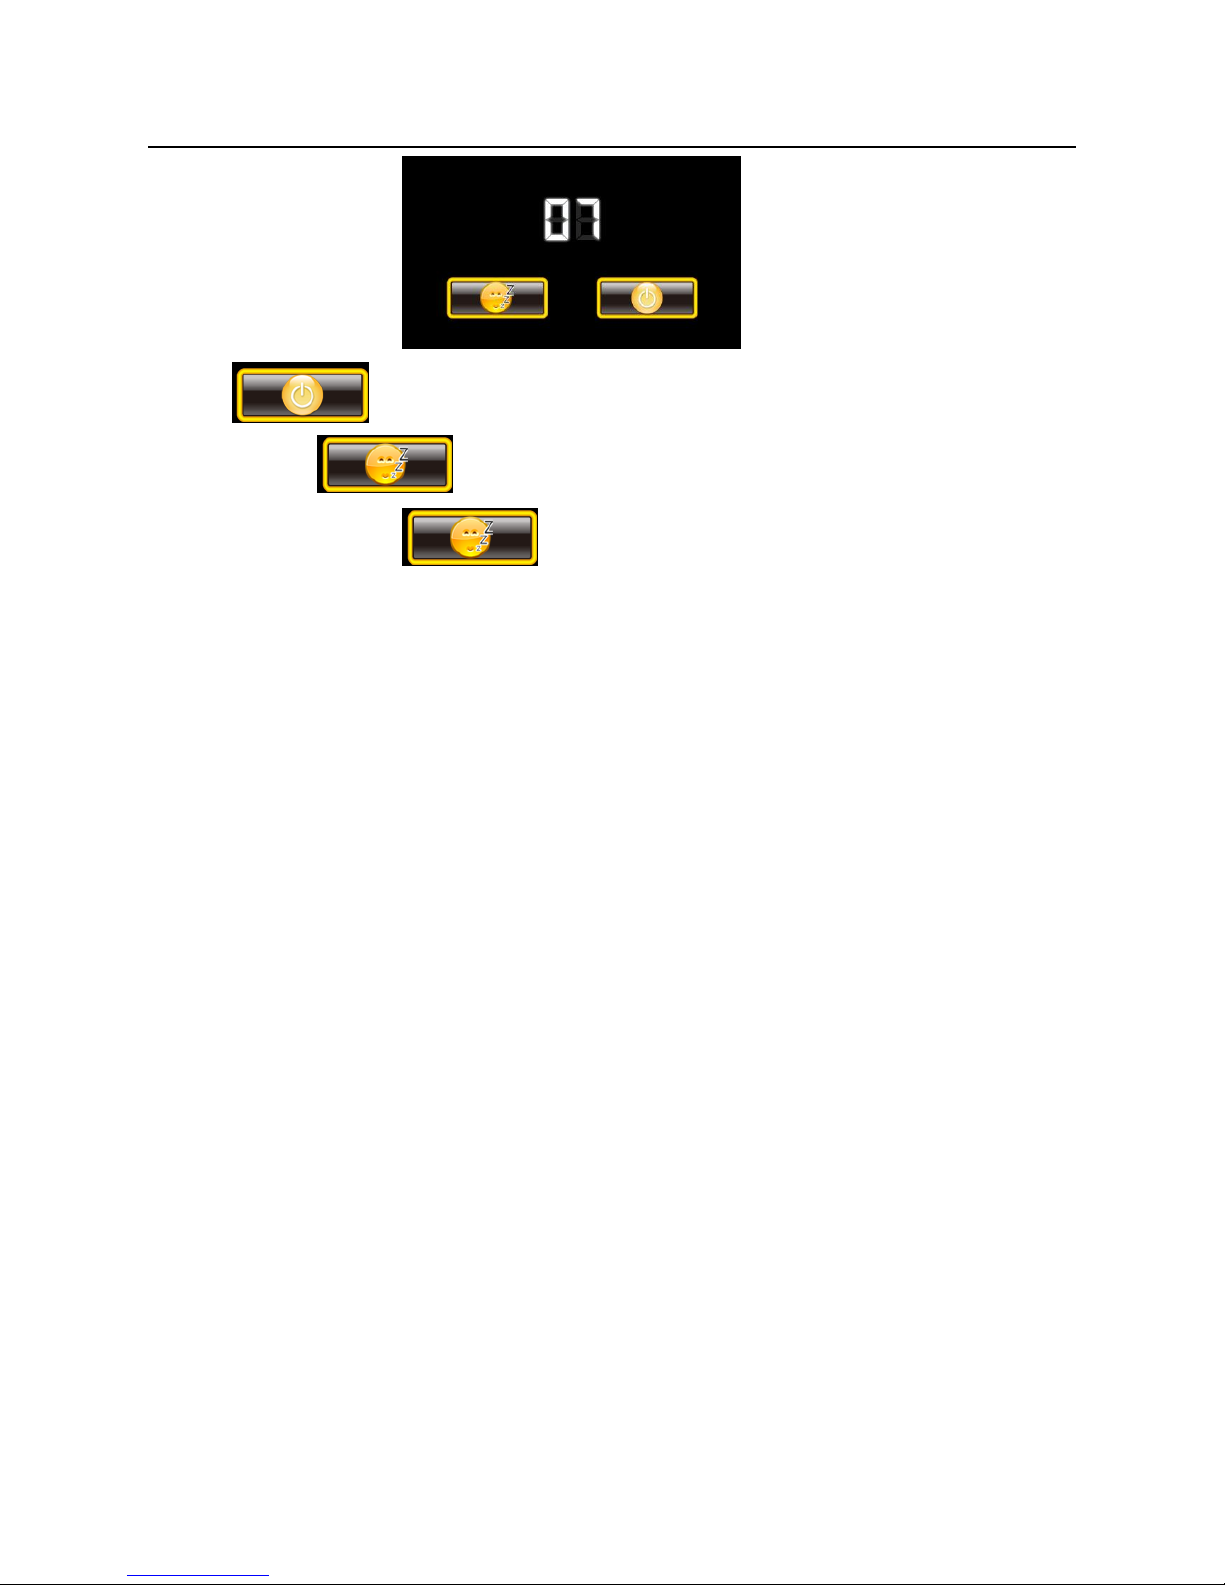
2.2 Turning On and Off / sleeping mode
1. Use the ON/OFF button to turn on and off your device.
2. If want to turn off the device, press the ON/OFF button for several seconds.
Your device will appearing the menu of turning off.
ON/OFF
Page 34
33
Operating Basics
press button, the device is turned off.
3. If pressing button, the device will enter into sleeping state.
When you press the button to turn off the unit, your device
actually enters a suspend state and the system stops operating. Once you turn
on the system again, it resumes.
2.3 Operating the Device
To communicate with your device, touch the screen with your fingertip. You can
perform the following actions:
. Tap
Touch the screen once with your fingertip to open item or options.
. Drag
Hold your fingertip on the screen and drag up/down/left/right or across the
screen.
. Tap and hold
Tap and hold your fingertip until an action is complete, or a result or menu is
shown.
Page 35
34
Operating Basics
2.4 Main Menu
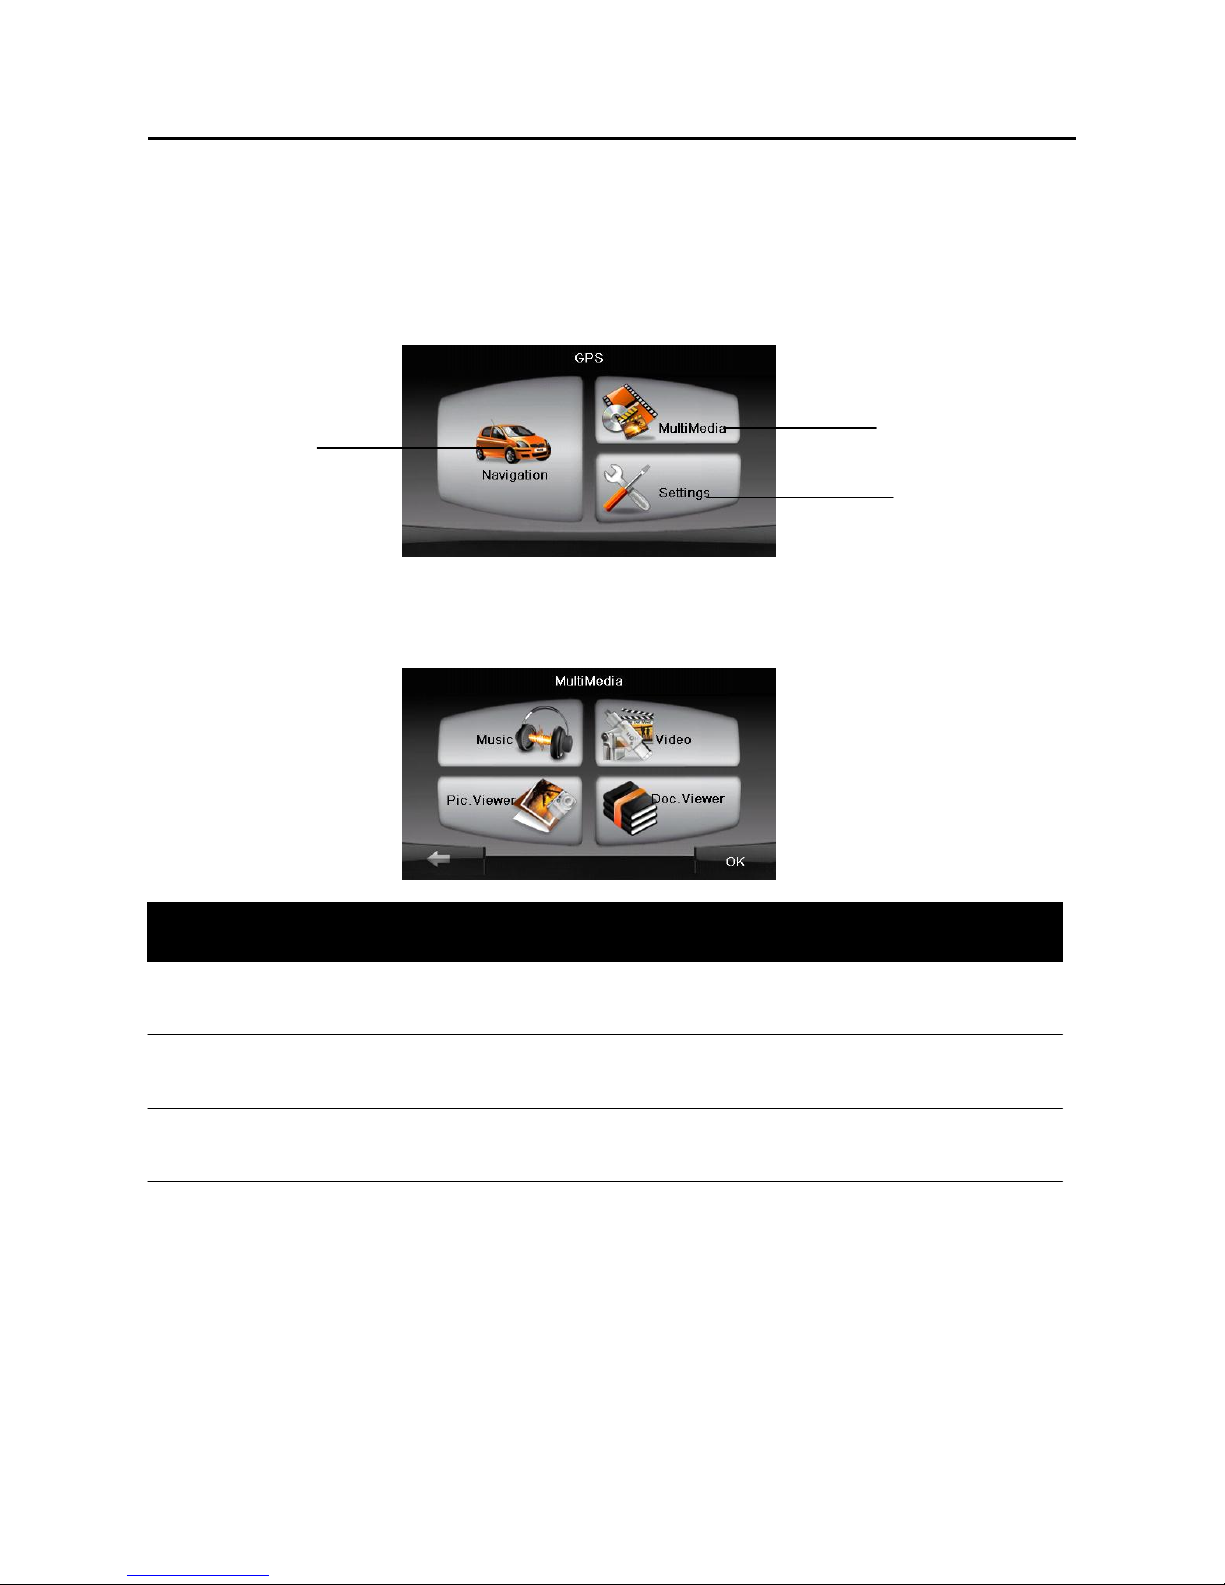
The first time you initialize your device, the Main Menu appears. The Main Menu
is your starting place for various tasks. Tap a button to start a task or open other
menu.
Such as tap "Multi Media" button, enter into the submenu.
1 Navigation Start navigation
2 Settings Device Settings
3 Multi Media Music and Video player and so on
2.5 Inserting a microSD Card
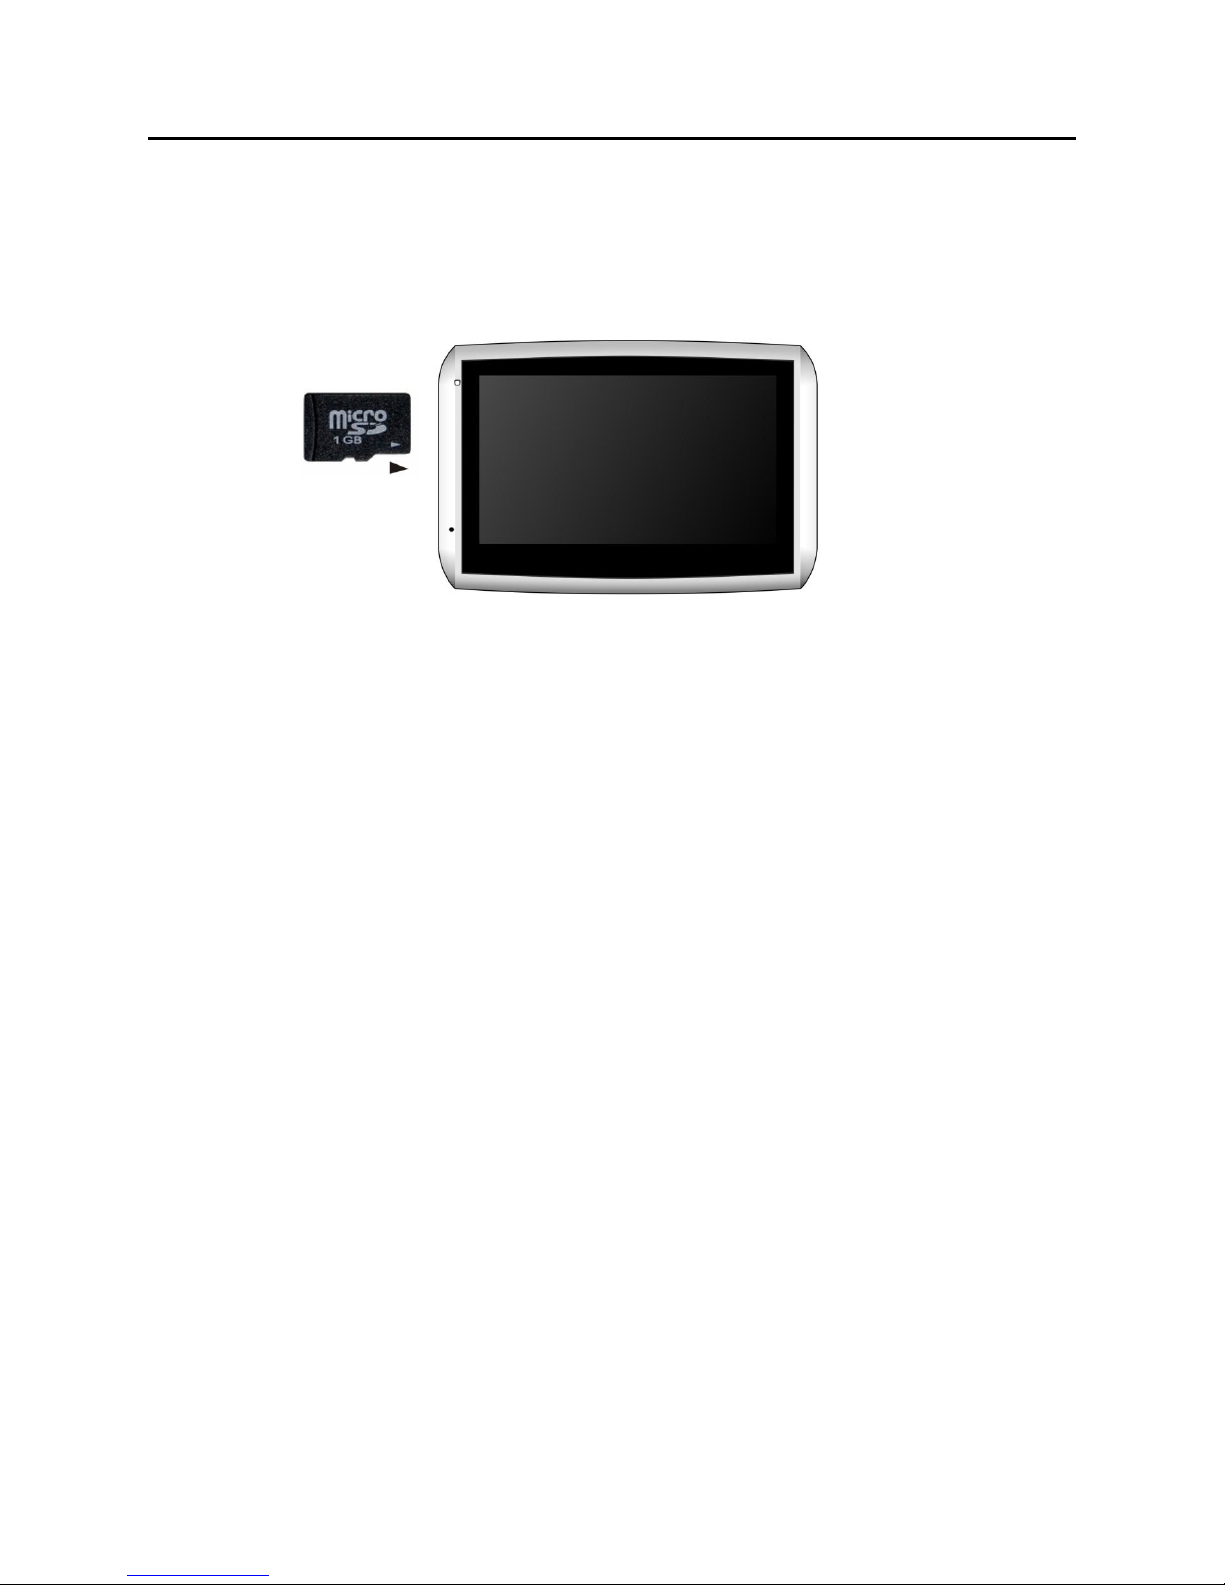
Your device has a microSD slot where you can insert an optional Secure Digital
storage card.
To use a microSD card, insert it into the slot, with the connector pointing to the
1 2 3
Ref Button Name Description For Detailed Information
Page 36
35
Operating Basics
slot and its label facing the front of the device.
To remove a card, first make sure that no application is accessing the card, then
slightly push the top edge of the card to release it and pull it out of the slot.
NOTE:
. Make sure that no foreign objects enter the slot.
. Keep a microSD card in a well-protected box to avoid dust and humidity
when you are not using it.
Page 37
36
Devices settings
3.1 Using Device Settings
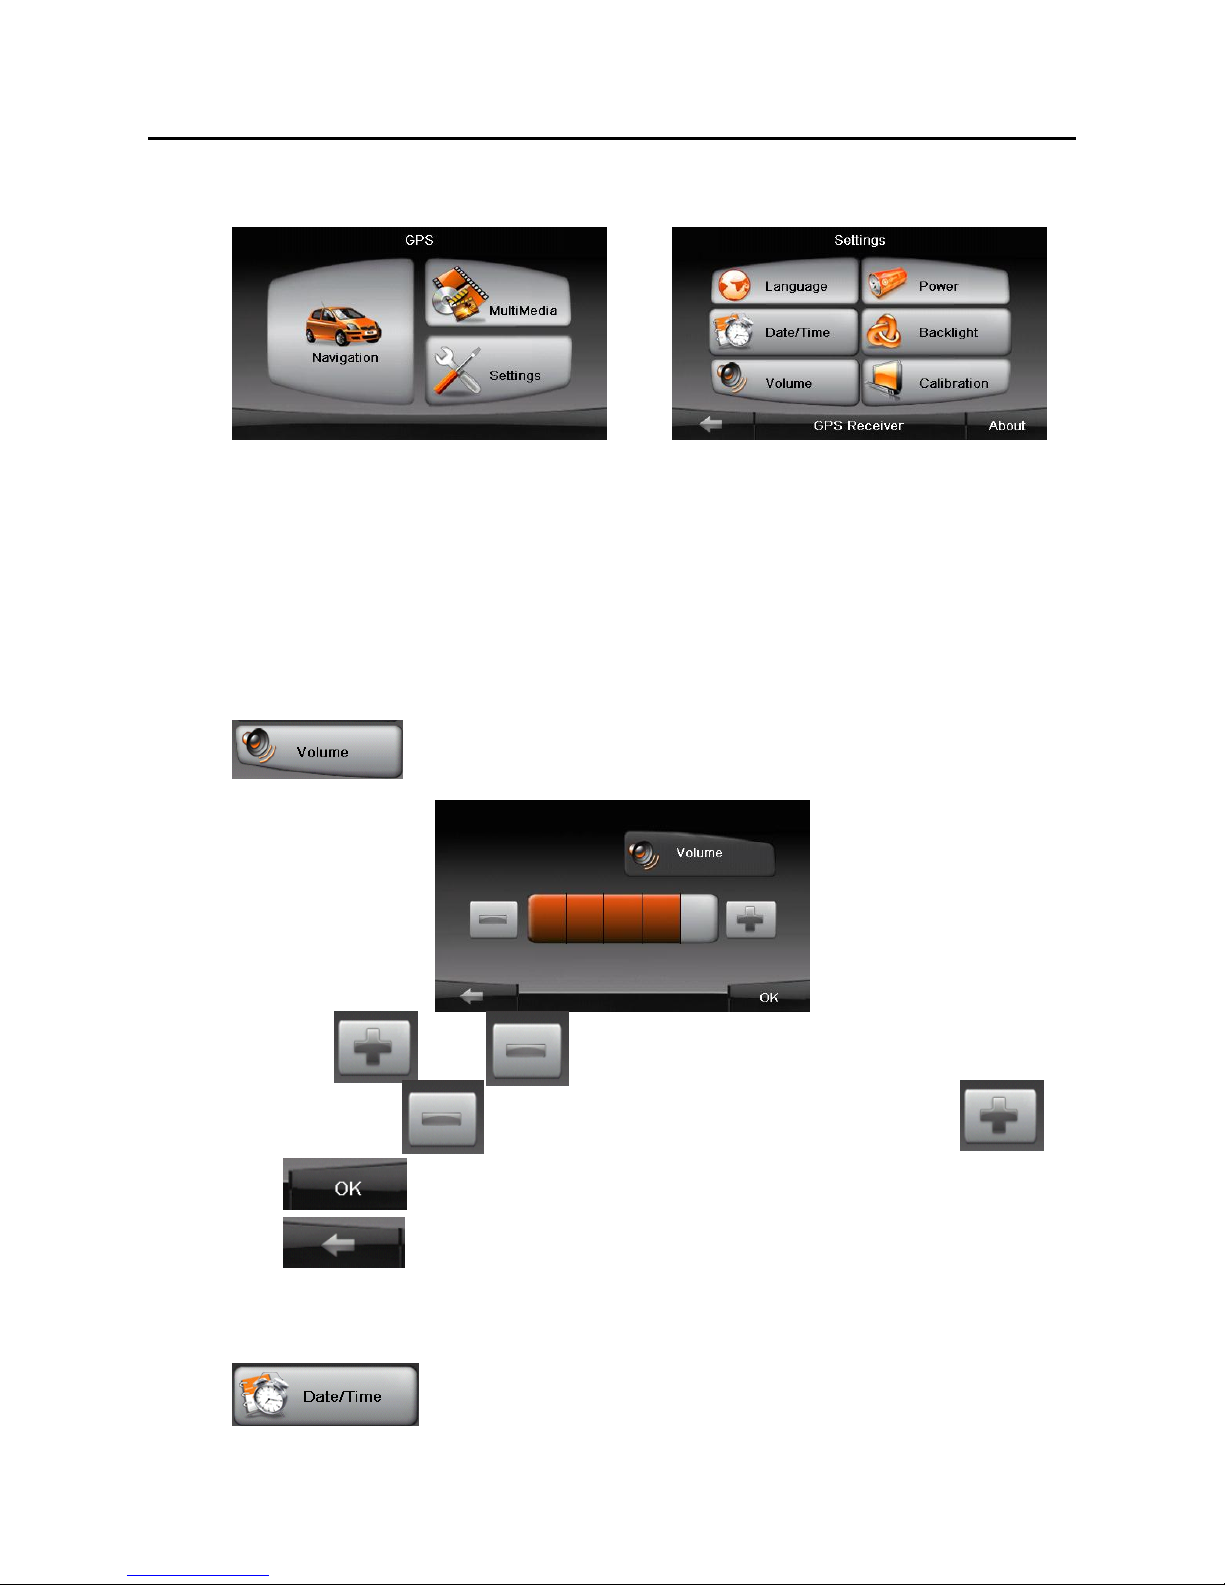
To open the Device Settings menu, first tap the Settings button on the main
menu.
The Device Settings menu appears as shown above. The following sections
describe these buttons and their functions.
You can customize the device settings such as backlight, volume, date and time.
Once you change the settings, your new settings will remain until you change
them again.
3.2 Volume
1. Tap button on the Device Settings menu. The volume function
menu appears as shown below.
2. Tap the knob and to adjust the volume. To decrease the
volume, tap the knob . To increase the volume, tap the knob .
3. Tap the button to accomplish modification.
4. Tap the button to quit modification to go back to the Device
Settings screen.
3.3 Date/Time
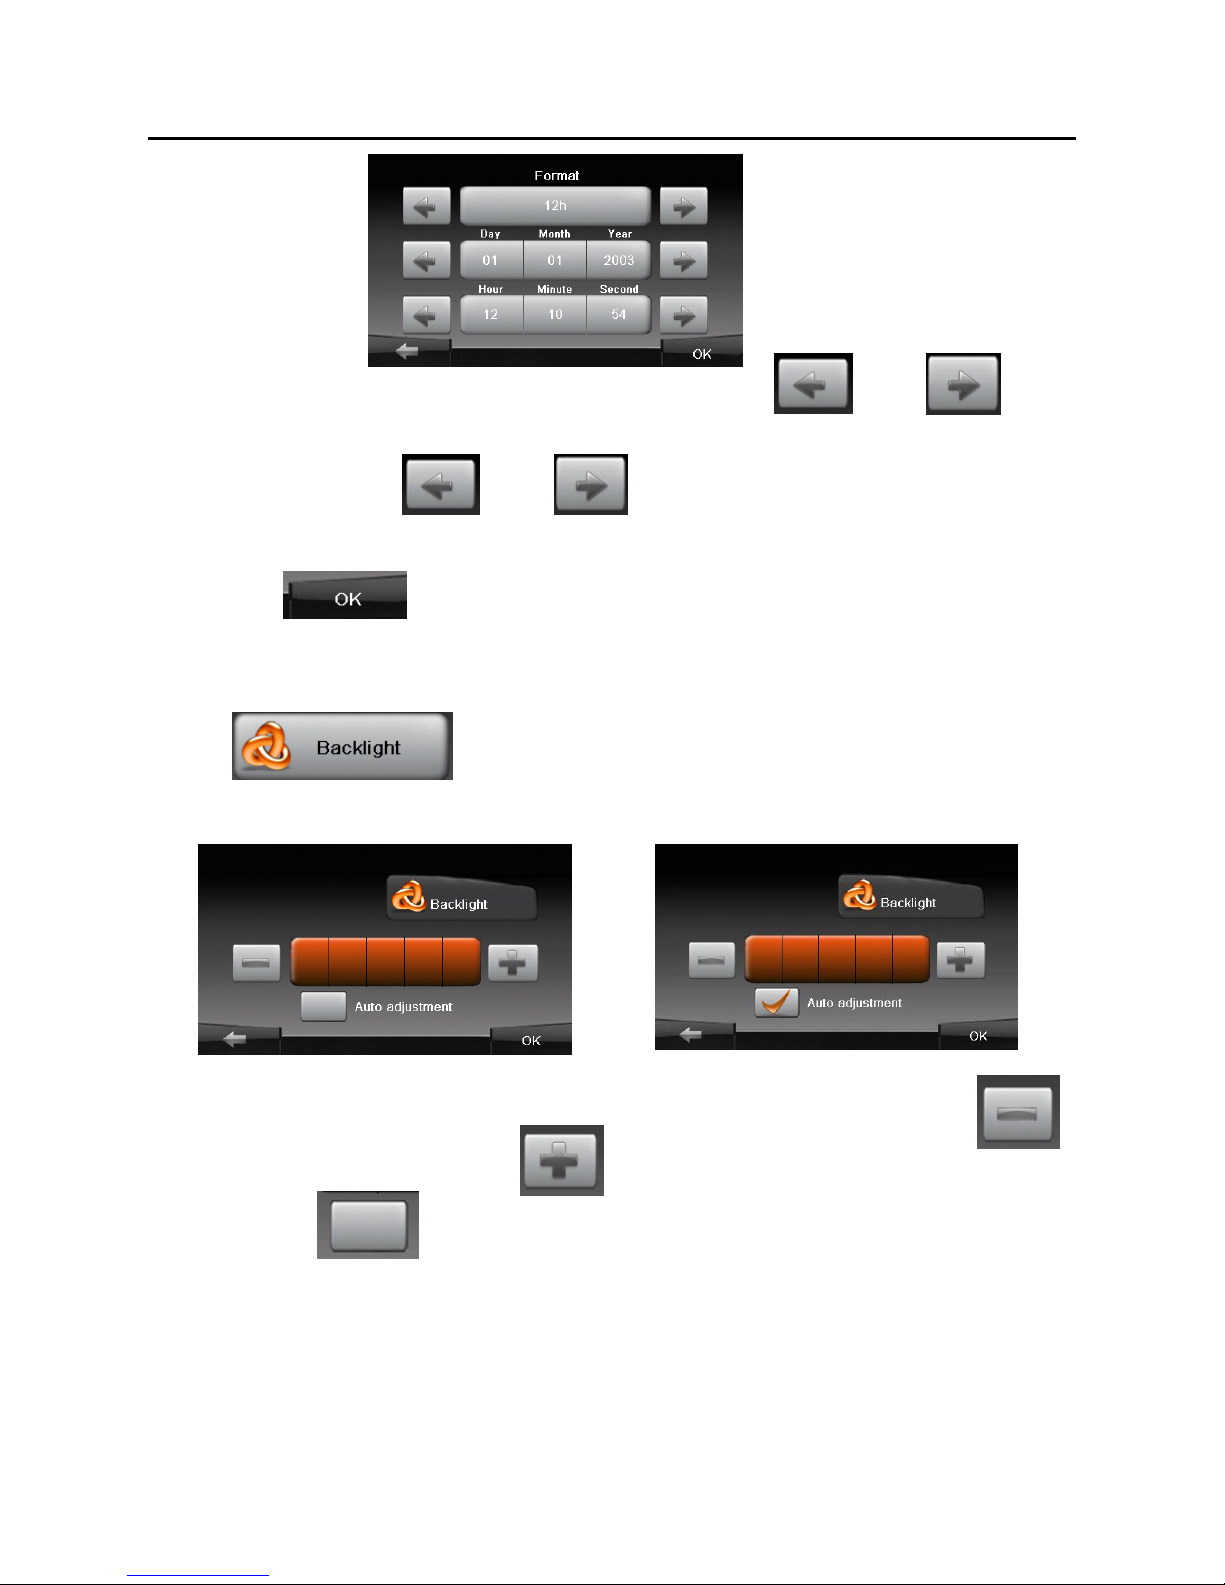
1. Tap button on the Device Settings menu. The Date/Time
Function menu appears as shown below.
Page 38
37
Devices settings
2. Tap the item of needing to modify, through clicking and on
the calendar, accomplish easily to adjustment ,such as: year, month and day.
3. Uniformity, clicking and on the calendar, you can accomplish
easily to adjustment of hour, minute and second.
4. Tap the button to save the changes and go back to the previous
menu.
3.4 Backlight
1. Tap button on the Device Settings menu. The backlight
Function menu appears as shown below.
2. Tap the knob to adjust the backlight. To decrease the backlight, tap .
To increase the backlight, tap .
3. When tap button, the device will enter into an auto adjustment
backlight state.
Now, if the environment beam is very bright, the display screen of the device will
become light, if the environment beam is very dark, the display screen of the
device will become dark. When the device is opening, if you don’t operate it for a
while, the device will become dark to enter into a saving electricity state.
Page 39
38
Devices settings
3.5 Language
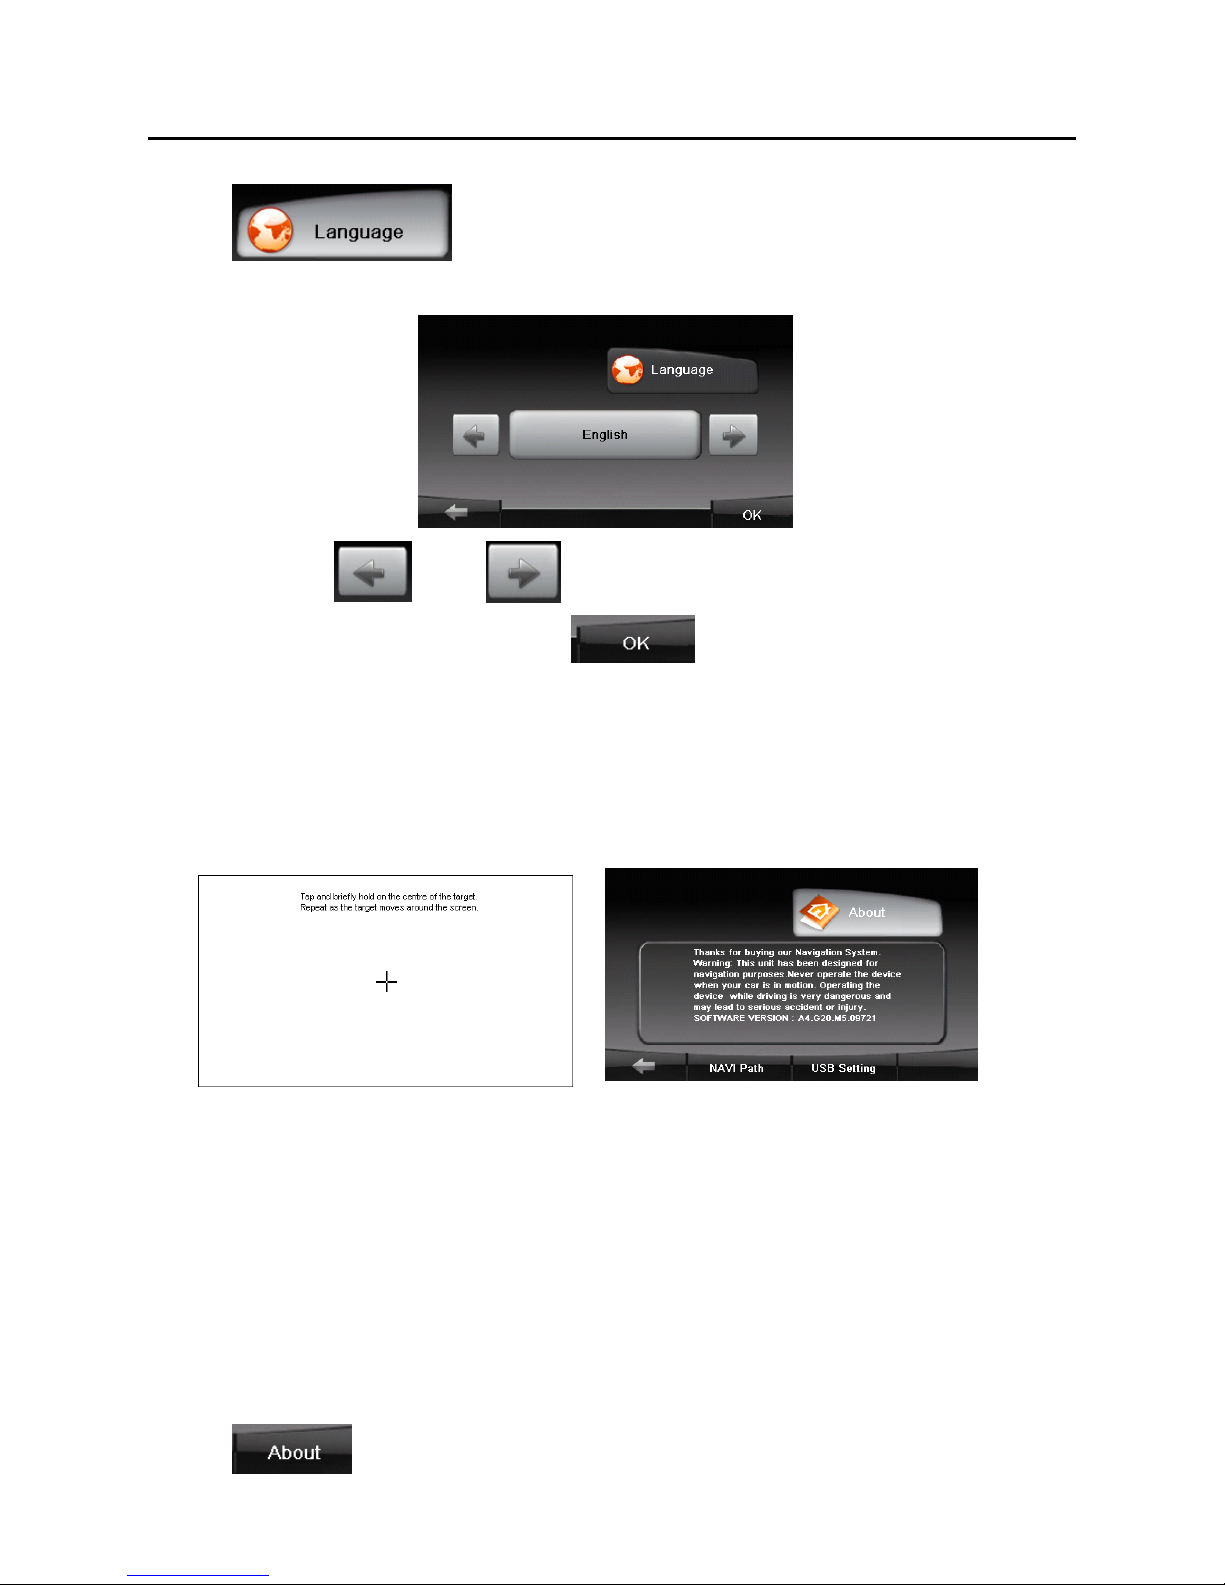
1. Tap button on the Device Settings menu. The Language
Function menu appears as shown below.
2. Tap the knob and to select language.
3. After accomplishing, tap the knob to exit.
3.6 Calibrate
You can calibrate the touch screen if it is not responding accurately to your Taps.
2. Tap “calibrate” button on the Device Settings menu. The calibrate Function
menu appears as shown left-below .
2. Tap and hold the centre of the target, the target moves to the position of
left-up. When again tap and hold the centre of the target, the target moves the
Next position of left-down.
3. The target moves to five position (Left-up' left-down' right-up' right-down'
Center) in order, forming a period. If nicetily tap and hold the target each time,
after a period, the target is Disappear, the device completes the calibration
process and backs to the Device Settings menu.
3.7 About
1. Tap button on the Device Settings menu. The About Function
Page 40
39
Devices settings
menu appears as shown right-up.
2. After accomplishing, tap the knob to exit.
3.8 NAVI Path
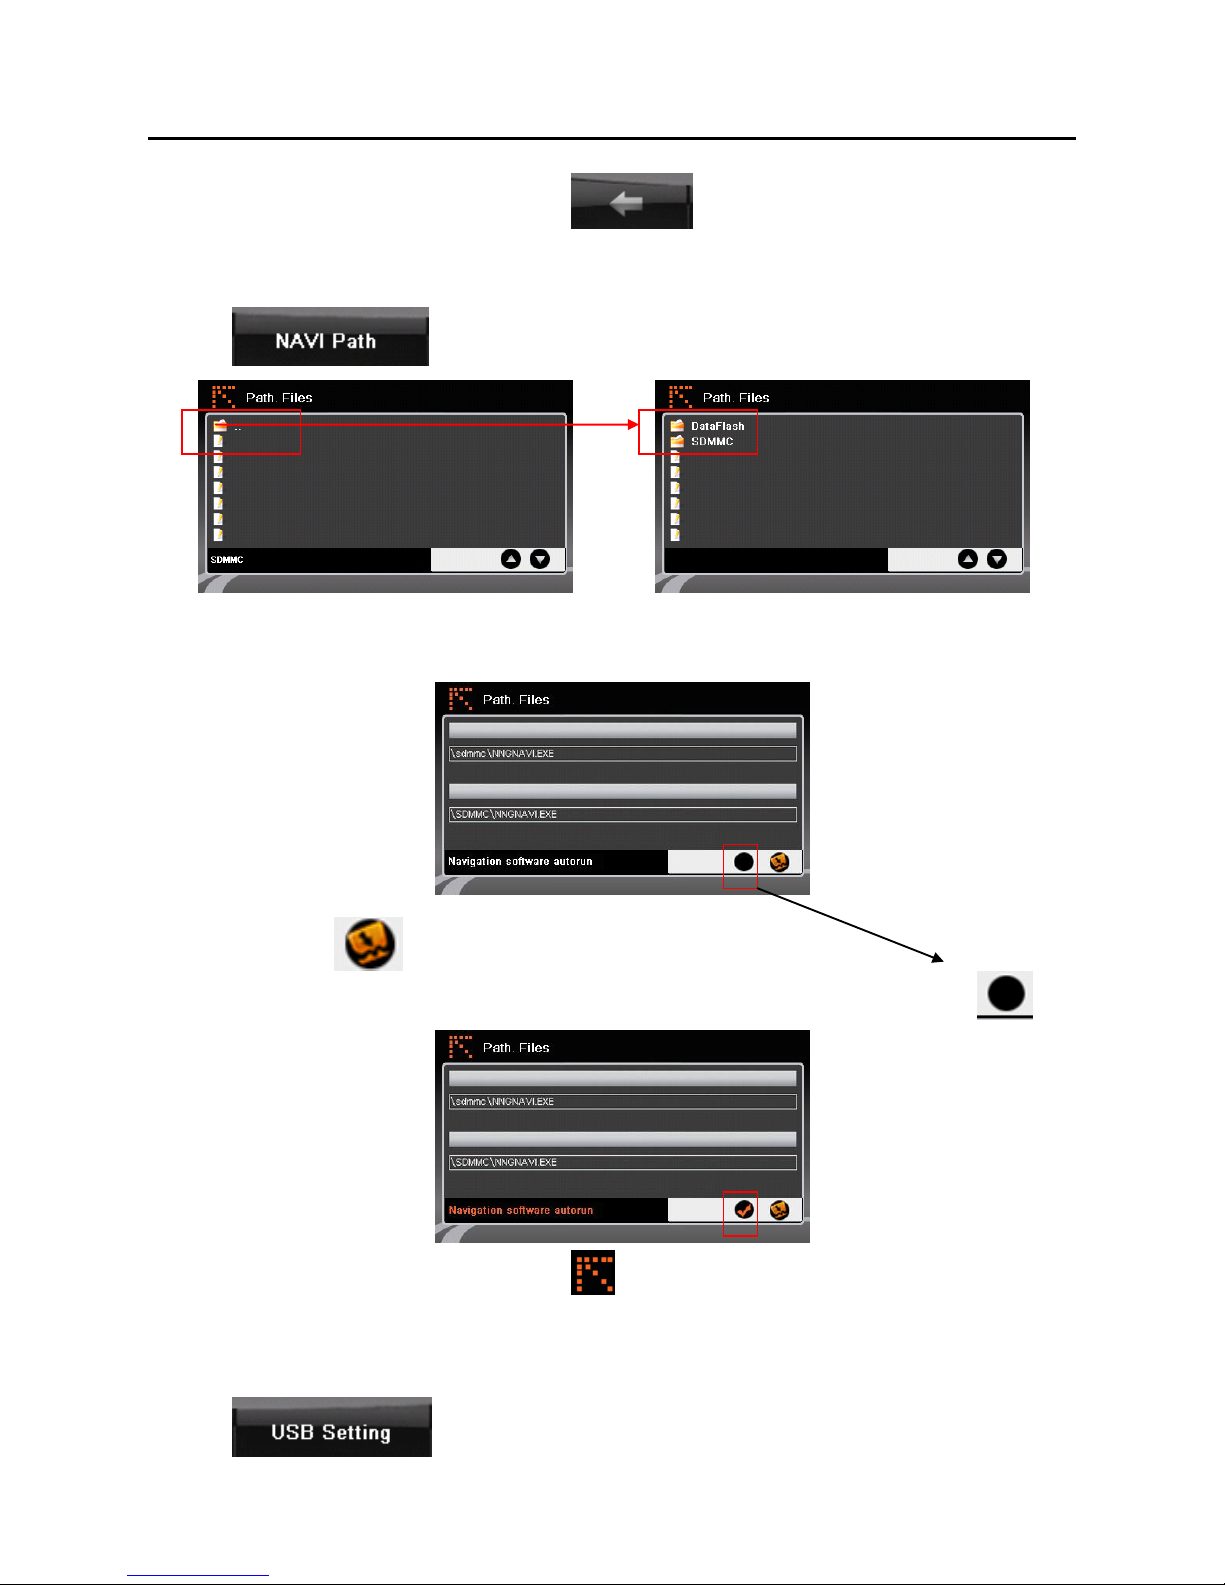
1. Tap button on the About Function menu, the path files
menu appears as shown down.
2. Tap the folder to find the navigation application location such as .exe file.
Taping this .exe file, the PND enter into the next menu.
3. Tap the knob to confirm.
4. If you want to run the map directly once re-start the PND, tap the
button.
5. After accomplishing, tap the knob to back.
3.9 USB Setting
Please connect your PND to the PC with USB cable.
1. Tap button on the About Function menu. The USB setting
menu appears as shown below.
Page 41
40
Devices settings
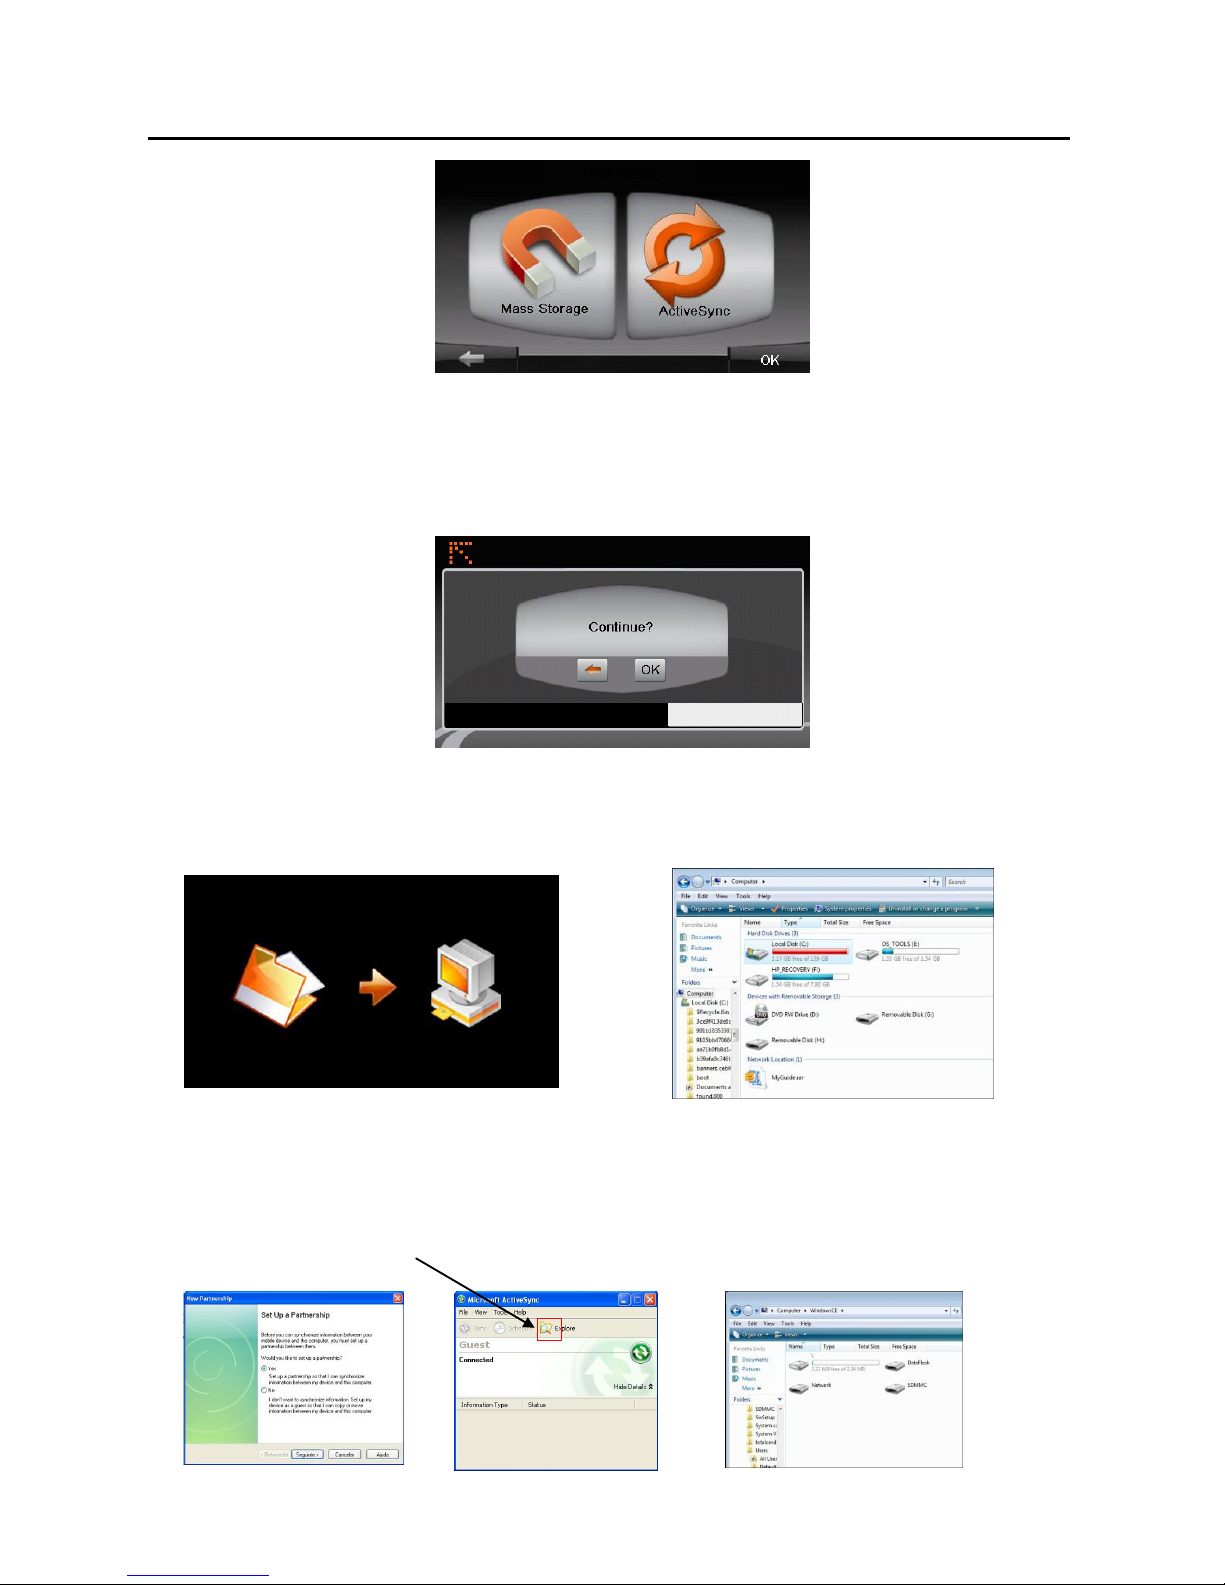
There are two setting styles: Mass storage & Active Sync.
c. Mass storage:
When selecting the Mass storage, the PND appears the next menu. Tap “OK”
button to save setting.
Now, the PND will appear the down menu only, and be used as a storage card.
You can browse the PND storage card and record some folders or files into it
freely throng PC such as a navigation map.
d. ActiveSync:
Please cut your PND connection whit the PC, newly turn on you PND and select
ActiveSync, connect your PND to the PC with USB cable.
For the first time, please note the change of PC and follow the steps to install the
connection. Tap “browse” button, open the motion device menu.
Page 42
41
Devices settings
Now you can copy something in or out the PND on PC and the PND also can
perform synchronously along with PC.
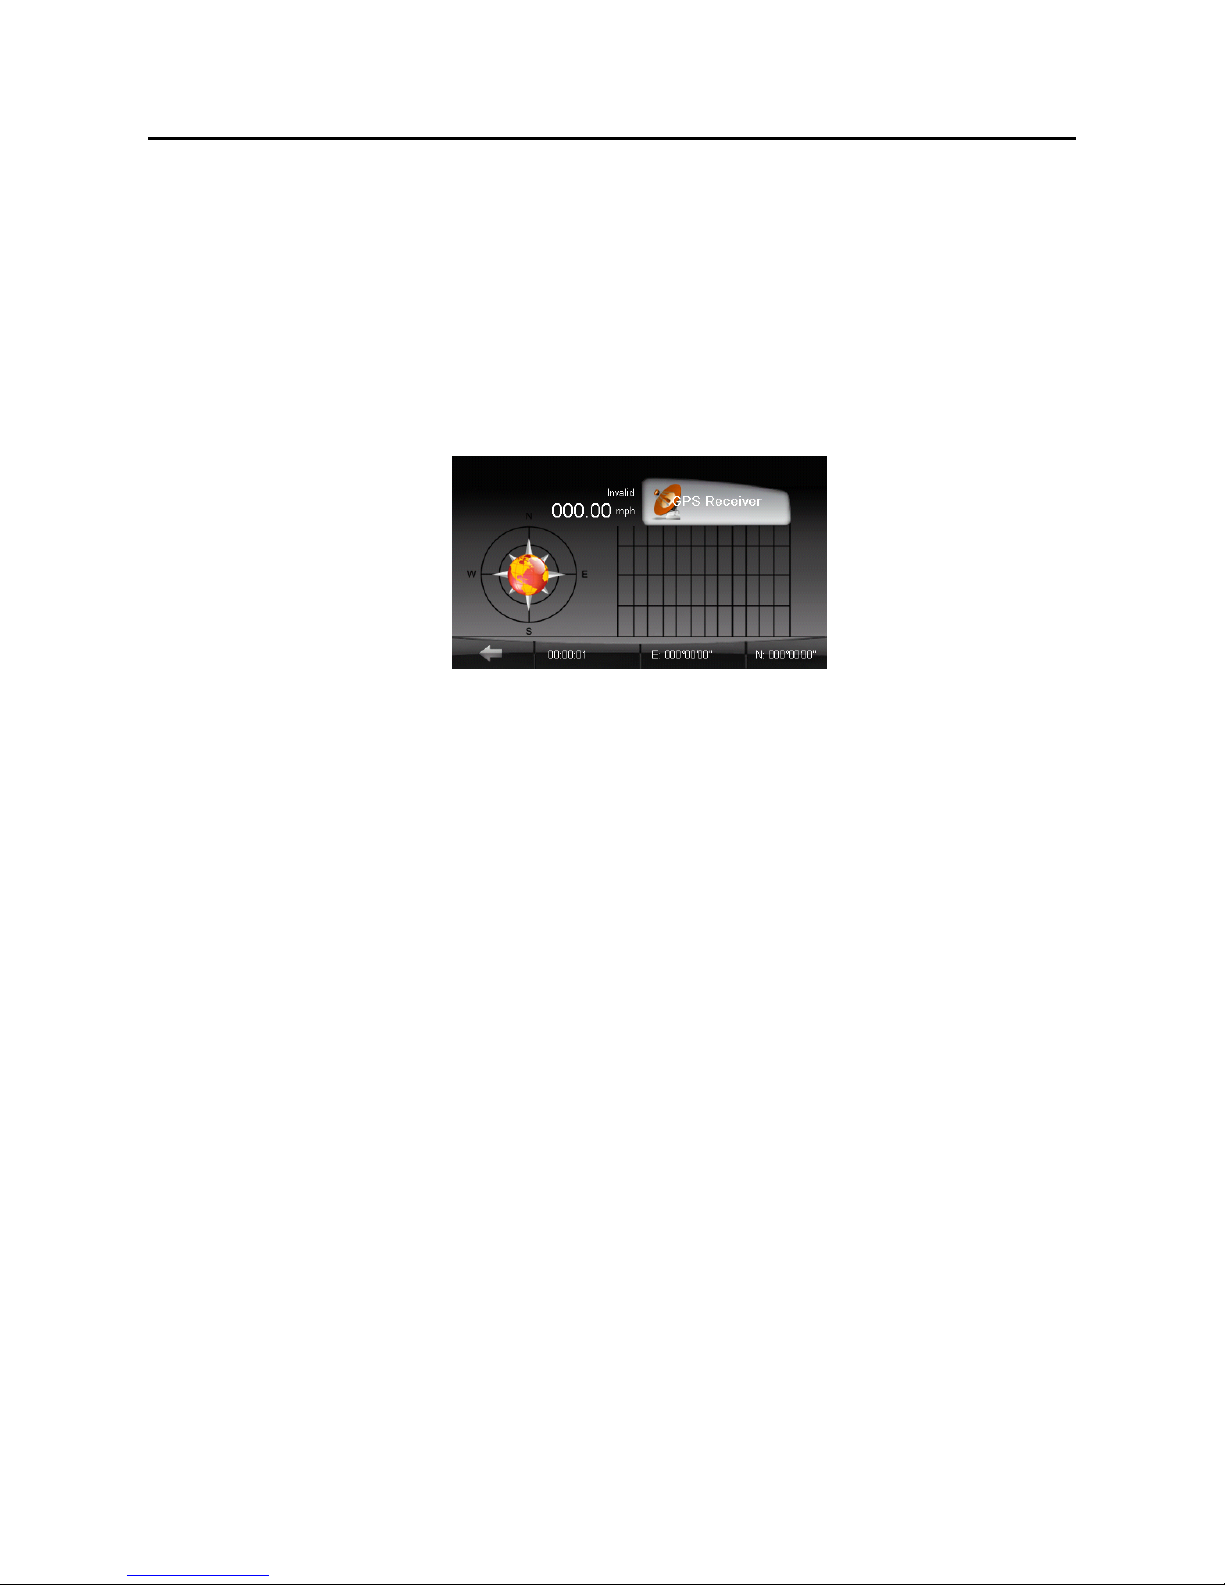
4.1 GPS Receiver
NOTE: This page is for information only. You can view the number of satellite
signals the unit is receiving and also the strength of these signals.
1. Tap “GPS Receiver” button on the Device Settings menu.
2. The GPS Receiver Function menu appears as shown below.
This page gives your current position in degrees longitude and latitude, your
current speed and the status of your position, i.e. Fixed 3D or Fixed Invalid etc.
The compass circle shows the satellites that the unit is receiving and the bar
chart below shows the strength of the signal from each of these satellites.
Page 43
42
Multi Media
5. Music Player
This chapter tells you how to play Music files on your device.
5.1 Starting and Exiting Music Player
The Music Player Program turns your device into an Music Player.
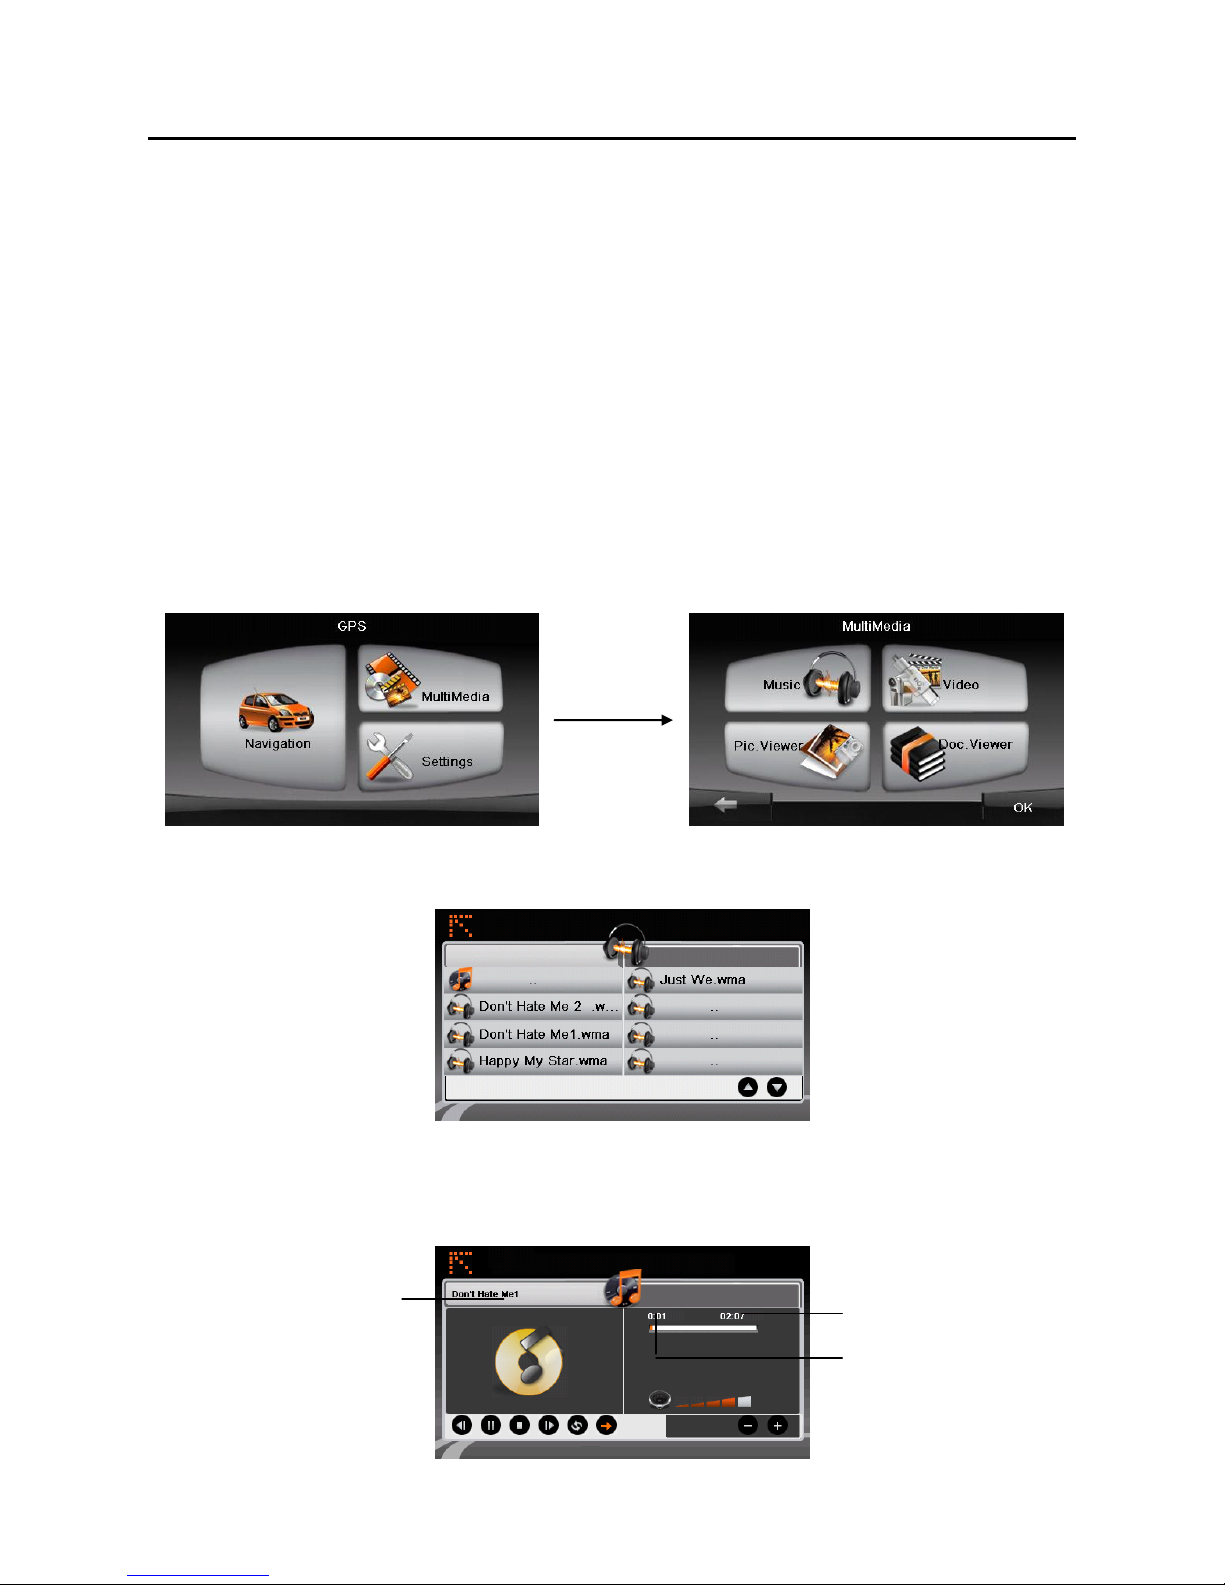
It features:
. Playback of Music files
. Basic playback controls such as play, pause, stop, next and previous
. 17 preset equalizer audio profiles
. Playback includes single selection playback, repeat, single repeat,
sampling playback, normal sequence and random sequence
. Play list support
1. Tap the Multi Media button on the main menu to display the submenu.
2. Tap the “Music” button to enter the file lists menu. All the Music files will show
on the lists menu.
3. Tap one of the Music files, the control panel of the Music player will appear
on the screen where you can easily control the player by tapping the control
buttons; and the selecting Music start playing.
1 2 3
Page 44
43
Multi Media
5.2 Preparing the Music Files for You Device
Before you want play Music files, you need to have the files. Operate:
1. Use Active Sync to copy Music files from your computer to a storage microSD
card.
2. Insert your microSD card into the PND.
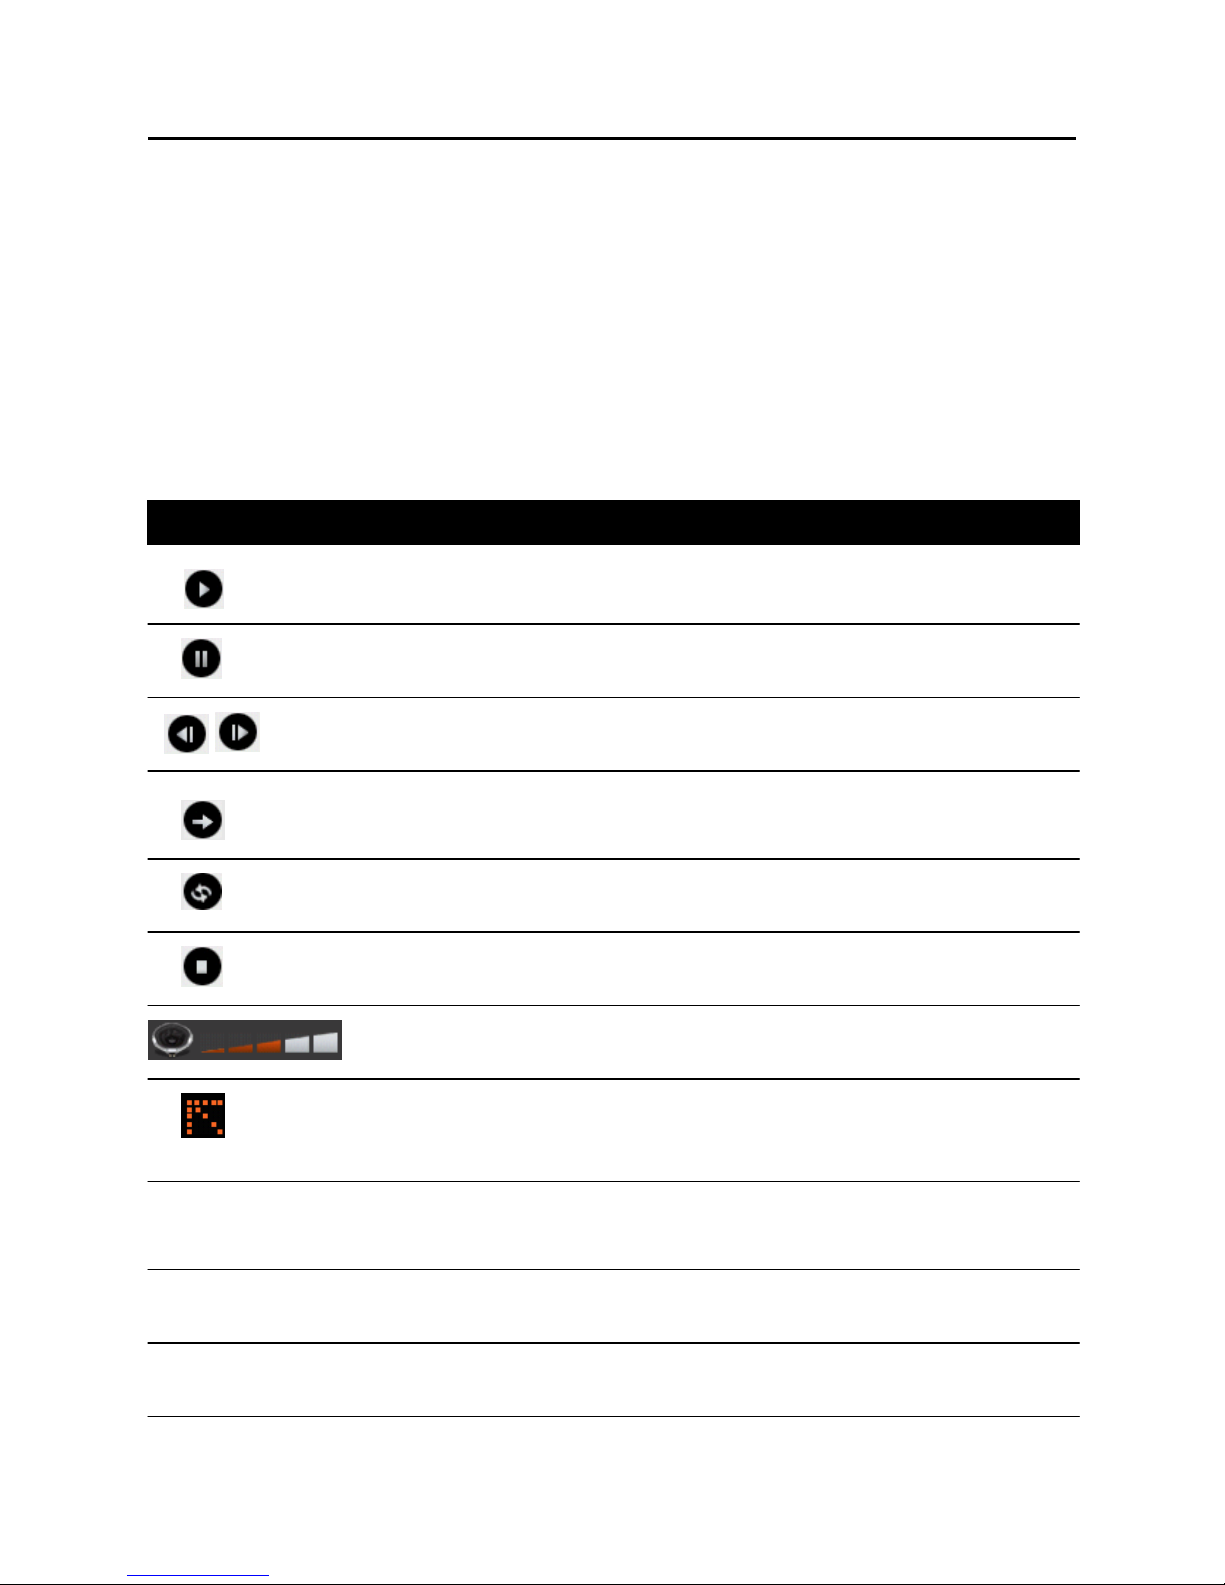
5.3 Music Playback Control
You can control the Music Player via control buttons. See the table below for
Details:
play play current song
Pause Pause playing current song
Previous/Next play previous or next song
Random Continuous play all songs
Replay Continuous play current song
Stop Stop playing current song
Volume Increase or decrease the volume
Exit Close the program and return to
the lists menu
1 Song name Show the file of the current song
2 Play Time
3 Total time
Control Name Description
Page 45
44
Multi Media
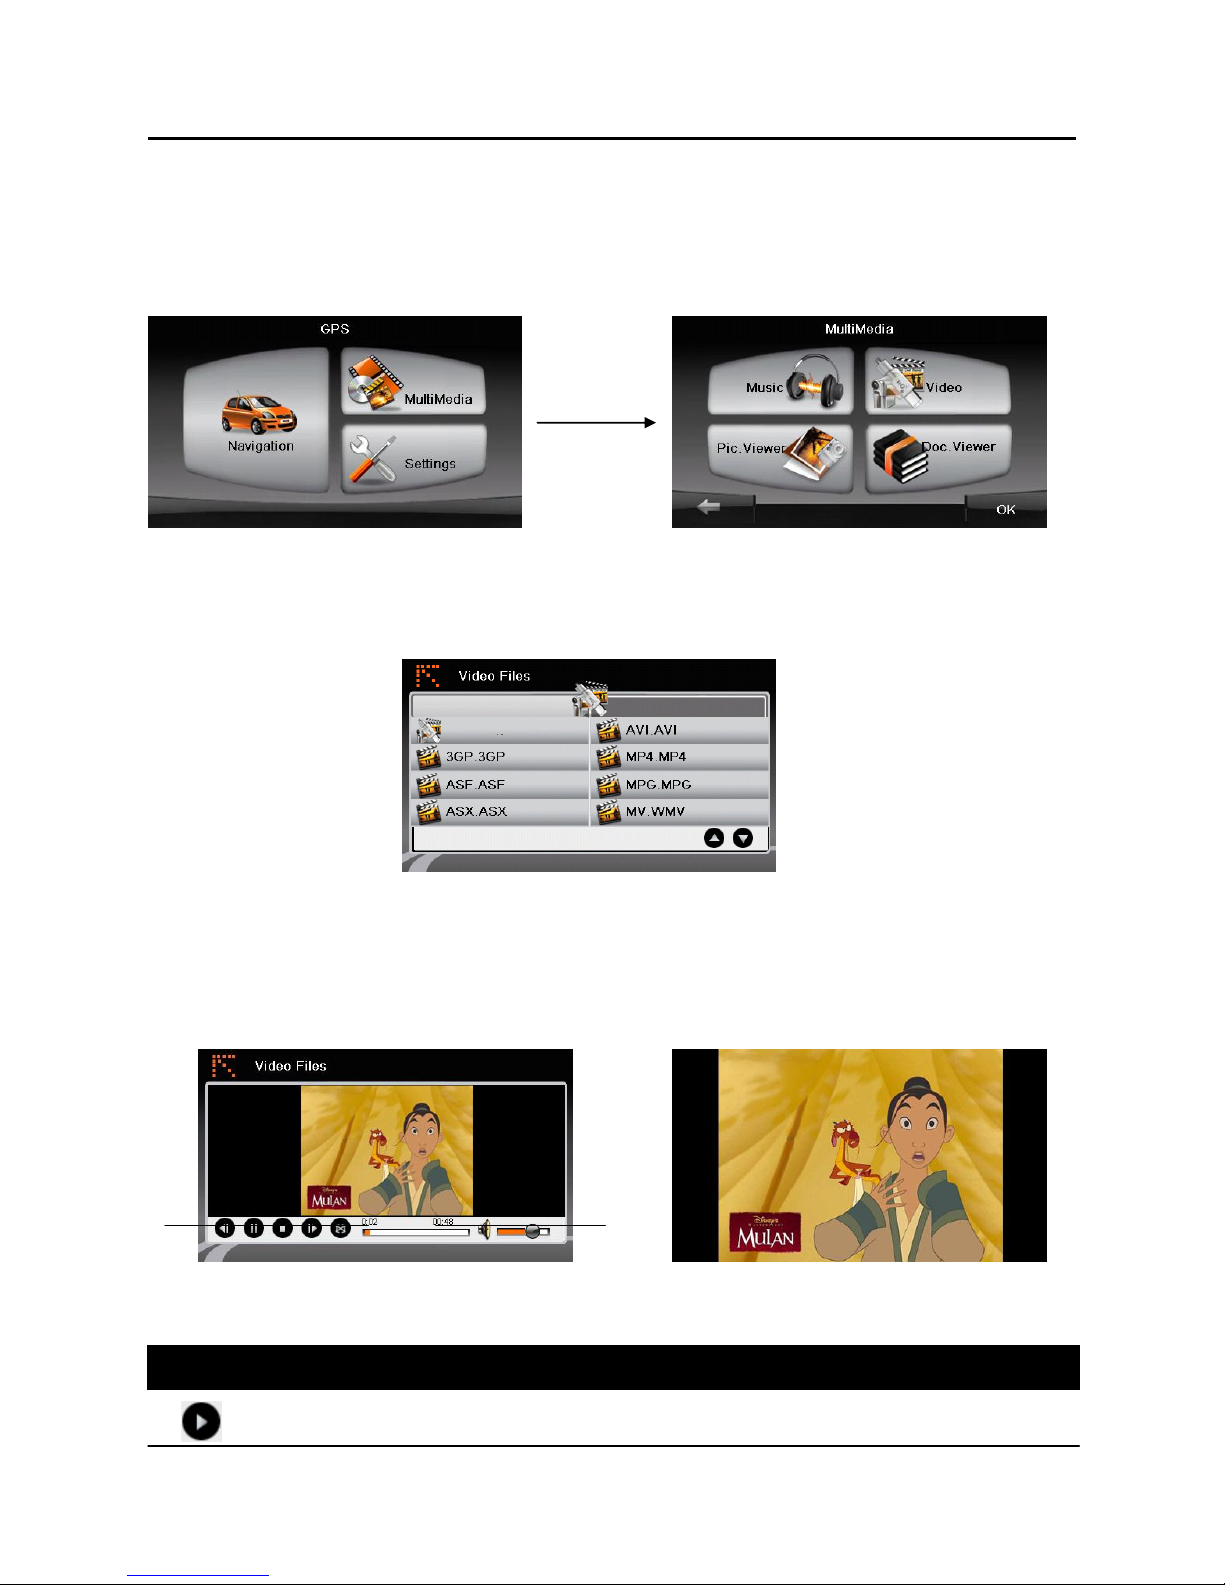
6. Video Player
This chapter tells you how to play Video files on your device.
6.1 Starting and Exiting Video Player
1. Tap the Multi Media button on the main menu to display the submenu.
2. Tap the Video button to enter the file lists menu. All the Video files will show
on the lists menu.
3. Tap one of the Video files, the control panel of the Video player will appear
and the selecting Video start playing.
4. Tap the control buttons, you can easily control the player.
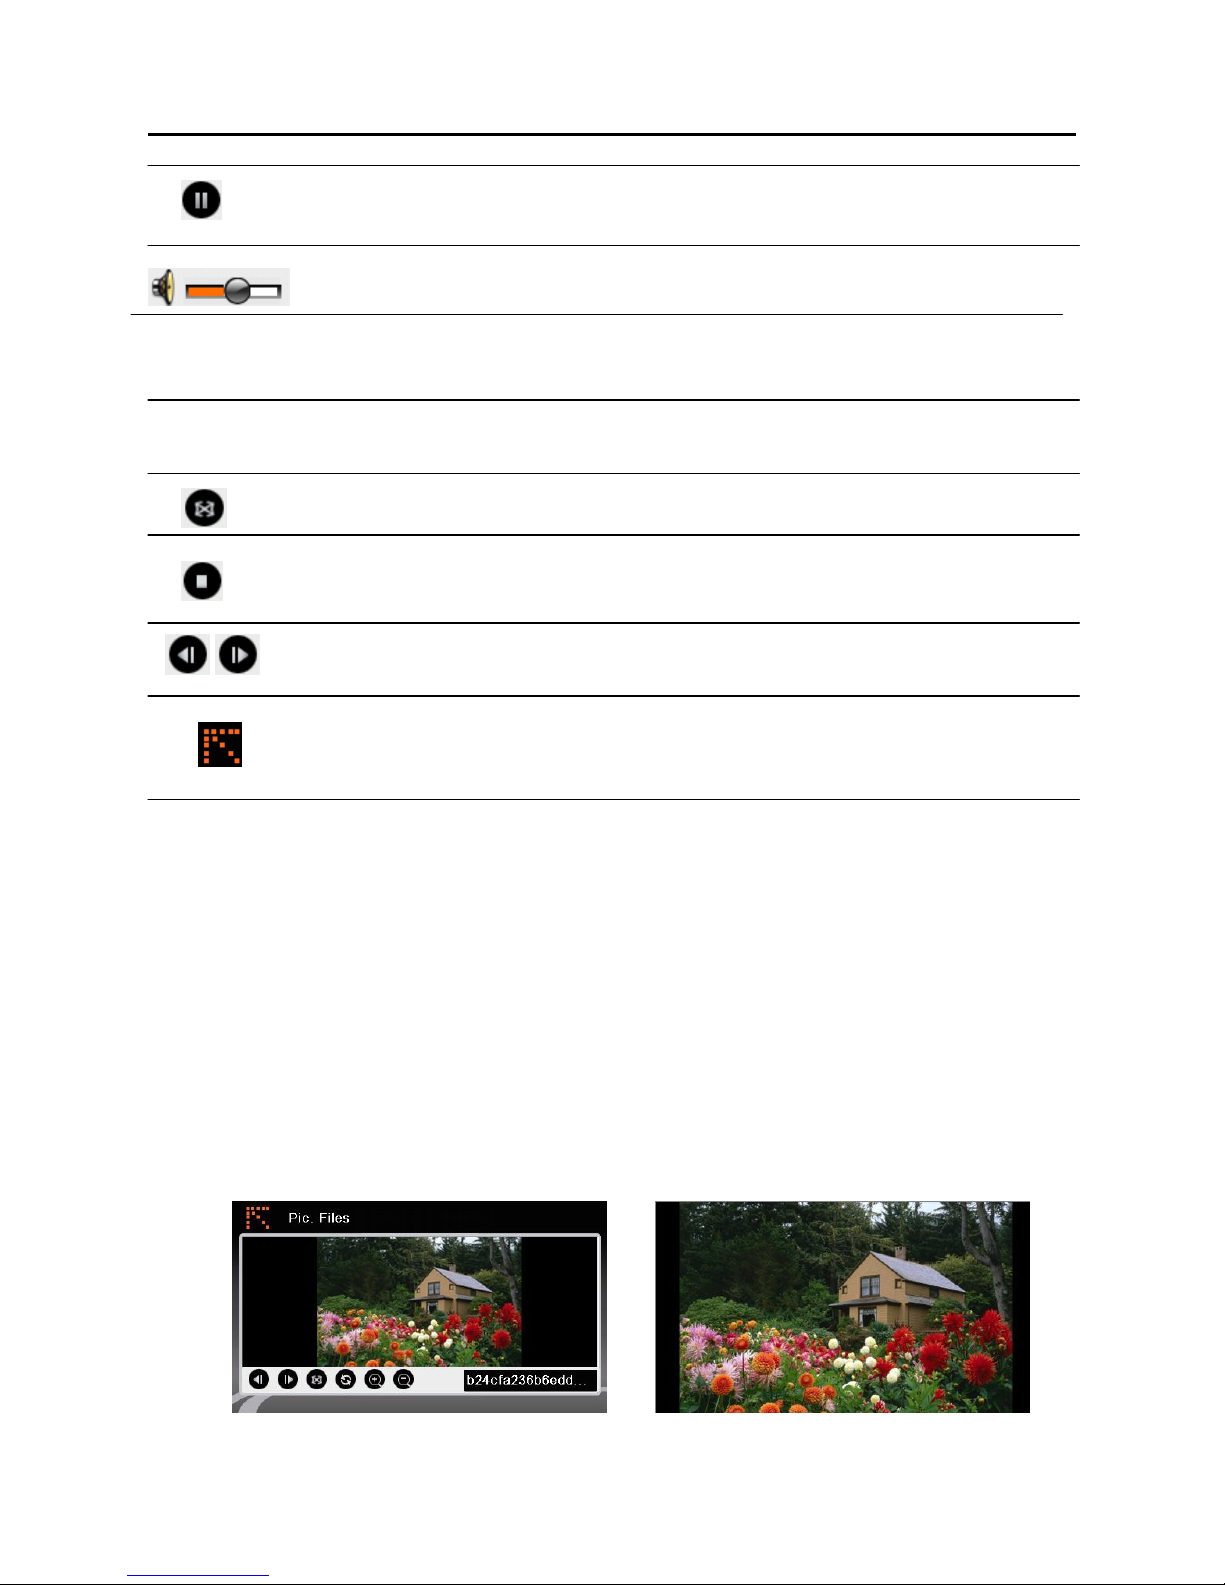
6.2 Video Playback Control Full screen
play play current video
Control Name Description
2
1
Page 46
45
Multi Media
Pause Pause playing current video
Volume Increase or decrease the volume.
1 Play Time
2 Total time
Full screen
Stop Stop playing current video
Previous/Next play the previous or next video
Exit Close the program and return to
the lists menu
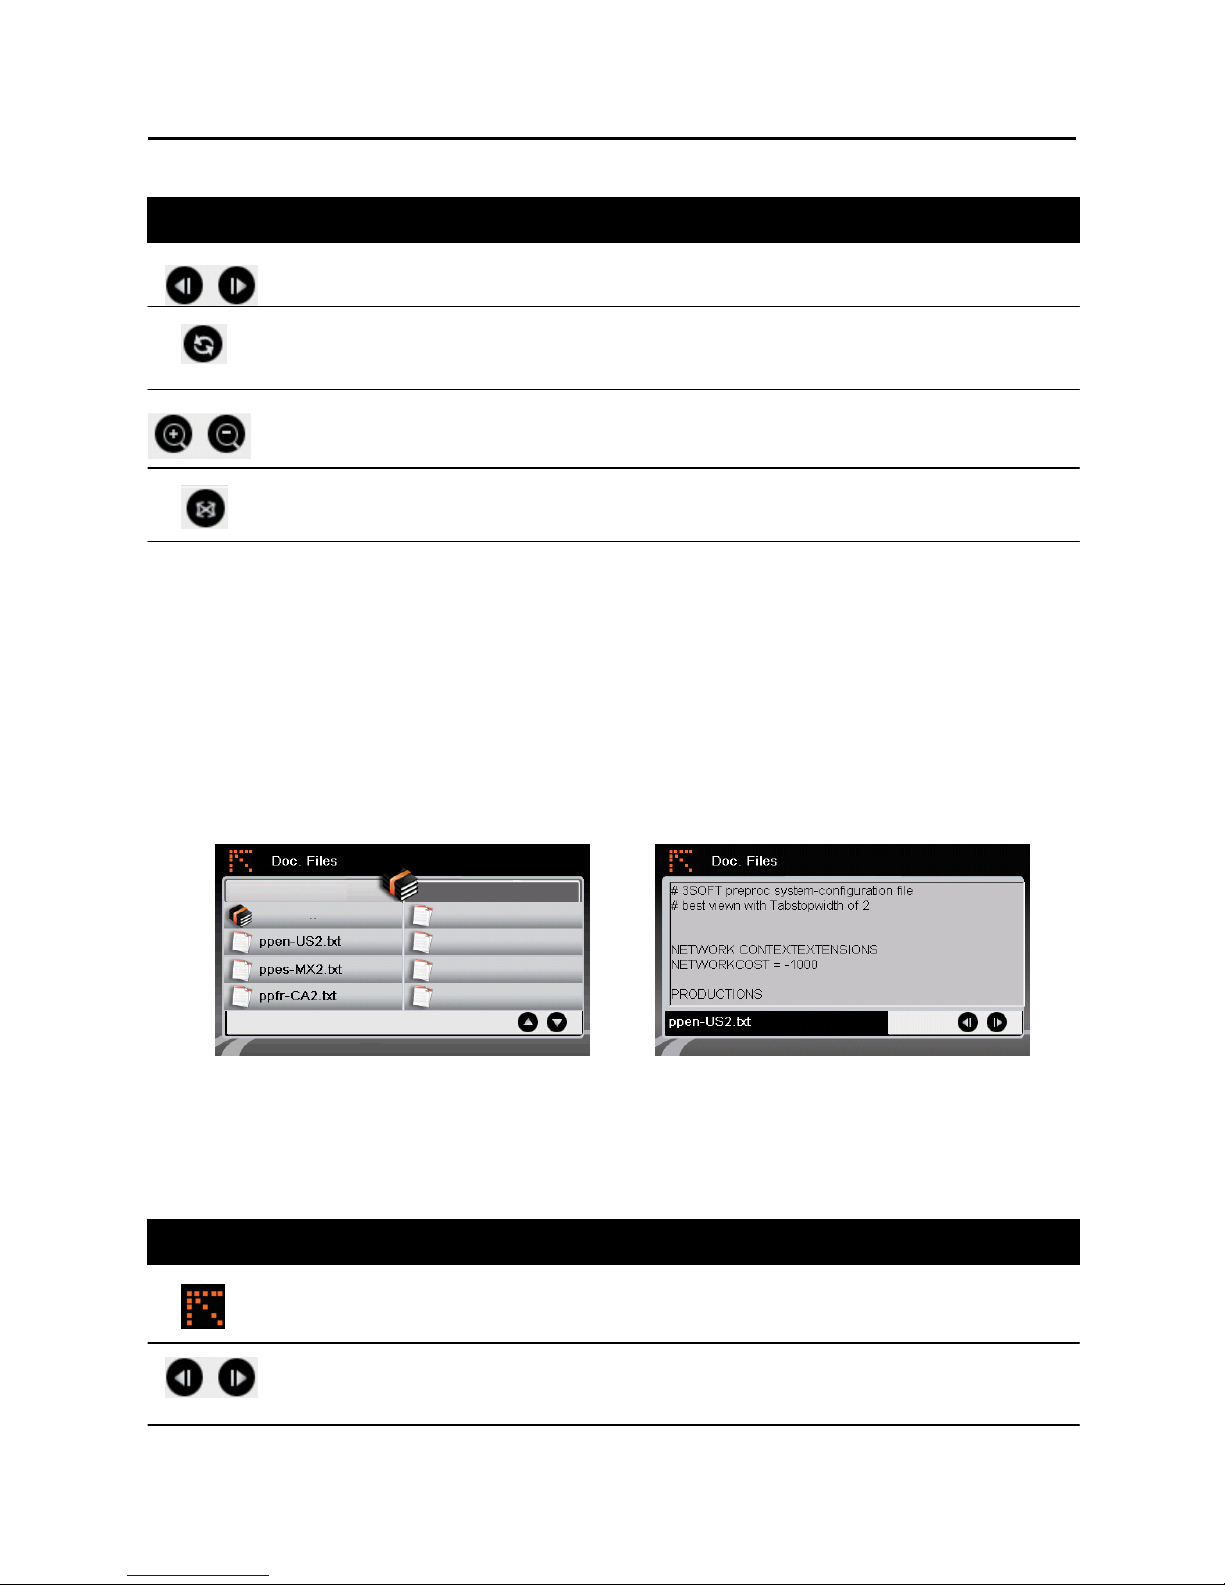
7. Picture Viewer
This chapter tells you how to view picture files on your device.
7.1 Viewing a picture file:
1. Tap the“ Multi Media ”button on the main menu to display the submenu.
2. Tap the “Pic. Viewer” button to enter the file lists menu. All the picture files
will show on the lists menu.
3. Tap one of the picture files, the system opens picture menu and shows the
selecting picture.
Page 47
46
Multi Media
7.2 Picture Viewer Playback Control
Previous/Next Play the previous or next file.
Twist Twist the photo screen
Zoom in/out Zoom in/zoom out the photo screen
Full screen
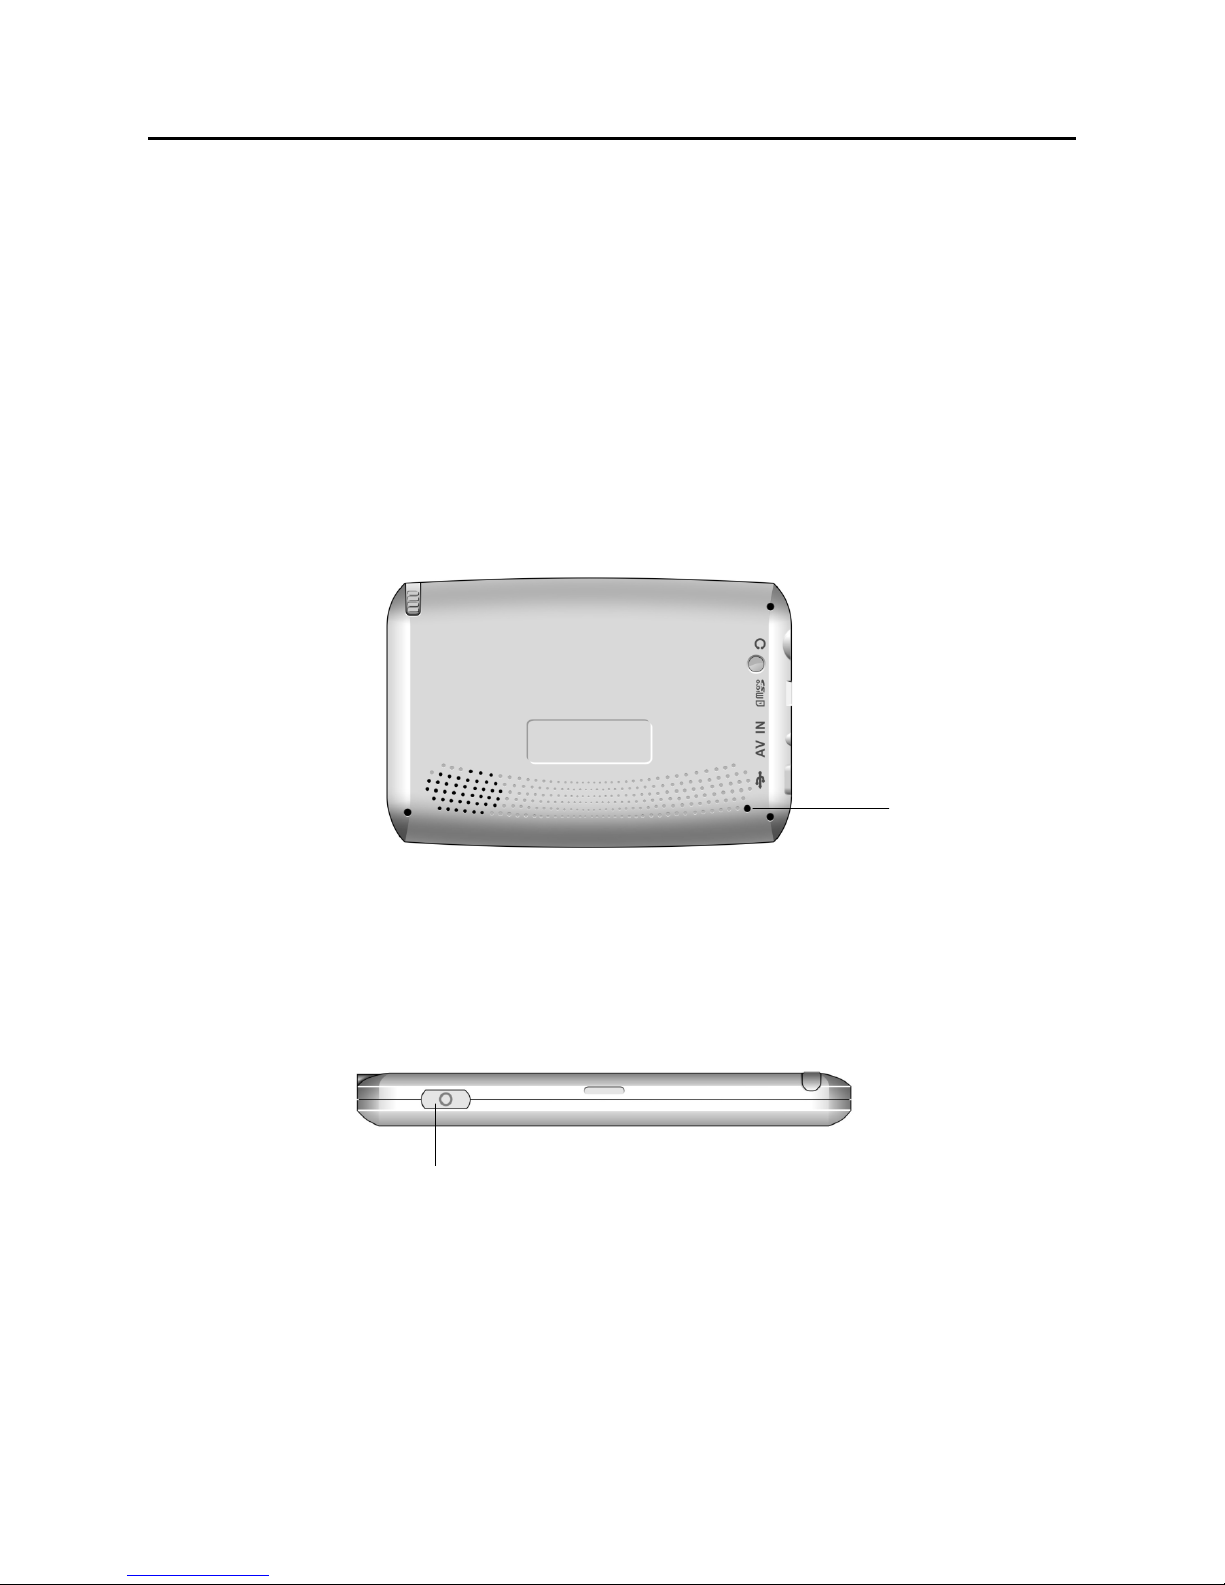
8. Document Viewer
This chapter tells you how to view document files on your device.
8.1 Viewing a document file:
1. Tap the “Multi Media” button on the main menu to display the submenu.
2. Tap the “Doc. Viewer ” button to enter the file lists menu. All the document
files will show on the lists menu.
4. Tap one of the document files, the system opens document menu and shows
the selecting document.
8.2 Document Viewer Playback Control.
Exit Back the file lists menu.
Previous/Next Play the previous or next file.
Control Name Description
Control Name Description
Page 48
47
Troubleshooting and maintenance
This chapter gives solutions to common problems you may encounter. It also
provides guidelines on taking care of your device.
NOTE: if you encounter a problem you can not solve, contact an authorized
service center for assistance.
9.1 Resetting Your System
Occasionally, you may need to reset your device. For example, you should reset
your system when it stops responding; or appears to be "frozen" or " locked up" .
Insert a small rod, such as a straightened paperclip, into the reset button on the
bottom of your device. This is called a "soft reset." The Main Menu should
appear after a soft reset.
If your device still does not respond after a soft reset, you can use the
following steps to perform a "hard reset."
1. Disconnect all cables, including the Car charger, from your device.
2. Press the ON/OFF button to the OFF position.
3. Wait for l minute and then press the button back to the ON position.
4. Your device turns on.
9.2 Troubleshooting
Power Problems
Power does not turn on when using battery power
The remaining battery power may be too low to run your device. Connect the
Car charger to your device and to Car charger. Then, turn on your device.
ON/OFF
RESET
Page 49

48
Troubleshooting and maintenance
Screen Problems
Screen is off
. If the screen does not respond even after you press the power button, try the
following in order until the problem is solved.
. Connect the Car charger to your device and to external Car charger.
. Reset your system.
Screen responds slowly
. Make sure that your device is not running out of battery power. If the problem
still exists, reset your system.
Screen freezes
. Reset your system.
Screen is hard to read
. Make sure that the backlight of the display is on.
. Move to a location with more light.
Inaccurate response to taps
. Recalibrate the touch screen. (See section 3.4 for instructions.)
Connection Problems
Cable Connection Problems
. Make sure that your device and your computer are both turned on before trying
to establish a connection.
. Make sure that the cable is securely plugged into the USB port on your
computer and on the device. Connect the USB cable directly to your computer
do not run the cable through a USB hub.
. Reset your device before connecting the cable. Always disconnect your device
before you restart your computer.
Page 50

49
Troubleshooting and maintenance
GPS Problems
When there are no valid signals available, consider the following:
. Make sure that the GPS antenna has a clear view of the sky.
. Note that the GPS reception can be affected by:
√Bad weather
√Dense overhead obstacles (e.g. trees and tall buildings)
√Other wireless device in the car
√Reflective car window tint
9.3 Maintaining Your Device
Taking good care of your device will ensure trouble-free operation and reduce
the risk of damage to your device.
. Keep your device away from excessive moisture and extreme temperatures.
. Avoid exposing your device to direct sunlight or strong ultraviolet light for
extended periods of time.
. Do not place anything on top of your device or drop objects on your device.
. Do not drop your device or subject it to severe shock.
. Do not subject your device to sudden and severe temperature changes.
this could cause moisture condensation inside the unit, which could damage
your device. In the event of moisture condensation, allow the device to dry out
completely before use.
. Take care not to sit on the device. We advise not to carry the device in one's
back pocket for that reason.
. The screen surface can easily be scratched. Avoid touching it with sharp
objects. Non-adhesive generic screen protectors designed specifically for use
on portable devices with LCD panels may be used to help protect the screen
from minor scratches.
. Never clean your device with it powered on. Use a soft, lint-free cloth
moistened with water to wipe the screen and the exterior of your device.
. Do not use paper towels to clean the screen.
. Never attempt to disassemble, repair or make any modifications to your device.
Disassembly, modification or any attempt at repair could cause damage to your
device and even bodily injury or property damage and will void any warranty.
. Do not store or carry flammable liquids, gases or explosive materials in the
same compartment as your device, its parts or accessories.
Page 51

50
Regulatory information
NOTE: Marking labels located on the exterior of your device indicate the
regulations that your model complies with. Please check the marking labels on
your device and refer to the corresponding statements in this chapter.
Some notices apply to specific models only.
10.1 Regulations Statements
Class B Regulations
USA Federal Communications Commission Radio Frequency Interference
Statement
NOTE:
This equipment has been tested and found to comply with the limits for a Class
B digital device pursuant to Part 15 of the FCC Rules. These limits are designed
to provide reasonable protection against harmful interference in a residential in
stallation. This equipment generates, uses, and can radiate radio frequency
energy and, if not installed and used in accordance with the instructions, may
cause harmful interference to radio communications. However, there is no
guarantee that interference will not occur in a particular installation. If this
equipment does cause harmful interference to radio or television reception,
which can be determined by turning the equipment off and on, the user is
encouraged to try to correct the interference by one or more of the following
measures:
. Reorient or relocate the receiving antenna.
. Increase the separation between the equipment and receiver.
. Connect the equipment into an outlet on a circuit different from that to which
the receiver is connected.
. Consult the dealer or an experienced radio/TV technician for help.
Any changes or modifications not expressly approved by the manufacturer
could void the user's authority to operate the equipment.
Please note:
The use of a non-shielded interface cable with this equipment is prohibited.
Canada
Canadian Department Of Communications
Page 52

51
Regulatory information
Radio Interference Regulations Class B Compliance Notice
This Class B digital apparatus meets all requirements of the Canada
Interference-Causing equipment regulations.
Cet appareil numérique de Classe B respecte toutes lesexigences duRèglement
Canadien sur le matériel brouileur.
European Notice
Products with the CE marking comply with Radio & Telecommunication
Terminal Equipment Directive (R&TTE) (1999/5/EEC), the Electromagnetic
Compatibility Directive (89/336/EEC) and the Low Voltage Directive
(73/23/EEC) as amended by Directive 93/68/ECC - issued by the
Commission of the European Community.
Compliance with these directives implies conformity to the following European
Standards:
EN301489-1: Electronic compatibility and Radio spectrum Matters (ERM),
ElectroMagnetic Compatibility (EMC) standard for radio equipment
and services; Part 1: Common technical requirements
EN301489-3:
Electronic compatibility and Radio spectrum Matters (ERM),
ElectroMagnetic Compatibility (EMC) standard for radio equipment
and services; Part 3: Specific conditions for Short-Range Devices
(SRD) operating on frequencies between 9 kHz and 40 Ghz
En55022: Radio disturbance characteristics
EN55024: Immunity characteristics
EN6100-3-2: Limits for harmonic current emissions
Page 53

52
Safety
EN6100-3-3: Limitation of voltage fluctuation and flicker in ow-voltage supply
system
En60950 / IEC 60950: Product Safety
The manufacturer cannot be held responsible for modifications
made by the User and the consequences thereof, which may alter the
conformity of the product with the CE Marking.
11. Safety Precautions
About Charging
. Use only the Car charger supplied with your device. Use of another type of Car
charger will result in malfunction and/or danger.
. Use a specified battery in the equipment.
About the Car charger
. Do not use the adapter in a high moisture environment. Never touch the
adapter when your hands or feet are wet.
. Allow adequate ventilation around the adapter when using it to operate the
device or charge the battery. Do not cover the Car charger with paper or other
objects that will reduce cooling. Do not use the Car charger while it is inside a
carrying case.
. Connect the adapter to a proper power source. The voltage requirements are
found on the product case and/or packaging.
. Do not use the adapter if the cord becomes damaged.
. Do not attempt to service the unit. There are no serviceable parts inside.
Replace the unit if it is damaged or exposed to excess moisture.
The manufacturer cannot be held responsible for modifications made by the
user and the consequences thereof, which may alter the conformity of the
product with the CE Marking.
Page 54

53
Safety
About the Battery
. Use a specified charger approved by the manufacturer.
CAUTION: This unit contains a non-replaceable internal Lithium Ion battery.
The battery can burst or explode, releasing hazardous chemicals. To reduce the
risk of fire or burns, do not disassemble, crush, puncture, or dispose of it in fire
or water.
. Important instructions (for service personnel only)
. Caution: Risk of explosion if battery is replaced by an incorrect type. Dispose
of used batteries according to the instructions.
. Replace only with the same or equivalent type recommended by the
manufacturer.
. The battery must be recycled or disposed of properly.
. Use the battery only in the specified equipment.
Page 55
54
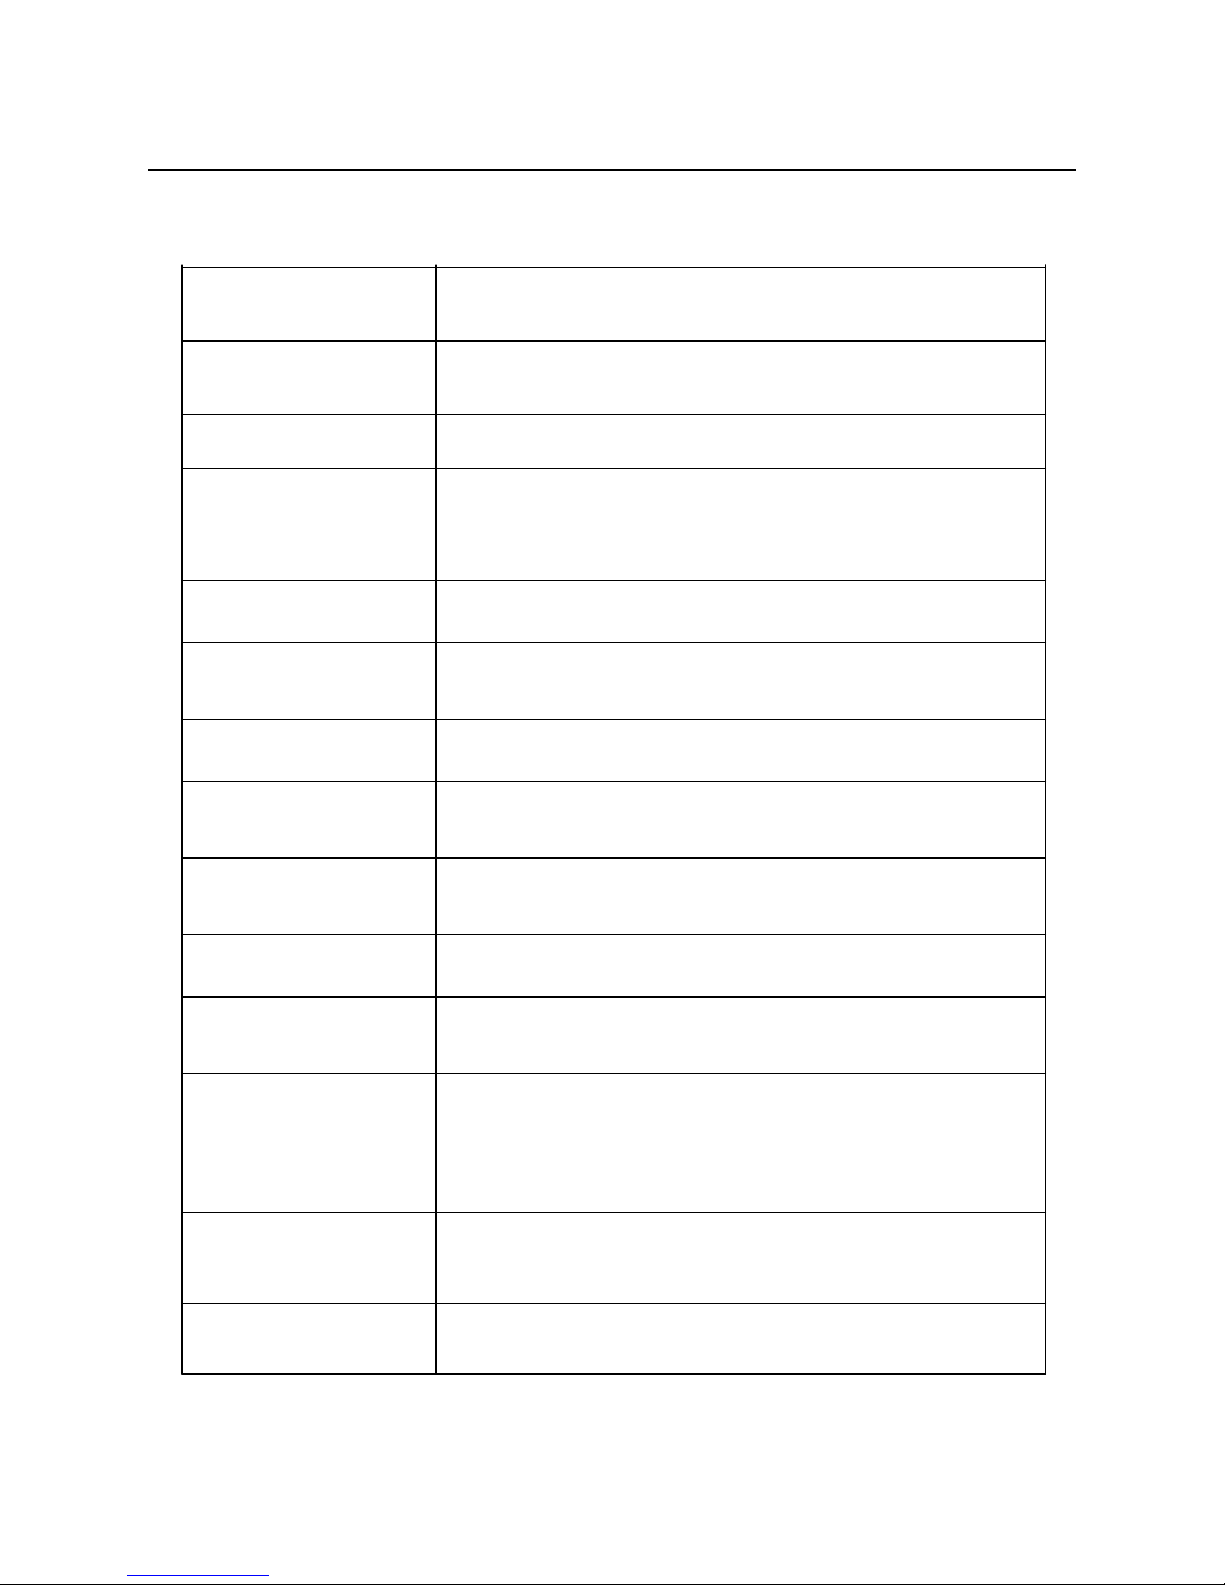
Tehnical specifications:
Navigation software: Igo Primo 2, Full Europe
CPU SIRF Atlas V - 644 MHz
Operating System Microsoft WinCE 6.0 Core Version
Antenna Built-in GPS high sensitivity receiver (64 channels)
Memory 128MB DDR2
4GB FLASH EPROM
Display Ultra lightning – 250 LUX, 5”
Resolution Display HD – 800 x 480
Weight 185 gr.
Extensible Memory microSD card
Speaker Built-in 1.0 W loud speaker
Headphone 3.5mm Jack
USB Mini USB
Battery Re-chargeable Lithium-ion Polymer battery
950mAh
Dimension 135 mm x 90 mm x 13, 5 mm
TMC Internal
Page 56
55
Page 57

56
 Loading...