

Page 1
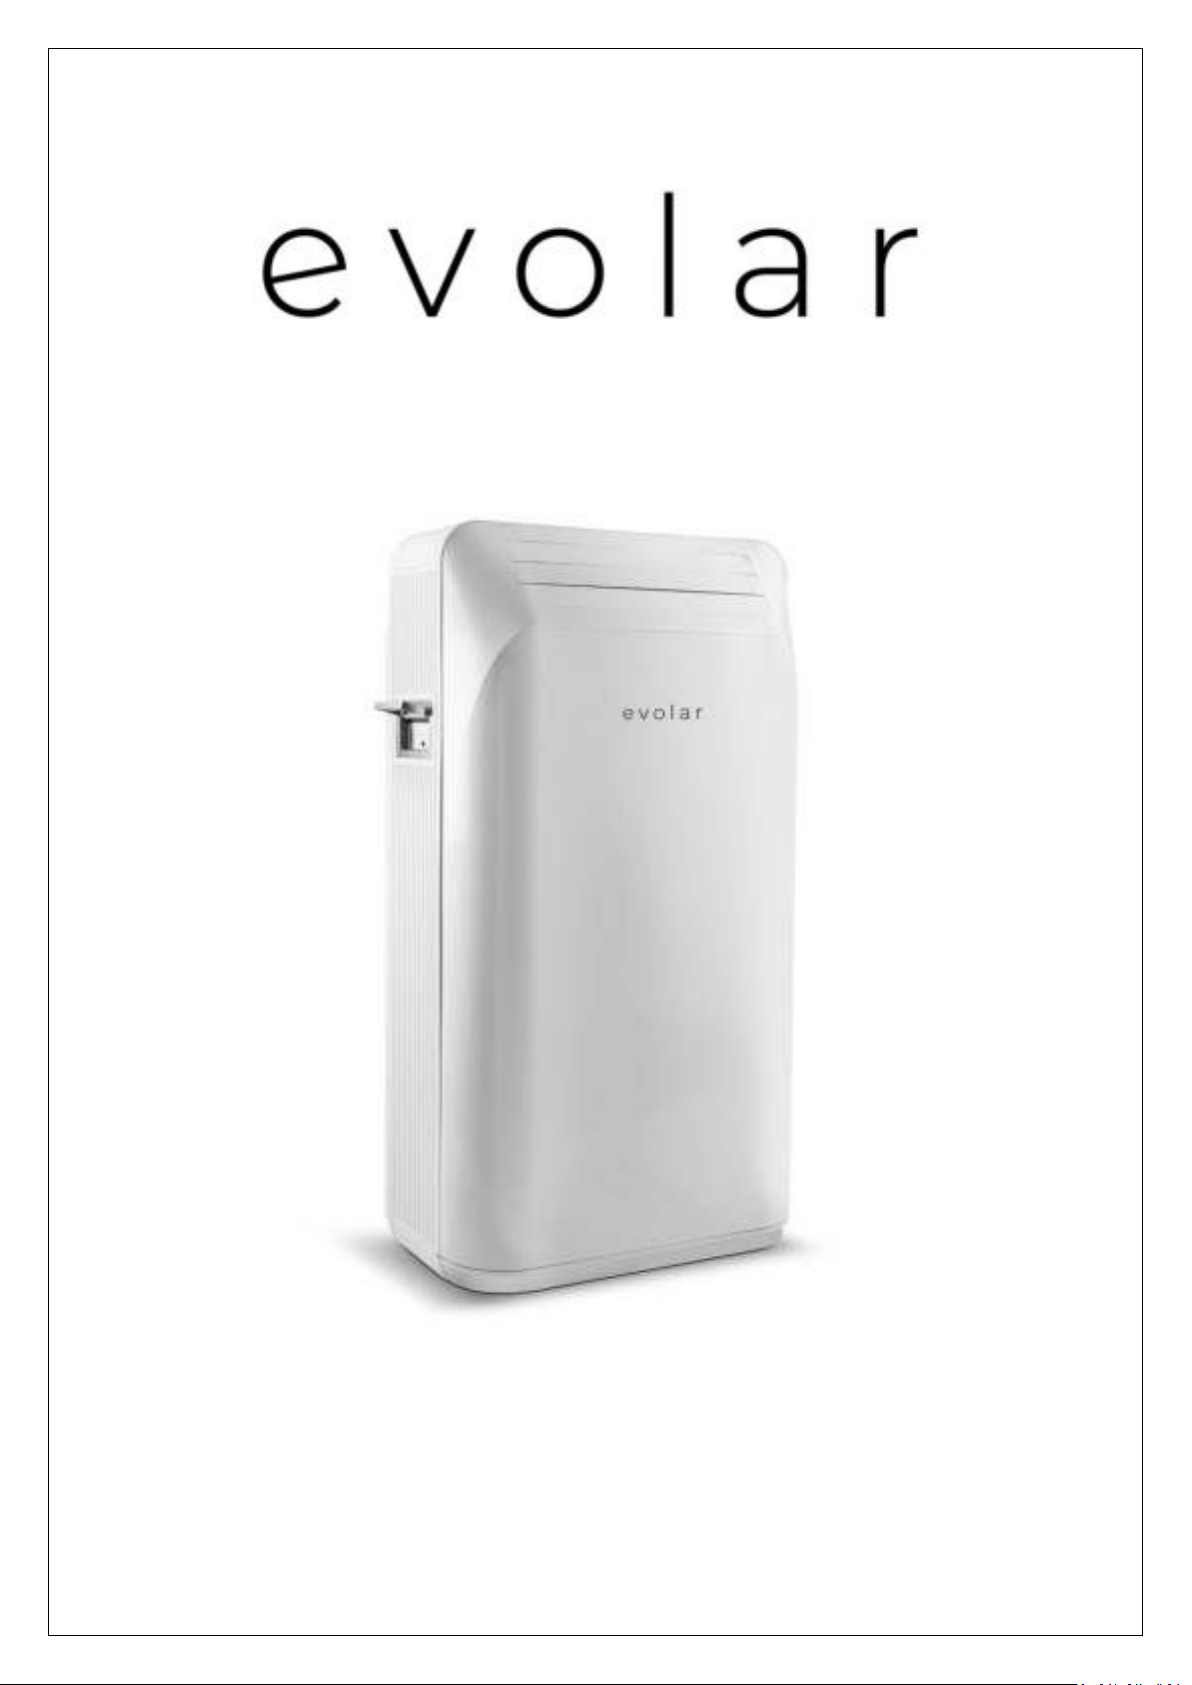
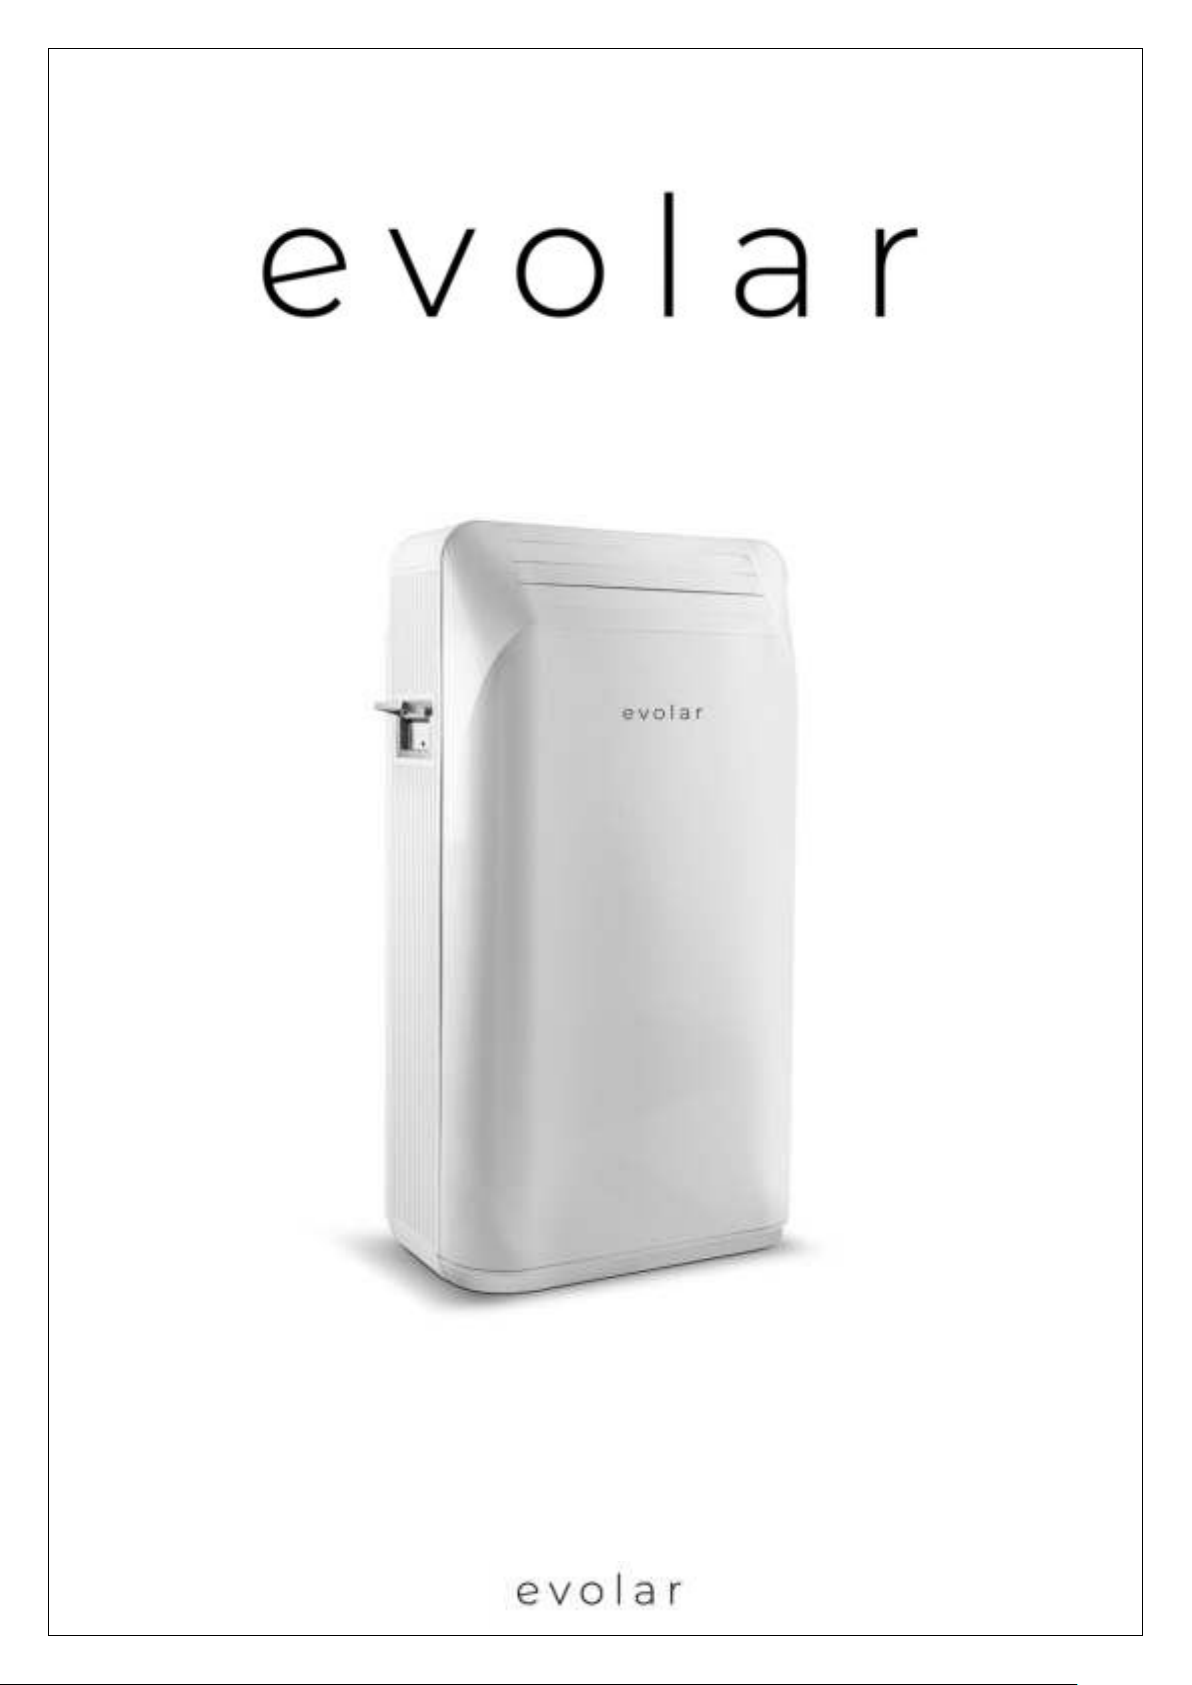
Handleiding mobiele airconditioner:
Installatie- en bedieningshandleiding V3
Evolar EVO-ES9000
Page 2
Veiligheidsmaatregelen
Nederlands (NL):
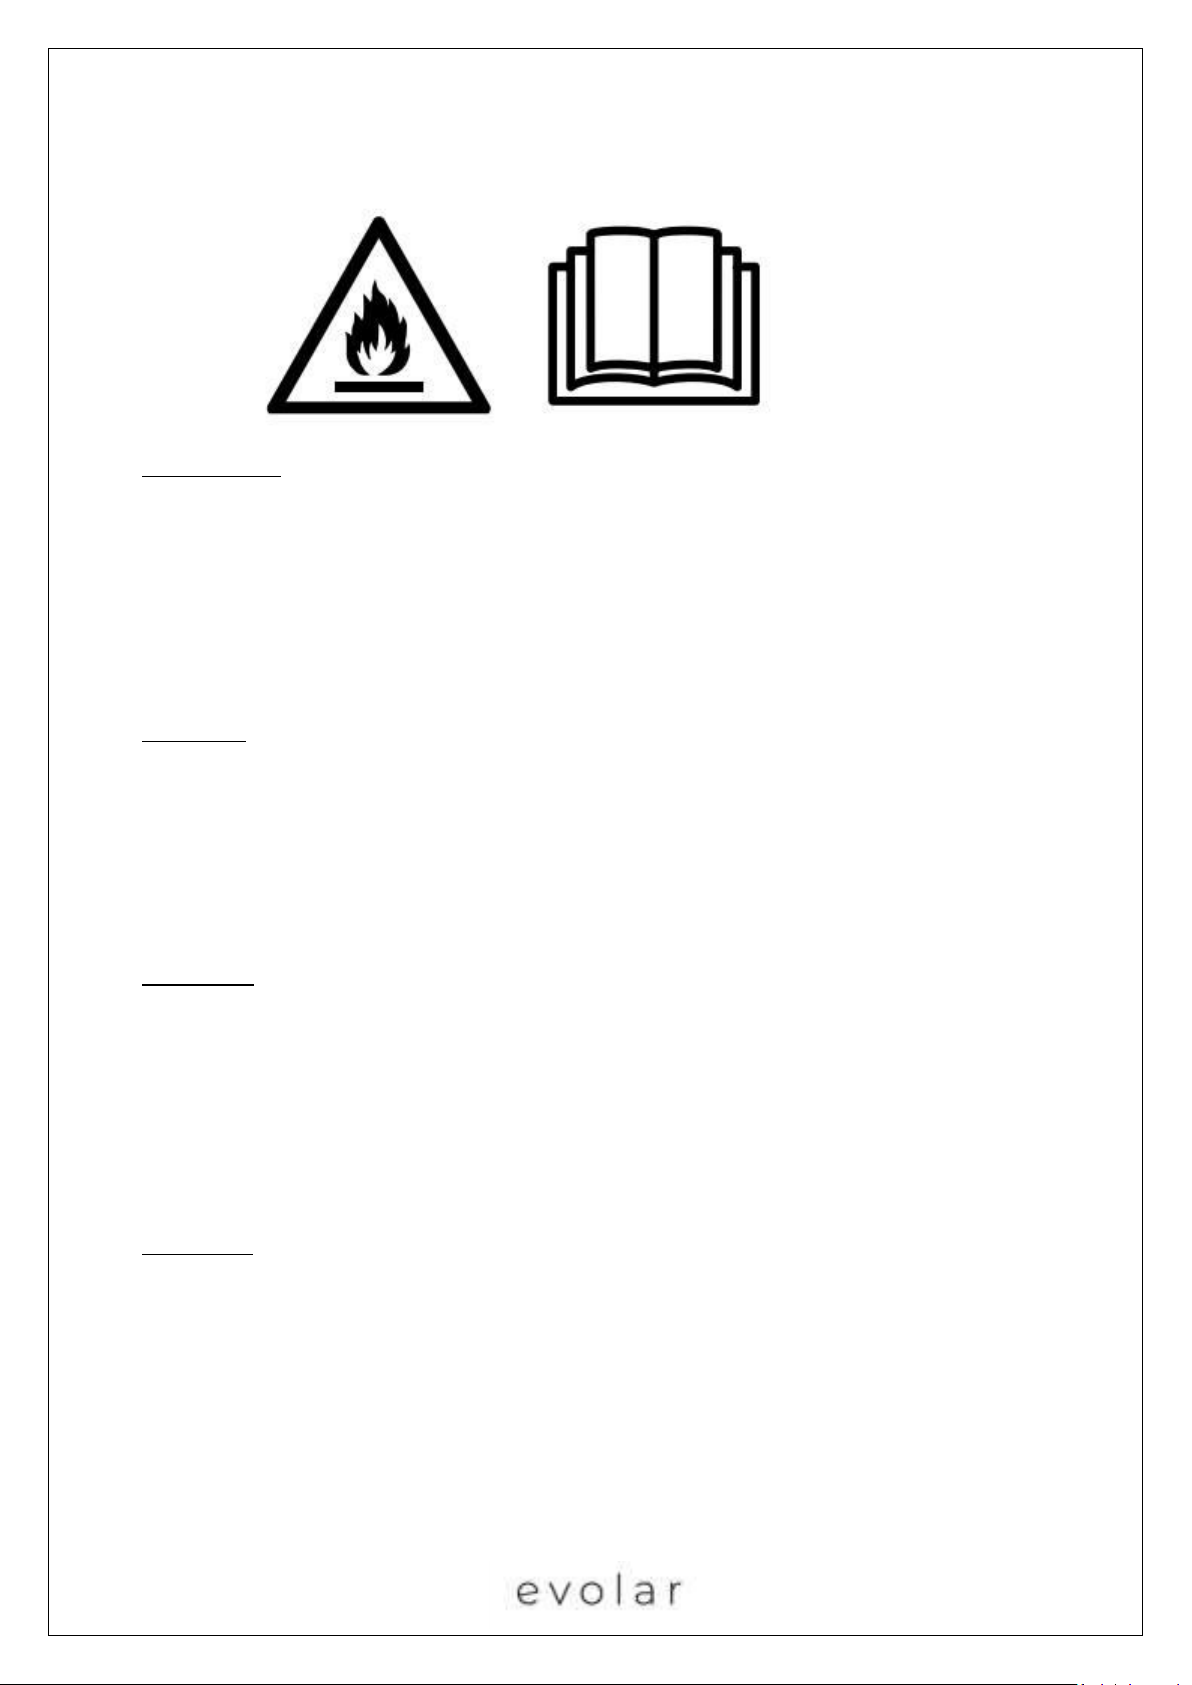
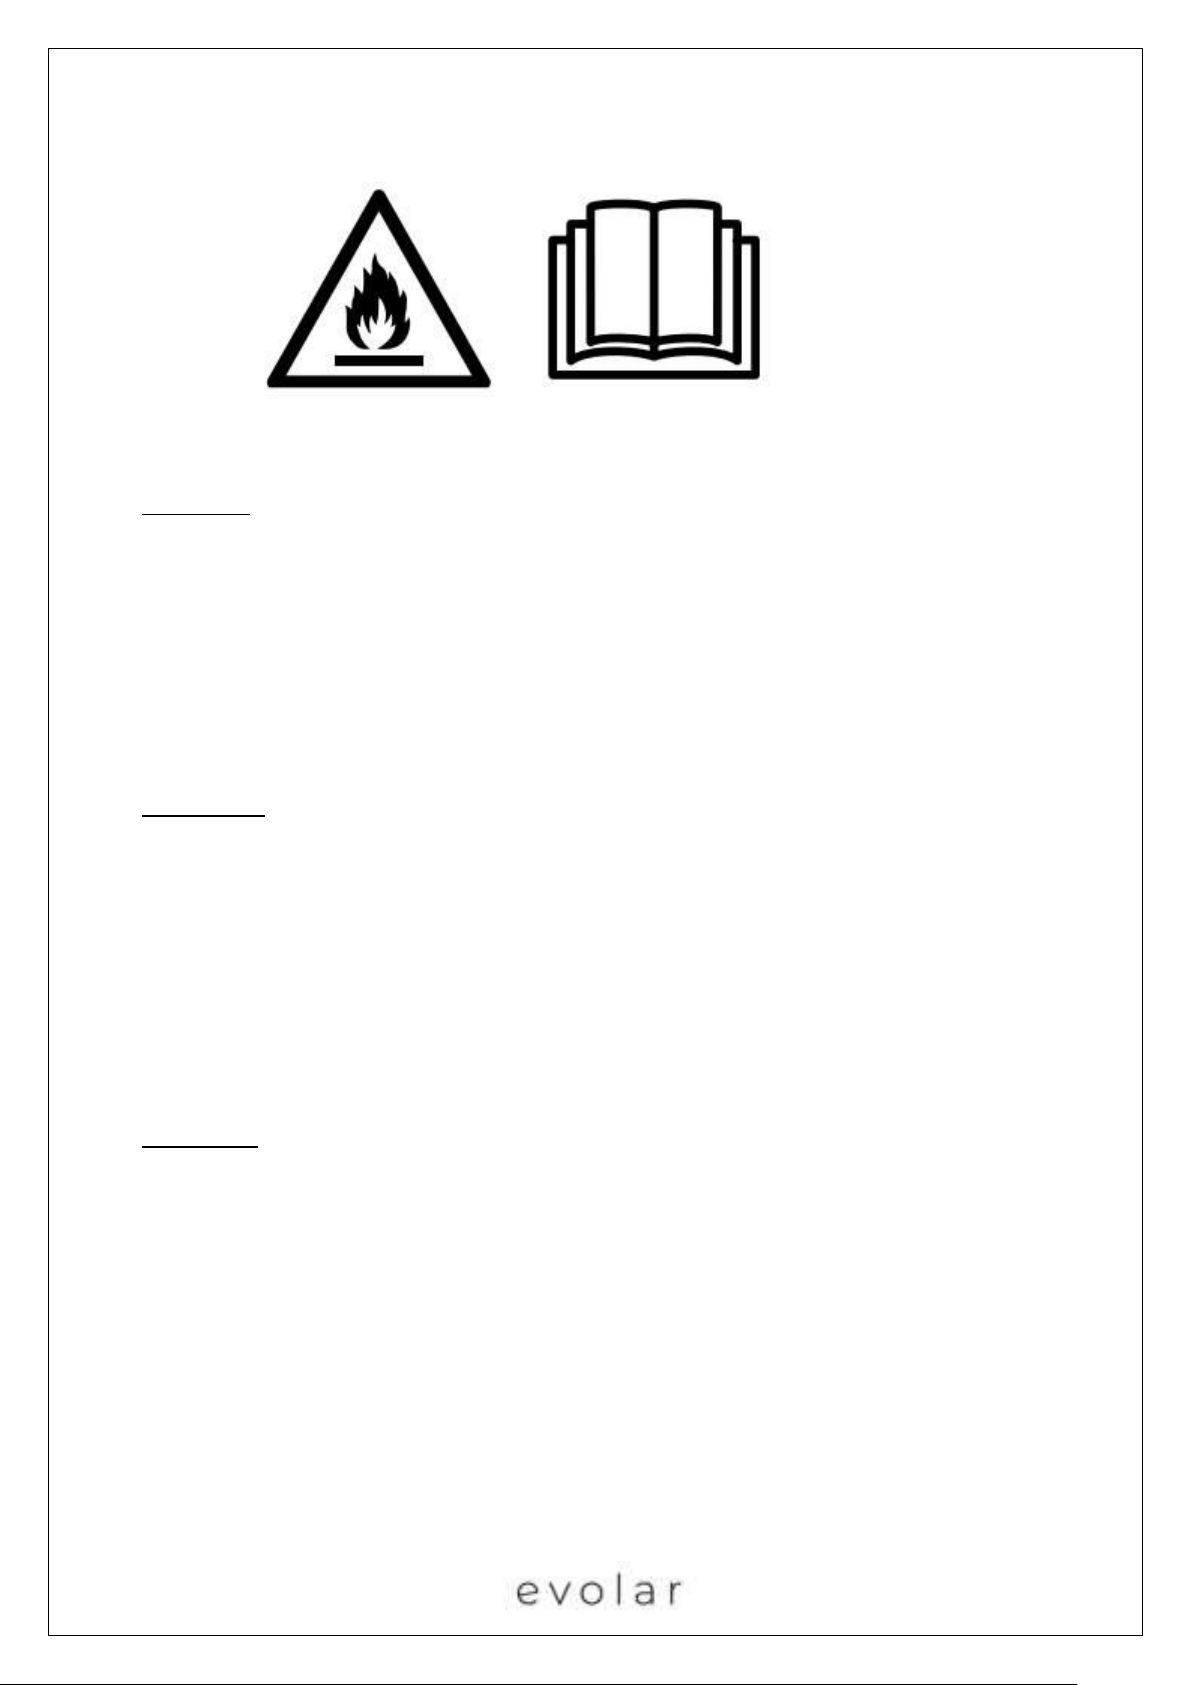
Betekenis symbolen op uw apparaat:
- De mobiele airconditioner is gevuld met Propaangas R290. U dient de voorschriften van de
fabrikant in het gebruik en reparatie op te volgen.
- Voor installatie en gebruik dient u de installatie- en gebruikershandleiding zorgvuldig en geheel
door te lezen.
- Gebruik of bewaar de Evolar EVO-ES9000 niet in een ruimte kleiner dan 12m
English (EN):
2
.
Meaning of the symbols on your device:
- The mobile air conditioner is filled with Propane Gas R290. You must follow the manufacturer’s
instructions for use and repair.
- Before the installation and use, carefully and completely read the installation and user manual.
- Do not use or store the Evolar EVO-ES9000 in a room smaller than 12m
Deutsch (DE):
Bedeutungssymbole auf Ihrem Gerat:
- Die mobile Klimaanlage ist mit Propangas R290 gefüllt. Sie müssen die Anweisungen des
Herstellers zur Verwendung und Reparatur befolgen.
- Lesen Sie vor der Installation und Verwendung die Installations- und Bedienungsanleitung
sorgfältig und vollständig durch.
- Verwenden oder lagern Sie den Evolar EVO-ES9000 nicht in einem Raum unter 12m
Français (FR):
Signification des symboles sur votre appareil:
- Le climatiseur mobile est rempli de gaz propane R290. Vous devez suivre les instructions du
fabricant pour l’utilisation et la réparation.
- Avant l’installation et l’utilisation, lisez attentivement le manuel d’installation et d’utilisation.
- n’Utilisez pas stockez l’Evolar EVO-ES9000 dans une chambre de moins de 12m
2
.
2
.
2
.
Page 3
Nederlands (NL):
Type/Model
Evolar EVO-ES9000
Koelcapaciteit opslag
4,5 kWh
Koelcapaciteit
2,5 kW
Koelcapaciteit BTU
9000 BTU
Verwarmingscapaciteit
2,5 kW
Koelvermogen
600 – 2500 W
Verwarmingsvermogen
900 – 2500 W
Luchthoeveelheid
360 m3/h
Aansluitspanning
220-240 V/ 50 Hz
Opgenomen vermogen koelen
30 – 800 W
Opgenomen vermogen koelen A
0.14 – 3.7 A
Opgenomen vermogen verwarmen
600 – 1400 W
Opgenomen vermogen verwarmen A
2.8 – 6.5 A
Opgenomen vermogen bij verwarmen
energieopslag
1000 W
Geluidsniveau
33/40/45 dB(A)
Gewicht (zonder water)
40 kg
Waterinhoud (te vullen door gebruiker)
37 liter
Gewicht (met water)
77 kg
Koudemiddel
R290
Vulling koudemiddel
245 gram
Maximale druk
2.1 MPa
Temperatuur instelling
15 – 32 °C
Werkingstemperatuur
5 – 38 °C
Maximale opgenomen vermogen
1400 W
Afmetingen
495 x 330 x 920 MM (BxDxH)
Keurmerken
CE/ROHS
Aansluitmaat watertoevoer/waterafvoer
¾ buitendraad
Technische gegevens:
Page 4
Veiligheidsinstructies:
- Voor gebruik dient u de installatie- en gebruikershandleiding zorgvuldig door te lezen.
- De mobiele airconditioner dient tijdens gebruik en transport te allen tijde rechtop te staan.
Mocht het apparaat niet volledig rechtop hebben gestaan, dient u 24 uur te wachten voordat
het apparaat gebruikt kan worden.
- Het apparaat is uitsluitend geschikt voor gebruik binnenshuis.
- Het apparaat dient op een vlakke ondergrond te staan met een vrije ruimte van 20CM rondom
het apparaat voor een juiste werking.
- Gebruik het apparaat op een stopcontact welke correct is geïnstalleerd en bereikbaar is bij
gebruik.
- Gebruik het apparaat niet in de nabijheid van een hittebron, licht ontvlambare of
explosiegevoelige stoffen of brandstoffen en/of in een natte ruimte waar water kan spetteren.
- Een werkend apparaat dient nimmer onbeheerd in een ruimte te worden gelaten.
- Plaats geen voorwerpen op het apparaat en dek het apparaat niet af, dit kan brand
veroorzaken.
- Steek uw vingers of andere voorwerpen niet in het apparaat (de roosters/luchtuitlaten) dit kan
het apparaat blokkeren en een onveilige situatie opleveren.
- Bij onderhoud en reiniging dient het apparaat altijd spanningsloos te worden gemaakt door de
stekker uit het stopcontact te halen.
- Schakel altijd de stroomtoevoer uit of trek de stekker uit het stopcontact wanneer u de
airconditioner verplaatst.
- Stopcontacten van de airconditioner dienen te voldoen aan de plaatselijke elektrische
veiligheidsvoorschriften. Controleer op deze voorschriften indien nodig.
- Houd toezicht op kinderen, huisdieren en handelingsonbekwame personen Bij of in de
nabijheid van het apparaat.
- Controleer het apparaat, het aansluitsnoer en de stekker op beschadigingen, stel het apparaat
niet in werking indien u beschadigingen constateert. Bij constatering van beschadigingen dient
het apparaat ter controle/reparatie worden aangeboden bij de fabrikant, zijn servicebedrijf of
een gelijkwaardig gekwalificeerd persoon, om gevaar te voorkomen. Evolar raadt ten zeerste
aan om bij reparatie door een derde gekwalificeerd persoon, altijd de originele orderdelen te
gebruiken.
Page 5
- Het apparaat kan niet op een veilige wijze worden gebruikt door kinderen en personen met
verminderde lichamelijke, zintuiglijke of verstandelijke vermogens of gebrek aan ervaring en
kennis als ze onder toezicht staan of geïnstrueerd zijn over het gebruik van het apparaat op
een veilige manier en de betreffende risico’s begrijpen.
- Gebruik uitsluitend de stekker welke fabriekswege op het apparaat is gemonteerd. Vermijd
zoveel mogelijk het gebruik van verlengsnoeren. Bij gebruik van een verlengsnoer dient deze
minimaal een capaciteit van 3x1,5mm2 te hebben.
- Evolar is nimmer aansprakelijk eventuele schade die het gevolg is van onjuist, ondeugdelijk of
het niet opvolgen van deze veiligheidsinstructies. Mocht u twijfelen aan de instructies of
tijdens het gebruik van het apparaat, neem dan altijd contact op met de klantenservice van
Evolar of van uw leverancier.
Koelmiddel R290 (propaangas) veiligheid:
- Bij gebruik van het apparaat dient u deze waarschuwingen aandachtig door te lezen.
- Het apparaat bevat koelmiddel R290. R290 is een koelmiddel conform de Europese richtlijnen.
Let op, perforeer het koelcircuit nooit, R290 is brandbaar (GWP 3).
- Gebruik voor het ontdooiproces geen andere middelen dan voorgeschreven/aanbevolen door
de fabrikant.
- De airconditioner bevat licht ontvlambaar gas (R290). Het apparaat dient aldus te worden
gebruikt en opgeslagen in een ruimte, waarin geen andere bronnen van ontsteking zich
bevinden.
- In een niet geventileerde ruimte dient u bij gebruik of bij het opslaan extra maatregelen nemen
ter voorkoming van brand of explosie door weggelekt koelmiddel.
- Installatie voorschriften per type: Gebruik of bewaar de Evolar EVO-ES9000 niet in een ruimte
kleiner dan 12m2.
- R290 is een geurloos koelmiddel, lekkage zult u niet ruiken.
Page 6
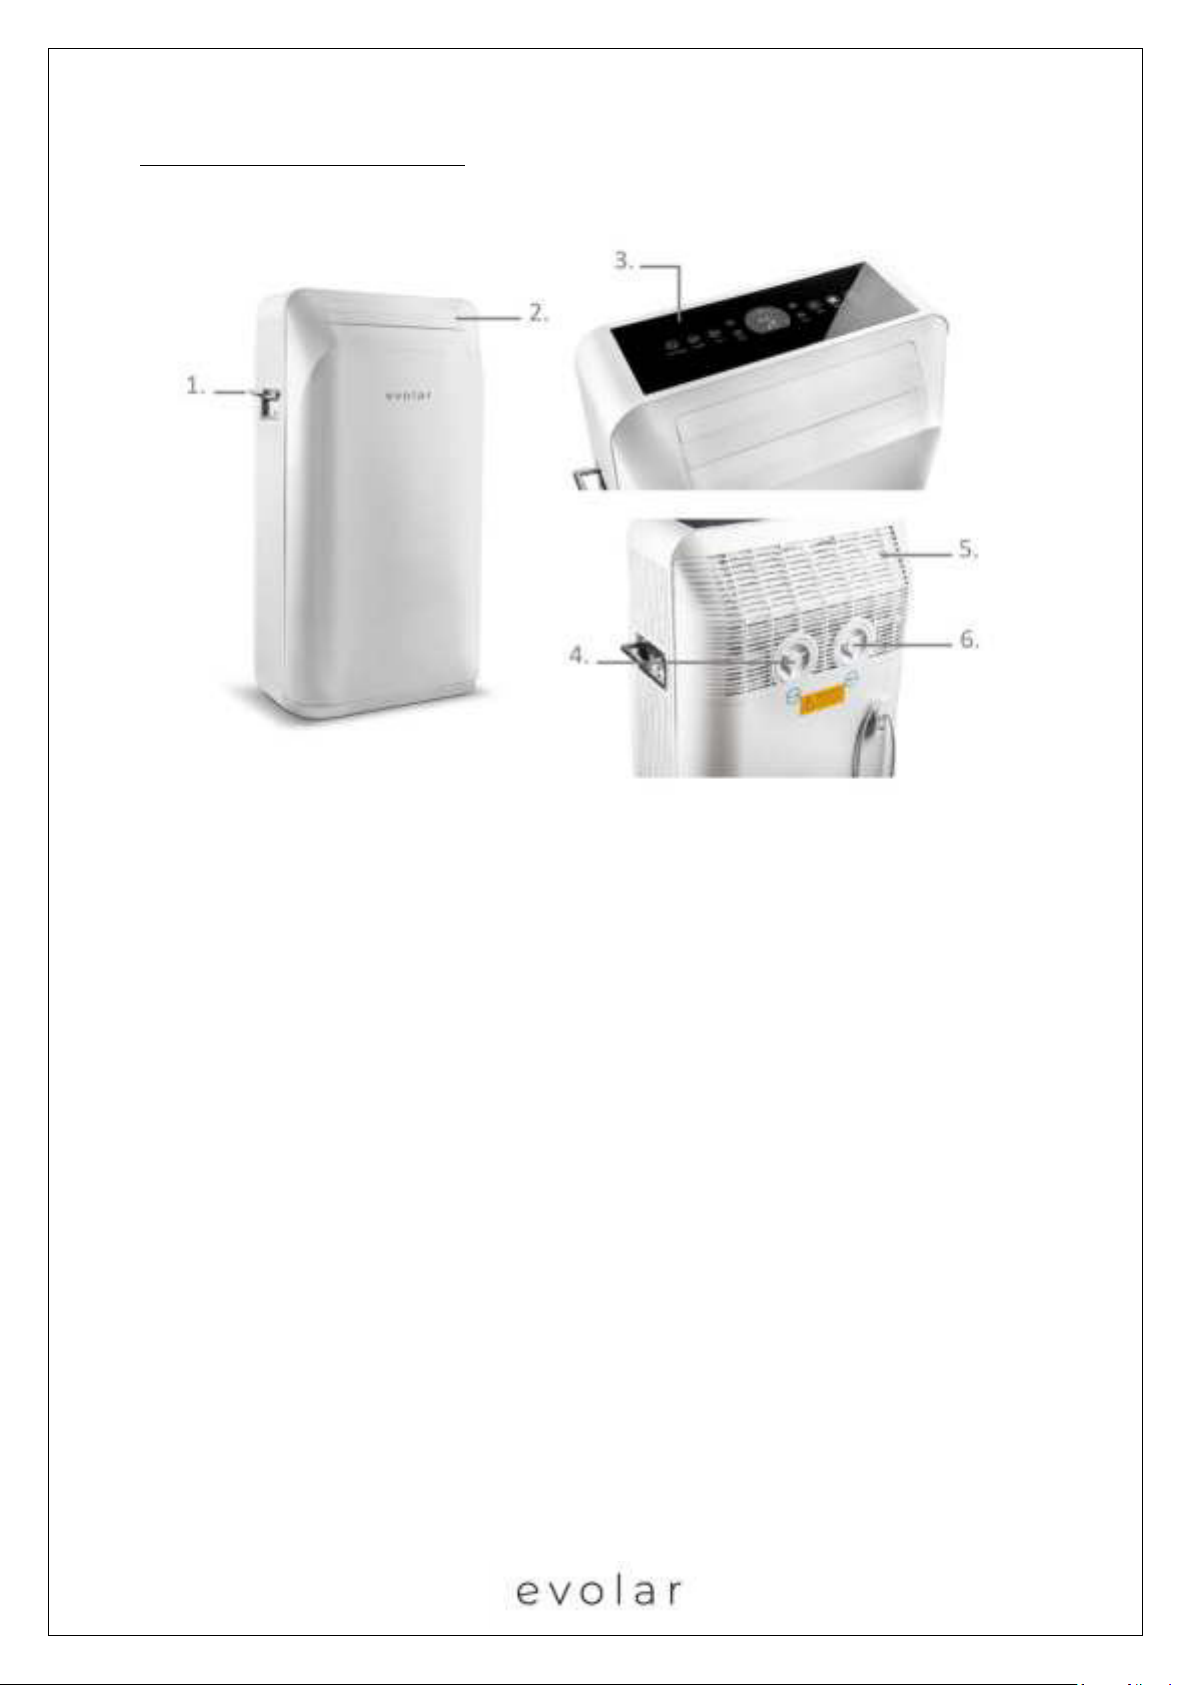
Beschrijving mobiele airconditioner
Onderdelen:
1. Greep
2. Luchtuitblaas
3. Bedieningspaneel
4. Waterinlaat
5. Luchtaanzuiging
6. Wateruitlaat
Page 7
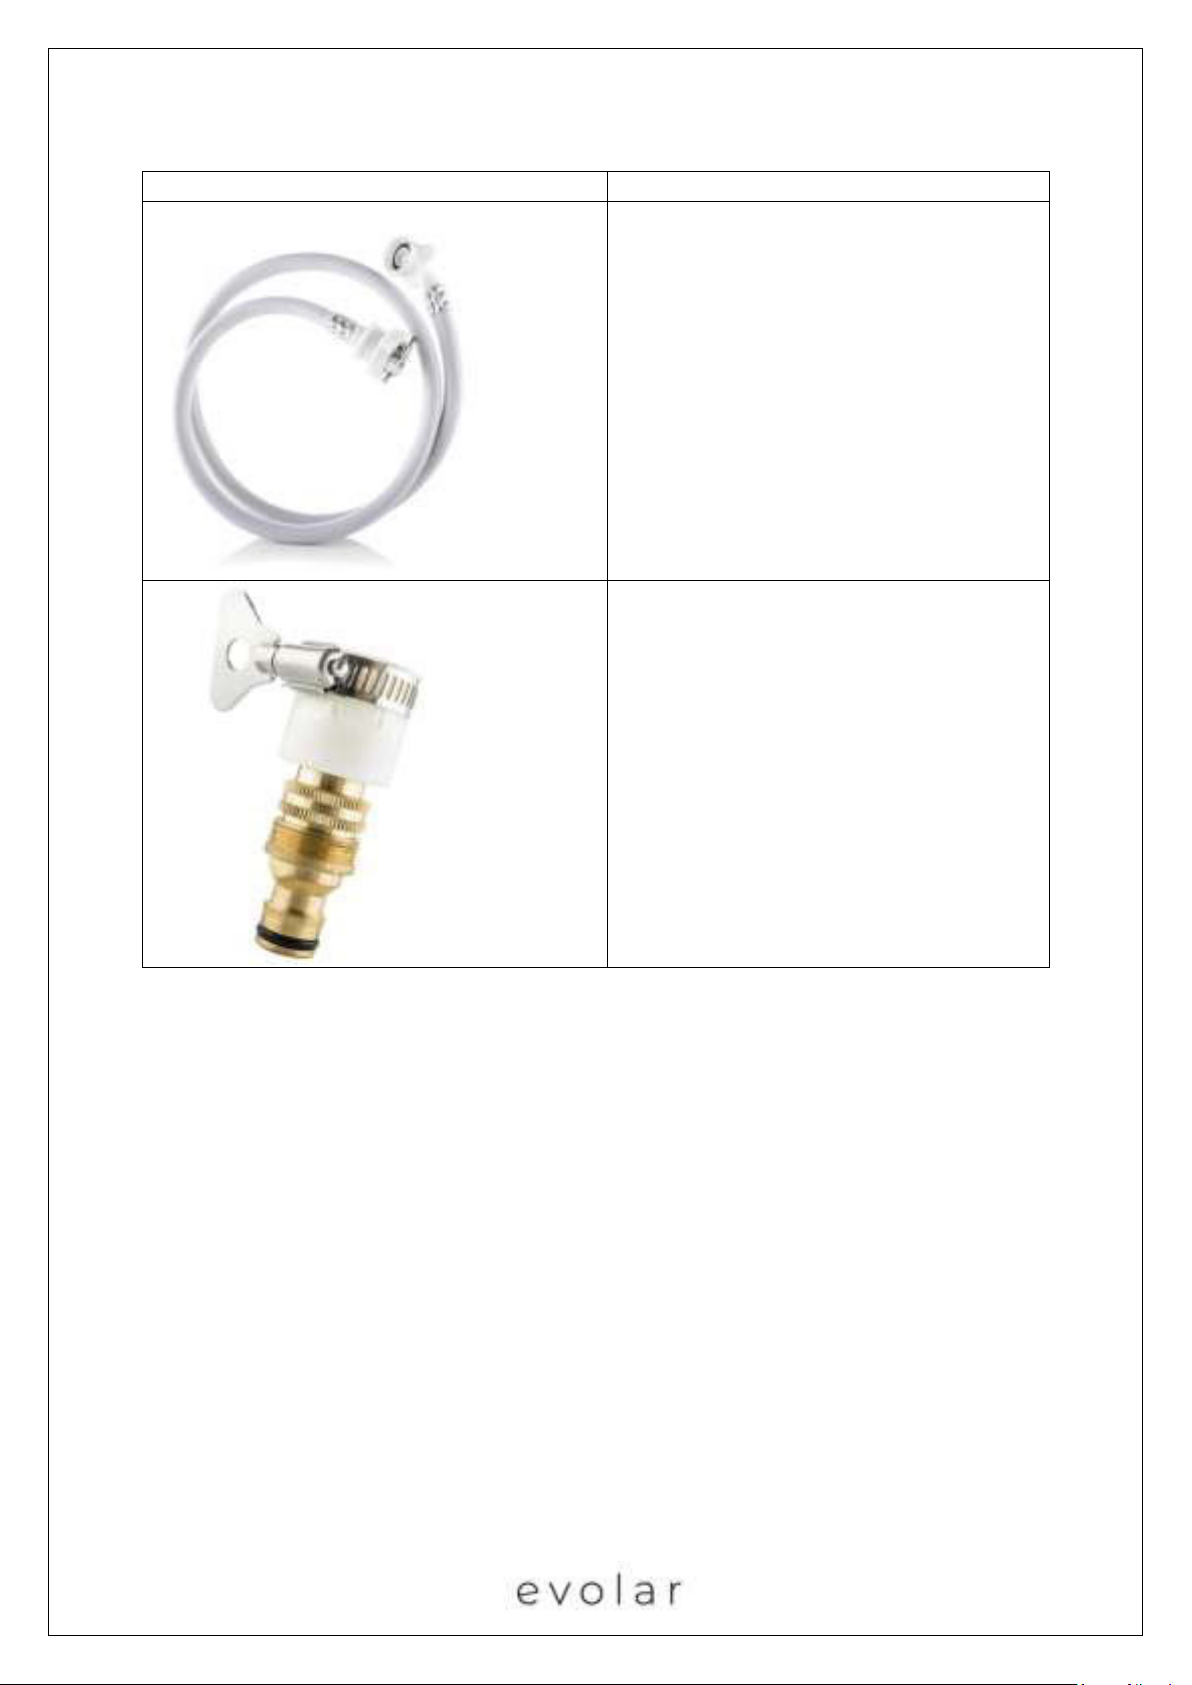
Accessoires:
Onderdeel
Omschrijving
- Vul/aftap slang
- Kraanadapters
- Aansluiting M22
- Aansluiting M24
- Aansluiting ½
- Klemaansluiting
Page 8
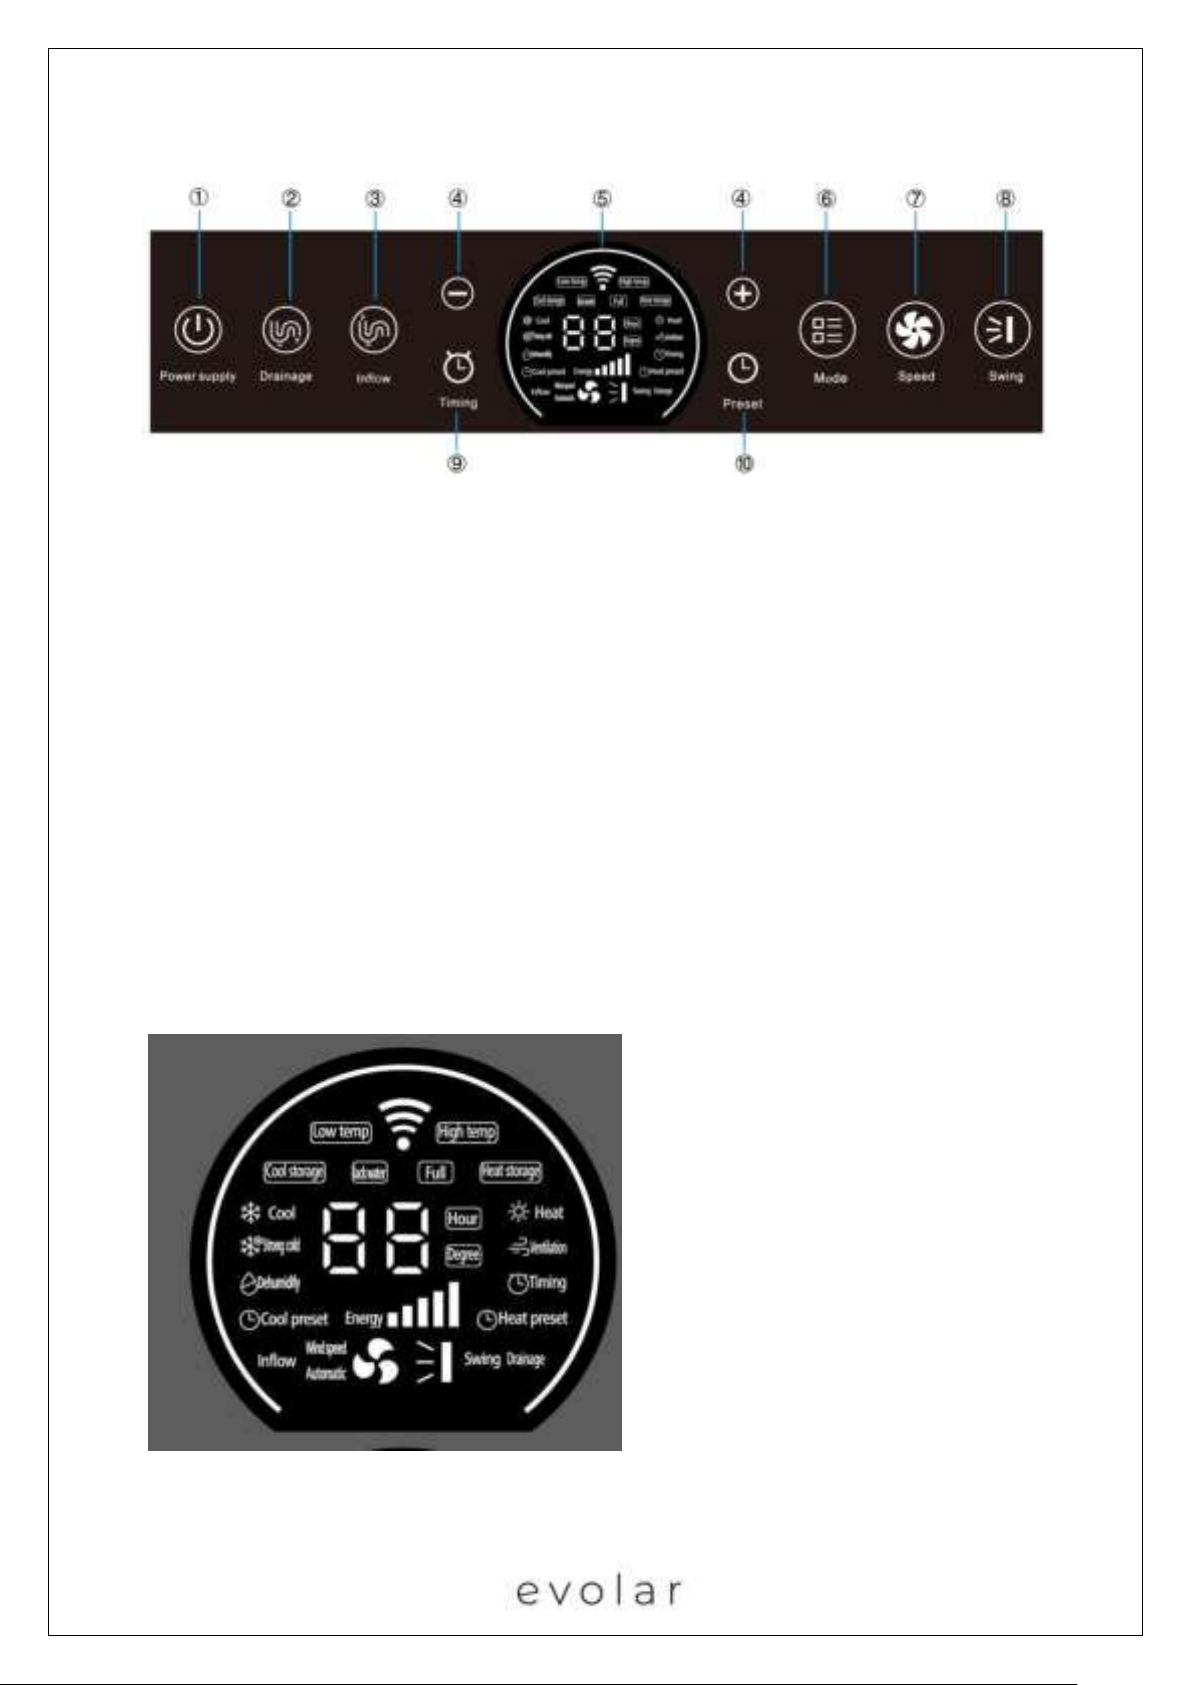
Bedieningspaneel:
1. 【Aan/uit】
Druk op deze knop om de airconditioner in / uit te schakelen
2. 【Afvoer】
Druk op deze knop om de waterafvoerfunctie te starten.
3. 【Instroom】
Druk op deze knop om de watertoevoerfunctie te starten.
4. 【+】 en 【-】
In de koelen-, sterk koelen-, ontvochtigings-, koelopslag-, warmteopslag- of warmtemodus, druk op
deze knop om de ingestelde temperatuur te verhogen of te verlagen (elke keer drukken past de
temperatuur met 1 graden aan).
Druk in de modus timing en vooraf ingestelde tijd op deze knop om de insteltijd te verlengen of te
verkorten (elke keer dat u drukt, wordt de ingestelde tijd met 1 uur aangepast.)
5. Schermweergave:
Page 9
6. 【Modus】
Druk op deze knop om de modi te selecteren: Verwarmen, koelen, Ontvochtigen, Koude opslag,
Warmteopslag, Verwarmen en Ventilatie.
7. 【Windsnelheid】
Druk op deze knop om de ventilatorsnelheid te selecteren: Midden, Hoog, Auto en Laag
8. 【Swing】
Druk op deze knop om op-neer zwaaien te selecteren of om zwaaien van de lamellen te stoppen.
9. 【Timing】
Druk in elke modus Verwarmen, koelen, Ontvochtigen, Koude opslag, Warmteopslag, Verwarmen en
Ventilatie) op 【timing】 om de eindtijd van een dergelijke werkingsmodus in te stellen.
Druk na het inschakelen op 【timing】 om de modus in te stellen, evenals de start- en eindtijd van een
dergelijke hardloopmodus.
10. 【Vooraf ingesteld】
Druk op deze knop om de uren in te stellen voordat de airconditioner wordt gebruikt, en de unit zal de
energie (warmteopslag / koude opslag) automatisch gedurende deze periode opslaan.
Installatie
De Evolar EVO-ES9000 is een mobiele airco welke verplaatst kan worden. Volg onderstaande installatie
instructies bij ingebruikname:
- Verwijder de verpakkingsmaterialen en plaats het apparaat dusdanig dat het rechtop blijft
staan.
- Controleer alle onderdelen op zichtbare beschadigingen. Neem het apparaat niet in gebruik
indien er beschadigingen zijn en neem contact op met uw leverancier.
- Plaats het apparaat in de buurt van een stopcontact. Zet het apparaat op een vlakke, stevige
en stabiele ondergrond welke bestand is tegen de drukbelasting van de wieltjes (gewicht
bedrijfsklaar +/- 77 kg en +/- 20 kg per wiel). Houd minstens 20cm vrije ruimte aan alle zijden
en houd rekening met de veiligheidsinstructies.
- Let op: Niet elke vloer is bestand tegen een dergelijke belasting bij het verplaatsen van het
apparaat. Evolar is nimmer aansprakelijk voor schade ontstaan door het gebruik en/of het
verplaatsen van het apparaat. Evolar geeft geen aanwijzing of advies op welke vloertypen het
apparaat vrijelijk middels de wielen verplaatst kan worden.
Page 10
Gebruik instructies:
Volg onderstaande stappen voorafgaand aan gebruik:
1. Steek de stekker in een geschikt stopcontact in de nabijheid van een vulkraan.
2. Schakel de mobiele airco in, druk op de 【power】-toets en verbind de mobiele airco met de
vulslang aan de vulkraan volgens de gesproken melding.
Let op: Beweeg de mobiele airco voorzichtig om botsingen en omvallen te voorkomen.
3. Stapel geen dingen op de luchtinlaat/-uitlaat van de machine. Er moet een ruimte van
minimaal 500 mm zijn tussen de luchtinlaat/-uitlaat en de omringende objecten en houd de
luchtinlaat/-uitlaat vrij om te voorkomen dat de luchtuitwisseling van de luchtinlaat/-uitlaat
van de machine wordt beïnvloed.
4. Gebruik voor het reinigen en onderhouden van de machine een zachte doek om de machine
af te vegen. Gebruik geen was, verdunningsmiddel of irriterend schoonmaakmiddel.
5. Reinig het filter regelmatig. Evolar raadt u aan om het filter elke 14 dagen schoon te maken.
6. Haal de stekker uit het stopcontact en laat het water in het waterreservoir weglopen als u de
machine langere tijd niet gebruikt.
7. Demonteer of repareer de machine niet zonder professioneel onderhoudspersoneel.
Belangrijke gebruiksinstructies:
1. Bij de uitvoering van de koude/warmte opslag functie (cold/heat storage bedrijf) wordt het
aangeraden om deuren en ramen geopend te houden voor ventilatie.
2. Na het uitvoeren van de koude/warmte opslag functie komt de compressor in de
beveiligingsstatus. U moet minstens 3 minuten wachten voordat u het apparaat in bedrijf kan
stellen.
3. Op het moment dat de compressor start, kan er tijdelijk een verhoogd geluidsniveau zijn, na
het starten van de compressor zal dit geluid weg zijn.
4. Na het legen van het water uit de mobiele airco dient u de afvoerslang los te koppelen en de
schroefdop gelijk weer op de machine te draaien. Wanneer u de slang niet verwijderd of de
dop niet terugplaatst, zal er water uit de afvoer blijven stromen.
5. Zelfs als de afvoerfunctie van de machine wordt gebruikt om het water in de tank af te tappen,
kan het water niet volledig worden afgetapt. Daarom moet de machine tijdens het
verplaatsen, dragen en opslaan rechtop staan en niet plat worden gelegd. Mocht de mobiele
airco toch plat hebben gelegen wacht dan 24 uur alvorens het apparaat weer in te schakelen.
Page 11
In gebruik name mobiele airco:
1. Sluit de voeding aan
1. Sluit voor het eerste gebruik de voeding aan en raadpleeg stap 2 "Water vullen".
2. Steek de stekker in het stopcontact en druk op de 【power】-toets op het bedieningspaneel
als deze niet voor de eerste keer wordt gebruikt of als er water in het waterreservoir zit.
Page 12

2. Water vullen
Wanneer de mobiele airco het signaal geeft water vullen (geen water in het waterreservoir tijdens het
eerste gebruik of watertekort tijdens gebruik), volgt u de onderstaande stappen om de mobiele airco
te vullen met water:
1. Gebruik de water vulaansluiting achter op de airco om de vulslang met de kraan te verbinden.
Druk op de watertoevoerknop (‘water inlet’) en open de vulkraan, dit dient gelijktijdig te
gebeuren.
2. Wanneer het waterniveau de juiste hoogte bereikt, zal de waterinlaatklep automatisch sluiten
om de watertoevoer te stoppen.
3. Verwijder de vulslang en schroef de deksel van de vulaansluiting vast.
3. Koelen (Gebruik voor een optimale werking eerst de Koude opslag (‘Cold Storage’) functie – punt
6.)
1. Druk op de 【modus】-toets om de koelfunctie te selecteren.
2. Druk op 【+】of 【-】om de gewenste temperatuur in te stellen. Stel de temperatuur in
tussen de 16 ℃ en 32 ℃.
3. Druk op de 【wind speed】-toets om de gewenste snelheid in te stellen. Er zijn vier standen:
laag, middel, hoog of automatisch.
4. Druk op de 【swing wind】-toets om de uitblaas lamellen in de juiste stand te zetten. De
lamellen kunnen in de swing stand automatisch op en neer bewegen en kunnen in de gewenste
stand vastgezet worden.
Let op:
Tijdens het koelen wordt de werkelijke luchtinlaattemperatuur getoond.
Wanneer de koelcapaciteit van het water in de watertank is verbruikt (watertemperatuur is 40 °C)
stopt de airco automatisch met koelen. Het water dient dan af te koelen, om weer te kunnen koelen.
Het is ook mogelijk de ‘cold storage’ functie te gebruiken om het water te laten afkoelen. Tevens is het
mogelijk om het water in de airco te vervangen voor koud water om weer op koelmodus aan te kunnen
gaan.
4. Sterk koelen (‘Strong Cooling’)
Page 13

Deze modus kan worden gebruikt wanneer snelle koeling gewenst is.
1. Druk op de 【modus】-toets de geforceerde koelfunctie selecteren.
2. Druk op 【+】of 【-】om de gewenste temperatuur in te stellen. Stel de temperatuur in
tussen de 16 ℃ en 32 ℃.
3. Druk op de 【swing wind】-toets om de uitblaas lamellen in de juiste stand te zetten. De
lamellen kunnen in de swing stand automatisch op en neer bewegen en kunnen in de gewenste
stand vastgezet worden.
Let op:
Tijdens het koelen wordt de werkelijke luchtinlaattemperatuur getoond.
Wanneer de koelcapaciteit van het water in de watertank is verbruikt (watertemperatuur is 40 °C)
stopt de airco automatisch met koelen. Het water dient dan af te koelen, om weer te kunnen koelen.
Het is ook mogelijk de ‘cold storage’ functie te gebruiken om het water te laten afkoelen. Tevens is het
mogelijk om het water in de airco te vervangen voor koud water om weer op koelmodus aan te kunnen
gaan.
5. Ontvochtigen
1. Druk op de 【modus】-toets om de ontvochtingsfunctie te selecteren.
2. Druk op 【+】of 【-】om de gewenste temperatuur in te stellen. Stel de temperatuur in
tussen de 20 ℃ en 32 ℃.
3. Druk op de 【swing wind】-toets om de uitblaas lamellen in de juiste stand te zetten. De
lamellen kunnen in de swing stand automatisch op en neer bewegen en kunnen in de gewenste
stand vastgezet worden.
Let op:
Tijdens het ontvochtigen wordt de werkelijke luchtinlaattemperatuur getoond.
6. Koude opslag (‘Cold Storage’)
1. Druk op de 【modus】-toets om de koude opslag functie te selecteren.
2. Druk op de【+】of 【-】om de temperatuur voor koude opslag in te stellen. Stel het
temperatuurbereik in tussen - 6 ℃ en 5 ℃.
Page 14

3. Hoe lager de ingestelde temperatuur is, hoe groter de koelcapaciteit is. Het kan voorkomen
dat de unit de ingestelde temperatuur niet bereikt nadat de cold storage functie is beëindigd.
Dit is afhankelijk van de omgevingstemperatuur en heeft geen invloed om de koelfunctie.
4. Na voltooiing van koude opslag functie, zal de airco automatisch in de stand-by stand
schakelen.
Let op:
Tijdens koude opslag functie zal er op hoge snelheid lucht verplaatst wordt en zullen de louvres op de
maximale uitblaashoek staan. Op dit moment wordt de opgeslagen warmte uit het water afgevoerd.
Open in een kleine ruimte de deuren en ramen voor ventilatie. Tijdens de ‘cold storage’ functie zal er
veel warmte de ruimte in worden geblazen.
- De werkelijke watertemperatuur in het waterreservoir wordt weergegeven tijdens koude
opslag.
- De luchtinlaat en luchtuitlaat mogen niet worden afgedekt.
7. Warmteopslag
1. Druk op de 【modus】-toets om de warmteopslag functie te selecteren.
2. Druk op【+】or【-】 om de warmte opslagtemperatuur in te stellen tussen 20℃ en 30℃.
Na voltooiing van de warmte opslag functie, zal de airco automatisch in de stand-by stand
schakelen.
Let op:
Tijdens de warmte opslag functie is de luchtafvoerventilator gesloten en zal er geen lucht uit de
mobiele airco worden geblazen.
De werkelijke temperatuur van het water in de tank wordt weergegeven tijdens warmteopslag.
8. Verwarmen
1. Druk op de 【modus】-toets om de verwarmingsfunctie selecteren.
2. Druk op 【+】of 【-】om de gewenste temperatuur in te stellen. Stel de temperatuur in
tussen de 16 ℃ en 32 ℃.
Page 15

3. Druk op de 【wind speed】-toets om de gewenste snelheid in te stellen. Er zijn vier standen:
laag, midden, hoog of automatisch.
4. Druk op de 【swing wind】-toets om de uitblaas lamellen in de juiste stand te zetten. De
lamellen kunnen in de swing stand automatisch op en neer bewegen en kunnen in de gewenste
stand vastgezet worden.
Let op:
Tijdens het verwarmen wordt de werkelijke temperatuur van het water in de watertank getoond.
Wanneer de verwarmingscapaciteit van het water in de watertank is verbruikt (watertemperatuur is 2
°C) stopt de airco automatisch met verwarmen. Het water dient dan op te warmen, om weer te kunnen
verwarmen. Het is ook mogelijk de ‘heat storage’ functie te gebruiken om het water te laten
opwarmen. Tevens is het mogelijk om het water in de airco te vervangen voor warm water om weer
op verwarmingsmodus aan te kunnen gaan.
9. Ventilatie
1. Druk op de 【modus】-toets om de ventilatiefunctie selecteren.
2. Druk op de 【wind speed】-toets om de gewenste snelheid in te stellen. Er zijn vier standen:
laag, midden hoog of automatisch.
3. Druk op de 【swing wind】-toets om de uitblaas lamellen in de juiste stand te zetten. De
lamellen kunnen in de swing stand automatisch op en neer bewegen en kunnen in de gewenste
stand vastgezet worden.
Let op:
Tijdens de ventilatie modus wordt de werkelijke luchtinlaattemperatuur weergegeven.
10. Preset
Voorinstelling:
1. Druk op de 【preset】-toets om de voorinstellingmodus te selecteren en selecteer de koude
opslag preset of de warmteopslag preset modus.
2. Druk op de 【preset】-toets om de preset voor koude opslag of preset voor warmteopslag te
bevestigen.
Page 16

3. Druk op 【+】 of 【-】 om te selecteren hoeveel uur de mobiele airco dient te werken na de
start van de vooraf ingestelde (cold of heat storage) functie. Selecteer een tijdsinterval tussen
de 4 en 24 uur. Na het selecteren van de gewenste tijdsduur druk op de 【preset】-toets om
de instelling te bevestigen.
Vooraf ingestelde preset annuleren:
1. Druk op de 【preset】toets, de vorige instelling wordt geannuleerd en een nieuwe
voorinstelling kan worden ingesteld.
2. Na het spanningsloos maken van de mobiele airco wordt de preset automatisch geannuleerd.
3. Druk en houd de【preset】-toets langer dan 3 seconden ingedrukt om de instelling te
annuleren.
Let op:
1. Enkele uren vóór de preset begint de machine met koudeopslag of warmteopslag. Na het einde
van de koudeopslag of de warmteopslag gaat deze automatisch naar de stand-by modus.
2. Na het instellen van de preset kunnen andere programma’s worden aangezet. Het aanzetten
van andere functies hebben voorrang op de voorinstelling. Als andere functies voor het
instellen van de preset eindigen, zal de preset voorinstelling doorgaan.
3. Zorg dat er voldoende ventilatie is bij het gebruik van de preset functie.
11. Timer
De Timerfunctie is in te stellen wanneer de mobiele airco niet in de koelmodus, sterk koelen modus,
ventilatiemodus, verwarmingsmodus of de ontvochtigingsmodus staat.
1. Druk op de 【modus】-toets om de functie te selecteren en druk op 【timing】om de functie
te bevestigen.
2. Druk op 【+】of 【-】om de gewenste starttijd in te stellen en druk op 【timing】om de tijd
te bevestigen.
3. Druk opnieuw op【+】of 【-】om de gewenste eindtijd in te stellen en druk op 【timing】
om de eindtijd te bevestigen.
Aan het einde van de timerinstelling zal er een gesproken bevestiging zijn.
Timer activeren in de modus koelen, sterk koelen, ventileren, verwarmen of ontvochtigen:
Page 17

Druk op【+】of 【-】om de gewenste eindtijd in te stellen en druk op 【timing】om de eindtijd te
bevestigen.
Aan het einde van de timerinstelling zal er een gesproken bevestiging zijn.
12. Kinderslot
Kinderslot activeren:
Druk gelijktijdig op 【+】en【-】voor 3 seconden om het kinderslot te activeren. Wanneer de mobiele
airco in kinderslot staat zal het bedieningspaneel worden geblokkeerd.
Kinderslot ontgrendelen:
1. Druk gelijktijdig op 【+】en【-】voor 3 seconden om het kinderslot te deactiveren.
2. Het is ook mogelijk om de stekker uit het stopcontact te halen om het kinderslot te
deactiveren.
Let op:
Het kinderslot is een extra veiligheidsfunctie. Laat het apparaat nooit onbeheerd in de buurt bij
kinderen, handelingsonbekwame volwassenen of huisdieren.
13. Condensafvoer
Na voltooiing van de cold storage of heat storage functie zal de unit automatisch het condenswater
afvoeren indien er geen andere functie actief is. Het water wordt voorts in het waterreservoir van het
apparaat opgeslagen.
14. Afvoer
In geval van een wateralarm moet u het water aftappen naar het juiste waterniveau voor de juiste
werking van de mobiele airco. Volg onderstaande stappen om het water in het interne waterreservoir
van de machine af te tappen.
1. Schroef de aftapknop op de achterzijde los (water outlet), draai de afvoerslang op de
wateruitlaat aansluiting en sluit de andere kant aan op een afvoer.
2. Steek de stekker in het stopcontact en druk op de aan-toets op het bedieningspaneel.
3. Druk op de 【drainage】-toets en houd deze toets langer dan 3 seconden ingedrukt volg
vervolgens de gesproken mededeling. Het afvoeren van het water uit het reservoir zal
automatisch beginnen.
Page 18

4. Wanneer het waterniveau boven het werkwaterniveau is, stopt de afvoer alleen wanneer deze
het werkwaterniveau bereikt. Als het nodig is om het water in het waterreservoir volledig af
te tappen, herhaalt u stap 3 om door te gaan met aftappen totdat het reservoir volledig leeg
is.
5. Nadat het afvoeren van het water uit het reservoir voltooid, wordt de afvoerpomp
automatisch uitgeschakeld.
6. Verwijder de afvoerslang en schroef de deksel van de aansluiting weer vast.
Page 19
I V. TuyaSmart APP
1. Download de APP
Download de Tuya-app bij de Appstore of Google Play.
2. Registratie
1. Klik op nieuw account maken om de registratiepagina te openen.
2. Het systeem zal automatisch het huidige land/regio bepalen. U kunt ook het land/regio
handmatig selecteren, het mobiele telefoonnummer of het e-mailadres invoeren en op
volgende klikken.
3. Als u het mobiele nummer invult, voert u de verificatiecode in die door de mobiele telefoon is
ontvangen, voert u het wachtwoord in en klikt u op OK om u te registreren.
4. Als u het e-mailadres invult, voert u het wachtwoord op de pagina in en klikt u op OK om te
registreren.
3. Log in/Wachtwoord ophalen
Account + wachtwoord login
Als u uw APP-account al hebt geregistreerd, klikt u op Inloggen met bestaand account om de
aanmeldingspagina te openen.
1. Het systeem beoordeelt automatisch het huidige land/regio, of u kunt een land/regio
handmatig selecteren.
2. Voer uw geregistreerde mobiele nummer of e-mailadres in, voer uw wachtwoord in en log in
op het systeem.
4. Mobiel nummer + verificatiecode login
1. Klik op Inloggen verificatiecode om de nieuwe pagina te openen.
2. Het systeem beoordeelt automatisch het huidige land/regio, of u kunt handmatig een
land/regio selecteren.
3. Voer het mobiele nummer in en klik op de knop Get om de verificatiecode op te halen. Voer
de verificatiecode in en klik op de knop verifiëren en inloggen om in te loggen op het systeem.
5. Wachtwoord vergeten
Als u uw wachtwoord van de APP bent vergeten, kunt u het wachtwoord opnieuw instellen
1. Klik op wachtwoord vergeten.
Page 20
2. Het systeem beoordeelt automatisch het huidige land/regio. U kunt ook het land/de regio
handmatig selecteren, uw geregistreerde mobiele telefoonnummer of e-mailadres invoeren
en op volgende klikken.
3. Vul de verificatiecode in die is ontvangen via de mobiele telefoon of e-mail, voer het nieuwe
wachtwoord in en klik op Bevestigen.
6. WIFI verbinding
1. Plaats de airconditioner binnen het WIFI-bereik.
2. Sluit de voedingskabel aan, druk op de aan / uit-knop tot de airconditioner in de stand-bymodus
gaat, druk vervolgens langer dan 5 seconden op de aan / uit-knop en de WIFI-indicator zal gaan
knipperen.
3. Start de “Tuya” APP, klik op Apparatuur toevoegen → Groot apparaat → Airconditioner → selecteer
WIFI 2.4GHZ → selecteer WIFI → Voer WIFI-wachtwoord in, druk vervolgens op de aan / uit-knop tot
de airconditioner in de stand-bymodus gaat, druk vervolgens op de aan / uit-knop gedurende meer
dan 5 seconden, en herhaal de handeling op de mobiele telefoon.
7. Airconditioner bedienen - individuele bediening
Nadat het apparaat met succes is geconfigureerd, verschijnt de naam van de airconditioner op de
startpagina. Klik om het configuratiescherm van airconditioner om deze te openen. Op dit moment
kunt u de airconditioner aan en uit zetten, de werkmodus (koelen-, sterk koelen-, ontvochtigings-,
koelopslag-, warmteopslag- of warmtemodus) van de airconditioner selecteren en functies van de
airconditioner selecteren (temperatuur, ventilatorsnelheid, verwarming, schermweergave, kinderslot,
swing, etc.).
【Timing】 functie: Druk op "Timing", klik op "Toevoegen" en selecteer de gewenste tijdsperiode,
selecteer vervolgens timing aan / uit (Opmerking: wanneer timing uit is geselecteerd, moet u de
tijdsperiode en de werkingsmodus selecteren en hoeft u niet temperatuur, windzwaai of windsnelheid
in stellen). Stel het gewenste temperatuurbereik in
(Opmerking: de temperatuur bereiken voor alle modi zijn: Sterk koelen 16 ~ 32 ℃; Koelen 16 ~ 32
℃; Verwarmen 16 ~ 32 ℃; Koude opslag -6 ~ 5 ℃; Warmteopslag 20 ~ 30 ℃; Ontvochtigen 25 ℃).
Stel de gewenste swing en windsnelheid in (Opmerking: de windsnelheid kan verschillen in
Page 21

verschillende modi), en klik vervolgens op "Opslaan", de vooraf ingestelde waarden worden
opgeslagen.
Page 22
V. Onderhoud
1. Machine reinigen
Schakel de stroomtoevoer van de mobiele airco uit en veeg de mobiele airco af met een zachte,
semi- droge doek. Gebruik geen chemische middelen, zoals benzeen, alcohol, benzine, etc.
Chemische schoonmaakmiddelen kunnen de oppervlakte of de gehele mobiele airco beschadigen.
Knoei geen water in de mobiele airco tijdens het schoonmaken.
2. Filter reiniging
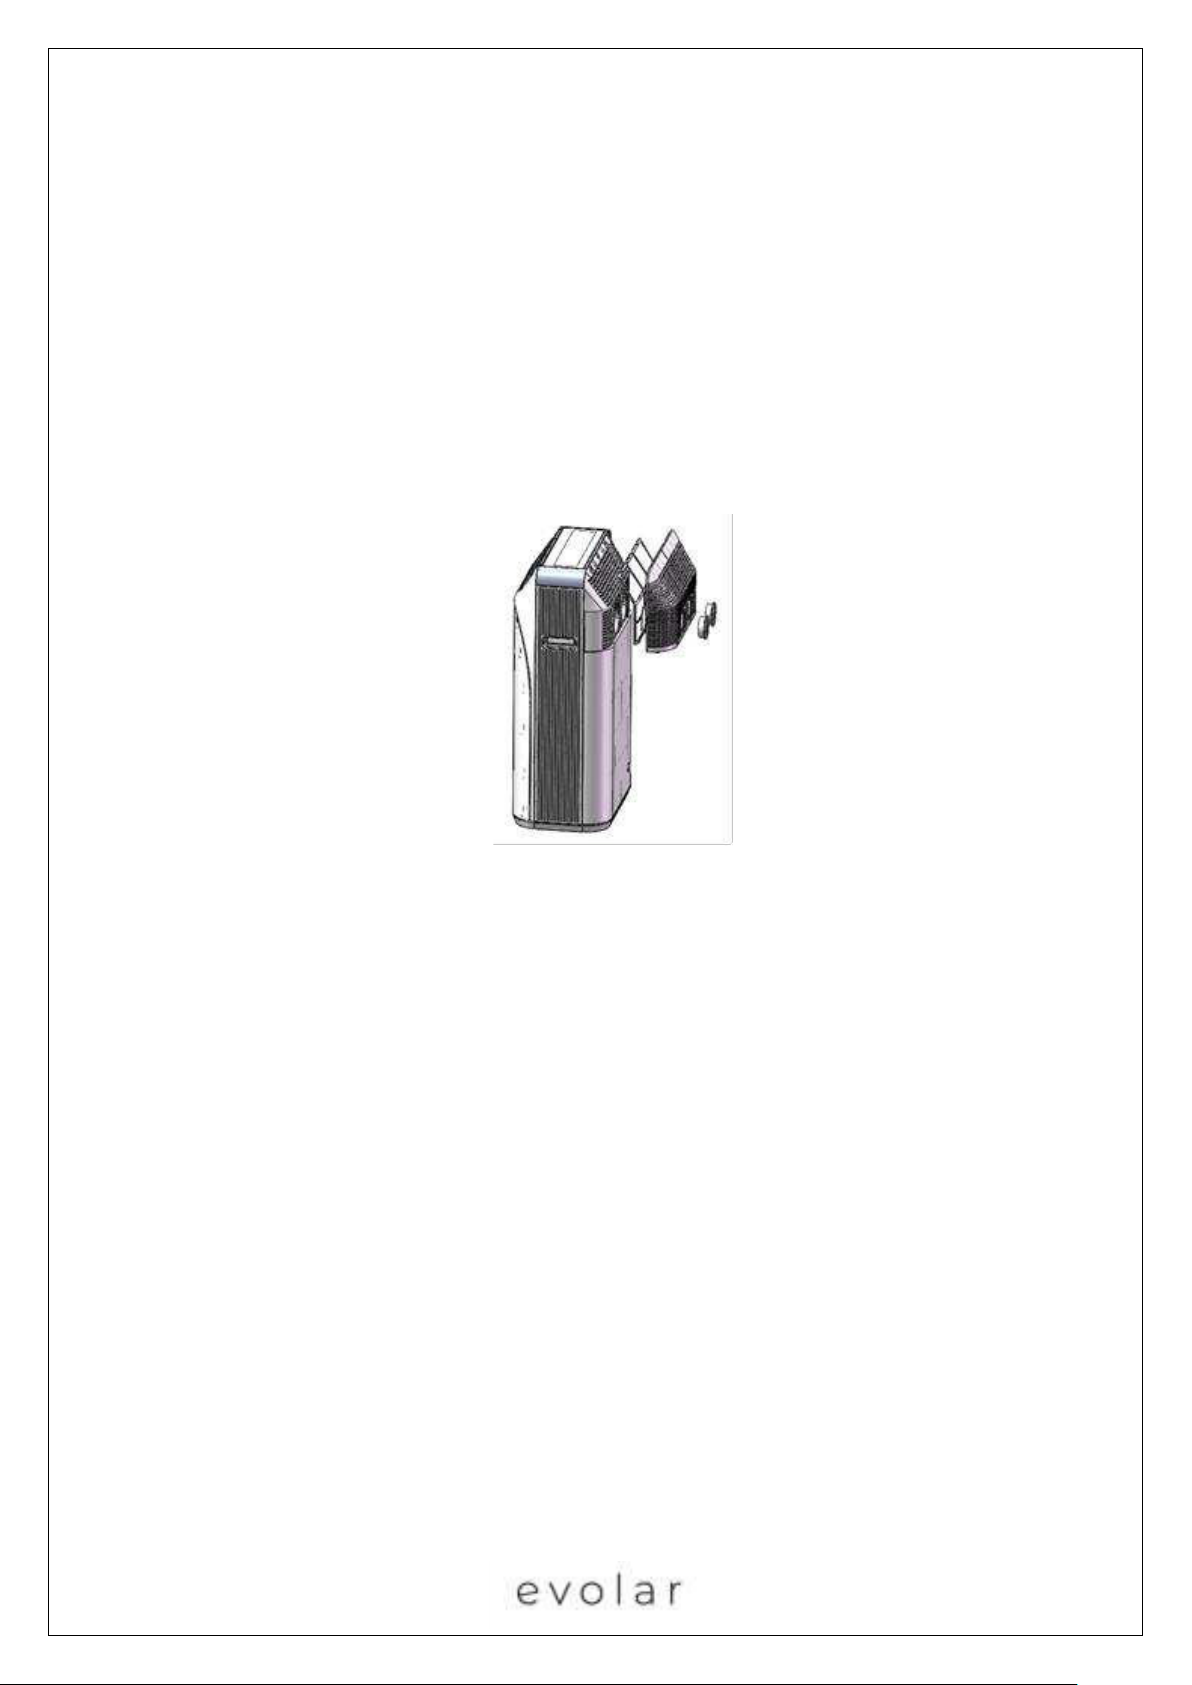
Schroef de twee knoppen van de waterinlaat en wateruitlaat van de achterkant los, verwijder
vervolgens het achterste luchtinlaatrooster en verwijder het filterzeefje van het luchtinlaatrooster
voor reiniging. Maak het filter schoon in water of warm water (ongeveer 40 ℃) met neutraal
reinigingsmiddel en laat het filter na reinigen op natuurlijke wijze drogen en plaats het filterzeef terug
op de mobiele airco.
Let op:
1. Gebruik geen water met een te hoge temperatuur (geschikte temperatuur is ongeveer 40 ° C)
of een agressief schoonmaakmiddel (zoals alcohol, benzine, benzeen, enz.) om het filter
schoon te maken;
2. Om vervorming van het filter te voorkomen, moet het gereinigde filter uit de buurt van
warmtebronnen worden gehouden en dient u het filter op natuurlijke wijze te laten drogen.
3. Evolar raadt u aan de filter elke 14 dagen te reinigen.
3. Vervang het water in de watertank regelmatig
Page 23
Evolar raadt u aan om het water in het waterreservoir ten minste elk kwartaal te vervangen.
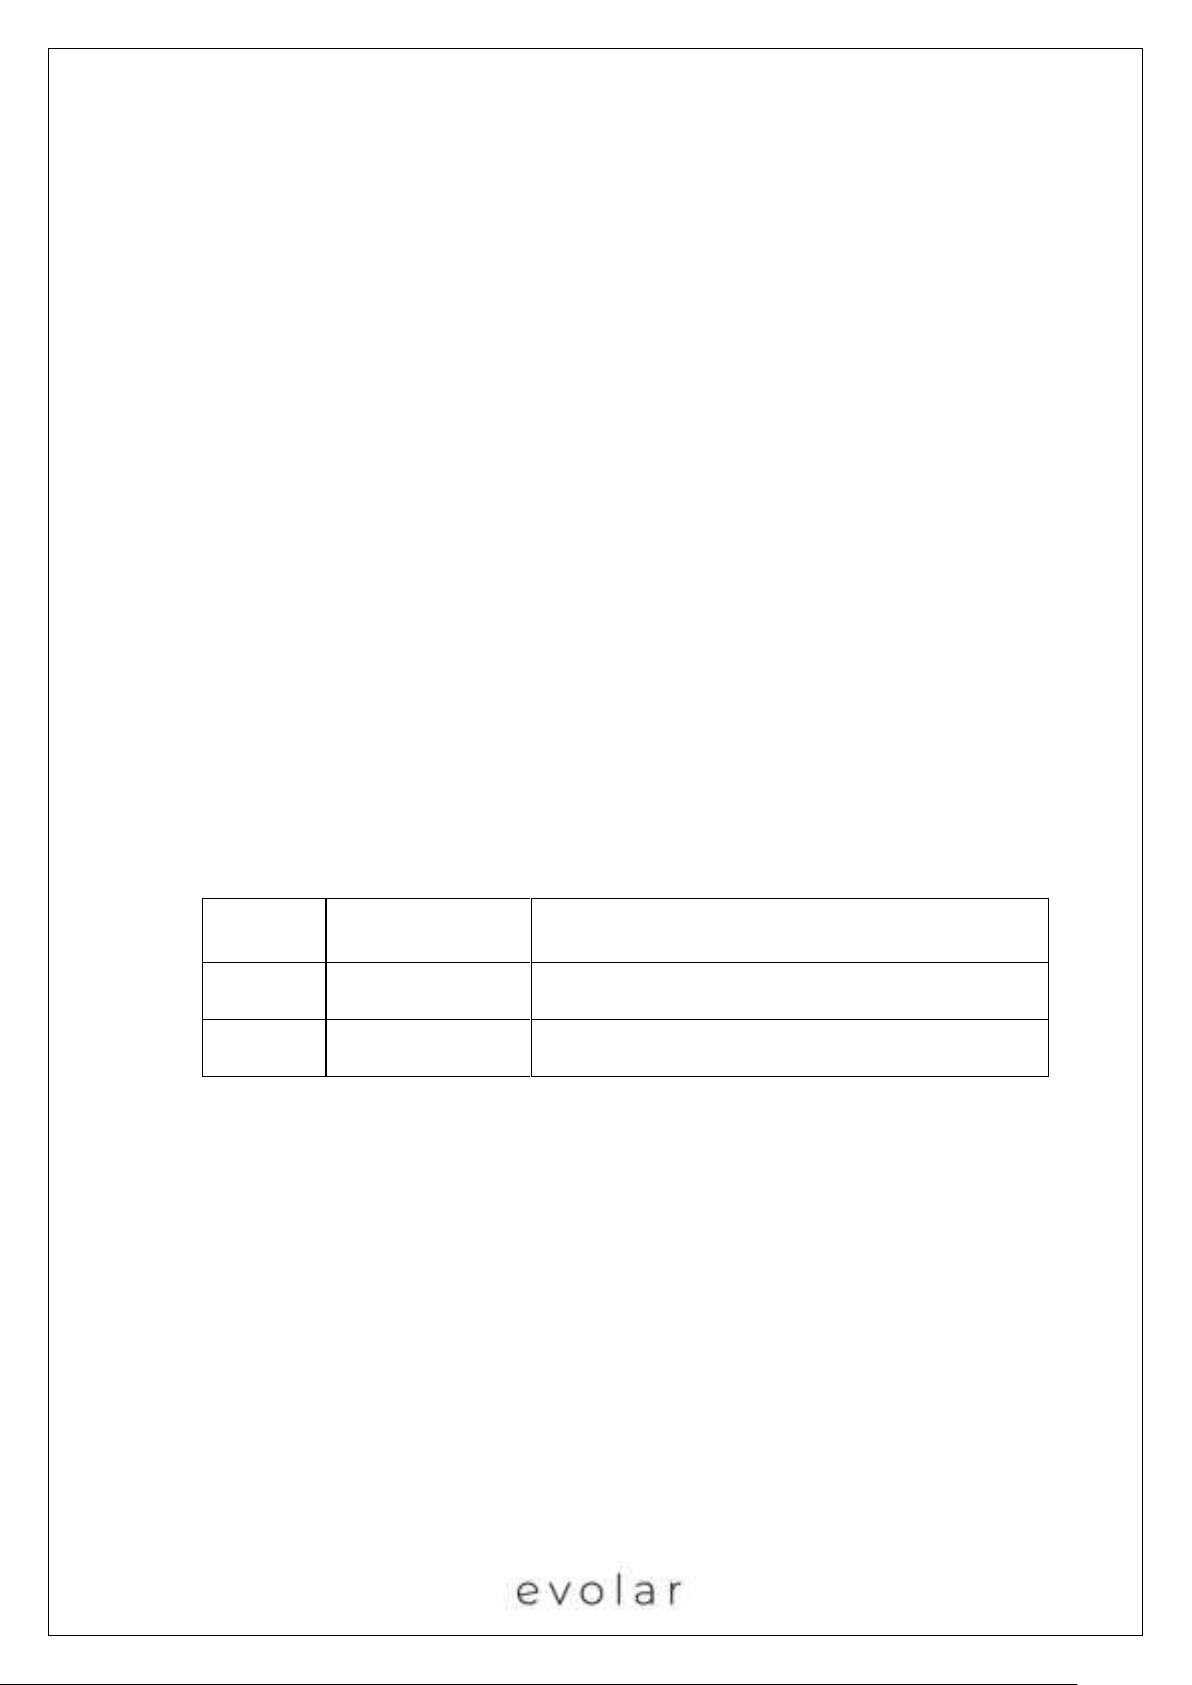
Fout code
Code Betekenis
Oplossing
E1
Watertekort van
watertank
Sluit de watertoevoerpijp aan en druk op de toets
【watertoevoer】om water te vullen.
E2
Watertank is vol
Sluit de afvoerpijp aan en druk op de toets 【afvoer】
om af te tappen.
4. Seizoen onderhoud
Als u de machine lange tijd (in beginsel langer dan een maand) niet gebruikt, volg dan de onderstaande
stappen om hem te onderhouden:
1. Tap het water uit de tank.
2. Maak het filterscherm schoon en plaats deze na het te laten drogen terug.
Als de mobiele airco lange tijd niet wordt gebruikt, let dan op de volgende punten wanneer u het
opnieuw in gebruik neemt:
1. Controleer of er water in het waterreservoir zit of dat het watervolume voldoet aan de vereiste
niveau. Er verschijnt een melding wanneer u de machine start.
2. Controleer of het netsnoer in goede staat is. Gebruik het niet als het beschadigd is.
VI Storingen
1. Foutcodes
Page 24
2. Probleemoplossing
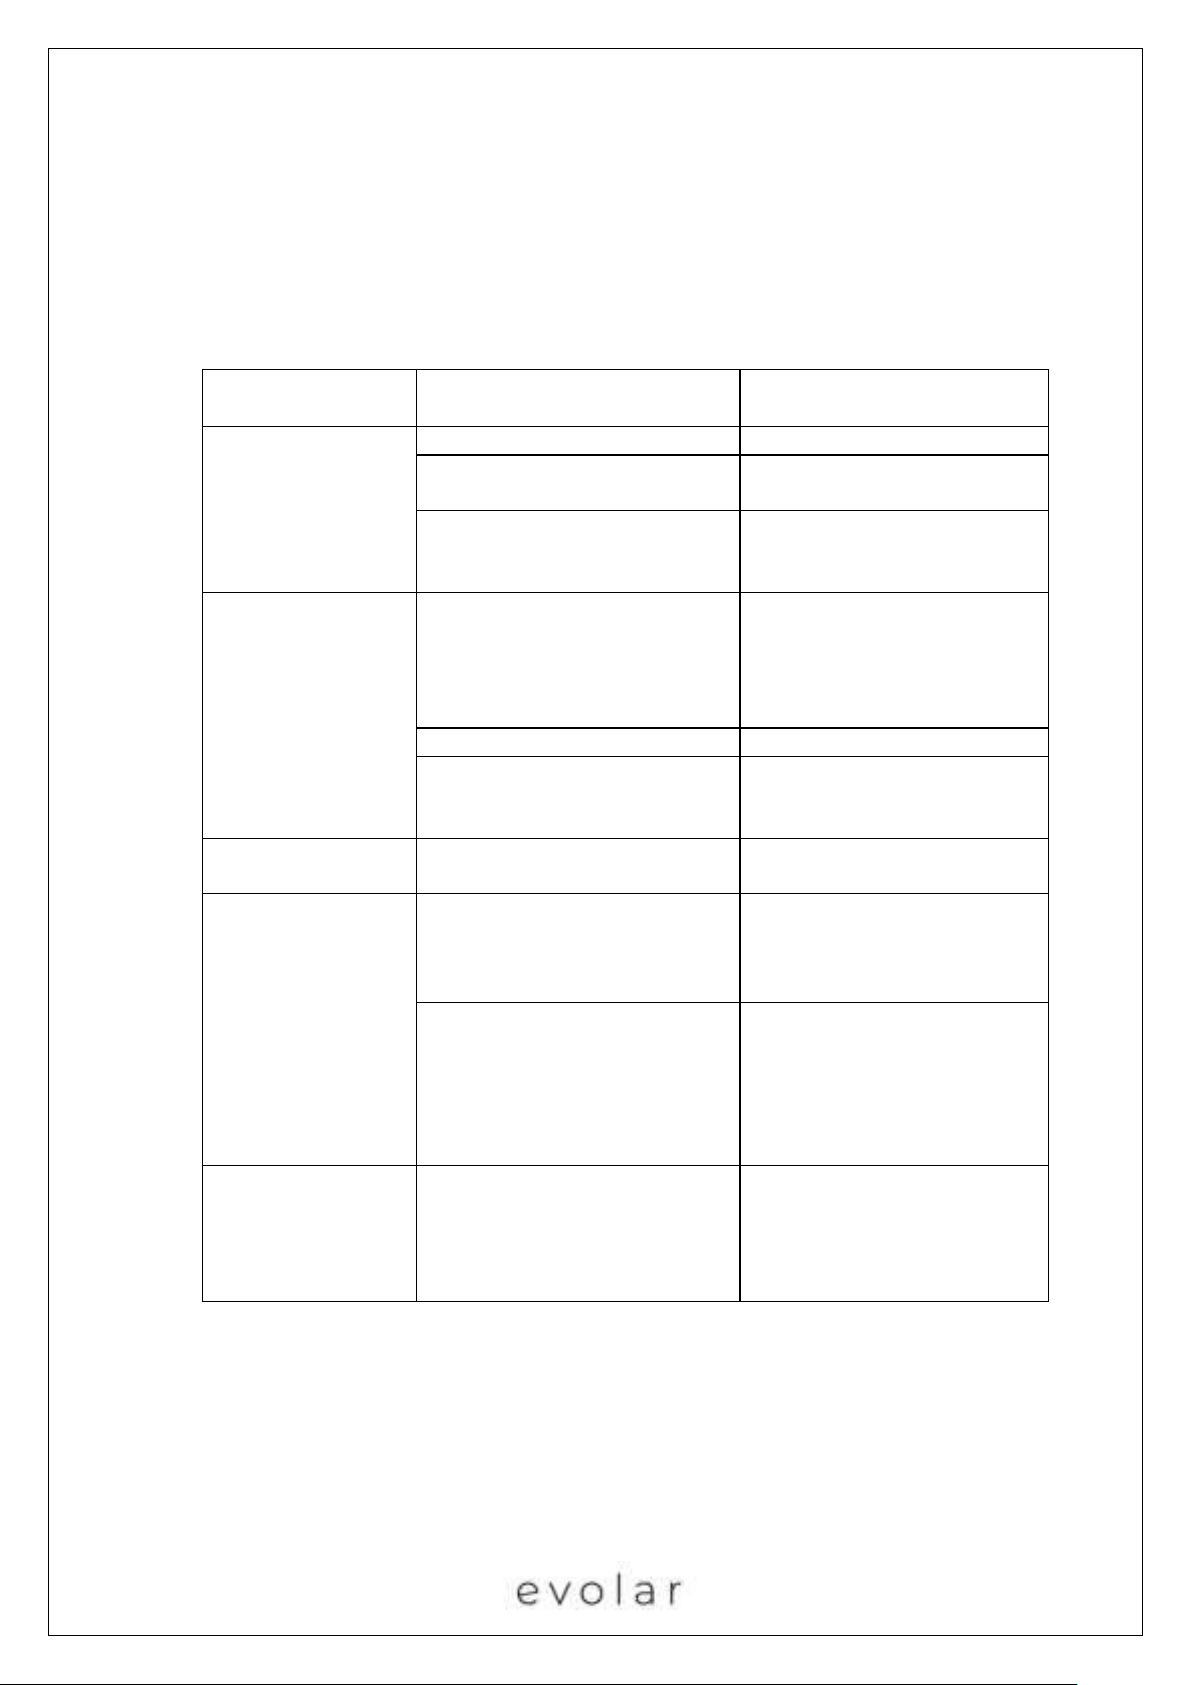
Probleem
Mogelijke reden
Oplossing
Airconditioning
werkt niet
Stroom staat niet aan
Schakel de stroom in
Koeling, ontvochtiging en
verwarming starten niet.
Controleer of de ingestelde
temperatuur is bereikt.
Wachttijd van drie minuten na
het schakelen tussen koelen en
verwarmen.
Wacht meer dan drie minuten.
Slechte koeling
(verwarming) effect
van airconditioning
De deuren en ramen staan open
en/of er is koude of hittelekkage
in de kamer. Er zijn andere
warmtebronnen (koude
bronnen)
Sluit de deur of het raam en
verwijder de warmtebron
(koude bron)
Het filter is vuil
Reinig of vervang het filter
Luchtinlaat of luchtuitlaat is
geblokkeerd of er is een slechte
luchtcirculatie.
Verwijder de blokkade van de
luchtinvoer of luchtafvoer.
De airconditioner
maakt lawaai
Airconditioner is niet waterpas
geplaatst of staat niet stabiel.
Plaats de airco op een vlakke en
stevige ondergrond.
Compressor werkt
niet
Compressorvertraging
bescherming ingeschakeld.
Wacht langer dan 3 minuten en
schakel de airconditioner in
nadat de temperatuur is
gedaald.
Wanneer in de koelmodus de
watertemperatuur niet de
starttoestand van de compressor
bereikt, wordt de watercyclus
gebruikt voor koeling en start de
compressor op dit moment niet.
Wanneer de koeling van de
watercyclus is voltooid, wordt
de compressor automatisch
gestart voor koeling.
Tijdens koude
opslag, ontstaat er
condensvorming op
de voorste en
achterste platen
Wanneer de luchtvochtigheid
hoog is en de waterdamp in de
lucht koud is, kan dauw
condenseren op de
airconditioning.
Het is geen fout, u kunt het
blijven gebruiken, controleer of
u de dauwverwijderingsfunctie
hebt uitgeschakeld.
Onderstaande tabel geeft een overzicht van de veelvoorkomende fouten en onderhoudsmethoden
van deze mobiele airconditioner. Wanneer de machine niet of niet goed functioneert, kan een
eenvoudige diagnose en onderhoud worden uitgevoerd via onderstaande tabel. Neem contact op met
uw leverancier als het probleem nog steeds niet kan worden opgelost.
Page 25
Garantie:
Evolar biedt een garantie van 24 maanden. Uw garantiebewijs is geldig als het product in
overeenstemming met de instructies wordt gebruikt en voor het doel waarvoor het is gemaakt. Het
oorspronkelijke aankoopbewijs met de datum van aankoop, naam van de verkoper en het
artikelnummer van het product moet worden ingediend. Voor service, vragen en garantievoorwaarden
en de algemene voorwaarden van Evolar kunt u terecht op
Milieu:
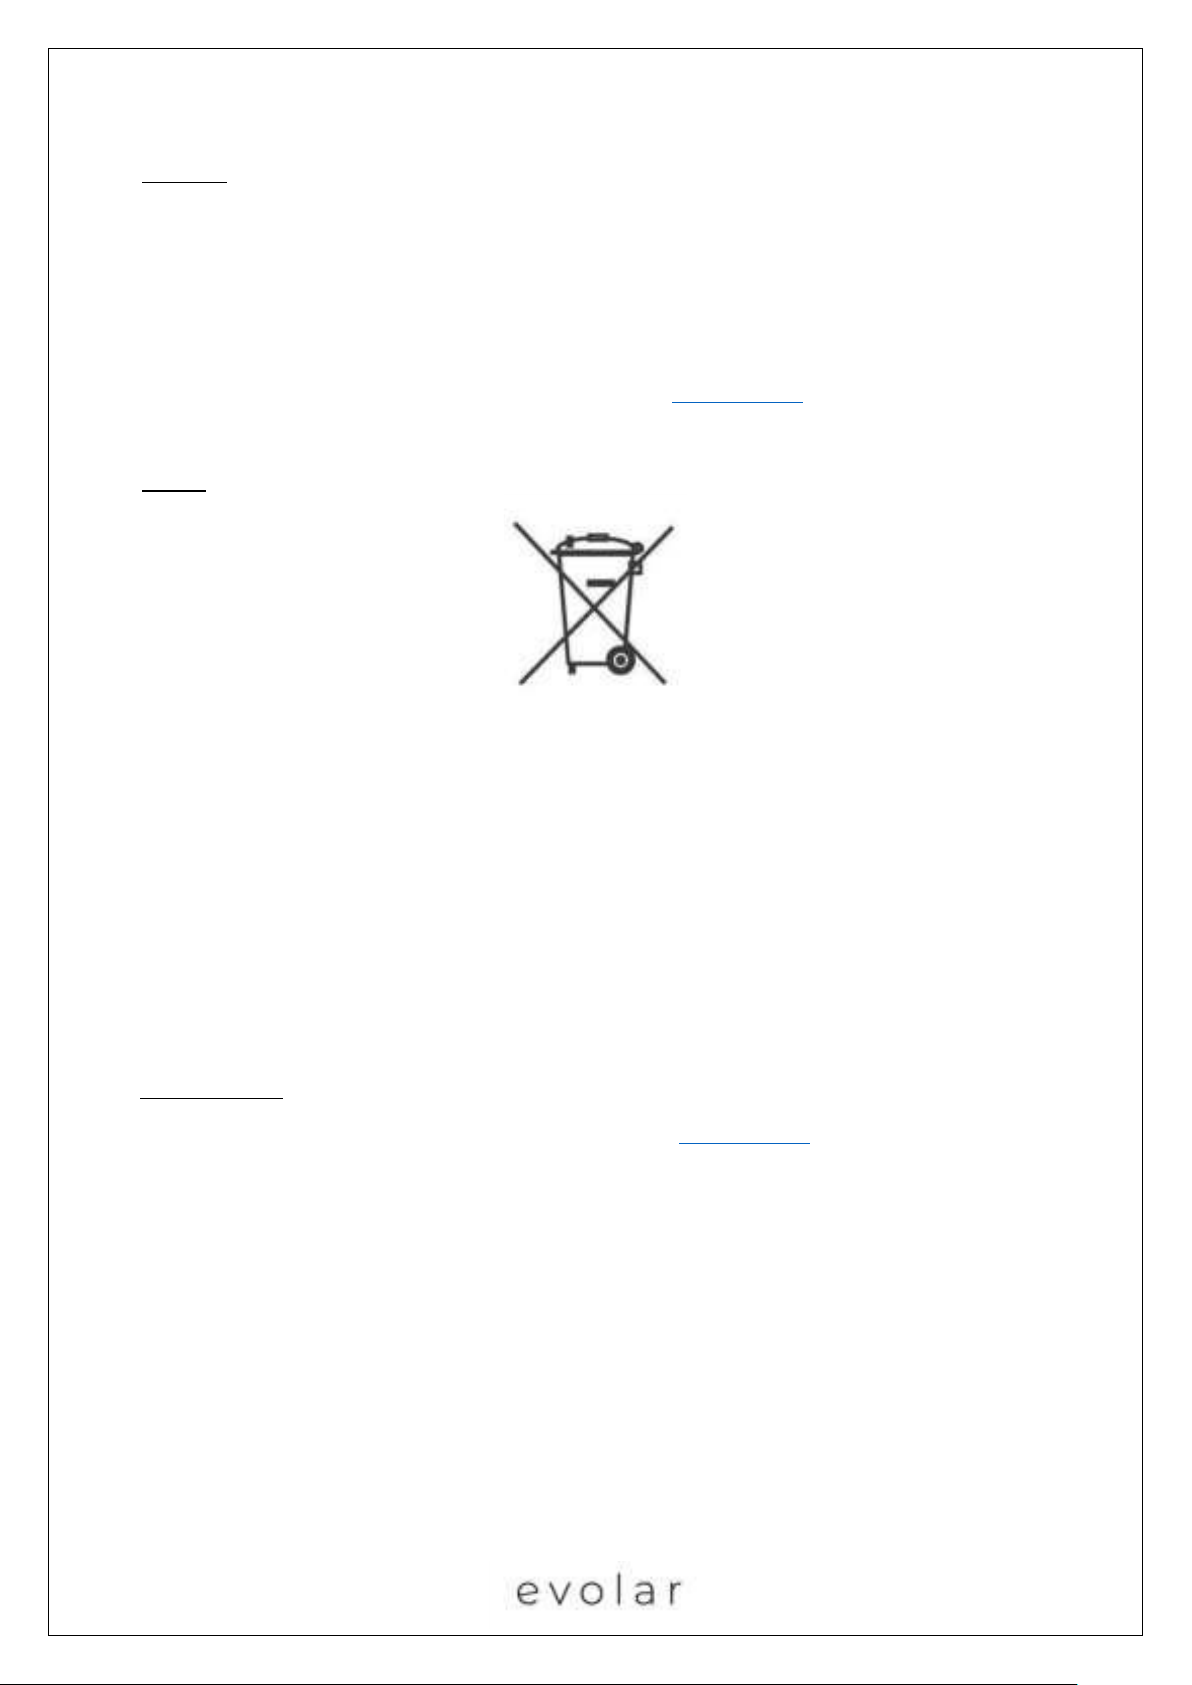
Dit apparaat mag aan het eind van zijn duurzaamheid niet bij het normale huisafval worden gezet,
maar moet bij een centraal punt voor de recycling van elektrische en elektronische huishoudelijke
apparaten worden aangeboden. Dit symbool op het apparaat, de handleiding en de verpakking richt
uw aandacht op deze belangrijke kwestie. De gebruikte materialen in dit apparaat kunnen gerecycled
worden. Door het recyclen van gebruikte huishoudelijke apparaten draagt u bij aan een belangrijke
www.evolar.nl
stap in de richting van de bescherming van ons milieu. Vraag uw lokale overheid voor informatie over
het inzamelpunt
Ondersteuning:
Alle beschikbare informatie en onderdelen zijn te vinden op www.evolar.nl
Page 26
Manual portable air conditioner:
Installation and operation Manual V3
Evolar EVO-ES9000
Page 27
Safety precautions
English (EN)
Meaning of the symbols on your device:
- The mobile air conditioner is filled with Propane Gas R290. You must follow the
manufacturer's instructions for use and repair.
- Before the installation and use, carefully and completely read the installation and user
manual.
- Do not use or store the Evolar EVO-ES9000 in a room smaller than 12m2.
Deutsch (DE):
Bedeutungssymbole auf Ihrem Gerat:
- These mobile Klimaanlage ist mit PROPANGAS R290 gefüllt. Sie müssen which
Anweisungen des Repairers zur Verwendung und Reparatur befolgen.
- Lesen Sie vor der Installation und Verwendung which Installation and sorgfältig
Bedienungsanleitung und durch vollständig.
- Verwenden oder lagern Sie den Evolar EVO-ES9000 nicht in einem Raum und unter den
12m2.
Français (FR)
Signification des symboles sur votre appareil:
- Le climatiseur mobile est rempli de gaz propane R290. Vous devez suivre les instructions du
fabricant pour l’utilisation et la réparation.
- Avant l’installation et l’utilisation, lisez attentivement le manuel d’installation et d’utilisation.
- Règlementations d’installation par type: n’utilisez ni ne stockez l’Evolar EVO-ES9000 dans une
pièce de moins de 12m2.
Page 28
Technical:
Type/Model
Evolar EVO-ES9000
Cool capacity storage
4,5 kWh
Cool capacity
2,5 kW
Cool capacity BTU
9000 BTU
Heating capacity
2,5 kW
Cooling capacity
600 – 2500 W
Heating capacity
900 – 2500 W
Airflow
360 m3/h
Supply voltage
220-240V/ 50 Hz
Power consumption cooling
30 – 800 W
Power consumption cooling
0.14 – 3.7 A
Power consumption heating
600 – 1400 W
Power consumption heating
2.8 – 6.5 A
Power consumption energy storage
1000 W
Noise level
33/40/45 dB(A)
Weight (without water)
40 kg
Water content (user to add)
37 liters
Weight (ready to use)
77 kg
Refrigerant
R290
Amount refrigerant
245 grams
Maximum pressure
2.1 MPa
Temperature setting
15 – 32 °C
Operating temperature
5 – 38 °C
Maximum power consumption
1400 W
Dimensions
495 x 330 x 920 MM (BxDxH)
Approval
CE
Connection size water inlet/outlet
¾’’
Page 29
Safety instructions:
- You are required to carefully read the operating manual through.
- The portable air conditioner must stand upright during use and transport at all times. If the
device has not been fully erect, you must wait 24 hours before the device can be used.
- The unit is suitable for indoor use only.
- The device is intended to assist a flat surface with an area of 50CM around the device for
proper operation.
- Use the power outlet that is properly installed and is accessible for use.
- Not use the device in the vicinity of a heat source, flammable or explosive-sensitive
substances, or fuels, in a wet space in which water can splash.
- An operating device should not be left unattended.
- Do not place objects on the appliance and do not cover the appliance, this can cause a fire.
- Insert block your fingers or other objects into the unit (the grids/air outlets) may the unit.
- For maintenance and cleaning device is always energized to be made by removing the plug
from the socket.
- Always turn the power off or pull the plug from the outlet when moving the air conditioner.
- Outlets of the air conditioner must comply with local electrical safety regulations. If necessary,
check these regulations.
- Always supervise children, pets and incapacitated persons to ensure that they do not touch
the appliance.
- Check the device, the power cord and plug for damage. Any evidence of damage should the
device be offered for inspection/repair to the manufacturer, its service agent or a similarly
qualified person to avoid danger. Evolar highly recommends in the case of a repair, the original
parts be used at all times.
- The device can’t be safely used be used by children and persons with reduced physical, sensory
or mental capabilities.
- Use of the plug only which is factory-mounted on the apparatus. If possible, avoid the use of
extension cords. When using an extension cord it should at least have a capacity of 3x1,5mm2.
- Evolar cannot be held liable in the case of damages as a result of the incorrect following of
these safety instructions. In the case of doubt or questions you may have regarding these
instructions, always contact the customer service of Evolar or your supplier.
Page 30
Refrigerant R290 (propane) safety:
- When using the device, you must read these warnings
- The unit contains refrigerant R290. R290 is a refrigerant in accordance with European
directives. Note that perforate the refrigeration circuit never R290 is flammable (GWP 3).
- Do not use substances other than prescribed/recommended by the manufacturer for the
thawing
- The unit contains refrigerant R290. The device is to be used and stored standing in a room in
which no other sources of ignition.
- In an unventilated room should you use or store to take additional measures to prevent fire or
explosion by refrigerant leakage.
- Installation rules for each type: use or store the Evolar EVO-12000C not in a space smaller than
12m2.
- R290 is an odorless refrigerant leak you will not smell.
Page 31
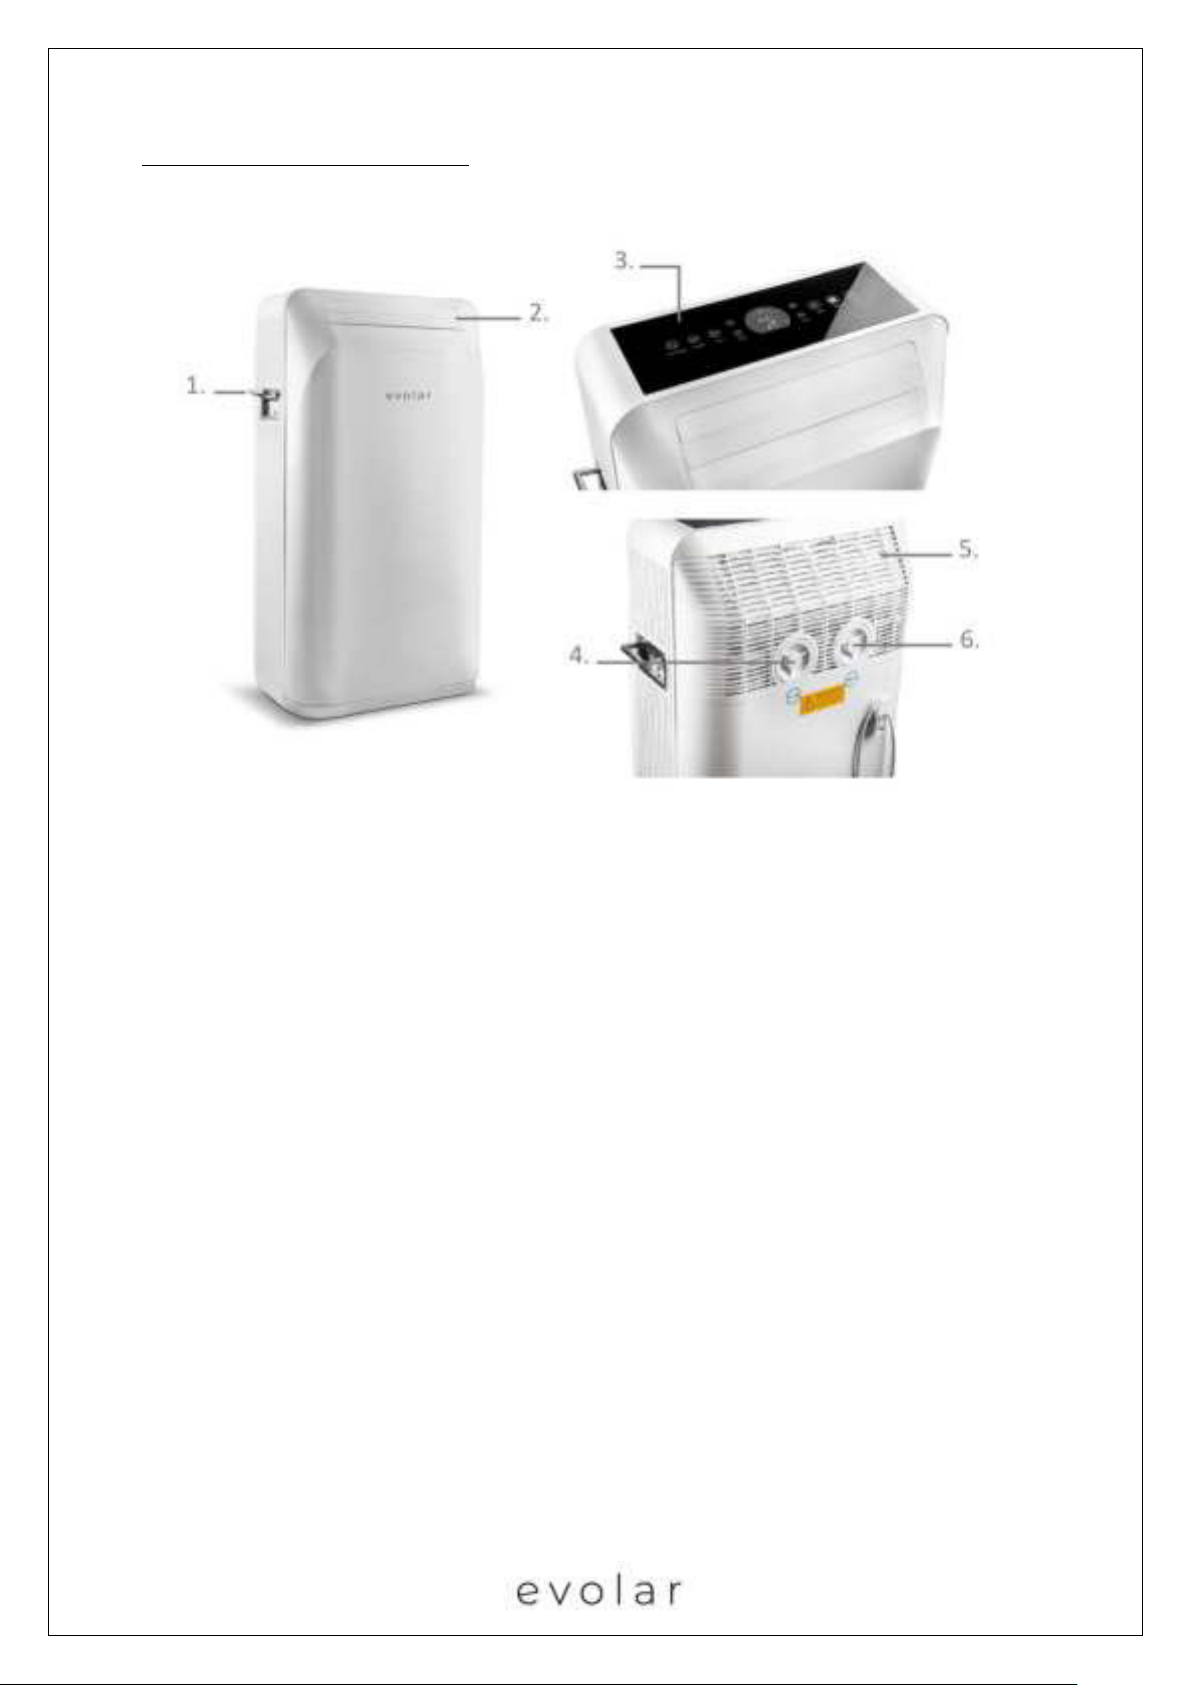
Description portable air conditioner
Parts:
1. Handle
2. Air outlet
3. Control panel
4. Water inlet
5. Air inlet
6. Water outlet
Page 32
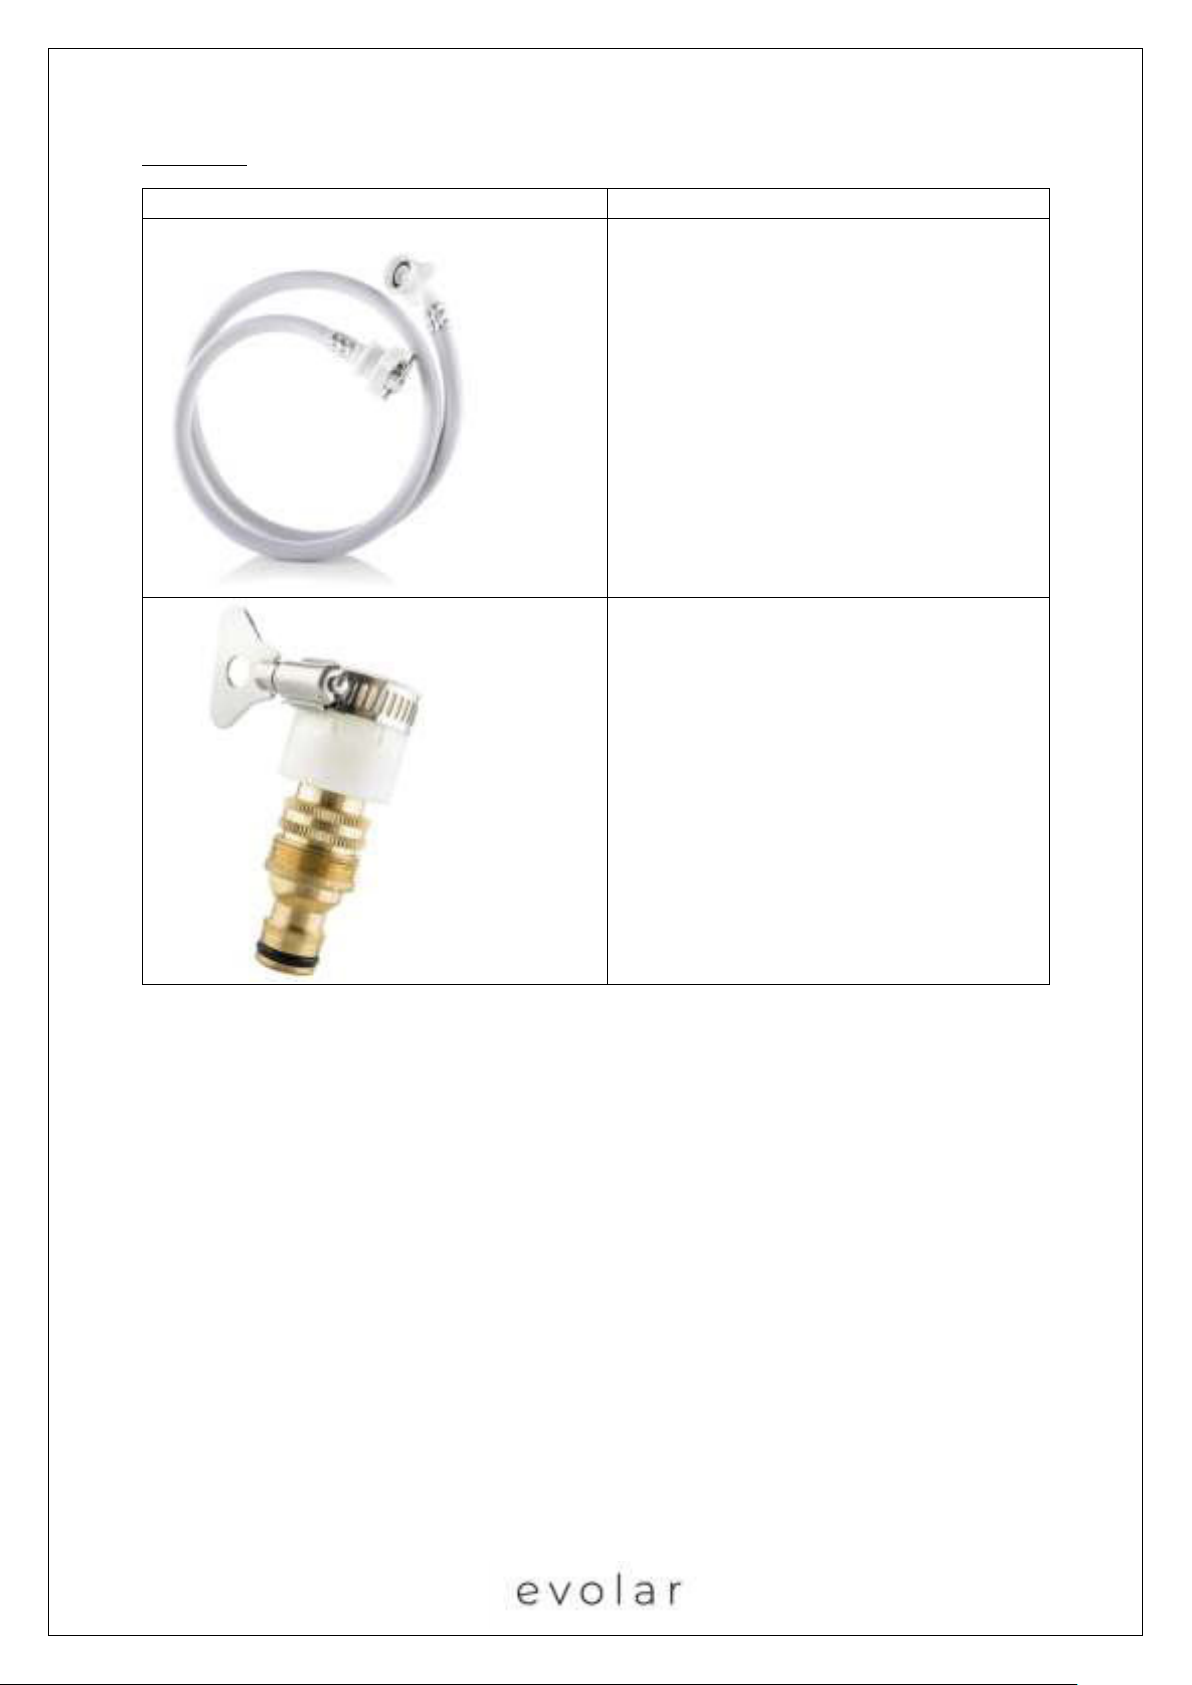
Accessories:
Part
Description
- Fill/drain hose
- Tap adapters
- Connection M22
- Connection M24
- Connection ½
- Terminal connection
Page 33
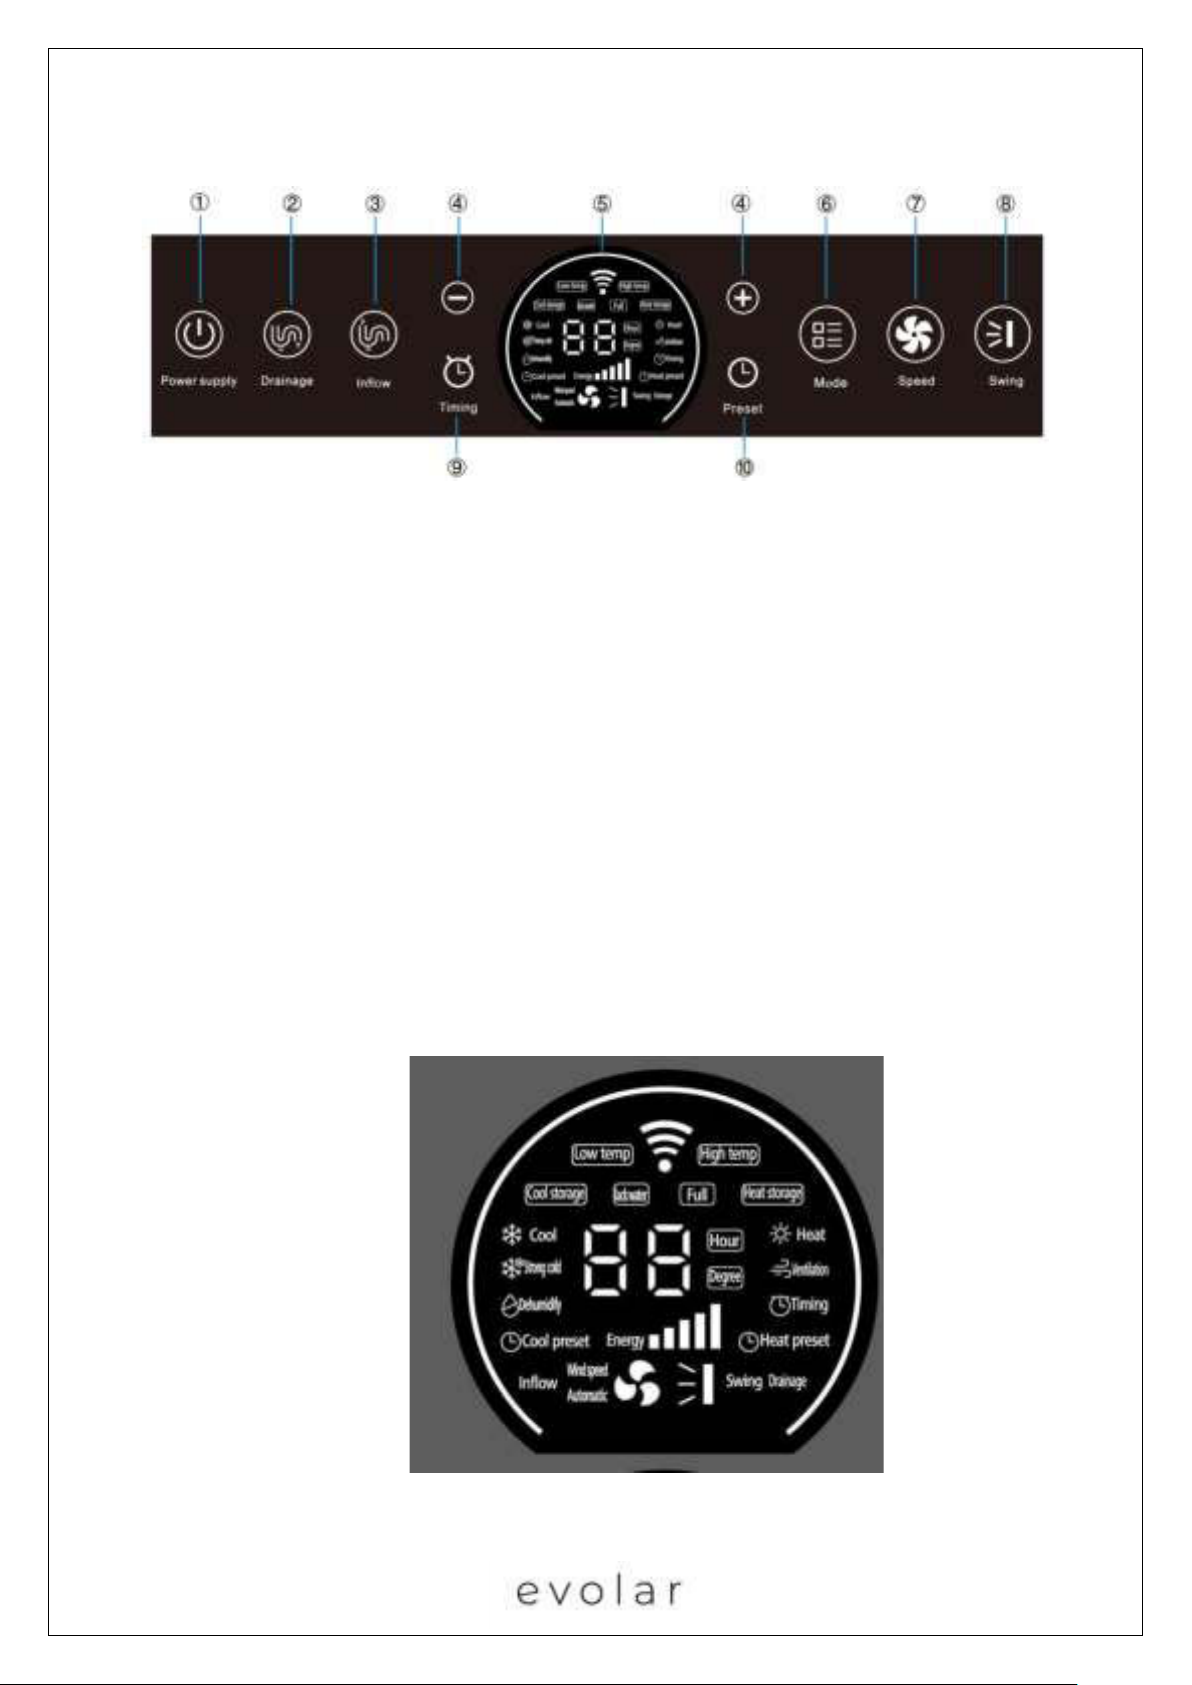
Control panel:
1.【Power】
Press this button to switch on/off the air conditioner
2. 【Drainage】
Press this button to start water drainage function.
3. 【Inflow】
Press this button to start water inflow function.
4. 【+】 and【-】
In cool, strong cold, dehumidify, cool storage, heat storage or heat mode, press this
button to increase or decrease the setting temperature (Each press adjusts 1 degree).
In timing and preset model, press this button to increase or decrease the setting time
(Each press adjusts 1 hour.)
5. Screen display:
Page 34
6. 【Mode】
Press this button to select the modes: Heat, Strong cold, Dehumidify, Cold storage, Heat
storage, Heat and Ventilation.
7. 【Wind speed】
Press this button to select the wind speed: Mid, High, Auto and Low
8. 【Swing】
Press this button to select up-down swing or to stop swing.
9. 【Timing】
In every mode (Cool, Strong cold, Dehumidify, Cold storage, Heat storage, Ventilation),
press 【timing】to set the end time of such running mode.
After power on, press 【timing】to set the mode, as well as the start and end time of
such running mode.
10. 【Preset】
Press this button to preset hours before the air conditioner will be used, and this unit will
store the energy (heat storage/cold storage) automatically during this period.
Installation
- The Evolar EVO ES9000 is a mobile air conditioning which can move. Follow the installation
instructions below for commissioning:
- Remove the packaging materials and place the device so that it stays upright.
- Check all parts for visible damage. Do not use the device if there are any damage and contact
your supplier.
- Place the device near a power outlet.
- Place the device on a flat, solid and stable surface that can withstand the pressure load of the
wheels (+/- 20 kg per wheel). Keep at least 20 cm free space on all sides and take the safety
instructions into account.
- Note: Not every floor type is suitable for moving the machine on its wheels. Evolar is not liable
for damages due to the use or the moving of the device. Evolar will not give any indication or
advice whether any specific floor type is suitable or not.
Page 35
User instructions:
Follow the steps below:
1. Plug the power plug in a wall outlet in the proximity of a filling hose.
2. Switch on the mobile air conditioner for the first time, press the 【power】-button and
connect the mobile air conditioner to the filling hose on the filling valve according to the
spoken message.
Note: Move the mobile air conditioner carefully to prevent collisions and falls.
3. Do not stack things on the air inlet/outlet of the machine. There must be a minimum clearance
of 500mm between the air inlet/outlet and the surrounding objects and keep the air
inlet/outlet free to prevent the air exchange of the machine's air inlet/outlet from being
affected.
4. To clean and maintain the machine, use a soft cloth to wipe the machine. Do not use wax,
thinner or irritant cleaner.
5. Clean the filter regularly. It is recommended to clean the filter every 14 days.
6. Remove the plug from the wall socket and drain the water in the water tank if the machine
will not be used for a longer period of time.
7. Do not disassemble or repair the machine without professional maintenance personnel.
Important usage instructions:
1. For cold/heat storage (cold/heat storage modus), it’s recommended to open doors and
windows for ventilation.
2. After the cold/heat storage is completed, the compressor enters the protection status. You
must wait at least 3 minutes before commissioning the device.
3. At the moment that the compressor starts there may be an increased noise level temporarily,
after starting the compressor this noise will be gone.
4. After draining the water from the mobile air conditioner, you must disconnect the drain hose
and screw the screw cap directly back on the machine. If you do not remove the hose or
replace the cap, water will continue to flow from the drain.
5. Even if the machine's drain function is used to drain the water in the tank, the water cannot
be drained completely. Therefore, the machine must be upright and not laid flat when moving,
carrying and storing. If the mobile air conditioner has nevertheless been lying flat, wait 24
hours before switching the device on again.
Page 36
In use mobile air conditioning:
1. Connect the power supply
1. Connect the power supply for the first use and refer to step 2 "Fill the water"
2. Insert the plug into the socket and press the 【power】-button on the control panel if it is not
being used for the first time or if there is water in the water tank.
2. Fill the water
When the mobile air conditioner gives the signal to fill water (no water in the water reservoir during
the first use or water shortage during use), follow the steps below to fill the mobile air conditioner
with water:
1. Use the water filler connection on the back of the air conditioner to connect the filling hose to
the tap. Press the water supply button ('water inlet') and open the filling tap, this should be
done simultaneously.
2. When the water level reaches the correct height, the water inlet valve will close automatically
to stop the water supply.
3. Remove the hose and screw the lid of the filler neck fixed.
3. Cooling For the best cooling performance, use cold storage function (point 6) before cooling.
1. Press 【mode】in order to select the cooling mode.
2. Press【+】or 【-】in order to set the desired temperature. Set the temperature in between
the first 16 ℃ and 32 ℃.
3. Press【wind speed】in order to set the desired speed. There are four positions: low, mid, high
or automatic.
4. Press【swing wind】to set the discharge blades in the correct position. The slats can move up
and down automatically in the swing position and can be locked in the desired position.
Note:
The actual air inlet temperature is displayed during cooling.
Page 37

When the cooling capacity of the water in the water tank is used up (water temperature is 40 °C), the
air conditioning automatically stops cooling. The water must then cool down to be able to cool again.
It is also possible to use the 'cold storage' function to cool the water. It is also possible to replace the
water in the air conditioning for cold water in order to be able to switch back to cooling mode.
4. Strong cooling
This mode can be used when fast cooling is required.
1. Press【mode 】to select the forced cooling function.
2. Press【+】or 【-】to set the desired temperature. Set the temperature in between the first
16 ℃ and 32 ℃.
3. Press【swing wind】to set the discharge blades in the correct position. The slats can move up
and down automatically in the swing position and can be locked in the desired position.
Note:
The actual air inlet temperature is displayed during cooling.
When the cooling capacity of the water in the water tank is used up (water temperature is 40 °C), the
air conditioning automatically stops cooling. The water must then cool down to be able to cool again.
It is also possible to use the ' cold storage' function to cool the water. It is also possible to replace the
water in the air conditioning for cold water in order to be able to switch back to cooling mode.
5. Dehumidify
1. Press 【mode 】to the to select dehumidify.
2. Press【+】or 【-】to set the desired temperature. Set the temperature in between 20 ℃ and
32 ℃.
3. Press【swing wind】set the discharge blades in the correct position. The slats can move up
and down automatically in the swing position and can be locked in the desired position.
Note:
The actual air inlet temperature is displayed during dehumidification.
6. Cold storage
Page 38

1. Press 【mode】to select the cold storage mode.
2. Press【+】or 【-】to set the temperature for cold storage. Set the temperature range
between - 6 ℃ and 5 ℃. The lower the temperature, the bigger the cooling capacity.
3. The unit may not reach the set temperature. This depends on the ambient temperature and
does not affect the cooling function. The unit will stop automatically when the cold storage
function is done.
4. After completion of the cold storage function, the air conditioner will switch to standby mode
automatically.
Note:
During cold storage function, air will be moved at high speed and the louvres will be at the maximum
discharge angle. The stored heat is currently being dissipated from the water. Open the doors and
windows in a small room for ventilation. A lot of heat will be blown into the room during the cold
storage function.
- The actual water temperature in the water reservoir is displayed during cold
storage.
- The air inlet and air outlet must not be covered.
7. Heat storage
1. Press 【mode】to select the heat storage mode.
2. Press【+】or【-】 to set heat storage temperature, between 20℃ and 30℃.
After heat storage completes, the unit enters in standby and temperature-holding status.
Note:
During the heat storage function, the air exhaust fan is closed, and no air will be blown out of the
mobile air conditioner.
- The actual temperature of the water in the tank is displayed during heat storage.
8. Heating
1. Press 【mode】to select heating mode.
Page 39

2. Press【+】or 【-】to set the desired temperature. Set the temperature between the 16℃
and 32℃.
3. Press 【wind speed】to set the desired speed. There are four positions: low, medium, high or
automatic.
4. Press【swing wind】to set the discharge blades in the correct position. The slats can move up
and down automatically in the swing position and can be locked in the desired position.
Note:
During heating, the actual temperature of the water in the water tank is displayed.
When the heating capacity of the water in the water tank is used up (water temperature is 2°C), the
air conditioning automatically stops heating. The water should then on to heat up, in order to be able
to again heat. It is also possible to ‘heat storage’ function to use to allow the water to warm up. It is
also possible to replace the water in the air-conditioning system with hot water in order to switch back
to heating mode.
9. Ventilation
1. Press 【mode】to select the fan mode.
2. Press 【wind speed】to set the desired speed. There are four modes: low, medium, high or
automatic.
3. Press【swing wind】to set the discharge blades in the correct position. The slats can move up
and down automatically in the swing position and can be locked in the desired position.
Note:
During the fan mode the actual air intake temperature is displayed.
10. Preset
1. Press 【preset】to select the preset mode and then select the cold storage preset or the heat
storage preset mode.
2. Press 【preset】to confirm the preset cold storage or heat storage.
Page 40

3. Press 【+】or 【-】to select how many hours the mobile air conditioner should work after
the start of the preset (cold or heat storage) function. Select a time interval between 4 and 24
hours. After selecting the desired time press 【preset】to confirm.
Cancel preset:
1. Press 【preset 】the previous setting is canceled and select a new preset set.
2. After the mobile air conditioning has been disconnected from the power supply, the
preset is automatically canceled.
3. Press and hold the 【preset】button for more than 3 seconds to cancel the setting.
Note:
1. A few hours before the preset, the machine starts with cold storage or heat storage. After the
end of the cold storage or heat storage, it will automatically go into standby mode.
2. Other programs can be switched on after setting the preset. Enabling other functions take
precedence over the preset. If other functions for setting the preset end, the preset will
continue.
3. Make sure there is adequate ventilation when using the preset function.
11. Timer
The Timer function can be set when the mobile air conditioner is not in cooling mode, strong cooling
mode, ventilation mode, heating mode or dehumidification mode.
1. Press 【mode】in order to select the function, and press【timing】to confirm the function.
2. Press【+】or 【-】to set the desired start time to and press【timing】to confirm the time.
3. Press【+】or 【-】to set the desired end time and press【timing】to confirm the final time.
At the end of the timer setting there will be a spoken confirmation.
Activate timer in cooling, strong cooling, ventilating, heating or dehumidifying mode:
Press【+】or 【-】to set the desired end time and press【timing】to confirm the end time
At the end of the timer setting there will be a spoken confirmation.
Page 41

12. Child lock
Activate child lock:
Press 【+】and 【-】at the same time as long as 3 seconds to activate the child lock. When the mobile
air conditioner is in child lock, the control panel will be blocked.
To unlock the child lock:
1. Press 【+】and 【-】at the same time as long as 3 seconds to unlock the child lock.
2. It is also possible to remove the plug from the wall socket to deactivate the child lock.
Note:
The child lock is a safety function. Never leave the device unattended near children, people with a
mental disability or pets.
13. Condensate drain
After completion of the cold storage or heat storage function, the unit will automatically drain the
condensed water if no other function is active. The water will be stored in het reservoir of the device.
14. Drain
In the event of a water alarm you must drain the water to the correct water level for the correct
operation of the mobile air conditioner. Follow these steps to drain the water in the internal water
reservoir of the machine.
1. Screw the drain button on the rear side separately (water outlet), turn the drain hose to the
water outlet connection, and connect the other end to a drain.
2. Plug in the power cord and press the power button on the control panel.
3. Press 【drainage】and hold the discharge button for longer than 3 seconds pressed. The
draining of the water from the reservoir will start automatically.
4. If the water level is above the working water level, the drain only stops when it reaches the
working water level. If it is necessary to completely drain the water in the water reservoir,
repeat step 3 to continue draining until the reservoir is completely empty.
5. After the water has been drained from the reservoir, the drain pump will be automatically
switched off.
6. Remove the drain hose and screw the cover lid back on.
Page 42

Page 43
IV. TuyaSmart APP
1. Download the app
Download the Tuya app from your Appstore or Google Play store.
2. Registration
1. Click on create new account to open the registration page.
2. The system will automatically determine the current country/region. You can also
country/region manually select the mobile phone or the Enter email address and click Next.
3. If you enter the mobile number, enter the verification code received by the mobile phone,
enter the password and click OK to register.
4. If you enter the email address, enter the password on the page and click OK to register.
3. Log in/Retrieval password
Account + password login
If you have already registered your APP account, click on Login with existing account to open the login
page.
1. The system automatically assesses the current country/region, or you can select a
country/region manually.
2. Enter your registered mobile number or email address, enter your password and log in to the
system.
4. Mobile number + verification code login
1. Click on Login verification code to open the new page.
2. The system automatically assesses the current country/region, or you can manually select a
country/region.
3. Enter the mobile number and click on the Get button to retrieve the verification code. Enter
the verification code and click on the verify and log in button to log in to the system.
5. Forgot password
When your password from the password APP are, you can reset the password.
1. Click on forgot password.
Page 44
2. The system automatically assesses the current country/region. You can also manually select
the country/region, enter your registered mobile phone number or email address and click on
next.
3. Fill verification code received at your mobile phone or e-mail, enter the new password and
click Confirm.
6. WIFI connection
1. Place the product within WIFI range.
2. Plug in power supply cable, press Power button into standby mode, then press Power button as
long as over 5 seconds, and WIFI indicator will be flashing.
3.Enter “Tuya” APP, click Add equipment→ Big appliance→ Air conditioner→ select WIFI 2.4GHZ→
select WIFI→ Input WIFI password, then press Power button into standby mode, then press Power
button as long as over 5 seconds, then repeat operation on the mobile phone.
7. Control device- separate control
After the device is configured successfully, the name of the intelligent device will appear on the home
page. Click to enter the control panel of the intelligent device. At this time, you can control the on and
off of the air conditioner, select the working mode(Cool, Strong cold, Dehumidify, Cold storage, Heat
storage, Ventilation, Standby) of the air conditioner, and select functions of the air conditioner
(temperature, wind speed, auxiliary heating, screen display, child lock, wind swing, etc.).
【Timing】function: Press “Timing”, click “Add” and select time period, then select timing
on/off(Note: when timing off is selected, you need to select the time period and running mode, and
need not to select temperature, wind swing or wind speed). Set temperature range (Note: The
temperature ranges for all modes are: Strong cold 16~32℃; Cool 16~32℃; Heat 16~32℃; Cold
storage -6~5℃; Heat storage 20~30℃; Dehumidify 25℃).Set wind swing and wind speed (Note: The
wind speed might be different in different running modes).Then click “Save”, the preset values are
saved.
Page 45
V. Maintenance
1. Clean the machine
Switch off the mobile air-conditioning power supply and wipe the mobile air-conditioning with a soft,
semi-dry cloth. Do not use chemical agents such as benzene, alcohol, gasoline, etc. Chemical cleaning
agents can damage the surface or the entire mobile air conditioner. Do not spill water in the mobile
air conditioner during cleaning.
2. Filter cleaning
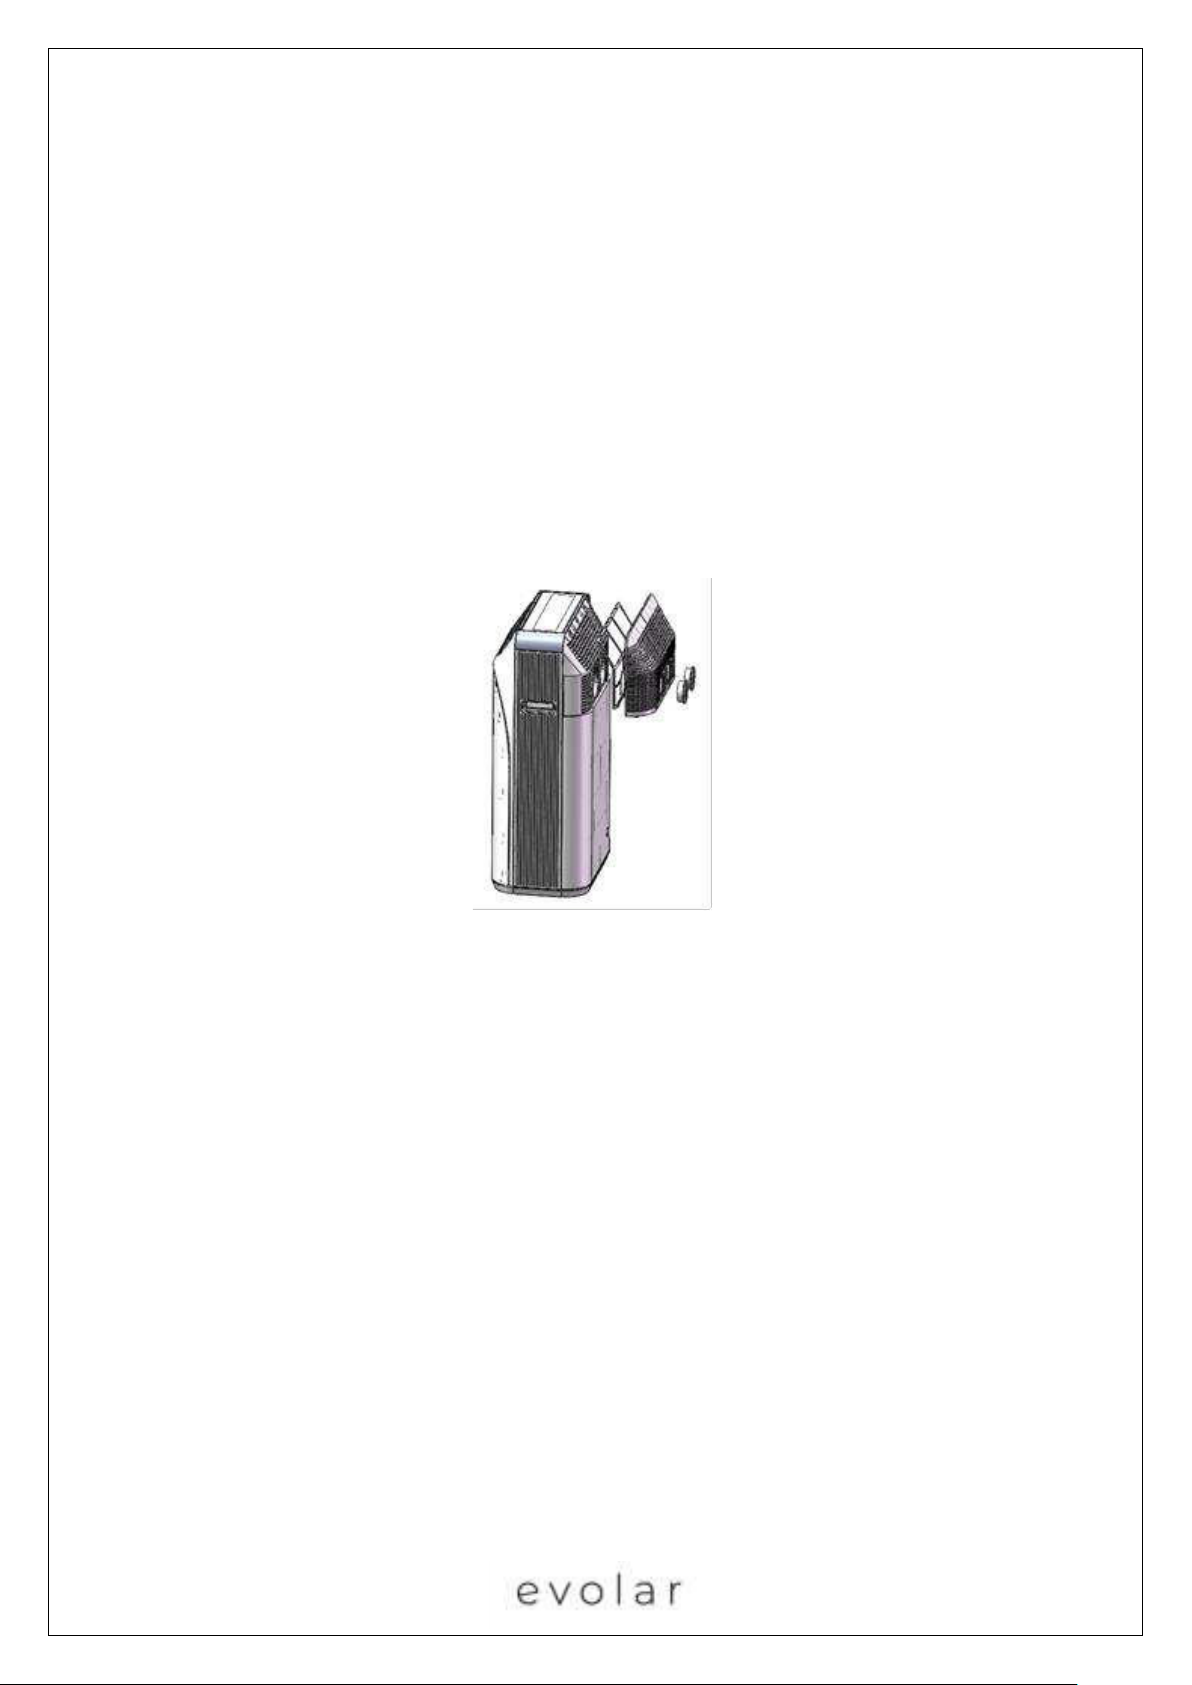
Unscrew the two buttons on the water inlet and water outlet from the rear, then remove the rear air
inlet grille and remove the filter strainer from the air inlet grille for cleaning. Clean the filter in water
or warm water (approximately 40 ℃) with neutral detergent and allow the filter to dry naturally after
cleaning and replace the filter strainer on the mobile air conditioner.
Note:
1. Do not use water with too high a temperature (suitable temperature is about 40 °C), or an
aggressive cleaning agent (such as alcohol, gasoline, benzene, etc.) to clean up the filter.
2. To prevent filter deformation, the cleaned filter must be kept away from heat sources and
allow the filter to dry naturally.
3. It is recommended to clean the filter once every 14 days.
3. Replace the water in the water tank regularly
It is recommended to change the water in the water reservoir at least every quarter.
Page 46
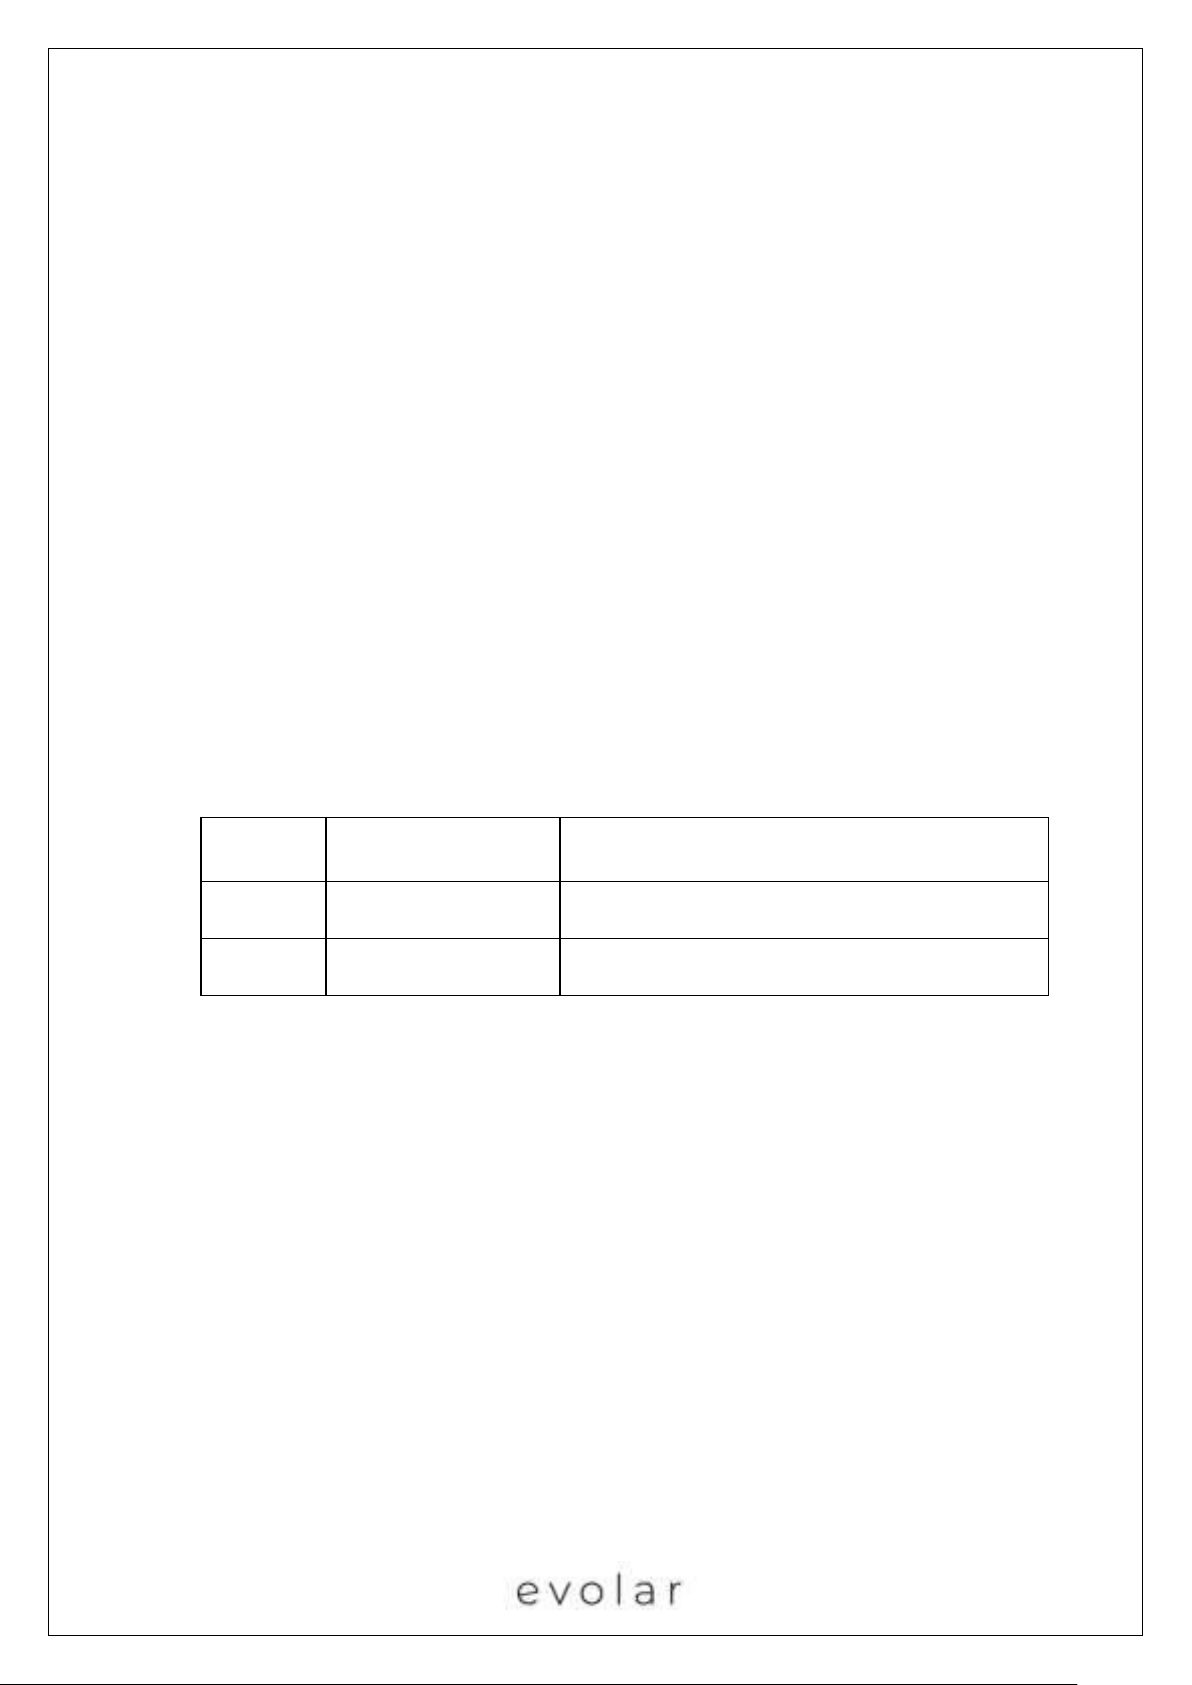
Error code
Code Meaning
Solution
E1
Water shortage of
water tank
Connect the water supply pipe and press 【water】
to water to fill.
E2
Water tank is full
Connect the drain pipe and press the 【drain】
button to drain.
4. Seasonal maintenance
If you will not be using the machine for a long time (such as one month), follow the steps below to
maintain it:
1. Drain the water from the tank.
2. Clean the filter screen and replace it after drying.
If the mobile air conditioner is not used for a long time, note the following points when you put it back
into use:
1. Check if there is water in the water tank or if the water volume meets the required level. A
message appears when you start the machine.
2. Check if the power cord is in good condition. Do not use it if it is damaged.
VI. Troubleshooting
1. Error codes
Page 47
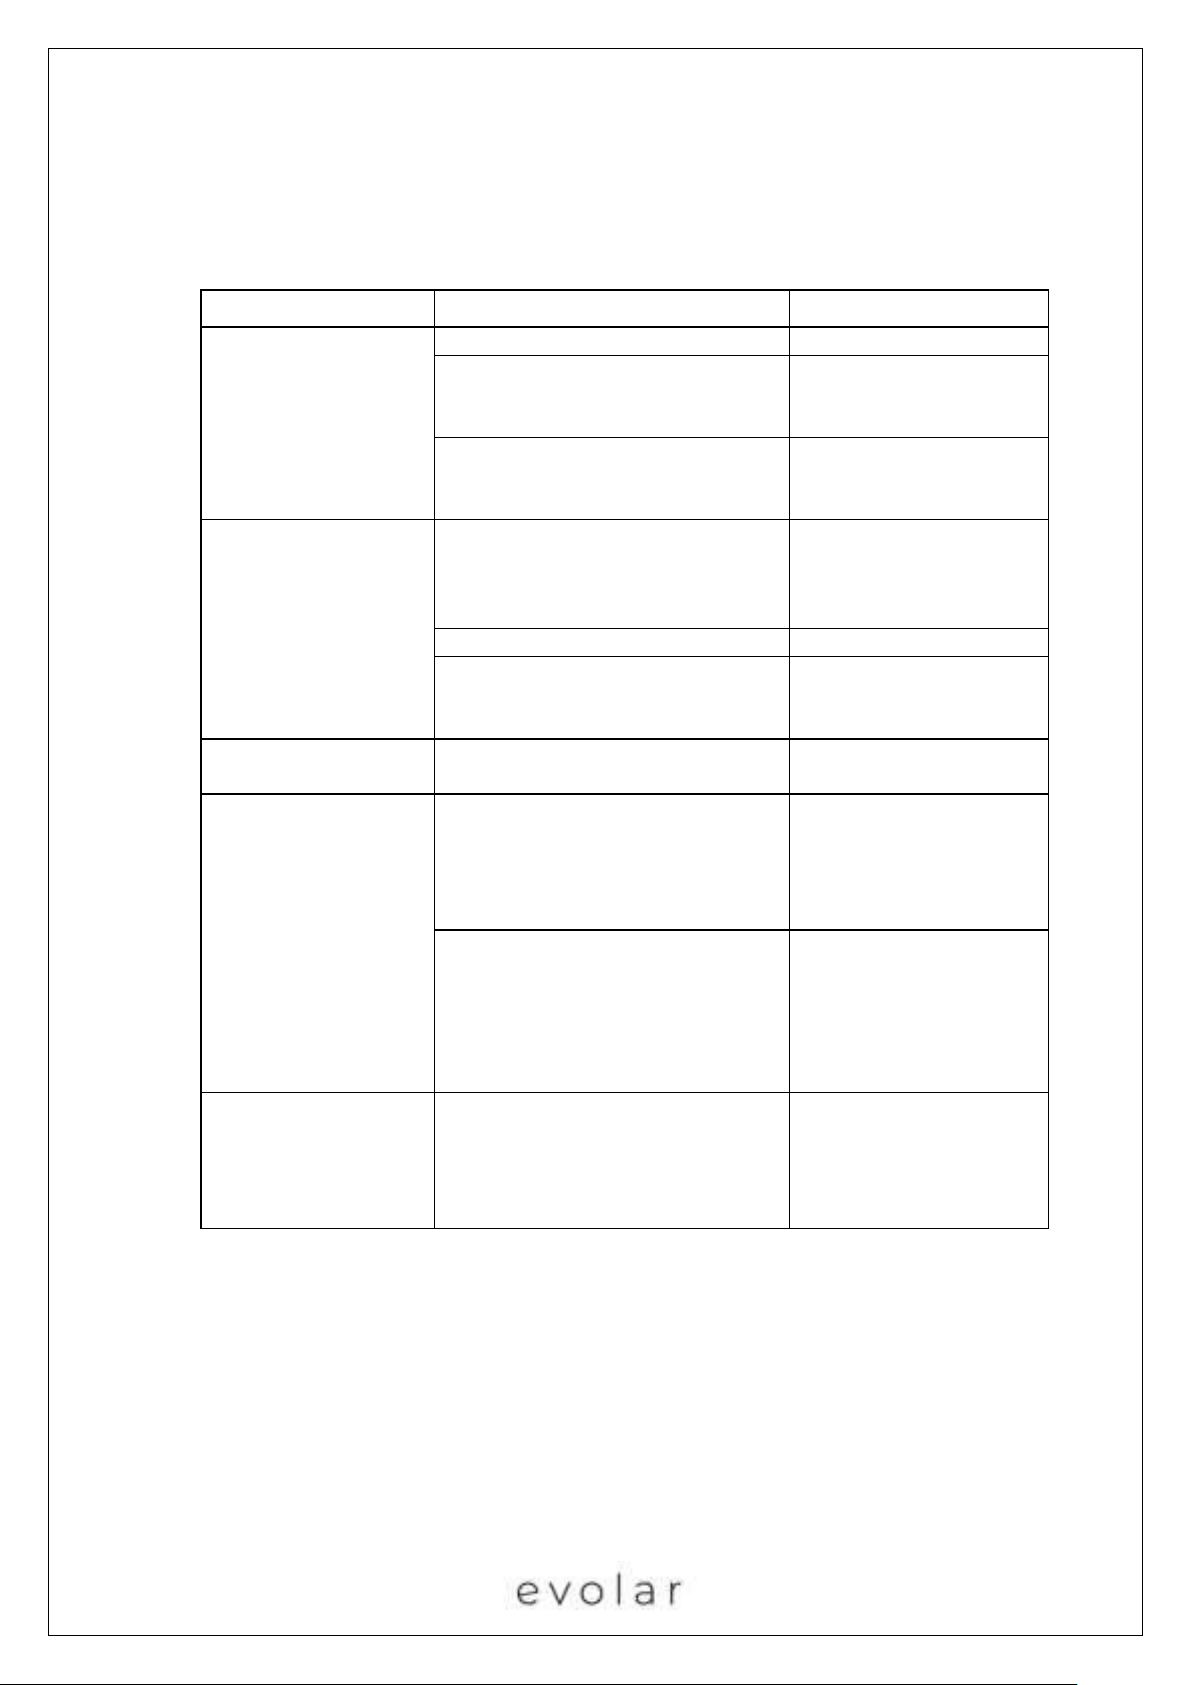
2. Trouble shooting:
Issue
Possible reason
Solution
Air conditioning is not
working
Power is not on.
Turn on the power.
Cooling, dehumidification and
heating do not start.
Check whether the set
temperature has been
reached.
Waiting time of three minutes after
switching between cooling and
heating.
Wait more than three
minutes.
Poor cooling (heating)
effect of air
conditioning there
The doors and windows are open
and there is cold or heat leakage in
the room. There are other heat
sources (cold sources).
Close the door or window
and remove the heat
source (cold source).
The filter is dirty.
Clean or replace the filter
Air inlet or outlet is blocked or there
is poor air circulation.
Remove the blockage
from the air inlet or
outlet.
The air conditioner is
noisy
Air conditioner is not leveled or is
not stable
Place the air conditioning
on a flat and solid surface.
Compressor is not
working
Compressor delay protection
enabled.
Wait longer than 3
minutes and switch on
the air conditioner after
the temperature has
dropped.
In cooling mode, if the water
temperature does not reach the
compressor start state, the water
cycle is used for cooling and the
compressor does not start at this
time.
When the water cycle
cooling is complete, the
compressor is
automatically started for
cooling.
During cold storage,
creates the formation
of condensation on the
front and rear panels
When the humidity is high and the
water vapor in the air is cold, may
dew condensation on the air
conditioning.
It is not an error, you can
continue to use it, check
whether you have
switched off the dew
removal function.
The table below provides an overview of the common errors and maintenance methods of this mobile
air conditioner. If the machine is not functioning properly, simple diagnosis and maintenance can be
performed via the table below. Contact your supplier if it still cannot be resolved.
Page 48
Guarantee:
Evolar offers a 24-month warranty. Your warranty is valid if the product is used in accordance with the
instructions and for the purpose for which it was created. The original purchase receipt with the date
of purchase, the vendor name and the item number of the product should be submitted. If you require
the general terms and conditions, service, and warranty questions on
Environment:
This product should not be put into the domestic garbage at the end of his endurance but should be
delivered to a central point for the recycling of electrical and electronic appliances. This symbol on the
device, manual and packaging direct your attention to this important issue. The materials can be
recycled in this unit. By recycling used domestic appliances you contribute an important step towards
protecting our environment. Ask your local government for information about the collection.
www.evolar.nl
Support:
All available information and components can be found at www.evolar.nl
 Loading...