

Page 1
EVO-CF52BWD
Installatie-instructies
plafondventilator
Page 2

VEILIGHEIDSTIPS
WAARSCHUWING: Om het risico van een elektrische schok te voorkomen,
schakelt u de elektriciteit naar de ventilator uit bij de hoofdzekering of het
schakelpaneel voordat u met de installatie van de ventilator begint of voordat u
onderhoud aan de ventilator uitvoert of accessoires installeert.
LEES ALLE INSTRUCTIES EN VEILIGHEIDSINFORMATIE ZORGVULDIG DOOR
VOORDAT U UW VENTILATOR INSTALLEERT EN BEWAAR DEZE INSTRUCTIES.
LET OP: om persoonlijk letsel te voorkomen, kan het gebruik van handschoenen noodzakelijk
zijn bij het hanteren van ventilatoronderdelen met scherpe randen.
1. Zorg ervoor dat alle elektrische aansluitingen voldoen aan de plaatselijke verordeningen
en nationale voorschriften. Als u niet bekend bent met elektrische bedrading of als de
draden in het huis/gebouw een andere kleur hebben dan die waarnaar in de instructie
wordt verwezen, neem dan contact op met een gekwalificeerde elektricien.
2. Zorg ervoor dat u een plaats voor uw ventilator hebt gekozen waar de bladen vrij kunnen
draaien en er minstens 2,3 meter ruimte is tussen de vloer en de uiteinden van de
ventilatorbladen. De ventilator moet zo worden gemonteerd dat de uiteinden van de bladen
ten minste 76 cm verwijderd zijn van muren of andere verticale structuren.
3. De plafonddoos en de plafondbevestiging moeten stevig vast zitten en minstens 45 kg kunnen
dragen. De plafonddoos moet rechtstreeks door de constructie van het gebouw worden
ondersteund. Zorg ervoor dat de plafonddoos waaraan de plafondventilator wordt
opgehangen, geschikt is voor ventilatoren. Er moet een opschrift op de plafonddoos staan dat
dit aangeeft.
WAARSCHUWING: om het risico van brand, elektrische schok of persoonlijk letsel te verminderen,
moet de ventilator gemonteerd worden aan de plafonddoos die gemarkeerd is met "Geschikt
voor ventilatorbevestiging" en moeten de montageschroeven gebruikt worden die bij de
plafonddoos geleverd zijn. De meeste plafonddozen die gewoonlijk worden gebruikt voor het
ophangen van verlichtingsarmaturen zijn niet geschikt voor ventilatoren en moeten mogelijk
worden vervangen. Raadpleeg bij twijfel een gekwalificeerde elektricien.
4. Nadat de elektrische aansluitingen zijn gemaakt, moeten de gesplitste draden naar boven
worden gedraaid en voorzichtig in de plafonddoos worden geduwd. De draden moeten uit
elkaar worden gelegd met de geaarde draad en de apparatuur-aardende draad aan
weerszijden van de plafonddoos.
WAARSCHUWING: om het risico van elektrische schok en brand te verminderen en om een
bromtoon te voorkomen, mag deze ventilator niet worden gebruikt met een solid-statesnelheidsregelaar of met een dimschakelaar voor het hele snelheidsbereik. Het gebruik van zo'n
dimschakelaar om de snelheid te regelen zal een luide bromtoon bij de ventilator veroorzaken.
5. Gebruik de draairichtingtoets niet voordat de ventilator volledig tot stilstand is gekomen
(draairichtingtoets, indien inbegrepen).
6. Steek niets tussen de ventilatorbladen terwijl deze draaien.
WAARSCHUWING: om het risico van persoonlijk letsel te verminderen, mag u de bladbeugels niet buigen
bij het installeren van de beugels, het uitbalanceren van de bladen of het schoonmaken van de ventilator.
Steek niets tussen de draaiende ventilatorbladen.
WAARSCHUWING: wees voorzichtig wanneer u rond de ventilator werkt of deze schoonmaakt,
om persoonlijk letsel of schade aan de ventilator of andere voorwerpen te voorkomen.
7. Gebruik geen water of schoonmaakmiddelen om de ventilator of ventilatorbladen schoon te
maken. Een droge stofdoek of een licht bevochtigde doek is voor de meeste
reinigingswerkzaamheden voldoende.
WAARSCHUWING: om het risico op persoonlijk letsel te verminderen, mag u alleen onderdelen
gebruiken die bij deze ventilator zijn geleverd. Bij gebruik van ANDERE onderdelen dan die
welke bij deze ventilator zijn geleverd, vervalt de garantie.
OPMERKING: deze belangrijke veiligheidsvoorschriften en instructies
omvatten niet alle omstandigheden en situaties die zich zouden kunnen
voordoen. Gezond verstand en voorzichtigheid zijn noodzakelijke factoren bij
de installatie en het gebruik van deze ventilator.
Page 3
.1.
Installatie voorbereiden
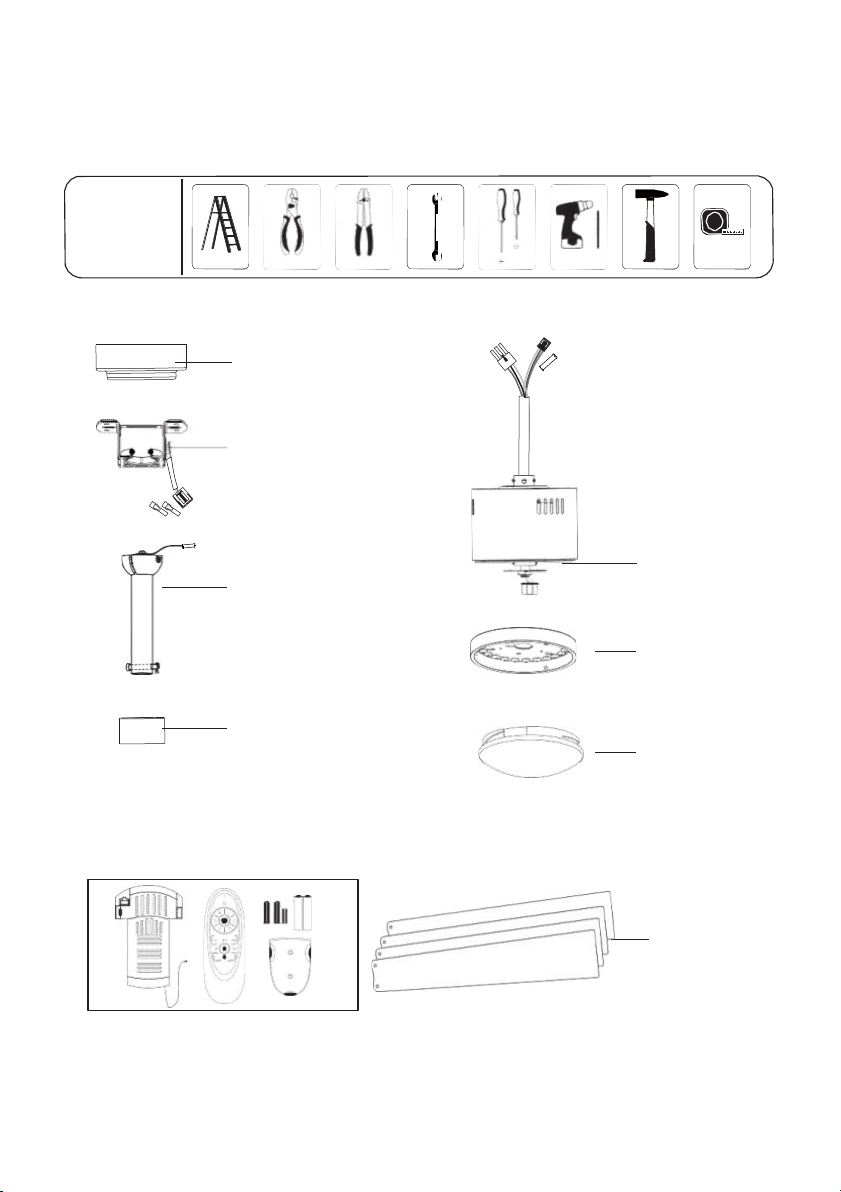
Benodigdheden
Inhoud van de verpakking
1.Beschermkap
2.Plafondhouder
3. Verlengstang
4. Jukafdekking
5.Motor
6.
Lampenset
7. Lampenkap
9. Afstandsbediening
8.Bladen
Page 4
.2.
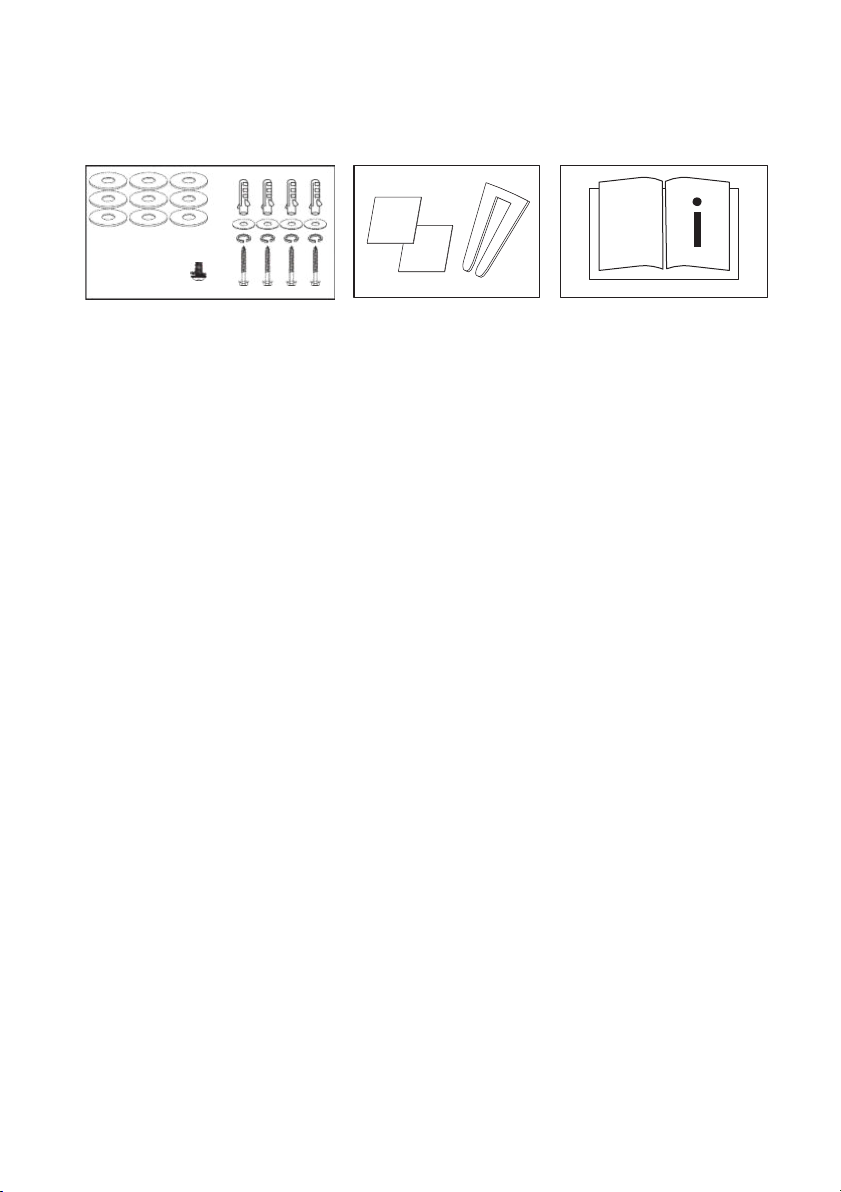
Installatieset
Balanceerset
Installatie-instructies
Page 5
.3.
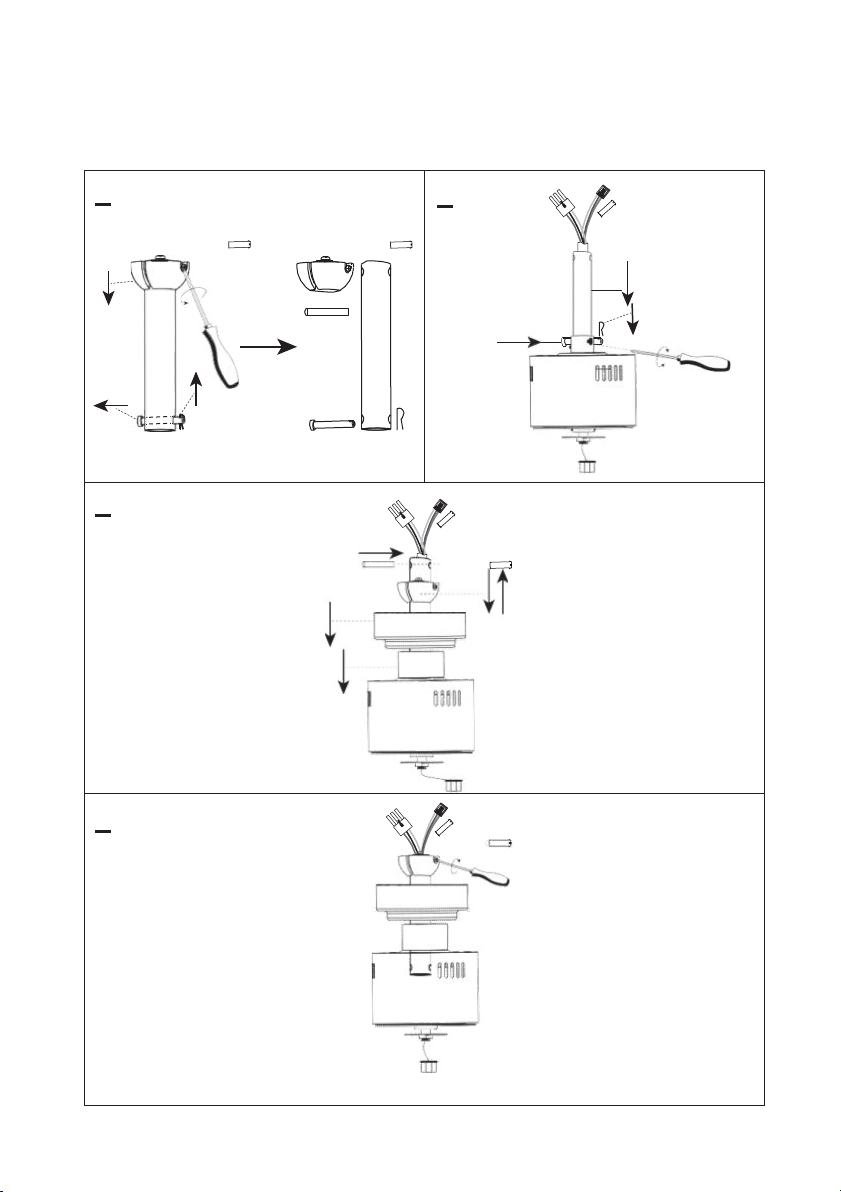
Plafondventilator installeren
1
2
schroeven
3
4
Stap 1 - Verlengstang en motor monteren
Page 6
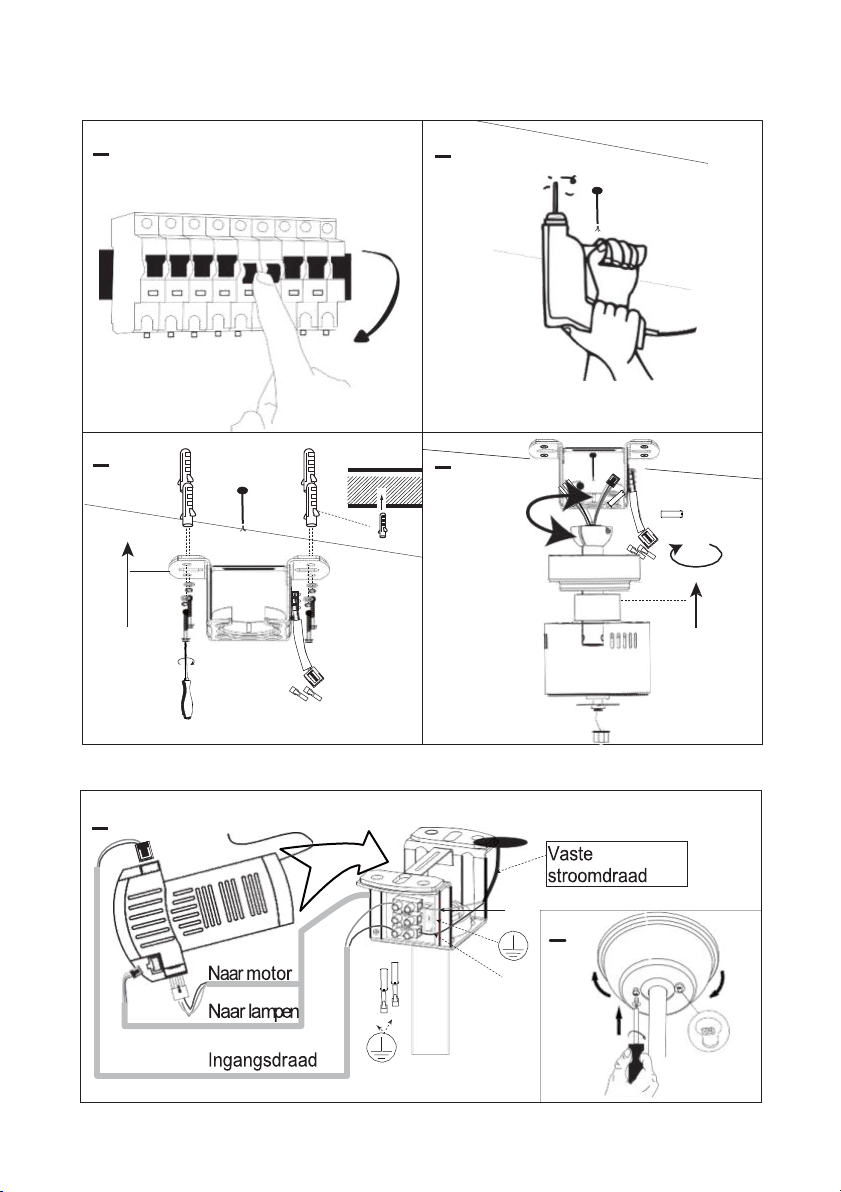
.4.
Stap 2 - Plafondhouder en ventilatorelement installeren
1
2
4
3
1
Insteken
N 2
L
VENTILATOR
UIT
Klik-
sluiting
Stap 3 - Ontvanger in plafondhouder plaatsen en bedraden
Page 7
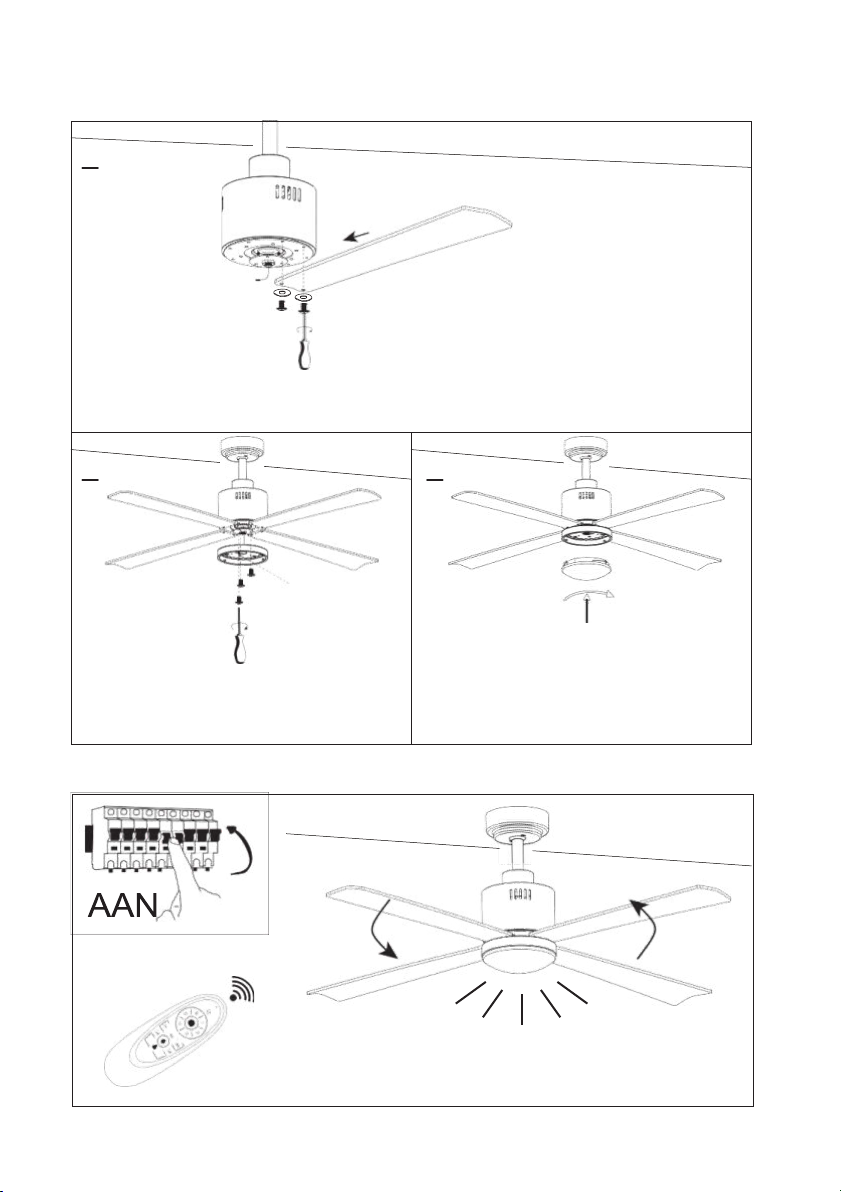
.5.
Stap 4 - Bladen en lampenset installeren
1
Verwijder de voorgeïnstalleerde schroeven, lijn de bladen uit met de juiste
schroefgaten en schroef ze stevig vast.
2
Insteken
Verwijder de voorgeïnstalleerde
schroeven, sluit de lampensetdraad
aan en dek de lampenset af.
3
Stap 5 - Plafondventilator inschakelen
Page 8
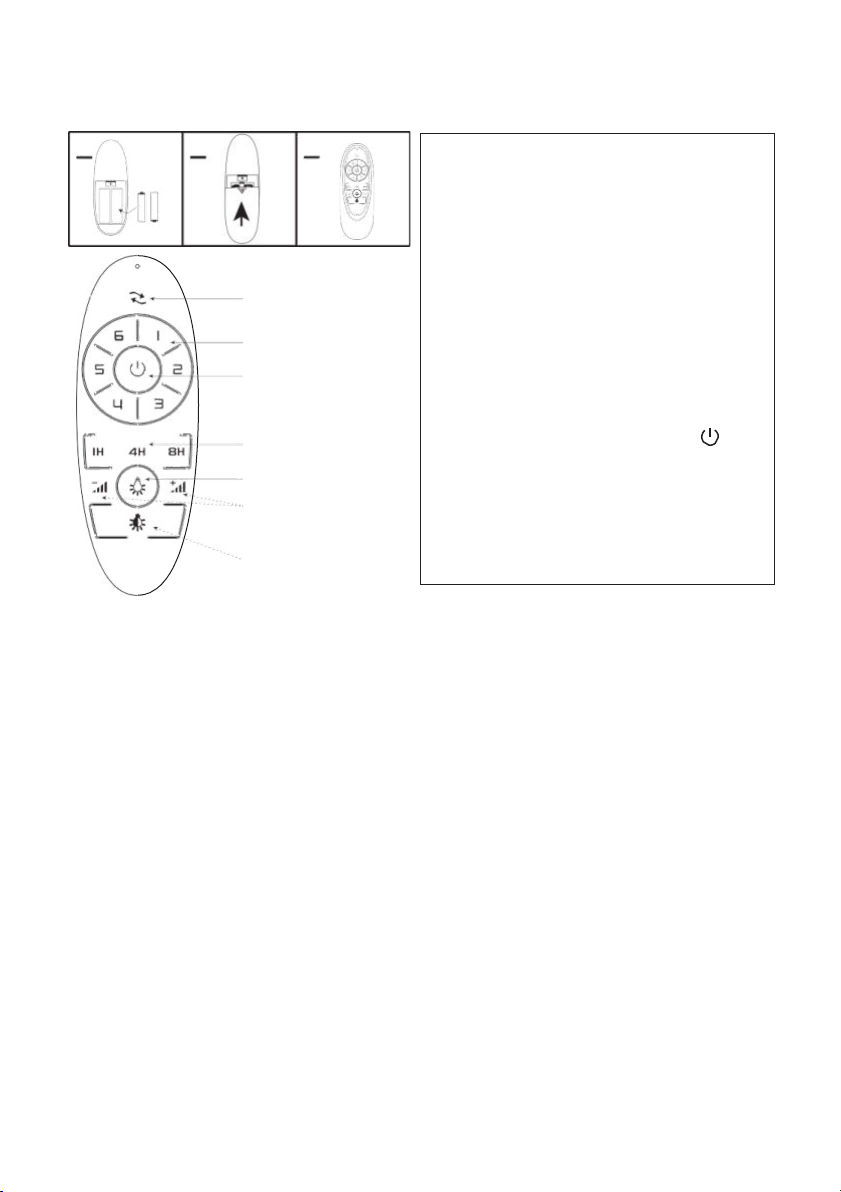
.6.
Als de zender de ventilator niet
bedient
1. Controleer of de batterijen correct
zijn geplaatst en niet leeg zijn.
Vervang de batterijen indien nodig.
2. Controleer of er soortgelijke
afstandsbedieningen in de
nabijheid actief zijn.
Afstandsbedieningen met dezelfde
frequentie kunnen elkaar storen.
3. Controleer of de zender en de
ontvanger elkaar herkennen.
Schakel de stroom in en houd binnen
30 seconden daarna de toets
5 seconden ingedrukt. Als u een
lange pieptoon hoort, is de herkenning
succesvol verlopen en functioneert de
afstandsbediening normaal.
Afstandsbediening (zender) gebruiken
1 2 3
Draairichtingtoets
Ventilatorsnelheid
Ventilator aan/uit
Timer
Lampen aan/uit
Helderheid
lager/hoger
Lampenkleur
wijzigen
Probleemoplossing
Ventilator werkt niet
1. Controleer of zekeringen of
schakelaars de stroomvoorziening
naar de ventilator blokkeren.
2. Schakel de stroom uit en controleer
alle draadverbindingen naar de
ventilator en in de schakelaarbehuizing
(moet door elektricien gebeuren!).
Ventilator maakt lawaai
1. Zorg dat de schroeven tussen
ventilatorbladen en motor goed
vastzitten en dat de meegeleverde
borgringen zijn gebruikt.
2. Haal de bovenste beschermkap
omlaag zodat deze zich minimaal 3
mm onder het plafond bevindt.
3. Controleer of er bladen gebarsten
zijn. Vervang de gebarsten bladen.
4. Als u de ventilator voor het eerst
gebruikt, laat deze dan ten minste 8
uur draaien. Als de bromtoon blijft,
schakel dan een elektricien in.
Ventilator draait, maar luchtstroom is
onvoldoende
1. De ventilator draait in de verkeerde
richting: de lucht gaat omhoog.
2. De ruimte bevat voorwerpen die
de luchtstroom blokkeren.
3. De ventilator is te klein voor de
afmetingen van de ruimte.
Ventilator trilt of wiebelt
1. De ventilatorbladen hangen niet
parallel met het plafond .Voor
controle zie afb. 1.
2. Zorg dat de plafondhouder strak
tegen de plafonddoos is bevestigd,
zonder enige beweging.
3. Zorg dat alle schroefverbindingen
tussen bladen en motor vast zitten.
4. Gebruik de balanceerset om de
ventilator uit te balanceren. Zie de
beschrijving hieronder.
Page 9
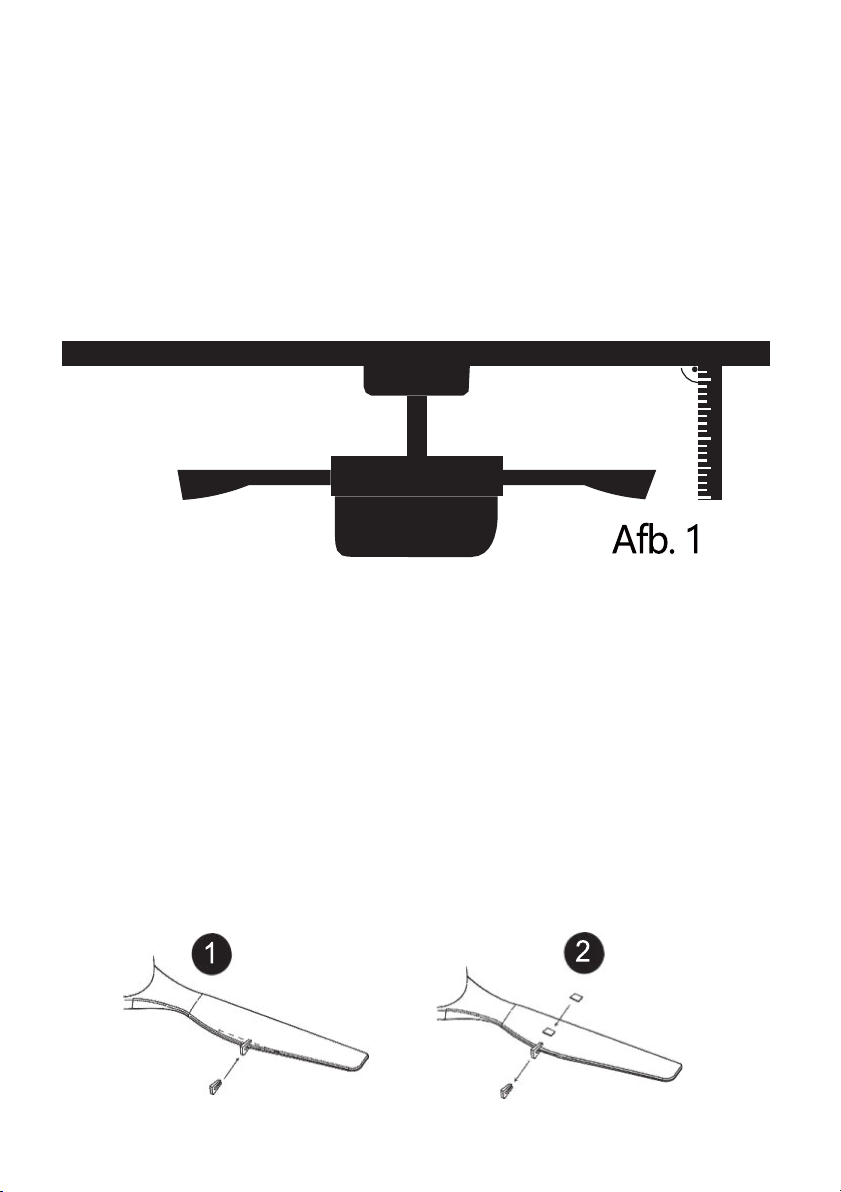
.7.
Uitbalanceren – Wiebelende ventilator
Als de ventilator tijdens het draaien wiebelt, is dat geen teken dat deze niet goed
functioneert (zelfs als het wiebelen enkele centimeters is). Om het wiebelen te
verminderen, kunt u bij een uitgeschakelde ventilator:
1.controleren of alle bladen stevig zijn bevestigd (schroeven aandraaien);
2.de afstanden tussen elk bladen en het plafond controleren. U voert de meting uit
zoals in onderstaande afbeelding is aangegeven. Als er verschillen zijn terwijl de
schroeven al goed zijn aangedraaid, controleert u of alle bladen dezelfde vorm
hebben. Als een blad duidelijk zichtbaar een andere vorm heeft, kan dat tijdens het
draaien voor onbalans zorgen.
Als u de voorgaande stappen hebt doorlopen en de ventilator nog steeds wiebelt,
moet u de meegeleverde balanceerset gebruiken om de ventilator als volgt
dynamisch uit te balanceren:
1. Schakel de ventilator in op de hoogste snelheid, zodat deze maximaal wiebelt.
2. Schakel de ventilator uit. Kies een blad en plaats een klemmetje (zie
afbeelding 1 hieronder) halverwege de schroefbevestiging en het uiteinde.
3. Schakel de ventilator weer in en controleer of het wiebelen meer of minder is
geworden. Schakel deze weer uit en plaats het klemmetje op een ander blad als
het wiebelen niet is verminderd. Herhaal deze stappen en bepaal bij welk blad het
wiebelen wel vermindert.
4. Laat het klemmetje zitten op het blad dat het beste resultaat geeft. Schuif het
klemmetje heen en weer langs dat blad tot u de positie vindt met het beste
resultaat.
5. Daarna plaatst u een van de gewichtjes bovenop het blad, op de middellijn ter
hoogte van het klemmetje (zie afbeelding 2 hieronder). Daarna verwijdert u het
klemmetje.
Page 10
.8.
EVO-CF52BWD Ceiling fan
Installation instructions
Page 11

.9.
SAFETY TIPS
WARNING: To reduce the risk of electrical shock, turn off the electricity
to the fan at the main fuse box or circuit panel before you begin the
fan installation or before servicing the fan or installing accessories.
READ ALL INSTRUCTIONS AND SAFETY INFORMATION CAREFULLY BEFORE
INSTALLING YOUR FAN AND SAVE THESE INSTRUCTIONS.
CAUTION: To avoid personal injury, the use of gloves may be necessary while
handling fan parts with sharp edges.
1. Make sure all electrical connections comply with Local Codes or Ordinances, the
National Electrical Code. If you are unfamiliar with electrical wiring or if the
house/building wires are different colors than those referred to in the instruction
please use a qualified electrician.
2. Make sure you have a location selected for your fan that allows clear space for the
blades to rotate and at least seven (7) feet (2.3 meters) of clearance between the
floor and the fan blade tips. The fan should be mounted so that the tips of the
blades are at least thirty (30) inches (76 centimeters) from walls or other upright
structures.
3. The outlet box and ceiling support joist used must be securely mounted, and capable
of supporting at least 100 Pounds (45.4 kilograms). The outlet box must be supported directly by the building structure. Make sure the electrical box that will hold the
ceiling fan is fan-rated. There should be an inscription on the box indicating it.
WARNING: To reduce the risk of fire, electrical shock, or personal injury, mount to the
outlet box marked “Acceptable for Fan Support,” and use the mounting screws
provided with the outlet box. Most outlet boxes commonly used for the support of
lighting fixtures are not acceptable for fan support and may need to be replaced.
Consult a qualified electrician if in doubt.
4. After making electrical connections, spliced conductors should be turned upward and
pushed carefully up into the outlet box. The wires should be spread apart with the
grounded conductor and the equipment-grounding conductor on opposite sides of
the outlet box.
WARNING: To reduce the risk of electrical shock, fire and to prevent humming noise
do not use this fan with any solid state speed control device or control fan speed
with a full range dimmer switch. Using a full range dimmer switch to control fan
speed will cause a loud humming noise from fan.
5. Do not operate the reverse switch until fan has come to a complete stop.(If included
Forward/Reverse Switch)
6. Do not insert anything between the fan blades while they are rotating.
WARNING: To reduce the risk of personal Injury, do not bend the blade brackets when
installing the brackets, balancing the blades, or cleaning the fan. Do not insert foreign
objects in between rotating fan blades.
WARNING: To avoid personal injury or damage to the fan and other items, be cautious
when working around or cleaning the fan.
7. Do not use water or detergents when cleaning the fan or fan blades. A dry dust cloth
or lightly dampened cloth will be suitable for most cleaning.
WARNING: To reduce the risk of personal injury, use only parts provided with this fan.
The use of parts OTHER than those provided with this fan will void the warranty.
NOTE: The important safety precautions and instructions
appearing in the manual are not meant to Cover all possible
conditions and situations that may occur. It must be understood
that common sense and caution are necessary factors in the
installation and operation of this fan.
Page 12
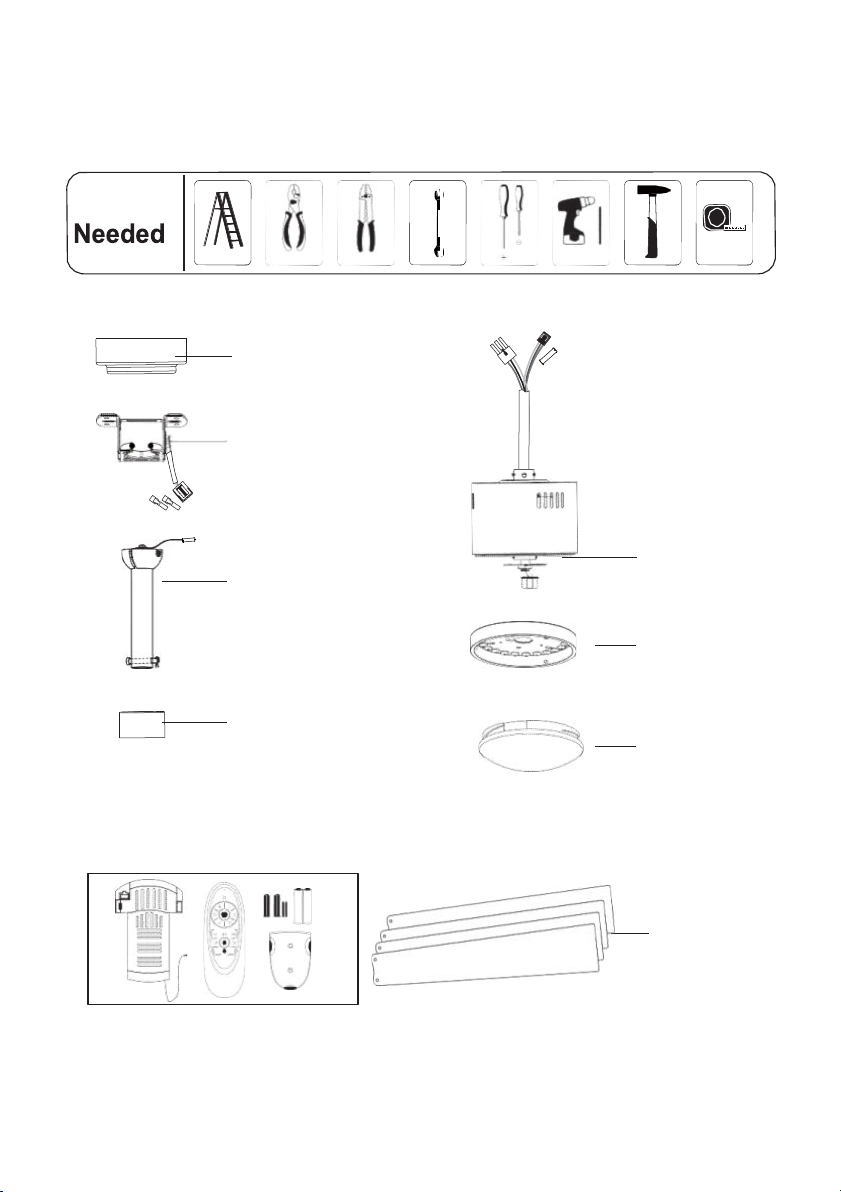
.1.
Preparing for installation
Tools
Package Lists
1.Canopy
2.Bracket
3. Down rod
4. Yoke cover
5.Motor
8.
9. Light shade
Light kit
9.Remote control unit
8.Blades
Page 13
.2.
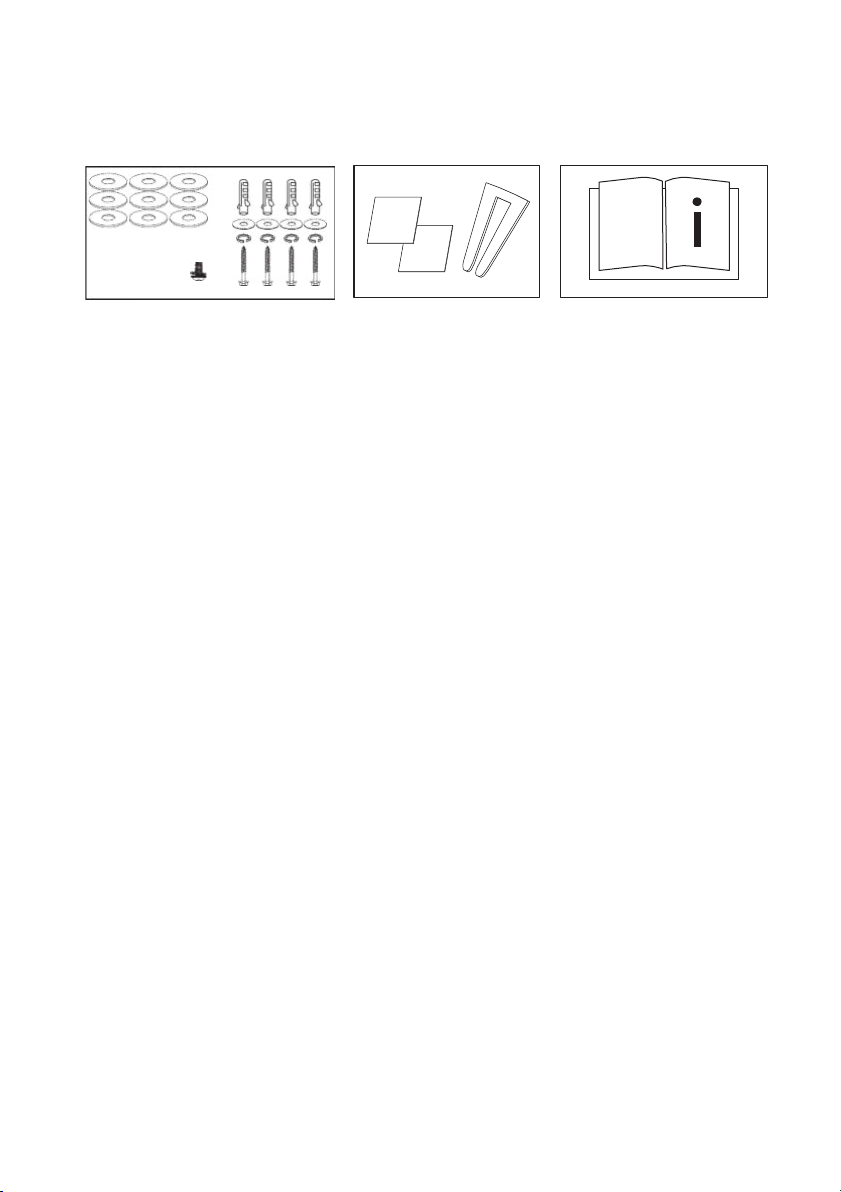
Installation kit
Blade balancing kit
Instructions manual
Page 14
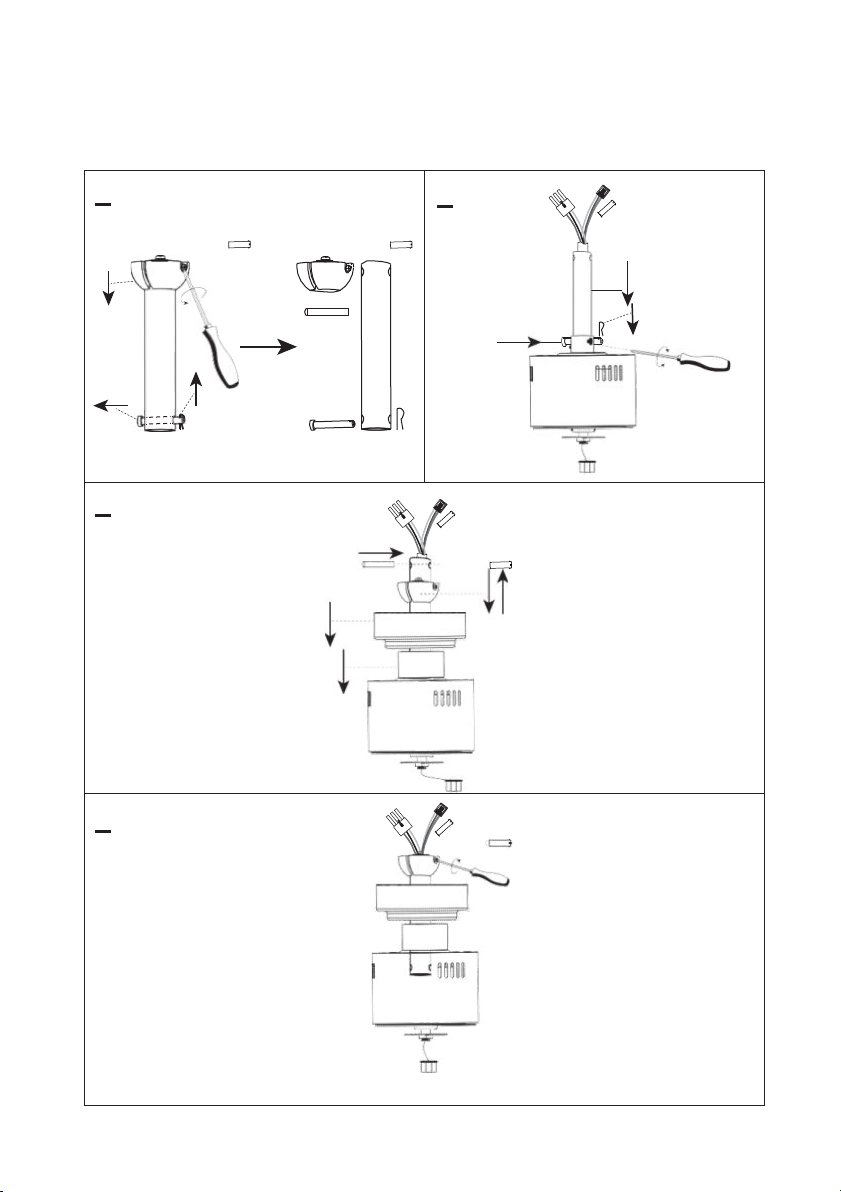
.3.
Installing the ceiling fan
1
2
screw
3
4
Step 1(Down rod and motor assembling)
Page 15
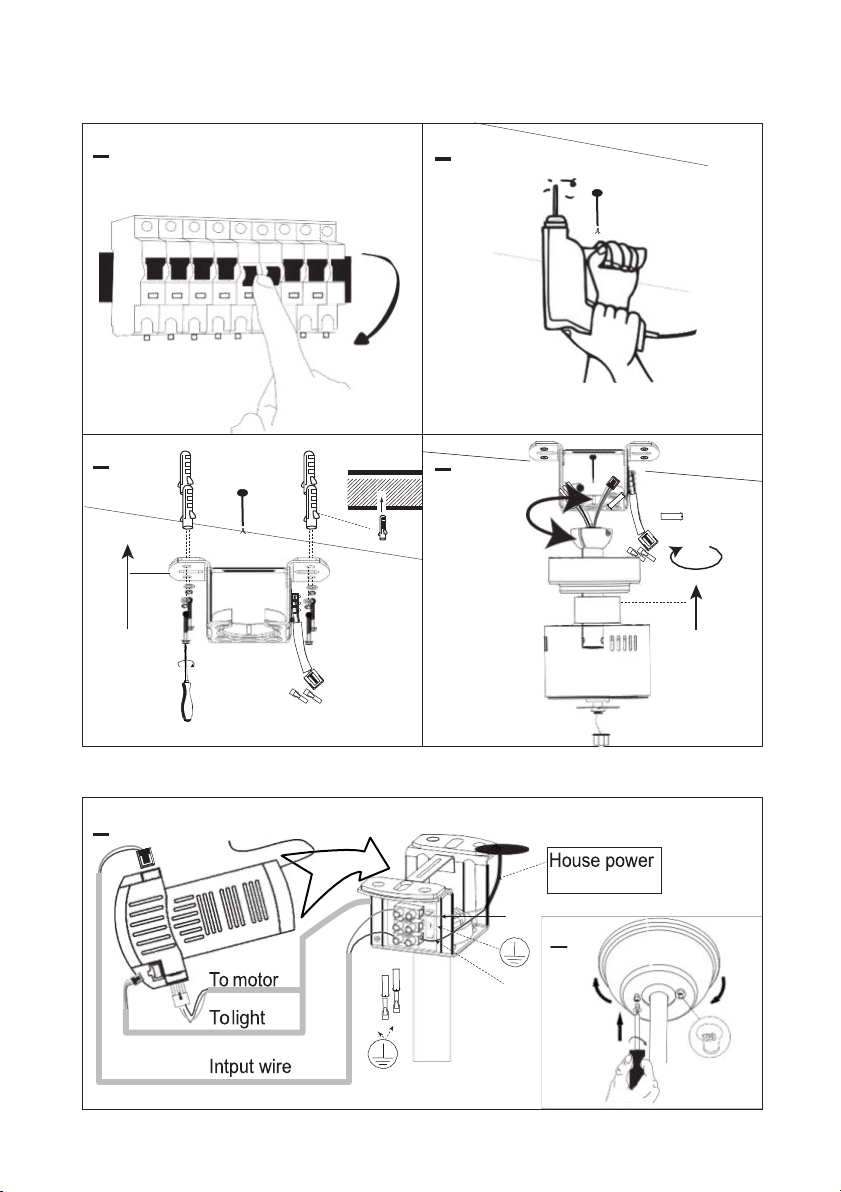
.4.
Step 2 (Ceiling bracket and fan body installation )
1
2
4
3
wire
1
Plug in
N
L
FAN
OFF
Click!
buckle
Step 3 (Put receiver into ceiling bracket and wiring)
Page 16
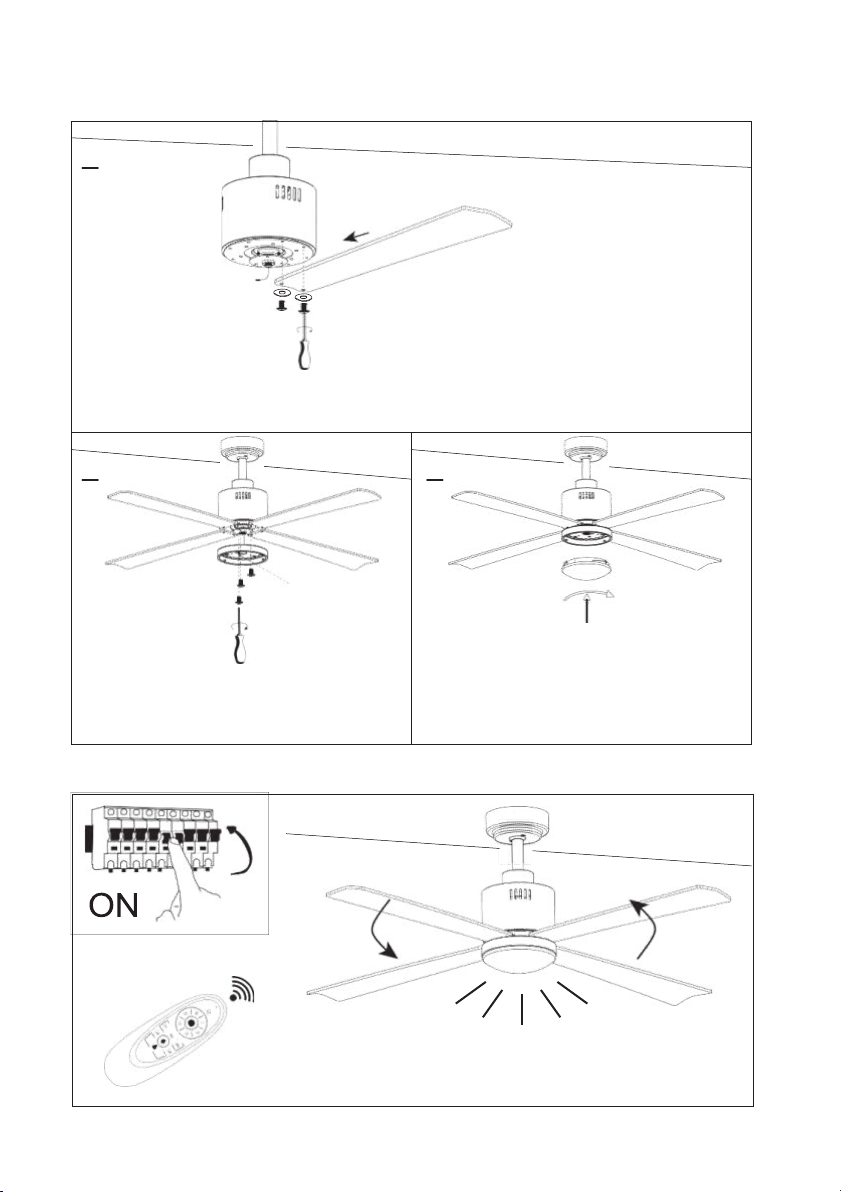
.5.
Step 4 ( Blades and Light kit installation)
1
Take out the pre-installed screws , aim the blades to the right hole position and
then screw tightly
2
Insert
Remove the pre-installed screws.
Connect the light kit cable, and then
lock the light kit.
3
Step 5(Switch on and ceiling fan works)
Page 17
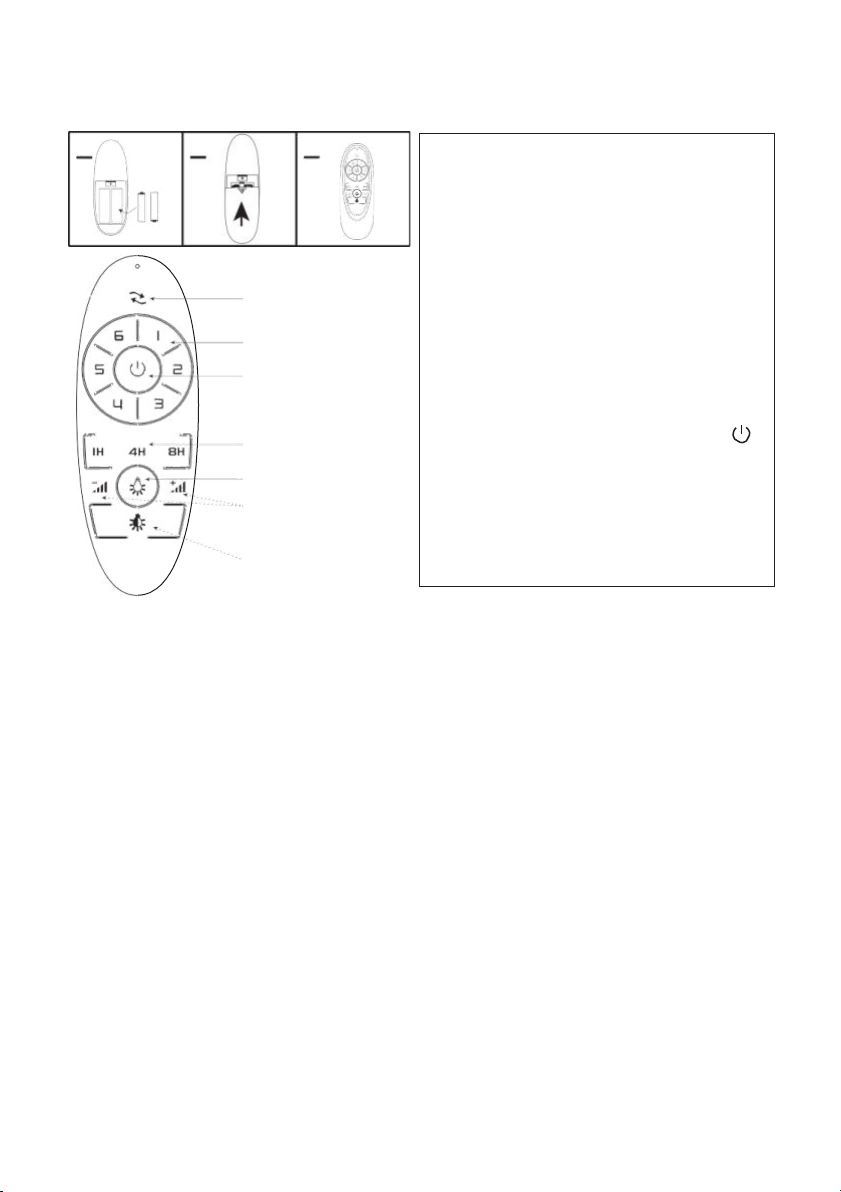
.6.
If emitter can not control the fan
1. Please check whether the battery is
installed correctly and whether it is
charged. If necessary, replace the
remote control battery.
2. Please check if there are similar
remote control products working
nearby, because remote control
products of the same frequency will
interfere with each other.
3. Use learning code matching mode is
used between emitter and receiver
Turn "ON"the supply power within 30
seconds and press the emitter,'s " "
button for 5 seconds. it can load
normally after hearing a long
sound"bee", which means learning
successfully and it can works normally.
Remote control (emitter) operation
1 2 3
Reverse switch
Fan speed
Fan on/off
Fan timer switch
Light on/off
Turn down/up
the brightness
Light color
Change
Troubleshooting
Fan does not work
1. Check all fuses or circuit breakers if
disconnecting the power supply to the
fan.
2. Turn off electrical power and check all
wire connections to fan and in switch
housing.It must be carried out by a
electrician
Fan is noisy
1. Assure that the screws fastening blade
arm to motor are tight and the lock
washers provided for that purpose
have been used
2. Lower the upper canopy to ensure a
separation from the ceiling of no less
than 3mm to reduce noisy
3. Check to see if any of the blades are
cracked .If so,replace all of the blades
4. If this is the first use ,leave the fan on
for at least 8 hours.In the event that
mechanical noise continues after this
period,contact certified electrician
Fan turns but airflow is inadequate
1. The fan may be running in reverse, so
air is going upward.
2. The room may contain items that
obstruct the air flow.
3. The fan may be too small for size of
the room.
Fan shakes or wobbles
1. The fan blades are not parallel to the
ceiling .See Fig.1 how to inspect
2. Make sure mounting bracket is
tightened at outlet box with no movement at all.
3. Make sure all screws holding the
blades to the blade arm and blade arm
to motor are tight.
4. Use the balance kit and instructions to
balance the fan. Please see the last
pages described.
Page 18
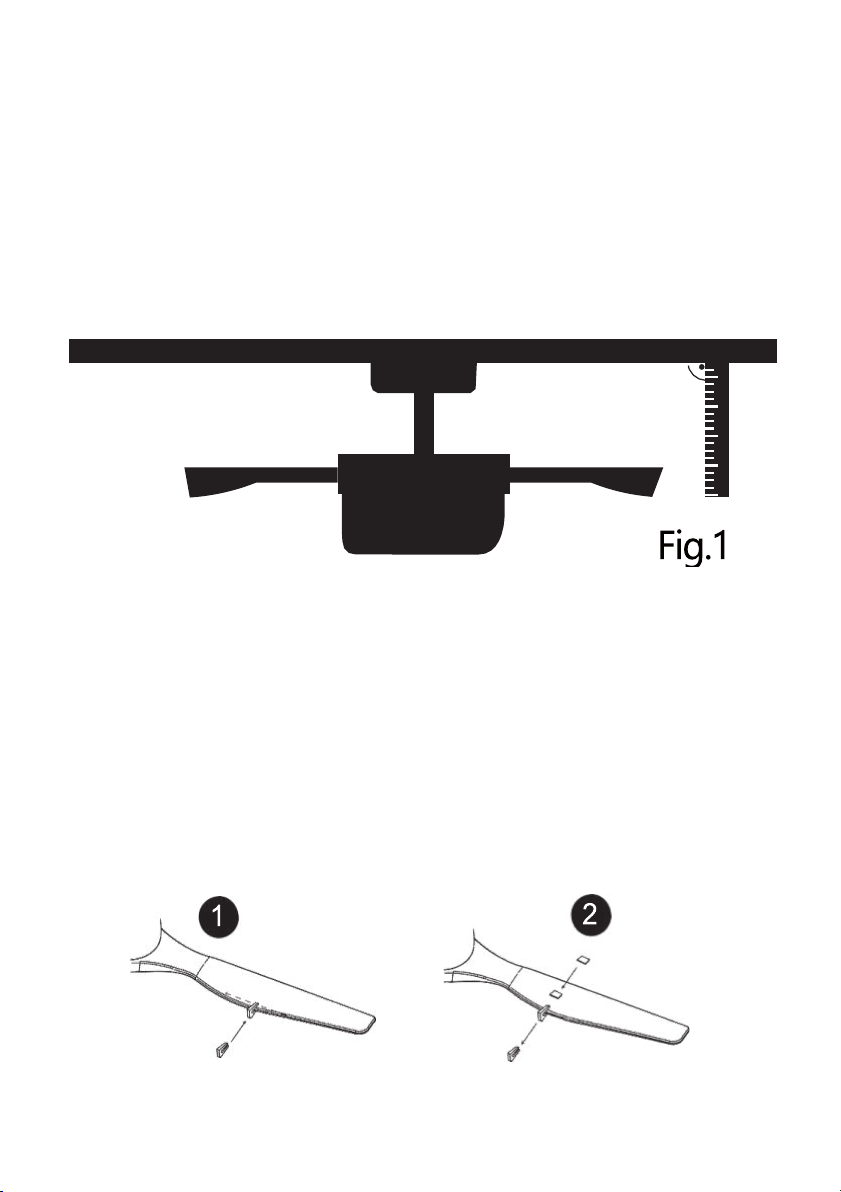
Balancing – Wobbling problems during fan operation
If the fan body wobbles during its operation, this is not a sign of malfunctioning
(even if it wobbles a few centimeters). To reduce wobbling, you can, while the
fan is off:
1.Check that all blades are properly fastened by tightening their screws.
2.Check the distance between each blade and the ceiling. Measurements to the
If you have completed the previous steps and the wobbling has not resolved,you
should apply dynamic balancing with the kit provided, as explained below:
1. Turn the fan on to the highest speed so that the greatest amount of wobbling is
2. Turn off the fan. Select a blade and place a clip on it (see diagram) halfway
3. Turn on the fan and check whether the wobbling has improved or gotten worse.
4. Leave the clip on the blade that produces the best results. Move the clip forward
5. Afterwards, remove the clip and place one of the weights on the upper part of
ceiling can be carried out as shown in the following diagram. If variations exist
and you have already correctly tightened the screws, check that all blades have
the same shape. If any of them have a shape that is visibly different, this may be
causing an imbalance during fan operation.
produced.
between the fastening and the far edge of the blade.
Turn it off once again and if the wobbling has not improved, place the clip on
another blade. Repeat this process and determine on which blade it improves
the wobbling.
or backwards on this blade until finding the position that offers the best results.
the center line of the blade at the position where the clip was located.
 Loading...