

Page 1
Portable Air
Conditioning Unit
& Remote Control
manual
EVO-3008CH
English: 2-24
Nederlands: 25-47
Contents
Air Conditioning Unit
2 Safety Precaution
4 Important
5 Parts Description
6 Accessories
7 Control Panel
9 Operation
11 Installation
14 Maintenance
17 Troubleshooting
18 WEEE Warning
18 Refrigerant Gas
AC Unit Remote Control
19 Button description
23 Usage
24 Fit batteries
Page 2
Safety Precaution
Your safety and safety of others is very important. We have provided many important safety
advisories in this manual and on your appliance. Always read and obey all
safety requirements.
WARNING This symbol indicates the possibility of death or serious injury.
CAUTION This symbol indicates the possibility of injury or damage to
properties only.
WARNING
This appliance can be used by anyone aged 8 years and above, any persons with
reduced physical, sensory or mental capabilities or lack of experience and knowledge
must be given supervision or instruction concerning the use of this appliance in a safe
and correct manner.
Children should not play with the appliance. Cleaning and user maintenance should
not be made by children without supervision.
Electrical connection of this appliance must be carried out in accordance to local
codes of practice.
An earth leakage breaker with rated capacity must be installed to avoid possible
electric shocks.
Do not install air conditioner in a place where there is flammable gas or
liquid. It may cause fire.
If the power supply cord is damaged, it must be replaced by the manufacturer or its
service agent or a similar qualified person.
The specification of fuse is AC250V T3.15AL.
Voltage should be in the range of 220~240V. The appliance should be installed in
accordance with national wiring regulation. The plug should be easily accessible after
installation. If the fuse on the unit PCB is broken, please change it with the type of
F3.15A/250V.
2
Page 3
Do not put fingers or other objects into the air outlet or inlets,
as fan rotates at high speed and will cause injury.
Do not touch the swinging wind vanes.
It may clamp your finger and damage the driving parts of the wind vanes.
Do not attempt to repair the air conditioner by yourself.
All repair works must be carried out by a fully qualified engineer with the
appropriate accreditations.
Do not operate in lightning storm weather. Please cut off the primary
power supply switch in order to prevent the machine from damage.
Do not use liquid or corrosive detergent to clean the appliance and don’t
splash water or other liquid onto it, otherwise, it may damage the plastic
components, and cause electric shock.
Do not operate the unit in wet rooms such as bathrooms and
laundry rooms.
CAUTION
Do not apply cold air to the body for a long period of time.
Do clean the air conditioner with a soft dry cloth.
Do not use chemical solvent, insecticide, inflammable spraying materials
which will damage the air conditioner. Do not sprinkle water directly on
the unit.
If the air filter is very dirty, the cooling or heating capacity will be reduced.
Please clean the air filter regularly .
3
Page 4

Important
• The room space for the installation, use, repair, and storage of this air conditioner should
be greater than 12m².
•
If the AC unit is installed, used or stored in an unventilated room, ensure any build
up of possible refrigerant gas leaks is prevented, as there could be a danger of fire or
explosion should the refrigerant come into contact with electric heaters, stoves or
other ignition sources.
This appliance is not intended for use by persons (including children) with reduced
•
physical, sensory or mental capabilities, or lack of experience and knowledge, unless
they have been given supervision or instruction concerning use of the appliance by a
person responsible for their safety. Children should be supervised to ensure that they
do not play with the appliance.
The specification of the fuse is printed on the circuit board, such as: AC 250V/5A
•
•
Don’t touch the unit with wet or damp hands or when barefoot.
Don’t pull the unit by the cord.
•
Don’t remove any part of the unit unless instructed by an authorised technician.
•
•
Don’t move the unit, unless the power has been cut off and the power cord is tied to
the power cord buckle.
Don’t operate the unit with a damaged plug or a loose socket.
•
• Ducts connected to an appliance shall not contain an ignition source.
• The AC unit must be stored and transported in an upright position or damage to the
compressor unit may occur. If in any doubt, wait at least 24 hours between installing
and using the unit.
4
Page 5
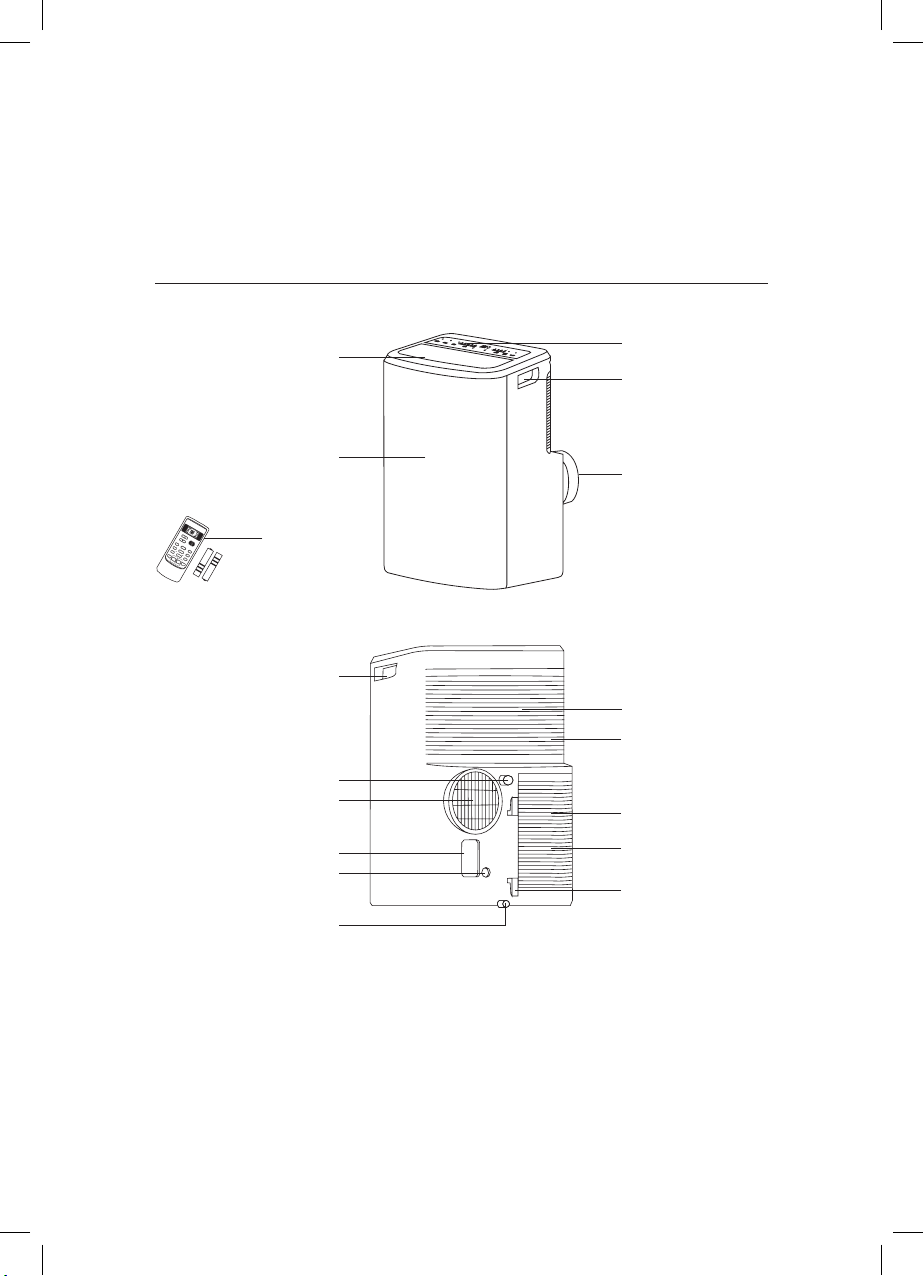
Parts Description
Front view
SET TEMPERATURE
AUT
COOL
O
DRY
SET ROOM
HEAT
TIMER ON OFF
h
FA
C°
N
HIGH
MI
D
LOW
SET
ON/OF
MODE
F
TURBO
SLEEP
SPEED
ºC / º
SWIN
FD
GS
ISPL
WING
Anti-F
AY
ELE.HH EALTH
iFEEL
ECOi CLEAN
TIME
R
Rear view
Air outlet
Front panel
Remote controller
Handle recess
Pump drain outlet
Air outlet
Power cord outlet
Pump drain outlet
Bottom tray drain outlet
Control panel
Handle recess
Air outlet
Upper air fil ter (Behind the gr ill)
Upper air int ake
Lower air filter (Behind the gri ll)
Lower air intake
Power cord bu ckle
Note: The descriptions in this user manual may differ slightly to the promotion
information and actual appliance. Please refer to the real appliance purchased. The
o
working temperature range of the air conditioner is 16-35
C under cooling mode;
5-27oC under heating mode.
5
Page 6
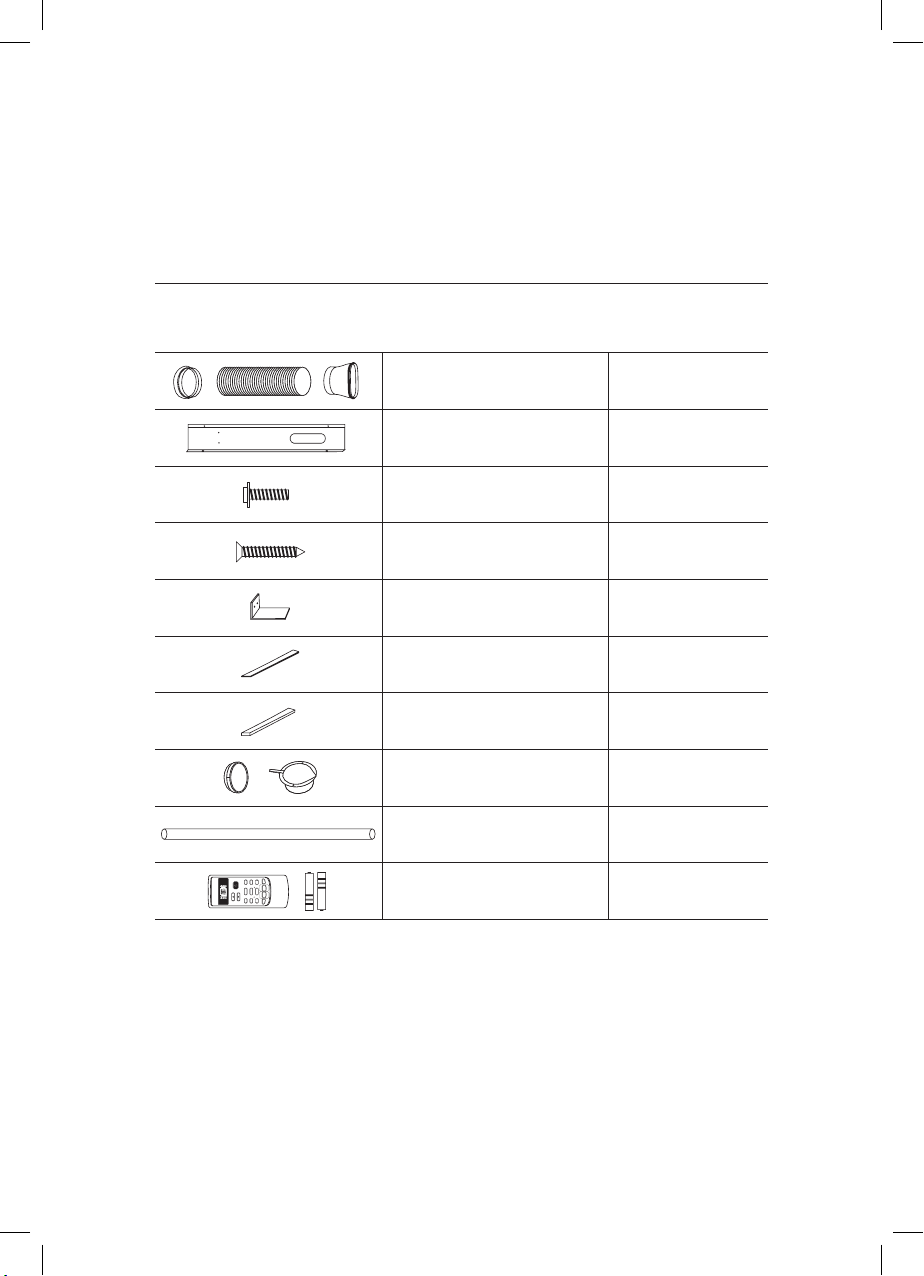
Accessories
Parts Parts name Quantity
Exhaust hose Adaptor and Adaptor B
(flat mouth or round mouth: depending
on models )
Window Slider Kit and bolt(#) 1
Type A Screws (#) 2
Type B Screws (#) 6
Security bracket (#) 1
Type A foam seal (adhesive) (#) 2
Type B foam seal (non-adhesive) (#) 1
1
Adaptor B (round mouth) (#),
Wall exhaust Adaptor (#)
1
Drain hose 1
FAN
HIGH
MID
LOW
ON/OFF
h
C°
SET ROOM
TURBO SPEED
TIMER ON OFF
ECOi CLEAN
ELE.HH EALTH
SET
SET TEMPERATURE
DRY
SLEEP ºC / ºFD ISPLAY
MODE
SWINGS WING iFEEL
HEAT
Anti-F TIMER
COOL
AUTO
Remote control
and Batteries
1
Some models without optional parts (#)
Note: Please select button on the remote controller according to the related
functions on the display, additional buttons may be invalid.
6
Page 7
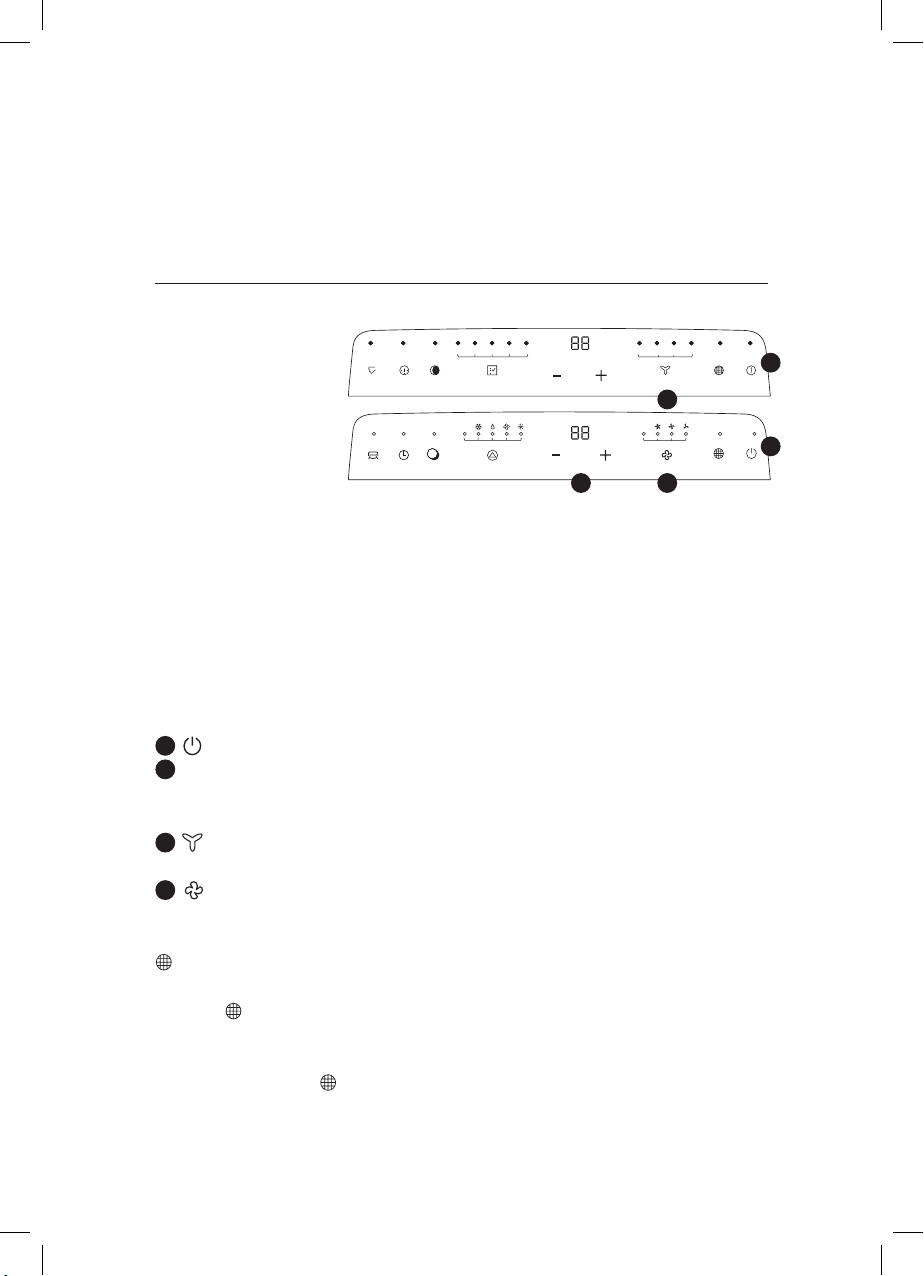
Control Panel
Fan
• AUTO
• HIGH – High speed indicator
• MED – Mid speed indicator
• LOW – Low speed indicator
Mode
• AUTO
• COOL – Cool indicator
• HEAT – Heating indicator (cold wind type unit without this display)
• DRY – Dehumidify indicator
• FAN – Fan indicator
Extra Features
• TIMER – Time indicator
• SLEEP – Sleep indicator
• SWING – Swing indicator
swing
swing
timer
timer
auto autocool hidry medfan heatheat
sleep
mode
auto auto
sleep
mode
fan speed
fan speed
2 4
filter
reset
3
filter
reset
Note: This icon is for all the buttons and display. Base models may not feature all the
functions & modes.
Function Buttons
1
Button. Press this button to make the unit start or stop.
2
“–” or “+” Button. Press “–” or “+” button to make the room setting
temperature decrease or increase. Press “–” and “+” together for 3 seconds to
choose between Celcius and Fahrenheit.
3
Button. Each time you press this button, a mode is selected in a sequence that
goes from AUTO › COOL › DRY › FAN › HEAT.
4
Button. This button is used for setting fan speed in the sequence that goes
from AUTO › HIGH › MED › LOW.
1
on•off
1
on•off
The running time of the unit has reached 250 hours, the filter reset indicator light
will illuminate, and it means the air filter should be cleaned. After cleaning, you can
press the button, the filter reset indicator light will turn off and the running time
will be cleared.
If you do not press the button when the filter reset indicator light illuminates, the
indicator light will always illuminate except the unit is power off.
7
Page 8
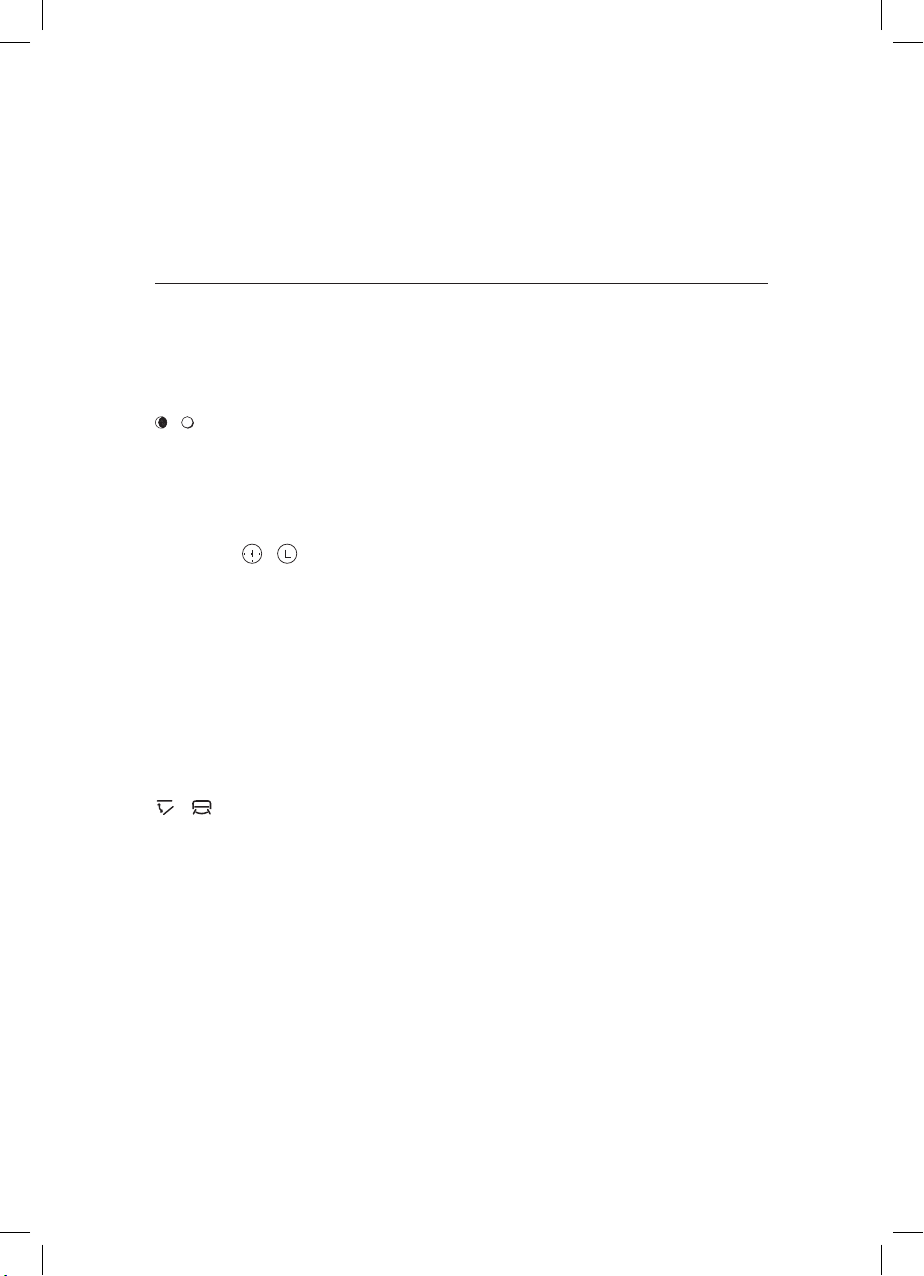
The mode indicator light illuminates under the different mode.
Note: HEAT mode is not available for cool only units.
/ button
Press this button to enter sleep mode, which the unit will exit after 8 hours of continuous
operation and restore to the previous status.
Note: The SLEEP function can not be activated in fan and dry mode.
a. Press the / button, the timer indicator light illuminates.
b. Press
“+” and “–”
button to select the desired time.
c. After setting time 5 seconds without other operation, the timing function will be
initiated automatically. If you press the timer button, there are no operation within 5
seconds or setting time is 0, the timing function will be cancelled automatically.
d. When the timing function is initiated, the unit displays the remaining time by press the
«timer» button once and cancel the timing function by press it again.
Note: With the unit on, press this button to set off timer.
With the unit off, press this button to set on timer.
/ button
Press this button, the indicator light will illuminate.
8
Page 9
Operation
WARNING Failure to follow the below precaution could result in electrical
shock, fire or personal injury.
1. The plug must be plugged into an outlet that is properly installed and
grounded.
2. Do not use an extension cord or plug adaptor with this unit.
Before starting the unit
• Select a suitable location, make sure the unit is near to an electrical outlet.
• Install the flexible exhaust hose and the adjustable window slider kit.
• Plug the unit into the correct outlet.
• Turn the unit on.
Heating operation mode (Cooling only model has no heating function)
• Press the MODE button in sequence until the heat display is illuminated.
• Press the “+” and “–” button to set your desired temperature.
• Press FAN button to select the fan speed.
• Press ON/OFF button to start the unit and press it again to stop
Cooling operation mode
• Press the MODE button in sequence until cool is illuminated.
• Press the “+” and “–” button to set your desired temperature.
• Press FAN button to select the fan speed.
• Press ON/OFF button to start the unit and press it again to stop.
9
Page 10
Drying operation mode
1. Press the MODE button in a sequence until the dry indicator is lighted.
2. The fan will run at a fixed speed at this operation mode.
3. Close windows and doors for the best dehumidifying effect.
Note: The setting temperature and fan speed can not be adjusted.The setting temperature
is 25° (77°F) and the fan speed is low.
Note: The setting temperature can not be adjusted.
Auto-restart function:
If power to the unit is interrupted, the unit will restart itself in its last used mode / settings
once power is restored. The compressor will restart after 4 minutes.
1. Set: Press the sleep button 10 times within 5 seconds, buzzer sounds 4 times.
2. Cancel: Press the sleep button 10 times within 5 seconds, buzzer sounds 2 times.
Circulation operation mode
• Press MODE button in sequence until the fan display is illuminated.
• Press the FAN button to select the fan speed.
• Press the ON/OFF button to start the unit and press it again to stop.
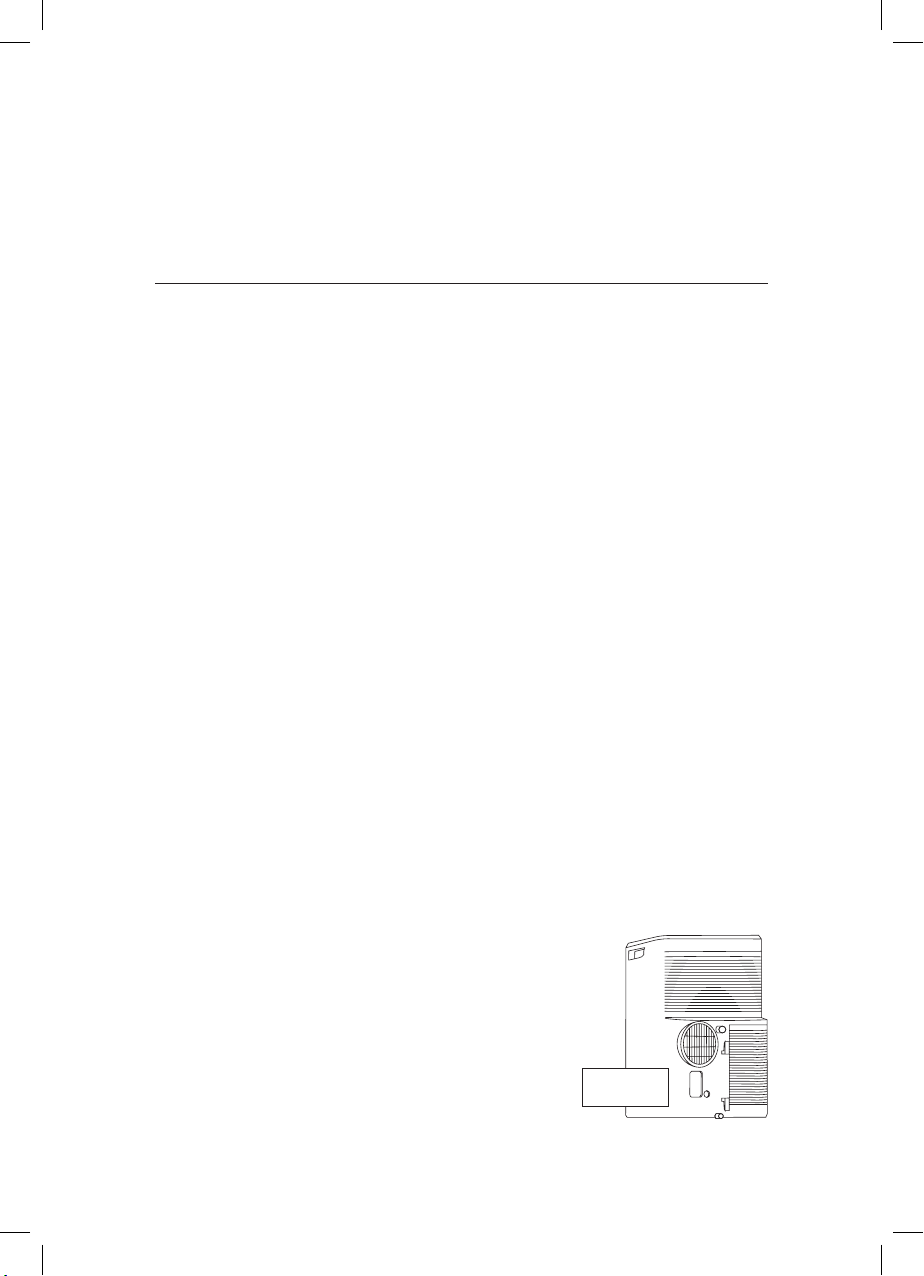
Removal of condensate water
When the internal water tank is full, the control panel display indicates “P1”.
• Open the drain cover and extract it upwards.
• Put a container under the drain pipe, take out the plug on the drain pipe and let out the
condensate water.
• After all the water has been emptied, replace the plug back onto
the drainage outlet, and replace the cover.
IMPORTANT This water is not suitable for drinking
Drain outlet
10
Page 11
Installation
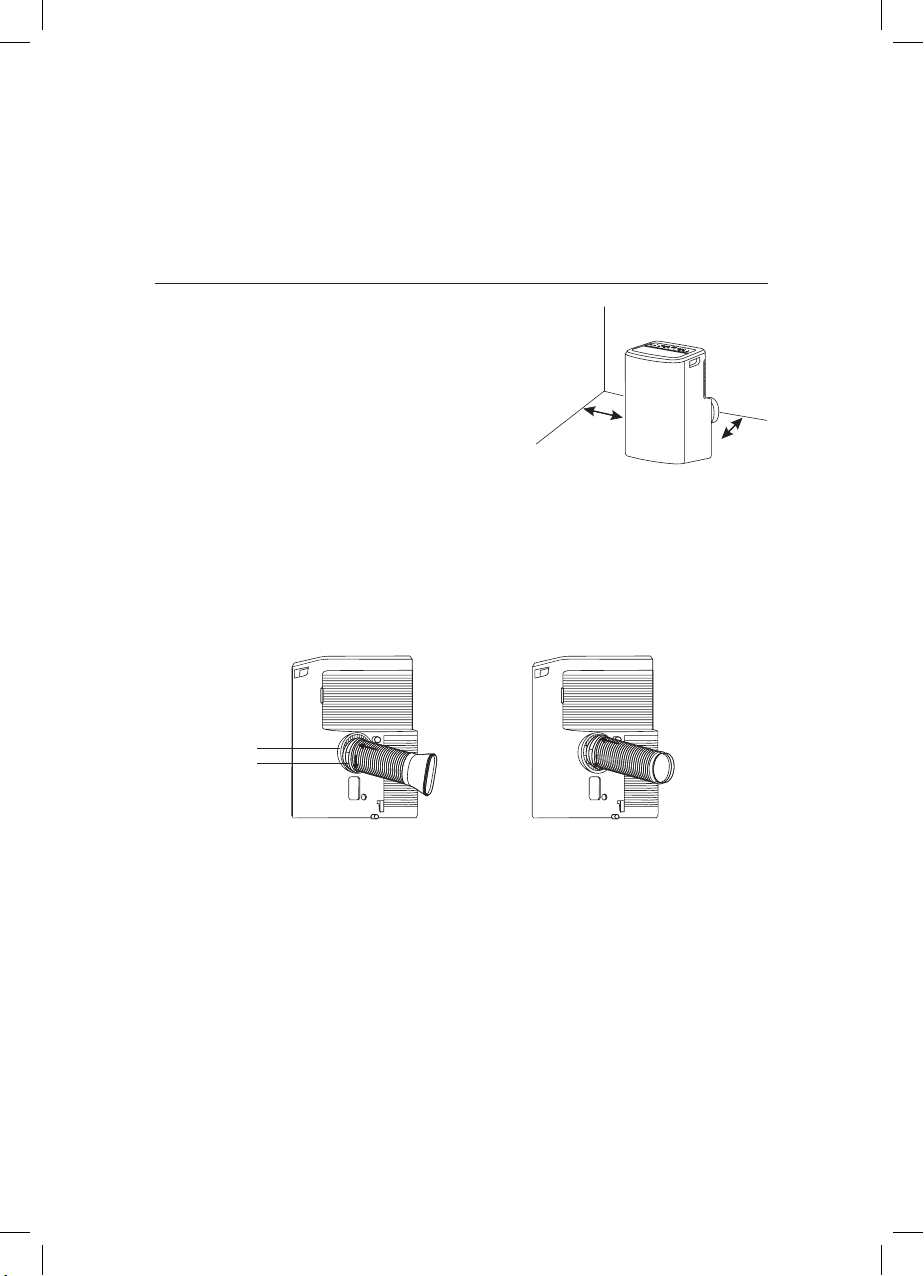
Select a best location
• Install the mobile air conditioner in a flat and spacious
location where the air outlets will not be obstructed.
• A minimum clearance of 50cm from walls or other
obstacles should be kept.
• The gradient can’t be more than 10 degrees in the
horizontal plane while using the unit & fitting kit.
Note: 1. The air conditioner shall not be used in the laundry room.
2. The plug shall be accessible after the unit is positioned.
Connect the exhaust duct to the Air outlet connector on back of the unit. Slide-in the
adaptor A downwards until it is locked in place.
More than
50 cm
More than
50 cm
Air outlet connector
adaptor A
or
Window kit installation
Your window kit has been designed to fit most standard vertical and horizontal
window applications. However, it may be necessary for you to improve or modify some
aspects of the installation procedure for certain types of window.
11
Page 12
Install the Window Slider Kit
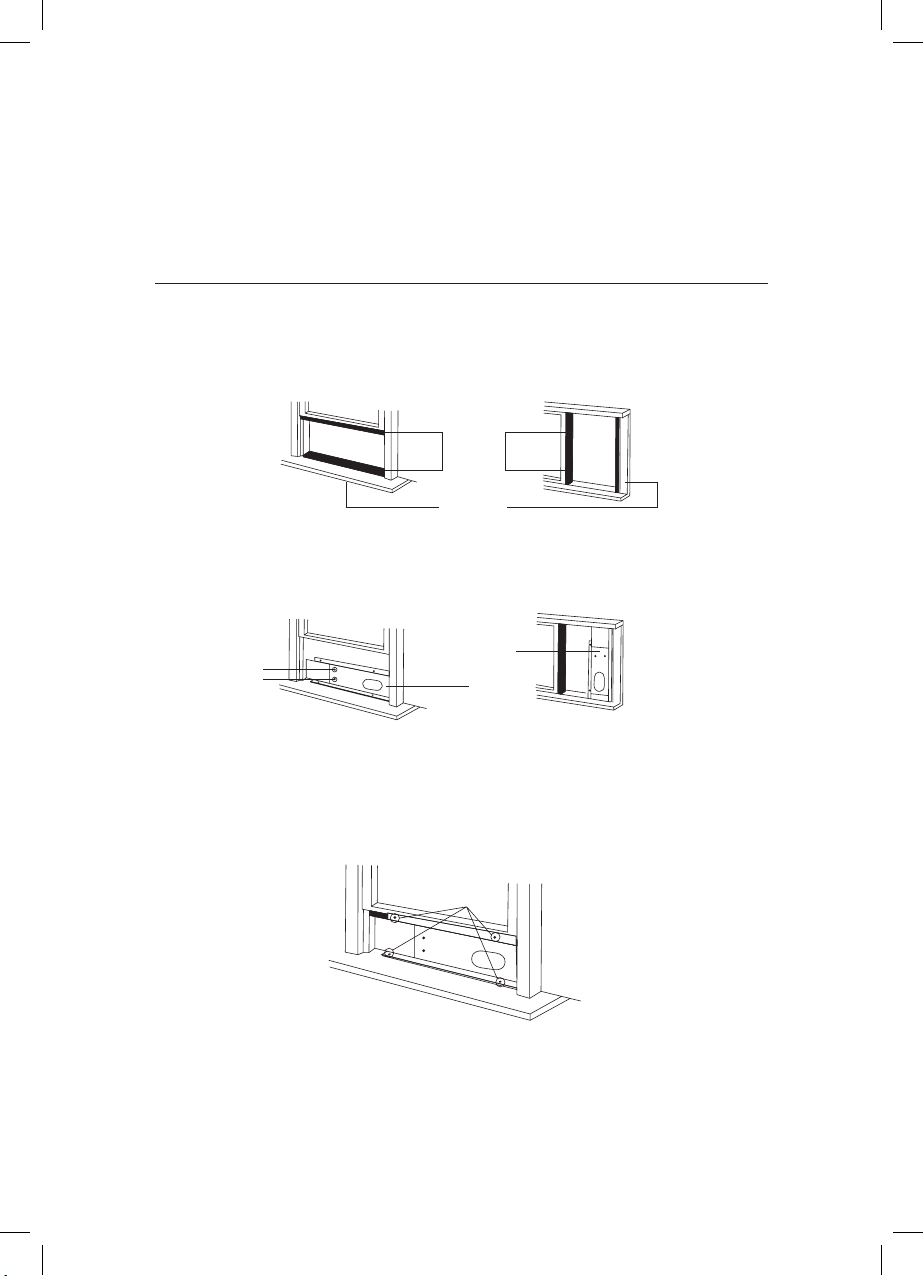
VerticalHorizontal
Foam Seal A
window sash
1. Cut the foam seal (adhesive type) to the proper length
and attach it to the window sash.
window
Screw A
slider
kit
2. Attach the window slider kit to the window sash. Adjust the length of the Window
Slider Kit: Loosen the screw A to adjust the length of the Window Slider Kit, then
tighten the screw when the length is suitable.
Note: the length of the Window Slider Kit is 67.5cm to 120cm.
Screw B
3. Carefully lower the window. Secure the vent panel in place with 4 type B screws,
plus one screw for each extension.
12
Page 13
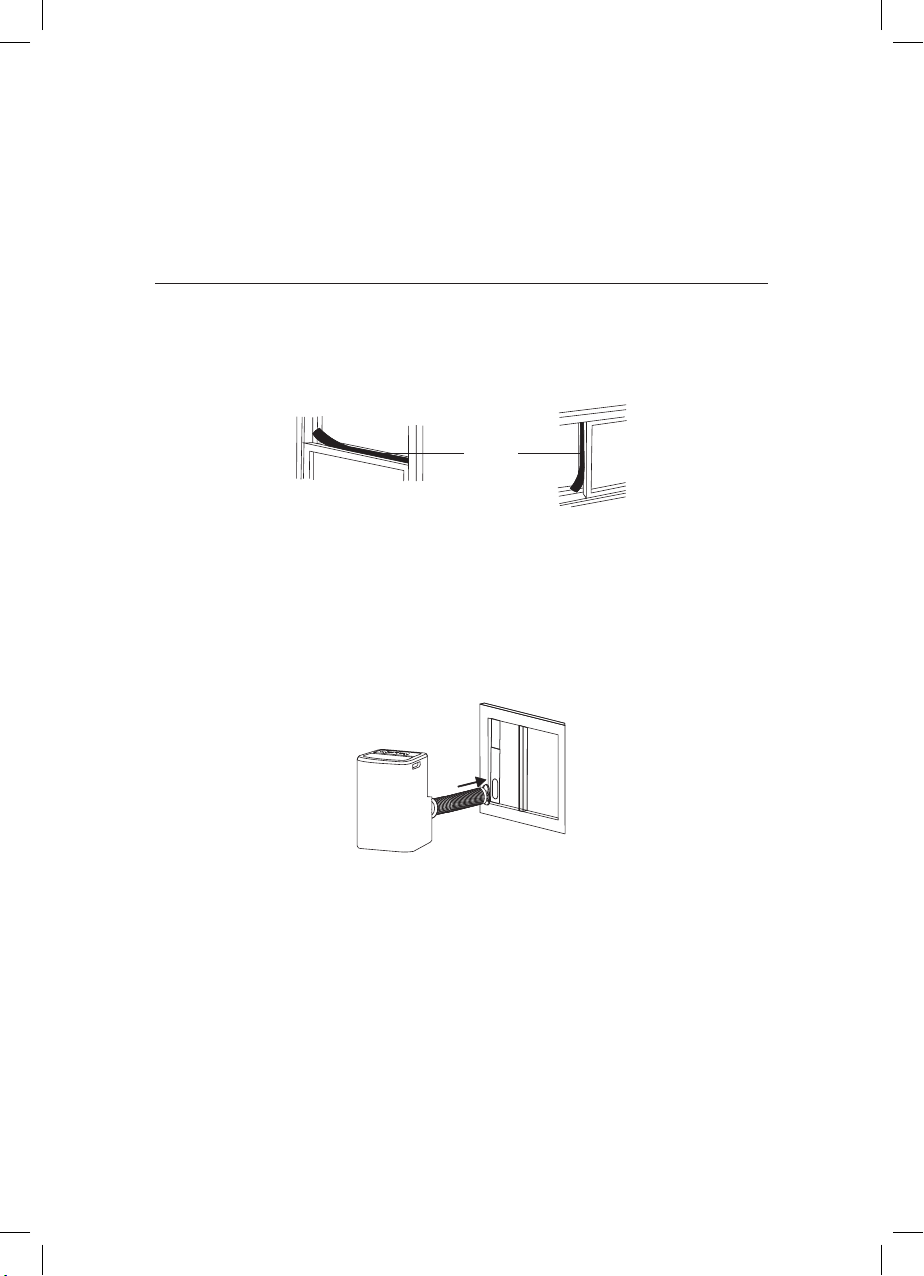
4. Cut the foam seal B (non-adhesive) to the window width. Stuff the foam seal B
between the glass and the window to prevent air and insects from getting
into the room.
Foam Seal
5. Install the security bracket with a type B screw, as shown.
Install the exhaust duct into the window
Remove the unit with the packed exhaust duct next to the window, and then connect
the adaptor B (flat mouth) of the exhaust duct with the window.
13
Page 14
Maintenance
Your new air conditioner is designed to give you dependable service for many years. This
section tells you how to clean and care for your air conditioner properly. We advise that you
contact your local accredited specialist for the annual maintenance. Remember the cost of this
service call is your responsibility.
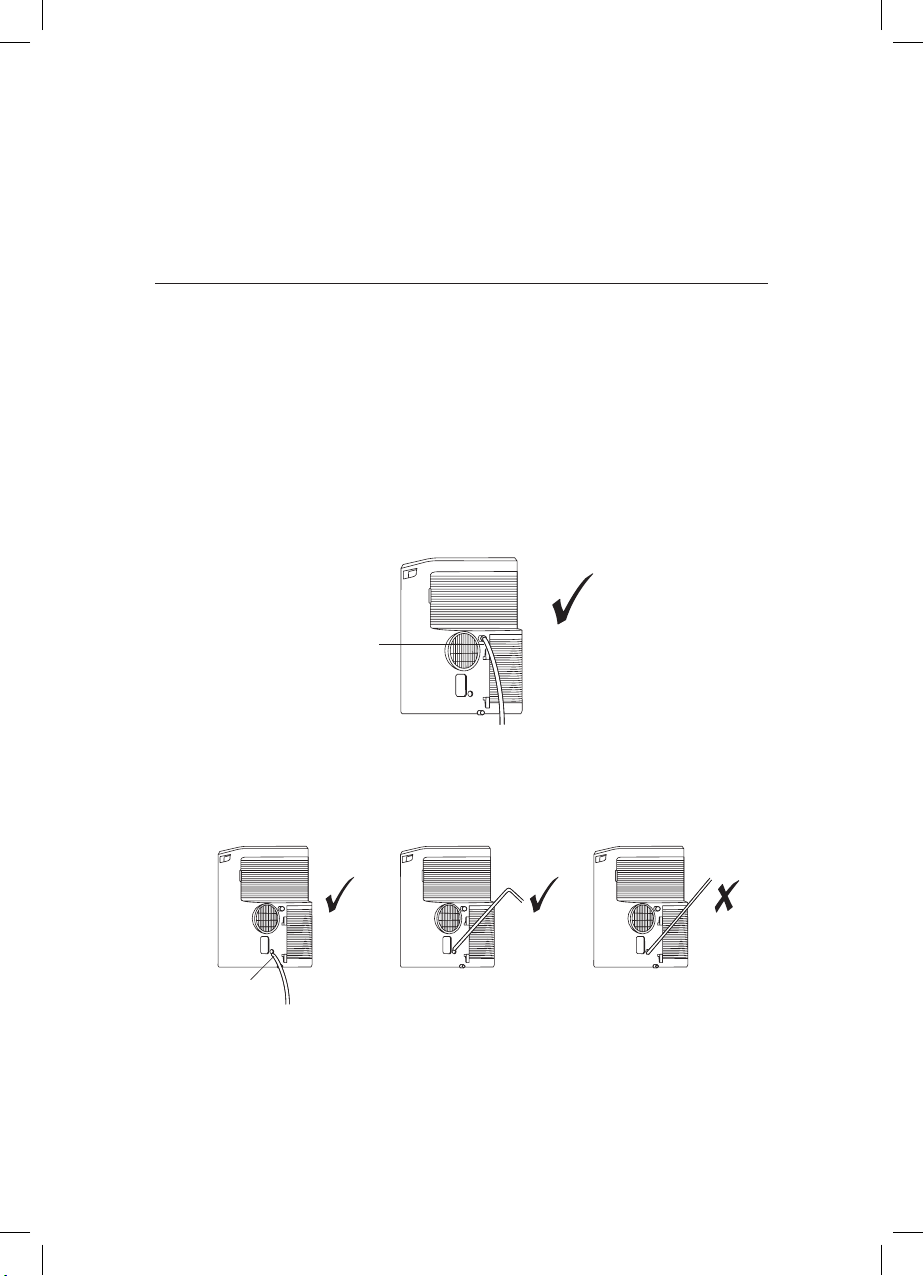
Water drainage
During dehumidifying mode, remove the upper drain plug from the back of the unit.
Attach the drain hose to the hole. Place the other end of the hose in the drainage way or
other drain areas.
Drain outlet
If the unit you bought has the pump drain outlet, as shown below, please drain in this way:
Remove the pump drain plug from the back of the unit, attach the drain hose to the hole.
Place the other end of the hose in the drainage way or other drain areas.
Pump drain outlet
Make sure the hose is secure and there are no leaks. Direct the hose toward the drain,
making sure that there are no kinks that will stop the water flowing. Place the end of the
hose into the drain and make sure the end of the hose is down to let the water flow
smoothly. Reinstall the drain plug after use.
14
Page 15
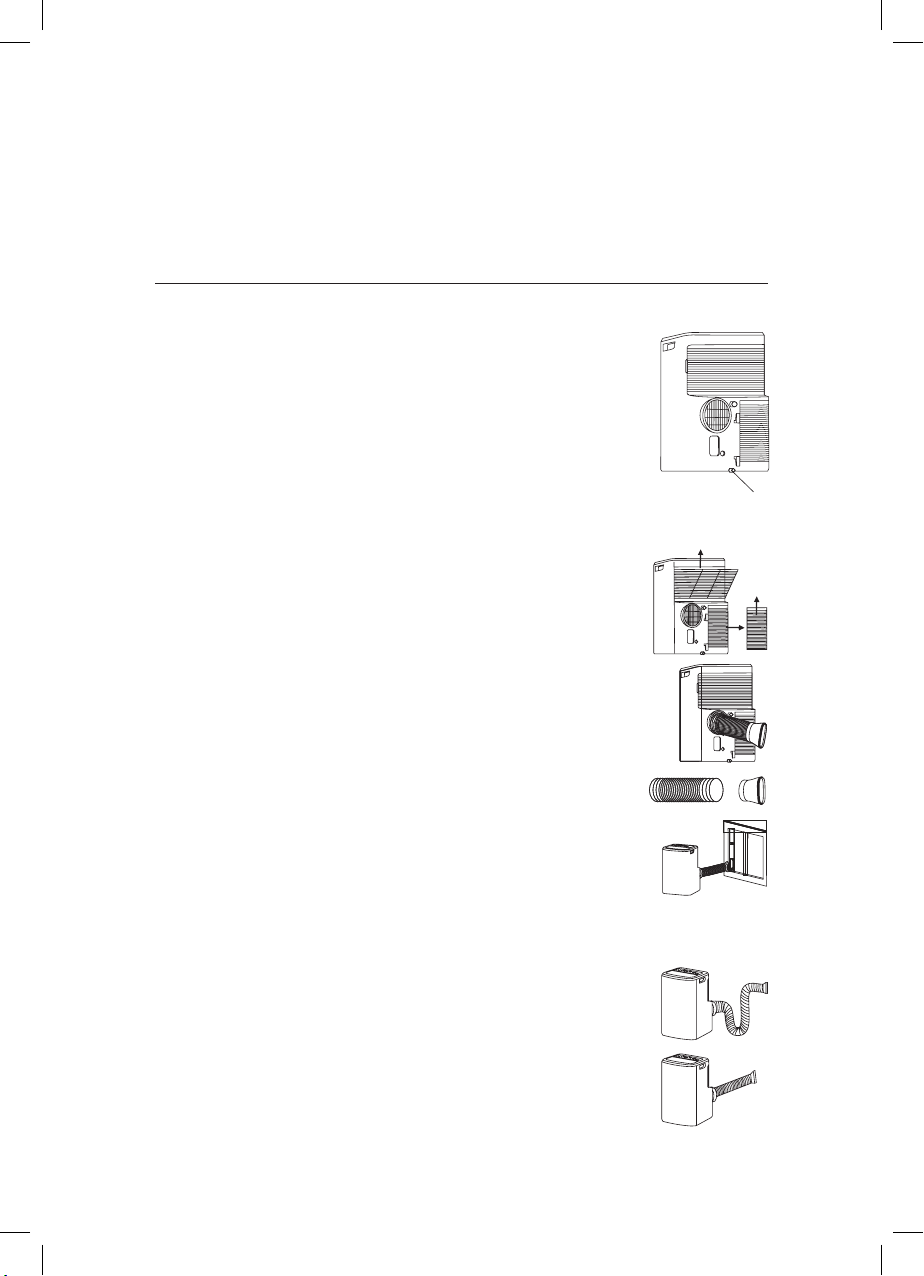
When the water level of the bottom tray reaches predetermined level,
the digital display area shows «P1» and the WATER FULL indicator light
illuminates. Carefully move the unit to a drain location, remove the
bottom drain plug and let the water drain away. Reinstall the bottom
drain plug and restart the machine until the P1 symbol disappears.
If the error repeats, call for service.
Note: Be sure to reinstall the bottom drain plug before using the unit.
Cleaning Air Filter
If the air filter is covered by dust, the cooling capability will be
decreased. Please clean the air filter every two weeks, dependant
on use.
• Turn off the power supply
• Pull out the filter cover and remove the filter from cover
• Vacuum off the surface of the filter and then if necessary wash air
filter in warm soapy water. Do not put air filter in the dishwasher or
use any chemical cleaners. And dry filter completely before replacing.
• Attach the air filter to the filter cover using the attachment hooks
on the inner surface of the cover. Put the filter cover back to it’s place.
Duct mount instruction flexible
1a. Connect the exhaust air outlet hose by screwing into the round hose
adaptor. Clip the hose and adaptor onto the air outlet of the unit.
2b. Connect the appropriate adaptor onto the opposite end of the air
outlet hose.
3c. Fit the adaptor sub-assembly to a nearby window.
Note:
• The duct can be compressed to 270mm minimum and extended to
1500mm maximum. It is better to keep the duct length to a minimum.
• The exhaust air must always be vented to outside.
• Stretching or bending the duct excessively will affect the cooling efficiency.
Bottom tray
drain outlet
15
Page 16
Cleaning The Unit
• For the purpose of safety, please turn off the air conditioner power supply.
• Wipe the unit with a dry cloth.
• If the unit is very dirty, please wipe with a damp cloth.
Note:
If the unit remains unused for a long period of time please remove
the condensate water & leave the drain bung out.
WARNING
• Do not use gasoline, benzene, thinner or any other chemicals, or any liquid
insecticide on the air conditioner, as these substances may cause flaking off
of the paint, cracking or deformation of plastic parts.
• Never attempt to clean the unit by pouring water directly over any of the
surface areas, as this will cause deterioration of electrical components and
risk of electrocution.
• Never use hot water over 40
o
C (104oF) to clean the air filter.
16
Page 17
Troubleshooting
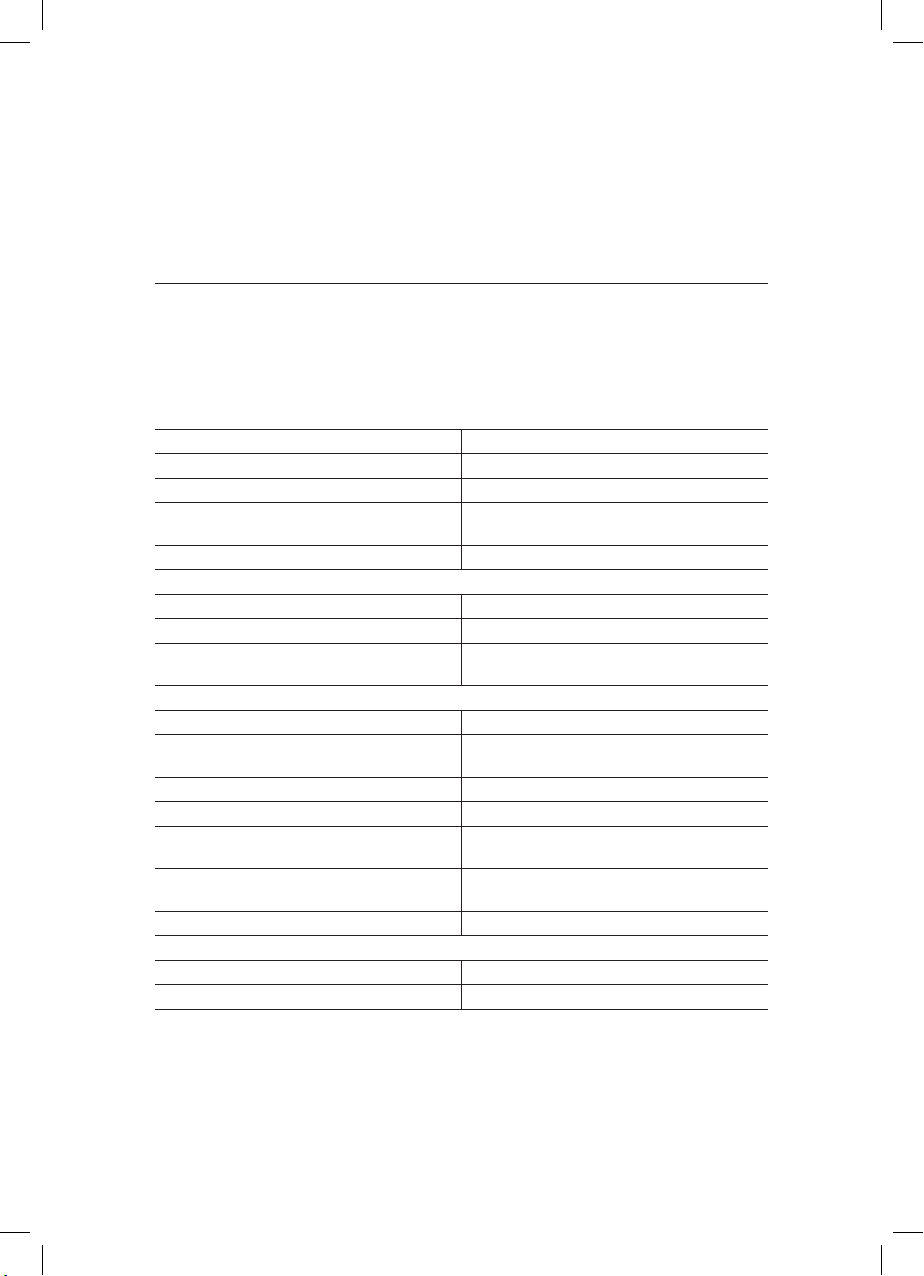
Before making a service call, please try the suggestions below if your unit is not
operating correctly.
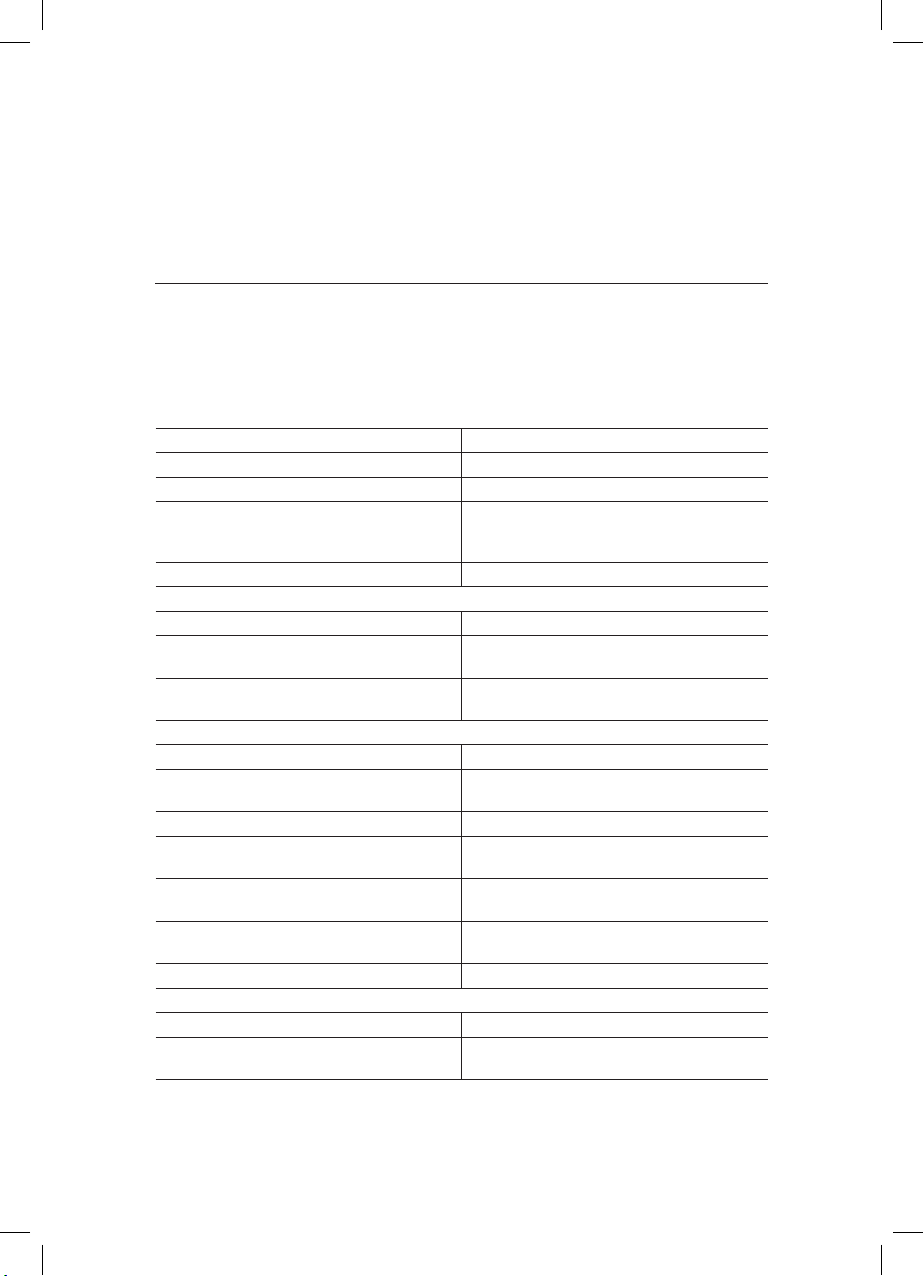
Air Conditionining unit will NOT operate
Causes Solutions
The power switch is off Switch on the power.
Power supply failure Wait for the recovery of power supply
The fuse is blown Check circuit breaker, replace the fuse
It doesn’t reach the setting time for starting up Wait or eliminate the original setting
Unit doesn’t start when pressing ON/OFF button
Causes Solutions
It is not four minutes after switch off Wait four minutes
Room temperature is lower than the setting
temperature
Air blowing out, but the cooling effect is bad
Causes Solutions
Mistakes in temperature setting Reset temperature. Set temperature should be
The air filter is blocked by dust Clean the air filter
The air inlet or outlet of machine is blocked Remove the obstruction
The air conditioner is on in a very hot room Allow additional time to remove stored
Cooling capacity is insufficient Reconfirm the required cooling capacity
The doors or windows are open Close the doors and windows
Noise or vibration
Causes Solutions
The ground is not level or not flat enough Place the unit on a flat, level ground if possible
(retest if fuse re-blows – contact electrician)
Reset the temperature
lower than ambient temperature
heat from walls, ceiling, floor and furniture
with your dealer.
17
Page 18
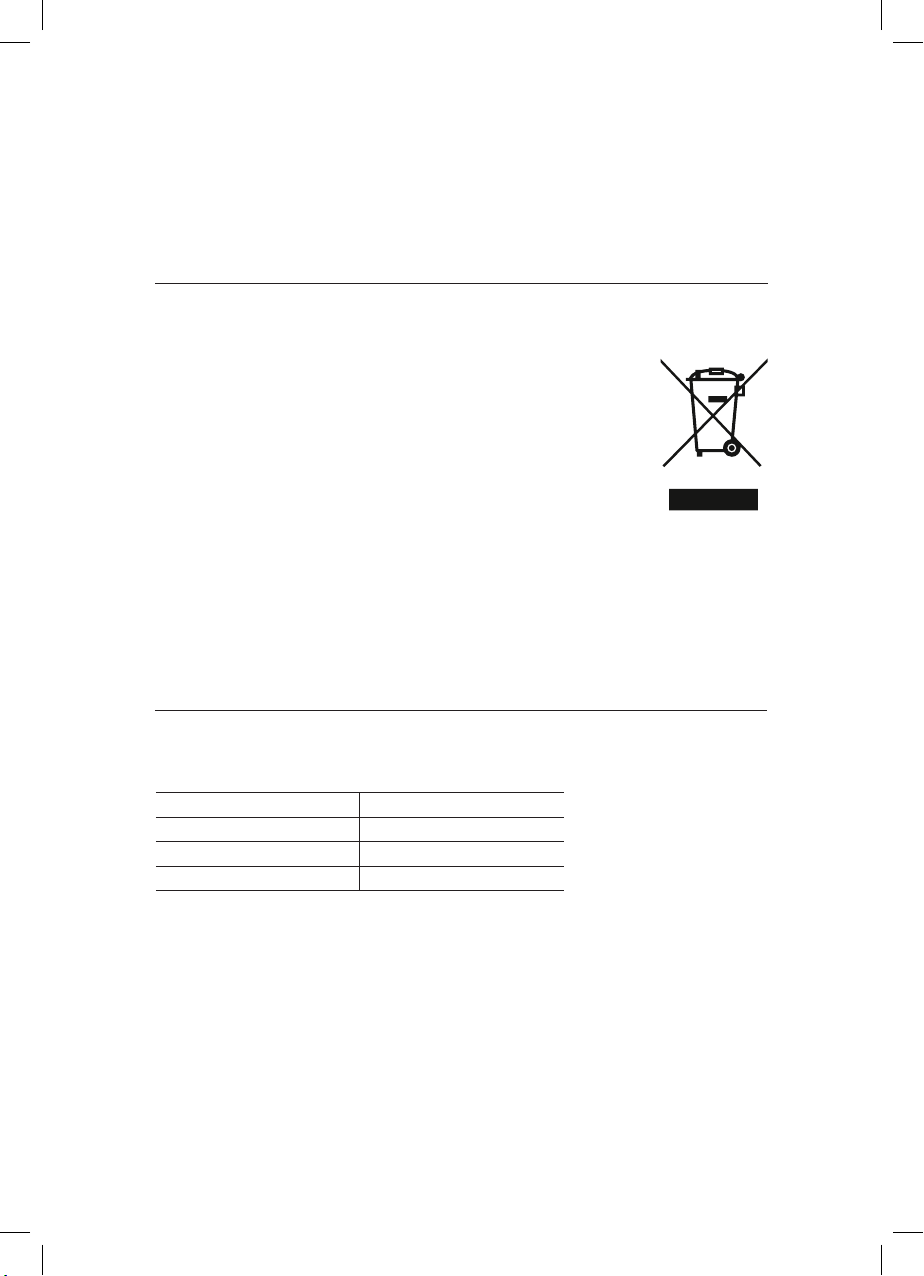
WEEE directive warning
Meaning of crossed out wheeled dustbin
Do not dispose of electrical appliances as unsorted municipal
waste, use separate collection facilities. Contact your local
government for information regarding the collection systems
available. If electrical appliances are disposed of in landfills or
dumps, hazardous substances can leak into the groundwater and
get into the food chain, damaging your health and well-being.
When replacing old appliances with new ones, the retailer is legally
obligated to take back your old appliance for disposal at least free
of charge.
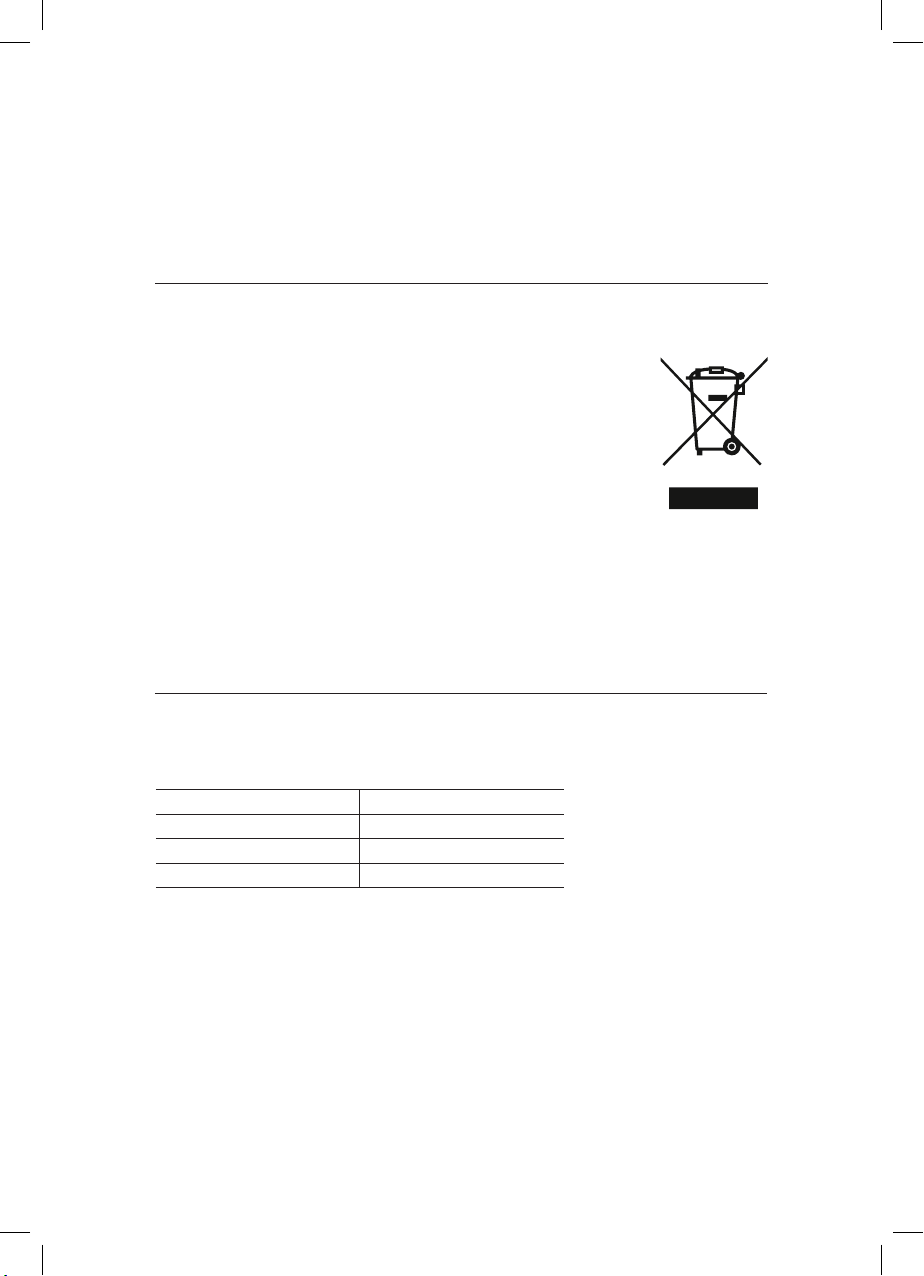
Refrigerant Gas
The Refrigerant gases contained in this equipment are hermetically sealed
Refrigerant R-290
Refrigerant Quantity (Kg) 0.21
GWP 3
ODP 0
18
Page 19
Portable Air Conditioning Unit
Remote Control
Read the following instructions carefully to ensure safe and correct usage of Portable
Air Conditioning Unit remote control. Keep instructions so that they can be referred to
at any time.
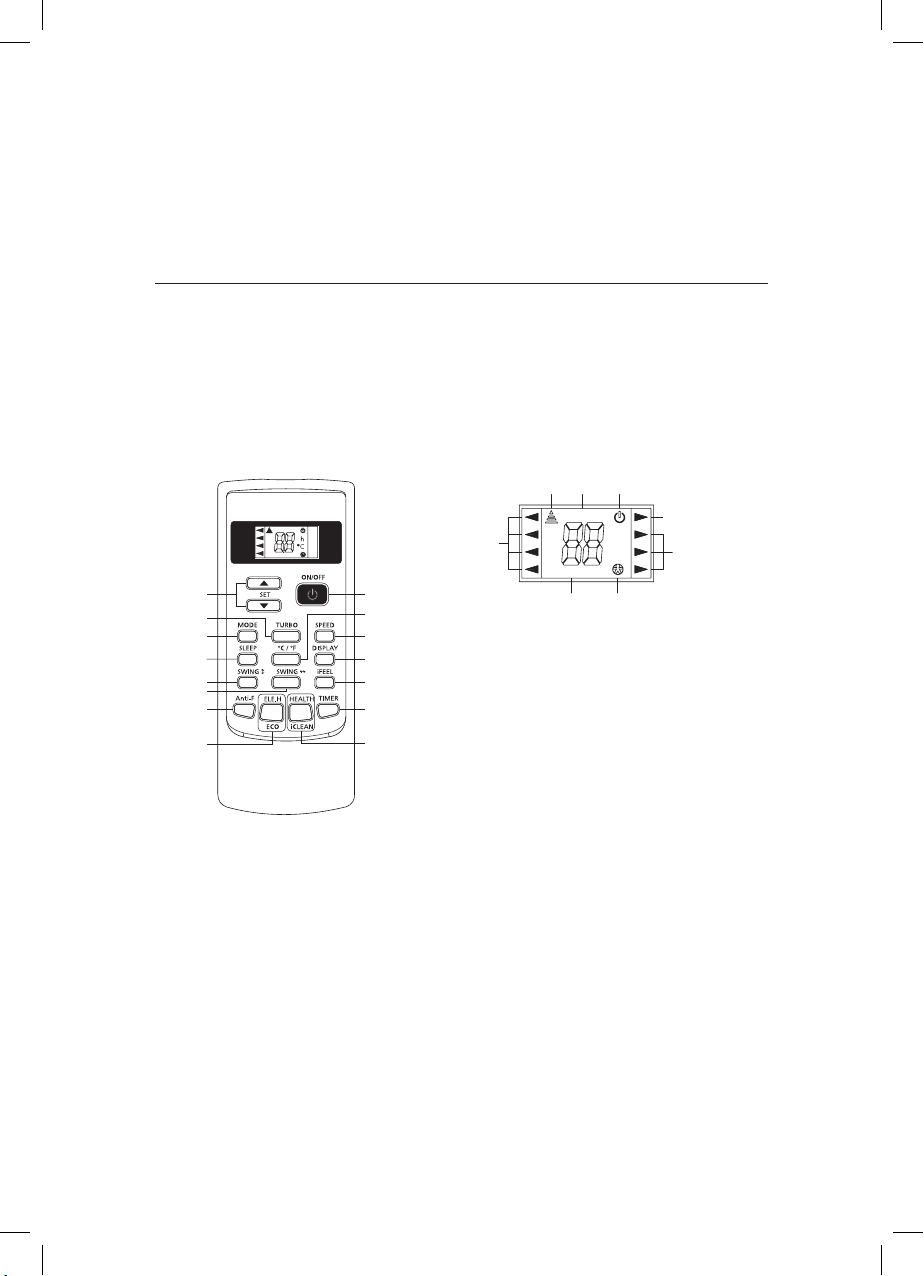
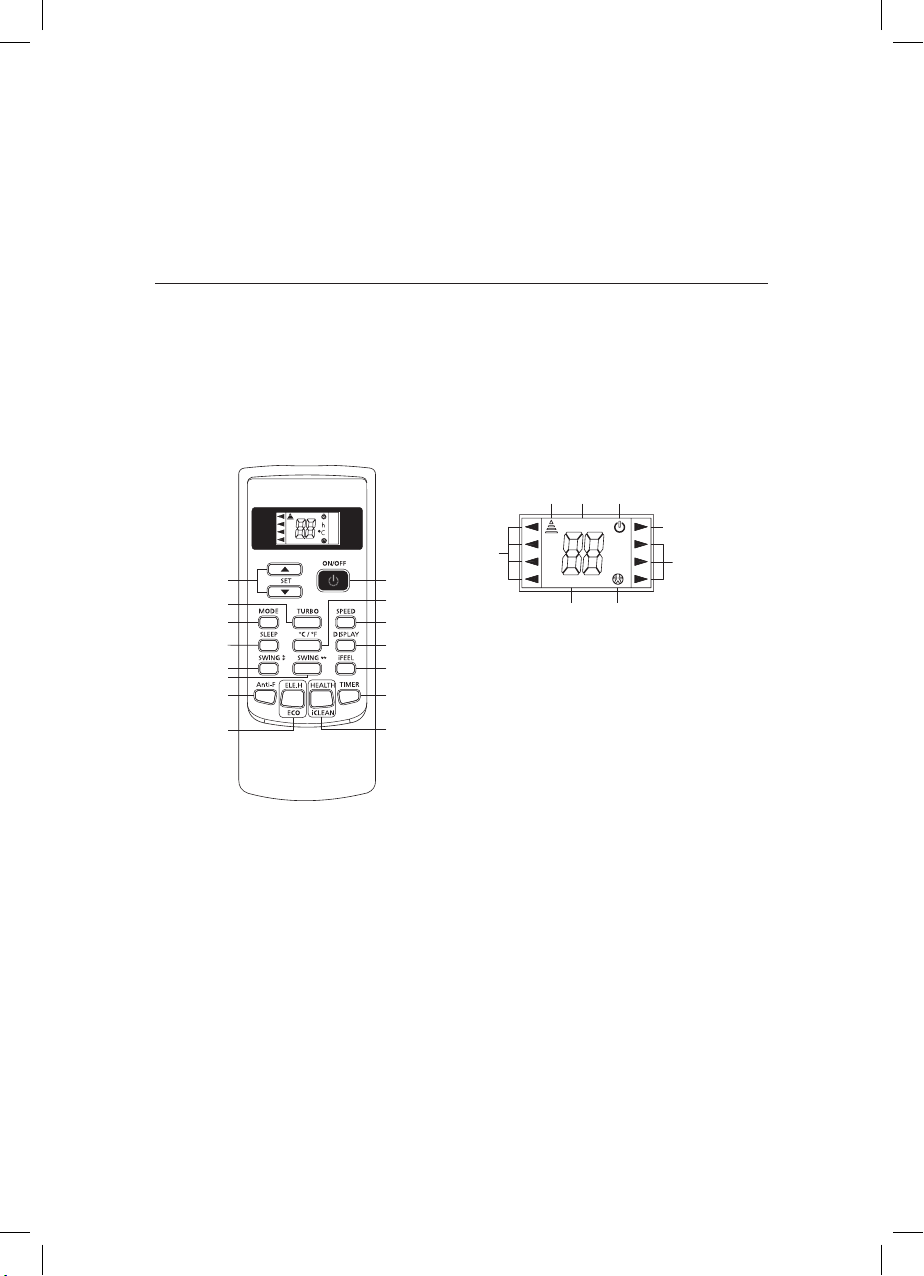
Buttons description
LCD Display
transmit on/offdigital
SET TEMPERATURE
set room
AUTO
COOL
DRY
HEAT
8 1
9
10
11
12
13
14
15
timer on off
FAN
HIGH
MID
LOW
running mode
2
3
Note:
4
The cooling only units do not have the function
5
of heating or electric heating. Do not turn the
6
remote controller to these functions, they will have
no effect.
7
set room
timer on off
timer
h
ºC
feeling
running mode
speed
1. «ON/OFF»
Start or stop the air-conditioner by pressing this button.
2. «ºC / ºF»
• Press this button to set the temperature display to Fahrenheit, which is displayed by
default in Celsius. The “ºC” will not be displayed on the LCD.
• Press this button again to restore the temperature display to Celsius.
Note: Temperature display in Fahrenheit is not available for some models. When
temperature is displayed in Fahrenheit on the remote controller, it might be in Celsius on
the unit, the function and operation of which will not be affected.
19
Page 20
3. «SPEED» button
Select fan speed as following:
LOW › MID › HIGH › AUTO
4. «DISPLAY»
• Press this button to turn on/off the display. This is for the convenience of users who
are uncomfortable sleeping with the backlight on.
5. «iFEEL»
• Press this button to set the temperature display on the remote controller to ambient
temperature and press this button again to set it to preset temperature.
6. «TIMER»
• With the unit ON, press this button to set OFF timer or with it OFF to set ON timer.
• Press this button once, a “ON (OFF)” will flash. Press “ ” or “ ” to set the number
of hours in which the unit will be turned ON/OFF, with an interval of 0.5 hour if less
than 10 hours, or 1 hour if longer than 10 hours , and a range of
0.5-24 hours.
• Press it again to confirm the setting, the “ON (OFF)” will stop flashing.
• If the timer button is not pressed longer than 10 seconds after the “ON (OFF)” start
flashing, the timer setting will be exited.
• If a timer setting is confirmed, pressing this button again will cancel it.
Note: When a ON timer is set, all function buttons (except SLEEP, DISPLAY and iFEEL
can’t be set) are valid and when the ON time set is up, the unit will operate as preset.
7. This button has two functions.
a. «HEALTH»
• Press this button with the unit ON to activate health related functions, such as the
removal of atmospheric particles, depending on the actual configuration of each model.
• Press this button again to deactivate the HEALTH function.
b. «iCLEAN»
Press this button with the unit OFF, the remote controller will display “CL” and the unit
will automatically clean dust off the evaporator and dry it, to increase the cooling and
heating efficiency.
20
Page 21
The iCLEAN function runs for approximately 30 minutes, during which if the unit is
turned on with the remote controller or this button is pressed again, the iCLEAN will be
deactivated.
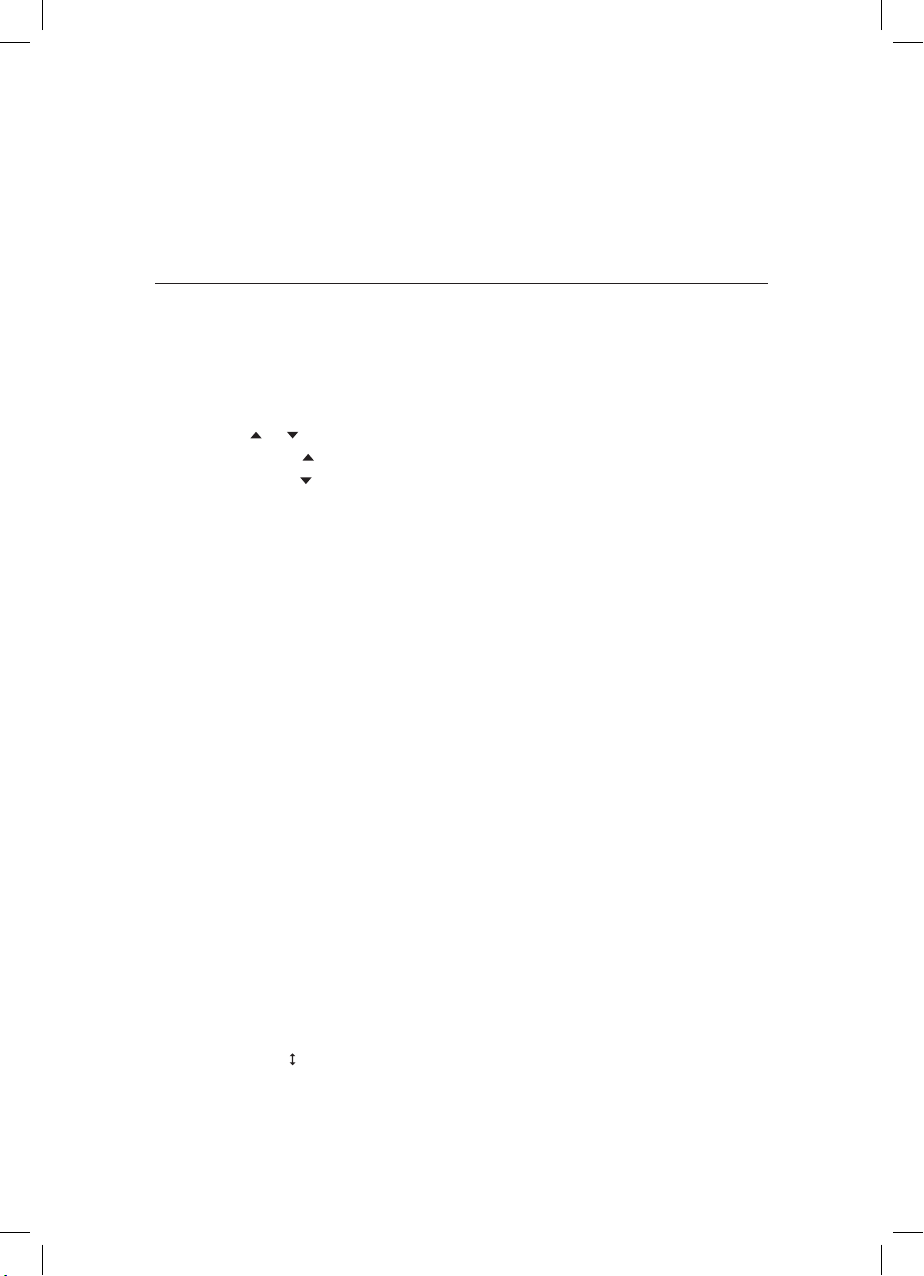
8. “ ” or “ ”
Each time the “ ” is pressed, the temperature setting will increase by 1ºC and each
time the “ ” is pressed, it will decrease by 1ºC.
• The temperature setting ranges from 16ºC (60ºF) – 35ºC (90ºF).
Note: The temperature cannot be set in AUTO or FAN mode, thus these two buttons
are not functional.
9. «TUR BO»
Press this button only in COOL or HEAT mode to set TURBO on or off to speedy the
cooling or heating.
• When TURBO is on, the air speed is HIGH.
• When TURBO is off, the air speed will restore to previous status.
10. «MODE» button
Enables you to select different operation modes after each press, the operation mode will
be changes. It shown in the following display:
AUTO * COO L * DRY * HE AT * FAN * AUTO.
Note: Cooling only units have no heating function.
11. «SLEEP»
• Press this button to enter SLEEP mode, which the unit will exit after 10 hours of
continuous operation and restore to the previous status.
Note: The SLEEP function cannot be activated in FAN mode.
12. «SWING »
Press this button to activate up/down swing and press it again to fix the swing position.
13. «SWING »
Press this button to activate left/right swing and press it again to fix the swing position.
21
Page 22

14. «Anti-F»
• The Anti-F functions when the unit is turned off with the remote controller in COOL,
DRY or AUTO mode. It will operate in HEAT mode (FAN mode for cool only units),
with the internal fan running with weak flow for 3 minute before stop, to remove
the moisture within the evaporator so as to prevent it from giving off bad smell from
mould.
• This function is not set in the factory. You may set it or cancel it any time you want
as follows: With both the unit and the remote controller OFF, point the remote
controller at the unit and press “Anti-F” button once, the buzzer will sound 5 times,
indicating this function is set. Once set, this function will remain valid except when
the unit is power off or until it is canceled.
To cancel Anti-F:
1. Power off the unit.
2. With both the unit and the remote controller OFF, point the remote controller at the
unit and press this button once, the buzzer will sound 3 times, indicating this
function is canceled.
Note:
• With Anti-F activated, it is advised not to turn ON the unit again before it is
fully OFF.
• Anti-F function will be invalid when OFF timer is set.
15. This button has two functions.
a. ELE.H
• If this button is pressed in HEAT mode, the electric heating will be turned on/off.
b. ECO
• If this button is pressed in COOL mode, the unit will enter the ECO mode which has
the lowest electricity consumption, and exit it automatically 8 hours after.
• Changing modes or turning off the remote controller will automatically cancel the
ECO function.
• Press ECO button in ECO mode to exit this mode.
Note: The ECO mode only works for inverter units.
22
Page 23
Usage
Automatic operation mode
• Press the MODE button, select the automotive operation mode.
• Press the SPEED button, to select the fan speed – you can select the fan speed from
LOW, MID, HIGH, AUTO.
• Press the ON/OFF button, the air conditioner starts to operate.
• Press the ON/OFF button to stop the air conditioning unit.
Cooling/ heating operation mode
(Cooling only units have no heating function)
• Press the MODE button, select the cooling or heating operation mode.
• Press the “ ” or “ ” button, select the temperature, temperature can be set at 1°C
difference range from 16-35°C.
• Press the SPEED button, to select fan speed – you can select fan speed from
LOW, MID, HIGH, AUTO.
• Press the ON/OFF button, the air-conditioner starts to operate.
• Press the ON/OFF button again, the air-conditioner stops.
Fan operation mode
• Press the MODE button and select FAN operation mode.
• Press the SPEED button, to select fan speed – you can select fan speed from
LOW, MID, HIGH, AUTO.
• Press the ON/OFF button, the air-conditioner starts to operate.
• Press the ON/OFF button to stop the air-conditioning unit.
Note: In “FAN“ operation mode the temperature setting is non effective.
Dehumidify operation mode
• Press the MODE button to select the Dehumidify operation mode.
• Press the “ ” or “ ” button to set the temperature, temperature can be set at 1°C
difference range from 16-35°C.
• Press the SPEED button, to select fan speed – you can select fan speed from
LOW, MID, HIGH, AUTO.
• Press the ON/OFF button the air-conditioner starts to operate.
• Press the ON/OFF button to stop the air-conditioning unit.
23
Page 24
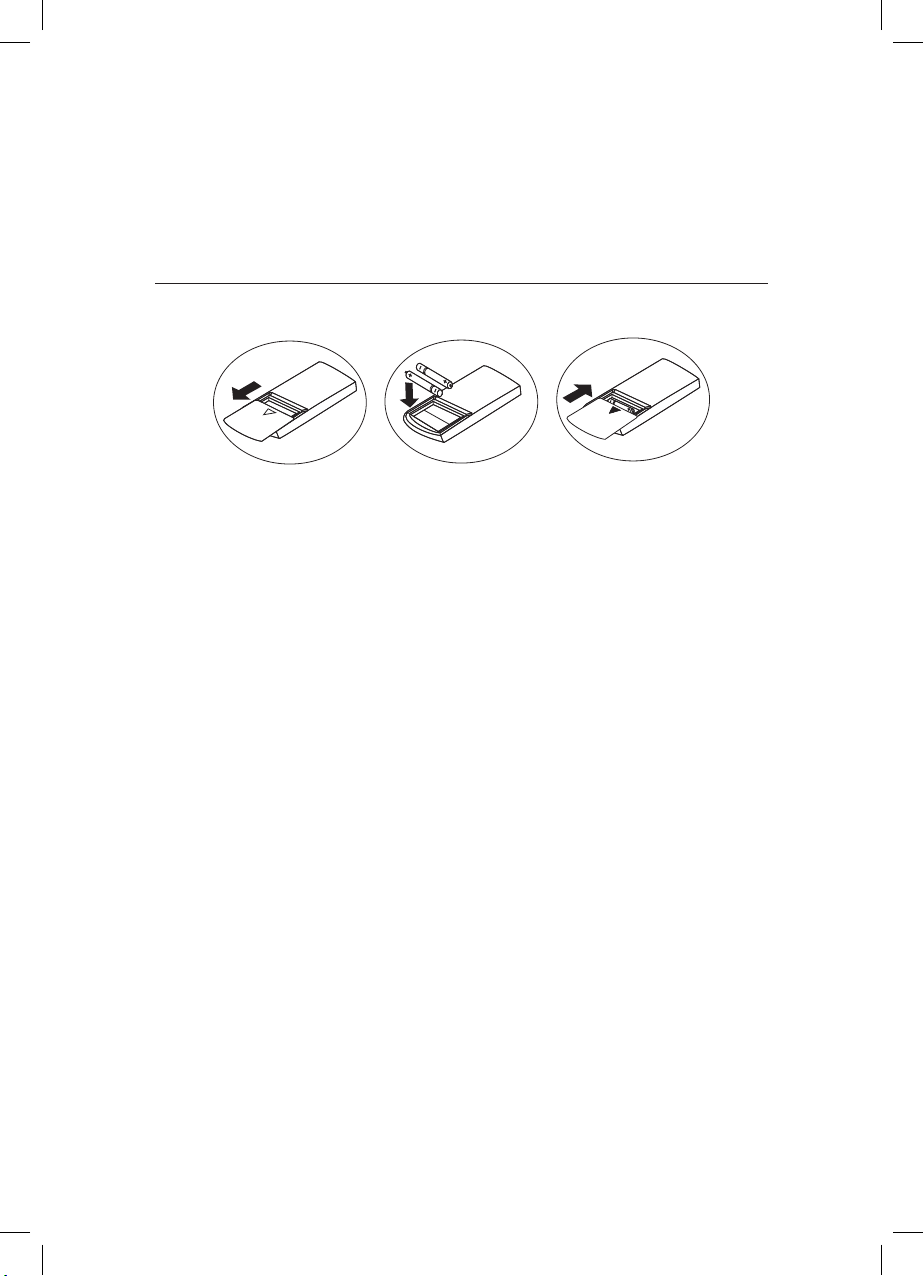
Fit Batteries
• Slide open the cover in the direction as indicated by the arrow on the handset.
• Put in two brand new batteries and position the batteries to the right electric
poles (+ & –)
• Replace the cover.
Attention:
• Aim the remote controller towards the receiver on the air-conditioner.
• The remote controller should be within 8 meters away from the receiver.
• No obstacles between the remote controller and receiver.
• Do not drop or throw the remote controller.
• Do not put the remote controller in direct sunlight or other heat sources.
• Use two AAA batteries, do not use electric batteries.
• Take batteries out of the remote controller if the unit is not being used for long
periods of time.
• If the unit does not respond to the remote control, replace the batteries.
• The waste battery should be disposed of properly.
Note: Some units may not enable function.
The design and specifications are subject to change without prior notice for product improvement.
Consult with the sales agency or manufacturer for details.
Information correct at time of going to press.
24
Page 25
Veiligheidsmaatregelen
Uw veiligheid en die van anderen is erg belangrijk. Deze handleiding bevat veel belangrijke
veiligheidsaanwijzingen en er zijn ook veiligheidsstickers op de airco aangebracht. Lees altijd
alle veiligheidsaanwijzingen en neem ze in acht.
WAARSCHUWING Dit symbool wijst op mogelijk ernstig of fataal letsel.
ATTENTIE Dit symbool wijst op mogelijk letsel of schade aan eigendom.
WAARSCHUWING
Dit apparaat mag worden gebruikt door kinderen van 8 jaar en ouder en door
mensen met lichamelijke, zintuigelijke en mentale handicaps of onvoldoende
ervaring en kennis, zolang ze onder toezicht staan of training hebben ontvangen
over het veilige en juiste gebruik van het apparaat.
Kinderen mogen niet met dit apparaat spelen. Dit apparaat mag alleen door
kinderen worden gereinigd en onderhouden onder toezicht van een volwassene.
De elektrische aansluiting van dit apparaat moet tot stand worden gebracht volgens
de lokale wet- en regelgeving.
Er moet een aardlekstroomonderbreker met een nominaal vermogen worden
geïnstalleerd om mogelijke elektrische schokken te voorkomen..
Installeer de airco niet op een plaats waar brandbaar gas of brandbare
vloeistoffen aanwezig zijn. Dit kan namelijk brand veroorzaken.
Als het stroomsnoer beschadigd is, dient het vervangen te worden door de
producent of de distributeur of door een vakbekwaam persoon.
De specificatie van de zekering is AC250V T3.15AL.
De benodigde spanning is 220 ~ 240 V. Het apparaat moet worden geïnstalleerd
volgens de geldende wet- en regelgeving voor de bedrading. De stekker moet na de
installatie eenvoudig toegankelijk zijn. Als de zekering van de PCB doorgeslagen is,
dient hij vervangen te worden door een zekering van het type F3.15A/250V.
25
Page 26
Steek geen vingers of andere voorwerpen in de in- of uitlaten. De ventilator
draait op hoge snelheid en zal letsel veroorzaken.
Raak de draaiende lamellen niet aan. Uw vinger kan vastgeklemd raken, wat de
aandrijving van de lamellen zal beschadigen.
Probeer de airco nooit zelf te repareren. Alle reparaties moeten worden
uitgevoerd door een vakbekwaam technicus die over de benodigde vaardigheden
beschikt.
Gebruik de airco niet tijdens onweer of wanneer het bliksemt. Schakel de
netstroomschakelaar uit om te voorkomen dat het apparaat beschadigd raakt.
Gebruik geen vloeibare of bijtende schoonmaakmiddelen om het apparaat te
reinigen en zorg ervoor dat er geen water of andere vloeistoffen op worden
gemorst, omdat dit de kunststofonderdelen kan beschadigen en een elektrische
schok kan veroorzaken.
Gebruik het apparaat niet in natte ruimtes zoals badkamers en wasruimtes.
ATTENTIE
Richt geen koude lucht gedurende lange tijd op het lichaam.
Reinig de airco met een zachte, droge doek. Gebruik geen chemische
oplosmiddelen, insecticiden of brandbare sprays die de airco kunnen beschadigen.
Nooit water direct op de airco aanbrengen.
De airco moet worden gebruikt in een ruimte met gesloten ramen en deuren. Als er
ramen of deuren open staan, kan de airco de gewenste temperatuur en vochtigheid
niet goed handhaven.
Als het luchtfilter erg vuil is, wordt de koeling of verwarming minder efficiënt. Reinig
het luchtfilter regelmatig.
26
Page 27

Belangrijk
• De ruimte voor installatie, gebruik, reparatie en opslag van deze airconditioner dient groter
te zijn dan 12 m2.
• Als de airconditioner wordt geïnstalleerd, gebruikt of opgeslagen in een
ongeventileerde ruimte, zorg dan dat opbouw van koelgas door lekken wordt
voorkomen, omdat er een risico op brand of ontploffing kan zijn als het koelmiddel
in contact komt met elektrische verwarmingen, fornuizen of andere
ontstekingsbronnen.
• Dit apparaat is niet bedoeld voor gebruik door personen (waaronder kinderen) met
verminderde lichamelijke, zintuiglijke of geestelijke vermogens of gebrek aan ervaring
en kennis, tenzij zij door een voor hun veiligheid verantwoordelijke persoon worden
begeleid of onderricht hebben gehad in het gebruik van het apparaat. Er dient
toezicht te worden gehouden op kinderen om ervoor te zorgen dat zij niet met het
apparaat spelen.
• De specificaties van de zekering zijn op de printplaat gedrukt, bijvoorbeeld AC
250V/5A.
• Raak het apparaat niet aan met natte of vochtige handen of op blote voeten.
• Trek het apparaat niet aan het netsnoer.
• Verwijder geen onderdelen van het apparaat, tenzij op instructie van een erkende
technicus.
• Verplaats het apparaat niet, tenzij de stroom is uitgeschakeld en het netsnoer aan de
netsnoerklem is bevestigd.
• Gebruik het apparaat niet met een beschadigde stekker of loszittende contactdoos.
• Kanalen aangesloten op een apparaat dienen geen ontstekingsbron te bevatten.
• De airconditioner moet rechtop worden opgeslagen en vervoerd, anders kan er
schade ontstaan aan de compressor. Wacht bij twijfel minimaal 24 uur voor installatie
en gebruik van het apparaat.
27
Page 28
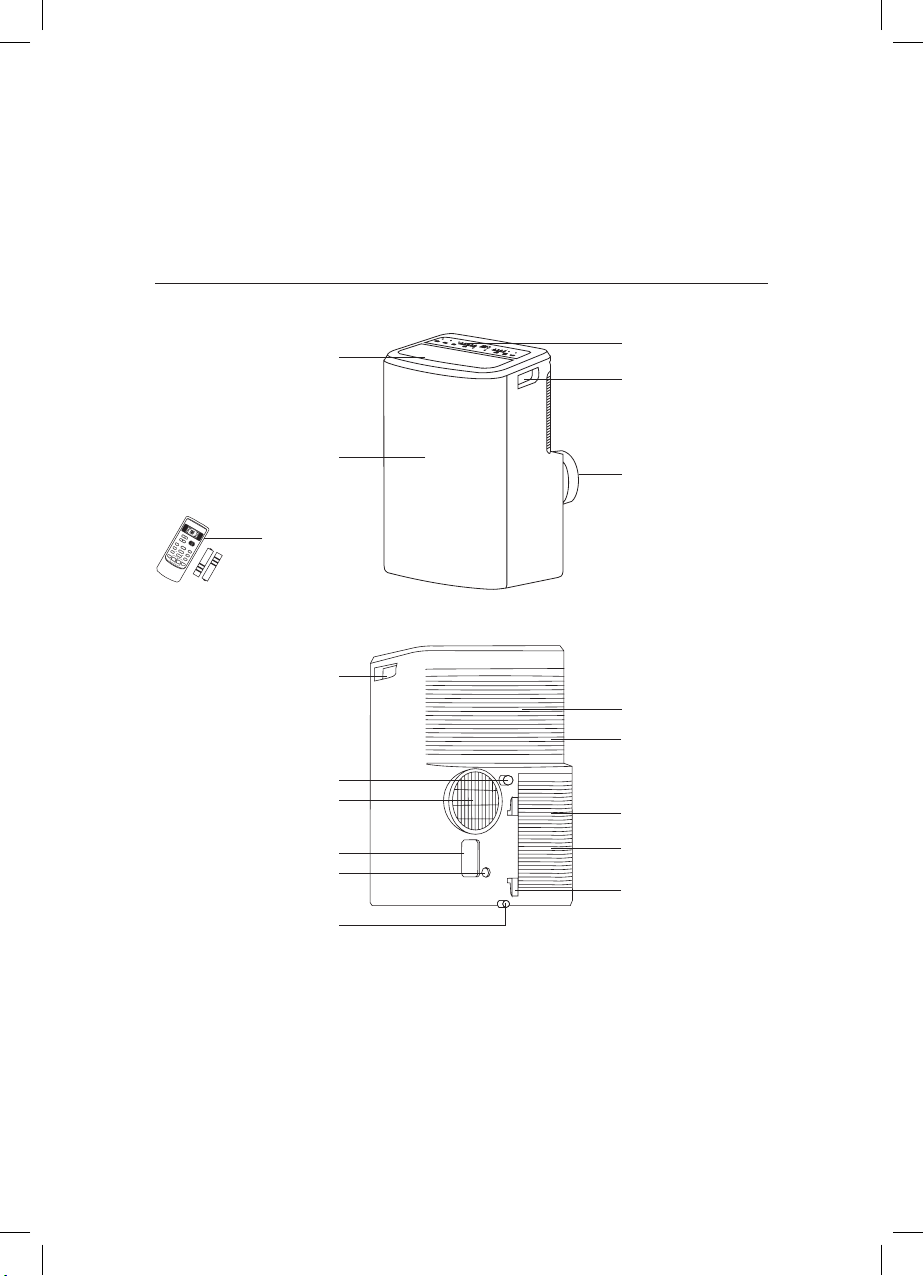
Beschrijving van onderdelen
Vooraanzicht
Luchtuitlaat
Bedieningspaneel
Handvat uitsparing
Voorpaneel
Luchtuitlaat
SET TEMPERATURE
AUT
COOL
O
DRY
SET ROOM
HEAT
TIMER ON OFF
h
FA
C°
N
HIGH
MI
D
LOW
SET
ON/OF
MODE
F
TURBO
SLEEP
SPEED
ºC / º
SWIN
FD
GS
ISPL
WING
Anti-F
AY
ELE.HH EALTH
iFEEL
ECOi CLEAN
TIME
R
Afstandsbediening
Achteraanzicht
Handvat uitsparing
Bovenste lu chtfilter (achter het rooster)
Bovenste luchtinlaat
Afvoeruitlaat
Luchtuitlaat
Stroomsnoer-uitlaat
Onders te luchtfilter (ac hter het rooste r)
Onderste luchtinlaat
Pompafvoeraansluiting
Netsnoerklem
Afvoeruitlaat onderste bak
Opmerking: De beschrijvingen in deze handleiding kunnen iets verschillen van de
informatie in de brochure en van de eigenlijke apparatuur. Raadpleeg de informatie
over het apparaat dat u hebt gekocht. Het bereik van de bedrijfstemperatuur van deze
airco is 16 - 35oC op de koelingstand; 5 - 27oC op de verwarmingstand.
28
Page 29
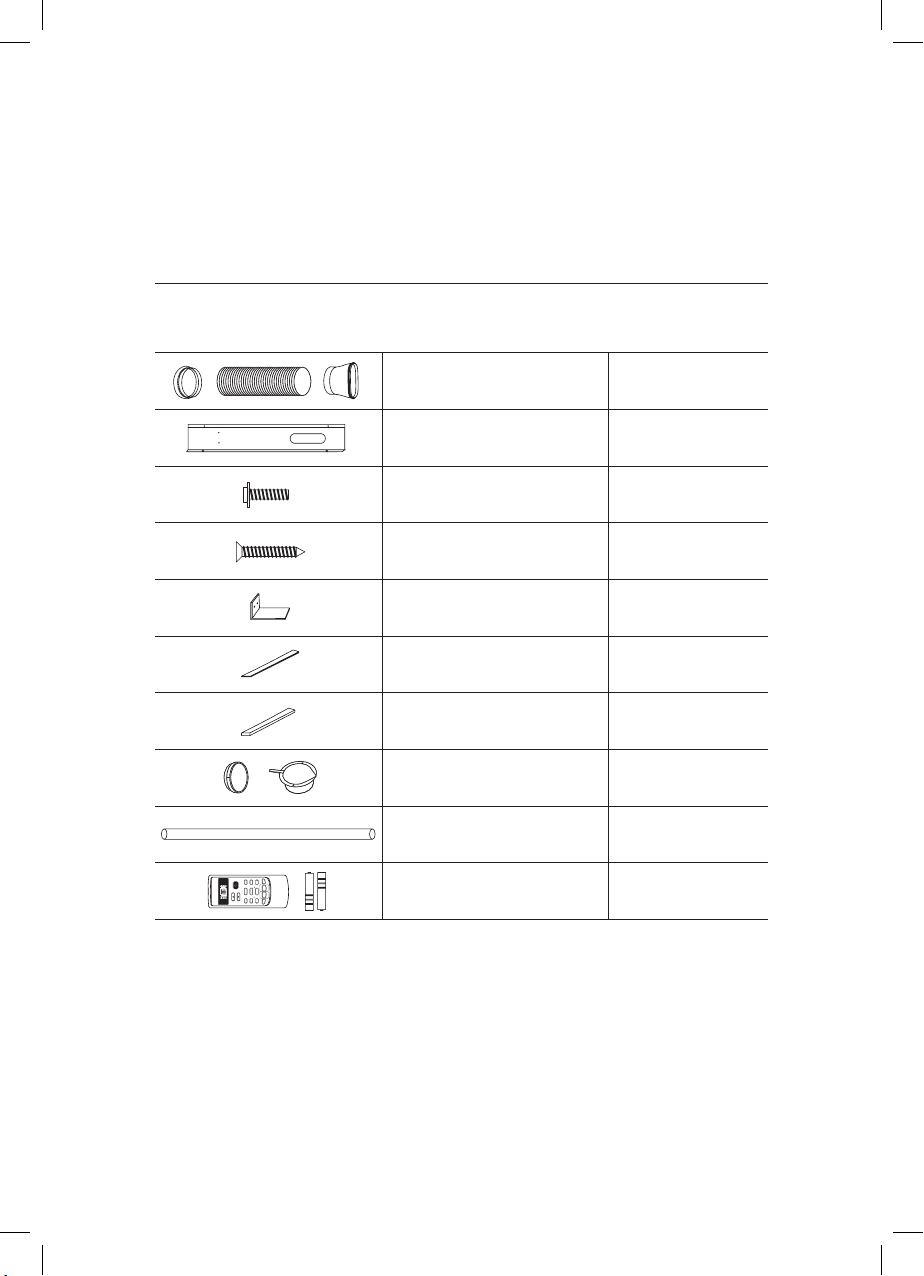
Accessoires
Onderdeel Naam van het onderdeel Hoeveelheid
Uitlaatslangadapter en adapter B (platte
of ronde opening, afhankelijk van het
model) Vensterschuifkit en bout
Raaminstallatieset 1
Schroef A 2
Schroef B 6
Beveiligingssteun 1
Schuimafdichting A 2
Schuimafdichting B 1
1
Adapter B (ronde opening)
Wanduitlaatadapter
1
Afvoerslang 1
FAN
HIGH
MID
LOW
ON/OFF
h
C°
SET ROOM
TURBO SPEED
TIMER ON OFF
ECOi CLEAN
ELE.HH EALTH
SET
SET TEMPERATURE
DRY
SLEEP ºC / ºFD ISPLAY
MODE
SWINGS WING iFEEL
HEAT
Anti-F TIMER
COOL
AUTO
Afstandsbediening en batterijen 1
Opmerking: Optionele onderdelen zijn aangeduid met een (#).
Opmerking: Kies de knop van de afstandsbediening voor de bijbehorende functies op
het display; niet alle knoppen hebben altijd een functie.
29
Page 30
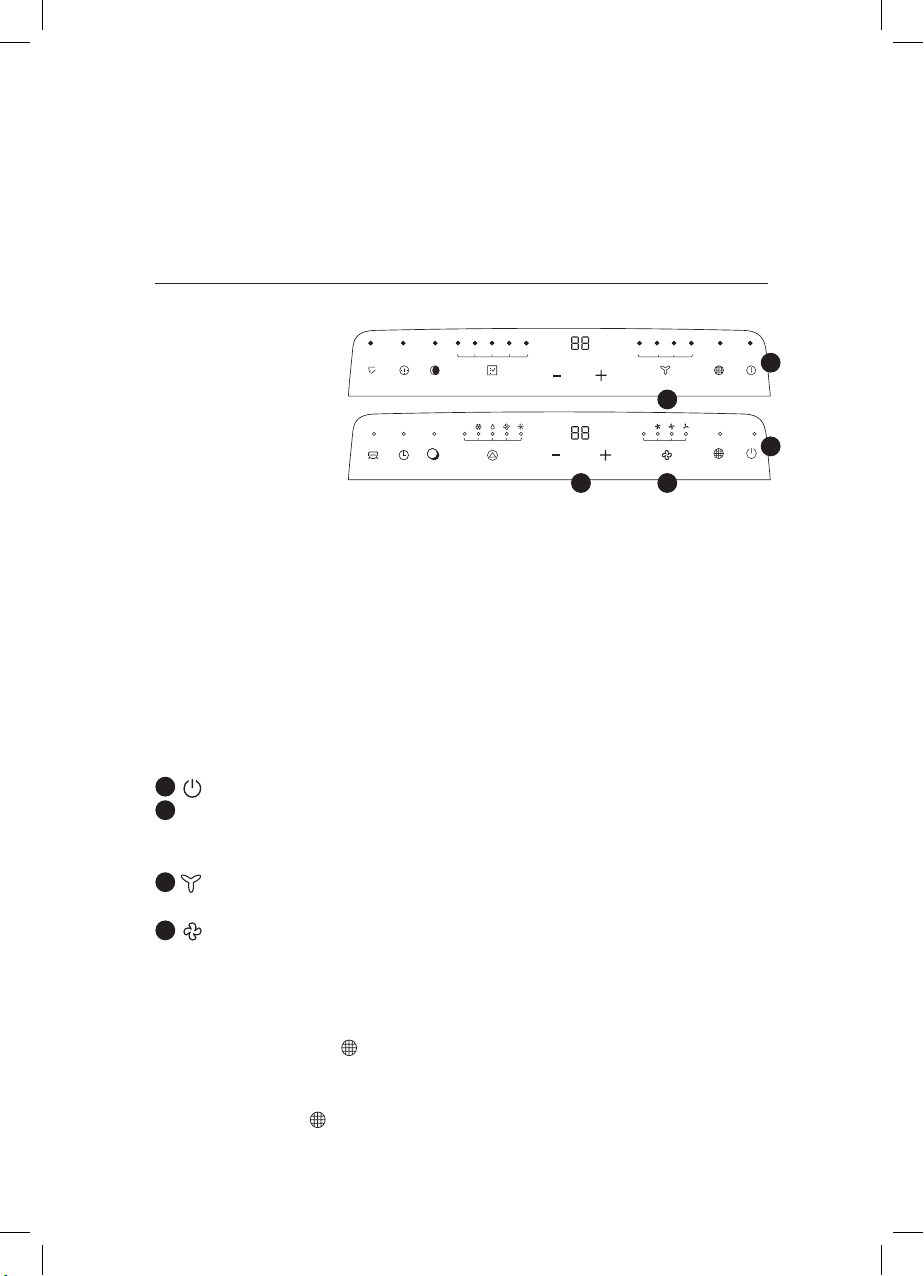
Bedieningspaneel
Ventilator
• AUTO
• HIGH – Hoge snelheid
• MED – Gemiddelde snelheid
• LOW – Lage snelheid
Stand
• AUTO
• COOL – Koeling
• HEAT – Verwarming
(koude wind-type zonder
dit display)
• DRY – Ontvochtiger
• FAN – Ventilator
Extra functies
• TIMER
• SLEEP – Slaapstand
• SWING – Draaifunctie
swing
swing
timer
timer
auto autocool hidry medfan heatheat
sleep
mode
auto auto
sleep
mode
fan speed
fan speed
2 4
filter
on•off
reset
3
filter
on•off
reset
Opmerking: Dit pictogram geldt voor alle knoppen en displays. Op basismodellen zijn
niet allen functies en standen aanwezig.
Functieknoppen
1
Button. Druk op deze knop om de airco in of uit te schakelen.
2
“–” of “+” Button. Houd “–” of “+” om de ingestelde kamertemperatuur te
verhogen of te verlagen. Houd “–” en “+” samen 3 seconden ingedrukt om
Celsius of Fahrenheit te selecteren.
3
Button. Telkens wanneer u op deze knop drukt, wordt een stand geselecteerd.
De volgorde is AUTO › COOL › DRY › FAN › HEAT.
4
Button. Deze knop wordt gebruikt om de ventilatorsnelheid in te stellen. De
volgorde is AUTO › HIGH › MED › LOW.
1
1
Wanneer het apparaat 250 uur heeft gelopen en het indicatorlampje voor de filterreset
brandt, betekent dit dat het luchtfilter moet worden schoongemaakt. Druk na het
schoonmaken op de knop , waarna het indicatorlampje uitgaat en de looptijd wordt
gereset.
Als u niet op de knop drukt wanneer het filterresetindicatorlampje brandt, blijft het
indicatorlampje branden tot het apparaat wordt uitgeschakeld.
30
Page 31
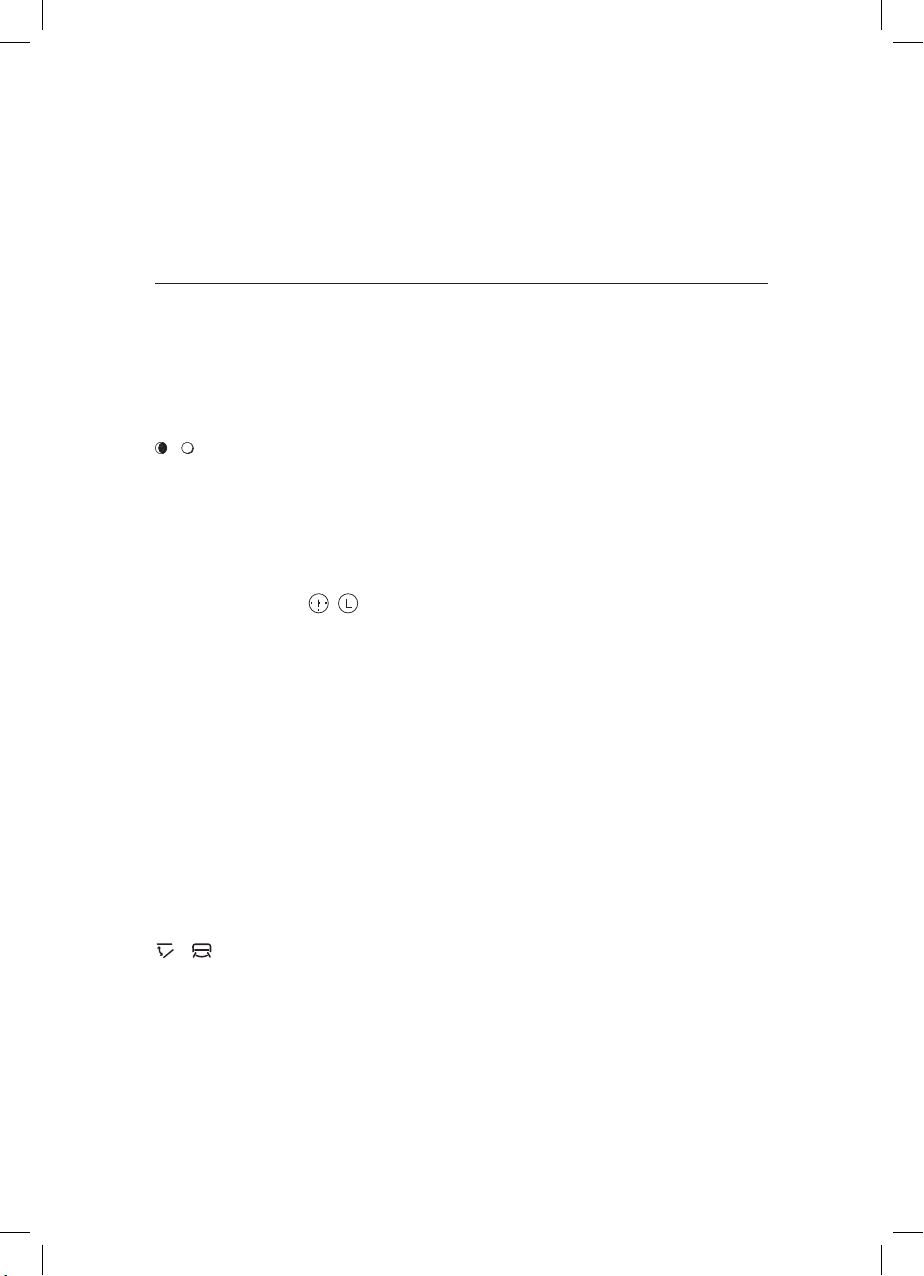
Het standindicatorlampje duidt de verschillende standen aan.
Opmerking: De VERWARMINGSSTAND is niet beschikbaar op apparaten die
alleen koelen.
/ Knop
Druk op deze knop om de slaapstand in te schakelen, welke het apparaat na 8 uur verlaat,
waarna de vorige status wordt hersteld.
Opmerking: De SLAAPSTAND kan niet worden ingeschakeld in de ventilatie- en
droogstand.
a. Druk op deze knop , het indicatorlampje gaat branden.
b. Druk op
“+” en “–”
om de gewenste tijd in te stellen.
c. Als de tijd is ingesteld en er 5 seconden geen andere handeling plaatsvindt, wordt de
timerfunctie automatisch gestart. Als u op de timerknop drukt en er binnen 5 seconden
geen andere handeling plaatsvindt of als de ingestelde tijd 0 is, wordt de timerfunctie
automatisch geannuleerd.
d. Wanneer de timerfunctie is ingeschakeld, geeft het apparaat de resterende tijd aan
door eenmaal op de timerknop te drukken. Door nogmaals op de timerknop te drukken,
wordt de timerfunctie geannuleerd.
Opmerking: Druk wanneer het apparaat is ingeschakeld op deze knop om de
uittimer in te stellen. Druk wanneer het apparaat is uitgeschakeld op deze knop
om de aantimer in te stellen.
/ Knop
Druk op deze knop, het indicatorlampje gaat branden.
31
Page 32
Werking
WAARSCHUWING Als u onderstaande voorzorgsmaatregelen niet
opvolgt, kan dit leiden tot een elektrische schok, brand of persoonlijk letsel.
1. De stekker moet in een stopcontact worden gestoken dat goed
geïnstalleerd en geaard is. 2. Gebruik geen verlengsnoer of
stekkeradapter voor dit apparaat.
Voordat u de airco start
• Kies een geschikte locatie, dicht in de buurt van een stopcontact.
• Monteer de flexibele uitlaatslang en de verstelbare vensterschuifkit.
• Steek de stekker in het stopcontact.
• Schakel de airco in.
Verwarming (modellen met alleen koeling hebben geen verwarmingstand)
• Druk op de STAND-knop totdat HEAT (warm) wordt verlicht.
• Druk op + en - om de gewenste temperatuur in te stellen.
•
Druk op de VENTILATOR-knop om de ventilatorsnelheid in te stellen.
• Druk op de AAN/UIT-knop om de airco te starten. Druk opnieuw op de knop om de
airco te stoppen
Koeling
• Druk op de STAND-knop totdat COOL (koel) wordt verlicht.
• Druk op + en - om de gewenste temperatuur in te stellen.
• Druk op de VENTILATOR-knop om de ventilatorsnelheid in te stellen.
• Druk op de AAN/UIT-knop om de airco te starten. Druk opnieuw op de knop om de
airco te stoppen.
32
Page 33
Droogstand
1. Druk herhaaldelijk op de MODE-knop tot de droogindicator brandt.
2. De ventilator loopt in deze stand met een vaste snelheid.
3. Sluit ramen en deuren voor het beste ontvochtigingseffect.
Opmerking: De temperatuurinstelling en ventilatorsnelheid kunnen niet worden gewijzigd.
De temperatuurinstelling is 25 ° (77 °F) en de ventilatorsnelheid is laag.
Opmerking: De temperatuurinstelling kan niet worden gewijzigd.
Automatische herstartfunctie:
Als de stroomtoevoer naar het apparaat wordt onderbroken, herstart het apparaat met de
laatst gebruikte stand/instellingen wanneer de stroomtoevoer wordt hersteld. De
compressor herstart na 4 minuten.
1. Instellen: Druk 10 keer op de Sleep-knop binnen 5 seconden, de zoemer klinkt 4 keer.
2. Annuleren: Druk 10 keer op de Sleep-knop binnen 5 seconden, de zoemer klinkt 2 keer.
Circulatie
• Druk op de STAND-knop totdat FAN (ventilator) wordt verlicht.
• Druk op de VENTILATOR-knop om de ventilatorsnelheid in te stellen.
• Druk op de AAN/UIT-knop om de airco te starten. Druk opnieuw op de knop om de airco
te stoppen.
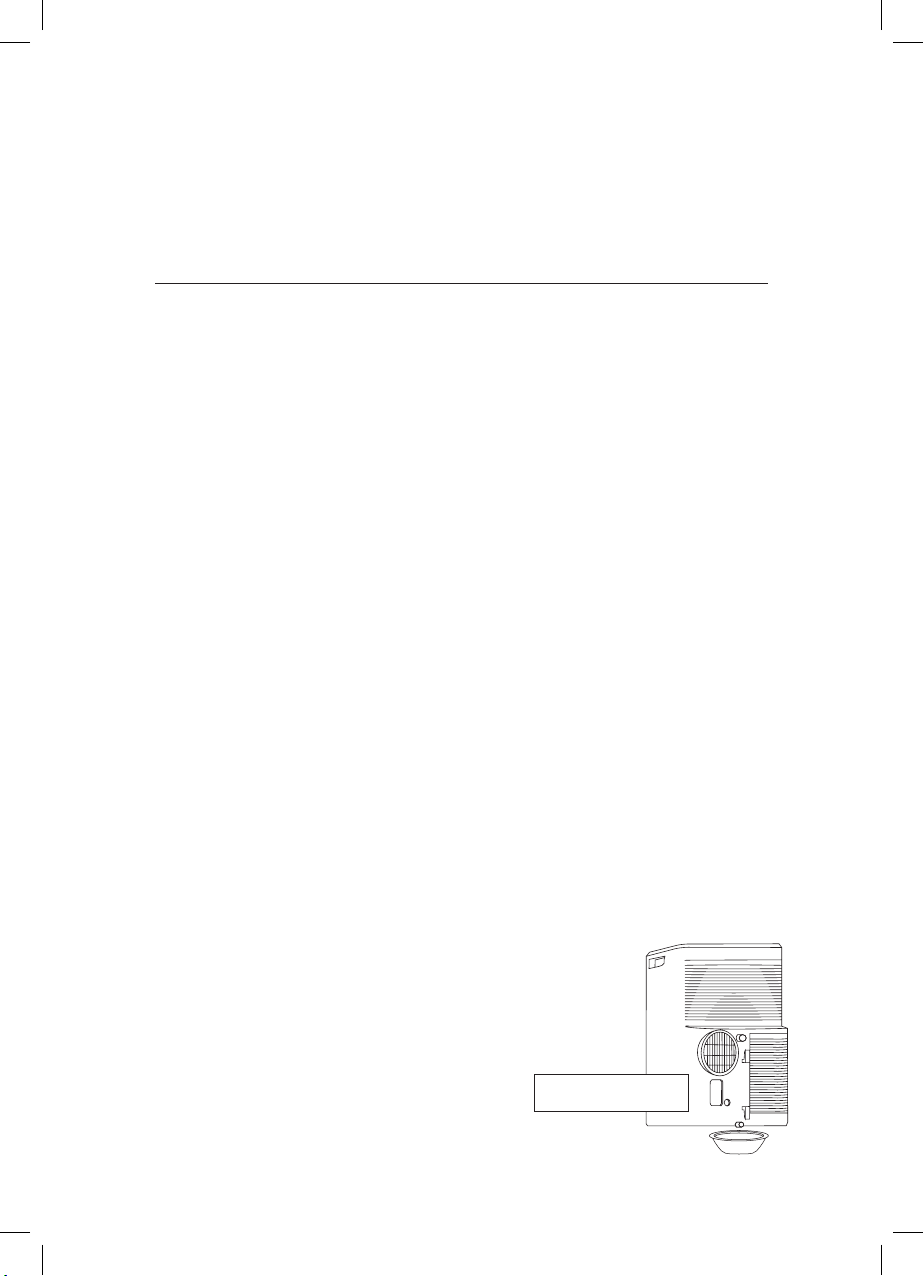
Condenswater verwijderen
Wanneer de interne watertank vol is, wordt op het display ‘P1’ weergegeven.
• Plaats de mobiele airco horizontaal in een grote ruimte, zodat de
luchtuitlaten niet worden geblokkeerd.
• Zorg voor een minimumspeling van 50 cm tussen de airco en
muren of andere voorwerpen.
• De helling mag niet meer zijn dan 10 graden van horizontaal,
wanneer u de airco gebruikt en de kit plaatst.
BELANGRIJK: DIT WATER IS GEEN DRINKWATER.
33
Pompafvoeraansluiting
Page 34
Installatie
Kies de beste locatie
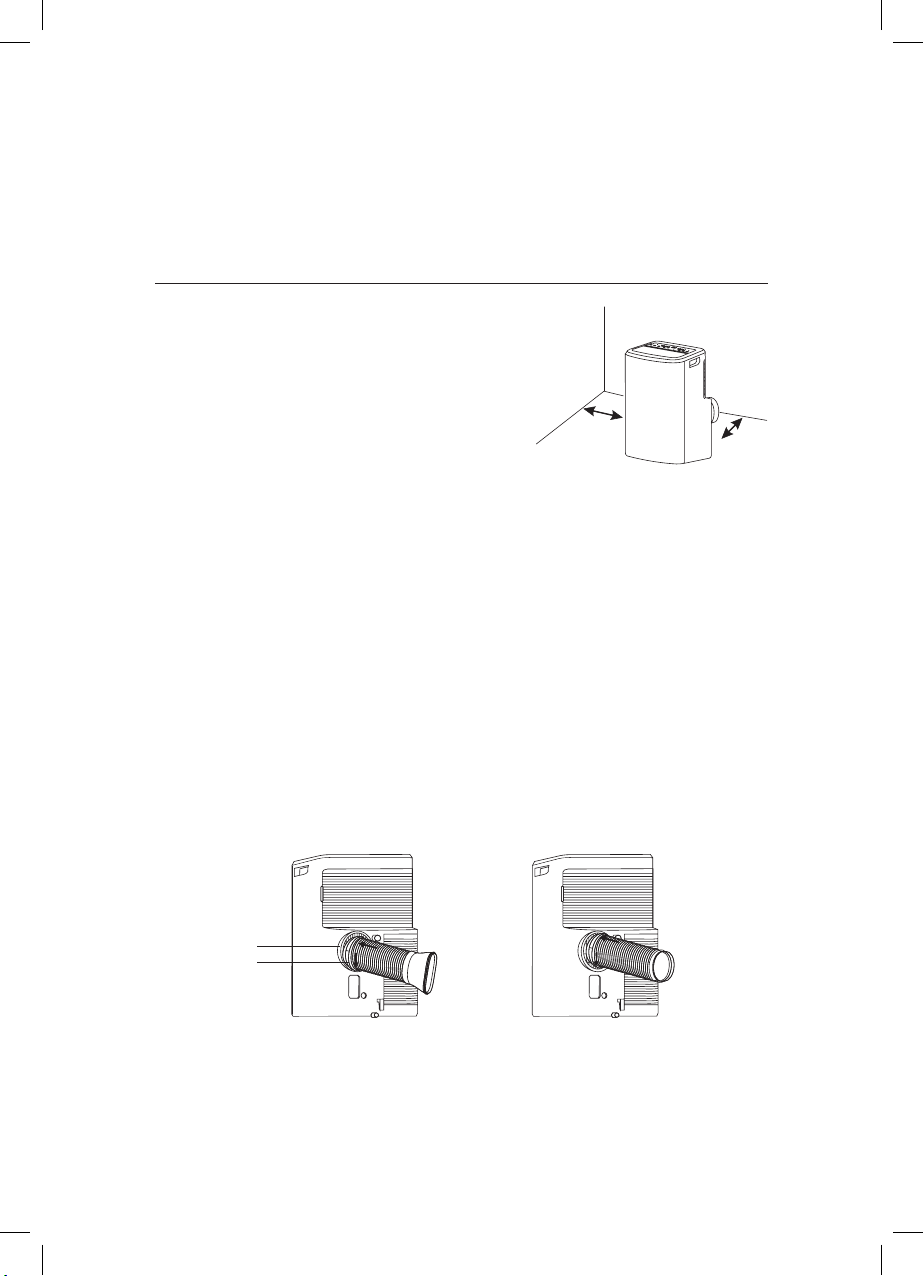
• Plaats de mobiele airco horizontaal in een grote ruimte,
zodat de luchtuitlaten niet worden geblokkeerd.
• Zorg voor een minimumspeling van 50 cm tussen de
airco en muren of andere voorwerpen.
• De helling mag niet meer zijn dan 10 graden van
horizontaal, wanneer u de airco gebruikt en de kit plaatst.
Opmerking:
1. De airco mag niet in een wasruimte worden gebruikt.
2. De plug moet toegankelijk zijn wanneer de airco op zijn plaats staat.
Installatie van de vensterkit
De vensterkit is ontworpen voor de meeste standaard verticale en horizontale vensters. Het
is echter mogelijk dat u sommige aspecten van de installatieprocedure voor bepaalde
soorten vensters moet verbeteren of wijzigen.
Opmerking: De bout en moer worden gebruikt om de vensterplaat te bevestigen.
Mindes tens
50 cm
Ten minst e
cm
50
Luchtuitlaataansluiting
Adapter A
of
34
Page 35
Installeer de raaminstallatieset
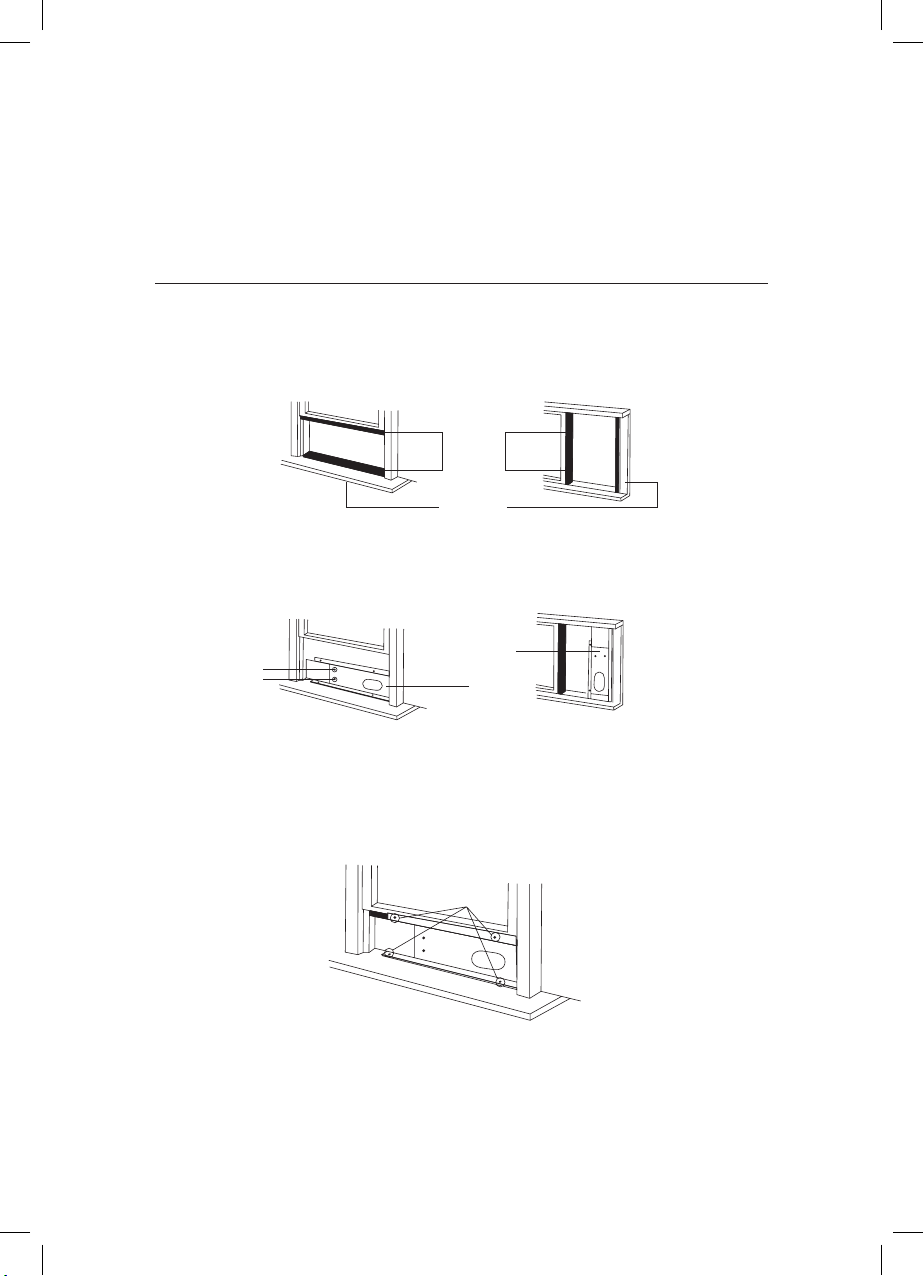
VerticaalHorizontaal
Schuimafdichting A
Raamvleugel
1. Snijd de schuimafdichting (klevend) tot de juiste lengte en bevestig deze op de
raamvleugel.
Schroef A
Raaminstallatieset
2. Bevestig de raaminstallatieset aan de raamvleugel. Pas de lengte van de raaminstallatieset
aan: draai schroef A los, pas de lengte van de raaminstallatieset aan en draai de schroef
weer vast wanneer de lengte juist is.
Opmerking: De lengte van de raaminstallatieset is 67,5 tot 120 cm.
Schroef B
3. Laat het raam voorzichtig zakken. Bevestig het ventilatiepaneel met 4 schroeven van type
B, plus één schroef voor elke verlenging.
35
Page 36
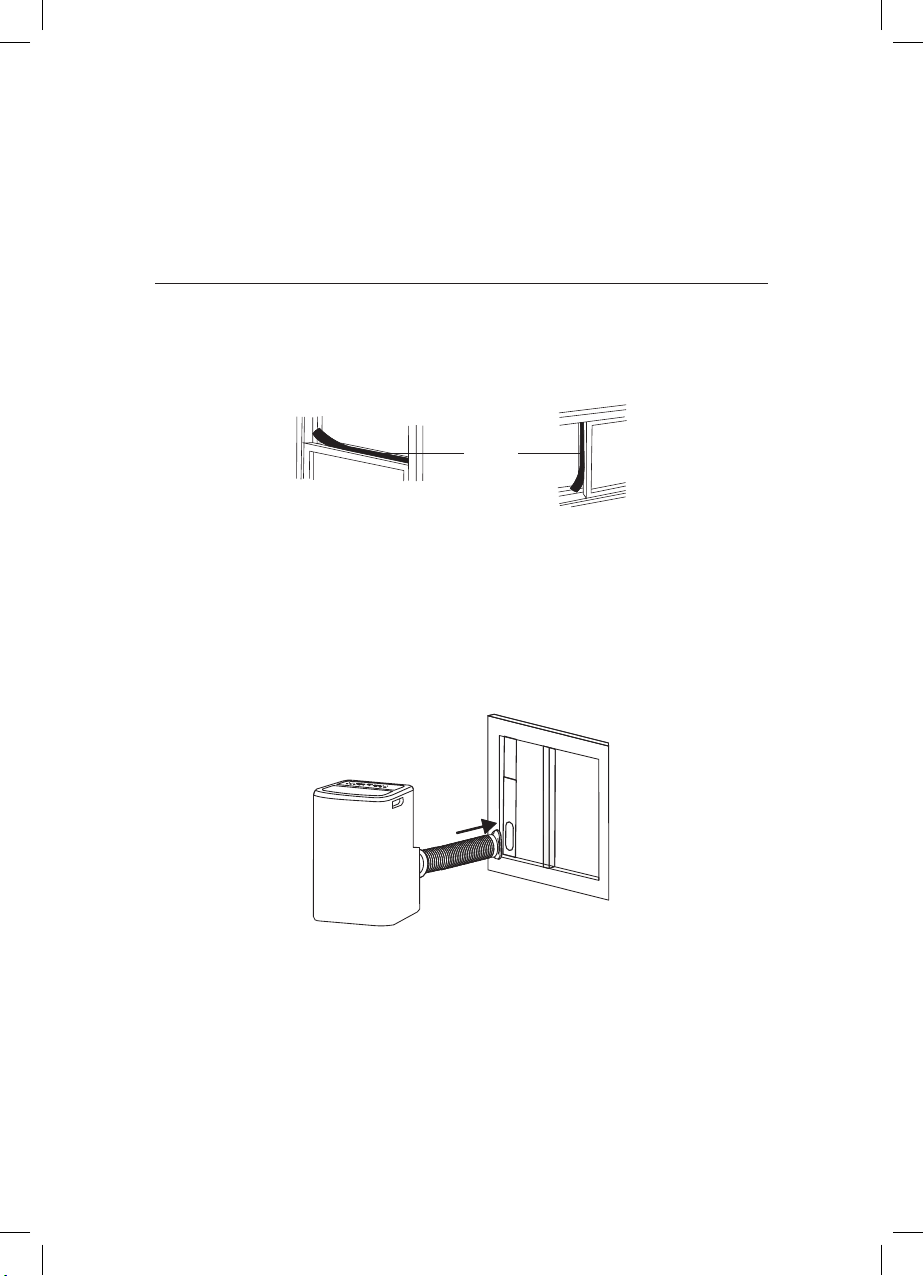
4. Snijd de schuimafdichting B (niet-klevend) op de breedte van het raam. Duw de
schuimafdichting B tussen het glas en het raam om te voorkomen dat lucht en insecten de
ruimte binnen komen.
Schuimafdichting
5. Installeer de veiligheidsbeugel met een schroef van type B, zoals is aangegeven.
Installeer het afvoerkanaal in het raam
Plaats het apparaat met het afvoerkanaal naast het raam en verbind vervolgens adapter
B (vlak mondstuk) van het afvoerkanaal met het raam.
36
Page 37
Onderhoud
Deze nieuwe airco zal vele jaren betrouwbaar functioneren. In dit deel leest u hoe de airco
op de juiste wijze gereinigd en onderhouden wordt. We raden aan dat u contact opneemt
met uw lokale distributeur voor de jaarlijkse onderhoudsbeurt. Deze onderhoudskosten zijn
voor uw rekening.
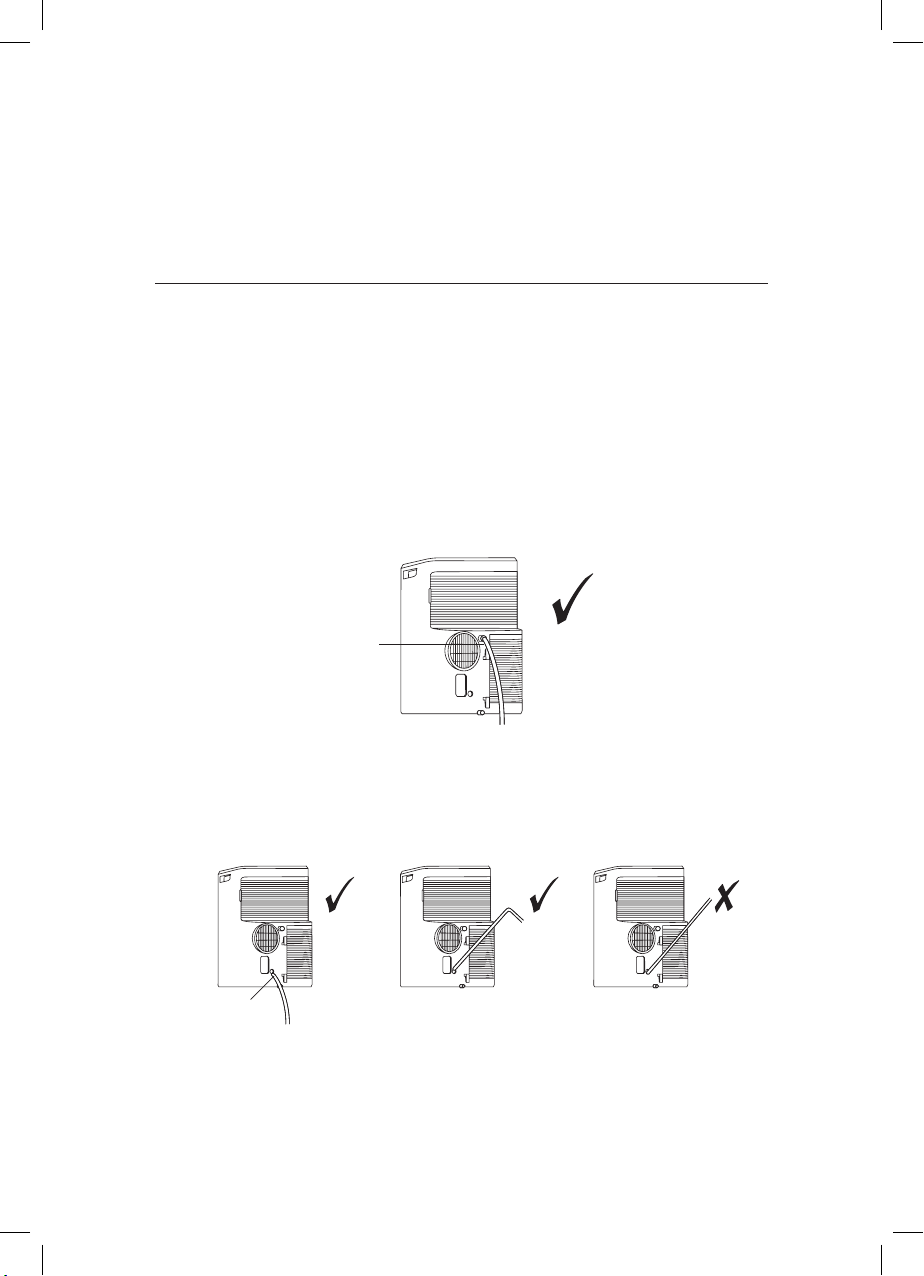
Afvoeraansluiting
Verwijder in de ontvochtigingsstand de bovenste afvoerplug aan de achterzijde van het
apparaat. Bevestig de afvoerslang aan de opening. Plaats het andere uiteinde van de slang in
een afvoerleiding.
Afvoeruitlaat
Als het apparaat beschikt over de hierboven weergegeven pompafvoeraansluiting, voer dan
het water op de volgende wijze af: Verwijder de bovenste afvoerplug aan de achterzijde van
het apparaat en bevestig de afvoerslang aan de opening. Plaats het andere uiteinde van de
slang in een afvoer.
Pompafvoeraansluiting
Zorg dat de slang goed vastzit en dat er geen lekken zijn. Leid de slang naar de afvoer en
zorg dat er geen knikken in zitten waardoor de waterstroom wordt geblokkeerd. Plaats het
uiteinde van de slang in de afvoer en zorg dat het omlaag wijst, zodat het water makkelijk
stroomt. Laat het uiteinde nooit omhoog wijzen.
37
Page 38
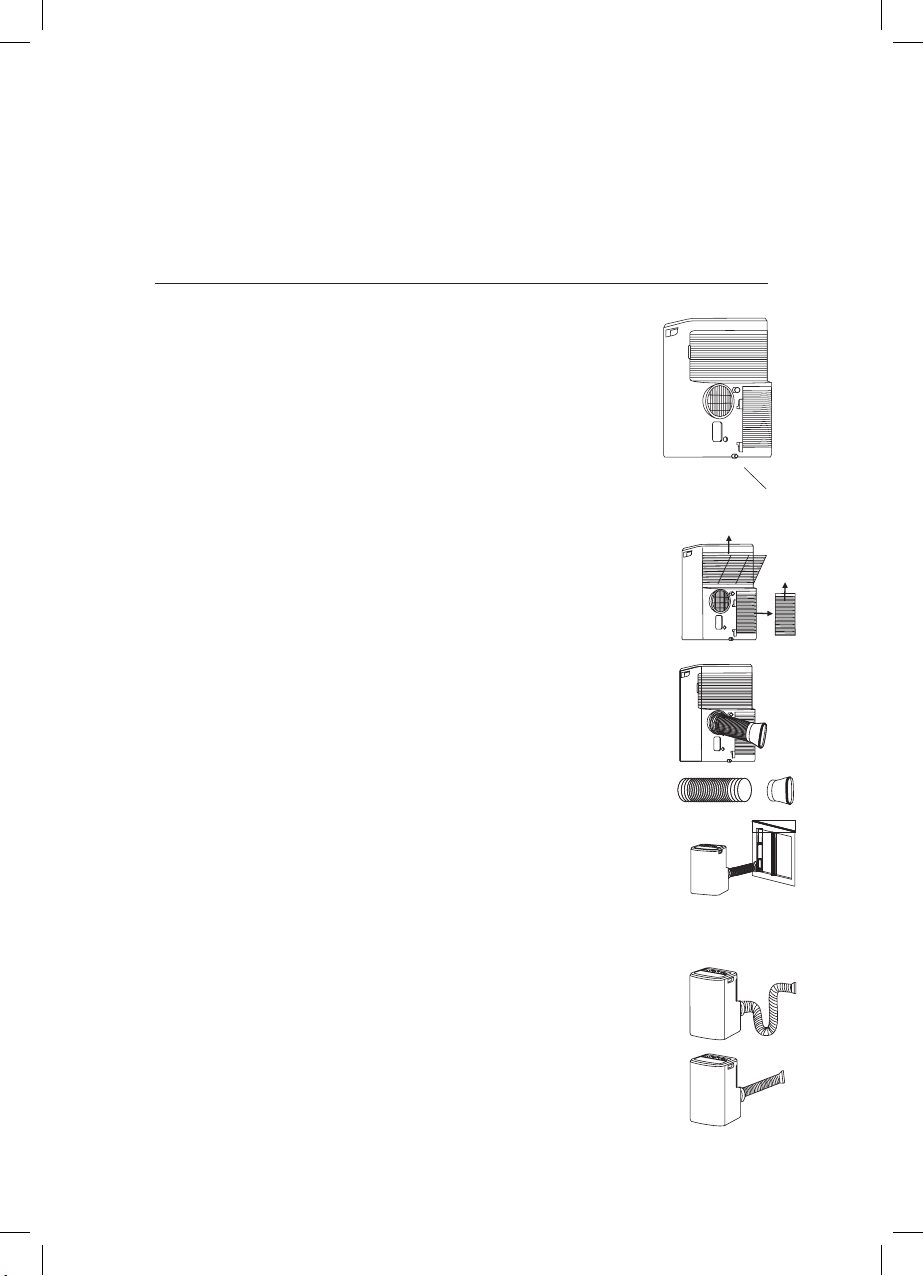
Wanneer het waterpeil in de opvangbak een vooraf bepaald niveau bereikt,
geeft het digitale scherm «P1” aan en gaat het indicatorlampje WATER FULL
(Water vol) branden. Verplaats het apparaat voorzichtig naar een afvoerlocatie,
verwijder de onderste afvoerplug en laat het water wegvloeien. Plaats de
afvoerplug terug en herstart het apparaat, waarna het P1-symbool verdwijnt.
Als de fout blijft, bel dan voor service.
Opmerking: Zorg dat u de afvoerplug terugplaatst voordat u het
apparaat weer gebruikt.
Het luchtfilter reinigen
Als het luchtfilter bedekt is met stof, wordt de koelingcapaciteit gereduceerd.
Reinig het luchtfilter om de twee weken, al naar gelang het gebruik.
•
Zet de stroom uit.
• Trek het filterdeksel weg en verwijder het filter.
• Stofzuig het filteroppervlak en was het luchtfilter zo nodig in warm
zeepsop. U mag het luchtfilter niet in de vaatwasmachine of met
chemische reinigingsmiddelen schoonmaken. Laat het filter helemaal
drogen voordat u het terugplaatst.
• Bevestig het luchtfilter aan het filterdeksel met de haken aan de
binnenkant van het deksel. Zet het filterdeksel terug op
zijn plaats.
Uitlaatleiding bevestigen
1a. Sluit de uitlaatslang aan door hem in de ronde adapter vast te draaien.
Klem de slang en adapter vast op de luchtuitlaat van de airco.
2b. Sluit de juiste adapter aan op het andere uiteinde van de uitlaatslang.
3c. Bevestig het adapterelement aan een venster dicht in de buurt.
Opmerking:
• De leiding kan tot 270 mm worden ingekort en tot 1500 mm worden
verlengd. Het is beter om de leiding zo kort mogelijk te houden.
• De uitlaat moet altijd aan de buitenlucht worden afgelaten.
• Als de leiding te ver wordt uitgerekt of verbogen, zal de airco minder
efficiënt koelen.
Afvoeraansluiting
opvangbak
38
Page 39
De airco reinigen
• Voor alle veiligheid schakelt u de stroom naar de airco uit.
• Veeg de airco met een droge doek schoon.
• Als de airco erg vuil is, veegt u hem schoon met een vochtige doek.
Opgelet
Verwijder het gecondenseerde water verdunnen ofwel de stekker weer in de afvoerbuis
als het apparaat niet gebruikt gedurende lange tijd.
WAARSCHUWING
• Wrijf geen benzine, verdunner, andere chemicaliën, of vloeibare insecticiden op de
airco om te voorkomen dat de verf afbladdert en de kunststofonderdelen barsten
of verbuigen.
• Probeer de airco nooit te reinigen door water direct op het oppervlak te gieten,
omdat dit de elektrische onderdelen beschadigt en elektrische schokken kan
veroorzaken.
• Gebruik nooit heet water van meer dan 40
o
C om het luchtfilter te reinigen
39
Page 40
Problemen oplossen
Voordat u hulp inroept, leest u eerst onderstaande aanwijzingen als de airco niet juist
functioneert.
Airconditioner functioneert niet
Oorzaken Oplossingen
De stroom staat uit. Schakel de stroom in.
De stroom is uitgevallen. Wacht totdat de netstroom wordt hersteld.
De zekering is doorgebrand. Controleer de stroomonderbreker, vervang de
De opstarttijd wordt niet bereikt. Wacht of wis de originele instelling
De airconditioner start niet wanneer u op de AAN/UIT-knop drukt
Oorzaken Oplossingen
Er zijn geen vier minuten verstreken nadat u de
airco hebt uitgeschakeld.
De kamertemperatuur is lager dan de ingestelde
temperatuur.
Er wordt lucht uitgeblazen, maar de koeling is slecht
Oorzaken Oplossingen
Onjuiste temperatuurinstelling. Reset de temperatuur. De ingestelde temperatuur
De luchtinlaat- of uitlaat van de machine is verstopt Verwijder de verstopping.
De airco functioneert in een zeer warme ruimte Wacht totdat alle opgeslagen warmte van muren,
De airco heef t onvoldoende koelingcapaciteit Bevestig de benodigde koelingcapaciteit
Het koelvermogen is ontoereikend. Laat uw leverancier het koelvermogen controleren.
zekering. (test of de zekering opnieuw doorbrandt,
zo ja, neem dan contact op met een elektricien)
Wacht 4 minuten.
Reset de temperatuur.
moet lager zijn dan de omgevingstemperatuur.
plafond, vloer en meubilair is verwijderd
met uw leverancier.
De deuren of ramen staan open. Sluit de deuren en ramen.
Lawaai of trilling
Oorzaken Oplossingen
De ondergrond is niet egaal of plat genoeg. Plaats de airco zo mogelijk op een horizontale en
egale ondergrond.
40
Page 41
AEEA-waarschuwing
Betekenis van vuilnisbak op wieltjes met een kruis er doorheen
Gooi elektrische apparatuur nooit met het huishoudafval weg.
Gebruik alternatieve voorzieningen. Neem contact op met uw
gemeente voor informatie over de beschikbare ophaaldiensten.
Als elektrische apparatuur samen met het huishoudafval wordt
begraven, kunnen gevaarlijke stoffen uitlekken en via het
grondwater in de voedselketen terechtkomen, wat schadelijk is voor
de gezondheid en het welzijn. Wanneer u een oud apparaat
vervangt, is de winkelier wettelijk verplicht om het oude apparaat
gratis van de hand te doen.
Koelmiddel
De koelmiddel gassen in deze apparatuur zijn hermetisch afgesloten
Koelmiddel R290
Hoeveelheid Koelmiddel 0.21kg
GWP 3
ODP 0
41
Page 42
Handleiding van de
afstandsbediening van de
mobiele airconditioner
Lees de volgende instructies aandachtig door voor veilig en correct gebruik van de
afstandsbediening van de airco. Bewaar de instructies zodat ze op elk moment
geraadpleegd kunnen worden.
Beschrijving van de knoppen
LCD-scherm
SET TEMPERATURE
set room
AUTO
COOL
DRY
HEAT
8 1
9
10
11
12
13
14
15
timer on off
FAN
HIGH
MID
LOW
2
3
4
5
6
7
Verzenden AAN/UITDigitaal
Actieve
stand
h
ºC
Snelheid
Actieve
stand
Instellen Ruimte
Timer AAN/UIT
Timer
Gevoel
Opmerking:
Verwijder het condenswater en steek de plug
niet terug in de afvoerpijp wanneer u het
apparaat gedurende een langere periode
niet gebruikt.
1. Knop «ON/OFF»
Druk op deze knop om de airco te starten of te stoppen.
2. Knop «ºC / ºF»
• Druk op deze knop om de temperatuurweergave in te stellen op Fahrenheit. De temperatuur
wordt standaard aangegeven in Celsius. De “ºC” wordt niet weergegeven op het scherm.
• Druk nogmaals op deze knop om de temperatuurweergave weer in te stellen op Celsius
Opmerking: Temperatuurweergave in Fahrenheit is niet beschikbaar bij sommige modellen. Wanneer
de temperatuur op de afstandsbediening in Fahrenheit wordt weergegeven, kan deze op het apparaat
in Celsius worden weergegeven. De werking van het apparaat wordt hierdoor niet beïnvloed.
3. Knop «SPEED»
Kies de ventilatorsnelheid als volgt:
LOW (LAAG) › MID (MIDDEL) › HIGH (HOOG) › AUTO (AUTO)
42
Page 43

4. Knop «DISPLAY»
Druk op deze knop om het scherm in en uit te schakelen. Dit is voor het gemak van gebruikers
die het niet prettig vinden om te slapen met de achtergrondverlichting aan.
5. Knop «iFEEL»
Druk op deze knop om de omgevingstemperatuur weer te geven op de afstandsbediening. Druk
nogmaals op deze knop om de ingestelde temperatuur weer te geven.
6. Knop «TIMER»
Deze knop heeft geen functie.
• Druk wanneer het apparaat is ingeschakeld op deze knop om de UIT-timer in te stellen, of
de AAN-timer wanneer het is uitgeschakeld.
• Druk eenmaal op deze knop, “ON (OFF)” (aan/uit) knippert. Druk op “ ” of “ ” om het
aantal uren in te stellen waarna het apparaat wordt in- of uitgeschakeld, met intervallen van
0,5 uur bij minder dan 10 uur of 1 uur bij langer dan 10 uur, van 0,5 tot 24 uur.
• Druk nogmaals om de instelling te bevestigen, “ON (OFF)” (aan/uit) stopt met knipperen.
• Als binnen 10 seconden nadat “ON (OFF)” (aan/uit) begint met knipperen niet op de
timerknop wordt gedrukt, wordt de timerinstelling geannuleerd.
• Als een timerinstelling is bevestigd, kan deze worden geannuleerd door nogmaals op deze
knop te drukken.
Opmerking: wanneer een AAN-timer is ingesteld, werken alle functieknoppen (behalve SLEEP,
DISPLAY en iFEEL) en wanneer de ingestelde tijd wordt bereikt, werkt het apparaat zoals is ingesteld.
7. Deze knop heeft twee functies.
A- «Health»
Druk terwijl het apparaat is ingeschakeld op deze knop om gezondheidsgerelateerde functies te
activeren zoals negatieve ionen, elektrostatische neerslag, fijnstofverwijdering, enz. afhankelijk
van de daadwerkelijke configuratie van elk model. Druk nogmaals op deze knop om de
gezondheidsfuncties uit te schakelen.
B- «iCLEAN»
Druk terwijl het apparaat is uitgeschakeld op deze knop, waarna de afstandsbediening “CL”
weergeeft en het apparaat automatisch stof van de verdamper verwijdert en deze droogt, om de
koelings- en verwarmingsefficiëntie te vergroten.
43
Page 44
De iCLEAN-functie loopt ongeveer 30 minuten. Als het apparaat gedurende deze tijd wordt
ingeschakeld met de afstandsbediening of nogmaals op deze knop wordt gedrukt, wordt de
iCLEAN-functie gedeactiveerd.
8. Knoppen en
Telkens wanneer op “ ” wordt gedrukt, wordt de temperatuurinstelling met 1 ºC verhoogd en
telkens wanneer op “ ” wordt gedrukt, wordt deze met 1 ºC verlaagd.
• De temperatuurinstelling heeft een bereik van 16ºC (60 ºC) tot 35 ºC (90 ºF).
Opmerking: De temperatuur kan in de AUTOMATISCHE of VENTILATIESTAND niet worden
ingesteld, deze twee knoppen zijn dan niet functioneel.
9. Knop «TURBO»
Druk alleen op deze knop in de KOEL- OF VERWARMINGSSTAND om TURBO in of uit te
schakelen om het koelen of verwarmen te versnellen.
• Wanneer TURBO is ingeschakeld, is de luchtsnelheid HOOG.
• Wanneer TURBO is uitgeschakeld, wordt de luchtsnelheid hersteld naar de vorige status.
10. Knop «MODE»
Met de “Mode”-knop kunt u kiezen uit verschillende gebruiksstanden. Deze worden als volgt op
het scherm weergegeven:
AUTO (AUTOMATISCH)
* COOL (KOELEN) * DRY (DROGEN) * HEAT ( VERWARMEN) * FAN
(VENTILATOR) * AUTO ( AUTOM ATISCH)
Opmerking: Er is geen verwarmingsfunctie aanwezig op het type koude wind.
11. Knop «SLEEP»
Druk op deze knop om de SLAAPSTAND in te schakelen, welke het apparaat na 10 uur verlaat,
waarna de vorige status wordt hersteld.
Opmerking: De SLAAPFUNCTIE kan niet worden geactiveerd in de VENTILATIESTAND.
12. Knop «SWING »
Druk op deze knop om omhoog/omlaag draaien in te schakelen en druk nogmaals om de positie
vast te zetten.
44
Page 45

13. Knop «SWING »
Druk op deze knop om links/rechts draaien in te schakelen en druk nogmaals om de positie vast te zetten.
14. «Anti-F»
• De Anti-F -functie werkt terwijl het apparaat is uitgeschakeld met de afstandsbediening in de
KOEL-, DROOG- OF AUTOMATISCHE STAND. De functie werkt in de VERWARMINGSSTAND
(VENTILATORSTAND voor alleen koelende apparaten), waarbij de interne ventilator 3 minuten
langzaam loopt, om het vocht in de verdamper te verwijderen, om te voorkomen dat deze gaat
stinken door schimmel.
• Deze functie wordt niet ingesteld in de fabriek. U kunt de functie op elk moment als volgt
instellen of annuleren: richt de afstandsbediening, terwijl het apparaat en de afstandsbediening
allebei uit zijn, op het apparaat en druk eenmaal op de “Anti-F”-knop. De zoemer klinkt 5 keer
om aan te geven dat de functie is ingesteld. De functie blijft actief, behalve wanneer het
apparaat is uitgeschakeld of totdat de functie wordt geannuleerd.
Anti-F uitschakelen:
1. Schakel het apparaat uit.
2. Richt de afstandsbediening, terwijl het apparaat en de afstandsbediening allebei uit zijn, op het apparaat
en druk eenmaal op deze knop. De zoemer klinkt 3 keer om aan te geven dat de functie is geannuleerd.
Opmerking:
• Wanneer Anti-F is ingeschakeld, wordt het aangeraden het apparaat niet opnieuw in te
schakelen totdat het volledig uit is.
• De Anti-F-functie is niet beschikbaar wanneer de UIT-timer is ingesteld.
15. Deze knop heeft twee functies.
a. ELE.H:
Als op deze knop wordt gedrukt in de VERWARMINGSSTAND, wordt de elektrische verwarming in-/
uitgeschakeld.
b. ECO:
• Als in de KOELINGSSTAND op deze knop wordt gedrukt, schakelt het apparaat naar de
ECOSTAND, welke het laagste energieverbruik heeft, en verlaat deze automatisch na 8 uur.
• Door van stand te wisselen of het apparaat uit te schakelen met de afstandsbediening wordt de
ECO-functie automatisch geannuleerd.
• Druk op de ECO-knop in de ECOSTAND om deze stand te verlaten.
• Opmerking: de ECOSTAND werkt alleen op apparaten met een omvormer.
45
Page 46

Gebruik
Automatische werking
• Druk op MODE en kies de automatische stand.
• Druk op SPEED om de snelheid van de ventilator te kiezen. De standen zijn LOW, MID,
HIGH, AUTO.
• Druk op ON/OFF, dan schakelt de airco in.
• Druk op ON/OFF, dan schakelt de airco uit.
Koeling/verwarming
(Airco’s alleen voor koeling hebben geen verwarmingsfunctie)
• Druk op MODE en kies de koeling- of verwarmingstand.
• Druk op “ ” of “ ” om de temperatuur in te stellen. De instelling verandert telkens 1°C
binnen het bereik van 16 - 35°C.
• Druk op SPEED om de snelheid van de ventilator te kiezen. De standen zijn LOW, MID,
HIGH, AUTO.
• Druk op ON/OFF, dan schakelt de airco in.
• Druk opnieuw op ON/OFF, dan schakelt de airco uit.
Ventilator
Druk op MODE en selecteer de ventilatorstand.
•
• Druk op SPEED om de snelheid van de ventilator te kiezen. De standen zijn LOW, MID,
HIGH, AUTO.
• Druk op ON/OFF, dan schakelt de airco in.
• Druk op ON/OFF, dan schakelt de airco uit.
Opmerking: wanneer de airco op FAN staat, is de temperatuurinstelling niet geactiveerd.
Ontvochtiger
• Druk op MODE en kies de ontvochtigerstand.
• Druk op “ ” of “ ” om de temperatuur in te stellen. De instelling verandert telkens 1°C
binnen het bereik van 16 - 35°C.
• Druk op SPEED om de snelheid van de ventilator te kiezen. De standen zijn LOW, MID,
HIGH, AUTO.
• Druk op ON/OFF, dan schakelt de airco in.
• Druk op ON/OFF, dan schakelt de airco uit.
46
Page 47
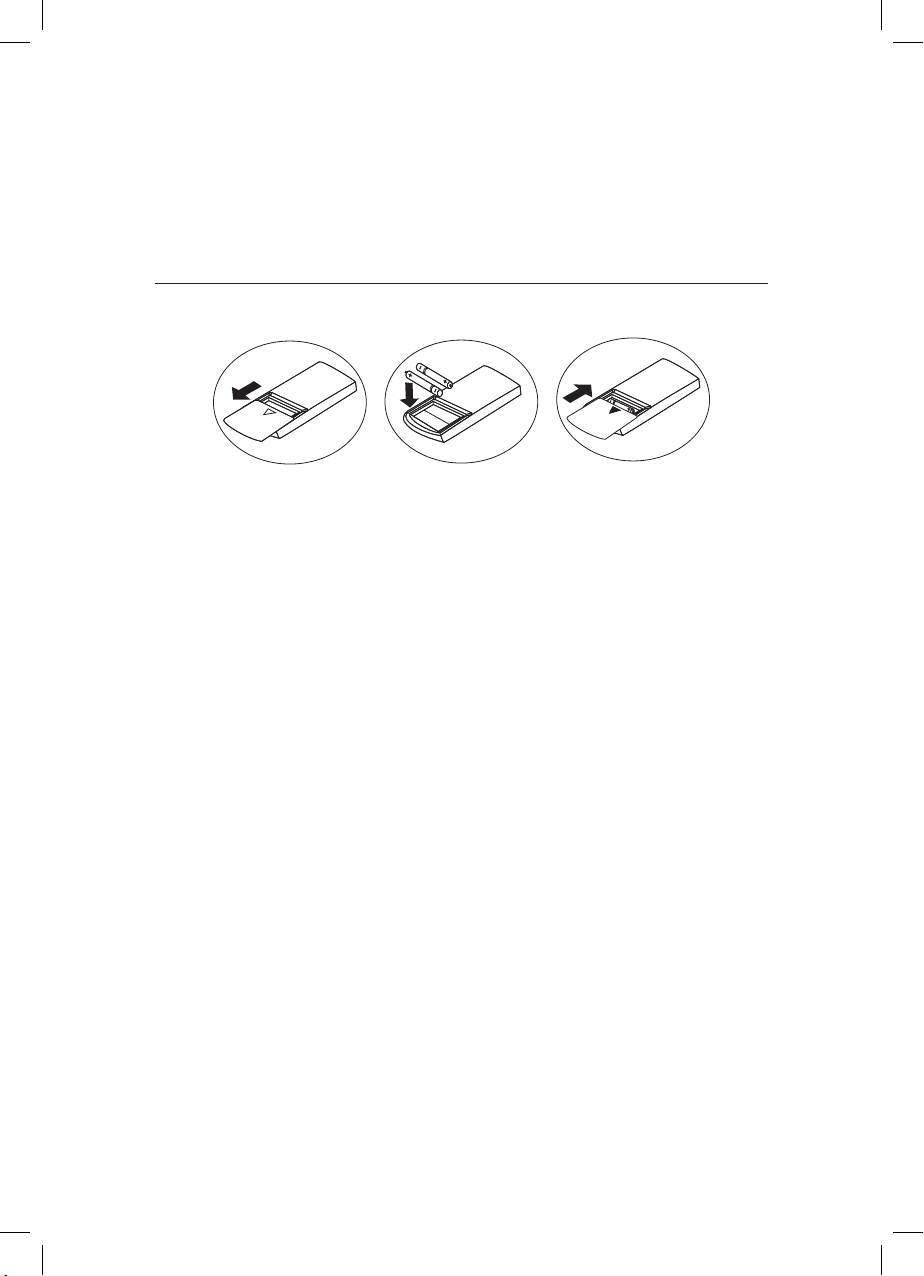
Batterijen
• Schuif het deksel open in de richting van de pijl.
• Plaats twee nieuwe batterijen in het vakje en let op de goede richting van de plus- en
minpolen (+ & –).
• Zet het deksel weer op zijn plaats.
Opgelet
• Richt de afstandsbediening op de ontvangstsensor van de airco.
• Zorg ervoor dat er niet meer dan 8 meter afstand is tussen de afstandsbediening en
de ontvangstsensor.
• Zorg ervoor dat geen voorwerpen de signaaloverdracht tussen de afstandsbediening
en de ontvangstsensor blokkeren.
•
Laat de afstandsbediening niet vallen en gooi niet met de afstandsbediening.
• Leg de afstandsbediening niet in direct zonlicht of in de buurt van andere
hittebronnen.
• Gebruik twee batterijen.
• Haal de batterijen uit de afstandsbediening als de airco lange tijd niet zal worden
gebruikt.
• Als de airco niet op de afstandsbediening reageert, vervangt u de batterijen.
• Doe de batterijen altijd op milieuvriendelijke wijze van de hand.
Opmerking: sommige apparaten kunnen de functie niet inschakelen.
Het ontwerp en de specificaties kunnen zonder voorafgaande mededeling, voor verbetering van het product
veranderen. Overleggen met de verkoop agentschap of de fabrikant voor meer informatie.
Informatie is correct bij het ter perse gaan.
47
Page 48
48
Page 49

EVOLARSHOP.COM
 Loading...