

Page 1
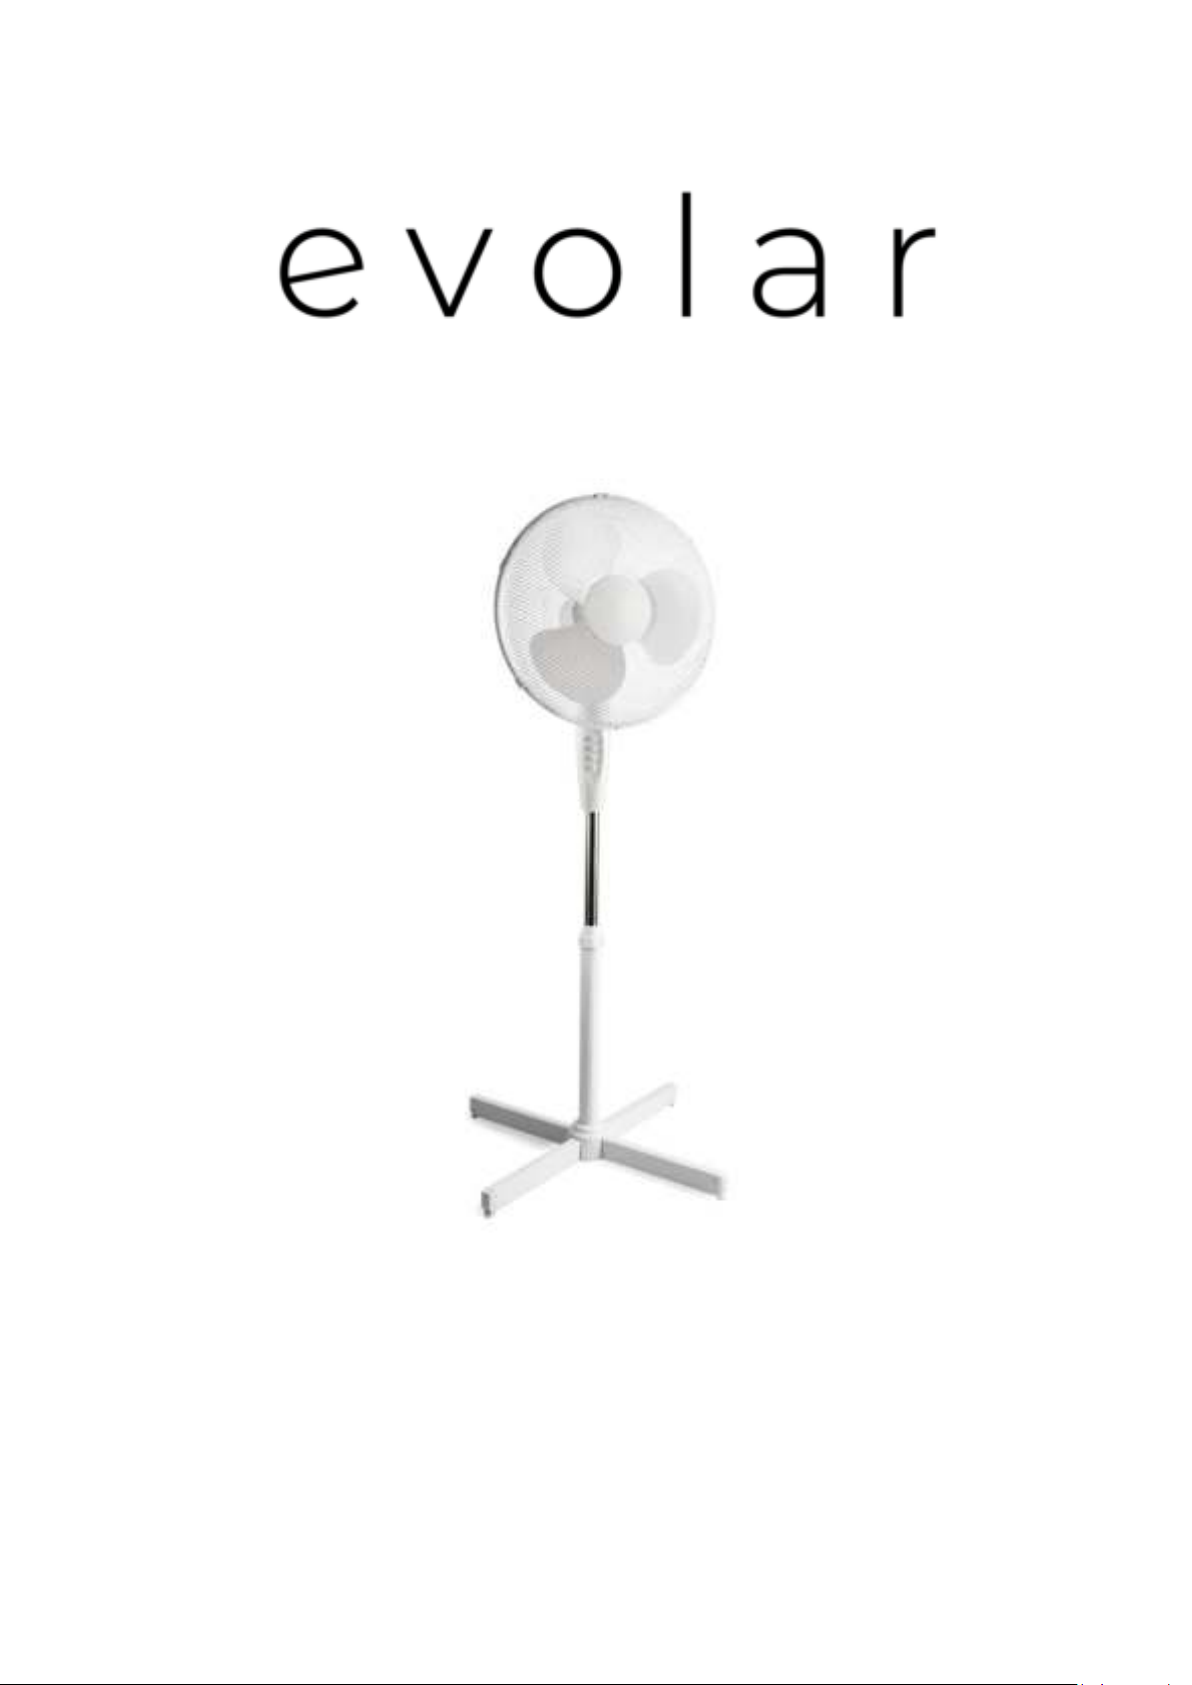
Handleiding statiefventilator 16’’ 40CM:
Installatie- en bedieningshandleiding
Evolar EVO-16S
Page 2
Gebruikershandleiding Statiefventilator Evolar EVO-16S
(Lees en bewaar deze instructies zorgvuldig)
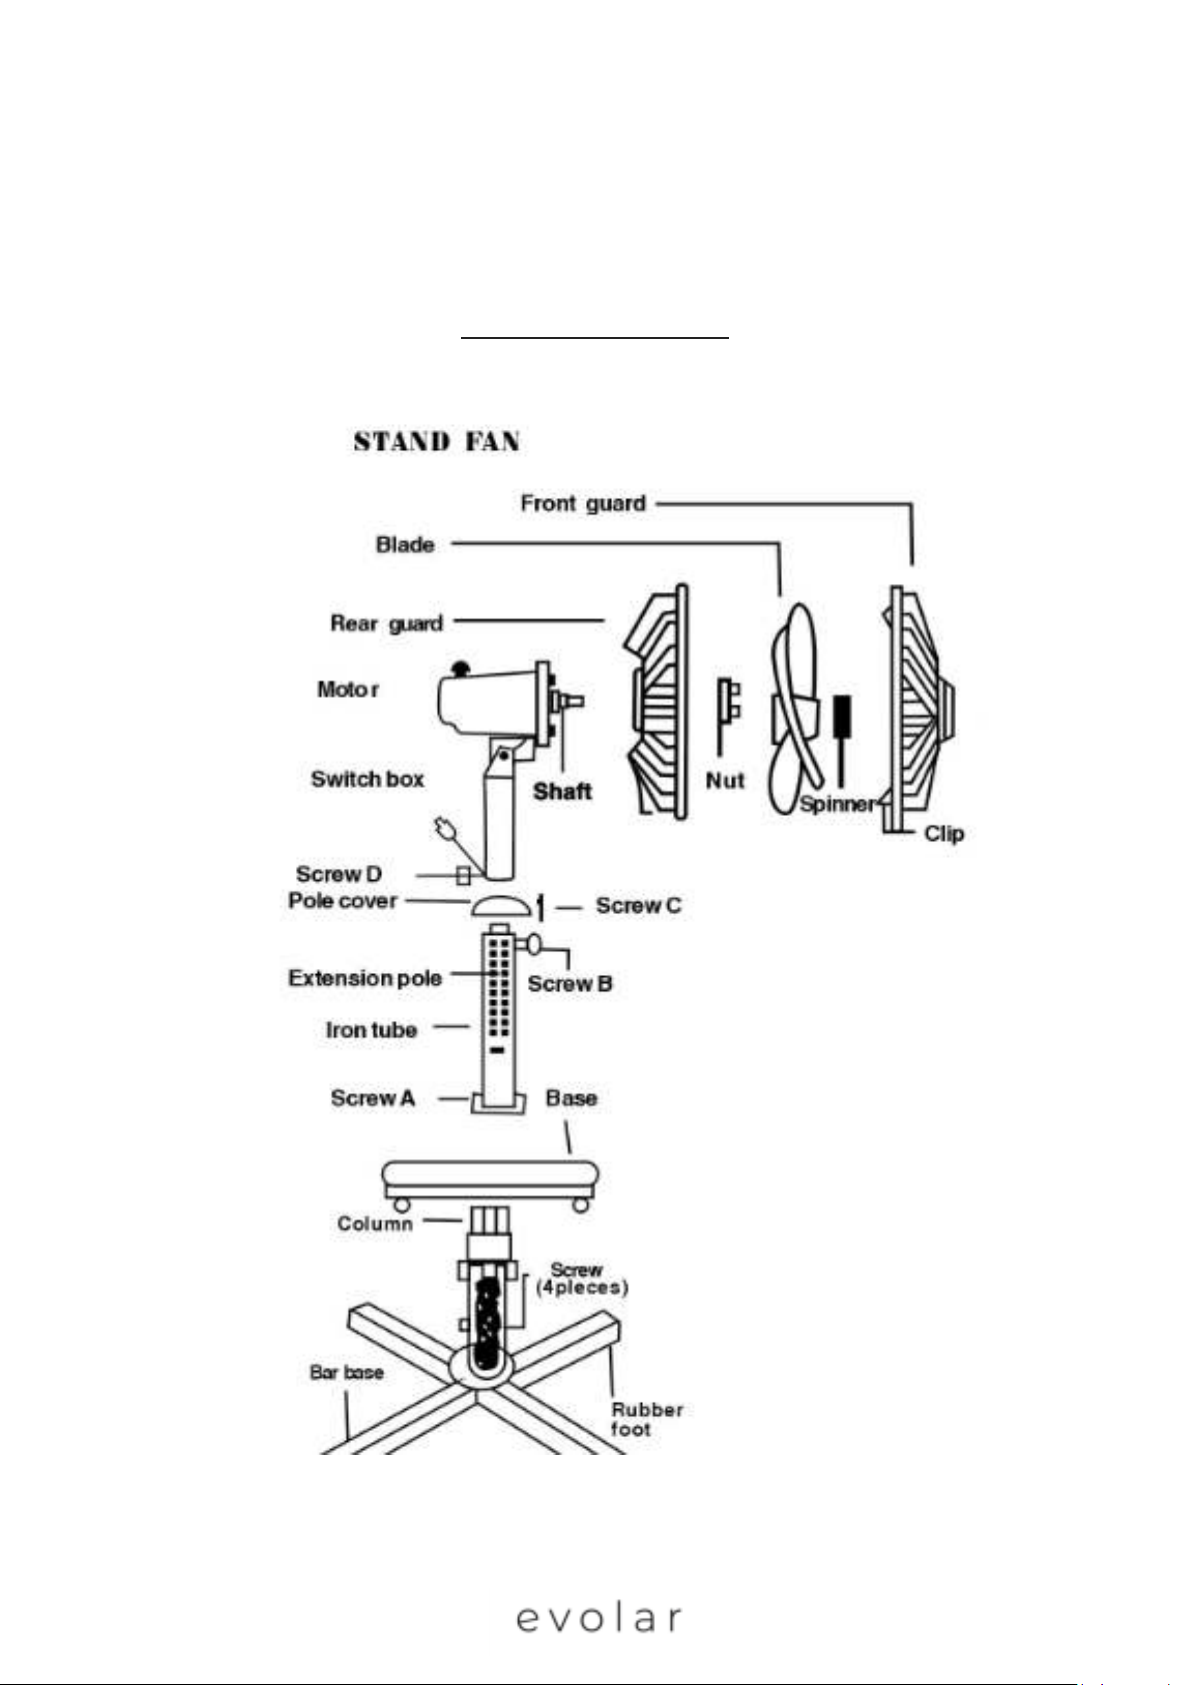
Montage schema:
Page 3
Specificatie:
Nominale spanning: 220V
Frequente: 50Hz
Opgenomen vermogen: 40W
REGELS VOOR EEN VEILIGE BEDIENING:
1. Lees de gebruikers/installatie instructies zorgvuldig door vóór gebruik.
2. Controleer de voeding met de voorgeschreven nominale spanning en frequentie van de
ventilator.
3. Voer geen vingers, potloden of andere voorwerpen door het rooster wanneer de ventilator
draait.
4.
Haal de ventilator van de voeding af wanneer u de ventilator verplaatst.
Haal de ventilator van de voeding af wanneer u schoonmaakt.
5.
BESCHERMINGSFUNCTIE OVERVERHITTING:
De ventilator is voorzien van een ingebouwde thermostaat in de motor. De zekering zal de ventilator
automatisch uitschakelen wanneer de motor oververhit raakt. De plastic delen zijn door de
ingebouwde temperatuurbeveiliging goed beschermd tegen vervorming en brand. Plastic stukken
worden dus goed beschermd tegen uitbranden en vervorming.
MONTAGE INSTRUCTIES
BASIS EN STATIEF MONTAGE INSTRUCTIE:
1. Haal de voet en het statiefdeel uit de doos.
2. Draai de hoogteaanpassing (kolomdeel), tegen de klok in, open en trek de stalen buis uit de
basis. Draai vervolgens de hoogteverstelling vast, door met de klok mee te draaien, om het
uitschuifbare gedeelte vast te klemmen.
3. Plaats het uitschuifbare gedeelte (kolom) in de voet (basis), haal de schroeven uit de plastic
zak en breng deze vanaf de onderkant van de voet aan op het kolomgedeelte en zet draai deze
vast.
4. Pas de hoogte van het kolom aan om de ventilator te laten werken op uw gewenste hoogte.
VENTILATORGEDEELTE EN BASISDEEL MONTAGE:
Schroef de bevestigingsknop op de achterkant (aan de onderkant) van de ventilatorbehuizing los,
verwijder de beschermingsmaterialen uit het gat van de ventilatorbehuizing. Plaats het basisgedeelte
(kolom) in het gat van het ventilatorgedeelte en draai de bevestigingsknop op het ventilatorgedeelte
vast.
MONTAGE VENTILATORBLAD EN BESCHERMKORF (GRILLEN):
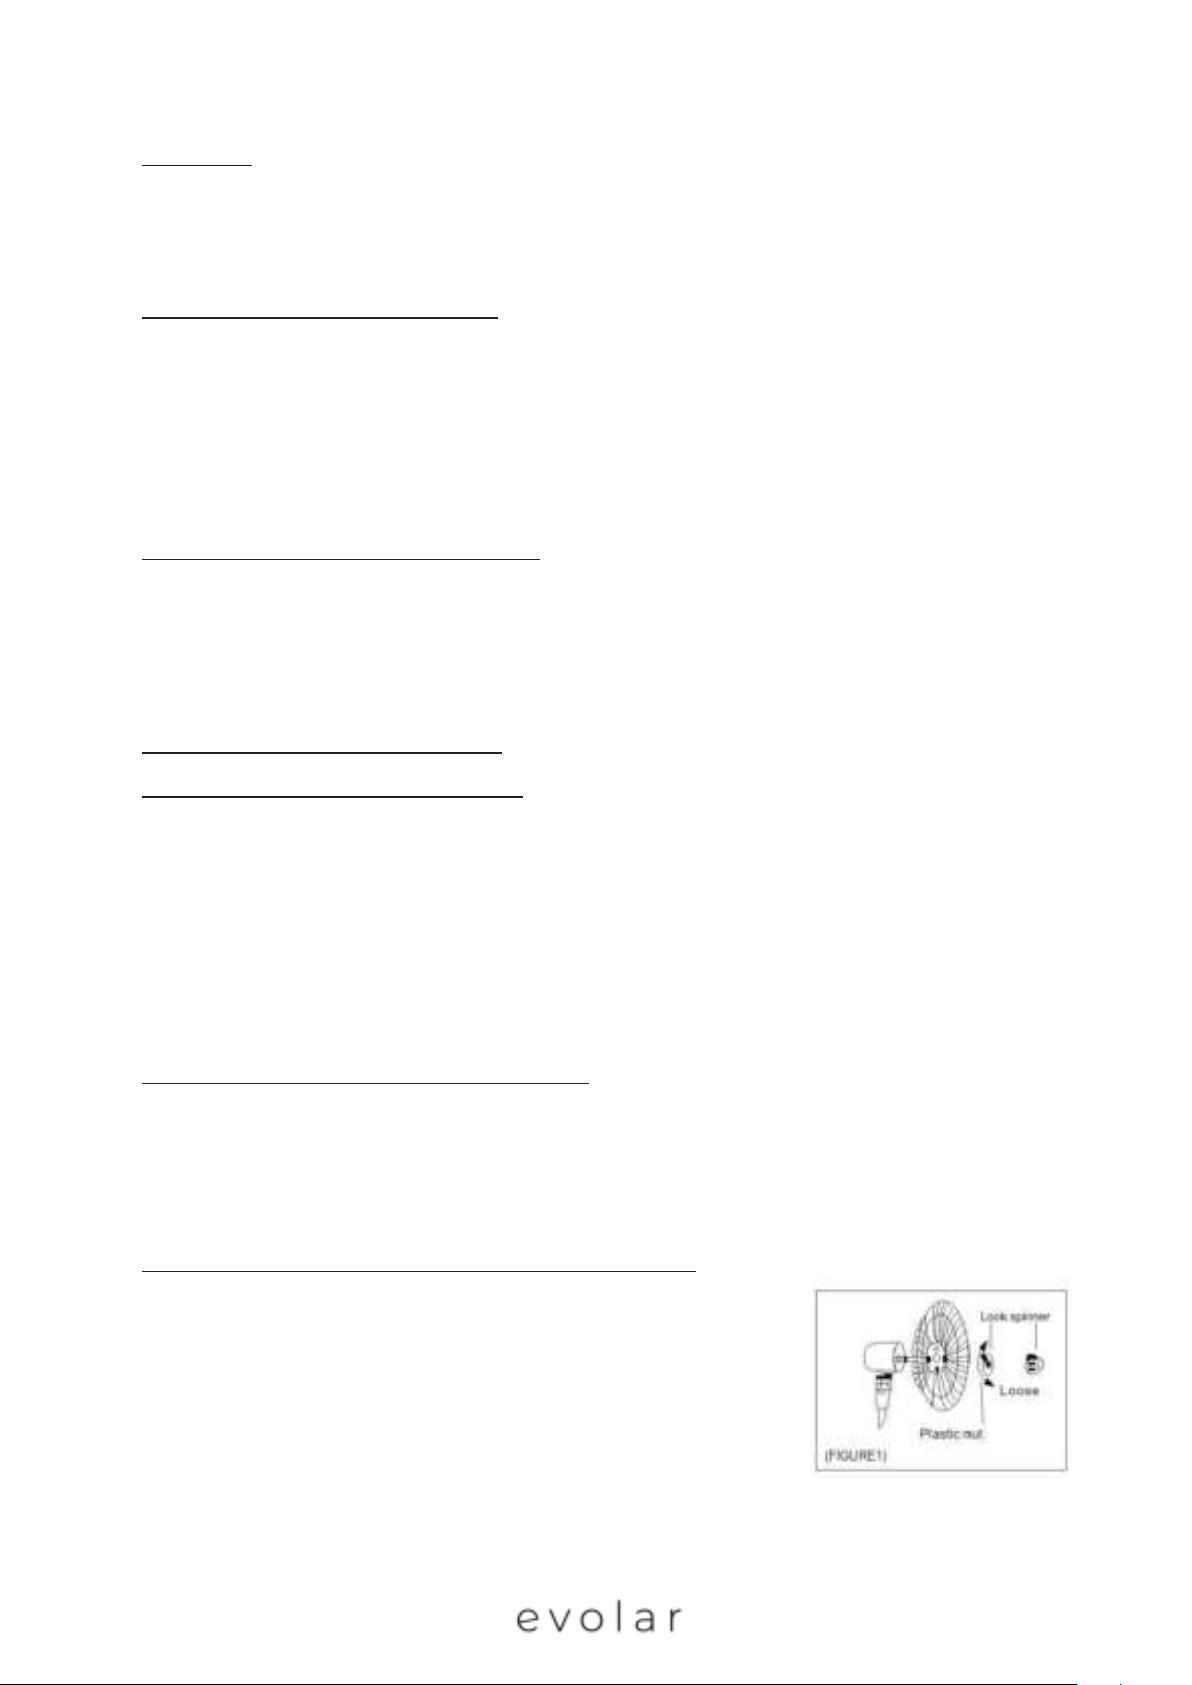
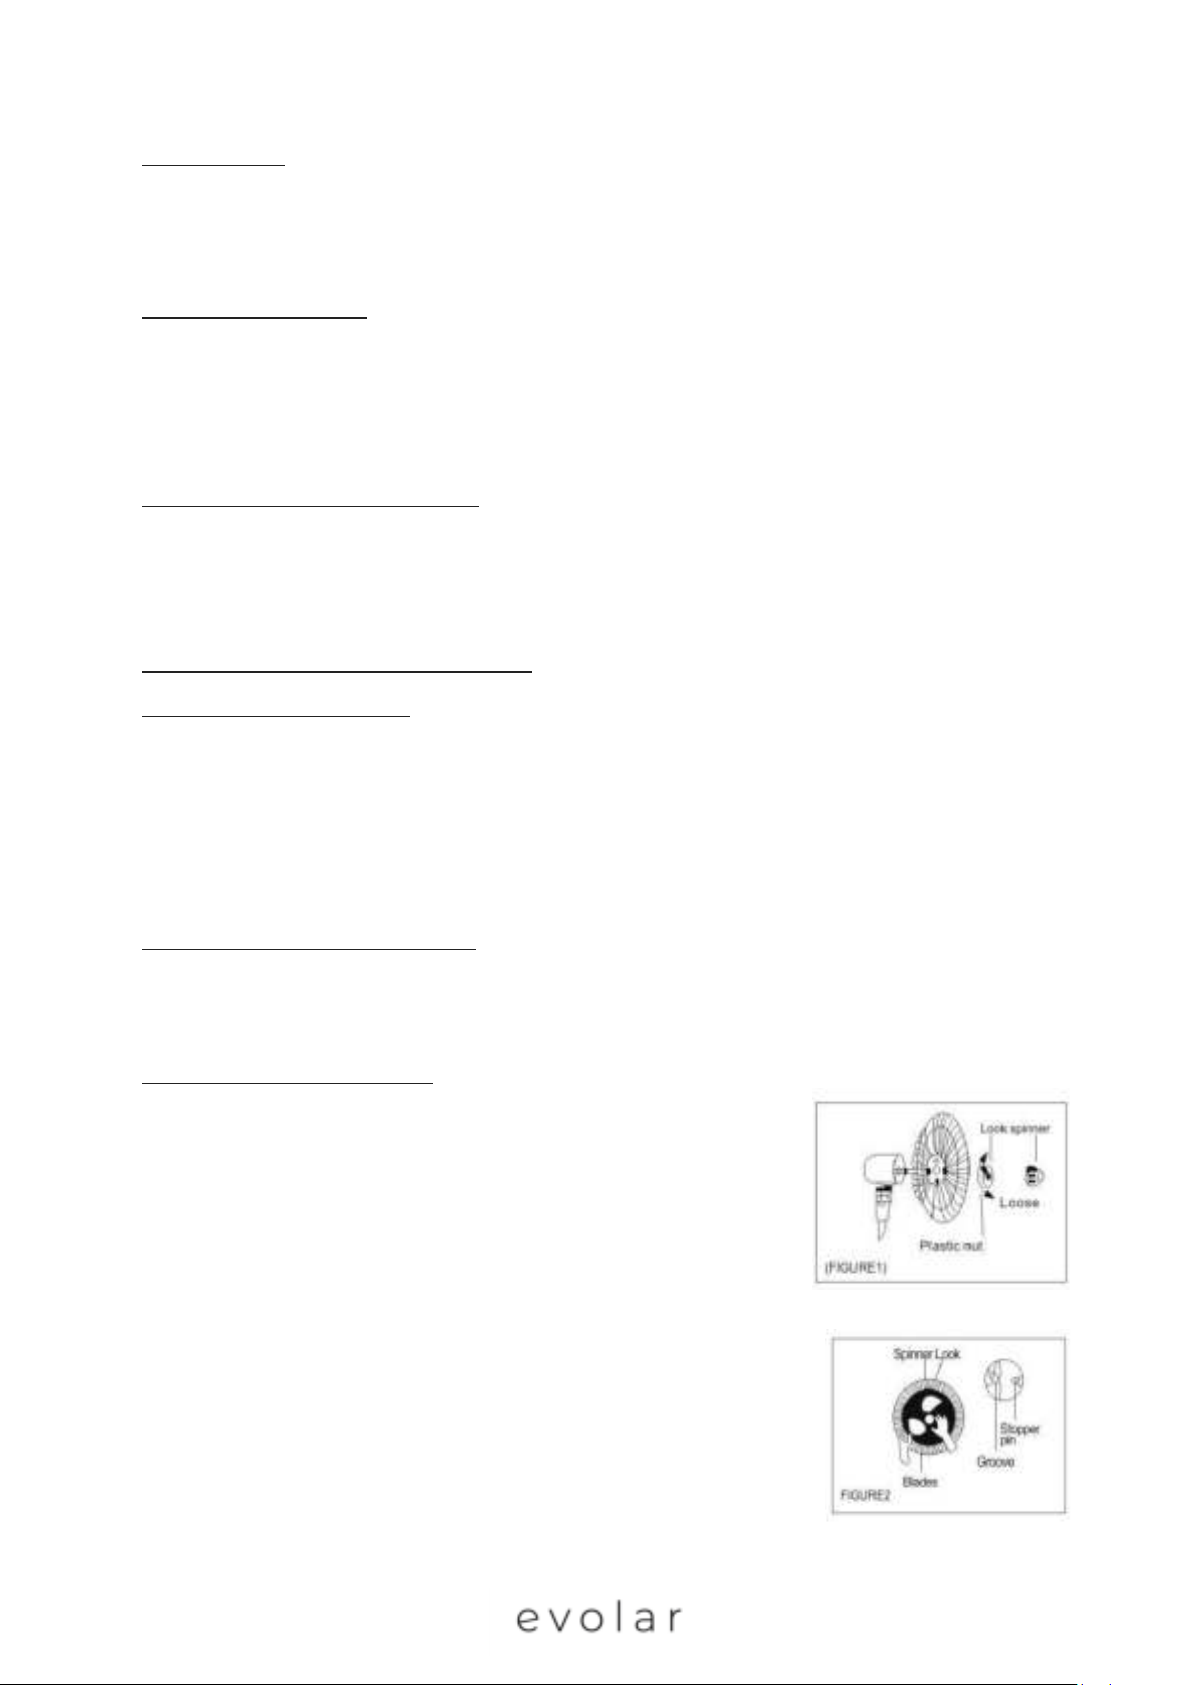
1. Verwijder de spinner en de plastic moer aan de voorkant van de
motoras. Draai vervolgens de plastic moer vast. (FIGUUR 1)
Page 4
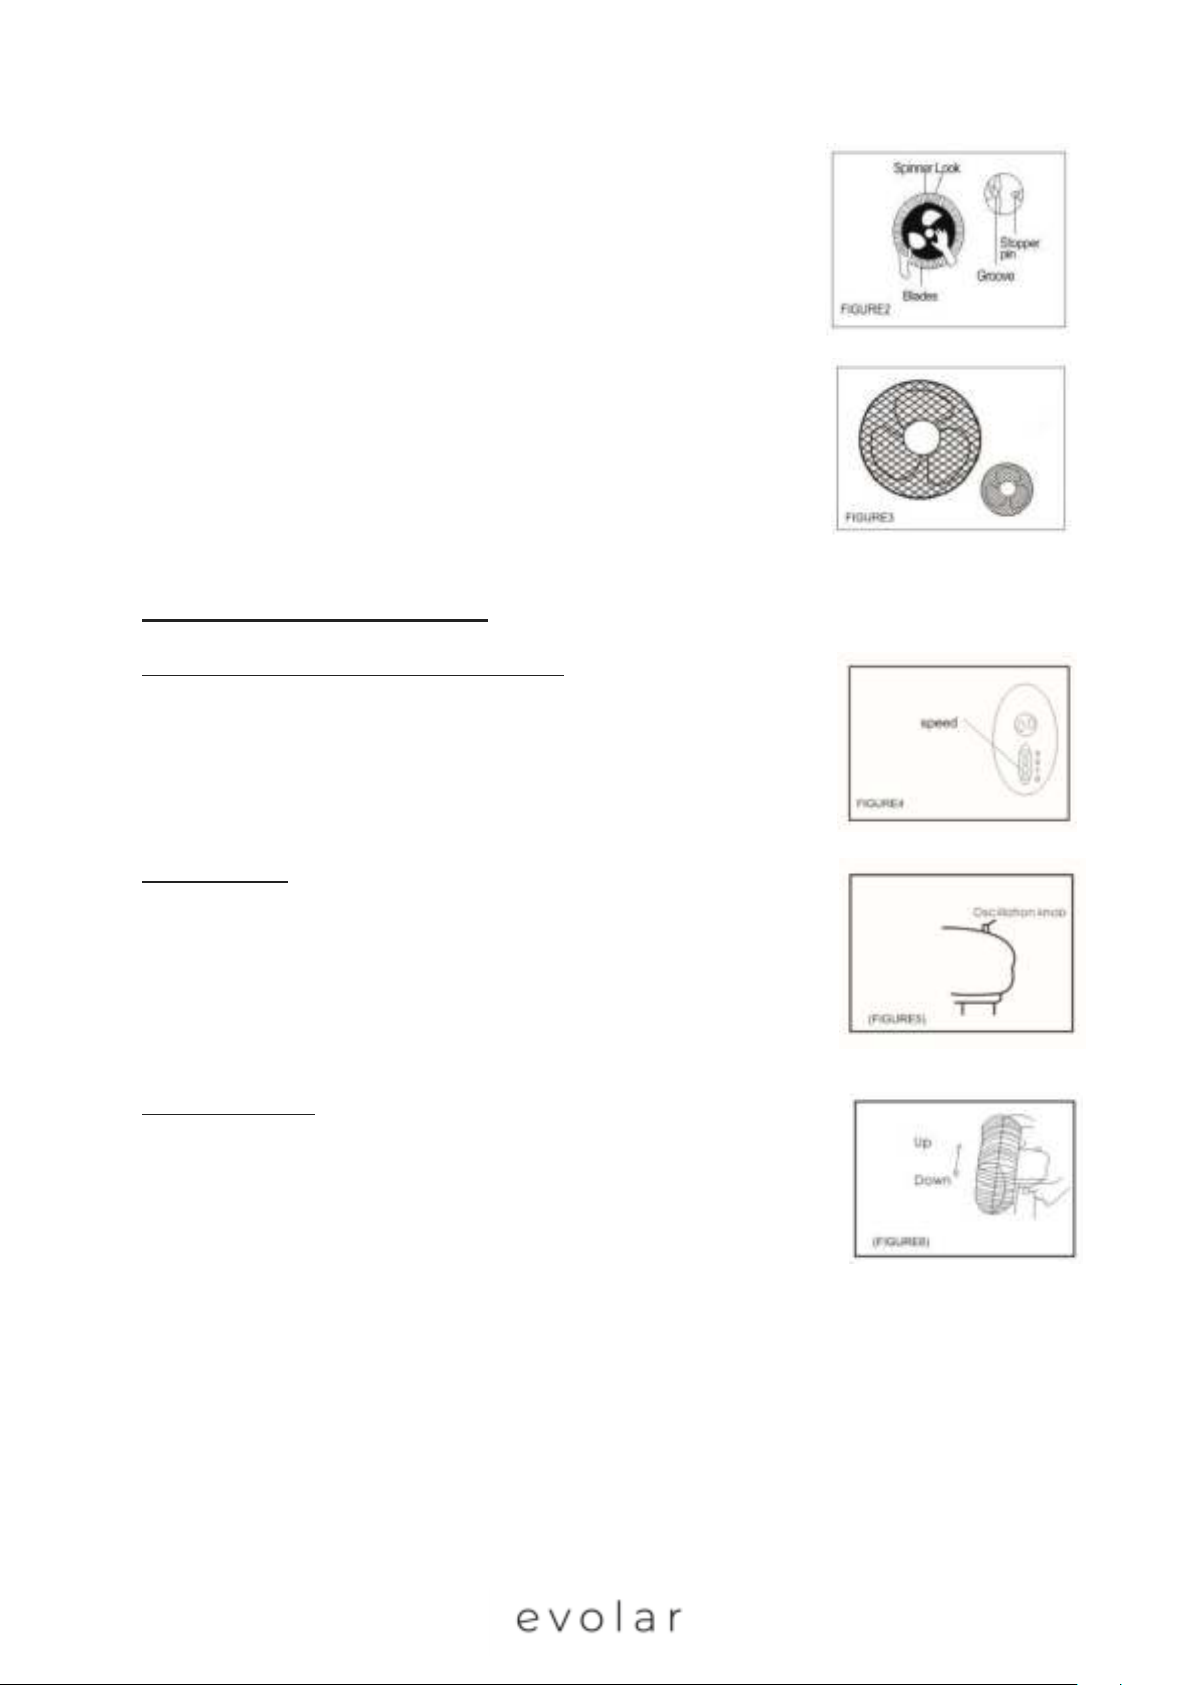
2. Verwijder PVC-beschermingshuls op de as. Plaats het
ventilatorblad op de as. Zorg ervoor dat de borgpin in de groef van
het ventilatorblad valt. Draai vervolgens de spinner tegen de klok
in vast, zodat het ventilatorblad vast zit. (FIGUUR 2)
3. Houd de voorste beschermkap vast om te controleren dat het logo
recht zit en de beschermkap recht gelijk zit met de achterste
beschermkap. Druk vervolgens alle veiligheidsclips stevig in zodat
deze op de juiste plaats vergrendelen. (FIGUUR 3)
GEBRUIKSAANWIJZING
VENTILATORREGELING (AAN/UIT & SNELHEID)
Gebruik de standenschakelaar voor het in-/ uitschakelen en het aanpassen
van de snelheid van de ventilator. Druk op de schakelaar voor de gewenste
ventilatorstand in te schakelen. De ventilator heeft vier standen: 0 = uit, 1
= laag, 2 = middel, 3 = hoog (FIGUUR 4)
ZWENKFUNCITE
Om de ventilator te laten bewegen (zwenkfunctie, drukt u op de
oscillatieknop. Deze knop bevindt zich aan de bovenkant van het motorhuis.
Om de luchtstroom te bewegen drukt u op de oscillatieknop. U kunt de
oscillatieknop omhoog klikken om de ventilator op de gewenste stand vast
te zetten (FIGUUR 5)
KANTELBEDIENING
Draai de kantelknop los, stel de ventilatorkop af in de gewenste hoek door
de ventilatorkop vast te houden, draai vervolgens de knop vast. (FIGUUR 6)
Page 5

ONDERHOUD INSTRUCTIES
De ventilator heeft weinig tot geen onderhoud nodig. Probeer de ventilator niet zelf te repareren,
de ventilator is beschadigd of , neem dan contact op met de leverancier of een erkend reparatie bedrijf.
ONDERHOUD:
1. Haal de stekker uit het stopcontact en maak de ventilator spanningsloos voordat u de
ventilator schoonmaakt, in elkaar zet of uit elkaar haalt.
2. Zorg voor voldoende luchtcirculatie naar de motor, houd de ventilatieopeningen aan de
achterkant van de ventilatormotor stof en vuilvrij. U kunt een stofzuiger gebruiken om deze
ventilatieopeningen te reinigen. Haal altijd de stekker uit het stopcontact voordat u de
ventilator reinigt. Demonteer de ventilator niet om pluizen te verwijderen.
3. Veeg de buitenste poorten af met een zachte doek met een mild schoonmaakmiddel. Gebruik
geen schurend schoonmaakmiddel of oplosmiddelen om krassen op het oppervlak te
voorkomen.
4. Laat geen water of andere vloeistoffen in de motorbehuizing of andere inwendige delen van
de ventilator terechtkomen.
5. Als het netsnoer is beschadigd, mag de ventilator ten alle tijden niet gebruikt worden. U dient
de ventilator bij een erkend reparatiebedrijf ter reparatie worden aangeboden.
6. Vervang zelf nooit onderdelen aan de ventilator.
Als
ONDERSTEUNING
Alle beschikbare informatie en onderdelen zijn te vinden op www.evolar.nl
Page 6

Manual stand fan:
Installation and operation Manual
Evolar EVO-16S
Page 7
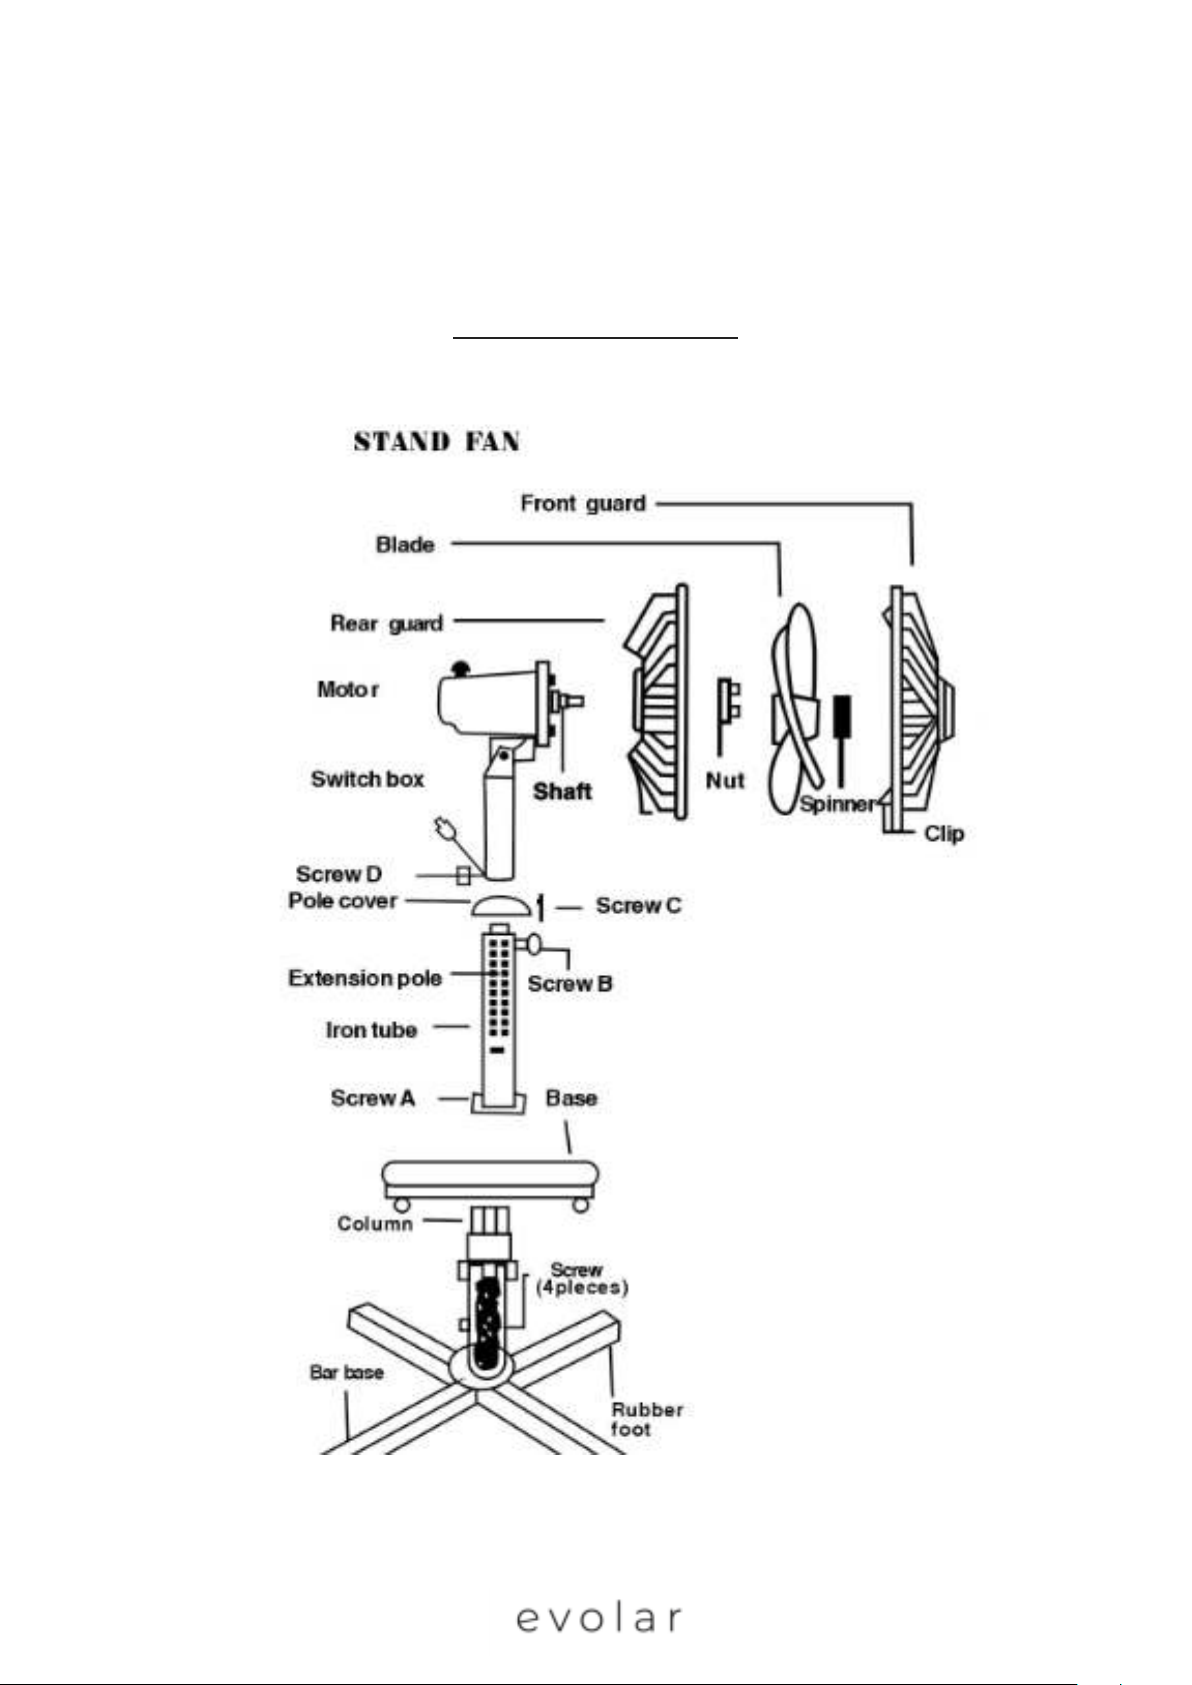
User Manual stand fan Evolar EVO-16S
(Before use read and save these instructions carefully)
Assemble diagram:
Page 8
SPECIFICATION:
Rated voltage: 220V
Rated frequency: 50Hz
Input power: 40W
Rules for safe operation:
6. Before use read these installation and operation manual carefully
7. Please match the power with the rated voltage and frequency of the fan.
8. Don’t insert fingers, pencils or any other objects through the grille when the fan is running.
9. Disconnect always the power when you move the fan.
10. Unplug the power plug before cleaning the fan.
OVER-HEAT PROTECTION FUNCTION:
A thermostat is built in the motor of the fan. The fuse will be automatically cut out when the motor
temperature exceed the limit caused by any accidents. The plastic pieces will be well protected for
burning out and distortion.
ASSEMBLY INSTRUCTIONS
BASE AND PILLAR ASSEMBLY:
5. Take out the base and pillar part from the carton.
6. Revolve the height adjuster anti-clock wise out, draw the steel tube out of the pillar. Then
revolve the height adjuster clock wise to fasten the tube.
7. Locate the pillar proper into the base, take the screw nuts from the plastic bag and fit it in to
the pillar form the bottom of the base and fasten it.
8. Adjust the height to the required height of the wind sending.
FAN BODY AND COLLUM ASSEMBLY:
Unscrew the fixing knob on the back of the bottom of the fan body, empty the hole in the bottom of
the fan body, put the extension column into the hole of the fan body and tighten the fixing knob.
BLADE AND GRILLES ASSEMBLY:
4. Remove the spinner and the plastic nut from the front side of the
motor shaft. Then tighten the plastic nut. (FIGURE 1)
Remove the PVC sleeve on the shaft. Insert the ventilation blade
5.
into the shaft. Make sure the stopper pin is clipped in to the groove
of the blade. Screw the spinner counter clockwise tot tighten the
blades.
(FIGURE 2)
Page 9
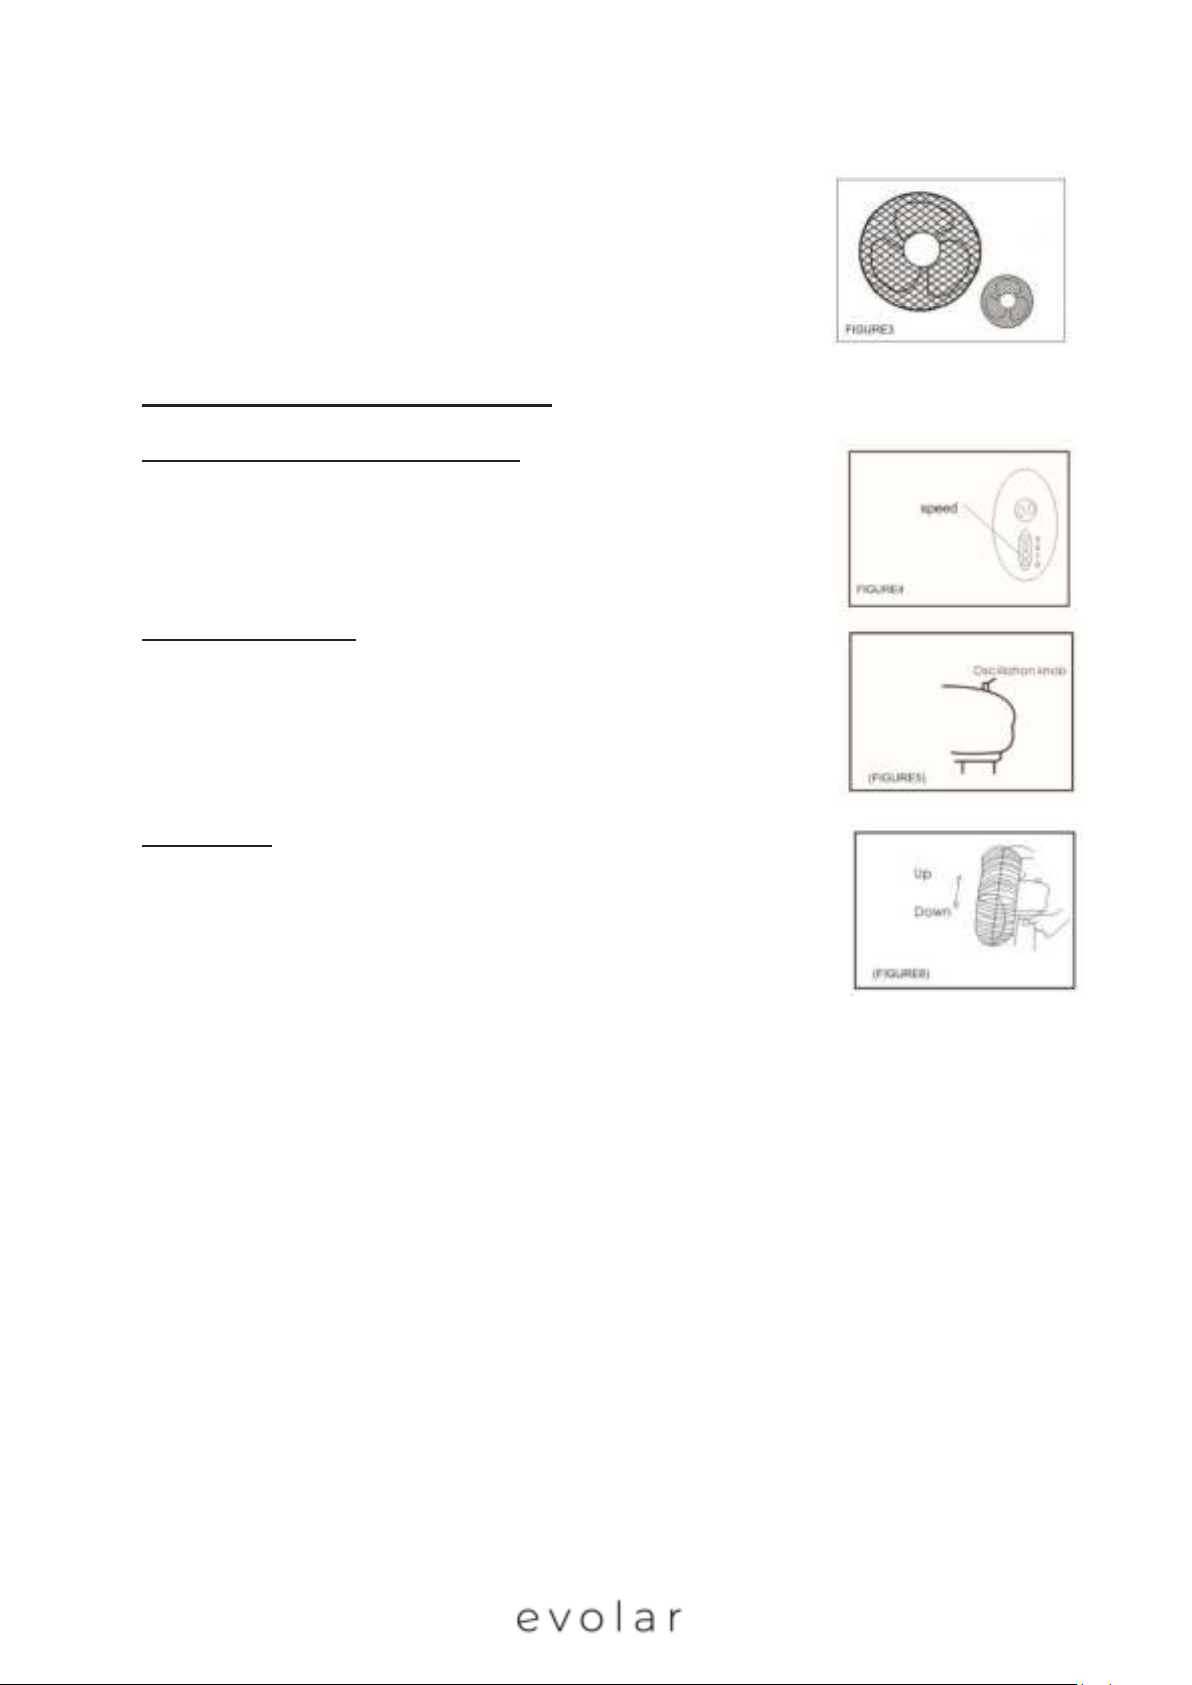
6. Hold the front guard to make sure that the trademark is level and
that the front guard are centred over the rear guard. Then push all
the safety clips into their places. (FIGURE 3)
OPERATION INSTRUCTIONS
FAN SPEED CONTROLL (ON/OFF & SPEED)
Use the speed switches to switch the fan on and off. Press the switch to turn
on the required speed. The fan has four speed positions: 0 = off, 1 = low, 2
= medium, 3 = high (FIGURE 4)
OSCILLATION CONTROL
To make the fan move (oscillation function) press the oscillation button. This
button is located at the top of the motor housing. To move the air flow, press
the oscillation button. You can click the oscillation button to move the fan to
the required position. (FIGURE 5)
TILT CONTROL
Unscrew the till knob, adjust the fan head to the desired angle by holding
the fan head, then tighten the knob (FIGURE 6)
Page 10

MAINTENANCE INSTRUCTIONS
The fan requires little maintenance. Do not attempt to repair the fan yourself. If the fan is damaged
or damaged, contact the supplier or go to an authorized repair company.
MAINTENANCE:
7. Disconnect the fan from the power supply before cleaning, assembling or disassembling the
fan.
8. To ensure adequate air circulation to the motor, keep vents at the rear of the motor housing
room dust and dirt free. You can use a vacuum cleaner to clean these vents. Always remove
the plug from the power socket before cleaning the fan. Don’t dissemble the fan to remove
the dust.
9. Wipe the outer ports with a soft cloth soaking. Do not use abrasive detergent or solvents to
avoid scratching the surface.
10. Do not allow water or any other liquid in to the motor housing or interior parts.
11. If the power cord is damaged, the fan can not be used at all times. Request a specialist to repair
the fan.
12. Never replace parts on the fan.
SUPPORT
All available information and parts can be found on www.evolar.nl
 Loading...