

Page 1
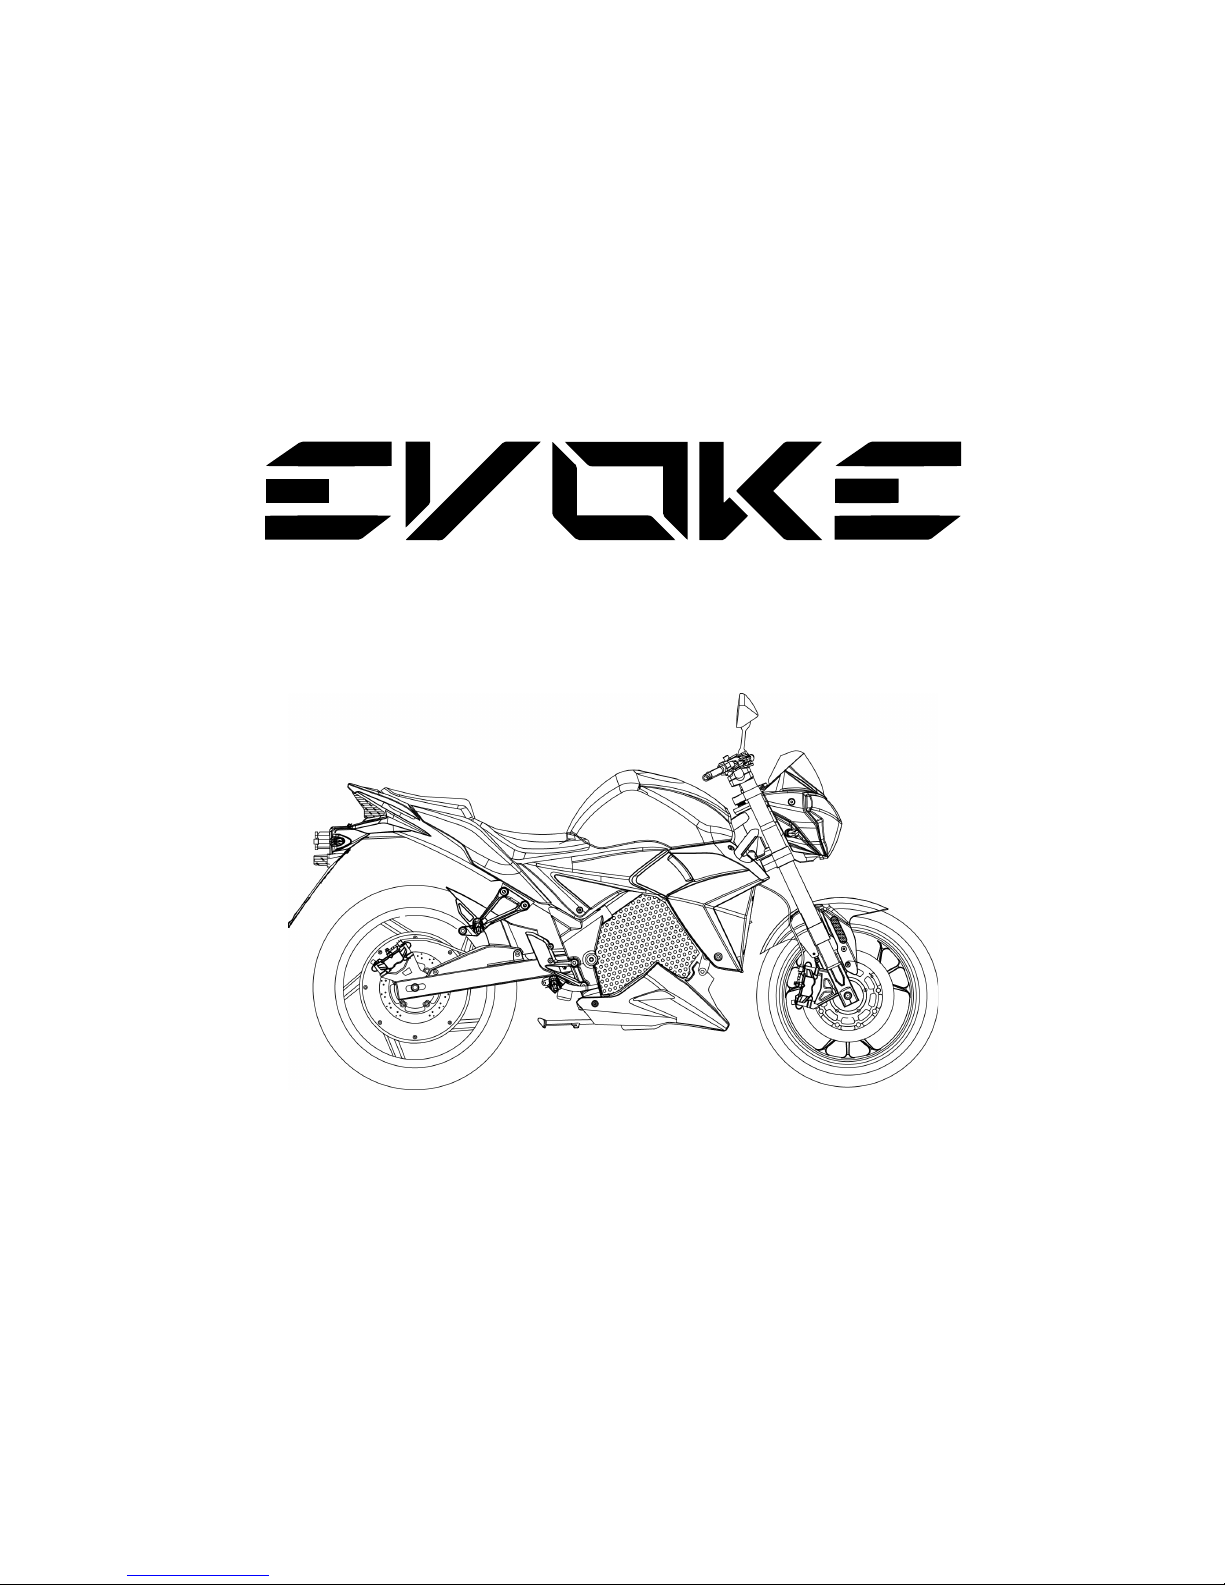
Urban s
USER MAnual
Page 2

2
Table of Contents
Important Message from Evoke 7
General Information 8
Important labels and locations 8
General Information 9
Accessories and Modications 9
General Information 10
Safety precautions 10
General Information 11
Load limits and riding guidelines 11
General Information 12
Pre-ride spot check 12
General Information 13
Identication data 13
General Information 14
Maintenance schedule 14
User-serviceable Components 15
Maintenance you can do yourself 15
Vehicle Specications 16
Controls and Instruments 17
Side Prole with Labels 17
Controls and Instruments 18
Foot pegs 18
Controls and Instruments 19
Handlebars 19
Controls and Instruments 20
Left Handlebar Switchbox 20
Controls and Instruments 21
Light settings 21
Controls and Instruments 22
Ignition Switch 22
Page 3

3
Controls and Instruments 23
Key switch 23
Controls and Instruments 24
Key switch 24
Controls and Instruments 25
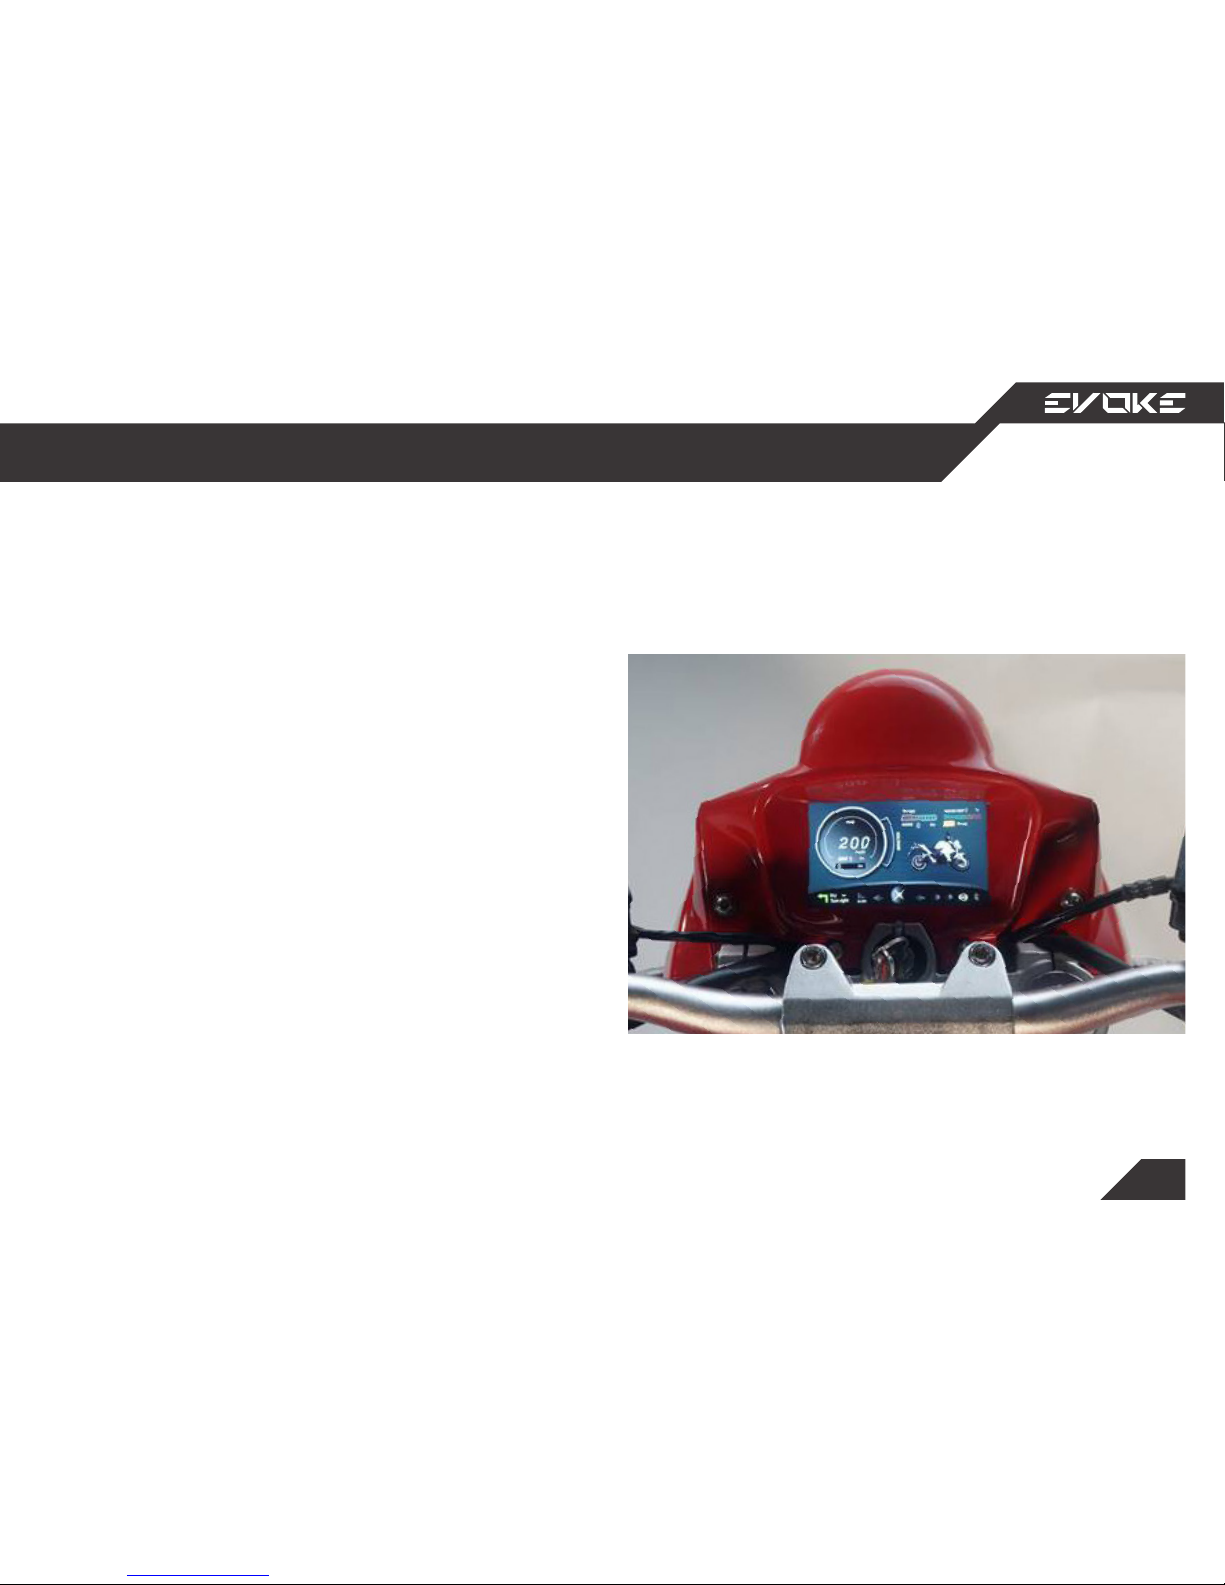
LCD display 25
Getting Started 26
Engage drive system 26
Controls and Instruments 27
Right handlebar switchbox 27
Controls and Instruments 28
Throttle control 28
Getting Started 29
powering o and parking 29
Controls and Instruments 30
Brake uid reservoir 30
Getting Started 31
Monitoring brake uid 31
max 31
min 31
Getting Started 32
Regen 32
Battery Information 33
Charging warnings 33
Charging Information 34
First time charge and calibrating the battery
gauge 34
Charging Information 35
Cold weather charging 35
Charging Information 36
Table of Contents
Page 4

4
Battery Chargers and Plugging In 36
Charging Information 37
Charging port access and location 37
Charging Information 38
Charging Indication 38
Charging Information 39
Partial Charging 39
Charging Information 40
Battery balancing 40
Charging Information 41
Battery Management System (BMS) 41
Suspension 42
Front adjustment 42
Suspension 43
Front adjustment 43
Suspension 44
Rear adjustment 44
Storing your Bike 45
Pre-storage cleaning 45
Storing your Bike 47
short-term, stored state eects on battery 47
Storing your Bike 49
short-term, stored state eects on battery 49
Transporting your Bike 50
Preparing for transportation 50
Storing your Bike 51
Protecting electronic elements 51
Range, Tires, and Motor 53
Reduced range 53
Range, Tires, and Motor 54
Table of Contents
Page 5

5
Increased range 54
Range, Tires, and Motor 55
Properly inated tires 55
Range, Tires, and Motor 56
Acceleration and protection mode 56
Troubleshooting 57
Abnormal behavior 57
Troubleshooting 58
Motor protection mode 58
Troubleshooting 59
No power 59
Troubleshooting 60
Flat tire 60
Troubleshooting 61
Lost keys 61
Diagnostics and Errors 62
Code Errors 62
What to Do 63
In the event of an accident 63
What to Do 64
In the event of an accident 64
What to Do 65
roadside assistance 65
Maintenance Records 66
Maintenance Records 67
Warranty 68
Dimensions 69
Table of Contents
Page 6

6
This manual must remain with
the vehicle at all times.
Page 7
7
Congratulations on purchasing your Urban S electric motorcycle! Welcome to the Evoke Motorcycle
rider community. This manual will provide you with a better understanding of your motorcycle’s operation and basic maintenance requirements.
Evoke is constantly improving product design and quality. Therefore, this manual contains the most
current product information available at the time of printing.
If you choose to sell your Evoke Urban S, remember to pass this manual to the new owner, as it is an
important part of the vehicle.
On behalf of all the Evoke team, we wish you an amazing journey and open, clear roads!
Have questions concerning operation or maintenance of your motorcycle?
Contact us!
Email: [email protected]
WeChat: Evokemotorcycles
Important Message from Evoke
Page 8
8
General Information
Important labels and locations
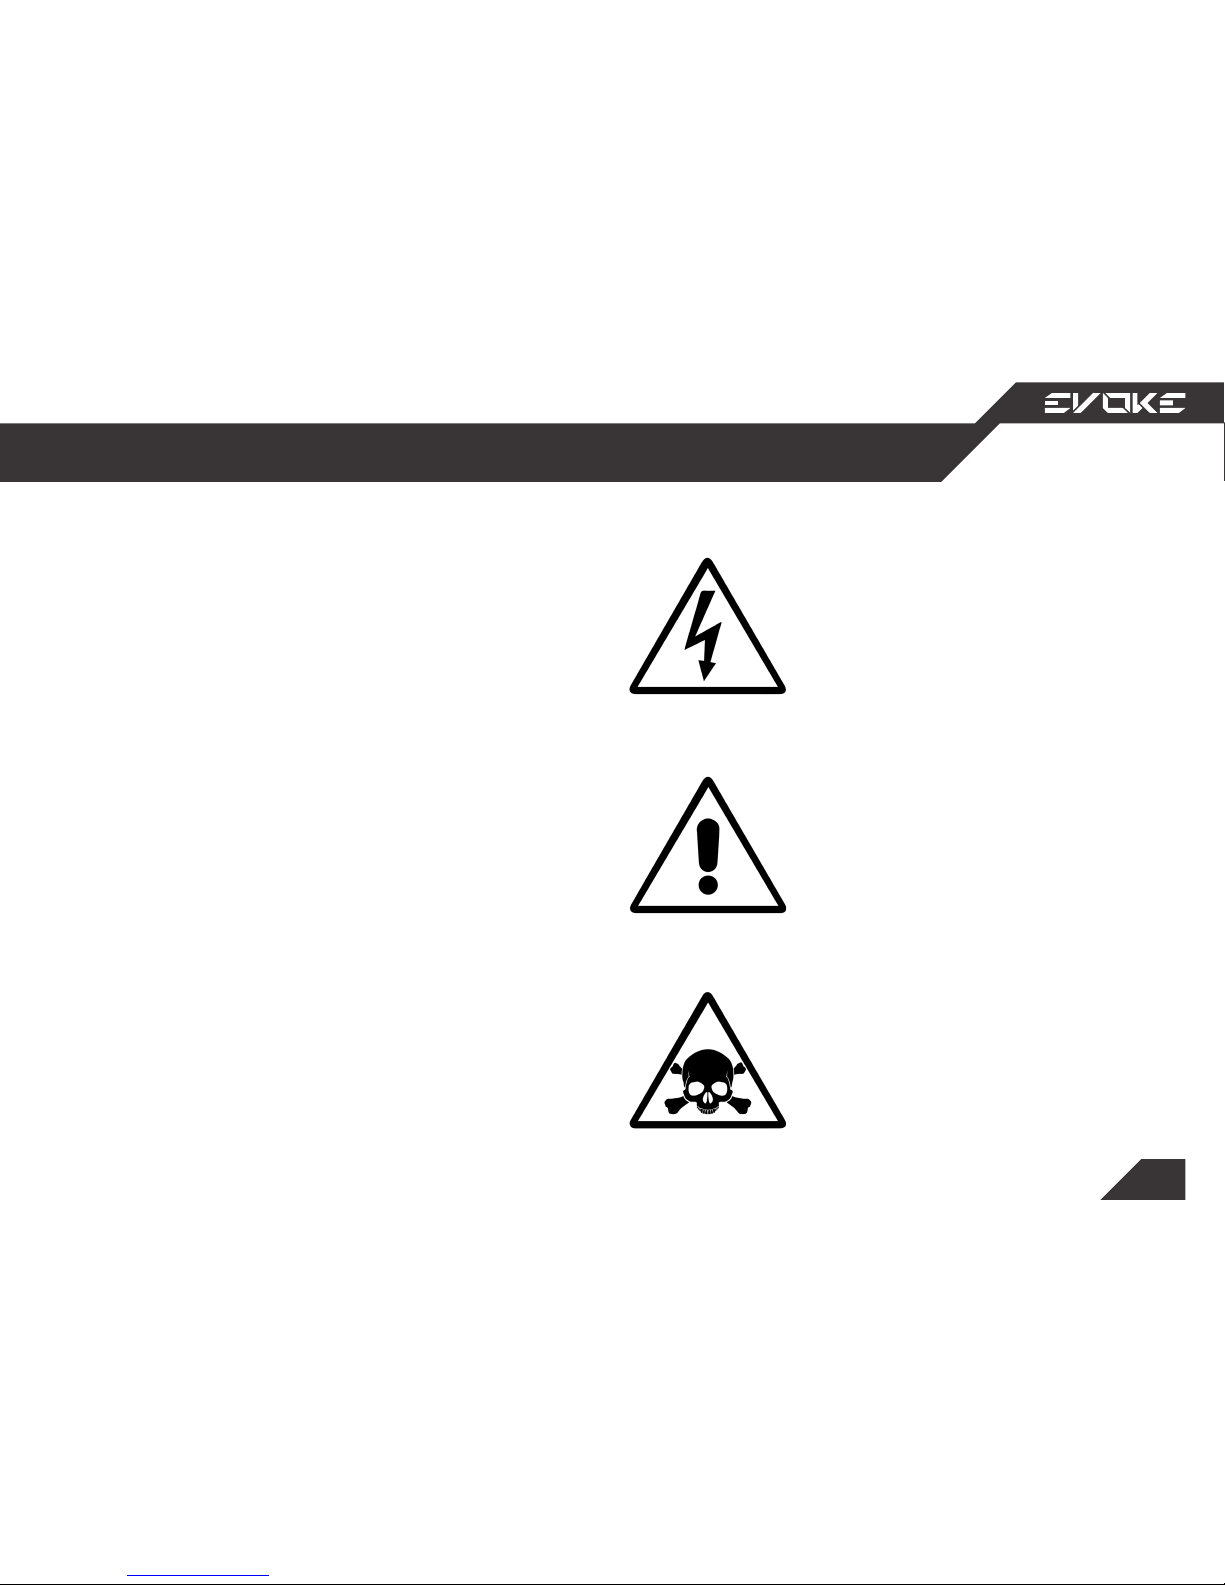
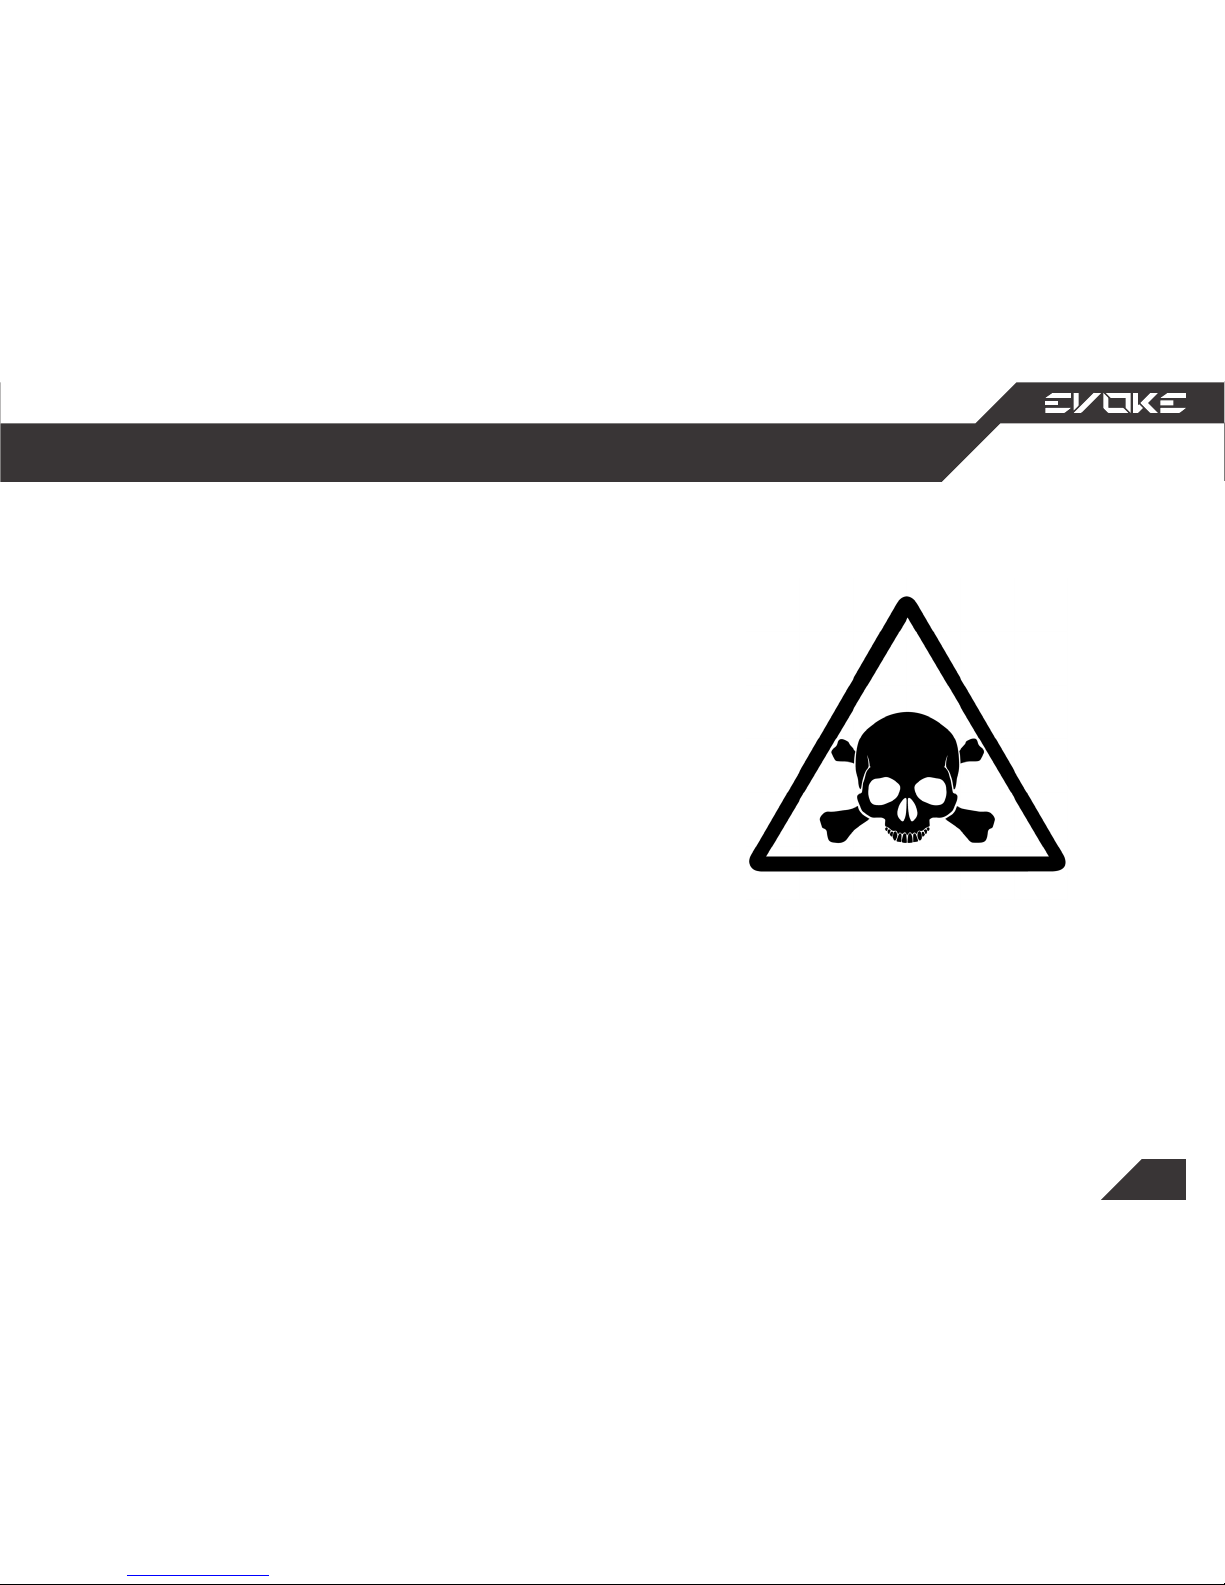
Caution indicates that minor or
moderate injury could happen.
Warning indicates that serious
injury or death may result.
Danger indicates that serious
injury or death will occur.
Evoke Urban S motorcycle series is an electric
motorcycle. As such, there are warnings you
should be aware of when touching or discon-
necting elements.
These labels indicate that the user should take
precautions to avoid harm, and are frequently
seen in the following areas:
• Main Power Connection
• Phase Wire Connection
• Battery Charger
• Battery Box
Page 9
9
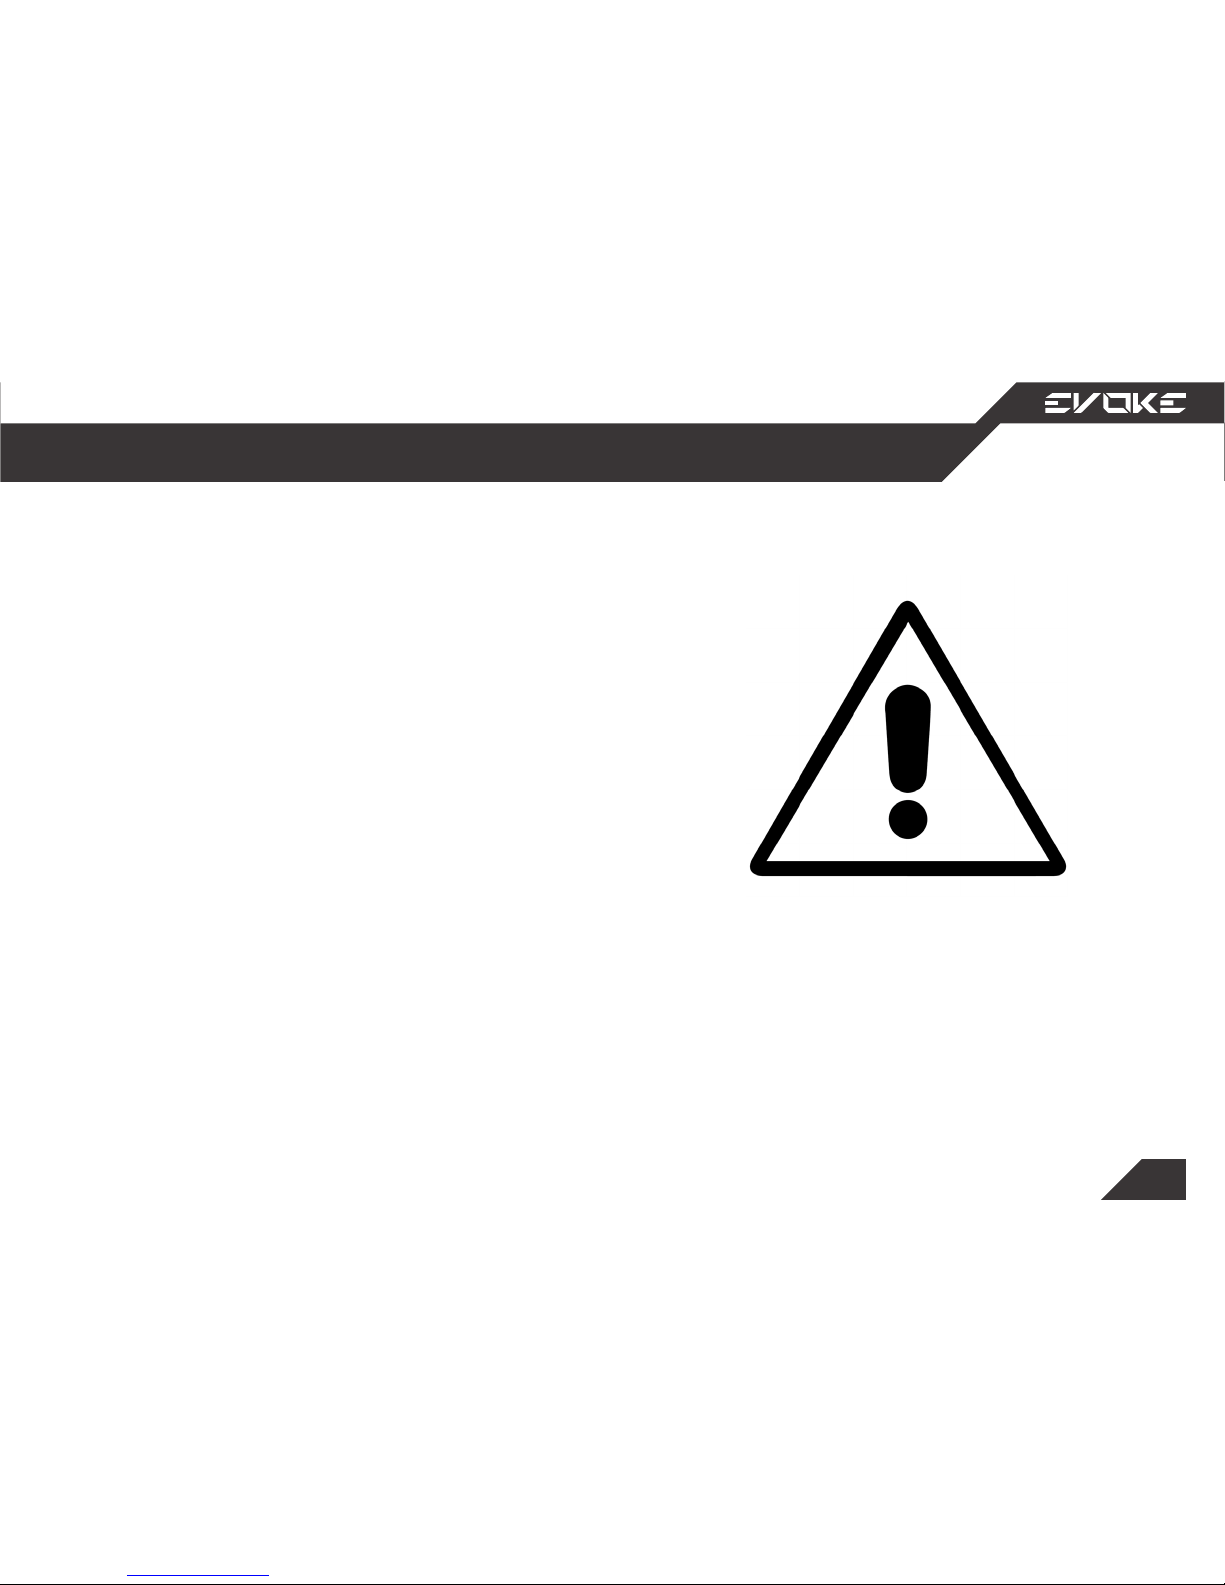
Improper accessories or modications can cause a
crash in which you can be seriously hurt or killed.
Follow all instructions in this owner’s manual re-
garding accessories and modications.
We strongly advise you not to remove any original equipment or modify your Urban S in any
way that would change its design or operation.
Such changes could seriously impair your Urban
S handling, stability, and braking, making it unsafe to ride.
Removing or modifying your lights or other
equipment can also make your Urban S illegal.
Accessories and Modifications
General Information
Page 10

10
At Evoke, we want all riders to have a great time
on their bikes, while also keeping in mind these
precautions to avoid harm to yourself, your bike,
others, and the environment:
1. Wear protective-grade clothing
• It could save your life!
2. Ride defensively
• Give yourself time and space to respond to
other motorist’s actions.
3. Be visible
• Other motorists may have diculty seeing
and reacting to motorcycles; always ride
in the part of the lane where you are most
likely to be seen.
4. Know your bike and how to use it
• Get formal training on motorcycle operation and take refresher courses.
5. Never drive while under the inuence
• Drugs and alcohol impair judgement and
reaction speed, putting you and other motorists in danger.
6. Always follow road rules
• This includes speed limits, using proper
signaling, and avoiding weaving between
lanes or other motorists.
7. Use caution in adverse weather conditions
• Your bike and other vehicles need twice the
distance to stop in adverse weather condi-
tions.
Safety precautions
General Information
Page 11
11
Overloading or improper loading can cause a
crash and you can be seriously hurt or killed.
Follow all load limits and other loading guidelines
in this manual.
Your Urban S has been designed to carry you
and only one passenger. When you carry a pas-
senger or cargo, you may feel some dierence
during acceleration and braking, but as long as
you keep your Urban S well-maintained, with
good tires and brakes, you can safely carry loads
within the given limits and guidelines.
Improperly loading your Urban S can aect
its stability and handling. Even if your Urban S
is properly loaded, you should ride at reduced
speeds when carrying cargo.
Load limits and riding guidelines
General Information
Page 12

12
To keep yourself and others safe, perform a visu-
al spot check on your bike before each ride:
1. Handlebars
• Make sure handlebars are secure. If they
move during inspection, contact your service provider and do not ride the bike!
2. Brakes and Brake Fluid Reservoir
• Test both the front and rear brakes. If
either of the brakes are unresponsive,
contact your service provider immediately
and avoid riding. Also check the brake uid
reservoir and rell if necessary.
3. Hoses and Lines
• If any leaks are present, contact your ser-
vice provider and be extremely vigilant
while riding.
4. Tires
• Make sure nothing is embedded in the tire;
check the tread for wear; gauge the tire’s
air pressure, it should be around 40psi. If
problems are present, contact your service
provider.
5. Brake Lights
• Brake lights should turn on when either
front or rear brake is used. If these lights
are unresponsive, contact your service provider and avoid riding at night.
6. Headlight and Turn Signals
• Conrm all headlight settings and turn sig-
nals are functional. If they are not, contact
your service provider and avoid riding at
night.
7. Battery Power Gauge
• Conrm that the bike has sucient battery
power to get you to your destination.
Pre-ride spot check
General Information
Page 13
13
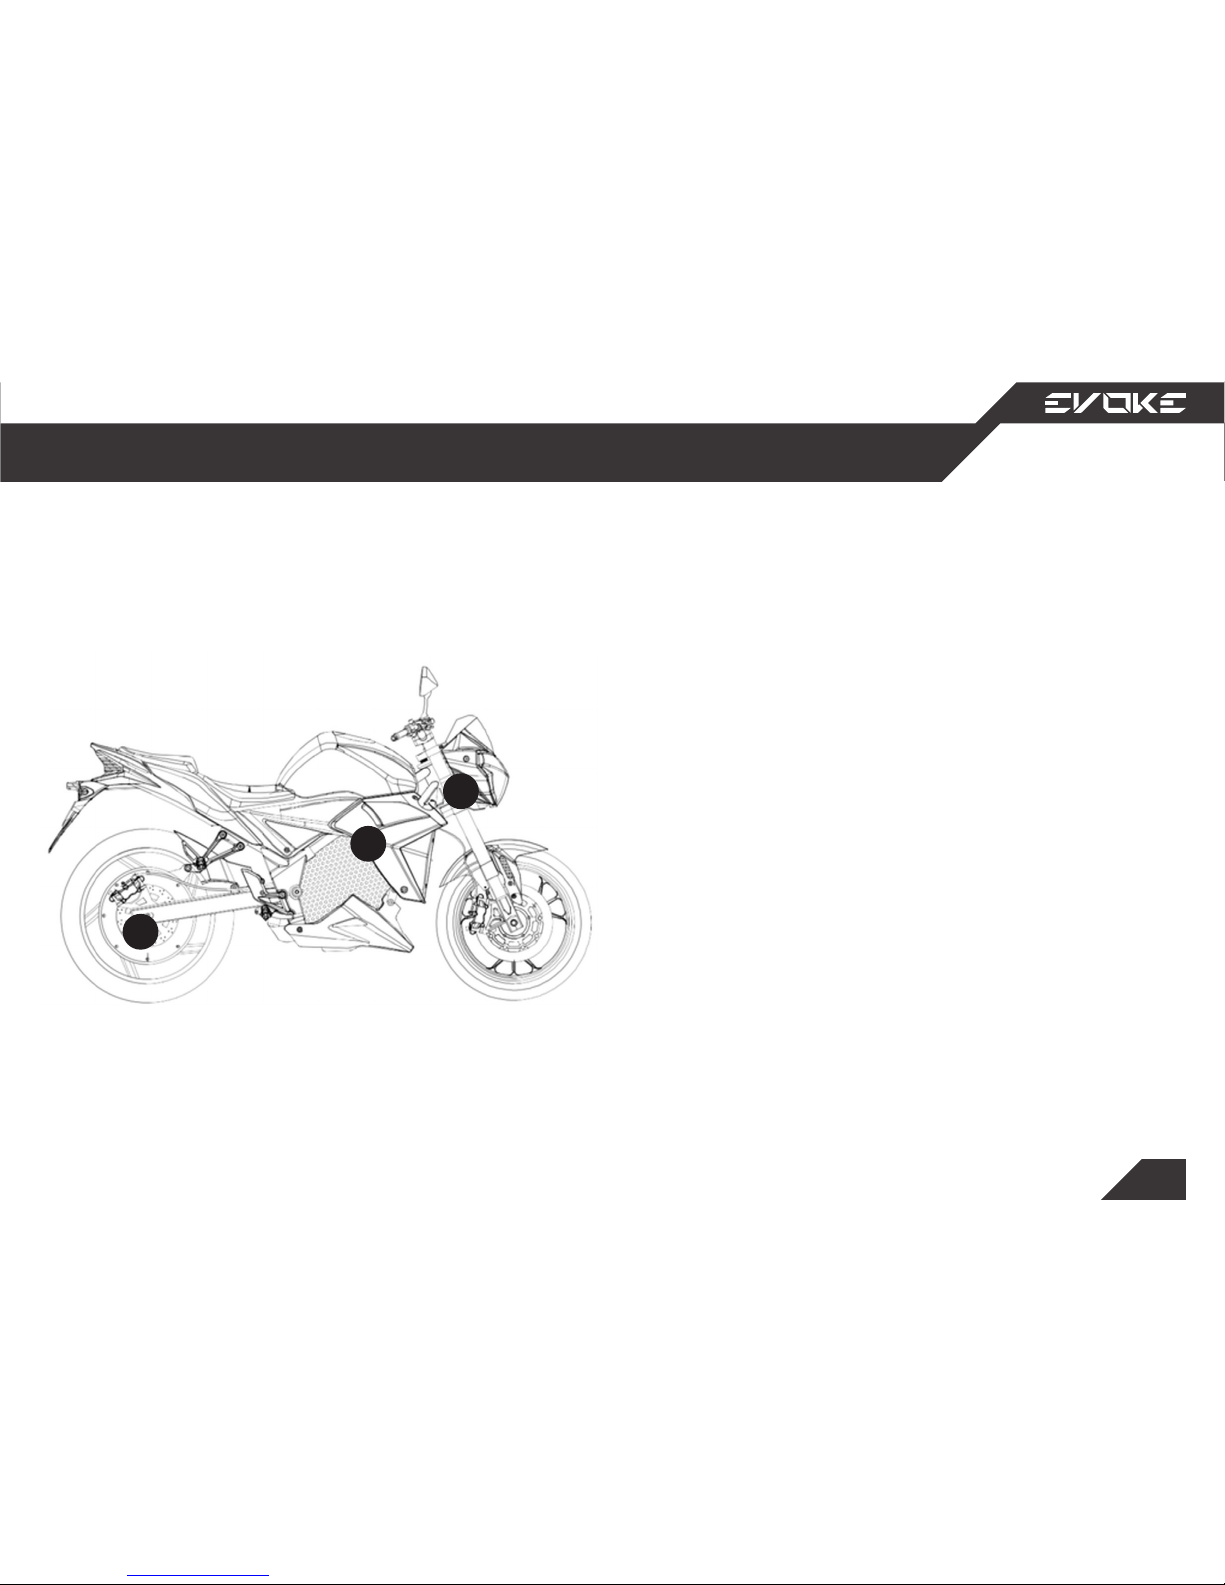
Your bike comes with three separate VIN numbers:
1. On the Motor
2. Carved into the Steering Neck
3. Mounted to the Frame
Be sure to document both and keep the num-
bers somewhere safe. In the unfortunate event
that your bike is stolen, the authorities will need
both VIN numbers to help return your bike.
Identification data
General Information
1
2
3
Page 14
14
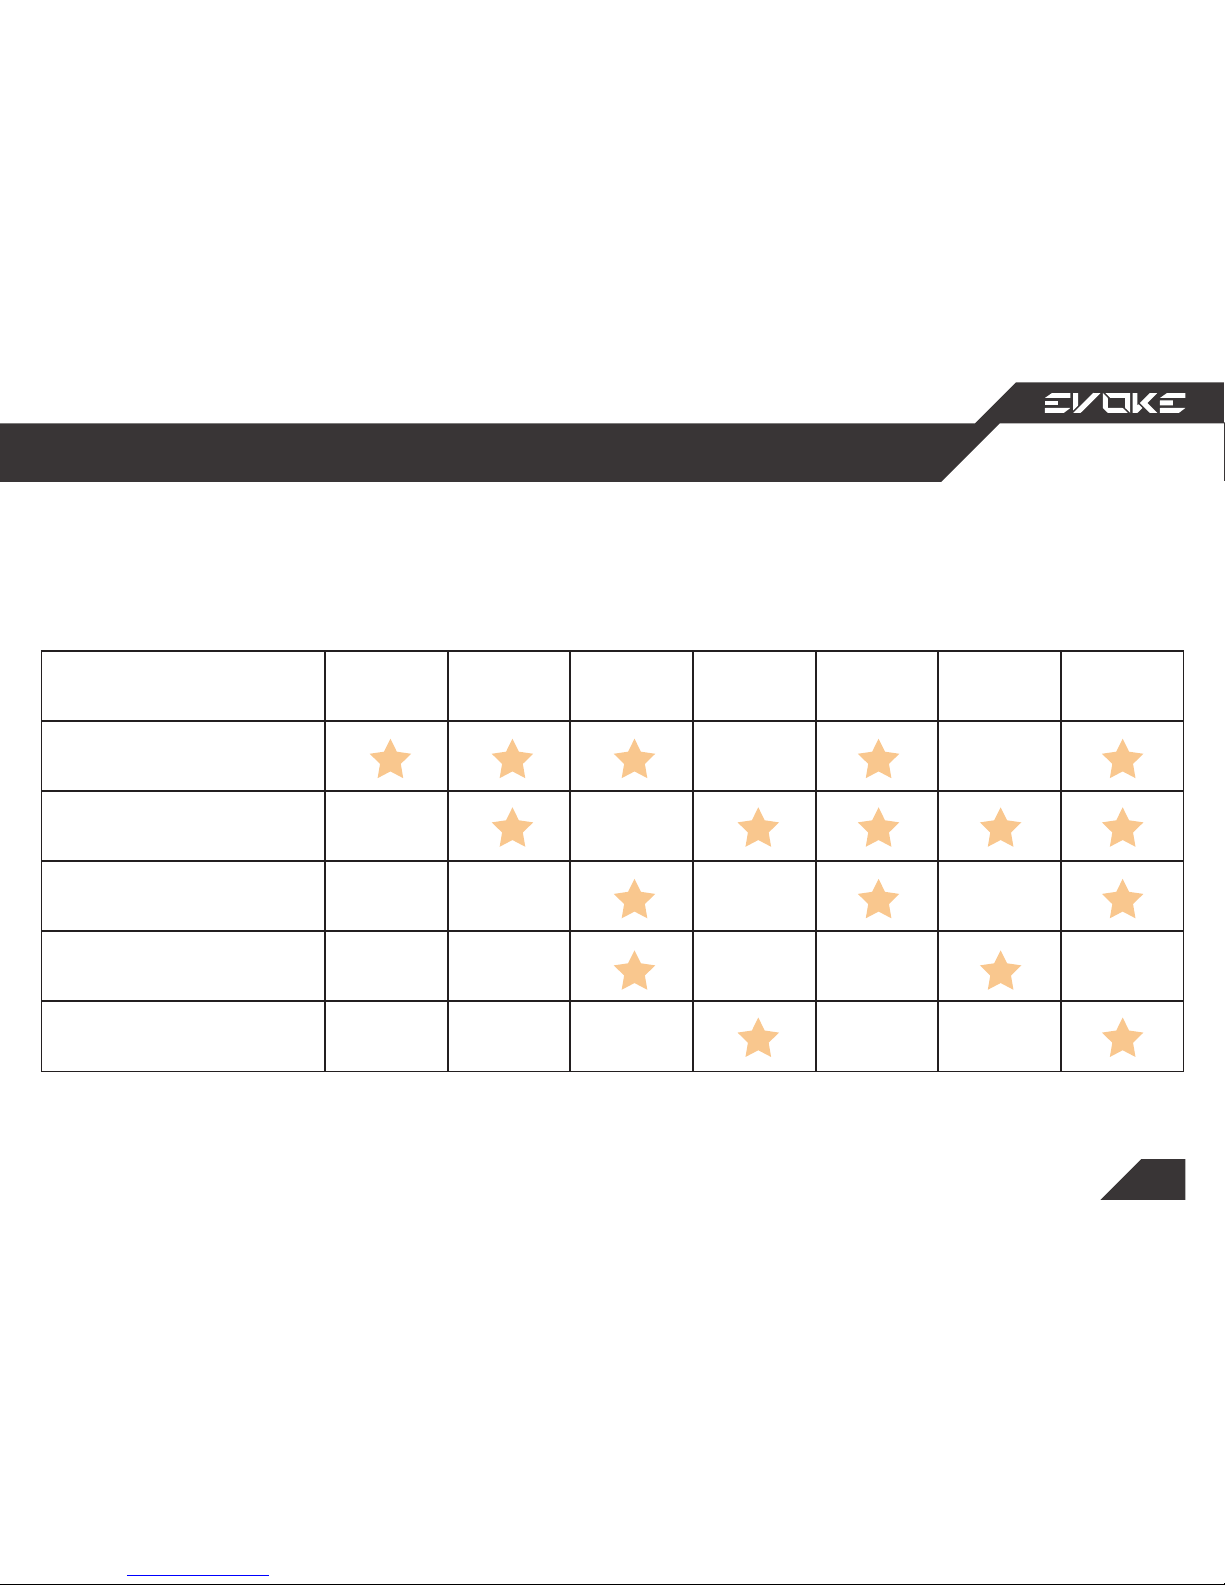
The following maintenance schedule is recommended for your Urban S.
Maintenance schedule
General Information
10 000
Km
20 000 Km40 000 Km60 000 Km80 000 Km100 000 Km120 000
Km
Battery Check Up
Tire Replacement
Brake Check Up
Motor Inspection
Controller Inspection
Page 15

15
1. Throttle Cable
1.1 Disassemble Right Side Switch Box on the handlebar
1.2 Remove Throttle Cable from the handle
1.3 Inject a 2 second burst of Lightweight lubricant down the throttle cable tube
2. Axles: Front and Rear
2.1 Inject a 1 second burst of Lightweight lubricant on the left and right side of the front axle
2.2 Inject a 1 second burst of Lightweight lubricant on the left and right side of the rear axle
3. Kickstand
3.1 Inject a 1 second burst of Lightweight lubricant on the upper bolt of the kickstand, securing
the kickstand to the frame
4. Brake Levers
4.1 Inject a 1 second burst of Lightweight lubricant on the brake lever bolts, both the left and
the right side
4.2 Squeeze the levers several time to circulate the lubricant
Required Tools: Lightweight lubricant (WD-40); Philips head screwdriver
Maintenance you can do yourself
User-serviceable Components
Page 16

16
Vehicle Specifications
Top Speed 130 km/h (81 mph)
Acceleration (0-100 6.0 seconds
Max power 19 kW
Max torque 86 lb-ft
Motor type Hub motor
Controller 400A DC wave controller with
regenerative braking
City* 200 km (125 miles)
Highway, 80 km/h (50 mph)* 125 km (75 miles)
Battery type 103.6v, 72ah Lithium Iron Evoke
PowerPack
Rated nominal capacity 7.8 kWh
Chassis, Brakes & Suspension 4 hours 220v (8 hours 110v)
Front brakes Dual disc, 4 piston hydraulic
300x4 mm
Rear brakes Single disc, 2 piston hydraulic
220x4 mm
Front suspension 42mm inverted fork, dual shock
Rear suspension Single shock rear
Front Wheel 3.00x17 cast aluminum
Rear Wheel 3.00x17 built-in hub motor w/
cast aluminum wheel
Front Tire 110/70-17
Rear tire 140/70-17
Pressure 280 kPa/40PSI
Storage, Weights & Dimensions
Curb weight 185 kg
Carrying capacity 150 kg
Wheelbase 1360 mm (54.4 inches)
Length 2030 mm (81.2 inches)
Width (excl. mirrors) 710 mm (28.4 inches)
Seat height 780 mm (31.2 inches)
Ground clearance 130 mm (5.2 inches)
Page 17
17
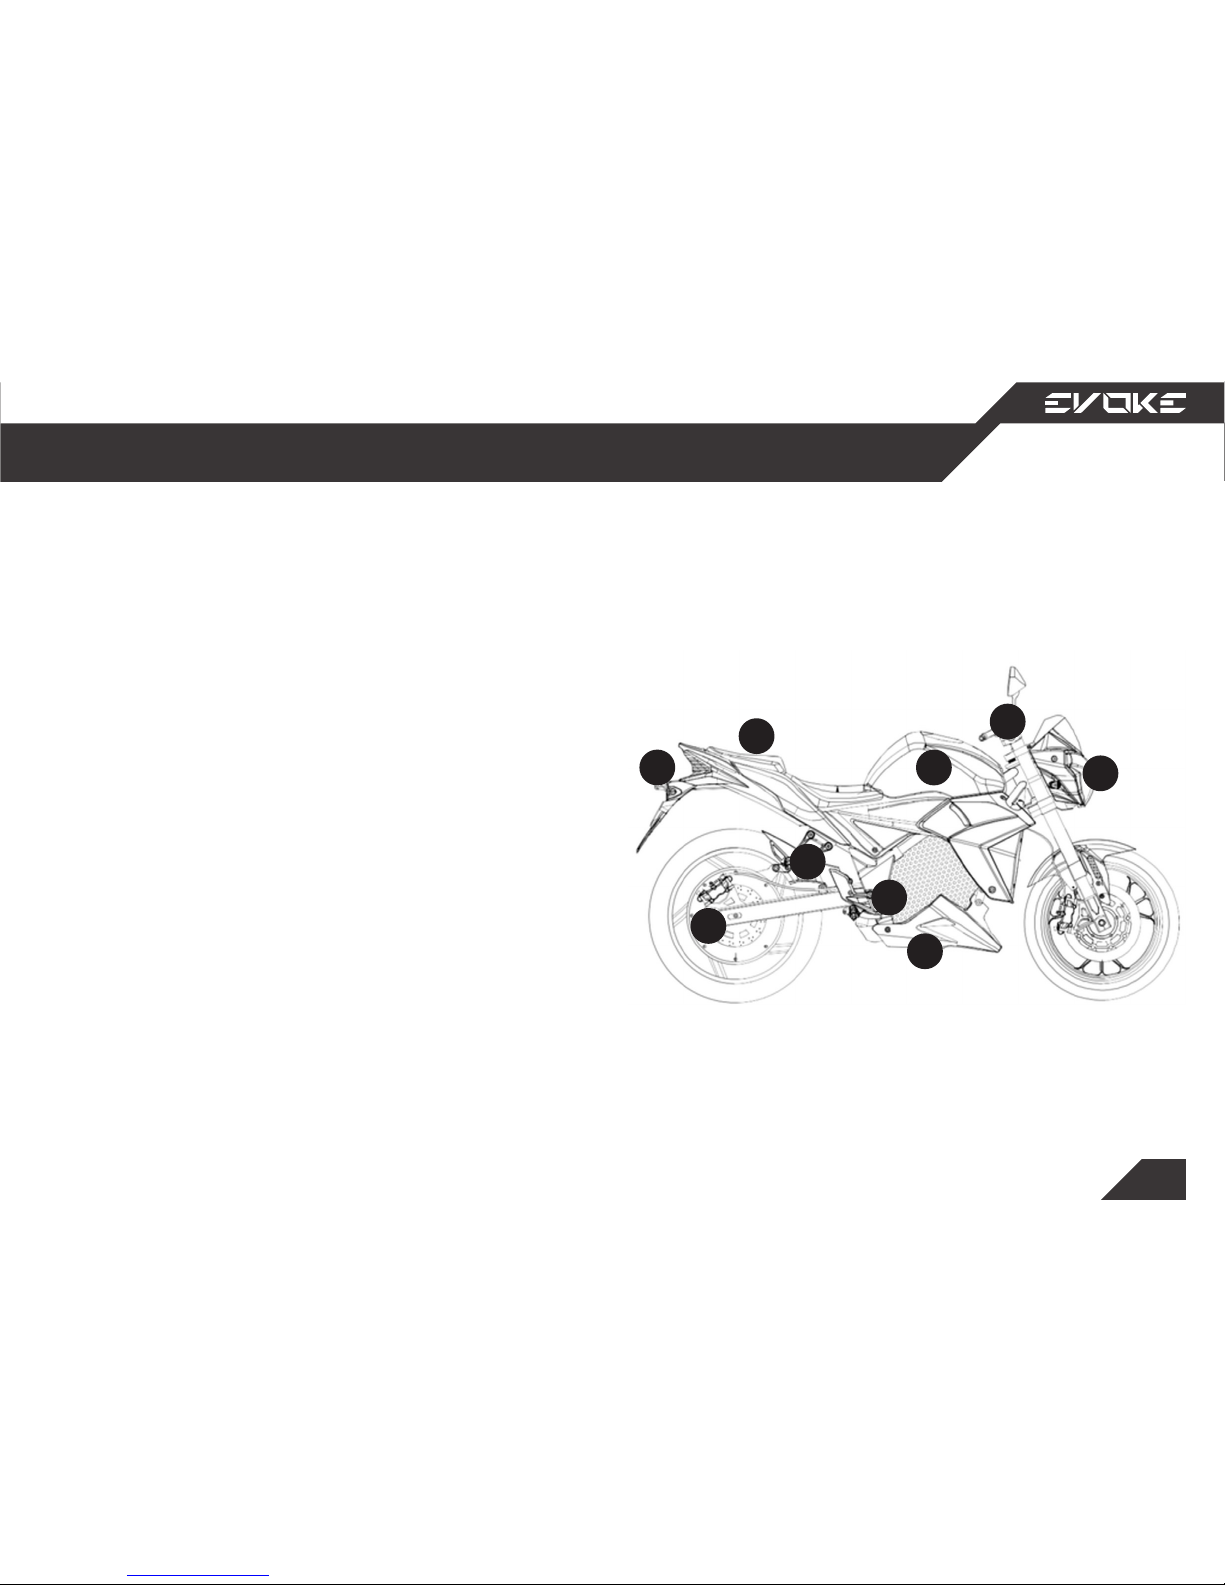
1. Handlebars
2. Headlight
3. Tank
4. Kickstand
5. Passenger seat
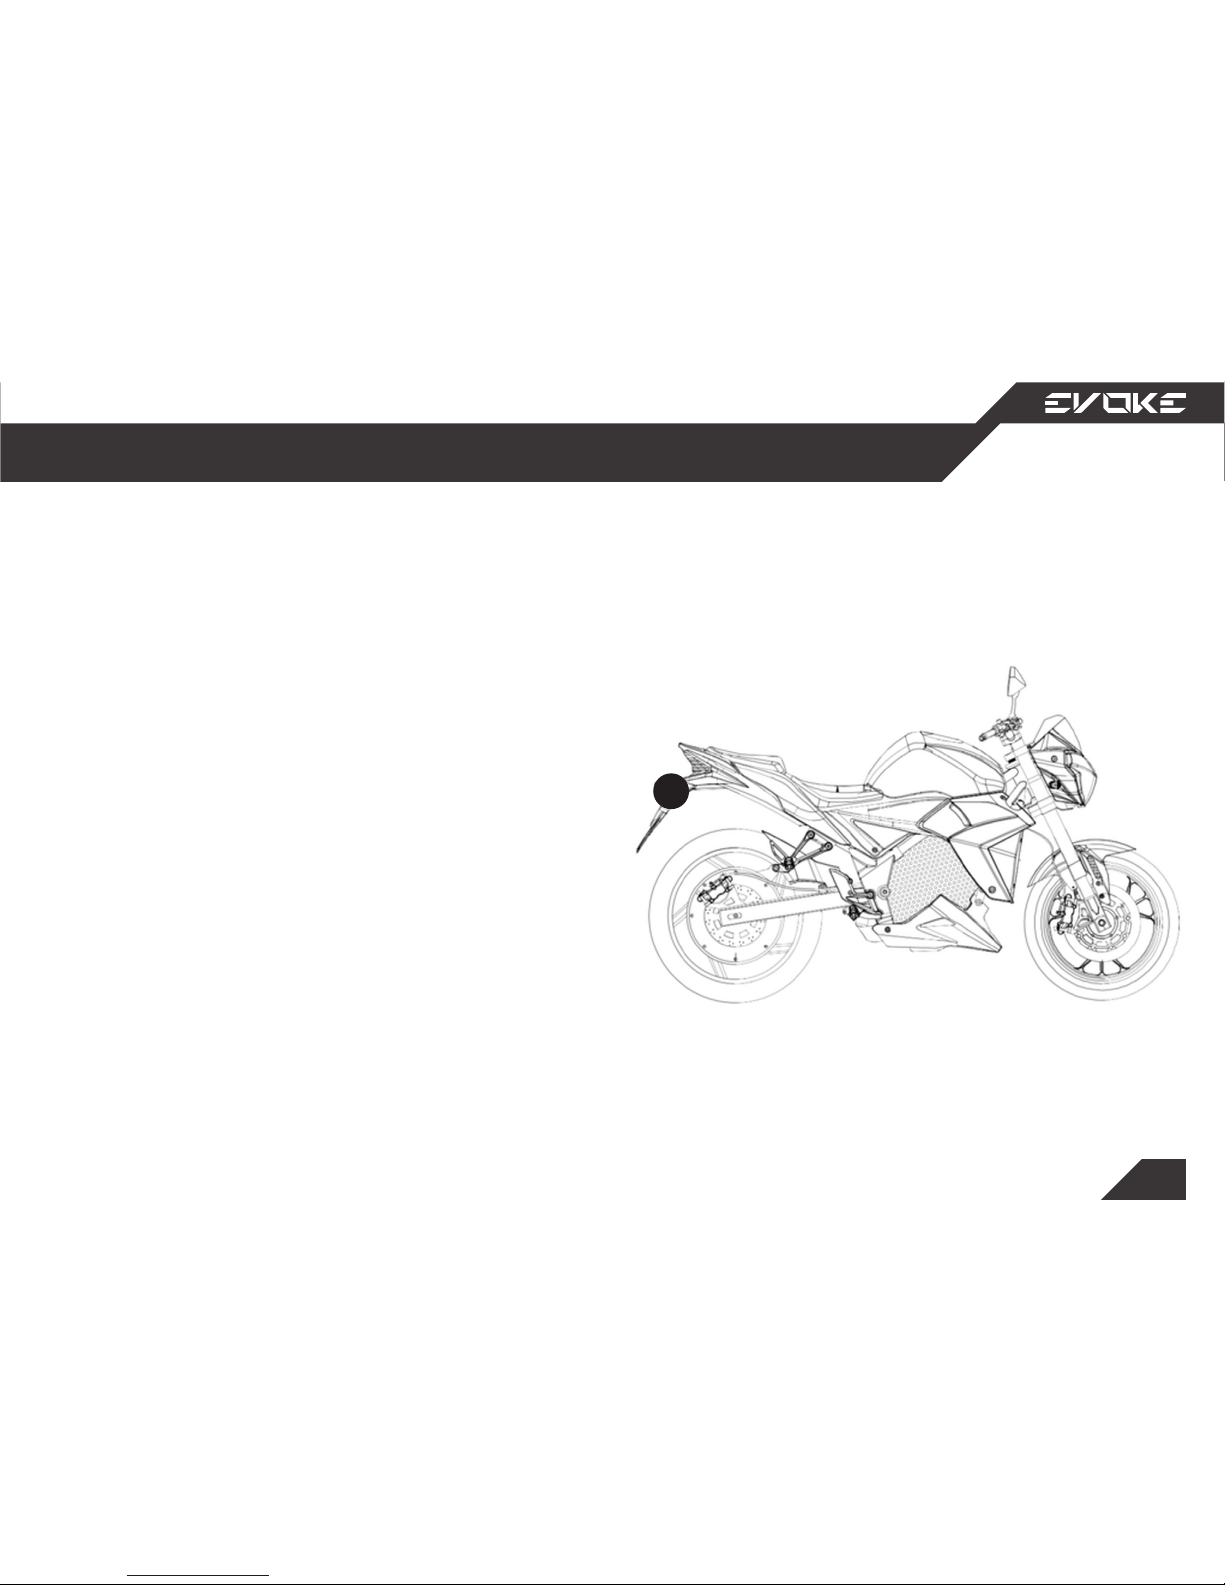
6. Charging port
7. Passenger foot pegs
8. Driver foot pegs
9. Motor
Side Profile with Labels
Controls and Instruments
2
1
3
4
5
6
7
8
9
Page 18
18
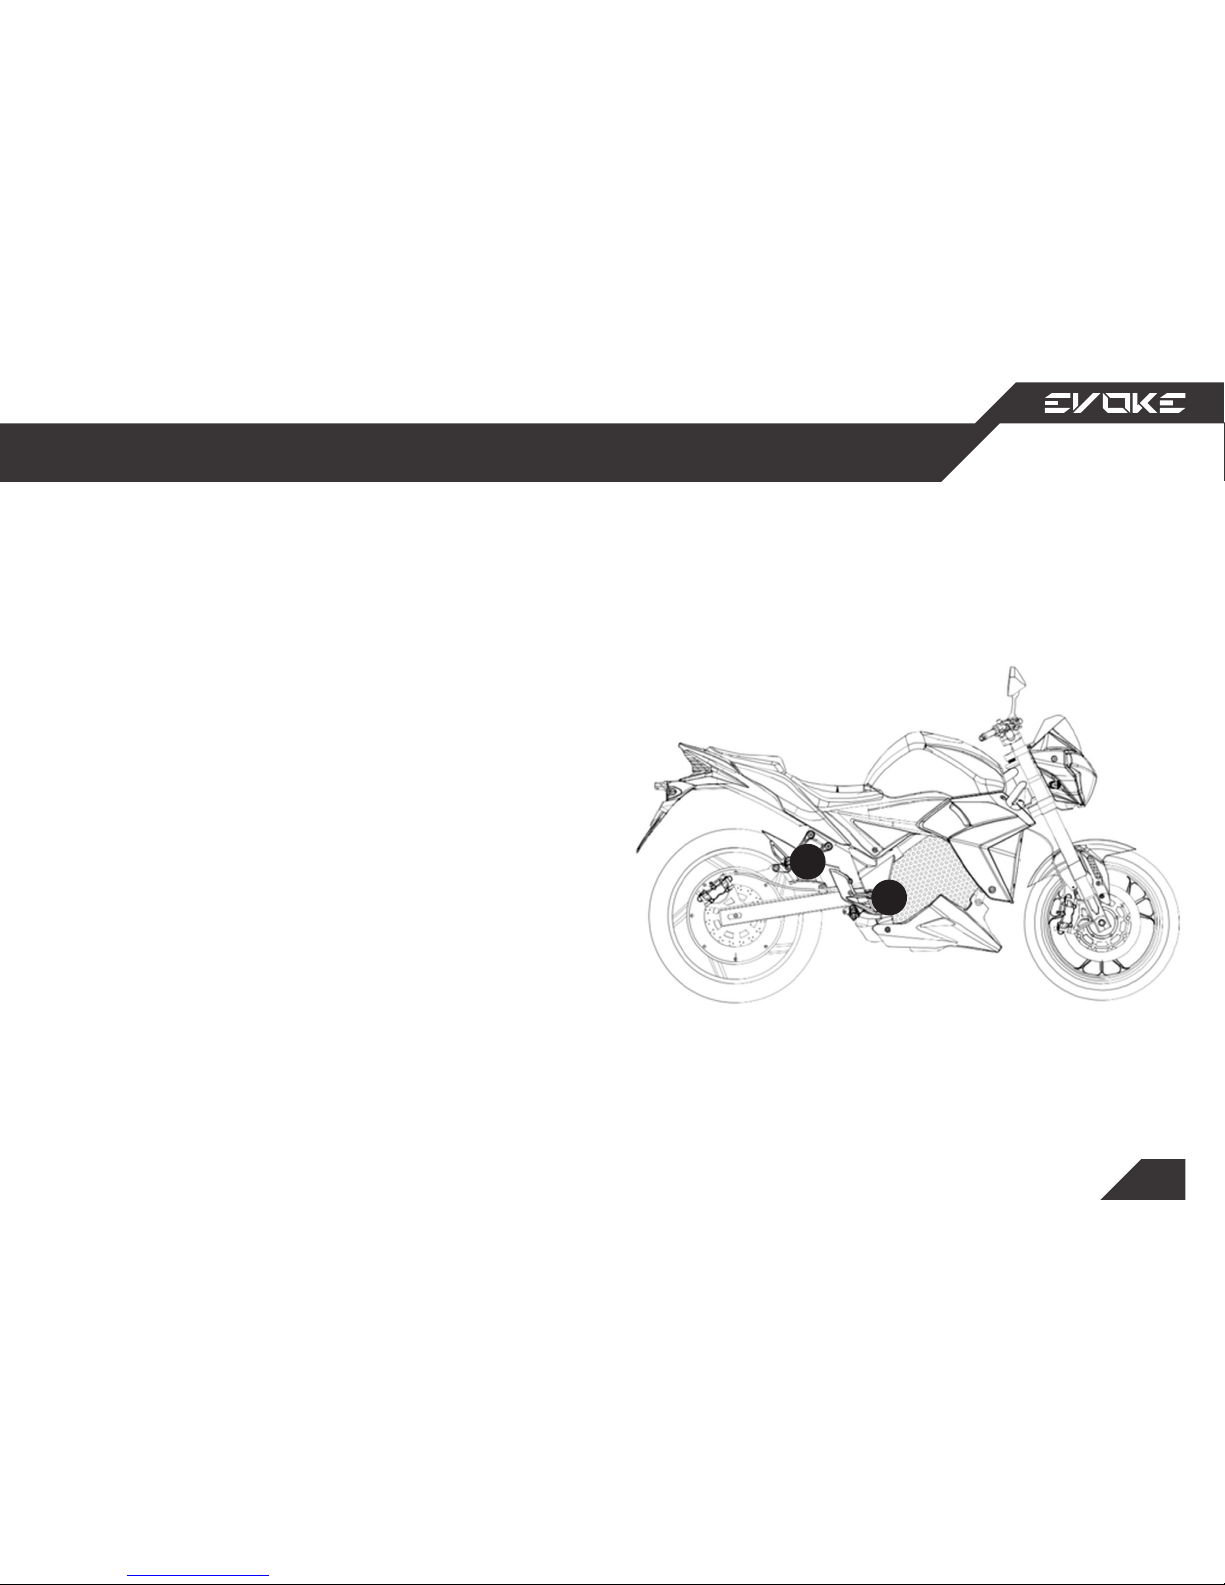
All Evoke Urban S bike are equipped with two
pairs of foot pegs.
The driver’s foot pegs (1) are spring-loaded and
are automatically deployed.
Passenger foot pegs (2) are usually folded in
upright/vertical position. To deploy them, gently
pull the peg into a horizontal position.
Foot pegs
Controls and Instruments
2
1
Page 19
19
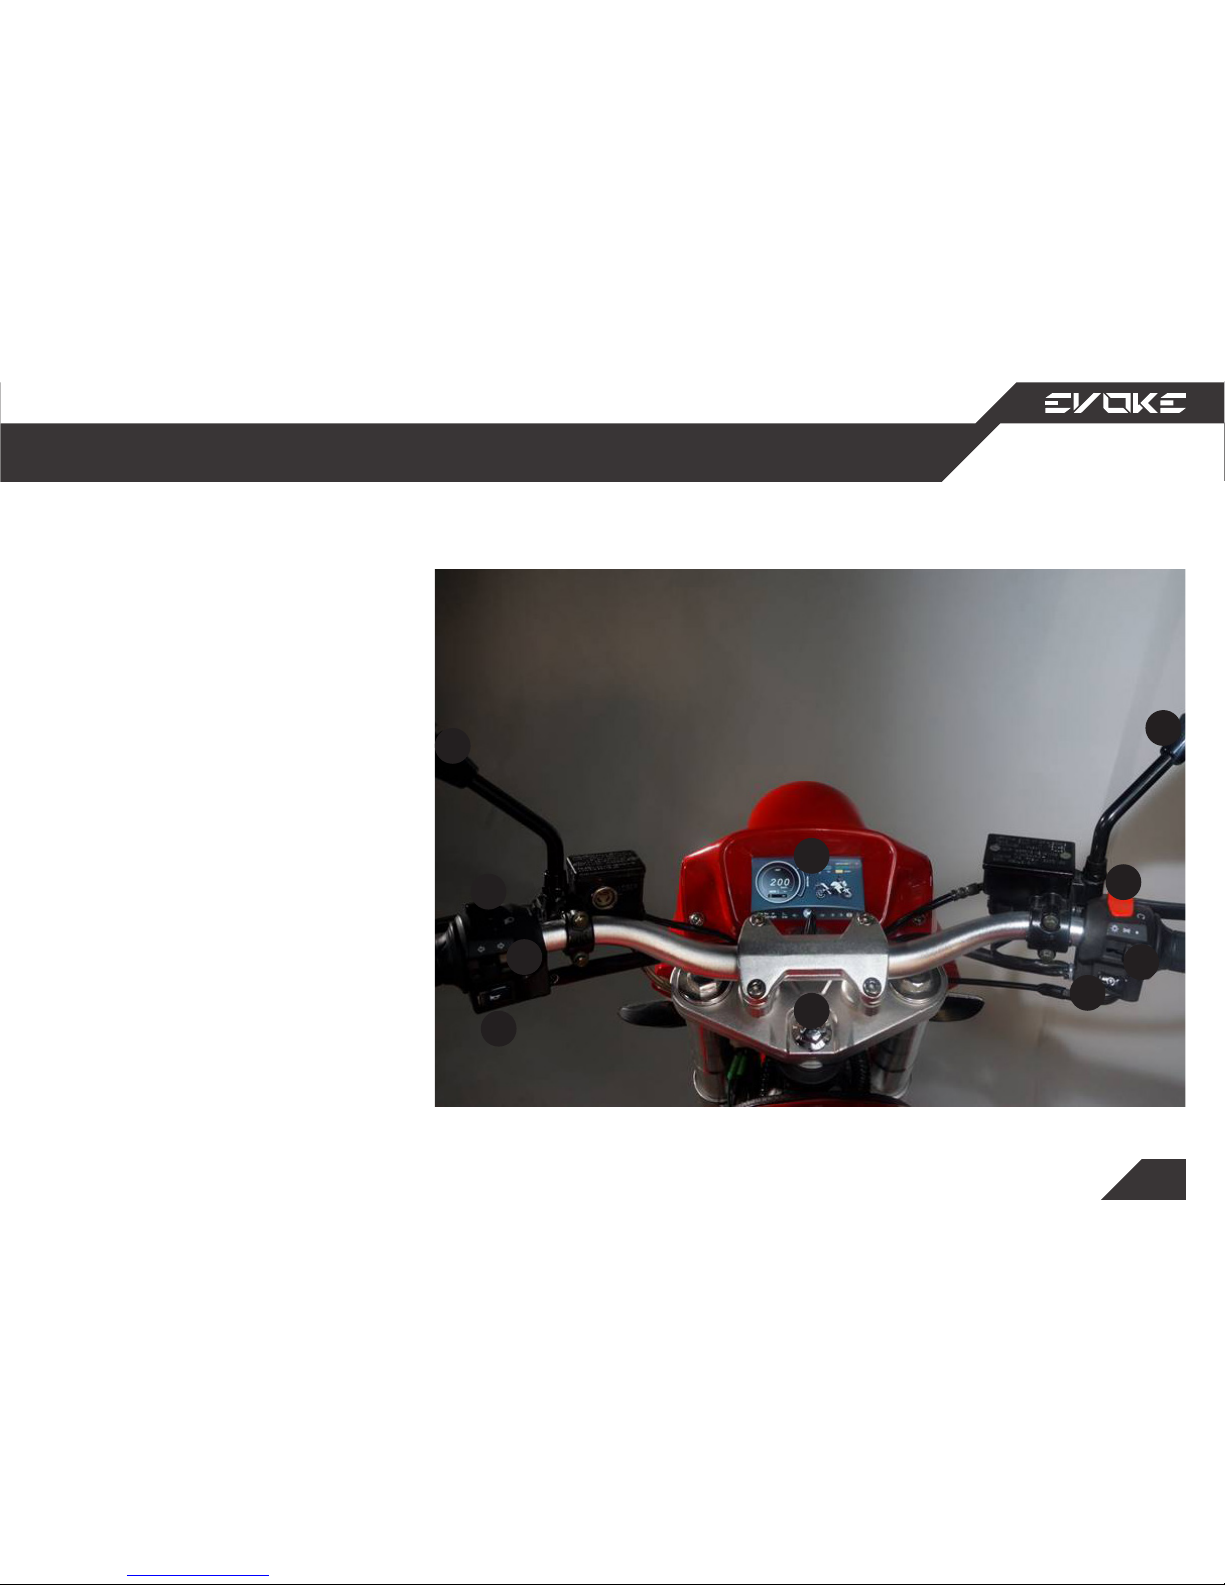
1. High beam
2. Turn signal
3. Horn
4. Left rearview mirror
5. LCD display
6. Wireless starter (optional)
7. Right rearview mirror
8. Throttle Kill Switch
9. Light settings
10. Key switch
Handlebars
Controls and Instruments
1
4
7
10
2
5
8
3
6
9
Page 20
20
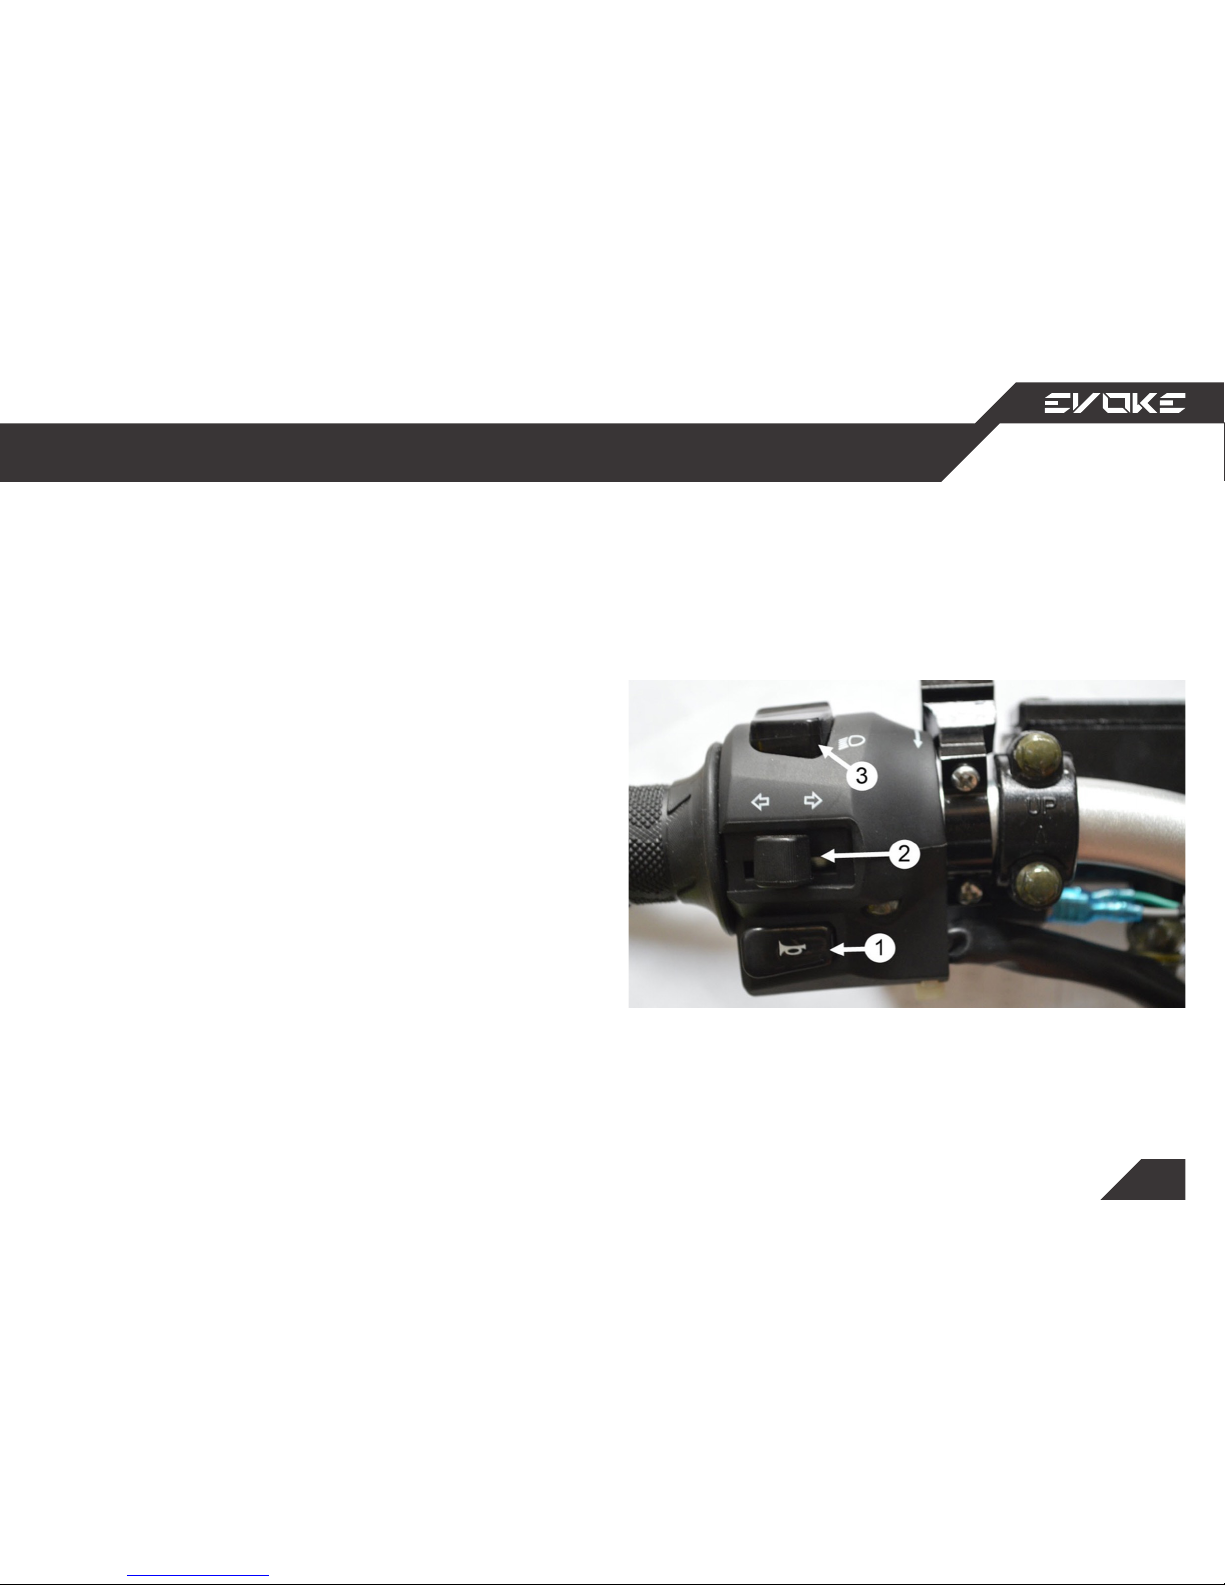
1. Horn
2. Turn signal
3. High beam
4. Left rearview mirror mount
Left Handlebar Switchbox
Controls and Instruments
Page 21
21
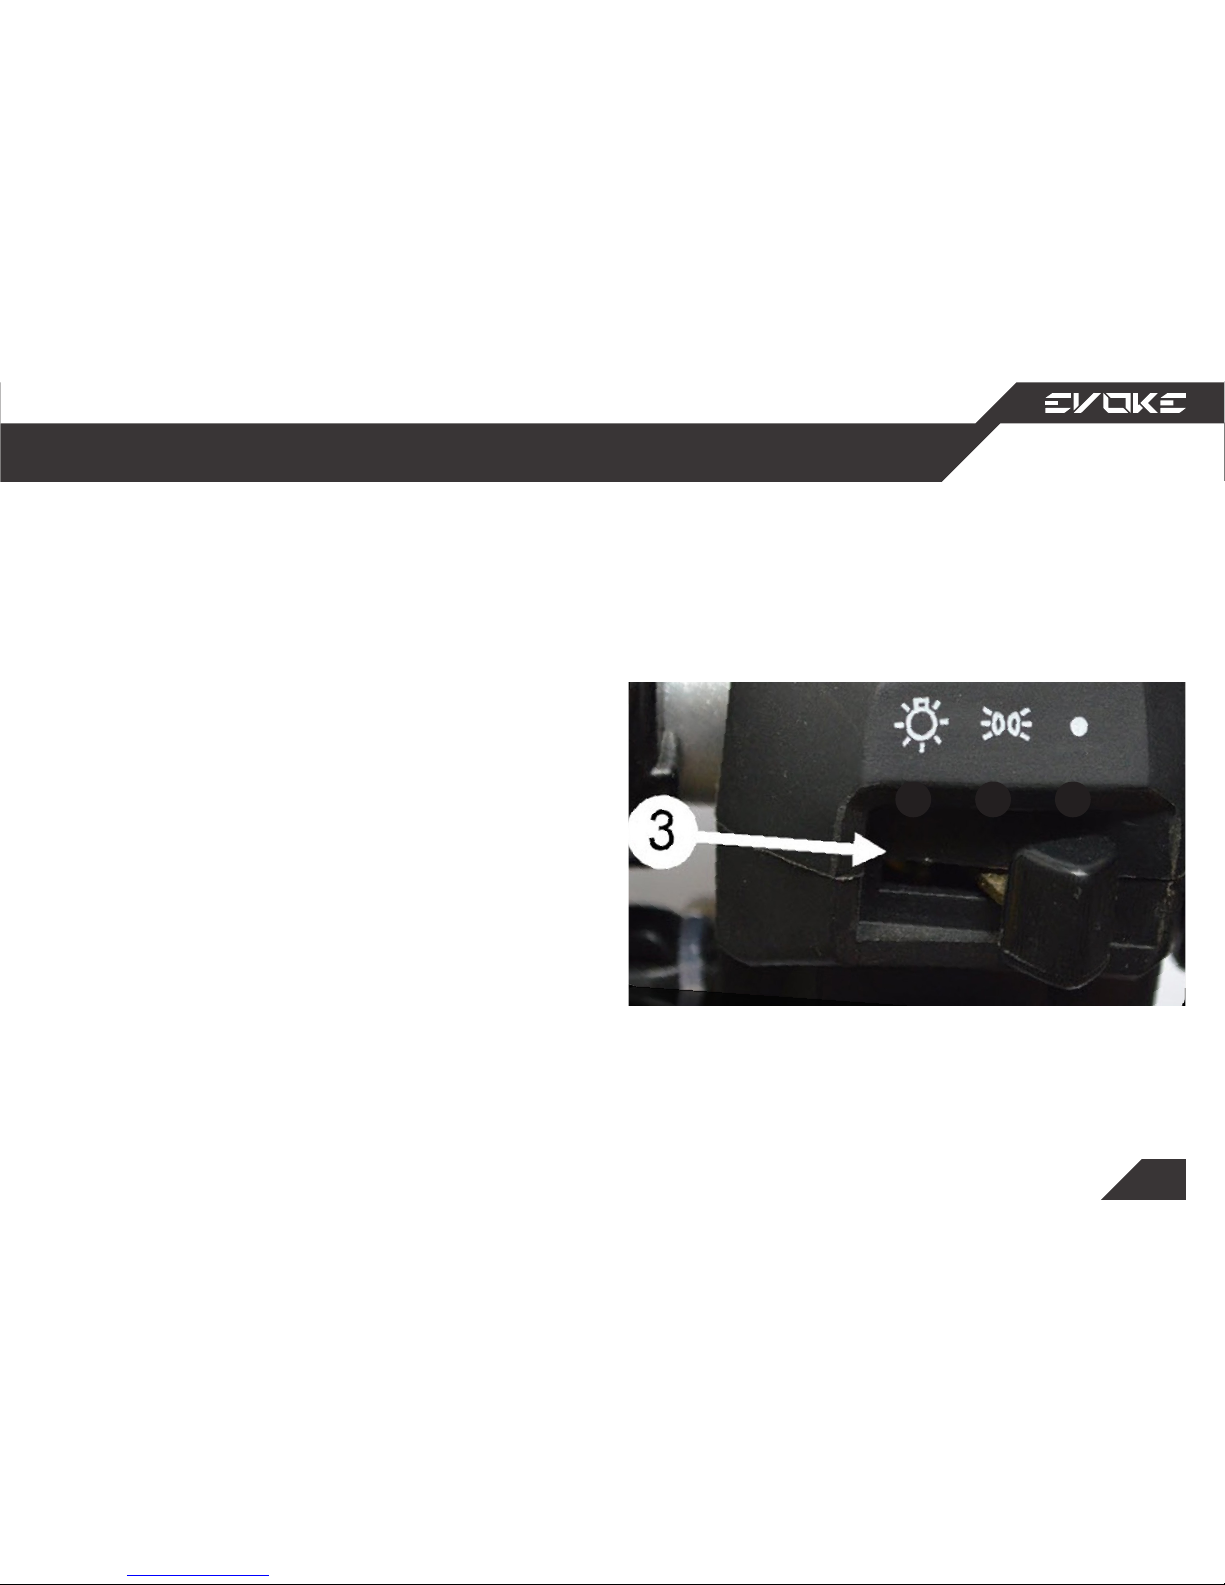
Light settings are used to make yourself more
visable when on the road, and to alert other motorists.
1. Headlights
• To alert other motorists and illuminate the
road
2. Parking Lights
• To make yourself more visible while
parked
3. O
*Vehicles equiped with DRL will automatically turn
the headlight on when the vehicle is active.
Light settings
Controls and Instruments
1 2 3
Page 22
22
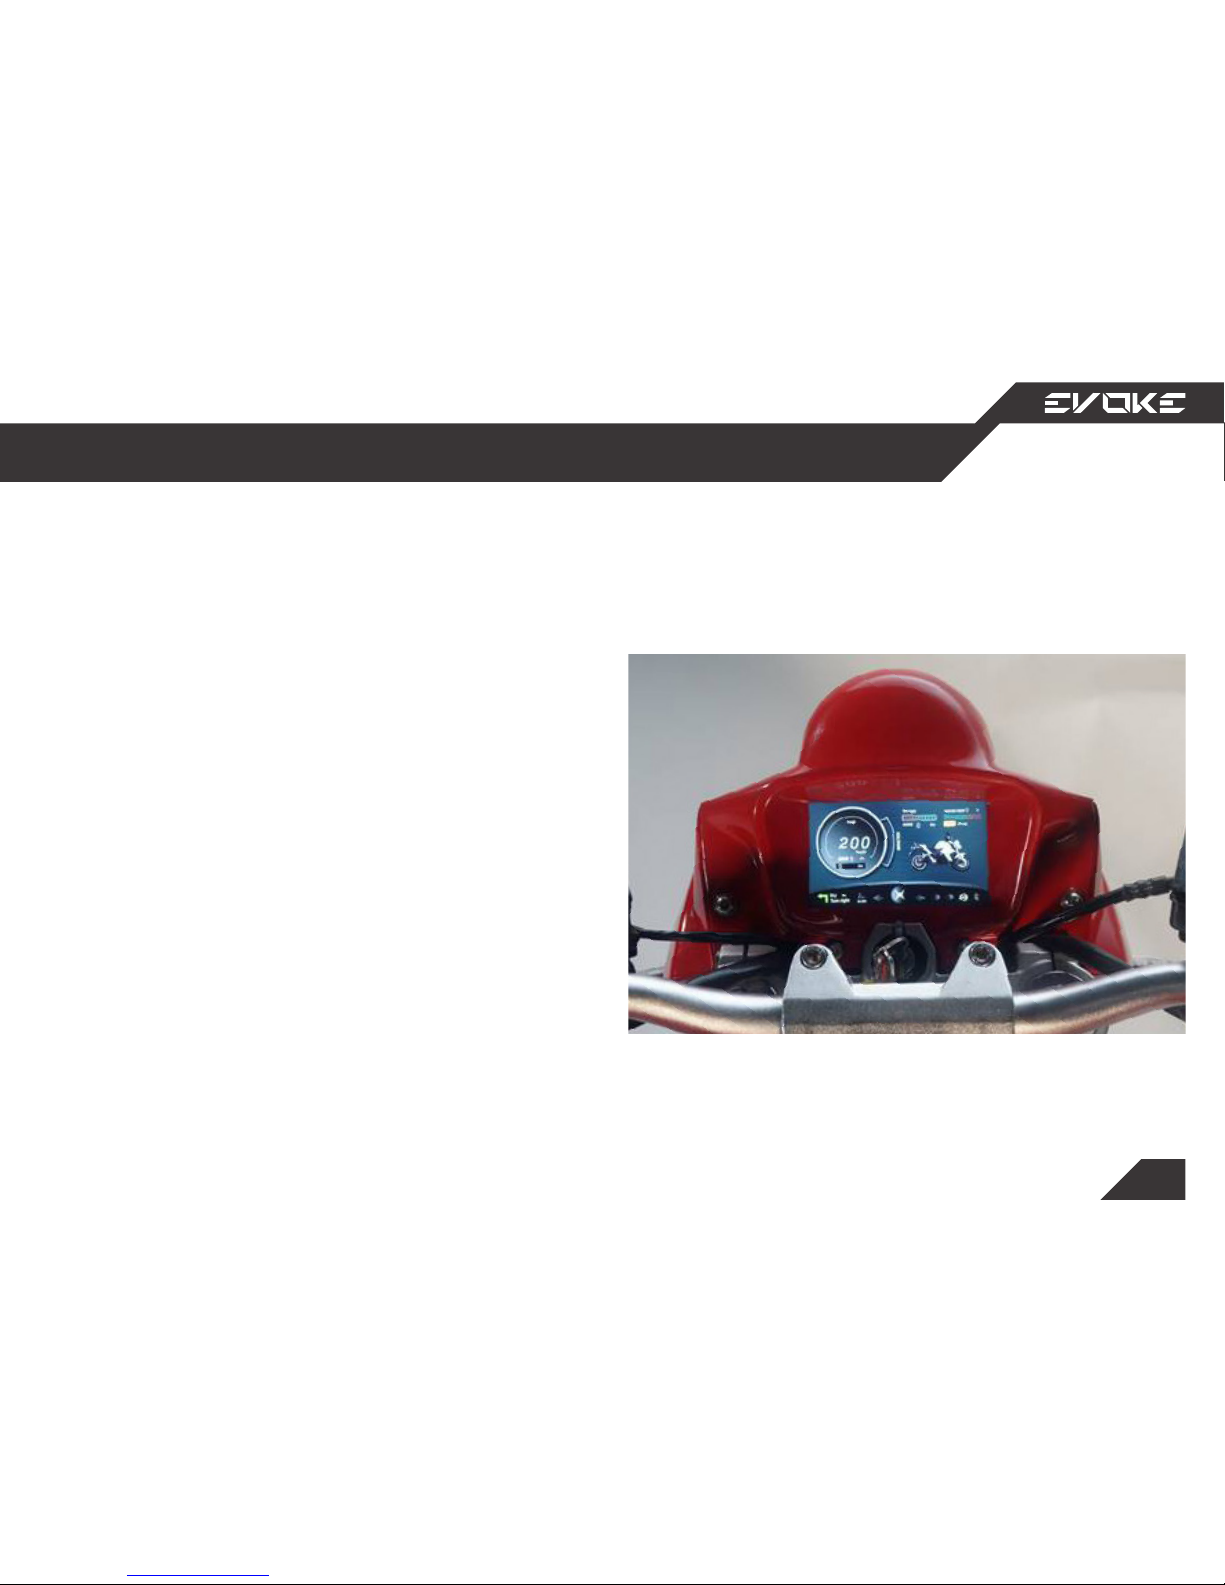
The ignition switch is used to select the operational mode of the bike, either ON or PARK
mode, and to lock the steering for theft prevention.
Ignition Switch
Controls and Instruments
Page 23
23
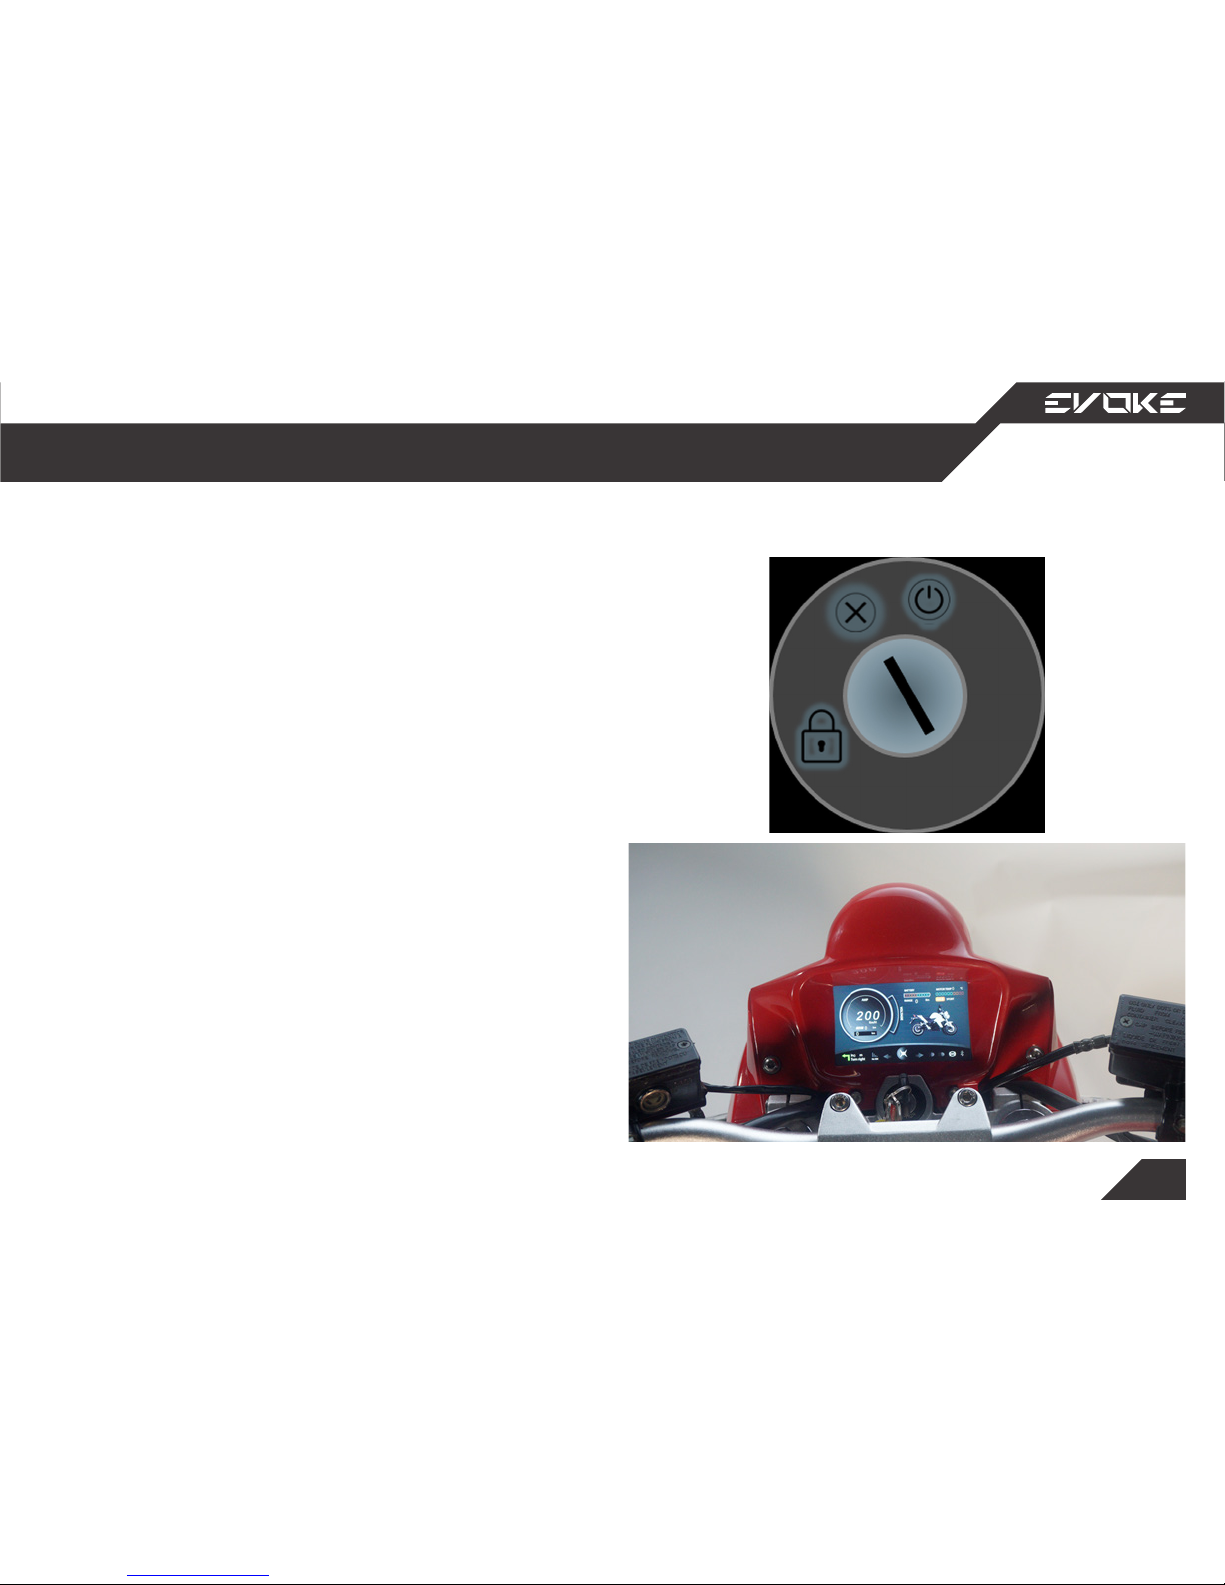
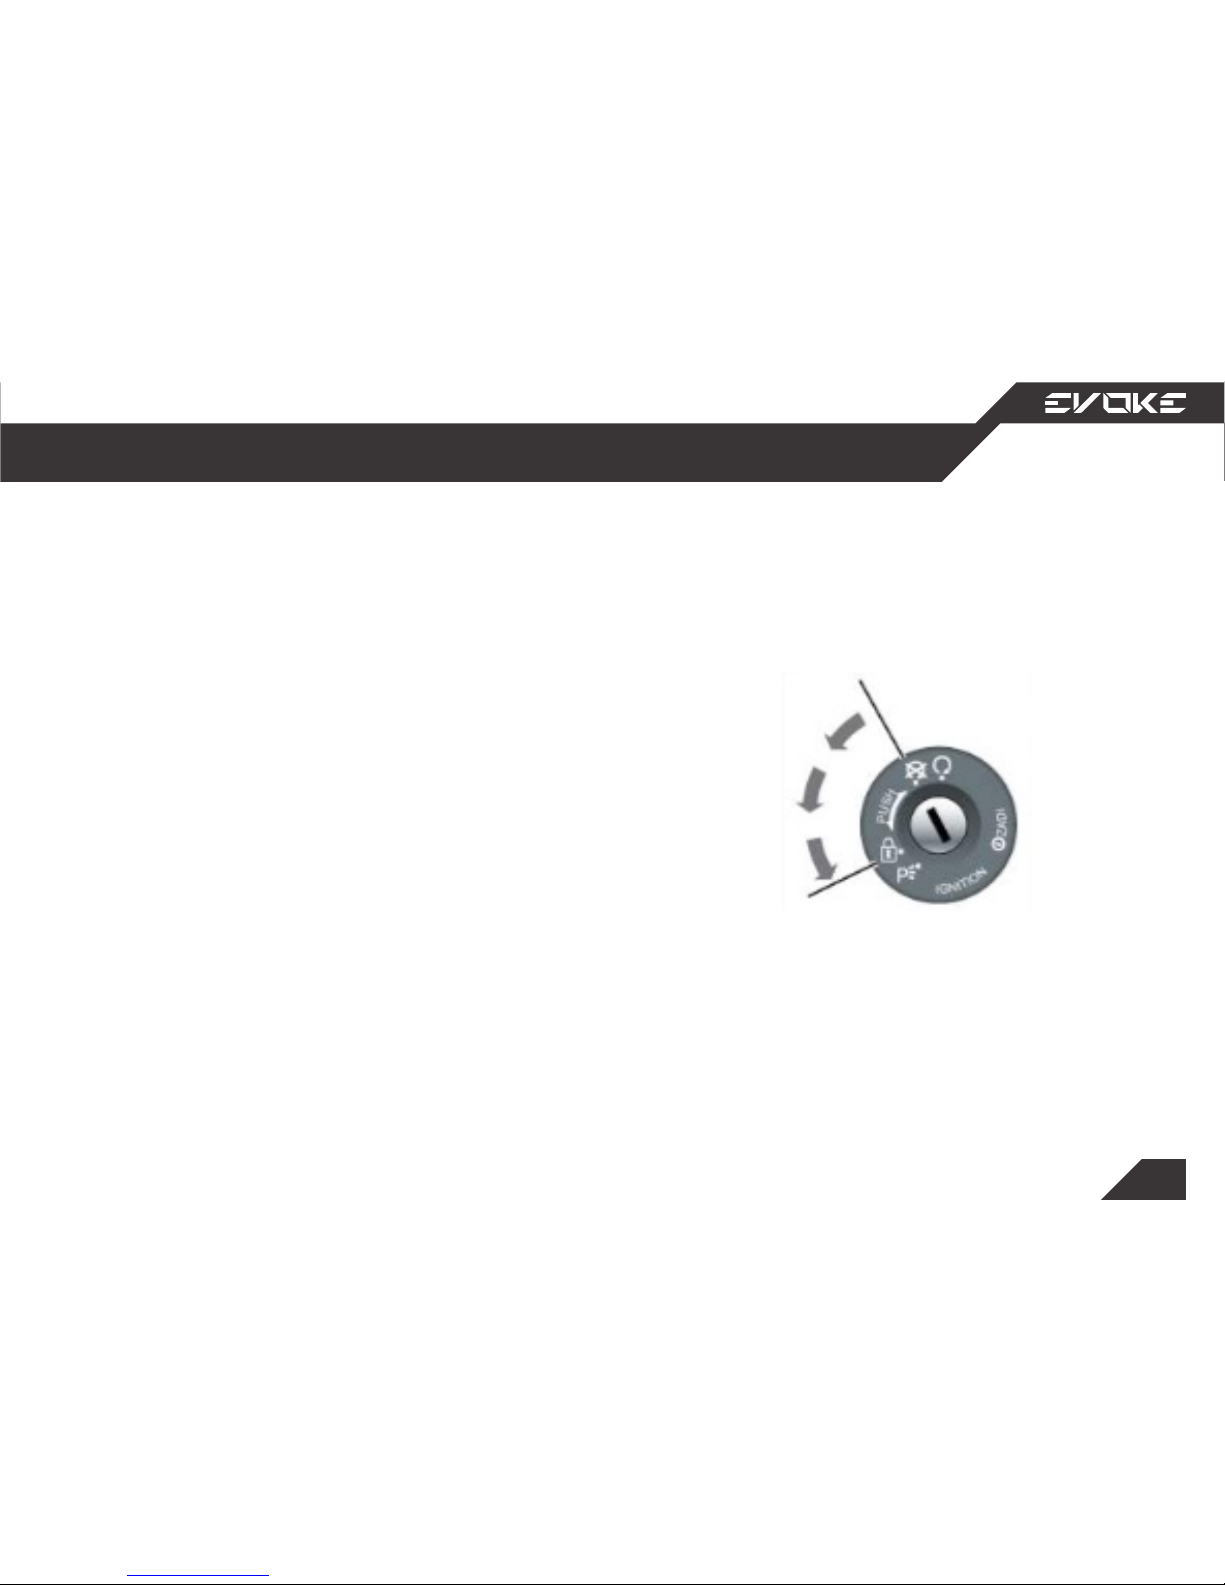
1. O
• No electrical circuits function.
2. On
• Insert the key and turn clockwise to the
On position. The Urban S powers up. Drive
mode can be engaged.
3. Lock
• Turn the handlebar all the way to the left,
push down on the key, and turn counter-clockwise to the Lock (steering lock)
position to lock the steering head. No electrical circuits function.
Key switch
Controls and Instruments
Page 24
24
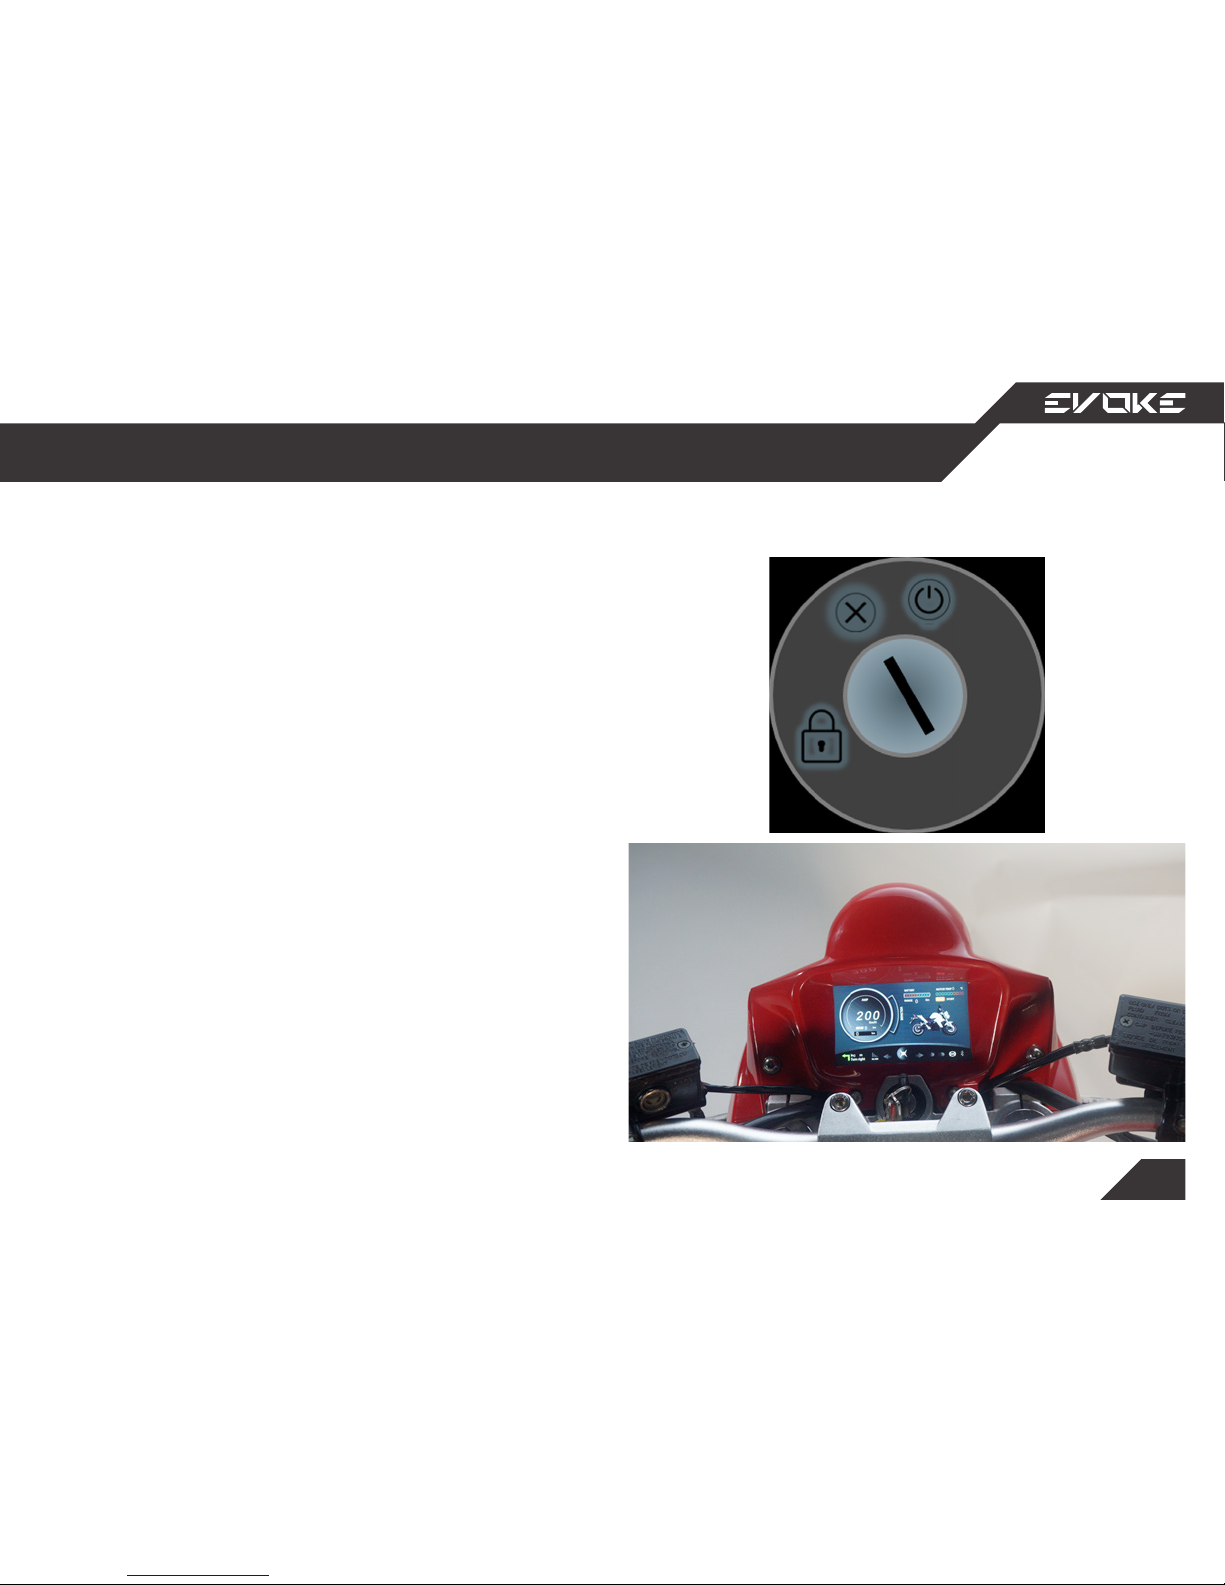
DISABLING THE DRIVE SYSTEM
Set the Start/O switch to the O position. This
will switch o the drive system.
Set the Start/O switch to the O position to
disengage the drive system.
Turn the ignition key counterclockwise to the
O position. The Urban S will now power o.
Controls and Instruments
Key switch
Page 25
25
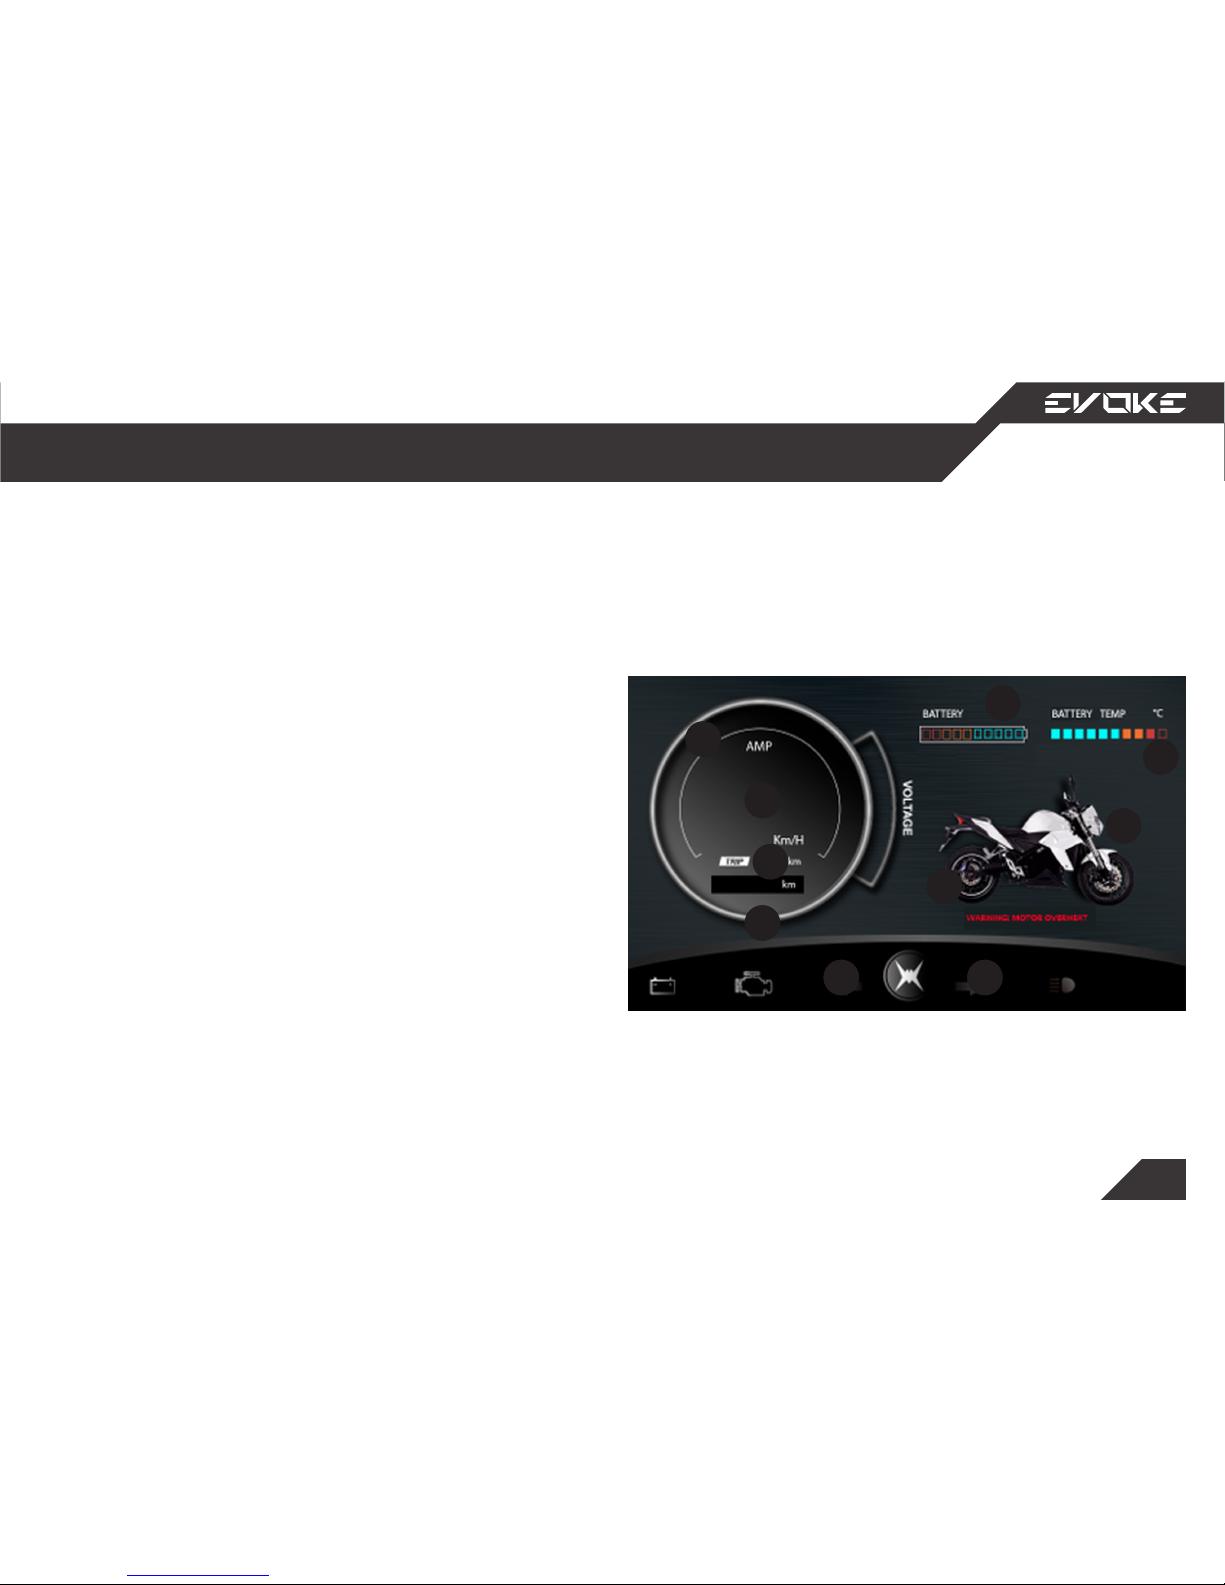
1. Speed Meter
2. Motor Temperature
3. Current meter
4. Trip Distance Meter
5. Voltage Meter
6. Odometer
7. Battery Gauge
8. Error Notication
9. ODB Error
10. Turn Signals
LCD display
Controls and Instruments
4
1
7
10
2
5
8
3
6
9
Page 26
26
To engage the drive system, insert the key that
came with your bike into the key switch, located in the front-center of your handlebars. Turn
clock-wise to the ON position.
*Ensure the Throttle Kill Switch is in the ON postion
and the Kickstand is in the full upright position.
In the ON position, the motor is able to draw
power from the battery and the bike’s electron-
ics are functional.
When in the OFF position, the bike’s electronics
will be unresponsive and the motor will not be
functional.
Engage drive system
Getting Started
Page 27
27
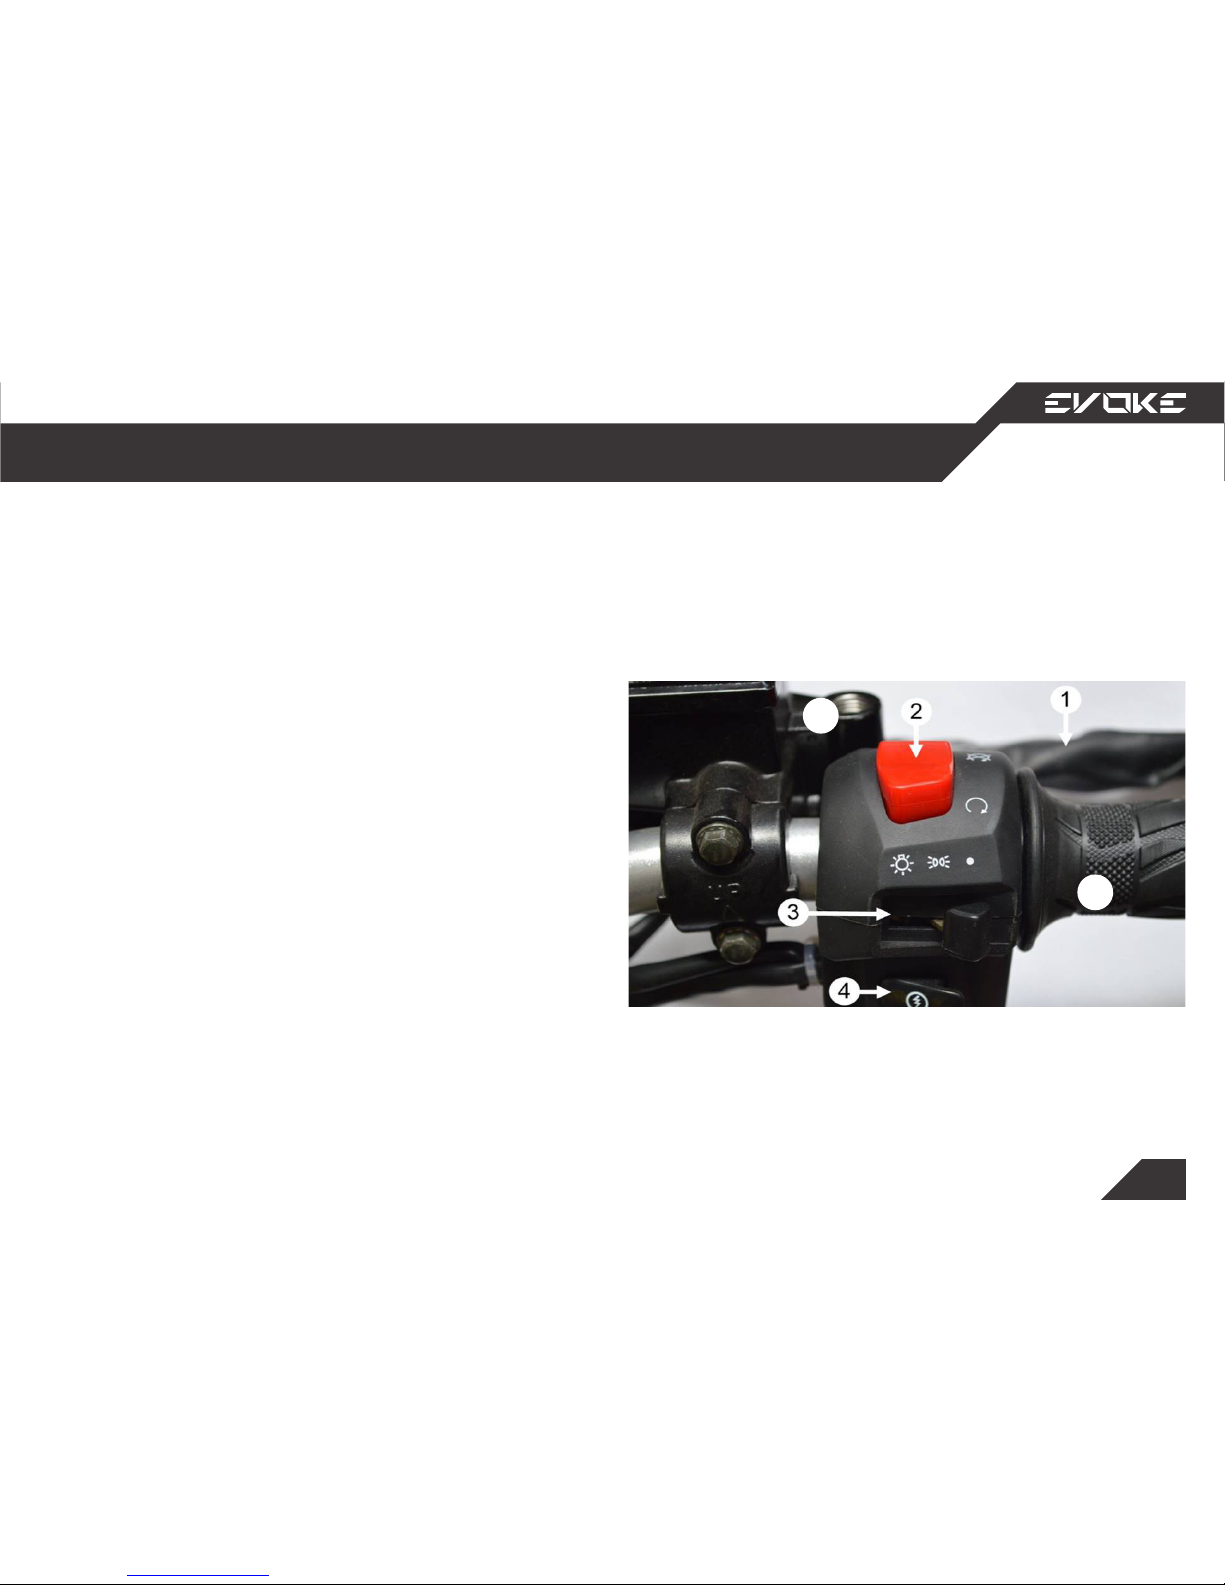
1. Right handbrake
2. Throttle Kill Switch
3. Light settings
4. Wireless starter (Optional)
5. Throttle
6. Right rearview mirror mount
Right handlebar switchbox
Controls and Instruments
5
6
Page 28
28
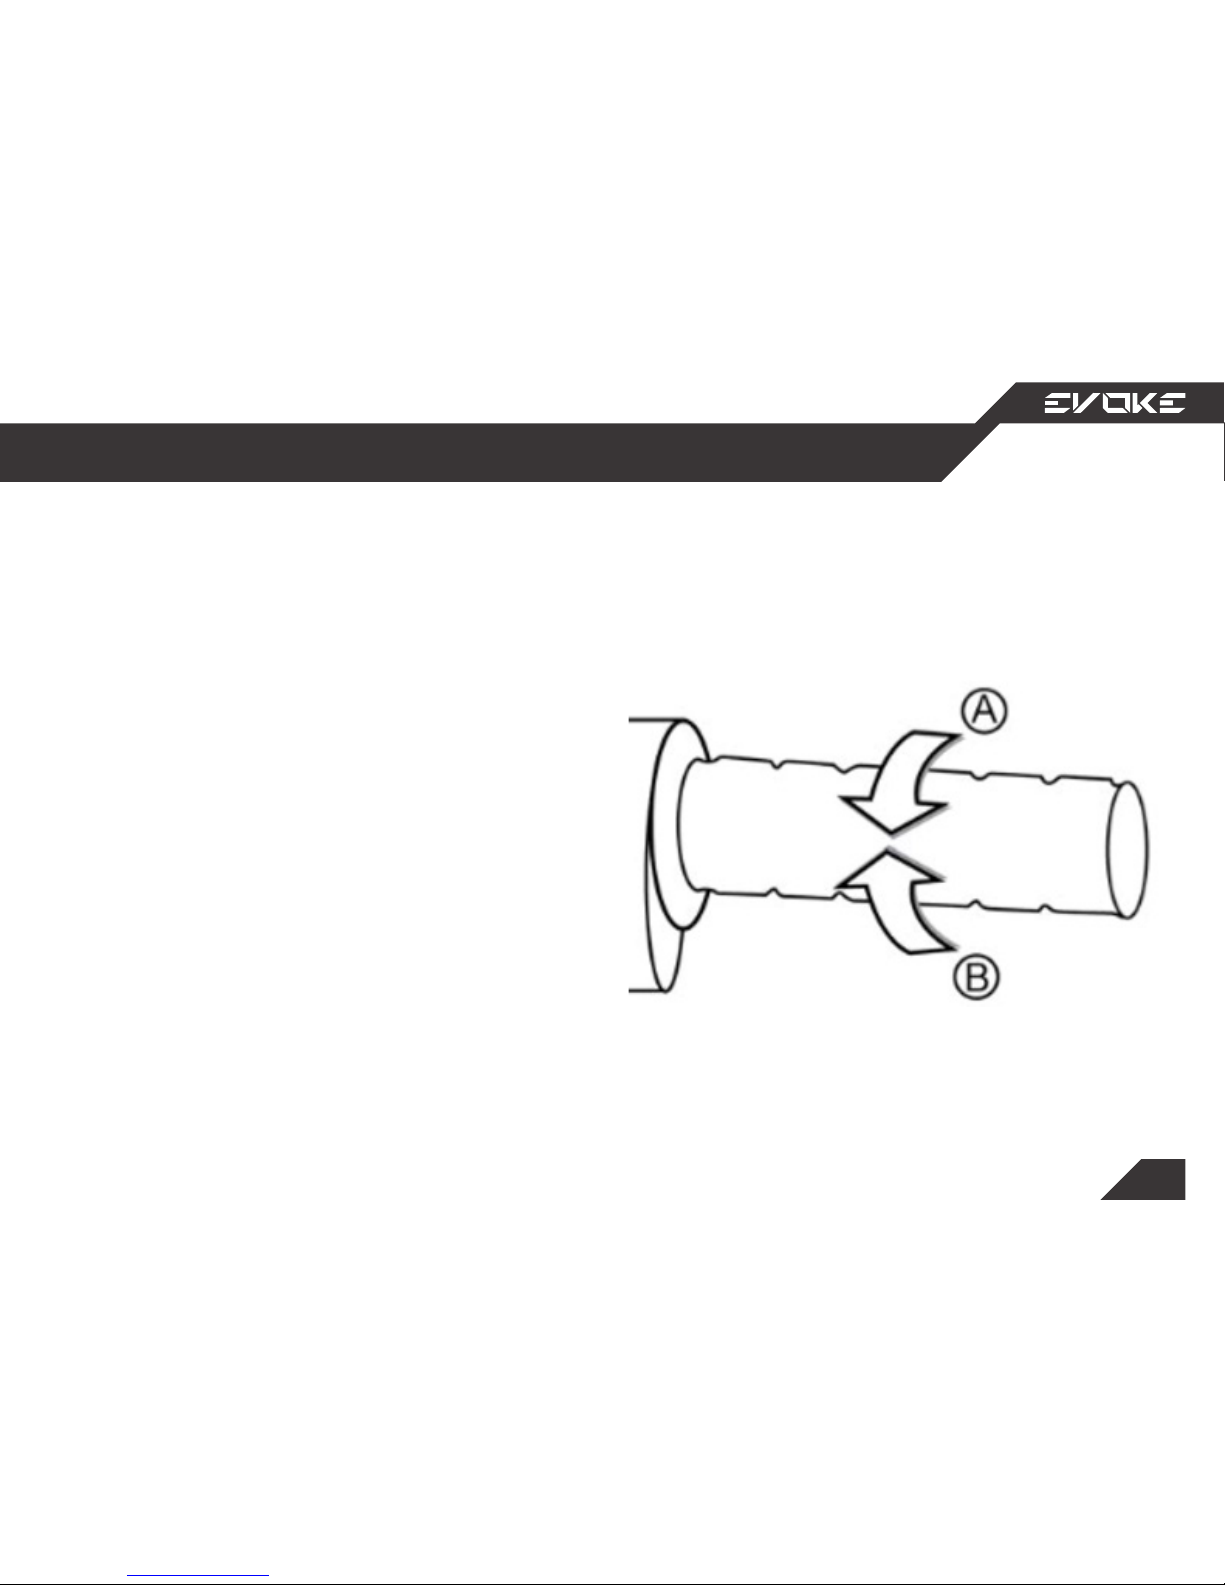
Twist the throttle in a counter-clockwise rotation
(A) to energize the motor and start the motorcycle in a forward direction.
Release the throttle and it snaps back to the
closed position (B), de-energizing the motor, and
regenerative braking begins.
When the motorcycle is moving and the throttle
control is in the fully closed position, the regenerative braking feature activates.
Throttle control
Controls and Instruments
Page 29
29
STEERING LOCK
The steering lock is used to lock the handlebars
in place.
1. Turn the handlebars all the way to the left.
2. Insert the key into the ignition.
3. Push in on the ignition key and turn it to the
Lock position (counter clockwise).
4. Remove the key from the ignition.
Look for a level parking area. If you can’t nd a
paved surface, make sure the ground surface is
rm, especially under the kickstand. If you must
park on a hill, back the rear tire downhill against
the curb with the Urban S at a 45-degree angle
to the curb.
KICKSTAND
Use the kickstand to support the Urban S while
parked.
1. To lower the kickstand, use your foot to
guide it down. Remember that lowering the
kickstand will disable the drive system.
2. Check that the kickstand is down all the
way.
3. If you have to park on a soft surface, insert
something solid under the kickstand for
support.
powering off and parking
Getting Started
Page 30
30
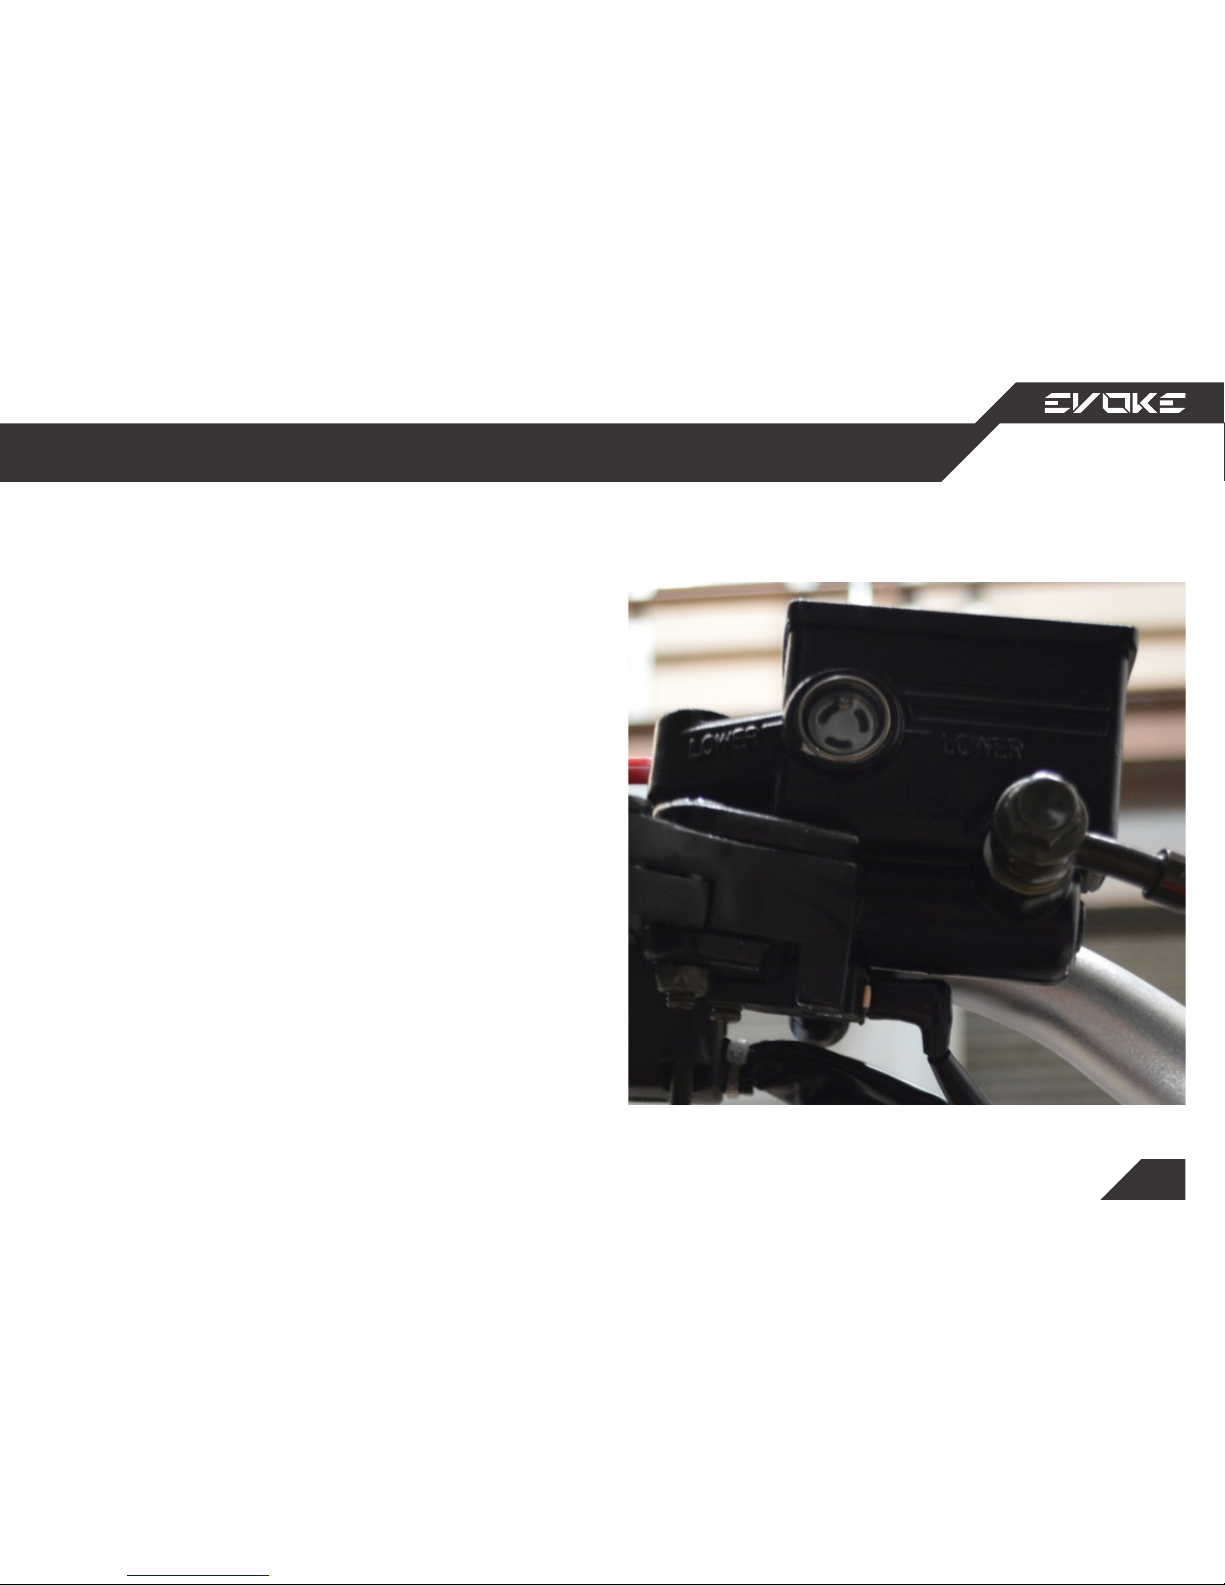
The brake uid reservoir is located on the backside of the right handlebar. Always be sure include checking the brake uid levels in your pre-
ride spot check as part of inspecting the brakes.
Brake uid is a type of hydraulic uid used to
transfer force into pressure, and to amplify braking force. Due to its hygroscopic properties, the
uid absorbs moisture as it is used. When this
happens, the boiling point of the uid decreases
causing your brakes to become less eective.
Brake fluid reservoir
Controls and Instruments
Page 31
31
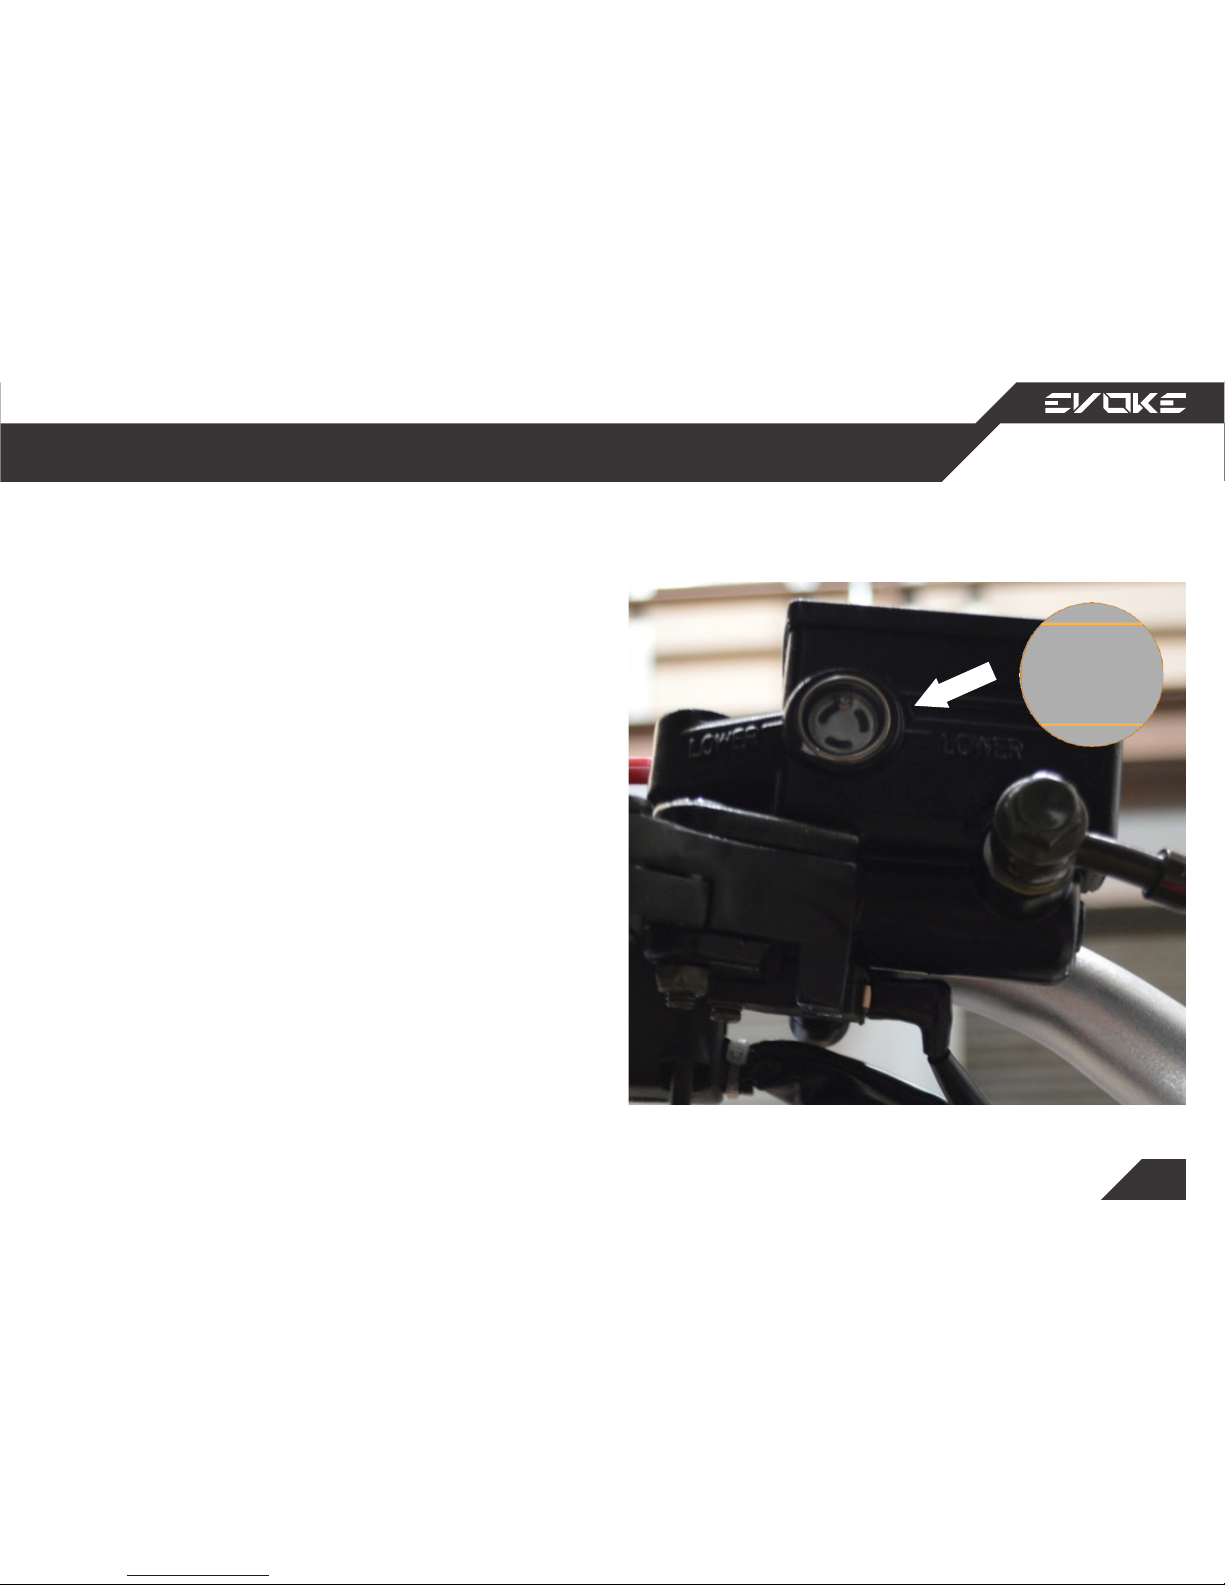
Ensure the clear brake uid liquid resides at 75%,
between the Min and Max marks on the clear
glass uid monitoring section.
If low, open the brake uid reservoir with the 2
Philips head screws and ll with DOT4 brake u-
id.
Make sure to close the reservoir tightly.
Wipe down any brake uid that has spilled over,
as it is detrimental to paint.
Monitoring brake fluid
Getting Started
max
min
Page 32
32
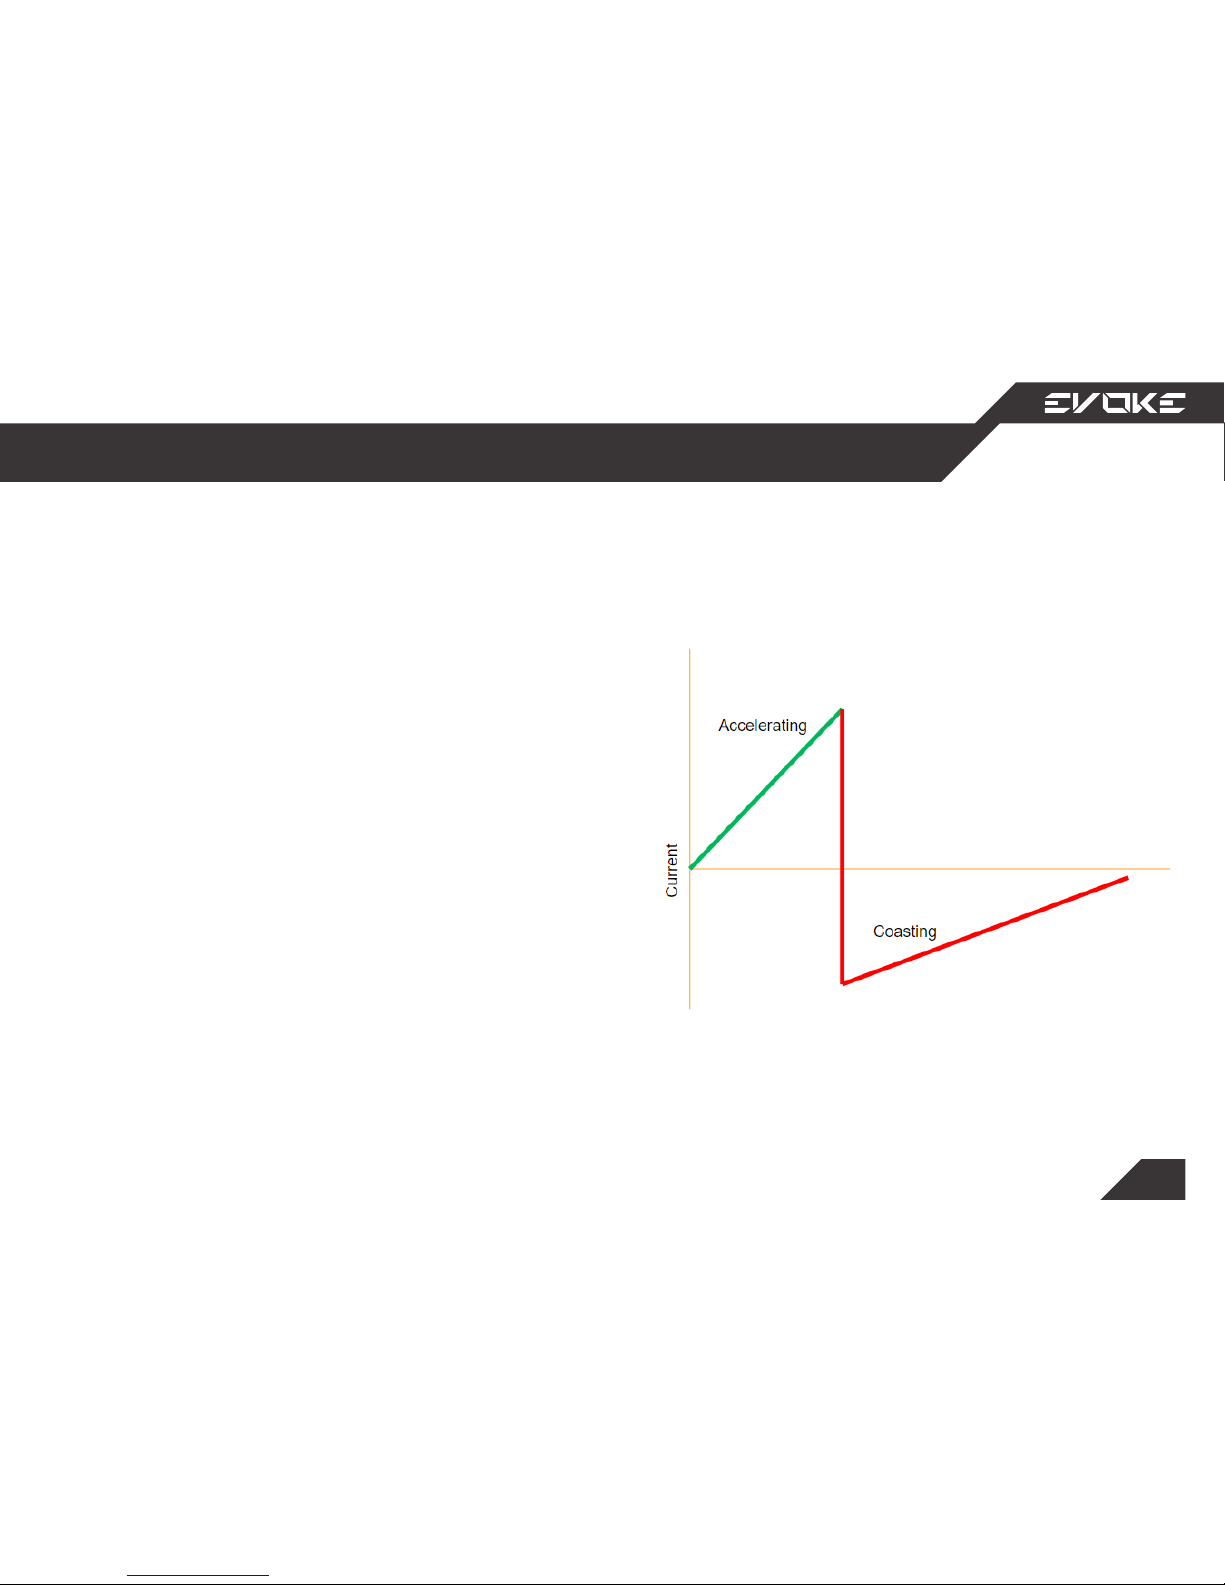
Slide to Regen is the default setting that comes
with all Evoke bikes.
Slide to Regen actives the regenerative braking
any time the throttle is not accelerating.
Slide to Regen prolongs your brake pads and
provides another level of safety.
An Authorized Evoke Dealer can adjust Slide to
Regen power from 10 – 50A of braking power.
Default is 40A of Slide to Regen.
Regen
Getting Started
Page 33
33
Never leave a charging
battery unattended.
Never charge indoors.
Charging warnings
Battery Information
Page 34
34
Before your
first ride,
fully charge
your bike.
Before you ride your bike for the rst time, you
must fully charge your Evoke battery. This is be-
cause the battery gauge will need to reset, making sure that the power displayed on your LCD
screen is accurate.
Each time you charge your battery, you should
be charging it to full capacity and allowing the
gauge to reset each time. If you fail to do so, you
will not have an accurate measure of how much
power you truly have in your battery.
First time charge and calibrating the battery gauge
Charging Information
Page 35
35
Avoid charging
the battery in
environments
colder than
0˚C (32˚F).
Evoke batteries contain lithium, which becomes
unstable in temperatures below 0˚C (32˚F).
Charging below freezing can cause permanent
damage to the battery and result in reduced performance.
Cold weather charging
Charging Information
Page 36
36
Evoke Battery Chargers contains 3 segments:
• Input Stage Wire (110v or 220v)
• Power Charger
• Output Stage Wire (DC Voltage)
The Input Stage Wire connects to the outlet or
Charging Station directly to control charging.
Charging Information
Battery Chargers and Plugging In
Page 37
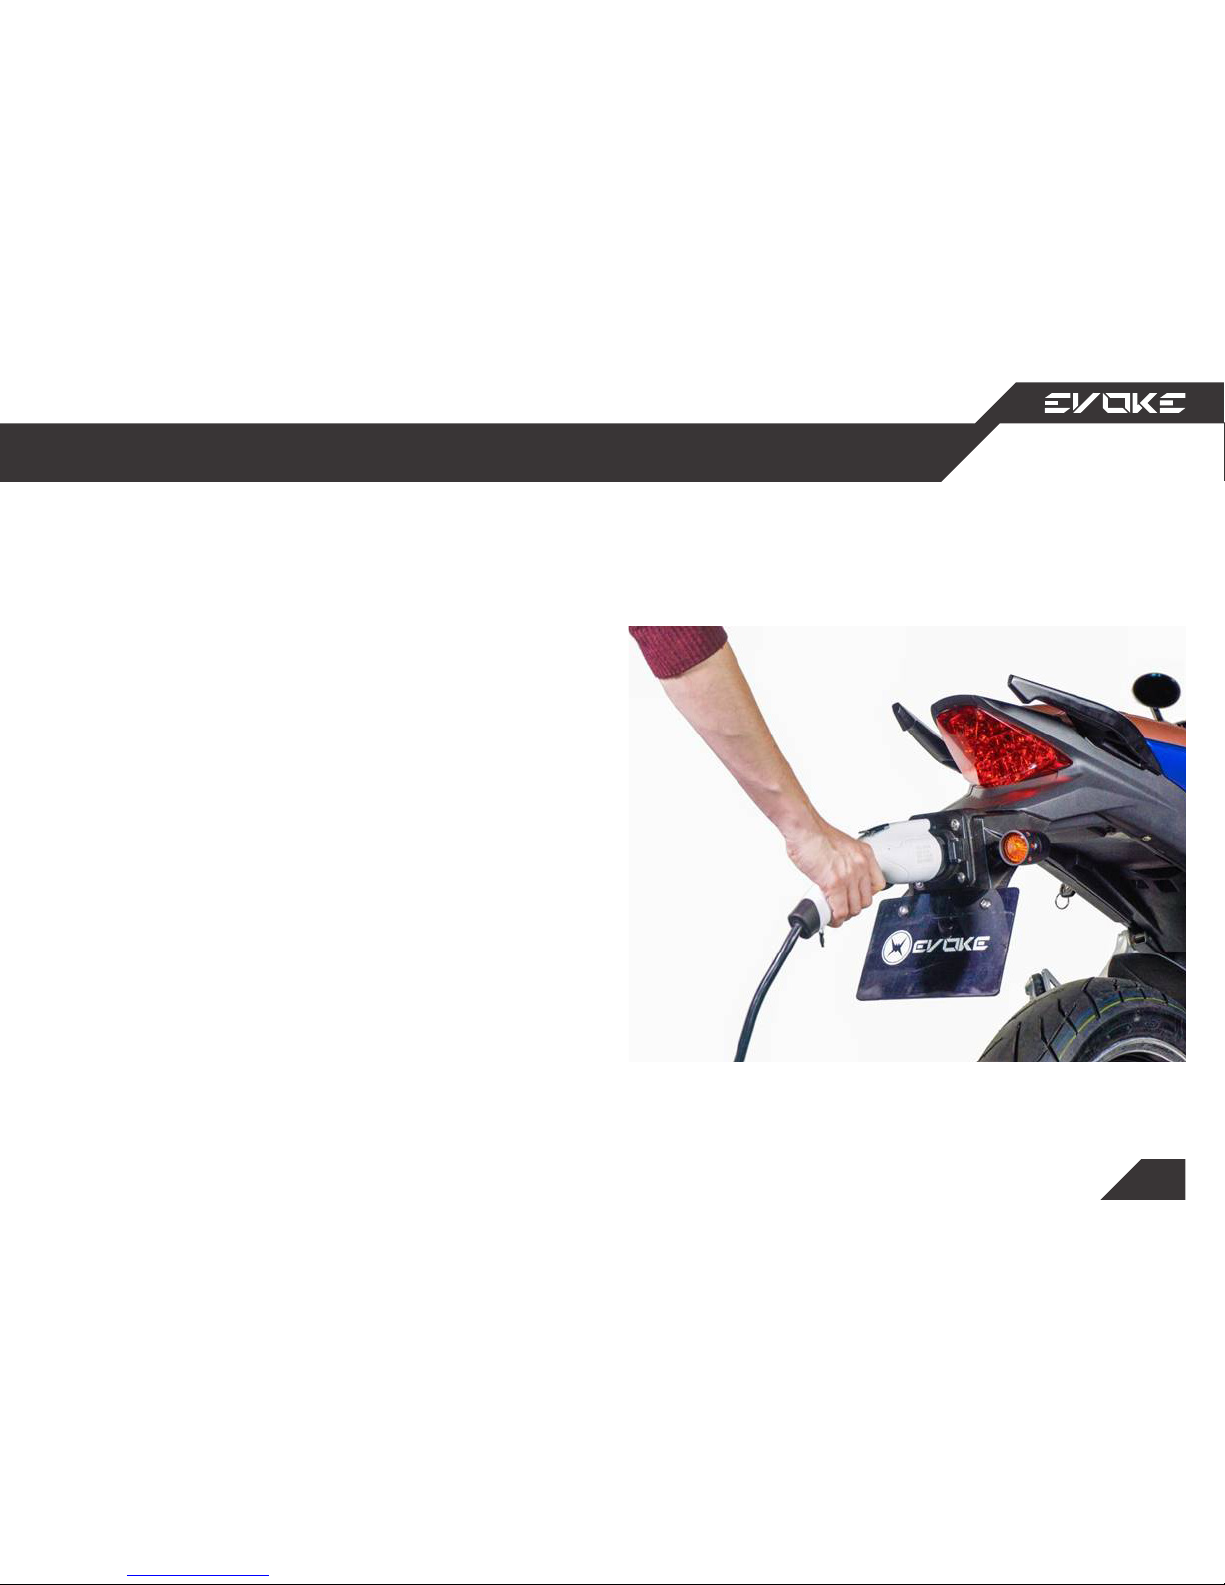
37
1. Charging from a Standard Outlet
1.1 Open charging port cap (1)
1.2 Insert charging pistol into the charging
port.
1.3 Plug in the Standard Outlet plug into the
wall socket.
2. Charging at a Charging Station (1)
2.1 Open charging port cap.
2.2 Insert charging pistol into the charging
port.
Charging port access and location
Charging Information
1
Page 38
38
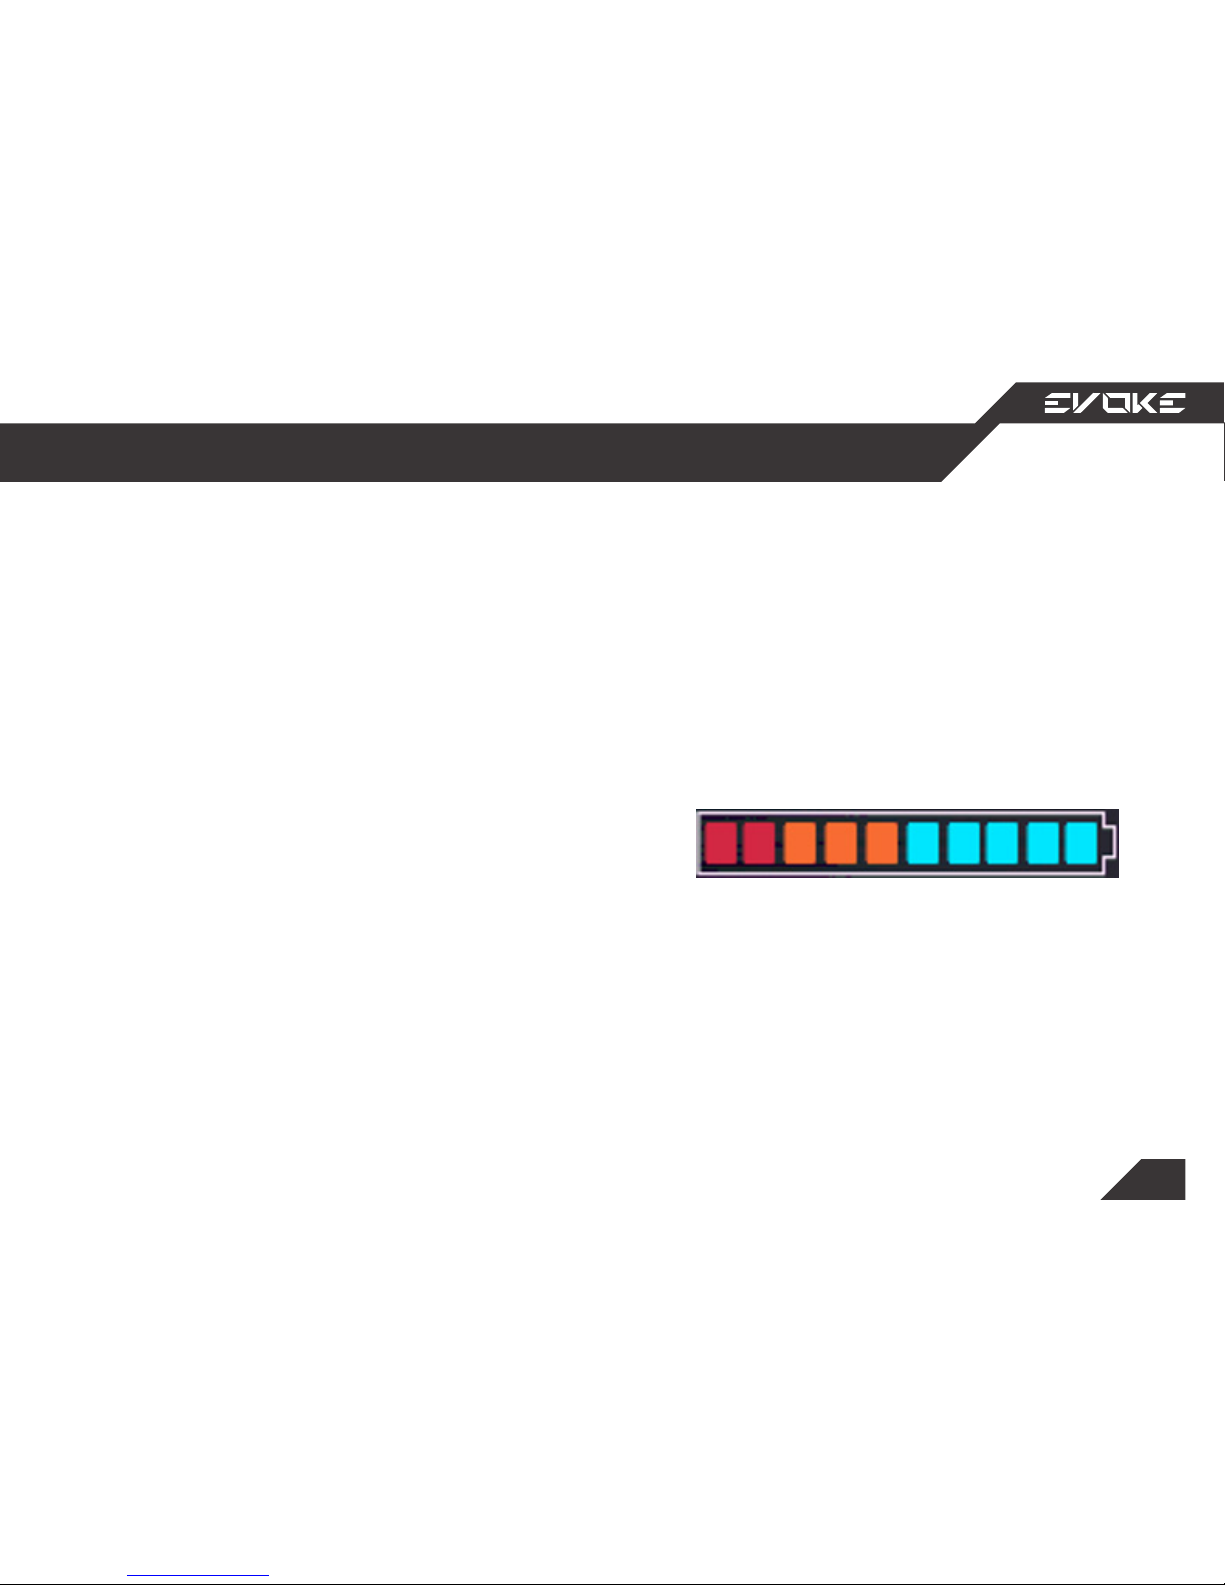
1. The On-board Charger Fan will turn on.
2. On the LCD screen, the top most bar of the
battery gauge will blink.
3. The vehicle throttle will not be active.
Charging Information
Charging Indication
Page 39
39
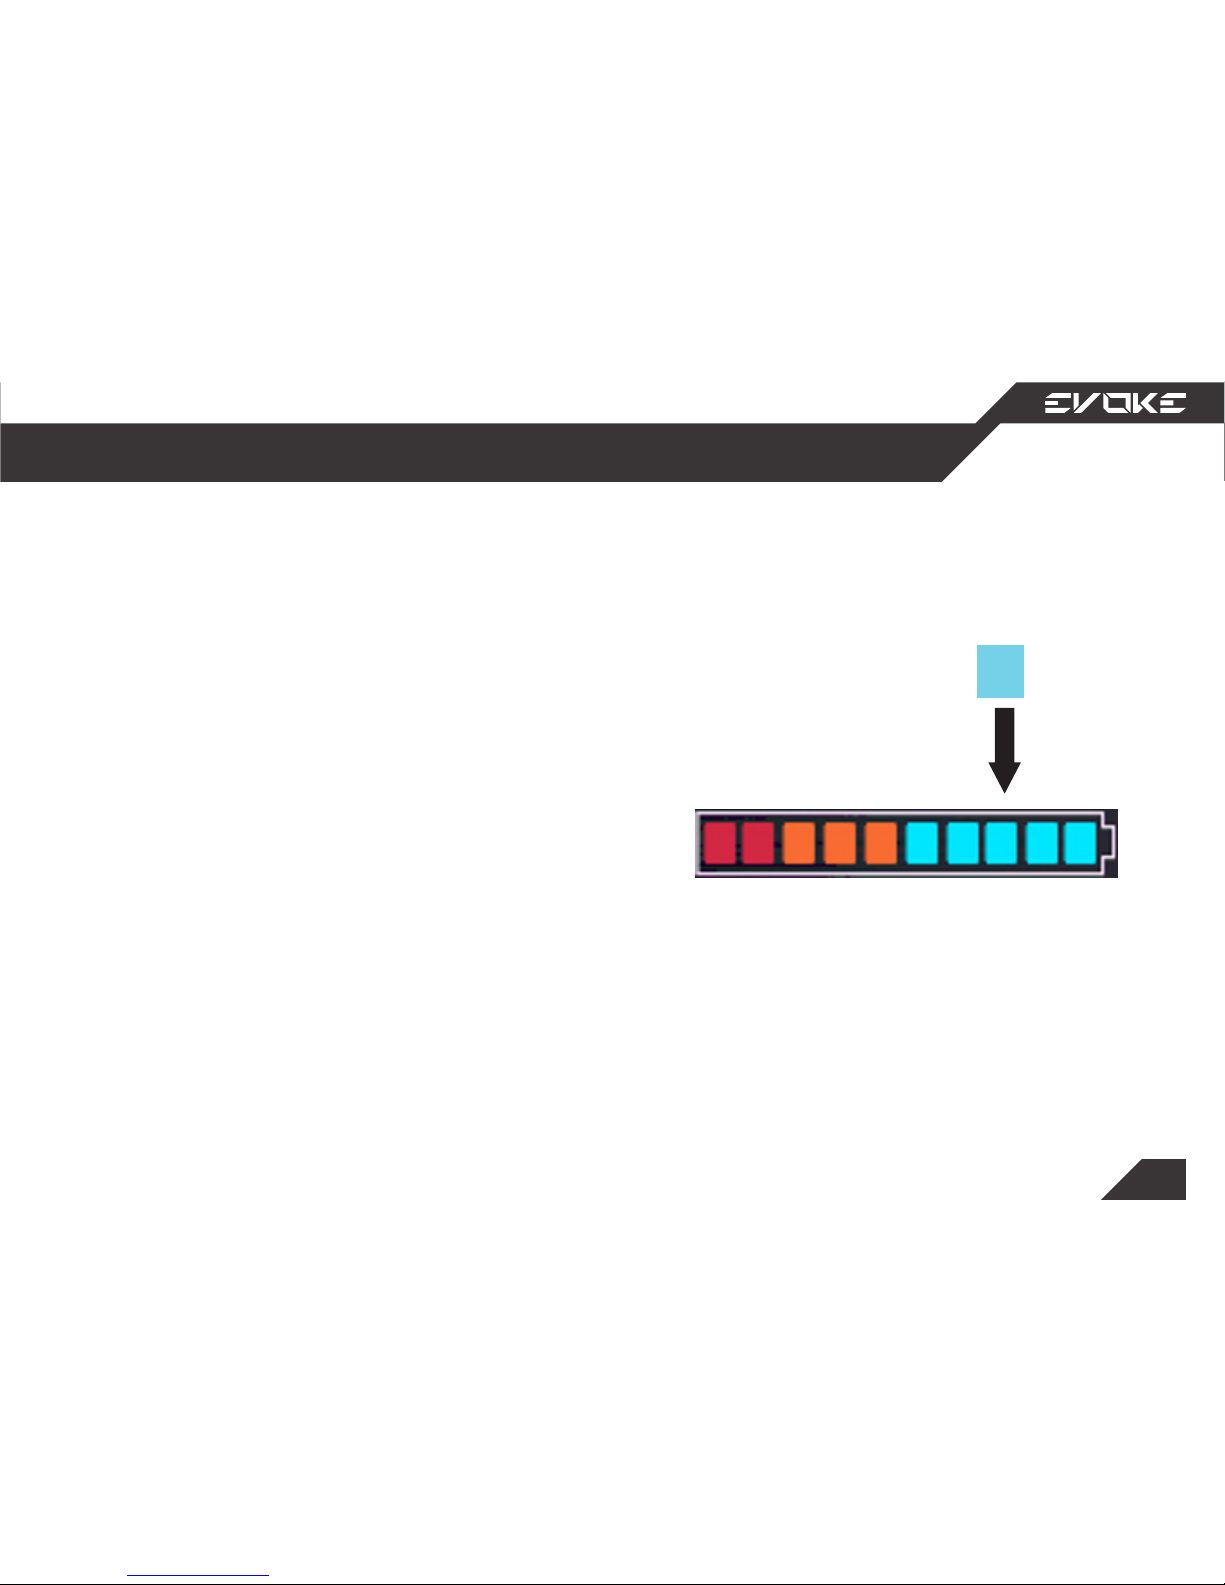
1. On-board Fast Charger (220v)
• One block represents approximately 25
minutes of a charge
• One block represents approximately 20
km of range
2. On-board Fast Charger (110v)
• One block represents approximately 50
minutes of a charge
• One block represents approximately 20
km of range
Charging Information
Partial Charging
Page 40

40
Keeping all of the battery cells balanced is vital for optimal battery performance. Evoke recommends
that you leave your Urban S on in charge mode with AC power connected to allow the cells to balance.
1. Every 3 months, discharge your bike to near empty. (20% State of Charge)
2. Charge your battery for 10 hours on the slow charger, or 5 hours on the on-board fast charger.
3. Run your bike to 80% SOC (State of Charge)
4. Your bike’s battery pack is fully balanced and calibrated.
Battery balancing
Charging Information
Page 41
41
In most cases, the BMS is fully automatic, pro-
tecting the vehicle and the battery pack from:
• Extreme temperatures,
• Short circuits,
• Overcharging and over-discharging,
• Unbalancing
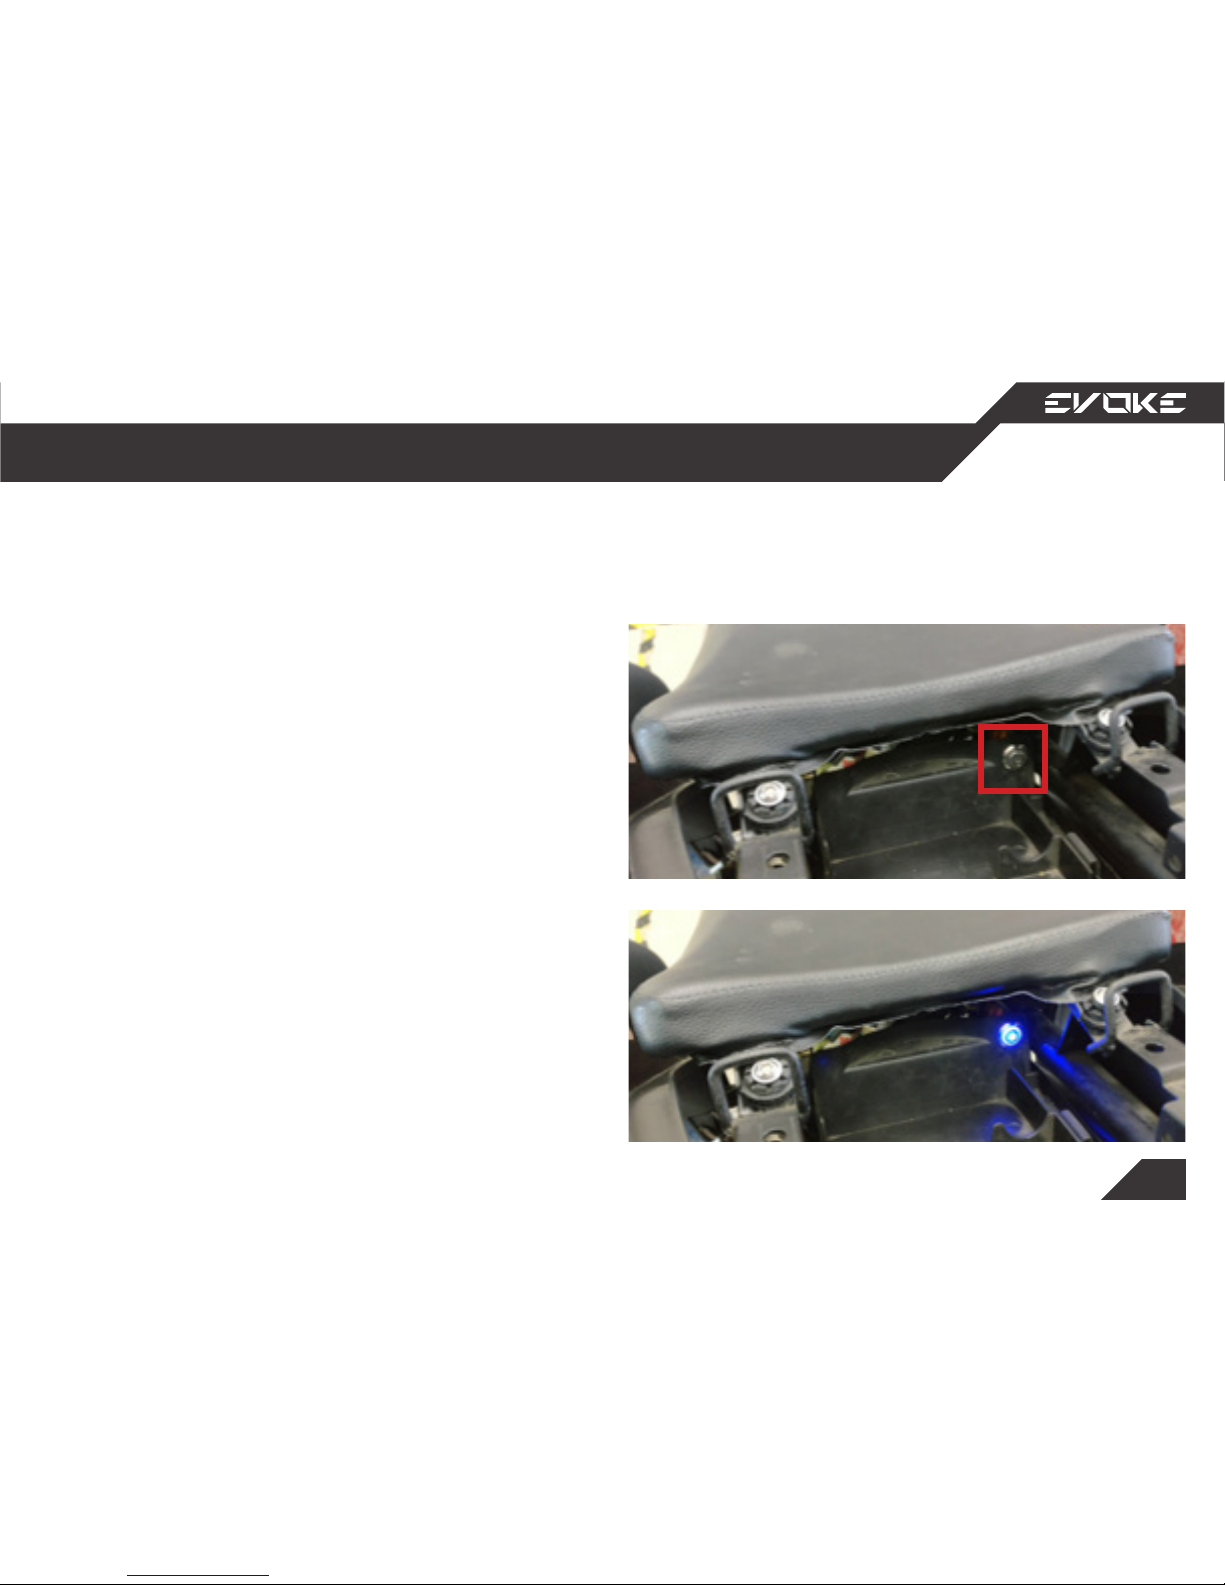
In the event the BMS goes into protection and
the unit does not automatically recover, there
is a manual override switch located underneath
the rear seat.
1. Turn on bike
2. Remove rear seat
3. Push and hold the button for a minimum
of 5 seconds
4. The battery will make a long beep sound to
conrm it is active
5. The button will also glow blue to indicate
the BMS is active
Charging Information
Battery Management System (BMS)
Page 42
42
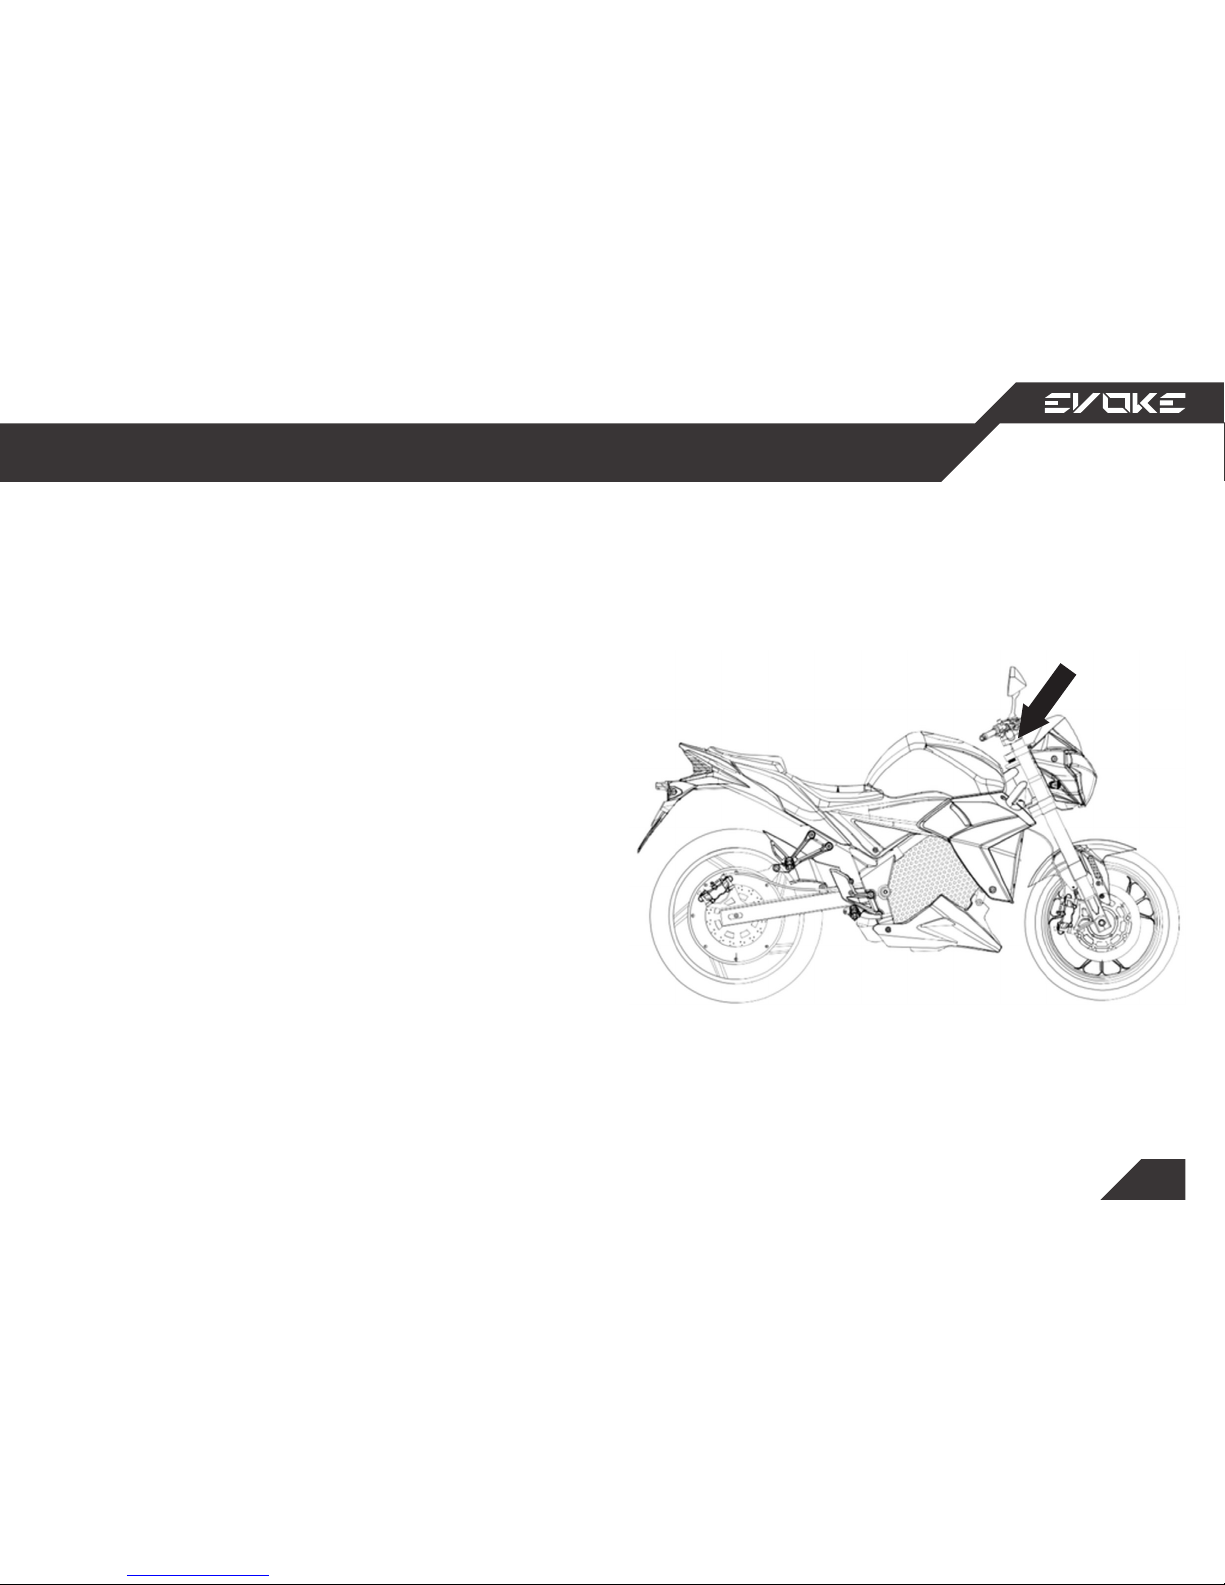
Spring preload adjustment screws (both
forks)
Adjusting the preload lets you change the “unloaded” sag of the suspension system.
• Turning the nut clockwise increases the
spring preload and reduces the “unloaded”
sag of the suspension system.
• Turning the nut counter-clockwise decreas-
es the spring preload and increases the “unloaded” sag of the suspension system
To adjust the spring preload, always start from
the minimum preload position (nut turned ful-
ly counter-clockwise). Take note of number of
turns and adjust both forks equally.
Front adjustment
Suspension
Page 43
43
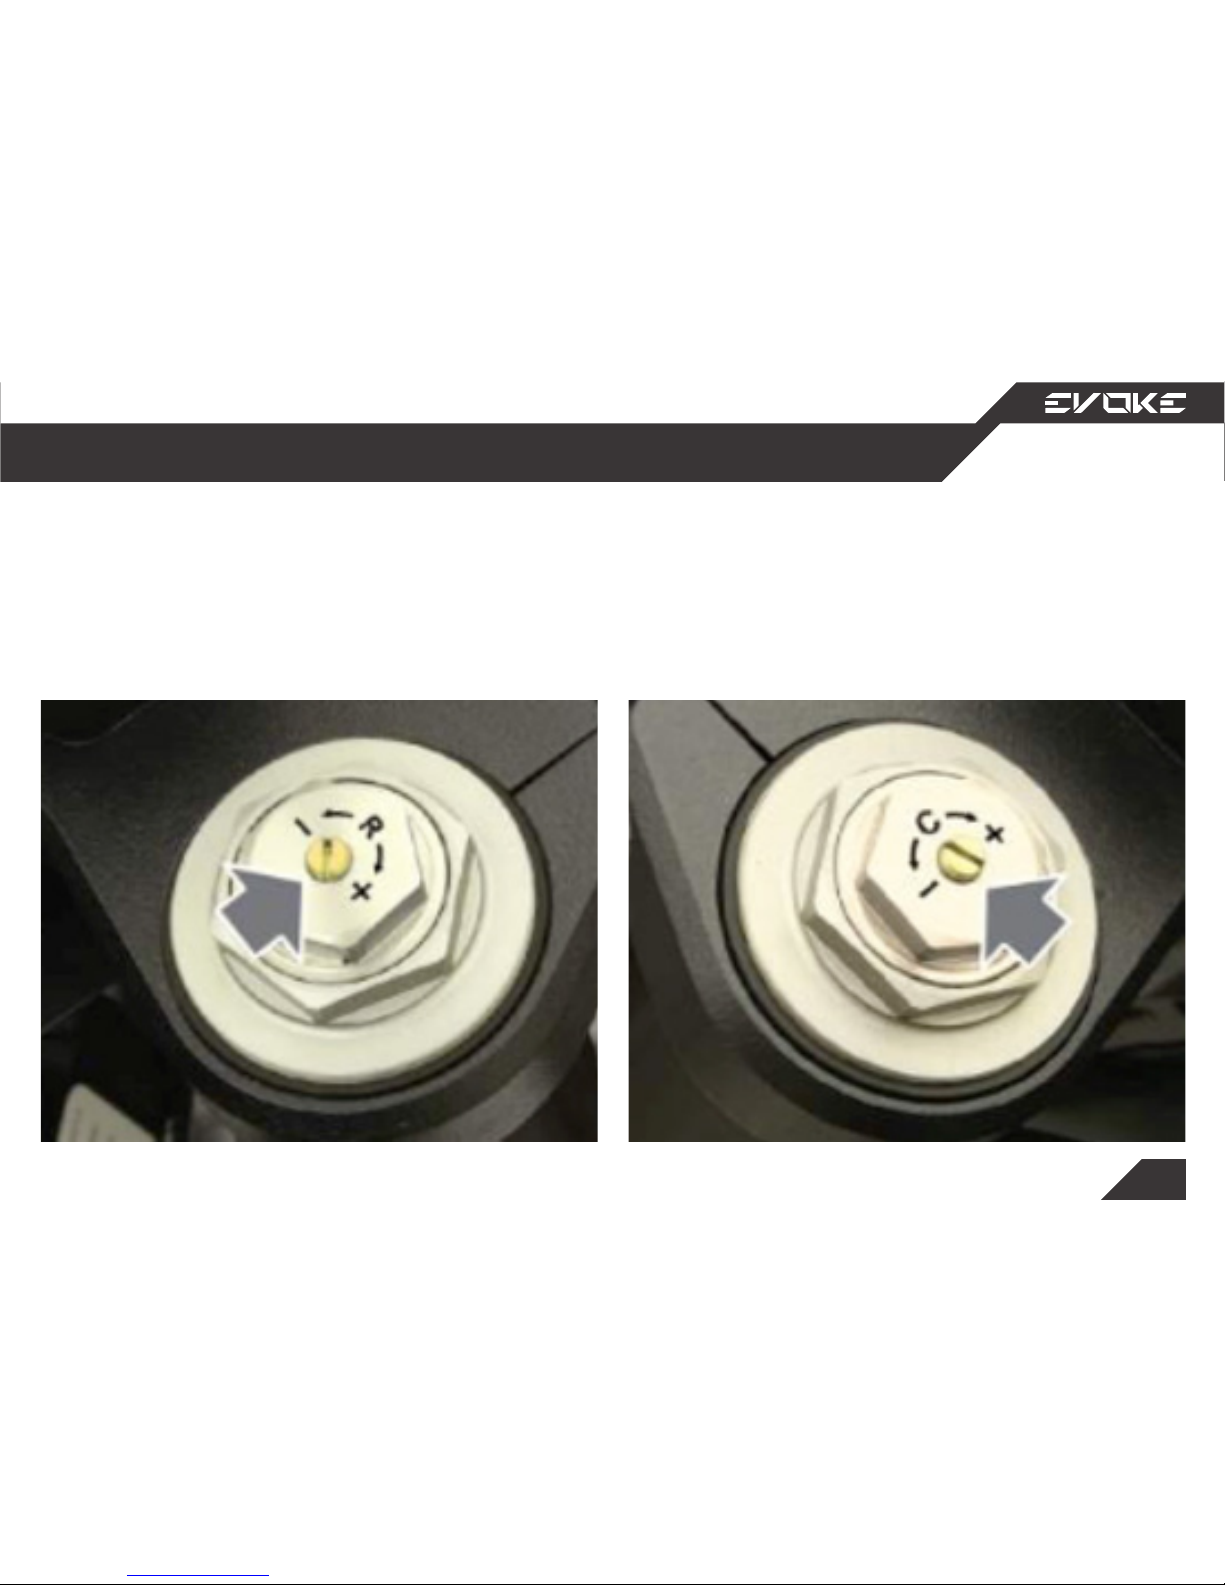
Compression damping (left fork)
Rotate the adjuster screw clockwise to stien
the damping (+) and counter-clockwise to soften
it (-).
Rebound damping (right fork)
Rotate the adjuster screw clockwise to stien
the damping (+) and counter-clockwise to soften
it (-).
Suspension
Front adjustment
Page 44
44
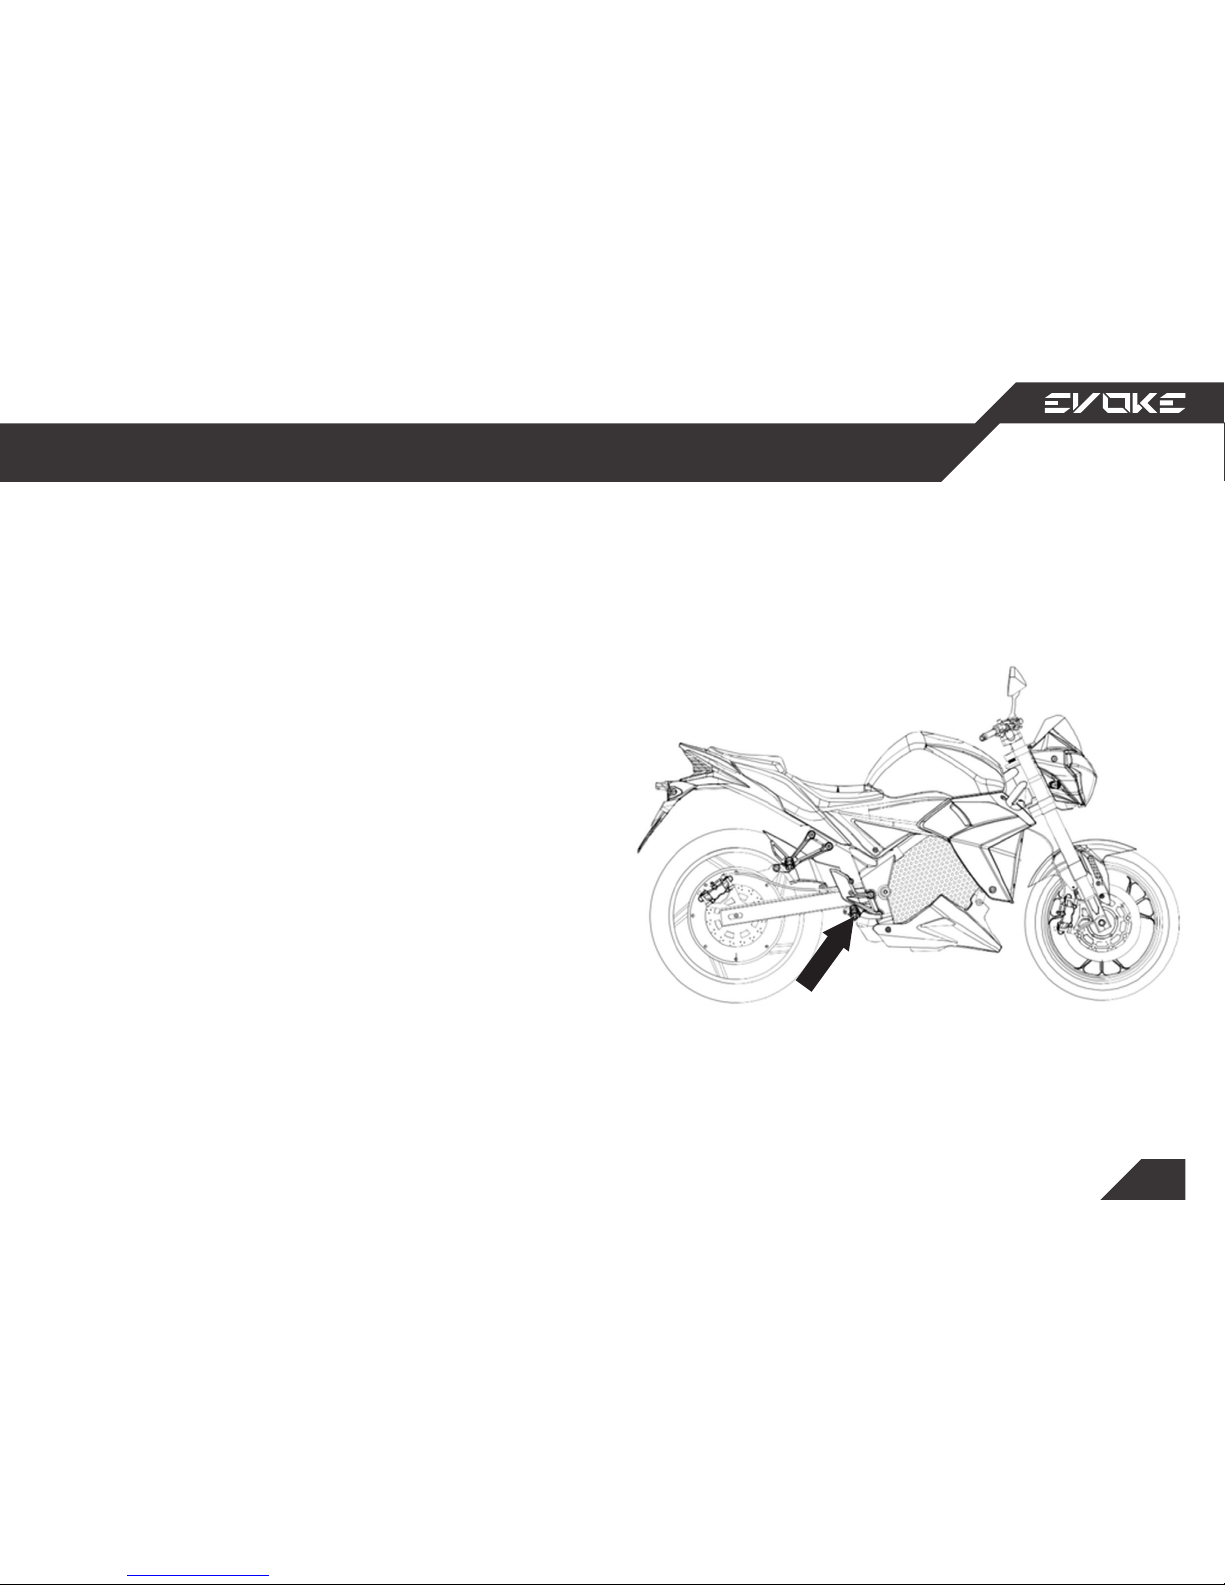
Adjust the spring pre-load by rotating the two
pre-load rings:
• Counter-clockwise to decrease the pre-load
• Clockwise to increase the pre-load
To adjust the pre-load back to the original setting
used during manufacture, raise the rear wheel
o the ground using a safety stand or a hoist. Rotate the pre-load ring counter-clockwise until it
is loose. Then, rotate the pre-load ring clockwise
four turns.
Rear adjustment
Suspension
Page 45
45
Do not use a pressure washer to clean
your bike. High-pressure water or air
may damage it. Never aim jets of water
at the batteries or other electrical
components. Damage caused from
using a pressure washer will not be
covered by the Evoke Limited Warran-
ty.
Before storing your bike, clean and polish it. This
will help keep the bike looking newer for longer,
it also makes it easier to inspect and service.
Do not expose your bike to harsh detergents or
chemical solvents, as this could damage its metal, paint, or plastic.
To clean your bike, use a sponge or soft towel,
mild detergent, and water.
Washing your Urban S in bright sunlight may
cause the nish to fade, because water droplets
intensify the sun’s brightness. Spotting is also
more likely because surface water can dry before
you have time to wipe it o.
To avoid this, clean your bike in a shaded area,
out of direct sunlight.
Pre-storage cleaning
Storing your Bike
Page 46
46
Your bike is considered to be
in a “stored” state if it goes
unused for more than three
days.
Page 47
47
While in a short-term stored state, the bike’s battery should be around 50% SoC (State of Charge),
and never completely full or empty. Storing the
battery at full charge can result in decreased bat-
tery life, whereas storing at empty can result in
complete battery dysfunction. To ensure a long
battery life, only store your bike between 50%
SoC.
Batteries should
only be stored
at around 50%
SoC.
short-term, stored state effects on battery
Storing your Bike
Page 48
48
“Long-term” storage is defined as storage lasting longer than two weeks.
Page 49
49
Batteries should be stored
between 50-60% SoC, in
temperatures between
0-24°C (32-75°F).
If you will not be riding your bike for any amount
of time lasting longer than two weeks, thorough-
ly inspect and correct any problems before storage so that issues are not forgotten about in the
meantime. Then, disconnect the Battery Safety
Disconnect to reduce quiescent drain on the batteries.
During storage, periodically (every 1 - 2 months)
check the SoC and charge if necessary.
After reconnecting the Battery Safety Disconnect,
the Urban S must be powered on to allow for a
full electrical system test and then, if necessary,
charged.
short-term, stored state effects on battery
Storing your Bike
Page 50
50
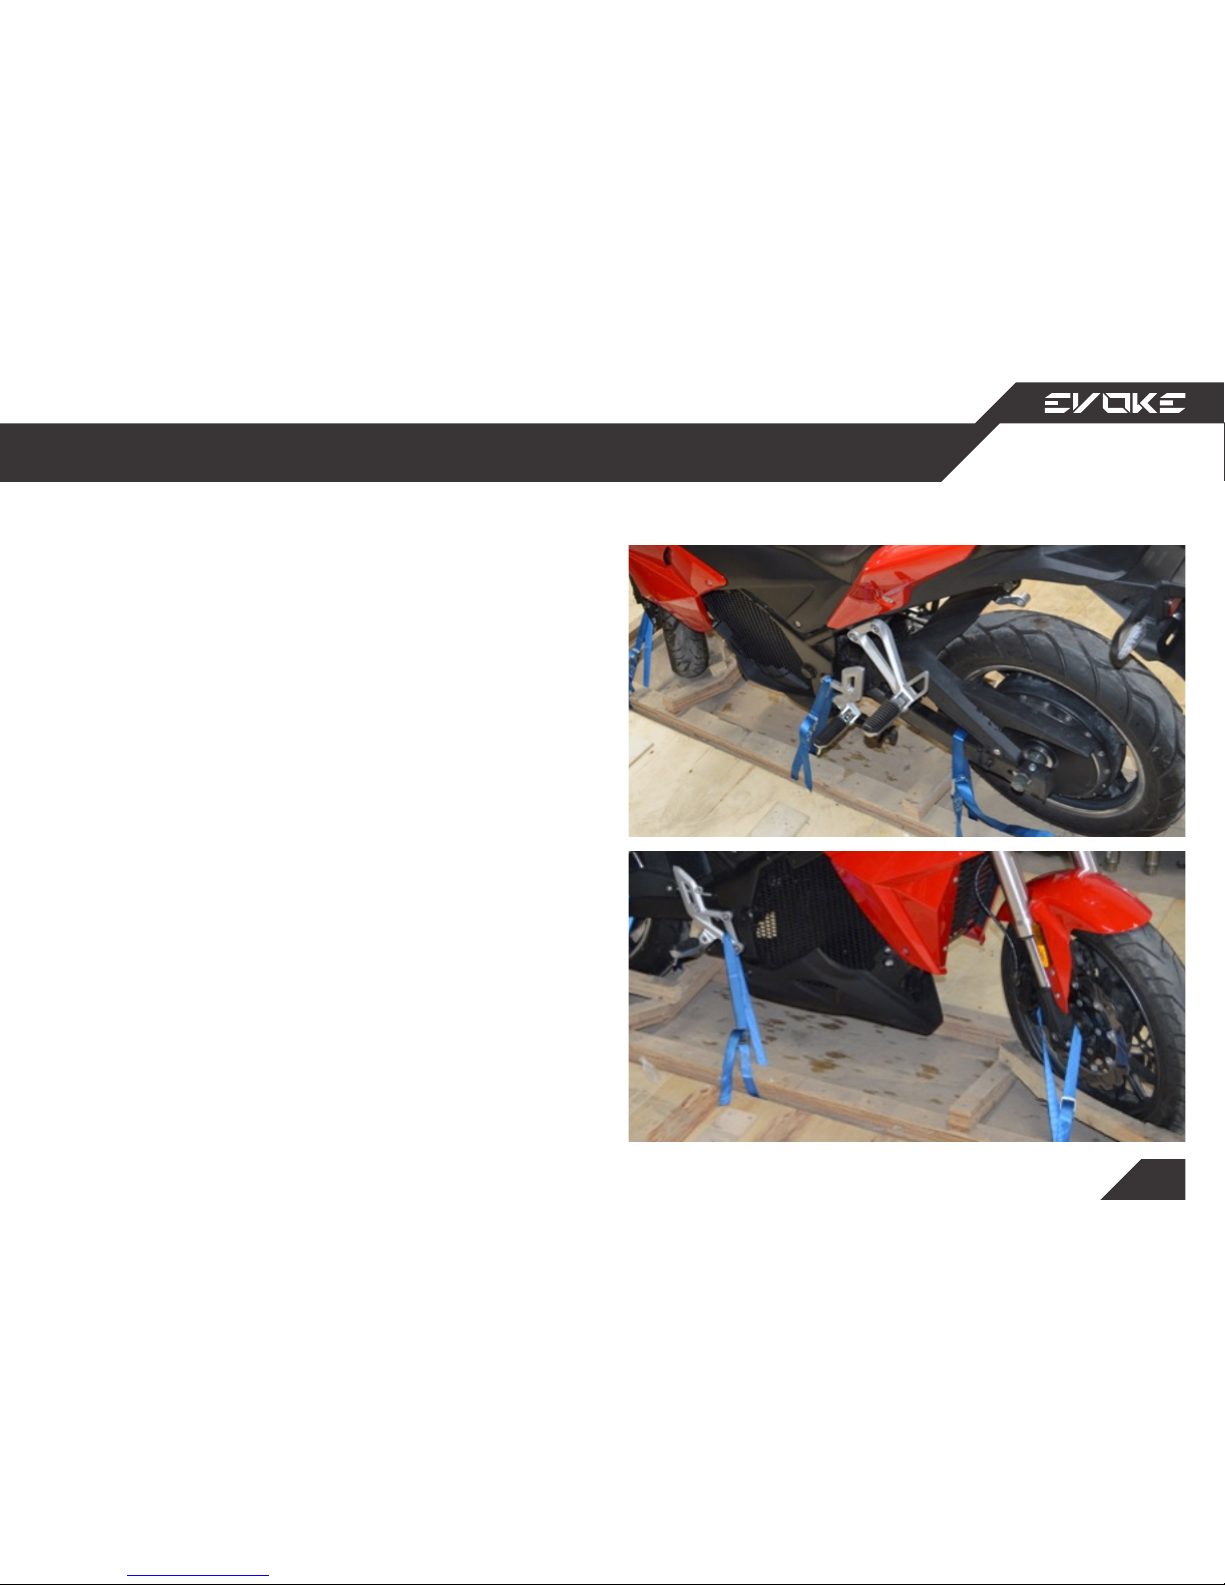
If your Urban S needs to be transported, it should
be carried on a motorcycle trailer, a truck, or a
atbed trailer. Do not tow your Urban S.
When contacting a towing or transporting service, be sure to ask if they have a atbed area,
loading ramp, or power ramp to safely lift the Urban S. Also ask if they have motorcycle tie-down
straps.
Preparing for transportation
Transporting your Bike
Page 51
51
Always use a protective tarp and
store in a cool,
dry area.
As a general rule, when storing any vehicle for
long periods it’s best to use a protective cover to
prevent the elements from aecting the vehicle’s internal components.
Be sure that the storage area is dry and not in
located in direct sunlight, as this can also aect
the bike’s performance following the conclusion
of storage.
Avoid using plastic or similar non-breathing ma-
terials during storage, as these restrict air-ow
and allow heat and moisture to accumulate on
the bike.
Protecting electronic elements
Storing your Bike
Page 52
52
Many factors affect
the range of your bike.
Page 53

53
• Cool temperatures
• Sitting upright
• Excess weight
• Mountainous terrain
• Accelerating hard
• Soft tires
Reduced range
Range, Tires, and Motor
The following factors are considered range
reducers. This means that your bike will be using
more power to move and, as a result, will not be
able to move as far.
Temperatures below 25°C (77°F), sitting
upright while riding, carrying excess weight
or passengers, accelerating hard, improperly
inated tires, and mountainous terrain will all
keep you from traveling long distances.
Remember to take this into consideration when
planning road trips!
Page 54

54
• Warm temperatures
• Leaning forward
• Flat terrain
• Soft acceleration
• Properly inated tires
The following factors are considered range
increasers. This means that your bike will be
using less power to move and, as a result, will be
able to move further.
Temperatures above 25°C (77°F), leaning forward
while riding, soft accelerating, properly inated
tires, and at terrain will all help you to travel
longer distances.
Remember to take this into consideration when
planning long journeys!
Increased range
Range, Tires, and Motor
Page 55
55
Using tires that are excessively worn or improperly
inated can cause an accident in which you can be
seriously hurt or killed.
Both the front and
rear tires should
measure 37 - 40
PSI.
To safely operate your Urban S, your tires must
be the proper type and size, in good condition
with adequate tread, and correctly inated for
the load you are carrying.
Inspection
Whenever you check the tire pressures, you
should also inspect the wheel and tire to see if
any of the following are evident:
Dents, cracks or any other damage to the wheel.
Replace the wheel if damaged.
Bumps or bulges in the side of the tire or the
tread. Replace any tire that has a bump or
bulge.
Cuts, slits, or cracks in the tire. Replace the tire if
you can see fabric or cord.
Properly inflated tires
Range, Tires, and Motor
Page 56
56
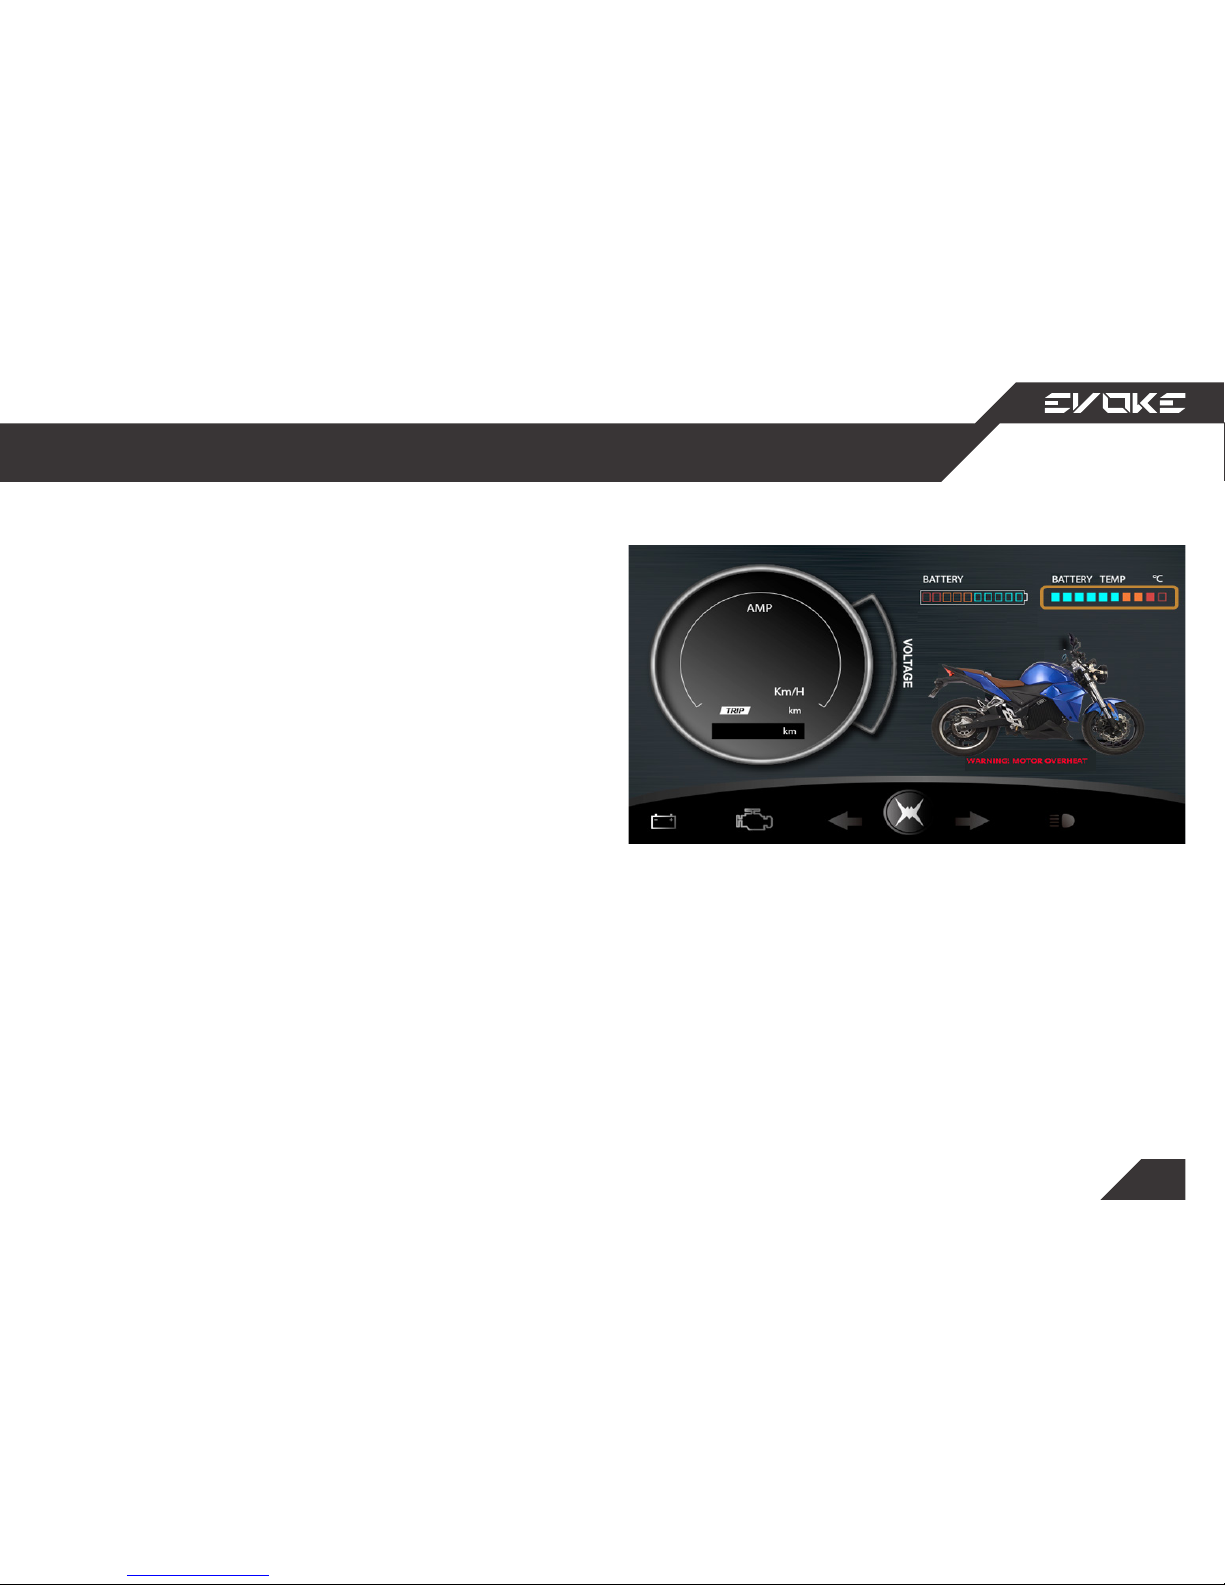
Know how to monitor your acceleration and adjust your riding to
maintain range.
The amp readout on your LCD tells you how
many relative amps you are pulling out of the
battery. If you are consistently “accelerating
hard,” meaning that your current gauge is constantly in the RED, you risk entering Motor Pro-
tection Mode.
Motor Temperature can be monitored with the
following gauge indicated on the right had side
of this page.
In protection mode, only 15% of total power
will be available for use, giving you just enough
to power to pull over in a safe location. When
this happens, simply shut the bike down for a
few minutes and allow the Motor to cool down.
Knowing how to monitor your acceleration and
adjust your riding can help you maintain range
and avoid protection mode.
Acceleration and protection mode
Range, Tires, and Motor
Page 57
57
Shut the bike down
for at least two
minutes and then
restart the bike.
If your bike is behaving in an abnormal manner,
the rst thing you should try is to simply shut it
o and then restart it again. In most cases, this
will resolve whatever the issue was. However, if
it does not resolve your problems, contact your
service provider for more assistance.
Abnormal behavior
Troubleshooting
Page 58
58
Get to a safe location and
shut the bike down for at
least two minutes. Once
the Motor cools down,
the bike will be operational again.
The motor has become too hot as a result of hard
acceleration, and only 15% of total power is available for use, giving you just enough to power to
pull over in a safe location. When this happens,
simply shut the bike down for a few minutes and
allow it to cool down. If the bike does not resume
normal operation after allowing it to cool down,
contact your service provider.
Motor protection mode
Troubleshooting
Page 59
59
Plug your battery into the
nearest outlet
and let it charge.
Your bike has no power.
1. The bike may be out of charge.
2. Get the bike to the nearest outlet and plug
it into the charger, and charge the bike
3. If On-board Charger does not turn on,
then:
• Open the rear seat
• Check if the BMS Switch is ON
• If the BMS Switch is OFF, press and hold
the BMS Switch for 5 seconds to active
BMS.
4. If this does not resolve the issue, contact
your service provider.
No power
Troubleshooting
Page 60
60
Get to a safe location
and shut the bike down.
Do not ride on a flat tire.
Transport your bike to
the nearest Authorized
Evoke Dealer.
Riding on a at tire is unsafe and may cause bodily harm and/or death.
As soon as you notice a at tire, pull over to the
side of the road in a safe location and shut the
bike down. Do not ride the bike.
Do not push the bike. Do not move the bike.
Transport the bike via tow truck or atbed to the
nearest Authorized Evoke Dealer for a tire re-
placement.
Flat tire
Troubleshooting
Page 61
61
Your Urban S was supplied with two keys. Evoke
recommends that you keep one key in a safe location, as a spare, in case you misplace the other.
If one or both keys are lost, contact your Evoke
Authorized Dealer for replacement options.
Lost keys
Troubleshooting
Page 62
62
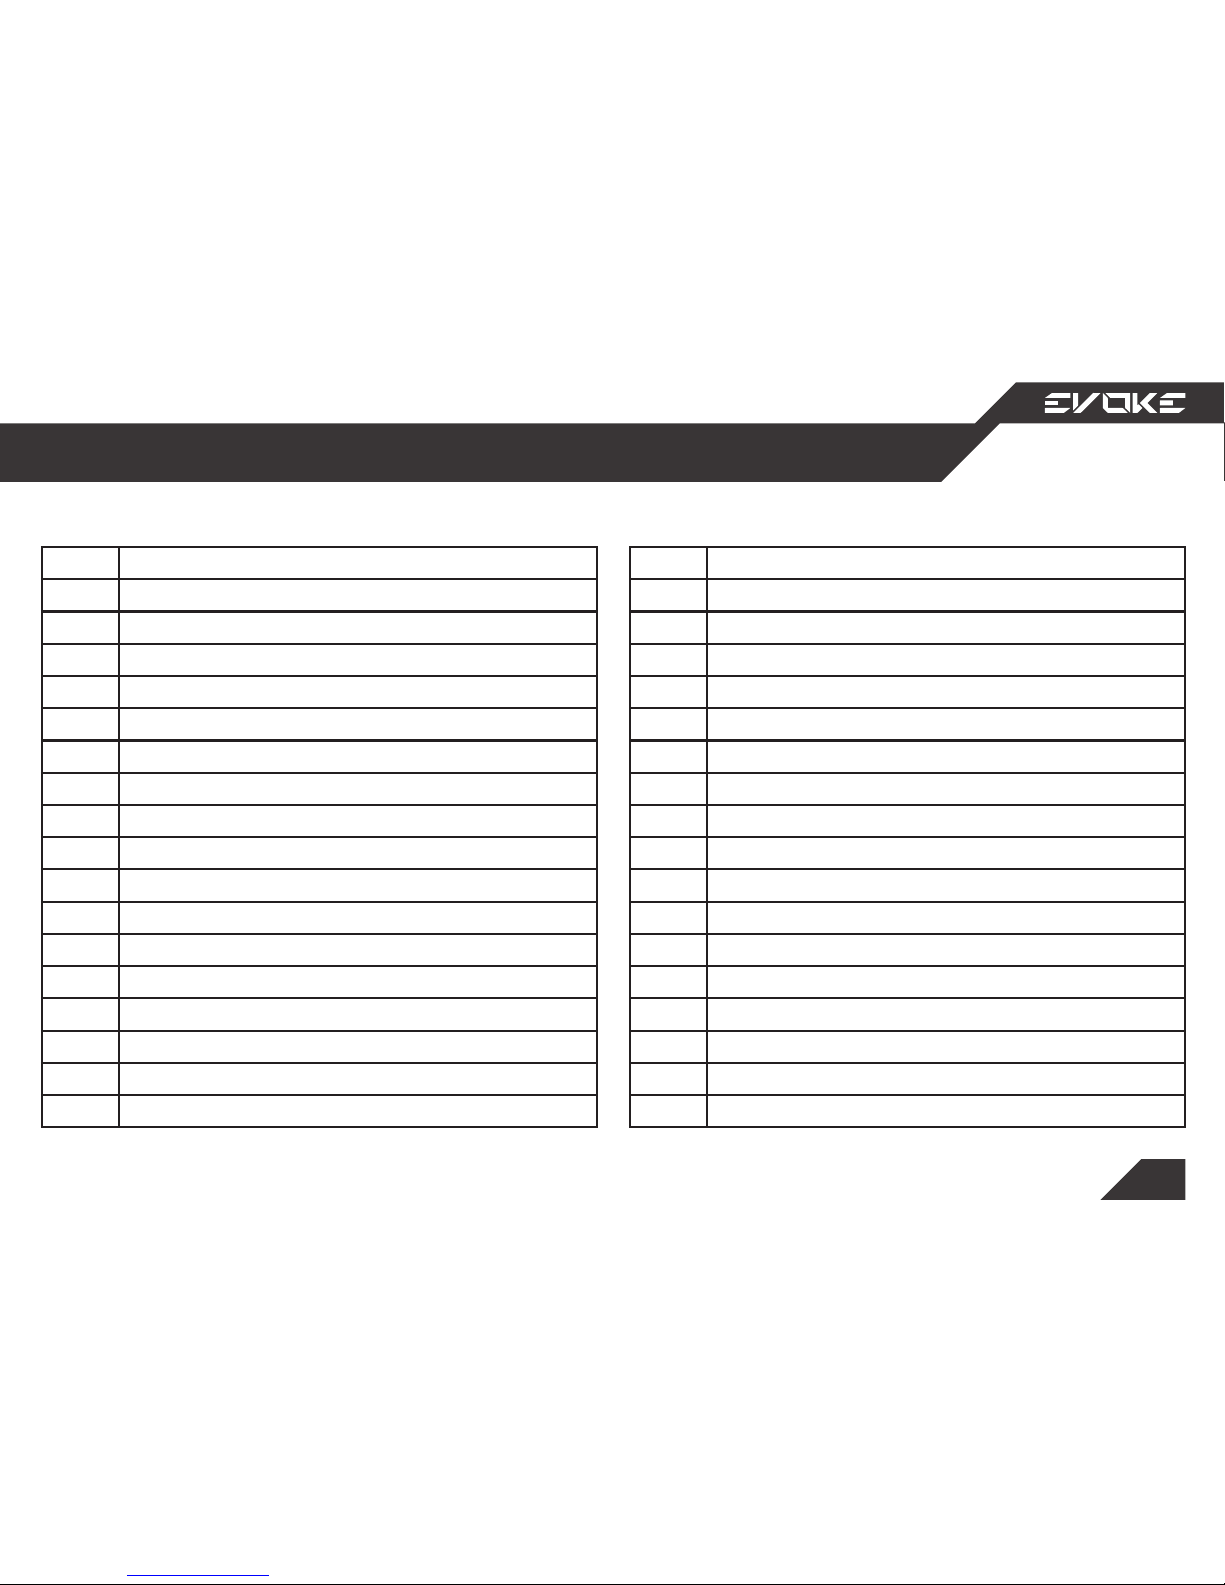
Code Errors
Diagnostics and Errors
Code Description
0x001 Charger overvoltage protection
0x002 Charger overcurrent protection
0x003 Charger is in over current protection
0x004 BMS overheat
0x005 Charging current error
0x006 Pack out of balance
0x007 BMS overheat
0x008 Controller error
0x009 Discharging level
0x010 Discharge overcurrent protection
0x011 Battery depleated
0x012 Battery overheat
0x013 Discharge BMS overheat
0x014 Discharge BMS overheat
0x015 BMS short circuit protection
0x016 BMS error
0x017 Single cell undervoltage
Code Description
0x018 Charger hardware failure
0x019 Charger temperature is too high
0x020 Charger input voltage wrong. Charger inactive
0x021 Hall sensor failure
0x022 Motor stalled
0x023 Controller overcurrent
0x024 Controller overvoltage
0x025 Power saving mode
0x026 Limp home mode
0x027 Protection shutdown mode
0x028 Throttle open from start
0x029 Throttle failure
0x030 Controller thermal warning
0x031 Controller thermal shutdown
0x032 Motor overheat
0x033 Motor overheat shutdown
0x034 Main contactor failure
Page 63
63
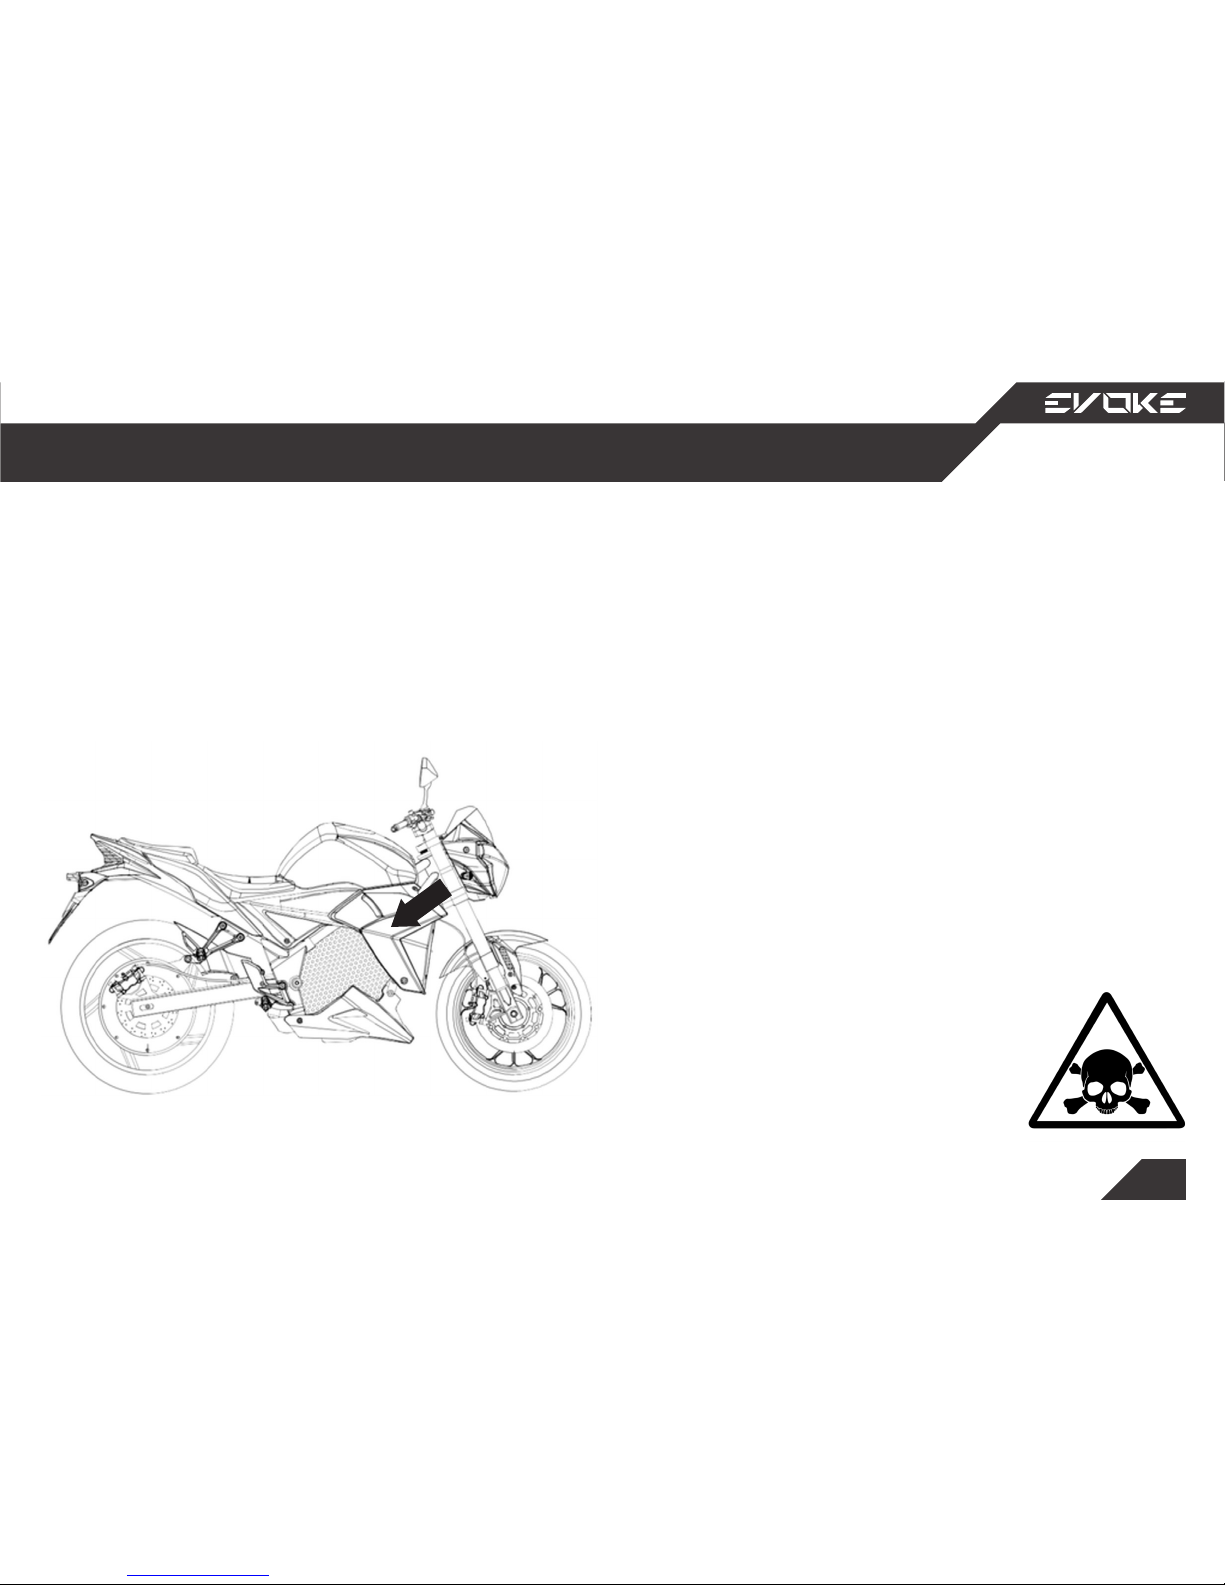
HIGH voltage components may remain energize for
up to 60 second after disabling.
NEVER cut high voltage components or cabling.
Cutting the cabling could
result in serious injury or
death.
DISCONNECT main battery connector located
to the rear of the front fork, beneath the body
panels
First Responder Information - High Voltage Components Locations
In the event of an accident
What to Do
Page 64
64
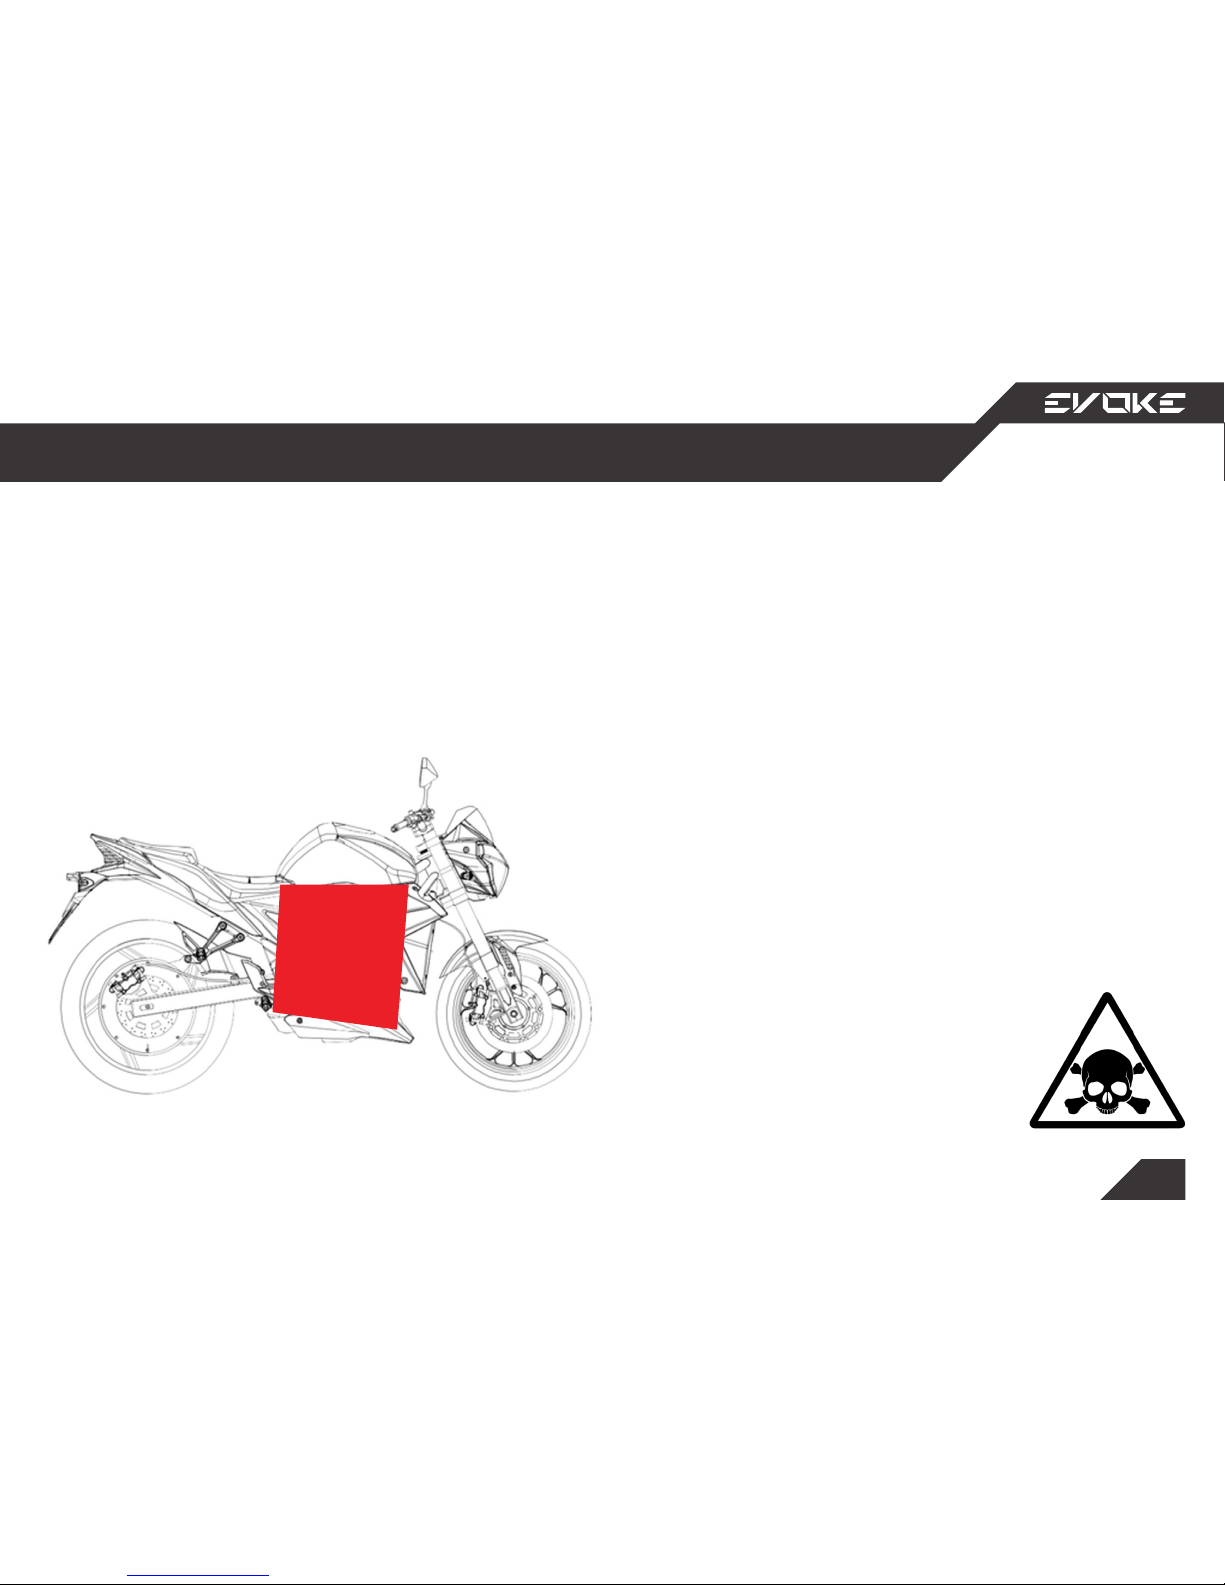
Do not puncture
RED AREAS on
the image.
DISCONNECT main battery connector located
behind front fork
First Responder Information - High Voltage Components Locations
In the event of an accident
What to Do
Page 65

65
Emergency roadside assistance is standard on all new Evoke Urban S models for the duration of the
warranty period. Contact your authorized Evoke Urban S dealer for further information.
Product quality and customer satisfaction are critical ingredients to the success of Evoke.
This information is designed as a tool to help you understand how to eciently service our products
by working with an Authorized Evoke Dealer near you or a Regional Dealer Support Representative.
Should a question or problem arise concerning service and warranty which cannot be resolved by an
Authorized Evoke Dealer or a Regional Dealer Support Representative, please contact Evoke head-
quarters directly.
What to Do
roadside assistance
Page 66
66
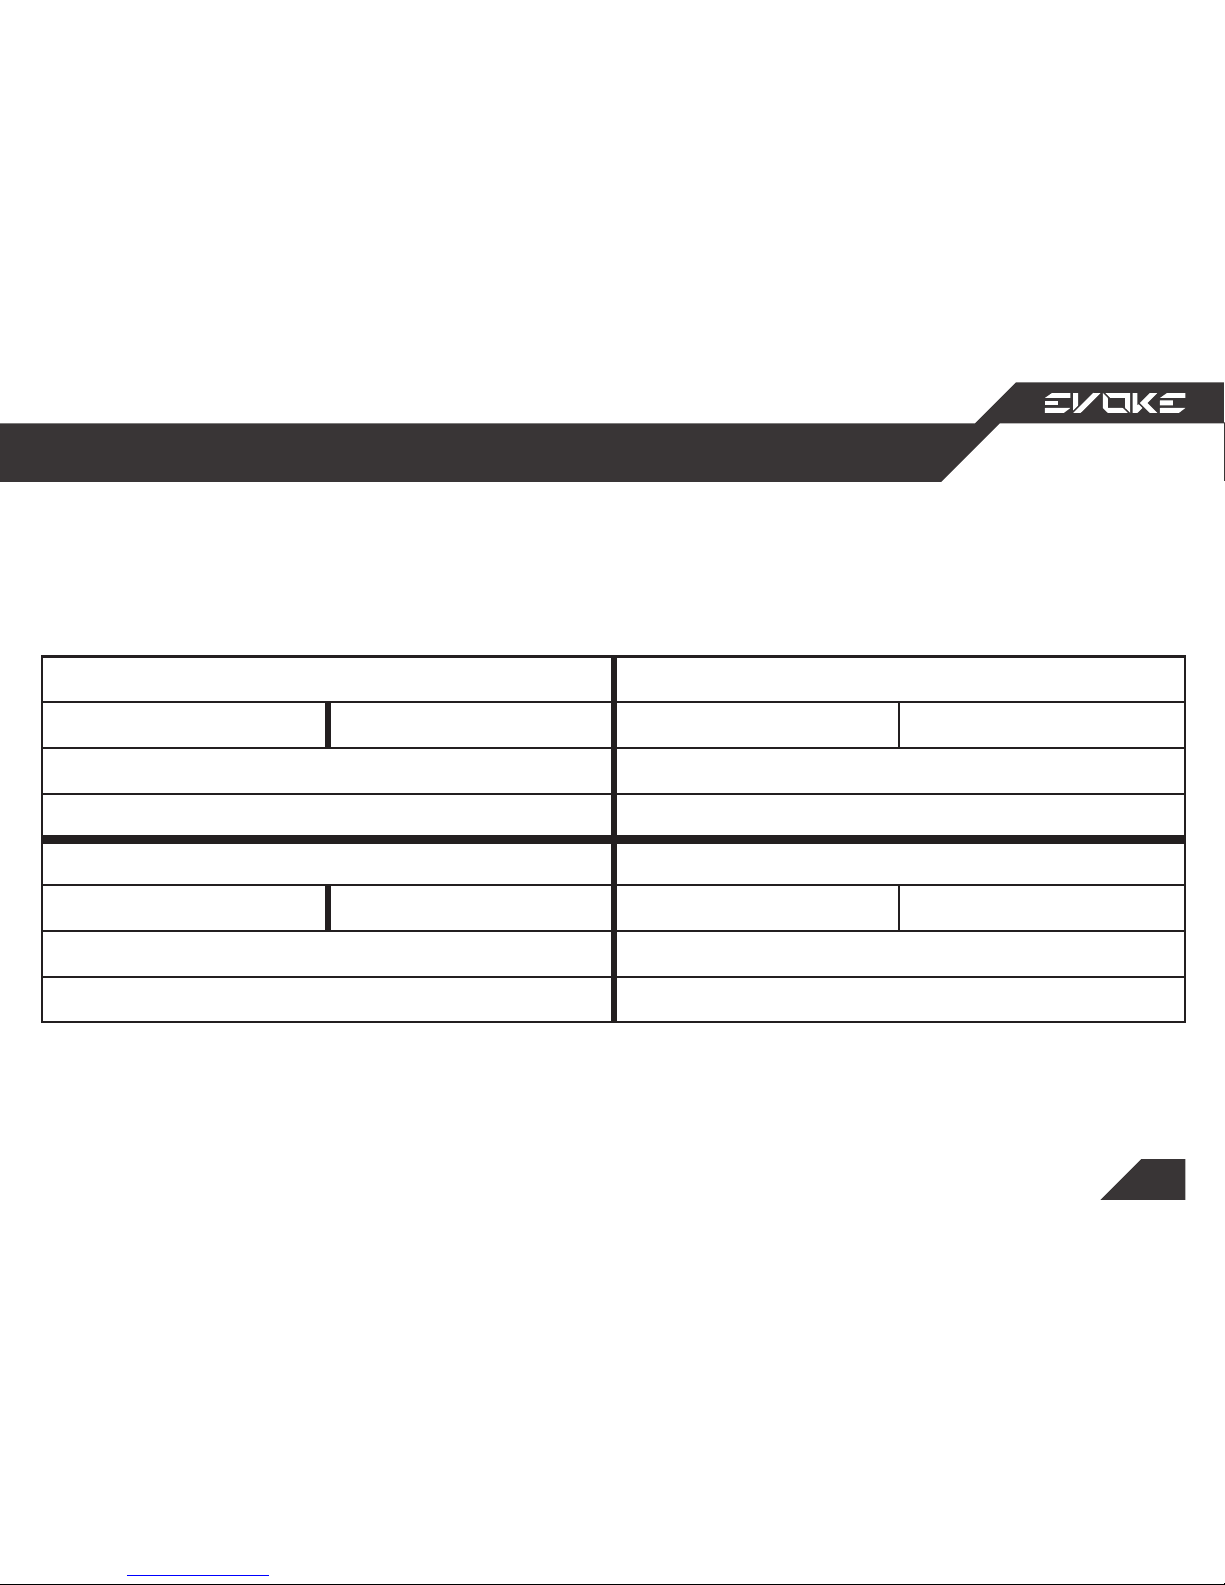
After you have had your Urban S serviced, please make sure that the appropriate maintenance record has been completed.
Maintenance Records
10.000 km 20.000 km
Date: Date:
Notes: Notes:
Peformed by: Peformed by:
40.000 km 60.000 km
Date: Date:
Notes: Note:
Performed by: Peformed by:
Page 67
67
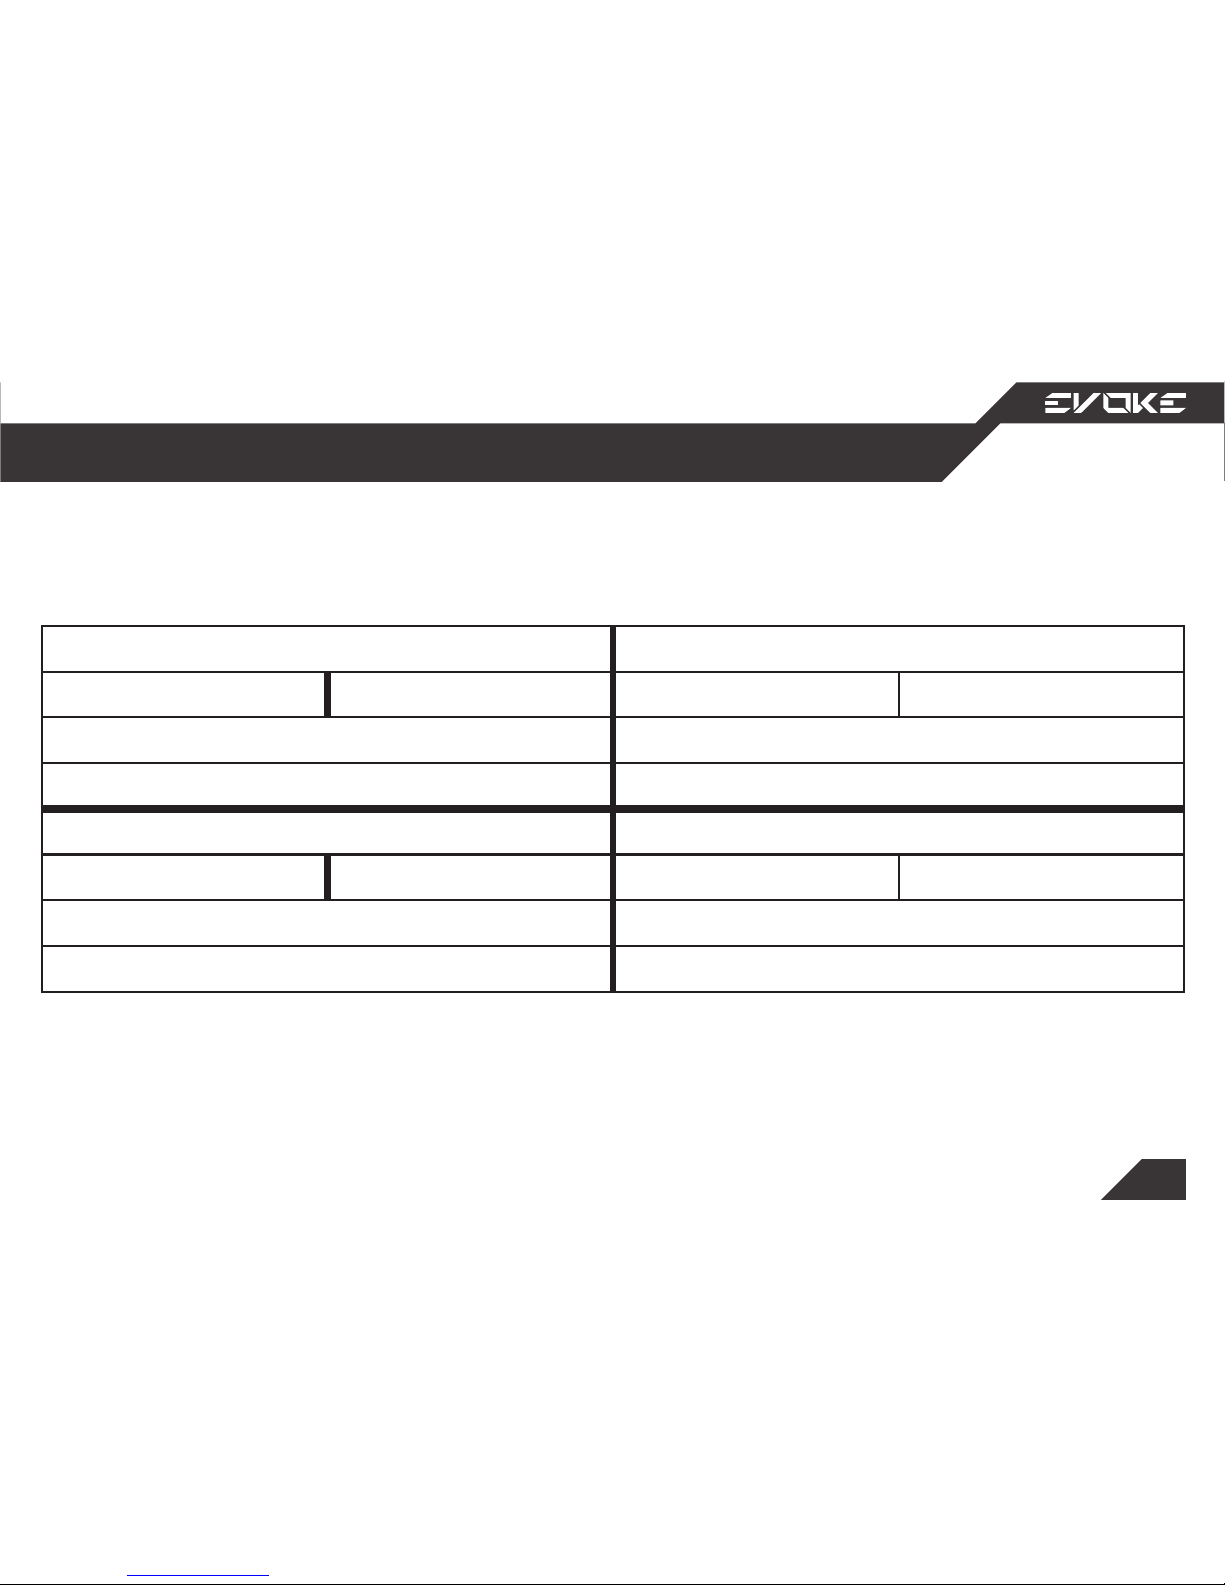
Maintenance Records
80.000 km 100.000 km
Date: Date:
Notes: Notes:
Peformed by: Peformed by:
120.000 km 130.000 km
Date: Date:
Notes: Note:
Performed by: Peformed by:
Page 68

68
All Evoke electric motorcycles come with
a 2 year or 20,000km tire to tire warranty.
All Evoke lithium ion batteries are warrantied for 2 years or 20,000km (Unless
otherwise stated)
Items Not Covered By Warranty
The warranty shall NOT apply to:
• Normal maintenance and service, including, without limitation, adjustments to brakes, tire
pressure, due to wear and tear from operation of the vehicle and not as a result of a defect in
materials and workmanship;
The replacement of normal wear parts, including, without limitation, all rubber parts, bulbs,
lenses, wires, cables, fuses, tires, tubes and brake lines, due to wear and tear from operation of
the vehicle and not as a result of a defect in materials and workmanship;
Any repairs or replacements required as a result of accidents or collision;
Any defects caused or repairs required as a result of abusive operation, negligence, accident,
improper installation (modication), or inappropriate use as outlined in this Owner’s Manual;
Any products tampered with, modied, adjusted, or repaired by any unauthorized party, including the owner;
Any damage caused or resulting from the use of inappropriate tools;
Any additional accessory installed by the owner which causes defect of additional parts;
Any damage caused by external or environmental conditions such as abnormal weather, acci-
dents, earthquake, etc;
Any product received without appropriate model and frame serial number identication;
Any product used for rental or racing purposes;
Any cosmetic damage to the surface or exterior;
Failure to use vehicle in the proper manner, or follow the maintenance and storage procedures
in this Owner’s Manual (i.e., motorcycle designed for “on the road use” and used as “o road
vehicle”).
Warranty
Page 69
69
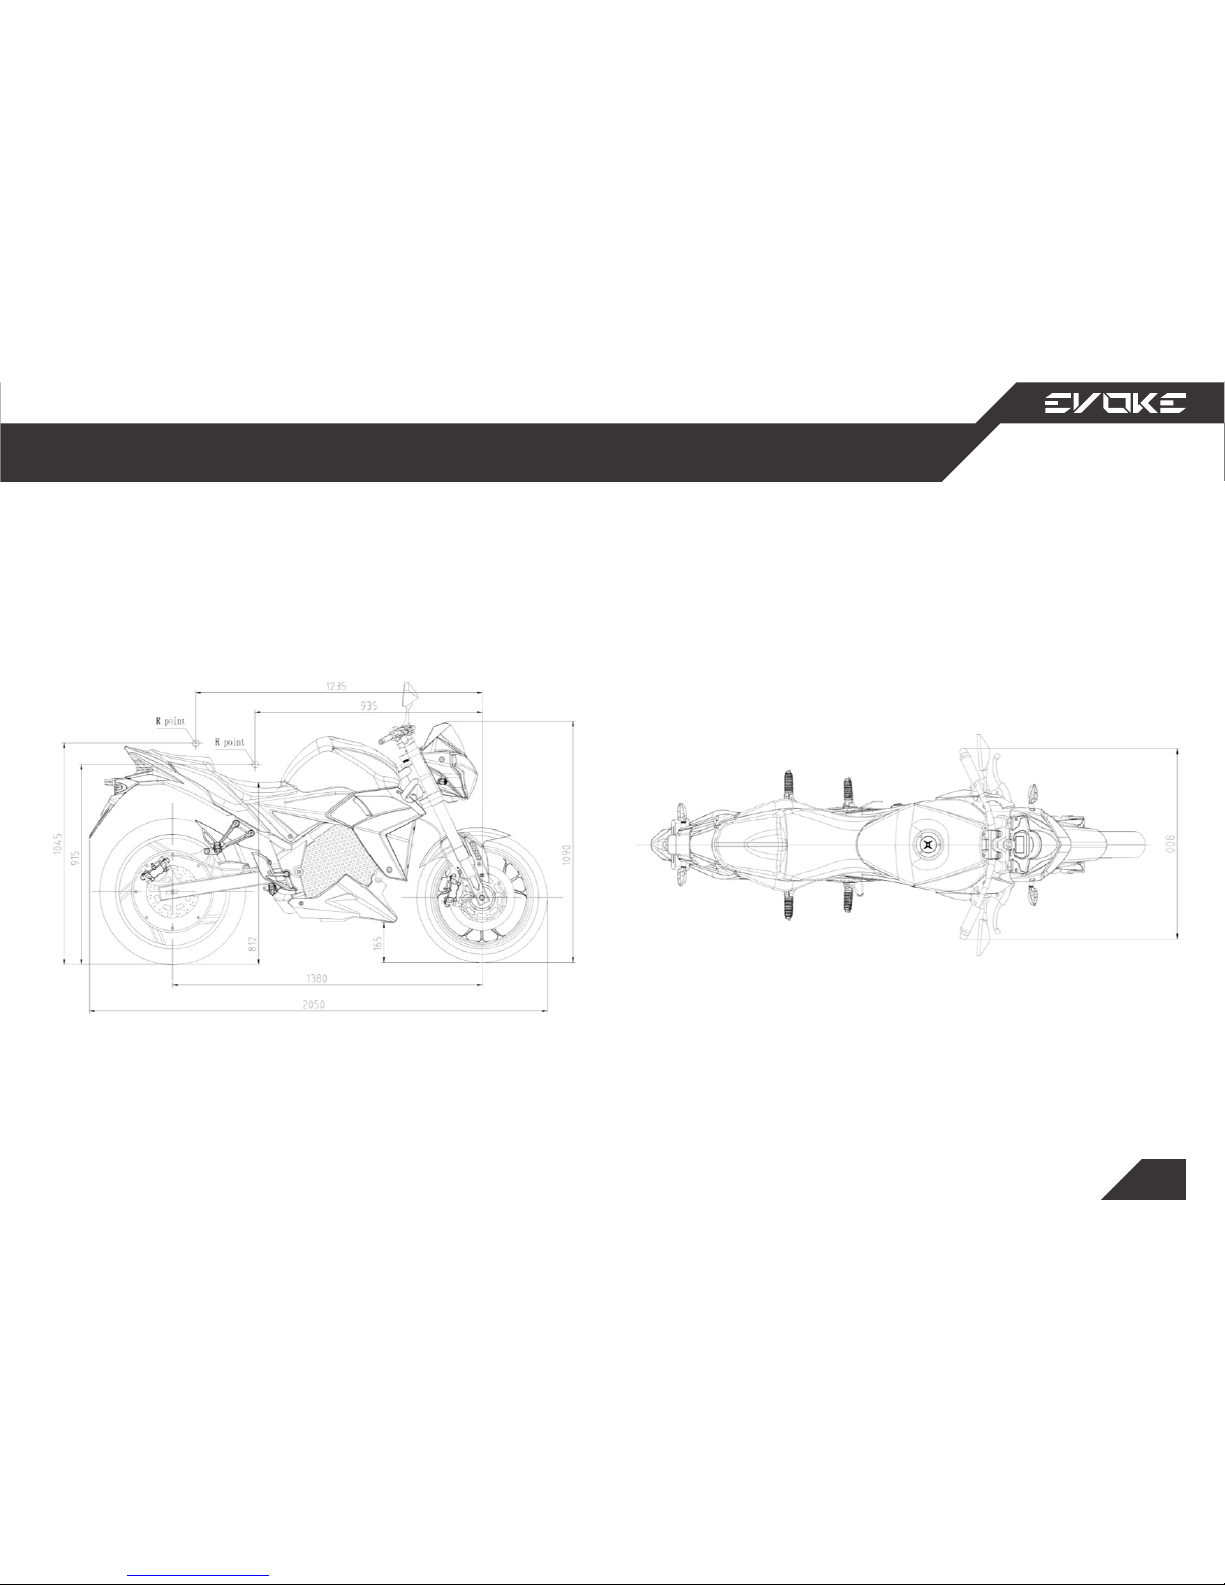
Dimensions
Page 70

Website: www.evokemotorcycles.com
www.evokeev.com
[email protected]
 Loading...