

EvoJet pocketleader xl v4 Instructions Manual

POCKETLADER XL V4 - Instructions
Contents
Preface.........................................................................................3
Warning and Safety Notes...........................................................4
Technical Specifications...............................................................6
Connections POCKETLADER XL ...............................................7
Connections Balancer..................................................................8
Controls......................................................................................10
Turning ON and OFF and SETup...............................................11
Charging and Discharging..........................................................12
1. NiCd and NiMh (NiXx) Batteries .......................................12
2. Lithium Ion/Polymer/FerroPhosphate (A123).....................17
3. Lead and Lead Acid Batteries (Pb)....................................22
Configuration - SETup mode......................................................26
Selectable Setup-Menus........................................................27
Setup 1: CHARGER..............................................................28
Setup 2: LiPo to Setup 6: NiXx..............................................32
The SIO Interface.......................................................................35
Updating the POCKETLADER Firmware...............................36
Specifications of the SIO Interface........................................38
Recommended Charging Currents (Overview) ..........................39
2

POCKETLADER XL V4 - Instructions
Preface
Please read these instructions completely and attentively, before
using the unit. This will help you to exploit all the functions of your
new POCKETLADER battery charger. The warnings and safety
notes are particularly important. With the powerful
POCKETLADER XL, most battery types used for Modellbau,
such as nickel metal hydride (NiMh), nickel cadmium (NiCd), lead
acid (Pb) and most types of lithium batteries (Lion, LiPo, LiFe
[A123]) can be charged and discharged in the range of 1 V to 33
V and 50 mA to 10 Amps. The Orbit extension is a powerful
Balancer / Equalizer for all lithium-batteries with full supervisory
function and single cell voltage display.
Due to a new technical concept, all functions of the battery charger are managed by a fully digital control system (DDCS).
Furthermore, the technical innovations of the POCKETLADER
also include a step-up/step-down converter, which can charge up
to 300 Watts and up to 10 Amps. This principle not only assures
an extremely low power dissipation, but also a reduction of the
operating current to a minimum with small numbers of cells (high
efficiency).
The POCKETLADER XL can be upgraded to support all common
and future battery types and charging methods by means of a
simple software flash-update. The latest control software
(firmware) can be downloaded at any time via the Internet from
the evoJet website (http://evojet.de) and saved in the flash
memory of your POCKETLADER XL. Thus your POCKETLADER
XL is optimally prepared for today's and tomorrow's applications.
Its ultra-compact dimensions and robust design make the
POCKETLADER a constant companion for both indoor and outdoor R/C adventures. We wish you a lot of fun and always a
good flight or drive!
Yours evoJet -Team evoJet GmbH
52379 Langerwehe
http://evoJet.de
3

POCKETLADER XL V4 - Instructions
Warning and Safety Notes
In order to guarantee a safe operation of your POCKETLADER XL,
please always observe the safety notes on this page. The manufacturer
takes no responsibility for damage caused by improper use. The
POCKETLADER XL charger is designed to be powered by a 12 V DC or
24 V DC car battery. Dont connect it to any AC power source.
● This product is not designed for use by children under the age of 14. This is
not a toy.
● The housing of the charger serves as a heat-sink. Operate the device in a
place where the heated air around the housing can be dissipated.
● If the charger, or the battery gets very hot, immediately interrupt the power
supply. A moderate warming of the charger (up to approx. 45 °C / 110 °F) is
normal at high-power operation.
● The charger and the battery to be charged should be set up on a heat-
resistant, non-inflammable and non-conductive surface for use. Never place
the charger directly on a car seat, carpet or similar. Keep all inflammable
and volatile materials well away from the charging area. Provide a good
ventilation. Defective batteries can explode or burn !
● The charge output sockets and connecting leads may not be modified and
may not be interconnected in any way. There is a danger of short-circuit
between the charge outputs and the cars body when the charger is
connected to the car battery. The charging leads and connecting leads may
not be coiled up when the charger is in use. Avoid any short-circuiting the
charging output or your model battery with the car body. For this reason the
charger must never be placed directly on the cars body.
● Always observe the charging current and voltage limits recommended by
the battery supplier. Excessive currents or voltages can damage or explode
the battery.
● Do not charge or discharge batteries unattended. Especially lithium
batteries have a high risk of fire or explosion. Only one battery may be
connected to the unit for charging at a time.
● The following types of battery may not be connected to the charger:
X NiCd / NiMh batteries with more than 20 cells, Lithium batteries with more
than 8 cells, or lead-acid batteries with a nominal voltage of more than 24V.
X Batteries which require a different charging method than for NiCd, NiMh,
Lithium or lead-acid types.
4

POCKETLADER XL V4 - Instructions
X Faulty or damaged cells or batteries.
X Batteries consisting of parallel-wired cells, or cells of different types or
consisting of old and new cells mixed, or cells of different makes.
X Non-rechargeable batteries(drycells). Caution: explosion hazard !
X Batteries which are not expressly recommended by the manufacturer to
be suitable for the currents which the charger unit delivers during the
charging.
X Batteries which are already fully charged or hot, or only partially
discharged.
X Batteries or packs fitted with an integrated charge circuit or charge
supervisory circuit.
X Batteries installed in a device, or which are electrically connected to other
devices.
● To avoid short-circuits between the banana plugs fitted at the chargeleads,
always connect the charge leads to the charger first, and then to the battery
to be charged. Reverse the sequence when disconnecting the battery.
● Before any charging doublecheck the proper qualification of the selected
charging program for your battery.
● Have you setup the correct charge or discharge current? Have you set the
important cut-off voltage when charging NiMh / NiCd batteries? Are all
connections correct? Avoid any intermittent contacts.
● Always be careful! A battery could explode or burn, if the charger does have
a fault or if the user chooses the wrong charging program and settings.
● Do not operate the device in a wet environment (for example, do not place it
on wet grass).
● Do not open the housing. In case of defects of the device, please contact
the manufacturer directly.
● Do not clean the device with aggressive detergents, but with a soft, dry or
barely damp cloth.
5

POCKETLADER XL V4 - Instructions
Technical Specifications
Power supply:
8 V - 30 V DC car battery with 12V
or 24V
Operating current:
typ. 125 mA - max. 20 A adjustable
Stand-by current (OFF):
< 100 µA
Output (reverse polarity
protected):
1 V - 33 V / 50 mA - 10 A
Corresponding to:
1 - 20 NiMh cells
or 1s - 8s lithium
or 2V - 24 V lead battery
Charging power:
Up to 300 Watt
Discharging:
50 mA - 3 A, max. 30 W
COMBO-Balancer 8S:
up to1 Ampere equalization
in the range 3,4V – 4,23V
LCD display:
32 character 10 mm, backlighted
SIO interface:
Connector for Personal Computer
measurement curves, Flash
software updates (via Orbit Microlog
software)
Dimensions (L x W x D):
164 x 145 x 35 mm
6.4“ x 5.7“ x 1.3“
Weight:
660 gr. / 1.45 lb
6
POCKETLADER XL V4 - Instructions
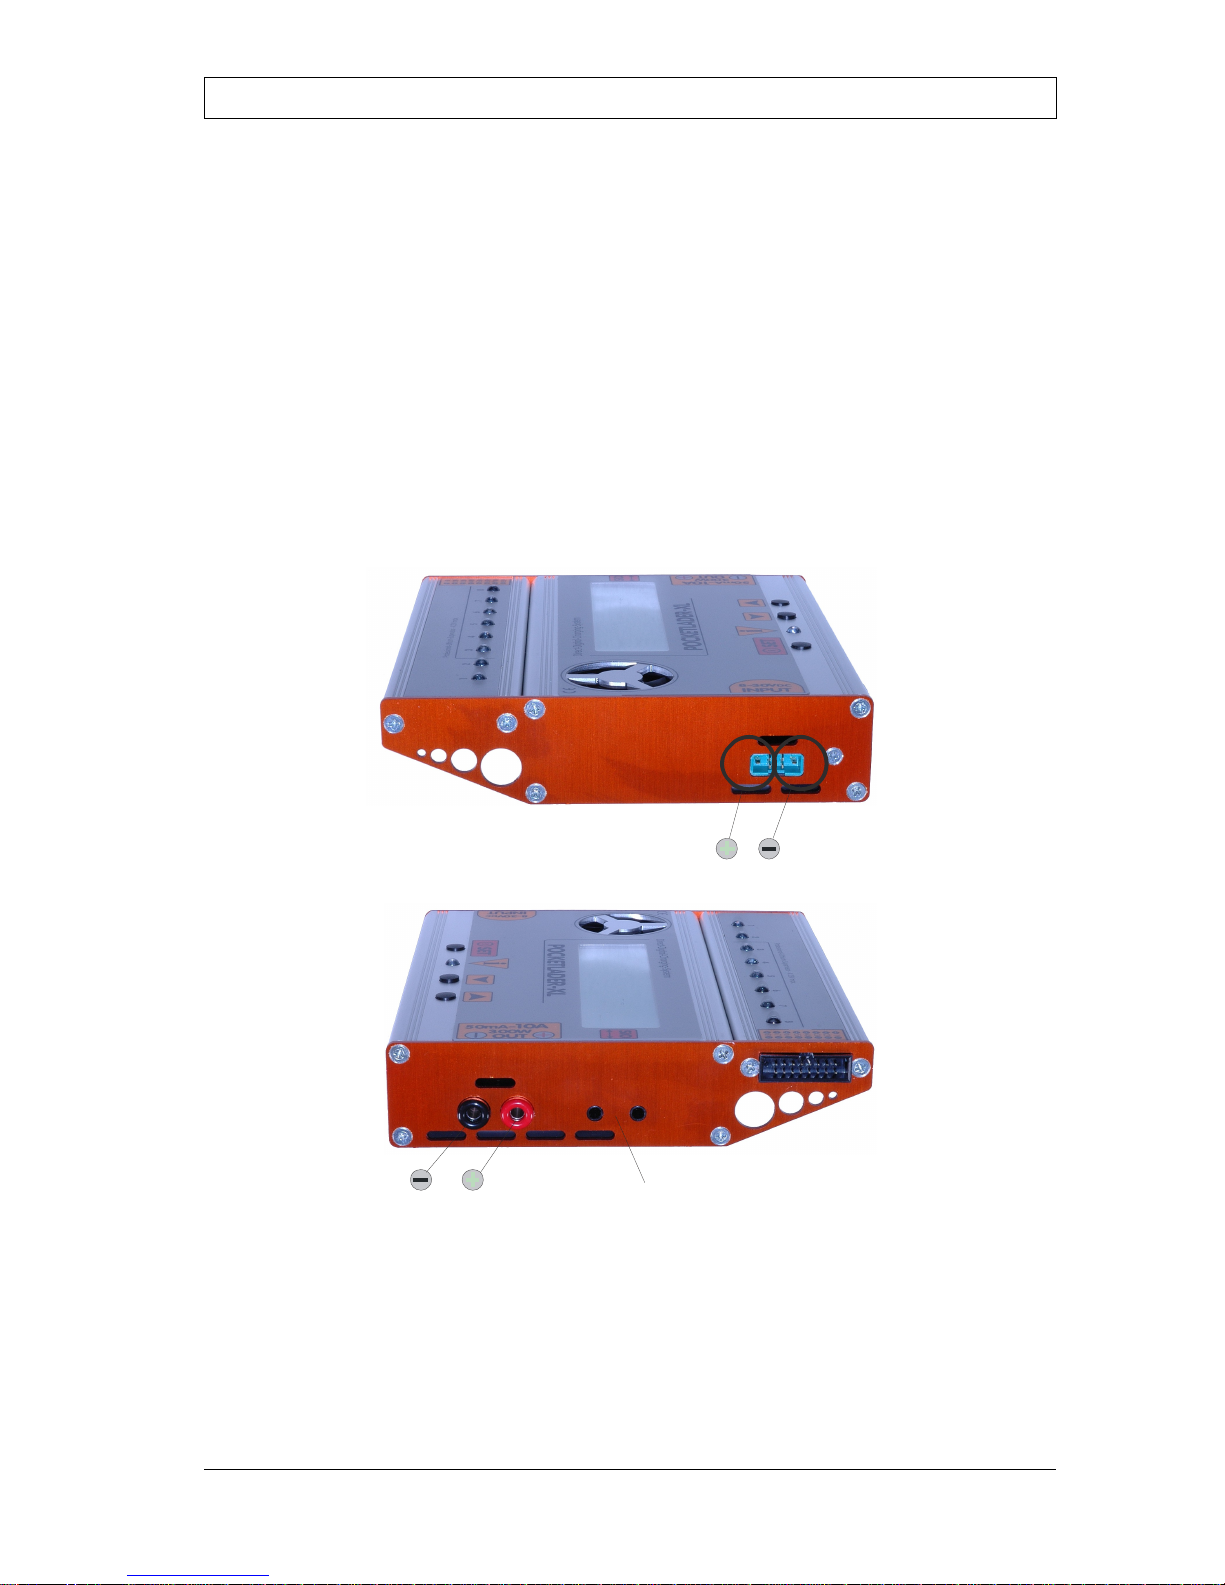
Connections POCKETLADER XL
On the left side of the housing, you will find the connector for the
power supply (stabilized DC power adapter or battery).
On the right side are the plug sockets for the connection of the
battery to be charged as well as the SIO interface for data exchange with a PC (e.g. for recording charging curves or for firmware updates).
7
Input
8V - 30 VDC max. 20A
MPX/MG6
4mm
Battery terminal
1V - 34V DC
3.5mm Stereo
SIO-Interface
LithiumBalancer
POCKETLADER XL V4 - Instructions
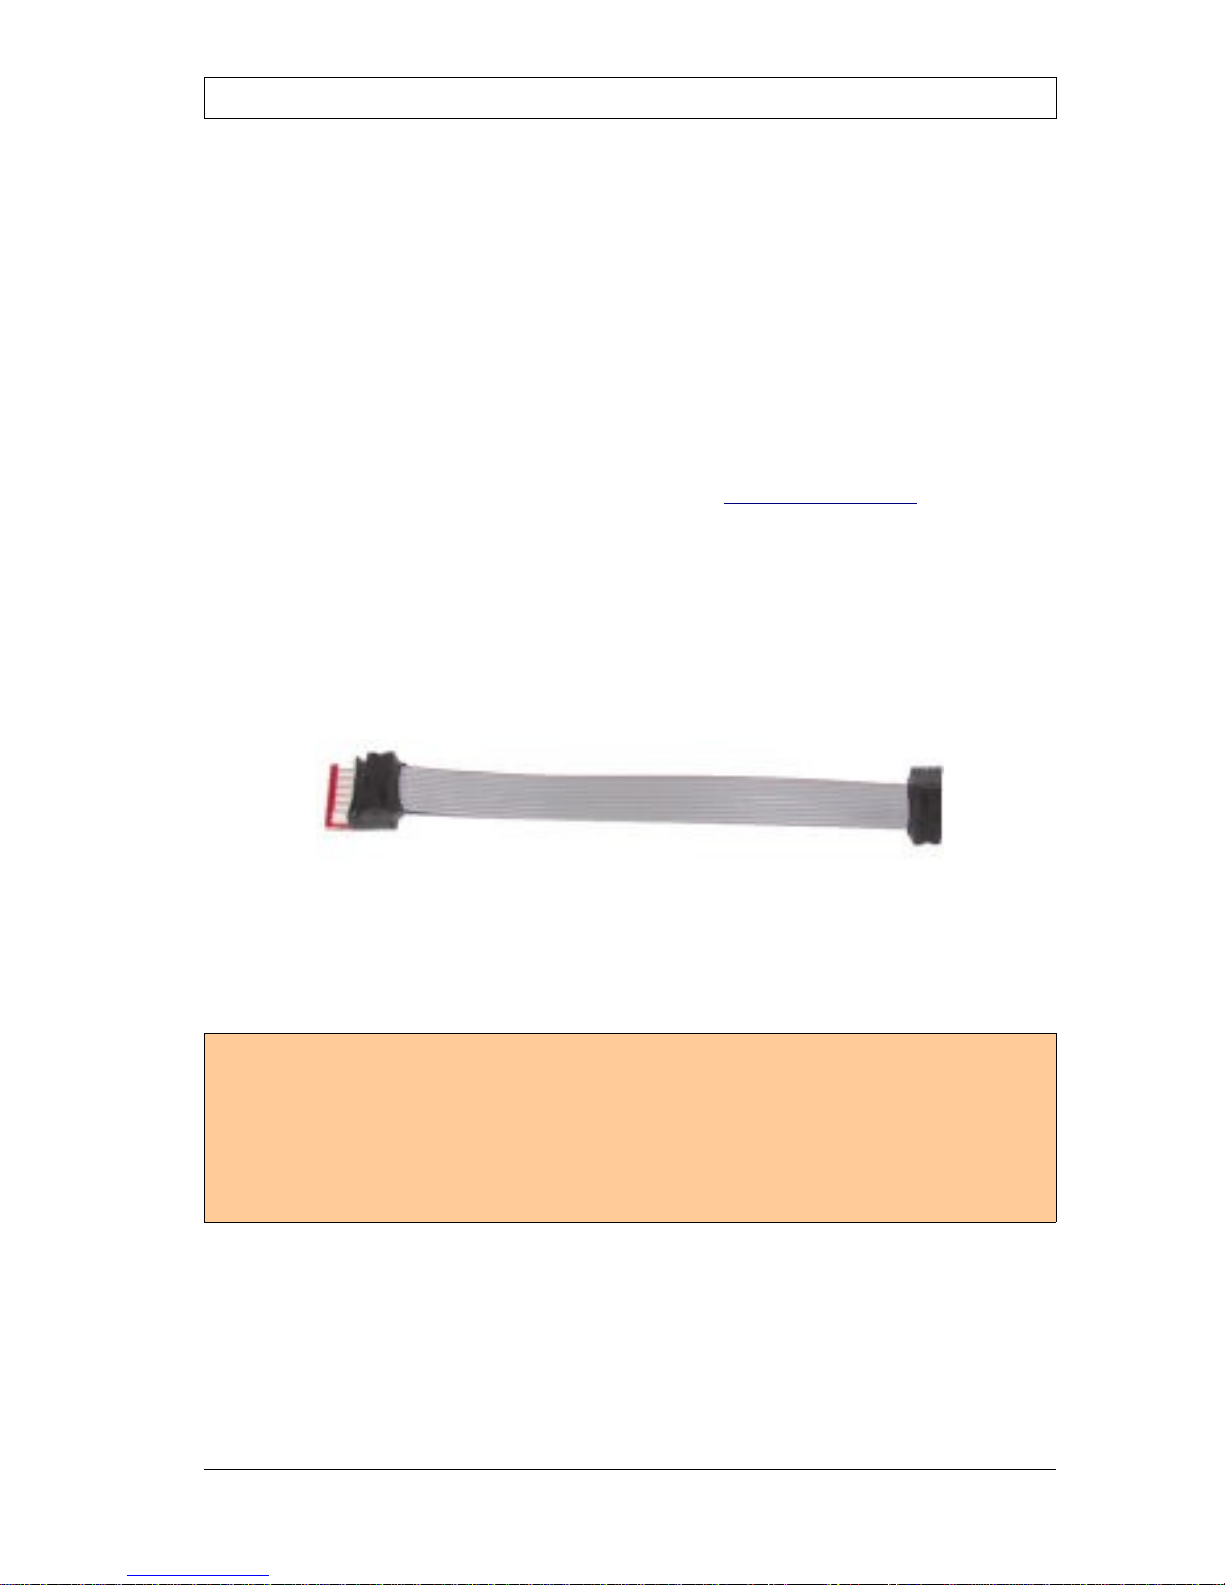
Connections Balancer
On the right side are the plug sockets for the connection of the
lithium battery adapter, see below. This is a 16-pin diagnosis for
up to 8s batteries. There are 2-pins per s-cell available (+) and (-)
which are fully floating. This means, it is absolutely equal in which
order the cells are being connected, as long as (+) and (-) are not
wrong.
Many ready to use diagnosis-adapter are available for all
common used LiPo/LiFe batteries: (see http://evojet.de)
Example: [0688G5] Adapter G5 – Graupner/robbe/Kokam 5S
Use always the right adapter-type for your battery.
For a 3S-battery a 3S-adapter, for a 4S-battery a 4S-adapter and so on.
Small 2S-LiPo batteries may be plugged in with 3S/4S/5S-adapter –
where it doesn't matter to plug it in right or left-justified.
8

POCKETLADER XL V4 - Instructions
Single-cell Voltages
An internal data-connection supplies the POCKETLADER-XL
with the voltage information of the single cells in a battery pack.
They can easily be toggled with the SET key during charging and
appears in the LCD instead of the time display. The cell-voltages
display will also automatic rotate slow.
A longer press on the SET key will return to the time-display.
Blue LED-flasher
Eight blue LED's indicate the functional status of the 8s balancer:
Connect the lithium-battery: Checkup the diagnosis adapter and
connectors. Comparing to the S-cells of the battery, the LED's
are flashing fast for about 10 seconds.
Balancing/Draining:
When a LED lit-on, the compared battery cell will be balanced /
drained and the battery pack will become more equalized. A
simple short flashing of a LED indicates attention due to
increasing cells voltages when charging. An LED off condition
means actual no more action required.
9

POCKETLADER XL V4 - Instructions
Controls
All keys and displays for controlling the device are located on the
upper side of the unit.
More information about using the keys and the meaning of the
displays can be found on the following pages.
10
ON - OFF
SETup Button
Up - Down
Buttons
Info-LED

POCKETLADER XL V4 - Instructions
Turning ON and OFF and SETup
● The Pocketlader powers-ON automatically, when the power
supply (stabilized DC power adapter with 8 V – 30 Volt or a
sufficiently dimensioned battery) is applied. See Setup 17:
POWERUP-ON must be YES. If set to NO, you have to press
the SET key for more than 2 seconds for manually turning the
charger on.
● By keeping the SET key pressed for 4 seconds when turning
the device on, the charger switches into SETup mode. In this
mode, you can modify the basic configuration settings of your
POCKETLADER-XL. For more information, see the section
SETup mode starting on page 26.
The SETup mode can also be entered from each charging
mode by a quick double-click on the SET key. But only if there
is no battery connected.
● To turn the charger OFF, press the SET key again and keep it
pressed until the device switches off.
11
POCKETLADER XL V4 - Instructions
Charging and Discharging
First select the charging program (mode) suitable for your battery
type by using the Up/Down keys. The program is shown in the
upper left corner of the display.
1. NiCd and NiMh (NiXx) Batteries
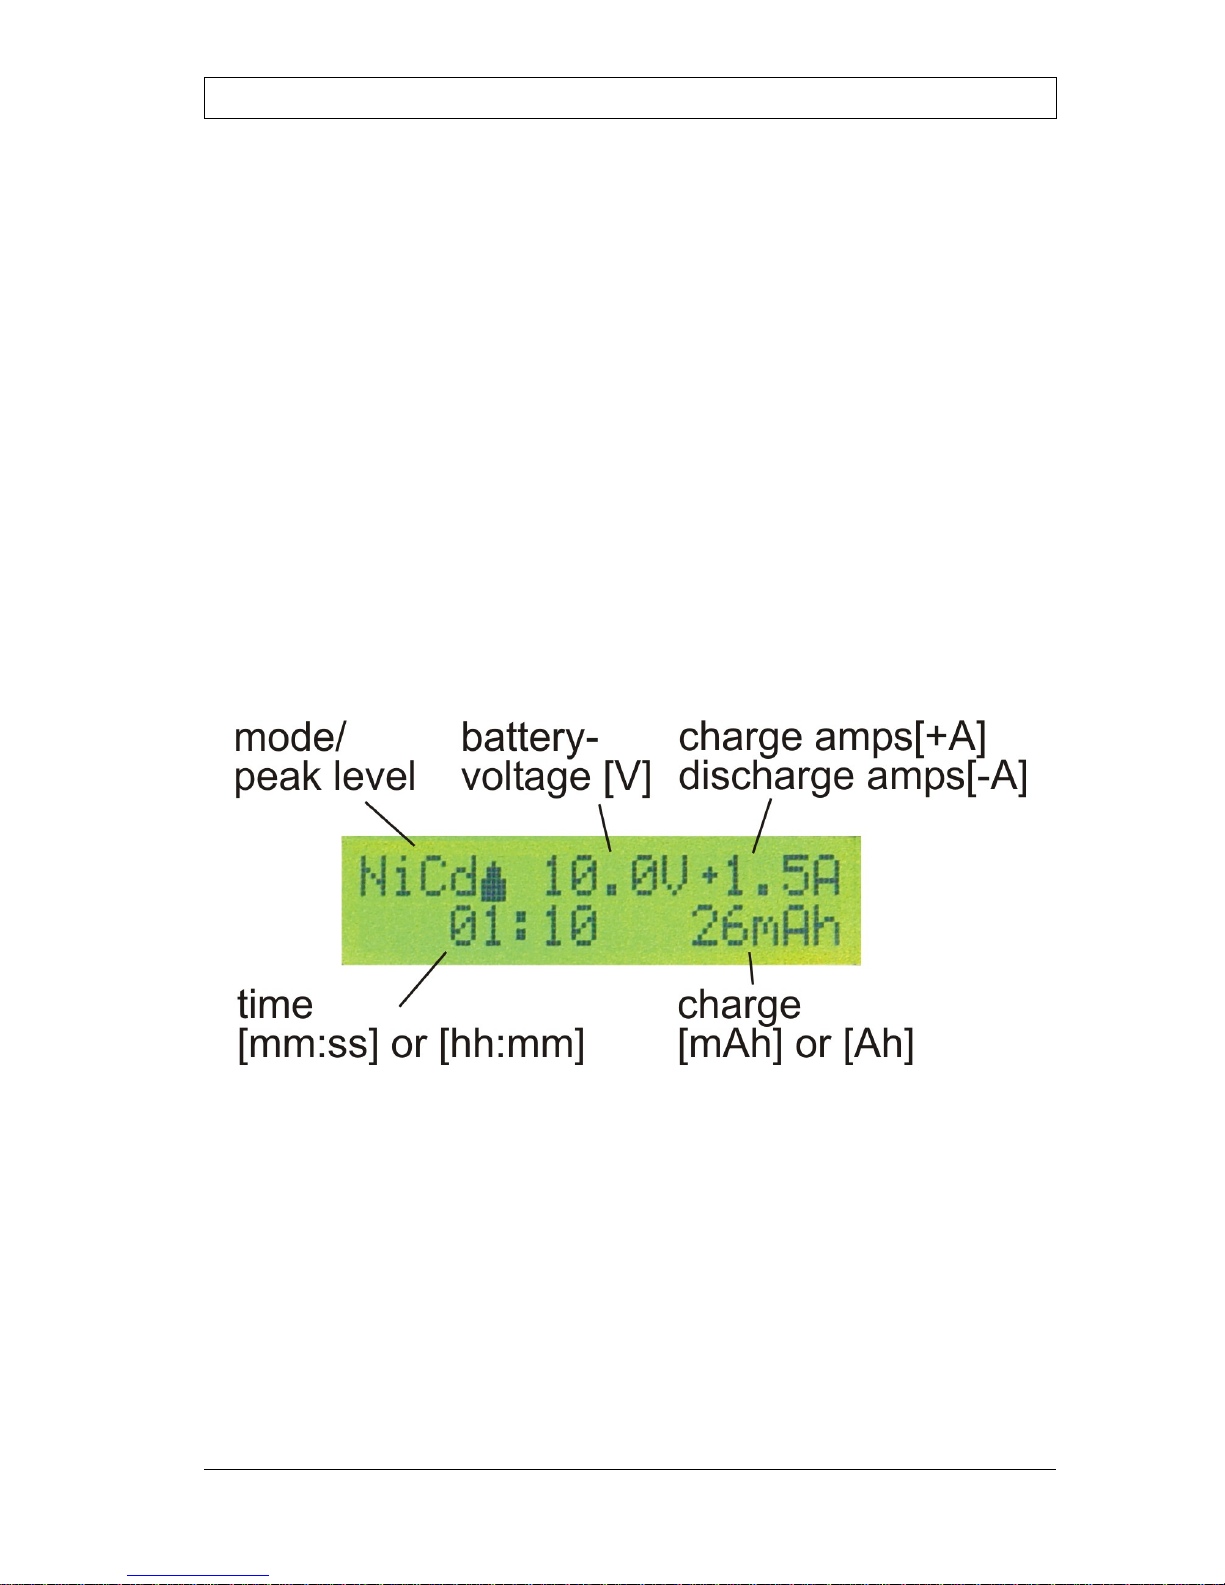
These battery types are charged with a selectable constant current. The charging process is terminated either by delta peak de-
tection (▲-cut-off when the battery is full) or by charging current
drop-down (NiXx). The display shows the following information:
For each battery type (NiMh and NiCd), two different delta peak
switch-off values can be selected, symbolized by the size of the
triangle icon (delta) after the program name. The NiXx mode
uses CC/CV (constant current/constant voltage), see also
SETUP 6: NiXx-mode.
12

POCKETLADER XL V4 - Instructions
Program Delta peak per cell
NiMh ▲ -0.30 % ≈ -4.5 mV
NiMh+▲
-0.50 % ≈ -7.5 mV
NiCd ▲
-0.70 % ≈ -10.5 mV
NiCd+▲
-1.30 % ≈ -19.5 mV
NiXx CC/CV Voltage 61:NiXx-CV/MAX.
To achieve an optimal charging result and temperature behavior,
we recommend the higher delta peak values (programs NiMh+
and NiCd+) for charging currents up to 1.5 C* and the smaller
values (NiMh and NiCd) for currents above 1.5 C*.
Charging current preselection
To select the charging or discharging current, first hit the SET
key and then the Up/Down keys to switch between the available
values.
● For charging, select a positive current value
(+0.05 A to +10 A).
● For discharging, select a negative current value
(-0.05 A to -3.0 A).
13
 Loading...