

Page 1
Legal Information
Warnings
Please pay attention to the tips within the manual so as to avoid personal injury or
property losses. The tips for personal injury are indicated in warning triangles while
the tips only related to property losses have no warning triangles. The warning tips are
listed as follows with the hazardous scale from severe to slight.
Danger
If handled carelessly, death or severe human injury will occur.
Warning
If handled carelessly, death or severe human injury might occur.
Caution
Warning triangle indicates that slight human injury might occur if handled carelessly.
Note
Unexpected result or status might occur, if not handled according to the tips.
Professional Personnel
The product/system covered by the manual can only be handled by qualified and
professional personnel. During operation, please follow the respective instructive
manuals, especially the safety warnings. The professional personnel have been trained
and possess relevant experiences; therefore, he/she could be aware of the risks of the
product/system and avoid possible damages.
EVOC Product
Please pay attention to the following instructions:
Warning
EVOC product can only be used according to the descriptions within the manual,
including the contents and the relevant technical documents. If the products or
components from other companies are required, please get the recommendation and
grant from EVOC first. Proper transportation, storage, assembly, installation,
debugging, operation and maintenance are prerequisite to ensure product safety and
normal operation; therefore, please ensure permitted environment conditions and
pay attention to the tips within the manual.
Page 2

Copyright Notice
Information offered in this manual is believed to be correct at the time of printing, and
is subject to change without prior notice in order to improve reliability, design and
function and does not represent a commitment on the part of the manufacturer. In no
event will the manufacturer be liable for direct, indirect, special, incidental, or
consequential damages arising out of improper installation and/or use, or inability to
use the product or documentation.
This user manual is protected by copyright. No part of this manual may be reproduced,
stored in any retrieval system, or transmitted, in any form or by any means,
mechanical, electronic, photocopied, recorded or otherwise, without the prior written
permission from the manufacturer.
Trademarks
EVOC is a registered trademark of EVOC Intelligent Technology Co., Ltd. Other
product names mentioned herein are used for identification purposes only and may be
trademark and/or registered trademarks of their respective companies.
Warranty Terms:
The warranty on the product lasts for two years. If the user has additional
requirements, the contract signed between the two sides shall prevail.
Please visit our website:
or send an email to the Technical Support Mailbox [email protected]
(International) or [email protected]
Hotline: 4008809666
http://www.evoc.com
(Domestic) for consultation.
for more information,
Page 3
About this manual
Scope of the Manual
The manual is appropriate for EVOC NPC-8220.
Convention
The term “the PC” or “the Product” within the manual usually stands for EVOC
NPC-8220.
Instructions
Safety instructions
To avoid property losses or individual injury, please pay attention to the safety
instructions within the manual. The warnings within the manual are marked with
warning triangle
potential hazard.
History
The version of this manual:
, whose existence is dependent upon the scale of the
Version Time
B00 2016.10
C00 2017.4
C01 2017.9
C02 2017.12
Page 4
Safety Instructions
General Safety Instructions
Caution
Before you have read related safety instructions, please do not expand your device.
This device is compliant with related safety requirements. If you have any doubt
about the effectiveness of installation in the planned environment, please contact your
service representative.
Repair
The PC can only be repaired by authorized personnel.
Warning
Unauthorized opening of the PC and improper repair may cause serious damage to
the PC or endanger users’ personal safety.
System Expansion
Only system expansion devices designed for this PC can be installed. Installing other
expansion devices may damage the system and violate regulations on radio
interference suppression. To know the system expansion devices that can be installed,
please contact technical support team or local distributor.
Caution!
If the PC is damaged due to improper installation or replacement of system
expansion devices, the warranty for the product will become invalid.
Battery
The battery can only be replaced by qualified personnel.
Caution!
If the battery is not replaced according to the instructions, it may have the danger of
explosion. It can only be replaced by the same type of battery or batteries
recommended by the manufacturer. The used battery must be disposed according to
local laws and regulations.
Warning!
Danger of explosion or release of hazardous substances may exist! Therefore, please
do not put the Li-ion battery into fire, weld it onto cell body, open, short-circuit or
reverse polarity of the battery, and do not heat it up to above 100℃. Dispose the
battery according to the rules, and avoid direct sunlight, moisture and condensation.
Page 5

ESD Instructions
The following label can be used to identify the modules that contain electrostatic
sensitive devices:
When operating the modules that contain electrostatic sensitive devices, please follow
the instructions below:
When operating the modules that contain electrostatic sensitive devices, make
sure to release static electricity on your body (for example, by touching a
grounded object).
All the devices and tools should not contain ESD.
Before installing or removing modules that contain ESD, make sure to pull out
the power plug and remove the battery.
When assembling modules that contain ESD, always handle them by their edge.
Please do not touch any connector pin or conductive part on the modules that
contain ESD.
Page 6

Contents
1. Product Introduction .................................................................................................1
1.1 Overview .......................................................................................................1
1.2 Specifications ................................................................................................2
1.3 Operating Instructions ...................................................................................6
1.3.1 External Functions.............................................................................6
1.3.2 Internal Layout ..................................................................................8
1.3.3 Operation Control..............................................................................9
1.4 Status LED...................................................................................................10
2. Application Scheme ................................................................................................11
2.1 Transportation..............................................................................................11
2.2 Storage......................................................................................................... 11
2.3 Opening the Box and Initial Examination....................................................12
2.3.1 Opening the Box..............................................................................12
2.3.2 Markings for PC Identification........................................................12
2.4 External Environment Conditions ...............................................................12
3. Product Installation.................................................................................................14
3.1 Installation Information ...............................................................................14
3.2 Mounting Method........................................................................................14
3.2.1 19″ Rack
4. PC Connection........................................................................................................15
4.1 Things to Know before Conn
4.2 Product Grounding ......................................................................................15
4.3 Connecting the Device to Power .................................................................16
5. Debugging ..............................................................................................................17
5.1 Operating System ........................................................................................17
5.2 Port Definition.............................................................................................17
5.2.1 COM port ........................................................................................ 17
5.2.2 LAN port .........................................................................................17
Mount ..............................................................................14
ection............................................................. 15
Page 7

5.2.3 USB Port .........................................................................................18
6. Software Introduction .............................................................................................19
6.1 BPI Overview ..............................................................................................20
6.2 FMI Overview ............................................................................................. 22
6.3 eManager Software......................................................................................23
6.3.1 Operating Environment ...................................................................23
6.3.2 Function...........................................................................................24
6.3.3 Firmware Management....................................................................27
7. Installing Expansion ...............................................................................................30
7.1 Opening the PC............................................................................................30
7.2 Installation and Removal of CFast Card...................................................... 31
8. PC Maintenance......................................................................................................33
8.1 Removal/Installation of Hardware
8.1.1 Carry out Maintenance ....................................................................33
8.1.2 Preventative Maintenance ...............................................................33
8.1.3 Replacing Backup Battery............................................................... 34
8.2 Installing the Drivers ...................................................................................35
9. Dimensions Drawing .............................................................................................. 36
9.1 Dimensions Drawing Overview...................................................................36
9.2 Product Outline Dimensions Drawing.........................................................36
9.3 Installation Dimensions Drawing ................................................................37
9.3.1 Product Installation Dimensions Drawing....................................... 37
10. Appendix...............................................................................................................38
10.1 Troubleshooting and Solutions ..................................................................38
10.2 Common Alarm Information Analysis and Solution..................................40
10.3 ESD Guideline...........................................................................................41
10.4 Abbreviations.............................................................................................43
10.5 Terminology Glossary ...............................................................................52
Assembly ..............................................33
Page 8
Product Introduction
1. Product Introduction
1.1 Overview
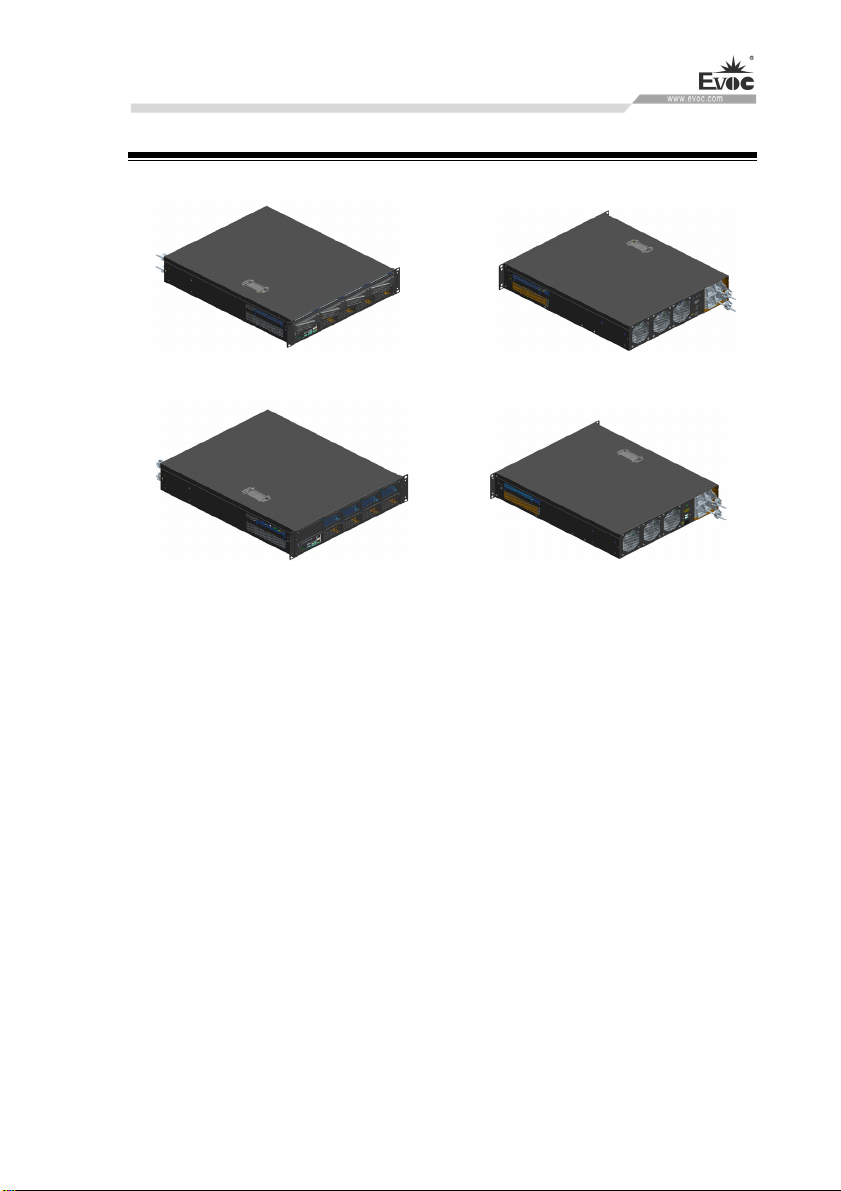
NPC-8220-01
NPC-8220-02
NPC-8220 is a high-performance network application platform based on X86
architecture. The PC contains Intel® C612 chipset, supports up to two Intel® Xeon®
processor E5-2600 V3/V4 family CPUs, onboard 16 DDR4 memory slots, and
supports Windows 7/8/8.1/10, Windows Server 2008R2/2012/2012R2/2016 and Linux
(Kernel 2.6 above) operating systems.
The PC adopts standard 2U, 19-inch rack mount and modular structure design,
supports two standard PCIE X8 slots, one PCIE X8 slot (only provides X4 signal) and
one CFast card expansion. The PC also supports four ENS slots, four 3.5/2.5-inch
drawable HDD bays or supports 8 ENS slots and two 2.5-inch HDD bays, varying
from different configurations. The PC supports single power supply or redundant
power supply, and can meet various network security application needs on the market.
NPC-8220 can be widely used in firewall, anti-virus wall, load balance, Internet
access management and audit, application delivery, flow traffic management, VPN,
DNS, IDS/IPS, UTM and etc.
NPC-8220 · 1 ·
Page 9

1.2 Specifications
Item Definition
Product Introduction
Microprocessor
Chipset
Memory
Main Functional Index
Display
Network
Supports up to two LGA2011-3 package Intel Xeon
E5-2600 V3/V4 family CPUs
Intel® C612
Provides 16 288Pin DDR4 memory slots, supports
DIMM/LRDIMM memory, support multi-channel
function, up to eight independent channels. A single
memory slot supports 32GB memory capacity, which
brings the total memory capacity to 512GB.
Please refer to the end of this table for memory module
installation method
Supports VGA output display;
Supported minimum resolution: 640×480
32bpp@60Hz; supported maximum resolution:
1920×1200 32bpp@60Hz
Provides two 10/100/1000Mbps network ports. LAN1
supports Wake-On-LAN and PXE function. For
NET-2815VD2N-01 motherboard, LAN1 also supports
.
Storage
· 2 · NPC-8220
IPMI remote management function.
When used together with NET-2815VD2N-01
motherboard, it supports four 3.5/2.5-inch drawable
HDD bays; when used together with
NET-2815VD2N-02 motherboard, it supports two
2.5-inch HDD bays.
Supports expansion to one CFast card.
Page 10

Product Introduction
Expandable to two PCIE X8 cards; supports
68.9mm height; 170mm length; compatible with
PCIE3.0/2.0/1.1 standard.
Expandable to one PCIE X8 card (only provides X4
Expansion bus
External IO
dimensions
Major Performance Index
mounting ear)
ports
External
(excluding
Net weight
Color
signal); supports 68.9mm height; 140mm length;
compatible with 2.0/1.1 standard.
Expandable to eight or four EVOC standard ENS
modular cards, varying with different
configurations.
Provides one COM port (RJ45), supporting serial
port redirection.
Provides two GbE network ports.
Provides two USB 2.0 ports.
440mm(W) ×88.1mm(H) ×550mm(D)
About:17.5Kg(excluding package and accessories)
Color of the PC: Diamond black
Temperature
Humidity
Operating temperature: 0℃~45℃
Storage temperature: -10℃~60℃
Relative humidity: 40℃,30%~90% (non-condensing)
NPC-8220 · 3 ·
Page 11
EMC
RELIABILITY
Product Introduction
Radiation disturbance: GB 9254-2008 Class A
Conduction disturbance: GB 9254-2008 Class A
GB/T 17626.2.2006 ESD Level 2
GB/T 17626.4-2006 Burst Immunity Level 2
GB/T 17626.5-2008 Surge(impact) immunity Level
2
MTBF≥50000h
MTTR≤0.5h
Safety
Mechanical
and
environmental
adaptability
Power feature
Notes: 1. ENS modules can be plugged only after AC power is disconnected.
Meets basic requirements for GB4943
Anti-vibration: 5-200Hz/1.0g acceleration,
amplitude: 0.5mm (non-power-on status)
Anti-shock: 10g acceleration, 11ms duration
Noise: ≤55dB
Input voltage/frequency: 220VAC/50Hz
Power consumption of the PC: 186.6W(standby
status)
Power consumption of the PC: 220.7W (operating
BurnIntest 100%)
· 4 · NPC-8220
Page 12
Product Introduction
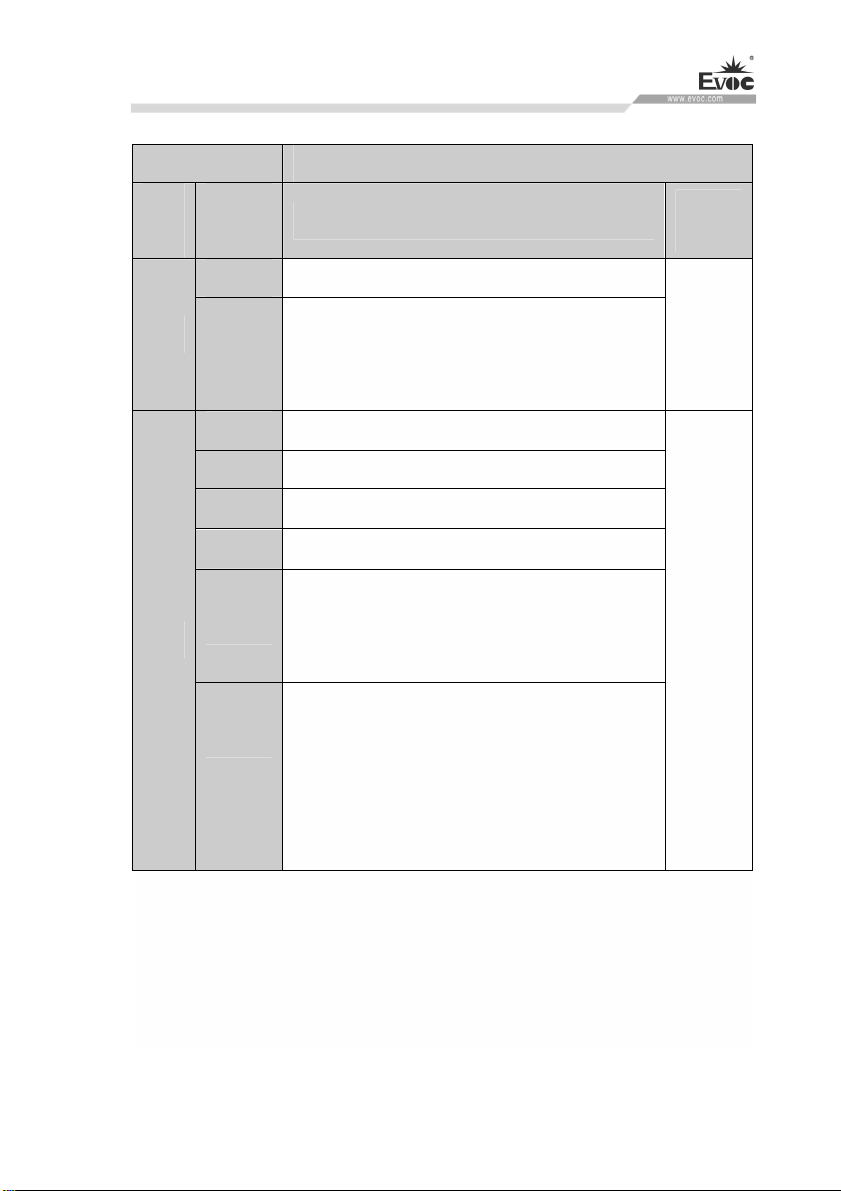
The memory installation method (for reference only):
Configuration Installation method
CPU
Qty.
Memory
Qty.
1-4 DIMMA1, DIMMB1, DIMMC1 or DIMMD1
CPU Qty.
Memory
Qty.
1
2
Notes: LRDIMM and RDIMM memory cannot be used on a same motherboard.
5-8
5-8
9-16
DIMMA1, DIMMB1, DIMMC1, DIMMD1;
additional ones can be inserted in DIMMA2,
DIMMB2, DIMMC2, DIMMD2
1 DIMMA1 (or DIMMB1, DIMMC1, DIMMD1)
2 DIMMA1, DIMME1
3 DIMMA1, DIMMB1, DIMME1
4 DIMMA1, DIMMB1, DIMME1, DIMMF1
DIMMA1, DIMMB1, DIMMC1, DIMME1,
DIMMF1, excessive ones can be inserted into
DIMMG1, DIMMD1, DIMMH1
DIMMA1, DIMMB1, DIMMC1, DIMMD1,
DIMME1, DIMMF1, DIMMG1, DIMMH1,
excessive ones can be inserted into any redundant
slots, and at same time memory quantity balance
of the two CPUs must be considered.
CPU1
CPU1
CPU2
&
NPC-8220 · 5 ·
Page 13
1.3 Operating Instructions
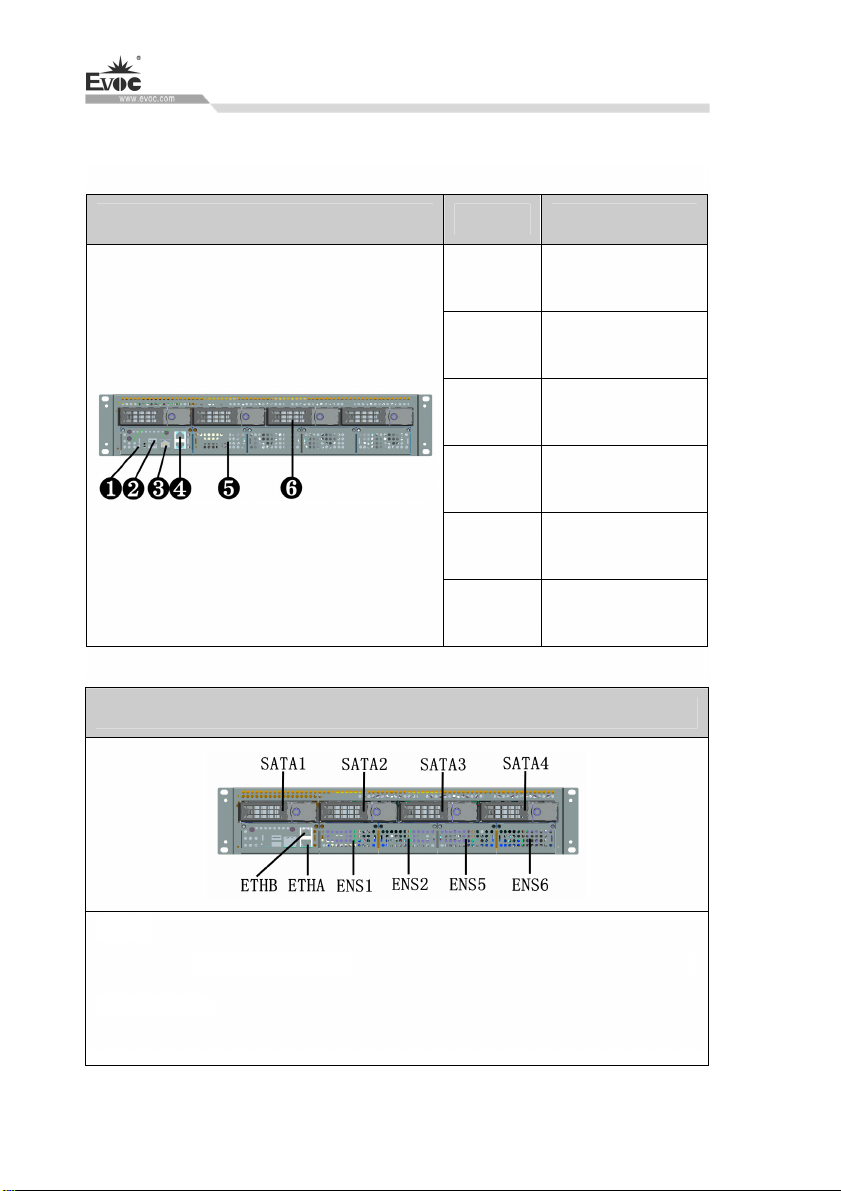
1.3.1 External Functions
Front view of NPC-8220-01 Location Description
Product Introduction
1 Reset button
2 USB port
3 COM port
4 LAN port
5 ENS empty bracket
6 HDD
NPC-8220-01 HDD and LAN port sequence diagram
Note:
NPC-8220-01 LAN port sequence: ENS1> ENS2> ETHA> ETHB> ENS5> ENS6.
Among them, ENS1 and ENS2 are controlled byCPU1, ENS5 and ENS6 are
controlled by CPU2.
· 6 · NPC-8220
Page 14
Product Introduction
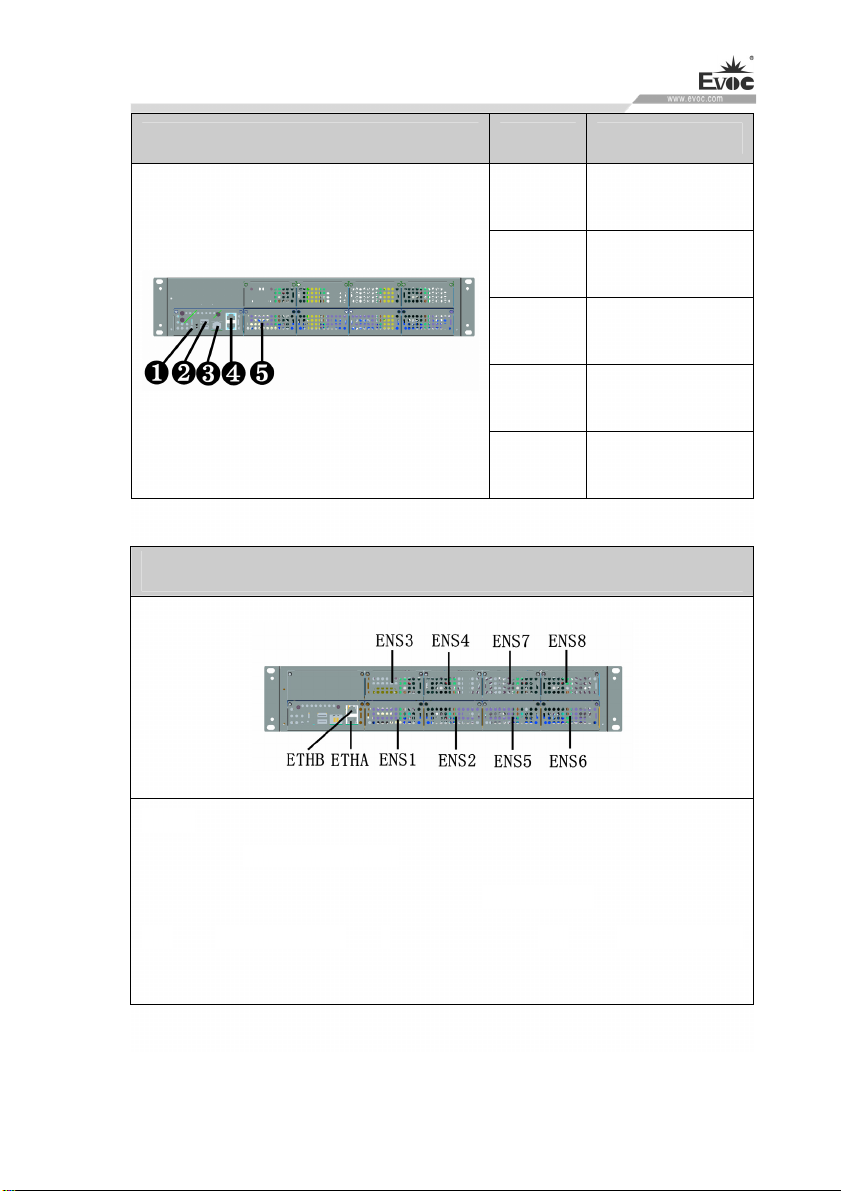
Front view of NPC-8220-02 Location Description
1 Reset switch
2 USB port
3 COM port
4 LAN port
5 ENS empty bracket
NPC-8220-02 LAN port sequence diagram
Note:
NPC-8220-02 LAN port sequence: ENS1> ENS2> ENS3> ENS4> ENS5> ENS6>
ETHA> ETHB> ENS5> ENS6> ENS7> ENS8. Among them, ENS1、ENS2、ENS3
and ENS4 are controlled by CPU, ENS5、ENS6、ENS7 and ENS8 are controlled by
CPU2.
NPC-8220 · 7 ·
Page 15
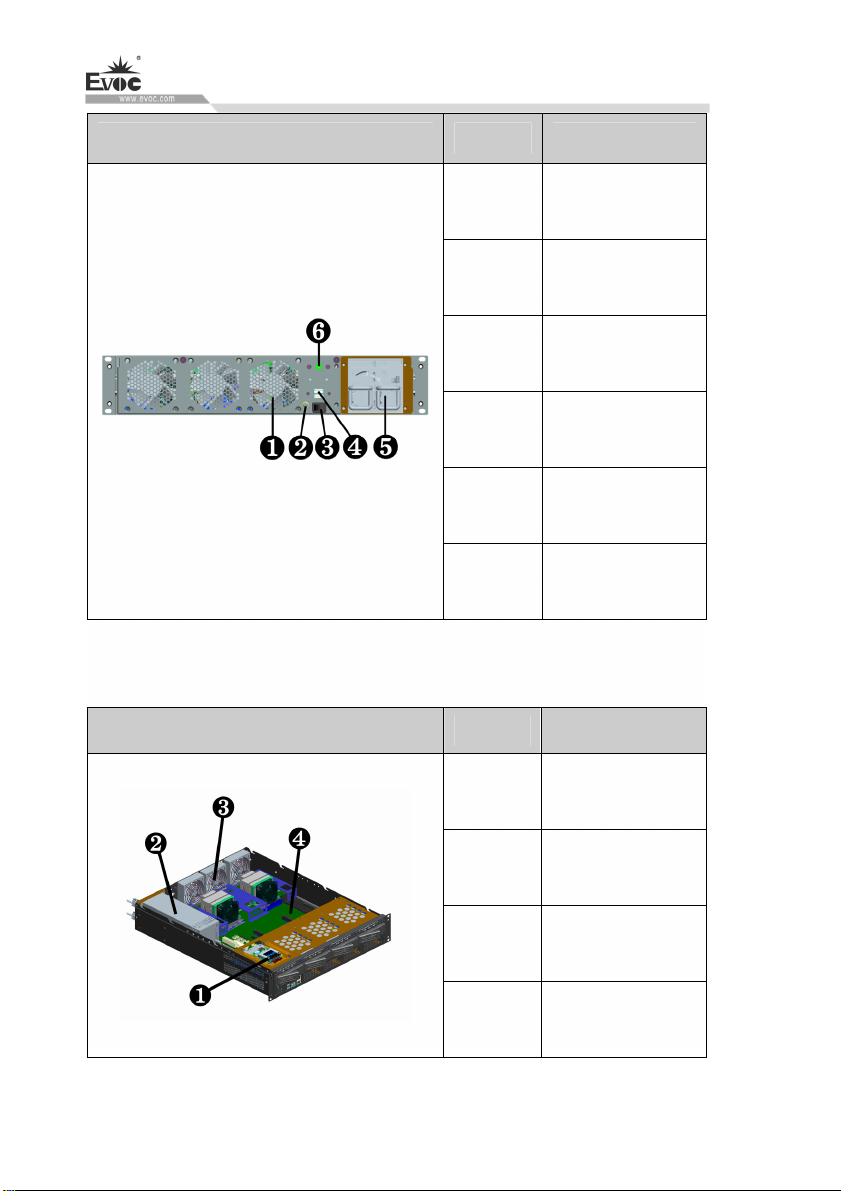
Product Introduction
Rear View Location Description
1 Cooling fan
2 Ground screw
3 Power switch
4 USB(optional)
5
6 Bypass switch
1.3.2 Internal Layout
Internal layout of NPC-8220-01 Location Description
1 CFast card module
2
3 Cooling fan
4 motherboard
Redundant power
module (optional)
Redundant power
module (optional)
· 8 · NPC-8220
Page 16
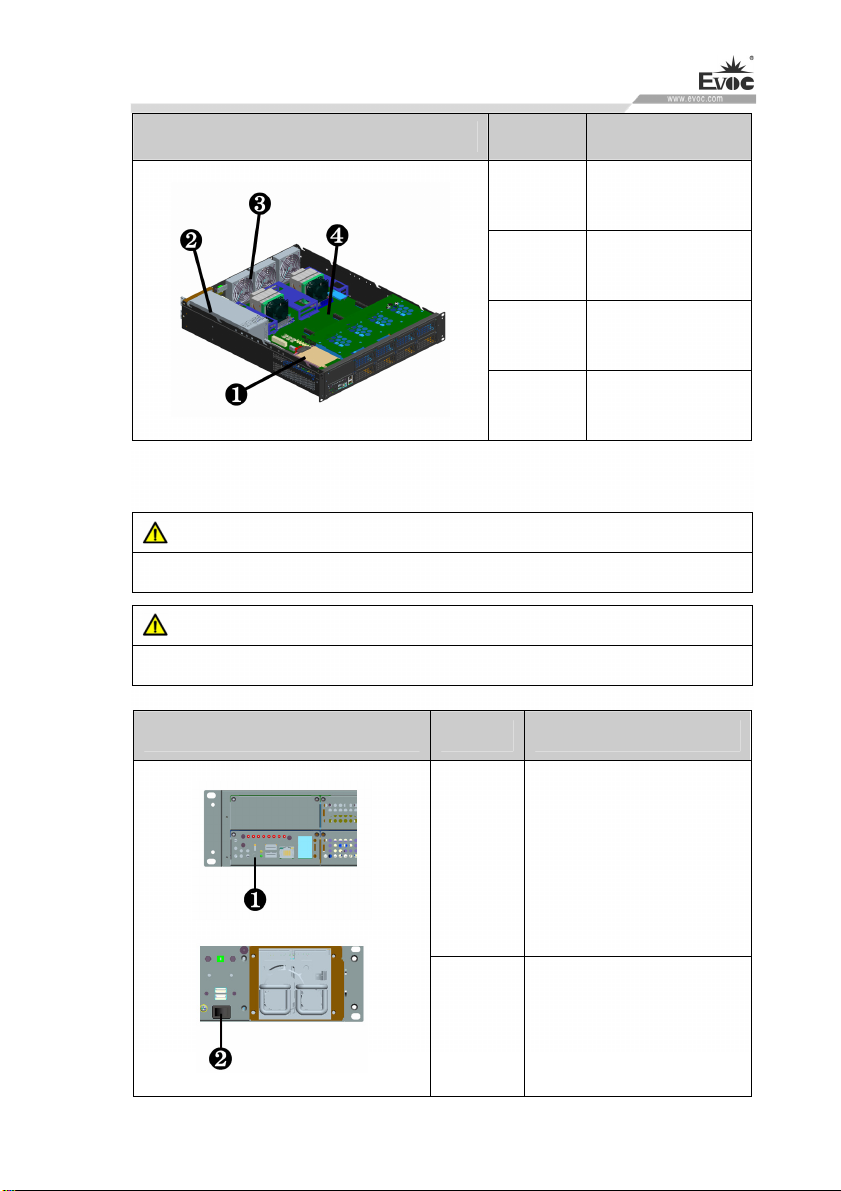
Product Introduction
Internal layout of NPC-8220-02 Location Description
1 HDD module
1.3.3 Operation Control
Warning
Pressing On/Off button won’t cut off the power of the PC!
Caution
When the PC executes hardware reset, data may be lost.
Control Button Location Description
1
2
3 Cooling fan
4 motherboard
Reset button
A pointed object or a clip
can be used to operate the
reset button. Pressing this
button will trigger hardware
reset.
Redundant power
module (optional)
On/Off button used to
2
switch on/off the PC
NPC-8220 · 9 ·
Page 17

1.4 Status LED
Display Meaning LED Description
Product Introduction
POWER
HDD
HOT
IPMI
FANS
CPUS
Displaying PC
status
Displaying hard
drive status
Overheat alarm
for CPU and
memory
IPMI heartbeat
indication
Fan alarm
indication
CPU load
indication
Off Disconnected from power
Green PC is operating
Off No access
Yellow Being accessed
Off Normal
Red Giving alarm
Off/on IPMI failure
Green flashing Normal
Off Normal
Red Fan failure
Off Normal load
Red Load alarm
System
SYS
LAN
Note: LEDs for FANS, CPUS, SYS and LAN need to be used together with system
software.
· 10 · NPC-8220
heartbeat
indication
Network
operating status
Off/on
Green flashing Normal
Off User-defined
Red User-defined
Abnormal system
heartbeat
Page 18

Application Scheme
2. Application Scheme
2.1 Transportation
Well-packaged products are suited for transportation by truck, ship, and plane. During
transportation, products should not be put in open cabin or carriage. During
transshipping, products should not be stored in open air without protection from the
atmospheric conditions. Products should not be transported together with inflammable,
explosive and corrosive substances and are not allowed to be exposed to rain, snow
and liquid substances and mechanical force.
2.2 Storage
Products should be stored in package box when it is not used. And warehouse
temperature should be 0°C ~ 40°C, and relative humidity should be 20% ~ 85%. In
the warehouse, there should be no harmful gas, inflammable, explosive products, and
corrosive chemical products, and strong mechanical vibration, shock and strong
magnetic field interference. The package box should be at least 10cm above ground,
and 50cm away from wall, thermal source, window and air inlet.
Caution!
Risk of destroying the device!
When shipping the PC in cold weather, please pay attention to the extreme
temperature variation. Under this circumstance, please make sure no water
drop (condensation) is formed on the surface or interior of the device. If
condensation is formed on the device, please wait for over twelve hours before
connecting the device.
NPC-8220 · 11 ·
Page 19
2.3 Opening the Box and Initial Examination
Application Scheme
2.3.1 Opening the Box
Please pay attention to the following issues when opening the box:
● Do not discard the original packing material. Please keep the original packing
material for re-transportation.
● Please keep the documentation at a safe place. The documentation, which is a part
of the device, is required for initial device debugging.
● When doing the initial examination, please check whether there are distinct
damages to the device caused during the transport.
● Please check whether the delivery contains the intact device and all of the
independently ordered accessories. Please contact the customer service when any
unconformity or transportation damages occur.
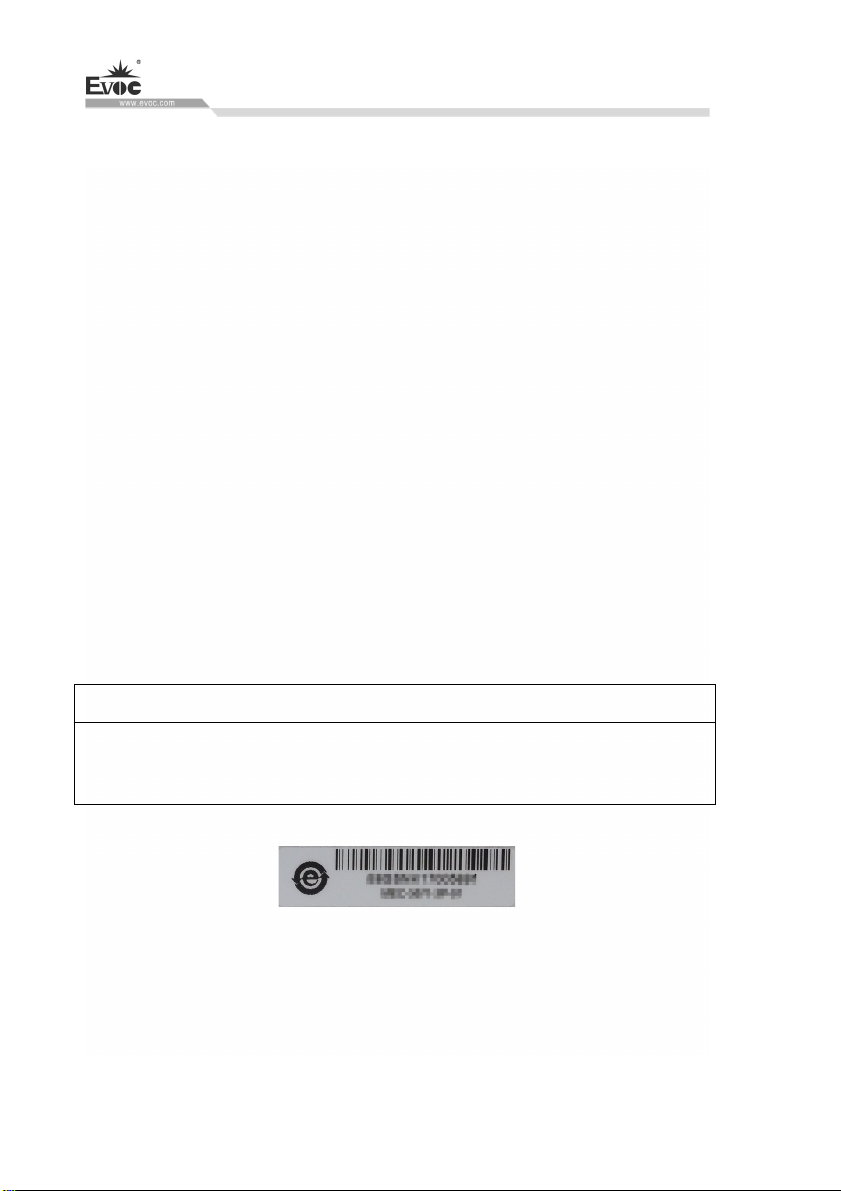
2.3.2 Markings for PC Identification
Attention
When the product needs to be repaired or after it has been stolen, these codes can be
used to identify the PC. Please do not rip them off.
Serial number: located on the chassis body (as shown below)
2.4 External Environment Conditions
The following conditions should be considered when planning the project:
The weather and mechanical environment conditions specified in the operation
manual should be observed.
· 12 · NPC-8220
Page 20

Application Scheme
Please avoid extreme environment conditions. The PC should be protected
against dust, moisture and heat.
Please avoid direct exposure to sunlight.
Please make sure that other assemblies and side of cabinet are at least 50mm
and 100mm away from the top and below the PC respectively.
Please do not block the ventilation hole of the PC.
The installation position requirement for the PC should be always observed.
The connected or installed I/O should not generate reverse voltage of more than
0.5V inside the PC.
NPC-8220 · 13 ·
Page 21
Product Installation
3. Product Installation
3.1 Installation Information
Before installing the PC, please read the installation instructions below:
Attention
When carrying out installation in the switch cabinet, please observe assembly
guidelines and related DIN/VDE requirements, or specific regulations of the
country/region.
3.2 Mounting Method
■19″ Rack Mount □Desktop □Embedded Panel
□Wall Mount □VESA Standard Arm □Portable
□Others___________
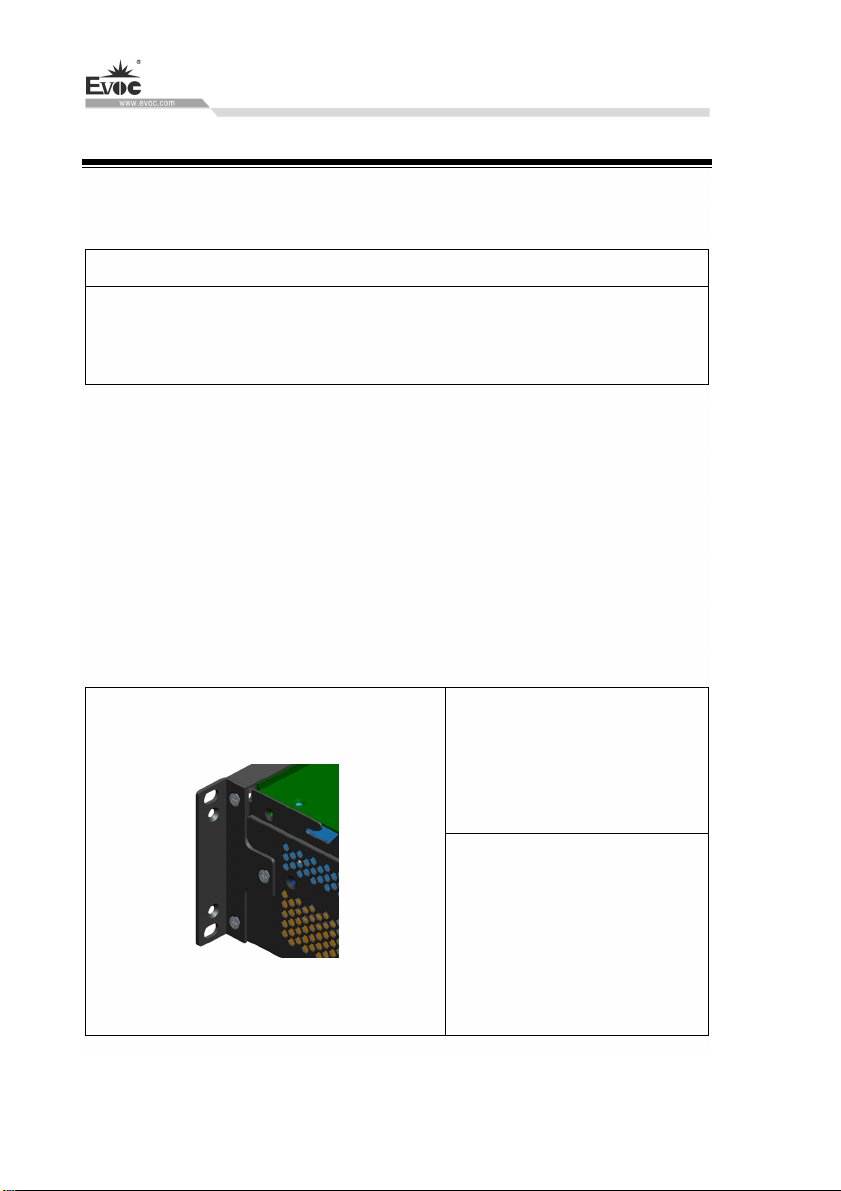
3.2.1 19″ Rack Mount
· 14 · NPC-8220
Step: As shown in the left
picture, use screws to fasten the
PC onto the cabinet.
Note: The PC must be placed on
the supporting board or guiding
rail. Do not fasten the PC only
by the screws on the front panel.
Page 22
PC Connection
4. PC Connection
4.1 Things to Know before Connection
Warning
The connected or built-in peripherals with opposite polarities are not allowed.
Warning
The device only operates when connecting with grounded power. No operation is
allowed when the device power is ungrounded or only impedance is grounded.
Warning
Rated voltage of the device in use shall be in accord with power feature of the
product.
Note:
Only the peripheral devices approved for industrial application can be used. When
operating the PC, hot swappable IO modules (USB) can be used. The IO devices
without hot swap function can only be connected when the PC is powered off.
4.2 Product Grounding
Low impedance ground connection is more helpful to release the interference
produced by the external cables, the signal cables or the cables connecting the IO
module to the grounding system.
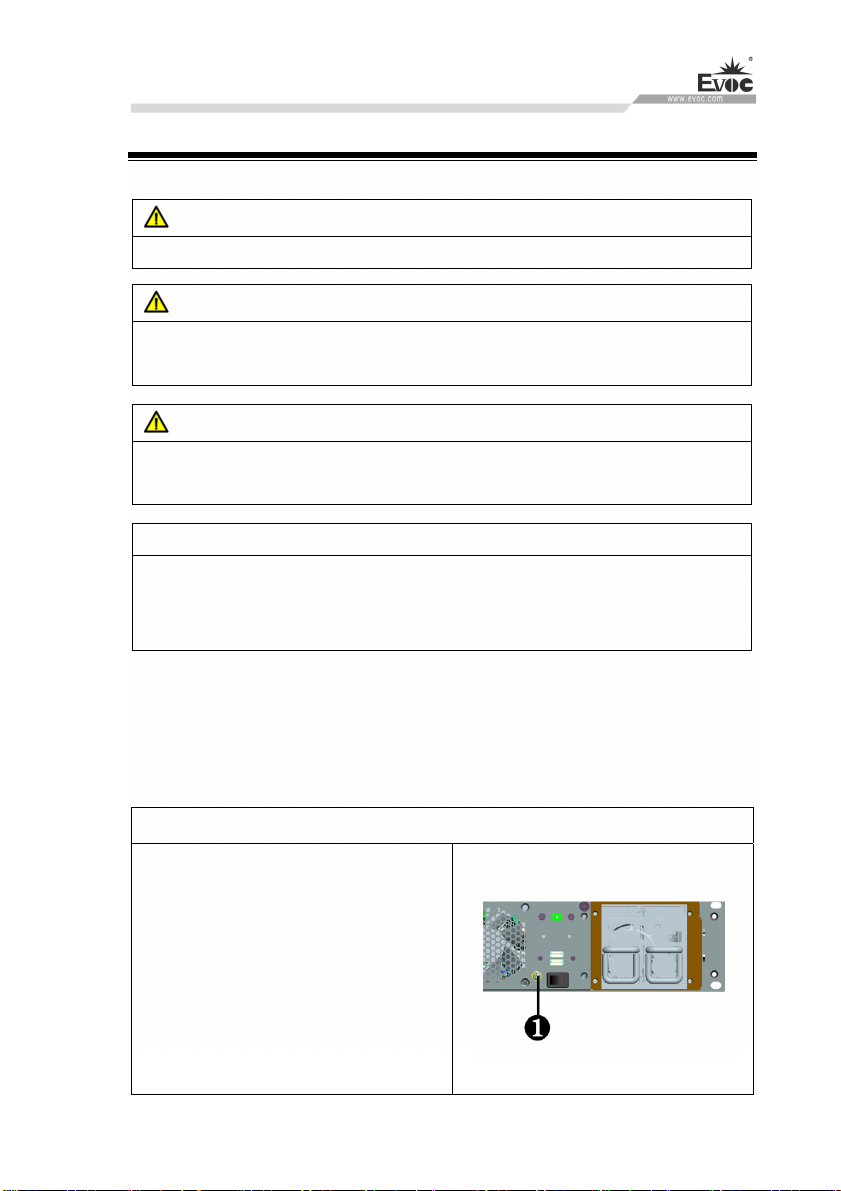
Ground Terminals
The equipotential bonding terminal ①
on the device shall be connected with
the cabinet installed with the PC or the
central grounding busbar on the device.
The minimum cross section area of the
cable shall be no less than 2.5mm
maximum ground resistance should be
no more than 0.1Ω.
2
. The
NPC-8220 · 15 ·
Page 23
4.3 Connecting the Device to Power
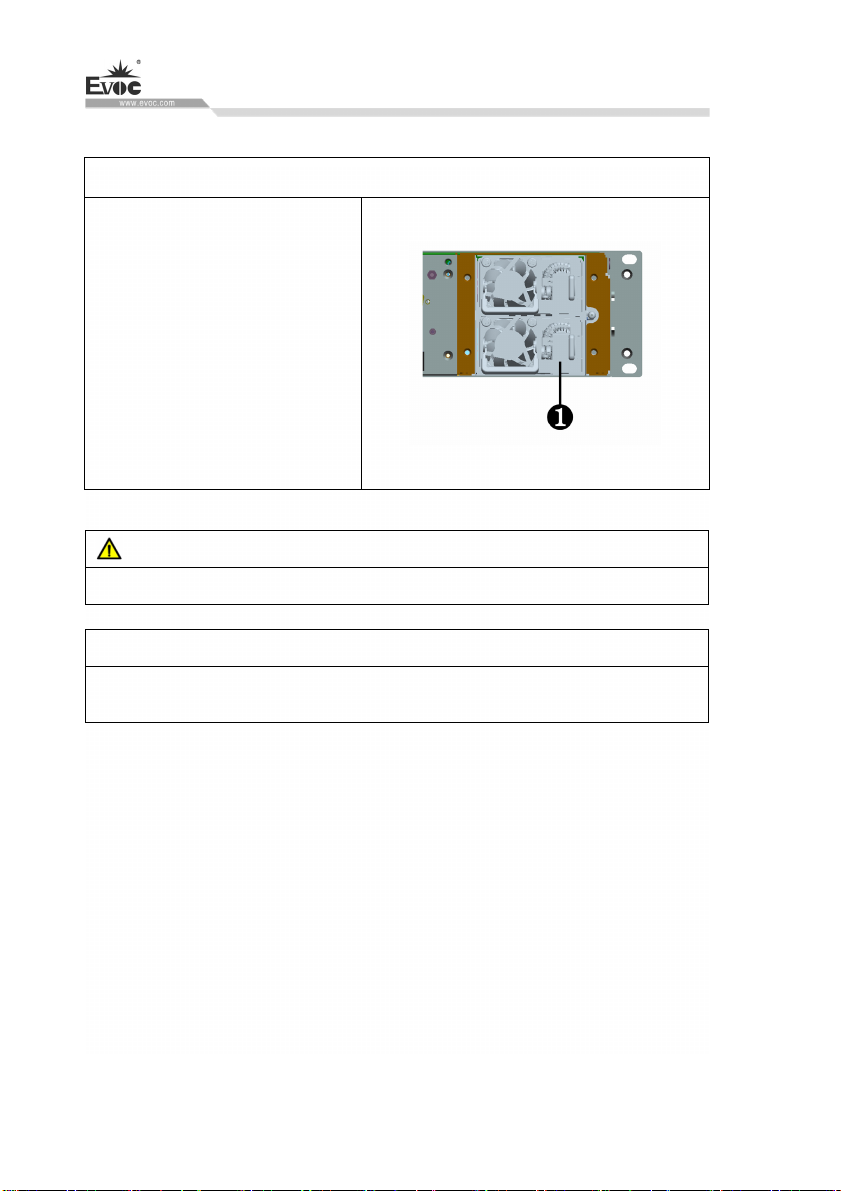
Steps to connect the device to power:
Connect the power cable to the
socket ①. Before insertion, please
confirm that the input voltage
complies with the power feature of
this product.
Danger
Disconnect the power source and data cable during a lightning storm.
Attention
PC Connection
The PC is completely isolated from the power supply only by disconnecting the
power connector.
· 16 · NPC-8220
Page 24
Debugging
5. Debugging
5.1 Operating System
Supported operating systems: Windows 7/8/8.1/10, Windows Server
2008R2/2012/2012R2/2016, and Linux (Kernel 2.6 above) operating systems.
5.2 Port Definition
5.2.1 COM port
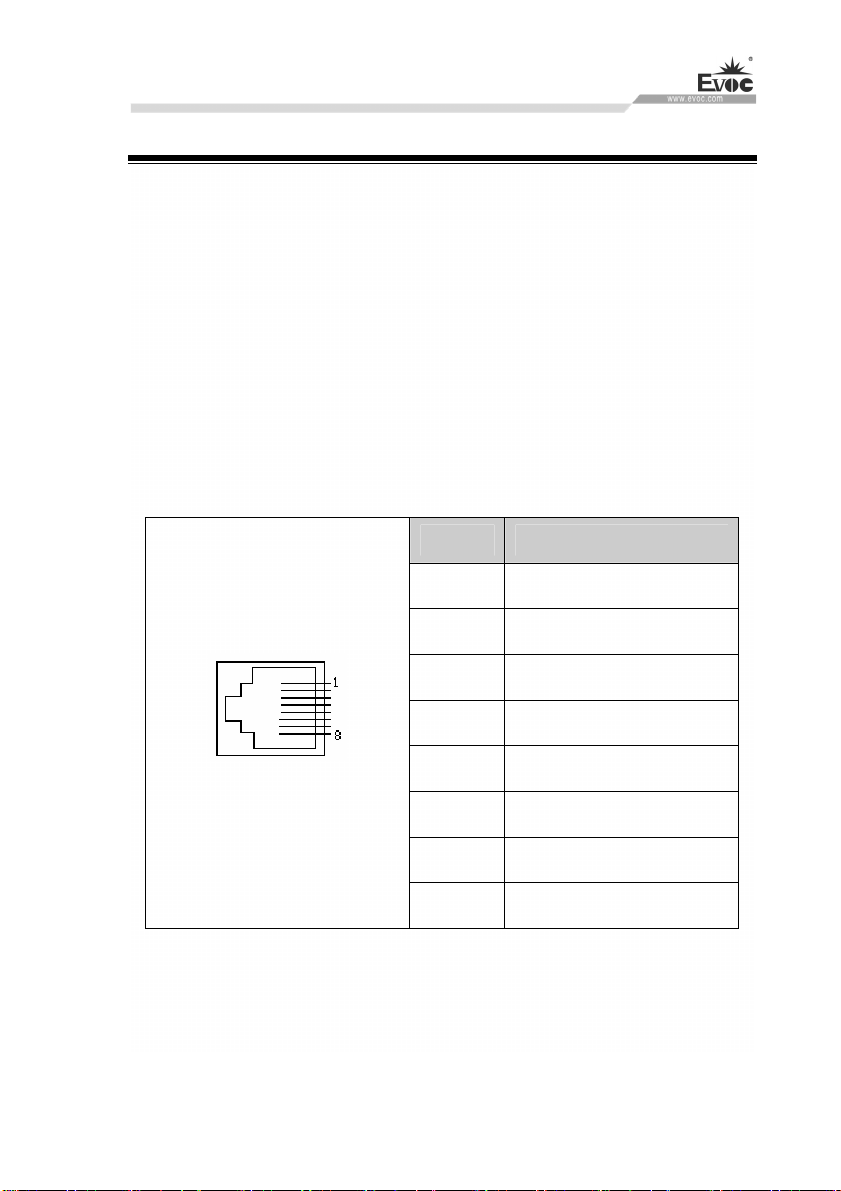
The PC provides one RJ45 COM port, supporting serial port redirection. Its pin
definition is as follows:
Pin Signal Name
1 RTS#
2 DTR#
3 TXD
4 GND
Console
5 GND
6 RXD
7 DSR#
8 CTS#
5.2.2 LAN port
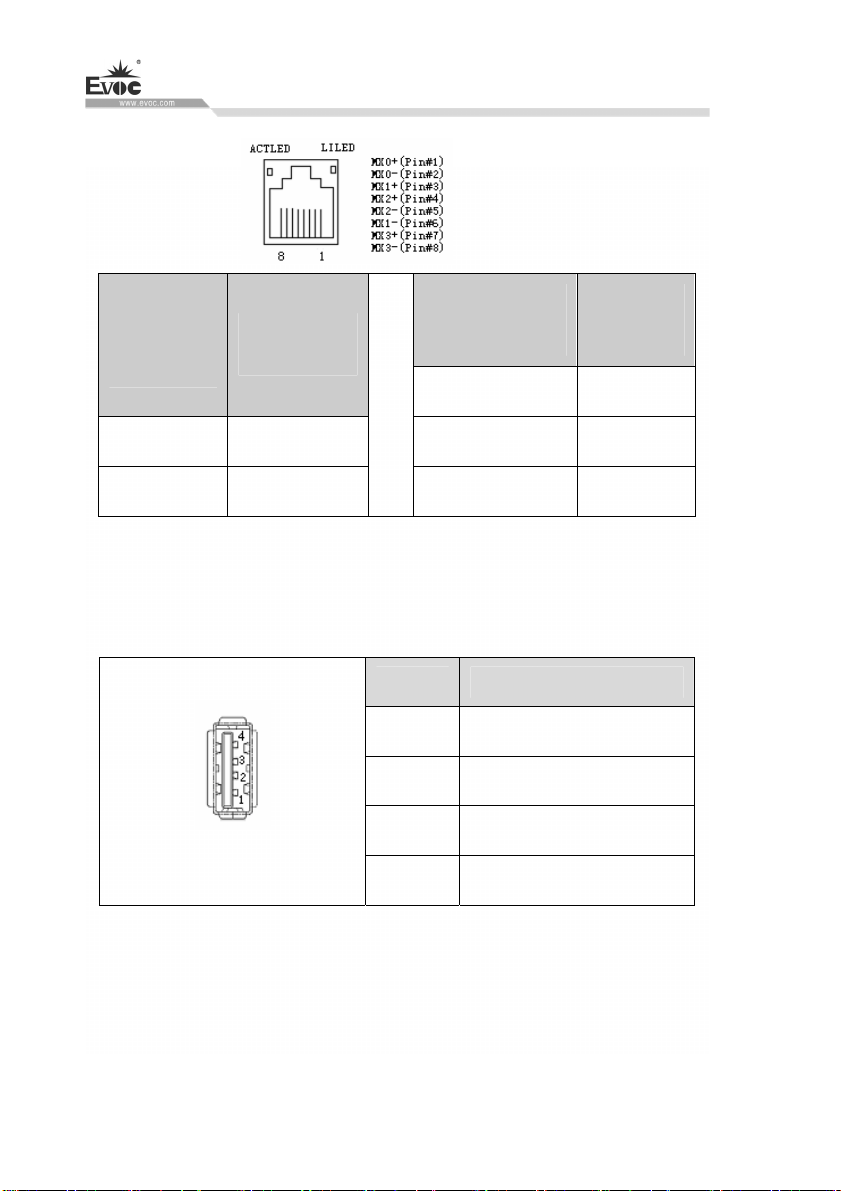
ACTLED and LILED are the green and dual-color LEDs beside the Ethernet port,
indicating LAN activity status and network speed.
NPC-8220 · 17 ·
Page 25
Debugging
(ETH-A, ETH-B)
ACTLED
(single color:
green)
Flash
Off
Network
Activity
Data being
transmitted
No data being
transmitted
LILED
(two colors:
orange and green)
Green 1000Mbps
Orange 100Mbps
Off 10Mbps
1000Mbps
network
speed
5.2.3 USB Port
Two USB2.0 ports on the front panel. Their pin definitions are as follows:
Pin Signal Name
1 +5V_USB
2 USB_Data-
USB1, USB2
3 USB_Data+
4 GND
· 18 · NPC-8220
Page 26

Software Introduction
6. Software Introduction
Software
Name
Description Supported Range
BPI
eManager
BIOS programming interface
specification, which provides
unified interface for software to
access hardware.
A platform management
application software developed
based on BPI, which enables
users to check the status of
embedded PCs, keep daily
records, and basic functions
commonly used by embedded
computers, such as WDT, GPIO,
Hardware monitoring, and etc.
All supporting BPI
motherboards and PCs of EVOC
company
All the motherboards/complete
PCs that support BPI can run
eManager, and the sub-functions
depend on the specific
motherboard. For those which
do not support BPI,
customization service can be
provided. (Please consult
customer service for the cost).
NPC-8220 · 19 ·
Page 27
Software Introduction
6.1 BPI Overview
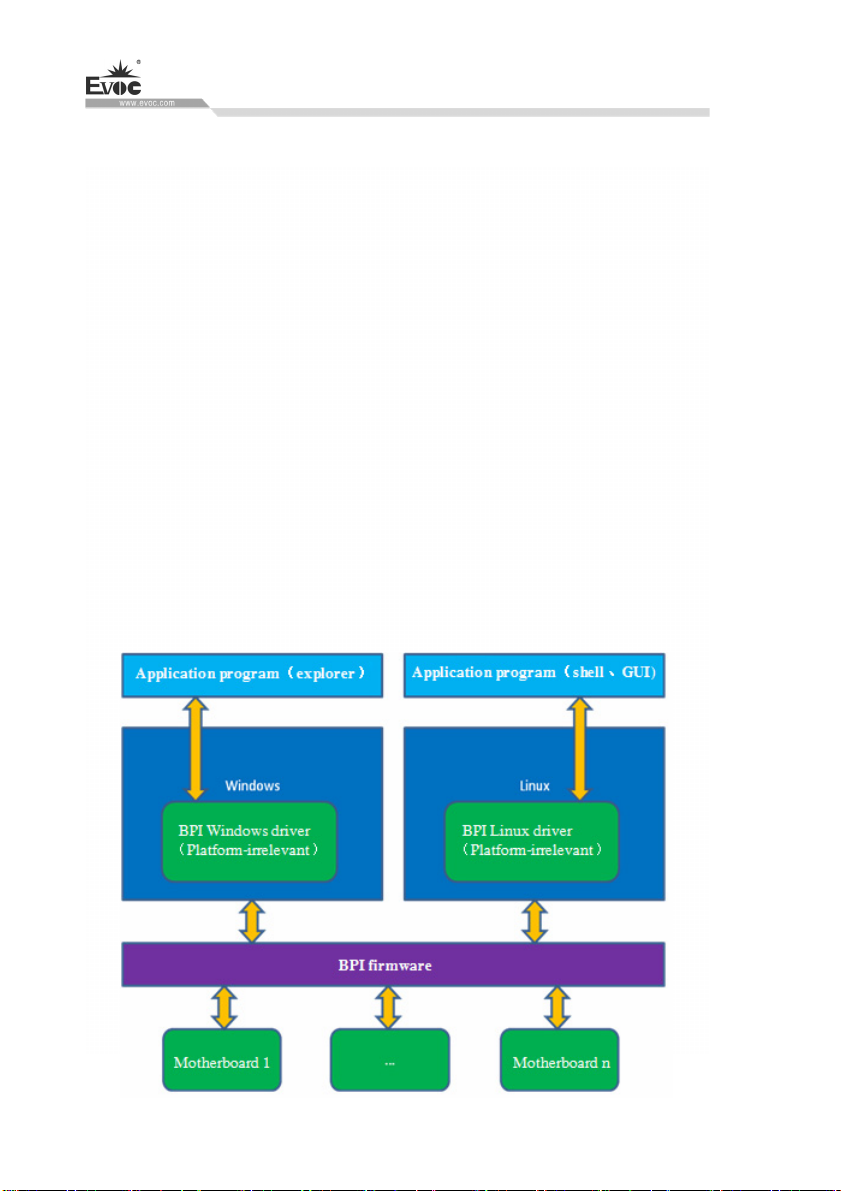
EVOC BPI (BIOS Programming Interface) is a cross-platform, easy-to-maintain
software interface specification, which supports access to hardware under the
Protected Mode of 32-bit or 64-bit operating system and supports multi-process and
multi-threading hardware access. BPI is a bridge between hardware and application
software, and its purpose is to provide a unified standard interface for the application
layer (in the form of library function, similar to library function of standard C). With
BPI, application software engineer do not need to care about the specific hardware
solution of the motherboard. The users can use BPI library to rapidly develop their
own software products, and when the hardware of the motherboard is upgraded, there
is no need to modify the application software or driver and the former software can
operate on the new platform normally. BPI has greatly sped up the product
development and reduced the maintenance cost. The BPI architecture is shown in the
Figure 1 below:
· 20 · NPC-8220
Page 28

Software Introduction
Figure 1 BPI architecture
1. Function Supported by BPI
1) Watchdog
Supports Watchdog boot, stop and feed Watchdog function.
2) GPIO
Supports GPIO input/output programming.
3) Hardware monitoring
Supports monitoring of motherboard CPU temperature, system temperature, fan
rotation speed and motherboard core voltage detection, such as CPU Core
voltage, V12.0, battery voltage, and etc.
The user can use BPI library for second development based on application
requirement, for example:
1) Detecting CPU temperature: If the temperature is too high, a buzzer will
be triggered to send alarm.
2) To control peripheral devices by GPIO programming.
2. Advantages of BPI
1) Platform Irrelevant
It is an interface provided by BPI to application layer, which means the BPI
library function is platform-irrelevant, so the software developed by BPI
function library can operate on a new hardware platform supporting BPI
function normally without making any modification.
2) Security and High Reliability
The BPI function library accessing the hardware is programmed by the
motherboard developer and is strictly tested; therefore, it can avoid system
malfunction caused by improper operation of the system hardware.
NPC-8220 · 21 ·
Page 29

Software Introduction
3) Easy Maintenance
Traditional WDT and GPIO programming are closely related to the hardware
with complicated test and debug process and software of different platforms;
however, the software developed by BPI only requires one set of the
maintenance software.
4) Low Cost
Developing the applications by BPI will not result in additional hardware and
software cost. Application software engineer can conveniently use BPI library
functions for second development, and do not need to pay attention to access
information of specific hardware. So it will greatly reduce the development
difficulty, shorten development cycle and boost time-to-market for the system
integrator.
6.2 FMI Overview
FMI(Firmware Management Interface) is management software developed based on
BPI specifications. Currently, FMI supports eDisk, eLogo, function. For its test
program, please refer to the eManager software in the user manual CD.
1) eDisk
eDisk is a virtual onboard disk device. It is a floppy drive device used for
system maintenance, which can be loaded into DOS system by factory default.
Users can change the purpose of eDisk based on their requirement, for example,
saving users’ private data or EVOC One-Button-Recovery system eBack
software.
2) eLogo
It provides an effective, simple and reliable way for users to replace OEM
LOGO of the PC. The users do not need to customize BIOS, and only need to
· 22 · NPC-8220
Page 30

Software Introduction
put the OEM LOGO into eDisk. And in the next boot or reboot, the BIOS will
update OEM Logo for the user automatically.
6.3 eManager Software
eManager software is a device management platform software developed by EVOC.
eManager software can be used for system operation abnormality monitoring, setup of
GPIO input/output mode and electrical level, real-time monitoring of temperature, fan
and voltage status. Among other functions, the eManager software can predict HDD
life, helping users to use and manage the device effectively. The software has the
following functions:
Watchdog (WDT)
GPIO
Hardware detection
Keep records for power-on/off time and draw the time data curve
HDD SMART information
6.3.1 Operating Environment
Take Windows operating system as an example, if customer needs library function
provided by BPI, self-developed application program, it only needs to include
EVOC_BPI_DLL.dll, BPI32.sys and BPI64.sys. If the customer needs to operate,
eManager software, directly unzip BPI3.0 installation packet we provided for
installation and boot it up. (Operation of win7 and above operating system needs
administrator authority).
NPC-8220 · 23 ·
Page 31
Software Introduction
6.3.2 Function
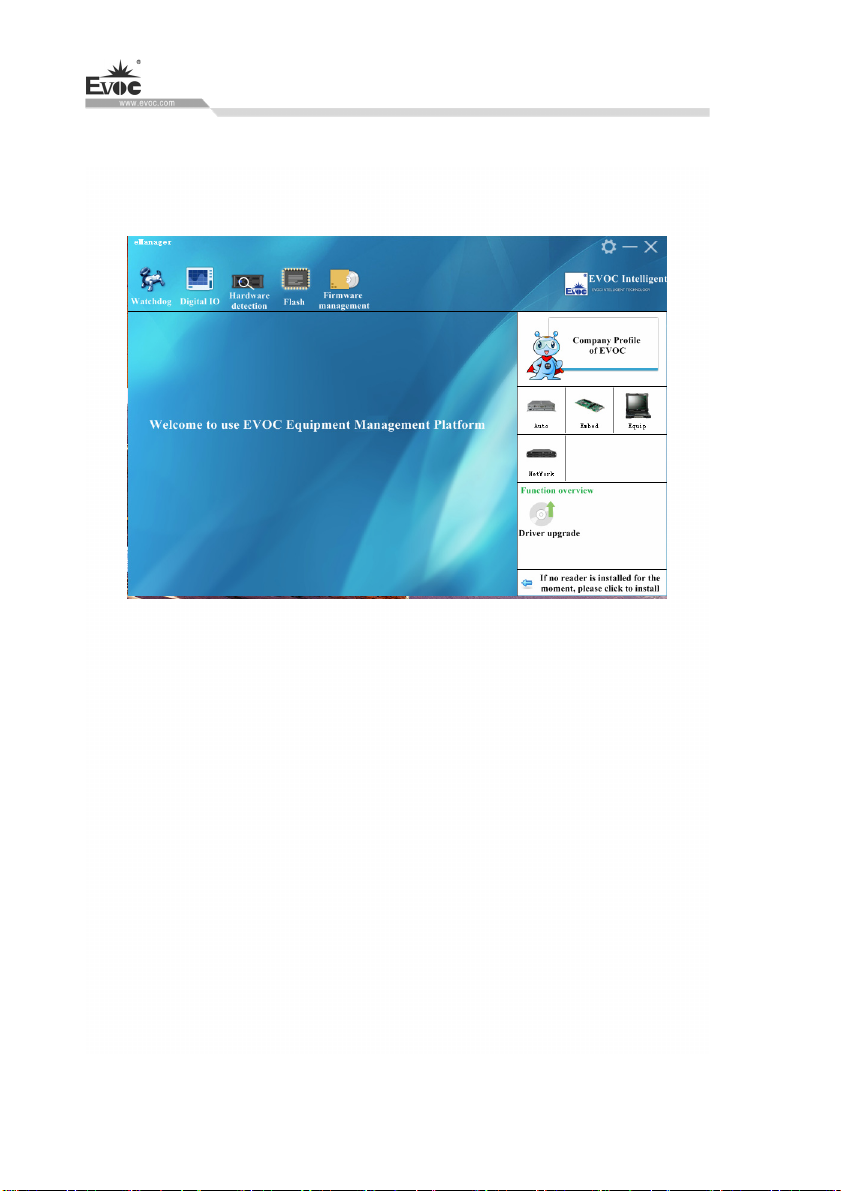
1. Welcome Interface
After the software is opened, the following welcome interface will appear:
2. Watchdog (WDT)
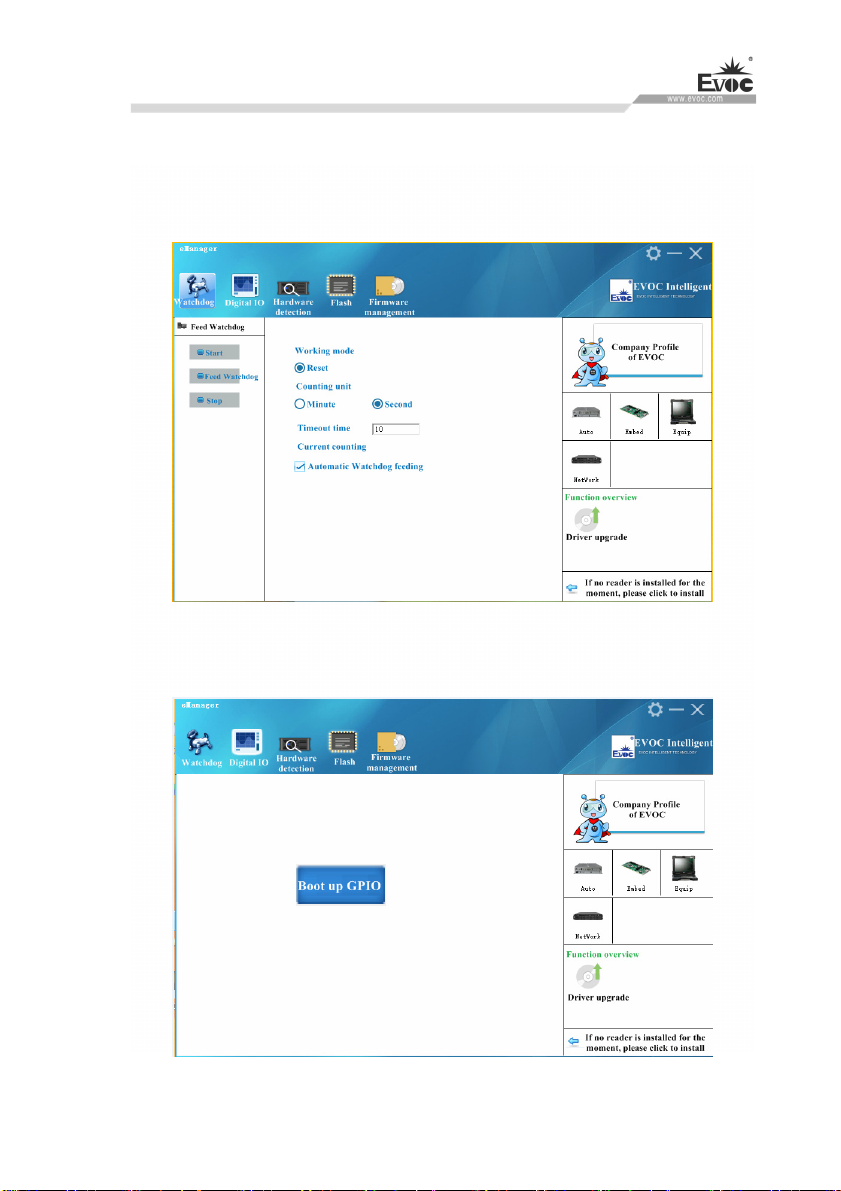
The effect of Watchdog is shown in the picture below.
Using method: First carry out setup. The mode is reset mode; counting unit can be
minute or second; timeout can be any figure within 1-255. After the setup is finished,
press “Start” button on the left, and Watchdog starts counting down. “Current time”
shows the current time for counting-down. Counting-down in reset mode means the
PC reboots at 0. During counting-down, “Feed Watchdog” button can be pressed to
restart counting-down from the set timeout time. Press “Stop” button to stop
Watchdog. Exiting the program when Watchdog is counting down will also stop
Watchdog. If “Automatically feed watchdog” option is selected, when the counted
time is less than 3 seconds, Watchdog will be automatically fed.
Function: Monitors whether the system can be normally operated, and carry out reset
· 24 · NPC-8220
Page 32
Software Introduction
for abnormality. When abnormality occurs to th
automatically. After counting-down is finished, the system will restart, and recover
from system error.
e system, Watchdog cannot be fed
3、GPIO
NPC-8220 · 25 ·
Page 33
Software Introduction
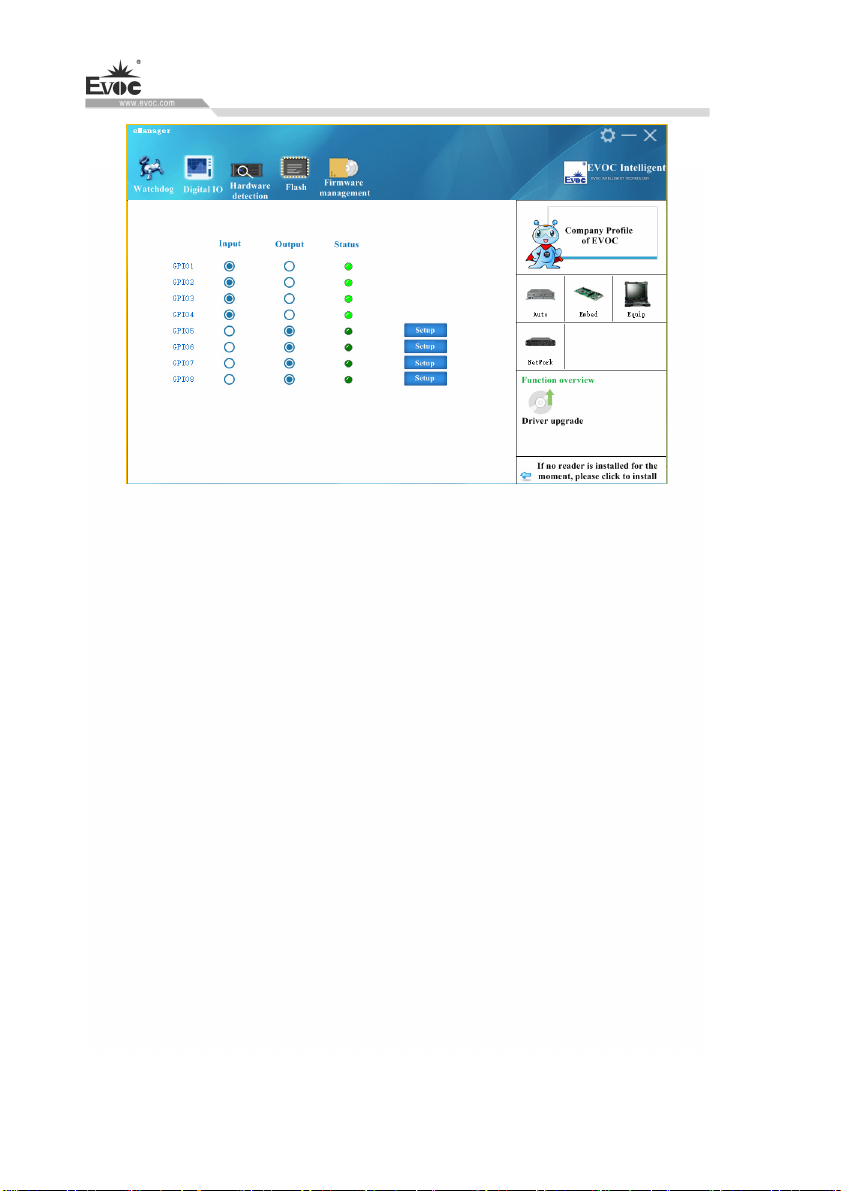
The effect of GPIO is shown in the above picture.
Using method: GPIO is not enabled by default, to avoid the conflict if there is also
GPIO setup in the user program. GPIO supports up to 64Pin display. When it is more
than 8Pin, there will be scroll bar on the interface. GPIO input/output mode can be set
up in the corresponding single option box. The electrical level is indicated by green
LED: On means high level; Off means low level. When GPIO is output mode, the
electrical level status can be switched by corresponding “Setup” button on the right. If
it is a network-type motherboard, the special LED of the motherboard will also be
displayed and can be set up.
Function: Setup of GPIO and Network LED
· 26 · NPC-8220
Page 34
Software Introduction
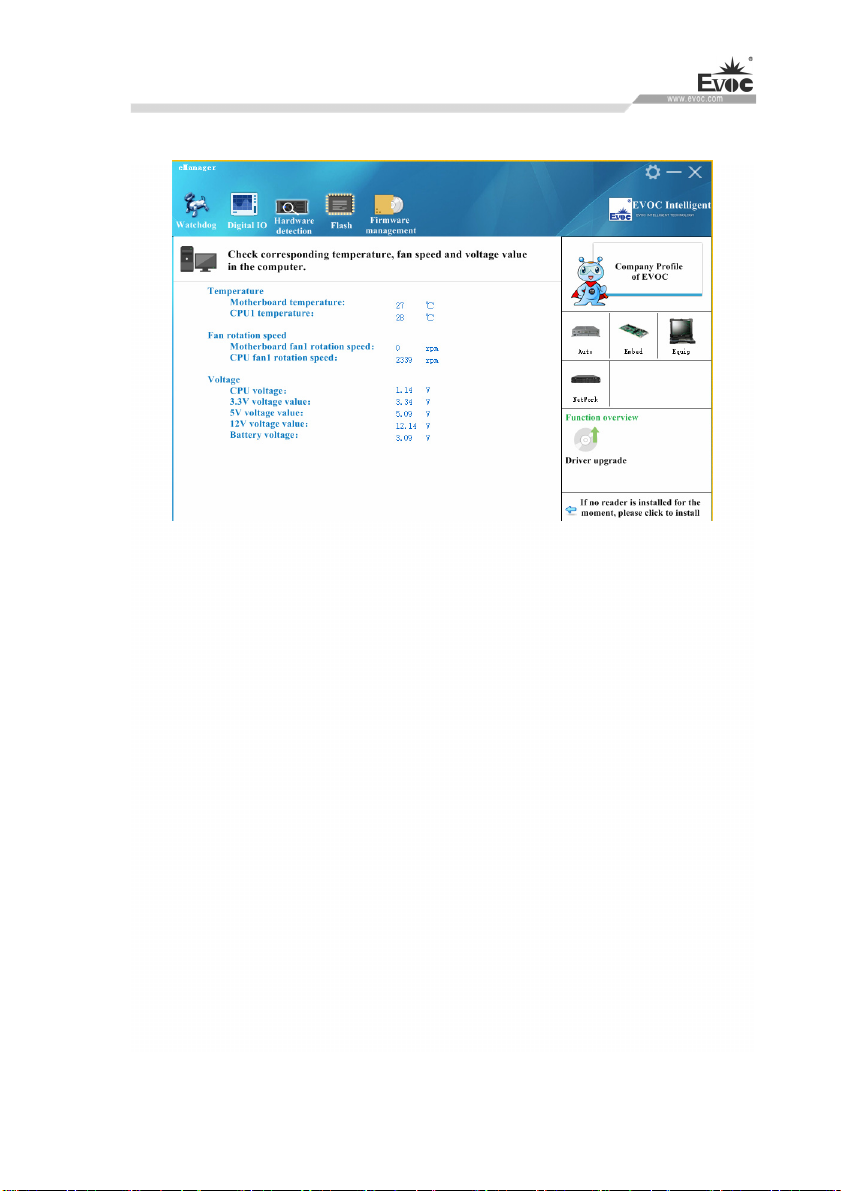
4. Hardware Detection
The effect of hardware detection is shown in the figure above.
Method: After the software switches to hardware detection interface, it will
automatically acquire temperature, fan speed, voltage and other information,
refreshing at a 2S interval.
Function: real-time acquisition of hardware operating status.
6.3.3 Firmware Management
1. HDD SMART
NPC-8220 · 27 ·
Page 35
Software Introduction
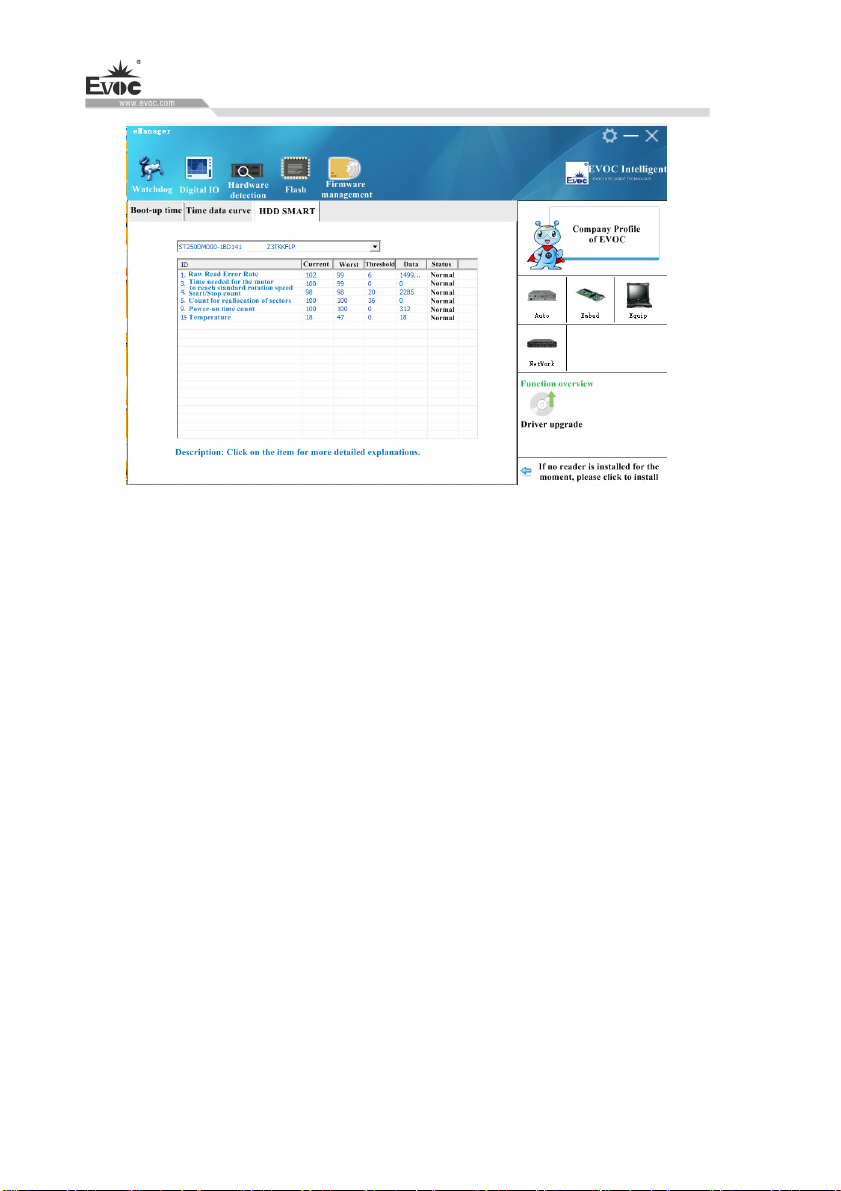
The effect of HDD SMART is shown in the picture above.
Using method: Select HDD in the dropdown list, then SMART information related to
HDD performance will be displayed in the list box.
Function: To check SMART information related to HDD performance, which helps
predict service life of HDD, and avoid data loss caused by damage to HDD.
2. Boot-up time
· 28 · NPC-8220
Page 36
Software Introduction
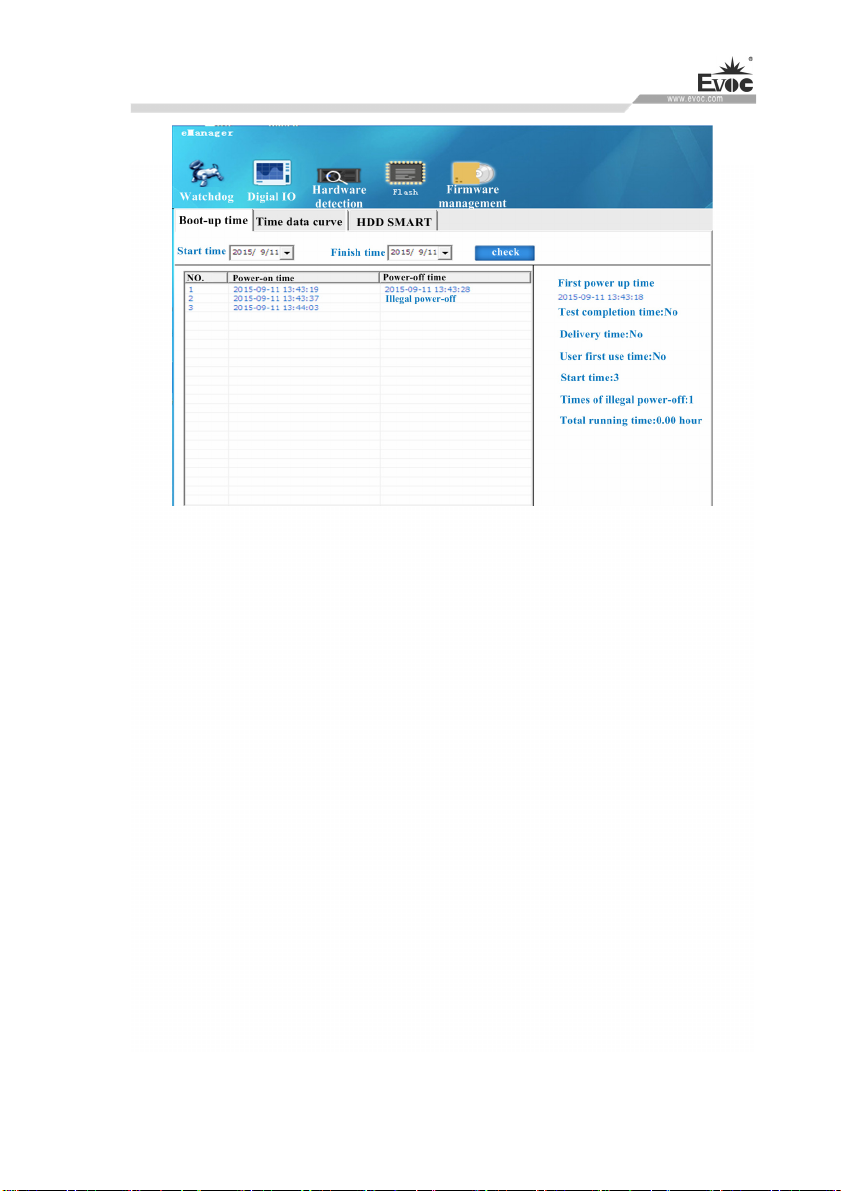
Boot-up time effect is shown in the above picture
Using method: Select start time and finish time to be checked, check them, and the
listbox will single out the record for times of power-on/off within a specified time
span. The times of illegal power-off and total operation time of the PC can also be
displayed.
Function: To monitor operating status of the PC. To keep record for times of illegal
power-off
3. User Programming
The user can directly use eManager software for management of the device. If users
intend to program software by themselves. Please refer to the complete routine of VB,
VC, C++Builder, Delphi and BPI Programming Interface Operation Manual in the
enclosed CD.
NPC-8220 · 29 ·
Page 37
Installing Expansion
7. Installing Expansion
7.1 Opening the PC
Caution
Only authorized and qualified personnel is allowed to open the PC. During
warranty period, the users are only allowed to install expansion memory and
expansion card module.
Caution
The electronic components contained in the PC may be damaged by ESD.
Therefore, please take preventative measures before opening the PC. Please see the
“ESD Guideline” for regulations related to operation of ESD-sensitive
components.
Preparation Work
Disconnect the PC from the power source.
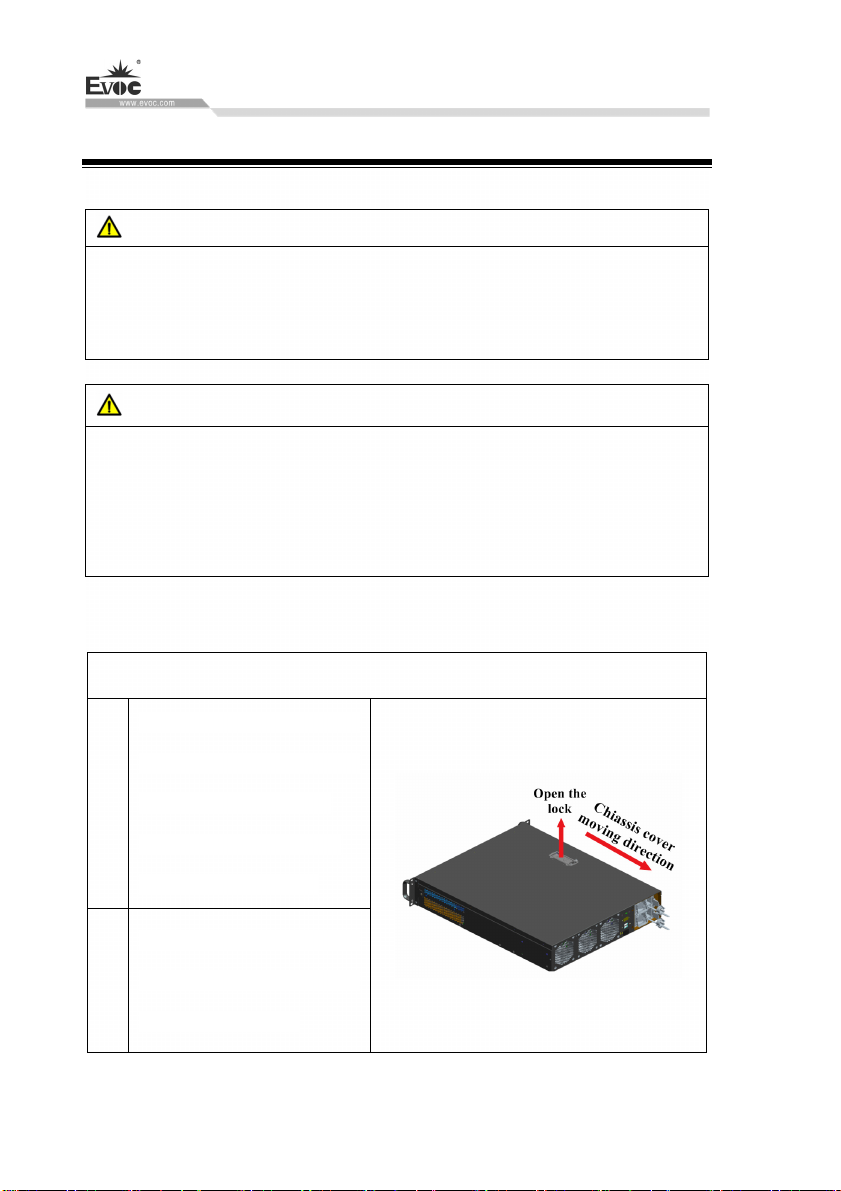
Steps to open the PC
Use hand to pull the handle of
cover lock upward, the chassis
1
cover will move along the
direction of arrow, until the
handle cannot be moved.
Pull the chassis cover upward,
2
to disengage the chassis cover
from the chassis body.
· 30 · NPC-8220
Page 38
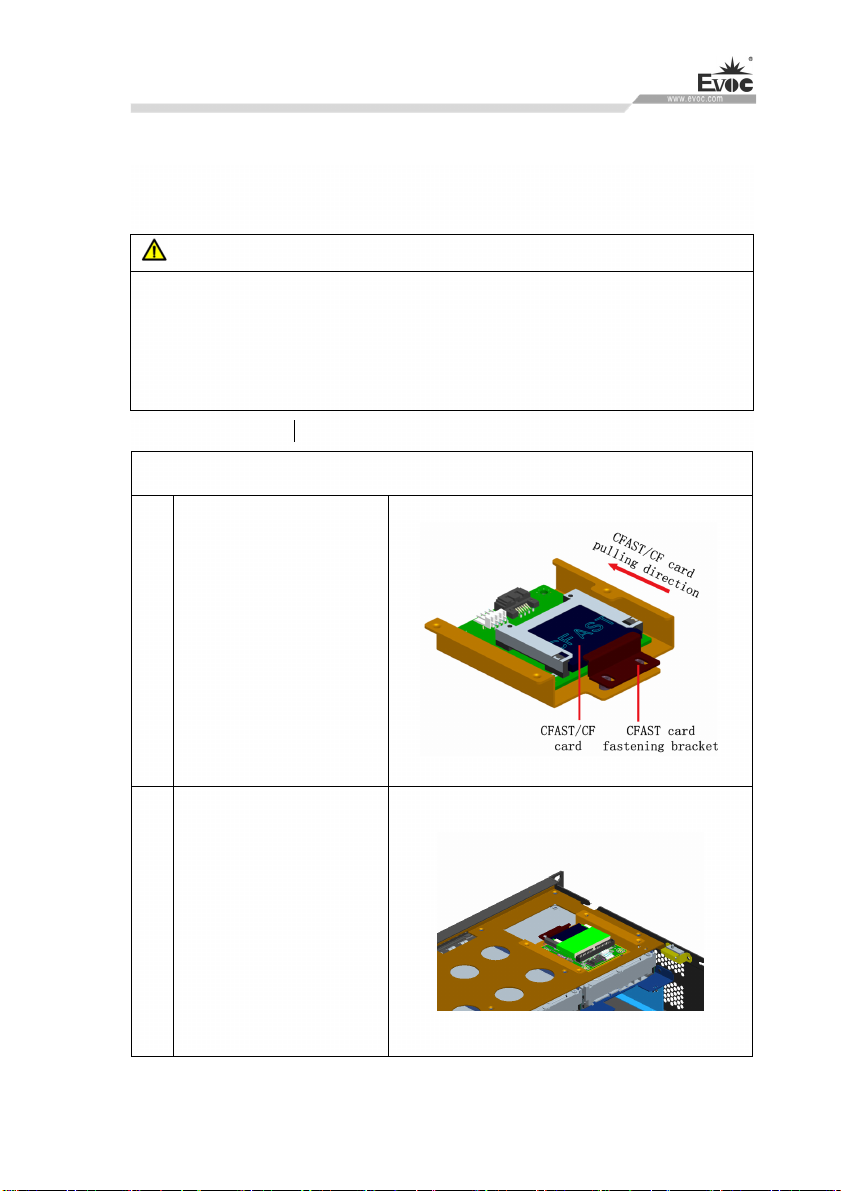
Installing Expansion
7.2 Installation and Removal of CFast Card
Preparation Work
Disconnect the PC from power source.
Caution
The electronic components on the PCB are extremely sensitive to ESD. When
operating these components, make sure to take proper preventative measures.
Please see the “ESD Guideline” for regulations related to operation of
ESD-sensitive components.
Installing CFast card
Installation steps
Insert the CFast card, and
1
use screws to fasten the
CFast card bracket.
Use sunkhead screws to
2
fasten the CFast card
module.
NPC-8220 · 31 ·
Page 39
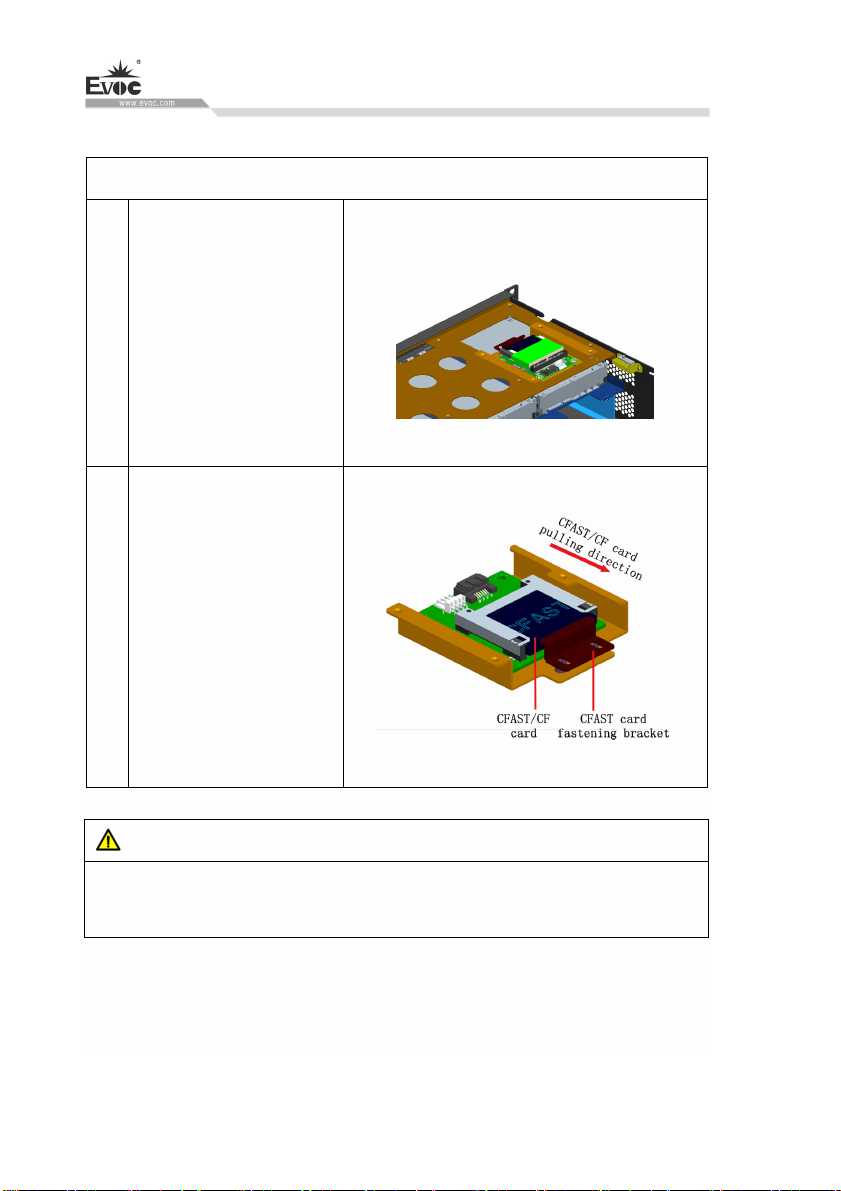
Removing the CFast card
Installing Expansion
Removal steps
Loosen the screws and
1
take out the CFast card
module.
Loosen the screws on
CFast card bracket and
pull it out in the direction
shown in the picture.
Caution
If the CFast card meets obstruction, reverse it and try again. Do not insert the CFast
card by force.
· 32 · NPC-8220
Page 40
PC Maintenance
8. PC Maintenance
8.1 Removal/Installation of Hardware Assembly
8.1.1 Carry out Maintenance
The PC can only be maintained or repaired by authorized personnel.
Warning
Unauthorized operation or repair for the PC may cause damage to the PC or
endanger safety of users.
Disconnect the PC from power source before opening the PC.
Only the system expansion devices designed for the PC can be installed. If other
expansion devices are installed, the PC may be damaged or safety requirements and
regulations related to radio frequency suppression may be breached. Please contact
technical support team or local distributor, to know the system expansion devices that
can be safely installed.
If the product is damaged due to installation or replacement of system expansion
device, the warranty will become invalid.
Responsibility Range
Our company shall not be held responsible for functional damage caused by use of
third-party device or assembly.
8.1.2 Preventative Maintenance
To maintain relatively high system availability, it is recommended to preventatively
replace the quick-wear parts. The table below give the time interval for replacement:
Assembly Time Interval for Replacement
HDD 3 years
CMOS backup battery 5 years
NPC-8220 · 33 ·
Page 41
PC Maintenance
8.1.3 Replacing Backup Battery
Things to know before changing battery
Caution
Damage may exist!
Always use same type lithium battery or lithium batteries recommended by the
manufacturer.
Disposal
Caution
Battery to be discarded should be disposed according to local laws.
Preparation Work
Notes:
1.Note down the current BIOS Setup or save the settings to the user profile in the
BIOS Setup“Exit” menu.
2. BIOS Setup provides a list, where these information can be saved.
3. Disconnect the PC from power source.
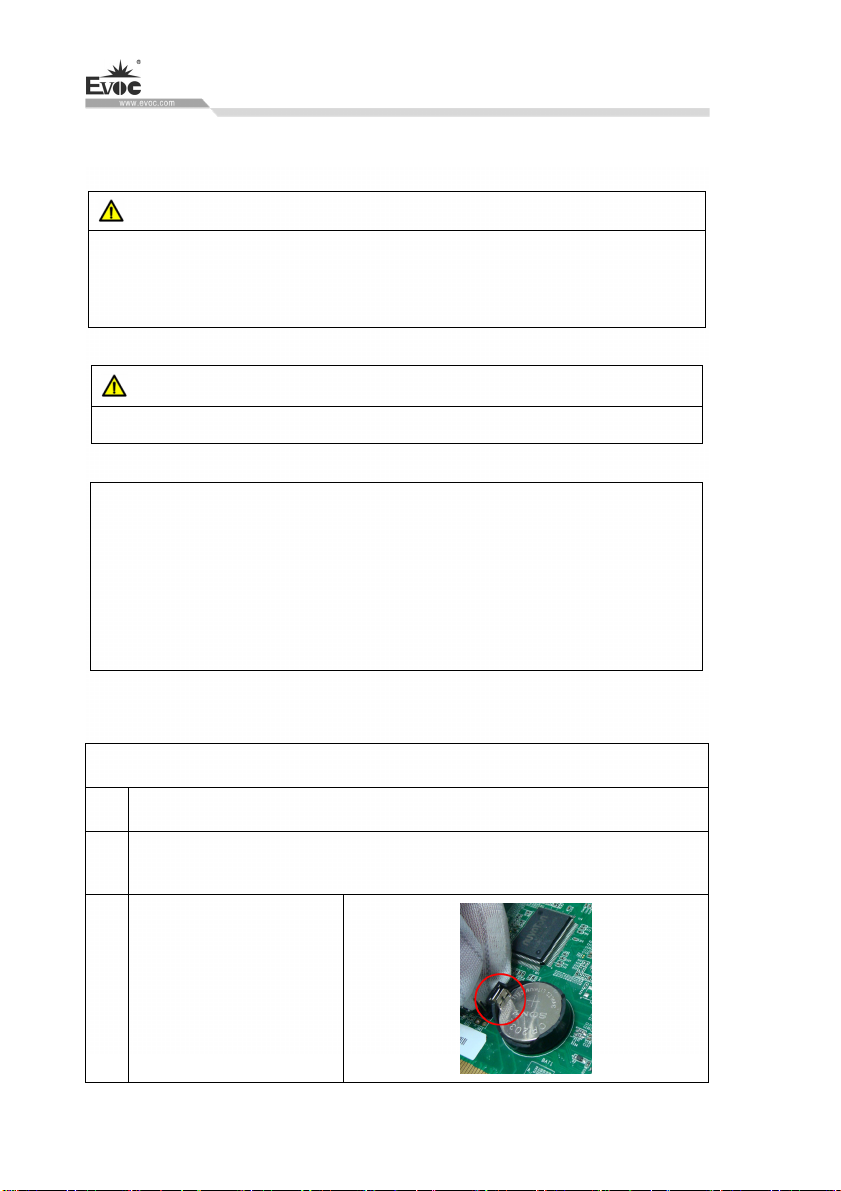
Replacing Battery
Steps to replace battery
1 Open the PC
Remove the motherboard. Note: place the motherboard on a desktop with
2
anti-electrostatic protection.
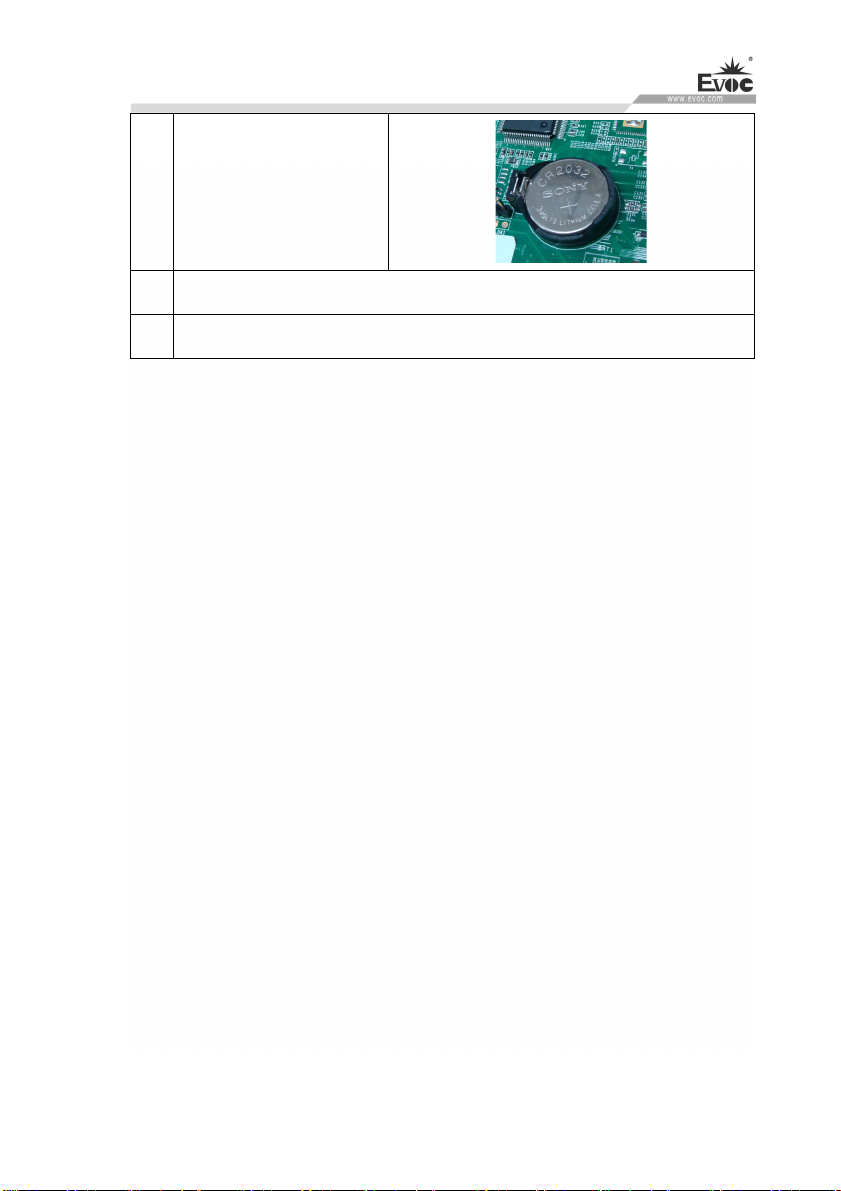
Press the clamp which
3
fasten the battery, and
remove the battery
· 34 · NPC-8220
Page 42
PC Maintenance
Place
the new battery into
4
the battery socket, and
click it into place
5 Install the motherboard
6 Close the PC.
Reconfiguration of BIOS Setup
If the time for battery replacement is over 30 seconds, the configuration data of the
PC will be lost. In this situation, reconfiguration of BIOS Setup is needed.
8.2 Installing the Drivers
Regarding the installation of the driver program and the detailed information of the
motherboard, please refer to the enclosed CD of the PC.
When driver program cannot be installed, for example a yellow question mark or
exclamation mark appears, it is recommended to install latest patch package of
corresponding operating system, or directly install the operating system of latest
release version before installing the driver program.
NPC-8220 · 35 ·
Page 43
9. Dimensions Drawing
9.1 Dimensions Drawing Overview
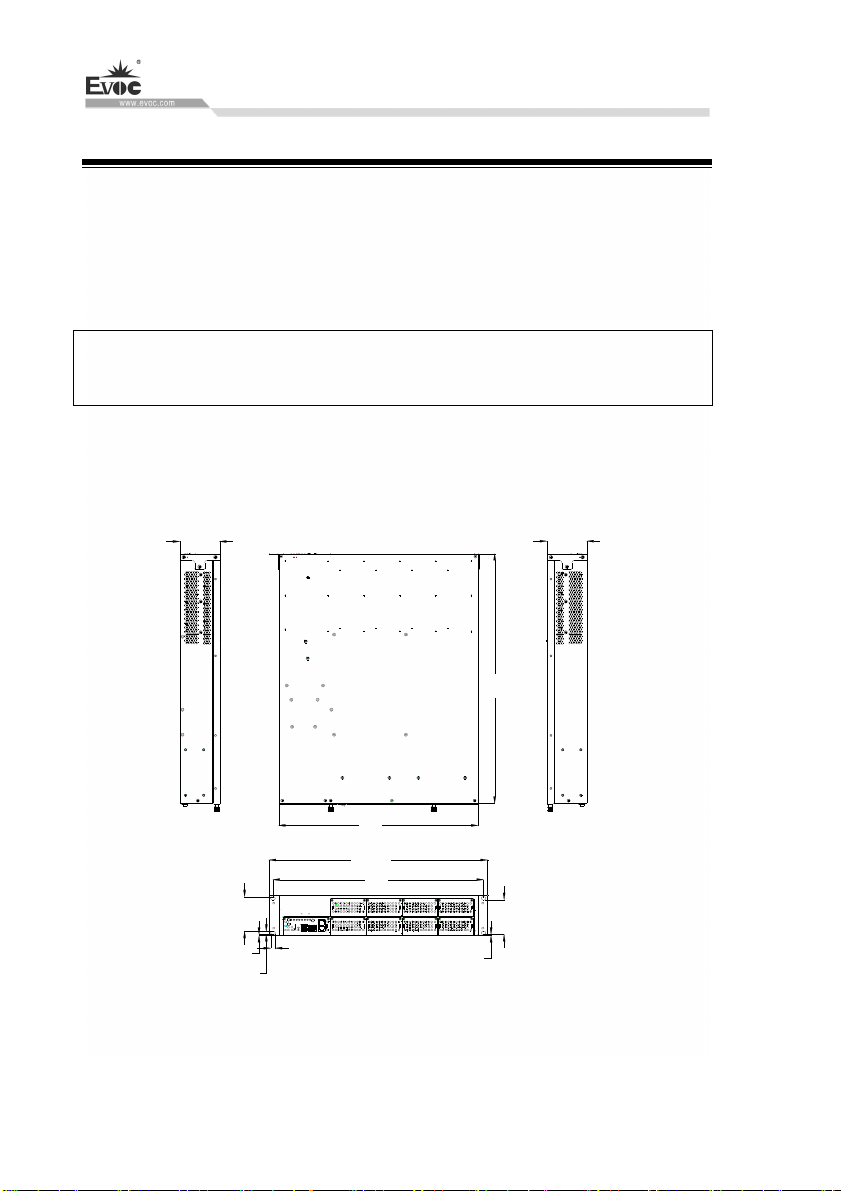
This section includes the following dimensions drawings:
Product Outline Dimensions Drawing
Product Installation Dimensions Drawing
Note:
The unit in the dimensions drawing is usually millimeter.
9.2 Product Outline Dimensions Drawing
Dimensions Drawing
88.1
· 36 · NPC-8220
2.6
4x6.8
76.2
4x10.3
88.1
550
440
482.6
465
76.2
2.6
Unit: mm
Page 44
Dimensions Drawing
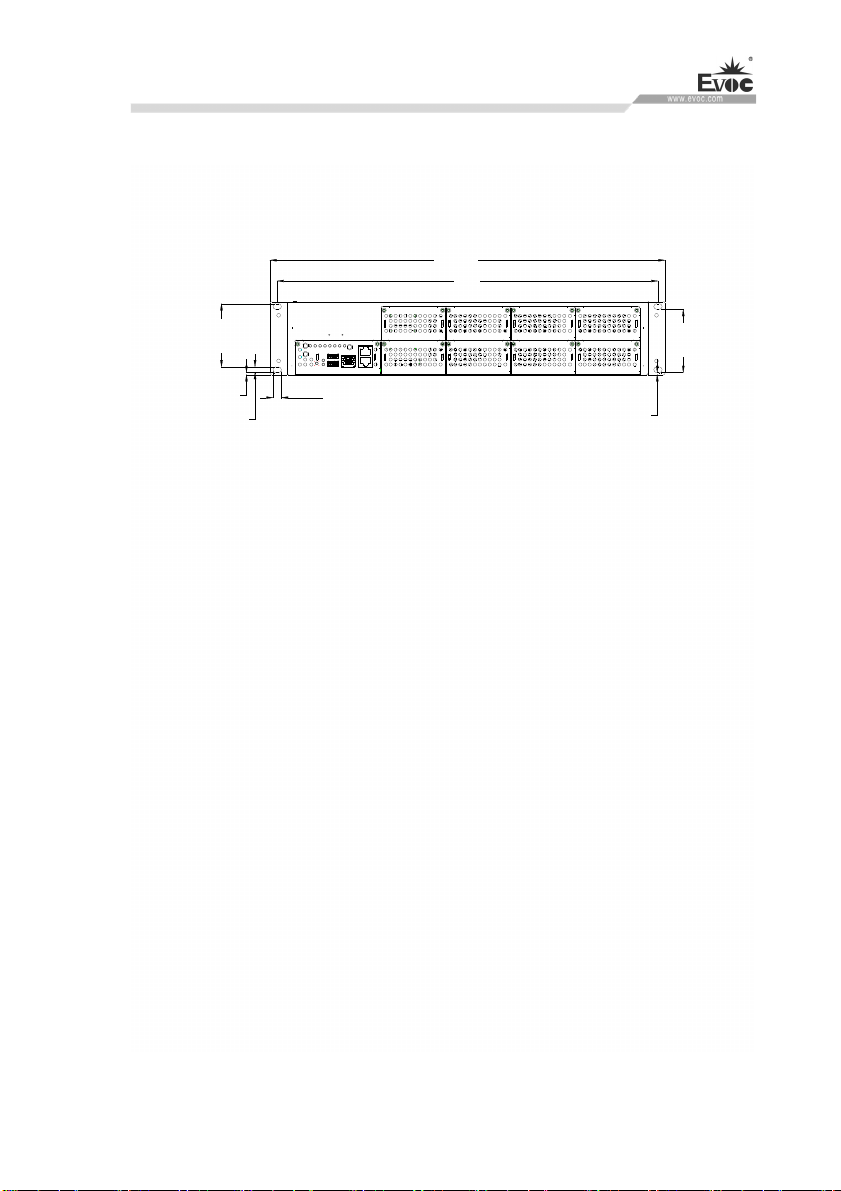
9.3 Installation Dimensions Drawing
9.3.1 Product Installation Dimensions Drawing
482.6
465
76.2
2.6
4x6.8
76.2
4x10.3
2.6
Unit: mm
NPC-8220 · 37 ·
Page 45

10. Appendix
10.1 Troubleshooting and Solutions
Appendix
Common
Malfunctions
The device is not
operating
The external
display is black
· 38 · NPC-8220
Possible Reasons Troubleshooting and Solution
No power supply
Improper device
operating environment
The display has not
been turned on
The display is under
“power saving” mode
The luminance control
is set to “Black”.
Power cable or display
cable is not connected
Please check the power supply
and the power cable/connector.
1. Check the environment
conditions;
2. Please wait for twelve hours
before powering on the device
shipped in cold weather.
Turn on the display
Press any key on the keyboard.
Increase the screen luminance by
luminance control. Please refer
to the instructions of the display
for detailed information.
1. Please check whether the
power cable is correctly
connected with the display, the
system unit or the ground port.
2. Please check whether the
display cable is correctly
connected with the display and
the system unit.
3. Contact Technique Support if
the screen remains black after
implementing the above
measures.
Page 46

Appendix
Incorrect time or
date on PC
BIOS setting is
correct while the
time and date are
incorrect.
USB device has no
response
The computer is
not booted or
displays “Boot
device not found”
No system disk can
be found when
powering on
Follow the power-on prompt and
Incorrect BIOS setting
Insufficient backup
battery capacity
USB port is disabled in
BIOS
USB 2.0 device is
connected; however,
USB 2.0 is disabled.
USB port is not
supported by the
operating system.
In booting priority of
the BIOS setting, the
device is not the first
priority or the device is
not include in the
booting device.
The HDD power cable
or data cable is not
connected well
press the key to enter the BIOS
Setup; adjust the time and date in
BIOS Setup.
Replace the battery
Use other USB ports or enable
that port.
Enable USB 2.0.
1. Enable USB Legacy Support
for the mouse and keyboard
(Legacy USB is supported);
2. For other devices, appropriate
Modify the booting priority of
the device in the Boot menu of
BIOS setting or include that
device into the booting priority.
Check whether the power cable
and the data cable of the hard
disk (the hard disk shall be
installed with operating system
and is bootable) are well
connected.
USB drivers are required.
NPC-8220 · 39 ·
Page 47
Enter the system (usually WinPE
system) with a bootable disk;
check whether the system in the
hard disk is damaged. Reinstall
the system if necessary.
Poor contact is usually caused by
frequent installation/
uninstallation of the PCI or ISA
card, unstable fixing or improper
dust-proof measures; please
remove and install the card for a
few times or use another slot.
Plug and play I/O
card, no IO card is
detected or no IO
card can be used
when used again
System files on the hard
disk are damaged
Poor contact of the slot
10.2 Common Alarm Information Analysis and Solution
Alarm Information Meaning and Solution
Appendix
EFI BIOS. After the product is booted,
the screen displays yellow alarm
information “Warning system time is
invalid,please set it to right”.
After bootup of motherboard, the screen
shows: “Reboot and Select proper Boot
device or Insert Boot Media in selected
Boot device and press a key”.
Award BIOS motherboard. During Power
On Self Test (POST), the screen displays
error information: “Keyboard error or no
keyboard present”.
· 40 · NPC-8220
Motherboard CMOS time setting
error, which needs to be corrected.
The current disk cannot be booted,
and the system HDD cable needs to be
rechecked, or use optical drive for
reinstallation of operating system.
The motherboard or complete PC is
not connected to PS/2 or USB
keyboard, and keyboard needs to be
connected properly.
Page 48
Appendix
EFI BIOS. During motherboard Power
The motherboard or complete PC is
On Self Test (POST),
“beep-beep-beep-beep-beep” five beeps
can be heard.
Redundant power supply equipped with
the complete PC. After the PC is powered
on, the PC power supply gives off
piercing alarms.
not connected to PS/2 or USB
keyboard, and keyboard needs to be
connected properly.
The redundant power supply is not
connected to two AC plugs. The PC
should be powered off, and connect
the two AC plugs.
10.3 ESD Guideline
Definition of ESD
All the electronic modules are equipped with large-scale integrated IC or assemblies.
Due to their own design, these electronic components are extremely sensitive to
over-voltage, so they are also extremely sensitive to any ESD.
ESD-sensitive assemblies/modules are usually called ESD devices. It is also the
internationally universal abbreviation for this type of devices.
The following sign can be used to identify ESD module:
Caution
ESD device may be damaged by any voltage which is much lower than ca
by human. If the component of the device you contact does not dissipate
electrostatic charges in your body, a static voltage will be generated. ESD current
may lead to potential problem of the module, or damage to the m
t but may cause fault during operation. serious for the momen
odule which is not
NPC-8220 · 41 ·
n be felt
Page 49
Electrostatic Charge
Appendix
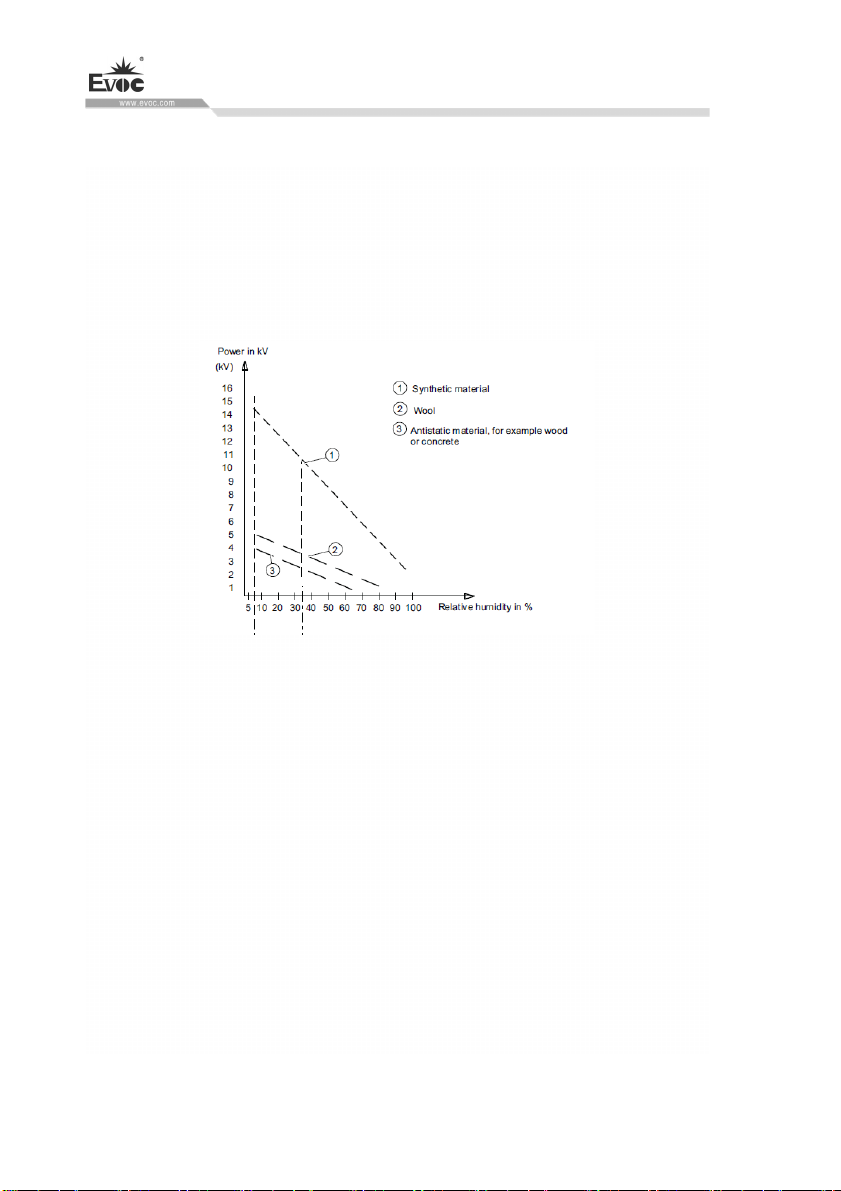
Electrostatic ch
to surrounding electrical level.
The following data shows the maximum electrostatic voltage which may be generated
when human body con
801-2 specifications.
Basic protective measures to prevent ESD:
arge phenomena may occur in the human body which is not connected
tacts specified material. These values are compliant with IEC
Electrostatic voltage on the body of operating personnel
Ensure excellent equipotential connection:
When holding the ESD-sensitive device, please make sure your
package are grounded. This c
Avoid direct contact:
Usually, people only contact ESD-sensitive device in unavoidable circumstances (f
example, for repair). When holding the module, do not touch any chip pin or PCB
circuit. In this way, the dissipated electricity will not affect the ESD-sensitive device
Before handling the module, dissipate the electrostatic charges on your body. The
can be dissipated by cont
measuring instrument.
· 42 · NPC-8220
an prevent electrostatic charge.
acting grounded metal part. Make sure to use grounded
body, work area and
y
or
.
Page 50

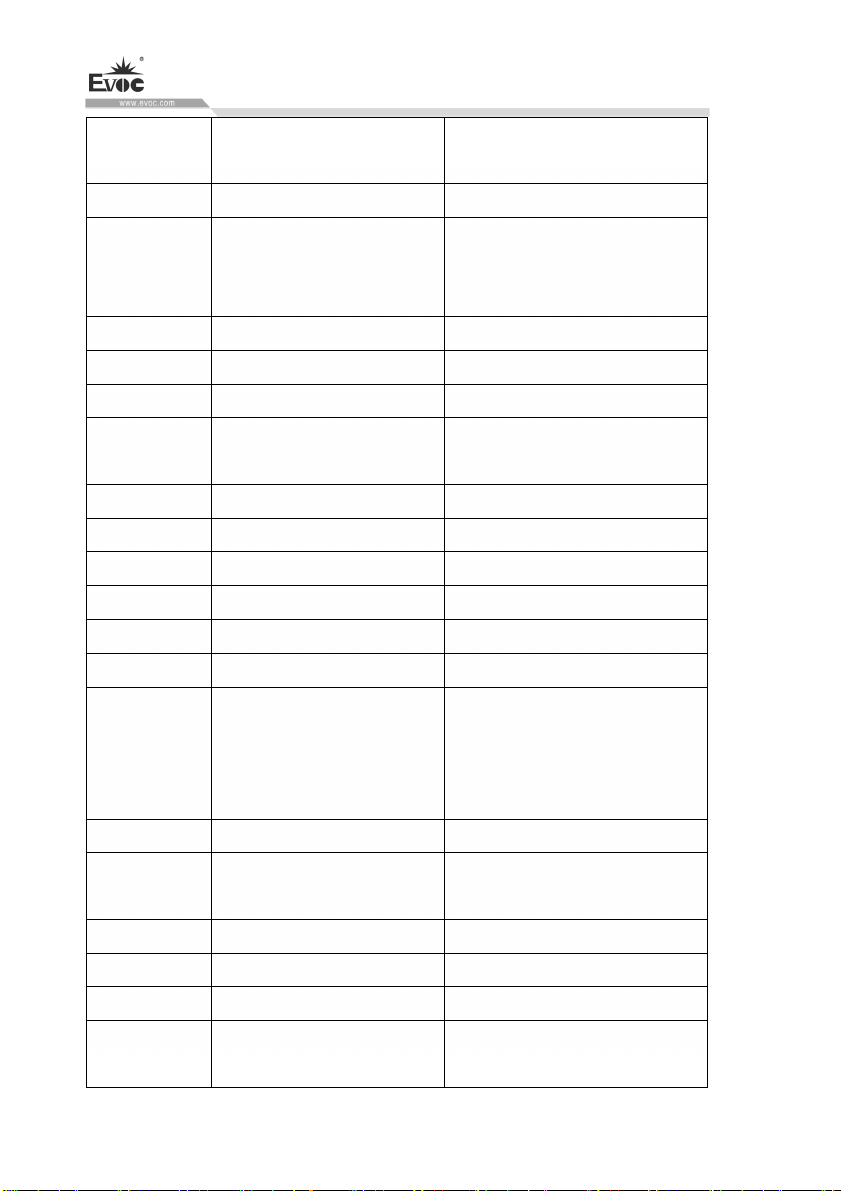
Appendix
10.4 Abbreviations
Abbreviation Terminology Meaning
AC Alternate current Alternate current
ACPI
PLC Programmable controller
AGP Accelerated Graphics Port High-speed bus system
AHCI
APIC
APM
AS Automation System
ASIS
AT Advanced Technology
ATA
ATX
AWG American wire gauge
BIOS Basic Input/Output System BIOS code
CAN Controller Area Network
Advanced Configuration and
Power Interf
Advanced Host Controller
Interface
Advanced Programmable
Interrupt Controller
Advanced Power
Management
After-sales Information
Advanced Technology
Advanced Technology
Extended
ace
System
Attachment
Standard control interface of
serial ATA, Microsoft windows
XP
(above SP1 version) and IAA
driver program supports the
interface
Extended programmable
interrupt controller
A tool used to monitor and lower
PC power consumption.
An America standard to
differentiate wire diameter
NPC-8220 · 43 ·
Page 51
CD-ROM
CD-RW CD Read & Write Burner disc
CE
CF CF card
CGA Color Graphic Adapter Standard monitor interface
CLK Clock Pulse Clock Signal
CMOS
COA Certificate Of Authenticity Microsoft Windows product key
COL Certificate of License License authorization
COM Serial Communication Port Serial Port
CP Communications Processor Communication PC
CPU Central Processing Unit CPU
CRT Cathode Ray Tube
CSA
CTS Clear to Send Clear to Send
DRAM
DC Direct Current Direct Current
DCD Data Carrier Detect Data carrier signal detect
DMA Direct Memory Access Direct memory access
DOS Disk Operating System
Compact Disc Read-only
Memory
Communate Europpene
(European Conformity ) (CE
Certificate Mark)
Complementary Metal-oxide
Semi-conductor
Canada Standard
Association
Dynamic Random Access
Memory
Large data storage read-only disc
Unified certificate mark of
European Union products
Complementary Metal-oxide
Semi-conductor
A Canada organization which
carries out test and certification
by the standard of Canada or the
two countries (using UL/USA)
Operating system without
graphic interface
Appendix
· 44 · NPC-8220
Page 52

Appendix
DP Distributed I/O
German Certification body
DQS
DDRAM Double Data Rate SDRAM
DSR Data set ready Set ready
DTR Data terminal ready Data terminal ready
DVD Digital Versatile Disc Digital Versatile Disc
DVI Digital Video Interface Digital Video Interface
DVI-I
ECC Error Correcting Code Error Correcting Code
ECP Enhanced Capability Port Extended parallel port
EGA Enhanced Graphics Adapter
ESD Electrostatic Discharge
DM Design Manual
EIDE Enhanced IDE
EISA
EMM Expanded Memory Manager To manage expansion of memory
EM64T
EN European Norm
EPROM/EEP
ROM
for Quality and Environment
Management Systems
Digital Video
Interface-Integrated
Extended Industry Standard
Architecture
Extended Memory 64
Technology
Electrically Programmable
Read -Only Memory/
Electrically Erasable
Memory chip with high-speed
interface
Digital video port with digital
and VGA signals
Connector between PC and
monitor
Enhanced electronic integrated
drive
Extended ISA standard
Use sub-module of
EPROM/EEPROM chip
NPC-8220 · 45 ·
Page 53

Programmable Read-Only
Memory
EPP Enhanced Parallel Port Two-way Centronics port
ESC Character for exit Control character
EWF Enhanced Write Filter
FAQ Frequently Asked Question FAQ
FAT 32 32-bit File Allocation Table 32-bit File Allocation Table
FBWF File Based Write Filter
FD Floppy Disk Disk drive, 3.5"
FSB Front Side Bus
GND Grounding Chassis grounded
HD Hard Drive Hard Drive
HDA High Definition Audio
HDD Hard Disk Drive HDD
HU Height Unit
HMI Human Machine Interface User interface
HORM
HT Hyper-Thread technology
HTML
HTTP Hypertext transfer protocol
Hardware Hardware
I/O Input/Output Data input/out of the computer
IAA
IDE Integrated Drive Electronics
IEC International
Hibernate once, resume
many
HyperText Mark-up
Language
Intel(R) Application
Accelerator
Script language used to create
Internet page
Data transfer protocol on the
Internet
Appendix
· 46 · NPC-8220
Page 54

Appendix
Electrotechnical
Commission
IGD Integrated Graphic Device
IP Ingress Protection Protection level
IR Infrared Infrared
IRDA Infrared Data Association
IRQ Interrupt Request Interrupt Request
Industrial Standard
ISA
Architecture
Information Technology
ITE
Equipment
L2C Level2 Cache
LAN Local Area Network
LCD Liquid Crystal Display Liquid Crystal Display
LED Light Emitting Diode Light Emitting Diode
LPT Line Print Terminal Line Print Terminal
Low-Voltage Differential
LVDS
Signaling
LW D riv e
MAC Media Access Control Media Access Control
MC Memory Card
Machine-readable product
MLFB
designation
MMC Micro Memory Card 32*24.5mm format memory card
Multiple Point Interface
MPI
Used for Programming
Used for the standard of data
transmitted by IR module
Used for bus of extended module
Computer network confined for
local communication
Memory card in credit card
format
NPC-8220 · 47 ·
Page 55

Devices
MS-DOS
MTBF Meantime between Failure
MUI
NA Not Available
NAMUR
NC Not Connected Not Connected
NCQ Native Command Queuing
NEMA
NMI Non Maskable Interrupt Interrupt cannot be refused
NTFS
ODD Optical Disc Drive
OPC OLE for Process Control
PATA Parallel ATA
PC Personal PC
Microsoft Disk Operating
System
Multi-language User
Interface
Normenarbeitsgemeinschaft
for Mess- und
Regelungstechnik in der
chemischen Industrie
(Standardization association
for measurement and control
in chemical industries)
National Electrical
Manufactures Association
New Technology File
System
Language localization of
Windows
Automatically rearrange the files
and disc access, to improve
performance
An organization of U.S.
electronic component
manufacturers
Safety file system of Windows
version (2000, XP, Vista)
Standardized interface of
industrial process
Appendix
· 48 · NPC-8220
Page 56

Appendix
PCI
PCIe
PCMCIA
PI Protective Ground Protective conductor
PEG PCI Express for Graphics
PG Programming PC
PIC
POST Power On Self Test
PXE
RAID
RAL Restricted Access Location
RAM Random Access Memory
RI Ringing Input Call in
ROM Read-Only-Memory
RS 485 Reconciliation Sublayer 485
RTC Real Time Clock Real Time Clock
RTS
Peripheral Component
Interconnect
Peripheral Component
Interconnect express
Personal Computer Memory
Card International
Association
Programmable Interrupt
Controller
Pre-boot Execution
Environment
Redundant Arrays of
independent Disks
Reliable Transmission
S
ervice
High-speed expansion bus
High-speed serial, differential
full-duplex PtP interface with
high-speed data transmission rate
Programmable Interrupt
Controller
Used to operate software without
HDD data PC via network
Redundant HDD array
Install device in operation
facility with restricted access
(e.g. control cabinet with lock)
Two-way bus system designed to
be used for up to 32 nodes
Request to send
NPC-8220 · 49 ·
Page 57

RxD Receive Data Data transmission signal
SATA
SCSI
SDRAM
SELV
SLC Second Level Cache
SMART
SMS Short Messaging Service
SNMP
SO-DIMM
SOM
SPP Standard Parallel Port Synonym to parallel port
SRAM
SSD Solid-State Drive
SVGA Super Video Graphics Array
SVP Serial number of the device
SW Software
Serial Advanced Technology
Attachment
Small Computer System
Interface
Synchronous Dynamic
Random Access Memory
safety extra-low voltage
safety extra-low voltage circuit
circuit
Self-Monitoring, Analysis
HDD error diagnosis procedure
and Reporting Technology
To transmit short message by
telecommunication network
Simple Network
Network protocol
Management Protocol
Small Outline Dual Inline
Memory Module
Safety Card on Motherboard
(SOM)
Static Radom Access
Static RAM
Memory
Enhanced VGA standard using at
least 256 colors
Appendix
TCO Total Cost of Ownership
· 50 · NPC-8220
Page 58

Appendix
TFT Thin Film Transistor An LCD screen type
TTY Teletypewriter Asynchronous data transmission
TxD Transmit Data Data transmission signal
TWD Watchdog Time Monitoring time of Watchdog
A U.S. organization which
UL
Underwriter Laboratories
Inc.
Unified Memory
UMA
Architecture
URL Unified Resource Locator
USB Universal Serial Bus
Ultra eXtended Graphics
UXGA
Array
V.24
VCC
Verein deutscher
Elektrotechniker (Prufstelle
VDE
Testing and Certification
Institute)
VGA Video Graphics Array
VRM Voltage Regulator Module
VT Virtualization Technology Simulated closed environment
carries out test and certification
based on the standards of the
country or two countries (using
CSA/Canada)
Video memory
Complete address mark of
Internet page
Graphics standard, with
maximum resolution of
1600x1200 pixel
ITU-T standardization advice to
transmit data by serial port
Positive supply voltage of
integrated circuit
Video adapter which meets
industrial standard
NPC-8220 · 51 ·
Page 59
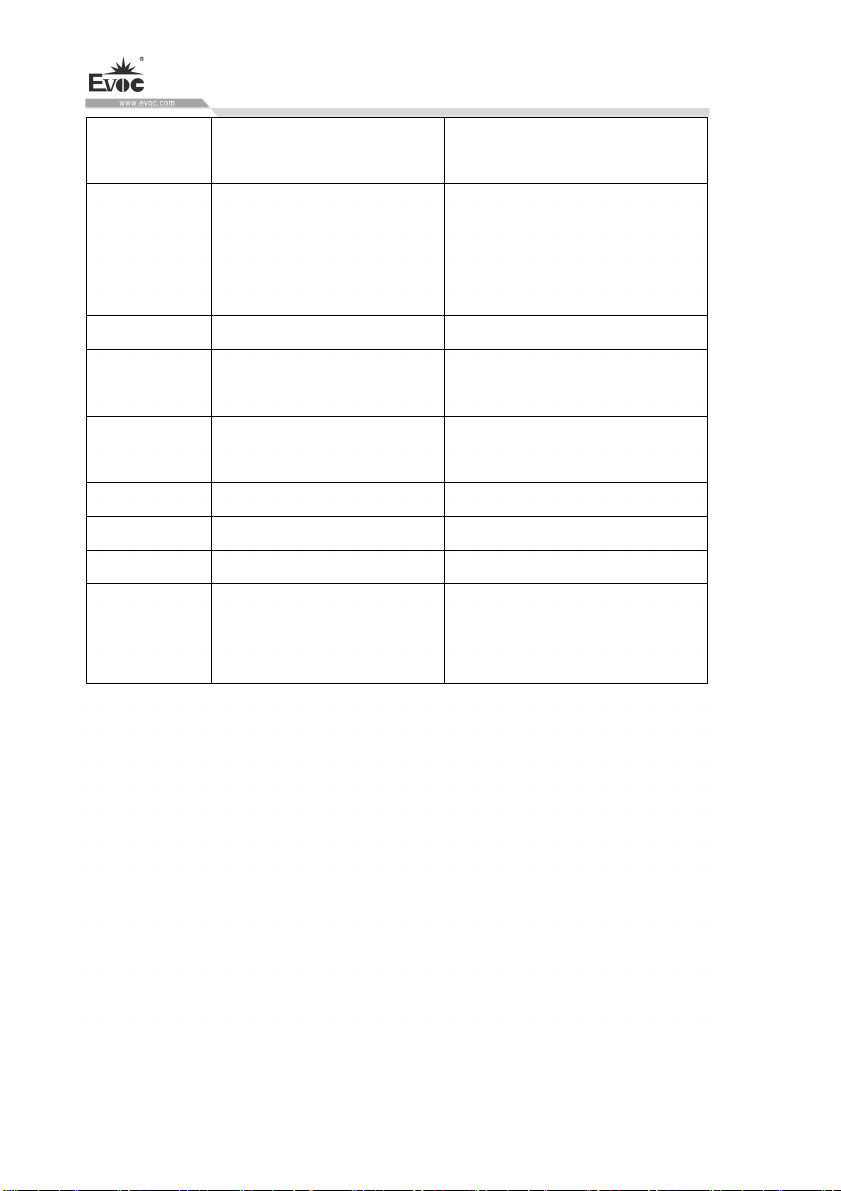
can be used by using Intel
technology
To enable the function which
VT-D
Intel Virtualization
Technology for Directed I/O
W2k Windows 2000
WAV Wavelength encoding
WD Watchdog
WLAN Wireless LAN Wireless LAN
WoL Wake-On-LAN
WWW World-Wide-Web
XGA Extended Graphics Array
directly assigns the device (e.g.
network adapter) to virtual
device.
Loss-free file format used for
audio data
Monitoring program using error
detection and alarm
Graphics standard, with a
maximum resolution of
1024×768 pixel
Appendix
10.5 Terminology Glossary
AHCI Mode
AHCI is a standard method for SATA controller to search address. AHCI describes
the structure in RAM, containing a routine area to control status and a command list.
APIC Mode
Advanced Peripheral Interrupt Controller, with 24 interrupt lines in total.
ATAPI CD-ROM Drive
AT Attachment Packet Interface (connected to AT bus) CD-ROM drive.
CE Mark
· 52 · NPC-8220
Page 60

Appendix
Communauté Européene CE mark confirms that the product is compliant with related
EC instructions, such as EMC instructions.
CF Card
CF card is a digital storage media in the card form, without mobile part. A CF card
includes non-volatile memory and controller. The CF card socket is compliant with
IDE port. CF card can be operated by connector and socket adapter, and other
electronic components on the PCMCIA or IDE HDD controller are not needed. There
are two kinds of design specifications: CF-I (42.6×36.4×3.3 mm) and CF-II
(42.8×36.4×5 mm).
COM port
COM port is a serial V.24 port, which is suitable for asynchronous data transmission.
EMC Instructions
Instructions about Electromagnetic Compatibility. The compliance standard is
confirmed by CE marking and EC conformity certificate.
ESD Instructions
Instructions for use of ESD-sensitive assemblies.
Intel VT
Intel Virtualization Technology (IVT) creates a safe and closed environment for
application program. To use this function, special (virtualized) software and
processors with VT function are needed.
LAN
Local Area Network: LAN means local area network, which contains a set of
computer and other devices distributed across relatively limited scope and connected
by communication cable. The devices connected to LAN are called node. The purpose
of network is to share files, printers and other resources.
NPC-8220 · 53 ·
Page 61

Appendix
Wake-On-LAN (WoL)
This function supports bootup of the PC via LAN port.
LPT port
LPT port (Centronics port) is a parallel port used to connect printer.
PATA
The interface used for hard drive and optical drive, with up to 100Mbps parallel data
transmission rate.
PC card
Marking of Personal Computer Memory Card International Association (PCMCIA),
which is the marking of support card compliant with PCMCIA specifications. PC
cards of a credit card size can be inserted into PCMCIA slot. Version 1 defines 3.3mm
thick Type I card, which is mainly used as external memory. PCMCIA standard
Version 2 also defines 5mm thick Type II card and 10.5mm Type III card. The Type
II card can realize modem, fax card, network interface card, among other devices.
Type III card is equipped with devices which require more space (e.g. wireless
communication module) or rotating storage media (e.g. hard drive).
PC/104 / PC/104-Plus
Two kinds of bus system architecture are currently popular in the industry: PC/104
and PC/104-Plus, both of which are of device type single board computer standard.
The electrical and logical layout of these two bus systems are the same with ISA
(PC/104) and PCI (PC/104-Plus). Software usually cannot detect the difference
between them and common desktop bus system. Their advantages are compact design
and space saving.
PCMCIA
The association is composed of about 450 company members in the computer
industry. It focuses on providing international standards for miniaturization and
flexible use of device expansion card, so as to provide basic technology for the
· 54 · NPC-8220
Page 62

Appendix
market.
PEG Port
PCI Express used for graphics. A graphics port with 16 PCIe channels, used to expand
graphics module.
PIC mode
Peripheral interrupt controller, having 15 interrupt lines.
POST
Self-test executed by BIOS after the PC is powered on. For example, RAM test and
graphics controller test. If BIOS detects any error, the system will output audio signal
(buzzer code); reason for the error and related information will be indicated on the
screen.
PROFIBUS/MPI
Process Field Bus (standard bus system of process application program).
PROFINET
PROFINET is the standard name of industrial Ethernet developed and maintained by
PROFIBUS users. PROFINET unifies the protocol and specifications of industrial
Ethernet, to meet the requirement of industrial automation technology.
RAID
Redundant Array of Independent Disks: a data storage system, which usually stores
data and corresponding error correction code (such as parity bit) on at least two hard
disk volumes, so as to improve reliability and performance. Hard disk array is
controlled by hard drive controller which manages program and corrects errors. RAID
system is usually realized in network server.
ROM
ROM refers to Read-Only Memory. It can separately search each storage address. The
program or data are permanently stored, so they will not be lost when power failure
occurs.
NPC-8220 · 55 ·
Page 63

Appendix
S.M.A.R.T
Self-Monitoring, Analysis and Reporting Technology (SMART or S.M.A.R.T.) is an
industrial standard integrated in memory media. This technology can be used to
continuously monitor key parameters and detect upcoming problems at early stage.
SATA
Serial ATA interface of hard drive and optical drive, with up to 300Mbps
transmission rate of serial data.
SCSI Interface
Small computer system interface use to connect SCSI device (such as hard drive or
optical drive).
SETUP (BIOS Setup)
The program where information about device configuration (i.e. configuration of
hardware on PC/PG) is defined. The device configuration of PC/PG is preset with
default values. Therefore, if memory expansion, new module or new drive is added to
hardware configuration, changes must be made in SETUP.
SSD (Solid-State Drive)
The installation method of solid-state drive is similar to any other drive. It only uses
semi-conductor memory chip of similar capacity, so it does not include rotating disk
or other mobile assembly. This design makes SSD more rugged and endurable,
shortens access time and lowers energy consumption.
WLAN
Wireless LAN is a local area network, which transmit data by radio wave, infrared
and other wireless technology. Wireless LAN is mainly used for portable PCs in
offices or factory environment.
Backup
Copies of programs, data media or database, use to keep or protect key, irreplaceable,
data, and prevent data loss when damage to a working copy occurs. Some application
· 56 · NPC-8220
Page 64

Appendix
programs automatically generate backup copies of data files, and manage current or
previous versions in the HDD.
Baud
Physical unit of stepping speed during signal transmission. It defines the number of
signal status sent each second. Only in two statuses, one baud is equal to 1bps
transmission rate.
Operating System
A general name describing all the functions in concerted operation with hardware, and
control and monitoring of user program execution, system resource assignment in user
program and operating mode. (e.g. Windows XP Professional).
Hyper-Threading
HT technology (multiple threads) allows multiple computing threads to run
simultaneously. Only when all the related system assemblies (e.g. processor,
operating system and application program) are supported, can HT be effective.
Legacy USB support
Not to use drivers to support USB devices on the USB port. (e.g. mouse, keyboard).
Legacy Boot Device
Traditional drive can be used as USB device.
Memory Card
Memory card of credit-card format, the storage to store user programs and parameters
(e.g. programmable module and CP).
Reset
Hardware reset: Using button/switch reset/reboot device.
Formatization
NPC-8220 · 57 ·
Page 65

Appendix
Storage space on the magnetic data media is primarily divided into magnetic track and
sector. Formatization operation will delete all the data on the data media. All the data
media must be formatized before first use.
Common Fault
Error reason, error analysis, corrective measures.
Cache
Used as a buffer for high-speed access of relay storage (buffer) of the requested data.
Plug and Play
It usually refers to the capability of automatic configuration system of the computer to
communicate with peripheral devices (such as monitor, modem or printer). Users can
insert a peripheral device and immediately use it without having to manually
configure the system. Plug-and-Play devices need BIOS and expansion card which
supports plug-and-play.
Hub
A jargon in network technology. It is a device in the network located in the center,
and connected to multiple communication lines, to provide common connections for
all the devices in the network.
Extensible Firmware Interface (EFI)
EFI refers to the central interface between firmware and each assembly of the
computer and that among operating systems. Logically, EFI is located under the
operating system, and is successive specification of device BIOS, mainly targeting
64-bit system.
Controller
Controller integrating hardware and software to control certain internal or peripheral
devices (e.g. keyboard controller).
· 58 · NPC-8220
Page 66

Appendix
Cold Reset
Cold Reset is a boot sequence. When the PC is powered on, it is to be booted up. In
the cold reset sequence, the system usually executes a couple of basic hardware
checks, then load the operating system from hard drive to working memory -> boot.
Module
Modules refer to PLC, programming device or plug-in unit. These modules can be
local modules, expansion modules, interfaces or mass storage (mass storage module).
Module Bracket
Module bracket is used to fix the module and ensure safe contact and transportation.
Impact and vibration especially affects large and heavy modules. Therefore, it is
recommended to use module bracket for this type of module. There are also short,
light and compact modules on the market. Module bracket is not designed for these
modules, because standard fixing measures are sufficient for them.
Warm Reset
Reboot the computer after the program is interrupted. Load and reboot the operating
system again. Hot key CTRL+ ALT+ DEL can be used to execute warm reset.
Drivers
Program part of operating system. They modify user program data according to
specific format required by I/O devices (e.g. hard drive, printer and monitor).
Hotswap
SATA interface provides hotswap function for hard drive system of the device. The
prerequisite of the configuration is a RAID1 system with SATA RAID controller
(onboard or slot module) and at least two SATA detachable supports. The advantage
of hotswap is that faulty hard drive can be replaced without having to reboot the PC.
Dual-core CPU
Compared with last-generation single-core CPUs using hyper-threading technology,
NPC-8220 · 59 ·
Page 67

Appendix
dual-core CPU remarkably improves the speed of computing and program execution.
Pixel
PixElement (Pixel) . Pixel means the smallest element which can be copied on the
screen or printer.
Chipset
A chipset is located on the motherboard, to connect processor with RAM, graphics
controllers, device I bus and external ports.
Ethernet
The transmission rate of text and data communication within local area network (bus
structure) is 10/100/1000 Mbps.
Boot Disk
A boot disk is a boot program disk with boot sector. It can be used to load operating
system from disk.
Image
It refers to image of hard drive partition, for example, saving to a file so that it can be
recovered when necessary.
Reboot
Warm boot the computer (Ctrl + Alt + Del) without disconnecting power source.
Motherboard
Motherboard is the core part of a computer. Motherboard is used to process and store
data, control and manage ports and device I/O.
· 60 · NPC-8220
 Loading...