

Page 1
For the latest user manuals, tutorial videos, rmware and calibration
instructions please visit our ocial wepage at EVOGimbals.com
Your new gimbal comes with a 1 Year Parts & Labor warranty. Be sure
to register your warranty by registering online at EVOGimbals.com
IMPORTANT MESSAGE
Thank you for choosing EVO Gimbals as your camera stabilization
solution! We know that buying a new product can be very exciting
and we are sure that you probably can not wait to use your new
gimbal! Before you start PLEASE read this manual and become
familiar with your gimbal’s components and operating modes.
We highly encourage everyone to also watch our great tutorial videos
on our website as a supplement to this manual.
BATTERY SAFETY!
Your Gimbal includes (2) Lithium Ion Batteries that must be handled with care!
Here are some simple safety precautions you can take to ensure the best
performance for your batteries.
- Always handle your batteries with care.
- Always store your batteries in a cool dry and well ventilated area.
- Never mix the batteries with dierent brand, type or model battery.
- Always charge batteries in proper charger.
- Keep out of reach of children
- Always pack batteries securely and avoid excessive shock and vibration
- Regularly inspect batteries for exterior wear.
- Never throw your batteries in the trash! Always be sure to recycle them at the
appropriate battery recycling center.
Lithium-Ion batteries should not be exposed to extreme temperatures. Heat and
cold stress the batteries. Always charge and use your batteries at room temperature. If the battery has been exposed to extreme temperatures, allow the battery
to return to room temperature before charging it or using it.
WARRANTY
LATEST INFORMATION
WARRANTY
USER MANUAL
V1.2
3 AXIS HANDHELD
GIMBAL
Compatible With:
Phone: +1 541 728 3741
Website: www.evogimbals.com
Address: 20810 Sockeye Pl
Suite 200
Bend, Oregon 97701
Page 2
INCLUDED IN THIS BOX
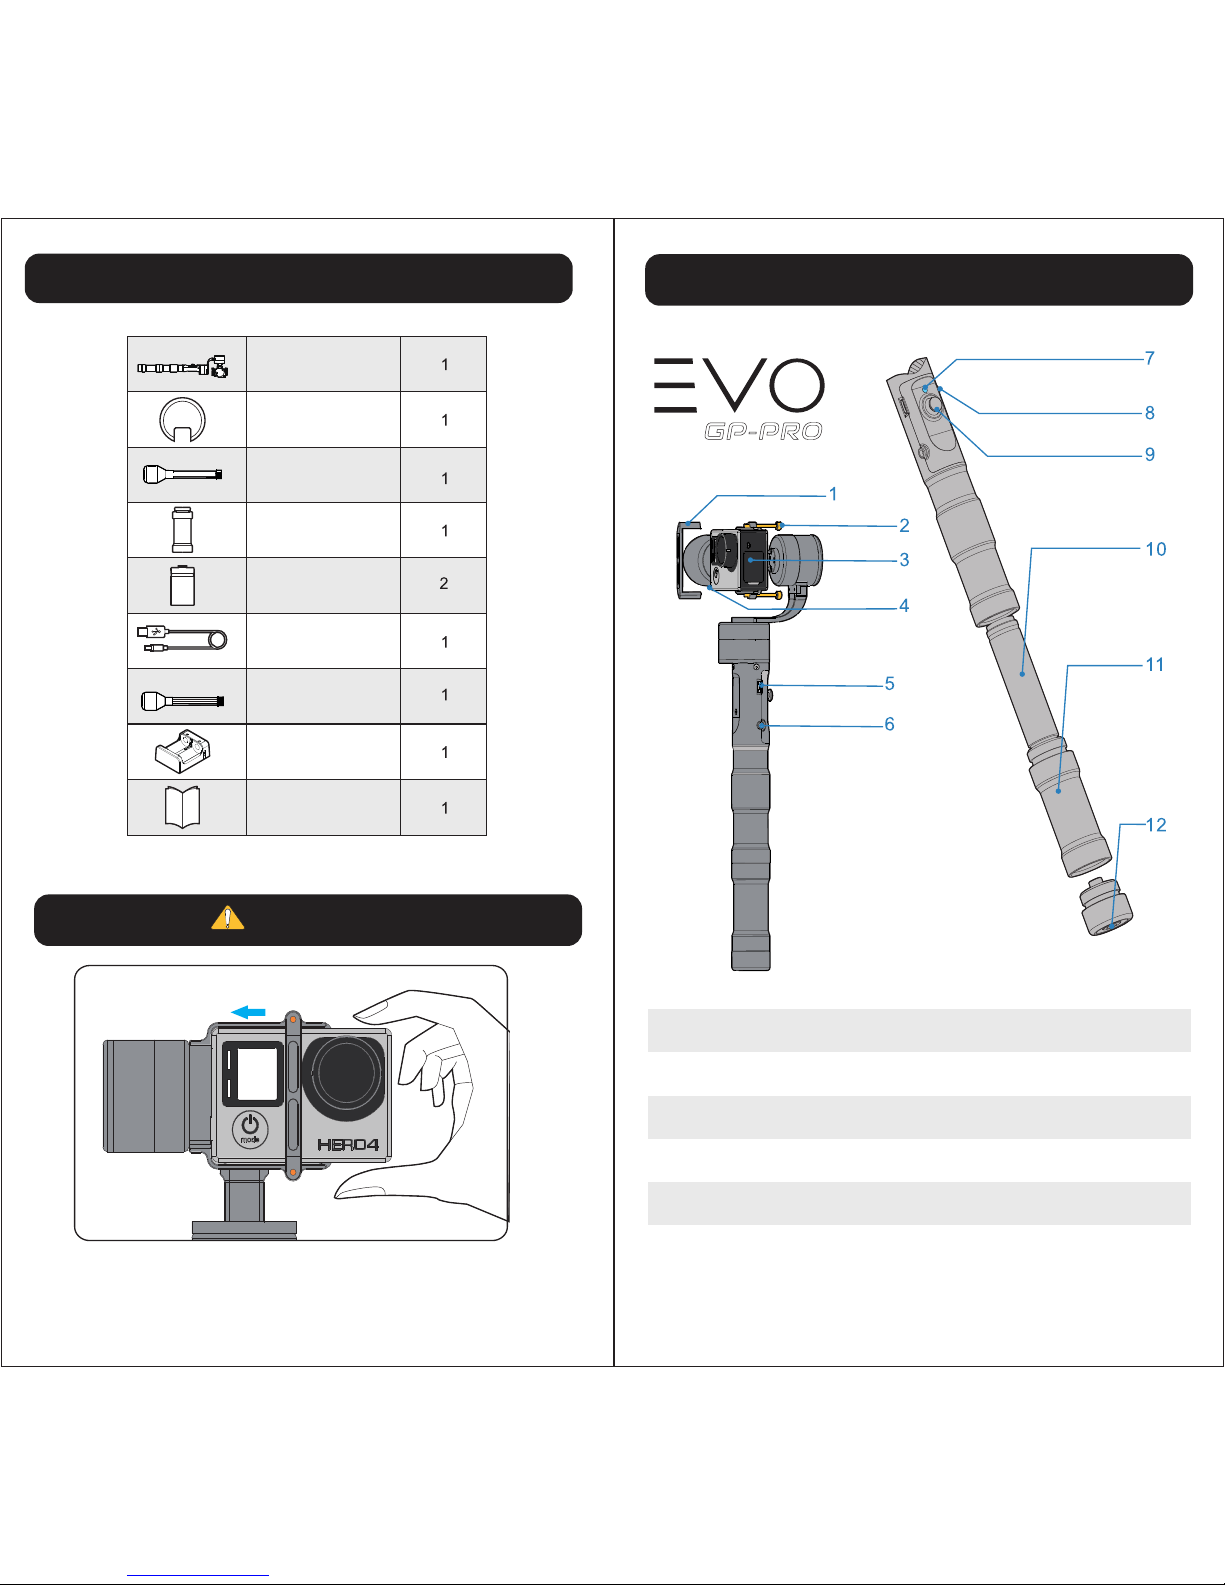
Please check that all items are included, if you are missing any
items or components please contact your dealer immediately!
WARNING!
ALWAYS INSTALL GOPRO
BEFORE POWERING ON MOTORS!
FAILURE TO DO SO CAN DAMAGE THE UNIT!
OVERVIEW
1. Camera Mounting Bracket 2. Thumbscrew 5 x 20mm (2)
3. GoPro Camera (not included)
4. GoPro Charging Port
5. Micro USB Port 6. 3.5mm Video Output Port
7. Power Indicator Light 8. Power Button
9. 4 Way Thumbstick 10. 18650 Li-Ion Battery
11. Battery Extension Tube 12. Battery End Cap with
1/4-20 Female Thread
EVO GP-PRO GIMBAL
Foam Protection Pad
for Pan Motor
GoPro Charging Cable
(3 Wire)
Battery Extension Tube
18650 Li-Ion Battery
USB Cable
GoPro Video Out
/ Charging Cable
(4 Wire)
18650 Battery Charger
User Manual
Page 3
QUICKSTART GUIDE
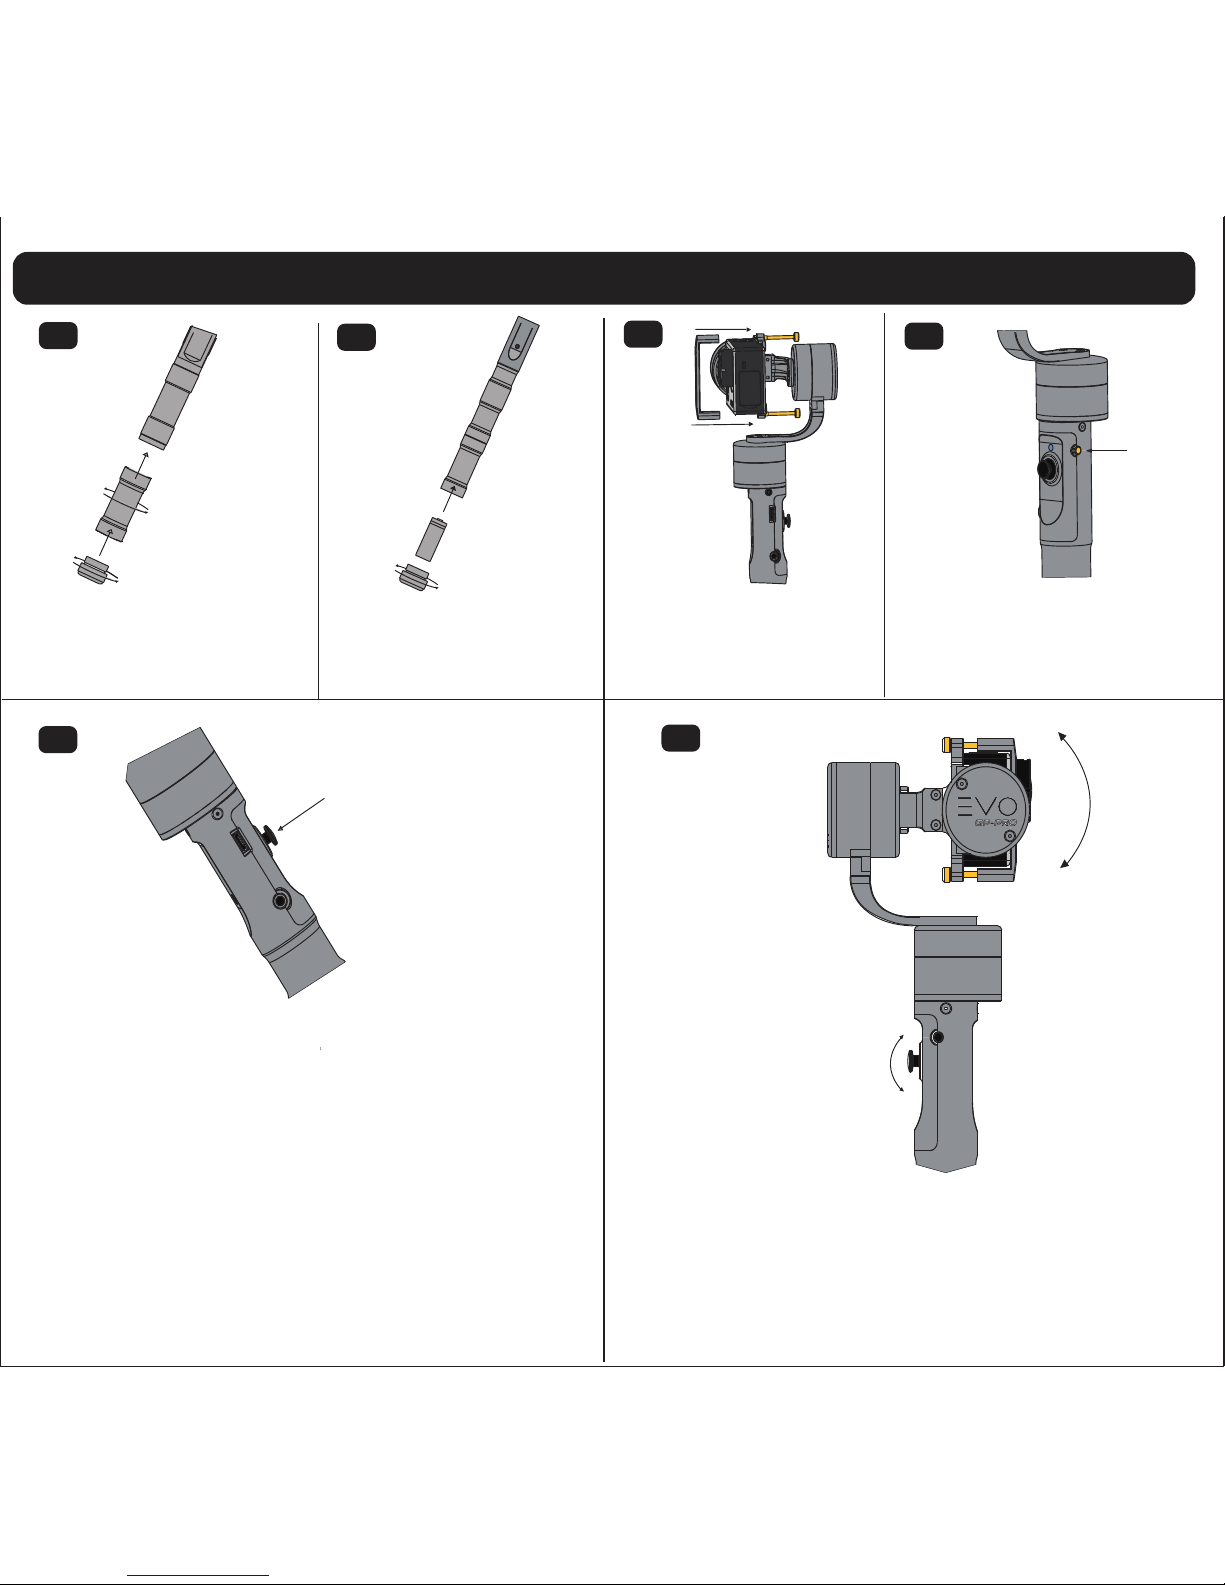
1
Remove battery end cap and
install the battery extention
tube.
2
Install GoPro in camera tray and
tighten the mounting bracket
using top and bottom thumb-
screws.
Insert both charged 18650 LiPo
Batteries and screw battery end
cap.
3
5
4
6
Initialize gimbal rst by setting on
at non-moving surface. Press
power button and wait 4-5 seconds
for blue calibration lights to stop.
Power
Button
Press & hold thumbstick
for 2 seconds to activate
motors.
To activate motors, depress thumbstick for 2 seconds.
Motors will initialize and stabilize the camera starting in
Heading Follow Mode.
Adjust the camera tilt angle by pushing up or down on the
thumbstick. Camera tilt can only be adjusted in Heading Follow
Mode or Lock Mode. Camera horizon angle can be adjusted when
in Heading and Pitch Followmode.
Activate Motors:
Single click thumbstick to switch between Heading
Follow Mode and Lock Mode. Double click thumbstick
to enter Heading and Pitch Follow Mode.
To power OFF motors (standby mode) simply depress
thumbstick for 2 seconds.
Switch Modes:
Standby Mode:
Adjust Camera Angle:
Page 4
CHARGING BATTERIES
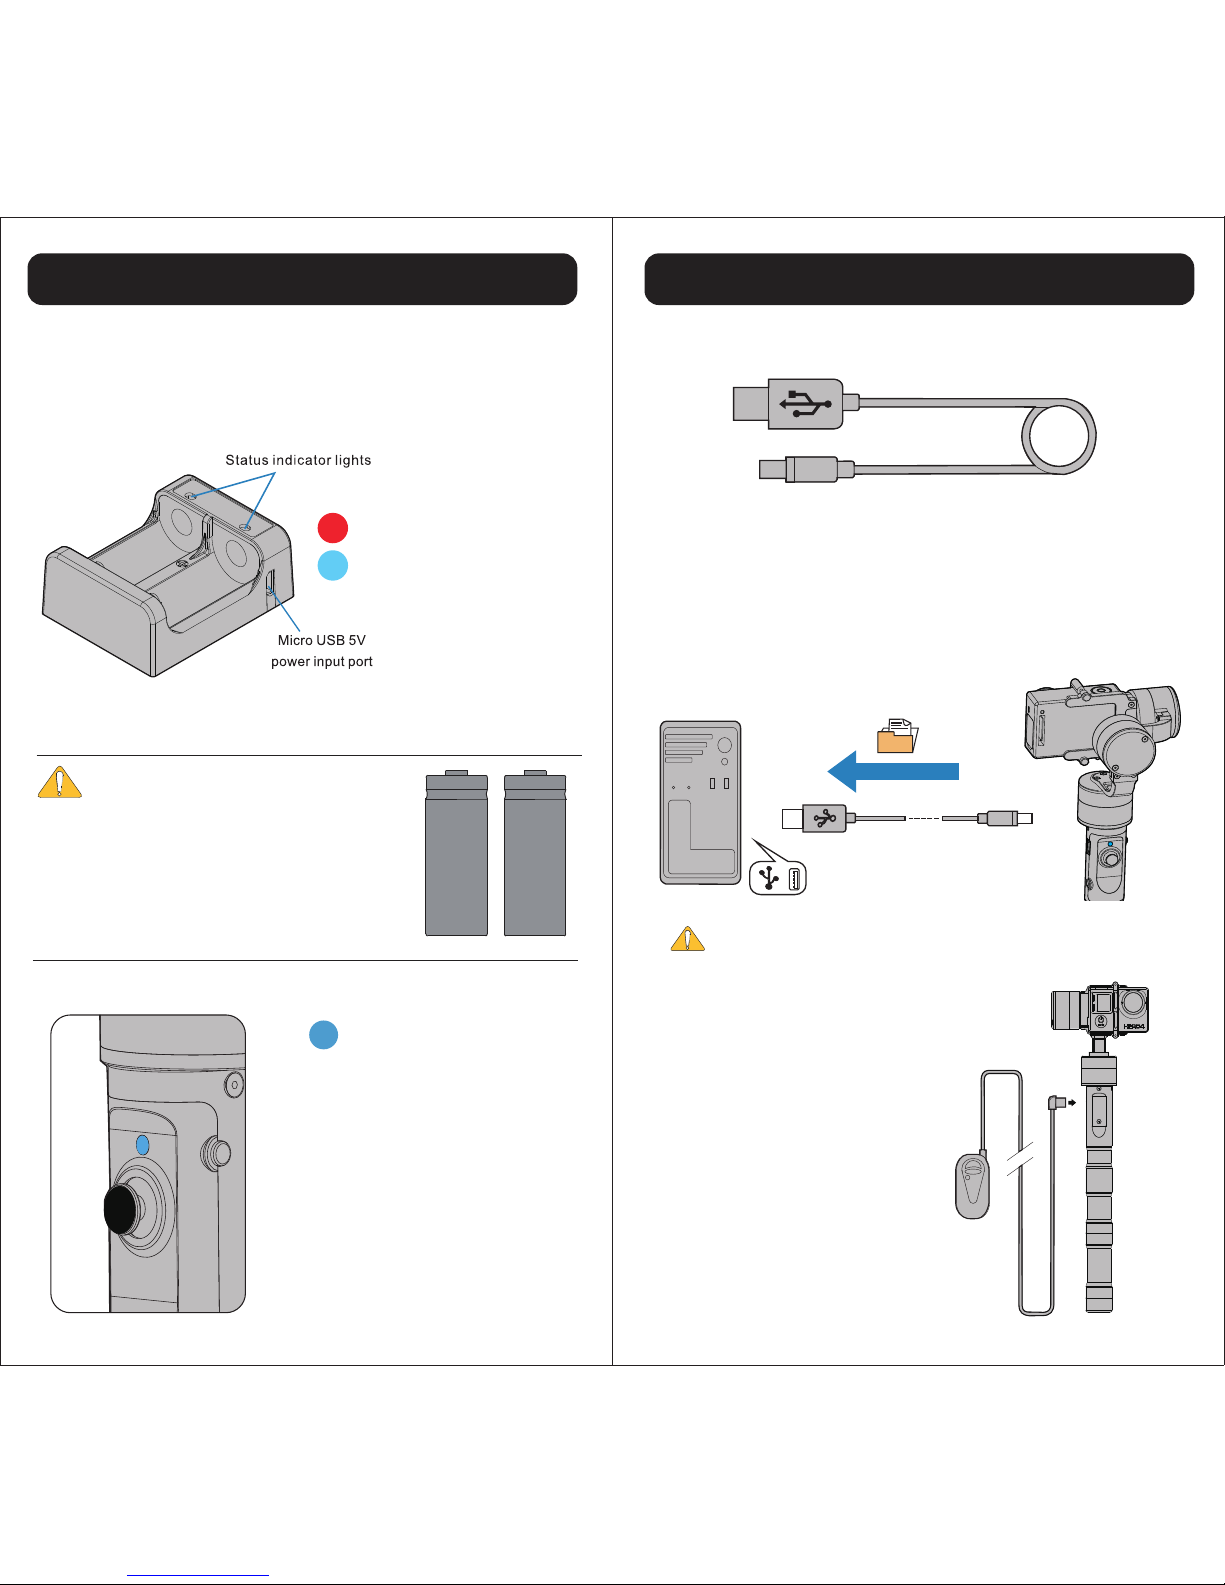
Red Light = Charging
Blue Light = Finished
Input: DC 5V / 800mA
Output: 4.2V / 400mA x2
Connect charger to any standard USB outlet or phone charger using
the included Micro USB cable. Batteries take approximately 2 to 3
hours to fully charge. Shorter charge times can be achieved using
higher mA rating AC/DC adapter.
ALWAYS USE GENUINE
18650 OEM EVO BATTERIES!
Monitor Remaining
Battery Power:
4 Flashes = 75-100%
3 Flashes = 50-75%
2 Flashes = 25-50%
Flashes Quickly = 0-25%
POWER INDICATOR LIGHT
MICRO USB CONNECTION
FIRMWARE UPGRADE / SOFTWARE CALIBRATION
Connect gimbal to your computer using the included Micro USB
cable to upgrade the rmware or to use the software calibration tool.
For the latest rmware upgrades, user manuals and software calibration please visit www.EVOGimbals.com and click on Downloads.
Note: Batteries cannot be charge through Micro USB port.
OPTIONAL REMOTE CABLE
Connect Remote Extension
Cable (sold separatley) to Micro
USB port to remotely control
operating modes and gimbal
functions.
Remote extension cable can be
very useful when shooting with
the carbon ber extension
poles (sold separatley).
Your gimbal must be matched with the orignal
batteries to guarantee performance, long life and
safety! Never pair dierent brand or dierent model
batteries together.
Additional batteries can be purchased from your
dealer or direct from EVOGimbals.com
Page 5
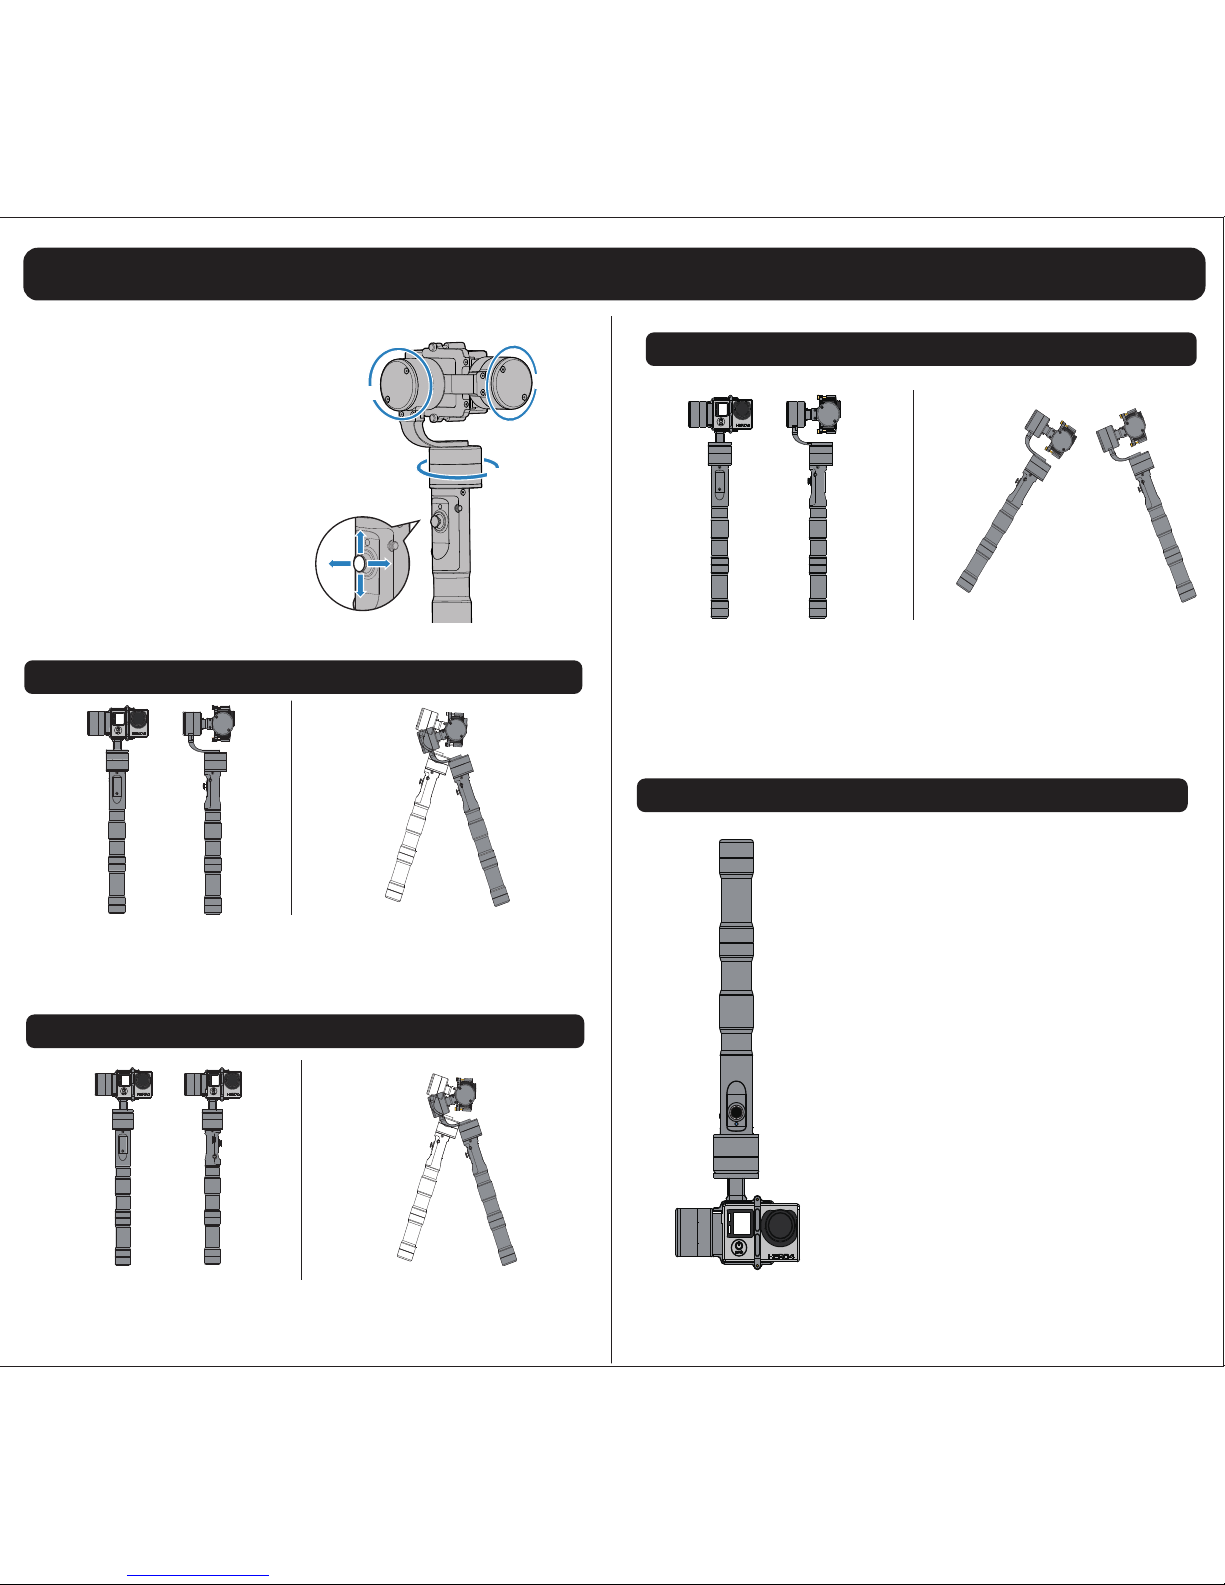
Tilt & Roll axis are locked.
Pan axis rotates smoothly with turn of wrist.
Use thumbstick up and down to control tilt of camera.
Heading Follow Mode - 1 Click
Heading Lock Mode - 1 Click
Tilt, Roll and Pan axis are locked.
Use thumbstick up and down to control tilt of camera.
Use thumbstick left and right to manually pan camera left/right
Heading & Pitch Follow Mode - 2 Clicks
Roll axis is locked. Pan and Tilt axis smoothly follow handle.
Use thumbstick left and right to adjust the pan angle.
Single click thumbstick to exit into previous mode.
Note: upon exiting this mode the camera tilt angle and horizon angle
will remain locked in last position.
Inverted Mode
To use gimbal inverted enter into “Heading
and Pitch Follow Mode” rst (2 Clicks)
Rotate gimbal 180 degrees front ward until
camera is upside down. You can now enter
into the other modes with the gimbal
inverted.
To return the gimbal upright enter into
Heading and Pitch Follow Mode (2 Clicks)
and rotate gimbal 180 degrees backward
until camera is upright. You can now enter
into other modes.
You can optionally mount the camera upside
down so you do not have to correct the
video in post production.
Filming in upside down mode is typically
used for low level shooting.
For additional information and video tutorials on switching between
modes and their intended uses please go to EVOGimbals.com
OPERATING MODES
Roll
Tilt
Pan
OVERVIEW
Your GP-Pro gimbal comes
pre-programmed with 4 dierent shooting modes for ultimate
creativity.
Please make note of each motor
as shown in diagram to the right.
You can also view ourtutorial
videos online to further understand the diernt operating
modes.
Page 6
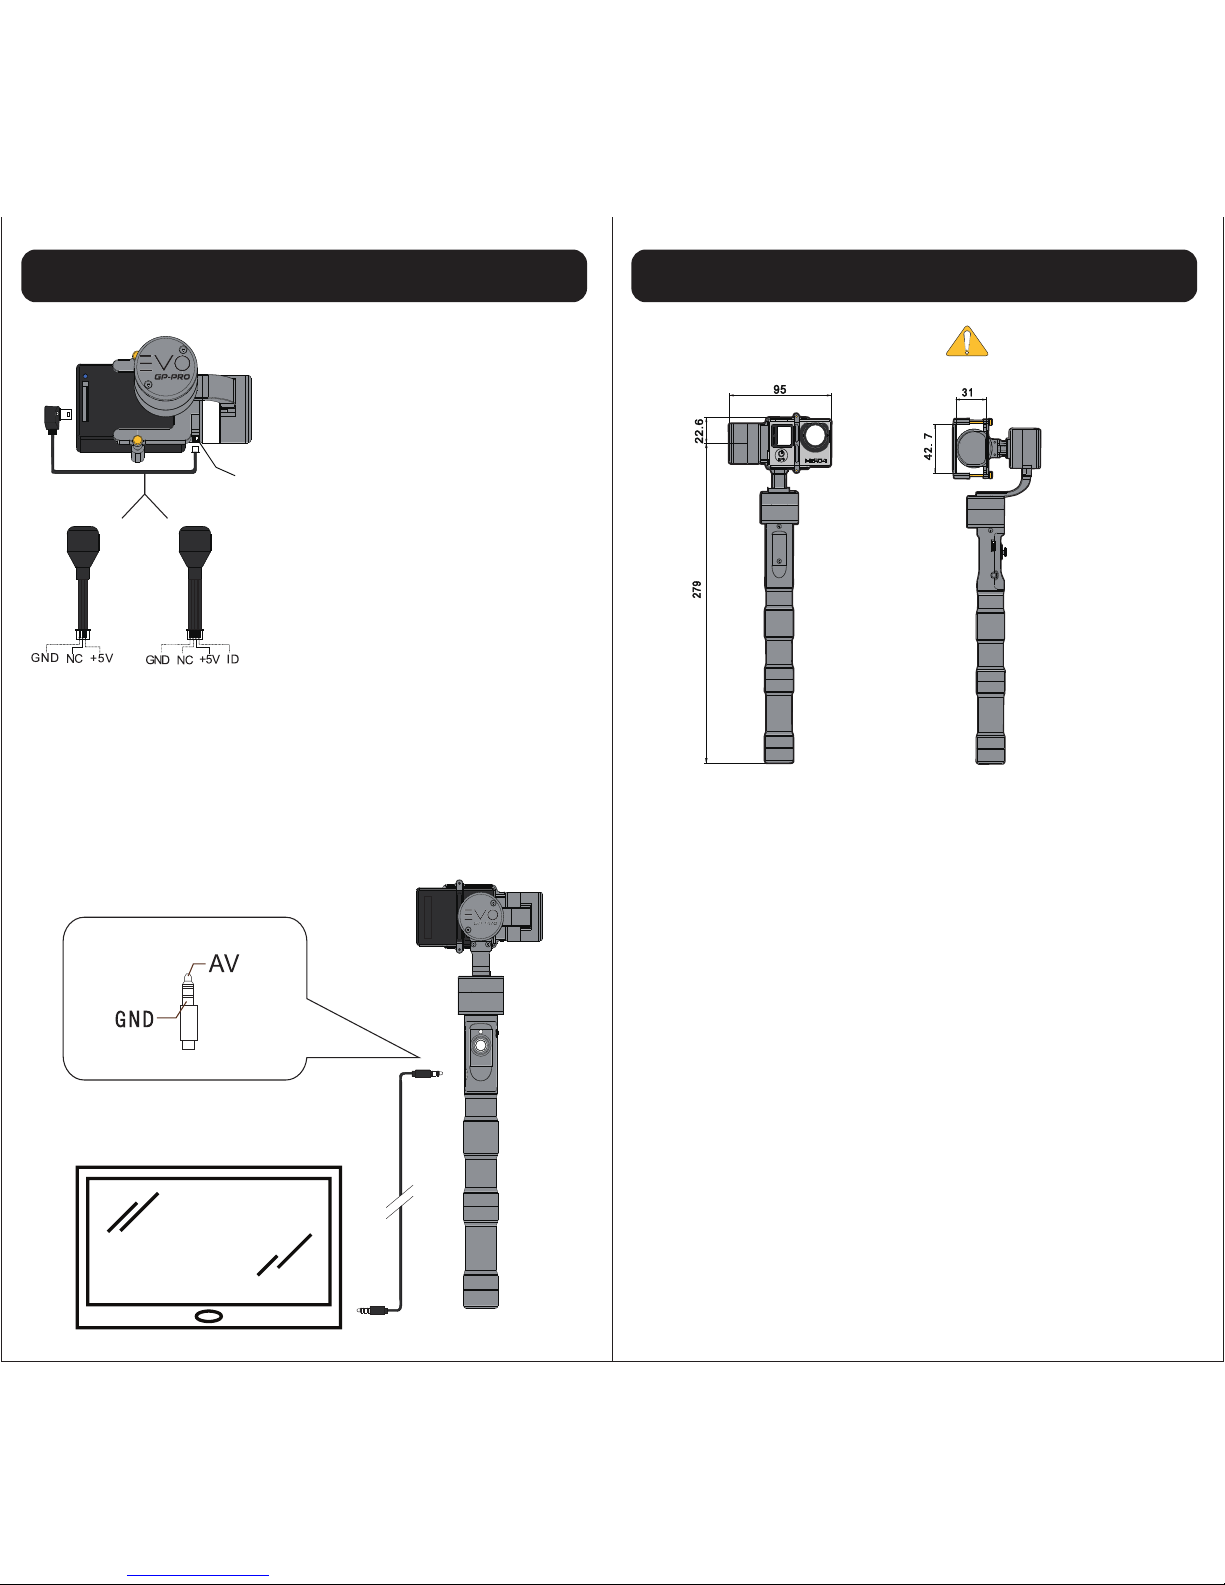
PERFORMANCE & SPECIFICATIONS
Stabilization Accuracy: ±0.01°
Follow Accuracy: ±0.2°
Pan Axis Range: -135° to +135°
Tilt Axis Range: -90° to +180° (Inverted)
Roll Axis Range: -45° to +45°
Tilt Axis Control Speed: Min 1°/s Max 50°/s
Pan Axis Control Speed: Min 1°/s Max 80°/s
Motor Type: 3x Triple Wound HT Brushless
Working Current Static Current: 6.8 mA (at 6.8 VDC)
Dynamic Current: 120mA (at 8.4 VDC)
Max Motor Current: 2A maximum (at 12.6 VDC)
Sensors: IMU module, HD Encoders
Batteries: IMR 18650, 2000mAh x2
(included)
Operating
Temperature: -5 to 122°F / -15 to 50°C
Weight: 0.75 lbs / 310g (unloaded)
Supported Cameras: GoPro Hero 3/Hero 3
GoPro Hero4 Silver / Black
GoPro Hero4 Session (adapter req.)
SJ4000 & Xiao Yi Cameras
Garmin Virb XE (Counterweight kit
required)
MAX CAMERA DIMENSIONS
Height: 42.7mm
Width: 31mm
Dimensions (mm)
Choose the appropriate cable for your application. Keep in mind
that battery life will vary dependent on the overall health of
your camera’s batteries. Run times while charging your camera
will typically be reduced to 1.5 to 2 hours total.
Please note that once the AV cable is plugged into the monitor
that your LCD monitor on your GoPro will turn o automatically.
(A/V Output cables are sold separatley)
Charging
Port
GOPRO CHARGING & VIDEO OUT
There are 2 GoPro accessory
cables included in the box.
The 3 pin cable is used for
charging and when using
the GoPro LCD.
The 4 pin cable is used for
both charging and activation
of 3.5mm A/V output port so
you can connect an external
monitor.
Page 7
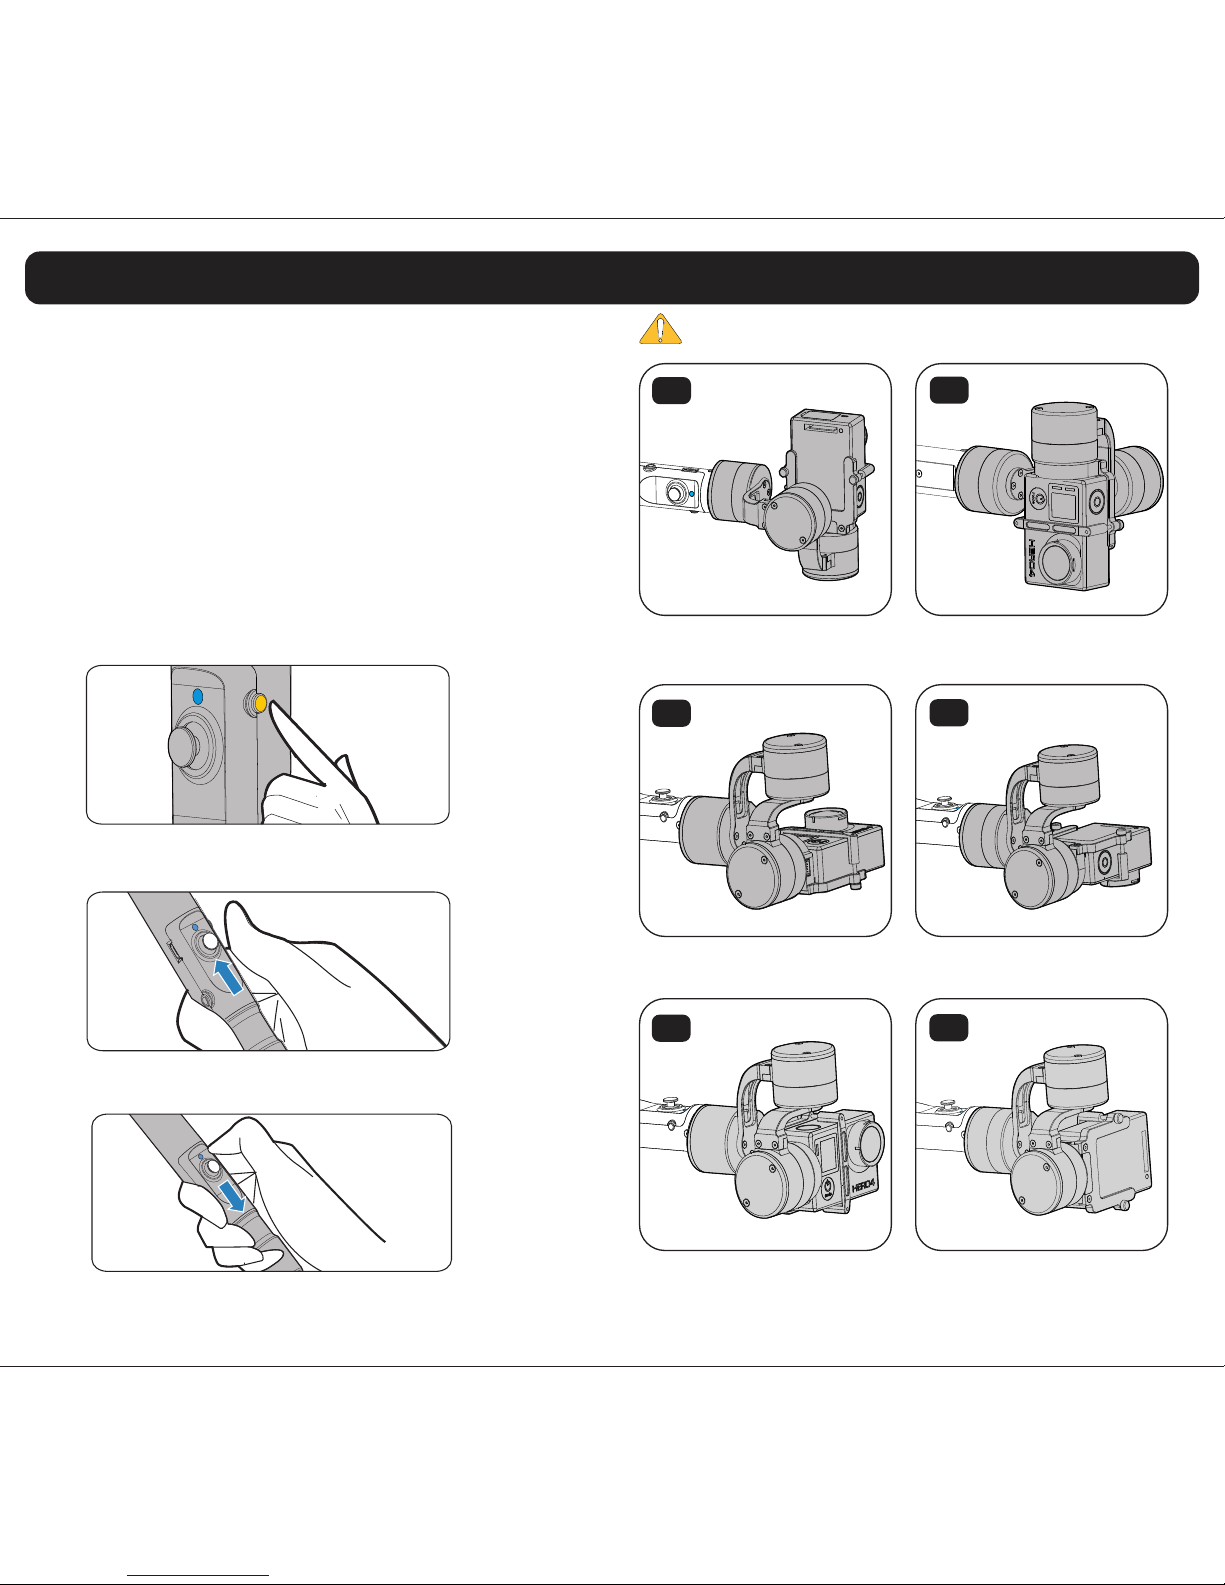
STARTUP & OFFLINE CALIBRATION
STARTUP CALIBRATION
If you nd during normal use that your camera’s pitch or roll angle
begins to drift or deviate then you need to rst try restarting your
gimbal. Simply power o your gimbal and set it down on a at non-moving surface (be careful not to scratch your cameras lens!)
Power on your gimbal and wait 5 seconds for the startup calibration
lights to stop ashing. The Startup Calibration is now complete.
OFFLINE CALIBRATION
If the Startup Calibration does not correct the drifting or deviation of
your camera then you will need to perform a 6-Point Oine Calibration.
This may also be needed if your gimbal has not been used for a long
period of time or if the operating temperature has changed considerably
since the gimbal was last calibrated. The IMU sensors in the gimbal can
be aected by extreme temperature changes.
OFFLINE CALIBRATION PROCESS
Press the power button to turn the gimbal on - wait 5
seconds for the startup calibration to complete.
Hold the thumbstick in the up position for 2 seconds until
the indicator light remains on.
Hold the thumbstick down for 2 seconds until the indicator
light ashes once intermittantly.
Carefully match each camera position in the diagrams below
1
2
3
4
5
6
Place gimbal as shown above.
The indicator light will ash 2 times
when successful.
Place gimbal as shown above. The
indicator light will ash 3 times when
successful.
Place gimbal as shown above. The
indicator light will ash 4 times when
successful.
Place gimbal as shown above. The
indicator light will ash 5 times when
successful.
Place gimbal as shown above. The
indicator light will ash 6 times when
successful.
Place gimbal as shown above. The
indicator light will remain solid for 5
seconds and then the gimbal will
re-enter standby mode. Calibration is
now complete.
Page 8

WARRANTY INFORMATION
WARRANTY PERIOD:
The warranty period is (1) Year from the original date of purchase. During this
warranty period, under normal use, EVO Gimbals will at its option, repair and/or
replace parts detemined to be defective.
WARRANTY DOES NOT COVER:
1. Any unauthorized maintenance, misuse, collision, liquid inltration (water
damage), or modications.
2. Incorrect Use of Product: altering software, removing serial numbers/logos,
using cameras not approved by EVO.
3. Damage due to re, ood, acts of God, misuse and related damage.
4. Any prepaid freight for warranty service.
WARRANTY SERVICE:
If any product issues arise please contact your dealer rst. Many gimbal
performance problems can be solved with a simple calibration sequence. Be
sure to visit www.EVOGimbals.com for the latest tutorial videos.
If it is found that service on your gimbal is needed please visit our ocial
website (www.EVOGimbals.com) or email us [email protected] to start
a warranty claim.
WARRANTY REGISTRATION:
Please register your warranty so we can provide you with the latest rmware
updates, user manuals and tutorial videos. To register your warranty please
and/or obtain warranty service for your gimbal,
Visit Our Web Site:
www.EVOGimbals.com
CONTACT US:
Email: [email protected]
Online: www. EVOGIMBALS .com
Phone: +1 541 728 3741
Address: 20810 Sockeye Pl
Suite 200
Bend, OR 97701
Parts: For a period of one (1) year from the original date of purchase of product (“Parts Warranty”),
EVO Gimbals will supply new or refurbished replacement parts in exchange for parts determined to
be defective.
This Limited Warranty covers only the hardware components packaged with the Product. It does not
cover technical assistance for hardware or software usage and it does not cover any software
products whether or not contained in the Product; any such software is provided “AS IS” unless
expressly provided for in any enclosed software Limited Warranty. Please refer to the End User
License Agreements included with the Product for your rights and obligations with respect to the
software.
Instructions: To obtain warranty service, you must deliver the product, freight prepaid, in either its
original packaging or packaging aording an equal degree of protection to the EVO Gimbals
authorized service facility specied. It is your responsibility to backup any data, software or other
materials you may have stored or preserved on your unit. It is likely that such data, software, or other
materials will be lost or reformatted during service and EVO Gimbals will not be responsible for any
such damage or loss. A dated purchase receipt is required. For specic instructions on how to obtain
warranty service for your product,
Visit Our Ocial Web Site:
www.EVOGimbals.com
Or email EVO Gimbals Customer Support
For an accessory or part not available from your authorized dealer please visit our website.
Repair / Replacement Warranty: This Limited Warranty shall apply to any repair, replacement part
or replacement product for the remainder of the original Limited Warranty period or for ninety (90)
days, whichever is longer. Any parts or product replaced under this Limited Warranty will become
the property of EVO Gimbals.
This Limited Warranty only covers product issues caused by defects in material or workmanship
during ordinary consumer use; it does not cover product issues caused by any other reason,
including but not limited to product issues due to commercial use, acts of God, misuse, limitations of
technology, or modication of or to any part of the EVO Gimbals product. This Limited Warranty does
not cover EVO Gimbals products sold AS IS or WITH ALL FAULTS or consumables (such as fuses or
batteries). This Limited Warranty is invalid if the factory-applied serial number has been altered or
removed from the product. This Limited Warranty is valid only in the United States.
LIMITATION ON DAMAGES: EVO GIMBALS SHALL NOT BE LIABLE FOR ANY INCIDENTAL OR
CONSEQUENTIAL DAMAGES FOR BREACH OF ANY EXPRESS OR IMPLIED WARRANTY ON THIS
PRODUCT.
DURATION OF IMPLIED WARRANTIES: EXCEPT TO THE EXTENT PROHIBITED BY APPLICABLE LAW,
ANY IMPLIED WARRANTY OF MERCHANTABILITY OR FITNESS FOR A PARTICULAR PURPOSE ON THIS
PRODUCT IS LIMITED IN DURATION TO THE DURATION OF THIS WARRANT Y.
Some states do not allow the exclusion or limitation of incidental or consequential damages, or
allow limitations on how long an implied warranty lasts, so the above limitations or exclusions may
not apply to you. This Limited Warranty gives you specic legal rights and you may have other rights
which vary from state to state.
LIMITED WARRANTY
EVO Gimbals (“EVO Gimbals”) warrants this product against defects in material or workmanship for
the time periods and as set forth below. Pursuant to this Limited Warranty, EVO Gimbals will, at its
option, (i) repair the product using new or refurbished parts or (ii) replace the product with a new or
refurbished product. For purposes of this Limited Warranty, “refurbished” means a product or part
that has been returned to its original specications. In the event of a defect, these are your exclusive
remedies.
Labor: For a period of one (1) year from the original date of purchase of the product (“Labor
Warranty”), EVO Gimbals will, at its option, repair or replace with new or refurbished product,
product determined to be defective. If EVO Gimbals elects to replace the product after this Labor
Warranty has expired but while the Parts Warranty below is still in eect, it will do so for the
applicable labor charge.
 Loading...