

Evh 5150III 6L6 2x12 Owner's Manual

2 x 12 Combo Amplifier
OWNER’S MANUAL | MANUAL DE INSTRUCCIONES
MODE D’EMPLOI | MANUALE UTENTE
BEDIENUNGSHANDBUCH | MANUAL DO PROPRIETÁRIO
オ ー ナ ー ズ・マ ニ ュ ア ル
EVH® 5150III™ 6L6 2x12 COMBO AMPLIFIER
This professional all-tube amplifier meets the exacting specifications of Edward Van Halen, one of the true living legends
of rock guitar. The III L x Combo Amplifier updates
his original and previous version, with new features that will
inspire unlimited artistic expression, including independent
dual-concentric controls that allow for gain and volume
level matching. With such fierce tone and uncompromising
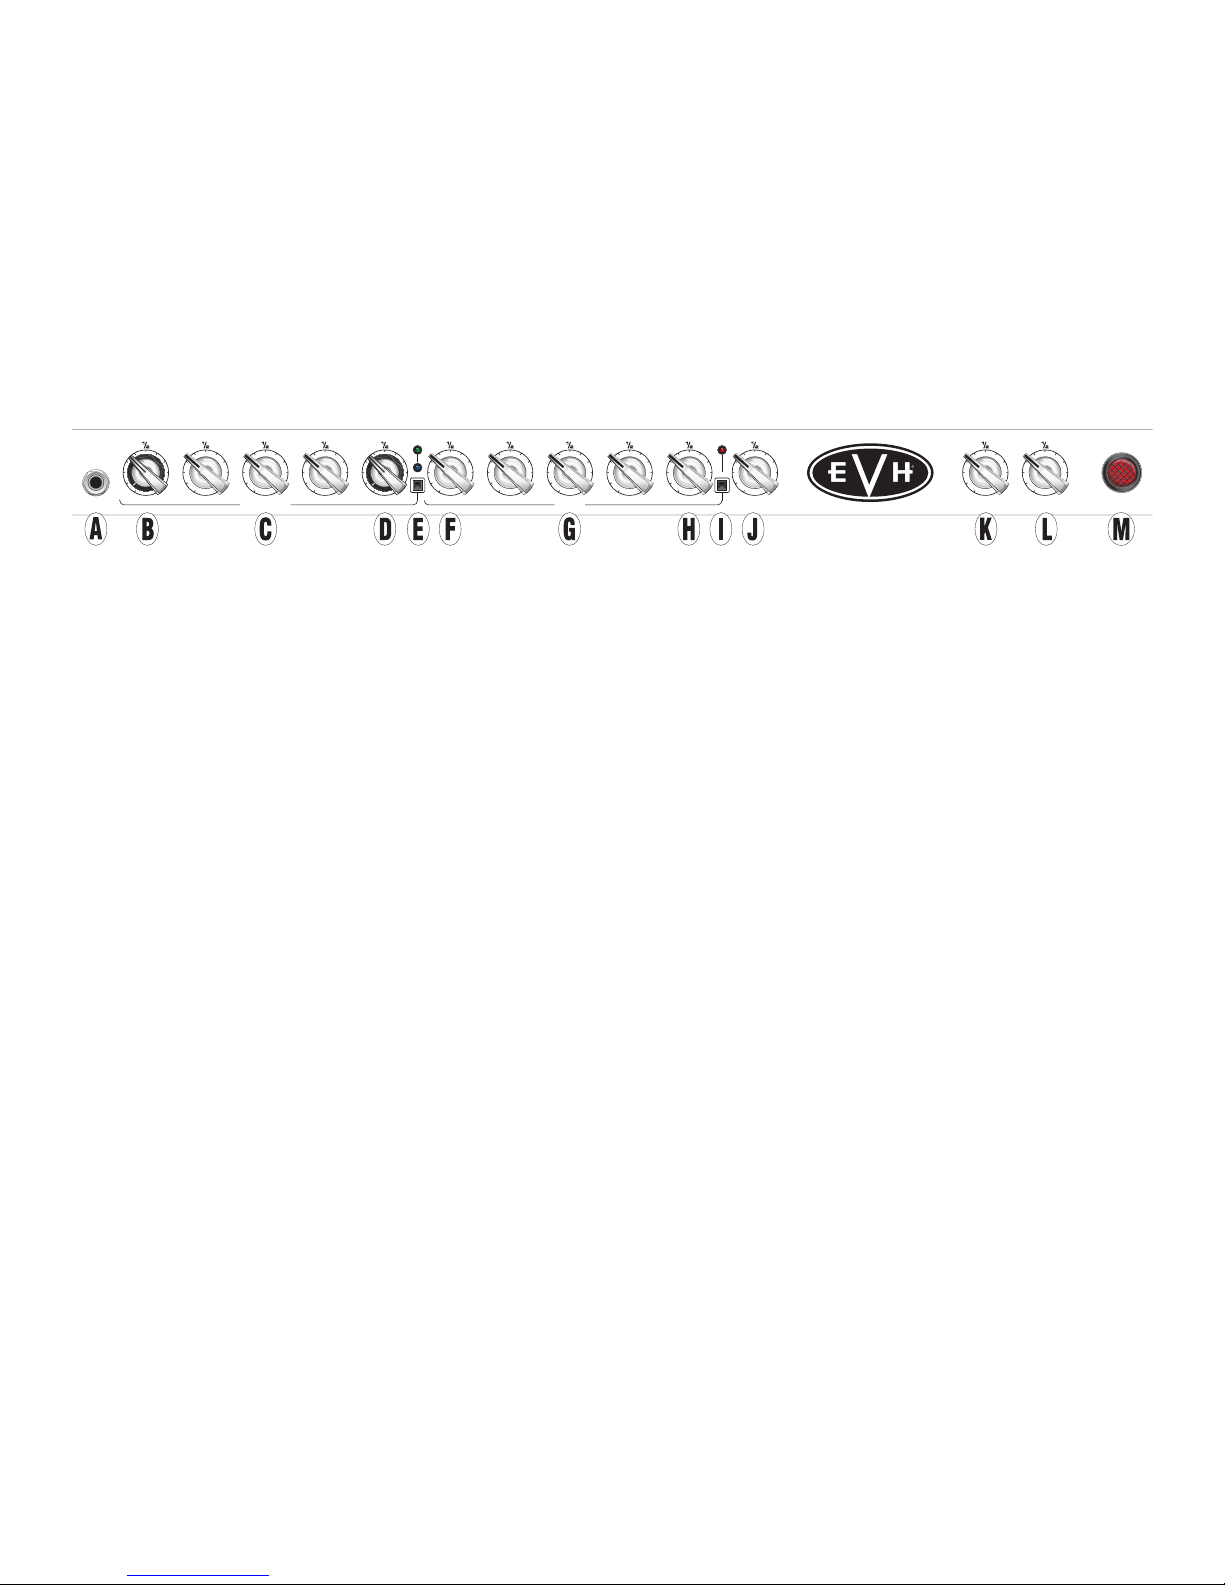
FRONT PANEL
OFF
UP
LOW MID
OFF
UP
ONE / TWO
HIGH VOLUME
OFF
UP
LOW MID HIGHGAIN
SELECT
OFF
UP
OFF
UP
OFF
UP
GAIN
OFF
INSERT
A. INPU T: Plug in an instrument here. Use only a high-qual-
ity shielded instrument cable.
ENGLISH
B. CHANNEL ONE/TWO GAIN: Dual concentric gain con-
trols. Inner round knob controls channel one (clean);
outer “chicken-head” knob controls channel two (medium gain).
C. CHANNEL ONE/TWO LOW/MID/HIGH: Low-, middle-
and high-frequency tone controls for channel one (clean)
and channel two (medium gain).
D. CHANNEL ONE/TWO VOLUME: Dual concentric volume
controls. Inner round knob controls channel one (clean)
volume; outer “chicken-head” knob controls channel two
(medium gain) volume. Note: For a cleaner sound from
channels one and two, set these volume controls to their
maximum, then bring the gain controls (B) up from their
minimum settings to the desired level.
E. CHANNEL ONE/TWO SELECT: Momentary pushbutton
alternately selects channel one (clean, green LED) and
channel two (medium gain, blue LED).
construction, the result is phenomenal EVH performance
for years to come. Other distinctive features of this ferocious amp include an ultra-high-gain preamp design custom
voiced for maximum harmonic content, black or ivory textured vinyl covering and much more.
VOLUME PRESENCE
SELECT
OFF
OFF
UP
UP
THREE
OFF
UP
OFF
UP
UP
REVERB POWER LEVEL
OFF
OFF
UP
UP
F. CHANNEL THREE GAIN: Preamp gain control for high-
gain channel three. Higher settings of this knob will
increase preamp distortion.
G. CHANNEL THREE LOW/MID/HIGH: Low-, middle- and
high-frequency tone controls for high-gain channel three.
H. CHANNEL THREE VOLUME: Post-preamp gain control
for high-gain channel three.
I. CHANNEL THREE SELECT: Momentary pushbutton
selects channel three (high gain, red LED). State of channel one or channel two is remembered when returning
from channel three to channel one/two select (E).
J. PRESENCE: Ultra-high frequency tone control for all
three channels.
K. REVERB: Adjusts reverb level for all three channels.
Reverb can be switched on/off from footswitch (T).
L. POWER LEVEL: Adjusts amplifier output from to
watts while maintaining same tonal characteristics.
M. POWER LAMP: Illuminates when amplifier is on.
2
INPUT
CAUTION:
WARNING:
120V 60Hz
POWER
THIS DEVICE COMPLIES WITH PART 15 OF FCC RULES.
OPERATION IS SUBJECT TO THE FOLLOWING TWO CONDITIONS:
(1)
THIS DEVICE MAY NOT CAUSE HARMFUL INTERFERENCE, AND
(2)
THIS DEVICE MUST ACCEPT ANY INTERFERENCE RECEIVED,
INCLUDING INTERFERENCE THAT MAY CAUSE UNDESIRED OPERATION.
400W
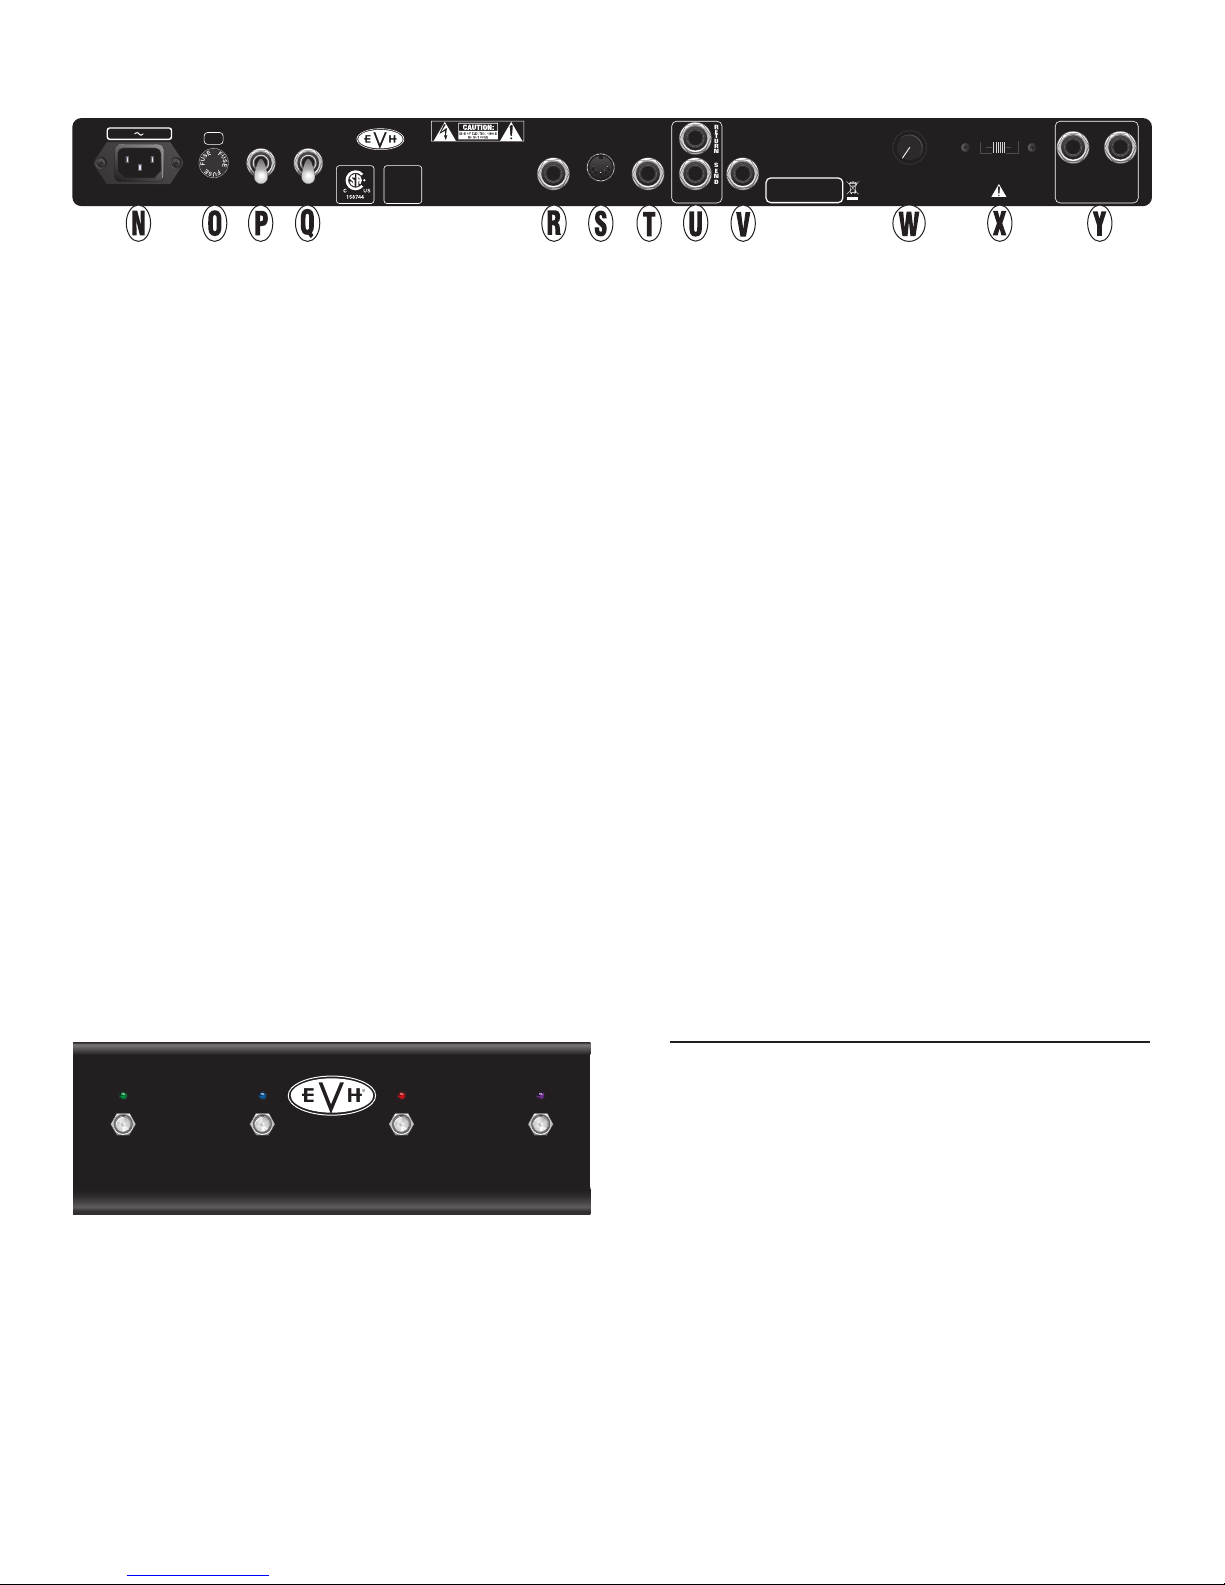
REAR PANEL
EFFECTS
RE T UR N
EVH® AMPLIFIER SYSTEMS
ARE CAPABLE OF PRODUCING
VERY HIGH SOUND PRESSURE
LEVELS WHICH MAY CAUSE
TEMPORARY OR PERMANENT
HEARING DAMAGE. USE CARE
WHEN SETTING AND ADJUSTING
VOLUME LEVELS DURING USE.
SEND
LOOP
PREAMP
TYPE: PR 2421
SERIAL NUMBER
OUT
RESONANCE
WARNING:
MAINTAIN 6" CLEARANCE FOR VENTILATION.
4Ω 8Ω 16Ω
LOAD
IMPEDANCE
PARALLEL
SPEAKER OUTPUTS
4Ω min TOTAL
50W
FUSE
POWER
F4A L
ON
250V
OFF
STANDBY
ON
OFF
5150 III 1X12 COMBO
A PRODUCT OF:
FMIC
MADE IN MEXICO
CAUTION: CHASSIS SURFACE HOT
WARNING: TO REDUCE THE RISK OF
FIRE OR ELECTRIC SHOCK, DO NOT EXPOSE
THIS EQUIPMENT TO RAIN OR MOISTURE
AVIS: RISQUE DE CHOC ELECTRIQUE NE
PAS OUVRIR
ATTENTION: SUPERFICIE DE CHASSIS
CHAUDE
TO REDUCE THE RISK OF FIRE, REPLACE
FUSE WITH SAME TYPE AND RATING
UTILISER UN FUSIBLE DE RECHANGE
DE MEME TYPE ET CALIBRE
HEAD
PHONES
ATTENTION:
MIDI IN
FOOT
SWITCH
N. POWER INPUT: Connect the included power cord to the
amplifier here, in accordance with the voltage and frequency ratings listed on the rear panel of the amplifier.
O. FUSE: Replace only with a fuse of the same rating.
P. POWER: Turns the amp on and off. After turning this
switch to ON, wait seconds for the tubes to warm
up, then turn the STANDBY switch (O) to ON to take the
amp out of STANDBY mode. When turning the amplifier off, place the amp in STANDBY mode by turning the
STANDBY switch to OFF for seconds before turning
the POWER switch to OFF.
Q. STANDBY: Place this switch in the OFF position to put
the amp in STANDBY mode. This should be done when
taking a break from playing or before turning the amplifier off (as described above in item “N”). Using STANDBY
mode prolongs tube life.
R. HEADPHONES: Connect headphones here (automati-
cally mutes speaker output).
S. MIDI IN: Connect a MIDI controller here to enable MIDI-
commanded channel selection and effects loop bypass
(see “MIDI Setup and Use” section on following page).
T. FOOTSWITCH: Connect the included footswitch (see
illustration below) here. The footswitch enables easy
selection of each of the three channels and reverb. The
green, blue and red footswitch LEDs correspond to the
channel LEDs on the amp front panel. Purple LED at far
right illuminates when reverb is active.
THREEONE TWO REVERB
U. EFFECTS LOOP: Connect SEND to an external effect
input; connect RETURN to external effect output.
V. PREAMP OUT: Connect to another amp’s effects return
or power amp input for simultaneous multiple amp use.
This output can also be used to send the preamp signal
directly to a mixer.
W. RESONANCE: Adjusts power amp low-frequency
response.
X. LOAD IMPEDANCE: Selects amp output impedance of
(, or ohms) to match speaker load.
NOTE: The 5150III 212ST speaker enclosure (recommended)
has an impedance of 16 ohms. When using the 5150III 212ST
speaker enclosure, set LOAD IMPEDANCE switch to “16Ω.”
Y. SPEAKER OUTPUTS: For connection to speaker cabinet(s).
Either jack can be used when using only one speaker cabinet. Five different speaker configurations are listed below.
Use only high-quality unshielded speaker cables.
NOTE: A speaker must always be plugged into one of the
speaker jacks when the amplifier is on, or damage may
occur. Turn the amplifier off or put it in standby modewhen
changing speaker connections or impedance settings.
SPEAKER CONFIGURATIONS
SPEAKER SPEAKER IMPEDANCE
JACK JACK SETTING
+ NONE =
+ =
+ NONE =
+ =
+ NONE =
ENGLISH
3

MIDI SETUP AND USE
MIDI CHANNEL SELECTION
. Press both channel SELECT buttons (E and I) simultaneous-
ly to initiate MIDI “learning mode.” The current amp channel
LED will start to flash.
. Send any desired program change message on any desired
channel from a MIDI controller to the amp. The channel one
LED (green) will start to flash unless the program change
message has previously been assigned to a different amp
channel (in which case the LED for the previously assigned
channel will start to flash).
. Select the target amp channel (one, two or three) using
the channel SELECT buttons (E and I). All three amp channel
LEDs will briefly illuminate to indicate if the amp channel
assignment has been changed for the program change message sent (if the amp channel assignment has not changed—
which would be the case when assigning amp channel one
to a program change message for the very first time—the
three amp channel LEDs will not all illuminate briefly,
because the amp channel assignment has not changed from
ENGLISH
the default amp channel one assignment).
If the program change message is currently assigned to amp
channel one (default), the channel one/two select button (E)
must be pressed twice to select amp channel two. If the program change message is currently assigned to amp channel
two, the channel one/two select button (E) must be pressed
twice to select amp channel one.
. Repeat steps two and three for each channel on the amp,
if desired. For greater flexibility, multiple program change
messages can also be assigned to the same amp channel.
Note that the footswitch can be used to temporarily change
channels at any time during MIDI setup; this will have no
effect on saving amp channel assignments. All channel
assignment changes must be made using the front panel
channel select buttons (E and I).
. When MIDI program change setup is complete, exit “learning mode” by pressing both front panel channel select
buttons (E and I) simultaneously. The amp is now set up to
switch to the target channels whenever the selected program change messages are sent on the selected MIDI channel.
Note that the default MIDI channel for the amp is channel
one. The amp MIDI channel can be changed by sending a
program change message from any other desired MIDI channel while in “learning mode.” The amp will then respond only
to program change messages and control change messages
on that new MIDI channel.
MIDI USE FOR EFFECTS LOOP BYPASS
No setup is required. From MIDI channel one (default) or the
channel used to send program change messages in the section above (if different from MIDI channel one), simply send
a control change # message with a value of or less to
bypass the effects loop, or a value of or greater to enable
the effects loop.
FURTHER INFORMATION
For a more in-depth guide to MIDI programming for EVH 5150III
series amplifiers, visit the online “Support” section of the EVH
website (evhgear.com), and click on “MIDI Programming EVH®
5150III 50W Series Amps” under the “Schematics and Wiring
Diagrams” heading.
TYPE PR 4 615
POWER REQUIREMENT 400 watts
OUTPUT 1 to 50 watts RMS into 4, 8 or 16 ohms
INPUT IMPEDANCE >1M
OUTPUT IMPEDANCE 4, 8 or 16 ohms (selectable)
SPEAKERS Two 12” 8 Celestion® 30W connected in series (total impedance 16)
FUSES F4A L 250V (100V and 120V units) F2A L 250V (220-240V units)
FOOTSWITCH Four-button (included, PN 0096467000)
TUBES Two 6L6GC power amp tubes, seven ECC83S preamp tubes
DIMENSIONS AND WEIGHT Height: 28” (71.1 cm) Width: 27.6” (70.1 cm) Depth: 12.1” (30.7 cm) Weight: 84 lbs. (38.1 kg)
Product specifications subject to change without notice.
4
SPECIFICATIONS

EVH® 5150III™ 6L6 2x12 COMBO AMPLIFIER
Este amplificador profesional completamente a válvulas cumple
con las especificaciones técnicas exactas de Edward Van Halen,
una de las auténticas leyendas del mundo de la guitarra. El III
L x Combo Amplifier actualiza su versión original y anterior
con nuevas características que harán que exploten todas sus
capacidades artísticas, incluyendo controles independientes
de doble concéntrico que permiten la igualación de niveles de
ganancia y volumen.
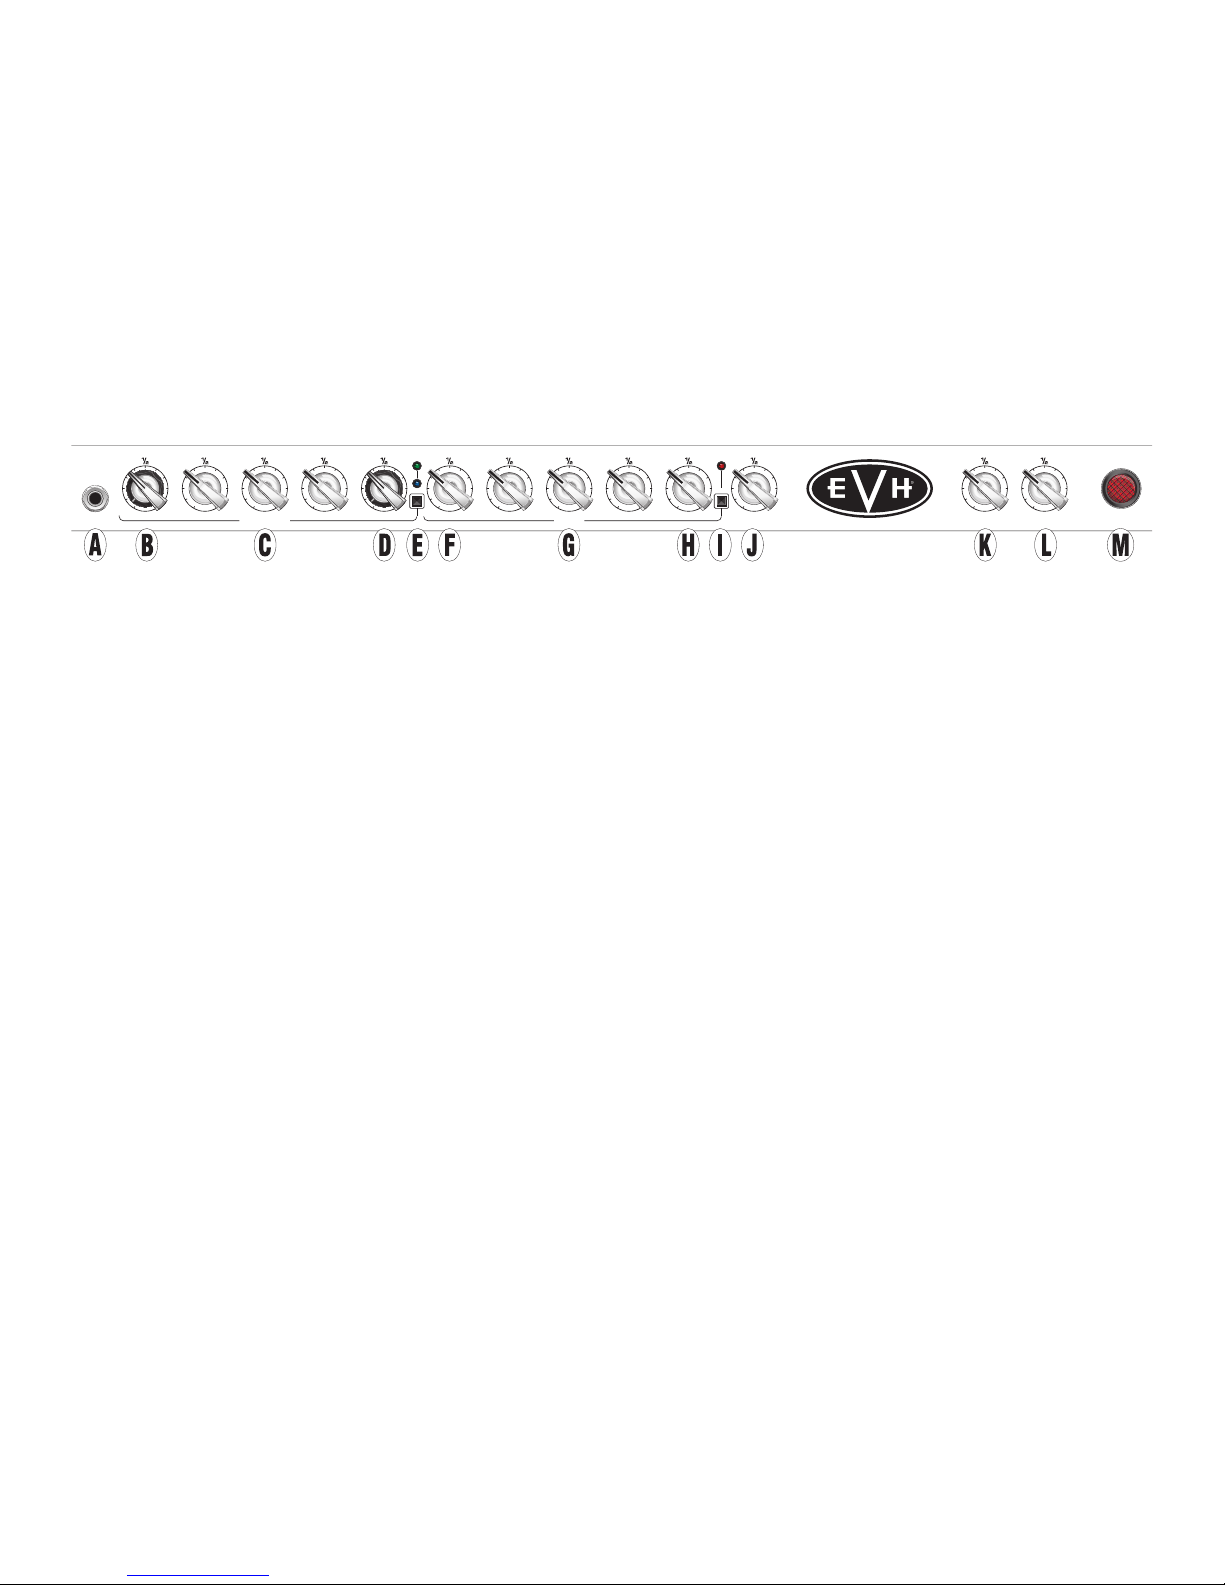
PANEL FRONTAL
OFF
UP
LOW MID
OFF
UP
ONE / TWO
HIGH VOLUME
OFF
UP
LOW MID HIGHGAIN
SELECT
OFF
UP
OFF
OFF
UP
UP
OFF
UP
THREE
GAIN
OFF
INSERT
A. INSERT: Conecte aquí su guitarra usando únicamente un
cable de instrumento con blindaje de alta calidad.
B. CANAL / GAIN: Doble control concéntrico de ganancia. El
mando interior controla el canal uno (limpio) y el exterior de
tipo “cresta de gallo” controla el canal dos (ganancia media).
C. CANAL / LOW/MID/HIGH: Controles de tono de frecuencias
graves, medias y agudas para el canal uno (limpio) y el dos
(ganancia media).
Con su potente sonido y su construcción a prueba de bombas, el
resultado es un verdadero rendimiento a lo EVH durante largos
años. Entre algunas de las funciones absolutamente únicas de
este exclusivo amplificador están un diseño de previo de máxima
ganancia modelado para ofrecerle el máximo contenido armónico,
cubierta de vinilo texturizado negro o marfil y muchas otras.
VOLUME PRESENCE
SELECT
OFF
UP
OFF
UP
OFF
UP
UP
REVERB POWER LEVEL
OFF
OFF
UP
G. CANAL LOW/MID/HIGH: Controles de tono de frecuencias
graves, medias y agudas del canal de alta ganancia.
H. CANAL VOLUME: Control de ganancia post-previo del canal
de alta ganancia.
I. CANAL SELECT: Pulsador que elige el canal tres (alta
ganancia, piloto rojo). El estado de los canales uno o dos es
memorizado para el momento en el que vuelva desde el canal
a la selección del canal / (E).
UP
ESPAÑOL
D. CANAL / VOLUME: Doble control concéntrico de volumen.
El mando interior controla el volumen del canal uno (limpio)
y el exterior de tipo “cresta de gallo” controla el volumen del
canal dos (ganancia media). Nota: Para conseguir el sonido
más limpio de los canales uno y dos, ajustes estos controles de
volumen al máximo y vaya subiendo después los controles de
ganancia (B) desde el mínimo hasta conseguir el nivel que quiera.
E. CANAL / SELECT: Pulsador que elige de forma alternativa
el canal uno (limpio, piloto verde) y el dos (ganancia media,
piloto azul).
F. CANAL GAIN: Control de ganancia del previo para el canal
de alta ganancia. Los valores más altos hacen que aumente la
distorsión del previo.
J. PRESENCE: Control de tono de frecuencias súper agudas para
los tres canales.
K. REVERB: Esto ajusta el nivel de reverb para los tres canales.
Puede activar-desactivar esta reverb desde el pedal (T).
L. POWER LEVEL: Esto ajusta la salida del amplificador entre y
watios, manteniendo las mismas características tonales.
M. PILOTO POWER: Cuando está iluminado indica que el
amplificador está encendido.
5

INPUT
CAUTION:
WARNING:
120V 60Hz
POWER
THIS DEVICE COMPLIES WITH PART 15 OF FCC RULES.
OPERATION IS SUBJECT TO THE FOLLOWING TWO CONDITIONS:
(1)
THIS DEVICE MAY NOT CAUSE HARMFUL INTERFERENCE, AND
(2)
THIS DEVICE MUST ACCEPT ANY INTERFERENCE RECEIVED,
INCLUDING INTERFERENCE THAT MAY CAUSE UNDESIRED OPERATION.
400W
PANEL TRASERO
EFFECTS
RE T UR N
EVH® AMPLIFIER SYSTEMS
ARE CAPABLE OF PRODUCING
VERY HIGH SOUND PRESSURE
LEVELS WHICH MAY CAUSE
TEMPORARY OR PERMANENT
HEARING DAMAGE. USE CARE
WHEN SETTING AND ADJUSTING
VOLUME LEVELS DURING USE.
SEND
LOOP
PREAMP
TYPE: PR 2421
SERIAL NUMBER
OUT
RESONANCE
WARNING:
MAINTAIN 6" CLEARANCE FOR VENTILATION.
4Ω 8Ω 16Ω
LOAD
IMPEDANCE
PARALLEL
SPEAKER OUTPUTS
4Ω min TOTAL
50W
FUSE
POWER
F4A L
ON
250V
OFF
STANDBY
ON
OFF
5150 III 1X12 COMBO
A PRODUCT OF:
FMIC
MADE IN MEXICO
CAUTION: CHASSIS SURFACE HOT
WARNING: TO REDUCE THE RISK OF
FIRE OR ELECTRIC SHOCK, DO NOT EXPOSE
THIS EQUIPMENT TO RAIN OR MOISTURE
AVIS: RISQUE DE CHOC ELECTRIQUE NE
PAS OUVRIR
ATTENTION: SUPERFICIE DE CHASSIS
CHAUDE
TO REDUCE THE RISK OF FIRE, REPLACE
FUSE WITH SAME TYPE AND RATING
UTILISER UN FUSIBLE DE RECHANGE
DE MEME TYPE ET CALIBRE
HEAD
PHONES
ATTENTION:
MIDI IN
FOOT
SWITCH
N. INPUT POWER: Conecte el cable de alimentación incluido
a una salida de corriente con toma de tierra del voltaje y
amperaje indicados al lado de esta toma.
O. FUSE: En caso de que se queme, sustituya este fusible por otro
de idénticas características.
P. POWER: Este interruptor le permite encender y apagar el
amplificador. La primera vez que encienda esta unidad, deje
el interruptor STANDBY (O) en la posición to ON para sacar
la unidad del modo STANDBY. Cuando lo apague, coloque el
amplificador en el modo de espera o STANDBY colocando el
interruptor STANDBY en OFF segundos antes de apagar
definitivamente la unidad con el interruptor POWER en OFF.
Q. STANDBY: Coloque este interruptor en la posición OFF para
hacer que la unidad quede en el modo de espera o STANDBY.
Haga esto cuando se esté tomando una pausa o antes de
apagar el amplificador (como le hemos descrito antes en el
elemento “N”). El uso de este modo STANDBY alarga la vida de
ESPAÑOL
las válvulas.
R. HEADPHONES: Conecte aquí unos auriculares (la salida de
altavoz quedará anulada automáticamente).
S. MIDI IN: Conecte aquí un controlador MIDI para permitir la
selección de canal vía MIDI y el bypass o anulación del bucle
de efectos (vea en la página siguiente “Configuración y uso del
MIDI”).
T. FOOTSWITCH: Conecte aquí la pedalera incluida (vea abajo
la ilustración). Esta pedalera le permite una selección rápida
de los tres canales y reverb. Los pilotos de la pedalera verde,
azul y rojo se corresponden con los pilotos de canal del panel
frontal de la unidad. El piloto púrpura de la derecha se ilumina
cuando reverb está activo.
U. EFFECTS LOOP: Conecte la toma de envío o SEND a la entrada
de una unidad de efectos externa; conecte el retorno o
RETURN a la salida de esa unidad de efectos externa.
V. PREAMP OUT: Conecte esta toma al retorno de efectos de
otro amplificador o entrada de una etapa de potencia para el
uso simultáneo de varios amplificadores. También puede usar
esta salida para enviar la señal del previo directamente a una
mesa de mezclas.
W. RESONANCE: Este mando ajusta la respuesta de bajas
frecuencias de la etapa de potencia.
X. LOAD IMPEDANCE: Este interruptor le permite elegir la
impedancia de salida (, ó ohmios) correspondiente a la
carga del altavoz conectado.
NOTA: El recinto acústico 5150III 212ST (recomendado) tiene una
impedancia de 16 ohmios. Cuando use el recinto 5150III 212ST,
ajuste el interruptor LOAD IMPEDANCE a “16Ω.”
Y. SPEAKER OUTPUTS: Para la conexión a recinto(s) acústico(s).
Puede usar cualquiera de las tomas cuando solo esté utilizando
un recinto acústico. Abajo puede ver cinco configuraciones de
altavoz diferentes. Use solo cables de altavoz sin blindaje y de
alta calidad.
NOTA: Siempre debe haber un altavoz conectado en esta salida
cuando el amplificador esté encendido, ya que en caso contrario
esta unidad puede resultar dañada. Apague esta unidad o active
el modo STANDBY cuando cambie la conexión de los altavoces o
el ajuste de impedancia.
CONFIGURACIONES DE ALTAVOZ
TOMA TOMA AJUSTE
SPEAKER SPEAKER IMPEDANCE
THREEONE TWO REVERB
6
+ NINGUNO =
+ =
+ NINGUNO =
+ =
+ NINGUNO =

CONFIGURACIÓN Y USO DEL MIDI
SELECCIÓN DEL CANAL MIDI
. Pulse ambos botones SELECT (E e I) a la vez para activar el “modo
de detección” MIDI. El piloto del canal de amplificación activo
empezará a parpadear.
. Envíe el mensaje de cambio de programa que quiera en
cualquier canal desde un controlador MIDI al amplificador. El piloto
del canal uno (verde) comenzará a parpadear salvo que el mensaje
de cambio de programa haya sido asignado previamente a un canal
de amplificación diferente (en cuyo caso parpadeará el piloto del
canal al que haya sido asignado).
. Elija el canal de amplificación destino (uno, dos o tres), usando
los botones de canal SELECT (E e I). Los tres pilotos de canal
de amplificación se iluminarán brevemente para indicar si la
asignación de canal de amplificación ha sido modificada por
el mensaje de cambio de programa enviado (si la asignación
de canal no ha cambiado—que sería el caso al asignar el canal
de amplificación uno a un mensaje de cambio de programa la
primera vez—los pilotos de los tres canales de amplificación no se
iluminarán brevemente dado que la asignación de canal no habrá
variado con respecto a la asignación del canal uno por defecto).
Si el mensaje de cambio de programa está asignado en ese
momento al canal uno (por defecto), deberá pulsar dos veces el
botón selector de canal / (E) para elegir el canal . Si el mensaje
de cambio de programa está asignado al canal , deberá pulsar dos
veces el botón selector de canal / (E) para elegir el canal .
. Si quiere, repita los pasos dos y tres para cada uno de los canales
del amplificador. Para una mayor flexibilidad, puede asignar varios
mensajes de cambio de programa al mismo canal de amplificación.
. Cuando haya terminado la configuración de cambio de programa
MIDI, salga del “modo de aprendizaje” pulsando a la vez los dos
botones selectores de canal del panel frontal (E e I). El amplificador
estará ahora configurado para cambiar a los canales de destino
cuando sean enviados los mensajes de cambio de programa
configurados en el canal MIDI elegido.
Tenga en cuenta que el canal MIDI Por defecto para el amplificador
es el canal uno. El canal MIDI del amplificador puede ser
modificado enviando un mensaje de cambio de programa desde
cualquier otro canal MIDI durante el “modo de aprendizaje”.
El amplificador responderá solo a los mensajes de cambio de
programa y de control enviados en ese nuevo canal MIDI.
USO DEL MIDI PARA EL BYPASS DEL BUCLE DE EFECTOS
Para esto no hace falta ninguna configuración. Desde el canal
MIDI uno (por defecto) o el canal usado para el envío de mensajes
de cambio de programa configurado en la sección anterior (si
es distinto al canal MIDI uno), simplemente envíe un mensaje de
cambio de control # con un valor de o menos para dejar en
bypass el bucle de efectos, o con un valor de o superior para
activarlo.
INFORMACIÓN ADICIONAL
Si quiere una mayor información acerca de la programación MIDI de
los amplificadores EVH 5150III series, visite la sección online “Support”
de la web EVH (evhgear.com) y haga clic en “MIDI Programming EVH®
5150III 50W Series Amps” dentro del capítulo “Schematics and Wiring
Diagrams”.
ESPAÑOL
Tenga en cuenta que puede usar la pedalera para cambiar
los canales temporalmente en cualquier momento durante la
configuración MIDI; esto no producirá ningún efecto sobre las
asignaciones de canal almacenadas. Todos los cambios de canal de
asignación deben ser realizados usando los botones selectores del
panel frontal (E e I).
ESPECIFICACIONES TÉCNICAS
TIPO PR 4615
CONSUMO 400 watios
SALIDA 1 - 50 watios RMS a 4, 8 ó 16 ohmios
IMPEDANCIA DE ENTRADA >1M
IMPEDANCIA DE SALIDA 4, 8 ó 16 ohmios (seleccionable)
ALTAV OCES Dos 12” 8 Celestion® 30 watio altavoces connected in series (total impedancia 16)
FUSIBLES F4A L 250V (unidades a 100 y 120V) F2A L 250V (unidades a 220-240V)
PEDALERA Cuatro botones (incluida, referencia 0096467000)
VÁLV ULAS Dos válvulas de amplificación 6L6GC, siete válvulas de previo ECC83S
DIMENSIONES Y PESO Altura: 71,1 cm (28”) Anchura: 70,1 cm (27,6”) Profundidad: 30,7 cm (12,1”) Peso: 38,1 kg (84 lbs.)
Las especificaciones de este aparato están sujetas a cambios sin previo aviso.
7
EVH® 5150III™ 6L6 2x12 COMBO AMPLIFIER
Cet ampli professionnel tout-lampes a été conçu pour répondre
aux besoins d’Edward Van Halen, véritable légende vivante du
rock. La III L x Combo Amplifier est la version mise à
jour du modèle originale et précédente, pourvu de nouvelles
caractéristiques très musicales, telles que ainsi qu’ et des
commandes indépendantes à double concentrique qui permettent
appariement du gain et volume.
INSERT
GAIN
OFF
OFF
UP
LOW MID
OFF
UP
ONE / TWO
HIGH VOLUME
OFF
UP
LOW MID HIGHGAIN
SELECT
OFF
UP
OFF
UP
OFF
UP
A. INSERT: Connectez votre instrument à cette entrée. Utilisez
uniquement des câbles blindés pour instrument de haute
qualité.
B. GAIN CANAL /: Double réglage de gain concentrique. Le
FRANÇ AIS
potentiomètre rond central permet de régler le gain du canal
(son clair) ; le potentiomètre extérieur de type “chicken-head”
permet de régler le gain du canal (gain modéré).
C. LOW/MID/HIGH DU CANAL /: Réglages des graves,
médiums et aigus du canal (clair) et du canal (gain modéré).
D. VOLUME CANAL /: Double réglage de volume concentrique.
Le potentiomètre rond central permet de régler le volume du
canal (son clair) ; le potentiomètre extérieur de type “chickenhead” permet de régler le volume du canal (gain modéré).
Remarque: Afin d’obtenir un son plus clair pour les canaux 1 et
2, placez les réglages de volume au maximum puis ajustez les
réglages de gain (B) en partant du minimum jusqu’à obtenir le
niveau souhaité.
E. BOUTON SELECT DU CANAL /: Ce bouton poussoir
momentané permet d’alterner entre le canal (clair, LED verte)
et le canal (gain modéré, LED bleue).
Avec un son féroce et une construction sans compromis, cet ampli
vous promets des performances dignes de Van Halen lui-même.
Parmi ses autres caractéristiques, cet ampli furieux propose un
préampli à gain ultra élevé conçu pour un son extrêmement riche
en harmoniques, un revêtement de vinyle texturé noir ou ivoire et
bien plus encore.
FACE AVANT
VOLUME PRESENCE
OFF
OFF
UP
UP
THREE
OFF
UP
F. GAIN DU CANAL : Réglage de gain du préampli du canal
(gain élevé). Montez ce réglage pour obtenir plus de
saturation.
G. LOW/MID/HIGH DU CANAL : Réglages des graves, médiums
et aigus du canal (gain élevé).
H. VOLUME DU CANAL : Réglage du volume post-préampli du
canal (gain élevé).
I. BOUTON SELECT DU CANAL : Ce bouton poussoir
momentané permet d’activer le canal (gain élevé, LED rouge).
Lorsque vous repassez au canal / avec le bouton SELECT (E),
c’est le dernier de ces deux canaux ayant été utilisé qui est
activé.
J. PRESENCE: Réglage des ultra-hautes fréquences pour les trois
canaux.
K. REVERB: Réglage de niveau de la réverbe pour les troix
canaux. La réverbe peut être activée/désactivée avec le
pédalier fourni (T).
L. POWER LEVEL: Réglage de la puissance de l’ampli de à
Watts, sans modifier les caractéristiques du son.
REVERB POWER LEVEL
SELECT
OFF
UP
UP
OFF
OFF
UP
UP
8
M. TÉMOIN DE MISE SOUS TENSION: S’allume lorsque l’ampli
est sous tension.
 Loading...