

Premier EZ Security Alarm System
WHA T YOU GET
Battery
Cover
The EZ Security Alarm system should contain the following components:
1 x EZ Alarm with Dialer (S E132)
1 x Wireless Motion Detector (SP101)
1 x Door/Window Contact Detector (SM101)
1 x Remote Controller (SR132)
4 x 1.5V AA size Battery (SE132)
2 x 1.5V AAA size Battery (SP101)
2 x 3V CR2032 Lithium Battery (SM101, SR132)
User’s manual and fixing pack
INTRODUCTION
It is designed to protect your property, serving as a basic alarm system and entry
enunciator as well. Upon receipt of radio signal from the associated transmitters,
a piercing 110 decibels alarm sound or chime alert will be emitted and in the
LINE
Telephone Jack
meantime dial up the preset phone numbers by playing 6 seconds alarm message
for help.
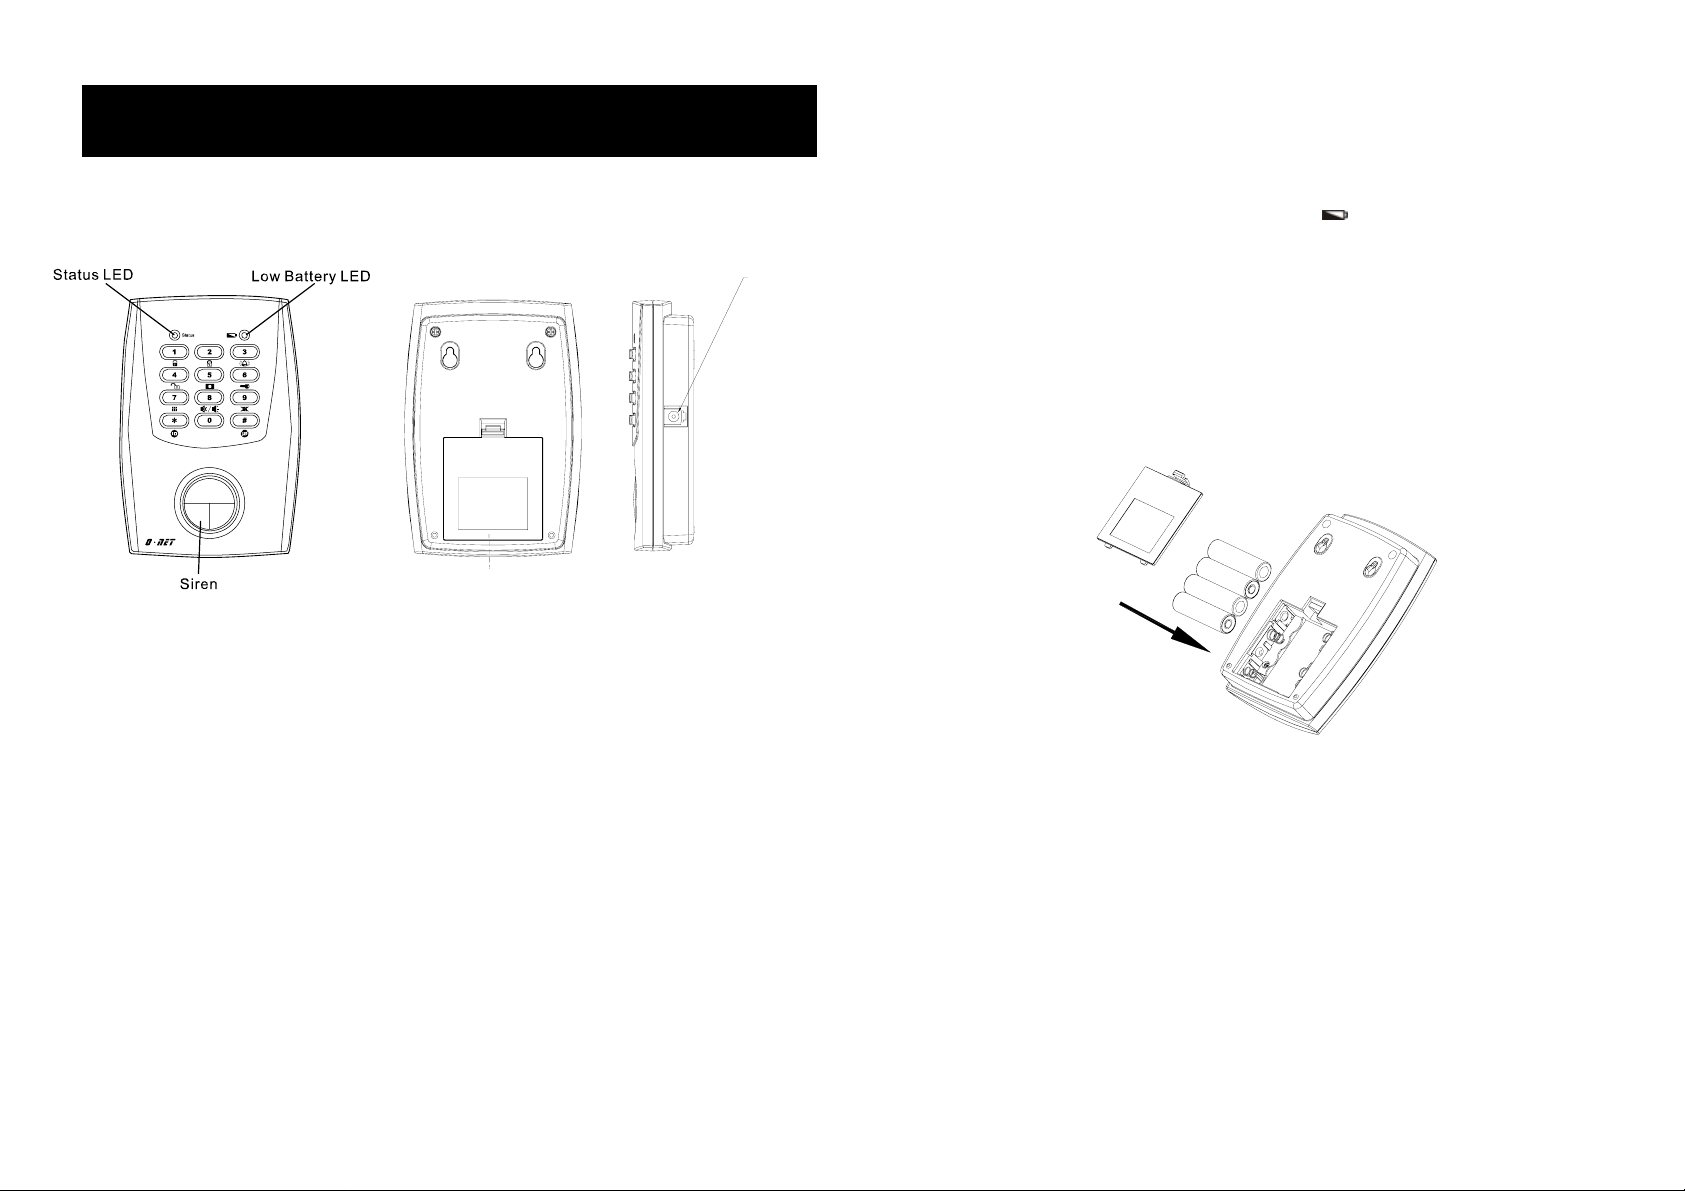
LOADING THE BA TTERY
The EZ Alarm requires 4 “AA” batteries. If the
LED of Alarm is flashing once
every 3 seconds, the batteries need to be replaced right away, otherwi se the Alarm
cannot be working properly. Average battery life for stand-by usage is 8 months,
subject to alkaline batteries being applied.
To install the batteries:
1. Open the battery cover. (FIGURE 1)
2. Insert 4 “AA” batteries ensuring correct polarity being put. (FIGURE 1)
3. Refit the battery cover.
FIGURE 1
Note: Remove batteries before storing the Alarm for extended periods. Batteries
corrode over time and may cause permanent damage to the unit. Different types
of batteries or new and used batteries should not be mixed. Depleted batteries
should be removed from the unit and disposed of properly.
CONNECTING TO THE TELEPHONE LINE
To call for help when the Alarm is activated, plug one end of the telephone line to
wall outlet and the other end into the side of the Alarm. (FIGURE 2)
1
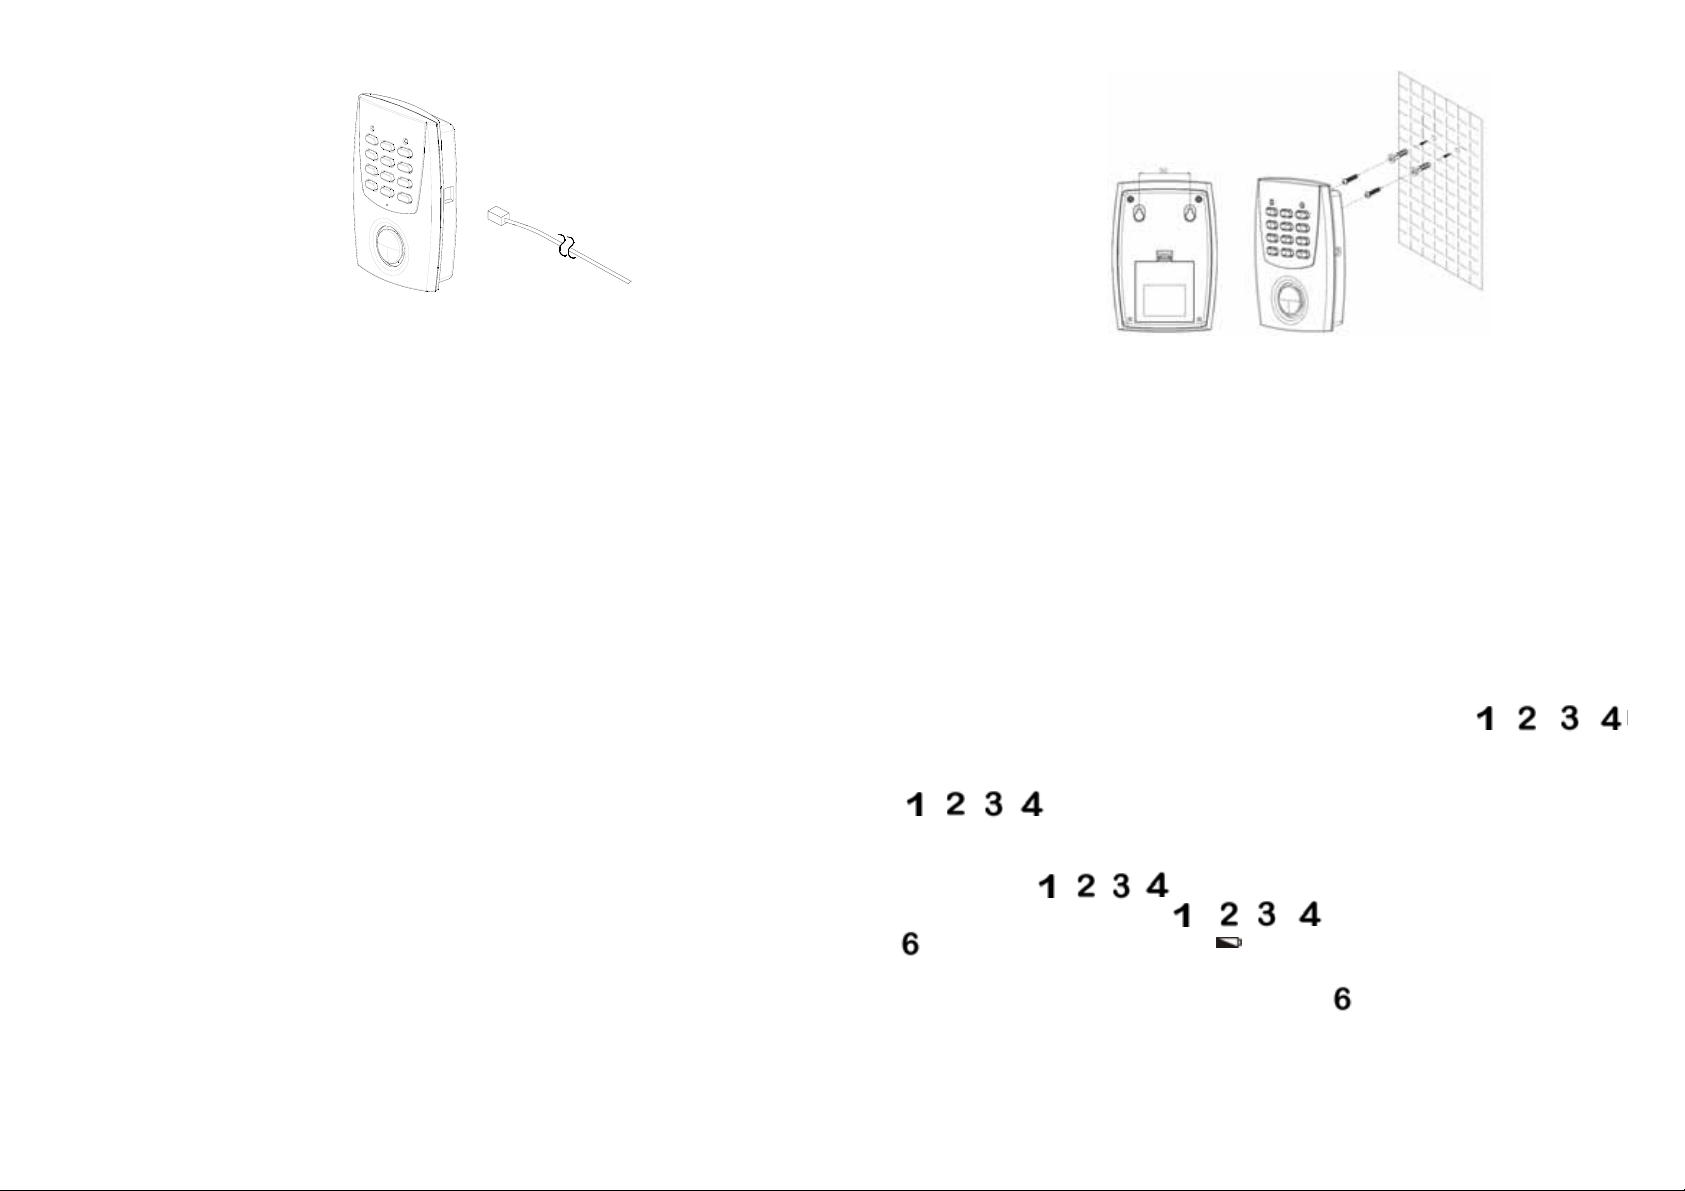
FIGURE 2
CHOOSING A MOUNTING LOCATION
When choosing a suitable location for the Alarm, the following points should be
considered.
1. The Alarm should be located within a protected area with the System set, eg:
an intruder cannot reach the Alarm without being detected by a detector.
2. The Alarm should be located in a position where it will be seen each day, but
not visible from the door or windows.
3. Do not locate the Alarm closer than 1m to any large metallic object, eg: mirrors,
radiators, fridges etc, as this may affect the radio range of the system.
4. Locate the Alarm in an easily accessible position between 1.5m and 2.0m
above floor level.
INSTALLING THE ALARM
Mark the two fixing holes 50mm apart in a line on the wall. Drill two holes; fully
insert the plastic wall plugs supplied and fit two 18mm screws into the wall plugs
until almost fully home and hang the Alarm over these screws using the two
keyhole slots in the top corners of the rear casing. (FIGURE 3)
FIGURE 3
STARTING UP
The Alarm is capable of memorizing up to 12 ID codes. For initial operation, the
Status LED will flash once every 3 seconds, it means that the Alarm does not
memorize any ID code or phone number. Without being programmed the phone
number, the Alarm cannot make use of its dialer function, while failure in learning
the ID code, the Alarm cannot be activated by the associated transmitters. It will
stop flashing until the code learning and phone number have been programmed.
Upon completion of batteries insertion, the Status LED will light up for one second
and extinguish, confirming that the Alarm has initiated properly.
The ex-factory mode is set for “disarm“ and 4-digit security code [ , , , ]
has been set as the default security code. (Note: After removing or replacing the
batteries, the Alarm security code would be automatically set back as default
[ , , , ], while the preset ID codes will be still in existence.)
SETTING THE 4-DIGIT SECURITY CODE
Default setting: , , ,
For initial operation, press [ , , , ] 4-digit security code and then
mode key, the Status LED and
LED will keep illuminating.
Press your new 4-digit security code and then mode key within 15 seconds.
This 15-second allows users to enter new security code. As soon a s the setting has
been completed before 15-second is out, the Alarm will revert to disarm mode
2

immediately. However, after the expiry of 15 seconds, the setting has not been
finished, but the Alarm will still revert to disarm mode automatically. If the fifth mode
key is not entered correctly, the Alarm will treat it as an input error. Three
consecutive input errors will make the Alarm revert to disarm mode automatically.
Note: Number ~ can be used repeatedly as the digit of 4-digit security
code, but and cannot be applied.
While setting the security code, the Alarm will stop receiving the radio signal from
any transmitters.
LEARNING THE ID CODE
Press 4-digit security code and then mode key to enter the code learning
mode. Both Status LED and
LED will be flashing. It offers a 30-second for the
Alarm to learn the ID code from the Transmitter. Once code learning is successful,
the Alarm will emit a long beep in response and revert to disarm mode
automatically. If the completion of code learning takes less than 30 seconds, the
Alarm will revert to disarm mode immediately. However, code learning has not
been completed before 30-second is out, the Alarm will still revert to disarm mode
automatically with the Status LED flashing 4 times rapidly. During code learning
mode, any input or activation will be ignored.
The maximum capacity of ID code learning is 12. It means it is compatible with
different type of transmitters for a maximum of 12 pcs. If 13
th
ID code is entered,
the Status LED will flash rapidly as rejection and revert to disarm mode directly.
CLEARING THE PRESET ID CODE
Press 4-digit security code and then mode key to enter code clearance mode.
Both Status LED and
LED will illuminate steadily. The users have a 15-second
to clear the ID code. Pressing 4-digit security code and then mode key again
within 15 seconds will clear all existing codes. Upon completion of clearing the ID
code or failure to do so before the time is out, the Alarm will revert to disarm mode
automatically. During code clearance mode, any input or activation will be ignored.
SETTING TELEPHONE NUMBER
Arm the Alarm by pressing 4-digit security code and then mode key. The
maximum allowable length of inputting a set of telephone number is 30 seconds,
while both Status LED and
LED will flash as an indication. Up to 4 set of
telephone numbers can be memorized.
Press right after the completion of each telephone number. If the input has
been accessed, the Alarm will have a long beep and revert to the disarm mode.
Repeat the same step from the beginning to input another telephone number.
During input, any incorrect digit number can be erased by pressing each time.
If a sequence of incorrect telephone number is entered 3 times or failure in
entering telephone number within 30 seconds, the Status LED will flash and revert
to the disarm mode straight away.
RECORDING ALARM MESSAGE
Arm the Alarm by pressing 4-digit security code and then mode key. The
Alarm can start to record after a long beep is emitted. The
LED will illuminate
while recording. The maximum allowable length of the alarm message is 6
seconds. After this period, the Alarm will beep once to indicate that the recording
has stopped. Alternatively, press any key to stop recording before the max. 6
seconds is out. Only one alarm message can be recorded.
SETTING TYPE OF ACTIVATION
Default setting: duration for alarm 30 seconds and be mute 45 seconds
Arm the Alarm by pressing 4-digit security code and then mode key.
When the Alarm is triggered, it will generate a full alarm condition for 30 seconds
and be silent for 45 seconds as one cycle. Such a cycle will be repeated 10 times
upon each activation. Each cycle, the Alarm will dial up one preset phone number
and will not hang up the line until every phone number has been dialed three times.
There are two other type of activation can be chosen as follows:
1. Arm the Alarm by pressing 4-digit security code and then mode key.
When the Alarm is triggered, it will be silent for 45 seconds and initiate a full
3

alarm condition for 30 seconds as one cycle. Such a cycle will be repeated
10 times upon each activation. During 45 seconds silent period, it will start
dialing up one preset phone number.
2. Arm the Alarm by pressing 4-digit security code and then mode key.
When the Alarm is triggered, it will not generate a full alarm condition but will
dial up each preset phone number 3 times before the Alarm stops.
Note: If the Alarm does not memorize any phone number, no phone number
can be dialed upon alarm activation.
No matter what type of activation is set, the Alarm always sounds for 30 seconds
and is mute for 45 seconds as one cycle. Every time 45-second countdo wn starts,
the Alarm will initiate dialing function so as to dial one of the preset phon e numbe rs
with 30-second alarm message.
This one-way dialer cannot detect whether the recipient pick up the phone or not .
After the phone number is dialed for 5 seconds, the alarm message will be sent
and played for 30 seconds before hanging up the line automatically. When the
next 45-second silent period starts, it will dial up the next phone number.
Each preset phone number needs to be dialed 3 times as prerequisite. If up to
four phone numbers were set, the Alarm should dial 12 times, but alarm activation
is set for 10 times, as a result, no alarm sound will be occurred for the last two
cycles.
If less than four phone numbers have been programmed, the Alarm will stop dialing
until all of the preset phone numbers were dialed 3 times, but 10 times alarm
activation remains unchanged.
ARMING THE ALARM
Both “instant arm” and “delay arm” mode have a 15-second exit delay duration.
1. Instant arm mode: Arm the Alarm by pressing 4-digit security code and then
mode key. The Alarm will have a 15-second exit delay before the Alarm is
armed. The delay allows time for you to leave the protected area without
4
triggering the Alarm. During this 15-second, the Alarm will be silent for 10
second and beep for a while and Status LED will flash as a notification. The
Alarm will enter instant arm mode after expiry of 15-second exit delay.
When the Alarm is activated, it will sound for 30 seconds and be silent for 45
seconds as one cycle. Such a cycle will be repeated for 10 times upon each
activation.
During 45 seconds silent period, if the phone numbers and alarm message
have been set, the Alarm will dial up one preset phone number by playing 30
seconds alarm message in each cycle.
Note: We would recommend that the Alarm mode is set for Chime mode when
you are at home to avoid hearing damage resulted from frequent activation.
2. Delay arm mode: Arm the Alarm by pressing 4-digit security code and then
mode key. The Alarm will have a 15-second exit delay. The delay allows
time for you to leave the protected area without triggering the Alarm. During this
15-second, the Alarm will be silent for 10 seconds and beep for a while and
Status LED will flash as a notification. The Alarm will enter delay arm mode
after expiry of 15-second exit delay.
Once the Alarm is activated, the Status LED will be on shortly and the Alarm
won’t sound until a 15-second entry delay expires.
When the Alarm is activated, it will sound for 30 seconds and be silent for 45
seconds as one cycle. Such a cycle will be repeated for 10 times upon
each activation.
During 45 seconds silent period, if the phone numbers and alarm message
have been set, the Alarm will dial up one preset phone number by playing 30
seconds alarm message in each cycle.
ACTIVATING THE CHIME
Activate the chime by pressing 4-digit security code and then mode key.
Din-don can be heard each time when the Alarm is activated.

DISARMING THE ALARM
Disarm the Alarm by pressing 4-digit security code and then mode key.
When the Alarm is set in the disarm mode, any activation or reception of radio
signal will be ignored.
DEACTIVATING THE CHIME
Deactivate the chime by pressing 4-digit security code and then mode key.
CLEARING THE PRESET TELEPHONE NUMBER
Arm the Alarm by pressing 4-digit security code and then mode key. The
maximum allowable length of clearing all preset telephone numbers is 15 seconds,
while both St atus LED and
LED will illuminate steadily as an indication.
Press 4-digit security code and mode key again to clear all of the preset
telephone numbers.
Press 4-digit security code and mode key to revert to disarm mode directly.
SETTING THE KEY TONE
This feature, if enabled, allows the Alarm to be emitted a tone each time the
keypad is pressed.
Default setting : on
Key tone can be heard when initially pressing 4-digit security code and then
mode key. Pressing 4-digit security code and then mode key will take
turns at disabling and enabling the key tone.
LED INDICATION
When entering 4-digit security code with the fifth mode key correctly, the Alarm will
respond with a long beep with the Status LED being on shortly.
If a sequence of incorrect code is entered, the S t atus LED will flash and beep th ree
times. Three consecutive input errors will disable the keypad for 30 seconds.
If a sequence of incorrect code is entered during siren sound, the Status LED will
flash but without beep tone. Three consecutive input errors will disable the keypad
until the siren ceases.
In the event of a low battery condition,
LED will be flashing once every 3
seconds until the battery power depletes.
CARE AND MAINTENANCE
To clean the unit housing, use a soft cloth slightly dampened with water and wipe
dry. Do not use chemical agents as this may damage and discolor the unit.
Note: After removing the batteries, the circuitry will retain residual current. In
order to speed up the consumption of residual current, pressing any keypad for at
least 10 seconds is of great importance before refitting the batteries.
QUICK INPUT GUIDELINE
Default Setting
(4-digit security code)
Mode
Key
Mode Status
Activation Type
Activation Type
Activation Type
Instant Arm
Delay Arm
Chime
Disarm
Recording Alarm Message
Security Code
Setting Phone Number
5

Key Tone
Clearing Phone Number
ID Learning
ID Clearance
Note: The security code for your Alarm should be changed from the factory default
setting.
Note: If input has not been entered entirely, incomplete input will be cleared after
10 seconds automatically.
Wireless Motion Detector
1 Front Cover 4 Battery
2 PIR Motion Sensor 5 Rear Cover
3 Time-off Knob 6 Tamper Switch
The Motion Detector is designed to detect movement in a protected area by
detecting changes in infra-red radiation levels caused, for example, when a pe rson
moves within or across the devices field of vision. If movement is detected a radio
signal will be emitted to the EZ Alarm.
The recommended position for a Motion Detector is in the corner of a room
mounted 2m from the floor. At this height, the detector will detect movement up to
8-12m depending on adjustment. (FIGURE 4a) Also, in this position, the 110
degrees fan-shaped detection pattern can normally offer greater protection than
mounting on a flat wall. Before selecting a position for a Motion Detector the
following points should be noted:
9
6
3
0
3
6
9
2.0
129630
FIGURE 4a FIGURE 4b
1. Do not position the detector facing a window or direct sunlight. Motion
Detectors are not suitable for use in conservatories or draughty areas.
2. Do not position the detector directly above or facing any source of heat, eg:
fires, radiators, boiler etc.
3. Where possible, mount the detector so that the logical path of an intruder
would cut across the fan pattern rather than directly towards the
detector.(FIGURE 4b)
LOADING THE BA TTERY
1. Using a Phillips screwdrivers to detach the rear cover. (FIGURE 5a)
2. Insert 2 AAA-size 1.5V batteries to the battery compartment, ensuring that
correct polarity is put. (FIGURE 5b)
3. Refit the rear cover. (FIGURE 5c)
FIGURE 5a FIGURE 5b FIGURE 5c
SETTING
1. There is an ID code that is fixed ex-factory and cannot be adjusted.
2. Emitting the ID code
6

Step 1: After inserting the batteries to the Motion Detector, it will have a
60-second warm up period before emitting the ID code.
Step 2: Set the EZ Alarm to code learning mode.
Step 3: Pressing the tamper switch for more than 3 seconds will emit the ID
code to the EZ Alarm instantly.
Step 4: If the EZ Alarm responds with a long beep, the code learning is
successful. If not, please repeat Step 2.
Step 5: If consecutive short beeps have been heard from the EZ Alarm, the
code learning is failure. Follow the below steps for resolution.
Step 6: Starting from Step 1 to re-try.
OPERA TION
1. When removing the rear cover, the tamper switch will be triggered. Trigger
command of radio signal will emit to the EZ Alarm immediately
2. The EZ Alarm will sound for 30 seconds and be silent for 45 seconds as a
cycle. Such a cycle will be repeated for 10 times, of which duration takes about
12-13 minutes. (FIGURE 6)
FIGURE 6
3. The Motion Detector is designed to detect movement within a protected area.
The detector element detects differences in the infra red radiation when a
person moves within the protected area. If movement is detected, a radio
signal is transmitted to the EZ Alarm to activate the chime or alarm.
4. A LED is mounted insi de of the Motion Detector. The indication of LED
represents the following status:
Status LED indication
1 Motion Detector is emitting radio
Illuminating steadily
signal
2 Low battery Flashing every 30 seconds
INSTALLATION
After the code learning procedure is completed, hold the rear cover in position and
mark the two mounting holes. Drill the holes, insert the plastic wall plugs and screw
the rear cover to the wall using the screws supplied. Offer the Detector up to the
rear cover using screws as originally supplied. (FIGURE 7)
FIGURE 7
Note: After replacing the batteries by refitting the rear cover, wait for 10 seconds
for the detector to become stable.
7

Door/Window Contact Detector
1 Battery Cover 6 Battery
2 Front Cover 7 Magnet
3 Rear Cover 8 LED
4 Tamper Switch 9 Arro w
5 Battery clip
Door/Window Contact Detectors can be fitted to protect doors or windows. If the
protected doors or windows are opened, a radio signal will be transmitted to the EZ
Alarm.
Before fixing the detector to a metal door/window check the radio range. It may
be necessary to space the Magnet/Detector off the metal surface using a plastic or
wooden spacer to achieve the necessary radio range.
Fix the Detector and Magnet to the opening using either the double sided tape or
screws provided. Mount the Magnet to the door and the Detector to the door frame
(or vice versa, if necessary). Ensure that the arrows on the Magnet and Detector
are pointing towards each other and that the gap between the Detector and the
Magnet is less than 12mm. (FIGURE 8)
FIGURE 8
LOADING THE BA TTERY
1. Remove the battery cover by sliding off. (FIGURE 9a)
2. Fit the 3V Lithium battery supplied, with the positive (+) facing upwardly.
(FIGURE 9b)
3. Refit the battery cover. (FIGURE 9c)
FIGURE 9a FIGURE 9b FIGURE 9c
SETTING
1. There is an ID code that is fixed ex-factory and cannot be adjusted.
2. Emitting the ID code:
Step 1: Fit the battery.
Step 2: Set the EZ Alarm to the code learning mode.
Step 3: Press the tamper switch for more than 3 seconds on the Detector .
Step 4: If the EZ Alarm has a long beep, the code learning is successful and
can start operating. If not, it implies that the code learning is failure.
Step 5: Starting from Step 2 to re-try.
8

OPERA TION
1. Upon opening the battery cover, the tamper switch will be triggered. A radio
signal will be emitted to the EZ Alarm immediately.
2. The EZ Alarm will sound for 30 seconds and be silent for 45 seconds as a
cycle. Such a cycle will be repeated for 10 times, of which duration takes
about 12-13 minutes.
3. Separating the magnet from the Detector, a radio signal will be emitted to the
EZ Alarm for chime al erting or alarming.
4. The indication of LED represents the following status:
Status LED indication
1 Door/Window Contact Detector is
emitting radio signal
2 Low battery Flashing every 30 seconds
INSTALLATION
1. Choose a position to drill a hole, insert the plastic wall plug and fix a screw on
the wall. Hang up the Detector on the screw. (FIGURE 10a)
2. Knock out the groove adjacent to the battery compartment and insert the screw
to fix the Detector on the wall. (FIGURE 10b)
Note: Ensure that the screw is driven flush with the inside of the casing hole.
FIGURE 10a FIGURE 10b
Note: After replacing the battery by refitting the battery cover, wait for 10 seconds
for the detector to become stable.
Illuminating steadily
1 LED indicator 5
2 Instant Arm 6 Key Chain Ring
3 Delay Arm 7 Negative Polarity
4 Disarm 8 Positive Polarity
The Remote Controller is designed to control a series of O-net products, such as
EZ Alarm (SE131) a nd EZ Alarm with Dialer (SE132).
The Remote Controller adopts a CR2032 type Lithium cell which under normal
conditions will have typical life in excess of 1 year. There are four buttons, each of
which will be transmitted instant arm, delay arm, disarm and chime radio sign al.
Remote Controller
Chime
LOADING THE BATTERY
1. Remove the rear cover with a coin.
2. Insert the battery ensuring that the +v terminal faces upwards away from the
PCB.
9

3. Replace the rear cover.
EMITTING THE ID CODE
In order to communicate with the EZ Alarm (SE131) and EZ Alarm with Dialer
(SE132), it is essential that the same ID code is used between the Receiver and
Transmitter.
Set the receiver to the ID code learning mode. Pressing and holding the
button on the Remote for 3 seconds will emit the ID code to the receivers. The
procedure for learning the ID code by the receiver is clearly described on the
Receiver’s manual.
OPERATION
Remote’s operating
status
Press the
button and LED on
Press the
button and LED on
Press the
button and LED on
Press the
button and LED on
Remote’s RF
transmission
Instant arm Instant arm
Delay arm Delay arm
Chime Chime
Disarm/Learn Disarm/Learn
Receiver’s
operating
status
Pressing the button instantly will emit disarm signal, while exceeding 3
seconds, the ID code will be transmitted to the Receivers.
The LED will be on and radio signal will be transmitted simultaneously when
pressing any button on the Remote Controller.
TROUBLESHOOTING
Symptom Possible Cause Recommendation
Motion Detector not
working
Door/Window Contact
not working
Press button on the
Remote, LED not
illuminating
After the batteries are
inserted to EZ Alarm, the
Status LED flashes once
10
Run out of battery Replace a new battery
Check if mounting
location of detector is
proper
Radio interference Remove interference
Check if the arrows on
the magnet and detector
are pointing toward each
other and that the gap is
less than 12mm
Run out of battery Replace a new battery
Code has not been
learned
Reverse battery polarity
Run out of battery
Either phone number or ID
code has not been
programmed
Adjust mounting location
source or change
mounting location
Adjust their position and
gap
Proceed “code learning”
with the EZ Alarm
Refit the battery
Replace a new battery
Both of phone number
and ID code have to be
programmed as

every 3 seconds
No alarm message when
dialer dials up the preset
phone number
Abnormal status on EZ
Alarm after putting the
batteries
No response with the EZ
Alarm
prerequisite
Message has not been
recorded
Pick up the phone before
30-second playing duration
is out
Liable to be false alarm
Record the alarm
message
Press any keypad for at
least 10 seconds before
putting the batteries
Check if learning the ID
code has been processed
Check if the procedure of
learning the ID code is
correct
Proceed “code learning”
with the EZ Alarm
Proceed “code learning”
with the EZ Alarm
Important: For wide expandability, the EZ Alarm is compatible with the following
transmitters of O-Net series, serving as a receiver.
Door/Window Contact Detector (SM101)
The Wireless Motion Detector, Door/Window Contact Detector and Remote
Controller are compatible with the following receivers of O-Net series, serving as a
transmitter.
Portable RF 2-tone Sounder (SE101)
On/Off Receiver (B410N, AN121)
Dimmer Receiver (B410D, AD121)
Lantern Receiver (ED102)
EZ Alarm (SE131)
Wireless Motion Detector (SP101)
Chime Remote Button (SR101)
Wireless Motion Detector (SP122)
Door/Window Contact Detector (SM122)
PIR Sensor Lantern Transmitter (ED101)
Remote Transmitter (SR102)
EZ Alarm with Dialer (SE132)
The member of O-NET series is on the increase. Visit our website
www.everspring.com fo r update information.
SPECIFICATION
SE132 SP101 SM101 SR132
Frequency range 315MHz or 433 MHz
Battery 1.5V AA type
x 4
Communication Range 70 meters min. (in an open space)
Specifications are subject to change without notice. A501111084R
1.5V AAA x 2 3V CR2032 x 1 3V CR2032 x
1
11

Federal Communication Commission Interference Statement
This equipment has been tested and found to comply with the limits for a Class B
digital device, pursuant to Part 15 of the FCC Rules. These limits are designed to
provide reasonable protection against harmful interference in a residential
installation. This equipment generates, uses and can radiate radio frequency
energy and, if not installed and used in accordance with the instructions, may
cause harmful interference to radio communications. However, there is no
guarantee that interference will not occur in a particular installation. If this
equipment does cause harmful interference to radio or television reception, which
can be determined by turning the equipment off and on, the user is encouraged to
try to correct the interference by one of the following measures:
- Reorient or relocate the receiving antenna.
- Increase the separation between the equipment
and receiver.
- Connect the equipment into an outlet on a circuit different from that to which
the receiver is connected.
- Consult the dealer or an experienced radio/TV technician for help.
This device complies with Part 15 of the FCC Rules. Operation is subject to the
following two conditions: (1) This device may not cause harmful interference, and
(2) this device must accept any interference received, including interference that
may cause undesired operation.
FCC Caution: Any changes or modifications not expressly approved by the party
responsible for compliance could void the user's authority to operate this
equipment.
Important Note:
FCC Radiation Exposure Statement:
This equipment complies with FCC radiation exposure limits set forth for an
uncontrolled environment. End users must follow the specific operating instructions
for satisfying RF exposure compliance.
This transmitter must not be co-located or operating in conjunction with any other
antenna or transmitter.
Warning:
Do not dispose of electrical appliances as unsorted municipal waste, use separate
collection facilities.
Contact your local government for information regarding the collection systems
available.
If electrical appliances are disposed of in landfills or dump s, ha zardous substances
can leak into the groundwater and get into the food chain, damaging your health
and well-being.
When replacing old appliances with new once, the retailer is legally obligated to
take back your old appliance for disposal at least for free of charge.
12
 Loading...