

Simple Alarm System
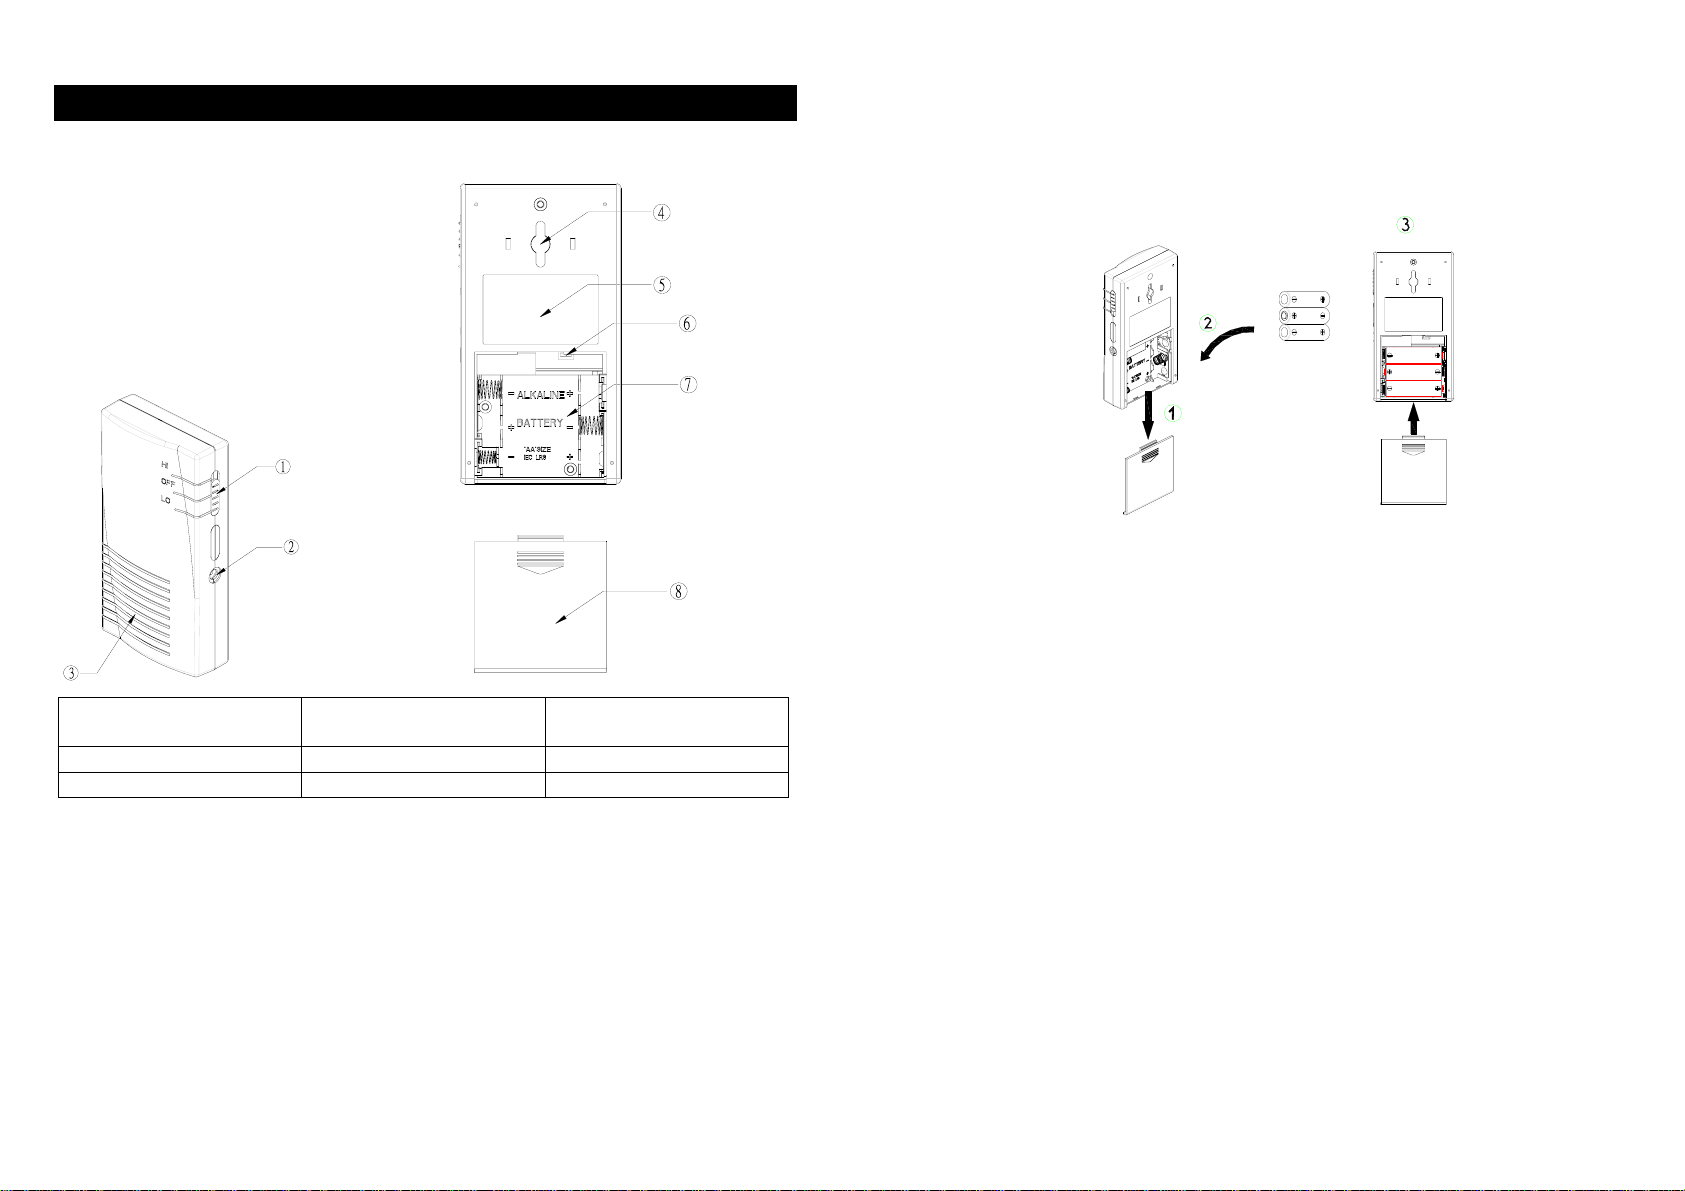
Portable RF 2-tone Sounder
1 3-position slide switch
Power/volume/mode selection
2 Jack for AC adapter 5 Sticker 8 Battery Cover
3 Buzzer 6 Code Learning Button
The Portable RF 2-tone Sounder, a 2-in-1 wireless receiver, is designed to work
with the Magnetic Contact Detector (SM101), Wireless PIR Detector (SP101) and
Chime Remote Button (SR101), serving as an audible chime or alarm.
Before selecting a position for the Sounder the following points should be noted:
1. Do not fix the Sounder to metalwork or locate the unit within 1m of metalwork
(i.e. radiator, water pipe s etc) as this could affect the radio range of the unit.
2. Do not locate the Sounder directly above a heat source, (e.g. fire, radiator,
boiler, etc)
3. Do not locate the Sounder where it is exposed to ventilators.
4 Hanging Slot 7 Battery Compartment
Loading the Battery
1. Open the battery cover. (FIGURE 1)
2. Insert 3 AA-size 1.5V batteries to the battery compartment, ensuring that correct
polarity is put.
3. Refit the battery cover.
FIGURE 1
Setting
1. The Sounder is able to memorize 10 set of individual codes.
2. Code learning
Note: For the best results, keep approx. 1 meter away from the transmitters
when proceeding with the code learning. The minimum distance between the
receiver and transmitter for code learning is 15 cm.
a. Setting the chime code
Step 1: Set the 3-position slide switch to “LO”. (FIGURE 2a)
Step 2: Open the battery cover.
Step 3: Using a ball-point pen, press and hold the code learning button for
more than 3 seconds. (FIGURE 2b & 2c)
Step 4: Keep holding the button. The Sounder will bleep per second.
After a long bleep being heard, it will enter code learning mode.
Step 5: Upon entering the code learning mode, release the button. The
Sounder is about to receive the code learning command within
30 seconds. During this 30 seconds period, the Sounder will react
with a long bleep as a confirmation if the code learning is successful.
Wait for at least 3 seconds to st art operating.
Step 6: Upon entering the code learning mode, release the button. The
Sounder is about to receive the code learning command within 30
seconds. During this 30 seconds period, the Sounder will emit four
1
bleeps consecutively as a warning if the code learning is failure.
Follow the below step for resolution.
Step 7: Starting from Step 1 to retry and refer to the troubleshooting’s
instruction for invalid code learning.
FIGURE 2a FIGURE 2b
FIGURE 2c FIGURE 2d
b. Setting the alarm code:
Step 1: Set the 3-position slide switch to “HI”. (FIGURE 2d)
Step 2: Open the battery cover.
Step 3: Using a ball-point pen, press and hold the code learning button for
more than 3 seconds. (FIGURE 2b & 2c)
Step 4: Keep holding the button. The Sounder will bleep per second.
After a long bleep being heard, it will enter code learning mode.
Step 5: Upon entering the code learning mode, release the button. The
Sounder is about to receive the code learning command within 30
seconds. During this 30 seconds period, the Sounder will react with a
long bleep as a confirmation if the code learning is successful.
Wait for at least 3 seconds to st art operating.
Step 6: Upon entering the code learning mode, release the button. The
Sounder is about to receive the code learning command within 30
seconds. During this 30 seconds period, the Sounder will emit four
bleeps consecutively as a warning if the code learning is failure. Follow
the below step for resolution.
Step 7: Starting from Step 1 to re-try and refer to the advice shown on the
Troubleshooting’s invalid code learning.
3. Cleaning the code
All the codes preset will be cleaned by taking the following step s.
Step 1: Open the battery cover.
Step 2: Using a ball-point pen, press the code learning button for more than 3
seconds. (FIGURE 2b & 2c)
Step 3: Keep holding the button. The Sounder will bleep per second. After a
long bleep being heard, it will enter the code learning mode.
Step 4: Upon entering the code learning mode, release the button. Before
receiving the code learning command, press and hold the button
immediately again for more than 6 seconds. (FIGURE 3) The Sounder
will bleep per second. After 6 bleeps being heard, all the preset
memory will be eliminated.
FIGURE 3
Installation
Upon completion of code learning procedure, fix the Sounder to the wall using the
screws and plastic wall plugs supplied. Or it can be free standin g, serving as a
portable annunciator or intrusion alarm. (FIGURE 4)
2
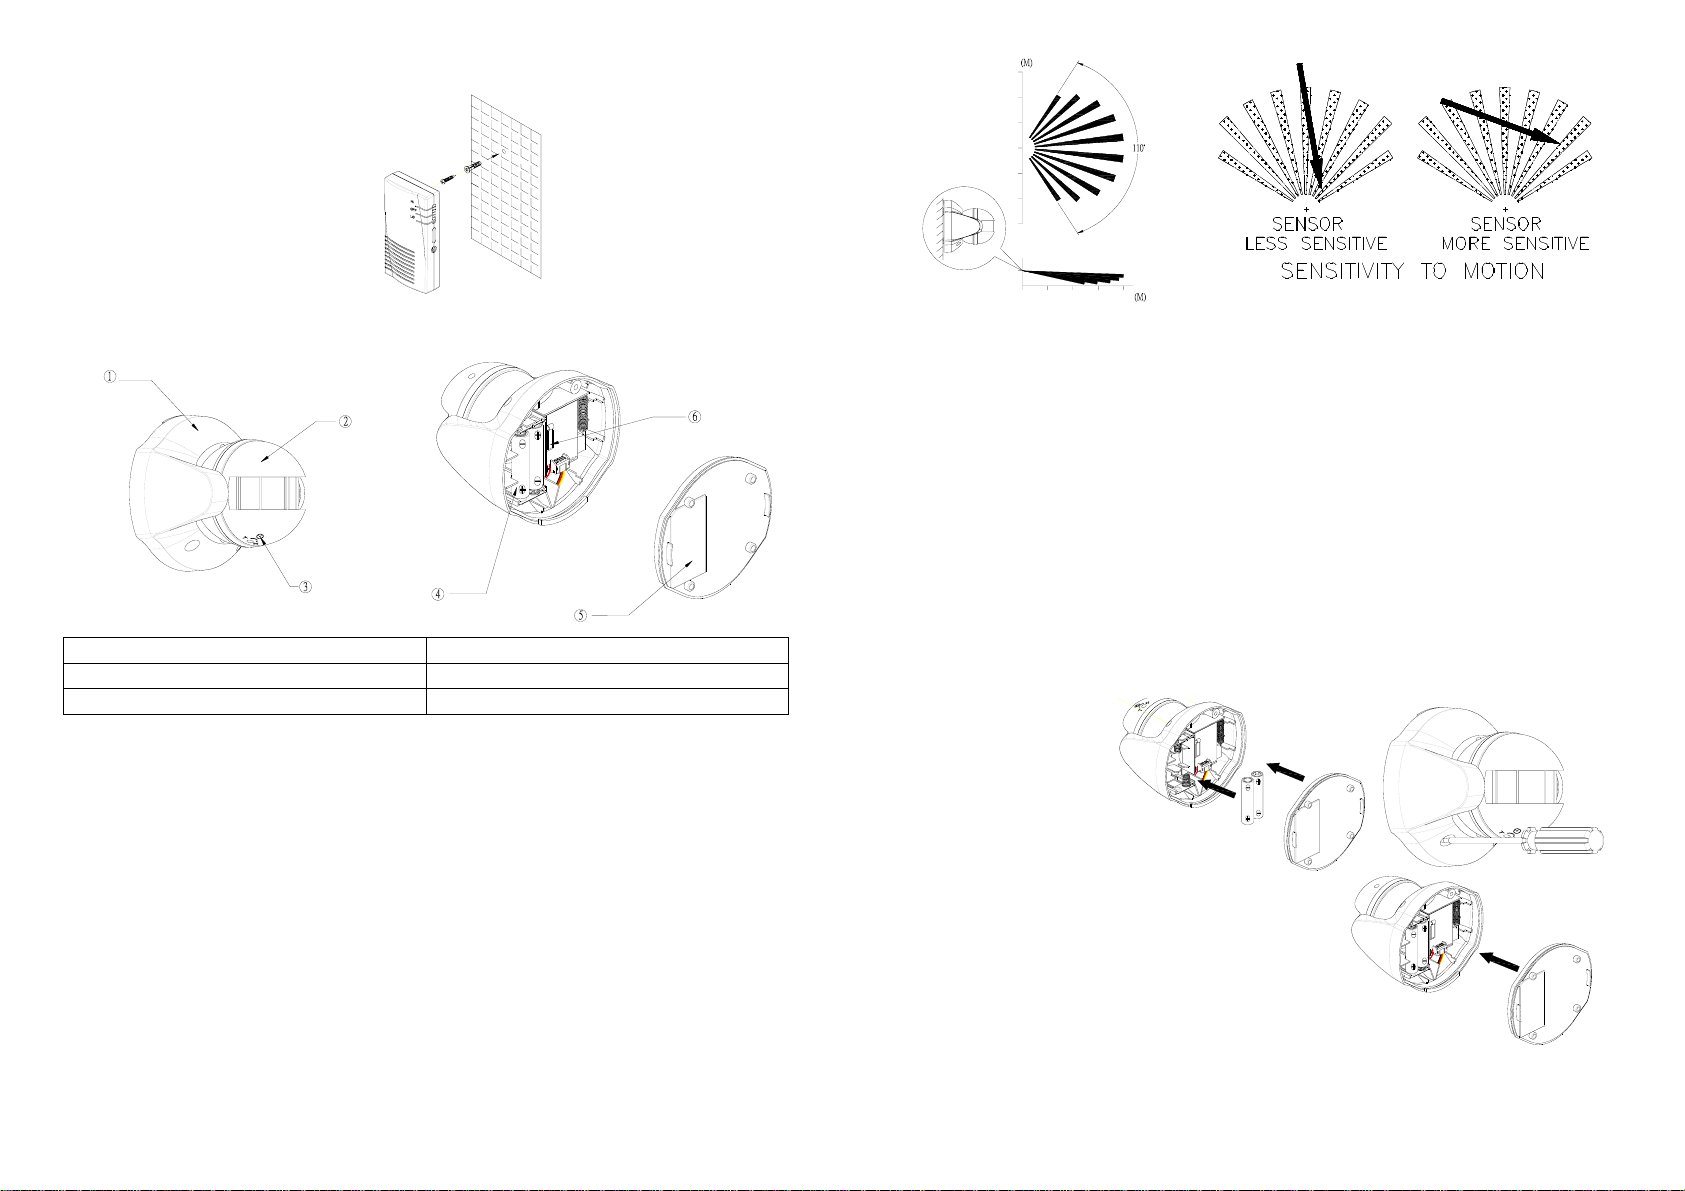
FIGURE 4
Wireless PIR Detector
1 Top Cover 4 Battery
2 PIR Motion Sensor 5 Back Cover
3 Time-off Knob 6 Tamper Switch
The PIR Detector is designed to detect movement in a protected area by detecting
changes in infra-red radiation levels caused, for example, when a person moves
within or across the devices field of vision. If movement is detected a radio signal
will be emitted to the Sounder.
The recommended position for a PIR Detector is in the corner of a room mounted
2m from the floor. At this height, the detector will detect movement up to 8-12m
depending on adjustment. (FIGURE 5a) Also, in this position, the 110 degrees
fan-shaped detection pattern can normally offer greate r protection than mounting on
a flat wall. Before selecting a position for a PIR Detector the following points should
be noted:
9
6
3
0
3
6
9
2.0
129630
FIGURE 5a FIGURE 5b
1. Do not position the detector facing a window or direct sunlight. PIR Detectors
are not suitable for use in conservatories or draughty areas.
2. Do not position the detector directly above or facing any source of heat, eg: fires,
radiators, boiler etc.
3. Where possible, mount the detector so that the logical path of an intruder would
cut across the fan pattern rather than directly towards the detector.(FIGURE 5b)
4. The PIR Detector can be used with Sounder, providing they are all coded with
the same code.
Loading the battery
1. Using a Phillips screwdrivers to detach the back cover. (FIGURE 6a)
2. Insert 2 AAA-size 1.5V batteries to the battery compartment, ensuring that
correct polarity is put. (FIGURE 6b)
3. Refit the back cover. (FIGURE 6c)
FIGURE 6a FIGURE 6b FIGURE 6c
Setting
1. There is an individual code that is fixed ex-factory and cannot be adjusted.
2. Code learning
Step 1: Set the Sounder to code learning mode. (For chime code, refer to page
3
 Loading...