

Page 1
SE812 INDOOR SIREN
Confidential Information of Everspring Industry Co. Ltd.
The Indoor Siren is a Z-Wave
Z-Wave
TM
enabled network. Z-WaveTM enabled devices displaying the Z-W aveTM
logo can also be used with it regardless of the manufacturer, and ours can also
be used in other manufacturer’s Z-Wave
Indoor Siren on other manufacturer’s Wireless Controller menu allows a full
alarm condition to be generated once a connected Z-WaveTM enabled device
has been triggered. Z-Wave
also act as repeaters, so as to re-transmit the RF signal to ensure that the signal
is received by its intended destination by routing the sign al around obst acles an d
radio dead spots.
The Indoor Siren integrates both functions of siren and strobe into one unit.
Two sound levels, 100dB and 90dB, are available for selection. When it
receives a RF command, it will either activate its sounder and flash lights or stop
these visual and audible alarm indications.
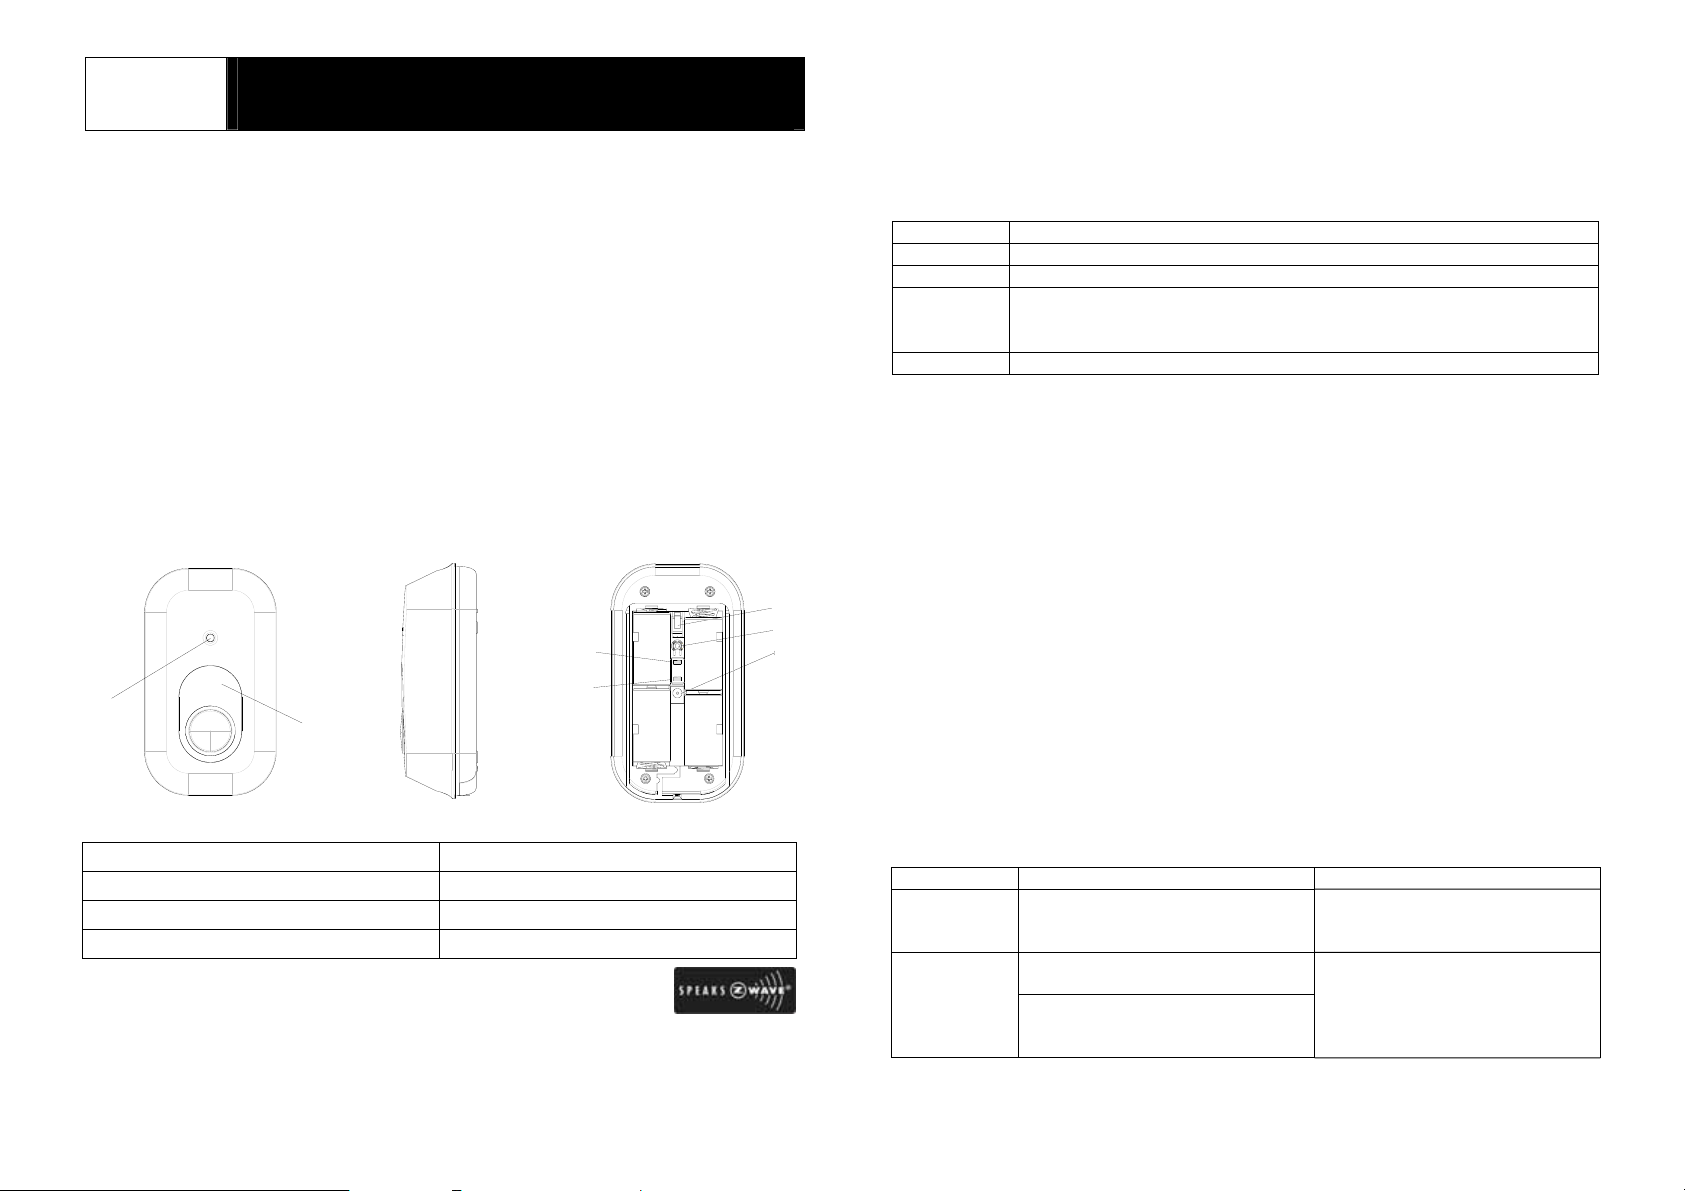
Product Overview
1
1
1
Front View
LED Indicator 5 Tamper Switch
2 Red Strobe Light 6 Link Key
3 Two-Phase Sound Jum per Link 7 DC Jack
4 Tamper Jumper Link
Include to or Exclude from a Z-Wave
In the rear casing, there is a link key which is used to carry out inclusion,
2
TM
enabled device and is fully compatible with any
TM
enabled networks. Inclusion of this
TM
enabled devices (refer to nodes) in the system
3
3
4
4
2
Side View
TM
Network
RearView
5
6
7
5
6
7
exclusion or reset. When power is first applied, its orange LED flashes on and
off alternately and repeatedly at 2-second intervals. It implies that it has not
been assigned a node ID and cannot work with Z-Wave enabled devices. The
Siren will stay “awake” for 10 minutes when power is first applied to allow time
for configuration. Please get familiar with the terms below before starting the
operations.
Function Description
Inclusion Add a Z-Wave enabled device (e.g. Siren) to Z-Wave network.
Exclusion Delete a Z-Wave enabled device (e.g. Siren) from the network.
Association After inclusion, you have to define the relationship between devices.
Trough association, device can be assigned as master/slave, and
specify which slave is going to be controlled by which master.
Reset Restore Siren to factory default.
The table below lists an operation summary of basic Z-Wave functions. Please
refer to the instructions for your Z-Wave
TM
Certificated Primary Controller to
access the setup function, and to include/exclude/associate devices. The
detector executes the function of auto inclusion when…
Auto Inclusion
The function of auto inclusion will be executed as long as the Siren does not
have node ID and in situations where…
1. The power is first applied.
2. The execution of exclusion/reset is successful where the stored node ID is
cleared.
Note: Auto inclusion timeout is 4 minute during which the node information of
explorer frame will be emitted once every 5 seconds. Unlike “inclusion”
function as shown in the table below, the execution of auto inclusion is free from
pressing the link key on the Siren.
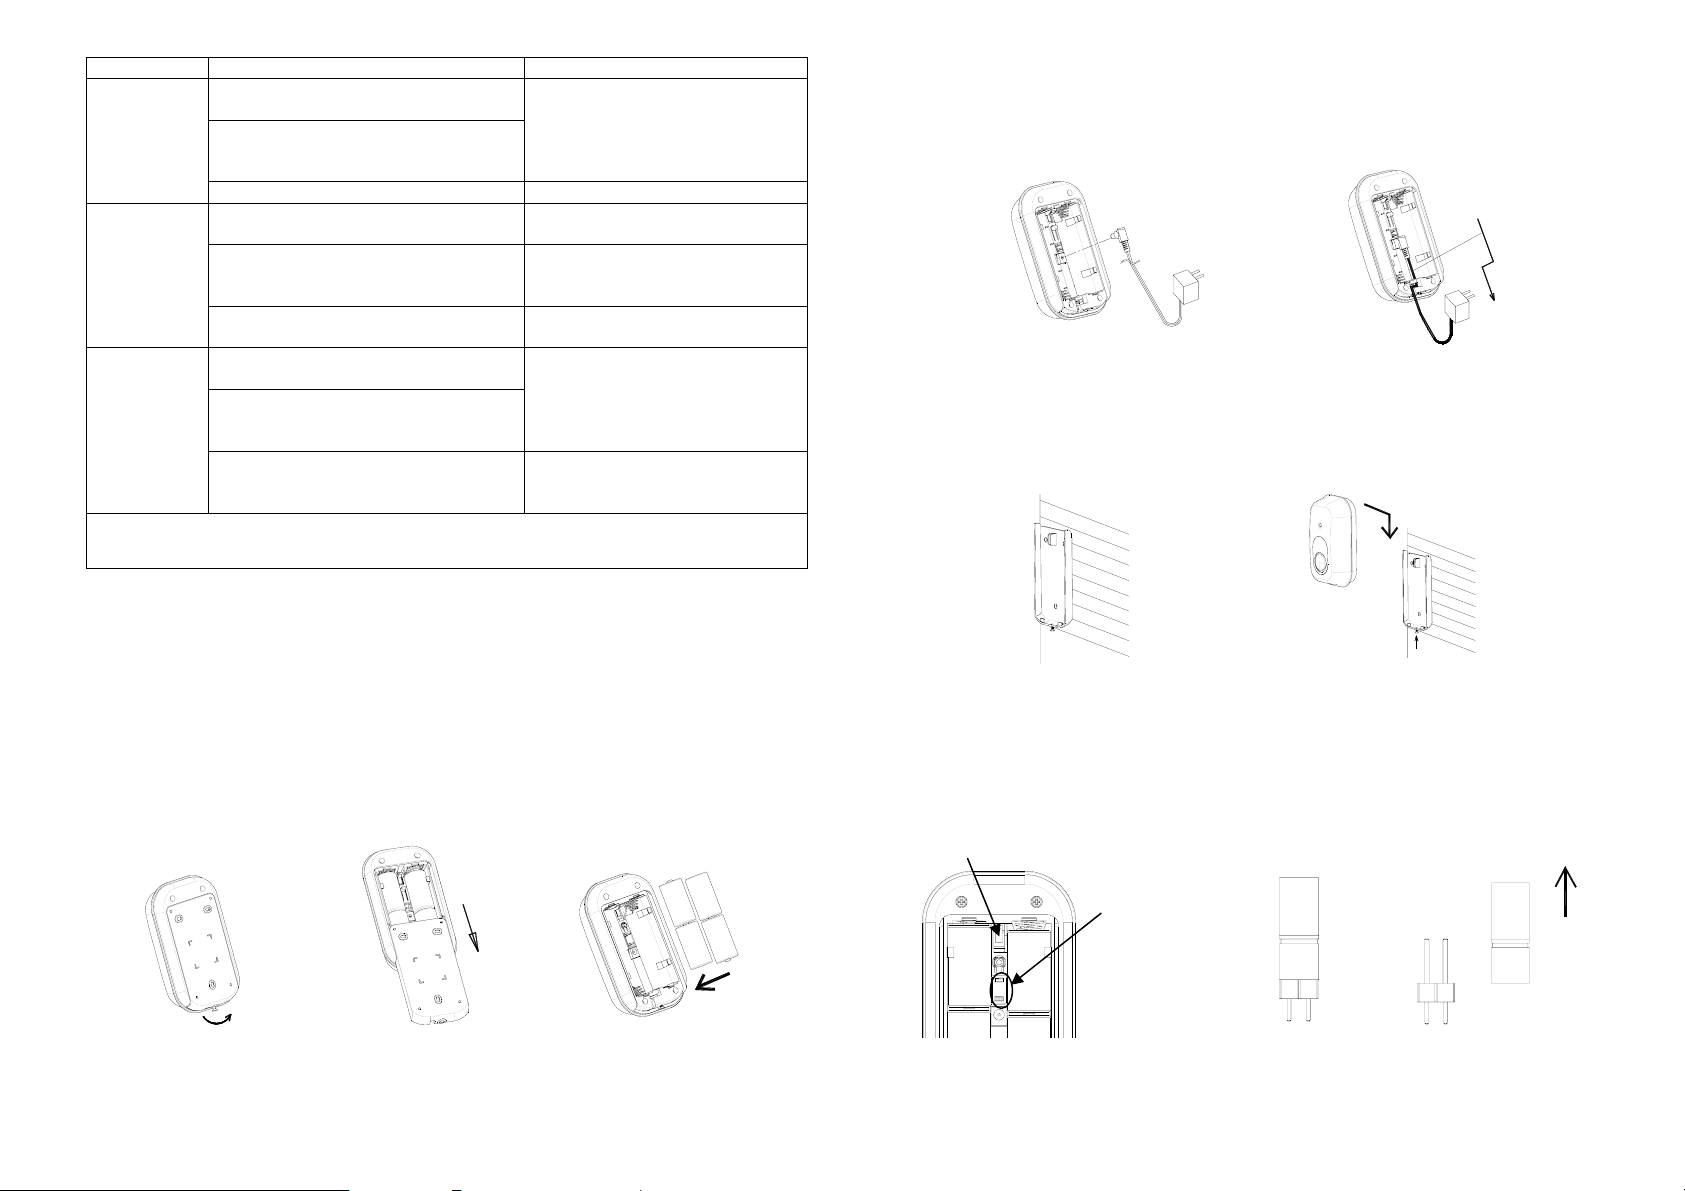
Function Description LED & Beep Indication
No node ID The Z-Wave Controller does not
allocate a node ID to the Siren.
Inclusion
1. Have Z-Wave Controller
entered inclusion mode.
2. Pressing link key 3 times within
1.5 seconds will enter inclusion
mode.
LED: 2-second on, 2-second off;
Beep: 0.1-second on,
9.9-second off
Green LED is on and Siren
beeps when link key is pressed.
1
Page 2
Function Description LED & Beep Indication
Confidential Information of Everspring Industry Co. Ltd.
Exclusion
Reset
Association
Including a node ID allocated by Z-Wave Controller means inclusion. Excluding a node ID
allocated by Z-Wave Controller means exclusion.
Failure or success in including/excluding the node ID can be viewed from the Z-Wave Controller.
1. Have Z-Wave Controller entered
exclusion mode.
2. Pressing link key 3 times within
1.5 seconds will enter exclusion
mode.
Node ID has been excluded.
1. Pressing link key 3 times within
1.5 seconds will enter reset mode.
2. Within 1 second, press link key
again for 5 seconds until LED is
off.
3. IDs are excluded; restores to
factory default.
1. Have Z-Wave Controller entered
association mode
2. Pressing link key 3 times within
1.5 seconds will enter association
mode.
3. There is one grouping (Grouping
1). Refer to Z-Wave’s Group as
described on page 3.
Green LED is on and Siren
beeps when link key is
pressed.
Orange LED is on and Siren
beeps when link key is pressed.
One long beep is on for 5
seconds, and orange LED is off.
Green LED is on and Siren
beeps when link key is
pressed.
Installation
The Siren is suitable for mounting in dry interior locations only. Please follow
these directions when first setting up, or for the purpose of battery replacing.
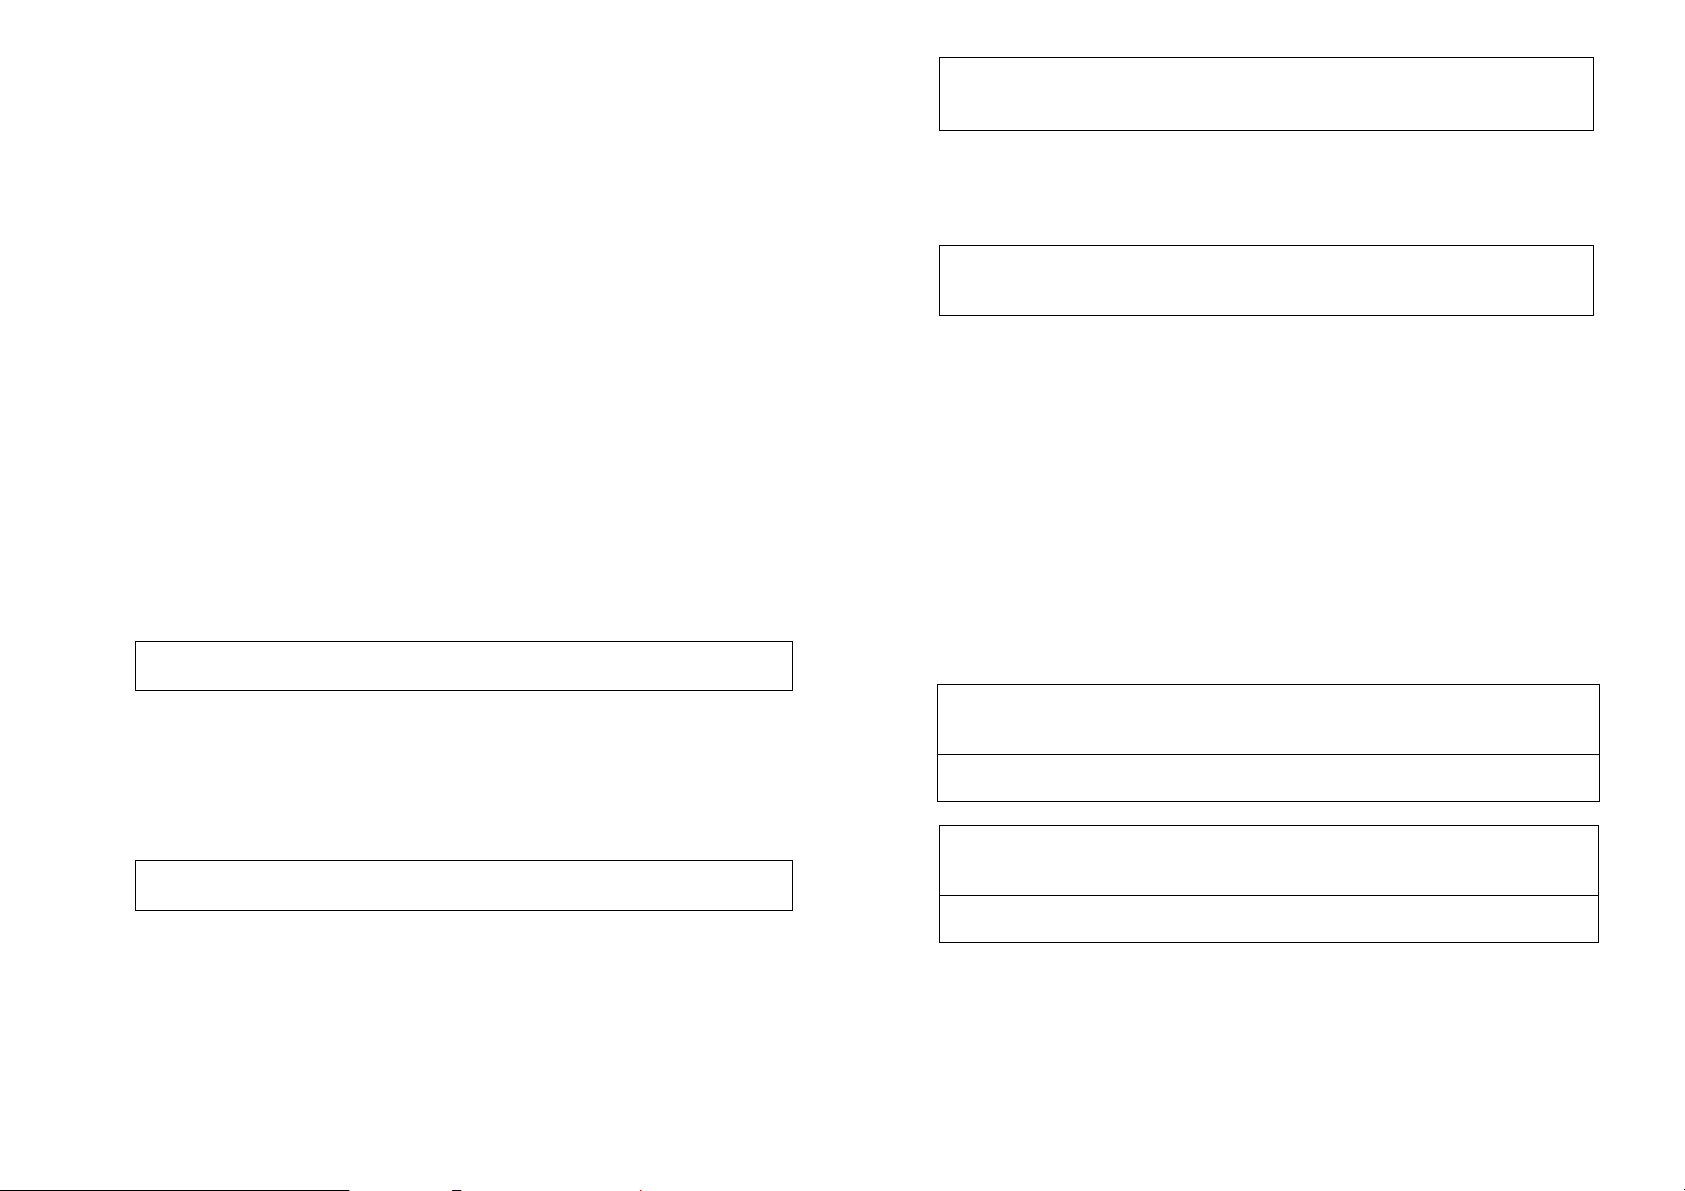
1. Undo and remove the fixing screws from the bottom edge of the Indoor Siren
and remove the rear cover (FIGURE 1 & 2).
2. Insert 4-LR14 1.5V size alkaline batteries to the battery compartment,
ensuring correct polarity is put (FIGURE 3).
FIGURE 1 FIGURE 2 FIGURE 3
-
+
+
-
-
+
+
-
Note: You can use power adapter instead of batteries. The power adapter
is an optional accessory. A cable track is set inside the unit for you to
secure the power adapter . To install the power adapter, connect the plug of
power adapter to the DC jack inside the unit. Route the cable along the
cable track (FIGURE 4 & 5).
FIGURE 4 FIGURE 5
3. Using the rear cover as a template, mark the positions of three fixing holes
on the wall. Fasten the rear cover to the wall using the screws and wall
plugs provided (FIGURE 6).
4. Slide the unit down to the rear cover and lock the screw clockwise (FIGURE
7).
FIGURE 6 FIGURE 7
Operation
Two jumper links are disposed inside the Siren: Two-Phase Sound Jumper Link
and Tamper Jumper Link (FIGURE 8). You can enable or disable the jumper
link by fitting it on or removing it (FIGURE 9).
Tamper Switch
FIGURE 8 IG FURE 9
2
Jumper Links
Jumper Link Fitted
Jumper Link Removed
Page 3
Tamper switch is designed to prevent Siren from being forcibly removed from the
Confidential Information of Everspring Industry Co. Ltd.
wall. Three minutes after it is pressed will enable the function of tamper
protection. Removing the unit from the rear cover will release the tamper
switch and generate a full alarm condition – strobe light flashes and alarm
sounds for 3 minutes.
Programming
The following information is for someone that has some experience setting up a
Z-Wave system or someone that has computer software running a Z-Wave
controller.
1. Z-Wave’s Groups (Association Command Class Version 2)
The Indoor Siren can be set to send reports to associated Z-Wave devices. It
supports one association group with 5 nodes support for Grouping 1. For
Grouping 1, the Siren will emit reports including POWER_APPLIED, Tamper
Trigger Report and Battery & Low Battery Report.
1-1 POWER_APPLIED command
When power is applied, it will send ALARM_REPORT command to nodes
of Grouping 1 to inform the devices that the Siren is powered up.
ALARM_REPORT Command
[Command Class Alarm, Alarm Report, Type = 0x02, Level = 0x01]
1-2 Tamper Trigger Report
When tamper switch is triggered, Siren will send ALARM_REPORT
command to nodes of Grouping 1 to inform the devices that the Siren has
been triggered.
ALARM_REPORT Command
[Command Class Alarm, Alarm Report, Type = 0x01, Level = 0x11]
1-3 Battery & Low Battery Report
When the battery level of the Siren drops to an unacceptable level, the
Siren will flash red LED once every 30 seconds and send Broadcast
command to the network.
ALARM_REPORT Command:
[Command Class Alarm, Alarm Type = 0x01, Alarm Level =
255(0xFF)]
The users can also enquire the battery status of the Siren by sending
BATTERY_ GET command via controller. Once the Siren receives the
command, it will return BATTERY_REPORT command.
BATTERY_REPORT Command
[Command Class Battery, Battery Report, Battery Level =
20%-100%]
If it displays with a message of “Battery Level = 255 (0xFF)”, it implies that
the Siren is at low battery status. Please replace the batteries as soon as
possible.
2. Basic Command Class / Binary Switch Command Class
The Siren will respond to BASIC and BINARY commands that are part of
the Z-Wave system.
2-1 BASIC_SET/SWITCH_BINARY_SET
Upon receipt of the following commands from a Z-Wave Controller, the
Siren will either generate a full alarm condition (on) or stop the full alarm
condition (off).
[Command Class Basic, Basic Set, Value = (255)0xFF]: the Siren
generates a full alarm condition by flashing strobe light and sounding
alarm for 3 minutes.
[Command Class Basic, Basic Set, Value = 0(0x00)]: the Siren stops
full alarm condition.
[Command Class Switch Binary, Switch Binary Set, Value =
(255)0xFF]: the Siren generates a full alarm condition by flashing strobe
light and sounding alarm for 3 minutes.
[Command Class Switch Binary, Switch Binary Set, Value =
0(0x00)]: the Siren stops full alarm condition.
2-2 BASIC_GET/BINARY_SWITCH_GET
Upon receipt of the following commands from a Z-Wave Controller, the
Siren will report its On/Off status to the Controller.
3
Page 4
Basic Get Command: [Command Class Basic, Basic Get]
Confidential Information of Everspring Industry Co. Ltd.
Basic Report Command:
Report OFF: [Command Class Basic, Basic Report, Value = 0(0x00)]
Report ON:[Command Class Basic, Basic Report, Value = (255)0xFF]
Binary Switch Get Command:[Command Class Switch Binary, Switch
Binary Get]
Binary Switch Report Command:
Report OFF:[Command Class Switch Binary, Switch Binary Report,
Value =0(0x00)]
Report ON:[Command Class Switch Binary, Switch Binary Report,
Value = (255 )0xFF]
Note: To execute the command of BASIC_SET/SWITCH_BINARY_SET,
BASIC_GET/BINARY_SWITCH_GET and BATTERY_GET, the notes in the
network must support the function of Z-Wave Wake Up Beam in order to wake
the Siren up from sleep status.
2. Command Classes
The Siren supports Command Classes i ncluding…
* COMMAND_CLASS_BASIC * COMMAND_CLASS_VERSION
* COMMAND_CLASS_BATTERY * COMMAND_CLASS_SWITCH_BINARY
* COMMAND_CLASS_MANUF A CTURER_SPECIFIC
* COMMAND_CLASS_ASSOCIATION_V2
Troubleshooting
Symptom Possible Cause Recommendation
LED cannot be displayed
or Siren not working
1. Run out of battery
power.
2. Check if reverse
battery polarity
The Siren is out of order Don’t open the Siren; send
1. Replace a new battery
2. Refit the battery with
correct polarity
it to the local retailer.
Specifications
Power Adapter (optional) 6V DC/600mA
Operating Frequency 868.42 MHz / 908.42 MHz
Battery Type 1.5V LR14 size x 4
Operating Range Up to 30 meters line of sight (indoor)
*Specifications are subject to change without notice A501111374R01
Federal Communication Commission Interference Statement
This equipment has been tested and found to comply with the limits for a Class B digital
device, pursuant to Part 15 of the FCC Rules. These limits are designed to provide
reasonable protection against harmful interference in a residential installation. This
equipment generates, uses and can radiate radio frequency energy and, if not installed
and used in accordance with the instructions, may cause harmful interference to radio
communications. However, there is no guarantee that interference will not occur in a
particular installation. If this equipment does cause harmful interference to radio or
television reception, which can be determined by turning the equipment off and on, the
user is encouraged to try to correct the interference by one of the following measures:
- Reorient or relocate the receiving antenna.
- Increase the separation between the equipment and receiver.
- Connect the equipment into an outlet on a circuit different from that to which the
receiver is connected.
- Consult the dealer or an experienced radio/TV technician for help.
This device complies with Part 15 of the FCC Rules. Operation is subject to the follo wing
two conditions: (1) This device may not cause harmful interference, a nd (2) this device
must accept any interference received, including interference that may cause undesire d
operation.
FCC Caution: Any changes or modifications not expressly approved by the party
responsible for compliance could void the user's authority to operate this e quipment.
This transmitter must not be co-located or operating in conjunction with any other antenna
or transmitter.
WARNING:
Do not dispose of electrical appliances as unsorted municipal waste, use separate
collection facilities.
Contact your local government for information regarding the collection systems available.
If electrical appliances are disposed of in landfills or dumps, hazardous substances can
leak into the groundwater and get into the food chain, damaging your health and
well-being.
When replacing old appliances with new once, the retailer is legally obligated to take back
your old appliance for disposal at least for free of charge.
4
 Loading...