

Page 1
1
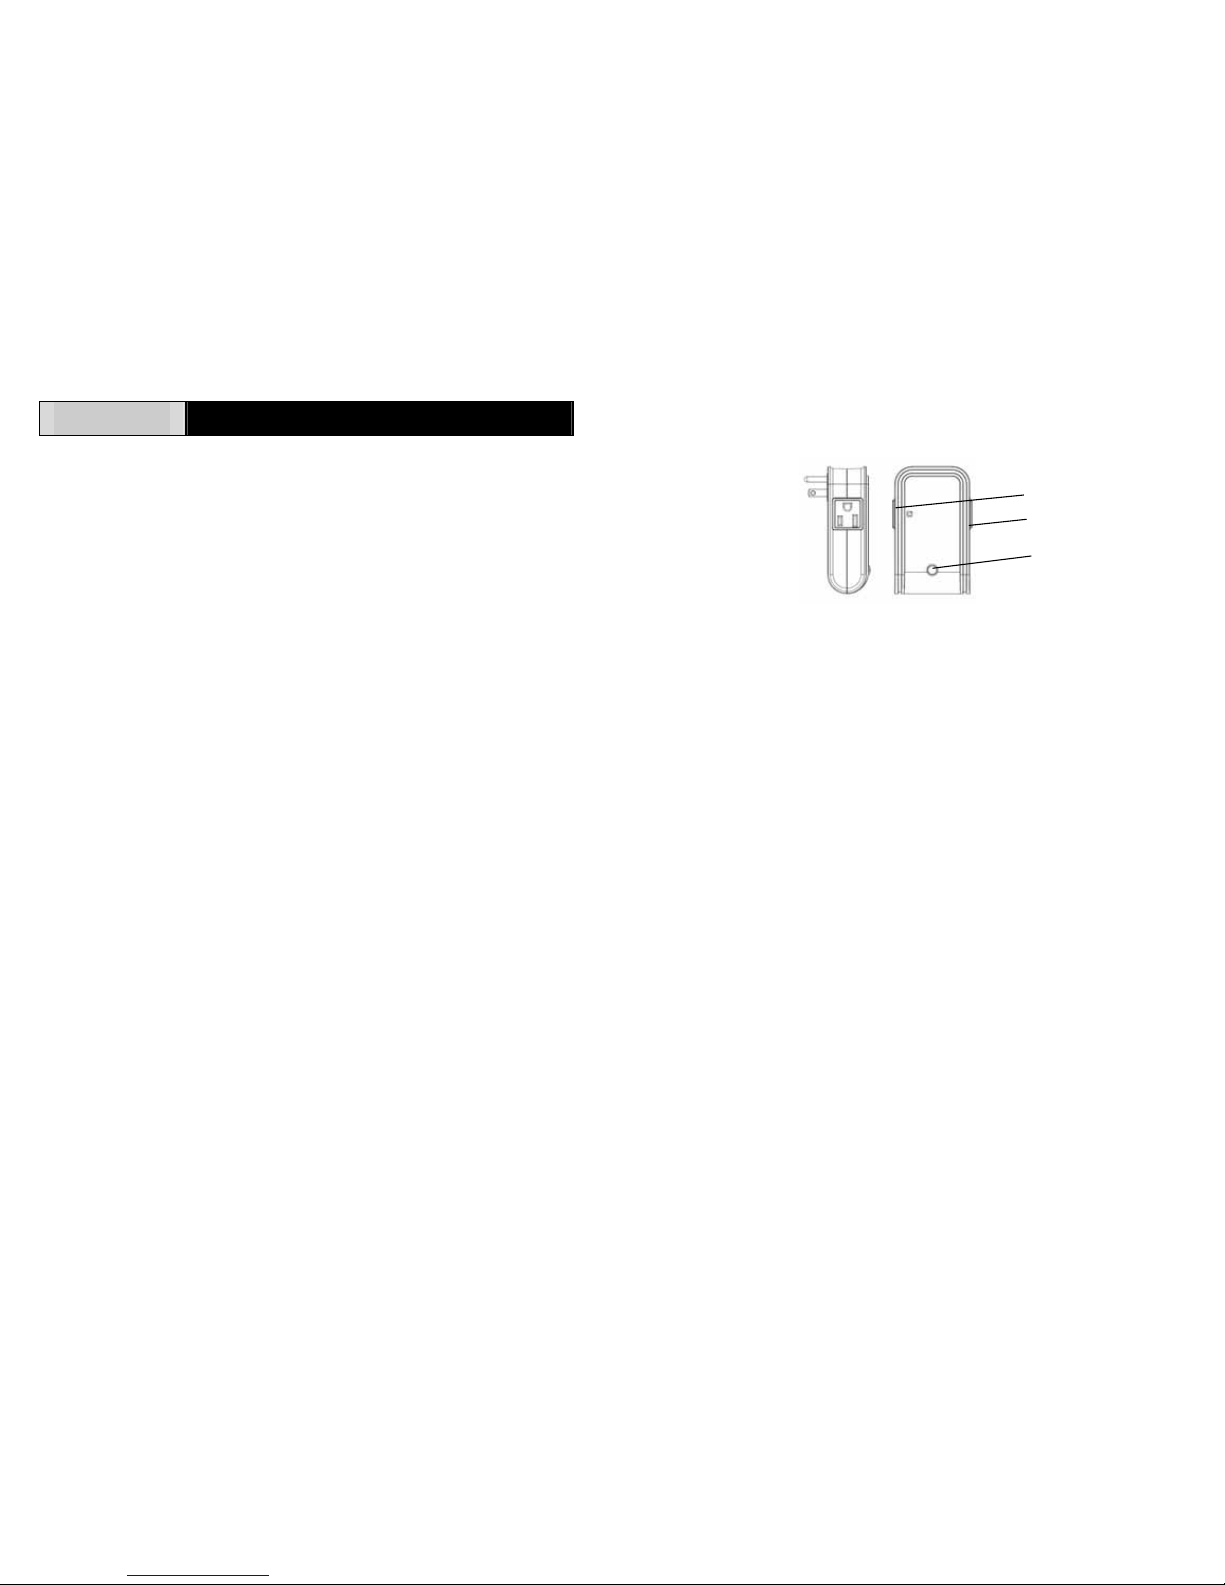
On/Off/Dim button
AD132-1 LAMP MODULE
Controllable outlet
Pass-through outlet
The AD132-1 Lamp Module is a transceiver which belongs to the member of UNet
series and is fully compatible with any UNet enabled devices. It is designed to
control the On/Off status and brightness level of incandescent lamp connected to
the lamp module. When setting to On, it will detect the connected load wattage,
thus ensuring safety and security. For instance, when overload occurs, the Lamp
Module will be disabled of which LED will flash rapidly for 30 seconds. Unplug
and re-connect the plug will restore the Lamp Module to Off status.
Initial Power Up & Installation
1. Plug this Lamp Module into a wall outlet near the load to be controlled. The
LED on the Module will be flashing slowly. This implies that the Module
does not memorize any ID code and cannot work with UNet enabled devices.
2. Plug the appliances into the Lamp Module. There are two outlets at different
sides of AD132-1. The appliances plugged into the controllable outlet can be
controlled by the On/Off button and remote controller, the other side is
non-controlled and acts as a pass-through outlet. Make sure the total load of
both sides cannot exceed 1500 watts which means if the load of controllable
outlet is changed, the other side will be altered accordingly.
For instance, if the load of controllable outlet is about 1500 watts, the other
should be 0 watt; while if the load of controllable outlet is 1200 watts, the
other should be 300 watts.
3. Turn the button or switch on the load to the ON position
4. To manually turn ON the AD132-1 Lamp Module, press and release the
On/Off button. The indicator LED will turn ON, and the load plugged into the
AD132-1 Lamp Module will also turn ON.
5. To manually turn OFF the AD132-1 Lamp Module, simply press and release
the On/Off button. The indicator LED will turn OFF and the load plugged into
the AD132-1 Lamp Module will also turn OFF.
6. To let AD132-1 work and communicate with the device of UNet network, it is
essential that the same ID essential that the same ID code is used between
Lamp Module and UNet enabled device. For more details about how
AD132-1 learns ID code of UNet device, please refer to the section of ID
code learning.
Note: The Module’s detection can only become precisely after 30 minutes for the
first time of plug-in to the electrical outlet, however during this 30 minutes it won’t
hinder its normal operation (e.g. learn, clear the ID code and On/Off control).
Learning the ID Code
1. In the front cover, there is an On/Off/Dim button with LED indicator (Fig. 1).
Fig. 1
Note: This On/Off/Dim button serves as a gateway to learn and clear the ID
code.
2. Keep pressing the button for 3 seconds until the LED flashes rapidly. A
30-second countdown will start. The Module is about to learn the ID code.
3. Using UNet enabled device to emit the ID code to the Module. Press and
hold the “learning” button of UNet device more than 3 seconds, so as to emit
the ID code to the Module.
4. If the Module learns the ID code properly, the LED indication will be on for 1
second then turn off.
5. When the LED flashes rapidly for 3 times, it is ascribed to the following two
conditions:
i. The Module failed to learn the ID code.
ii. After entering 30-second ID code learning mode, press the button
again to exit the ID code learning mode.
Note:
Ú At the step 2, if you happen to press the On/Off/Dim button for less than 3
seconds, the Module will turn to “On” status (LED lights on steadily). To
re-enter the ID code learning mode, simply press the On/Off/Dim button to turn
off the Module (LED lights off), and then repeat the above step 2-5 to complete
ID code learning procedure.
Ú The ID code setting is stored in non-volatile memory and is not lost during
power failures. It can be cleared by proceeding with ID code clearance as
indicated below in ID code clearing section.
Ú The module can learn only one set of ID code.
Page 2
Clearing the ID Code
1. Make sure the Module is in Off status (LED lights off). If not, press the
On/Off/Dim button to turn off the Module. Keep pressing the button until the
LED flashes rapidly. A 30-second countdown will start.
2. Press the button again more than 6 seconds within 30-second countdown, the
preset ID code will be cleared.
Note: LED turns back to flashing status if ID code is cleared.
Operation
2
z Toggle the On/Off/Dim button for On or Off. Turn on the button of which LED
will be on and the incandescent lamp controlled by AD132-1 will be on, while
pressing the button again will turn off the incandescent lamp and its LED will
be off.
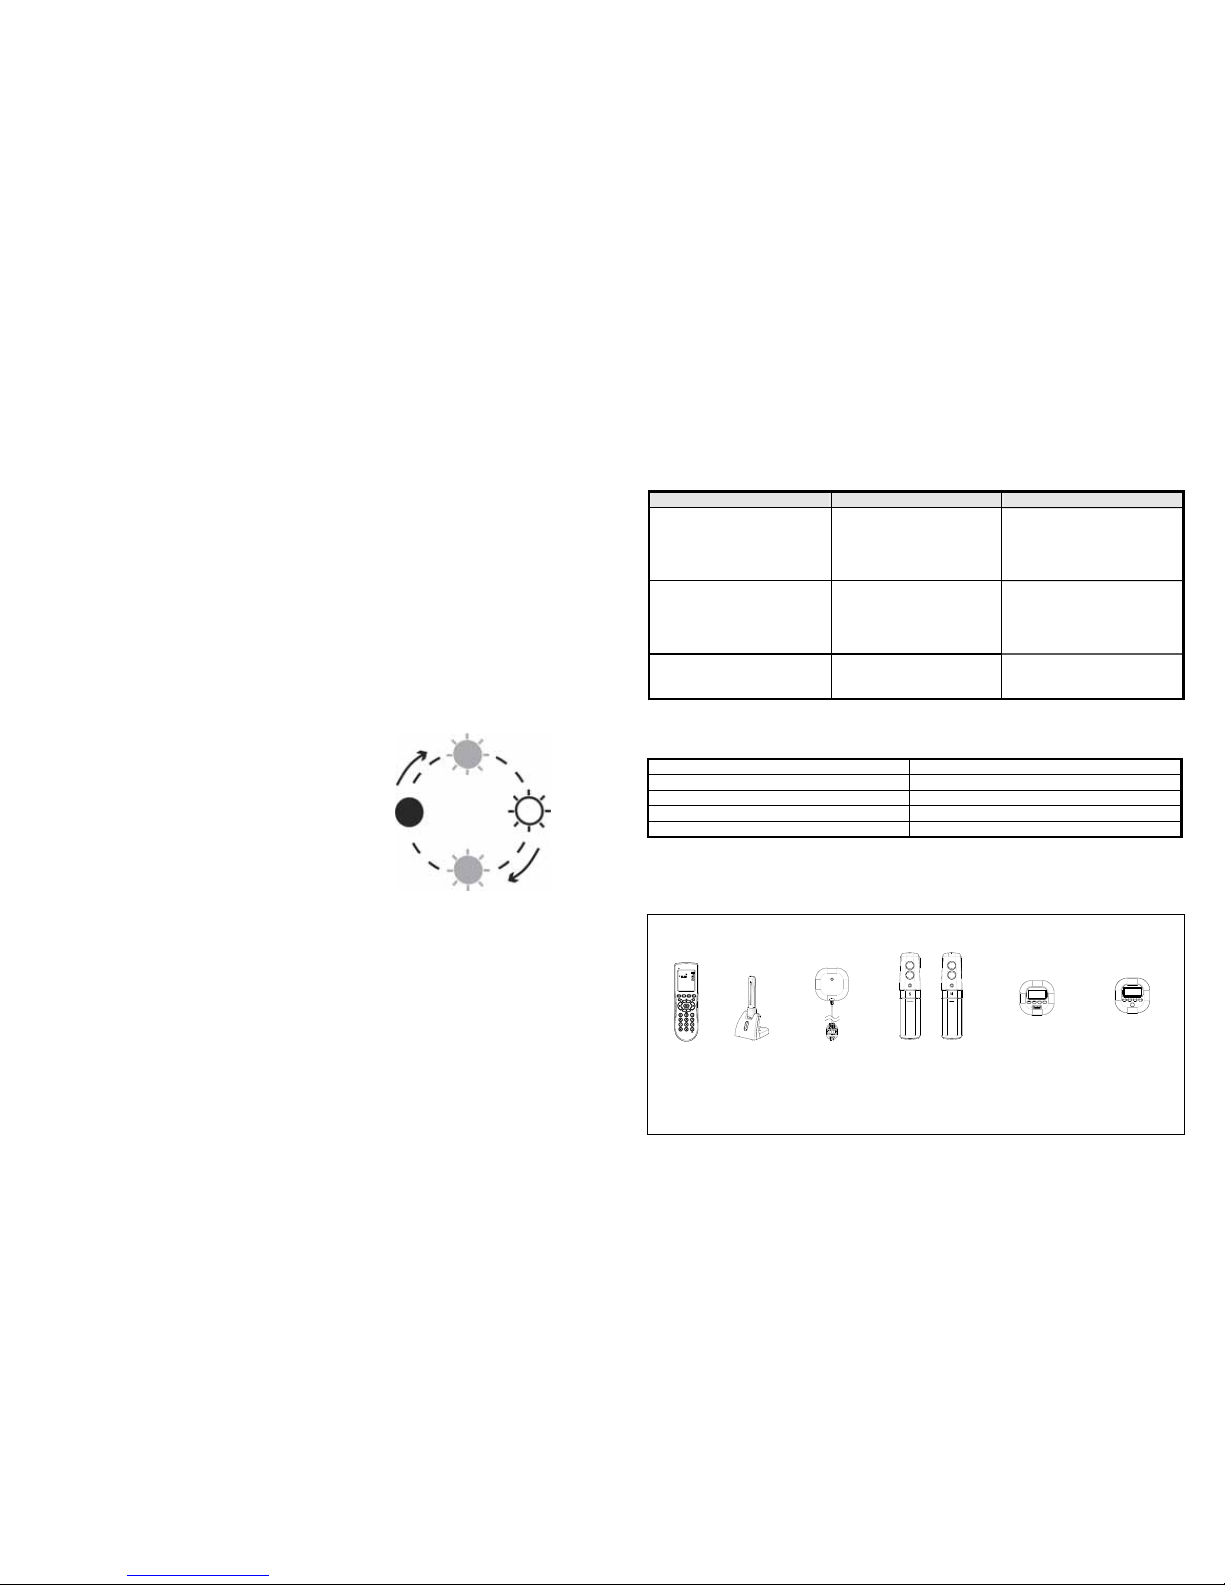
z To adjust brightness/dimness level, press
the On/Off/Dim button on the module to
turn on the lighting device. The default
setting of brightness is 50% (refer to the
asterisk as shown in Fig 2). Press and
hold the On/Off/Dim button to start
brightness adjustment. The brightness
level will go up, and when it goes up to the
maximum value (100%), it will start
adjusting dimness. Choose the ideal level
you desire and release the On/Off/Dim
button simultaneously. The brightness/
dimness level is now fixed as you wish.
Please note there are two outcomes for dimmer adjustment. As you know,
press and hold the On/Off/Dim button to start light level adjustment as
prerequisite. The key point is to keep your finger off the button before
pressing and holding the button. For instance, for brightness level
adjustment, if you release the button before pressing the button again, it will
switch to dimness adjustment automatically. On the contrary, for dimness
level adjustment, if you release the button before pressing the button again, it
will shift to brightness adjustment automatically .
z When setting to On, the Module will initiate wattage detection function. Upon
detecting overload condition, the Module will be switched to Off, the
On/Off/Dim button will be disabled and the LED will flash rapidly for 30
seconds. Reset the Module by unplugging and re-connecting the plug to the
electrical outlet.
Troubleshooting
Symptom Cause of Failure Recommendation
The Module not working and
LED off
1. The Module is not
connected to the mains
properly
2. The Module is out of
order
1. Check if wire connection
is correct
2. Don’t open up the Module
and send it for repair
The Module’s LED working,
but cannot control the
ON/OFF switch of the
incandescent lamp connected
to the Module
Check if the switch of
incandescent lamp
connected to the Module
is set in OFF
Set the On/Off switch of the
connected incandescent lamp
to ON
The Module’s LED working,
but the Transmitter not
working
1. Incorrect ID code
2. Same frequency
interference
1. Learning the ID code again
2. Wait for a while to re-try
Specification
* 50%
BRIGHTNESS
Operating Voltage 120V/60Hz
Maximum Load 300W, for incandescent lamps only
Minimum Load 25W, for incandescent lamps only
Range Up to 100 meter line of sight
Frequency Range 923.00 MHz
100%
0%
** Specifications are subject to change and improvement without notice.
Compatibility
DIMNESS
50%
Fig. 2
The following transceivers (sold separately) can control THIS module:
923.00MHz
Transmitter USB Dongle Flood Detector IR Beam Detector Temperature & Illumination
Humidity Detector Sensor
(AC124) (SA804) (ST802) (ST803) (ST804) (ST805)
IMPORTANT! To avoid poor compatibility with devices of other brands, purchase
only Everspring UNet devices to ensure best compatibility is strongly
recommended.
Page 3

Federal Communication Commission Interference Statement
This equipment has been tested and found to comply with the limits for a Class B
digital device, pursuant to Part 15 of the FCC Rules. These limits are designed to
provide reasonable protection against harmful interference in a residential
installation. This equipment generates, uses and can radiate radio frequency
energy and, if not installed and used in accordance with the instructions, may
cause harmful interference to radio communications. However, there is no
guarantee that interference will not occur in a particular installation. If this
equipment does cause harmful interference to radio or television reception, which
can be determined by turning the equipment off and on, the user is encouraged to
try to correct the interference by one of the following measures:
- Reorient or relocate the receiving antenna.
- Increase the separation between the equipment and receiver.
- Connect the equipment into an outlet on a circuit different from that to which
the receiver is connected.
- Consult the dealer or an experienced radio/TV technician for help.
This device complies with Part 15 of the FCC Rules. Operation is subject to the
following two conditions: (1) This device may not cause harmful interference, and
(2) this device must accept any interference received, including interference that
may cause undesired operation.
FCC Caution: Any changes or modifications not expressly approved by the party
responsible for compliance could void the user's authority to operate this
equipment.
This transmitter must not be co-loc ated or operating in conjunc tion with any other
antenna or transmitter.
3
 Loading...