

Page 1

AC133
e anual - Manuale utente
Page 2
AC133 Wall Switch
Installation Instructions
The AC133 Wall Switch is a portable wireless switch designed to control the
ON/OFF status of other associated devices thru the Gateway. After receiving
the signals emitted by the Wall Switch, the Gateway can then give commands
or operate according to its own settings. Its great compatibility with our U-Net
family security products makes it suitable for smart home cloud based
platforms such as Homesys.
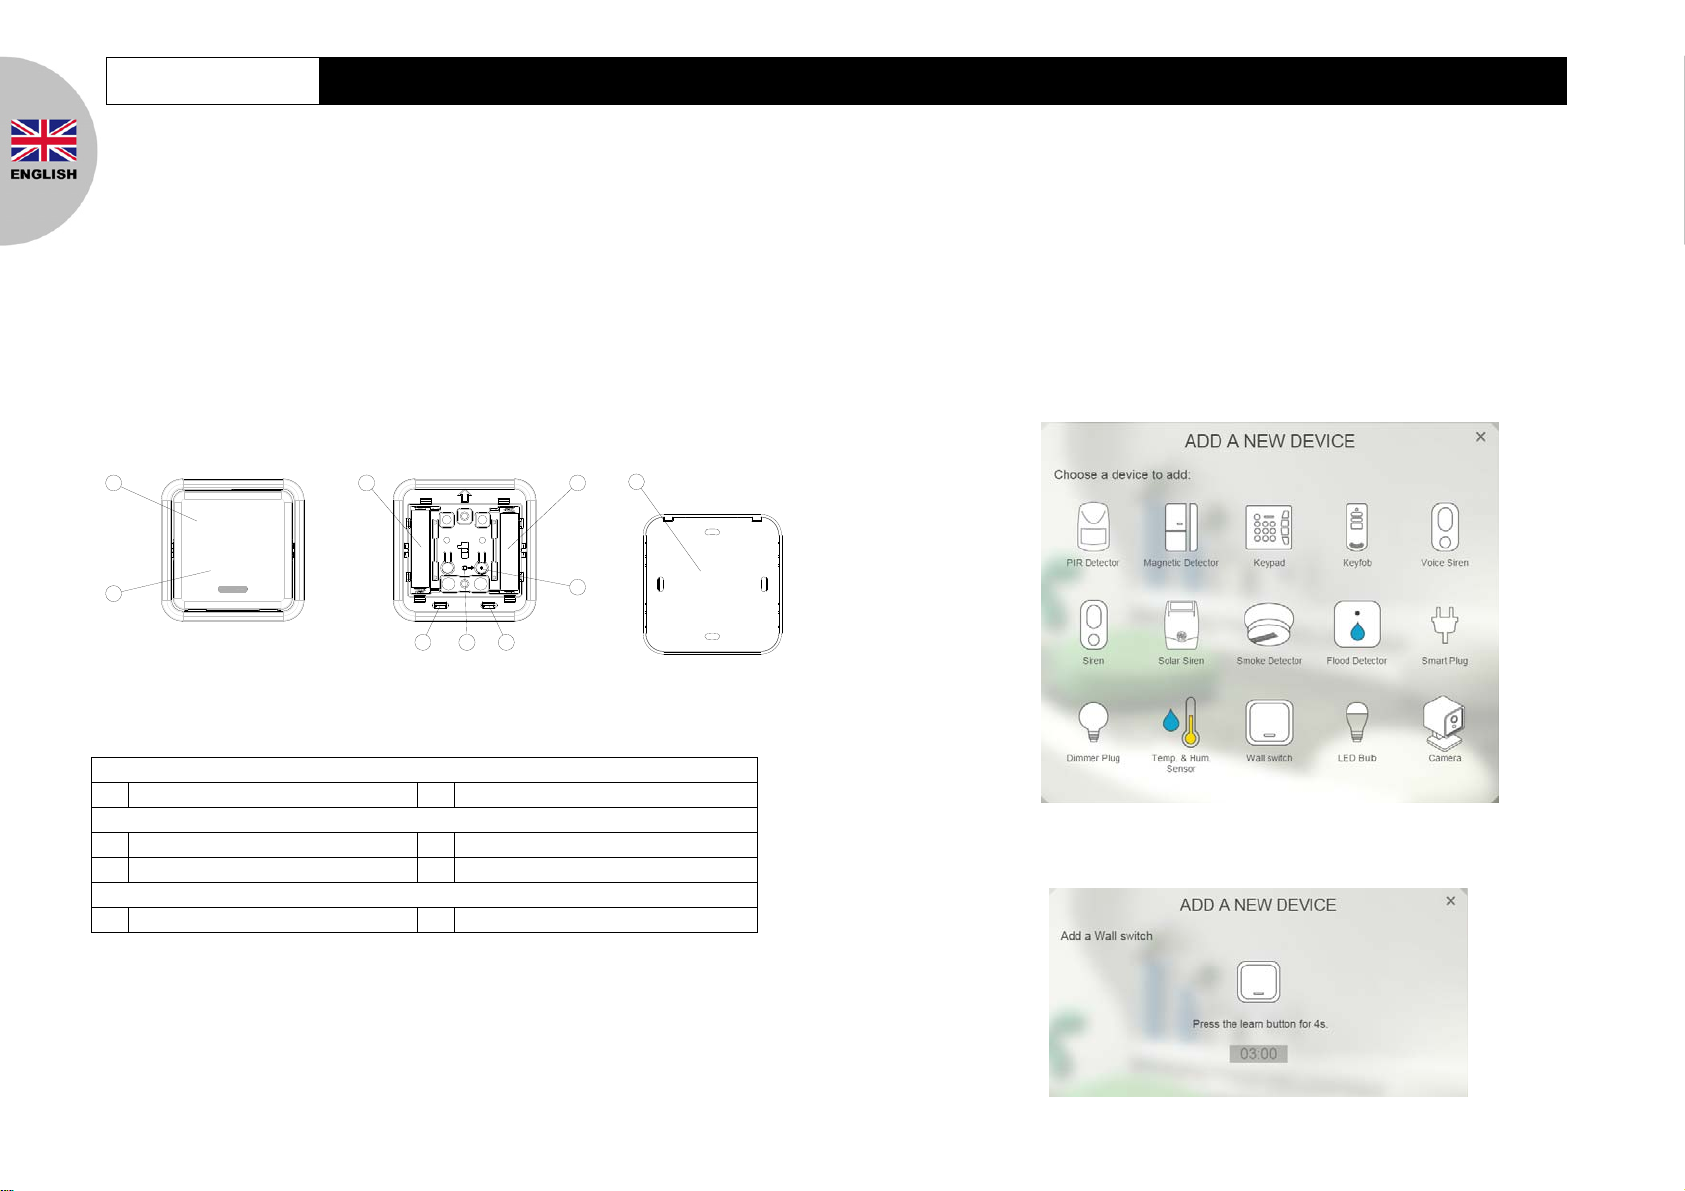
Product Overview
1
2
OFF Knob ON Knob
Battery Compartments Link Button
Rear Cover Latch LED Indicator
Rear Cover
33
LINK
55 6
Front View
Inside View
Rear View
7
4
Binding with Homesys
1. Gently lever the bottom edge of the front cover to detach it from the main body.
2. Prepare two 1.5V AAA alkaline batteries. Do not insert them into the unit yet.
3. Log into the Homesys account from a web browser.
4. Select “System”.
5. Select “Add a New Device”, then “Wall Switch”.
6. The following screen will appear. This means the gateway is entering binding mo de.
1
Page 3
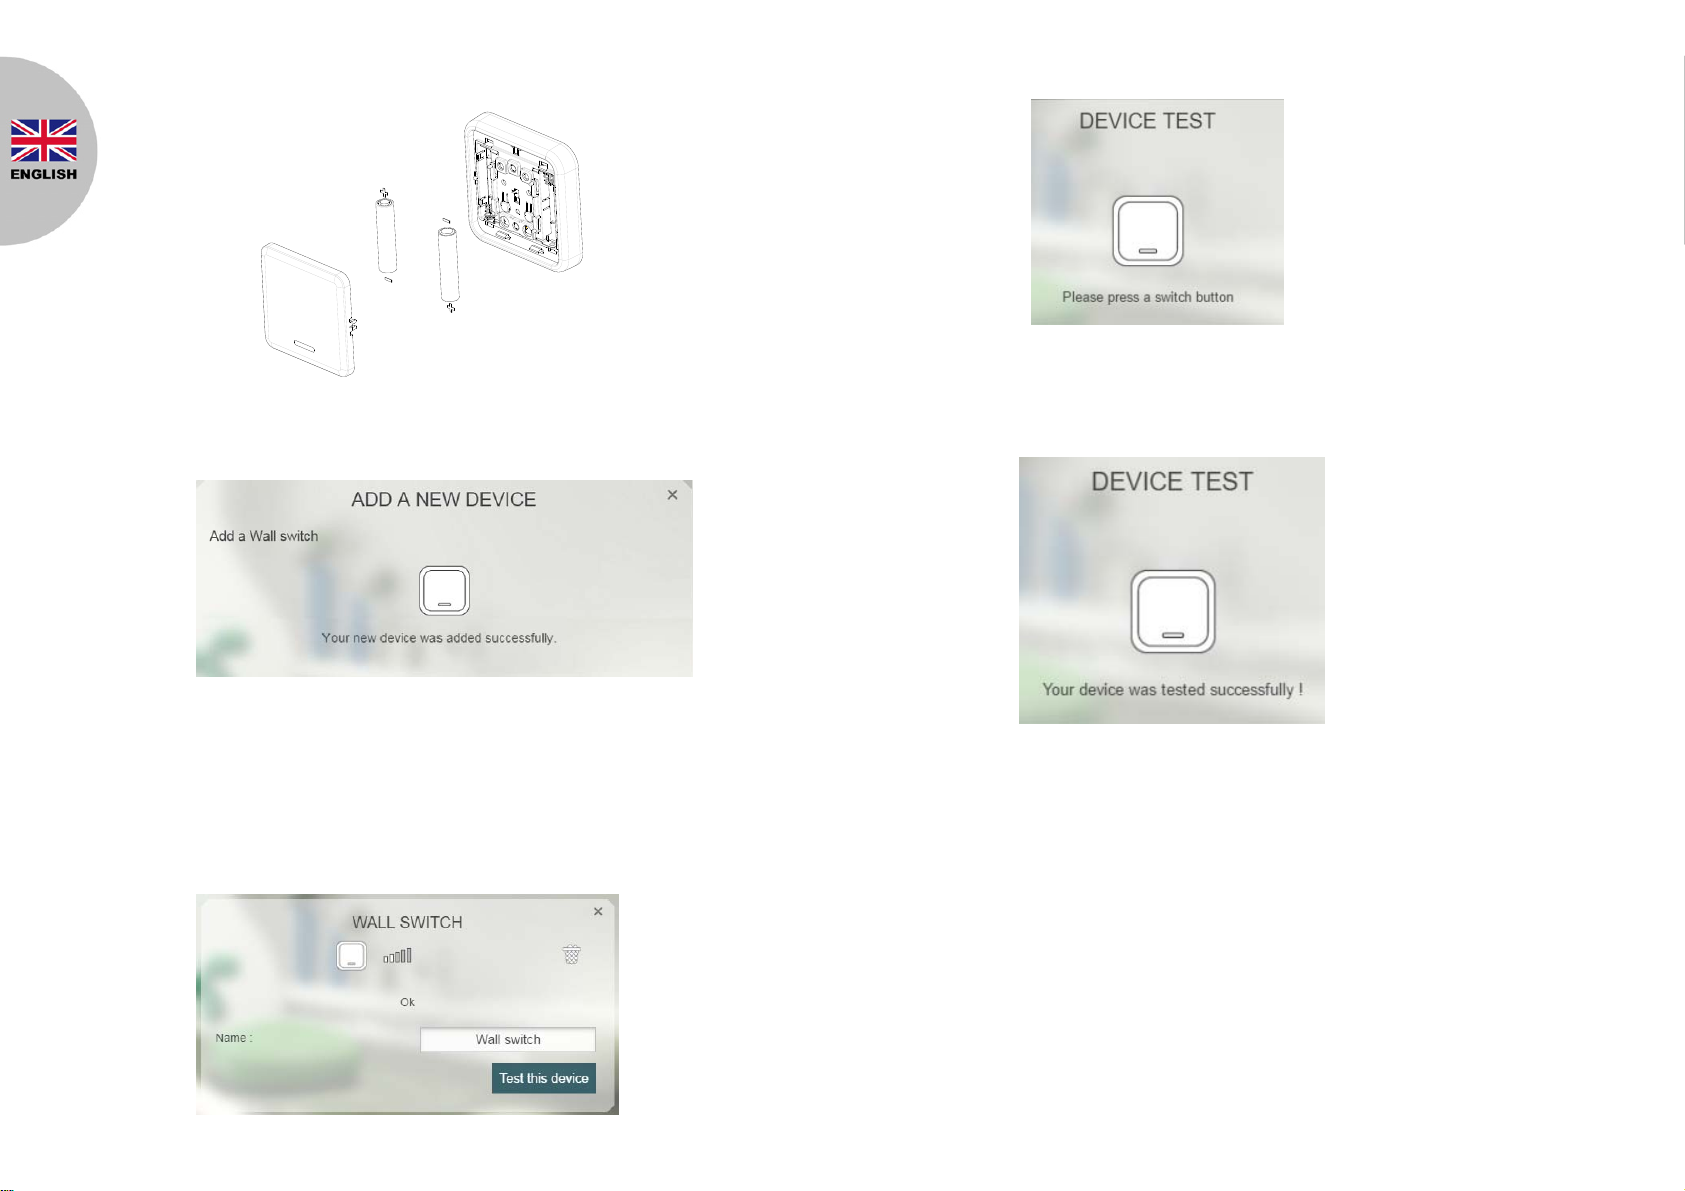
7. Insert the batteries with correct polarity at this point.
2. Next, click on “Test this devic
When the above message appears, press the knob on the AC133.
3.
e”.
8. The screen below will appear in 10 seconds if the process is successful.
9. Time-out will occur if the binding process was unsuccessful. Please refer to the
Manual Binding procedure in the Troubleshooting section.
Operation & Testing
1. To test the wall switch, go to “Systems” and click on the Wall switch.
4.
You should see the success message if the Gateway receives
move c
5.
For the Wall switch to control other devices on the Homesys system, a Scen
need
determi
the event to t
or dimme
Home
6.
After binding with the Gateway, the Wall Switch will send data a
power to the
once every 60 minutes.
loser to the Gateway until the test is successf
s to be created. Scenes are user defined elements in Homesys th
nes what actions to take when an event occurs. The Wall switch creat
his Scene which then controls other activation devices such as plug
rs, or perhaps set the alarm to Arm or Disarm mode
sys web user guide on how to create a Scene.
Gateway after about 2 minutes. Subsequently it will send the data
ul.
the signal. If not,
. Refer to the
bout its battery
es
at
es
s
2
Page 4
Mounting the AC133
Note: Ensure the unit is installed within transmission range of the gateway using the
test above.
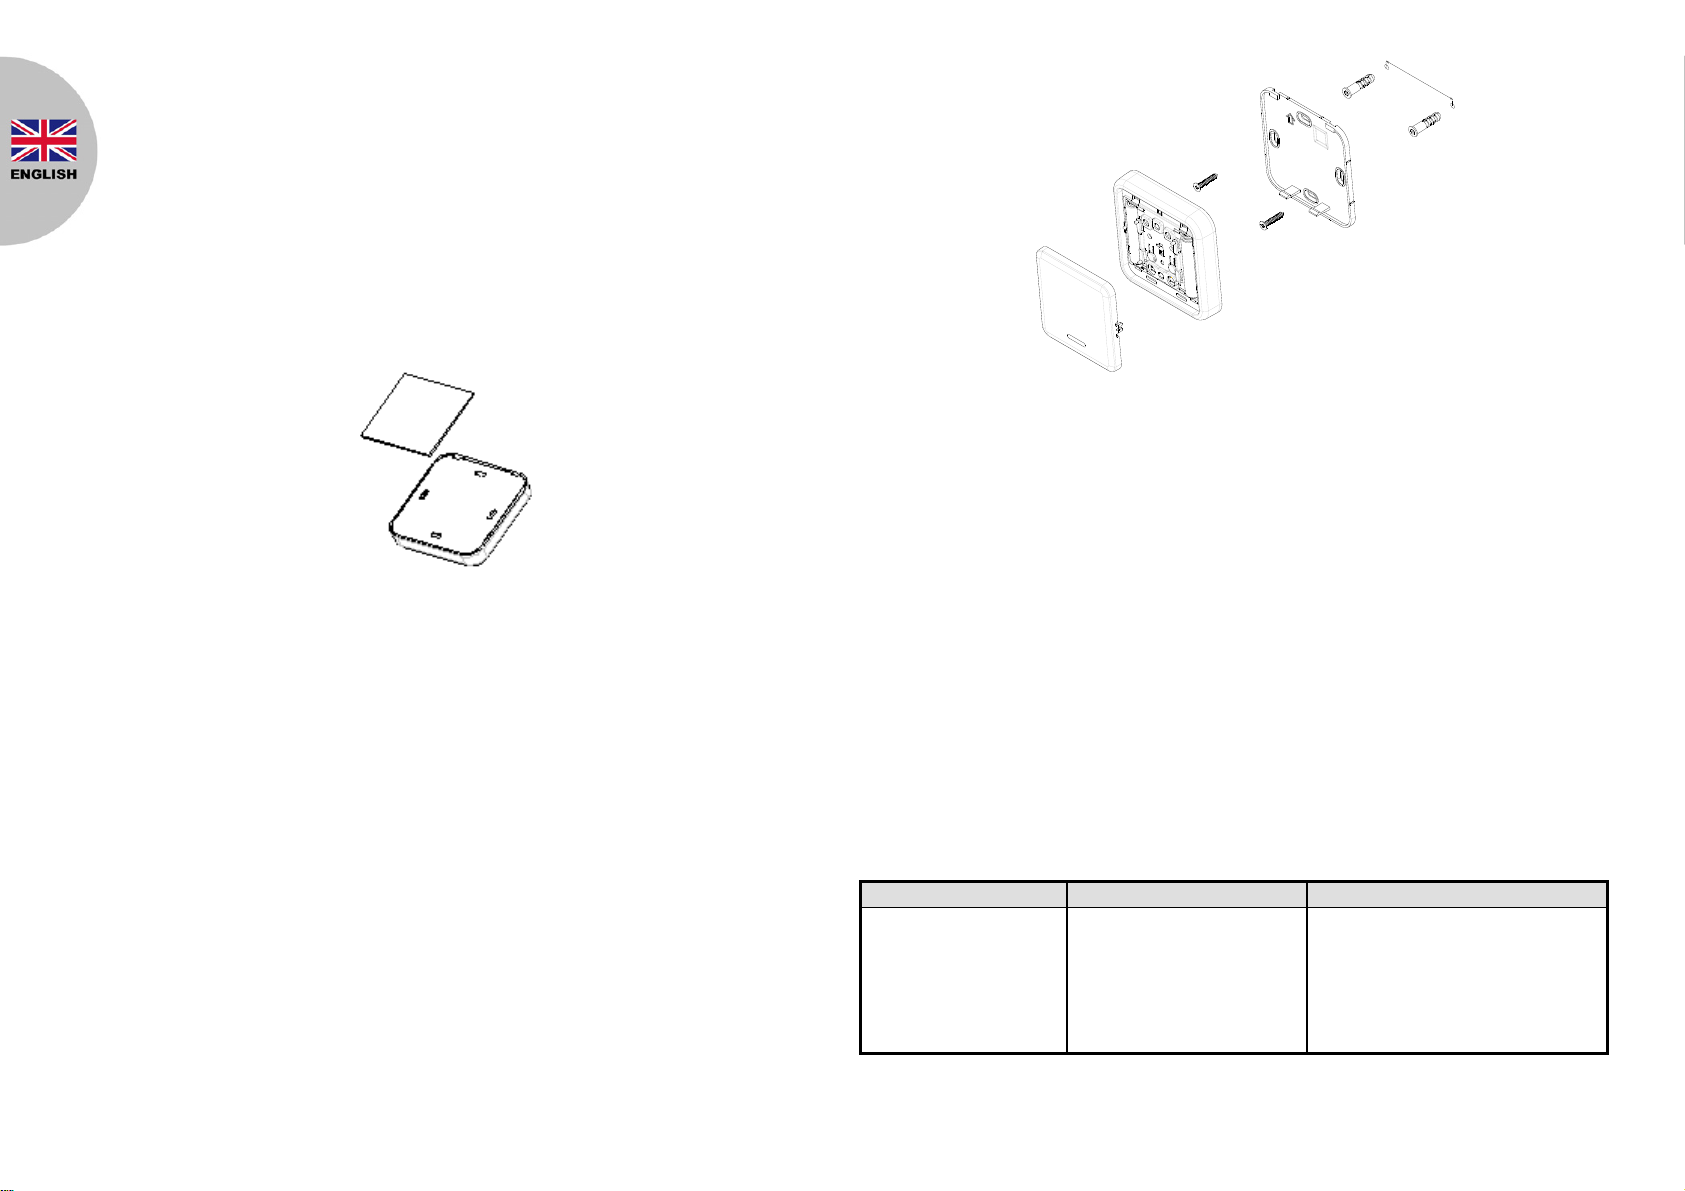
The Wall Switch can be installed on the wall either by using the supplied double-sided
tapes or the screws:
1. Using the double-sided tape: first peel one side of the tape and place the sticky
side onto the back of the Wall Switch. Then peel the other side of the tape and
attach the unit onto a proper location on the wall. There are 3 tapes in the pa ckage
and you can retain other 2 tapes for future use.
60MM
Maintenance
1. Do not put the unit in humid or dusty places or facing direct sunlight.
2. Using the screws:
i. Detach the rear cover by removing the front cover and then pressing the rear
cover latch (see item in Product Overview).
ii. Use the rear cover as a template to mark on the wall the positions of two
screws. The marks should be in horizontal positions and the distance
between the two marks is 60mm.
iii. Drill the holes using an appropriate size drill bit. Insert the supplied plastic
wall plugs first for a cement wall. For a wooden wall the wall plugs would not
be needed.
iv. Position the rear cover on the wall and turn the two screws into the wall (or
wall plugs). DO NOT fasten too tightly as the rear cover might be damaged.
Then replace the main body and the front cover.
2. Do not place the unit near combustible substances or any source of
radiato
The suitable ambient temperature for the unit is -10°C - +40°C.
3.
rs, boilers etc.
heat, e.g. fires,
Low Battery: The Wall Switch will inform the Gateway when its battery runs low. Also, if
the unit has completed binding with a Gateway and the front cover is detached, you
can see the LED flashes once when you press the ON/OFF Knob to indicate low
battery condition.
Troubleshooting
The troubleshooting table lists some possible causes and solutions. Please contact
your original retailer or nearest service center if the below solutions cannot solve your
problem.
Symptom Possible Cause Recommendation
Press Wall Switch, LED
illuminates, but the
receiver(s) have no
response
3
1. Distance between the
Wall Switch and the
receiver(s) too far
2. Battery running low
3. Receivers did not learn
ID successfully
1. Move closer to the receivers
2. Replace new batteries
3. Bind with Gateway again
Page 5
Manual Binding
Specifications
Operating Temperature Range 0°C - +40°C
Operating Humidity 5 - 85% RH
Battery Type AAA Battery x2
Transmitting Range Indoor 30m; Outdoor >150m (Open space)
Frequency Range 868MHz (EU)/ 923MHz (America)
1. Repeat steps 5 to 6 of the Binding with Homesys section.
Press and hold the Link button for 3 seconds until the LED flashes moderately (on
2.
for 0.5 second; off for 0.5 second). This implies AC133 has now entered the
binding mode and is waiting to receive binding signals from the gateway.
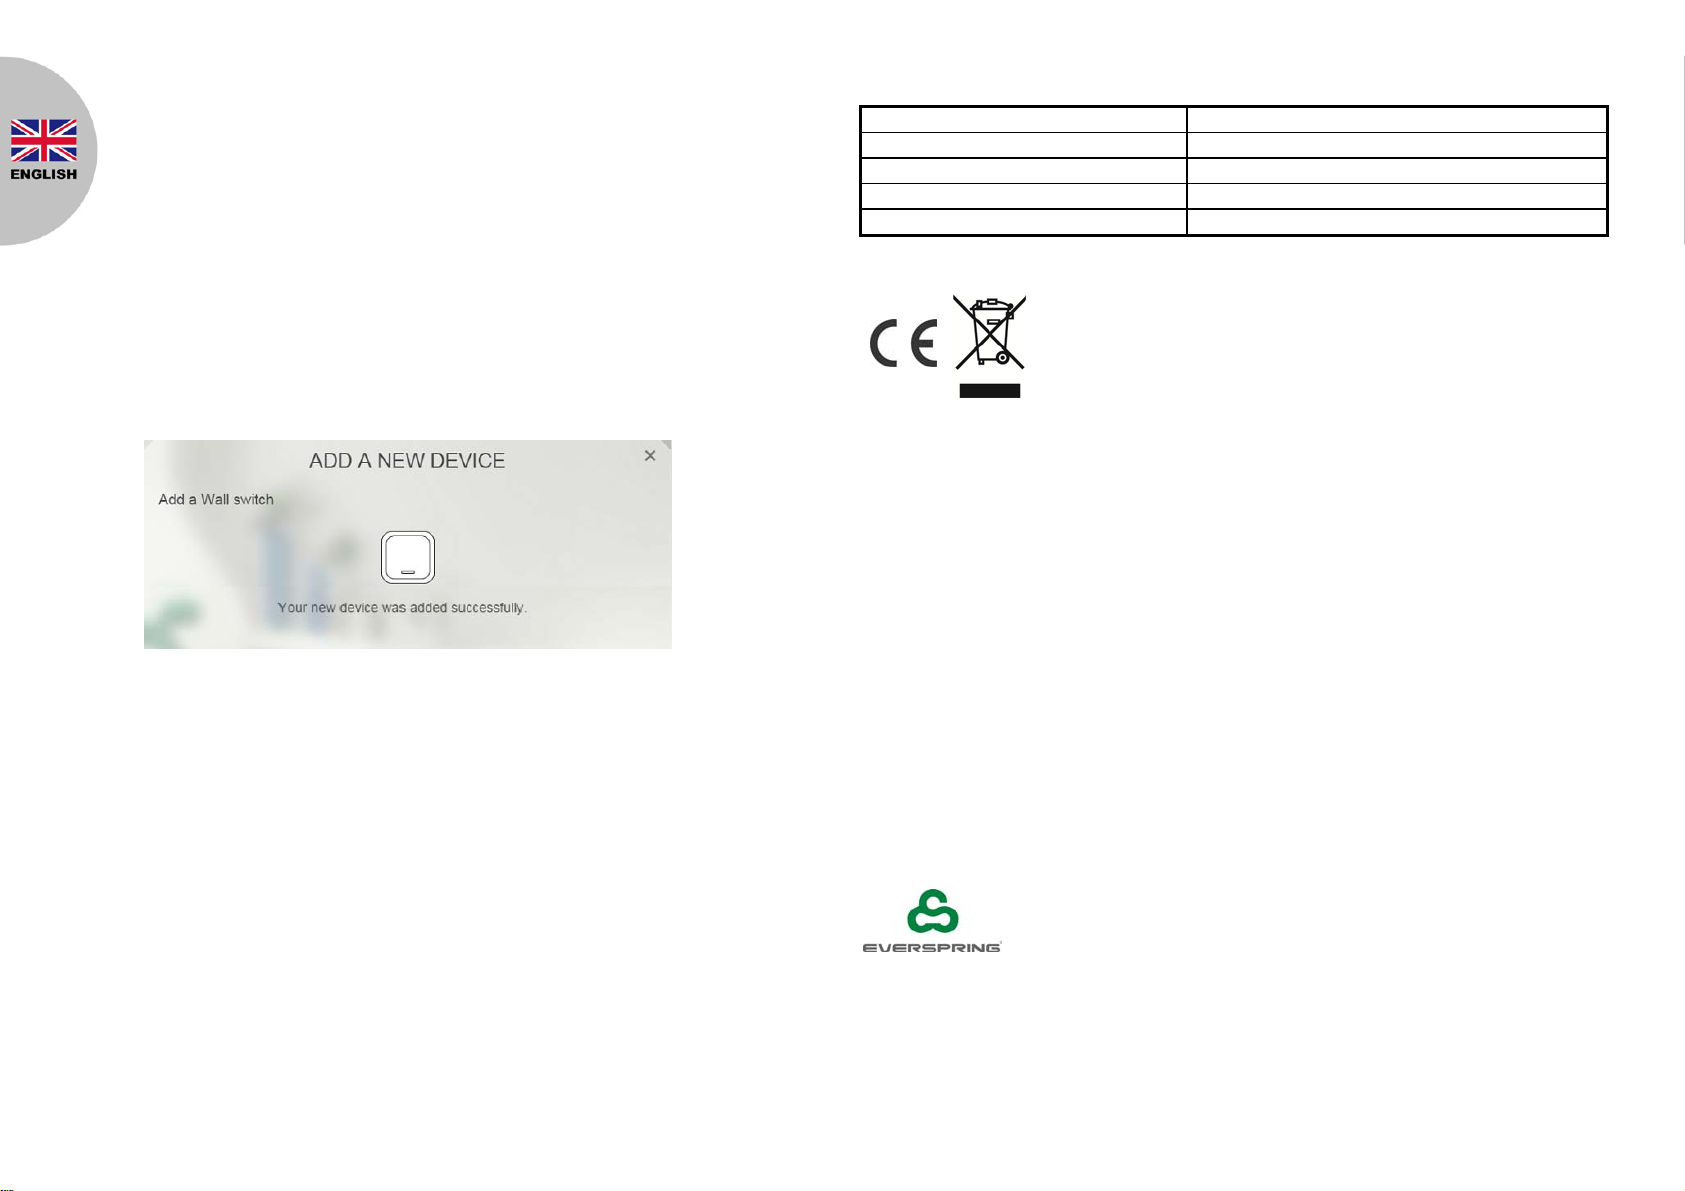
3. Within 5 seconds, the LED indicator then stop flashing and turn off, indicating the
learning procedure is completed. The screen below will appear indicating the
process is successful.
4. If after 30 seconds LED flashes rapidly (on for 0.1 second; off for 0.1 second) for
3 times, it means the Wall Switch failed the binding process.
Reset to factory default
** Specifications
are subject to change without notice
Warning:
Do not dispose of electrical appliances as unsorted municipal waste, use separate
collection facilities.
Contact your local government for information regarding the collection systems
available.
If electrical appliances are disposed of in landfills or dumps, hazardous substances can
leak into the groundwater and get into the food chain, damaging your health and
well-being.
When replacing old appliances with new ones, the retailer is legally obligated to take
back your old appliance for disposal at least for free of charge.
To reset AC133 back to factory default state:
1. Insert the batteries into the unit.
2.
Press and hold the link button for 3 seconds until the LED flashes moderately then
release the button.
3. Within 30 seconds, press and hold the link button again, this time for more than 6
seconds until the LED turns off.
4. Remove the batteries and re-insert them again. If the LED blinks repeatedly once
every 30 seconds this implies the device is reset ba
ck to factory mode.
.everspring.
www
3F., No. 50, Sec 1, Zhonghua Rd., Tucheng Dist.,
New Taipei City 23666, R.O.C
com
4
A501112400R
Page 6
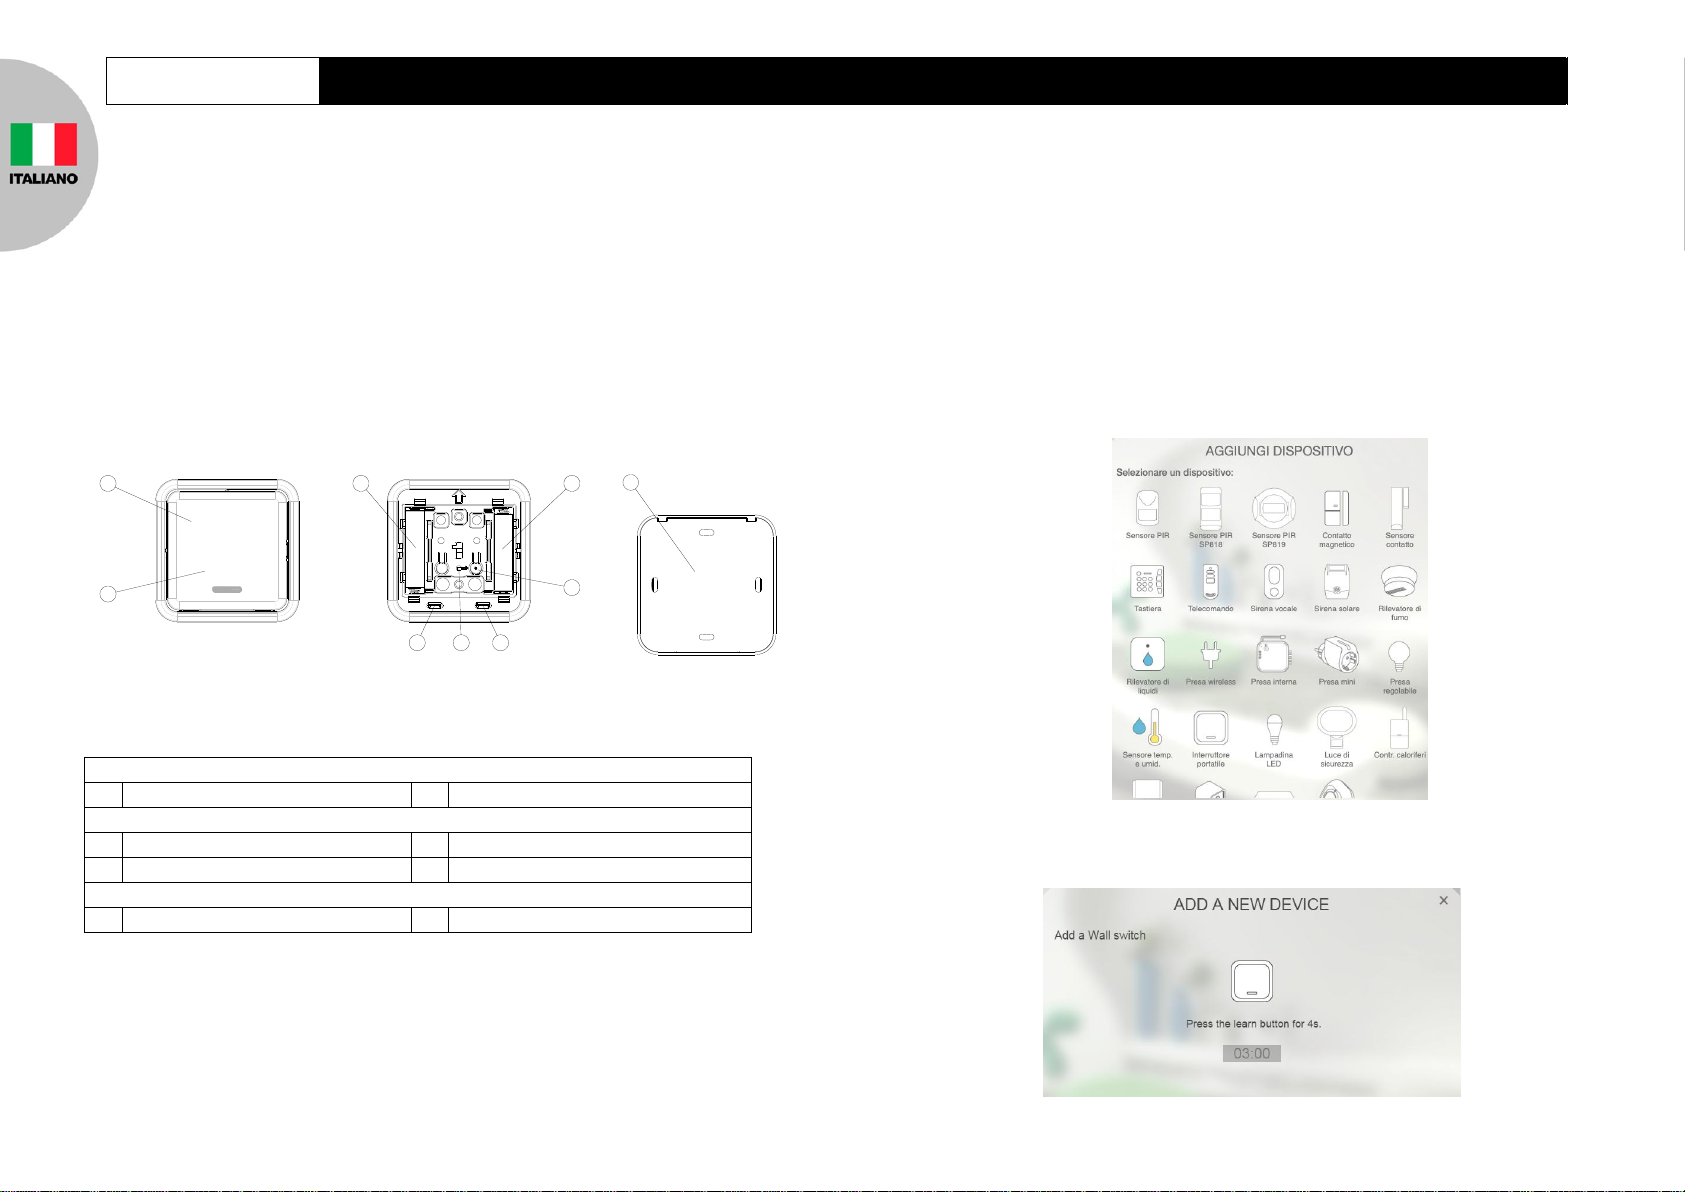
AC133 Interruttore portatile
1
2
3 3
LINK
4
55
7
6
7
Vista frontale
Interruttore ON
Interruttore OFF
Vista interna
Spazio batterie
Tasto di ricerca
Aggancio per base
Indicatore LED
Vista posteriore
Base
Guida all’installazione
L’interruttore portatile AC133 è un dispositivo wireless utilizzato per
accendere e spegnere dispositivi di domotica collegati alla stessa centrale
IPBOX. Una volta premuto l'interruttore, la centrale IPBOX esegue il
commando che è stato configurato nella sezione SCENE. Questo accessorio
utilizza la tecnologia wireless UNET ed è compatibile con tutti gli accessori
della serie Homesys.
Descrizione
Aggiungere ad Homesys
1. Sollevare lentamente il lato frontale dell'interruttore per staccarlo dalla base.
2. Preparare 2 batterie 1.5V AAA alkaline. Per il momento non inserirle.
3. Accedere al proprio sistema Homesys via web browser.
4. Selezionare l'area “Sistema”.
5. Cliccare “Aggiungi un dispositivo”, quindi “Interruttore”.
6. Appare la seguente schermata. Significa che la centrale ha attivato la ricerca.
1
Page 7
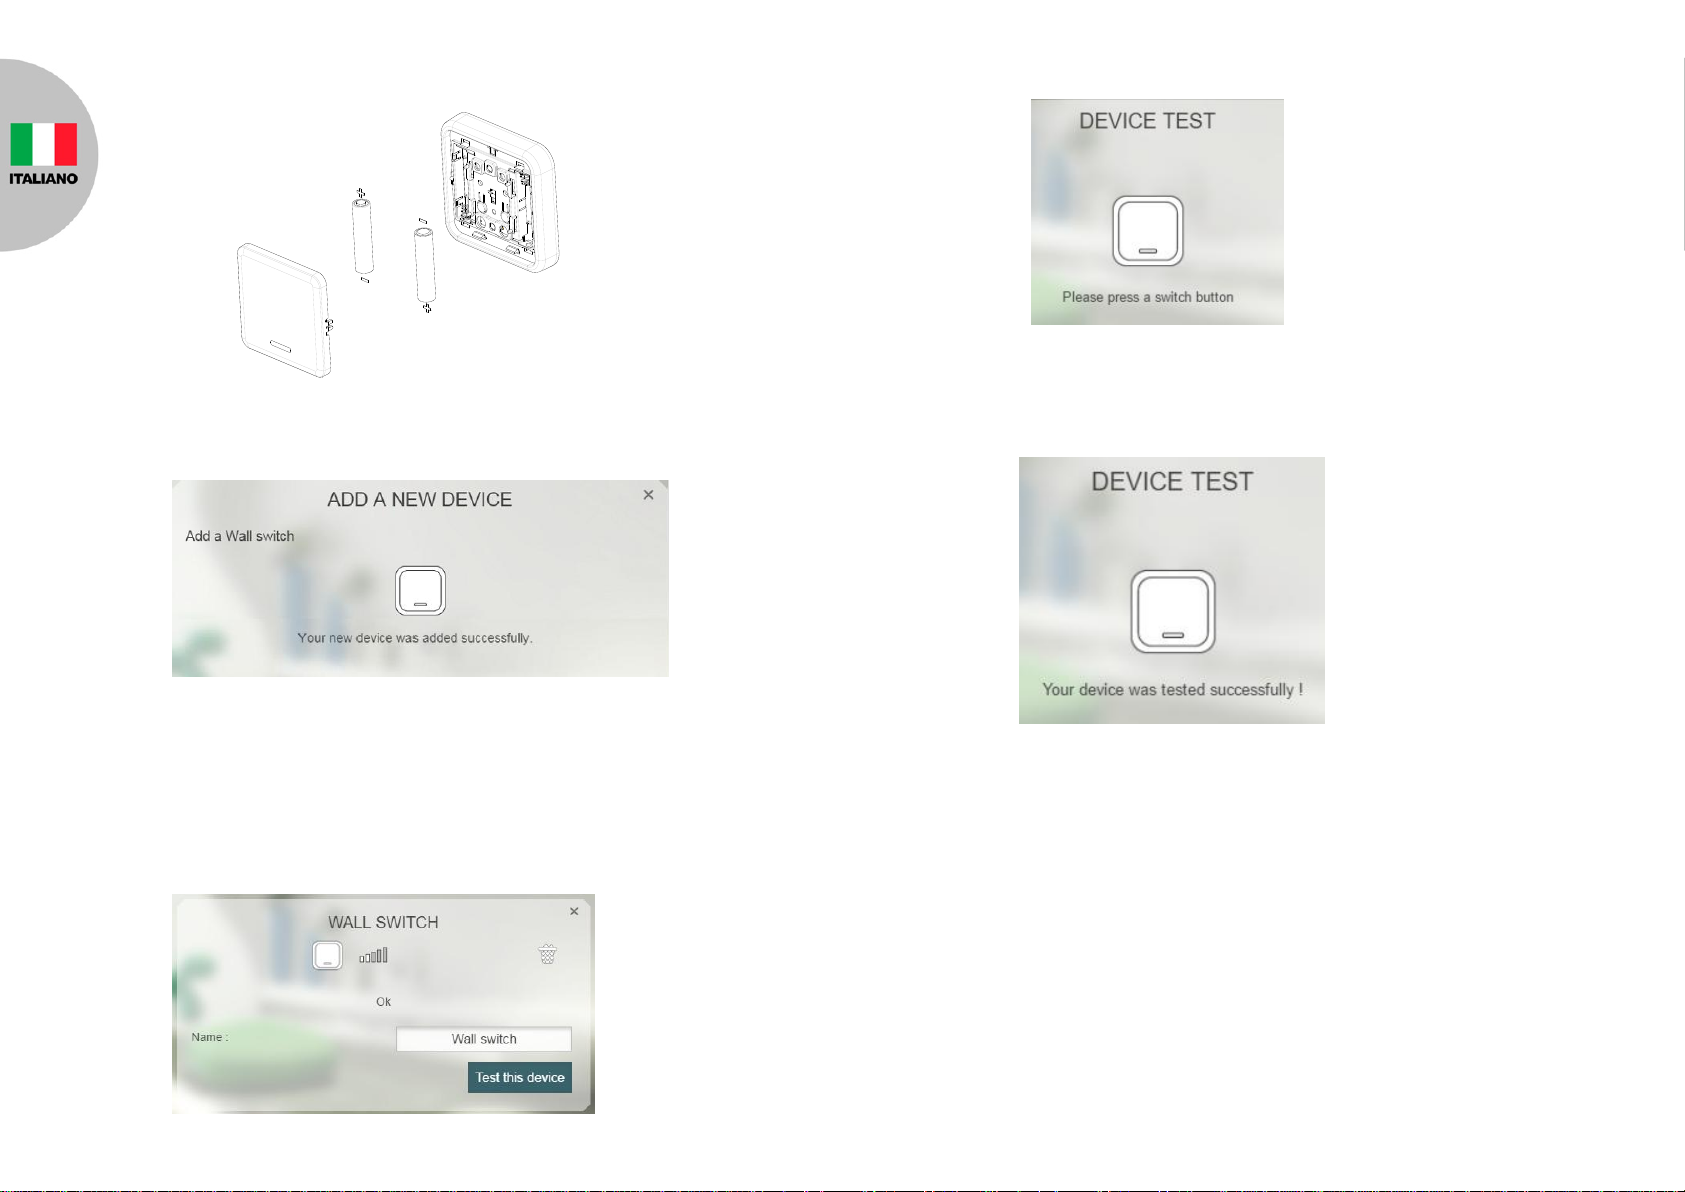
7. Inserire le batterie facendo attenzione alla polaritá.
8. Se l'operazione ha successo, appare la seguente schermata.
2. Cliccare su “Prova dispositivo”.
3. Quando appare questo messaggio, premere l'interruttore AC133.
4. Se la prova ha successo appare questo messaggio, altrimenti spostare
l'interruttore piu vicino alla centrale o sostituire le batterie.
9. Se scade il tempo e la ricerca non dá esito, consultare la procedura di ricerca
manuale nella sezione "Domande frequenti".
Utilizzo e prova dispositivo
1. Per testare il dispositivo, spostarsi su “Sistema” e cliccare l'icona dell'interruttore.
5. Per controllare un altro dispositivo Homesys tramite l'interruttore è necessario
creare una scena. Una scena è una regola personalizzata del sistema Homesys
che permette di eseguire una determinata azione ogni volta che si verifica un
evento. Si puo quindi creare una scena nella quale l'interruttore si configura come
evento mentre l'azione puo essere l'accensione di una presa wireless, accensione
tv tramite dispositivo di controllo IR o semplicemente per armare/disarmare il
sistema. Fare riferimento all guida Homesys interfaccia web per maggiori dettagli
su come configurare una Scena.
6. Una volta rilevato dalla centrale IPBOX e passati due minuti, l'interruttore invia al
sistema un aggiornamento sullo stato delle batterie. Successivamente il livello
delle batterie viene aggiornato ogni 60 minuti.
2
Page 8
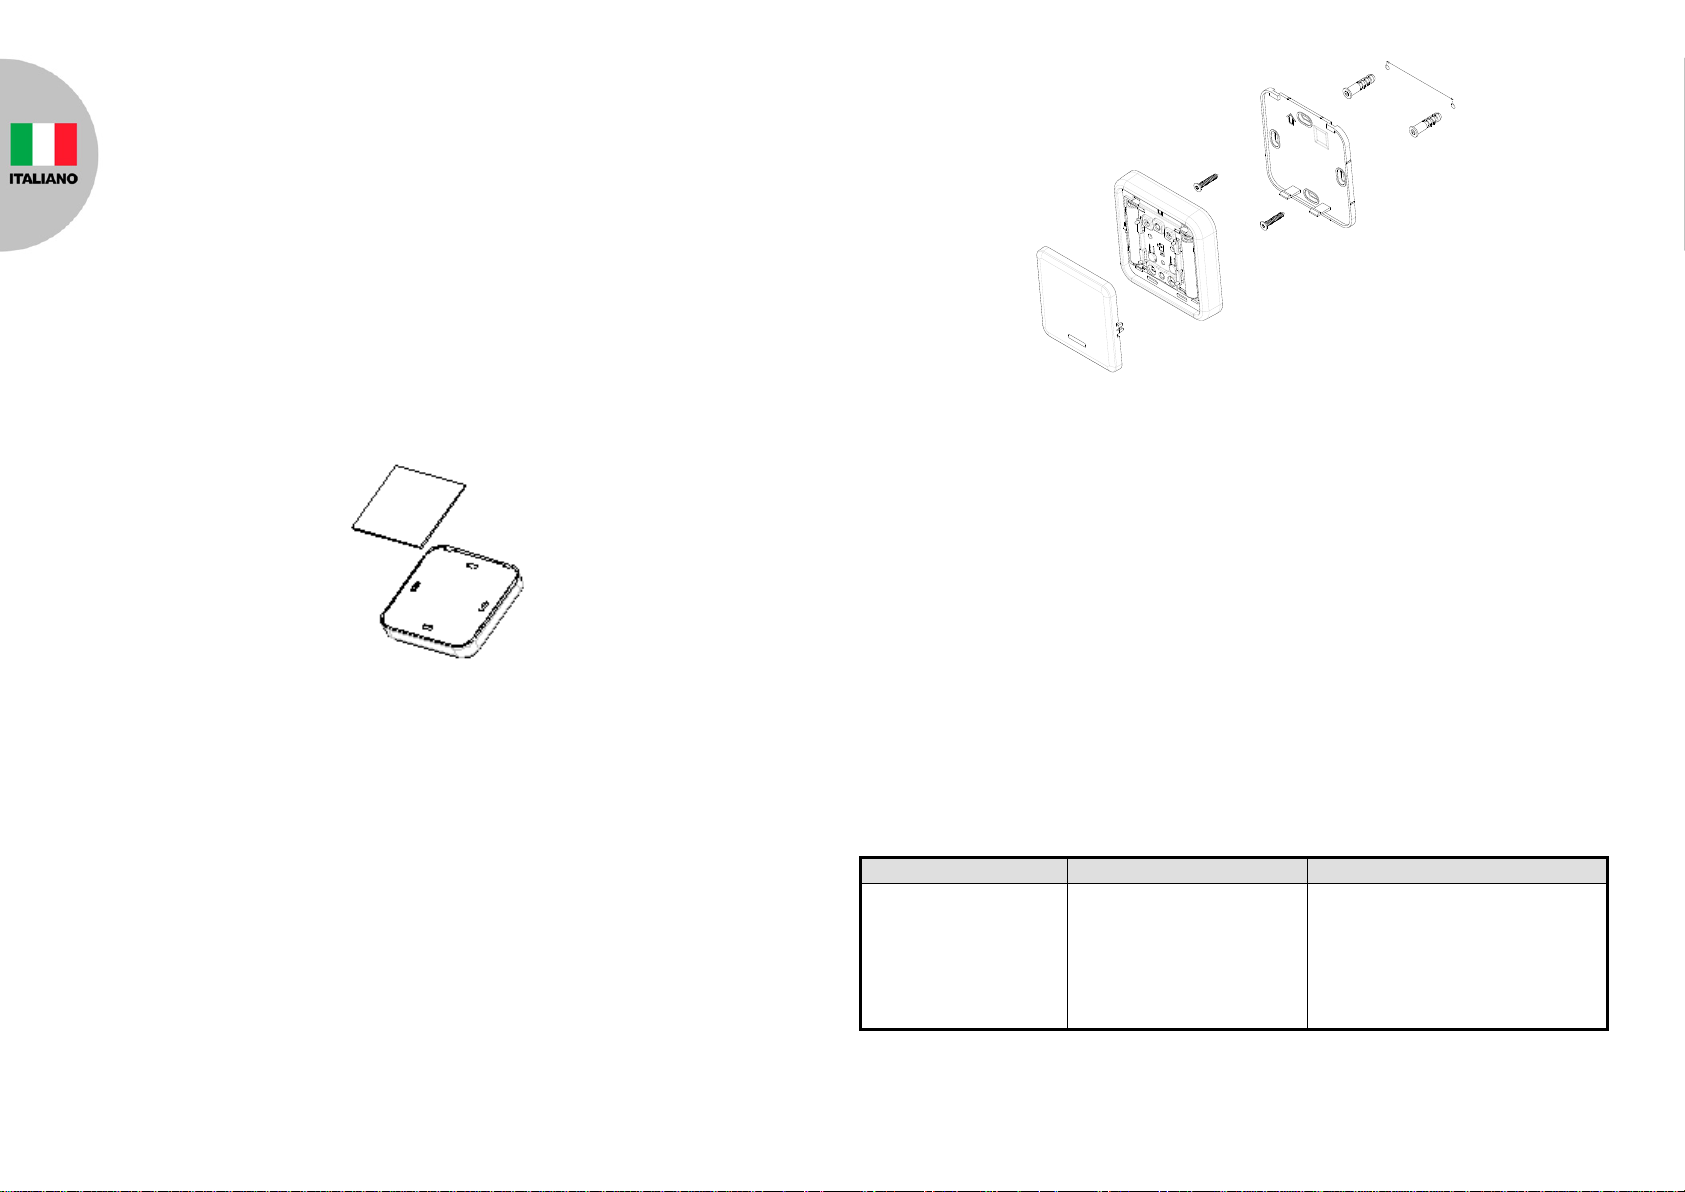
Installare AC133
60MM
Sintomi
Possibili Cause
Soluzioni
Premendo l'interruttore
l'LED si accende, ma la
centrale non da risposta
1. Eccessiva distanza tra la
centrale e l'interruttore
2. Batterie scariche
3. La centrale non ha
aggiunto correttamente
l'interruttore
1. Spostare piu vicino l'interruttore
2. Sostituire le batterie
3. Ripetere la procedura di ricerca
Nota: Prima di fissare l'interruttore, usare la funzione "prova dispositivo" per
assicurarsi che il segnale wireless del dispositivo raggiunga la centrale IPBOX.
L'interruttore puo essere installato alla parete usando la placca biadesiva o le viti
contenute nella confezione:
1. Placca biadesiva: Rimuovere il rivestimento di un lato della placca, fissare il
lato adesivo sulla parte posteriore dell'interruttore. Rimuovere il rivestimento
dall'altro lato della placca e fissarla nel punto selezionato sulla parete. Nella
confezione sono presenti 3 placche adesive, nel caso si volesse cambiare
posizione in futuro.
2. Viti:
i. Rimuovere il lato frontale dell'interruttore, quindi premere sull' "aggancio
base" per rimuovere la placca posteriore con i fori per le viti (vedi elemento
nella sezione Descrizione).
ii. Usare la placca posteriore per segnare i punti per le due viti sulla parete. La
posizione dovrebbe essere orizzontale e la distanza tra i due fori di 60mm.
iii. Usare un trapano con una punta adatta per eseguire i fori. Inserire i tasselli di
plastica per superfici murarie, mentre per superfici in legno non sono
necessari.
iv. Posizionare la placca posteriore sulla parete ed inserire le due viti. Non
avvitare la placca troppo stretta per evitare che si possa danneggiare.
Applicare quindi il resto dell'interruttore sulla placca posteriore.
Manutenzione
1. Non tenere il dispositivo in luoghi umidi, polverosi o a diretto contatto con la luce.
2. Non tenere il dispositivo vicino a sostanze infiammabili o vicino a sorgenti di calore,
come: fornelli, caloriferi, bollitori ecc.
3. Il dispositivo funziona in ambienti con temperatura tra: -10°C e +40°C.
Batteria scarica: L'interruttore segnala alla centrale quando le batterie stanno per
esaurirsi. Per segnalare il livello basso delle batterie, se si apre l'interruttore, si puo
vedere il LED accendersi quando si preme il pulsante acceso/spento.
Domande frequenti
In questa lista sono inseriti alcuni sintomi e possibili soluzioni. Se questi consigli non
aiutano a risolvere il problema, si consiglia di rivolgersi al proprio venditore o centro di
assistenza.
3
Page 9
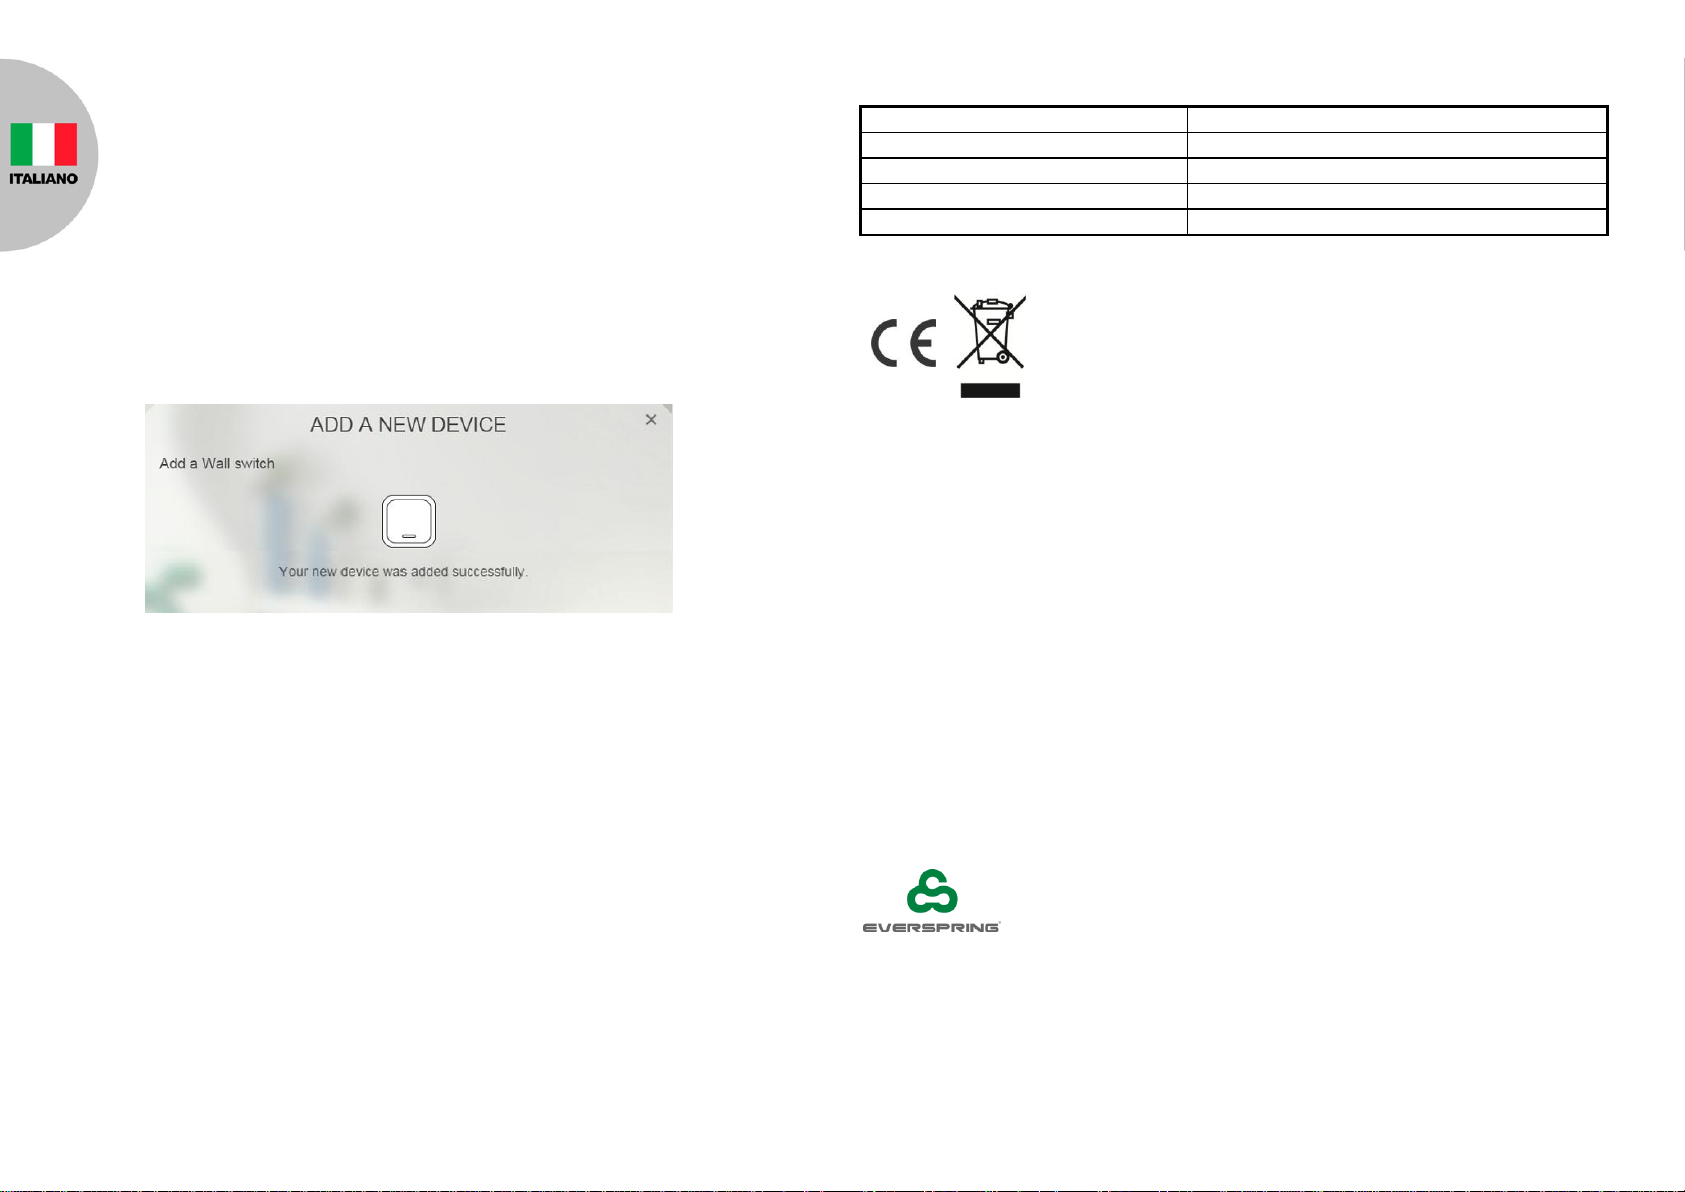
Ricerca manuale
Temperatura operativa
0°C - +40°C
Umidità operativa
5 - 85% RH
Tipo di batteria
2 Batterie AAA
Distanza di trasmissione
Indoor 30m; Outdoor >150m (Spazio aperto)
Frequenza
868MHz (UE)/ 923MHz (America)
1.
Ripetere i punti 5 e 6 di "Aggiungere ad Homesys".
2.
Premere e tenere premuto il tasto di ricerca per 3 secondi fino a che l'LED
lampeggia (acceso per 0.5 secondi; spento per 0.5 secondi). Questo significa che
AC133 ha iniziato la ricerca di una centrale IPBOX.
3.
Entro 5 secondi, l'LED si spegne ad indicare che la procedura di ricerca ha avuto
successo. Questa è la schermata di conferma.
4. Se dopo 30 secondi l'LED lampeggia per 3 volte veloce (acceso per 0.1 secondi;
spento per 0.1 secondi), questo significa che la ricerca non ha avuto successo.
Specifiche tecniche
** Le specifiche sono soggette a modifiche senza preavviso
Precauzioni:
Non gettare dispositivi elettronici come normali rifiuti, utilizzare servizi di raccolta
differenziata.
Contattare il proprio comune per informazioni sul tipo di raccolta differenziata svolto
nella propria zona.
Dispositivi elettronici che vengono gettati in natura, possono rilasciare nelle falde
aquifere sostanze dannose pericolose per la salute di persone e di altri esseri viventi.
In caso di sostituzione di vecchi dispositivi, il venditore è obbligato a prendere i vecchi
dispositivi e gratuitamente deve farsi carico dello smaltimento.
Resettare il dispositivo
Per resettare AC133:
1. Inserire le batterie.
2. Premere e tenere premuto il tasto di ricerca per 3 secondi fino a che l'LED
lampeggia .
3. Entro 30 secondi, premere e tenere premuto di nuovo il tasto di ricerca, questa
volta per 6 secondi fino a che l'LED si spegne.
4. Rimuovere le batterie ed inserirle nuovamente. Se l'LED lampeggia una volta ogni
30 secondi, significa che il dispositivo è stato resettato.
www.everspring.com
3F., No. 50, Sec 1, Zhonghua Rd., Tucheng Dist.,
New Taipei City 23666, R.O.C
A501112400R
4
 Loading...