

Page 1
Installation and Operation Guide
INTRODUCTION
The Everpure ENVI-RO™ Mineral Reduction System is a preengineered, pre-assembled Reverse Osmosis (RO) system designed
to provide high purity water for multiple applications, such as
premium espresso, coffee, blended beverages and steam, to name a
few. It combines a number of water treatment technologies into one
easy to install package. The system provides superior protection
against taste and odor causing contaminants while removing dirt,
particulates and dissolved solids that can foul or scale equipment.
Initial System Production
Water production depends on supply water pressure and temperature.
See PERFORMANCE section (page 8) for normalized production.
Influent Water Characteristics
The following table lists the allowable operating range of various
water properties within which the ENVI-RO™ will function
properly.
Total Dissolved Solids (TDS) 0-1,000 ppm (0-1,000 mg/I)
pH 5-10
Chlorine
1
Chloramines 0-3 ppm (0-3 mg/I)
Turbidity 0-1 NTU
Iron 0-1 ppm (0-1 mg/I)
1
Reverse osmosis membrane lter used in this system will be damaged by chlorine. An
activated carbon lter should be provided with this system to protect the reverse osmosis
membrane from chlorine attack. Inuent chlorine should not exceed 3 mg/I.
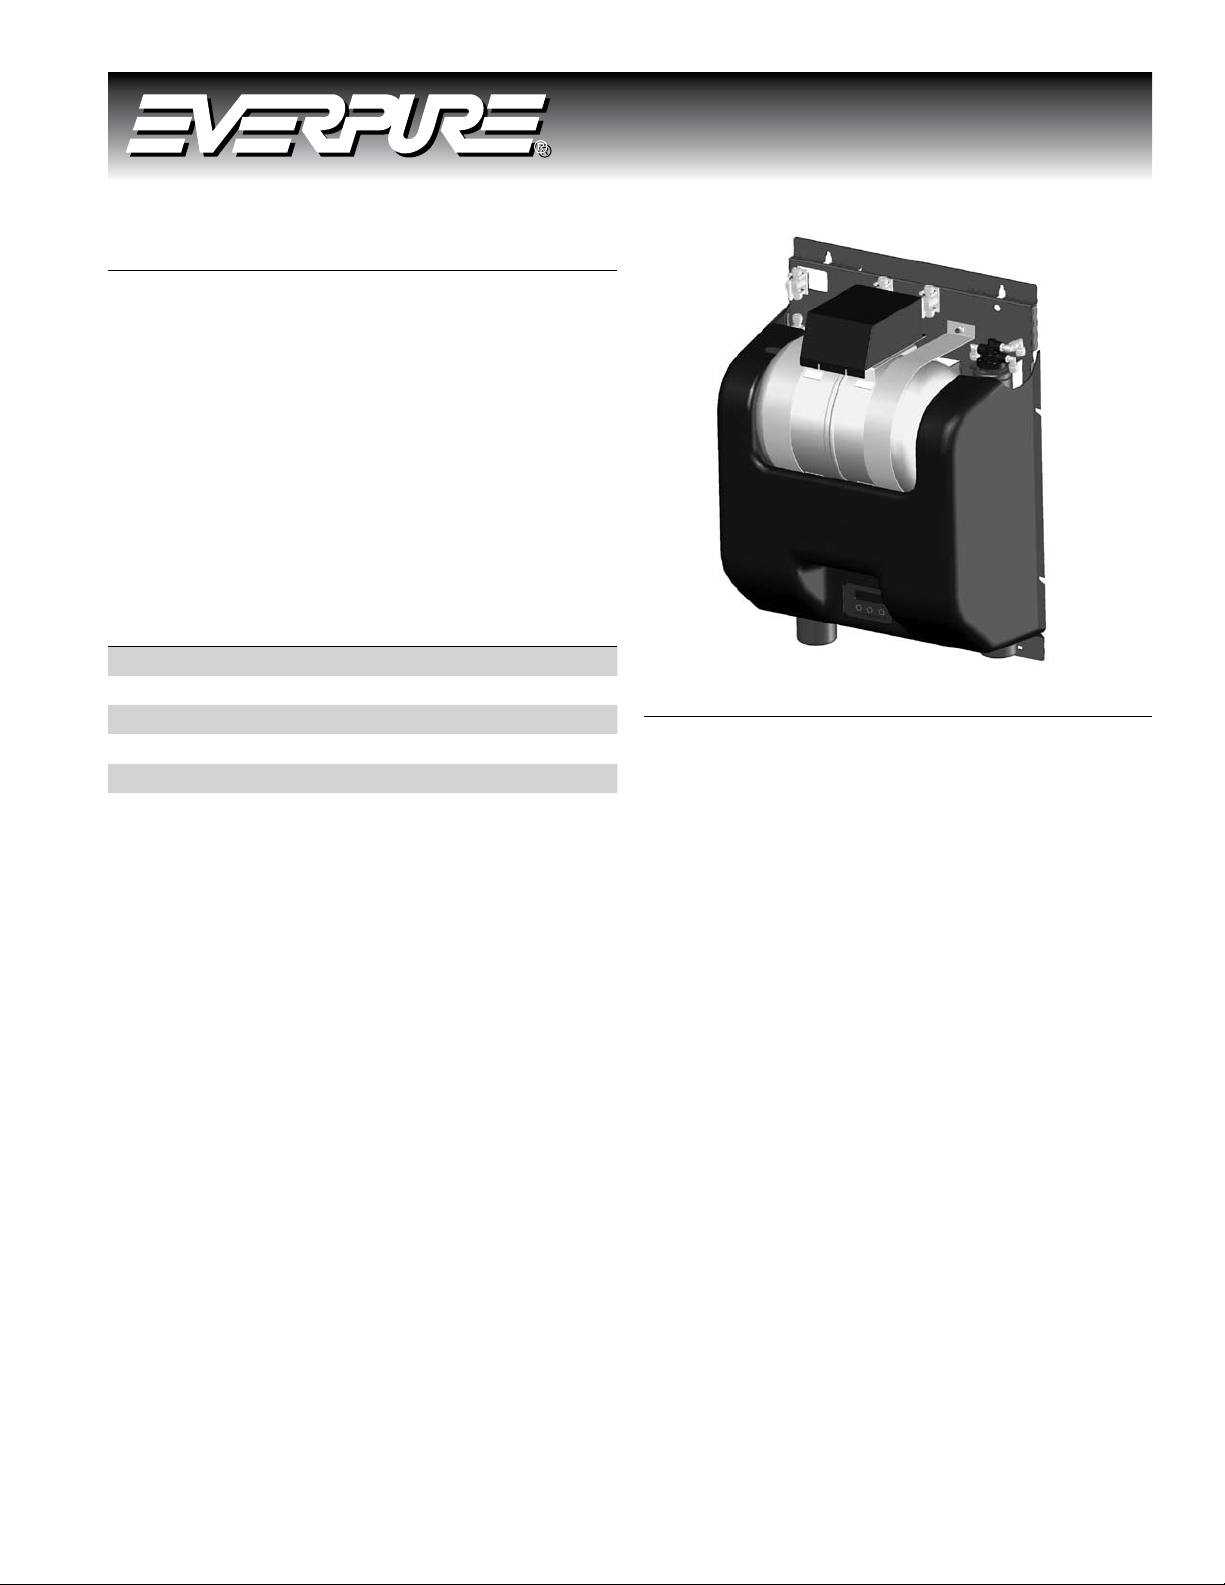
The system consists of 5 major components:
2SR-BW Water Conditioning cartridge1.
Dual-Head booster pump2.
MR-600 Reverse Osmosis (RO) membrane car tridge.3.
6-Gallon RO Water Storage Tank4.
Control System with Power Supply5.
The 2SR-BW Water Conditioning cartridge contains media that
reduces the scaling tendency of hard water minerals found in many
water supplies, extending RO membrane life.
The Dual-Head booster pump increases the inlet pressure to
maintain consistent permeate production, plus eliminates backpressure on the permeate output. This innovative approach to both
boosting and eliminating back-pressure allows for maximum system
efficiency.
The MR-600 RO membrane cartridge contains a semi-permeable
reverse osmosis membrane. Here, most dissolved impurities are
separated from the water and flushed down the drain. The water
that is able to pass through the membrane, which is very low in
dissolved impurities, is referred to as permeate, RO water, or
product water.
Once the RO water is produced, it is stored in the 6-Gallon RO Water
Storage Tank. This tank serves t wo key functions; 1) It acts as a
buffer between the system and the connected equipment, providing
ample volumes of water instantaneously, 2) It reduces the on-off
cycling of the RO system, which produces better quality water, and
prolongs the system’s life.
0-3 ppm (0-3 mg/I)
ENVI-RO™ High Efciency Reverse Osmosis System
Mineral Reduction System For Foodservice Applications
OPERATING SPECIFICATIONS
Dynamic Operating Pressure: 25-80 psi (1.7-5.5 bar)•
Static Operating Pressure: 100 psi (6.9 bar)•
Operating Temperature 40-100°F (4.4-37.8°C)•
Connections•
Inlet /Outlet: 3/8-inch OD tube (John Guest© Push-in)
Concentrate: 3/ 8-inch OD tube (John Guest© Push-in)
Electrical: 115 volt AC / 60 Hz / 1 Phase
Ampere:
Stand-by: 0.2
Flush: 0.5
Run/Fill: 2.7
Branch Circuit Protection: 15 or 20 AMP Ground Fault Protected
Pre-Installation Checklist
Can1. the unit be mounted within a reasonable distance of the
water supply and drain facilities?
Is 2. there an un-switched 115 VAC GFIC (ground fault interrupter
circuit) protected receptacle available for powering the system?
Is 3. there adequate clearance and support to install the unit
and permit access for maintenance? The total system weight
will vary based on model and storage tank selected. See
specification table for approximate operating weights.
Doe4. s the inlet water supply meet the requirements listed below?
A minimum of 25 PSI pressure on a consistent basisa.
Less than 1,0 00 ppm of Total Dissolved Solids (TDS)b.
pH level between 7.0-9.0c.
Turbidit y less than 1 NTUd.
Printed in U.S.A. EV3128-25 Rev A SE08
Page 2
20.0 508
5.0 127
3.1 80
16X .33
THRU
8.4
17.8 452
16.6 422
15.4 391
14.2 361
4.2 107
Low TDS
Outlet
(Steamer)
Inlet
(From Filter System)
Reduced TDS
Outlet
(Coee)
NOTES:
WARNING
WARNING
Please read this manual prior to installing and operating the •
system.
Incoming water supplies that do not meet these requirements •
may need additional pre-treatment prior to the system. System
performance may be affected if requirements are not met,
including system output production and cartridge change-out
frequency.
Consult with your local building inspector for approval and •
required permits to install this system. Additional equipment, such
as back-flow prevention devices, seismic restraint equipment, air
gaps, etc., may be required. Completed installation must meet all
local and national codes.
Do not connect the ENVI-RO™ system af ter any water filtration
system, unless specifically provided or specified for use with the
ENVI-RO™ system.
UNPACKING AND INSPECTION
The ENVI-RO™ includes all the necessary fittings for installation.
Lengths of 3 /8" tubing have been provided for connecting to the
wastewater/drain connection. Supply lines and distribution piping/
tubing are not included.
The ENVI-RO™ system is packaged as a complete unit in one carton.
At a minimum, you should have the following:
Plate mounted processor assembly including:1.
Dual-head Pump •
Cartridge Heads •
Controller & Power Supply•
Storage Tank •
Wall Mount Bracket2.
MR-600 RO cartridge 3.
2SR-BW Cartridge4.
Parts Kit5.
Inspect the carton for damage. Report any damage to freight carrier
immediately and retain all packaging materials. Carefully unpack and
inspect each item.
Figure 1. Wall mount bracket.
Position top line of mounting holes 1-9/16” above
the top edge of backplate
Figure 2. ENVI-RO Assembly.
SYSTEM ASSEMBLY
Locate the system in an area that is convenient to the inlet water
supply and drain facilities, with access for routing the product water
tubing/piping to the equipment. Install in a dry location, away from
all forms of corrosive and/or flammable materials. Consider ease
of access for servicing when selecting a location. Evaluate the
mounting surface for its ability to properly support the weight of the
processor when in operation (Approximately 90 pounds).
Processor Assembly Mounting
The ENVI-RO system has been provided with a wall mount 1.
bracket to allow greater installation flexibility and ease of
processor placement. If the wall mount bracket is not suitable for
this specific application, the processor backplate has 4 mounting
holes (2 keyhole slots, 2 standard) on 16" centers for securing it
directly to a vertical surface.
Refer to 2. Figure 7 (page 13) for dimensional information. Use
this as your guide to determine the wall mount bracket and/or
processor location. If NOT installing the wall mount bracket go
to step 5.
continued on the next page . . .
Do not use screws smaller than #12 for mounting the
processor.
Mounting surface may require reinforcement to
suppor t processor safely. Hollow walls, dry wall and
other non-structural surfaces are not suitable unless
reinforced.
2SR-BW
Conditioning
Cartridge
ENVI-RO
System
RO Reject
MR-600
RO Car tridge
Floor Drain
Maintain air-gap per local and national codes
(3/8" John
Guest) route
to drain
2
Page 3
Refer to 3. Figure 1 for mounting bracket details. Position the top
WARNING
row of holes 1-9/16" inches below the top of the processor when
installed. Install the wall mount bracket to a suitable vertical
surface. Use no less than 4 - #12 fasteners to secure the bracket
to the surface.
Prepare to attach the processor to the wall mount bracket. 4.
Lift the processor and “hook” the metal lip of the processor
backplate over the top edge of the wall mount bracket.
Go to step 6.
Measure and install 2 - #12 fasteners on 16" centers to engage 5.
the top edge of the processor backplate - leave 1/4" gap. Lift
the processor and “hook” the key-hole slots on the processor
backplate. Tighten the 2 fasteners.
Install 2 - #12 minimum fasteners in the 2" wide slots along the 6.
bottom edge of the processor backplate.
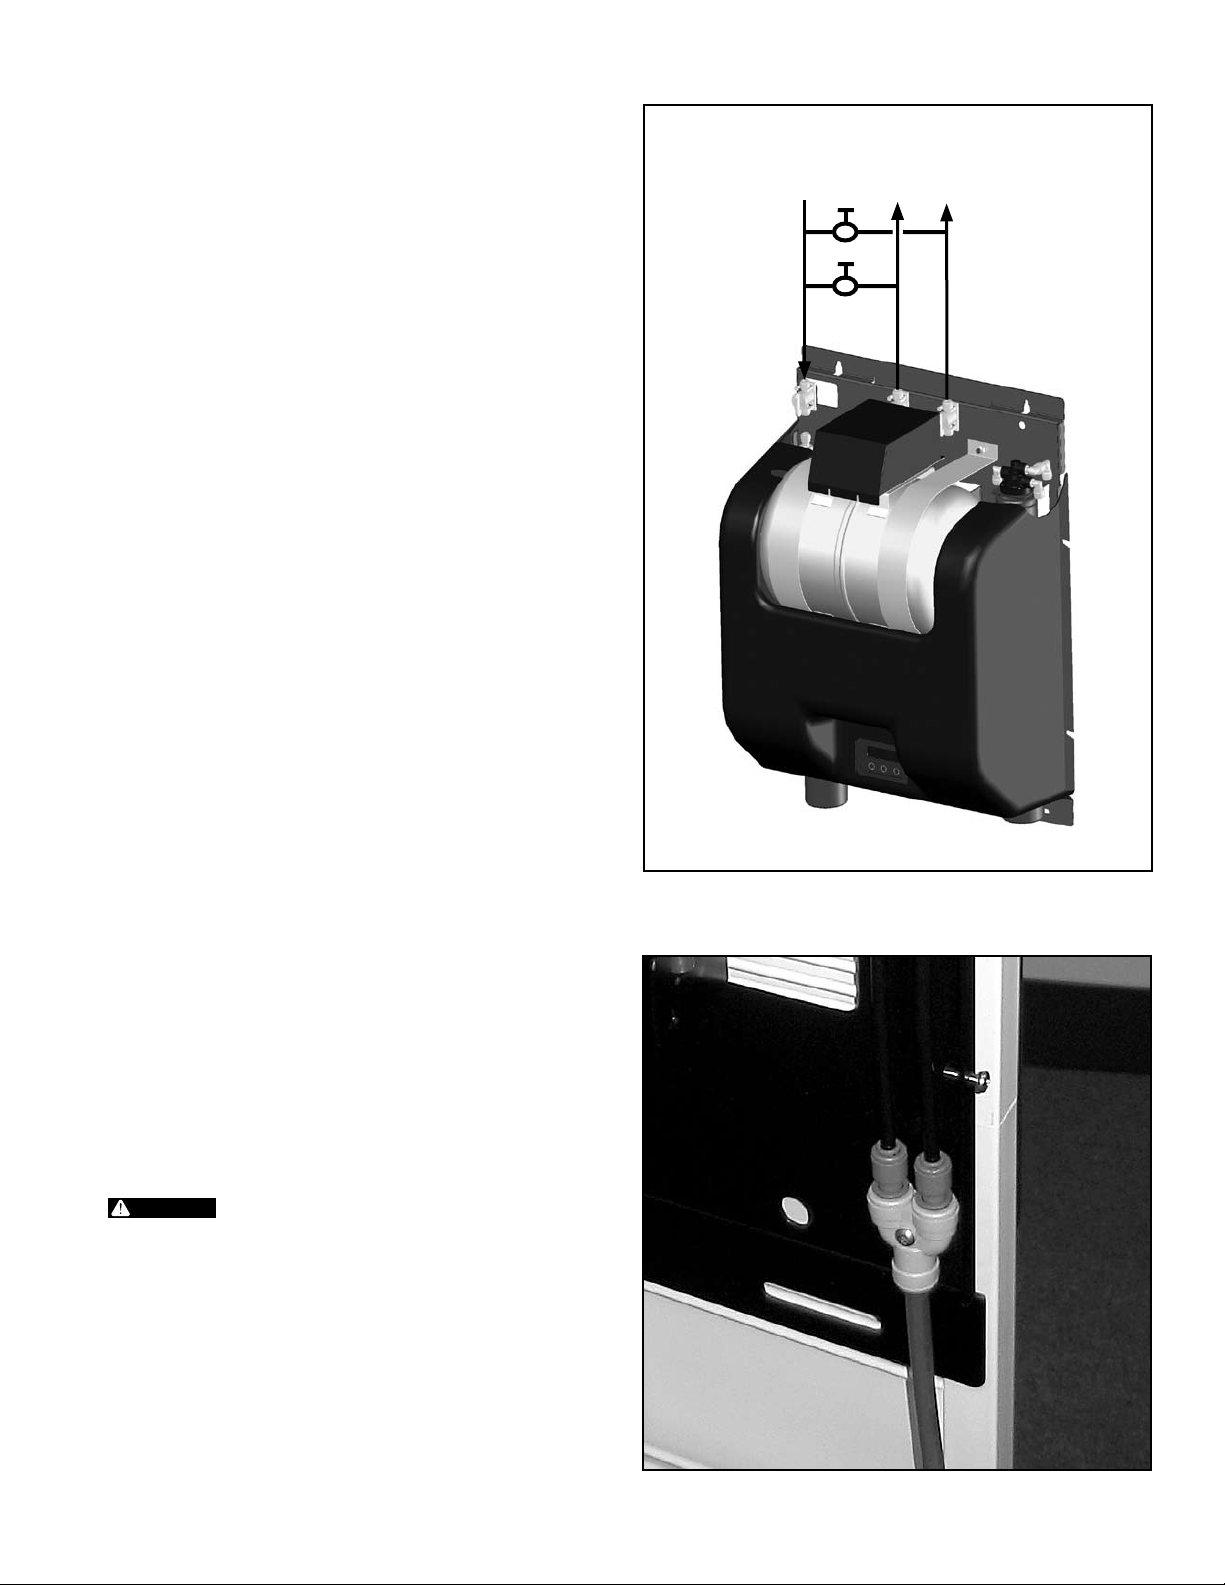
Piping/Tubing Connections
Refer to 1. Figure 2 and the drawing on Page 14 for general views
of the piping, with a description of major components and
connection points. These major components and connections
will be referred to in the following steps.
A parts kit has been provided, which includes valves and tees to 2.
configure a system by-pass. Assemble the parts to the system
using the example shown in Figure 3.
Prepare the plumbing to accept the RO system. 3.
NOTE: The product water tubing/piping and associated fittings
connecting the RO product outlet to the equipment being
serviced
Standard 51 or 61 with a minimum pressure rating of 100-PSI.
The product water may react with metal piping, creating a
corrosive condition, in addition to imparting an objectionable
taste. Plastic pipe or reinforced tubing are generally very
good choices for RO water
the product water tubing/piping
Distances of 25 feet or greater
being ser viced should be 1/2" ID minimum.
Shut-off the supply of water to the existing filtration system, and 4.
relieve pressure. Connect a line from the treated water outlet of
the filtration system to the inlet of the ENVI-RO system.
Connect the appropriate size and t ype of tubing/piping and 5.
associated fit tings to the corresponding ENVI-RO outlet
connection. Route the line(s) to the equipment being serviced
(i.e.; espresso, cof fee, etc.). Close the inlet, outlet and by-pass
valves. Apply pressure to the existing filtration system and place
it back into service.
Check the 6. storage tank pre-charge pressure. It should only be
checked and adjusted when the storage tank is empty. A 30 psi
pre-charge pressure is required.
Connect a 3/8" OD tube to the reject Y-connector (labeled 7.
WASTE) located in lower right corner of processor. Route the
other end of the tubing to a drain nearby, securing it properly.
Allow an air gap at the drain, following any applicable local and
national codes. See Figures 2 and 4.
should be food grade material that meets NSF
distribution materials. The size of
should be 3/8" ID minimum.
from the RO to the equipment
Figure 3. Inlet and Outlet Connections
INLET
Figure 4. Reject Y-Connector Detail
STE AMER
COFFEE
Refer to “Reject to Drain, Maximum” under RO
Production in the Performance Table (page 8) to
determine the maximum gallon per minute waste
flow rate. Verify drain has ample capacity for this
waste flow, plus all other sources of waste flow
sharing this drain.
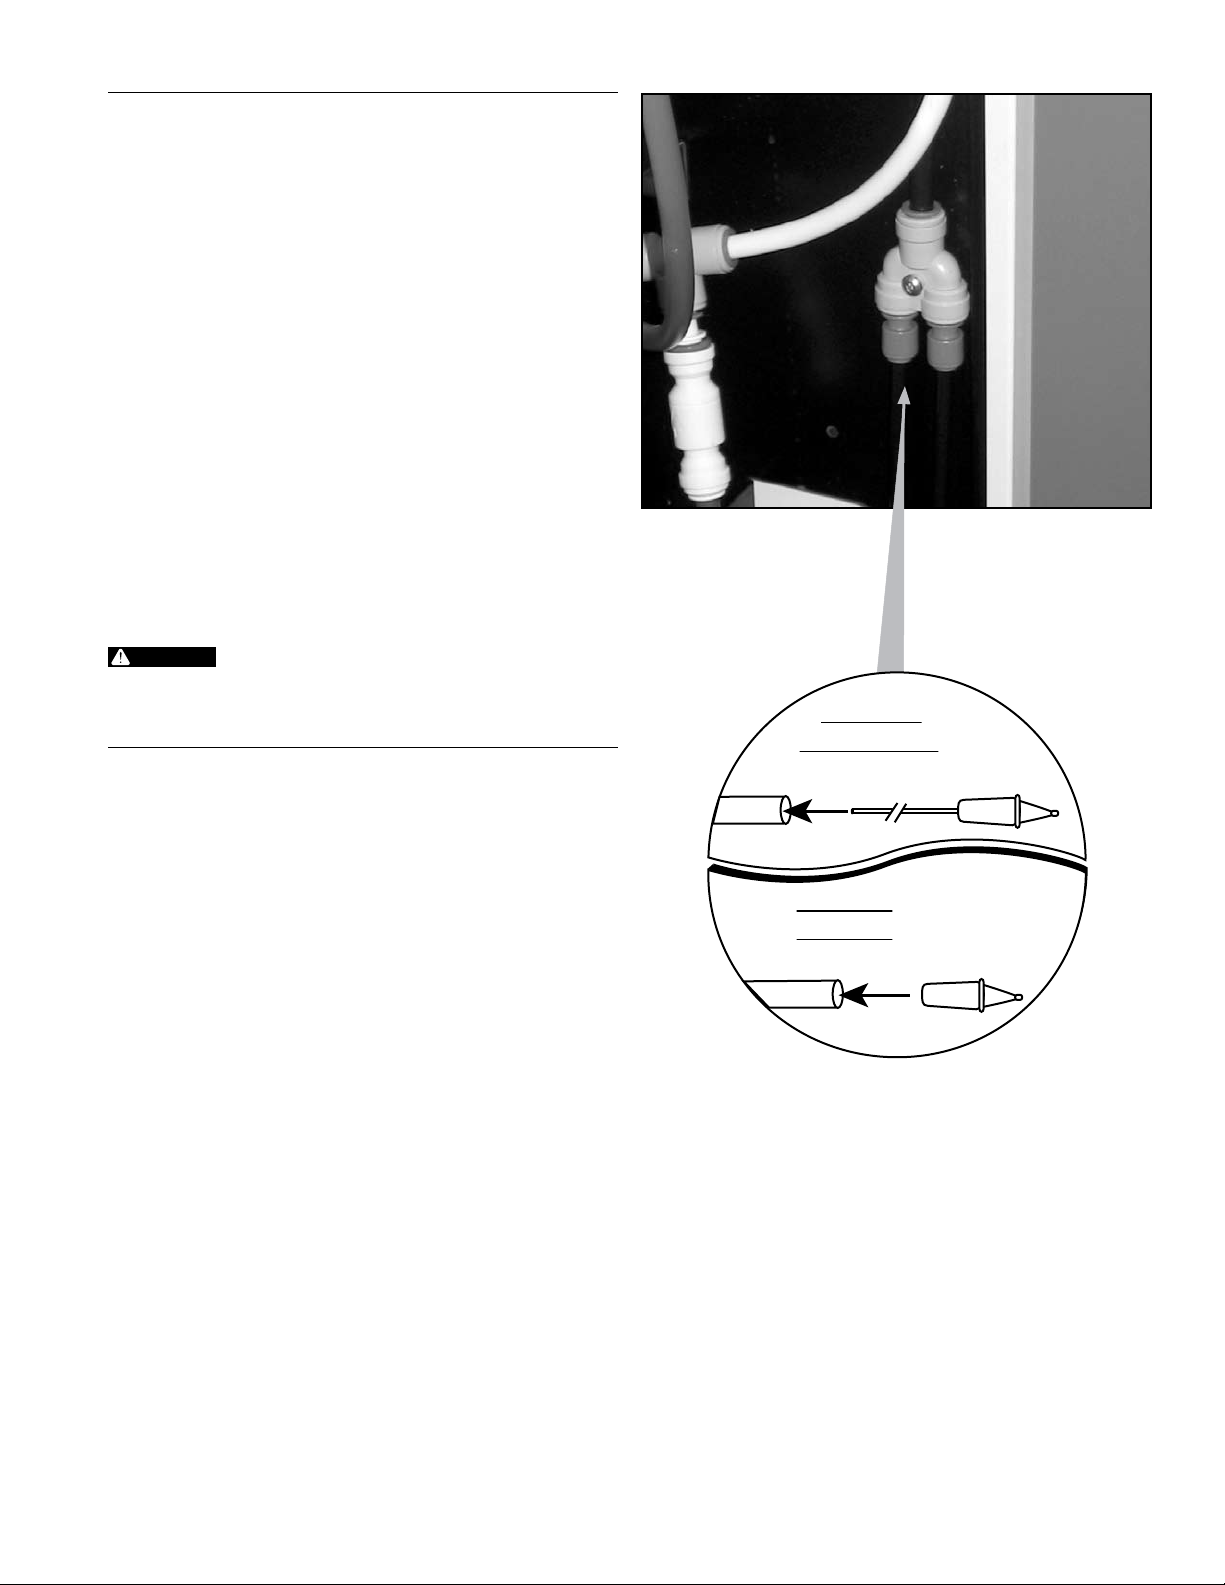
Locate the needle valve from the parts kit. Attach a short section 8.
of 3/8" tubing to this valve.
NOTE: This assembly will be used to adjust the system recovery in
the following section, then removed.
Remove the 3/ 8" tube from the reject Y-connector and install the 9.
needle assembly between the reject Y-connector and 3/8" tube.
3
Page 4
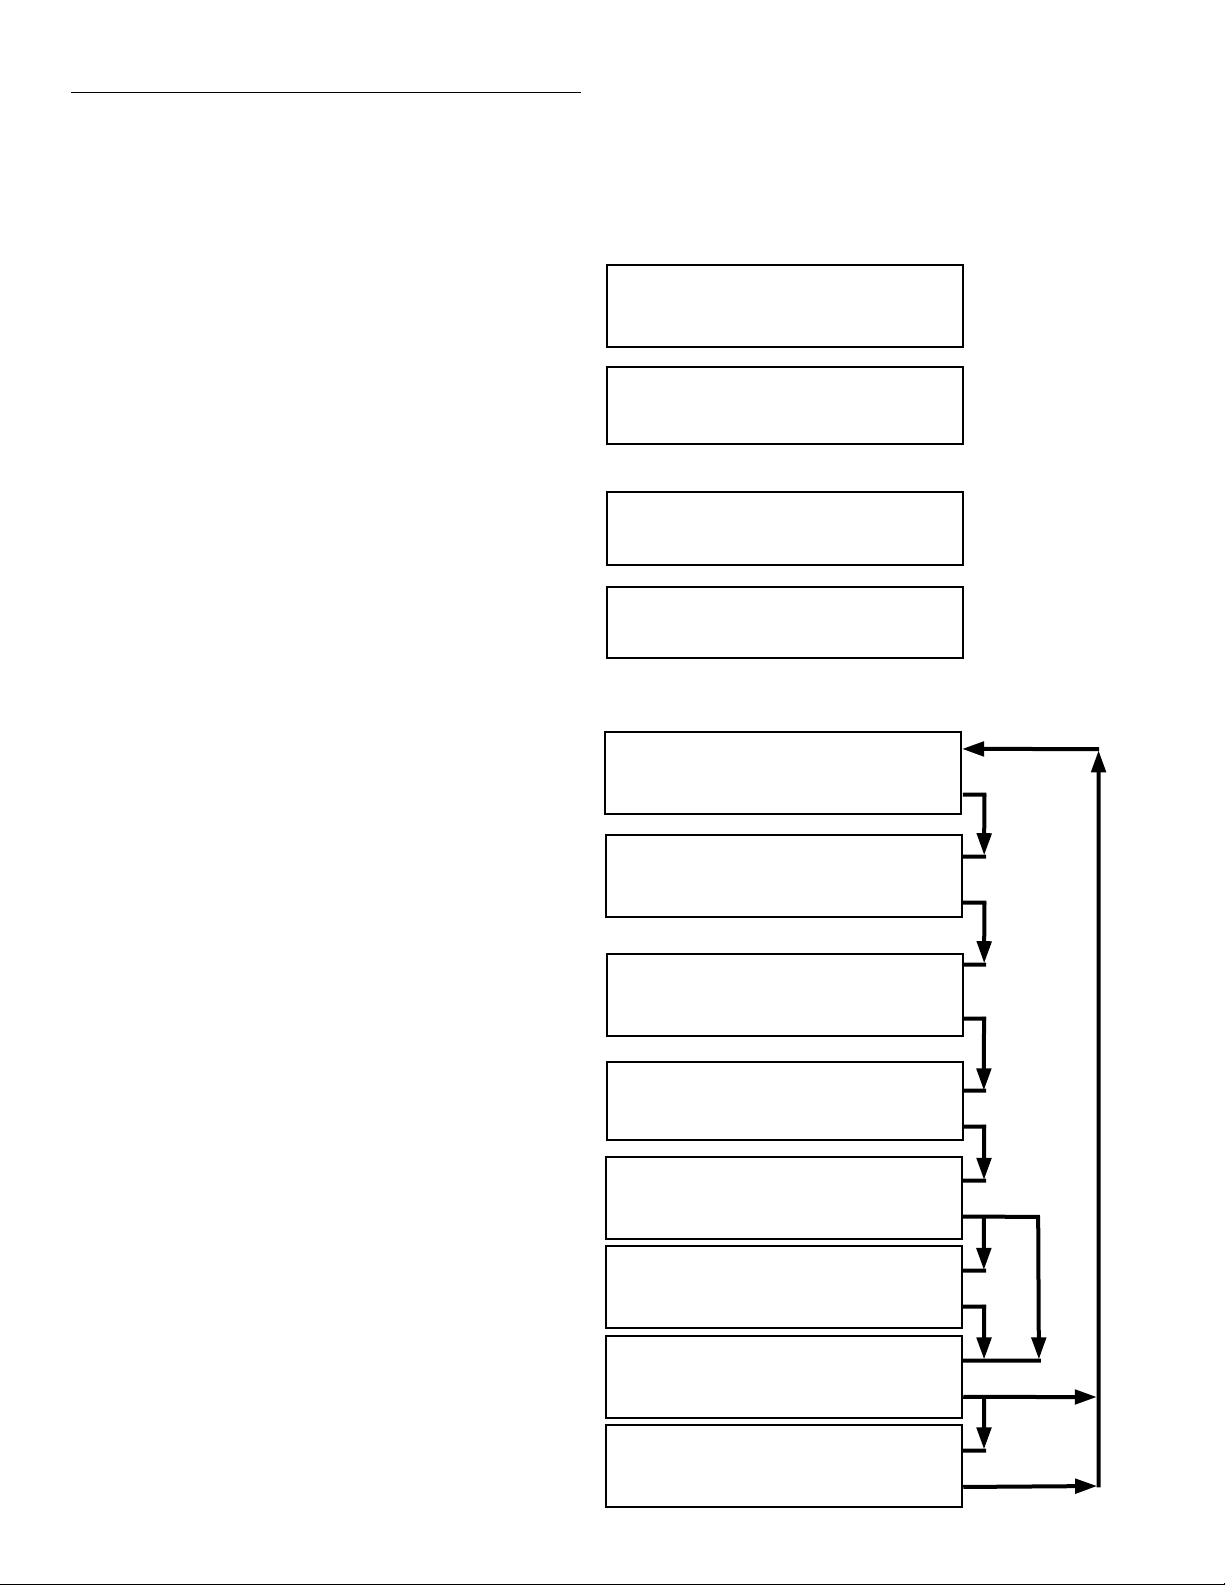
CONTROL SYSTEM OPERATION
The ENVI-RO system includes a micro-processor based control
system that monitors system conditions and controls the system
operation. A digital display panel provides operational information
and 4 but tons provide operator access. To follow is a list of modes
and a description of each function. Use this as a guide during startup, normal operation and when service is required.
Operational Mode
MAIN SCREEN VIEW -• When the system is in normal operation
and not operating in any of the following operational modes,
the panel will display the system identification with soft ware
version and total run hours since start-up, or last reset.
PRESSURIZE -• When pressure in the storage tank drops
below the pressure switch “on” setting, the system will
start processing water and refill the storage tank . Once the
pressure in the storage tank rises above the pressure switch
“off ” setting, the system will stop. Run time in seconds will be
displayed.
FLUSHING -• If the ENVI-RO System remains idle for
the programmed length of time, the control system will
automatically go into FLUSHING mode. During this time, there
will be flow to drain (reject). Remaining flush time in seconds
will be displayed.
REFILL -• At the end of FLUSHING, or if pressure drops too low in
the storage tank during FLUSHING, the control will enter REFILL
mode. Run time in seconds will be displayed.
Electrical Connections
The system is pre-wired at the factory. Verify that a 115 VAC ground
fault protected circuit rated at 15 Amps minimum is located nearby.
Plug-in power cord when instructed to do so in the following section.
ENVIRO V. X.XX
TOTAL: XXXX.XX Hours
PRESSURIZE... XXXXX
FLUSHING... XXXX
REFILL... XXXX
Programming Mode
The ENVI-RO Controller has several user accessible menu’s.
This menu “loop” allows for adjustment of several variable
parameters. The Controller has 4 buttons below the display for these
adjustments. Description of the button functions are shown in the
digital display area.
Press and hold any key for 3 seconds to enter set-up mode.•
Flush Time X1 -• This parameter determines the flush duration.
Upon determining the recovery and reject flow, a time value in
seconds is entered for this setting. Range is 0-995 seconds in 5
second increments. Use the +/- keys to adjust this value. Press
Enter to save value and go to next screen.
Flush Int X2 -• This parameter determines the flush interval. If
the system does not process water for the time value selected,
the system will enter FLUSHING mode. A time value in hours
is entered for this set ting. Range is 0.5 to 10 hours in 0.5 hour
increments. Use the +/- keys to adjust this value. Press Enter to
save value and go to next screen.
Reset Total Hr? -• This parameter allows reset ting the total run
time, which is displayed in the MAIN SCREEN VIEW. Press YES
to reset, NO to NOT reset. Controller saves selection and goes
to next screen.
Coffee Setup? -• This parameter allows viewing the TDS reading
in the coffee outlet line, with a very frequent up-date rate. Use
this mode when adjusting the blend valves. Select YES to enter
this mode, and NO to exit programming.
Coffee TDS: -• This is a view only screen. The value displayed
is the TDS level of the water in the Coffee outlet line. The most
accurate readings are attained by having flow on the Coffee
line. Press any key to return to the MAIN SCREEN VIEW.
SAVING DATA... -• This is a view only screen. The controller is
saving the set tings and returning to the MAIN SCREEN VIEW.
If desired, press and hold either middle button to enter TDS
Calibration mode.
TDS CAL - • This parameter allows adjustment of the TDS value
the controller will display. Use this mode to calibrate the system
with a calibration solution. Use the +/- keys to adjust this value.
Press Enter to save and return to the MAIN SCREEN VIEW.
ENVIRO V. X.XX
TOTAL: XXXX.XX Hours
Flush Time X1
- Enter +
Flush Int X2
- Enter +
Reset Total Hr?
Yes No
Coffee Setup?
Yes No
Coffee TDS: XXX
PRESS TO RETURN
SAVING DATA...
TDS CAL XXX
- Enter +
Yes No
4
Page 5
CARTRIDGE INSTALLATION AND ACTIVATION
WARNING
TUBE
FLOW
CONTROL
Capillary
Not Trimmed
TUBE
FLOW
CONTROL
Capillary
Trimmed
Remove the outer shrink-wrap and protective cap from the 1.
2SR-BW & MR-600 RO cartridges. Position a bucket under the
2SR -BW cartridge head. Slowly open the Inlet shut-off valve.
Apply power to the system by plugging the power cord into the
receptacle. Within moments, the display water should illuminate
and the system will go into PRESSURIZE mode. Once a solid flow
of water has been established, flush 1 gallon. Unplug power cord.
Empt y bucket.
Install 2SR-BW cartridge. Align the lugs on the new cartridge 2.
with the slots in the head. Holding the head and cartridge firmly,
press the cartridge upward into the head fully, and then turn the
cartridge to the right until it stops.
Disconnect 3/ 8" OD line from 2SR-BW to Booster Pump inlet at 3.
Booster Pump. Route line into bucket and secure. Plug-in power
cord. Once a solid flow of water has been established, flush 1
gallon. Unplug power cord. Re-connect 3/8" OD line to Booster
Pump inlet. Empty bucket.
Route a blue line from the 3/8" storage tank drain valve to drain 4.
temporarily. Open storage tank drain valve.
Install MR-600 cartridge. Align the lugs on the new car tridge 5.
with the slots in the head. Holding the head and cartridge firmly,
press the cartridge upward into the head fully, and then turn the
cartridge to the right until it stops.
Plug-in power cord. Once a solid flow of water has been 6.
established, flush 5 gallons from storage tank drain (about 10
minutes). Unplug power cord.
DO NOT USE THIS PRODUCT WATER! It may contain
a preservative solution from the RO cartridge and
should not be consumed!
Figure 5. RO Reject Flow Control Assembly
RECOVERY ADJUSTMENT
Measure the raw water TDS. Refer to Table 1 on page 6. Find 1.
the TDS range in the column labeled “Raw Water TDS” that
corresponds to your TDS measurement. Read across that row
to determine maximum recovery, permeate to reject ratio and
permeate/reject volumes.
Using 2 - 32 oz. or 1,00 0 ml graduated containers, apply power 2.
to the system and collect the permeate flow (from storage tank
drain valve) in one container and the reject (WASTE) flow in the
second container. Compare the volumes collected to the data
shown in the table. Adjust the reject needle valve to increase or
decrease the flow. Empty the containers and collect additional
samples.
Once the ratio of Permeate-to-Reject closely matches the data 3.
in Table 1, the Reject Only volume requires measurement . Using
only 1 graduated cylinder, collect the reject flow for 1 minute.
NOTE: Reject volume in 1 minute may exceed 32 oz./1,000 ml. If
so, use a larger container, or collect samples in multiple
containers and add all collected volumes together.
Unplug power cord. Close storage tank drain valve.4.
Return to page 6, Table 2. Find the volume range in the column 5.
labeled “Reject Volume per Minute” that corresponds to the
volume collected in Step 4. Read across that row to identify the
correct capillary tube combination.
Locate the correct capillary tubes from the par ts kit. Remove the 6.
2 - 1/4"OD tubes from the upper Y-connector. Insert the capillar y
tubes into each line and re-assemble to the Y-connector.
NOTE: In some cases, the capillary tube requires trimming. Use a
SHARP utility knife to cut the tube cleanly without tearing or
crushing the tube.
Remove Reject Needle valve assembly and reconnect 3/8" tube. 7.
Plug-in power cord. Allow system to run and fill tank. This will
take 5-10 minutes.
Refer to Table 2 again. Under the column labeled “Flush Time in 8.
Seconds”, find the value that corresponds to the Raw Water TDS.
Enter this value in the controller under “FLUSH TIME X1”. Adjust
“FLUSH INT X2” to 1.5 Hours.
5
Page 6

Table 1 - Recovery & Permeate to Reject Ratio
Permeate & Reject Volumes
at Specified Recovery
Ratio
Raw (Feed)
Water
TDS
Maximum
Recovery
Permeate
(Blue Line)
(Black Line)
Permeate to Reject
Ounces
0 - 200 80.0% 1 to 0.25 80.0 800 20.0 200
201 - 250 77.4% 1 to 0.29 77. 4 774 22.6 226
251 - 300 72.8% 1 to 0.37 72.8 728 27.2 272
301 - 350 68.3% 1 to 0.46 68.3 683 31.7 317
351 - 4 00 63.8% 1 to 0.57 63.8 638 36.2 362
401 - 450 59.3% 1 to 0.69 59.3 593 40.7 407
451 - 500 54.7% 1 to 0.83 54.7 547 45.3 453
501 - 550 50.2% 1 to 0.99 50.2 502 49.8 498
551 - 600 45.7% 1 to 1.19 45.7 457 54.3 543
601 - 650 41.2% 1 to 1.4 3 41.2 412 58.8 588
651 - 700 36.7% 1 to 1.73 36.7 367 63.3 633
701 - 750 32.1% 1 to 2.11 3 2.1 321 67.9 679
751 - 1000 30.0% 1 to 2.33 30.0 300 70.0 700
Milliliters
Ounces
Reject
Milliliters
Table 2 - Capillar y Tube and Flush Time Selector
Reject Volume per Minute Capillary Tube
Ounces Milliliters #1 #2
0.0 - 6.1 0 - 179 Red PLUG 838
6.1 - 14.0 180 - 414 Brown - Trimmed PLUG 362
14.0 - 20.1 415 - 593 Brown - Trimmed Red 253
20.1 - 25.9 594 - 766 Green PLUG 196
25.9 - 31.9 767 - 945 Green Red 159
31.9 - 40.1 94 6 - 1186 Blue - Trimmed PLUG 126
40.1 - 46.2 1187 - 1365 Blue - Trimmed Red 110
46.2 - 51.6 1366 - 1525 White - Trimmed PLUG 98
51.6 - 57.6 1526 - 1703 White - Trimmed Red 88
57.6 - 65.5 1704 - 1938 White - Trimmed Brown - Trimmed 77
65.6 - 72.9 1939 - 2155 Grey Red 70
72.9 - 77.4 2156 - 2290 White - Trimmed Green 66
77.4 - 83.7 2291 - 2475 White Blue - Trimmed 61
83.7 - 91.6 2476 - 2709 White - Trimmed Blue - Trimmed 55
91.6 - 97.5 2710 - 2883 White White 52
97.5 - 103.1 2884 - 3048 White - Trimmed White - Trimmed 49
103.1 - 116.5 3049 - 3444 Grey White 44
116.5 - 135.5 3445 - 4006 Grey Grey 37
Flush Time in
Seconds
6
Page 7

DISINFECTION
When car tridge activation and recovery adjustments are complete,
the storage tank and associated piping must be disinfected, then
completely flushed. The steps for this are outlined below.
Locate the 3/8" OD tubing that connects to the inlet (left side) 1.
of the storage tank. Disconnect the end which connects to the
elbow fitting at the processor. Measure 1 ounce of 5.25% bleach
for ever y 7.5 gallons of storage tank capacity. Pour this volume of
bleach into the tube that leads to the storage tank. Re-connect
this tube to the elbow fitting. Apply power to the system by
plugging the power cord into the receptacle. The booster pump
should begin to run and fill the storage tank.
Once suf ficient water has entered the storage tank (more 2.
than 1/4 full), demand treated water from at least one piece of
equipment the ENVI-RO is supplying water to. Once all of the
air has been purged, and a solid flow of water is observed, stop
the flow at the connected equipment. Purge the air from all
remaining pieces of connected equipment by demanding water
from each one individually.
Allow the storage tank to fill until the booster pump turns off. 3.
Allow the chlorinated water to remain in the storage tank and
distribution piping for 10 minutes.
Unplug the power cord. Drain the storage tank by demanding 4.
water downstream and allow the storage tank to drain. Once the
storage tank is empty, stop demanding water downstream.
Apply power to the system by plugging the power cord into the 5.
receptacle. Once sufficient water has entered the storage tank
(more than 1/4 full), demand treated water from at least one piece
of equipment the ENVI-RO is supplying water to. After 5 minutes,
stop the flow at the connected equipment . Flush the lines to each
remaining piece of connected equipment by demanding water
from them for 2 minutes each.
Allow the storage tank to fill until the booster pumps turns off.6.
Unplug the power cord. Drain the storage tank by demanding 7.
water downstream and allow the storage tank to drain. Once the
storage tank is empty, stop demanding water downstream
Repeat steps 5-7 until no residual chlorine odor is detected from 8.
the water exiting the storage tank or connected equipment.
DUAL OUTLET AND BLEND ADJUSTMENT
The ENVI-RO system is capable of producing t wo water qualities,
which are detailed below.
The outlet marked “STEAMER” provides water directly from the •
RO Membrane. The TDS of this water is ver y low, ideally suited
for applications such as flash steamers and other equipment that
“boils away” the water. This outlet requires no adjustment.
The outlet marked “COFFEE” can produce a wide range of water •
qualities. It combines or “blends” two sources of water; 1)
directly from the RO Membrane and, 2) filtered water containing
the same level on mineral content as the raw (feed) water. The
following text describes the adjustment of this feature.
Open the feedwater blend valve (FBV) and dilution blend 1.
valve (DBV) fully. See Figure 6 for location of these valves.
Demand flow on the “COFF EE” line. The flowrate should 2.
equal the maximum expected demand of all connected
equipment.
Access the “Cof fee TDS” view screen on the controller to 3.
observe a real-time reading of the TDS quantity in the water
flowing to the “COFFEE” line.
Compare TDS value on controller to application requirement. 4.
If controller reading is higher than requirement, slowly close
FBV until TDS value is met. If controller reading is lower than
requirement, slowly close DBV until TDS value is met.
Figure 6. RO Blend Valve Locations
PLACING ENVI-RO INTO SERVICE
Once the car tridges have been activated, the storage tank and
distribution piping sanitized, the ENVI-RO can be placed into ser vice.
During normal operation, the valves on the ENVI-RO should be in the
following positions:
System inlet and outlet valves – openA.
System by-pass valves – closed.B.
Once the system been started-up initially, it is a good idea to
measure the outlet water flow rate and quality to verify the system’s
performance. The initial values should be recorded for future
comparison to detect any changes in performance. A Performance
Log has been provided on Page 9 to record this information.
OPERATION
During normal operation, a continuous supply of water must be 1.
available to the system.
The system inlet and outlet valves must be open, the sample 2.
outlet and flushing valves must be closed and the drain line must
be unrestricted.
Feedwater Blend
Valve (FBV)
Dilution Blend
Valve (DBV)
7
Page 8

PERFORMANCE* SECTION
RO Production
†
Gallons per Day 600
Gallons per Hour 25
Ounces per Minute 53
Inlet Supply
Requirements,
Minimum
Reject to Drain,
Maximum
†Production rates based on the following:
750 ppm TDS Soft Water @ 5 0 psi, 77°F, to Atmosphere, Recovery = 40%, SDI = <3,
ENVI-RO 600
1.5 gpm
0.85 gpm
Stored Water System
Flowrate (gpm) Dependant on: Pressure/volume in storage, line sizes
Volume (Gallons) Dependant on: Pressure/volume in storage
Pressure (typical) 60 –100 psi (4.1-6.9 bar)
Salt Rejection 90% minimum
Recovery Varies based on water conditions - 30-80%
DIMENSIONS AND OPERATING WEIGHTS
System Only
Dimensions 32"H x 23" W x 13.6"D
Operating Weight 90 lbs.
ENVI-RO (EV9970-38)
Cartridges and Elements
Reverse Osmosis 24-inch TFC
Conditioning Cartridge 10-inch Scale Control
Carbon Post-Filter 10-inch In-line
*Specifications Subject To Change Without Notice.
8
Page 9

MAINTENANCE SECTION
Performance Log
Outlet Flow
Test Date
(ml/min)
Drain Flow
(ml/min)
Inlet
Pressure/
Temp (psi/°F)
Inlet TDS
(ppm)
STEAMER
Outlet TDS
(ppm)
COFFEE
Outlet TDS
(ppm) % Reduction
NOTES:
9
Page 10

TROUBLESHOOTING GUIDE
Problem Possible Cause Remedy
Insuf ficient product water 1.
during normal operating
periods.
Insuf ficient product water 2.
volume during peak periods.
Low quality RO water.3. Refer to problem 1.a. Refer to problem 1.a.
Low water pressure at water 4.
using equipment.
Objectionable product water 5.
odor.
Wastewater flow too low or 6.
decreases over time.
a. Pre-filtration system restriction. Check pre-filtration system and/or replace pre-a.
filter cartridge(s).
SR cartridge plugged.b. Replace SR cartridge.b.
RO cartridge plugged.c. Replace RO cartridge.c.
Insuf ficient system inlet pressure.d. Check/repair booster pump and inlet line.d.
e. Incorrect storage tank pre-charge. e. Empt y water in storage tank. Check pre-charge
pressure. Adjust to 30 psi. Presence of water
at Schrader valve indicates failed bladder Replace bladder or tank.
Refer to problem 1.a. Refer to problem 1.a.
System rated output low for application.b. Verif y system output. If output is within b.
specification, increase output if applicable.
System storage capacity low.c. Increase storage capacity if applicable.c.
RO cartridge failure.b. Replace RO cartridge.b.
Tubing/piping run to equipment restrictive.a. Increase tubing/piping diameter. Refer a.
to "System Installation" section for
recommendations.
Incorrect storage tank pre-charge.b. Empt y water in storage tank. Check pre-charge b.
pressure. Adjust to 30 psi. Presence of water
at Schrader valve indicates failed bladder Replace bladder or tank.
Pre-filtration cartridge(s) exhausted.a. Replace pre-filtration cartridge(s).a.
Storage tank requires disinfection.b. Disinfect storage tank.b.
Drain line restricted.a. Check/correct any restrictions in drain line a.
tubing. Make sure to allow an air gap at the
drain. Disconnect reject line at quick connect
fitting and inspect for obstruction or damage.
Remove obstruction. Replace if required.
Insuf ficient system inlet pressure.b. Check/repair booster pump and inlet line.b.
10
Page 11

Figure 6. Parts Diagram
1
2
6
7
3
12
4
14
1
9
15
5
8
10
11
4
13
REPLACEMENT PARTS
KEY PART NO. DESCRIPTION
1 E V311192 Valve, Ball, 3/ 8” PI x 3/8” PI
2 EV312810 Pressure Reducing Valve
3 EV312839 Valve, Control (FBV)
4 EV312808 Valve, Solenoid
5 EV312818 Pump
6 EV312809 Accumulator Tank without Bladder
7 EV312814 Bladder
8 EV312817 Controller
9 EV312815 Power Supply
10 EV3 11161 Valve, Needle (DBV)
11 EV310391 Check Valve, 3/8”
12 EV312 840 Check Valve, 1/4”
REPLACEMENT CARTRIDGES
KEY PART NO. DESCRIPTION
14 EV962714 Cartridge, 2SR-BW
15 EV962713 Cartridge, MR-600
KEY PART NO. DESCRIPTION
13 EV312827 RESTRICTOR, BLUE, 735 ml/min
13 EV312828 RESTRICTOR, WHITE, 1052 ml/min
13 EV312829 RESTRICTOR, GRE Y, 1577 ml/min
13 EV312830 RESTRICTOR, RED, 125 ml/min
13 EV312831 RESTRICTOR, BROWN, 189 ml/min
13 EV312832 RESTRICTOR, GREEN, 525 ml/min
13 EV312833 PLUG, 1/4” OD
KEY PART NO. DESCRIPTION
16 EV312867 IN-LINE FILTER, GS-215RO-H, 16PK
Contact your local Everpure Dealer for replacement and spare parts.
11
Page 12

MAINTENANCE
WARNING
The ENVI-RO requires very little maintenance. Regular cartridge
replacement is the only normal requirement, and a very important
one. In typical service, the car tridge change-out schedules are as
listed below.
Every 6 months
- Replace the SR cartridge:
Open both by-pass valves.•
Remove power from system by unplugging power cord.•
Close the inlet valve.•
Follow instructions on the SR cartridge label. Place a bucket •
under the cartridge to catch any excess water that may spill from
the head. Remove the old cartridge by turning the cartridge to
the left until it stops and pulling it downward until it is free from
its head.
Remove the outer shrink-wrap and protective cap from the new •
SR cartridge.
Align the lugs on the new cartridge with the slots in the head.•
Holding the head and car tridge firmly, press the cartridge •
upward into the head fully, and then turn the cartridge to the
right until it stops.
Disconnect 3/ 8” OD line from SR Cartridge to Booster Pump •
inlet at Booster Pump. Route line into bucket and secure. Plug-in
power cord.
Route a blue line from the 3/8” storage tank drain valve to drain •
temporarily. Open inlet valve. Open storage tank drain valve.
Drain storage tank until system starts processing water. Close
storage tank drain valve.
Once a solid flow of water has been established, flush 1 gallon. •
Unplug power cord. Re-connect 3/8” OD line to Booster Pump
inlet. Plug in power cord.
Close both by-pass valves.•
Drain storage tank until system starts processing water. Once •
a solid flow of water has been established, flush 5 gallons from
tank drain (about 10 minutes). Unplug power cord.
DO NOT USE THIS PRODUCT WATER! It may contain
a preservative solution from the RO cartridge and
should not be consumed!
Re-install capillary tubes.•
Close both by-pass valves.•
– Replace the Post Carbon cartridge:
Open both by-pass valves.•
Remove power from system by unplugging power cord.•
Close the inlet and both outlet valves.•
Route a blue line from the 3/8” storage tank drain valve to drain •
temporarily. Open storage tank drain valve. Drain storage tank.
Close storage tank drain valve.
Follow instructions on the Post Carbon car tridge label. Place a •
bucket under the cartridge to catch any excess water that may
spill when removing lines. Remove lines, note flow direction, then
remove cartridge.
Install new cartridge, in same flow direction as original cartridge. •
Connect lines.
Plug-in power cord. Once a solid flow of water has been •
established, flush 5 gallons from tank drain.
Close storage tank drain valve.•
Open the inlet and both outlet valves.•
Close both by-pass valves.•
Every 12 months
– Sanitize the storage tank and lines:
Refer to “Disinfection” section - steps 1-8, for sanitization •
procedure.
– Replace the RO cartridge:
Open both by-pass valves.•
Remove power from system by unplugging power cord.•
Close the inlet valve.•
Follow instructions on the MR cartridge label. Place a bucket •
under the cartridge to catch any excess water that may spill from
the head. Remove the old cartridge by turning the cartridge to
the left until it stops and pulling it downward until it is free from
its head.
Remove the outer shrink-wrap and protective cap from the new •
MR cartridge.
Align the lugs on the new cartridge with the slots in the head.•
Holding the head and car tridge firmly, press the cartridge •
upward into the head fully, and then turn the cartridge to the
right until it stops.
Remove both capillary restrictors temporarily.•
Route a blue line from the 3/8” storage tank drain valve to drain •
temporarily. Open inlet valve. Open storage tank drain valve.
Plug-in power cord.
12
Page 13

13.6" 346 23" 583
40616"
32"
Side View Front View
Top View
813
Figure 7. Dimensional Drawing
13
Page 14

Figure 8. General Installation Arrangement
14
Page 15

NOTES:
15
Page 16

For sales, replacement components, and service, contact your Everpure dealer or:
Everpure, LLC: 1040MuireldDrive•HanoverPark,Illinois60133•800.323.7873
Printed in U.S.A. EV3128-25 Rev A - SE08
800.942.1153
www.everpure.com
Technical Service
 Loading...