

Everlea EIV-Small Office Administrator's Manual

Administrator
Manual
EIV-Small Office

EIV-Small Office —Administrator Manual
Environment
The phone you have purchased must not be disposed of with household waste. You should return
these to your distributor if they are to replace or dispose of them in an approved recycling centre.
FCC Statement
This equipment generates,uses and can radiate radio frequency energy and, if not installed and
used in accordance with the instructions in this manual, may cause interference to radio
communications. This equipment as been tested and found to comply with the limits for a Class B
computing device pursuant to Subpart J of Part 15 of FCC rules, which are designed to provide
reasonable protection against radio interference when operated in a commercial environment.
Operation of this equipment in a residential area is likely to cause interference, in which case the
user, at his own expense, will be required to take whatever measures are necessary to correct the
interface.
CE Declaration of Conformity
This equipment complies with the requirements relating to electromagnetic compatibility, EN55022
class B for ITE and EN 50082-1. This meets the essential protection requirements of the European
Council Directive 89/336/EEC on the approximation of the laws of the Member States relating to
electromagnetic compatibility.
Copyright Notice
All rights reserved. No part of this publication may be reproduced, transmitted, transcribed, stored
in retrieval system or translated in to any language or computer language, in any from or by any
means, electronic, mechanical, magnetic, optical, chemical, manual or otherwise, without the prior
written permission of Everlea Group Ltd.
Everlea Group Ltd reserves the right to revise the publication and make changes from time to time
in the contents hereof without obligation of Everlea Group Ltd to notify person of such revision or
changes. The material contained herein is supplied without representation or warranty of any kind.
Everlea Group Ltd therefore assumes no responsibility and shall have no liability of any kind
arising from the supply or use of this document or the material contained herein.
Trademarks
Windows 98/2000/XT/NT™ and Internet Explorer™ are registered trademarks of Microsoft
Corporation. All other company, brand and product names, like Netscape Navigator™ are
trademarks or registered trademarks of their respective owners.
ISO-9001ISO-9001
www.everlea.co.nz
Page 2

EIV-Small Office —Administrator Manual
WARNING!
!
1. Read these installation instructions carefully before connecting the IP phone to its
power source.
2. To reduce the risk of electric shock, do not remove the cover from the IP phone or
attempt to dismantle it. Opening or removing covers may expose you to dangerous
voltage levels. Equally, incorrect reassembly could cause electric shock on re-use of
the appliance.
3. Do not expose the IP Phone to Fire, direct sunlight or excessive heat.
4. Do not expose the IP Phone to rain or moisture and do not allow it to come into contact
with water.
5. Do not install the IP phone in an environment likely to present a THREAT OF IMPACT.
6. You may clean the IP phone using a fine damp cloth. Never use solvents (such as
trichloroethylene or acetone), which may damage the phone’s plastic surface and LCD
screen. Never spray the phone with any cleaning product whatsoever.
7. Take care not to scratch the LCD screen.
8. The IP phone is designed to work in temperatures from 5oC to 45oC.
9. The IP phone must be installed at least 1 meter from radio frequency equipment, such
as TVs, radios, hi-fi or video equipment (which radiate electromagnetic fields).
10. Do not connect the LAN/PC port to any network other than an Ethernet network.
11. Do not attempt to upgrade your IP phone in an unstable power environment. This could
cause unexpected issues.
12. Do not work on the system or connect or disconnect cables during lightning storms.
13. Children don't recognize the risks of electrical appliances. Therefore use or keep the
phone only under supervision of adults or out of the reach from children.
14. No repair can by performed by the end user, if you experience trouble with this
equipment, for repair or warranty information, please contact your supplier.
Electrical Powering:
The IP Phone must be powered using a correct power adaptor provided in the package.
Any damage caused to the IP Phone as a result of using unsupported Power adaptors will
NOT be covered by the manufacturer’s warranty.
Everlea Group Ltd disclaims all responsibility in the event of use that does not comply with
the present instructions.
Product Disposal Warning:
Ultimate disposal of this product, accessories, packing, especially the batteries should be
handled carefully for recycle and nature protection in accordance with national laws and
regulations.
www.everlea.co.nz
Page 3

EIV-Small Office —Administrator Manual
Contents
Contents .......................................................................................... 4
Getting Started ................................................................................ 8
Overview of EIV-SMALL OFFICE ................................................... 9
The front-View of the EIV-SMALL OFFICE phone .................... 10
Understand the front panel indicators ....................................... 12
The Rear-view of the EIV-SMALL OFFICE Phone .................... 13
Understanding the Connectors of the IP Phone ........................ 14
Installing the IP Phone .............................................................. 14
Accessing the LCD Screen ....................................................... 16
Basic Operations .......................................................................... 17
Making Calls .............................................................................. 17
Making a basic phone call ..................................................................... 17
Making an outgoing SIP trunk call .......................................................... 17
Making a call using the Phone Book ...................................................... 17
Making a call using the Call Record ....................................................... 17
Make an intercom call using directory .................................................... 18
Answering Calls......................................................................... 18
Receiving a phone call ........................................................................... 18
Receiving a trunk call with Auto Attendant ............................................. 18
Receiving a trunk call with system Operator .......................................... 18
Receiving a trunk call with All Ring ........................................................ 19
Receiving a trunk call with DID .............................................................. 19
Receiving multiple calls ......................................................................... 19
Handling Calls ........................................................................... 20
Placing a call on hold ............................................................................. 20
Redialing ............................................................................................... 20
Muting the microphone .......................................................................... 20
Adjusting the voice volume during a conversation ................................. 20
Transferring a call (blind) ....................................................................... 21
Transferring a call (semi-attended) ........................................................ 21
Transferring a call (attended) ................................................................. 21
Using Other Call Features ......................................................... 21
3-way conference call ............................................................................ 21
Call Hold/Retrieve .................................................................................. 22
Call Transfer Recall ............................................................................... 22
www.everlea.co.nz
Page 4

EIV-Small Office —Administrator Manual
All Paging .............................................................................................. 22
Single Paging ........................................................................................ 23
Auto Busy Redial ................................................................................... 23
Listen VM from Remote ......................................................................... 24
Leave MSG to VM via AA ...................................................................... 24
Configuring the IP Phone ............................................................. 25
Phone Settings .......................................................................... 25
Display Name ........................................................................................ 26
Language .............................................................................................. 26
Sounds .................................................................................................. 26
Ring Type .............................................................................................. 27
Tone Type .............................................................................................. 27
Volume .................................................................................................. 27
Dial Timeout........................................................................................... 28
User Settings ............................................................................. 28
DND ...................................................................................................... 28
Call Waiting ........................................................................................... 29
Call Forward .......................................................................................... 29
Auto Answer .......................................................................................... 30
Phone Lock ........................................................................................... 30
Call Record ............................................................................................ 30
Phone Book ........................................................................................... 31
Speed Dialing ........................................................................................ 32
Message Box ......................................................................................... 33
VM Settings ............................................................................... 35
Visual Voice Mail ................................................................................... 35
Record Greeting .................................................................................... 35
Change Password ................................................................................. 36
EDM Key Set ............................................................................. 37
Setting Left Column Key Function .......................................................... 37
Setting Right Column Key Function ....................................................... 37
BLF function .......................................................................................... 38
Other features ........................................................................................ 39
Phone Information ..................................................................... 40
VAA Settings .............................................................................. 40
Operating Mode ..................................................................................... 40
AA Time Setting ..................................................................................... 40
Customize AA Voice............................................................................... 41
Admin Settings .......................................................................... 41
Reboot ....................................................................................... 41
Advanced Operations .................................................................. 42
www.everlea.co.nz
Page 5

EIV-Small Office —Administrator Manual
Phone Number .......................................................................... 42
Account ..................................................................................... 42
Admin .................................................................................................... 43
User ....................................................................................................... 43
Network ..................................................................................... 44
Setting up a Static IP address ................................................................ 44
Setting up a Dynamic IP address (DHCP) ............................................. 45
Default Gateway .................................................................................... 45
System Setting .......................................................................... 46
Multi-Service .......................................................................................... 46
Trunk Line x ........................................................................................... 46
Operator Setting .................................................................................... 47
Number Range ...................................................................................... 47
Time Zone ............................................................................................. 48
DID Settings .......................................................................................... 48
Reset Setting ......................................................................................... 49
SIP ............................................................................................. 49
DTMF .................................................................................................... 50
Codec .................................................................................................... 50
Packet Time ........................................................................................... 51
Block Anonymous ...................................................................... 51
Call Blocking.............................................................................. 51
Ping ........................................................................................... 52
Reset Public PHBK ................................................................... 52
Reset to Default......................................................................... 52
Configuring the Phone thru the Web .......................................... 54
Network Settings ................................................................................... 54
Login page ............................................................................................. 54
Information ............................................................................................ 55
Network ................................................................................................. 57
Phone .................................................................................................... 58
Management.......................................................................................... 62
Diagnostics ............................................................................................ 65
System .................................................................................................. 67
Phone Book ........................................................................................... 71
EDM ...................................................................................................... 74
Features & Specifications ............................................................ 75
Troubleshooting ............................................................................ 77
Glossary ........................................................................................ 78
www.everlea.co.nz
Page 6

EIV-Small Office —Administrator Manual
Acronyms .................................................................................. 78
Terminology ............................................................................... 79
www.everlea.co.nz
Page 7
EIV-Small Office —Administrator Manual
Getting Started
This section will help you quickly find the information that you need to make use of the full
features of your EIV-SMALL OFFICE.
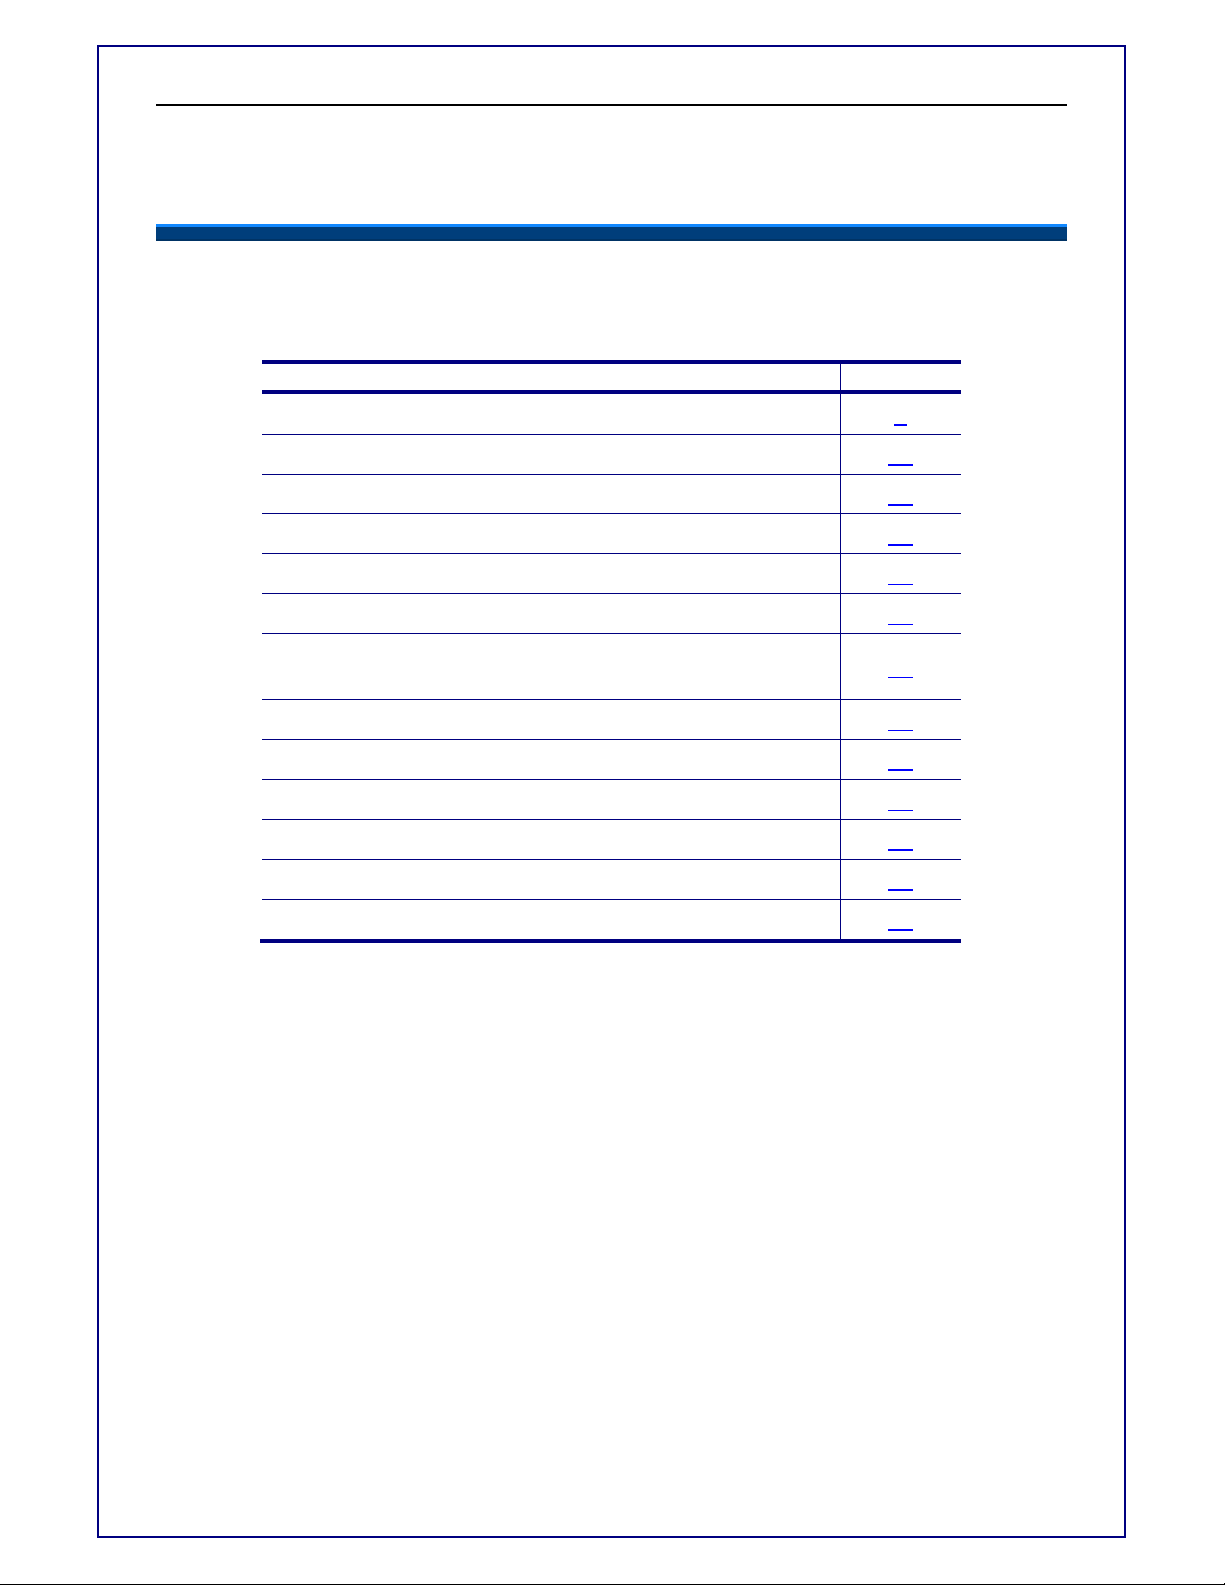
You want to… see page
Have an overview of the EIV-SMALL OFFICE. 9
Understand the front-view of the EIV-SMALL OFFICE. 10
Understand the LED indication. 12
Understand the rear-view of the EIV-SMALL OFFICE. 13
Understand the LCD indication. 16
Make/receive calls. 17
Hold a call, make a three-way conference call, or
transfer a call.
Use the phonebook. 30
Use the Speed Dialing feature. 32
Setup the EIV-SMALL OFFICE via web. 41
Changing network settings via web. 56
Set System related settings. 66
APS 74
19
www.everlea.co.nz
Page 8
EIV-Small Office —Administrator Manual
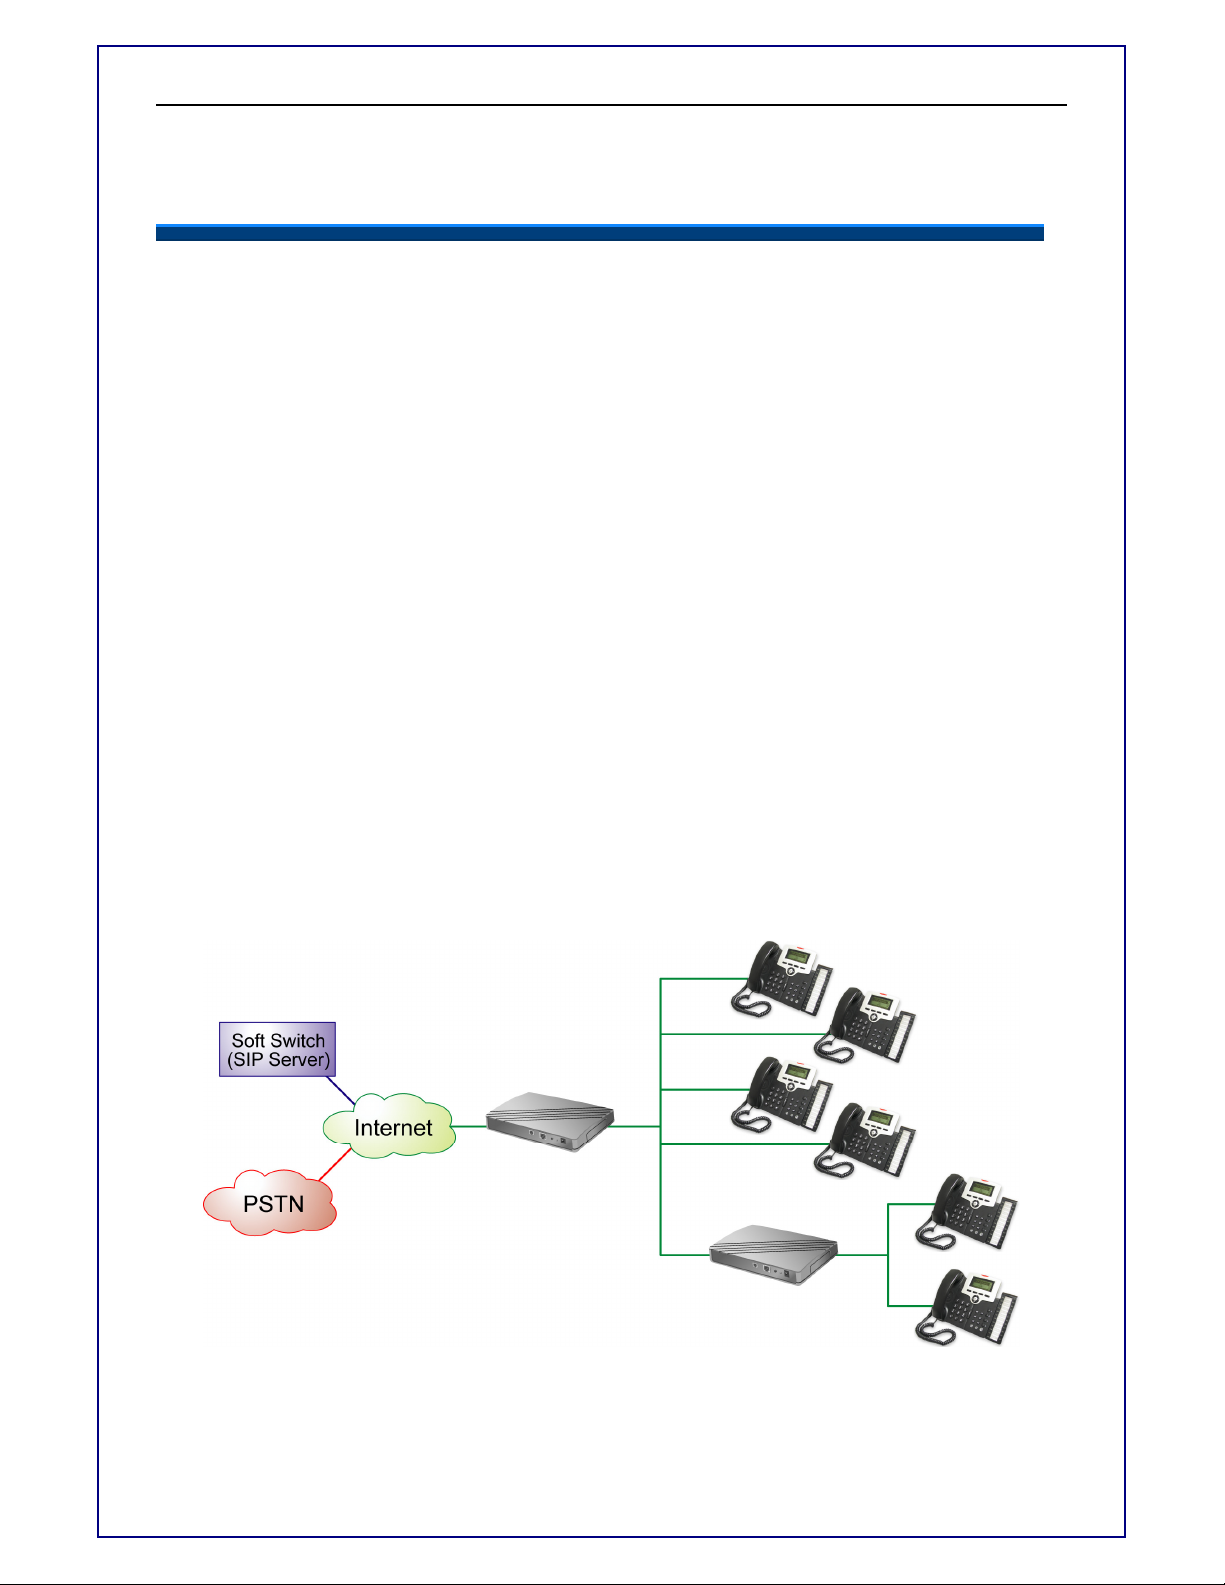
Overview of EIV-SMALL OFFICE
The NoKSU IP phone is an innovative desktop telephone in the modern telecommunication market. It supports VoIP (Voice over Internet Protocol) function and can
work with a group of same NoKSU IP phones to perform a powerful office communication
system for small medium enterprises. With the sophisticated design, no IP-PBX or SIP
Server is required for intercom calls. This will save users’ budget in the investment of IPPBX or PBX system. You can connect the IP phone to a LAN enterprise network with
Internet connection and it will work as an office phone. Like a traditional office telephone, it
can deliver good voice quality and perform a great number of call features.
This IP phone can support Peer-to-Peer protocol in office local network for intercom calls
as well as it offers the standard SIP protocol for public ISP (Internet Service Provider) VoIP
service. In the same office network segment, this phone can support up to 16 extensions.
The phone is design to support both plug-and-play and auto-provisioning function. Users
can install the phone easily without the assistance of technician or system installer.
The IP phone can transfer and receive voice across the international Internet , therefore, it
can be deployed and connected among the headquarter and remote branch offices. Since
it is a stand-alone and “always-on” terminal, there is no need to have any active PC to let it
work. The IP Phone is completely stand-alone.
The IP phone comes with a graphic LCD display, traditional keypad, a navigator key &
content-sensitive programmable keys, handset, I/O ports, Power adaptor. It can be
installed and placed on the desktop or mounted on the wall.
Broadband
Router
Ethernet
Switch in LAN
Figure 1 - A typical configuration of EIV-SMALL OFFICE in an office
www.everlea.co.nz
Page 9
EIV-Small Office —Administrator Manual
4
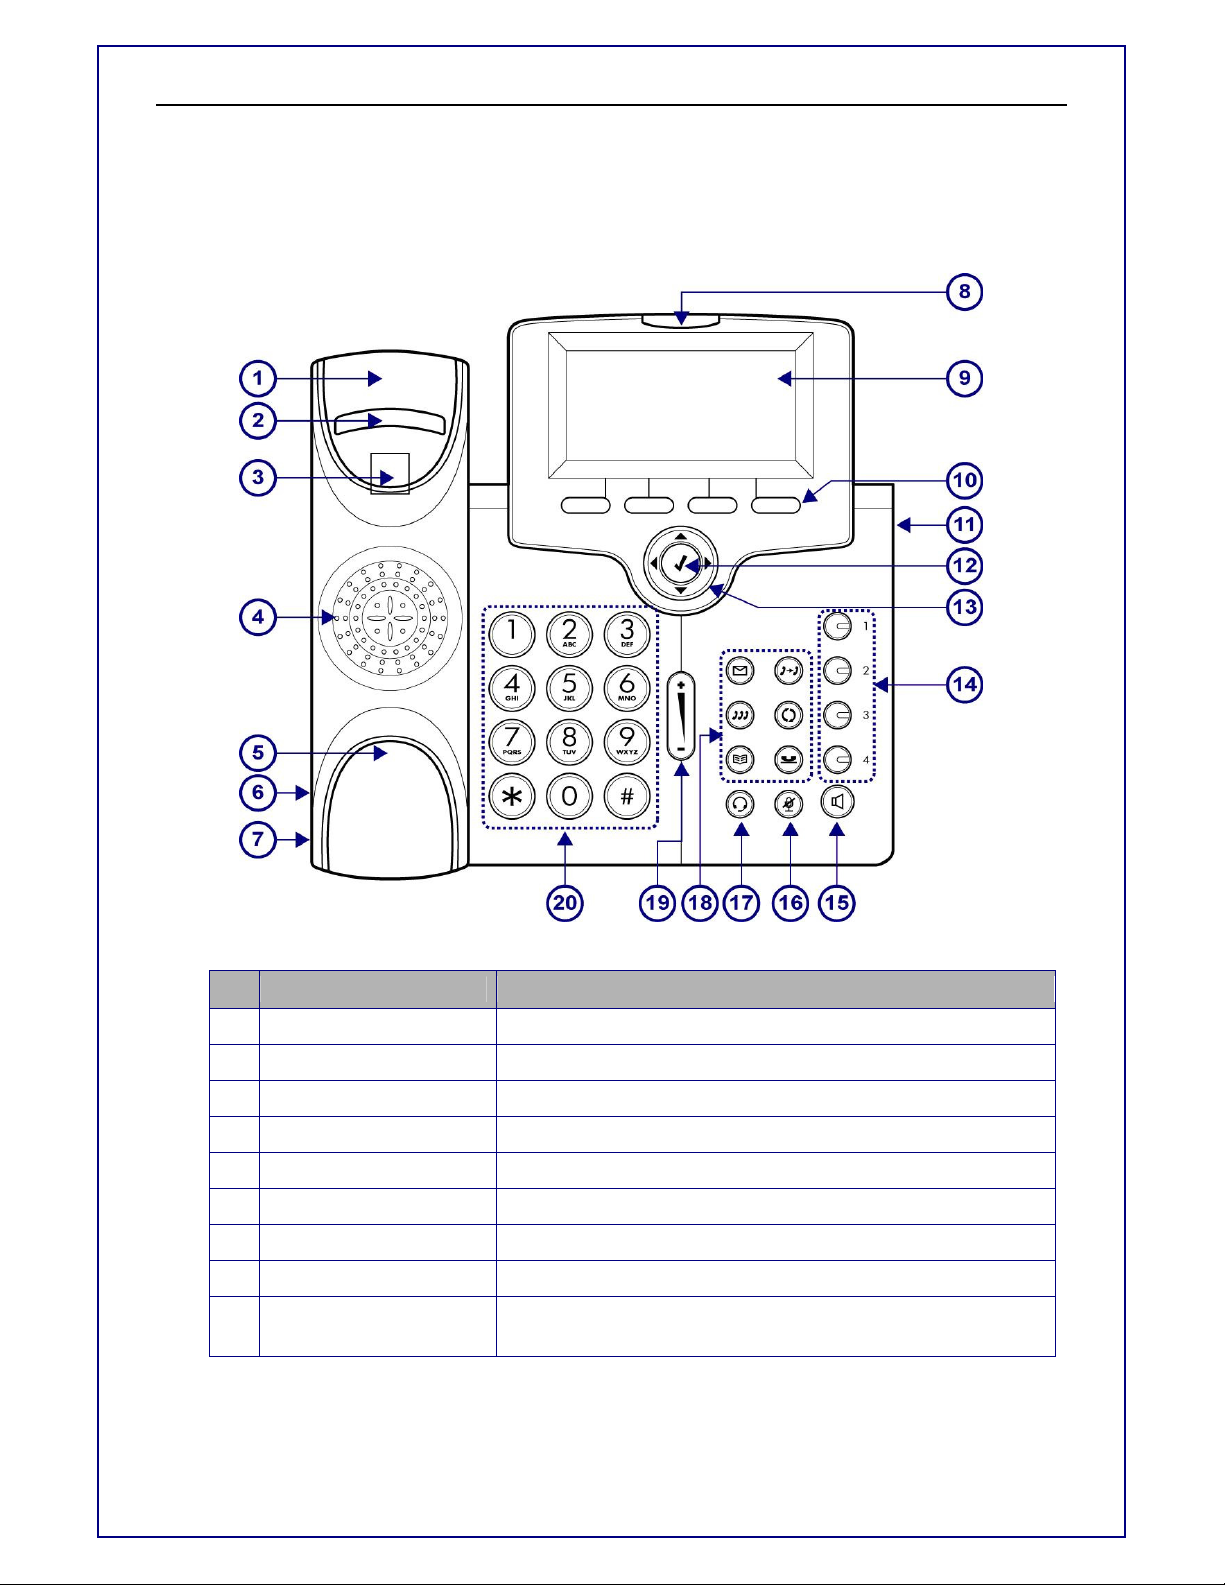
The front-View of the EIV-SMALL OFFICE phone
The figure below illustrates the front view of the EIV-SMALL OFFICE phone. With the point
numbers, you can find its name and a simple description of the part in the following table.
No Part Name Description
1 Handset top cradle For the placement of handset receiver.
2 Hook switch For hanging up your handset.
3 Cradle latch For latching your handset when it is wall mounted.
Speaker Provides sound for telephone ring and hands free talking.
5 Handset bottom cradle For the placement of handset transmitter.
6 Handset cord port Handset jack for connecting your handset.
7 Headset wire port Headset jack for connecting your headset.
8 Message LED Indicates an incoming call or new voice message.
9 Graphic LCD
Displays features such as the time, date, your phone
number, caller ID, line/call status and soft key tabs.
www.everlea.co.nz
Page 10
EIV-Small Office —Administrator Manual
11 EDM
XFR key
No Part Name Description
Each activates a softkey option (displayed on your phone
10
Soft keys
12 Navigator [] OK Key Used to confirm the setting or phone number dial.
screen). Soft keys point to feature options displayed along
the bottom of your LCD screen. Soft keys change
depending on the status of your phone.
Connects to an Extension Dial Module.
13 Navigator Control Keys
14
1,2,3,4 Line Keys
15
SPKR key
16
MUTE key
17
Headset key
REDIAL Key
HOLD Key
18
MSG Key
The four arrows enable you to scroll through text
and select features displayed on the LCD screen.
These keys can be used for line selection. A green LED is
associated with each key to indicate its line/call status.
Toggles the speaker on or off. A green LED is associated to
indicate its status.
Toggles the mute on or off. A red LED is associated to
indicate its status.
Toggles the headset on or off. A green LED is associated to
indicate its status.
Transfer a call to another IP phone.
Access to the Dialed Record menu list to redial the dialed
number.
Place the current call on hold so you may place another
phone call.
To get access to Voice Mail System for message retrieval.
19
20
CONF Key
Phonebook Key
Volume Control Key
Numeric Keypad
To initiate a conference call after multiple calls are
connected.
Access the Phone Book so you may call or edit the
contacts.
Increases or decreases volume for the handset, headset, or
speakerphone (depending upon which is currently active).
Also controls the ringer volume (if the handset is in its cradle)
[1], [2]… [9], [*], [0], [#]: The numeric keypad for dialing
numbers.
www.everlea.co.nz
Page 11
EIV-Small Office —Administrator Manual
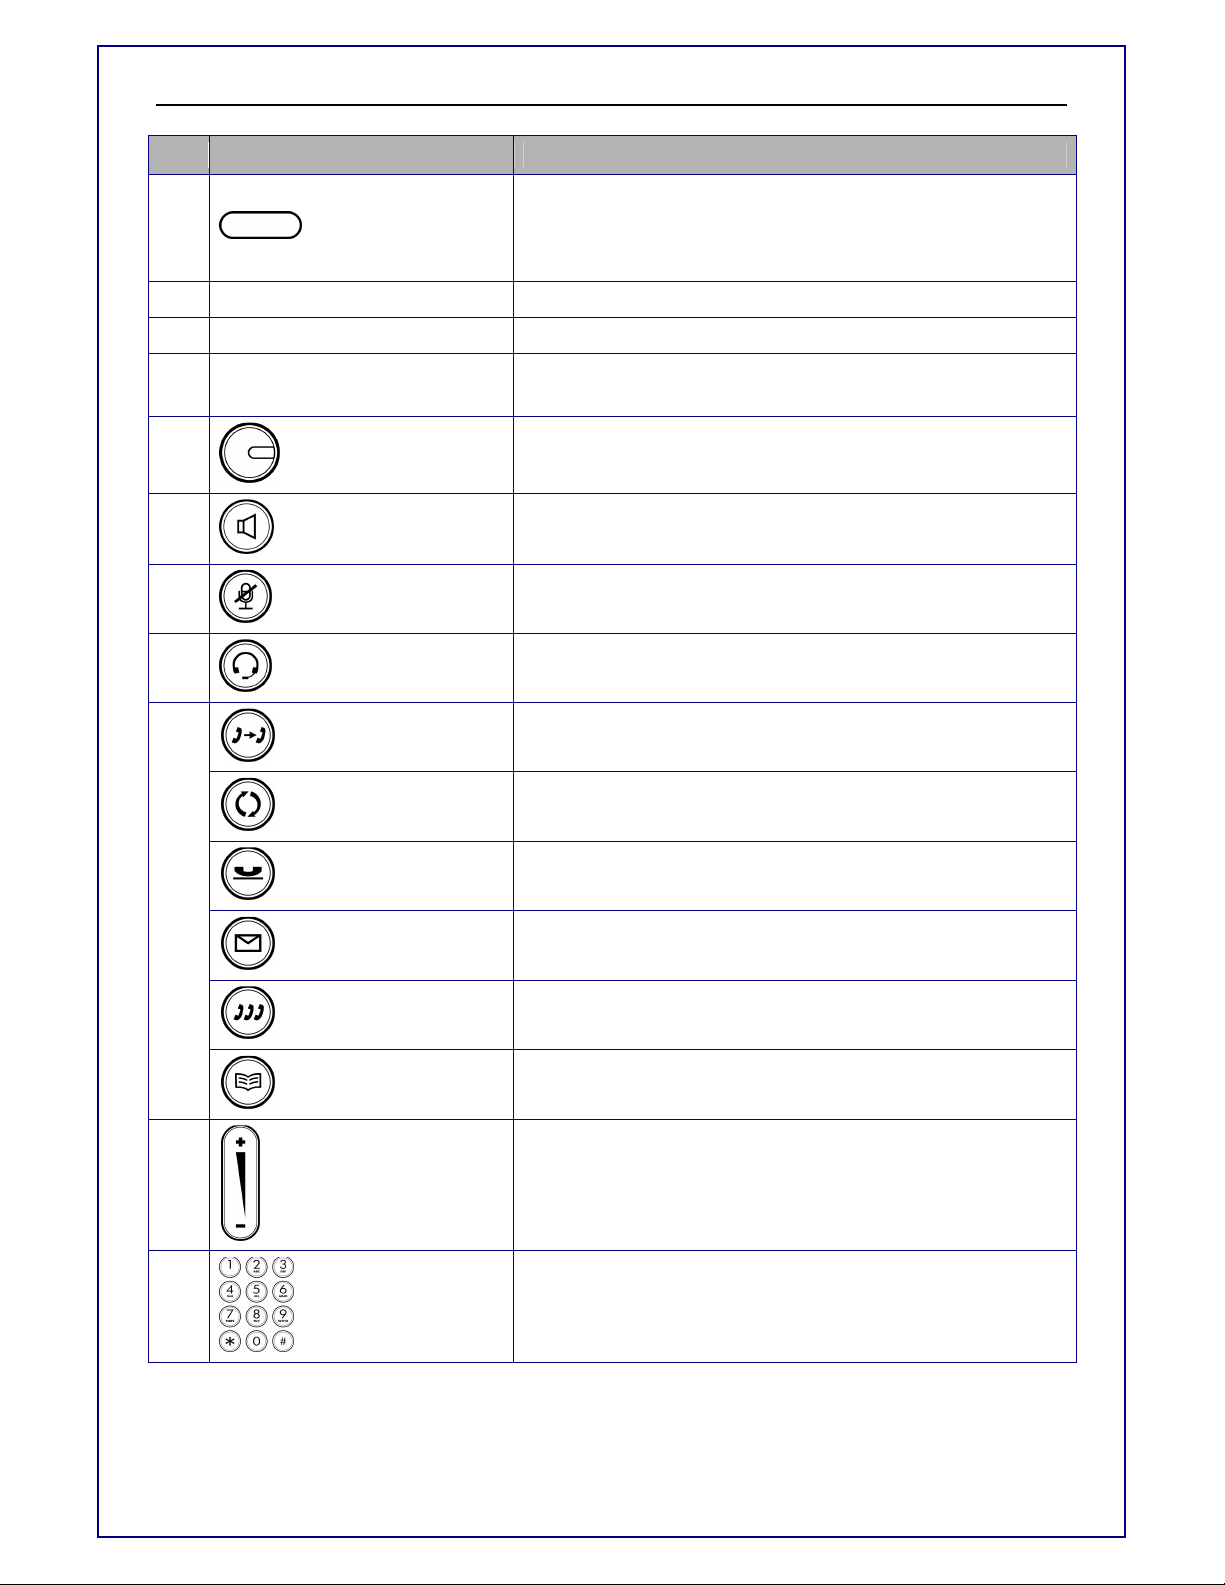
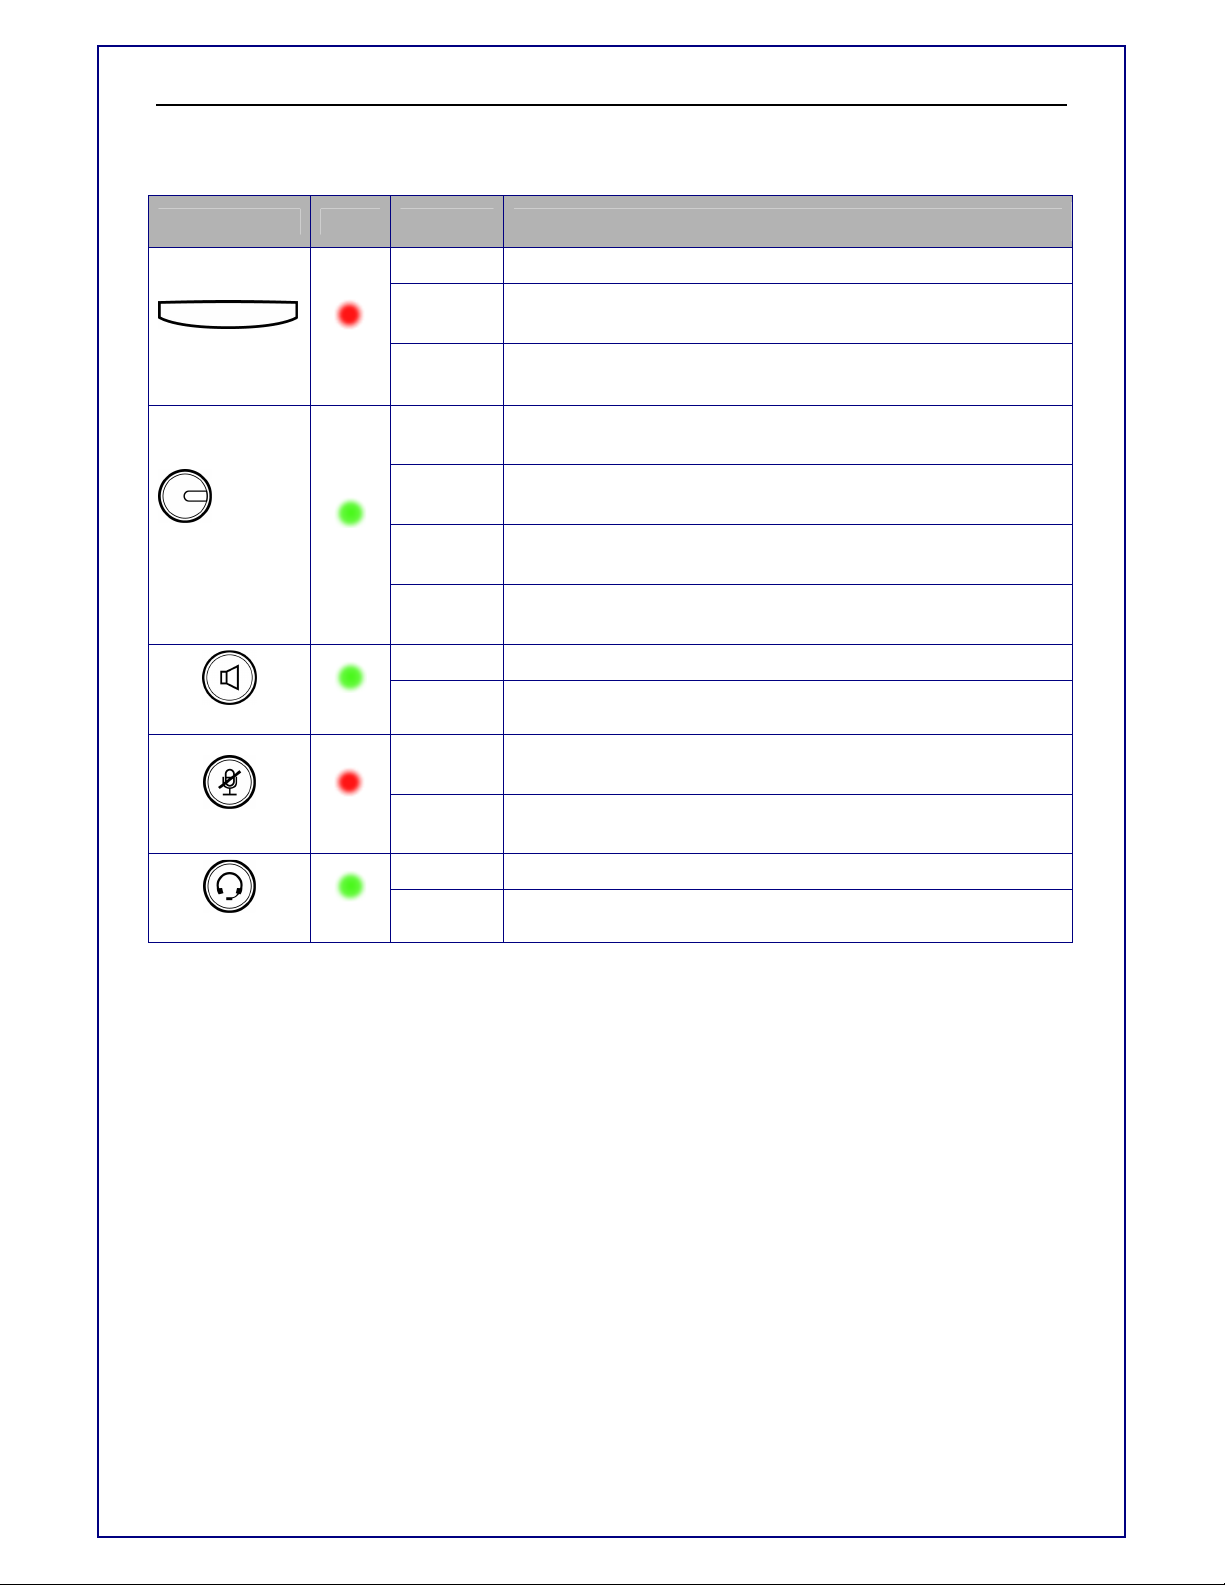
Understand the front panel indicators
LED Color Status Description
Off Idle or no new message.
MSG
1,2,3,4
Trunk lines
keys
SPKR key
MUTE key
Headset key
Red
Green
Green
Red
Green
Blinking
Slowly
Blinking
Rapidly
Off
Steady
Blinking
Slowly
Blinking
Rapidly
Off The speaker is not in use.
Steady While in on-hook dialing mode or hands-free mode.
Off
Steady
Off The headset mode is disabled.
Steady The headset mode is enabled.
New voice message indication.
There is an incoming call.
The trunk line is registered and is in idle (4 Trunk lines
supported per phone).
When the trunk line is active (dialing, or during a call).
Or the trunk line is unregistered.
The call of relative line is on hold or held by remote.
There is an incoming call.
The microphone is active for handset, headset, or handsfree mode.
The microphone is inactive for handset, headset, or
hands-free mode.
www.everlea.co.nz
Page 12
EIV-Small Office —Administrator Manual
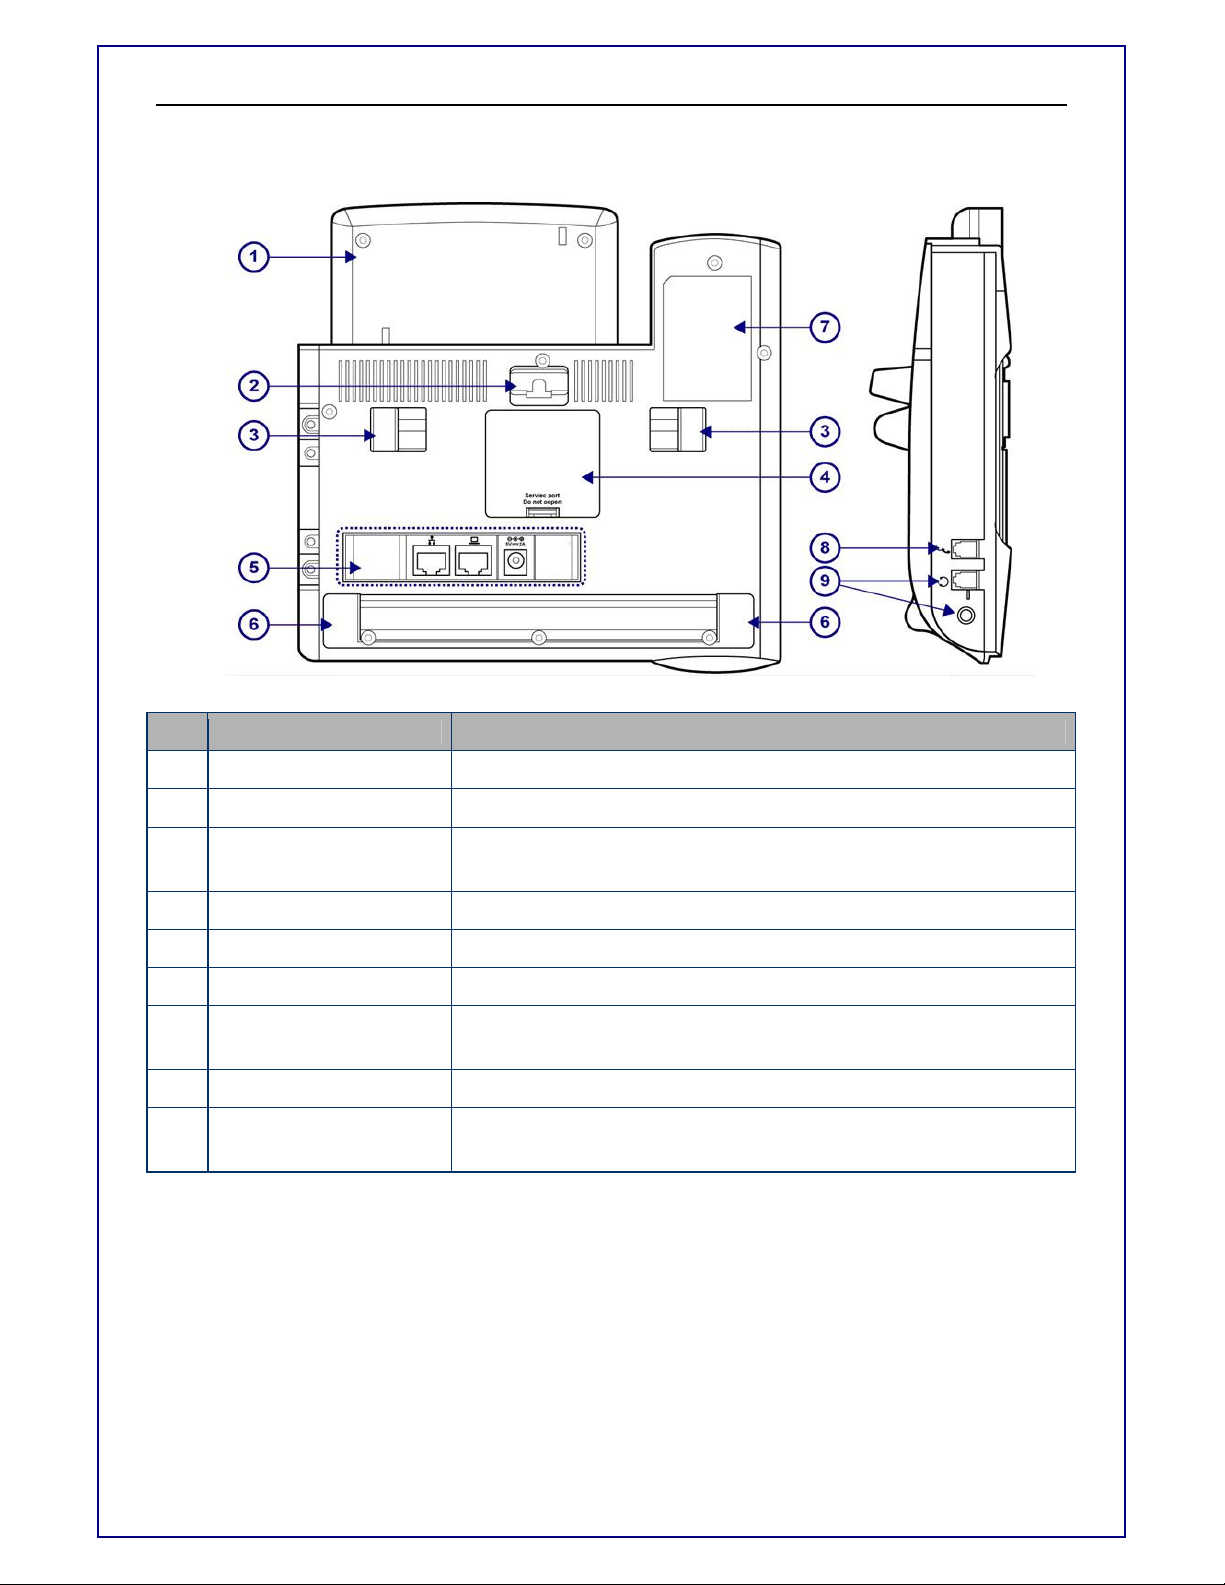
No Part Name
Description
1 LCD
S
creen
C
over
2 Wall
-
Mount Hole
8 Handset
C
ord
P
ort
The Rear-view of the EIV-SMALL OFFICE Phone
Covers the LCD screen.
For hanging the phone on the wall.
3 Hinge of Stand
4 Service Door For service only.
5 Input /Output Ports IP phone connectors (see the next figure for the details).
6 Hinge of Chassis For supporting the IP phone at different angles.
7 Product Label
9 Headset Wire Port
For supporting the IP phone at different angles. For wall
mounting, please remove the stands.
To show product production information, such like Product
model, serial number and MAC address.
Handset cord jack on the side of IP phone.
(1) Headset wire jack on the side of IP phone.
(2) Smaller Headset jack for different plug type.
www.everlea.co.nz
Page 13
EIV-Small Office —Administrator Manual
No Part Name
Description of function
1 WAN
P
ort
Understanding the Connectors of the IP Phone
Ethernet port for connecting to IP network.
Ethernet port for connecting to PC or Notebook PC. This
2 LAN Port
port can also be link to the other IP-Phones as P2P
intercom function.
3 Power Jack
If a power source from adaptor is required, please use a
standard power adaptor supplied in the package.
Installing the IP Phone
Before using phone, you have to prepare your network environment first. Please see the
figure below. You can find an Ethernet switch (or Router or Hub) and connect it to your
office network that is accessible to the global Internet. For sure, your network environment
has also a regular DHCP server that can offer you one applicable IP address to the IP
phone.
www.everlea.co.nz
Page 14

EIV-Small Office —Administrator Manual
Then, you can start to install the phone.
1. Plug the optional add-on Module (IP-EDM) onto the IP phone) and fasten it with 2
screws.
2. Connect one end of the coiled telephone cord to the handset and the other end tp the
handset port on the side of IP phone.
3. Connect an Ethernet cable to the LAN Port of your switch/router/hubs.
4. Then connect the other end of this Ethernet cable to the LAN port of the IP phone.
5. For local configuration purpose on the web of IP phone, you may connect a PC or
notebook via another Ethernet cable to the PC port on the back of IP phone.
6. Plug the power cord to the power jack of IP Phone and then plug the power adapter to
the wall outlet. Remember to power on your Ethernet switch/router/hub as well.
7. Wait for your phone to boot up. Please do not interrupt this process as it may take a
few minutes.
8. When the prompt on the LCD display is ready, please check if the IP phone works by
lifting up the handset. If there is a dialing tone, then dial several numbers to see
whether the LCD screen is showing your dialed numbers or not.
9. Check all the connections and reconfiguration of the IP phone, if you do not hear a dial
tone.
www.everlea.co.nz
Page 15
EIV-Small Office —Administrator Manual
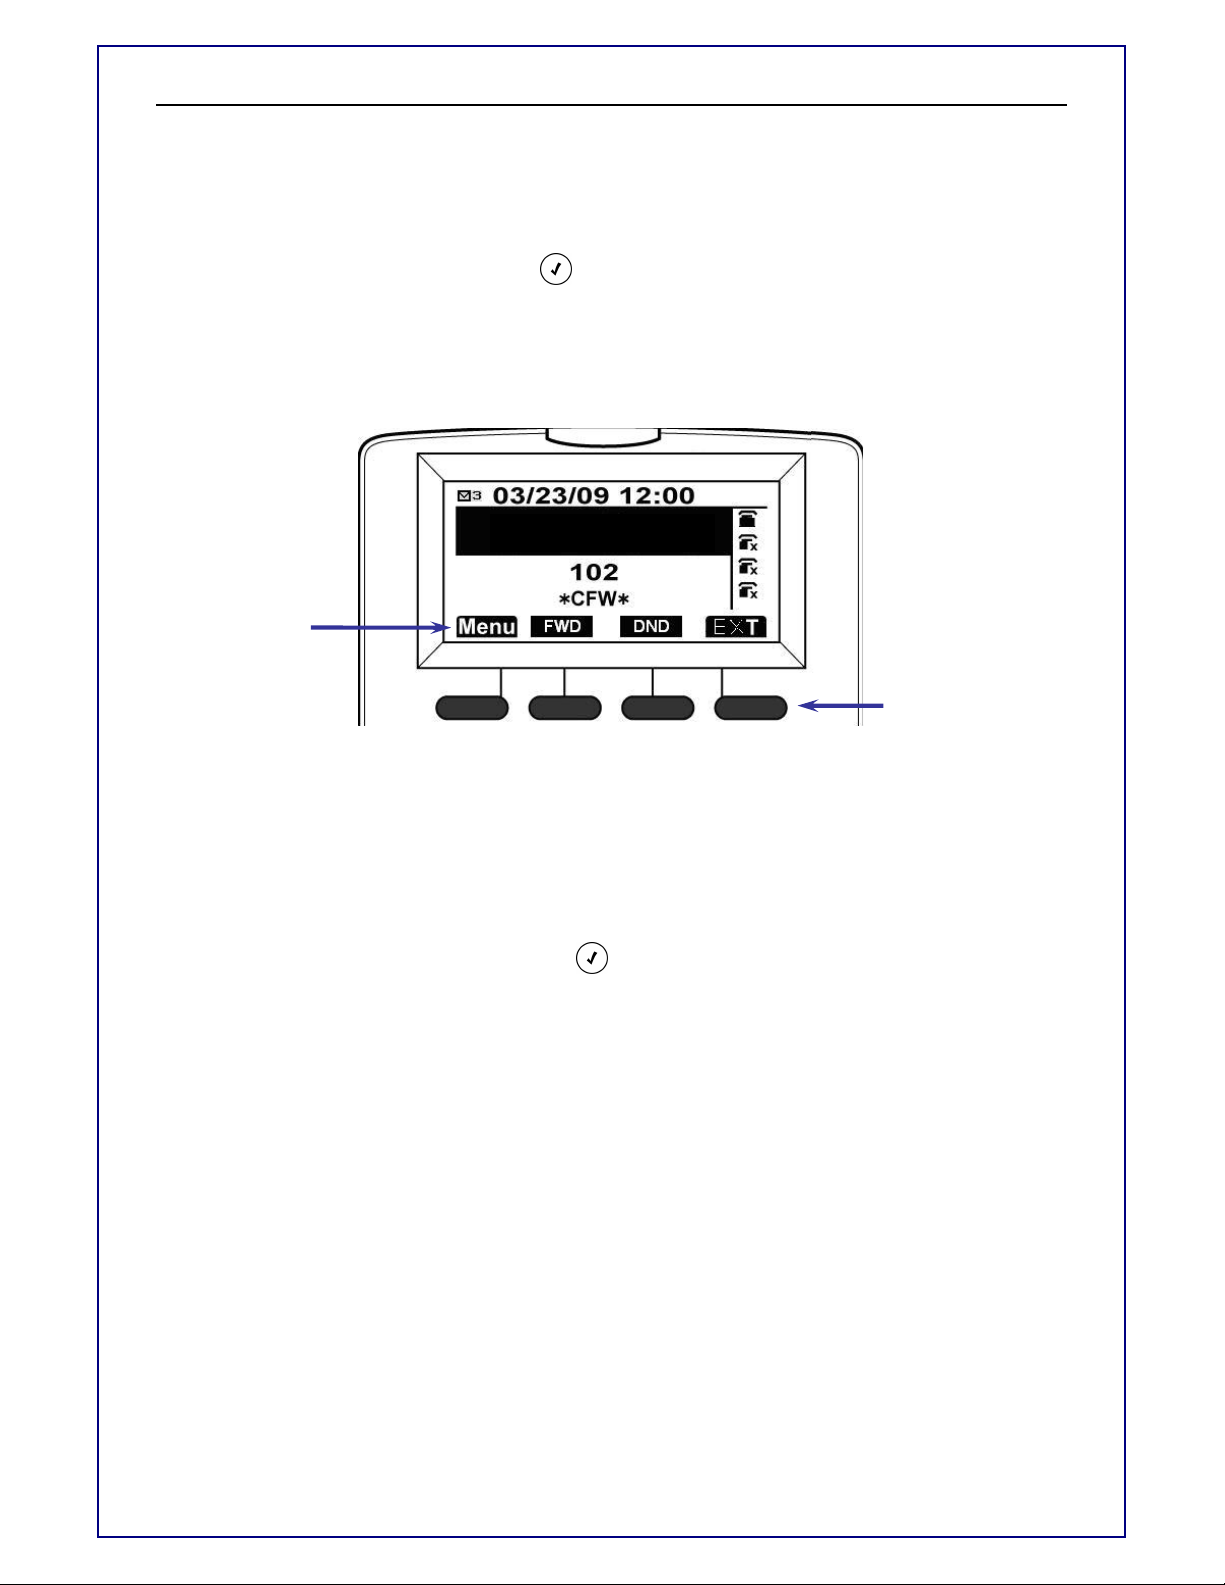
Accessing the LCD Screen
The following figure shows a standard format of LCD screen.
Operating your phone’s LCD screen is easy. Use the Navigation Control keys
softkeys, and the Navigation OK key to make your selections. Softkeys dynamically
change their functions and label depending on the state of the telephone. The dynamic
features associated with the softkeys are displayed on the bottom line of the LCD display
directly above each softkey buttons.
The softkeys
functions will
change dynamically
depending on the
status of the phone.
,
Softkeys:
Press the softkeys
to enter submenus
or to select the
functions.
Navigating LCD Screen
1. Press a softkey “Menu”, “FWD”, “DND”, or “EXT” to enter the submenu.
2. Use the
3. Use the
4. During navigation, the softkeys functions will change dynamically
depending on the selections you make. To select the softkey functions on
the LCD screen, press the softkeys associated with the functions.
5. Use the
navigation keys to browse through the submenu.
navigation key or the key to enter the submenu.
navigation key to go back to the previous level of the menu.
www.everlea.co.nz
Page 16

EIV-Small Office —Administrator Manual
Menu
User
Settings
Phonebook
Menu
User Settings
Call
Record
Basic Operations
Making Calls
You can make a call using one of the following methods:
• Dial the number directly from the numeric keypad.
• Dial the number using a trunk line.
• Use the Phone Book.
• Use the Call Record.
• Use the EXT function.
Making a basic phone call
1. Pick-up the handset. You will hear a dial tone.
2. Dial the phone number and press the key to dial out immediately.
Note: You may use the “Backsp” softkey to delete the last digit.
3. On-hook the handset when your conversation is over.
Making an outgoing SIP trunk call
1. Pick-up the handset. You will hear a dial tone.
2. Press the trunk line key and dial the phone number. The LED of trunk line
key lights up in red. Press the “#” key to dial out immediately.
3. On-hook the handset when your conversation is over.
Making a call using the Phone Book
1. From the LCD screen, select
2. Enter the phone number and press the key or use the
keys to search for your desired number in the Phone Book.
3. Select Dial from the LCD screen to dial the number.
Or you can press an idle line key to make a trunk call for selected number.
>
>
navigation
Making a call using the Call Record
1. From the LCD screen, select
2. To review your calls, select Dialed Calls, Missed Calls, or Answered
Calls.
>
>
.
.
www.everlea.co.nz
Page 17

EIV-Small Office —Administrator Manual
Answer
Answer
3. Use the
4. Select Dial from the LCD screen to redial the number.
navigation keys to select phone number you want to review.
Make an intercom call using directory
Use the “EXT” function to call members in the same system.
1. Select EXT on the LCD screen.
2. Use the
3. Select Dial on the LCD screen to dial the number.
navigation keys to choose the member you would like to call.
Answering Calls
Receiving a phone call
4. Pick up the handset upon hearing the phone ringing.
5. On-hook the handset when your conversation is over.
Receiving a trunk call with Auto Attendant
1. When there is an incoming call, the trunk line LED on all phones in local
system will be on.
The Auto-Attendant system will answer the phone and its IVR (Interactive
Voice Response) will help callers to connect to the extension they want.
2. The extension which caller wants to connect rings. And the trunk line LED
on this extension flashes.
3. You can pick-up the handset or select
the trunk line to answer the incoming trunk call.
4. On-hook the handset when your conversation is over.
Note: Only the ringing extension can answer the call (no Pickup)
on the LCD screen or press
Receiving a trunk call with system Operator
1. When there is an incoming call, the call will be sent to the system Operator
directly.
2. The system Operator rings, and the trunk line LED on Operator flashes.
3. You can pick-up the handset or select
the trunk line to answer the incoming trunk call.
on the LCD screen or press
www.everlea.co.nz
Page 18

EIV-Small Office —Administrator Manual
Answer
4. On-hook the handset when your conversation is over.
Note: Only Operator can answer call no other extension, you can use
ISP voice mail to send you email with message attached
Receiving a trunk call with All Ring
1. When there is an incoming call, the trunk line LED on all phones in local
system will flash, phones in local system will follow the rules as following:
DND, phone just not rings.
Block Calls, Block Anonymous, FWD, Auto Answer don’t take effect.
Phone keeps ringing.
Call Waiting, provide call waiting tone if there is free channel, or else
just not ring.
2. You can pick-up the handset or select Answer on the LCD screen or press
the trunk line to answer the incoming trunk call.
3. On-hook the handset when your conversation is over.
Notes:
a/ All Phones will ring, all trunk LED light will flash, anyone can answer call
b/ If Operator position set in programming after 60 seconds of ringing Operator Mail
Box will answer call and a message can be left.
c/ If Operator Postion is not set, after 60 seconds of ringing the Auto Attendant will
answer (Day / Night) and the caller can dial extension number, if the extension have
call forwards to voice mails the call will follow these, or the extension could have a
call forward external.
d/ The 60 second timer in above examples cannot be changed.
Receiving a trunk call with DID
1. When there is an incoming call, it’ll match DID table firstly with remote
number regardless of trunk line answering position.
2. If matched extension number successfully, the incoming call will send to
the extension directly, the trunk line LED on this extension flashes;
If matched extension number fails, it’ll send the call according to the
answering position.
3. You can pick-up the handset or select
the trunk line to answer the incoming trunk call.
4. On-hook the handset when your conversation is over.
Note: Call will only go to extension, no pickup
on the LCD screen or press
Receiving multiple calls
5. Pick up the handset upon hearing the phone ringing.
www.everlea.co.nz
Page 19

EIV-Small Office —Administrator Manual
•
6. During an active call, the LCD screen shows an incoming phone call and
the telephone number appears on the LCD screen. Use the
keys to select the caller.
7. Select Answer on the LCD screen to answer the call or select Reject to
reject the call. The current caller will be placed on hold automatically if you
choose to answer the call.
navigation
Handling Calls
Placing a call on hold
When you put a call on hold, the call remains active even though you and the other party
cannot hear one another. You can answer other calls while a call is on hold.
1. During an active call, hold the call using the Hold button .
2. Resume the call by using the Hold button again or select Resume soft key
on the LCD screen.
3. If multiple calls are on hold, select the call you want to resume conversation
with before selecting Resume.
Redialing
4. Press the Redial key. The Dialed Record menu will be showed.
5. Select any number you have ever dialed and press Dial soft key to dial out
Muting the microphone
1. During an active call, press the Mute key to mute the microphone.
2. The LED on the Mute key turns red. The microphones in the handset and
the speakerphone are now turned off.
3. To turn the microphone back on and return to the conversation, press the
Mute key again.
Adjusting the voice volume during a conversation
Press the volume control key to adjust the volume if the voice volume is
too low or too high.
www.everlea.co.nz
Page 20

EIV-Small Office —Administrator Manual
Transferring a call (blind)
4. During an active phone call, press the transfer key . This puts the call
on transfer hold. The phone prompts you entering the phone number to
which you would like to transfer the call to.
5. Enter the phone number then hook on.
Transferring a call (semi-attended)
1. During an active phone call, press the transfer key . This puts the call
on transfer hold. The phone prompts you entering the phone number to
which you would like to transfer the call to.
2. Enter the phone number and select Dial on the LCD screen or press
key to make the call.
3. Hook on before the callee answering the call.
Transferring a call (attended)
1. During an active phone call, press the transfer key . This puts the call
on transfer hold. The phone prompts you entering the phone number to
which you would like to transfer the call to.
2. Enter the phone number and select Dial on the LCD screen or press
key to make the call.
3. Hook on after the callee answering the call.
Using Other Call Features
3-way conference call
1. During an active phone call, you may invite another party to join using the 3way conference call feature.
To achieve this, using the CONF key to hold the first call. The phone
prompts you entering the phone number to which you would like to join in the
conference.
2. Enter the phone number and select Dial on the LCD screen or press key
to make the call.
3. Wait for the call to be answered.
www.everlea.co.nz
Page 21

EIV-Small Office —Administrator Manual
Web
->System
-
Web
-
4. Press the CONF key again to start conference.
Call Hold/Retrieve
Call Hold/Retrieve function lets user to pick up the hold call on another phone in local
system by press the corresponding hold trunk line key.
1. During an active phone trunk call, hold the call using the Hold button
or press the Hold soft key. When hold the trunk call
successfully, the led of the corresponding trunk line on all phones in
local system will be slow flash.
2. Press the slow flash trunk line on other phones in local system, the
hold call will be retrieved.
Call Transfer Recall
Call Transfer Recall lets the trunk call recall to the transferor or operator when transfer
target don’t answer the transfer call.
1. During an active phone trunk call, transfer the call to another local phone,
the call on another phone will be ringing.
2. When the call hasn’t been answered and time to transfer recall timeout
(Configured on Web->System ->Transfer Recall Setting), the call will be
recalled to transferor.
Transferor will always ring regardless of the DND/FWD/Call Blocking .etc.
3. When transferor hasn’t answer the call and time to the transfer recall
timeout, the call will be sent to system operator.
All Paging
All Paging makes a paging call to all phones in local system. The called party will hear the
voice from paging party, and he can select whether answer the paging call or not.
1. When user dials All Paging Access Code (configured on
>All Paging Access Code), All paging will be activated, and it’ll play a
beep on phone.
2. The paged party will accept all paging according to the configuration (
>Phone ->Paged Settings) as following:
• All Paged Call: Permit paged party accept the paging call or not.
If permitted, the paged party will play a beep and can hear voice from
paging party; otherwise nothing will happen on the paged party.
Note: When “All Paged Call” is on, and the phone is set “DND”, this party will also
reject the All Paging call.
www.everlea.co.nz
Page 22

EIV-Small Office —Administrator Manual
Answer
Paging
ABR
3. The paged party can end the paging call by press EndCall soft key.
4. The paged party can answer the paging call by press
soft key,
then the call between paging party and the paged party will be normal call.
Paging call between paging party and other paged party will be
disconnected.
Single Paging
Single Paging make a paging call to another phone in local system. The called party will
auto answer the call, and he can select whether accept the paging call or not.
1. When user is dialing the phone number in local system,
will appear in the third soft key place. Press Paging, single paging will be
activated.
2. The paged party will answer the single paging according to the
configuration(Web->Phone ->Paged Settings), there are three options for
single paging:
• Single Paged Call: Determines the paged party will answer the
paging call or not.
• Auto Mute on Single Paged Call: If Auto Mute is on; the paged
phone will enable Mute when answer the paging call, If Auto-Mute is
off, the two phones can talk with each other directly.
• Notification on Single Paged Call: If Notification Tone is on, a beep
will be heard when the phone accepts the paging call no matter Auto
Mute is on or off.
Note: When “Single Paged Call” is on, following condition also can’t be paged:
1) Set DND
2) Paging party in blocking list
3) Set Block Anonymous, and Paging party is anonymous
4) Set All Call Forward
5) Set Busy Call Forward and paged part is busy now.
soft key
Auto Busy Redial
Auto Busy Redial can be activated when the called party (Trunk call) is busy. The Redial
Attempts (1~10) and Interval (15~60 sec) can be configured on Web->Phone->Phone
Features.
1. Press the Redial key. The Dialed Record menu will be shown. And
soft key will be showed on the fourth place.
www.everlea.co.nz
Page 23

EIV-Small Office —Administrator Manual
2. Use the
press one line key to dial out the trunk call.
When the trunk call is busy, Auto Busy Redial function will be activated.
Phone will auto redial the busy trunk call in attempts times and after
interval time until called party answer the call.
During ABR process, if the called party is not busy, the Auto Busy Redial
function will be stopped.
3. Between the ABR attempts, any action except pressing the volume keys
will cancel the auto busy redial function.
navigation keys to select a trunk number, press ABR or
Listen VM from Remote
This function let user dial into the system to listen to the voice messages left for him/her.
1. Configure the phone forward to “vm”. When user dial from the remote, the
call will forward to vm.
2. When user hear the prompt “please leave a message after the beep”,
press the “*” key, then user will hear the prompt “please input the
password”,
3. When user input the correct vm password, he can listen voice message left
for him. And the follow steps are the same as operating vm on local phone.
Leave MSG to VM via AA
This function let remote user leave message to local extension’s VM when call to the
extension by AA but it is busy or no answer
1. Make an incoming call by AA, and dial the extension.
2. When the extension busy or no answer, AA supports retry, it’ll prompt to
transfer to another ext or to the operator or press “#” key to leave message
to VM of this extension.
3. If outside codec don’t support G.729, it can’t leave message to VM via AA.
www.everlea.co.nz
Page 24

EIV-Small Office —Administrator Manual
Configuring the IP Phone
Select Menu on the LCD screen to access the phone features and settings.
The menu options include:
• Phone Settings
• User Settings
• VM Settings
• EDM Key Set (If EDM add on)
• Phone Information
• VAA Settings
• Admin Settings
• Reboot
Phone Settings
Use Phone Settings to configure the phone settings of your IP Phone.
www.everlea.co.nz
Page 25
 Loading...