

Page 1
09/28/11
Important – Please read these instructions fully before assembly or using
These instructions contain important information which will help you get the best from your equipment and ensure
safe and correct assembly, use and maintenance.
If you need help or have damaged or missing parts, call the Customer Helpline: 0845 6000 464
335/8704
EV7000 Treadmill
Assembly & User Instructions - Please keep for future reference
Page 2
2
Contents
Safety Information 3
Components - Parts 4
Components - Fixings 5
Assembly Instructiions 7-12
Computer Operation 13-15
Incline Adjustment 16
Folding Instructions 17
Care and Maintenance 18-19
Belt adjustment 18
Cleaning 19
Deck lubrication 19
Exercising Information 20-23
Before starting to exercise 20
Muscle chart 21
Warming up and cooling down exercises 22
Exploded Parts Diagram 24-30
Console 24
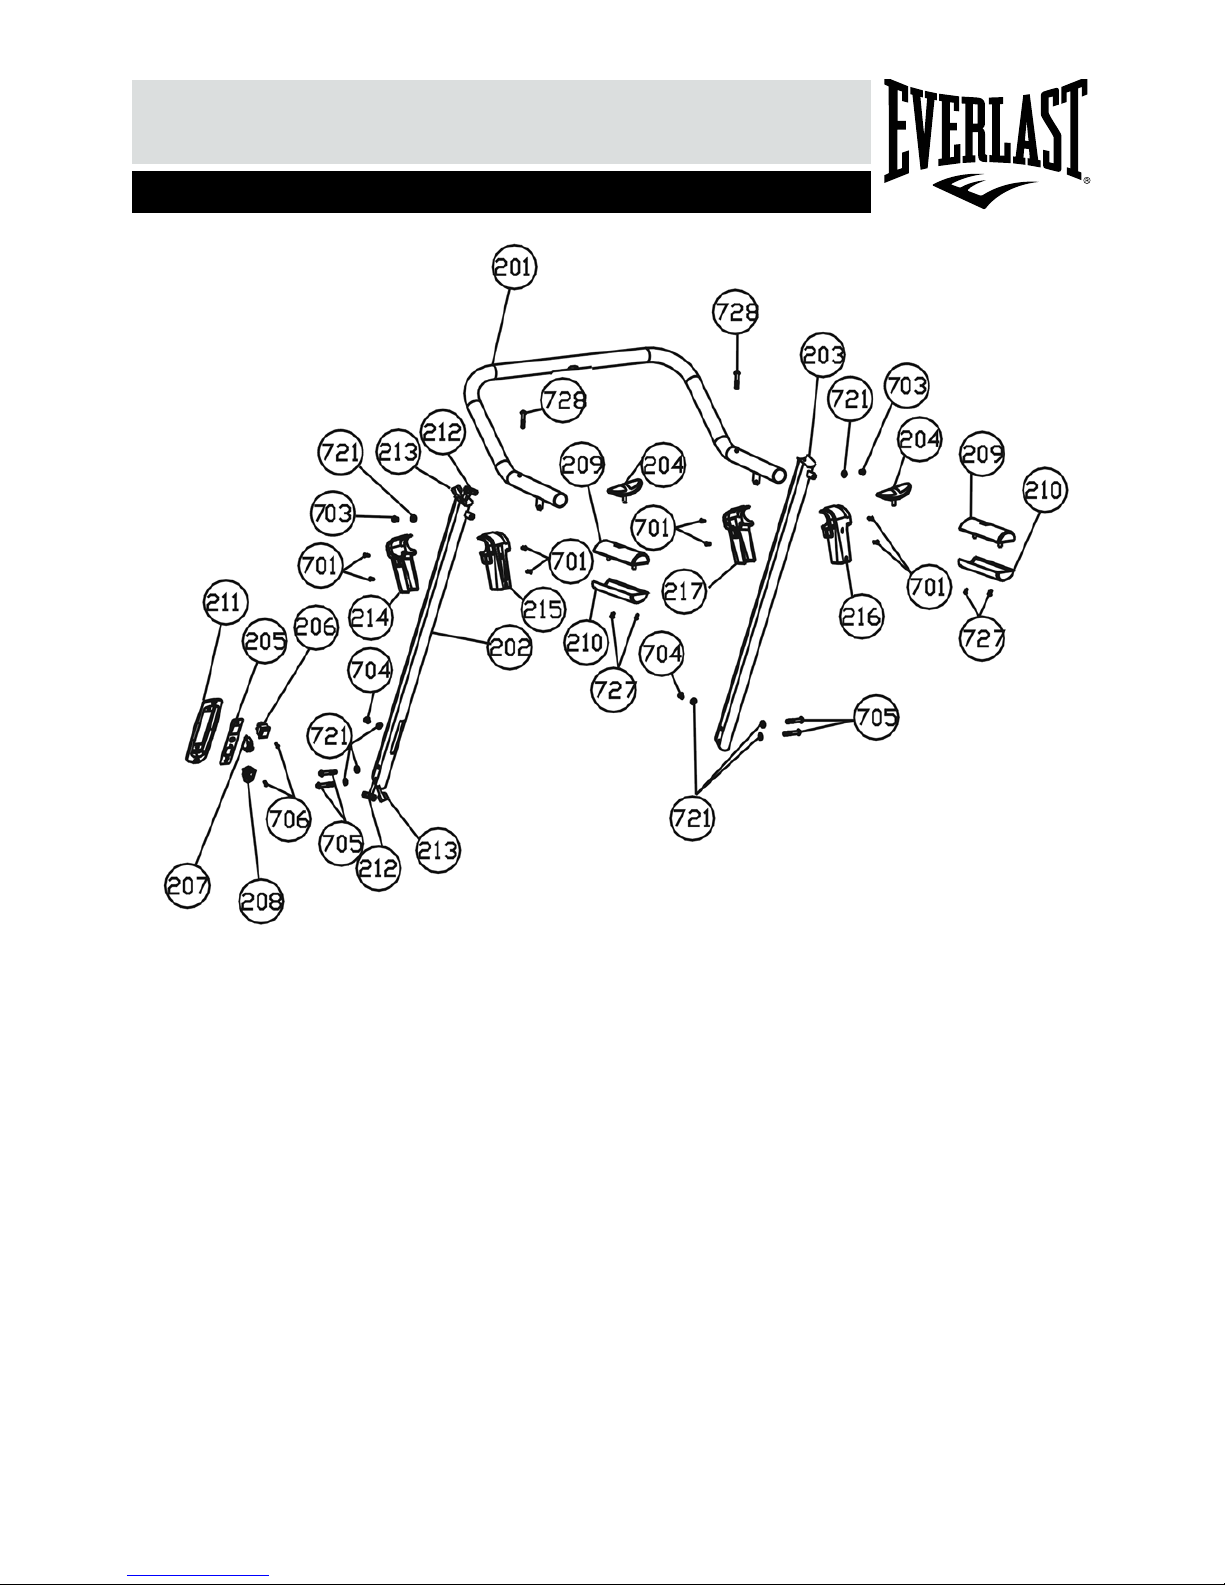
Upright Frame and Handle Bar 25
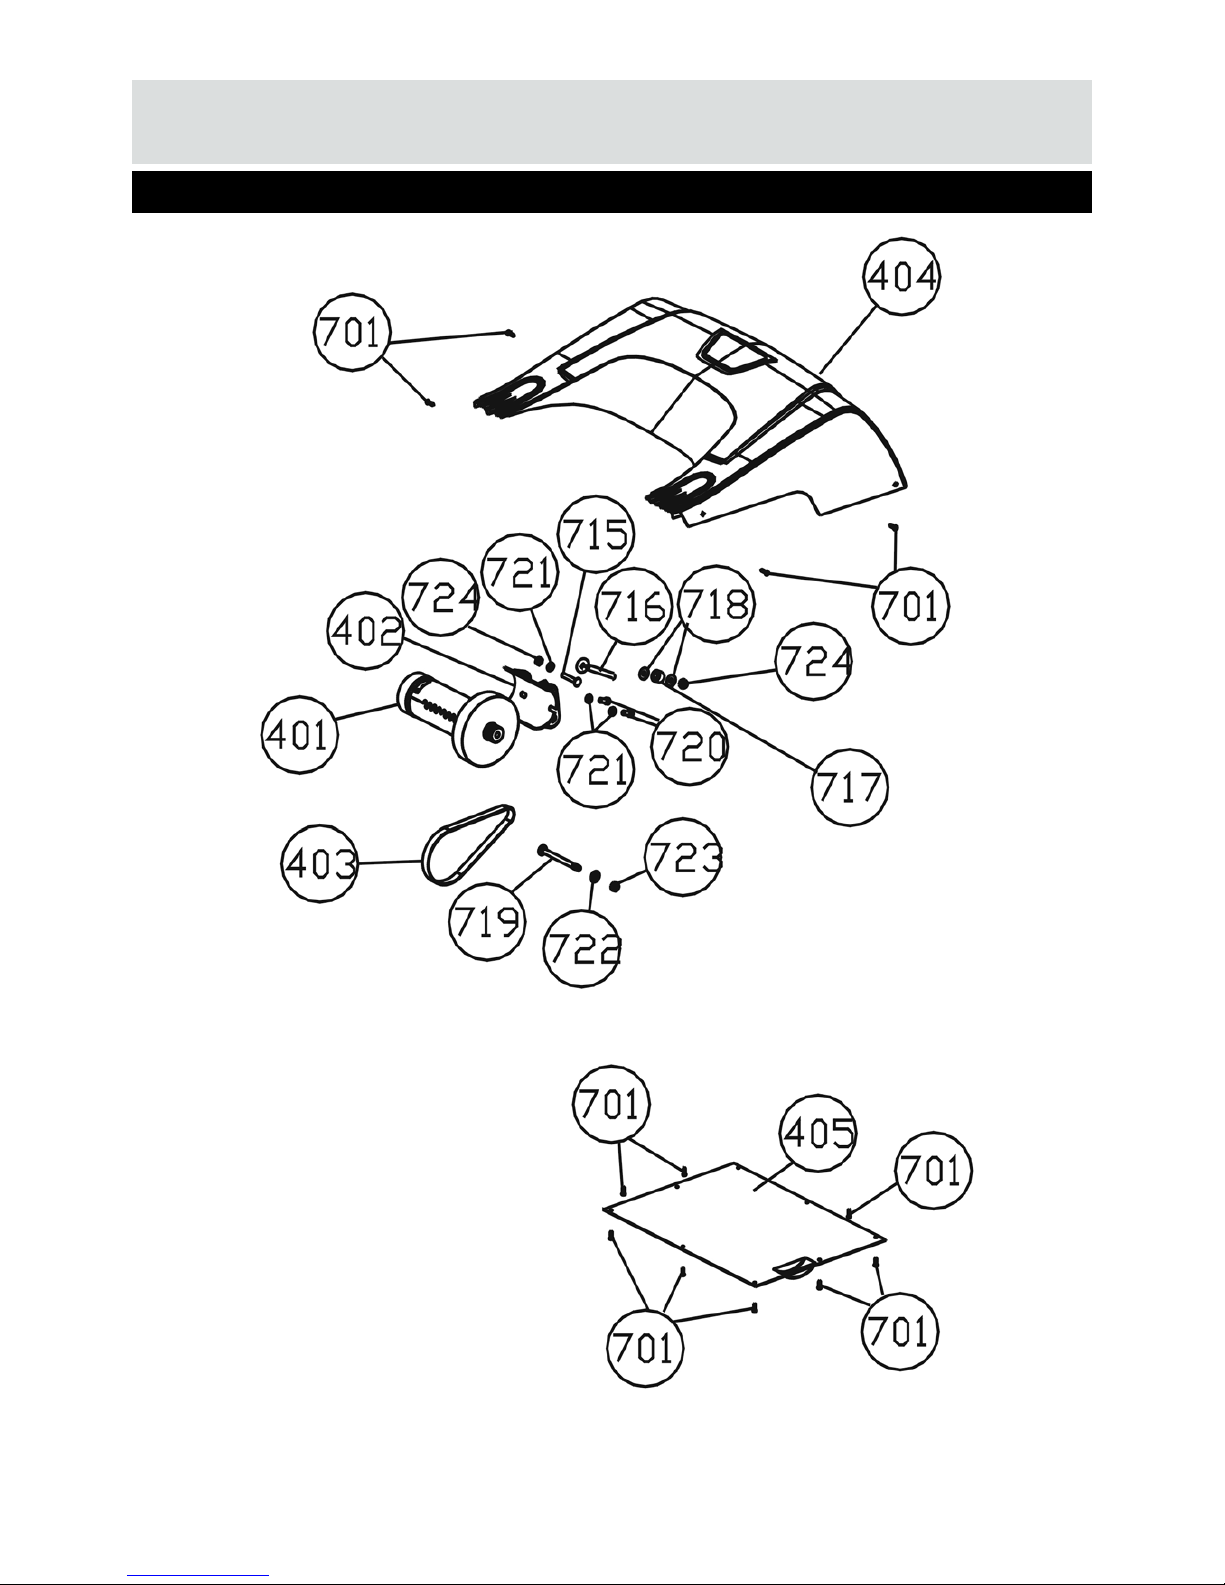
Motor Cover 26
Motor Cover Frame and Upright Cover 27
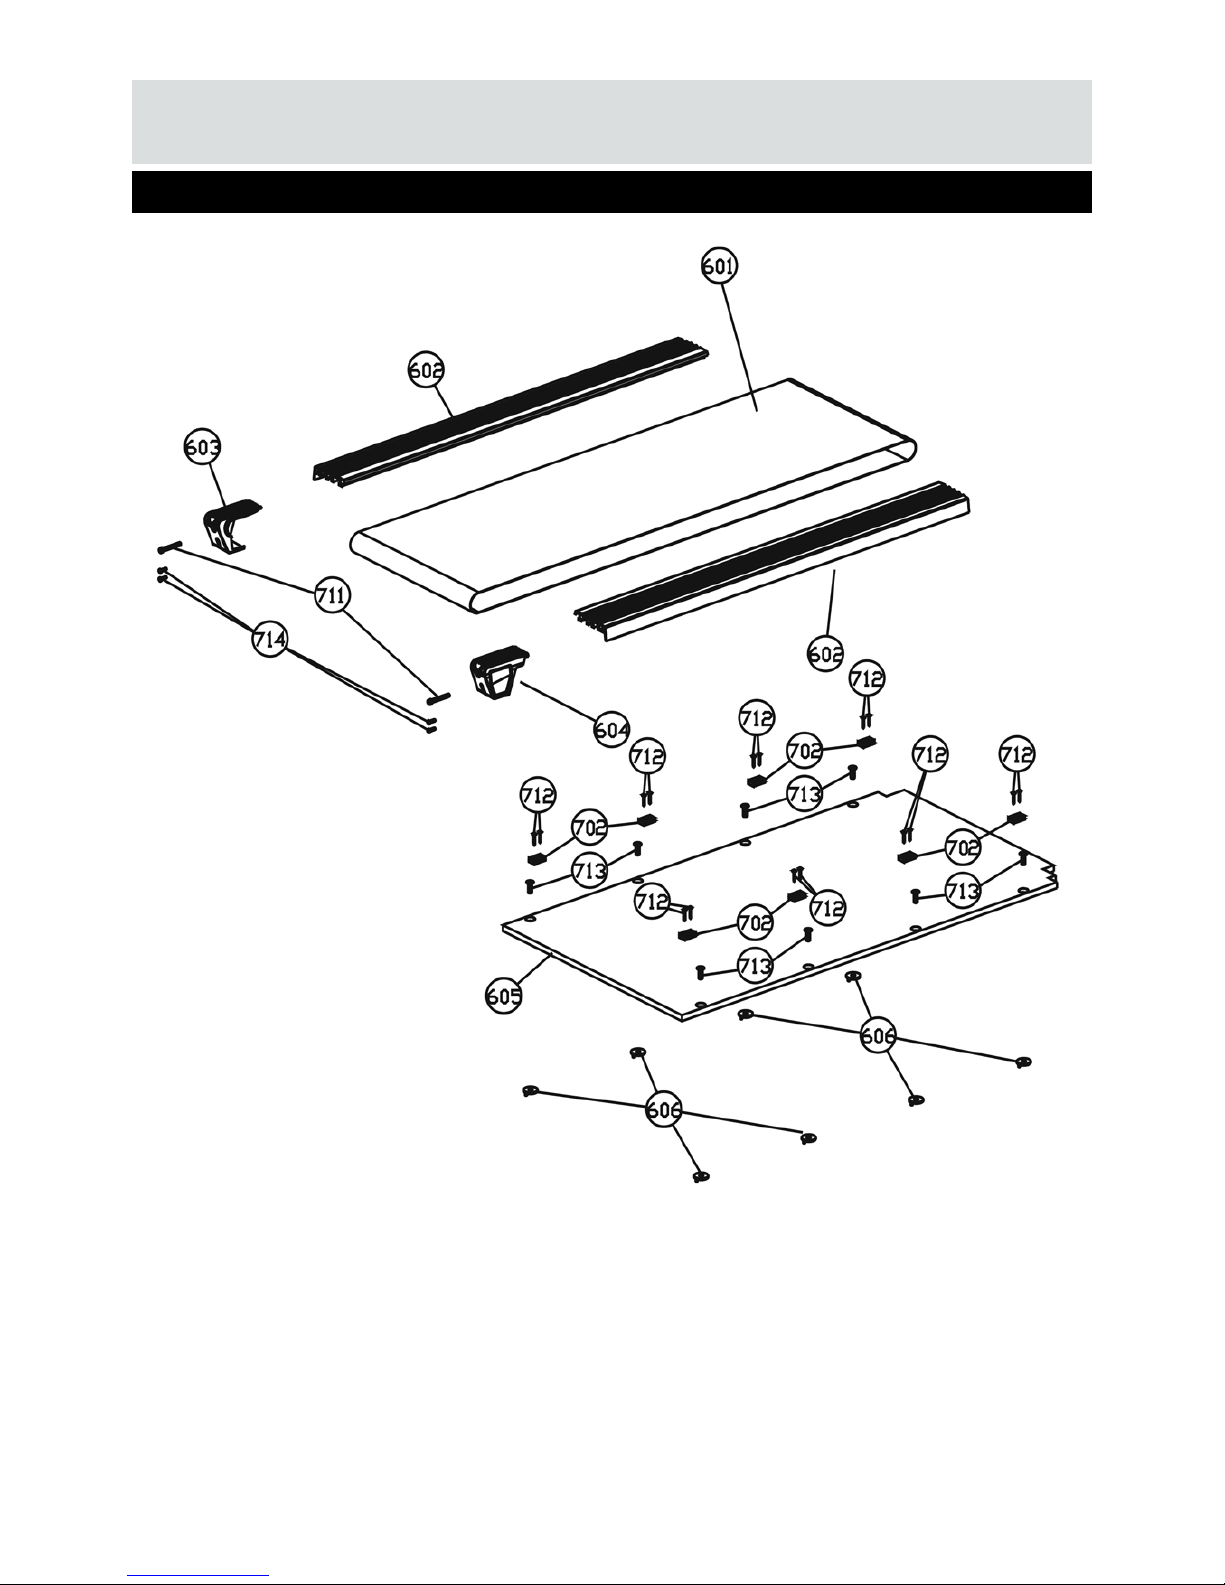
Walking Belt 28
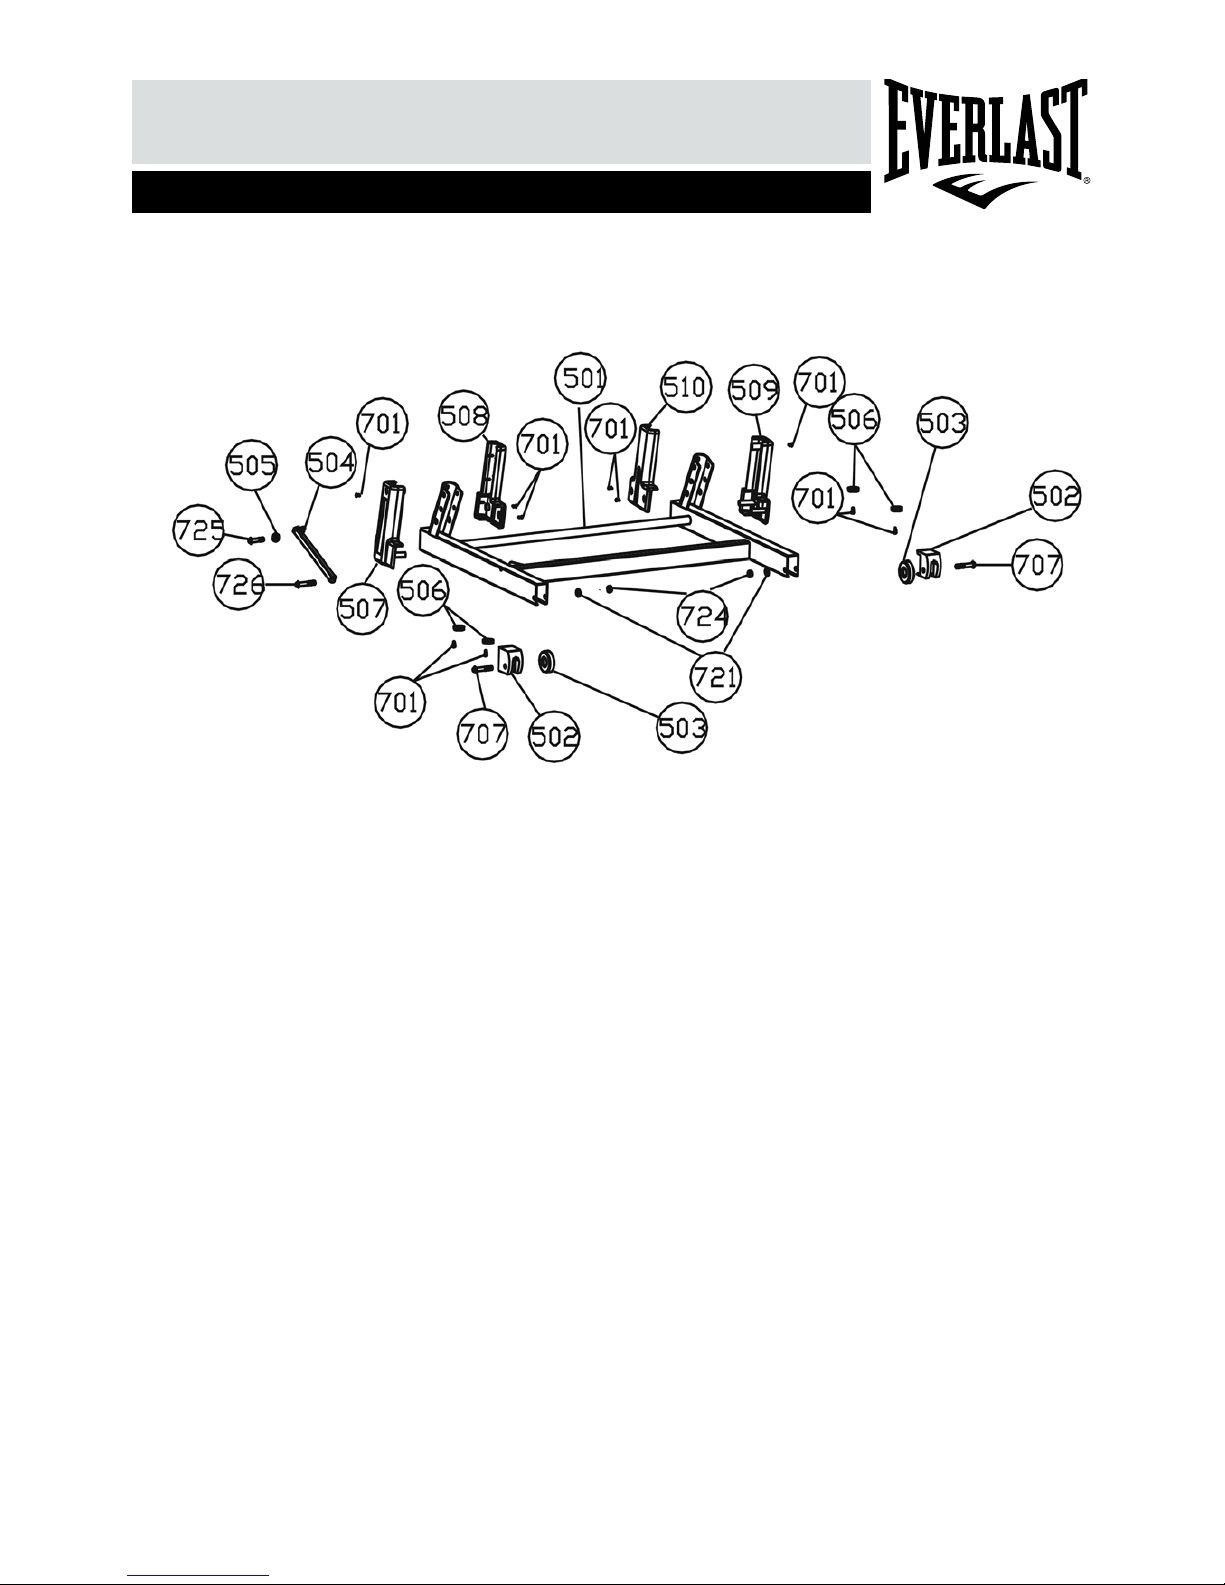
Main Frame 29
Upright Cover and Handle Bar Cover 30
Exploded Diagram Parts List 31
Page 3

3
Safety Information
To reduce the risk of serious injury, read the entire manual before you assemble or operate the Everlast Treadmill.
In particular, note the following safety precautions:
Important – Please read fully before assembly or using
Assembly
Using
• Check you have all the components and tools listed,
bearing in mind that, for ease of assembly, some
components are pre-assembled.
• Keep children and animals away from the work area,
small parts could choke if swallowed.
• Make sure you have enough space to layout the
parts before starting.
• Assemble the item as close to its final position (in
the same room) as possible.
• Position the equipment on a clear, level surface.
• Dispose of all packaging carefully and responsibly.
• Only one person at a time should use the
equipment.
• Keep hands away from all moving parts.
• Always wear appropriate workout clothing when
exercising. Do not wear loose or baggy clothing,
since it may get caught in the equipment. Wear
athletic shoes to protect your feet while exercising.
• Do not place any sharp objects around the
equipment.
• Disabled persons should not use the equipment
without a qualified person or doctor in attendance.
• This product is suitable for user’s weight of: 100kgs.
• This product conforms to: (BS EN957) - PARTS 1 &
6 class (H) - Home Use - Class (B).
• This exercise product has been designed and
manufactured to comply with the latest (BS EN 957)
British and European Safety Standards.
• It is the responsibility of the owner to ensure that all
users of this product are properly informed as to how
to use this product safely.
• This product is intended for domestic use only. Do
not use in any commercial, rental, or institutional
setting.
• Before using the equipment to exercise, always do
stretching exercises to properly warm up.
• If the user experiences dizziness, nausea, chest
pain, or other abnormal symptoms stop the workout
and seek immediate medical attention.
• Ensure that there is space behind your treadmill, 2
metres is recommended.
Warning: Before beginning any exercise program, consult your Doctor. This is especially important for
persons over the age of 35 or persons with pre-existing health problems. You MUST read all instructions before
using any fitness equipment. Argos and its associates assumes no responsibility for personal injury or property
damage sustained by or through the use of this product.
Page 4
4
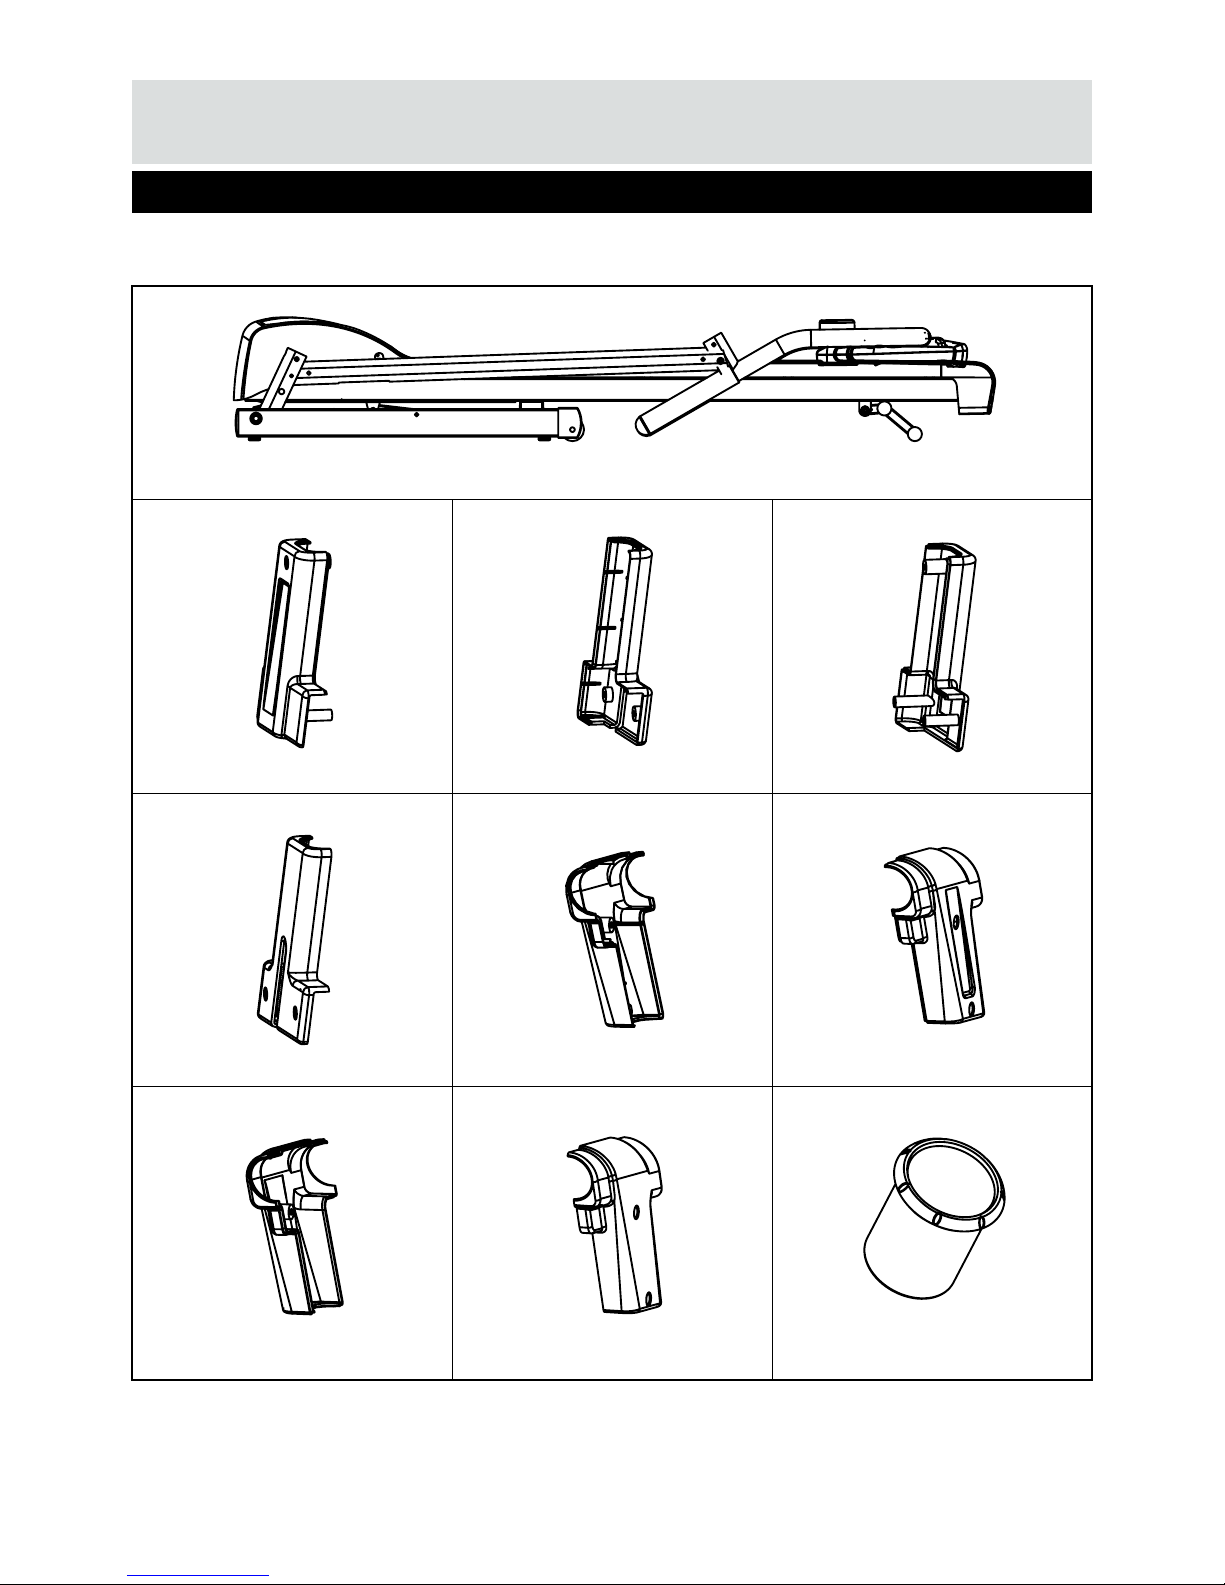
Main Frame Assembly x 1
507
Upright Cover - LL x 1
508
Upright Cover - LR x 1
509
Upright Cover - RL x 1
510
Upright Cover - RR x 1
214
Handle Bar Cover - Left 1 x 1
215
Handle Bar Cover - Left 2 x 1
217
Handle Bar Cover - Right 2 x 1
216
Handle Bar Cover - Right 1 x 1
103
Water Bottle Holder x 2
Components - Parts
Note: Some of the smaller components may be pre-fitted to larger components. Please check carefully before
contacting Argos regarding any missing components.
Please check you have all the parts listed below
If you have damaged or missing components,
call the Customer Helpline: 0845 6000 464
Page 5
5
728
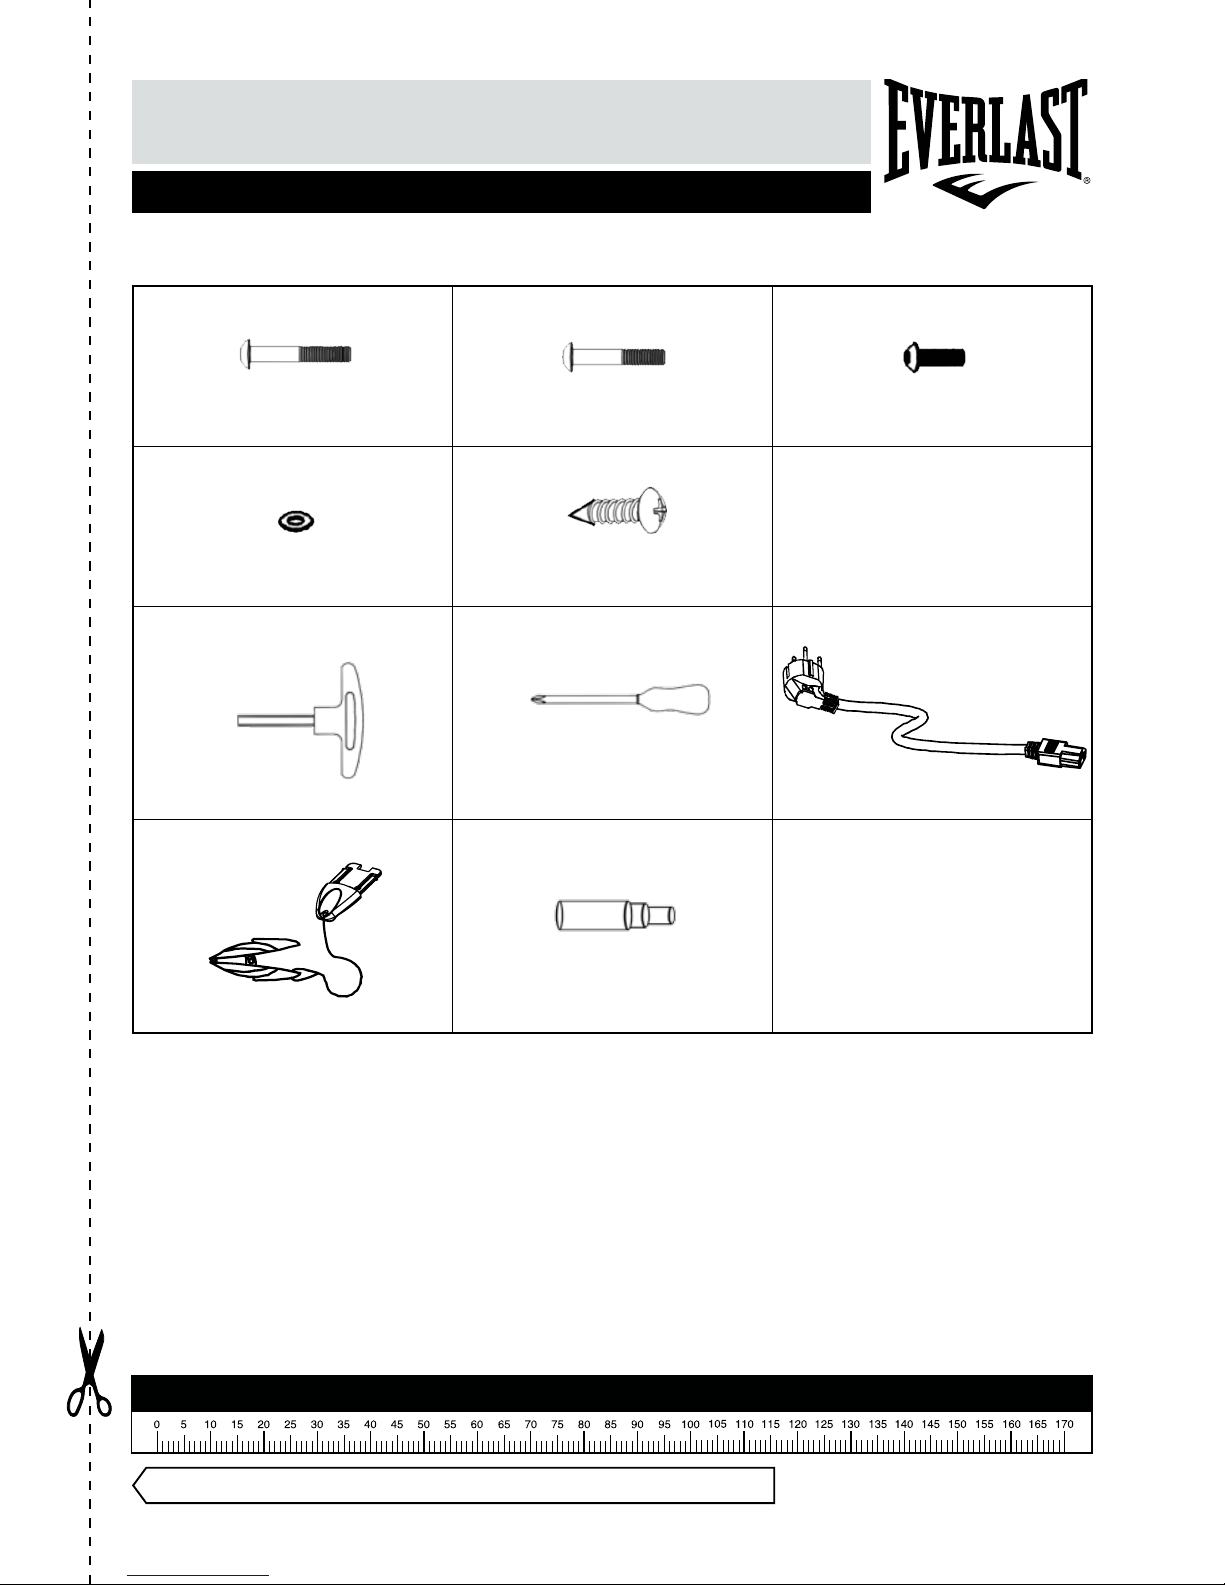
M8 x 45mm Bolt x 2
705
M8 x 42mm Bolt x 2
704
M8 x 18mm Bolt x 2
721
ø8 Washer x 4
701
M4 x 15mm Screw x 14
A
Allen Wrench x 1
B
Screwdriver x 1
E
Power Cord x 1
F
Safety Key x 1
G
Deck Lube x 1
Components - Fixings
Note: Some of the fixings are pre-fitted to the larger components. Please check carefully before contacting Argos
regarding any missing fixings.
Please check you have all the fixings listed below
Ruler - Use this ruler to help correctly identify the hardware
Note: Cut out this page to help fixing identification during assembly.
Page 6

6
Page 7
705
704
721
721
705
704
721
721
202
203
7
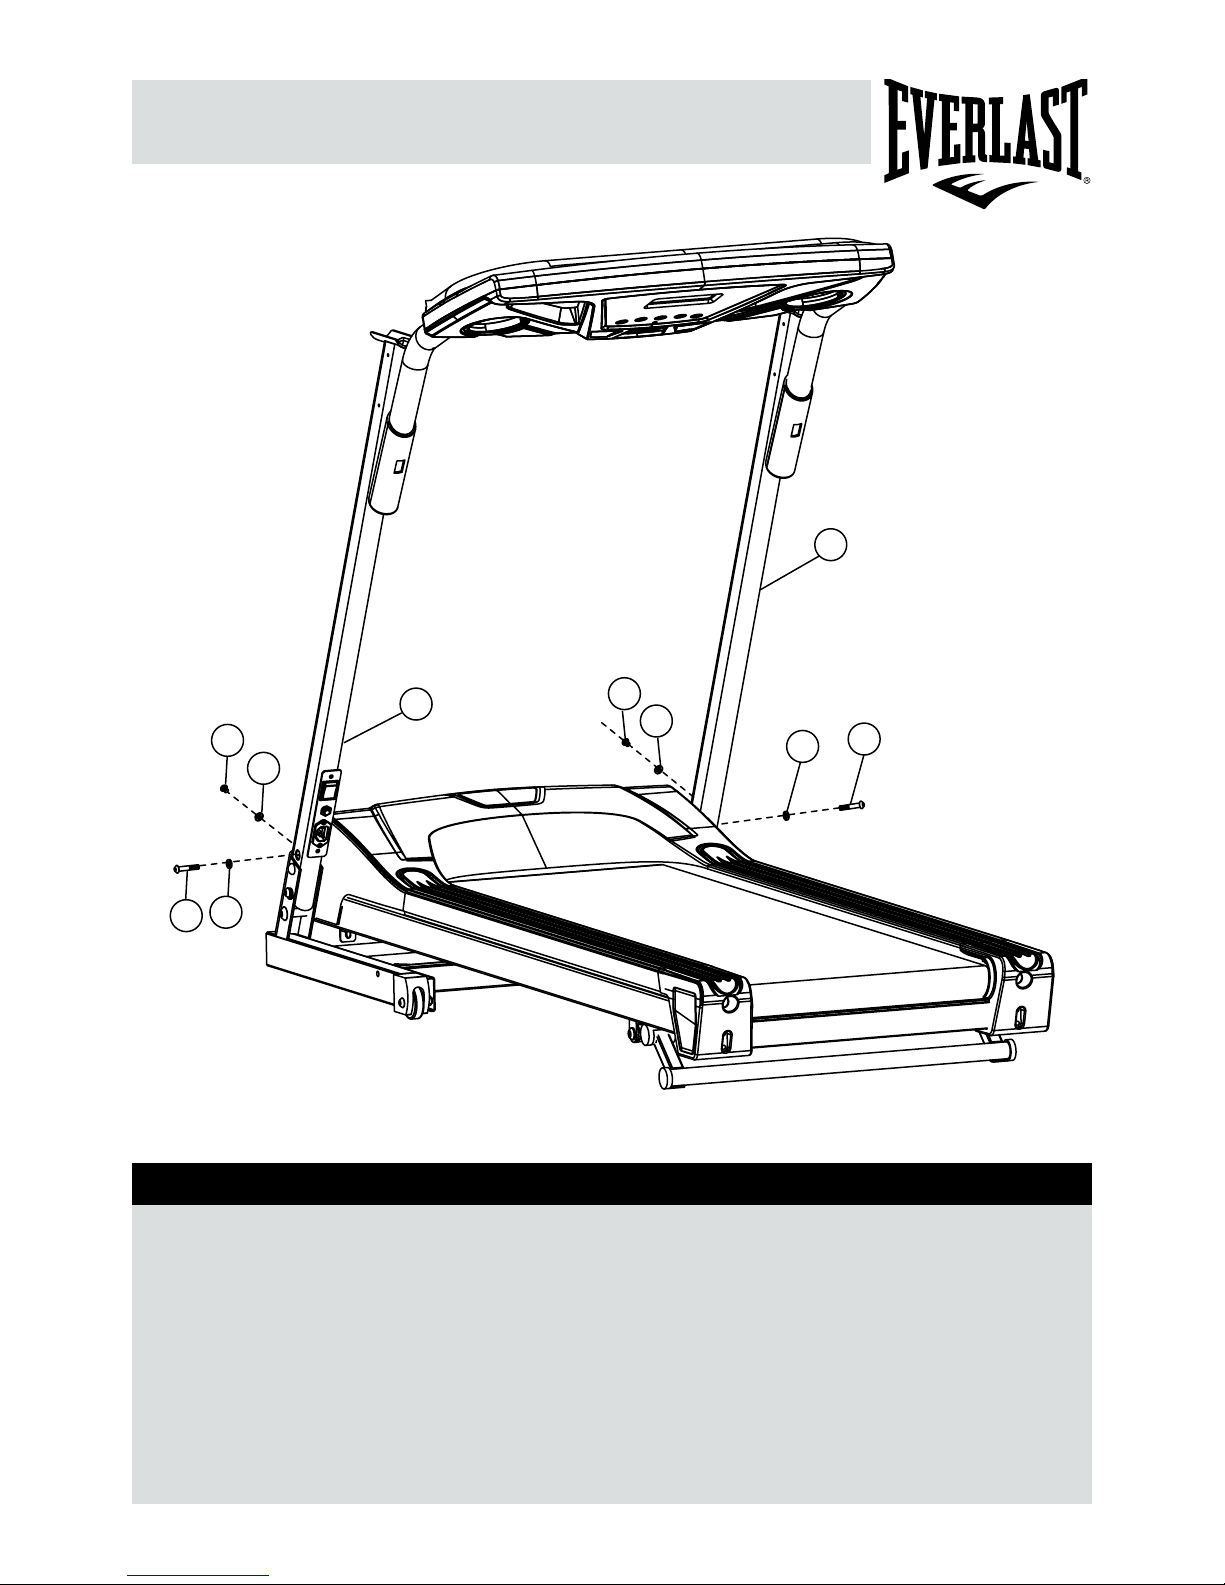
Assembly Instructions
a: Remove treadmill from carton and
place it on the oor in an open area.
Step 1
b: Attach the Upright-Left (202) and
Upright-Right (203) to the Base Frame
and secure in place using one M8 Bolt
(705) and two ø8 Washers (721), one
M8 Bolt (704).
Repeat this procedure on the Upright
- Right.
b:
b:
Page 8
8
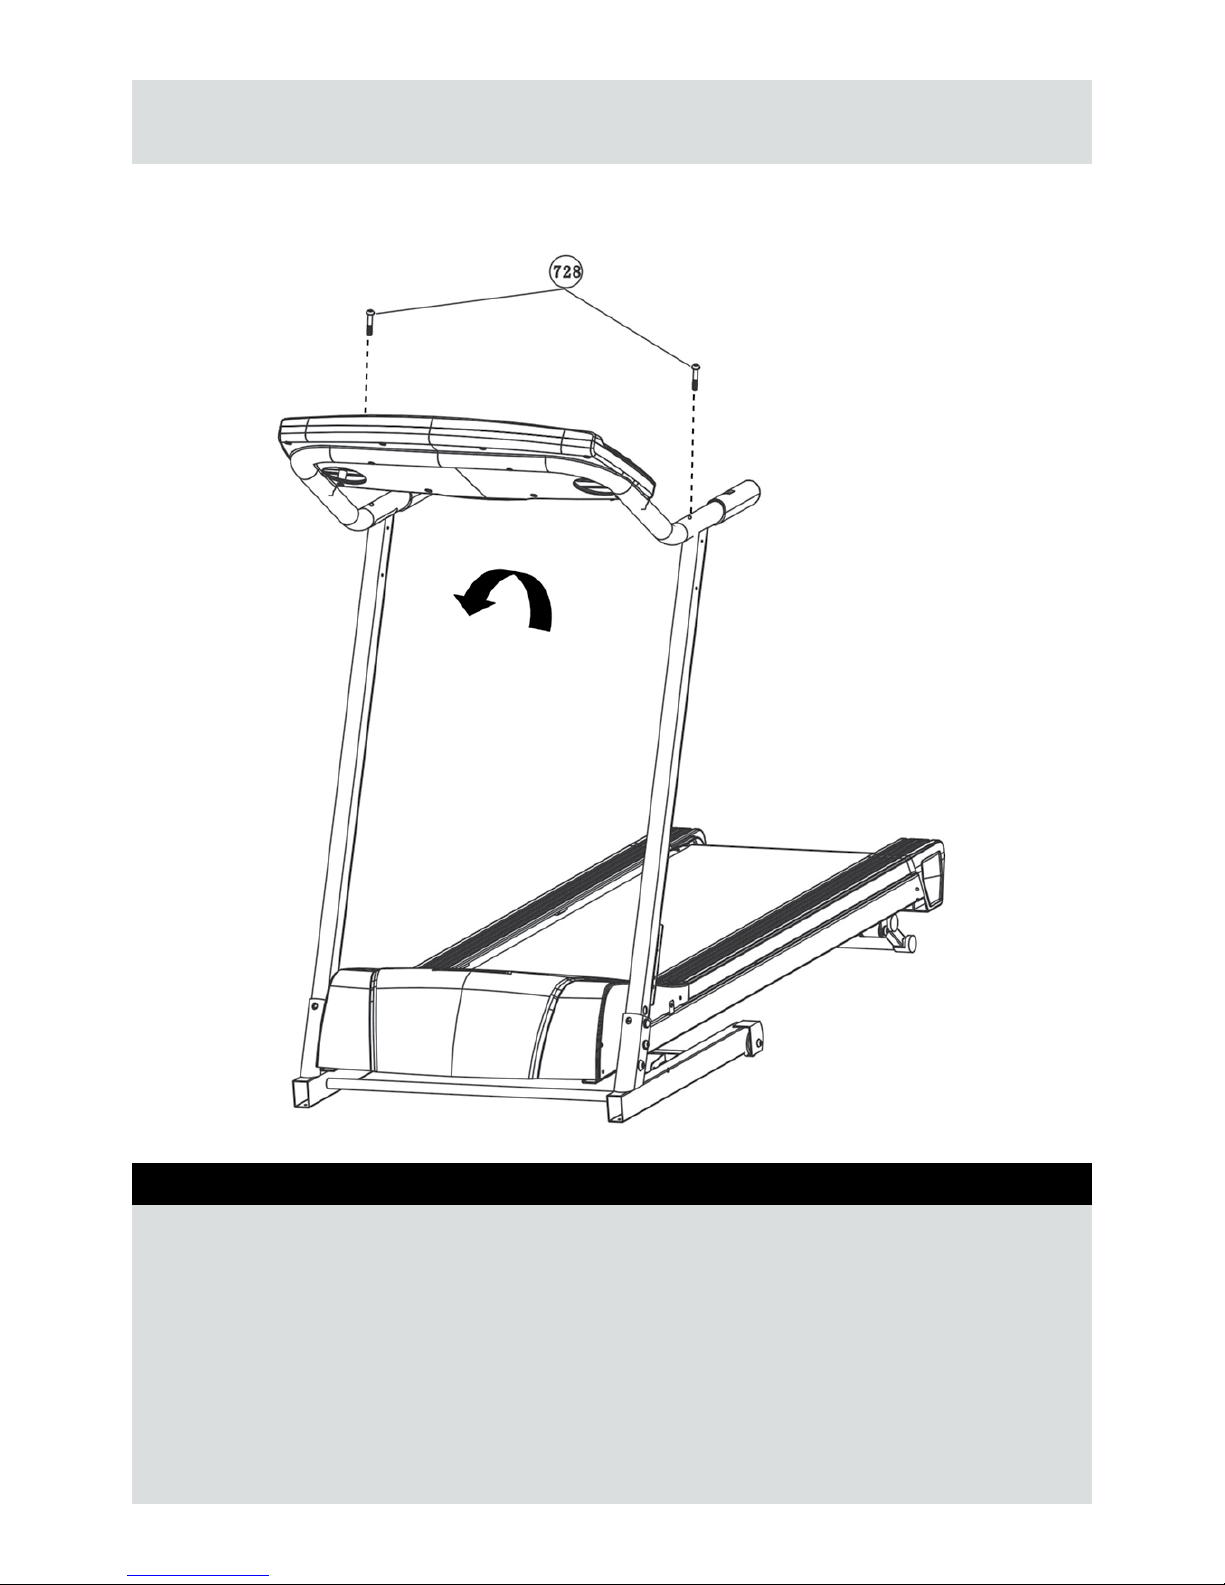
Assembly Instructions
Rotate the console upwards until it
stops, as shown in the drawing. Fix to
handlebar using 2 x Bolts (728).
Step 2
Page 9
9
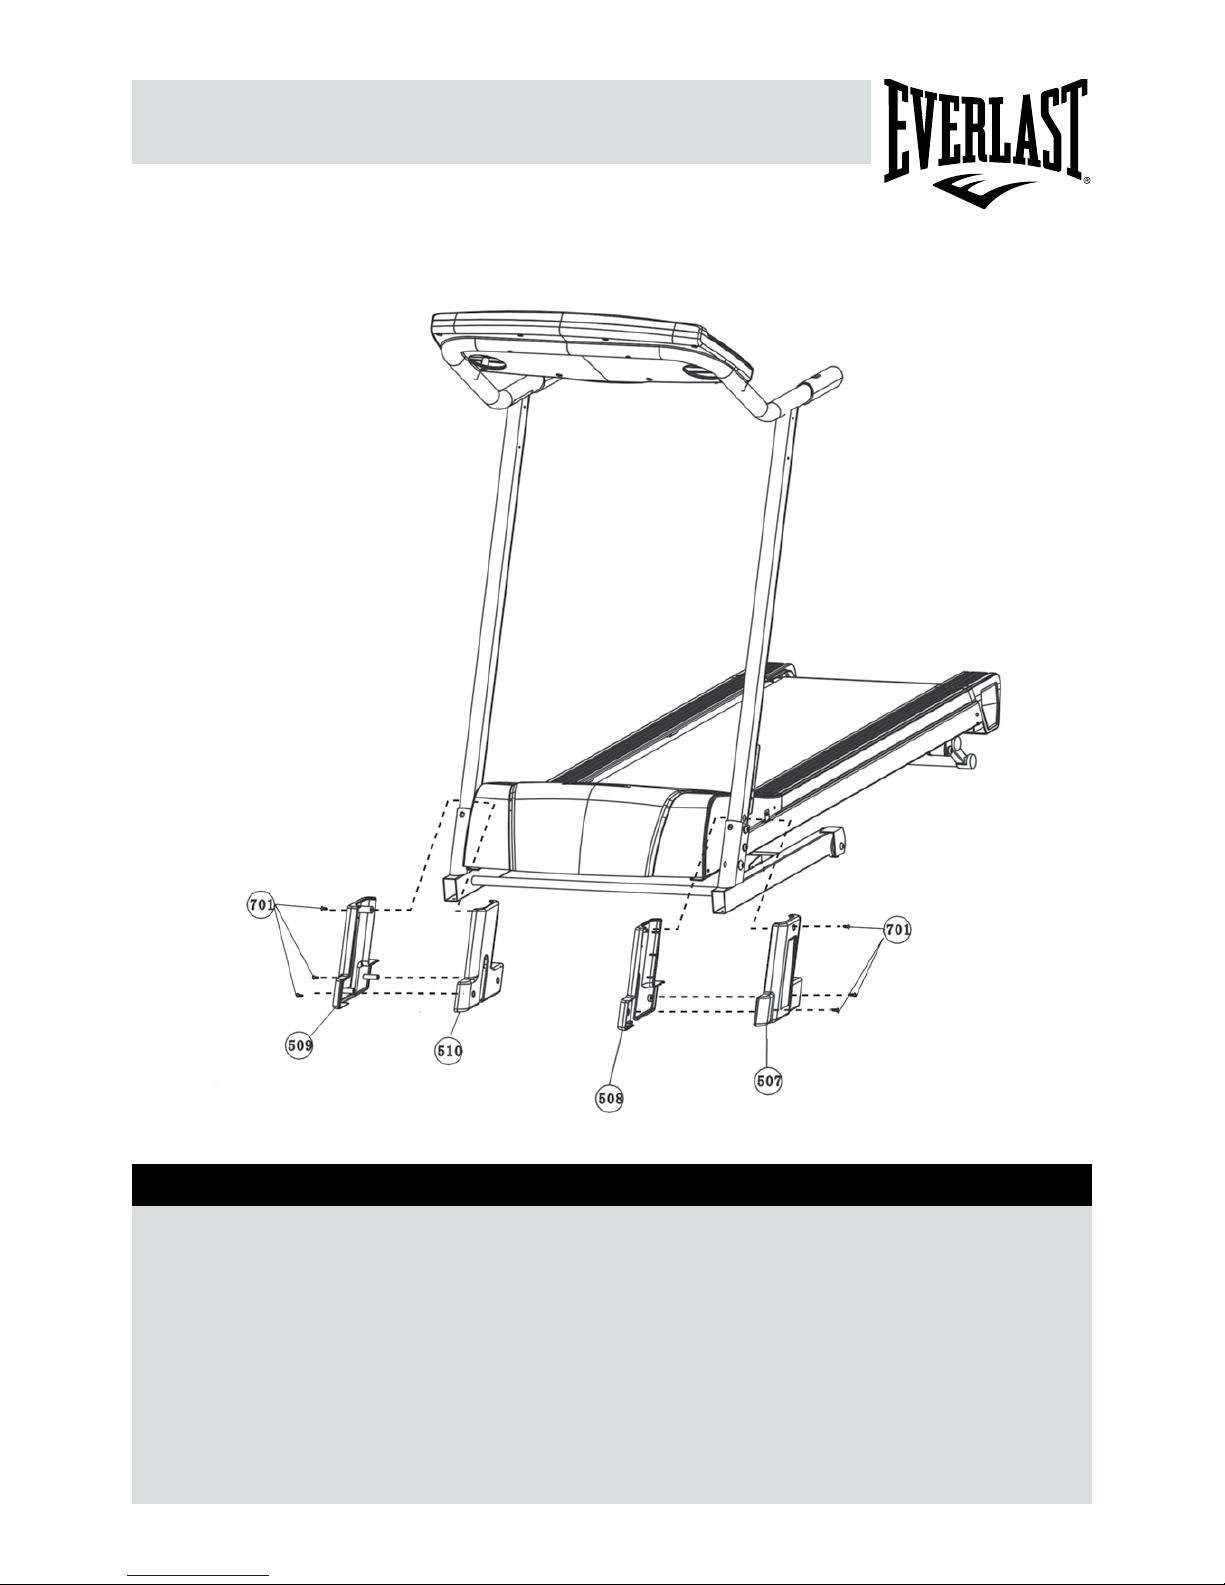
Assembly Instructions
Step 3
Attach the Upright Cover (507)
(508) (509) (510) onto the bottom of
upright by ø4 x 15mm Bolt (701) as
shown in the drawing.
Page 10
10
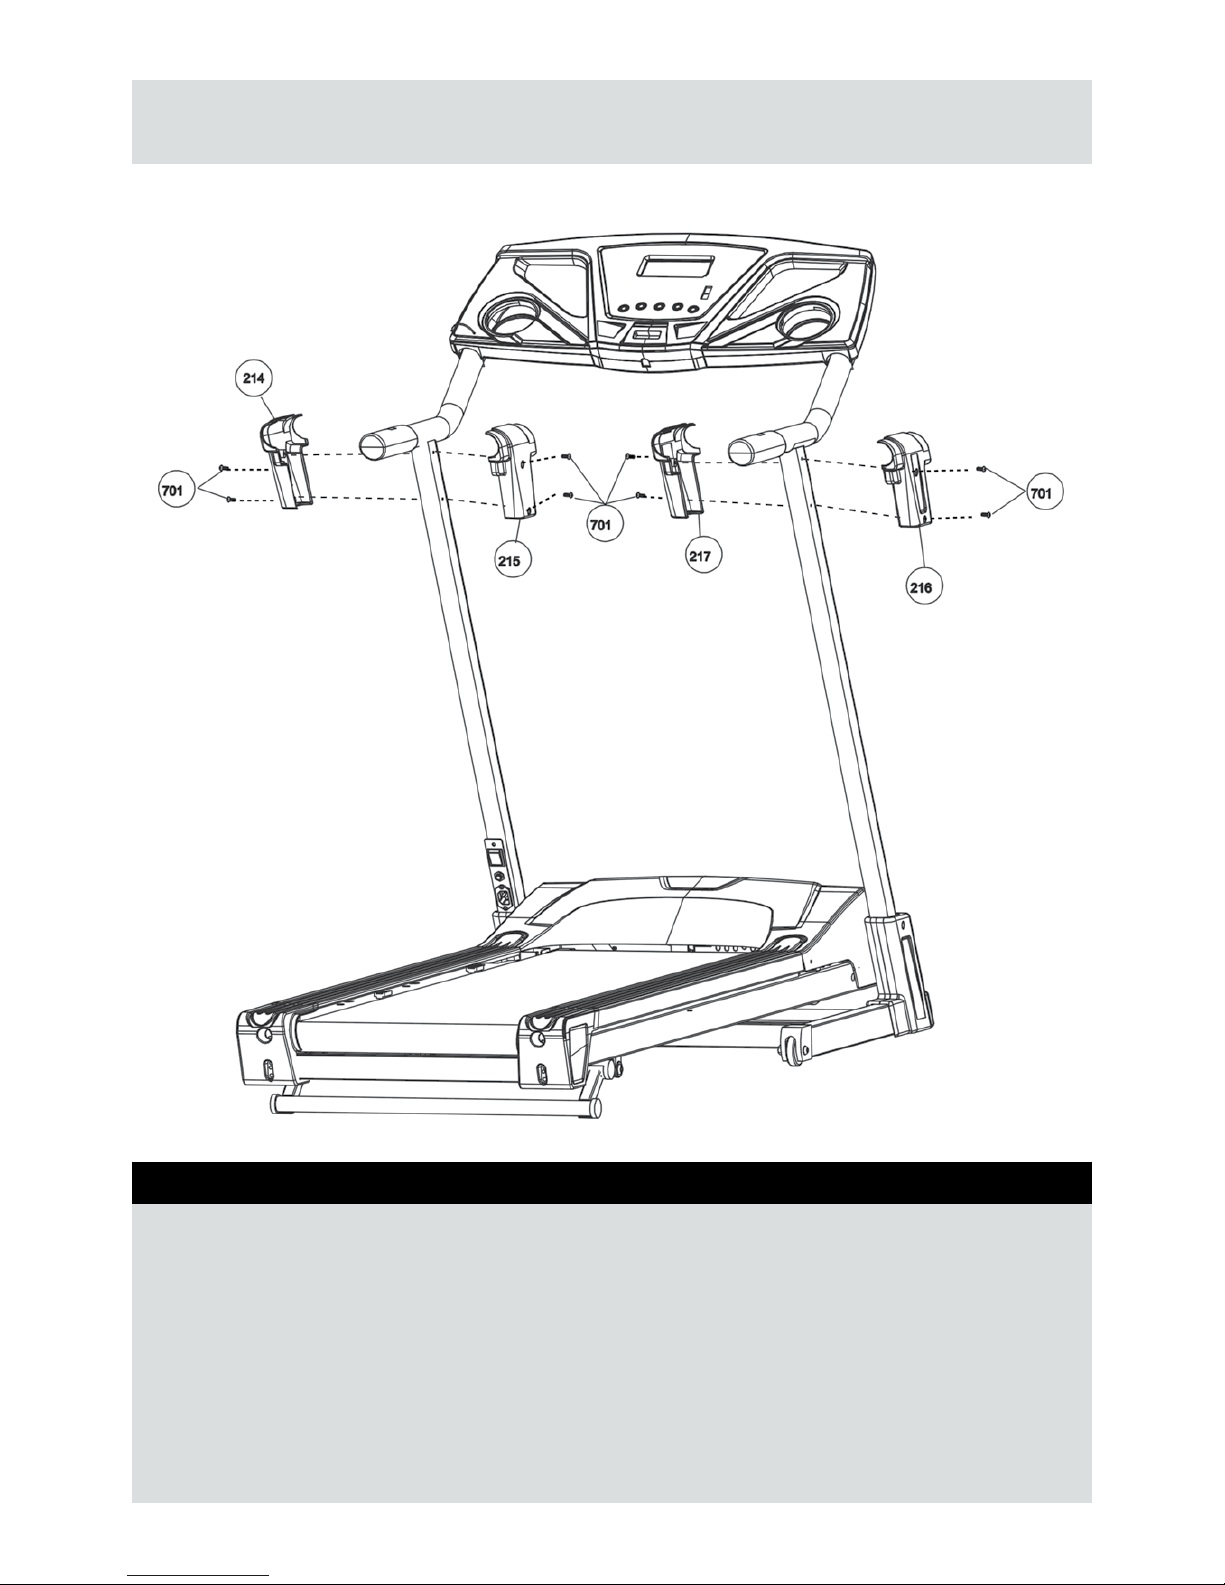
Assembly Instructions
Attach Handlebar Covers (214, 215,
216,217) to top of uprights using 2 x
Screws (701) per cover.
Step 4
Page 11
11
Assembly Instructions
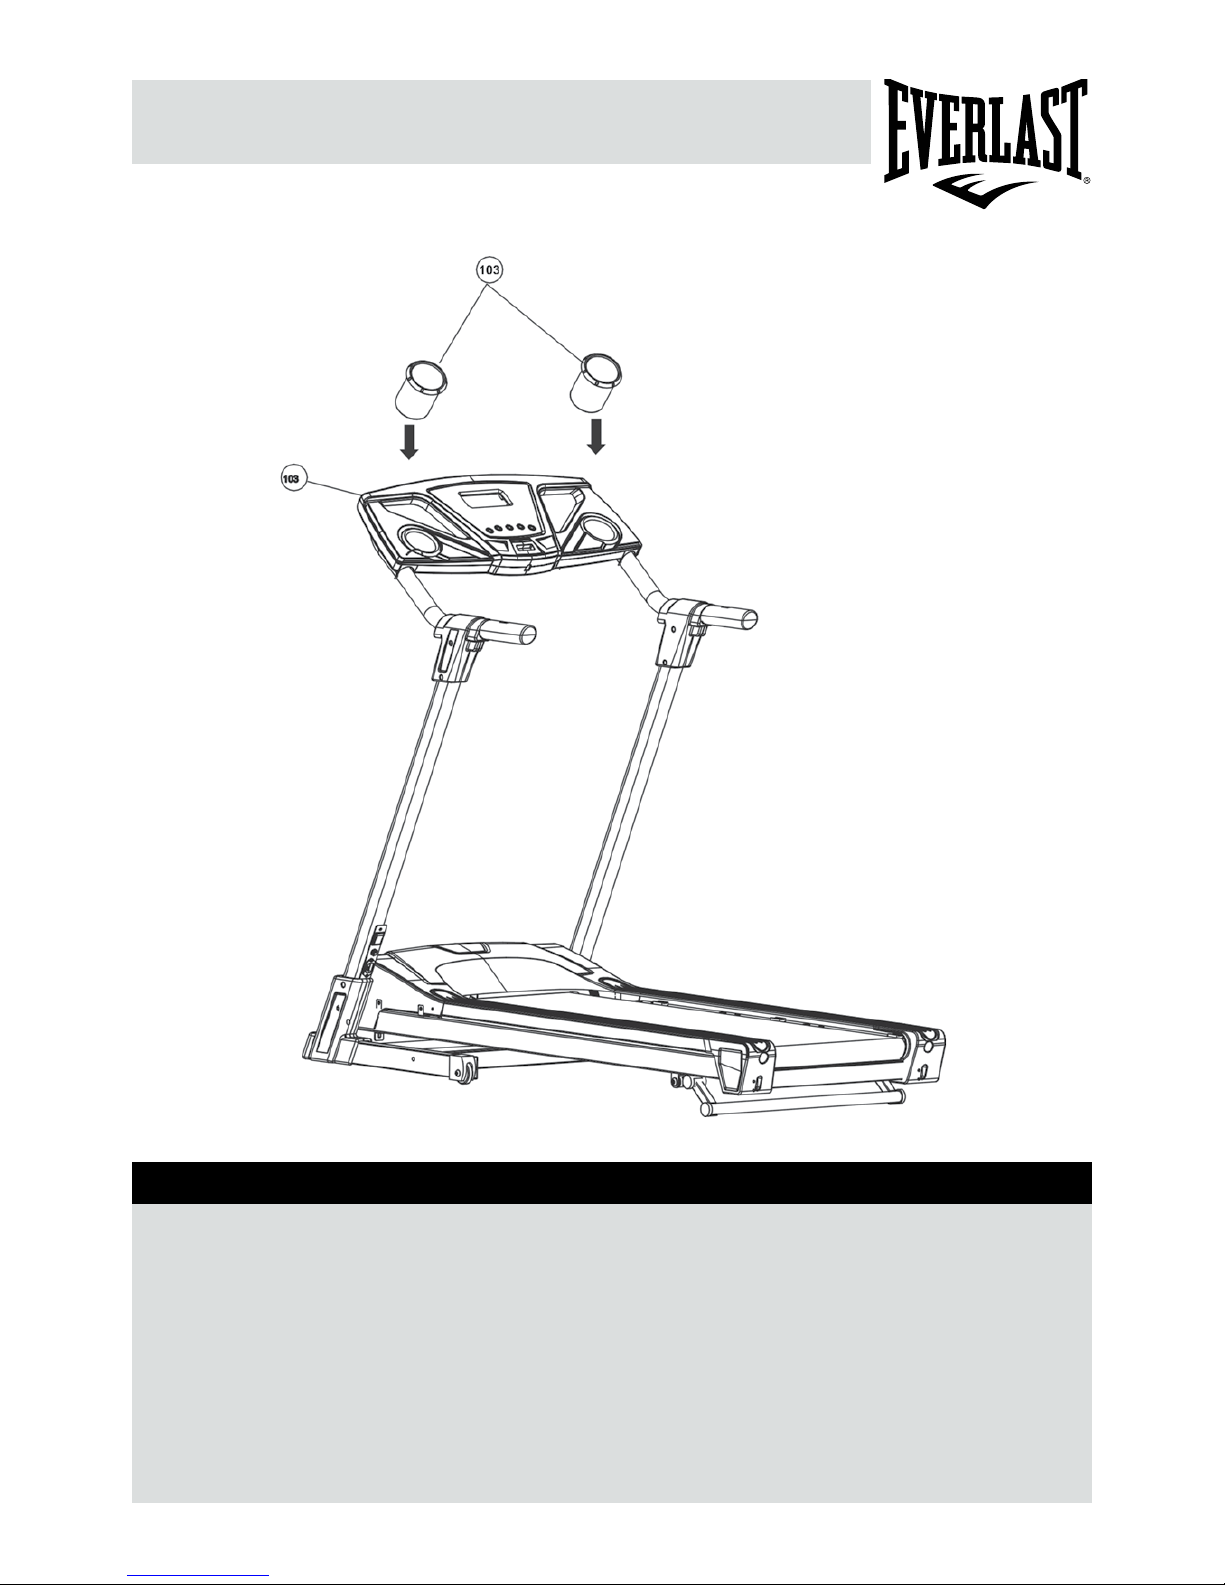
Insert bottle holders (103) into the
computer housing.
Step 5
Page 12
ON/OFF SWITCH
12
Assembly Instructions
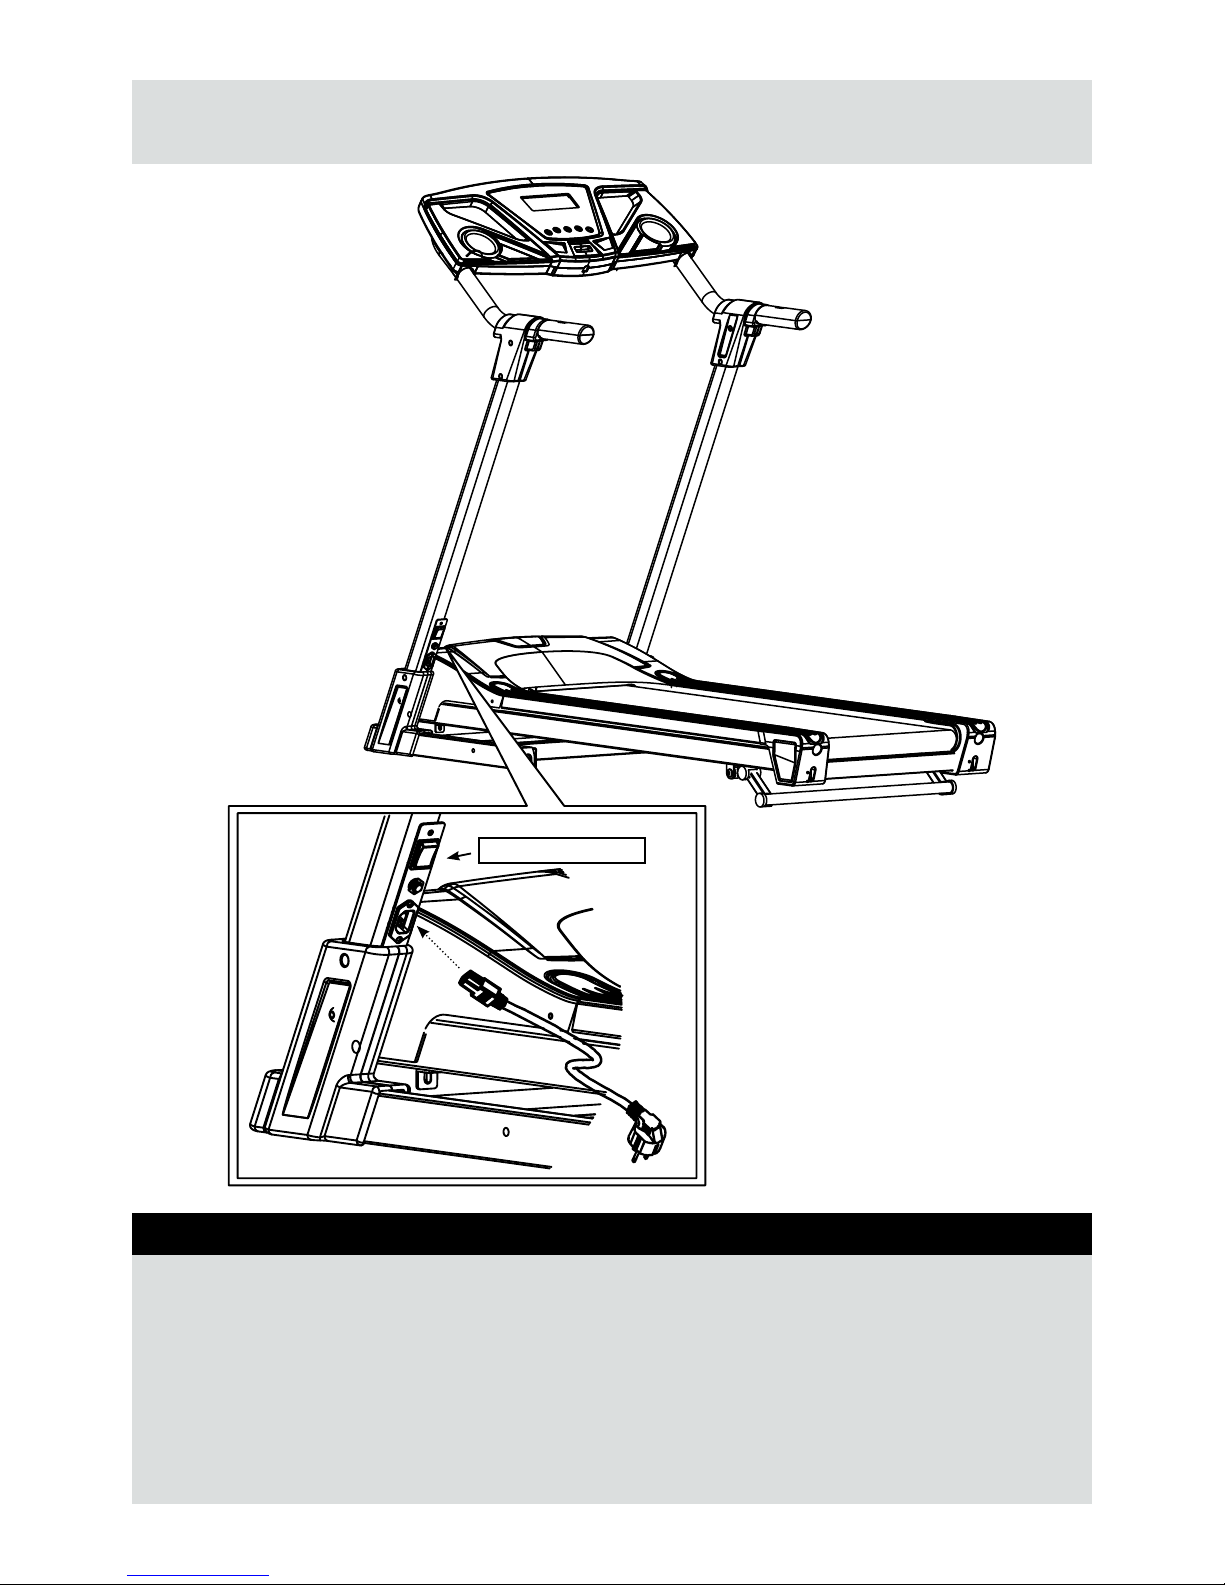
Connecting to mains.
Step 6
Page 13
13
Computer Operation
Functions and operations
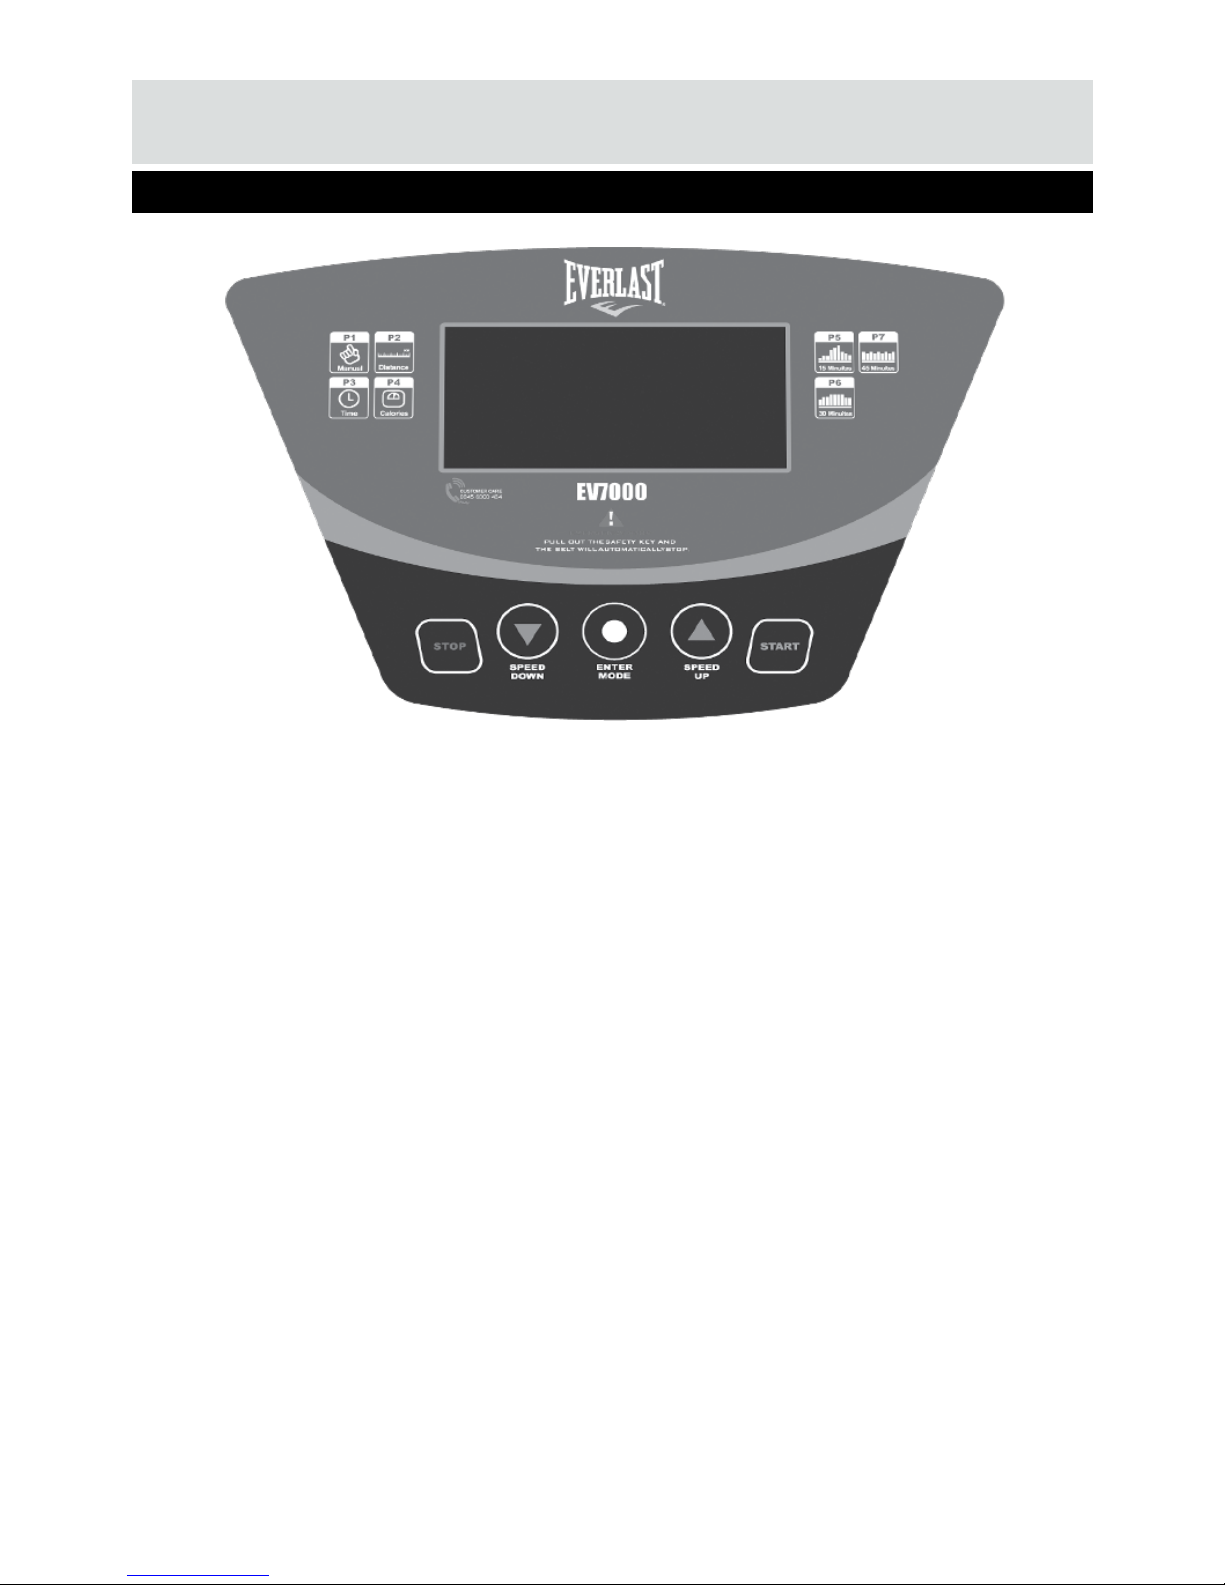
BUTTON FUNCTIONS - This describes the button functions and should be read in
conjunction with computer operation.
START : Press to start exercise (initial speed 0.8 km/0.5 ml).
ENTER (MULTI FUNCTION)
1. Press to confirm program and preset function values under setting mode.
2. Press to quit preset program and function value after complete single program.
3. Setting procedure: returns to beginning of setting mode before pressing the START key.
STOP
Press to stop exercise during workout time.
SPEED UP / DOWN (MULTI FUNCTION)
1. Press to increase/decrease exercise speed by 0.1km/ml.
2. Hold the button to increase/decrease rapid speed by 0.5km/ml per second and release the button to stop the
function.
3. Press to select programs.
IMPORTANT
• The console display will turn itself off automatically after five minutes after the belt has stopped moving.
• The pulse function is for reference only, and not to be used for medical purposes.
SAFETY KEY
The safety key must be inserted into the slot on the console in order to operate the treadmill. Always insert the
safety key and attach the clip to your clothing waist before beginning your workout.
If you should encounter problems and need to stop the motor quickly, simply pull on the cord the disengage the
safety key from the console.
Page 14

14
Computer Operation
Computer operation
QUICK START
After “power on” press start key to start exercise, use SPEED UP/DOWN keys to control belt speed.
PROGAM MODE
After “power on” P1 will ash in display, press SPEED UP/DOWN keys to select desired program, press ENTER key
to confirm selected program.
PROGARAM 1 – MANUAL
1. Press ENTER/MODE to confirm the program and press START key to start exercise.
2. Press ENTER/MODE before starting exercise to run presetting procedure, with P1 blinking.
TIME : Accumulates and displays workout time from start of exercise.
DISTANCE : Accumulates and displays workout distance from start of exercise.
CALORIES : Accumulates and displays calories consumed during workout time.
SPEED : Displays current speed.
PROGRAM 2 – TIME
1. Press ENTER/MODE to confirm the program.
2. Press ENTER/MODE before starting exercise to run presetting procedure, with P2 blinking.
3. Press SPEED UP/DOWN keys to preset the distance target values and press START
DISTANCE : Count down from preset target value automatically slows at end of program.
TIME : Accumulates and displays workout time from start of exercise.
CALORIES : Accumulates and displays calories consume during workout time.
SPEED : Displays current speed.
PROGRAM 3 – DISTANCE
1. Press ENTER/MODE to confirm the program and press START key to start exercise.
2. Press ENTER/MODE before starting exercise to run presetting procedure, with P3 blinking.
3. Press SPEED UP/DOWN keys to run preset time target value and press START.
TIME : Count down from preset target value automatically slows at end of program.
DISTANCE : Accumulates and displays workout distance from start of exercise.
CALORIES : Accumulates and displays calories consume during workout time.
SPEED : Displays current speed.
PROGRAM 4 – CALORIES
1. Press ENTER/MODE to confirm the program and press START key to start exercise.
2. Press ENTER/MODE before starting exercise to run presetting procedure, with P4 blinking.
3. Press SPEED UP/DOWN keys to run preset calories target value and press START.
CALORIES : Count down from preset target value automatically slows at end of program.
TIME : Accumulates and displays workout time from start of exercise.
DISTANCE : Accumulates and displays workout distance from start of exercise.
SPEED : Displays current speed.
Page 15

15
Computer operation
PROGRAM 5 – 15 MINUTES PRESET SPEED
1. Press ENTER/MODE to confirm the program.
2. Press START key to start the exercise, or press ENTER/MODE before starting exercise to run preset procedure
with P5 blinking.
TIME : Accumulates and displays workout time from start of exercise.
DISTANCE : Accumulates and displays workout distance from start of exercise.
PULSE : Detects and displays current heart rate.
CALORIES : Accumulates and displays calories consume during workout time.
SPEED : Displays current speed.
PROGRAM 6 – 30MINUTES PRESET SPEED
1. Press ENTER/MODE to confirm the program.
2. Press START key to start exercise or press ENTER/MODE before starting exercise to run preset procedure with
P6 blinking.
TIME : Accumulates and displays workout time from start of exercise.
DISTANCE : Accumulates and displays workout distance from start of exercise.
PULSE : Detect and displays current heart rate.
CALORIES : Accumulates and displays calories consume during workout time.
SPEED : Displays current speed.
PROGRAM 7 – 45 MINUTES PRESET SPEED
Press ENTER/MODE to confirm the program. Press START key to start exercise or press ENTER/MODE before
starting exercise to run preset procedure with P7 blinking.
TIME : Accumulates and displays workout time from start of exercise.
DISTANCE : Accumulates and displays workout distance from start of exercise.
CALORIES : Accumulates and displays calories consume during workout time.
SPEED : Displays current speed.
SWITCHING BETWEEN PROGRAMS 5, 6, 7
If you want to switch program after you confirmed the program, press STOP key and re-initiate program selection
procedure.
Computer Operation
Page 16
16
Incline level operation
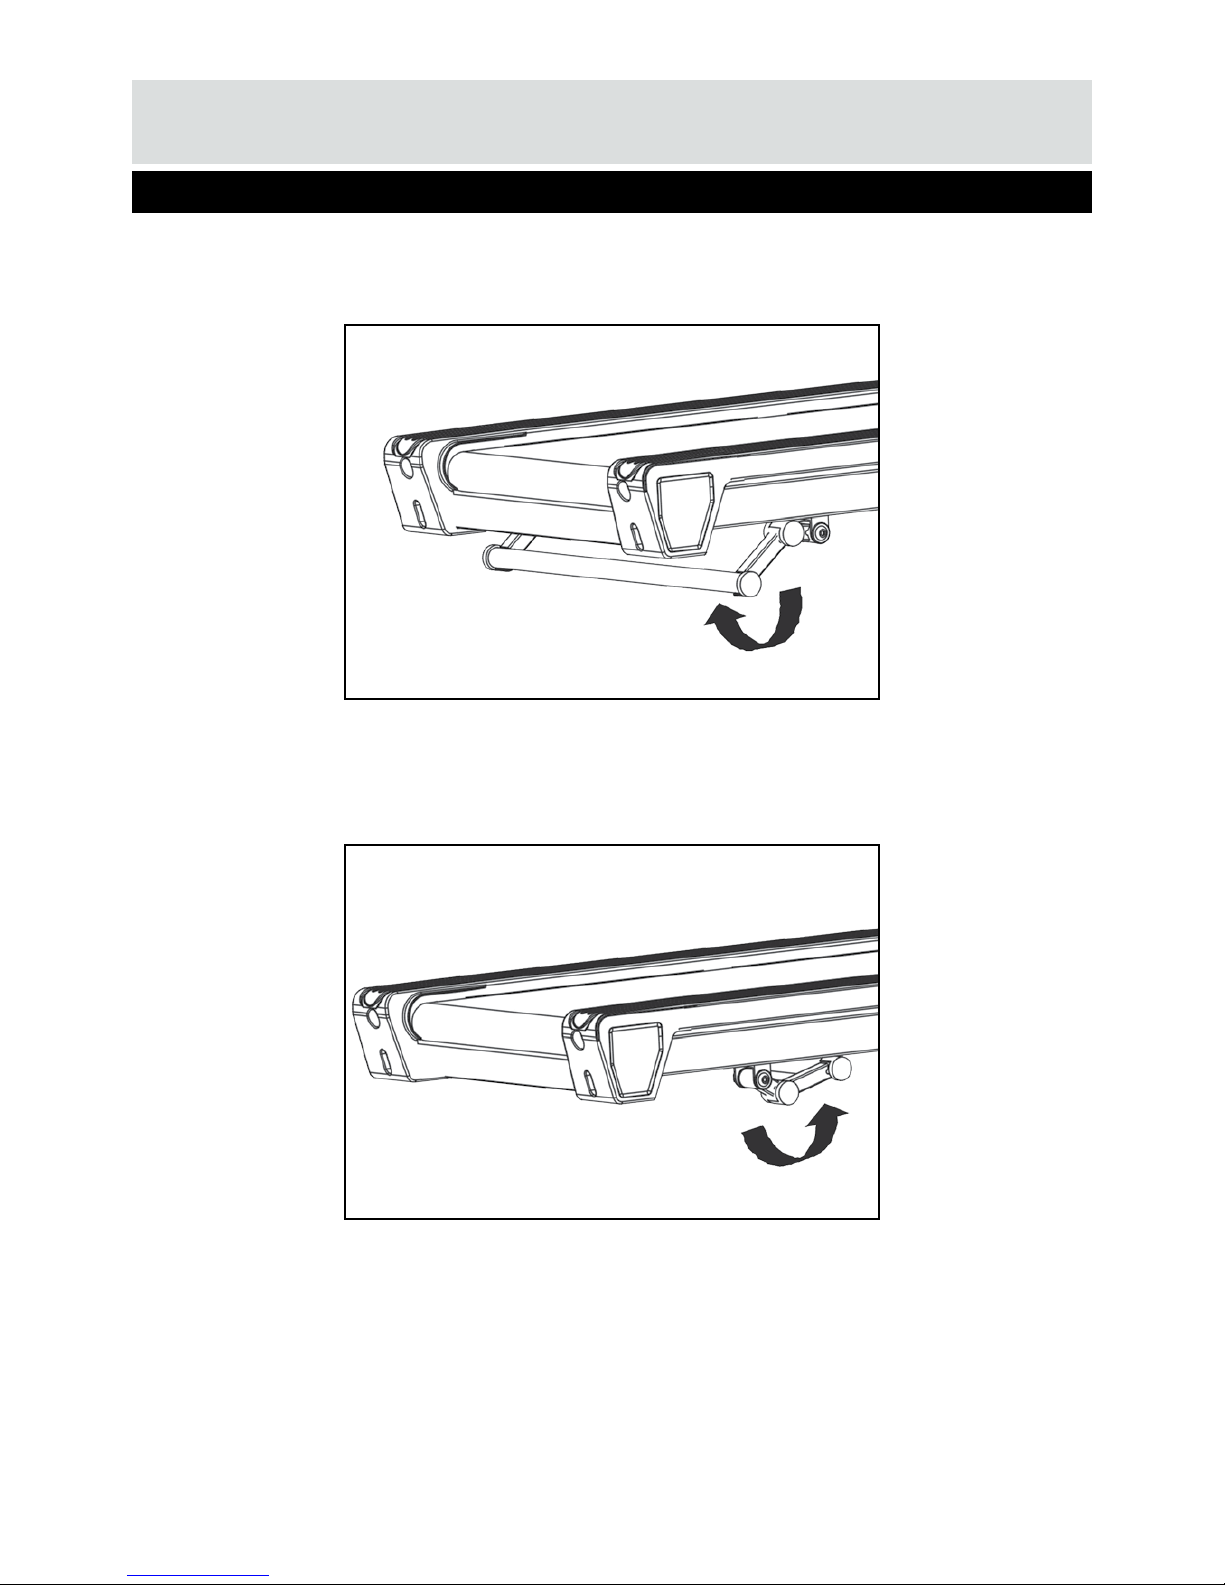
The treadmill is designed with two level incline adjustment. To adjust the incline simply lift up the rear of the
treadmill, then rotate the elevation stabiliser to the desired level.
Incline Adjustment
Position for maximum incline level
Position for minimum incline level.
Page 17
17
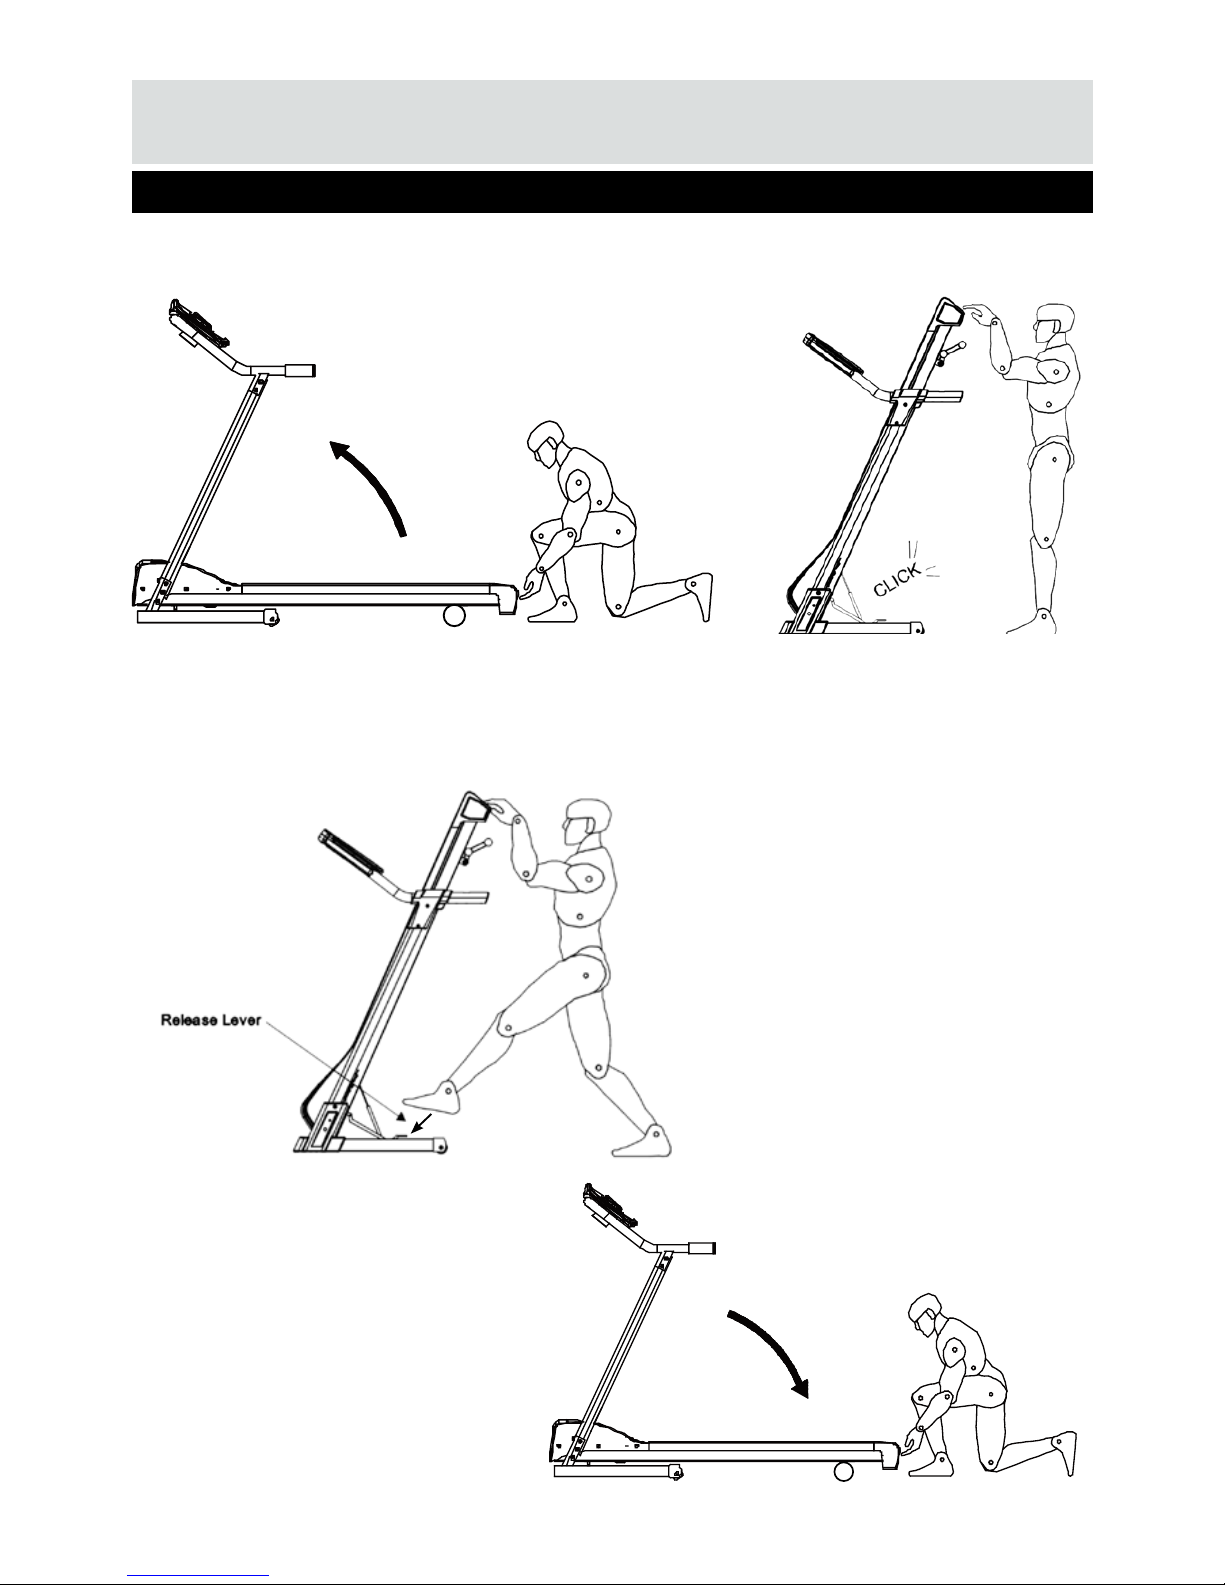
Folding and Unfolding Instructions
How to fold up the treadmill:
Your treadmill can be folded up for space saving storage. To do this follow the instructions here:
How to unfold the treadmill:
To unfold the treadmill for use follow the instructions here:
Folding Instructions
STEP FOOT RELEASE
Page 18
18
How to maintain the momentum EV7000 treadmill:
Proper maintenance is very important to ensure your treadmill is always in top working condition. Improper
maintenance could cause damage or shorten the life of your treadmill and void the WARRANTY.
Important: Never use abrasives or solvents to clean the treadmill. To prevent damage to the computer, keep liquids
away and keep it out of direct sunlight.
Inspect and tighten all parts of the treadmill regularly. Replace any worn parts immediately.
BELT ADJUSTMENT:
Belt adjustment and tension performs two functions: adjustment for tension and centering. The running belt has
been adjusted properly at the factory. However transportation, uneven ooring or other unpredicted reasons could
cause the belt to shift off center resulting in the belt rubbing with the plastic side rail or end caps and possibly
causing damage. To adjust the belt back to it’s proper position please follow the directions below:
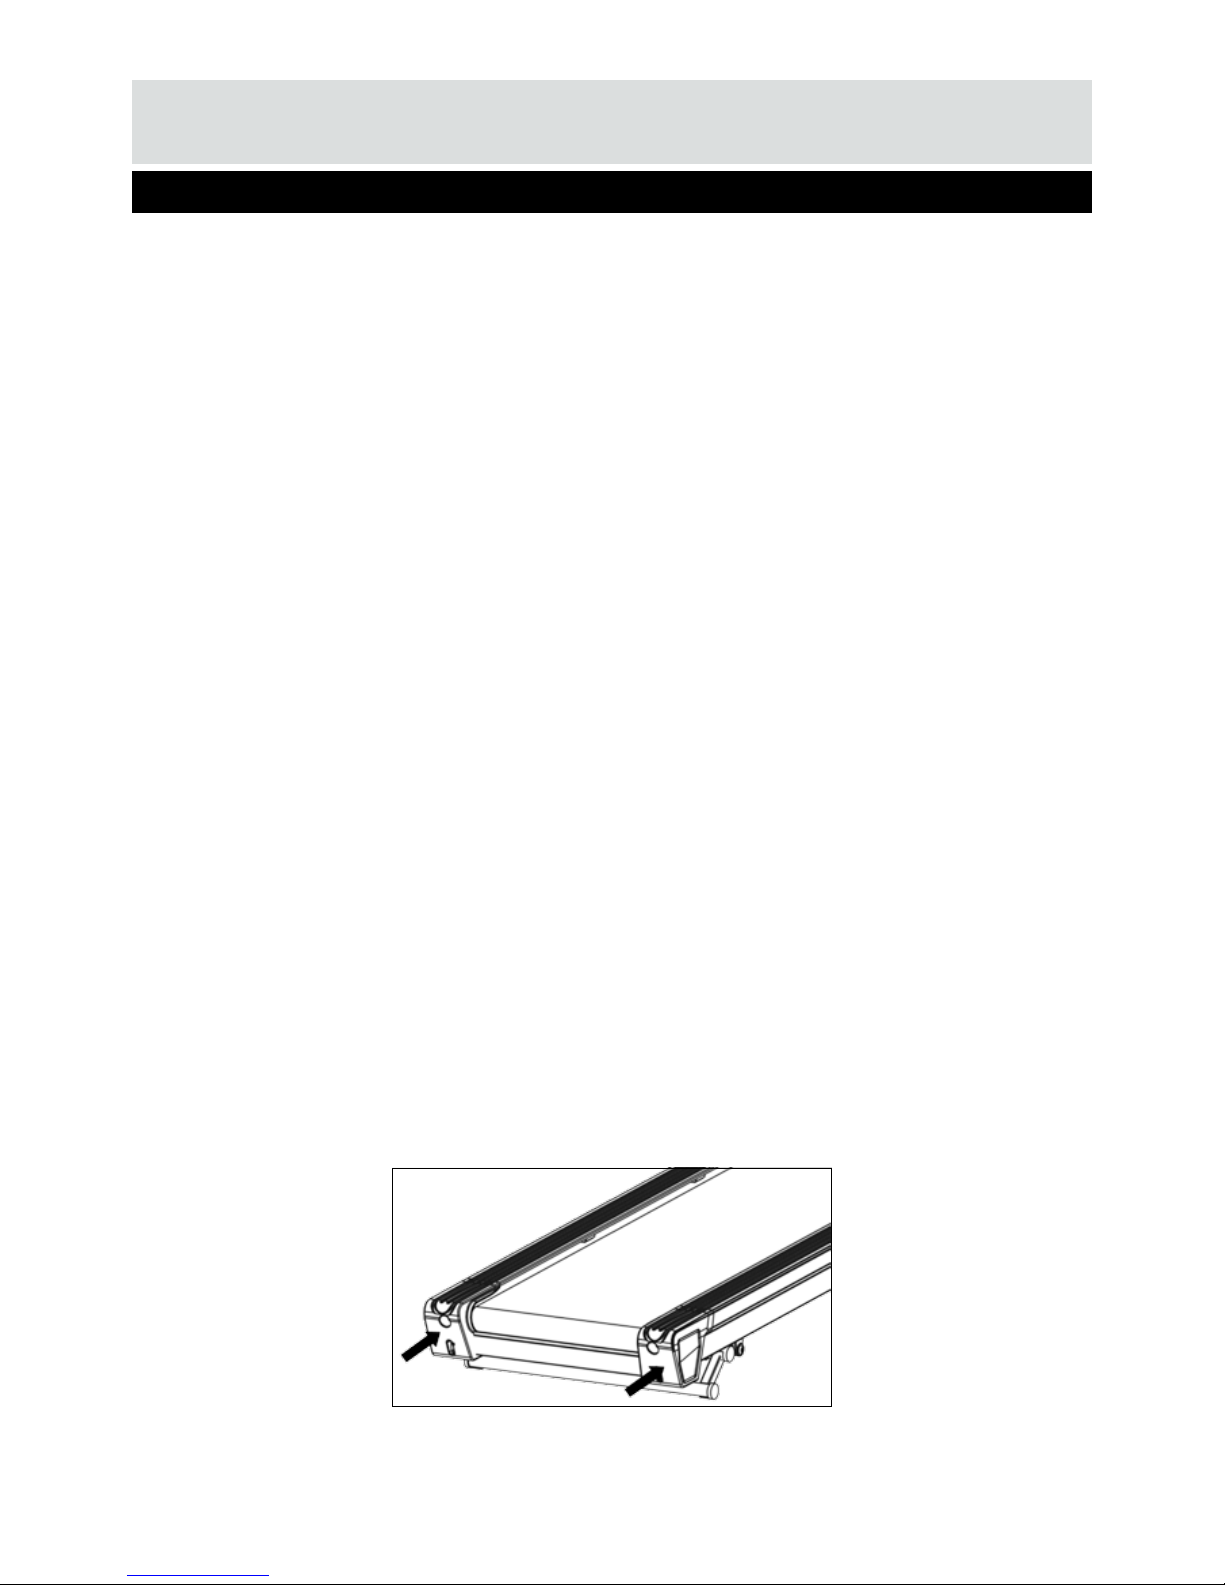
Belt has shifted to the left: First unplug the power cord from the surge protector. Using the hex key provided,
turn the left rear roller adjustment bolt 1/4 turn in the clockwise direction. Plug the power cord back into the surge
protector and run the treadmill at 2.5 mph. You should see the belt start to correct itself, moving back towards the
center. Repeat the above procedure until the walking belt is centered. It may be necessary to set walking belt
tension once you have completed this procedure if the belt feels like it is slipping while walking. Refer below to the
“Walking belt slipping” instructions.
Belt has shifted to the right: First unplug the power cord from the surge protector. Using the hex key provided,
turn the right rear roller adjustment bolt 1/4 turn in the clockwise direction. Plug the power cord back into the surge
protector and run the treadmill at 2.5 mph. You should see the belt start to correct itself, moving back towards the
center. Repeat the above procedure until the belt is centered. It may be necessary to set belt tension once you
have completed this procedure if the belt feels like it is slipping while walking. Refer below to the “Belt slipping”
instructions.
Belt is slipping: First unplug the power cord from the surge protector. Using the hex key provided, turn both the
left and right rear roller adjustment bolts the same distance, usually a 1/4 turn in the clockwise direction. Plug the
power cord back into the surge protector and run the treadmill at 2.5 mph. You should now walk on the belt to
determine if the belt is still slipping. Repeat the above procedure until the belt is not slipping. The tension should
be just tight enough not to slip.
WARNING! Do not over tighten rollers! This will cause premature roller bearing failure!
Right and left tension bolts are located at the rear of the treadmill.
Care and Maintainence
Page 19
19
CLEANING:
Routine cleaning of your treadmill will extend the product’s life.
Warning : To prevent electrical shock, be sure the power to the treadmill is OFF and the power cord is
unplugged from the wall electrical outlet before attempting any cleaning or maintenance.
Important : Never use abrasives or solvents to clean the treadmill. To prevent damage to the computer,
keep liquids away and keep it out of direct sunlight.
After each workout : Wipe off the console and other treadmill surfaces with a clean, water dampened soft cloth to
remove excess perspiration.
Weekly : Vacuum underneath treadmill once a week as dirt from your shoes eventually makes it way
underneath the treadmill. Use of a treadmill mat is recommended.
DECK LUBRICATION:
The treadmill deck has been pre-lubricated at the factory. However, it is recommended that it is checked
periodically for lubrication to ensure optimal treadmill performance. Your treadmill should not have to be lubricated
usually within the first 400 hours of use.
Every 2 months of operation lift the sides of the walking belt and feel the top surface of the deck as far as you
can reach. If you feel signs of silicone, no further lubrication is required. If it feels dry to the touch, follow the
instructions below.
Please use a non-petroleum based silicone.
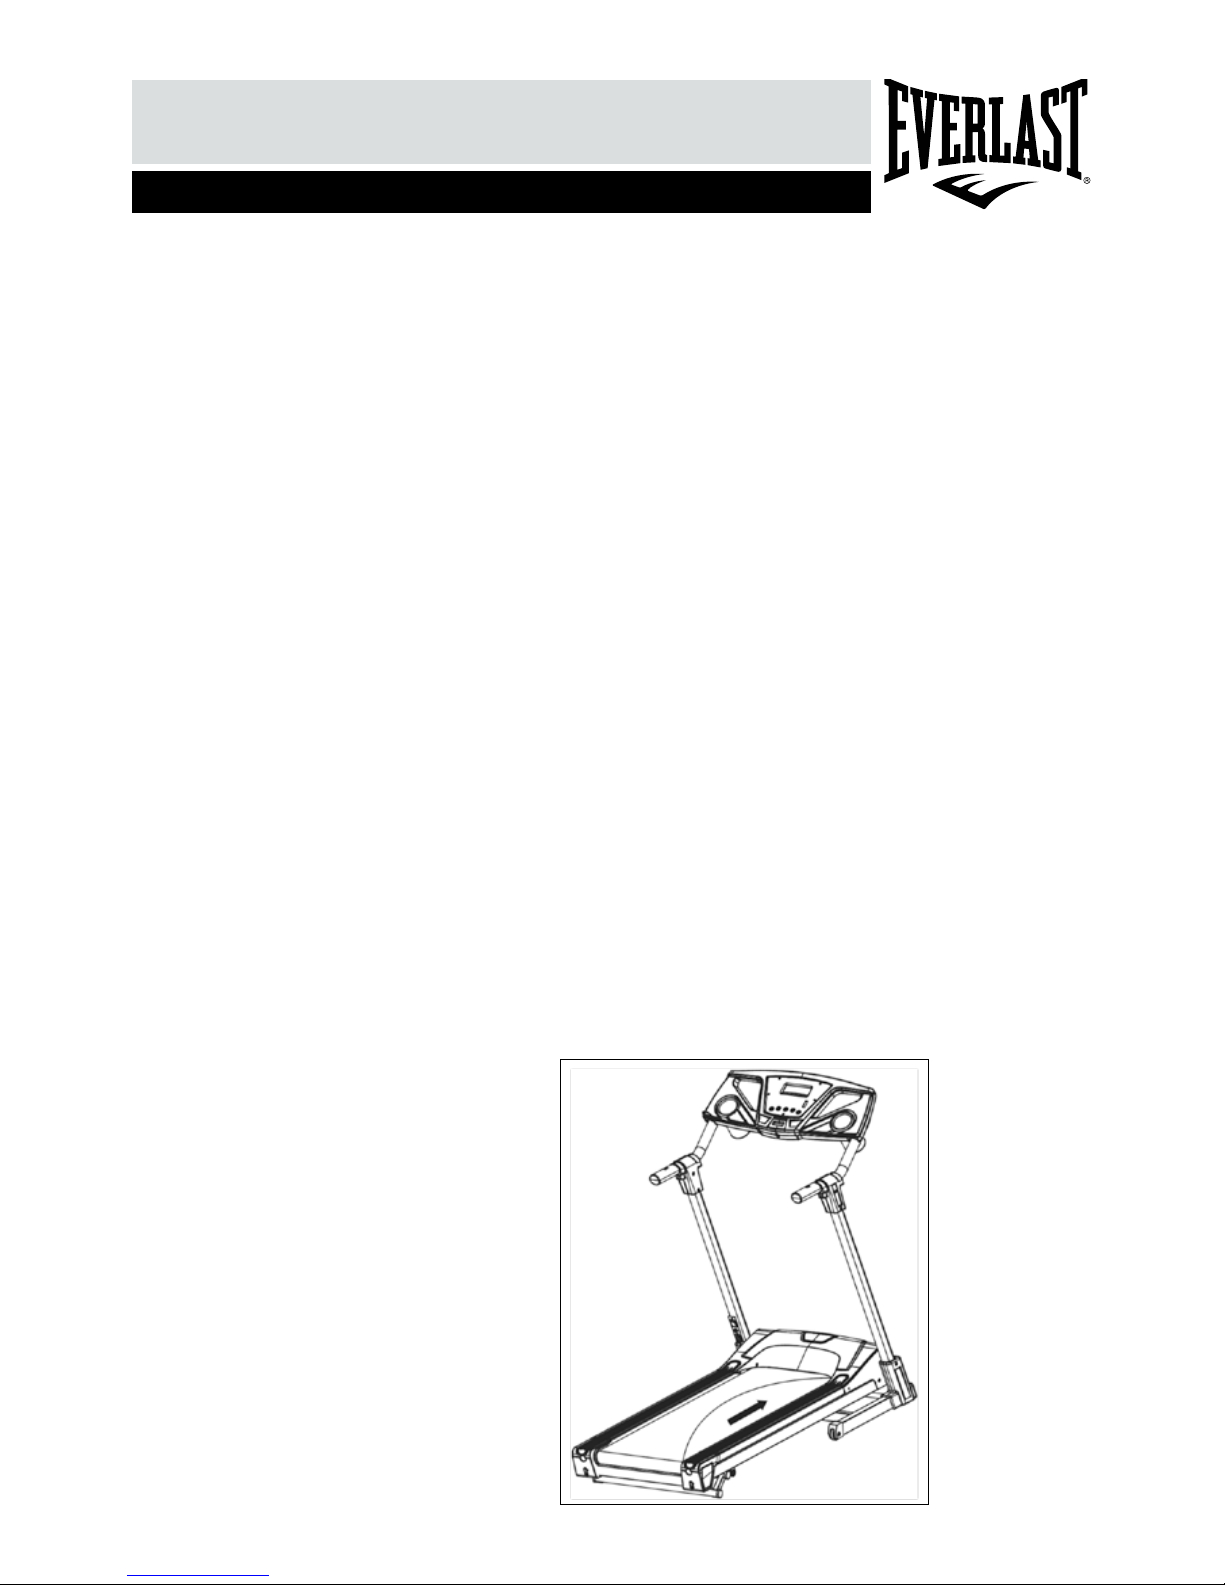
To apply lubricant to the deck:
1. Position the deck so that the seam is located on top and in center of the deck.
2. Insert the spray lube nozzle into the spray head of the lubricant bottle.
3. While lifting the side of the belt, position the spray nozzle between the belt and the board approximately 6” from
the front of the treadmill. Apply the silicone spray to the deck, moving from the front of the treadmill to the rear.
Repeat this on the other side of the belt.
Care and Maintainence
Spray lubricant from front to back.
Page 20
20
Exercising Information
How you begin your exercise program depends on your physical condition. If you have been inactive for several
years, or are severely overweight, you must start slowly and increase your time on the equipment; a few minutes
per workout.
Initially, you may be able to exercise only for a few minutes in your target zone, however, your aerobic fitness will
improve over the next six to eight weeks. Don’t be discouraged if it takes longer. It’s important to work at your own
pace. Ultimately, you’ll be able to exercise continuously for 30 minutes. The better your aerobic fitness, the harder
you will have to work to stay in your target zone.
Please remember these essentials:
• Have your doctor review your training and diet programs to advise you of a workout routine you should adopt.
• Begin your training program slowly with realistic goals that have been set by you and your doctor.
• Monitor your pulse frequently. Establish your target heart rate based on your age and condition.
• Set up your equipment on a at even surface at least 3 feet from walls and furniture.
Exercise intensity
To maximize the benefits of exercising, it is important to exercise with the proper intensity. The proper intensity
level can be found by using your heart rate as a guide. For effective aerobic exercise, your heart rate should be
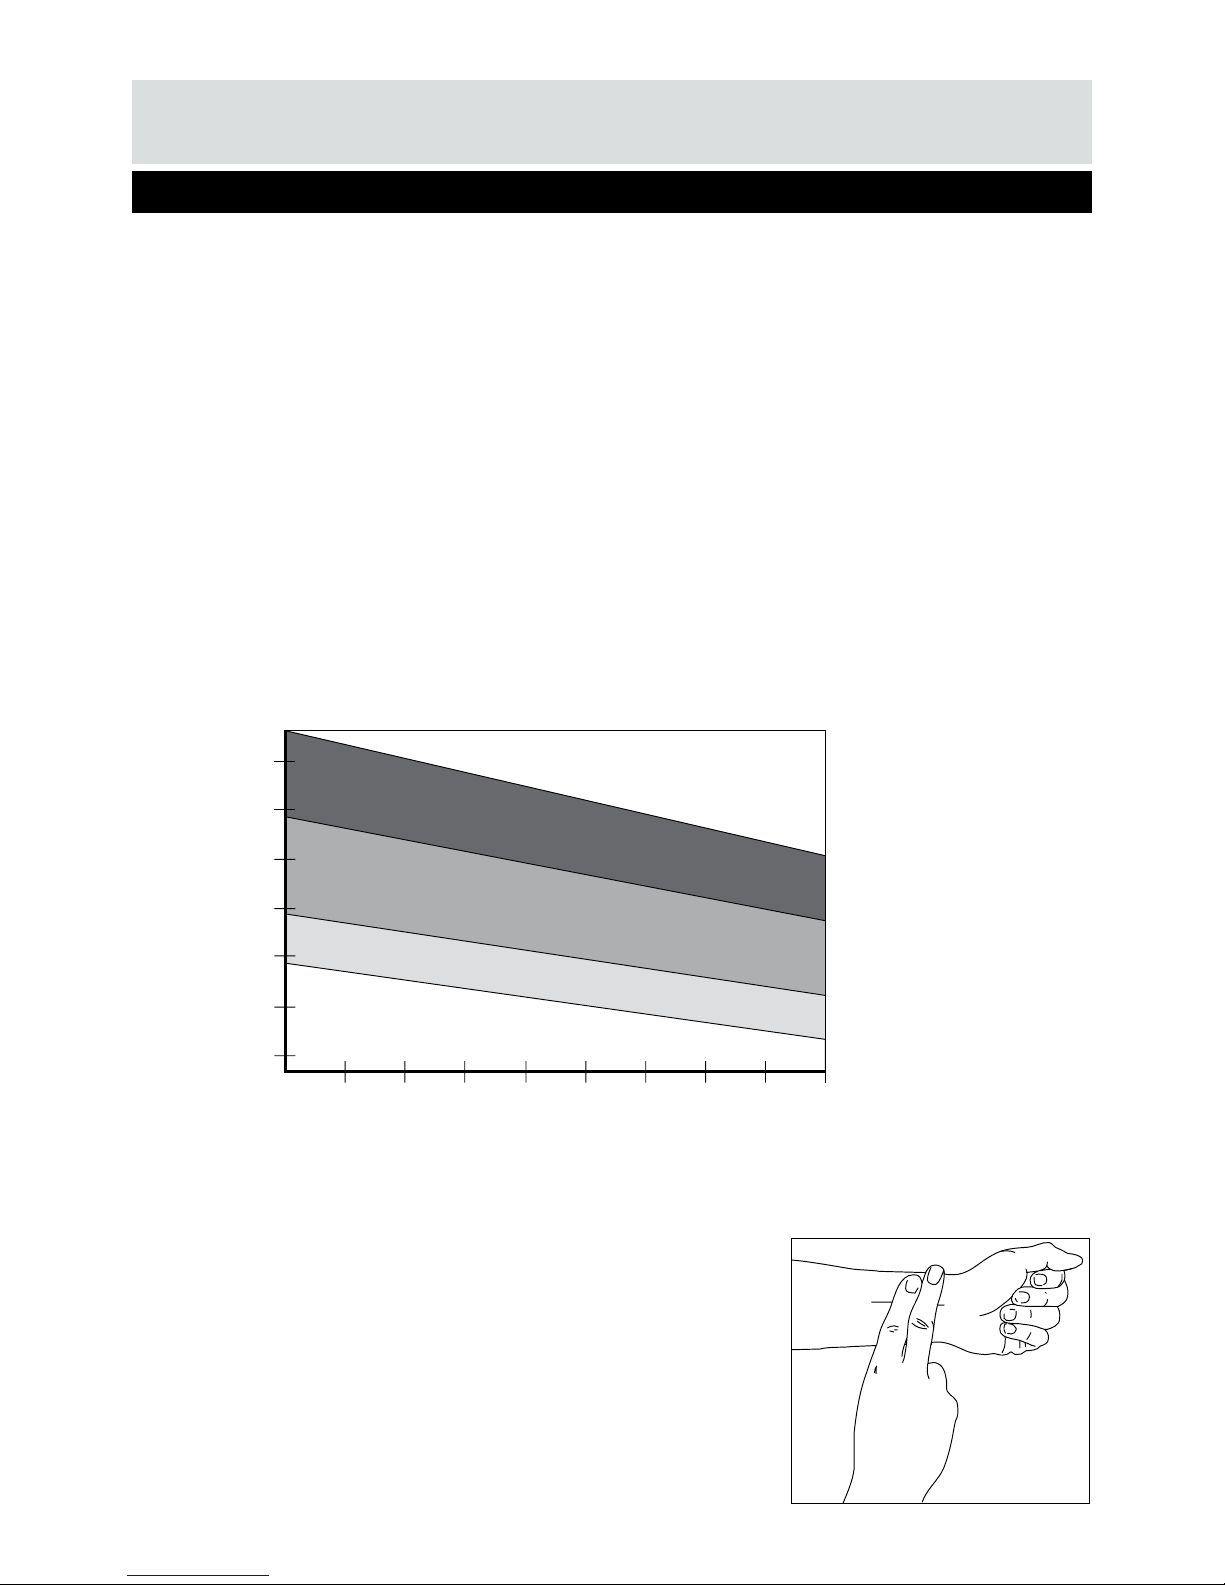
maintained at a level between 65% and 85% of your maximum heart rate as you exercise. This is known as your
target zone. You can find your target zone in the table below.
During the first few months of your exercise program, keep your heart rate near the low end of your target zone
as you exercise. After a few months, your heart rate can be increased gradually until it is near the middle of your
target zone as you exercise.
To measure your heart rate, stop exercising but continue moving your legs
or walking around and place two fingers on your wrist. Take a six-second
heartbeat count and multiply the results by 10 to find your heart rate. For
example, if your six-second heartbeat count is 14, your head rate is 140
beats per minute. (A six-seconds count is used because your heart rate will
drop rapidly when you stop exercising.) Adjust the intensity of your exercise
until your heart rate is at the proper level.
Before starting to exercise
80
100
120
140
160
180
200
Beats per minute (bpm)
25
Age
30 35 40 45 50 55 60 70
Cardiovascular
performance
Intermediate aerobic
Effective fat burning
Up to 55%
55% to 65%
65% to 85%
85% to Max
Page 21
21
Exercising Information
Muscle chart
Aerobic Exercise
Aerobic exercise improves the fitness of your lungs and heart - your body’s most important muscle. Aerobic
exercise fitness is promoted by any activity that uses your large muscles (arms, legs, or buttock, for example). Your
heart beats quickly and you breathe deeply. An aerobic exercise should be part of your entire exercise routine.
Weight Training
Along with aerobic exercising which helps get rid of and keep off the excess fat that our bodies can store, weight
training is an essential part of the exercise routine process. Weight training helps tone, build and strengthen
muscle. If you are working above your target zone, you may want to do a lesser amount of reps. As always,
consult your doctor before beginning any exercise program.
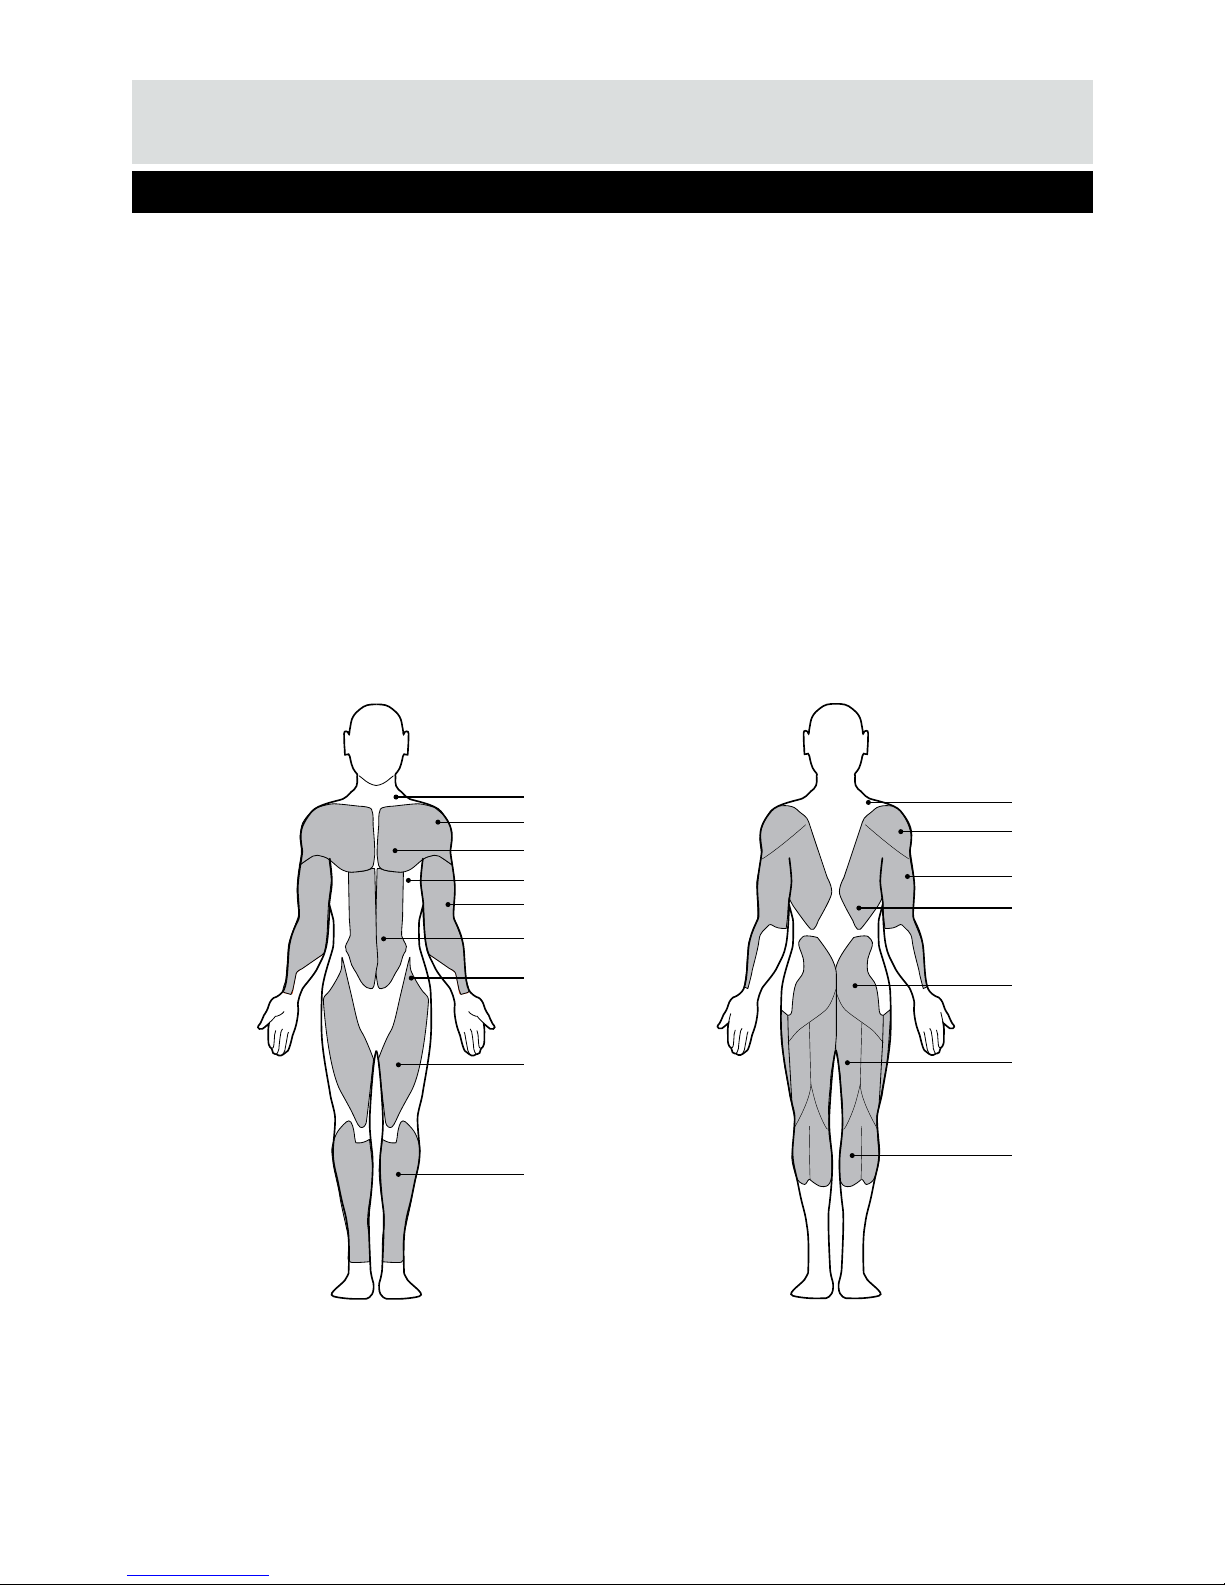
Targeted Muscle Groups
The exercise routine that is performed on the Treadmill will develop the upper and lower body muscle groups.
These muscle groups are highlighted on the muscle chart below.
A: Trapezius
B: Anterior
C: Pectoralis Major
D: Serratus Anterior
E: Biceps
F: Abdominal
G: Sartorius
H: Quadriceps
I: Tibialis
J: Trapezius
K: Posterior
L: Triceps
M: Latissimus Dorsi
N: Gluteals
O: Hamstrings
P: Gastrocnemius
A
B
C
E
F
G
H
I
J
K
L
M
N
O
P
D
Front Back
Page 22
22
Exercising Information
Warming up and Cooling down exercises
Each workout should include the following three parts:
1. A warm-up, consisting of 5 to 10 minutes of stretching and light exercise. A proper warm-up increases your body
temperature, heart rate, and circulation in preparation for exercise.
2. Training zone exercise, consisting of 20 to 30 minutes of exercising with your heart rate in your training zone.
(Note: During the first few weeks of your exercise program, do not keep your heart rate in your training zone for
longer than 20 minutes.)
3. A cool-down, with 5 to 10 minutes of stretching. This will increase the exibility of your muscles and will help to
prevent post-exercise problems.
Exercise Frequency
To maintain or improve your condition, plan three workouts each week, with at least one day of rest between
workouts. After a few months of regular exercise, you may complete up to five workouts each week, if desired.
Remember, the key to success is make exercise a regular and enjoyable part of your everyday life.
Suggested Stretches
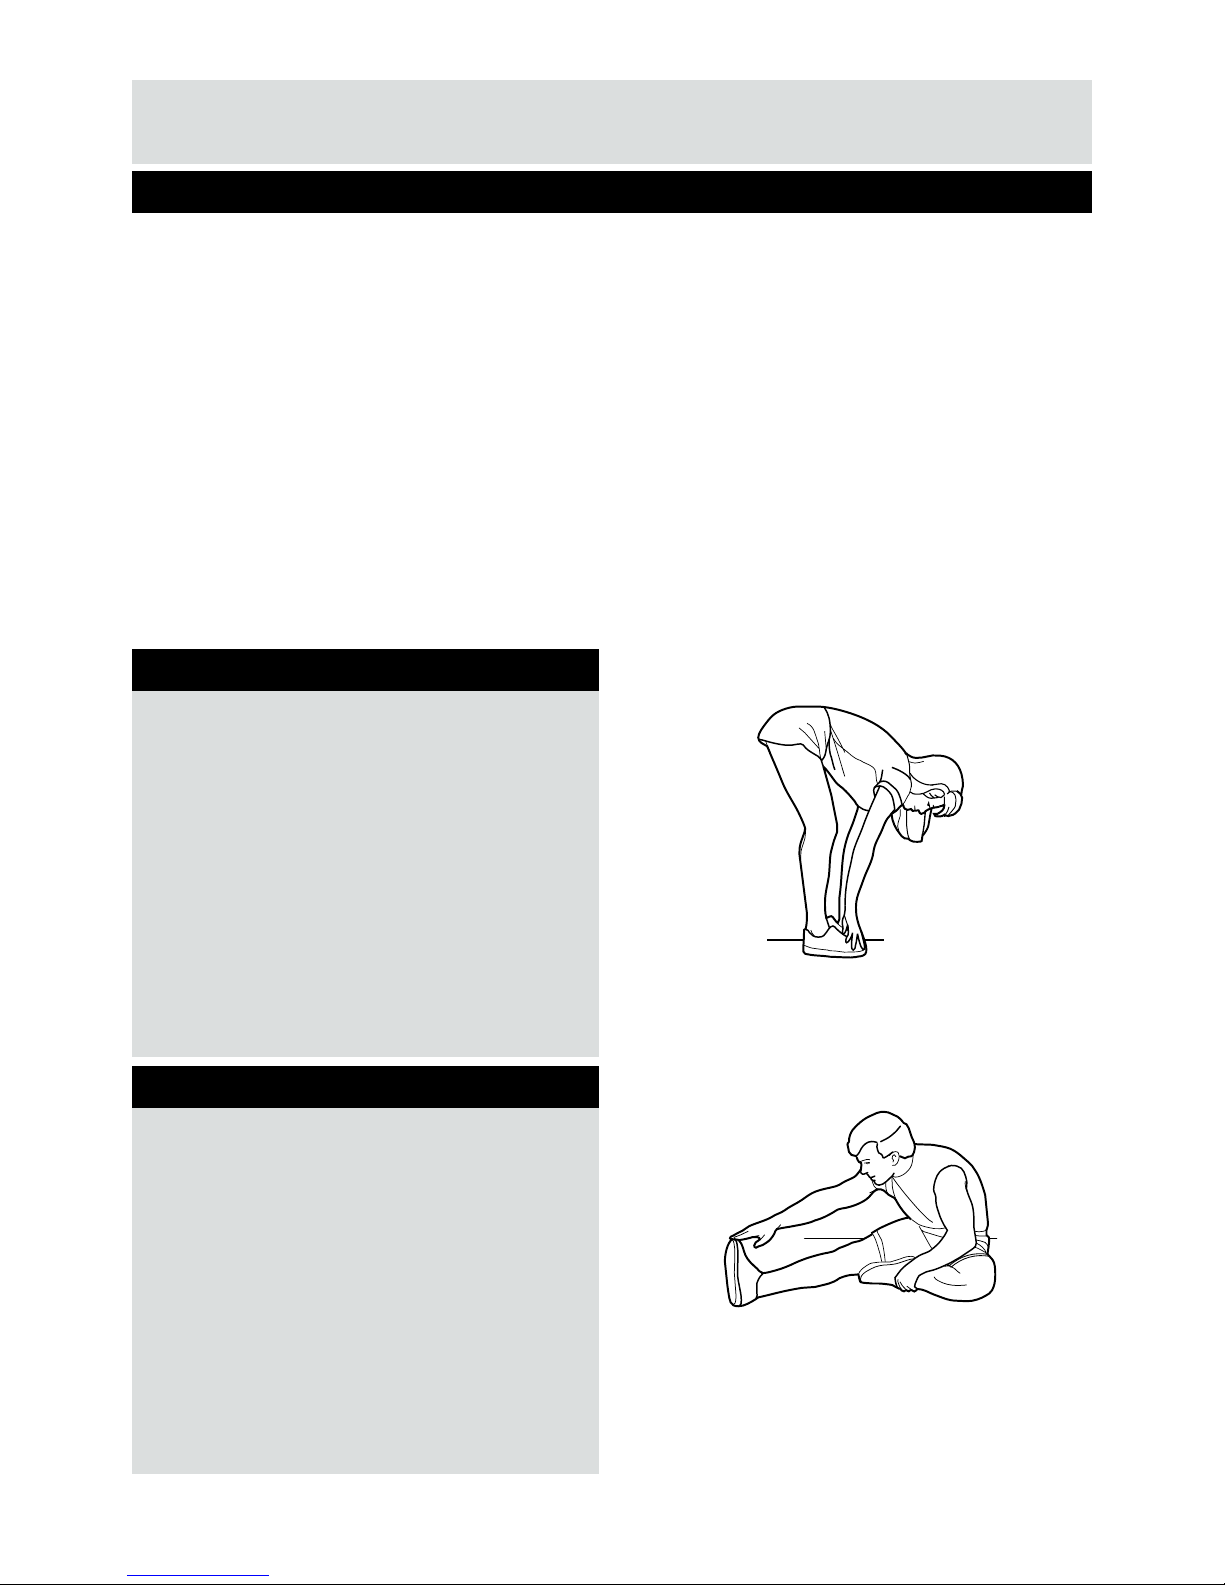
For a correct warm up, see the following basic stretching exercises. Move slowly as you stretch, never bounce.
Toe touch stretch
Hamstring stretch
Stand with your knees bent slightly and slowly bend
forward from your hips. Allow your back and shoulders
to relax as you reach down toward your toes as far as
possible.
Hold for 15 counts, then relax.
Repeat 3 times.
Stretches: Hamstrings, back of knees and back.
Sit with one leg extended. Bring the sole of the
opposite foot toward you and rest it against the inner
thigh of your extended leg. Reach toward your toes as
far as possible.
Hold for 15 counts, then relax.
Repeat 3 times for each leg.
Stretches: Hamstrings, lower back and groin.
Page 23
23
Exercising Information
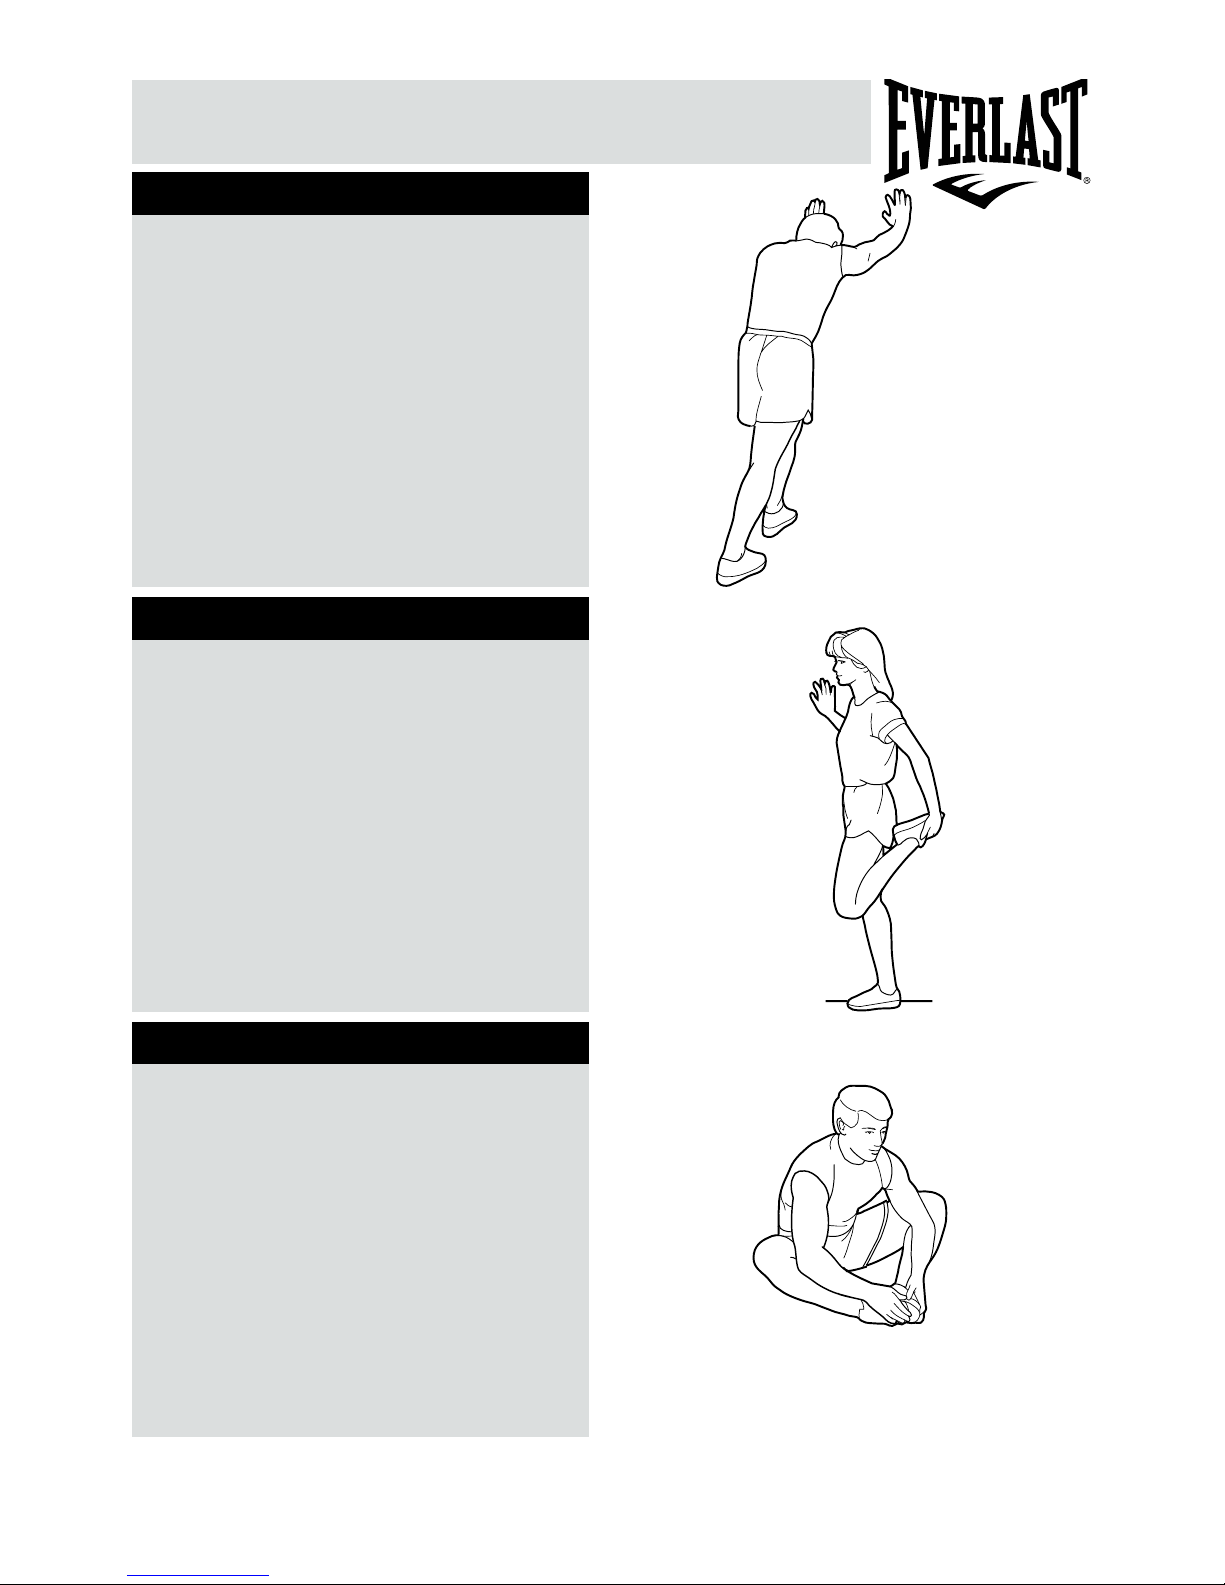
Calf/achilles stretch
Quadriceps stretch
Inner thigh stretch
With one leg in front of the other, reach forward and
place your hands against a wall. Keep your back leg
straight and your back foot at on the oor. Bend your
front leg, lean forward and move your hips toward the
wall.
Hold for 15 counts, then relax.
Repeat 3 times for each leg. To cause further stretching
of the achilles tendons, bend your back leg as well.
Stretches
: Calves, achilles tendons and ankles.
With one hand against the wall for balance, reach back
and grasp one foot with your other hand. Keeping your
bent knee pointing directly downward towards the oor,
gentle pull your heel towards your buttock until you feel
a gentle stretch in the target area.
Hold for 15 counts, then relax.
Repeat 3 times for each leg.
Stretches
: Quadriceps and hip muscles.
Sit with the soles of your feet together and your knees
outward. Pull your feet toward your groin area as far as
possible.
Hold for 15 counts, then relax.
Repeat 3 times.
Stretches
: Quadriceps and hip muscles.
Page 24
24
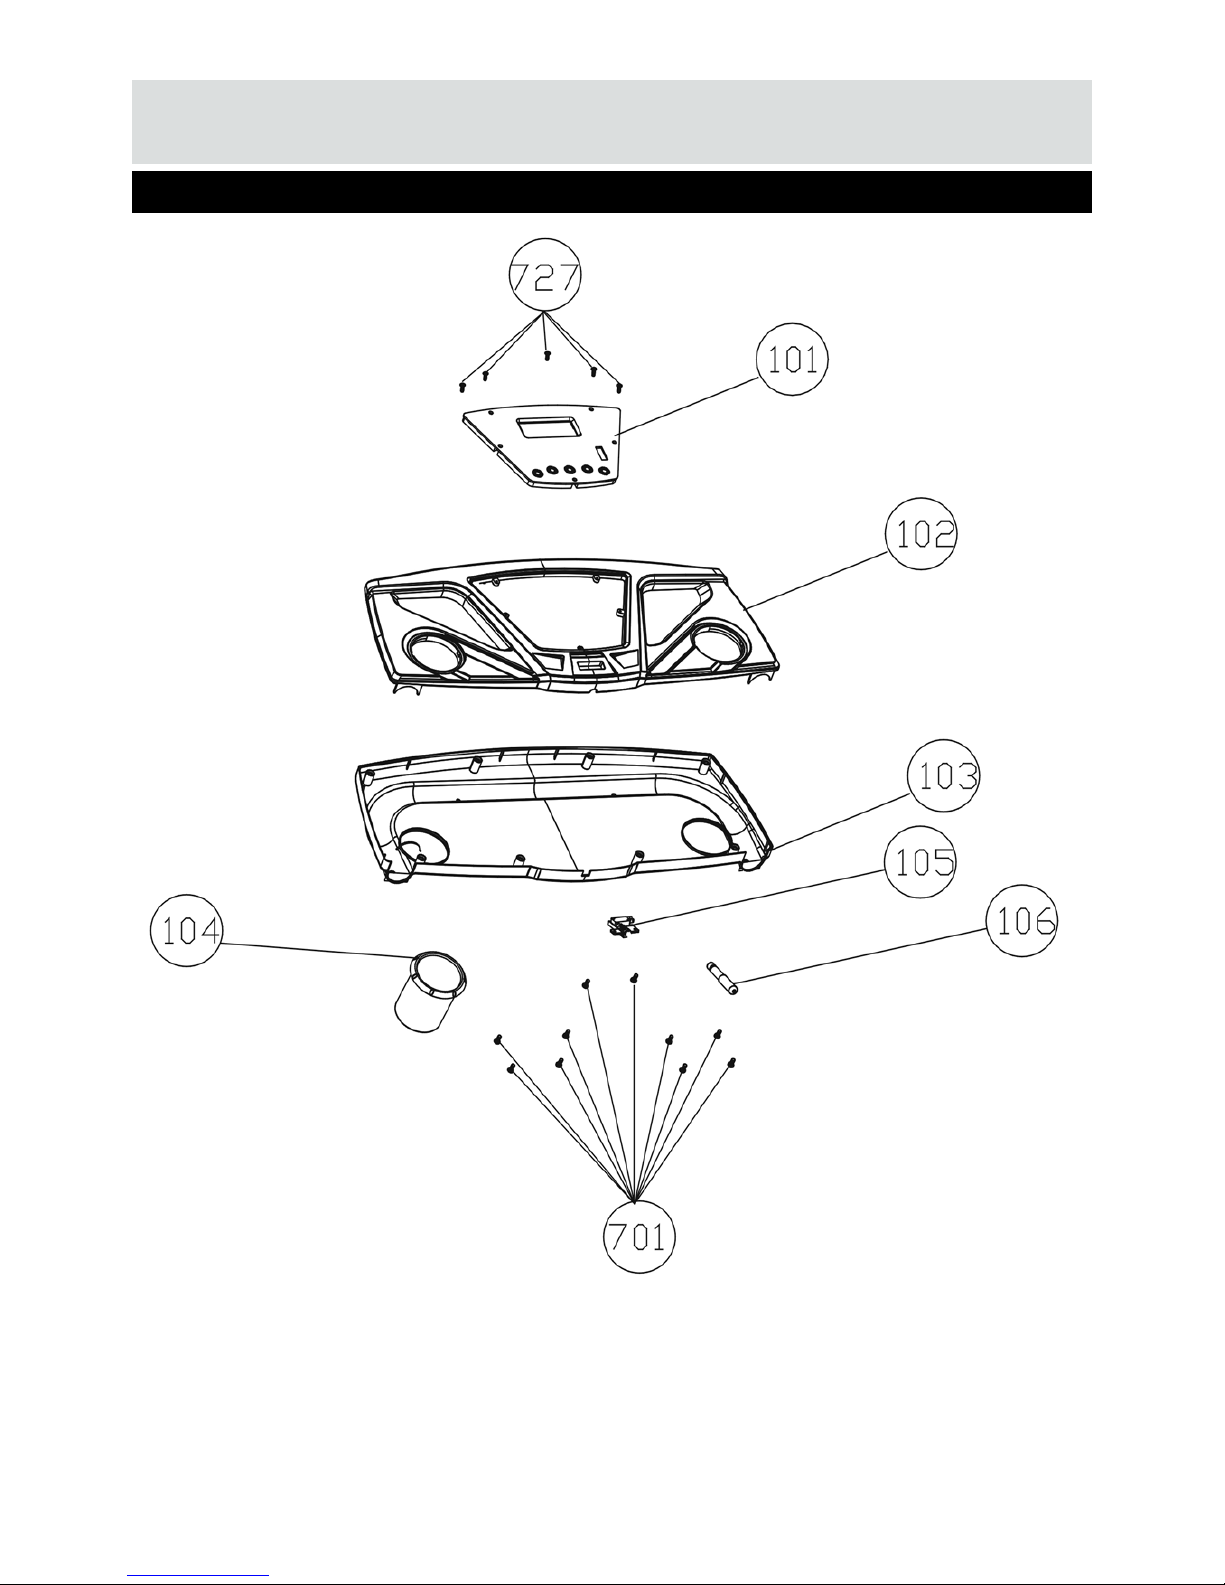
Exploded Parts Diagram
Console
Page 25
25
Exploded Parts Diagram
Upright Frame and Handle Bar
Page 26
26
Exploded Parts Diagram
Motor Cover
Page 27
27
Exploded Parts Diagram
Motor Cover Frame and Upright Cover
Page 28
28
Exploded Parts Diagram
Walking Belt
Page 29
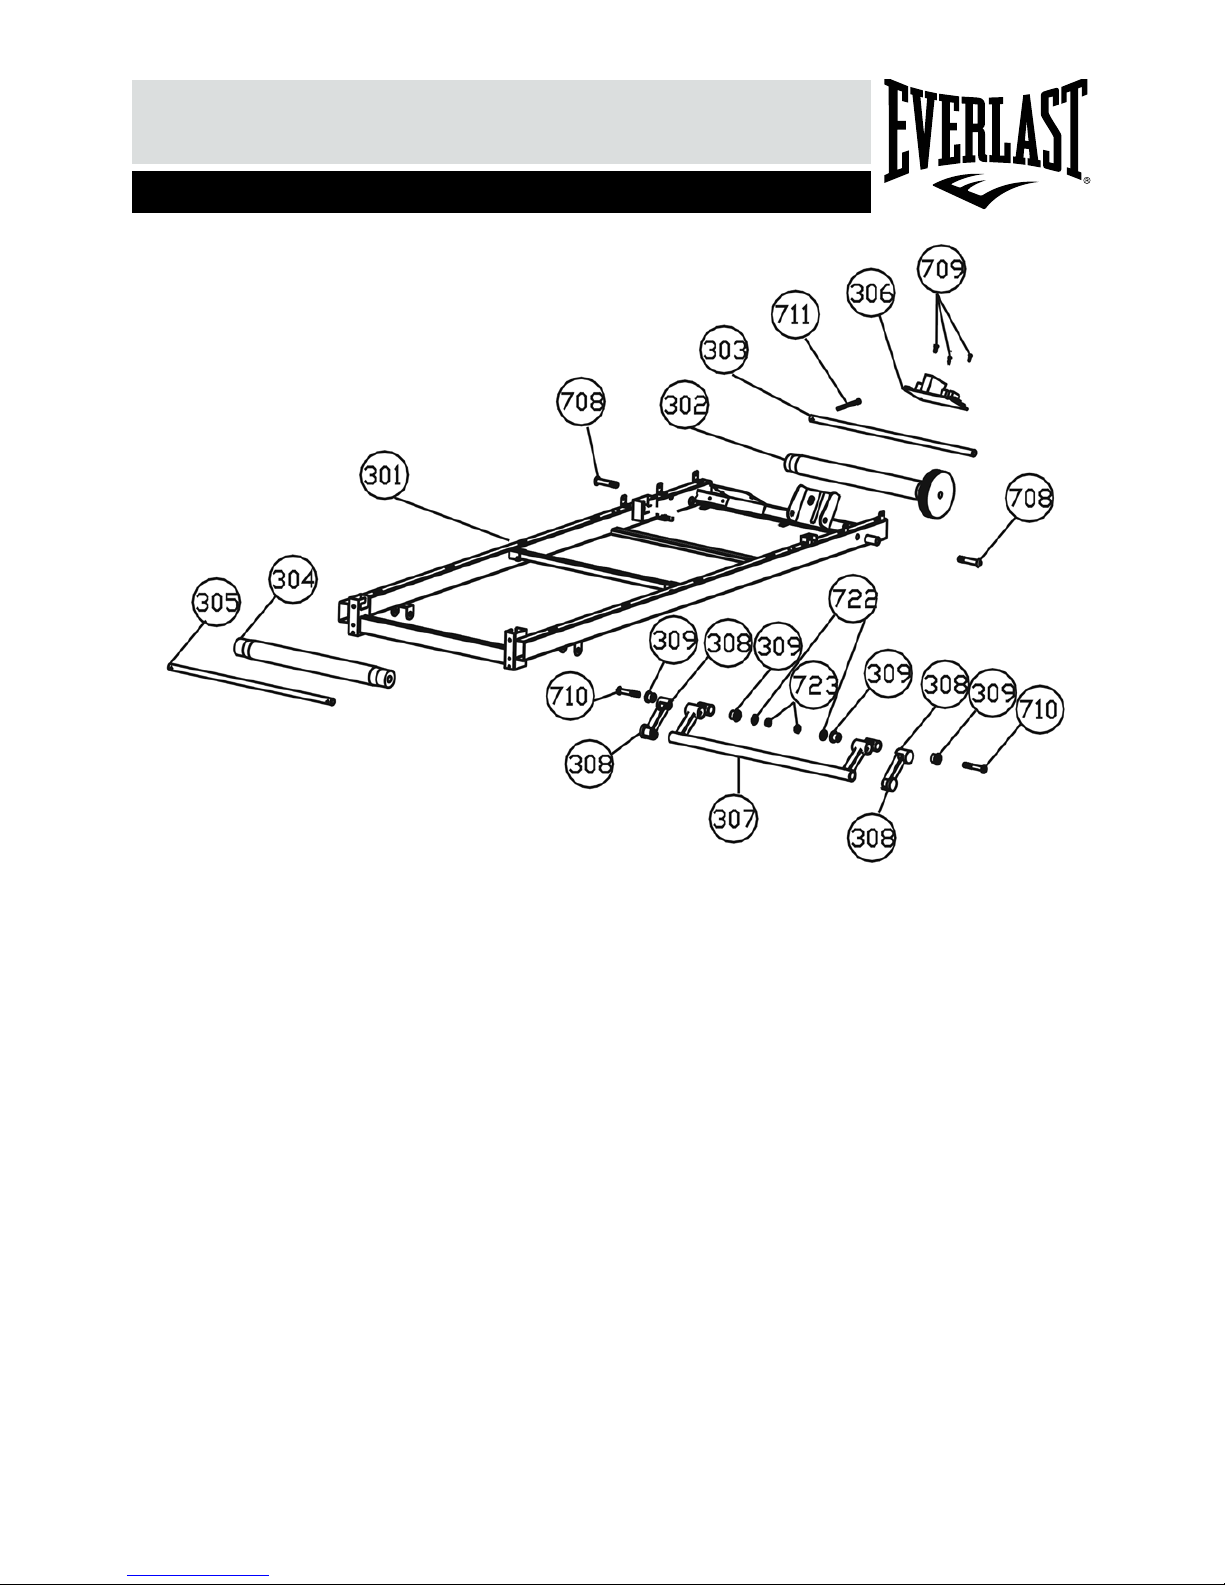
29
Exploded Parts Diagram
Main Frame
Page 30
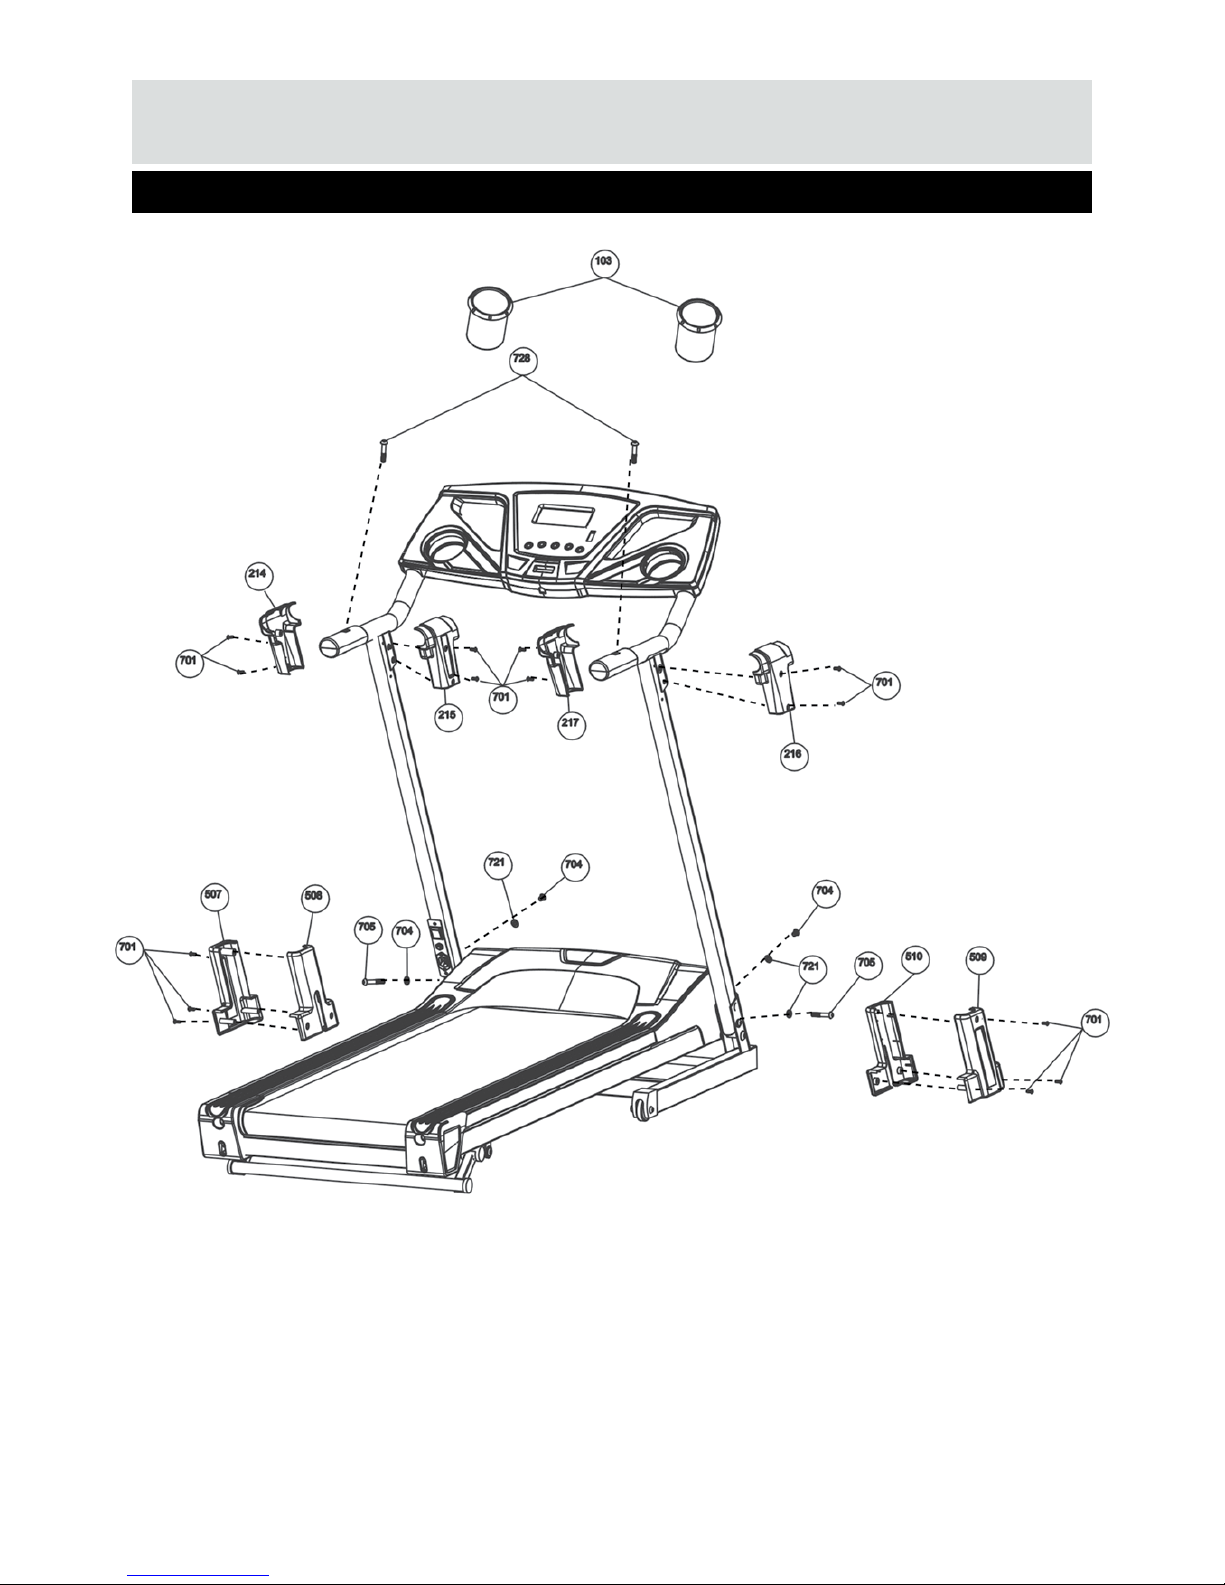
30
Exploded Parts Diagram
Upright Cover and Handle Bar Cover
Page 31
31
Part Description Qty Part Description Qty
101 Computer 1 503 Transportation Wheel 2
102 Console Housing - Upper 1 504 Fold Holder 1
103 Console Housing - Bottom 1 505 Fold Holder Wheel 1
104 Water Bottle Holder 2 506 10mm Foot Cushion 4
105 Safety Key Base 1 507 Upright Cover - LL 1
106 Safety Key 1 508 Upright Cover - LR 1
509 Upright Cover - RL 1
201 Handle Bar 1 510 Upright Cover - RR 1
202 Upright - Left 1
203 Upright - Right 1 601 Running Belt 1
204 Hand Pulse Sensor 2 602 Side Rail 2
205 Power Switch Plate 1 603 End Cap - Left 1
206 Power Switch 1 604 End Cap - Right 1
207 Power Breaker 1 605 Running Deck 1
208 Electric Outlet 1 606 Cushion Pad 8
209 Hand Pulse Sensor Cover - Upper 2
210 Hand Pulse Sensor Cover - Bottom 2 701 ø4x15mm Screw 40
211 Power Switch Plate Base 1 702 Rail Guide 8
212 5 Pin Wire 2500mm 1 703 M8x10mm Bolt 2
213 2 Pin Wire 1900mm 1 704 M8x18mm Bolt 2
214 Handle Bar Cover - Left 1 1 705 M8x42mm Bolt 4
215 Handle Bar Cover - Left 2 1 706 ø4x19mm Screw 2
216 Handle Bar Cover - Right 1 1 707 M8x39mm Bolt 2
217 Handle Bar Cover - Right 2 1 708 M12x85mm Bolt 2
216 Handle Bar Cover - Right 1 1 709 M4x12mm Screw 3
217 Handle Bar Cover - Right 2 1 710 M10x59mm Bolt 2
711 M6x45mm Bolt 3
301 Main Frame 1 712 ø4x19mm Screw 16
302 Front Roller 1 713 M8x25mm Bolt 8
303 Front Roller Shaft 1 714 M5x14mm Bolt 4
304 Rear Roller 1 715 M8x47mm Bolt 1
305 Rear Roller Shaft 1 716 Motor Bolt 1
306 Control Board 1 717 Motor Cushion 1
307 Rear Foot Frame 1 718 Washer 2
308 Rear Foot Frame End Cap 4 719 M10x116mm Bolt 1
309 ø22 x ø10 End Cap 2 720 M8x12mm Bolt 2
721 ø8 Washer 13
401 Motor 1 722 ø10 Washer 3
402 Motor Holder 1 723 M10 Nut 3
403 Belt 1 724 M8 Nut 4
404 Motor Hood - Upper 1 725 M8x35mm Bolt 1
405 Motor Hood - Bottom 4 726 M8x50mm Bolt 1
727 ø3.5x15mm Screw 9
501 Base Frame 1 728 M8x45mm Bolt 2
502 Transportation Wheel Cover 2
Exploded Diagram Parts List
Page 32

AN AUTHORISED LICENCEE OF EVERLAST WORLD WIDE INC. FCSI LTD
CUSTOMER HELPLINE : 0845 6000 464
 Loading...