

Page 1

MID USER MANUAL
EverLast INNERgy, LLC
www.everlastinnergy.com
888-335-0323
Page 2

Content
1 Foreword.............................................................................................................................................. 3
1.1 Acknowledgements....................................................................................................................... 3
1.2 Announcements............................................................................................................................. 3
1.3 Safety Tips ....................................................................................................................................3
1.4 Acronym/terms ............................................................................................................................. 4
2 A Brief Description of MID Series of Products................................................................................... 5
2.1 MID Overall Drawing................................................................................................................... 5
2.2 MID Accessories Introduction......................................................................................................6
2.3 MID Use and preparation.............................................................................................................. 7
2.4 MID State and information ........................................................................................................... 7
3 Quick start............................................................................................................................................8
3.1 Button function ............................................................................................................................. 8
3.2 Boot and shutdown ....................................................................................................................... 9
3.3 Screen of opening and closing ...................................................................................................... 9
3.4 The use of touch screen............................................................................................................... 10
3.5 Page interface.............................................................................................................................. 10
3.6 Access to the application ............................................................................................................ 12
3.7 USB connection ..........................................................................................................................12
3.8 Storage card ................................................................................................................................ 13
3.9 Input text ..................................................................................................................................... 14
3.10 Use skills................................................................................................................................... 16
4 Establish connections......................................................................................................................... 17
4.1 WIFI connection ......................................................................................................................... 17
5 Communication.................................................................................................................................. 18
5.1 E-MAIL....................................................................................................................................... 18
6 Multimedia.........................................................................................................................................20
6.1 Support the file format................................................................................................................ 20
6.2 Music .......................................................................................................................................... 20
1
Page 3

6.3 Camera ........................................................................................................................................ 22
6.4 HDMI.......................................................................................................................................... 23
6.5 Media Browser............................................................................................................................ 23
7 Internet ............................................................................................................................................... 25
7.1 Browser....................................................................................................................................... 25
8 Other applications .............................................................................................................................. 28
8.1 Alarm clock.................................................................................................................................28
8.2 Calculator....................................................................................................................................28
8.3 File Manager ............................................................................................................................... 28
9 Basic Setup......................................................................................................................................... 31
9.1 Sound and Display.................................................................................................................31
9.2 Safety and Position ................................................................................................................32
9.3 SD Card and storage ................................................................................................................... 32
9.4 Date and time ........................................................................................................................... 33
9.5 Set the language ....................................................................................................................... 33
9.6 About the equipment................................................................................................................... 34
10 The installation and Control of Program....................................................................................... 35
10.1 Installation.............................................................................................................................. 35
10.2 Managing and Unloading.......................................................................................................35
10.3 Update way ............................................................................................................................... 36
11 Troubleshooting ............................................................................................................................... 36
Be sure the wireless router is work ............................................................................................... 36
Annex 1.................................................................................................................................................38
Specifications....................................................................................................................................38
2
Page 4

1 Foreword
1.1 Acknowledgements
Thank you for choosing our products. Products for MID (Mobile Internet Device), this is a
kind of mobile Internet equipment, delicate and cabinet, easy to carry. Equipped with a high
resolution 800x480 LCD touch screen, can see high-definition video and images. Support to
install multiple office, entertainment etc applications.
The dazzle cruel interface can let you have new user experience.
This manual introduces the various functions, using skills and announcements.
Please read the manual carefully before using MID.
1.2 Announcements
Maintenances
Please keep MID dry. Do not let equipment, battery charger contact water and
vapour or use wet hand to operate equipment or charger. Lest cause short-circuit,
corrosion caused by equipment failure, and personnel.
Don’t make equipment, battery and charger strongly impact or vibration. Lest cause
equipment, battery and charger fault, fire or explosion.
Don’t put this equipment, battery and charger in the too high or too low temperature
region. Otherwise you may cause equipment, battery and charger fault, fire or
explosion.
Do not hit, throw, acupuncture the MID, and avoid drop, extrusion, bending MID.
Do not unauthorized equipment and accessories,otherwise the equipment and
accessories will not in the company’s warranty scope.
1.3 Safety Tips
Before you use the MID, please read this section information .and let your child know these
information. For detailed information, please refer to the safety guidelines and note.
Do not use MID in driving, in order to prevent the safe driving.
In medical sites, please comply with relevant provisions or regulations. Please close
MID near the medical equipment area.
Please close MID or open planes mode when you are boarding, to avoid wireless
signals jamming aircraft control signal.
Please close MID near the use of high precision electronic equipment, otherwise it
3
Page 5

may lead to electronic equipment disabled.
Do not unauthorized to remove MID and accessories. Only authorized institutions
can repair this MID.
Please put MID away from magnetic equipment. The radiation of MID will erase
information which is on magnetic storage device.。
Please don’t use MID in the high temperature and flammable areas (such as near gas
station).
Please don’t put MID and accessories in this place which children can touch it,
please do not let the child use MID in unsupervised.
Please abide by the relevant laws and regulations when you use the MID, and respect
others lawful rights and privacy.
Please strictly abide by relevant specification of this manual when you use USB
cable. Otherwise it might damage your MID or personal computer.
Please don’t use MID in the damp environment such as bathroom etc. And avoid the
1.4 Acronym/terms
Acronym/terms Full name Instruction
MID
WIFI
TF
HDMI
MID soaked or flushed by the liquid.
Mobile Internet Device
Wireless Fidelity
Trans Flash
High Definition Multimedia
Interface
Mobile Internet terminals
Based on the IEEE 802.11B
standard wireless LAN
Also call : Micro SD
High-resolution multimedia
interface
4
Page 6
6
5
7777
8
11
9999
2 A Brief Description of MID Series of Products
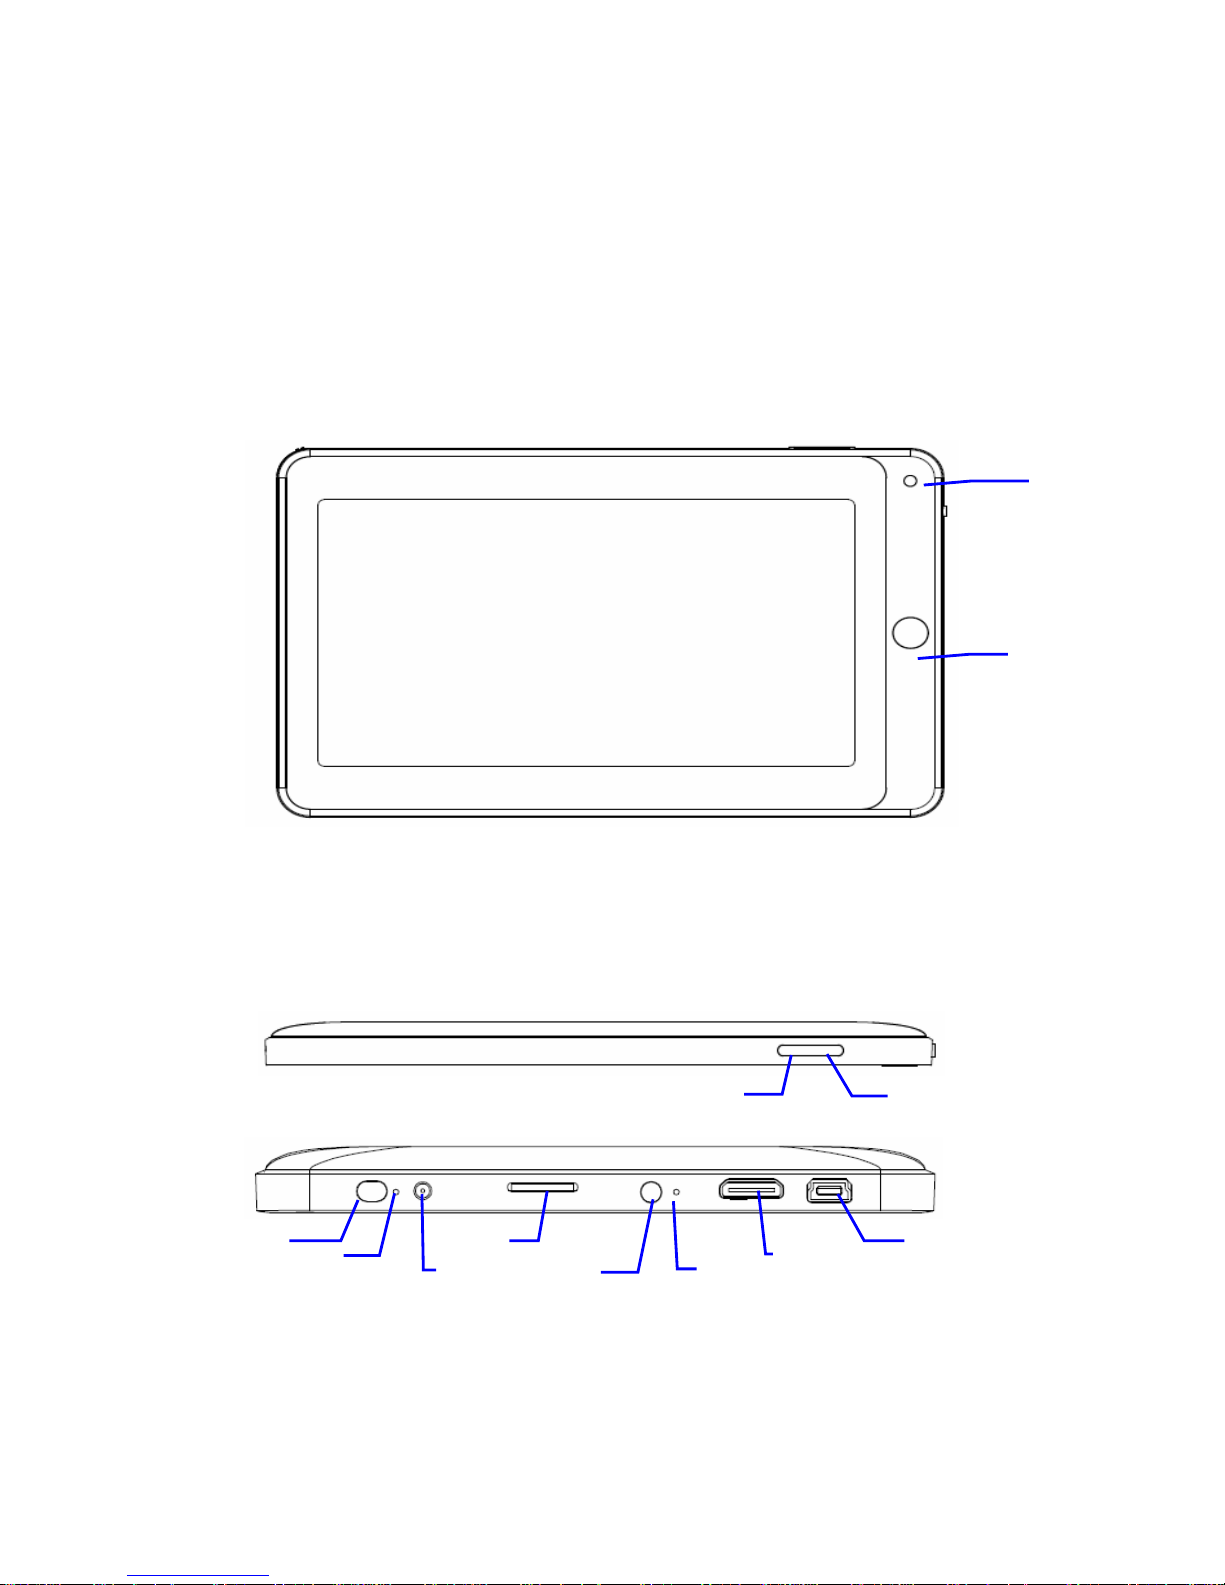
2.1 MID Overall Drawing
EM73 Front View
2
Figure 2-1
EM73D Side View
Figure 2-2
1
3
4
12
10
10
5
1010
Page 7
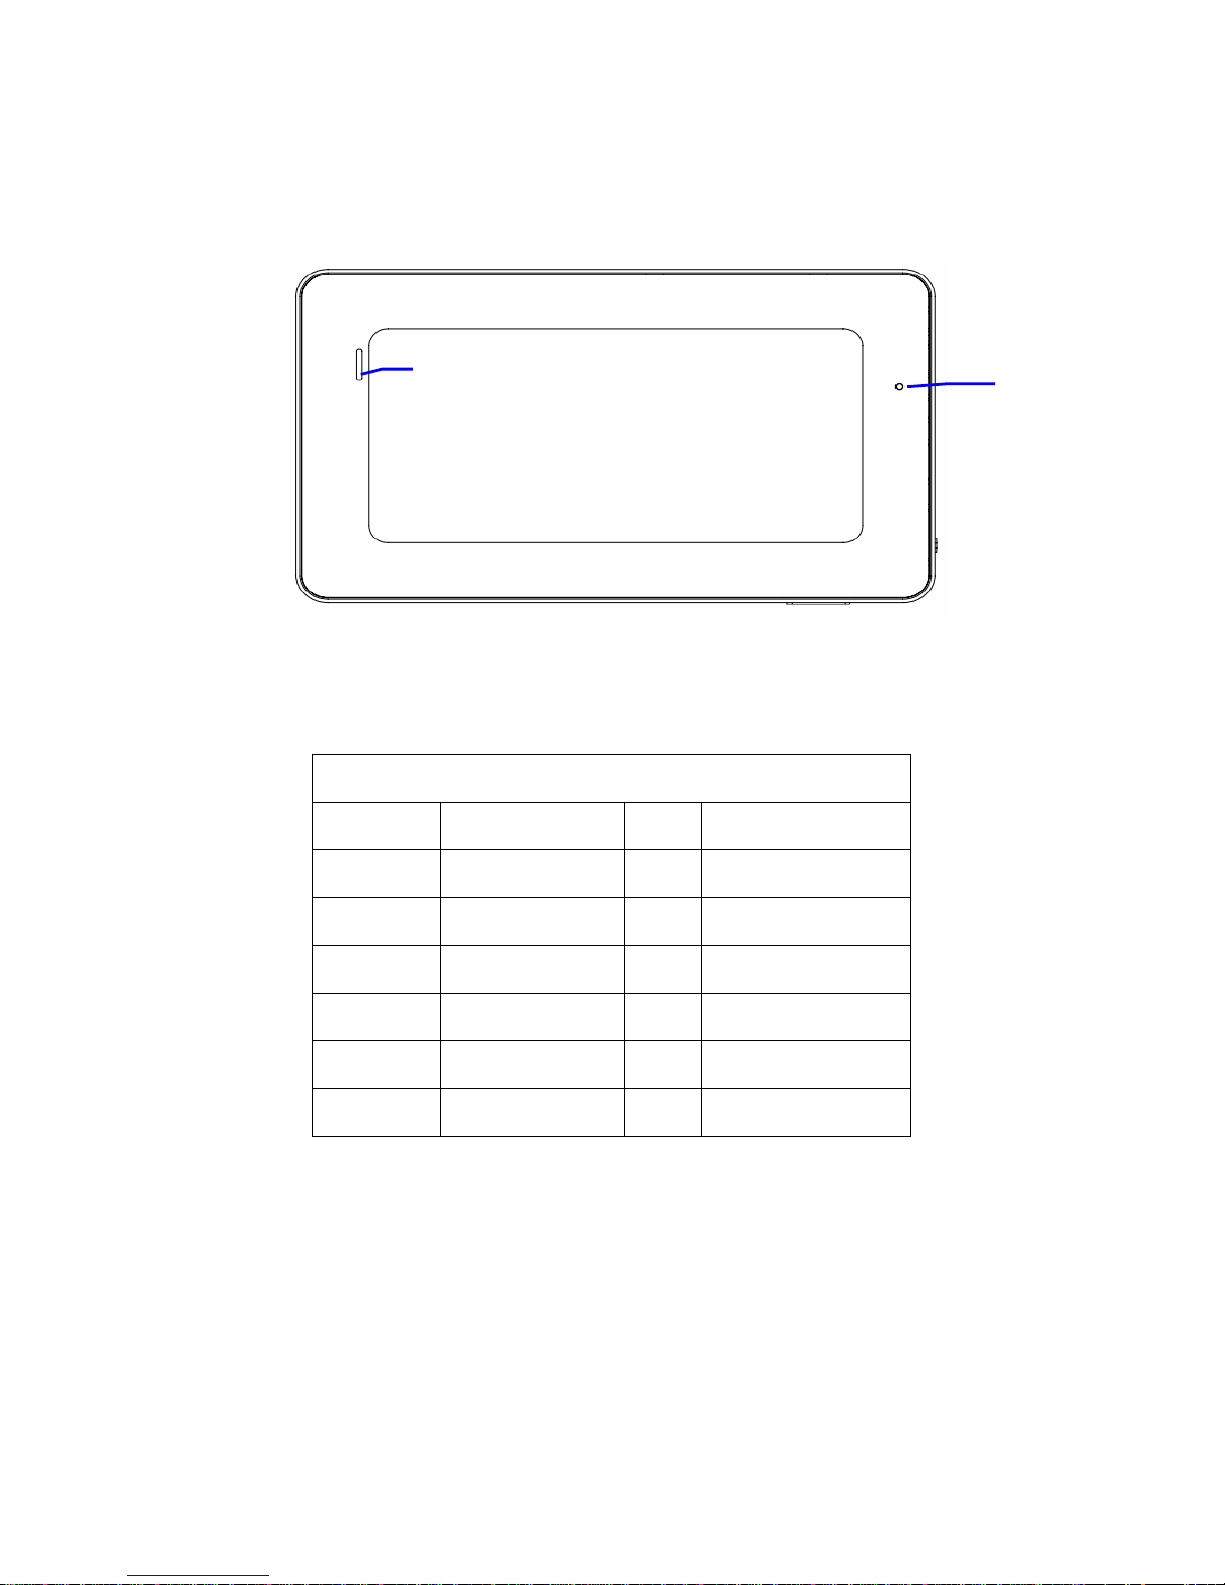
EM73D Bottom View
Figure 2-3
13
Figure 2-4
Description of EM73 Button Functions
1 Return button 2 Camera
3
5
Homepage key
On/Off key
Menu key
4
Power indication lamp
6
14
7
9
11
13
Power interface
Earphone interface
HDMI
Speaker
2.2 MID Accessories Introduction
Packing List
6
8
10
12
14
TF
MIC
miniUSB
Reset key
Page 8
Your MID packing box includes the following items
MID complete machine
Power adapter
USB cable
Mini USB connecting lines
4G TF card(Optional)
Earphone (Optional)
User manual
Compact disc(Optional)
2.3 MID Use and preparation
Battery charging
Before using MID firstly, please charge for battery.
1. Use the ac adapter to charge for MID.
2. In order to ensure that the battery is full, please charge for 4 hours or more.
2.4 MID State and information
Notice Icon
Please click column frame and slide on screen by touching pen to open notice list when the
message appears notice panel. Click to requisite view options, check the detailed
information. Later you can click information box and slide to shut up information windows.
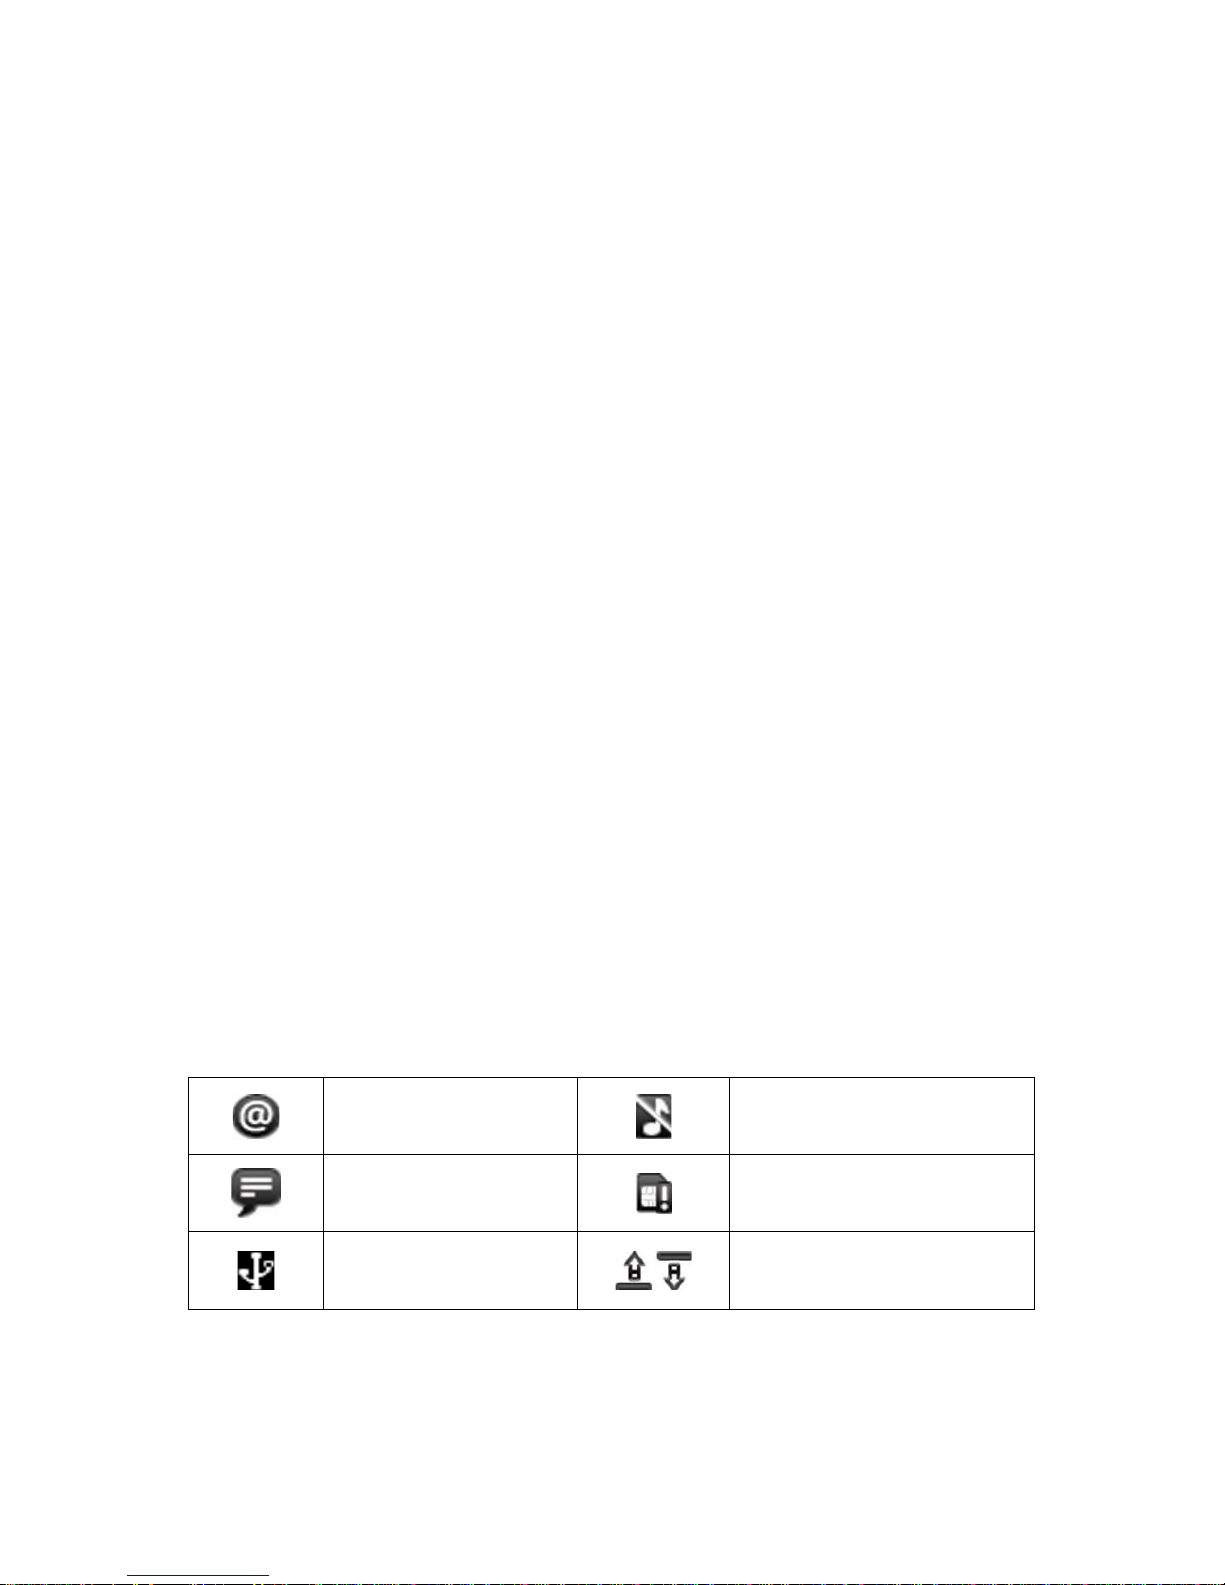
The icon illustration for status bar as follows:
New email
New instant messaging
Use USB line to connect
computer with MID
Mute
No SD card
Uploading/downloading
7
Page 9

Matters to be handled
Download is completed
Alarm opening
Music playing
Data synchronization
Insufficient SD
card space
WIFI service already
connected ,network
General notice (such as:
synchronization error)
Flight mode
Charging
More
Battery changing sign
available
Notice panel
Notice icon will display the new message, the setted alarm clock, schedule, and SD card inserting
etc. You can open inform panel to check specific information.
Open notice panel
When notice bar appears new notice icon here, please hold notice bar, then slide down fingers or
touching pen, then you can open notice panel.
3 Quick start
3.1 Button function
Key functions illustration:
Power key Long press this button for booting
In booting condition, long press this button pop-up shutdown options.
In booting condition, press this button to turn off the screen
Menu button Press this button to open the interface menu
Press this button to unlock in the lock screen condition
Back button Press this button to back a previous operation procedure or previous operation
interface.
Page key Press this button to return the function interface from arbitrary interface.
8
Page 10

Long press this button to open recently application window.
3.2 Boot and shutdown
After long pressing 2 seconds for the power button, you can see the boot logo.
The system is access into screen locking status after opening, please press the menu button
Boot
to unlock.
Shutdown
1. Long press the power button, then popup "shutdown" options.
2. Equipment options have silent mode, flight mode and shutdown.
3. Click the shutdown.
3.3 Screen of opening and closing
It will be closed during the screen idling.
1. After idling period of time, screen will be automatically closed to save the battery.
2. In the screen opening condition, press the power button, the screen can immediately
shut down.
Tip: if you need to find out how to configure screen closing time please refer to chapter 9.1.
Opening in screen closed condition.
If screen is in the closed position, you can long press Return button or other buttons to
activate the screen. Enter locked condition after opening it, press "lock "icon and slide up
for unlocking, and holding up " voice "icon and slide down for mute condition with finger
or touching pen.
Figure 3-1
9
Page 11
3.4 The use of touch screen
There are several ways you can browse screen, menu and application, etc on the MID.
MID operation mode
Click
When you want to use the screen keyboard to input and choose applications etc on the home
page, as long as you click a project with finger or touching pen.
Press
If you want to open a available options (such as the text box or web link) or move shortcut
and main program menu on the homepage as long as you press the items.
Fast sliding or sliding
Fast sliding or sliding said in his fingers or touching pen making rapid vertical or horizontal
drag action.
Drag
Before you start to drag, you must use a finger or touching pen to press and put some
pressure on, until touch to the position which you want, finger can loosen.
Rotating
For most pictures, you can only turn to MID then screen will translate from lateral direction
to straight. Such as in the input text, watch movies, etc.
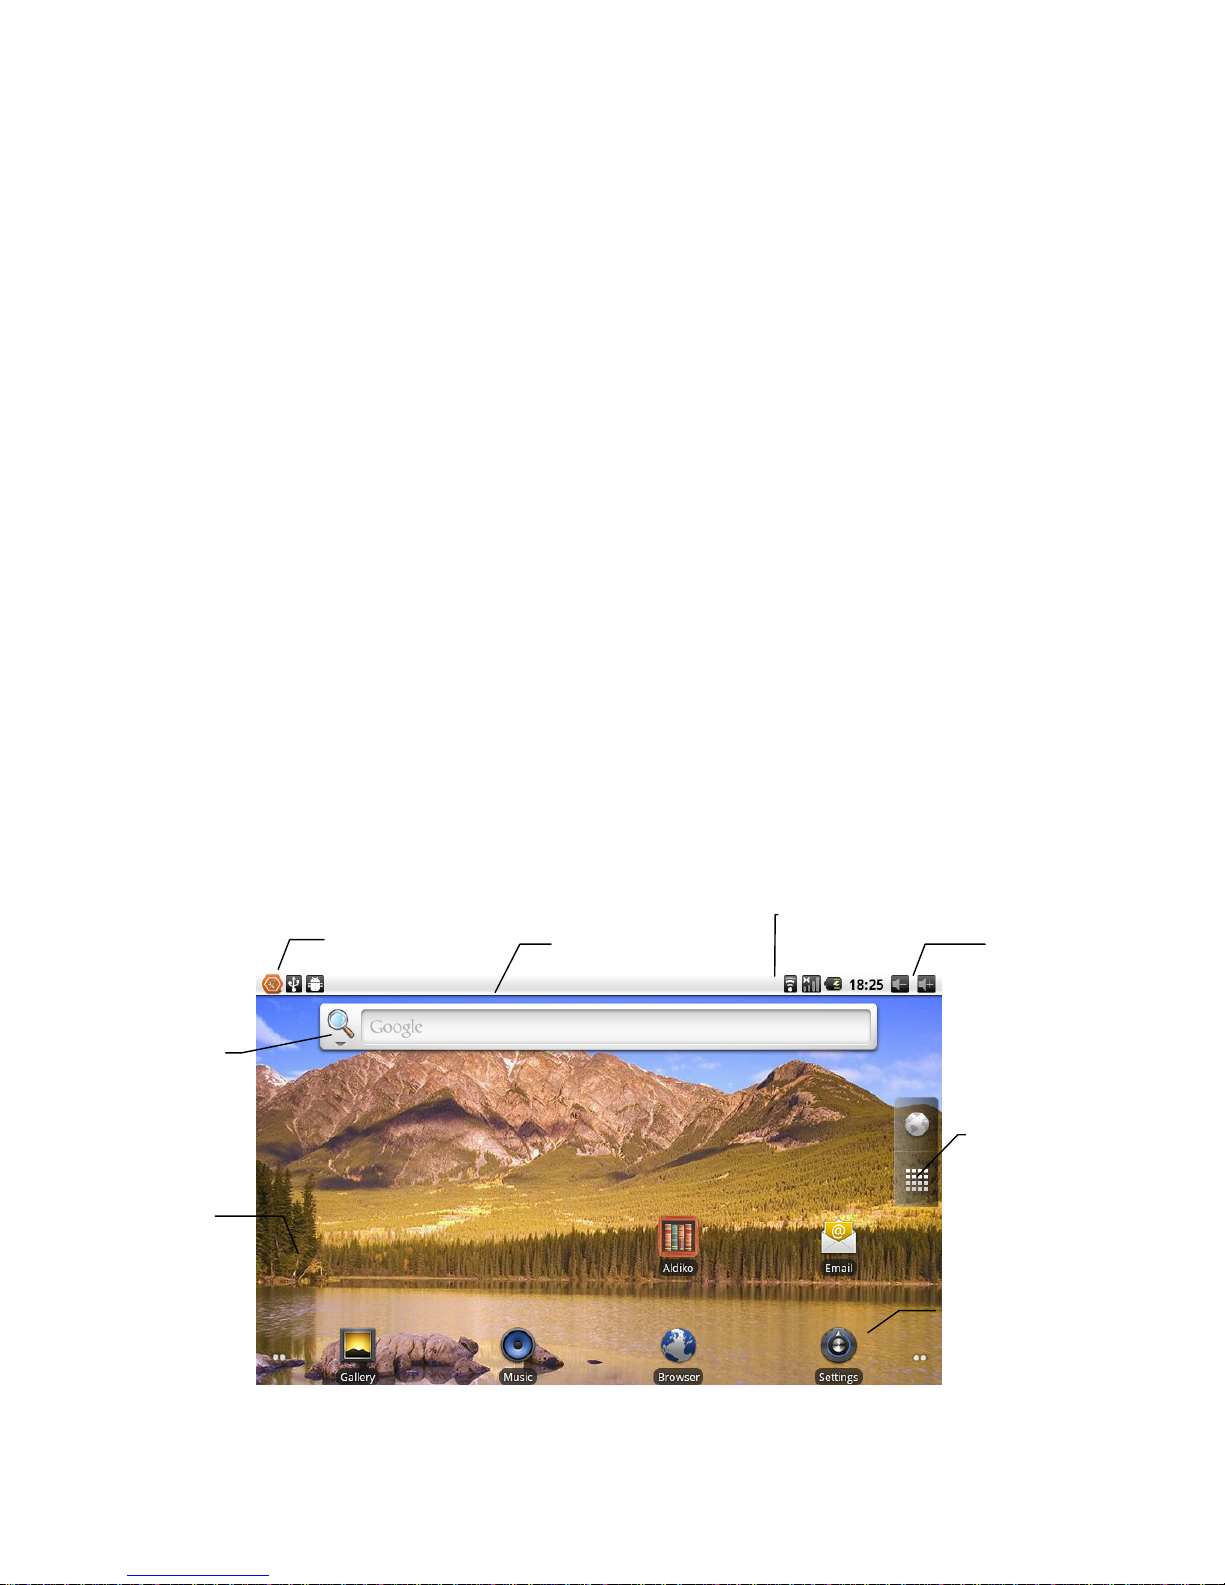
3.5 Page interface
The main menu screen will show all application . You can use the application, shortcut and
customize your homepage interface wallpaper, etc.
Figure 3-2
y
10
Page 12
Tips: in any applications homepage key can be pressed returns to the home page.
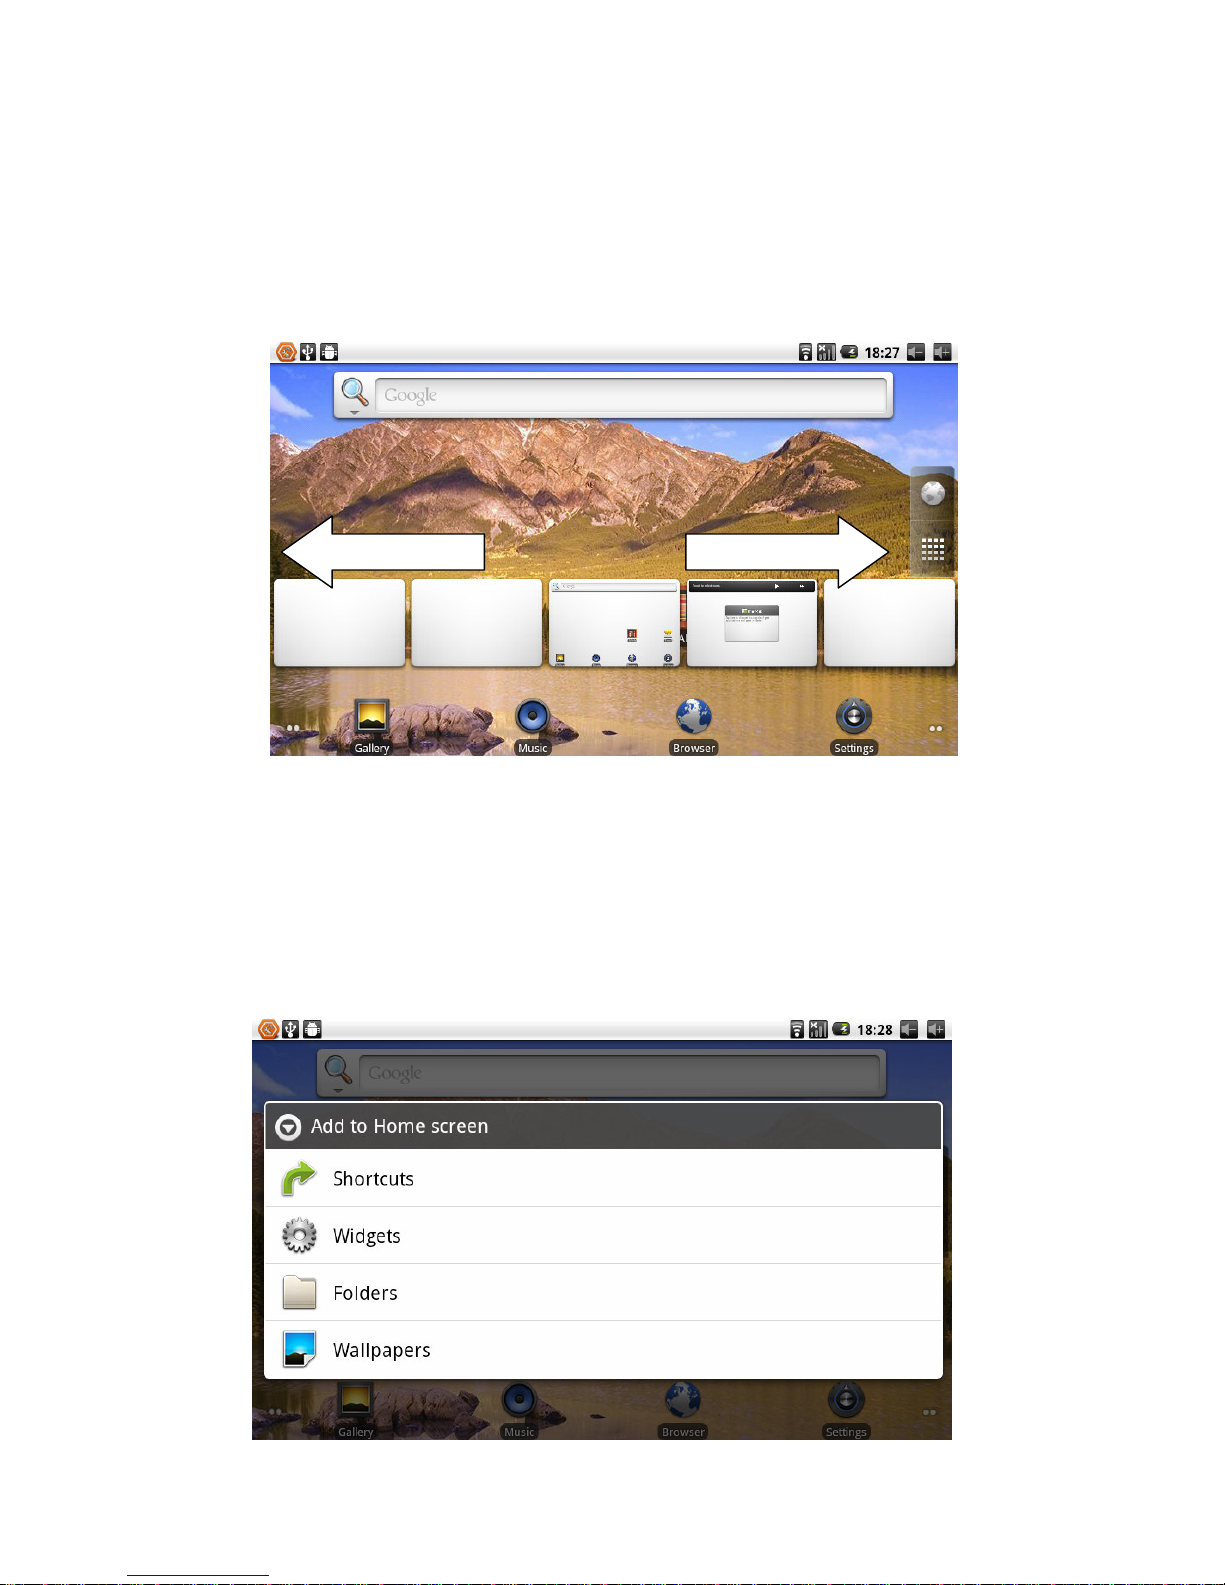
The homepage interface may extend
Homepage interface can be extended to screen width, to provide more space, let you can put
new shortcut, small tools etc. Press blankplace of homenpage interface ,then use touching
pen to rapidly vertical slide which can skip to extend to the left or right of screen.Homepage
have above 2 extended interface.
Figure 3-3
Skill: Long press Program Menu button to be able to quickly preview five desktops
Customize homepage interface
New homepage project
1 Press on the popup menu in the blank area of the interface of the homepage.
2 During the popup menu, select the wanted project to add to a new homepage interface.
11
Page 13
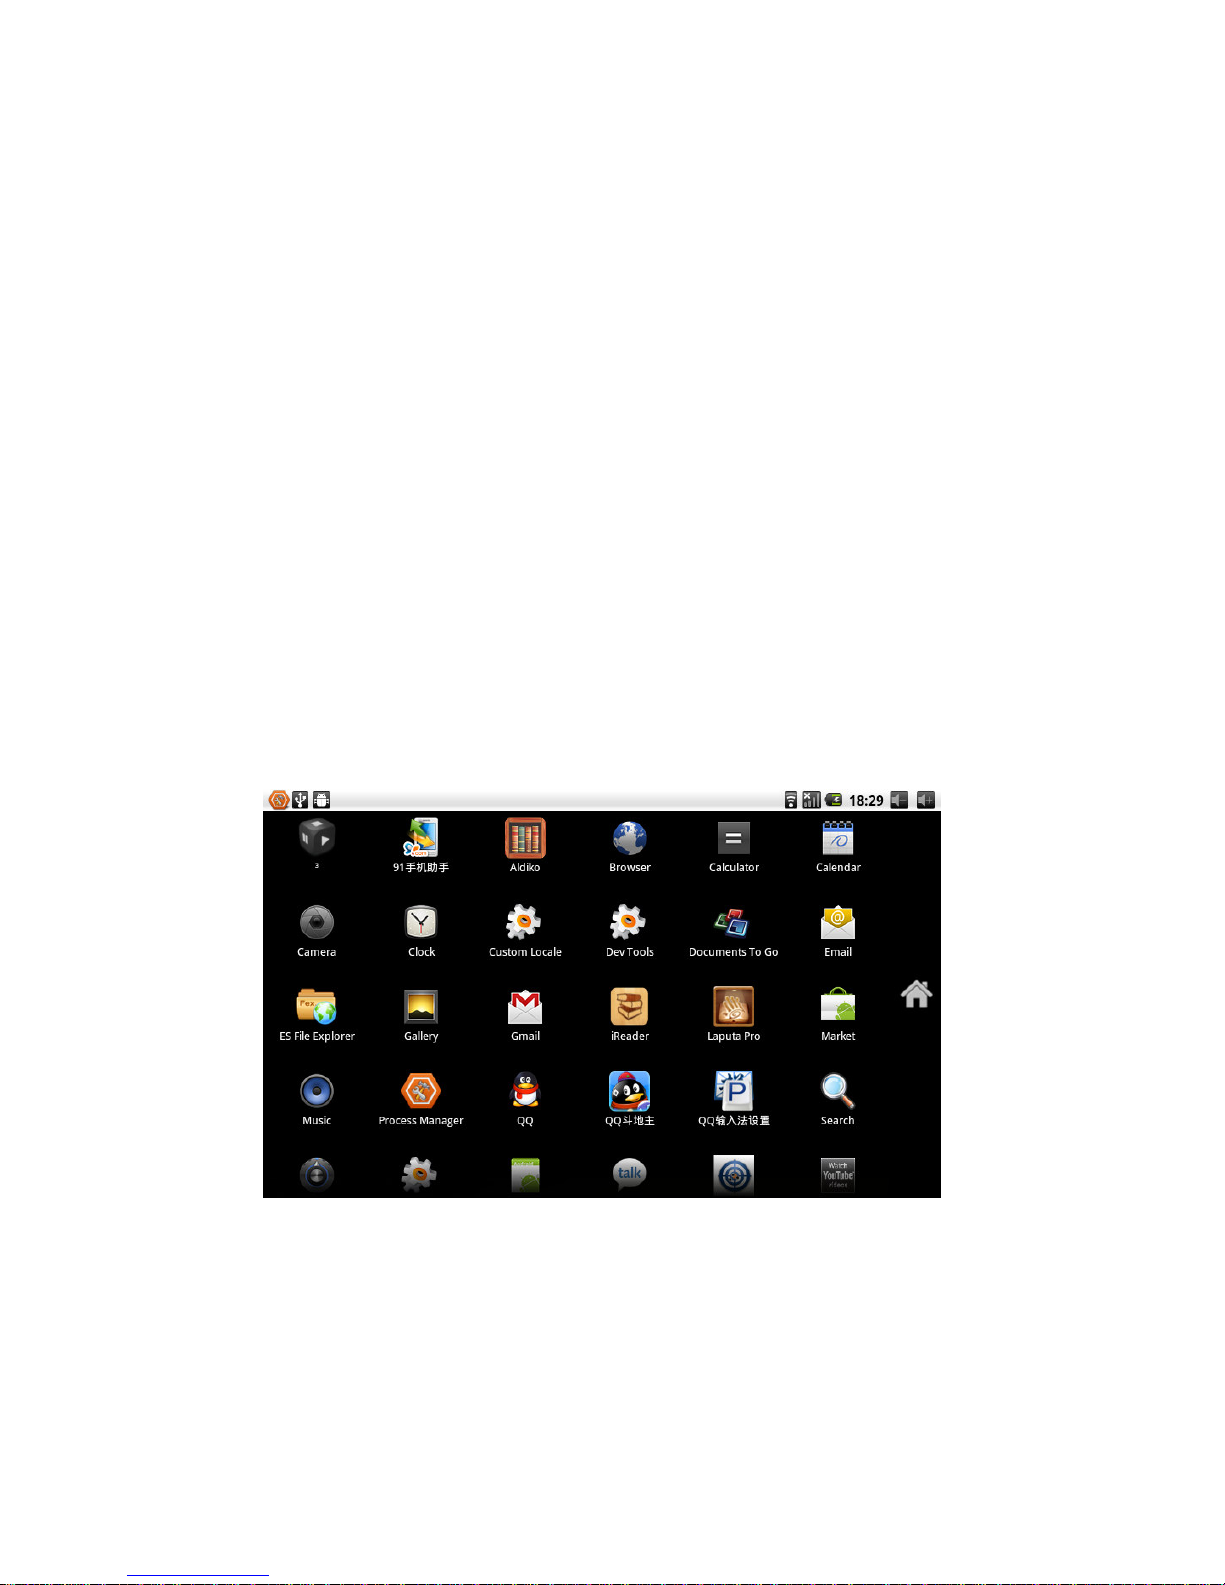
Figure 3-4
Change desktop wallpaper
1. In the homepage interface, according the menu button to popup menu, then click the
wallpaper.
2. Click the picture or wallpaper to select pictures.
Establish folder
1. In the homepage interface, according to the menu button and click addition.
2. Click the folder, and new folder.
3. Click new folder of homepage interface to open it.
4. Click and hold the folder list of headlines to rename it.
5. Open the folder, click the application of marking, holding the application to drag folders,
then may put in he folder.
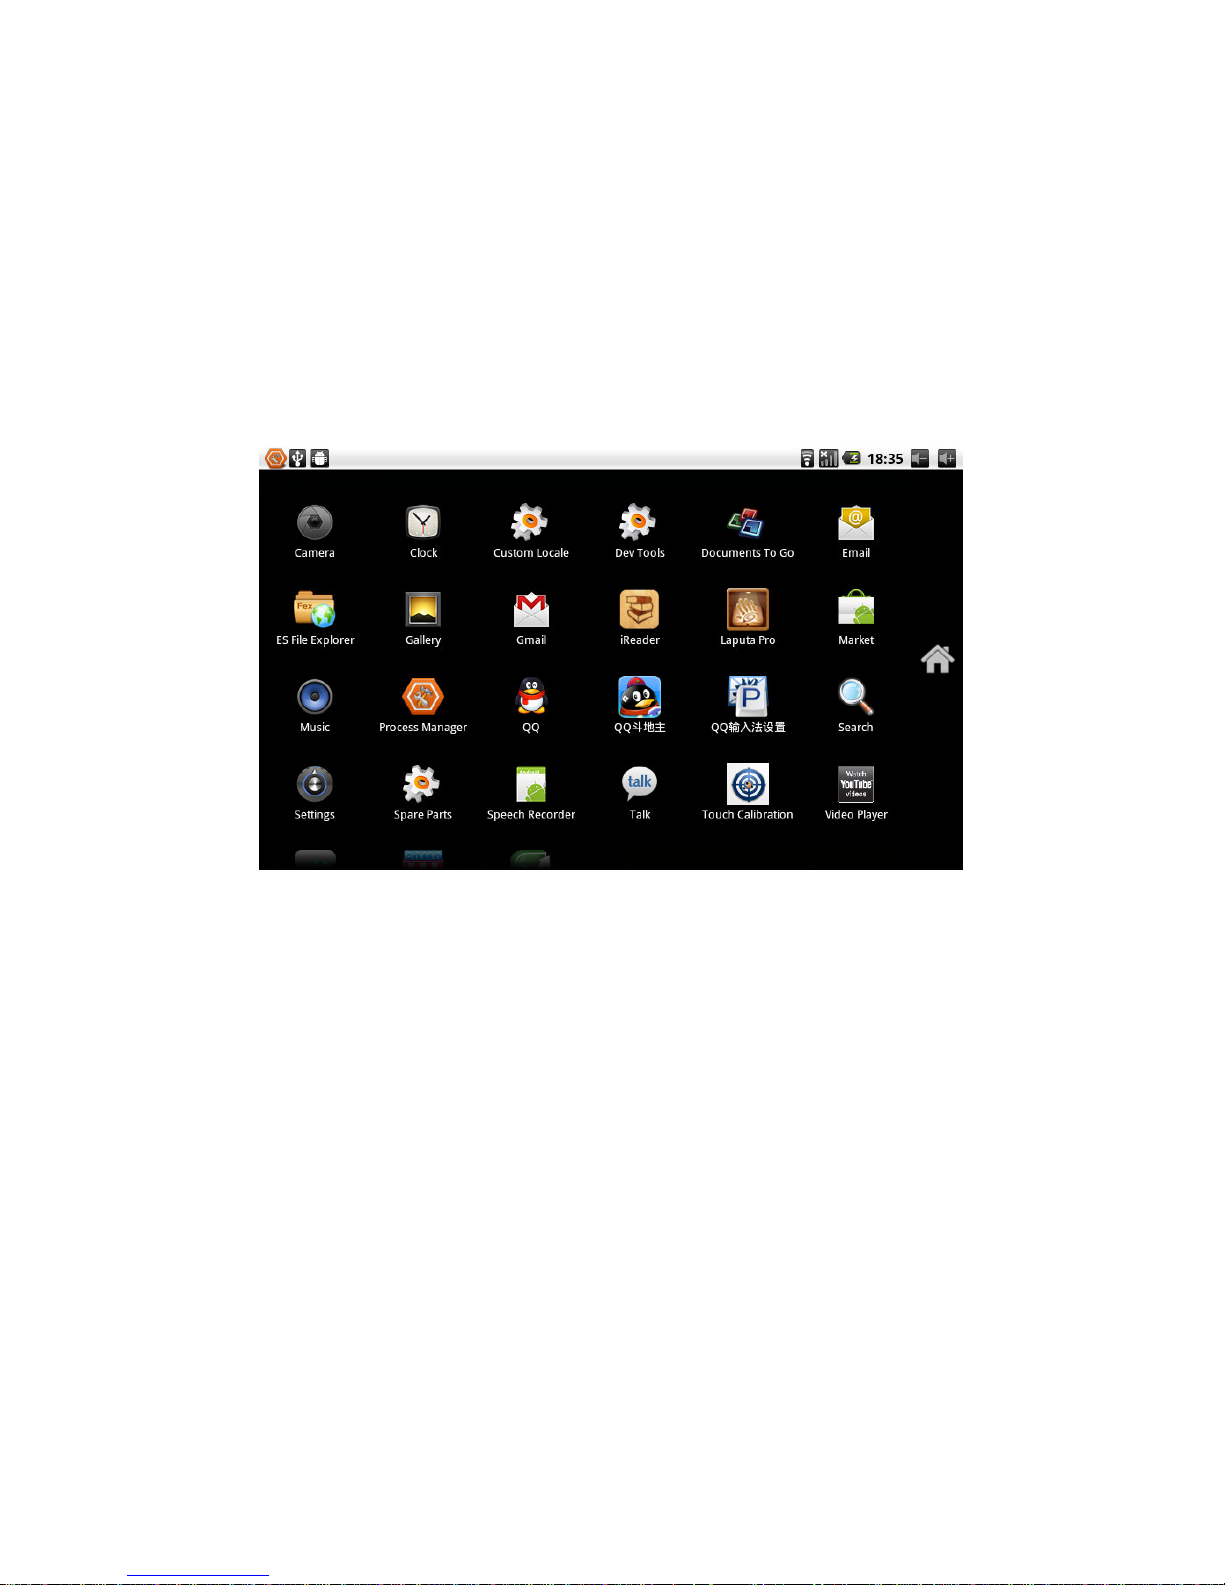
3.6 Access to the application
How to access to MID application:
1. Please click program volume label. As shown in figure 3-5.
2. Choose to visit the application.
3. If you want to quit program interface, press the return key to a page or press homepage
key to directly returns home interface.
Figure 3-5
3.7 USB connection
The storage setup of MID.
Before transporting documents, firstly you must set store mode for your MID.
1. Use USB cable to connect MID with computer. Notice bar will appear notice cue.
12
Page 14
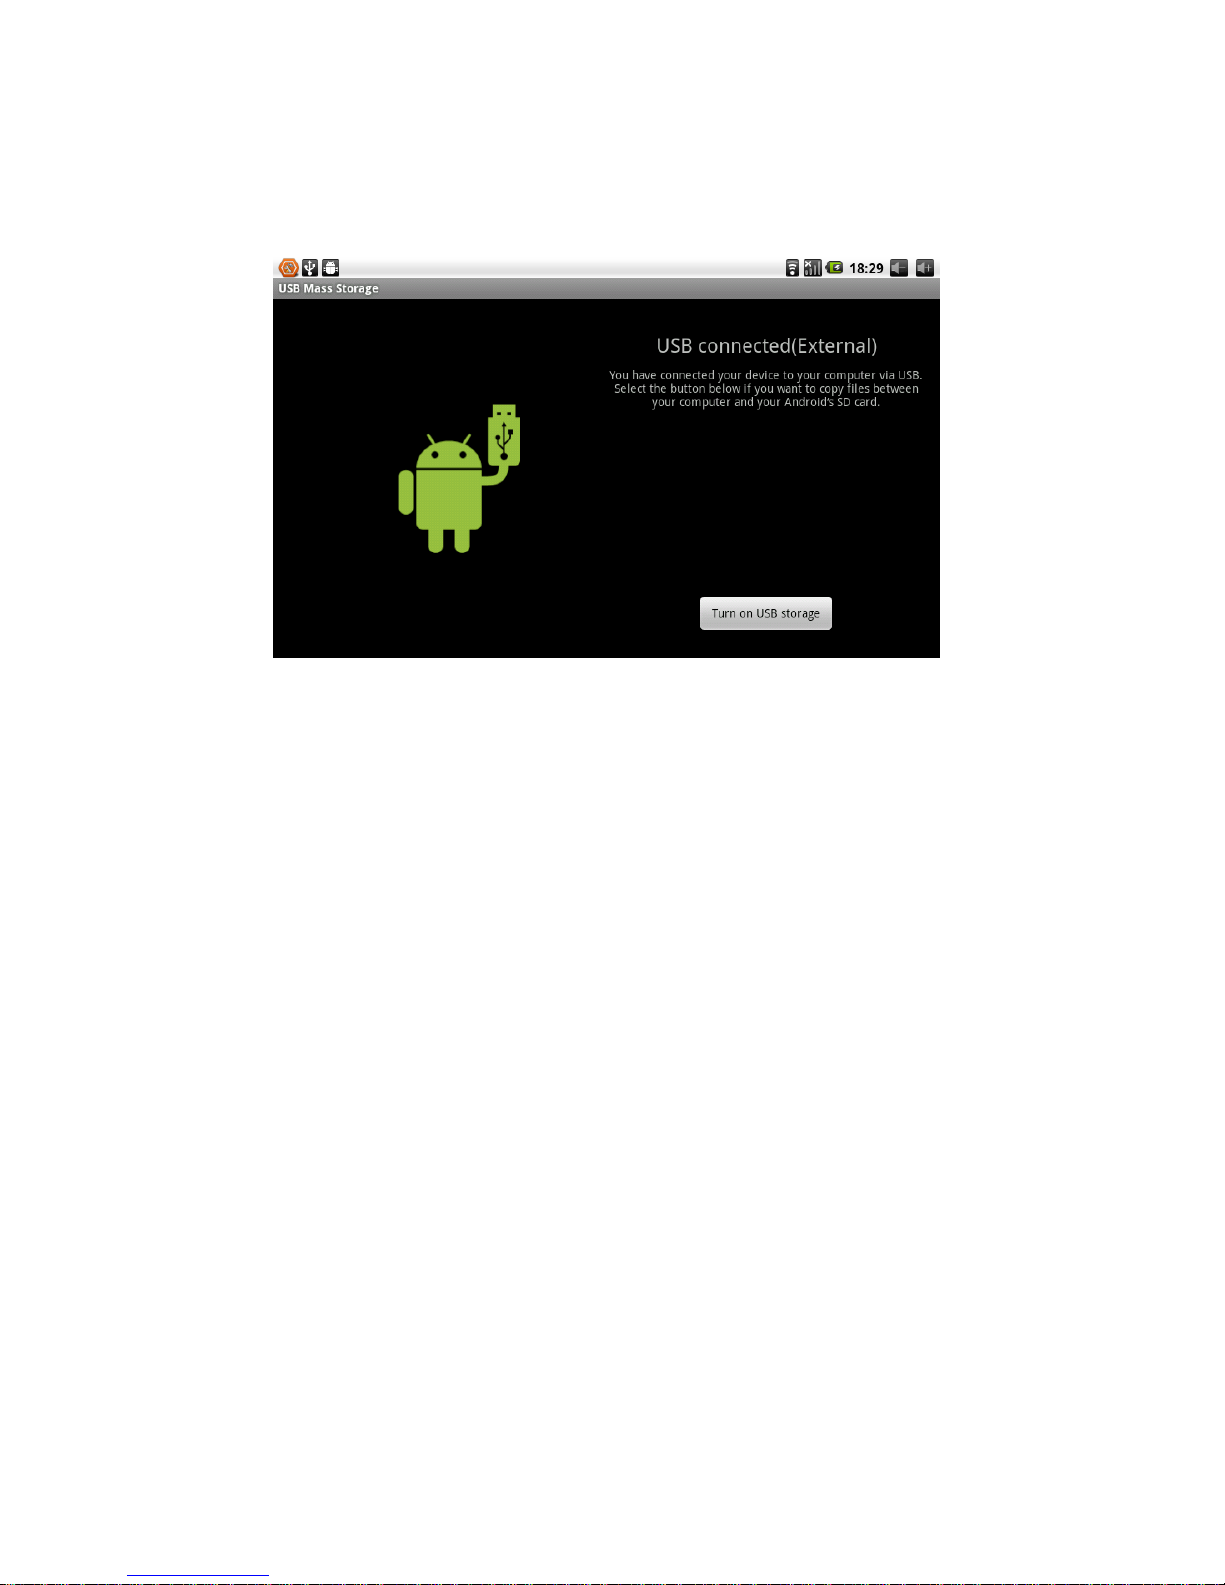
2. Press Menu button to pop up Menu option, and click on Notice.
3. In the notification panel, click on the USB connection, then click Loading USB Storage
Device.
4. Then the USB connection has been successfully.
Figure 3-6
Copy files to memory cards.
1. Use a USB cable to connect MID with computer.
2. After setting the store setting, then connect with computer successfully.
3. Open My Computer of your computer, then see "portable disk (x)" content.
4. Find intended copy files to duplicate to the "portable disk (x)".
5. After the completion of the copy, click on "safe deletion hardware" of your computer
task bar to unload.
Content of MID Storage Device
1.NAND FLASH storage device, MID itself has 4G storage space for keeping files.
2.TF movable storage card.
3.The abovementioned two storage devices can access using USB to connect your
computer.
Note: when you connect the USB cable to MID, if you enable USB storage device, you will
not access to memory card; if you want to access to memory, as long as disconnect the USB
cable.
3.8 Storage card
Copy files to storage card
You can transfer file between MID and computer such as music and pictures, etc. Want to
see the file, provided that you click file browser, then you can browse to the contents of the
SD card.
13
Page 15

3.9 Input text
Delete the file on the MID memory card.
1. Find the file you want to delete.
2. Hold the file which you need to delete, then it will popup the file menu.
3. Click "delete"
Remove memory card in the MID opening condition.
If you need to remove memory card in the MID opening condition, you must firstly unload
memory card, lest memory card fault or damaged.
1. In the homepage interface, press the menu button and then click Settings.
2. Drag down setting menu, and then click the SD card and equipment memory.
3. Click the "Unload SD card"
Use the screen keyboard
When you start programs or select text edit box which need to input text or number, it can
appear screen keyboard.
Keyboard have optional input way below:
1. Android keyboard
2. The third party input method(The user can install independently)
Select the input method which you want to use.
According to preinstall,MID will display Android keyboard when you want to input word.
1. On the homepage interface, press menu button and then click "Settings".
2. Click the language and keyboard.
3. List all installed input method of MID in the text setup area.
4. Tick after the input method which you want.
Use and switch input method
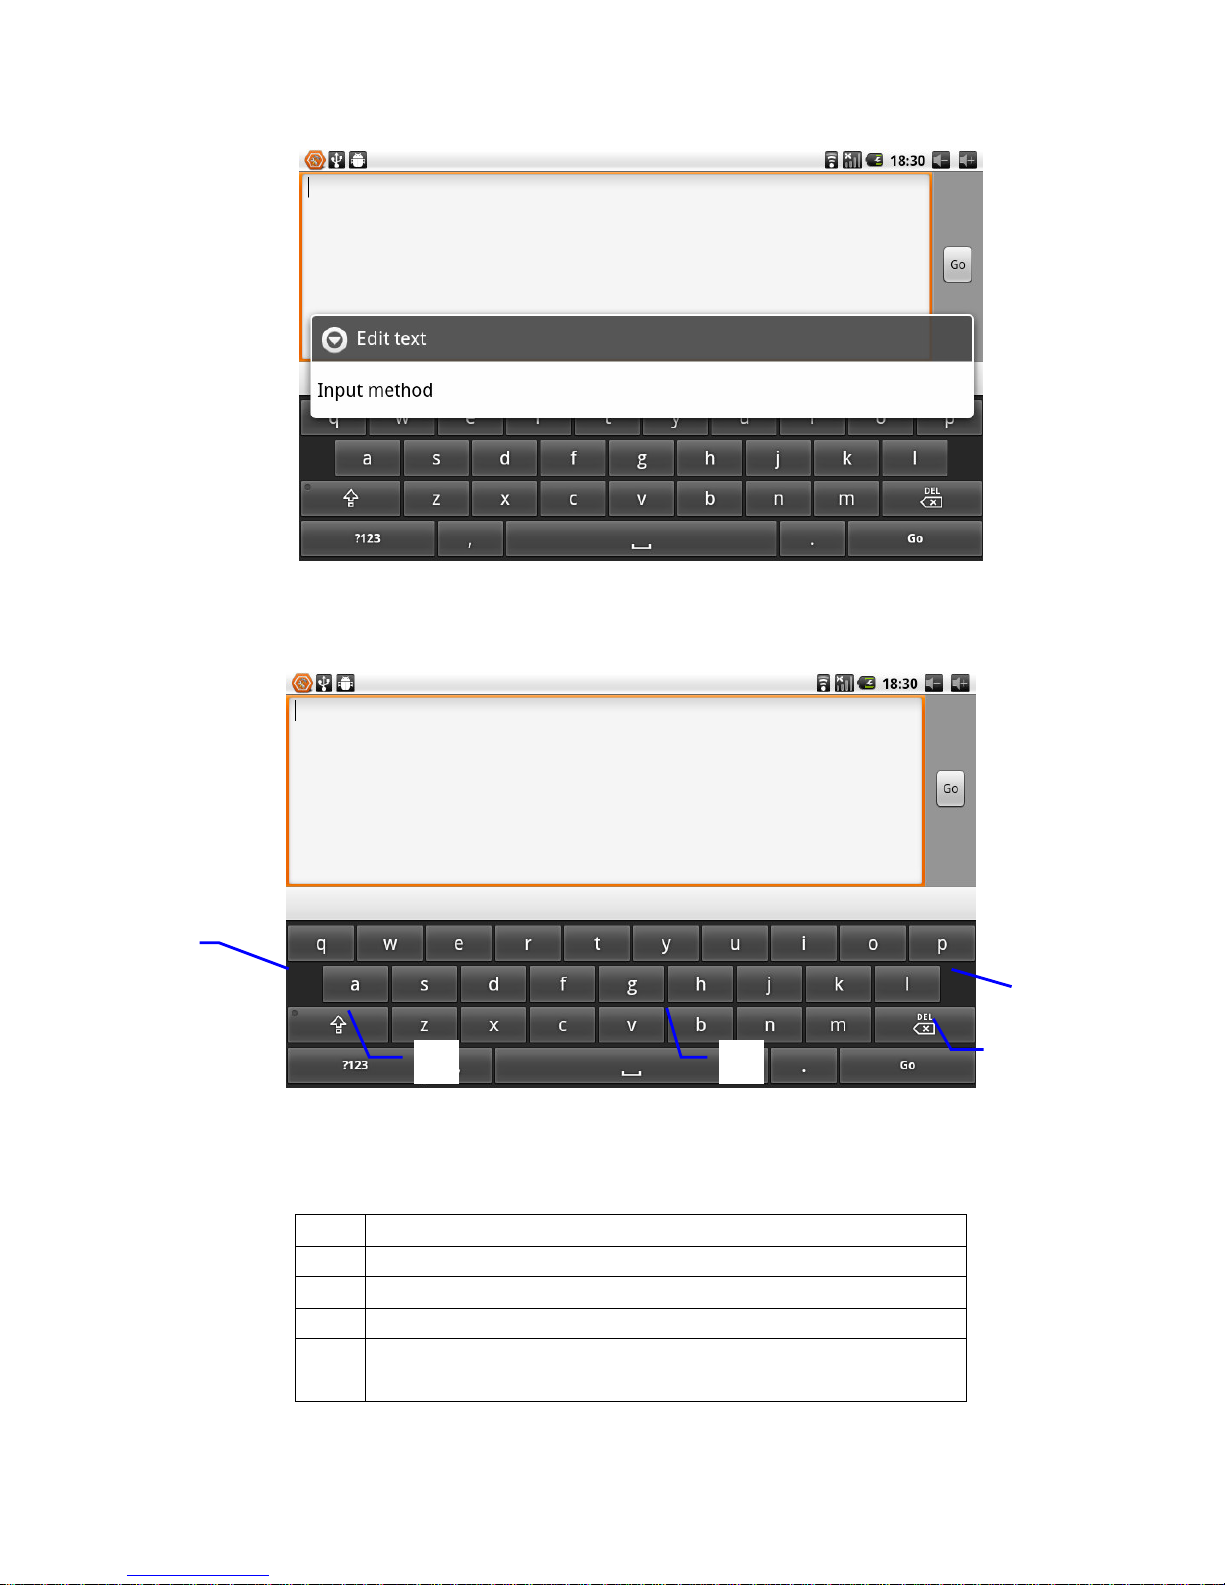
1. On the text input interface, hold text edit box area until it popups "edit text menu ". Then
click the input method.
2. Select the input method which you want to use.
14
Page 16
①①①①
②②②②
③③③③
⑤⑤⑤⑤
④④④④
Figure 3-7
Use Android keyboard panel
1 Switch input case-sensitive
2 Switch text input mode and coincidence /digital input mode
3 "Click "can insert spaces
4 "Click "can perform "enter"
5 Delete the characters of the left cursor. Click and hold can delete all
the characters of the left cursor.
Figure 3-8
15
Page 17
3.10 Use skills
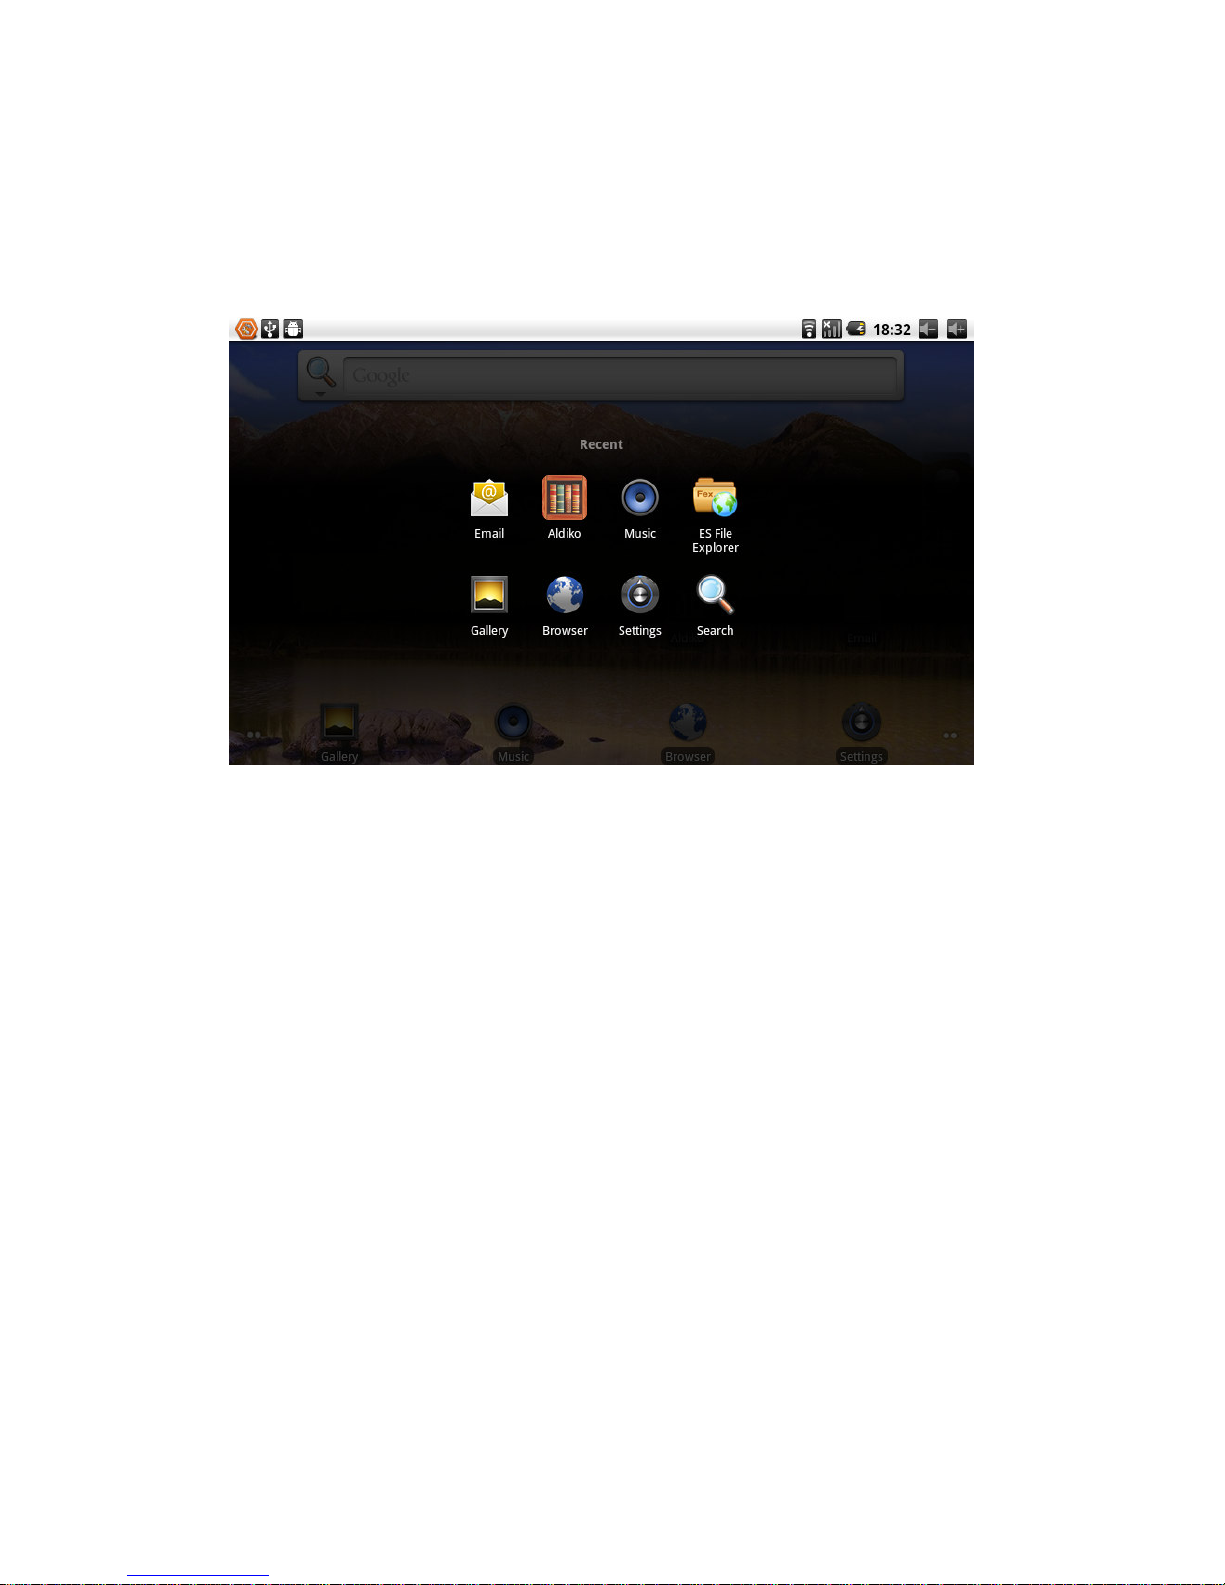
Open recently used applications
In any programming interface you can hold homepage keys, the screen will popup program
window, window displays recently used application.
Figure 3-9
Add small tools on the table
In the homepage interface, hold the blank area, popup menu, click the plugin, listing will list
attached plugin of applications, such as music, picture frame, clock, search, etc.
Switch input method
Hold the Chinese edit box of system, popup menu, click the input method.
Quick close the program
Press the back button back to superior interface, or press homepage button back to the
homepage interface.
Restore to factory settings
When your MID has great errors or forget unlocking passwords, etc, you can use Restore to
Factory Seetings to restore them to the factory delivery state. There are two methods for
restoring to factory settings:
Methods:
1. At the homepage interface, press Menu key to pop up the Set menu.
2. Click on Set.
3. Click on Privacy.
16
Page 18
4. Click on Restore to Factory Settings.
5. Wait for the system to restart.
4 Establish connections
4.1 WIFI connection
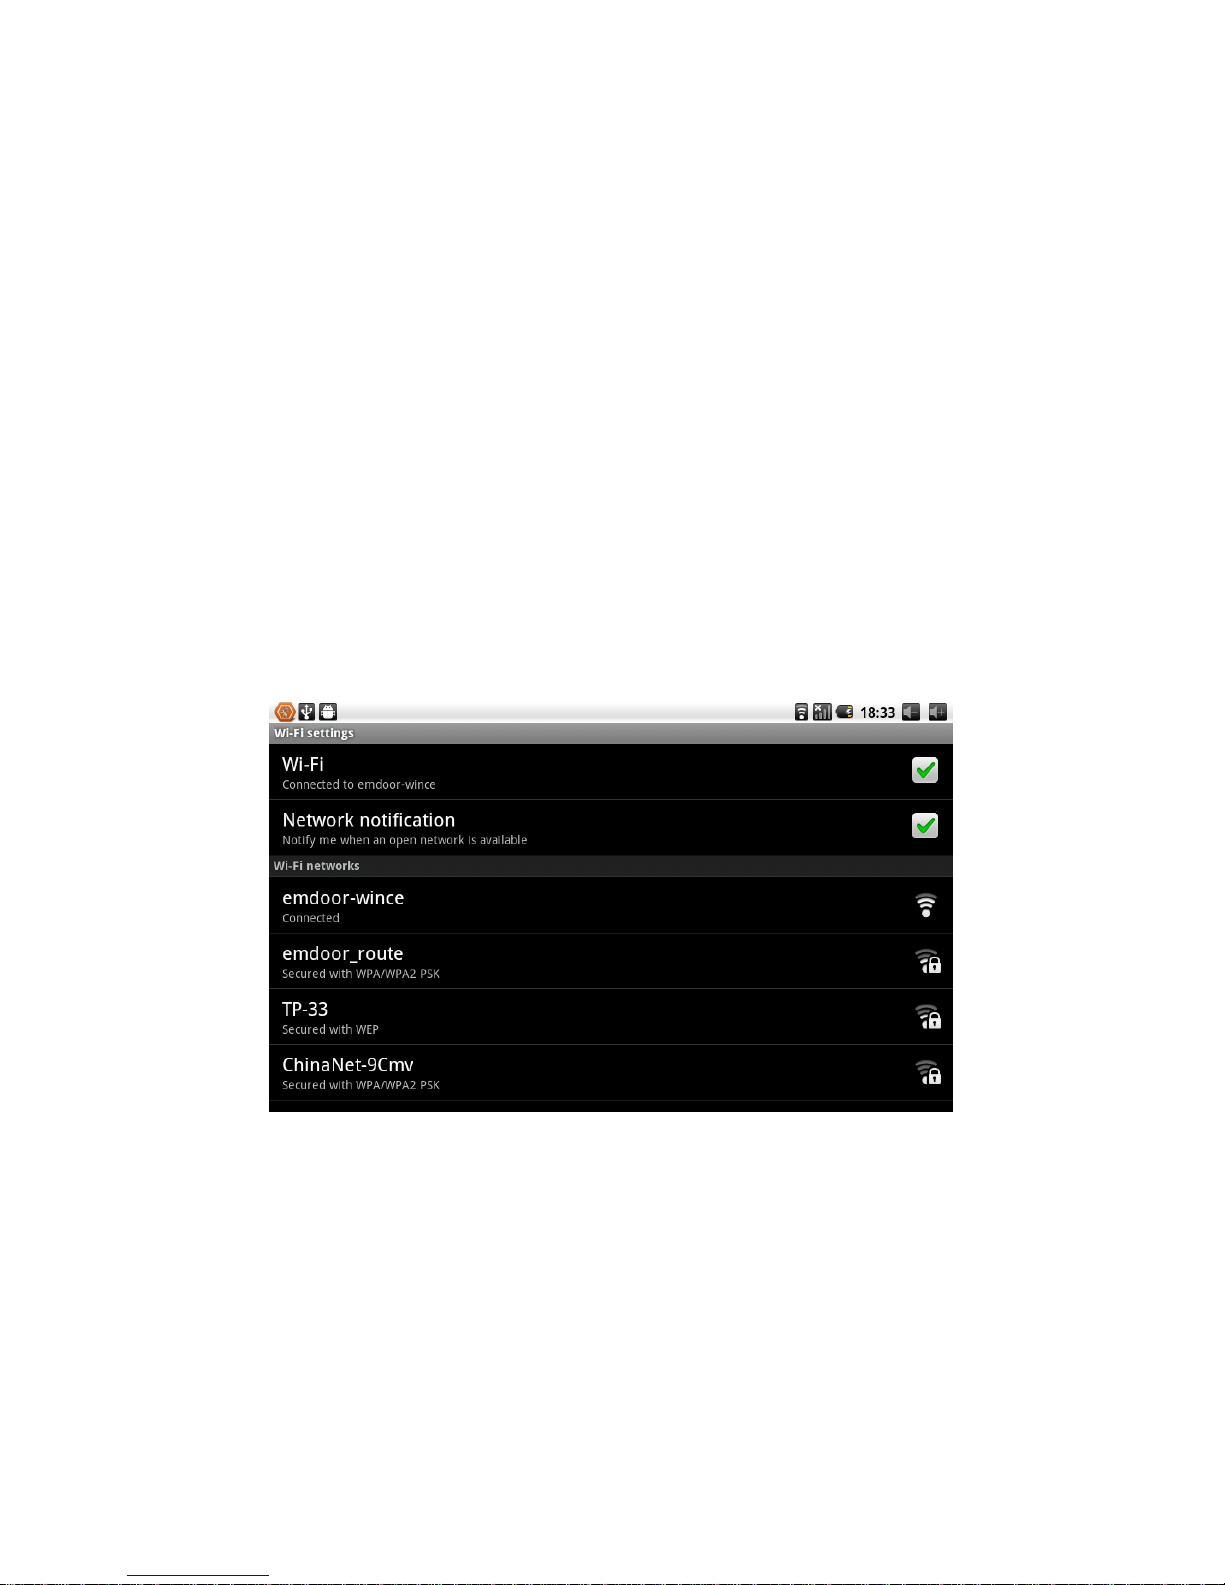
You can connect MID to Wi-Fi network, operation for connection:
1. In the homepage interface, click the menu button, then popup settings menu.
2. Click settings.
3. Click wireless and network.
4. Click Wi-Fi, then start Wi-Fi
5. Click Wi - Fi Settings, MID will automatically scan available Wi - Fi wireless networks.
6. Choose the Fi network which you want to connect. If it has add password, it will popup a
input password window, then input relevant password.
7. Click on the link
Figure 4-1
17
Page 19
5 Communication
5.1 E-MAIL
E-mail Settings
E-mail applications accompany with email settings guide, it can add the common Web
email service providers (e.g. Gmail, Yahoo, Hotmail and 163 etc manufacturers) external
POP3 or IMAP email account.
Figure5-1
Note: before the mail will be setted guide, please ensure that you already link the network.
Mailbox setting guide
1. Click the E-mail icon, then it will appear mailbox setup guide to help you to set.
2. Click the next step button.
3. Enter your email account address and password.
4. Click the next step button, and select your mailbox type: POP3 or IMAP.
5. Then click next step button to check whether email server is available.
6. Input account name and to display the name, then click completion.
7. If the mail is available, it will automatically enter your inbox.
18
Page 20
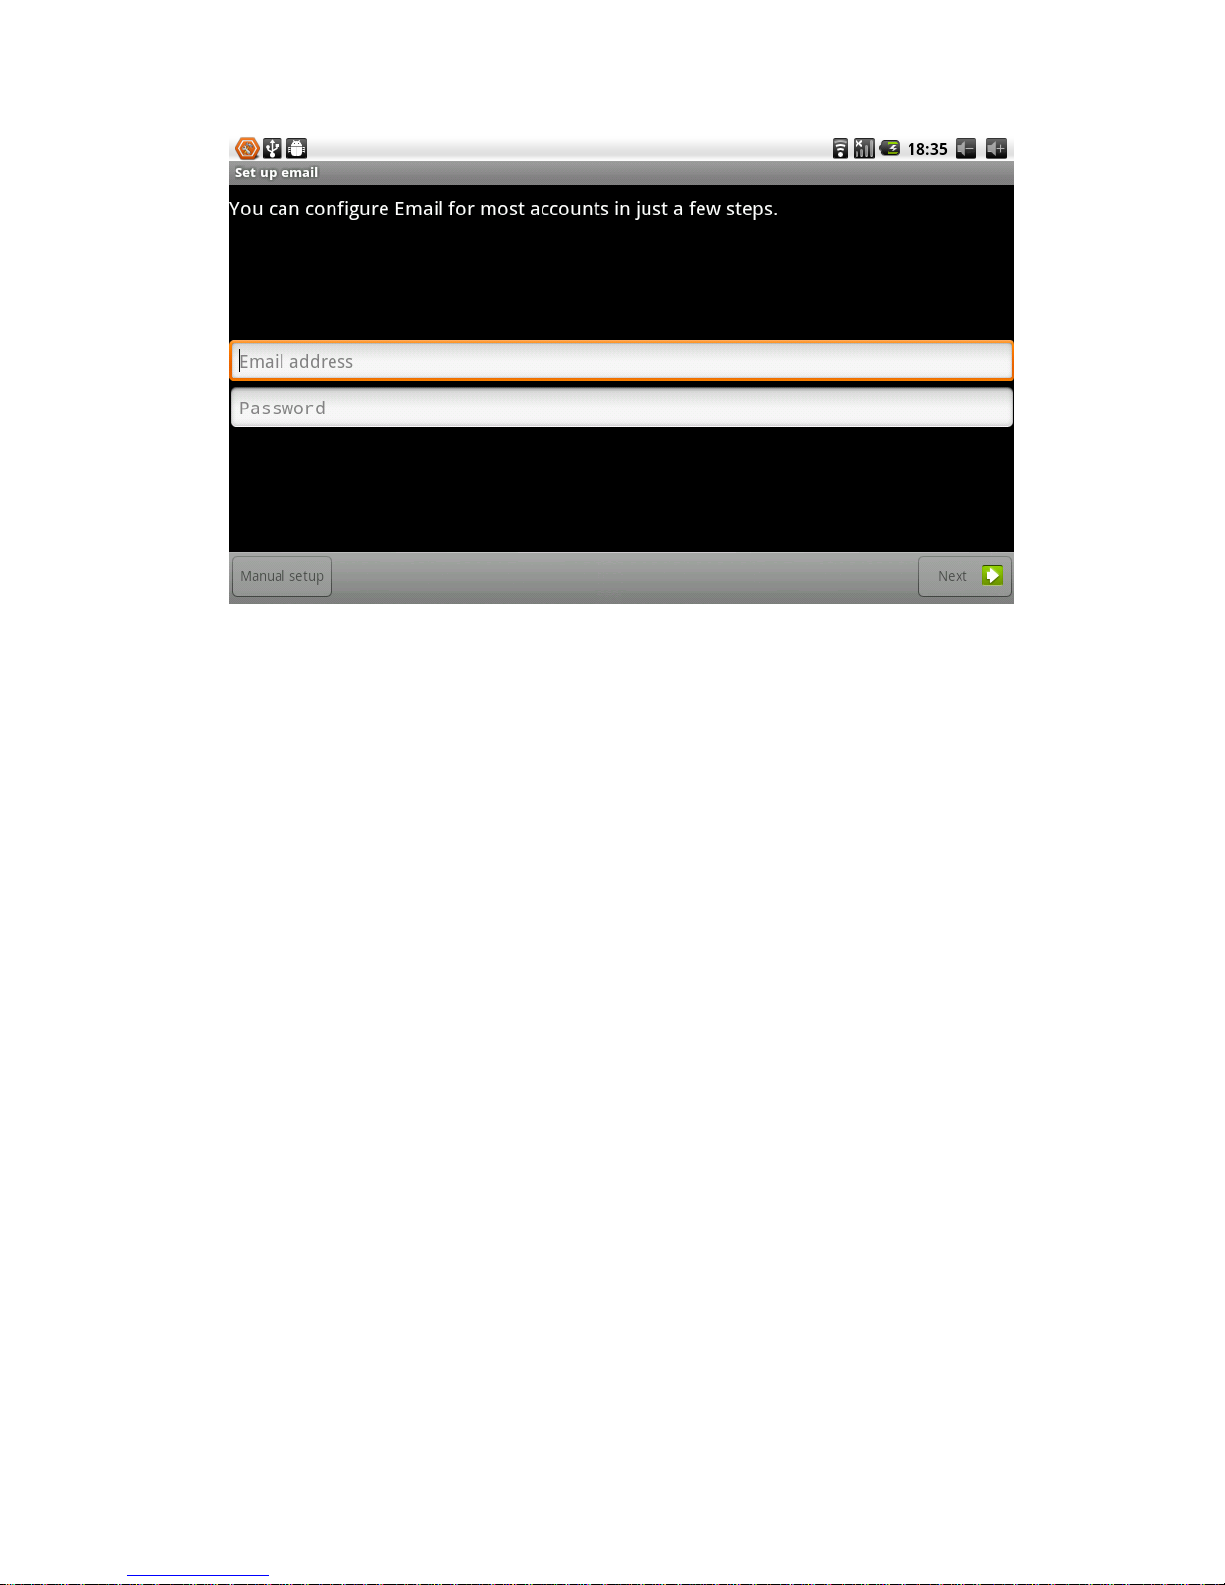
Figure 5-2
Delete email accounts
You can delete setted POP3 or IMAP email account from your mobile phone
1. Click E-mail
2. Enter to your inbox
3. Press menu key
4. Click account
5. Hold account which you want to delete.
6. Popup menu listing, and click “delete account”
7. Click the" sure "can remove it.
Send E-mail messages
1. Click the E-mail, display your inbox.
2. Click the inbox to enter in, automatically refresh email, click to read.
3. Press the menu button, and popup menu.
4. Click "compose", enter to write a new mail interface
5. Input your E-mail address of the recipient in the recipient column.
6. Input theme and information content.
7. If you want to add attachments, press the menu button, and then popup menu options.
8. Click "add attachments"
9. Select attachments which you want to send (such as video, images, etc.)
10. Click "send E-mail" and then sent email out.
Note: If you have more than one account, and hope to send an email in one account, click
that account title in advance before you click main mune key and write email.
19
Page 21

6 Multimedia
6.1 Support the file format
Your MID can play the following formats.
Music file format
MP3
AAC(AAC, AAC+ and AAC-LC)
OGG
MIDI
WAV
Video format
AVI(H.264, and DivX, and XviD)
RM/RMVB
MKV
WMV
MP4
DAT
VOB
FLV
3GP
6.2 Music
Your music is divided into four categories: artist, album, songs and playlist. Choose a
classification to check list contents. If you enter a classification, always choose until you
have to play songs. For example, if you choose the artist category, you will see A to Z
sequence of a list of names of art. If you choose a artist, the list will be presented artist
album songs and lists.
20
Page 22
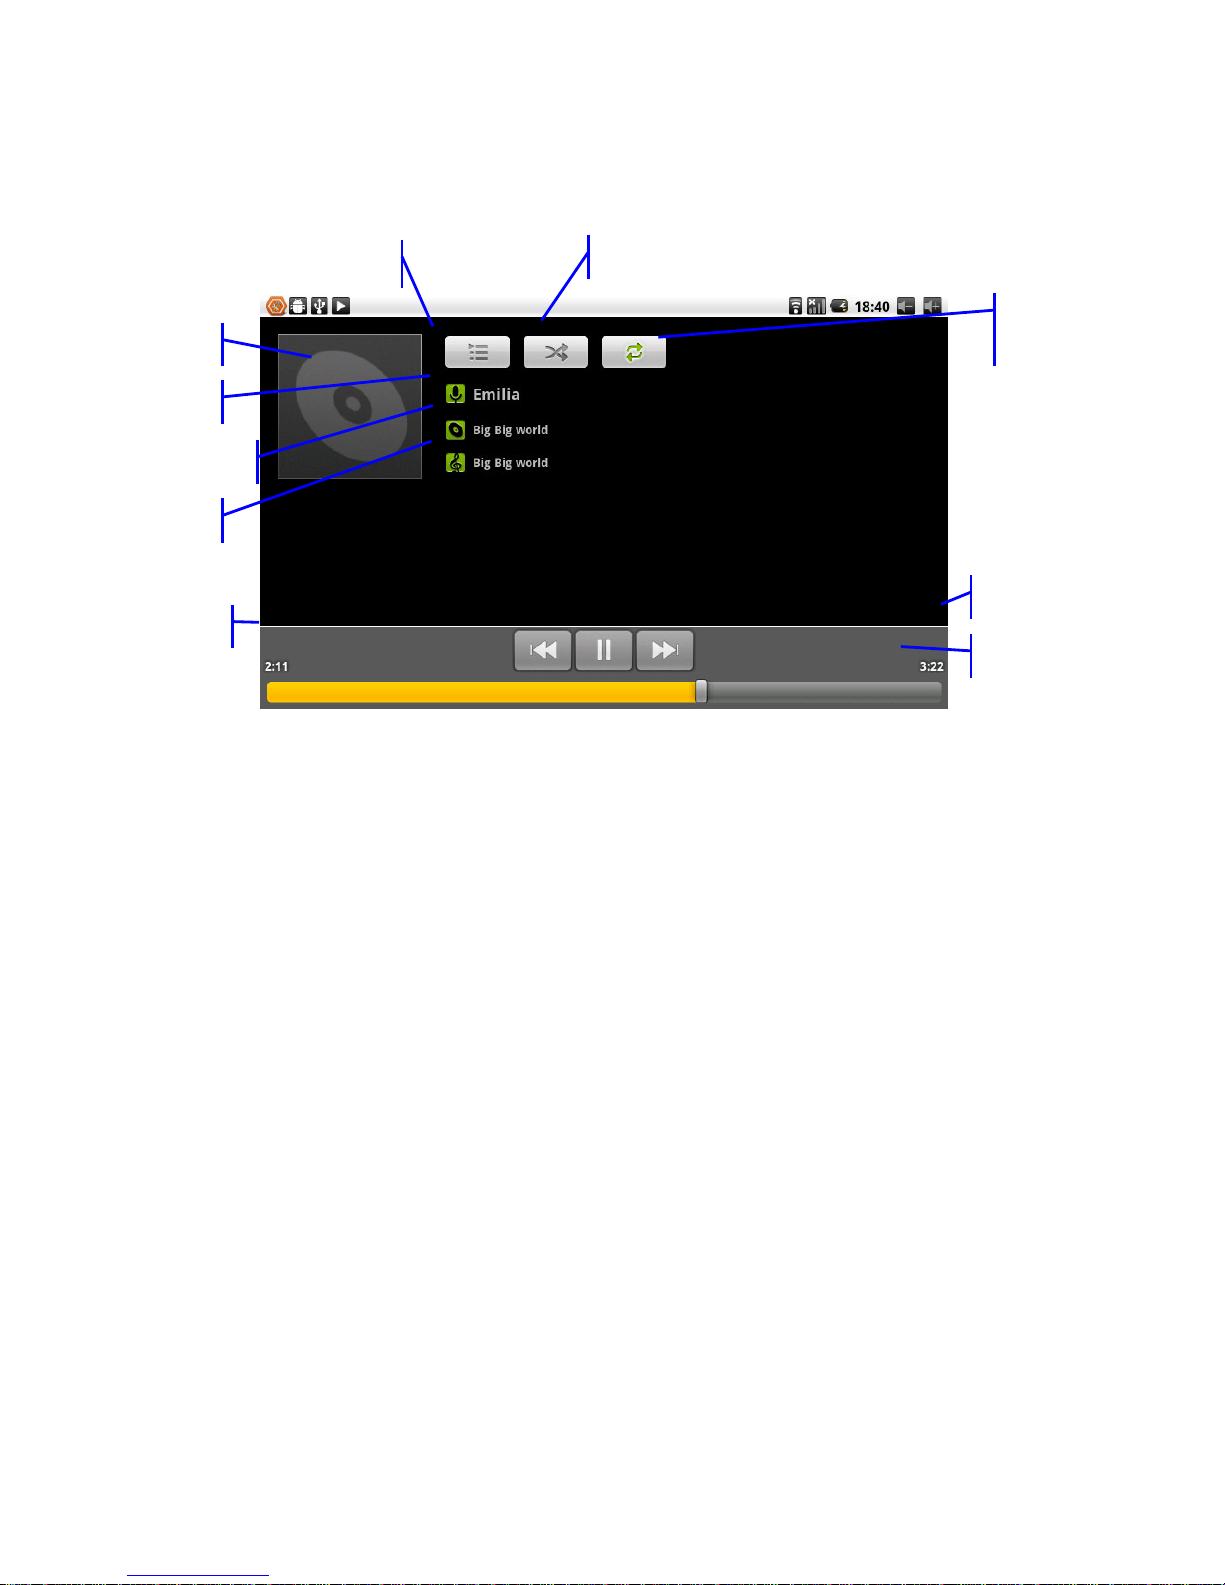
Special cover
Artist
Special item
Music
Time played
View current play list
Cycle on
Repeat all music
Remaining time
Playing progress bar
Figure 6-1
Visit and broadcast music
1. Click the music.
2. Click songs, also can click artist, album or song list.
3. Choose one song to play.
Add song to the new playlists
1. Click the music.
2. Click the songs.
3. Hold the song which you want to add to playlists.
4. Popup music setting menu, click to add music to play lists.
5. Click the New.
6. Input name of playlist.
7. Click to save.
8. Click on a song, add this song as bell.
Delete the playlist
1. Click the music.
2. Click the songs.
3. Hold the song which you want to delete to playlists.
4. Popup music setting menu, click "delete ".
21
Page 23
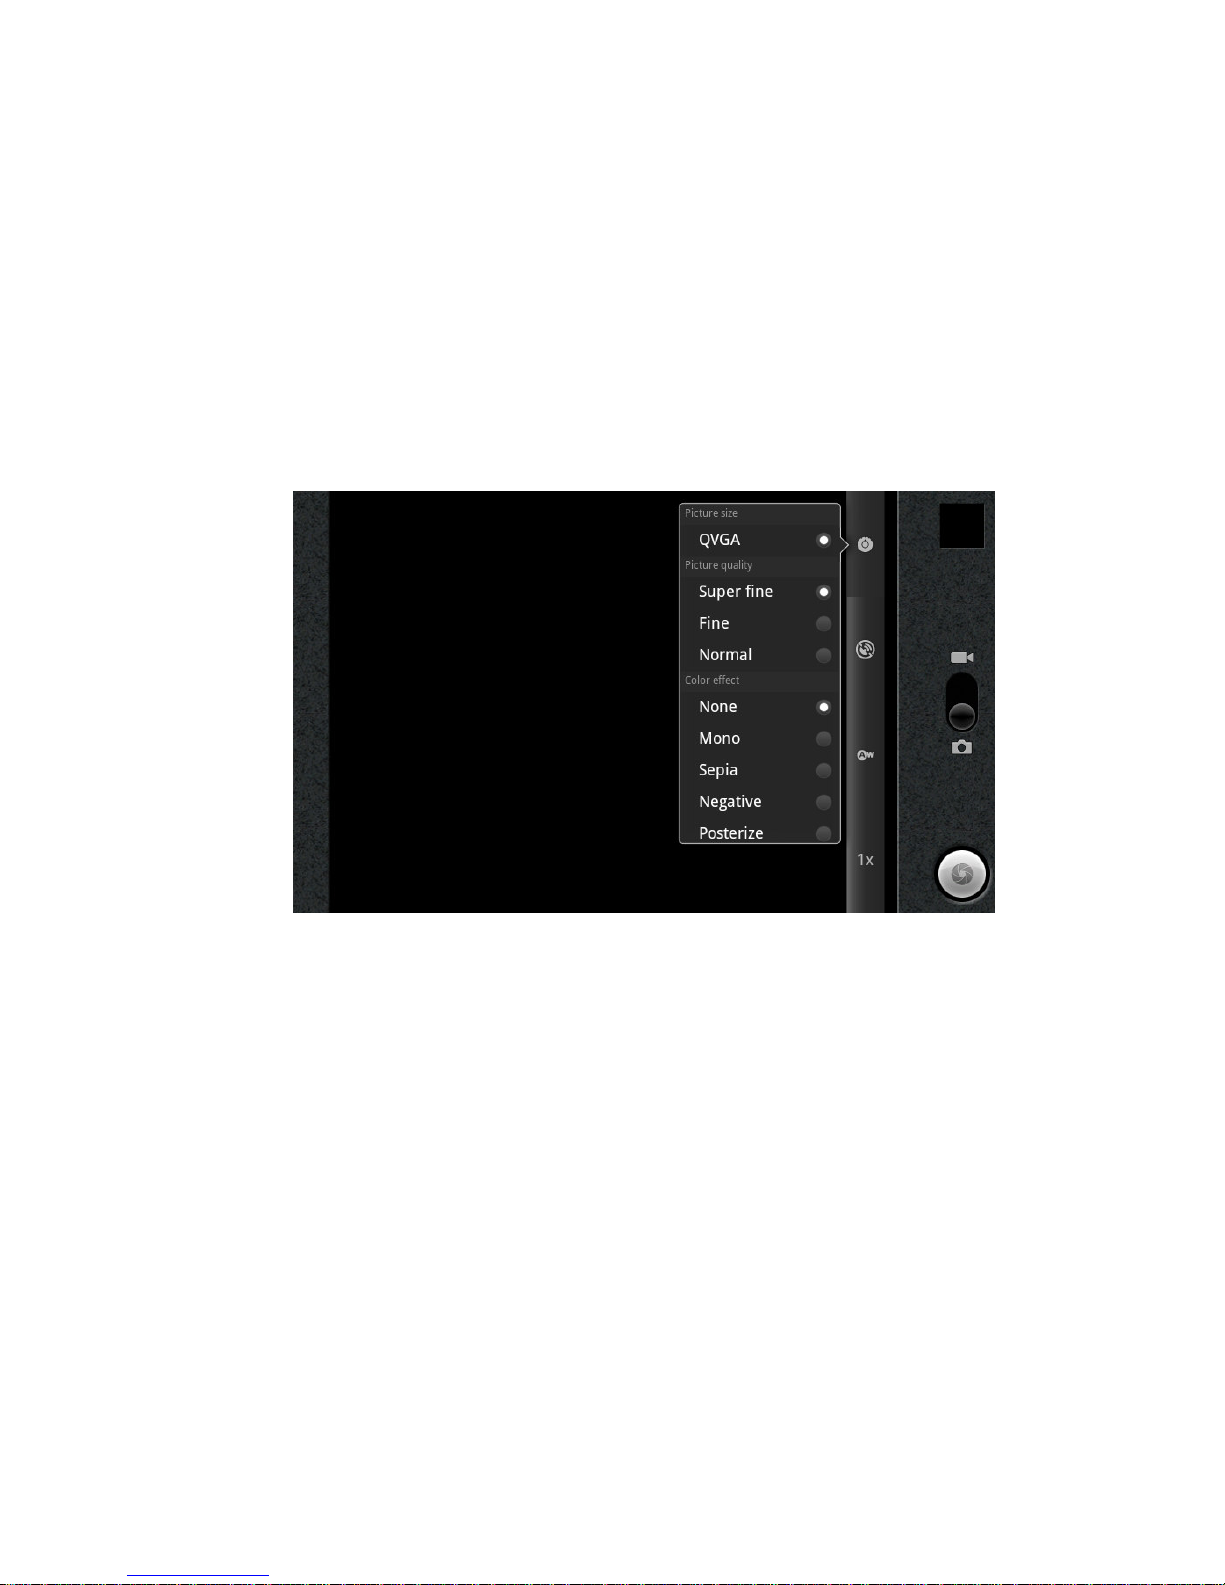
6.3 Camera
Photo taking functions
1. Click on Camera.
2. The system enters the Camera interface.
3. Click on Shoot button to be able to have photos taken easily.
4. You can set sizes, storage locations, white balance and focusing adjustment and other
functions.
5. After photo taking, there will be preview of thumbnail display.
Figure 6-2
Video recording functions
1. Drag up the switchover button to switch it into the video recording mode.
2. Click on red Video Record button to be able to perform video recording.
3. You can set color effect, white balance and video quality and other functions
4. Click on Video Record button again to end video recording, and you can see previewed
videos.
22
Page 24
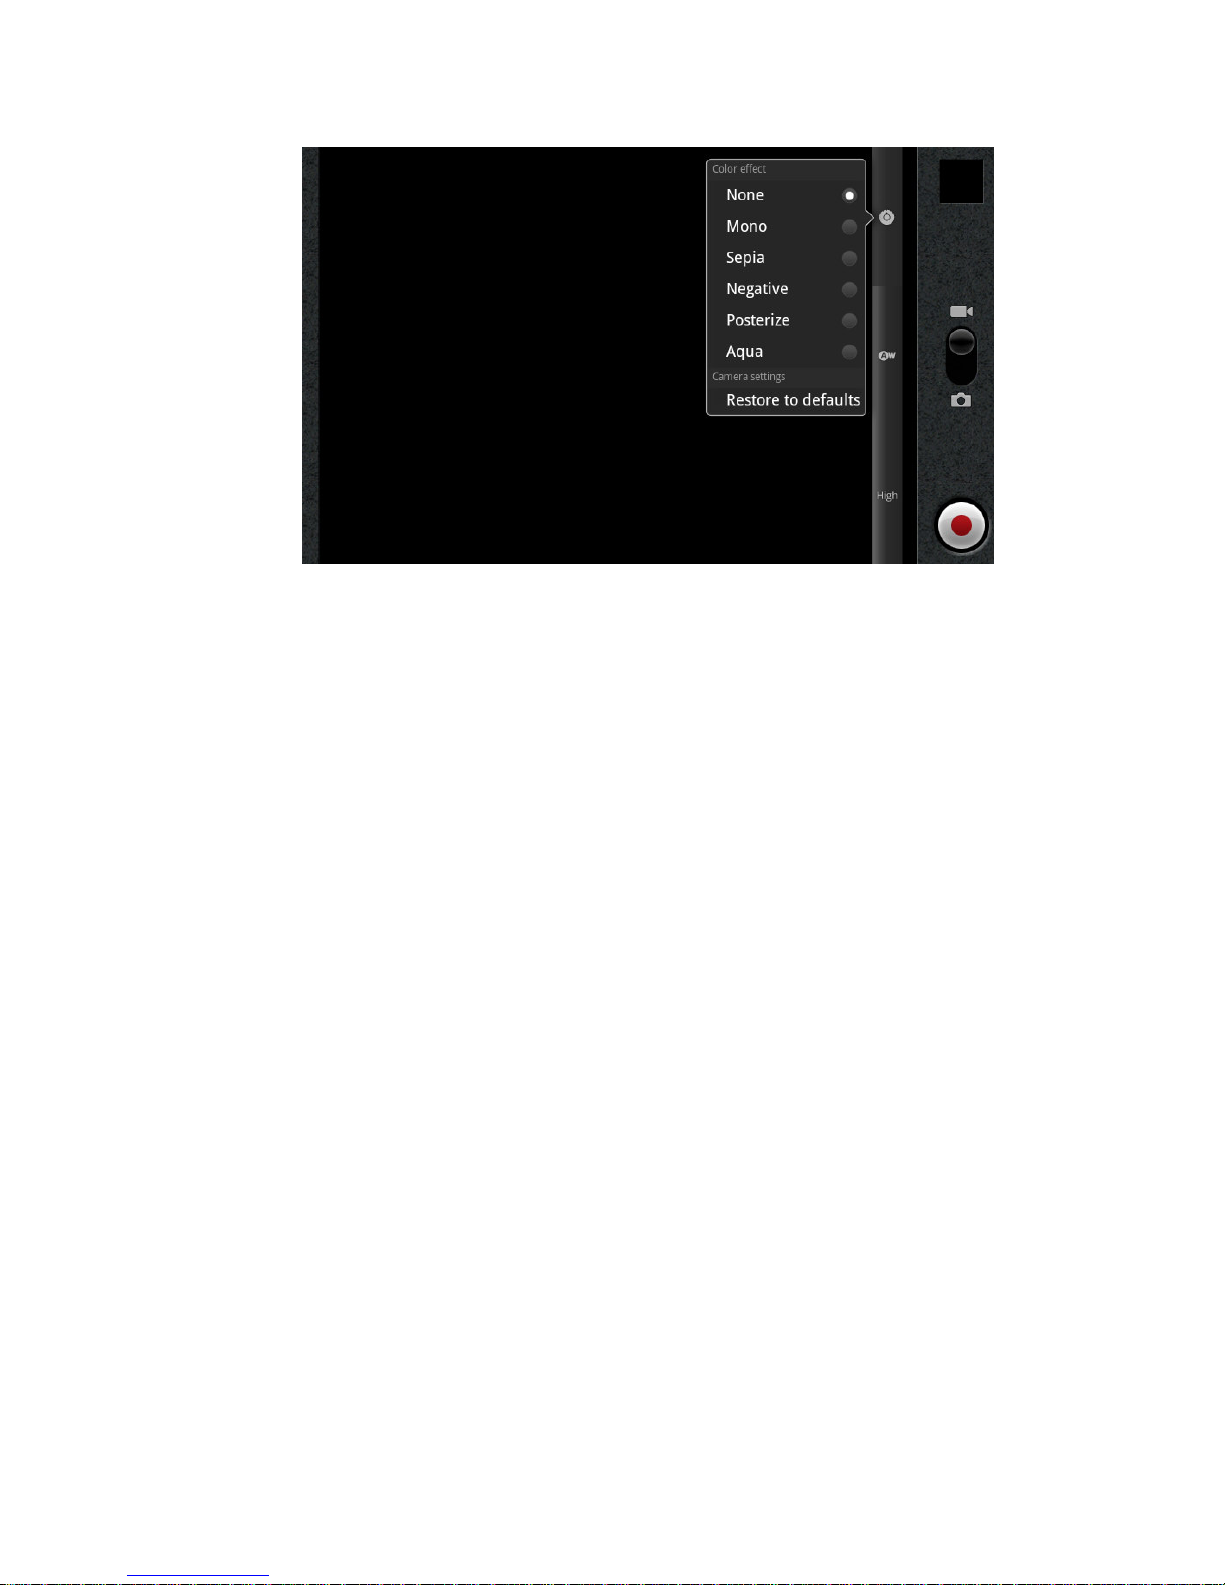
Figure 6-3
6.4 HDMI
HDMI high-definition video interface
Use a standard HDMI cable to connect MID with high definition television. This interface
can support the highest quality 720P resolution, and but plug.
1 MID is on boot state.
2. Use a standard HDMI cable to connect MID with high definition television .
3. The system interface on the MID can be synchronous with high resolution TV pictures.
4. In the Set menu, click on Display.
5. Click on Output Select to switch over to the HDMI mode.
6. Click HDMI Setting to set HDTV display resolution.
6.5 Media Browser
Using the media browser application program, you can automatically search all photos and
video files in MID and TF card. Moreover, the media browser will classify such photos and
video files by these folders. You can use the media browser program to view and edit
photos and take the photos as the desktop and view videos.
Check pictures
1. Click the folder you want to see to check included pictures.
2. Click pictures you want to see, the system will automatically check in full screen
mode.
3. Touch screen, it will appear arrow around the picture, please click the arrow to see
superior or next picture.
4. Touch screen, zoom-panel will appear in pictures below; you can magnify and narrow the
23
Page 25
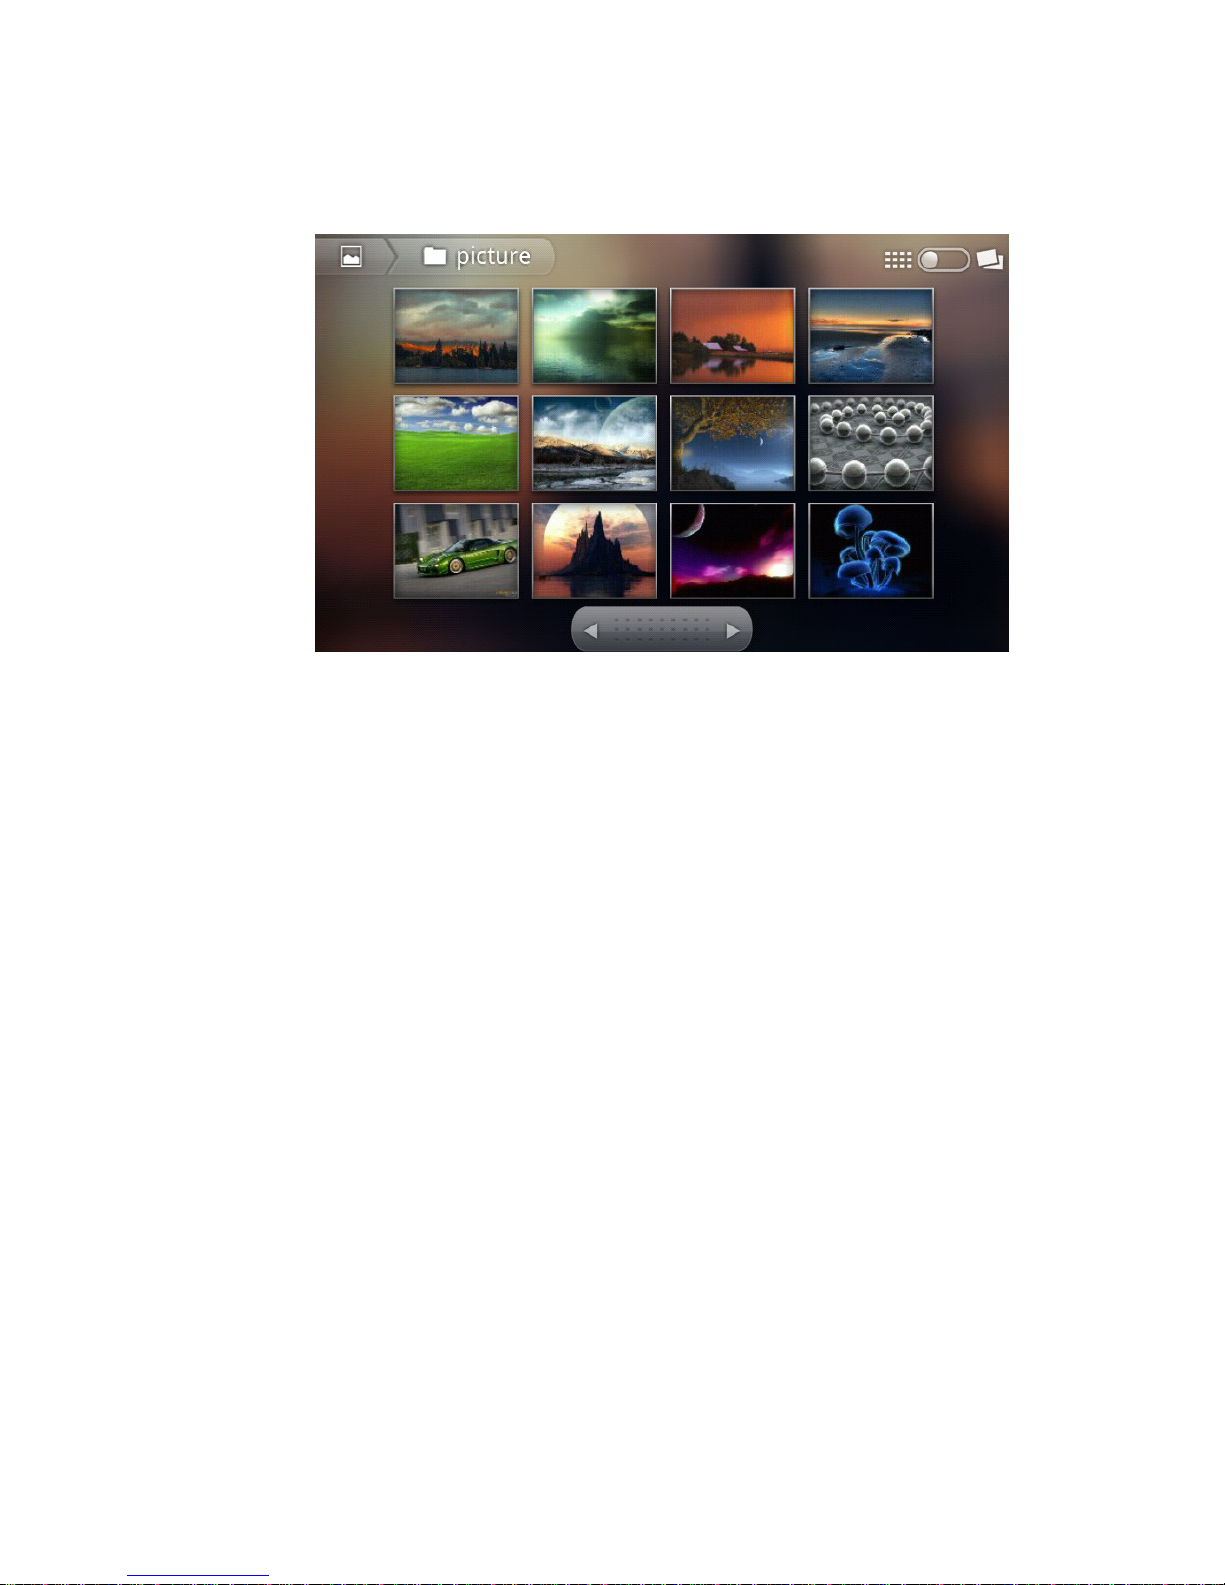
pictures.
Skills: Image browsing support automatically rotating function. When you spin MID, the
picture will automatically adjust direction of rotation.
Figure 6-2
Edit and set images
Press menu button to display option of menu in full screen mode, you can select the option
to edit and setting up the picture according to your needs.
Slide presentation
Press the menu button to show menu options. Then click slide presentation. All the
pictures will be to slide folder broadcast to display.
Sharing
1. Press the menu button to display menu option, and then click "share".
2. The picture will share with your friends via E-mail attachment.
Rotating
1. Press the menu button to display menu option, and then click "rotating".
2. Click the left or right rotation.
Cutting
1. Press the menu button to display menu option, and then click “cutting”
2. Click on drag related region to adjust cutting device.
3. Click on cutting device to drag out from centre, to adjust cutting size.
4. Adjust the size you want, click save.
5. If you want to abandon cutting, click "give up” back to browse pictures.
Video preview and play
After the media browser is opened, you can scan all video files in the MID and the TF card,
24
Page 26
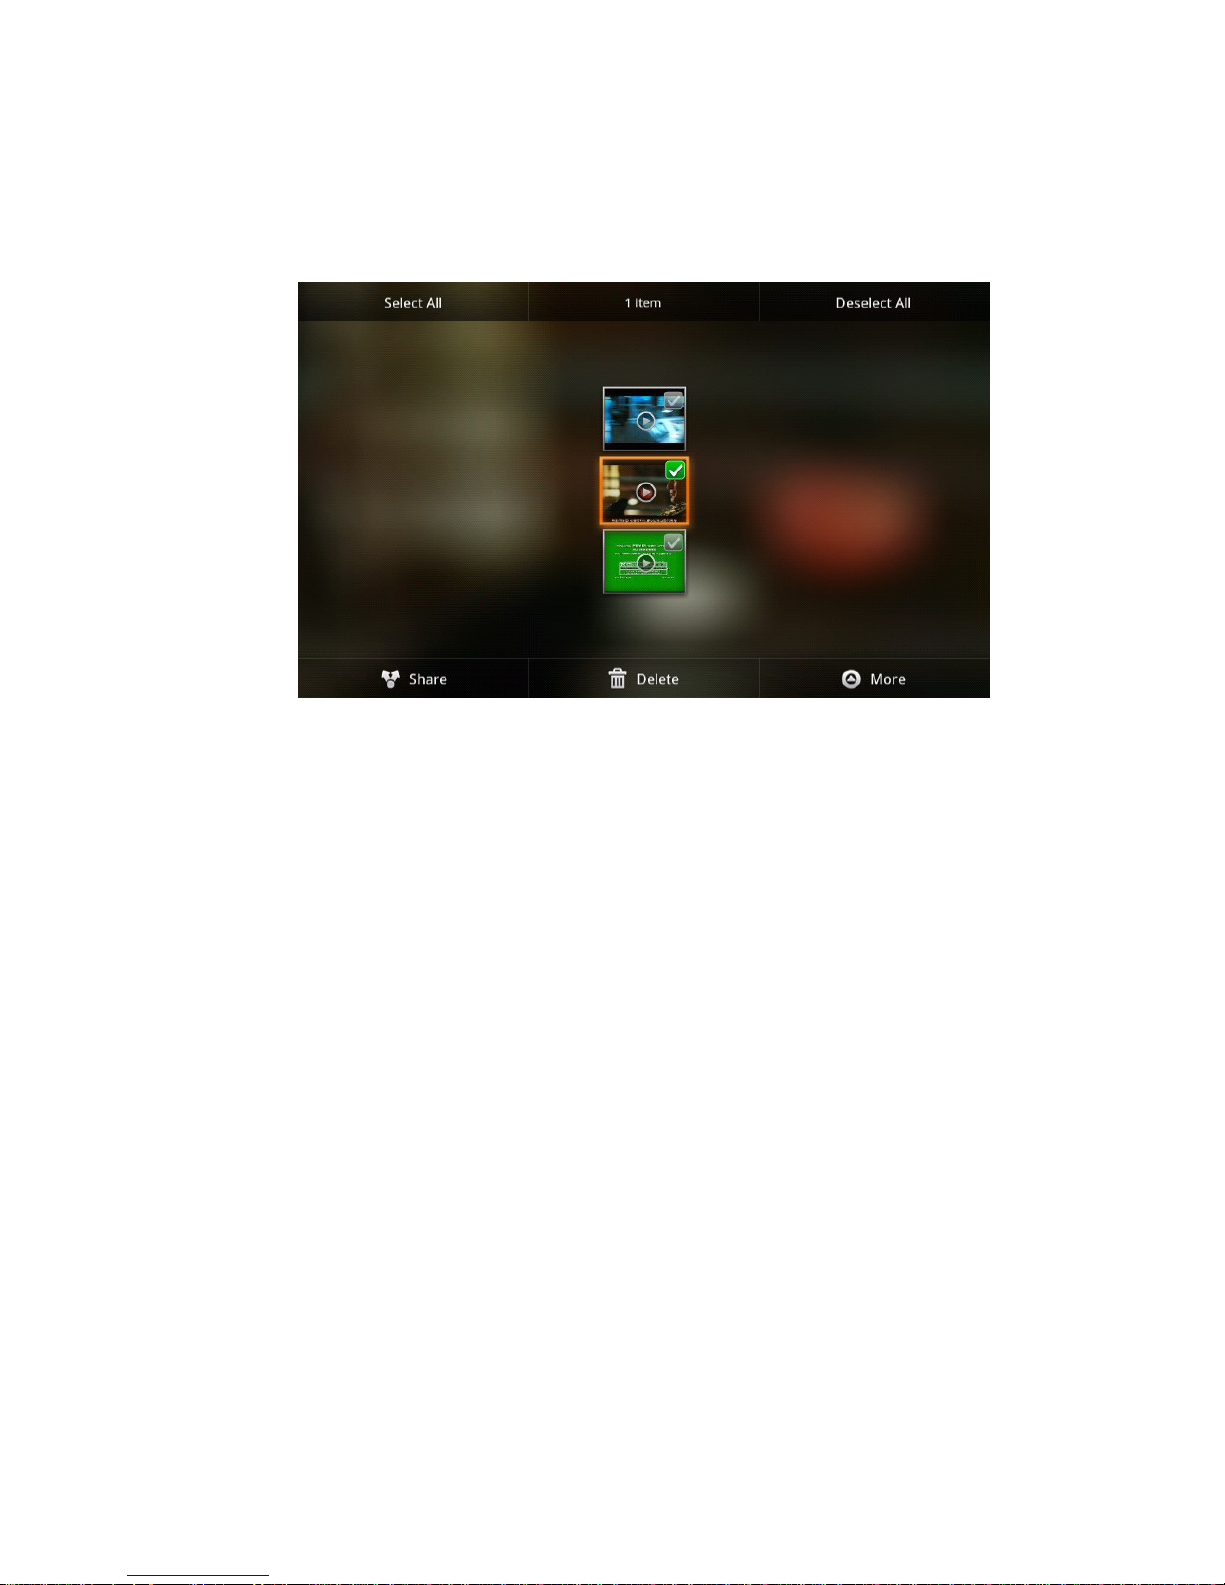
and can preview playable video files. Ckick to select one of them to be able to play the
video file.
In the video preview interface, press Menu button to be able to appear the function window
editing video files as shown in Figure 6-3 below
7 Internet
7.1 Browser
Enter into homepage
The browser always habitually open the last web users have browsed the web, the
homepage will appear when it enters into the browser on boot.
Change your Home Page
1. Click on the browser.
2. Press the main menu,popup settings menu of browser.
3. Click more.
4. Click Settings.
5. Click Settings homepage.
6. Input website, and click "ensure".
Figure 6-3
25
Page 27
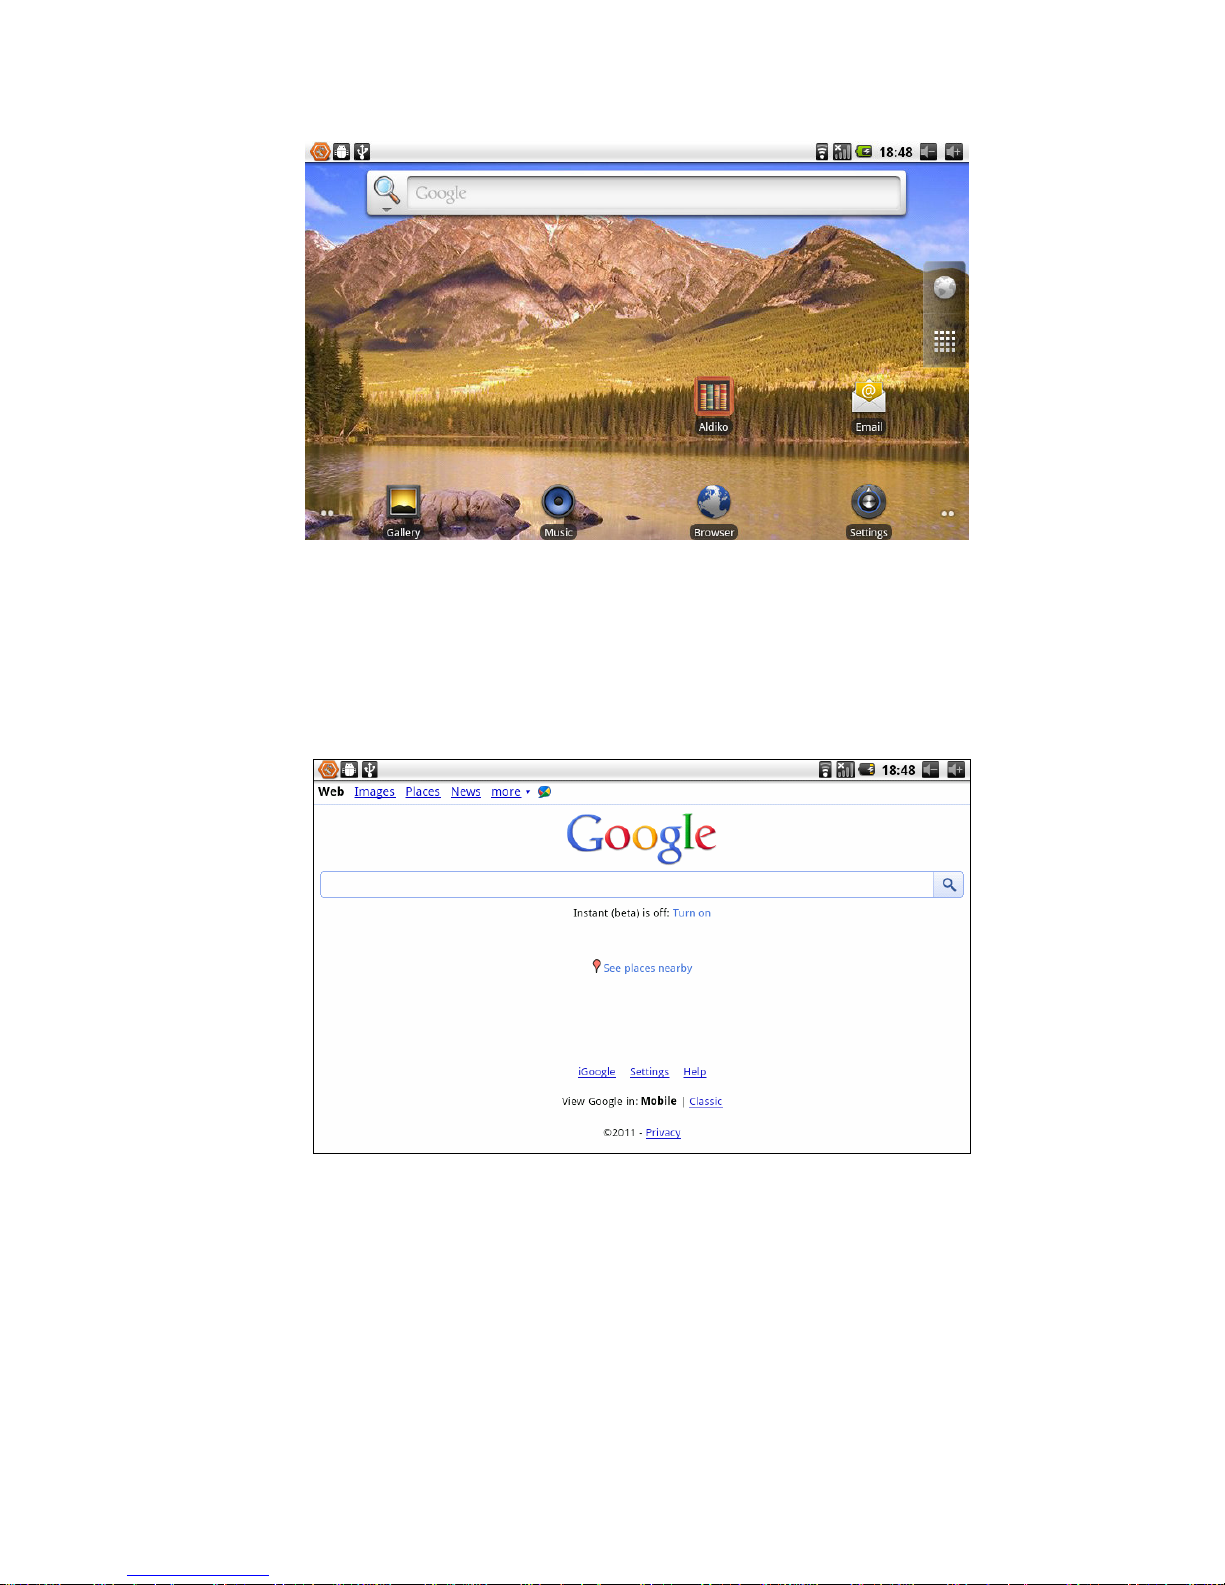
Figure 7-1
Visit website
1. Click on the browser.
2. Press the main menu,popup settings menu of browser.
3. Click "start", popup the address bar, input url.
4. Click start in the soft keyboard.
Browse website
You can slide finger on screen to browse and check other part of webpage.
Enlarge or shrink pages
After opening webpage when you drag webpage, the browser below will appear enlarge
and zoom-out button. You can click "enlarge" or "reduce" to browse webpage.
Figure 7-2
26
Page 28

Find the words in webpage
1. When browsing the web, press menu button, popup menu options.
2. Click more.
3. Click on a page to check.
4. Enter your search projects.
5. When you input characters, words can change from white to green.
6. Click arrow on search column to move last or next one consistent supremacy.
Management bookmarks
Settings webpage bookmarks
1. Go to a web page in the browsing interface.
2. Press menu button and click the bookmarks, then click addition bookmarks.
3. Edit bookmarks and click the sure.
Opening bookmarks
1. Press the menu button and click the bookmarks in the browser interface.
2. Click the bookmarks which you want to use to open the webpage.
Editing bookmarks
1. Press the menu button and click the bookmarks in the browser interface.
2. Click and hold bookmarks to open the menu options.
3. Click the edit bookmarks to edit it, then click sure.
Use the browser window
Open a new browser window
1. Open the browser window; click the menu button and a new window.
2. Click the new window to open a new browser window.
Switch browser window
1 In the browser window, press the menu button and click on the window.
2. Click window you want to open it.
Set browser
In the browser interface, press the menu button and click more, then click Settings to
set the browser.
27
Page 29
8 Other applications
8.1 Alarm clock
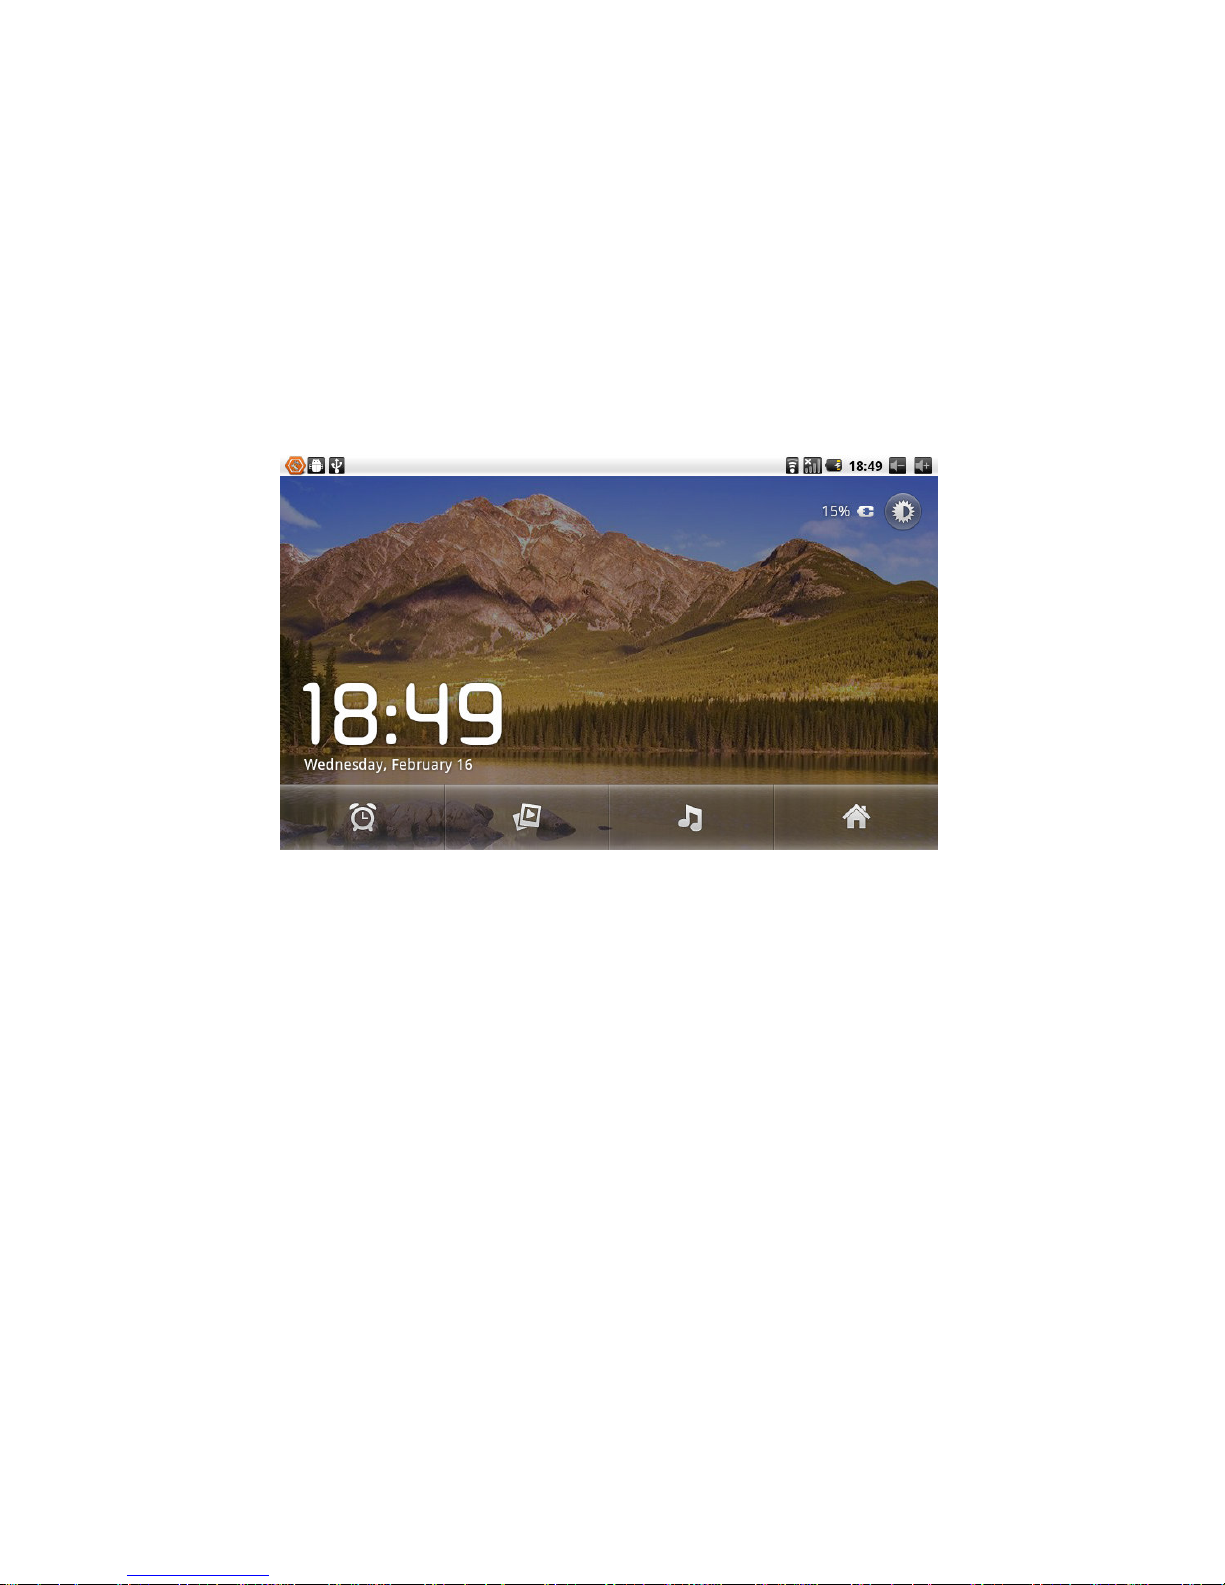
1. Click the clock program.
2. Enter into programming interface such as figure 8-1.
3. There were pictures, music, alarm clock and page buttons.
4. Press the menu button, pop-up alarm setting menu.
Figure 8-1
8.2 Calculator
1. Click the calculator.
2. Enter into the basic calculator panel.
3. Press the menu button, then click the advanced panel.
4. Touch panel digital or operators on the counter to calculate.
Skills: you can slide to switch basic panel and senior panel.
8.3 File Manager
Browse the file
Sliding desktop, and find the file browser.
You can use the file browser to manage editing and deleting files and folders, and can also
28
Page 30
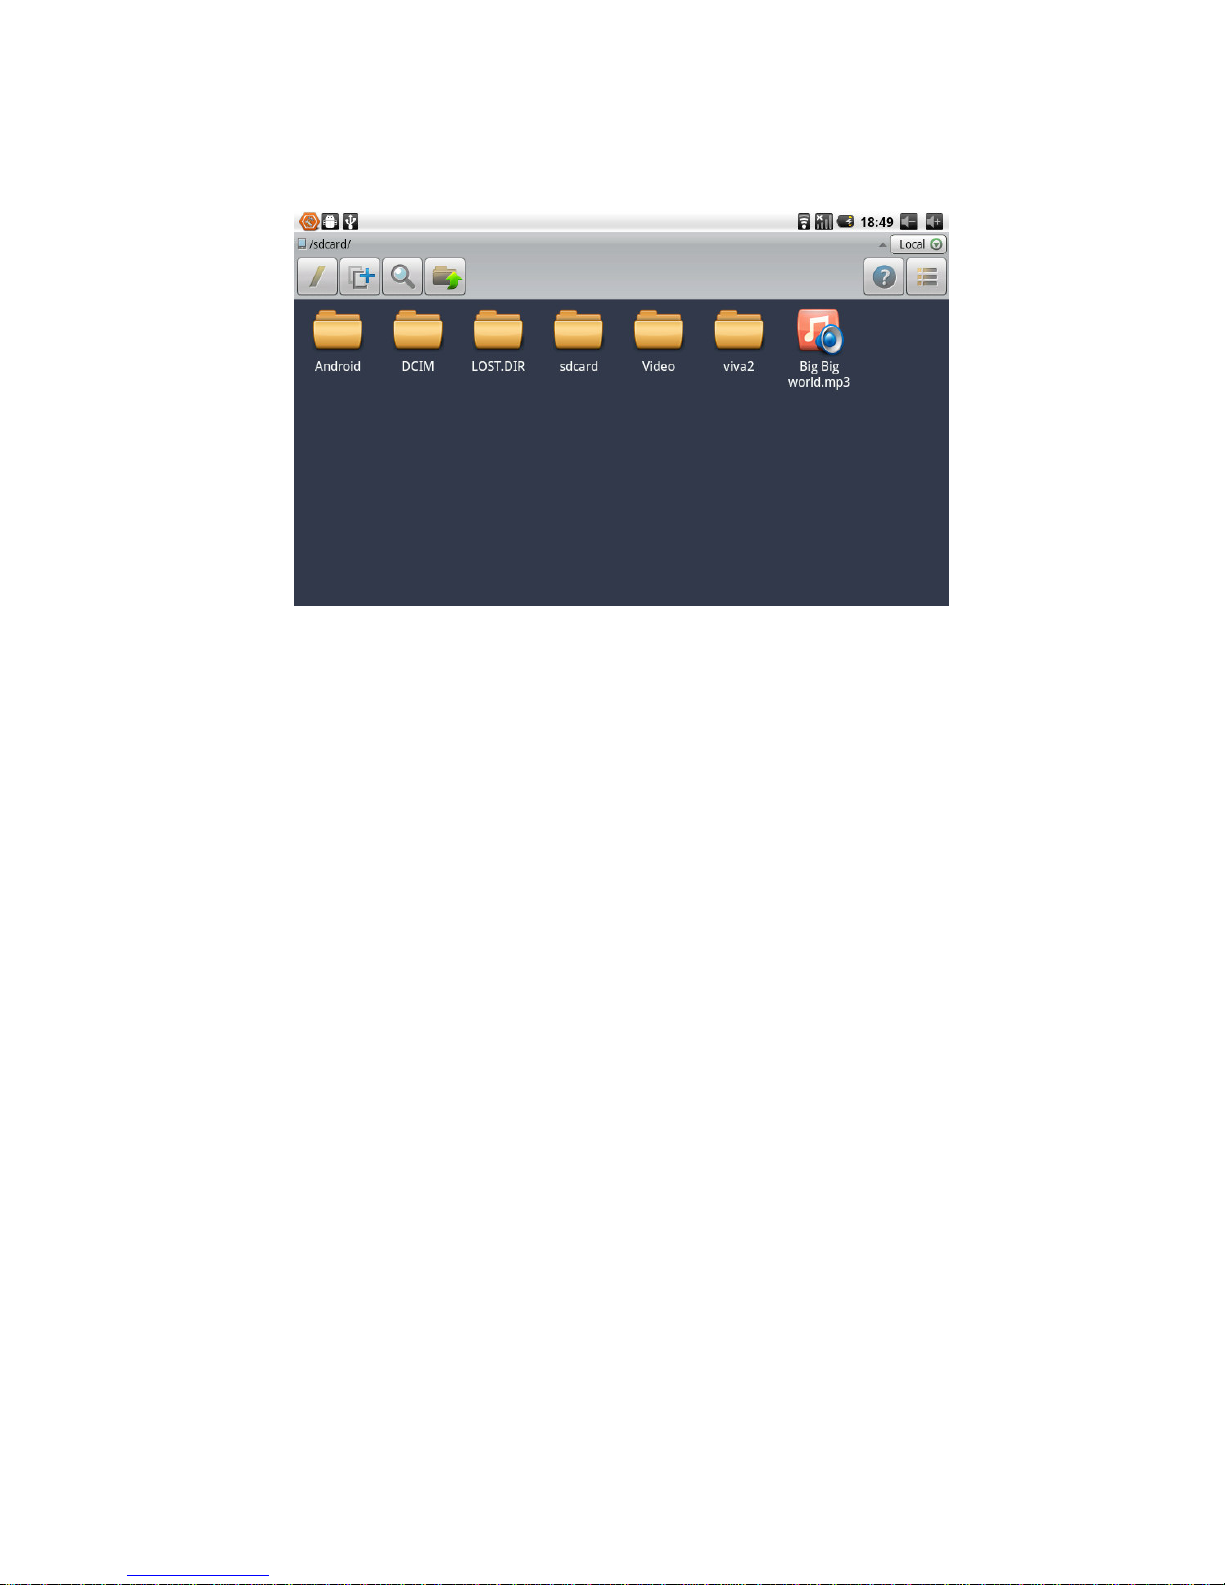
establish sharing and FTP servers to realize resource sharing.
Figure 8-2
Cut and copy files
1. On the file browser, press operation documents with finger.
2. Popup operation menu, including copying, cutting, deleting, rename, new, setting of
content and attributes.
3. Click " cut" or "copy" to cut and copy folders.
4. Click the folder you want to paste into, press the menu button to popup menu.
5. Click "operation", then click "paste".
Delete the file
1. Use fingers to hold the file you want to delete in the file browser.
2. Click "delete".
3. Click "sure" to delete files。
Establish folder
1 On the file browser, press the menu button to popup menu.
2. Click "new".
3. Click the folder.
4. Popup window, input new folder name in the text box.
5. Click "sure" to establish the folder.
Quick search
1.On the file browser, press the menu button to popup menu.
2. Click "new".
3. Click "search".
4. Popup search panel, input your search keywords.
29
Page 31

5. Click on "sure”, notice bar will display search progress bar.
6. After the completion of the search, popup dialogue box to confirm whether need to show
results.
7. Click "sure" to display search results.
30
Page 32

9 Basic Setup
9.1 Sound and Display
Media volume Settings
1. On the homepage interface, press the menu button to popup setting menu.
2. Click Settings.
3. Click Sound.
4. Click on Volume to be able to control ring tones, and volume of media and alarm
clock.
5. Popup Volume Settings panel, then drag the progress bar to control.
Notice Ring Settings
1. On the homepage interface, press the menu button to popup setting menu.
2. Click Settings.
3. Click Sound.
4. Click the Ring Notice.
5. Popup ring menu, and select the bell ring you want to notice.
Screen button sound
You can set MID to release sound when you use the soft keyboards or tickle screen.
1. On the homepage interface, press the menu button to popup setting menu.
2. Click Settings.
3. Click Sound.
4. There is selection such as Button Operation Tone, Selected Operation Tone and
Screen Lockup Reminder Tone.
Display Settings
Adjust screen brightness
1. On the homepage interface, press the menu button to popup setting menu.
2. Click Settings.
3. Click Display.
4. Click the brightness.
5. Popup Brightness Settings panel, drag to bright slider adjust bright degree.
6. Click sure.
Adjust screen standby time
1. On the homepage interface, press the menu button to popup setting menu.
2. Click Settings.
3. Click Display.
4. Scroll down the screen, then click screen overtime.
5
. Popup Screen Standby Time Settings, choose standby time you want the standby
time.
31
Page 33
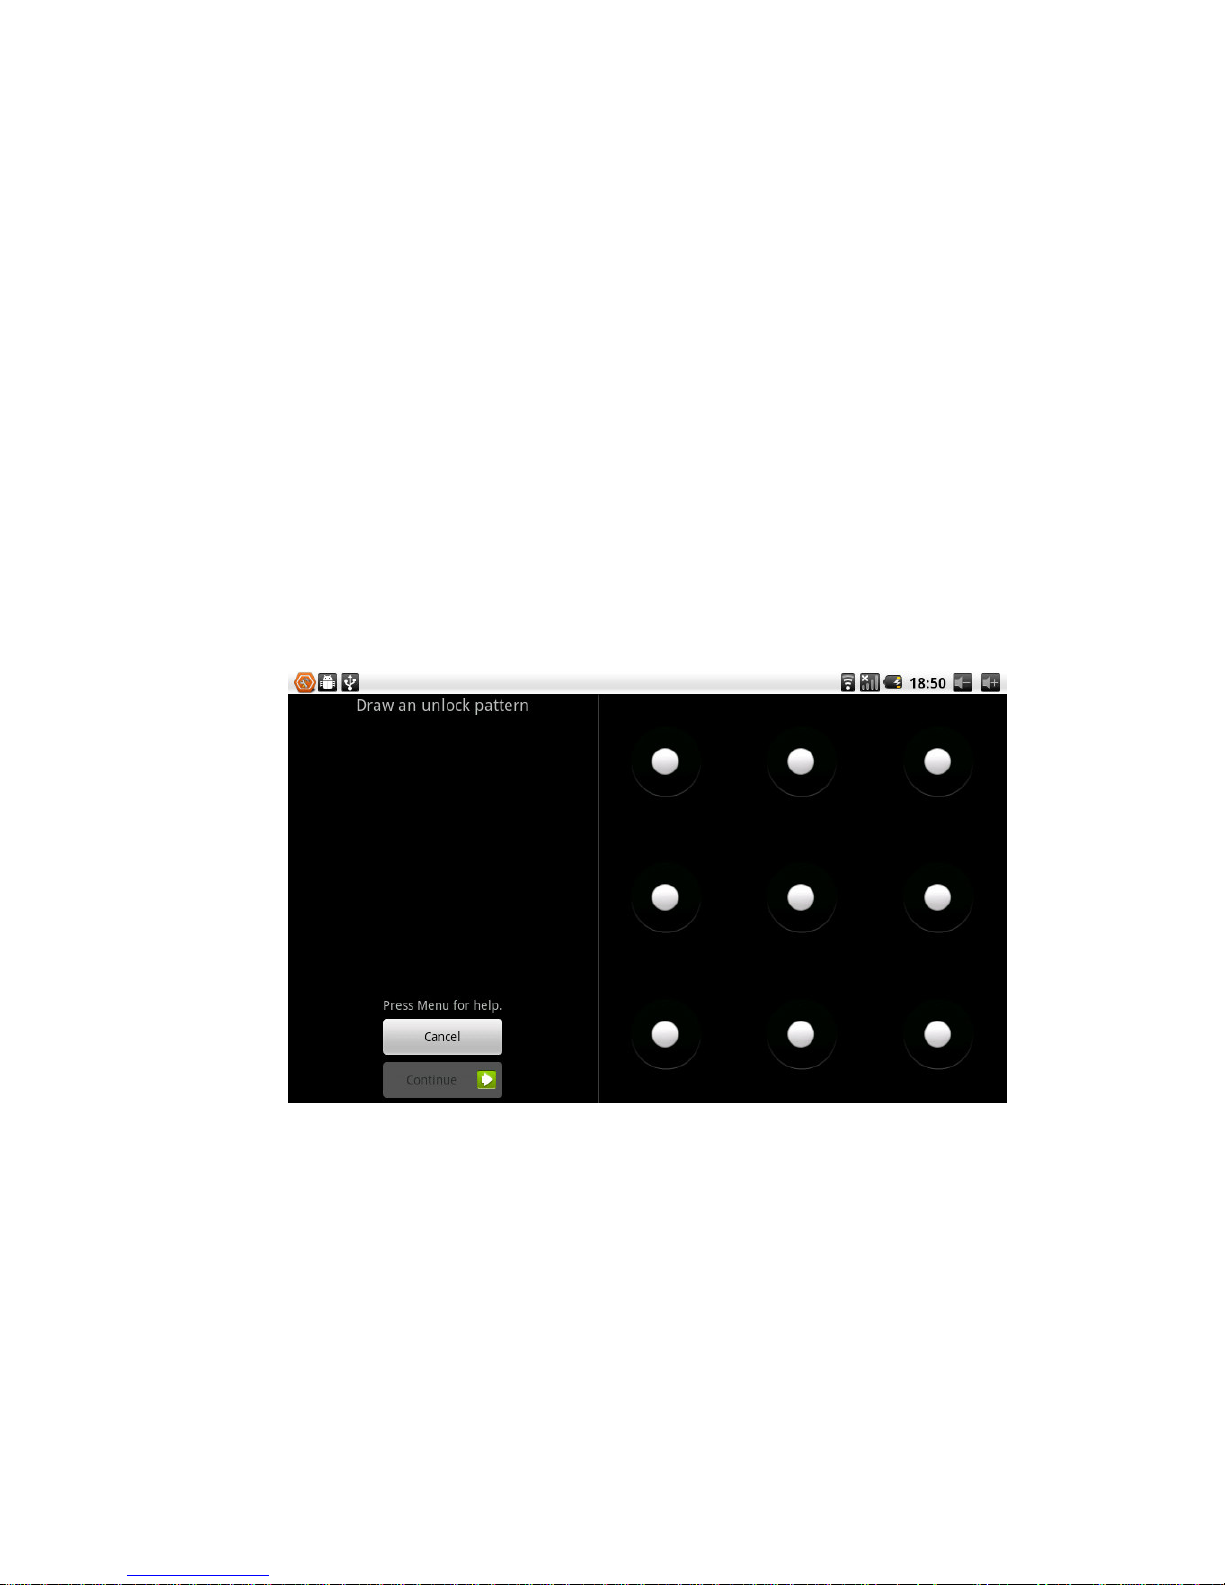
9.2 Safety and Position
Set to unlock pattern
You can set up their unlock pattern (equivalent to password) to protect your MID
privacy.
1. On the homepage interface, press the menu button to popup setting menu.
2. Click Settings.
3. Click on safety and position.
4. Click "Settings to unlock pattern".
5. Popup unlock pattern plate, pattern has nine contacts. With vertical and horizontal, or
diagonal directions to connect four points at least. Fingers left screen after completing.
The system will record your setting pattern.
6. Click "Continue".
7. See hints, draw a screen unlock pattern, and click sure.
Skills: If you don't want unlocked pattern to display on the screen in unlock, please
remove using visible pattern checkbox.
9.3 SD Card and storage
Check SD card and device memory settings.
1. On the homepage interface, press the menu button to popup setting menu.
2. Click Settings.
3. Click the SD card and device memory settings.
Figure 9-1
32
Page 34

4. Check the space available of SD card.
5. Check NAND FLASH inner storage space.
Safely remove SD card
Secure removal of the SD card can effectively protect the SD card and increase the service
life of the SD card.
1. On the homepage interface, press the menu button to popup setting menu.
2. Click Settings.
3. Click the SD card and memory of equipment.
4. Click the uninstall SD card.
5. Popup SD card.
9.4 Date and time
According to preset, the system will automatically use date, time zone and time provided
by network.
Note: If you automatically use time provided by the internet, you cannot manually adjust
the date, time and time zone.
1. On the homepage interface, press the menu button to popup setting menu.
2. Click Settings.
3. Scroll down the screen, then click the date and time setting.
4. Remove automatically checkbox.
5. Click the choice time zone, then select time zone of the list. Scroll down the list to see
more time zone.
6. Click date-setting, then click upward or downward button to adjust the date and year,
month, click Settings when completed.
7. Click time-setting. Then click upward or downward button to adjust the hour and
minute, click AM or PM to change morning or afternoon .then click Settings when
completed.
8. Select checkboxes which is using 24 hours format to switch system between 12-hour
and 24-hour .The selected format will also applied to the time format of the clock.
9. Click to select date format, and then choose to display the date format on the MID.
9.5 Set the language
1. On the homepage interface, press the menu button to popup setting menu.
2. Click Settings.
3. Click on language and keyboard.
4. Click to select language area, then choose words of your need. Scroll down the list to
see more of the language.
33
Page 35

9.6 About the equipment
Check MID status
1. On the homepage interface, press the menu button to popup setting menu.
2. Click Settings.
3. Click on the equipment.
4. Click the state. You can see the battery state, the network state, network types and
accumulative used time etc.
Check system version
1. On the homepage interface, press the menu button to popup setting menu.
2. Click Settings.
3. Click on the equipment.
4. Can check MID model, firmware version, internal version etc.
34
Page 36
10 The installation and Control of Program
10.1 Installation
Install the third-party applications
You can get the third party on the Internet for Android system, and install in MID
automatically .Copy applications into SD card, then insert into MID.
1. Click on File Manager, and search necessary installed application program in the SD
card.
2. Hold the application you needed to install.
3. Popup install option, click install.
4. according to the installation guide to complete, and then operate.
Note: Search files with the apk suffix for these third party programs which based on
system in the Interne
10.2 Managing and Unloading
Uninstall applications
1. On the homepage interface, press the menu button to popup setting menu.
2. Click Settings.
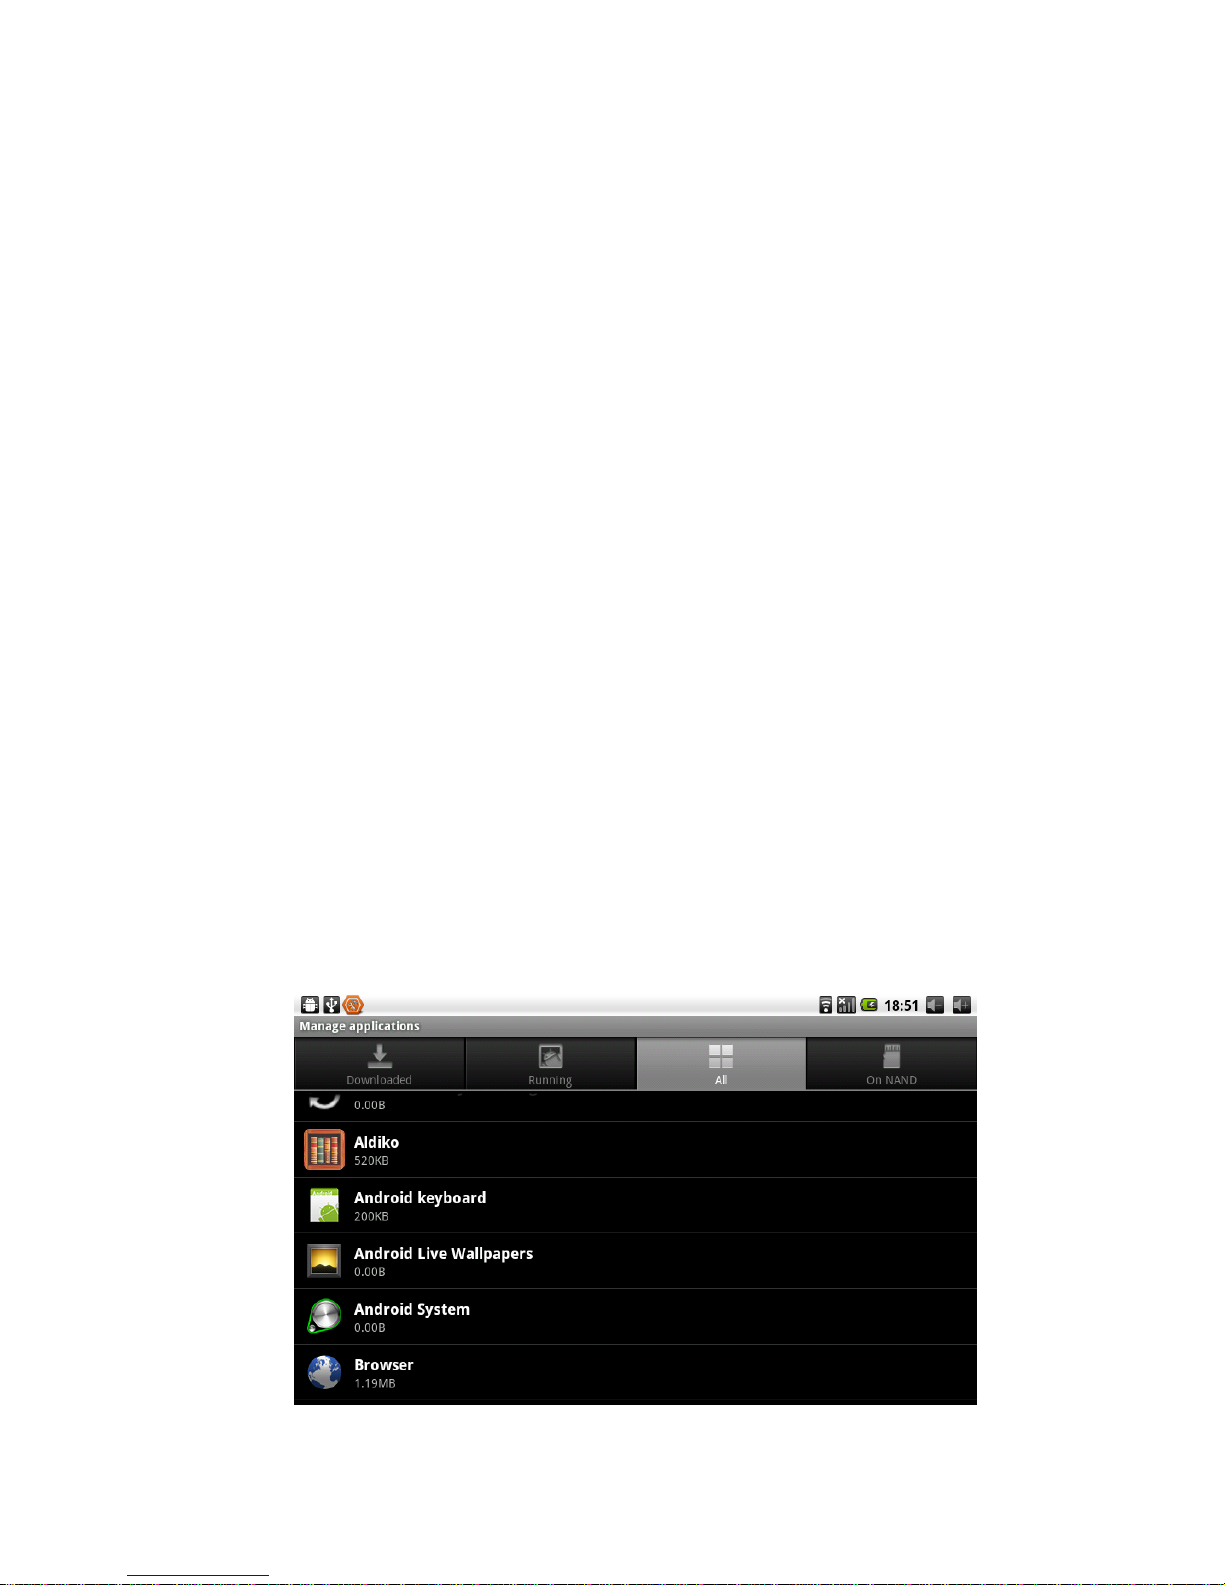
3. Click "application".
4. Click "management applications", list all installed application list in the system.
5. Click "unloading".
6. Click "sure" to finish unloading.
Figure 10 -1
35
Page 37

Skills: program manager that systems installed can realize unloading easily. Open the
program manager and click the uninstall option .it will list application list which
system has been installed.
10.3 Update way
Update Android system application
Download the latest applications through our designated website.
Download through Android system related software BBS in the internet.
Update by the Emdoor Shop preinstalled in the MID.
11 Troubleshooting
1....MID first start is slow
After MID system upgrades, install preloaded application software takes about 2-3 minutes
while first start. Then will be faster.
2....Can not connect with WIFI
Be sure the wireless router is work
Be sure there is some distance between MID and wireless router, and no wall or other
obstacles
Be sure user name and password are correct
3....Feels a bit hot
It is normal when many programs are in use, or the screen is in most brightness, or in charge.
4.... The system in abnormal
Installing the 3th party program will maybe result in failure operation, press RESET (nearby
power connector) to reset the system.
5....Unable setting Email or login program
Be sure the network is normal, can connect with Internet
Be sure Email setting is appropriate
Be sure system time is the same as the local
6
....3G net signal is weak
Be sure MID internal aerial is unblocked
No signal if in weak signal or failure receive places
36
Page 38

37
Page 39
Annex 1
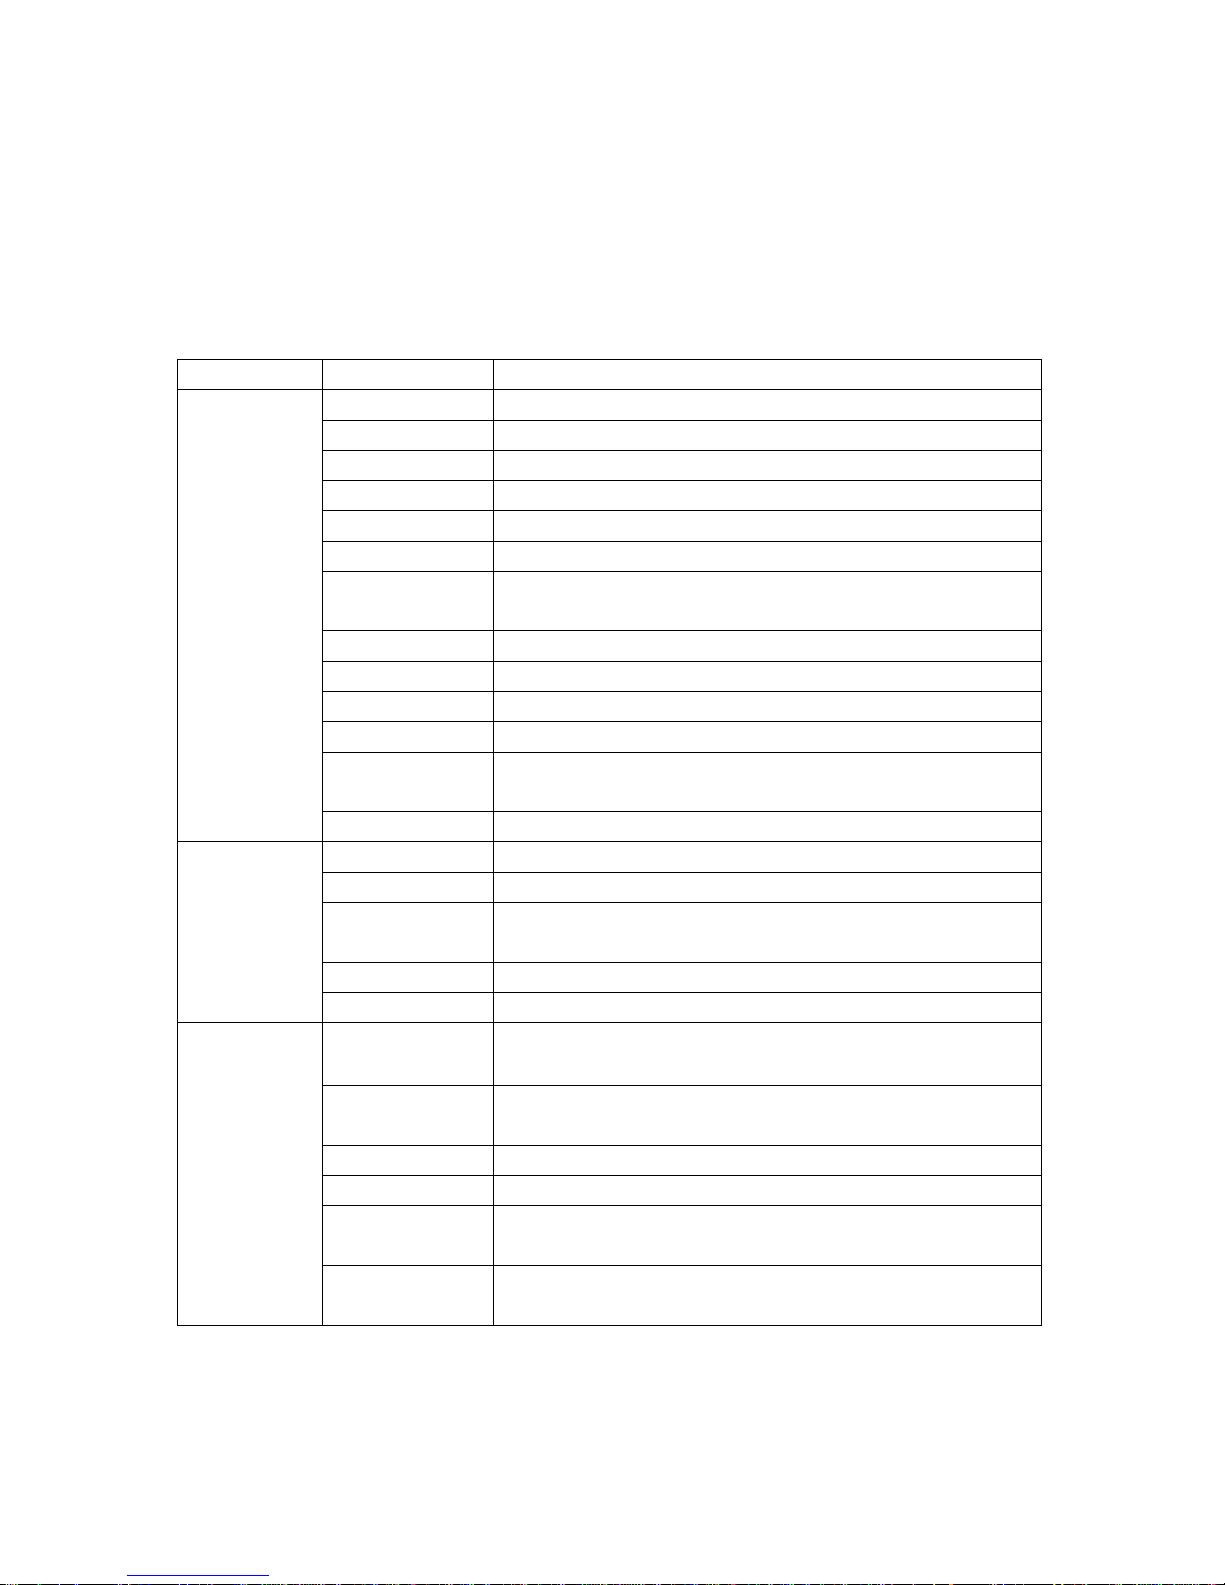
Specifications
EM72 product parameters
Type Content Description
MID model EM73
CPU model Telechips 8803
CPU frequency 1.2G MHZ
DDR-RAM 512MB DDR3
NAND FLASH 4 GB
:
Basic
parameters
Product
visual
appearance
Operation system Google Android 2.2/2.3
Network insertion WiFi
Out-built 3G USB dongle
USB interface
HDMI interface 1080P high resolution video output
Camera 2m pixel (EM73 enhancing camera functions)
Standard batteries Lithium battery, 3400mA/3.7V
Power adaptor Input voltage at AC 100V-240V, and output voltage at DC 5V,
SD card Suppo rting 32G maximum
Visual pattern Pad
Body color Black
Master screen 7.0-inch TFT liquid crystal touch (resistance and capacitance)
Product size
Product weight 285g
Mini USB*1 OTG
and current at 3A
liquid crystal screen at the resolution of 800x480
192mm x 121mm x 11mm
Video playing Supporting AVI, RMVB, MKV, FLV and other formats, and
Music playing Built-in music player supporting playback in the MP3, MIDI,
Application
programs
Games Supporting a third party program
Input method Android input method
Picture browsing Supporting picture browsing in the formats of JPG, TIF, BMP,
OFFICE software Supporting office (word, excel reading and editing), and
supporting 1080P high resolution playing
WAV and other formats
PNG and GIF, etc
supporting PDF browsing
38
 Loading...