

Everlast ELITE GYM, 18106 User Manual
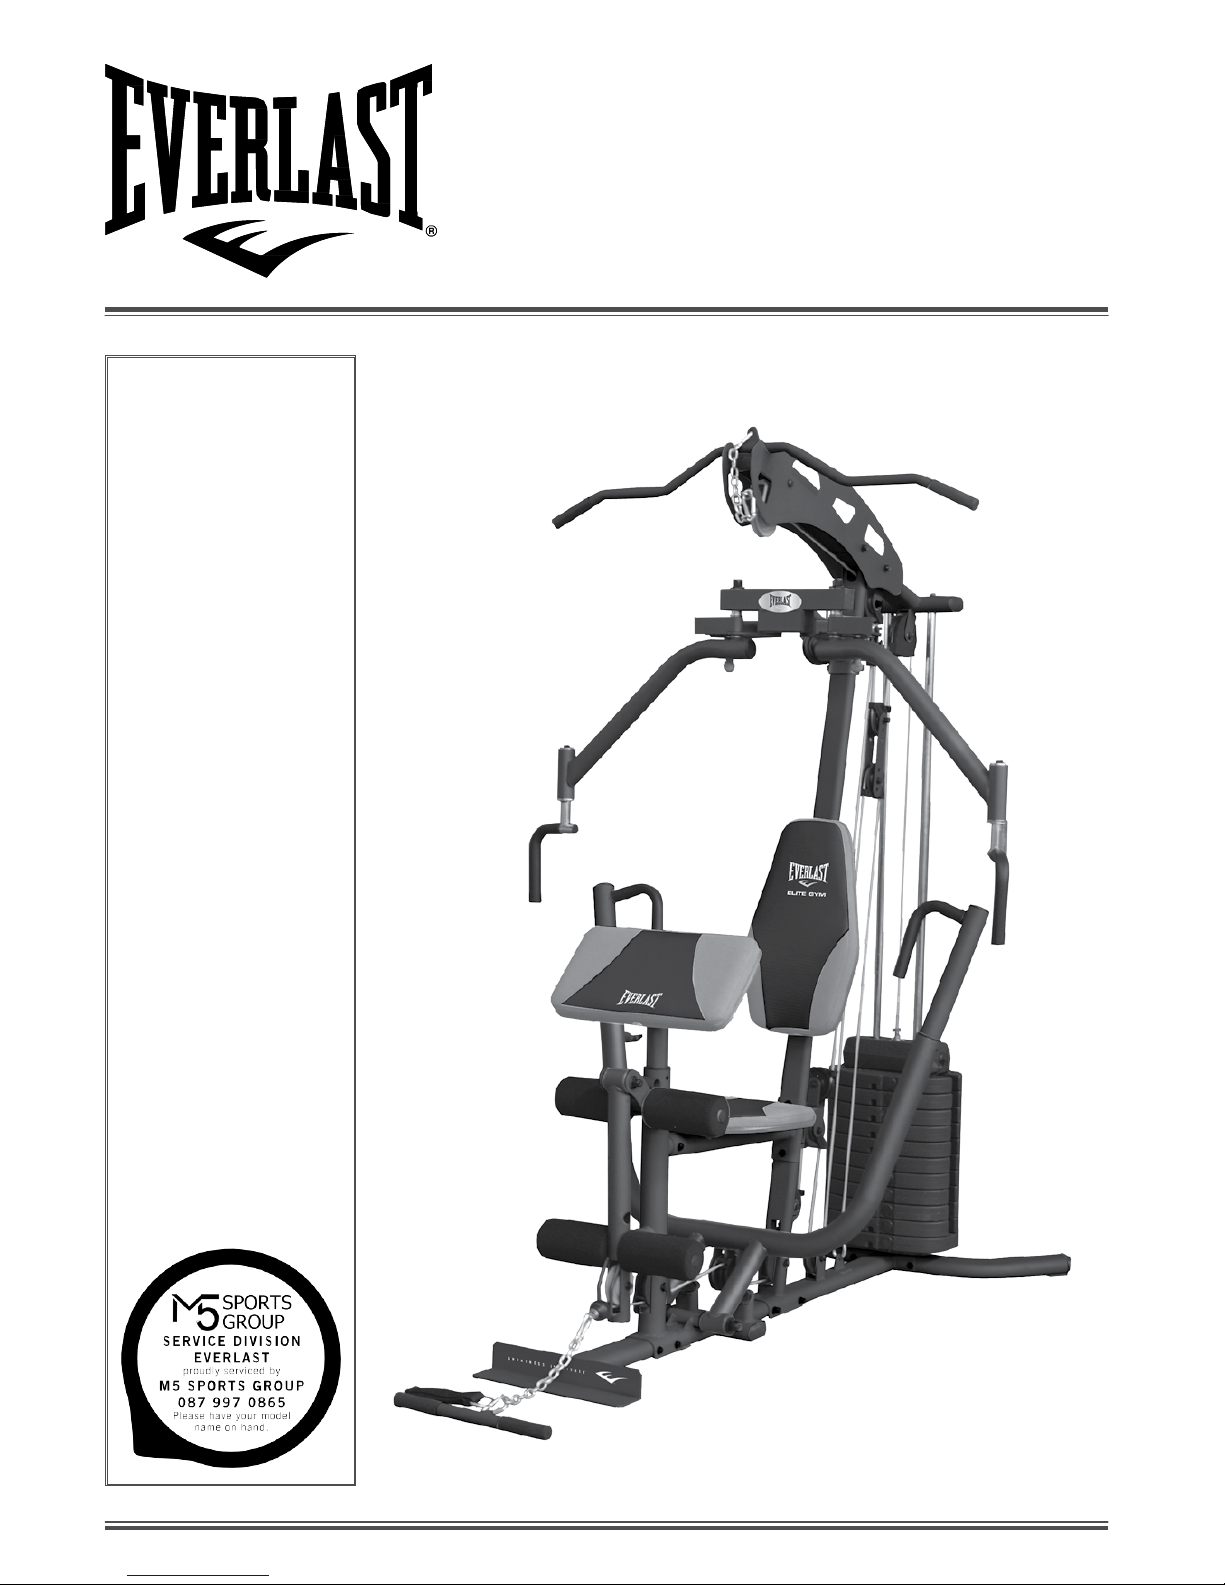
ELITE GYM
USER MANUAL
IMPORTANT - PLEASE
READ THESE
INSTRUCTIONS FULLY
BEFORE ASSEMBLY OR
USE
These instructions contain
important information which
will help you get the best from
your equipment and ensure
safe and correct assembly, use
and maintenance.
If you need help or have
damaged or missing parts, call
the service centre on
087 997 0865
Please keep this manual for
future reference.
MODEL NO.
ELITE GYM
RONS CODE
18106
www.everlast.com
TABLE OF CONTENTS
SAFETY INFORMATION 3
COMPONENTS PARTS 4-6
ASSEMBLY INSTRUCTIONS 7-18
Assembly Steps 7-14
Upper Cable (L=2500mm) 15
Butterfly Cable (L=3000mm) 16
Lower Cable (L=4740mm) 17-18
EXERCISING INFORMATION 19-21
PRE AND POST STRETCHING EXERCISES 22-23
EXPLODED VIEW 24
PARTS LIST 25
SERVICE WARRANTY 26
SPECIFICATIONS FOR EVERLAST ELITE HOME GYM
EXERCISE FUNCTION
Preacher curls, Bent over rows, Seated low row, Cable front raises, Seated
tricep press, Wide grip lat pull down, Lat pull back, Seated leg extension,
Standing hamstring curl, Rear delt fly’s
EXERCISE PART
Chest, Shoulder, Back, Leg, and Arm
PRODUCT SIZE
L 1710 X W 1445 X H 2050 mm
MAXIMUM USER WEIGHT
120 kgs
LOADING WEIGHT
60 kgs
For queries or additional product information, pleas e call our Servi ce Centre on:
087 997 0865
Please have your model name on hand.
www.everlast.com
2

SAFETY INFORMATION
IMPORTANT - PLEASE READ FULLY BEFORE ASSEMBLY OR USE
TO REDUCE THE RISK OF SERIOUS INJURY, READ THE ENTIRE MANUAL BEFORE YOU ASSEMBLE OR
OPERATE THE EVERLAST POWER GYM. IN PARTICULAR, NOTE THE FOLLOWING SAFETY PRECAUTIONS:
WARNING: Before beginning any exercise program, consult your Doctor. This is especially important for
persons over the age of 35 or persons with pre-existing health problems. You MUST read all instructions before
using any fitness equipment. The manufacturer and its associates and partners assumes no responsibility for
personal injury or property damage sustained by or through the use of this product.
PHYSICIAN WARNING:
Not all exercise equipment and training programs are suitable for everybody.It
is recommended that you consult your physician before using this equipment or beginning this or any other
training program.
ASSEMBLY
•
Check you have all the components and tools listed,
bearing in mind that, for ease of assembly, some
components are pre-assembled.
•
Keep children and animals away from the work
area, small parts could choke if swallowed.
•
Make sure you have enough space to layout the
parts before starting.
•
Assemble the item as close to its final position (in
the same room) as possible.
•
Position the equipment on a clear, level surface.
•
Dispose of all packaging carefully and responsibly.
USE
•
It is the responsibility of the owner to ensure that all
users of this product are properly informed as to how
to use this product safely.
•
This product is intended for domestic use only. Do
not use in any commercial, rental, or institutional
setting.
•
Before using the equipment to exercise, always do
stretching exercises to properly warm up.
•
If the user experiences dizziness, nausea, chest
pain, or other abnormal symptoms
stop the workout
and seek immediate medical attention.
•
Only one person at a time should use the equipment.
•
Keep hands away from all moving parts.
•
Always wear appropriate workout clothing when
exercising.
Do not
wear loose or baggy clothing, since it
may get caught in the equipment. Wear athletic shoes
to protect your feet while e xerc is ing .
•
Do not
place any sharp objects around the
equipment.
•
Disabled persons should not use the equipment
without a qualified person or doctor in attendance.
•
Max user weight
120kgs.
•
This product conforms to: (BS EN957) - PARTS 1
and 2 class (H) - Home Use - Class (C).
•
This exercise product has been designed and
manufactured to comply with the latest (BS EN 957)
British and European Safety Standards.
For queries or additional product information, pleas e call our Servi ce Centre on:
087 997 0865
Please have your model name on hand.
www.everlast.com
3
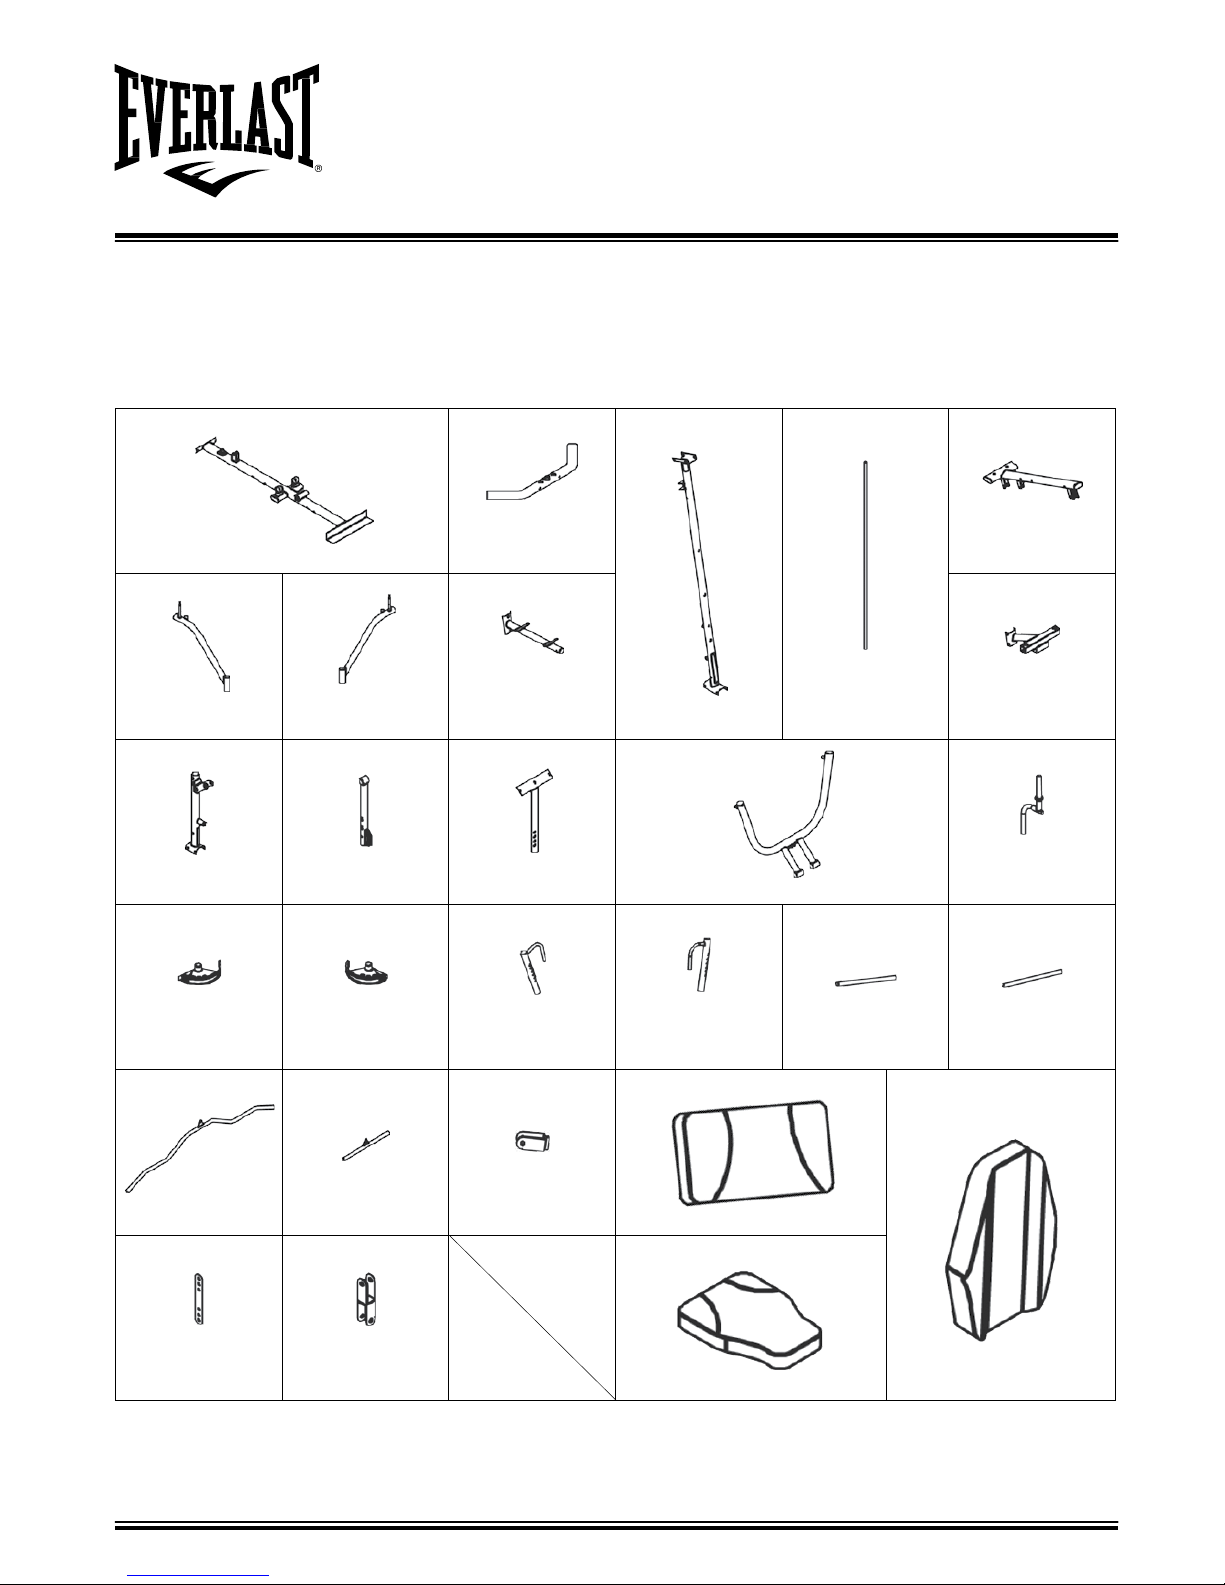
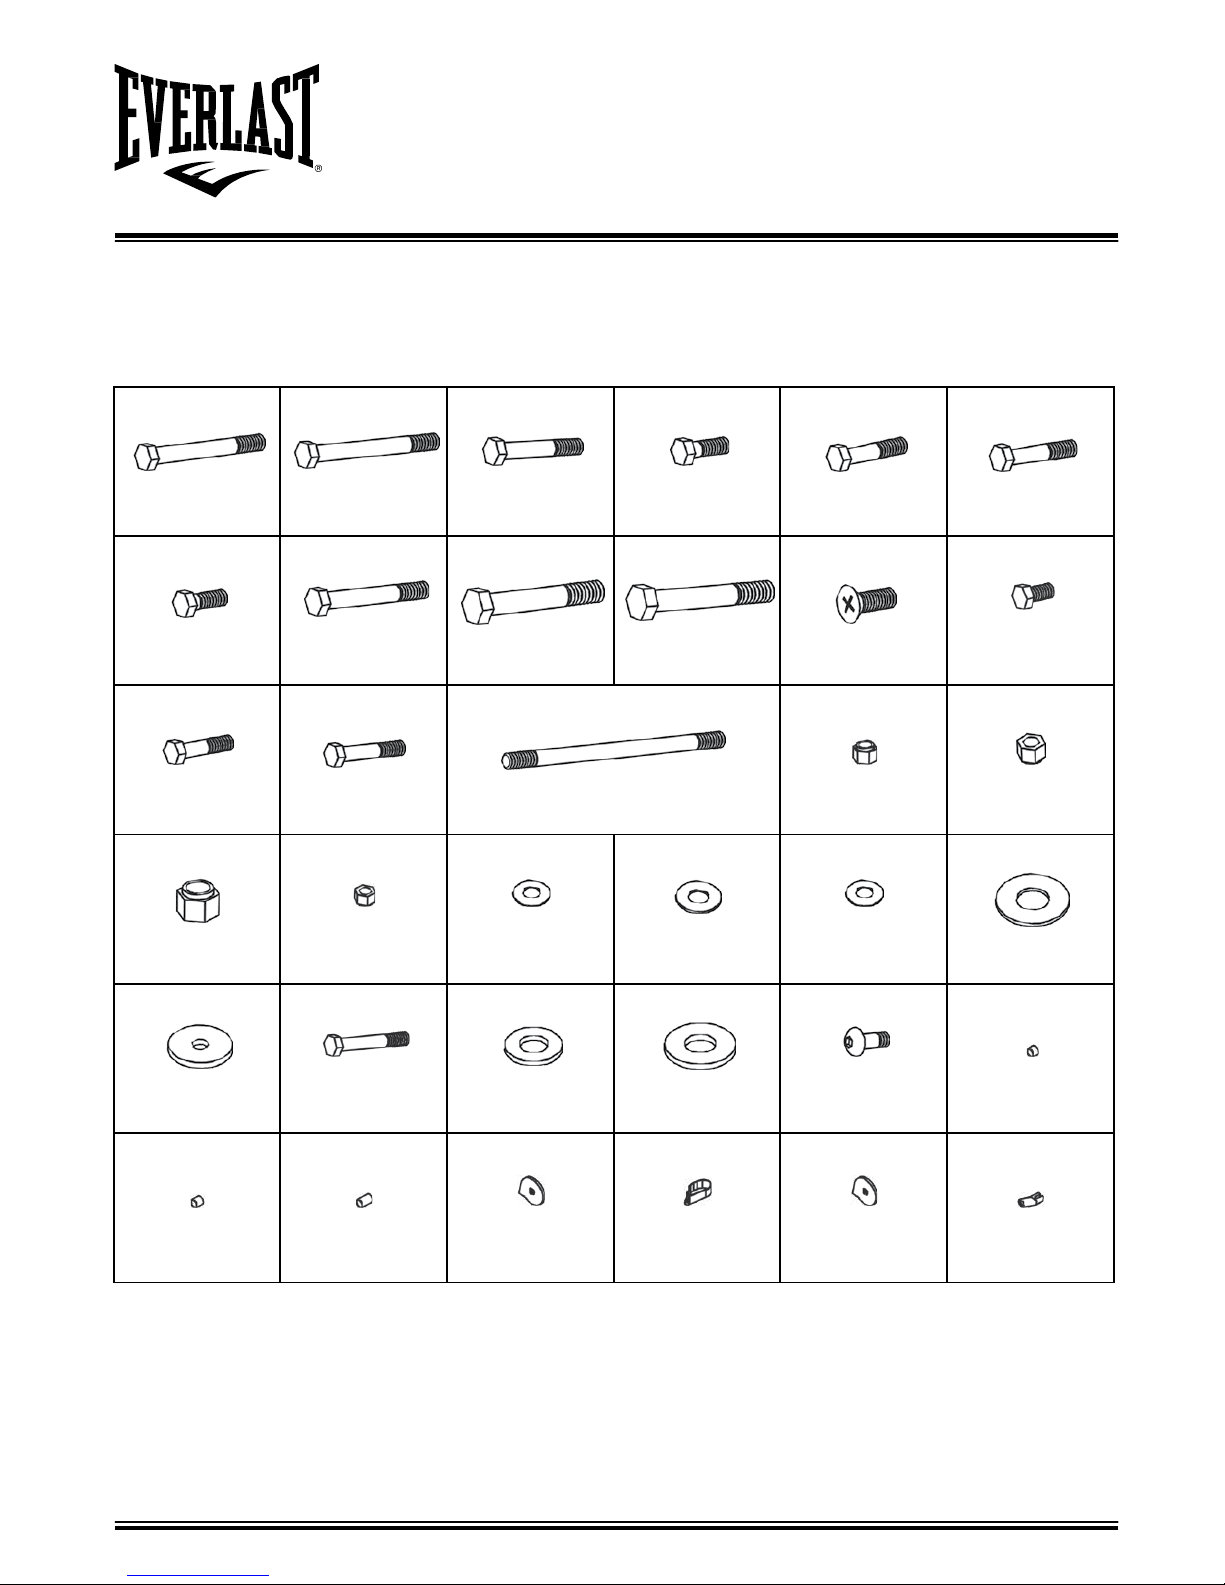
COMPONENTS - PARTS
NOTE:
if you have damaged or missing components, call the service division on
087 997 0865
IMPORTANT - PLEASE CHECK YOU HAVE ALL THE PARTS LISTED BELOW
NOTE: SOME OF THE SMALLER PARTS MAY BE PRE- FITTED TO LARGER COMPONENTS. PLEASE CHECK
CAREFULLY BEFORE CONTACTING US REGARDING ANY MISSING PARTS.
1
Main Base Frame x 1pc
2
Rear Base x 1pc
3
Verticla Post x 1pc
4
Guide Rod x 2pcs
5
Top Beam x 1pc
7
Left Butterfly
Arm x 1pc
8
Right Butterfly
Arm x 1pc
9
Seat Cushion
Support x 1pc
6
Butterfly Extension
x 1pc
10
Seat Support
Post x 1pc
11
Leg Extension
x 1pc
12
Arm Curl Frame
x 1pc
13
Bench Press Arm x 1pc
14
Sold Handle
x 2pcs
15
Left Adjustable
Plate x 1pc
16
Right Adjustable
Plate x 1pc
17
Adjustable Press
Frame (A) x 1pc
18
Adjustable Press
Frame (B) x 1pc
19
Foam Rod
(Short) x 1pc
20
Foam Rod
(Long) x 1pc
21
Lat Bar x 1pc
22
Curl Bar x 1pc
23
Single Pulley
Bracket x 2pcs
26
Arm Curl Cushion x 1pc
28
Backrest Cushion x 1pc
24
Pulley Bracket
Piece x 2pcs
25
Intersect Pulley
Bracket x 1pc
27
Seat Cushion x 1pc
For queries or additional product information, pleas e call our Servi ce Centre on:
087 997 0865
Please have your model name on hand.
www.everlast.com
4
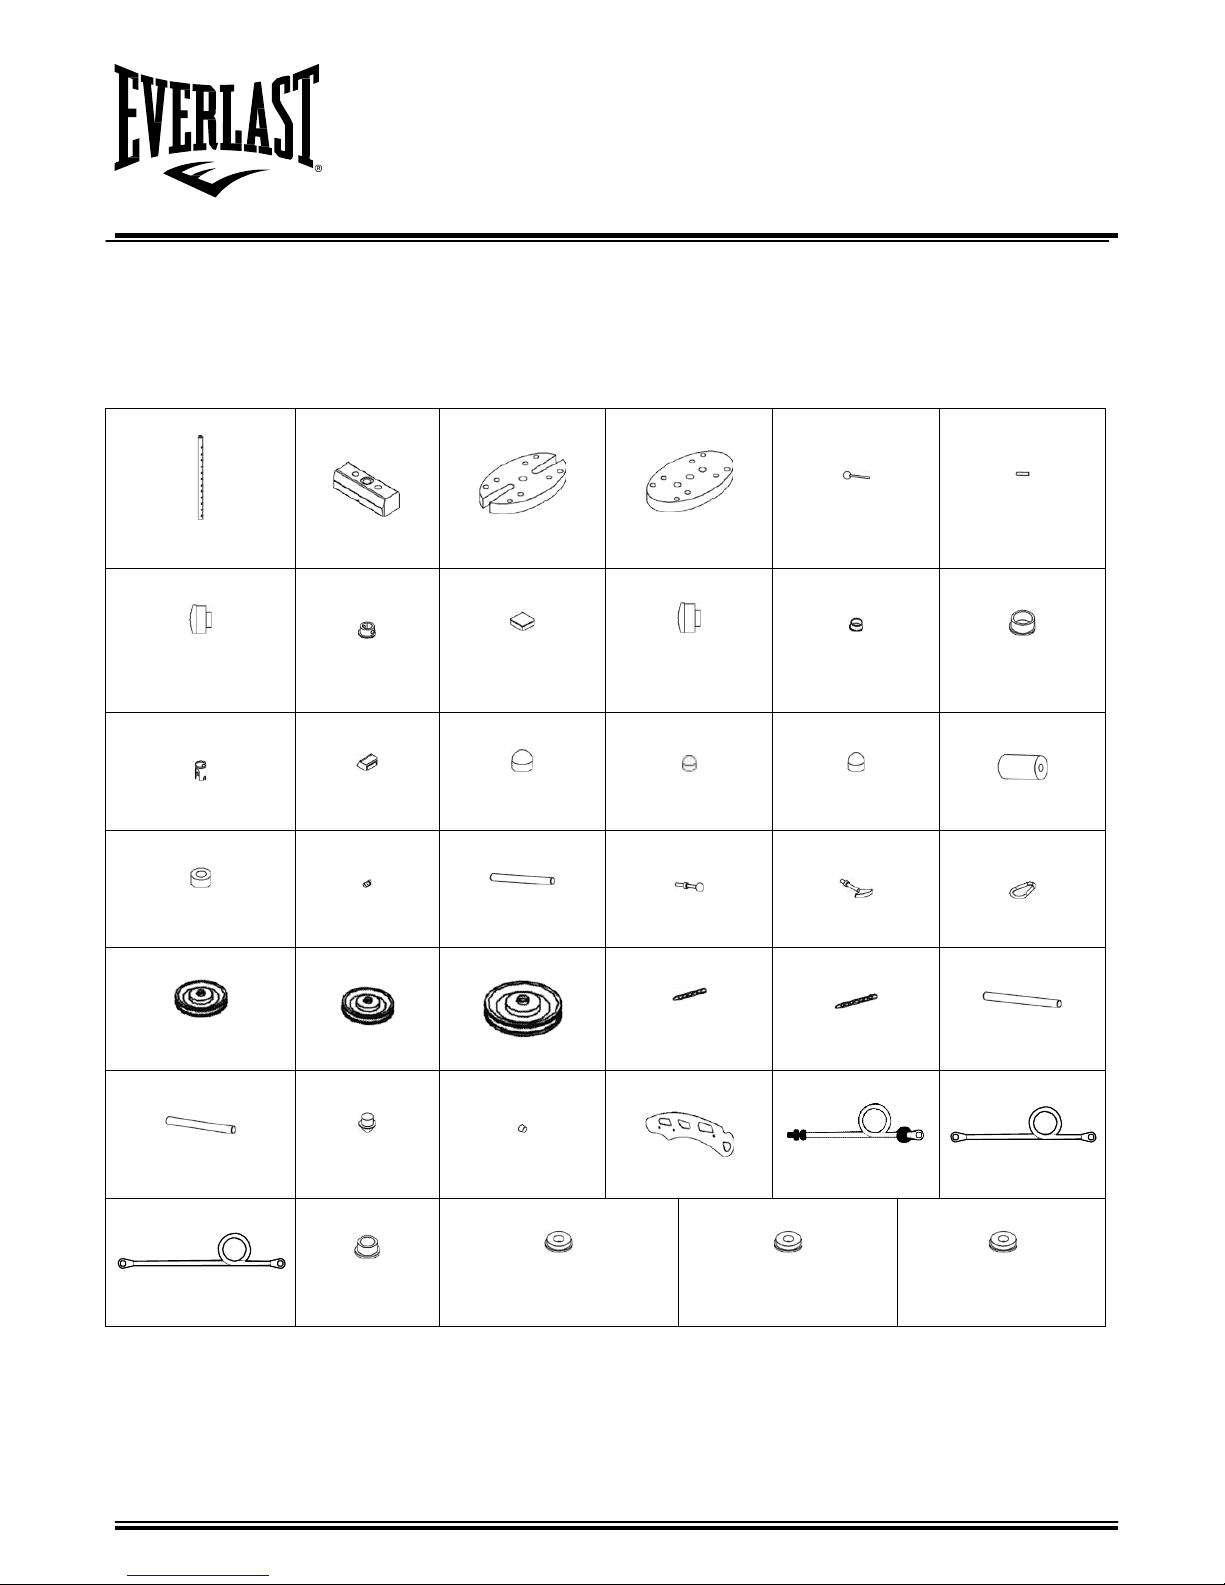
COMPONENTS - PARTS
NOTE:
if you have damaged or missing components, call the service division on
087 997 0865
IMPORTANT - PLEASE CHECK YOU HAVE ALL THE PARTS LISTED BELOW
NOTE: SOME OF THE SMALLER PARTS MAY BE PRE- FITTED TO LARGER COMPONENTS. PLEASE CHECK
CAREFULLY BEFORE CONTACTING US REGARDING ANY MISSING PARTS.
29
Weight Selection Rod
x 1pc
30
Top Plate x 1pc
31
Weight Plate
x 10pcs
32
Weight Base
x 1pc
33
Weight Selection
Pin x 1pc
34
Pin x 1pc
35
(40x80mm)
Oval End Cap
x 2pcs
36
Plastic Bushing
x 1pc
37
(50x50mm)
Square End Plug
x 4pcs
38
(40x80mm)
Oval End Plug
x 5pcs
39
(ø25mm) Round
End Plug x
10pcs
40
(ø50mm) Round
End Plug
x 5pcs
41
Bushing x 3pcs
42
Bumper Cap
x 2pcs
43
5/8” Plastic Dome
Cap x 4pcs
44
3/8” Plastic Dome
Cap x 2pcs
45
1/2” Plastic Dome
Cap x 2pcs
46
Foam Roll x 4pcs
47
Round Bumper
x 2pcs
48
Oval Bumper
x 2pcs
49
PVC Handle Tube
x 4pcs
50
POP Pin x 2pcs
51
PT-IB Pin x 3pcs
52
Hook x 5pcs
53
Yellow Pulley
x 2pcs
54
Pulley x 13pcs
55
Big Pulley x 1pc
56
Chain (short)
x 1pc
57
Chain (long)
x 1pc
58
Handle Tube
(long) x 2pcs
59
Handle Tube
(short) x 2pcs
60
Taper End
Plug x 1pc
61
Taper Bumper
x 1pc
62
Plate x 2pcs
63
Upper Cable
(2500mm) x 1pc
64
Lower Cable
(4740mm) x 1pc
65
Butterfly Cable
(3000mm) x 1pc
66
Oil Bushing
x 10pcs
67
ø44xø39.4xø19.1x12
Oil Bushing
x 4pcs
68
ø50xø44xø12.8x12
Oil Bushing
x 2pcs
69
ø44xø39.4xø25.6x12
Oil Bushing
x 4pcs
For queries or additional product information, pleas e call our Servi ce Centre on:
087 997 0865
Please have your model name on hand.
www.everlast.com
5
COMPONENTS - PARTS
IMPORTANT - PLEASE CHECK YOU HAVE ALL THE PARTS LISTED BELOW
NOTE: SOME OF THE SMALLER PARTS MAY BE PRE- FITTED TO LARGER COMPONENTS. PLEASE CHECK
CAREFULLY BEFORE CONTACTING US REGARDING ANY MISSING PARTS.
70
71
72
73
74
75
3/8”x3-3/8”
3/8”x4-1/4”
3/8”x2-1/2”
3/8”x1-1/4”
3/8”x2”
3/8”x2-1/8”
Hex Bolt x 2pcs
Hex Bolt x 2pcs
Hex Bolt x 2pcs
Hex Bolt x 2pcs
Hex Bolt x 11pcs
Hex Bolt x 2pcs
76
77
78
79
80
81
3/8”x1”
1/2”x3-3/8”
3/8”x3-3/4”
3/8”x3”
M10x25mm
M8x16mm
Hex Bolt x 6pcs
Hex Bolt x 1pc
Hex Bolt x 2pcs
Hex Bolt x 1pc
Screw x 2pcs
Screw x 6pcs
82
M8x42mm
Screw x 2pcs
83
M8x60mm
Screw x 2pcs
84
ø19x280 Pivot Shaft
x 1pc
85
3/8” Lock Nut
x 30pcs
86
1/2” Lock Nut
x 1pc
87
5/8” Lock Nut
x 4pcs
88
M8 Lock Nut
x 2pcs
89
M8 Washer
x 12pcs
90
3/8” Washer
x 66pcs
91
1/2” Washer
x 2pcs
92
5/8” Washer
x 4pcs
93
94
95
96
97
98
ø11xø36xT3
3/8”x4-1/8”
ø13xø32xT3
ø26xø46xT3
3/8”x3/4”
ø13xT1.0x11
Washer x 2pcs
Hex Bolt x 6pcs
Washer x 1pc
Washer x 1pc
Allen Bolt x 2pcs
Bushing x 2pcs
99
ø13xT1.0x17
Bushing x 2pcs
100
ø13xT1.0x22
Bushing x 2pcs
101
Pulley Guard
x 4pcs
102
Ankle Strap
x 1pc
103
Big Pully Guard
x 2pcs
104
Pulley Bracket
x 22pcs
For queries or additional product information, pleas e call our Servi ce Centre on:
087 997 0865
Please have your model name on hand.
www.everlast.com
6
ASSEMBLY INSTRUCTIONS
IMPORTANT - ASSEMBLE WITH ALL NUTS AND BOLTS LOOSE AT FIRST, ONLY TIGHTEN AFTER
COMPLETING ALL ASSEMBLY STEPS.
1.
UNPACK THE CARTON AND PLACE ALL PARTS ON THE FLOOR.
2.
CAREFULLY REMOVE ALL PACKING MATERIAL AND CHECK EACH PART WITH THE MANUAL FIRST.
3.
REMEMBER SOME PARTS ARE PRE-FITTED TO LARGER COMPONENTS.
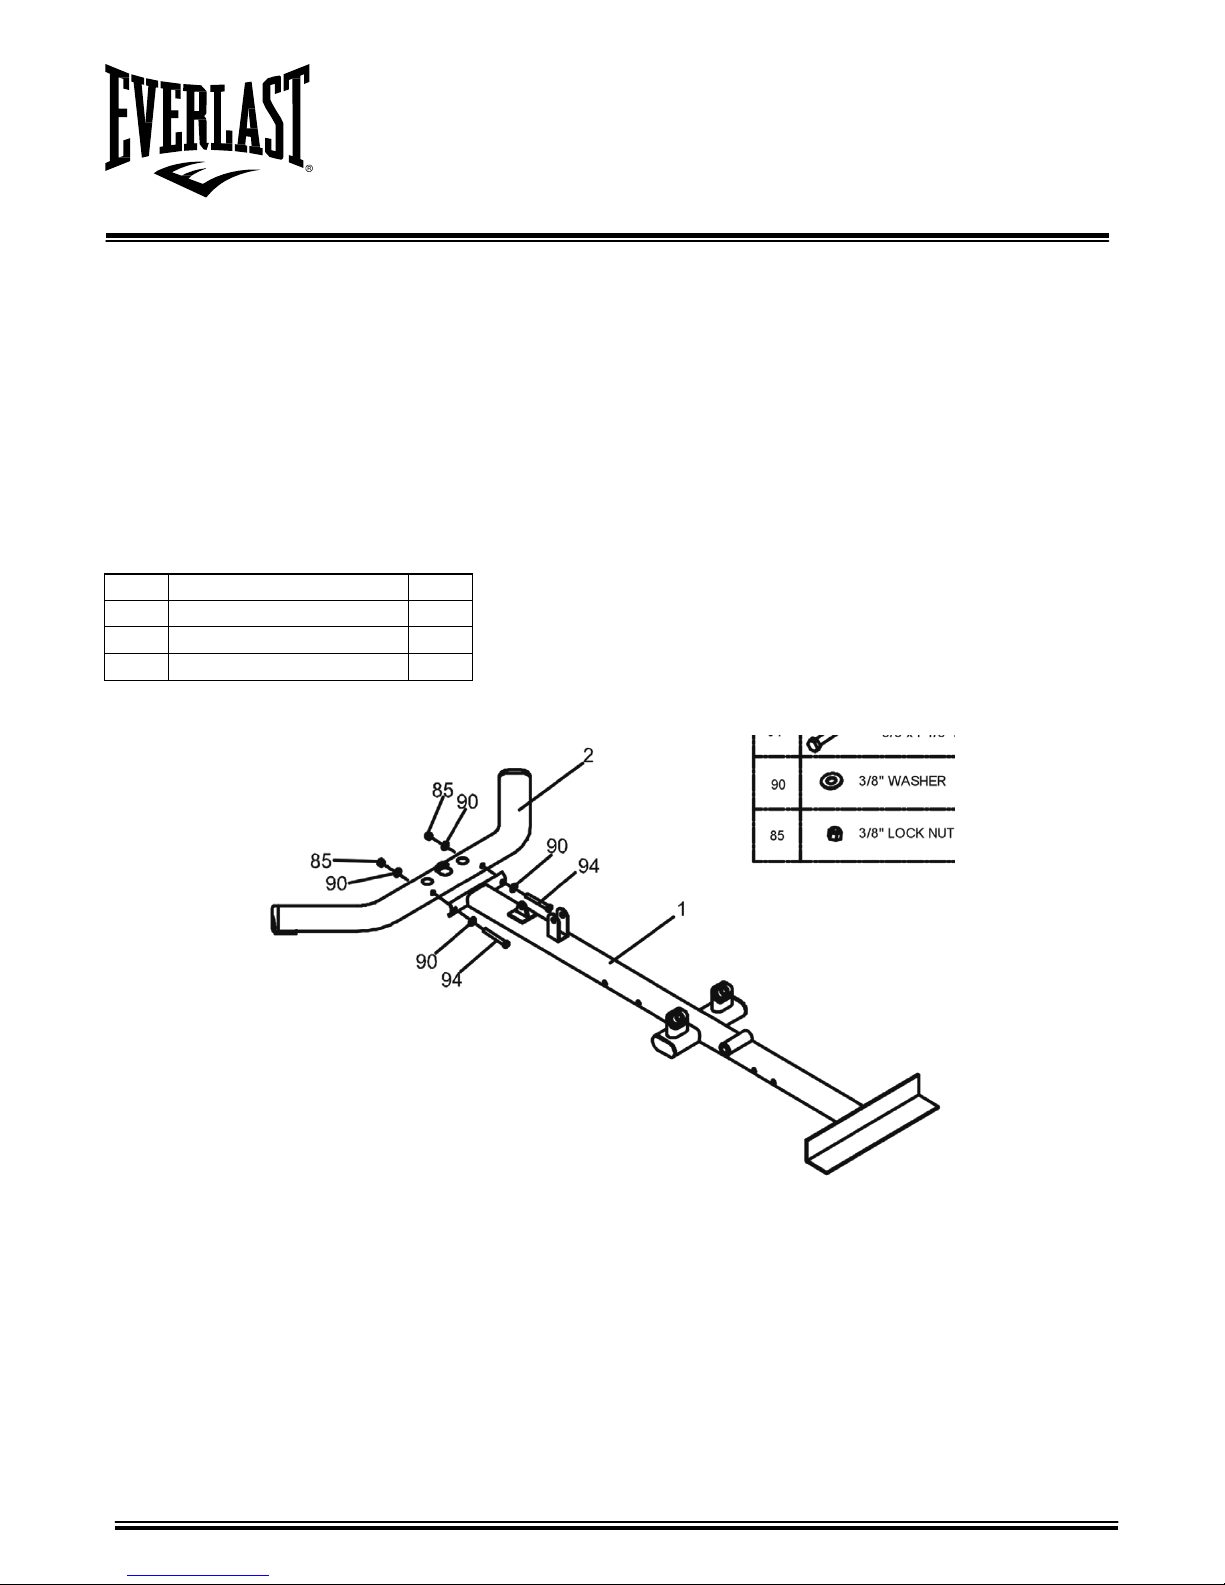
STEP 1
Attach Main Base (1) to the Rear Base (2) using 2pcs x Hex Bolt (94), 4pcs x Washer (90) and 2pcs x Lock Nut
(85).
No.
Description
Qty
85 Lock Nut (3/8”)
2 90 Washer (3/8”)
4
94 Hex Bolt (3/8”x4-1/8”)
2
For queries or additional product information, pleas e call our Servi ce Centre on:
087 997 0865
Please have your model name on hand.
www.everlast.com
7
ASSEMBLY INSTRUCTIONS
No.
Description
Qty
34 Pin 1
36 Plastic Bushing
1 47 Round Bumper
2 76 Hex Bolt (3/8” x 1”)
2 85 Lock Nut (3/8”)
2
90 Washer (3/8”)
6 94 Hex Bolt (3/8” x 4-1/8”)
2
STEP 2
1.
Slide 2pcs x Round Bumper (47) onto the 2pcs x Guide Rod (4). Insert 2pcs x Guide Rod (4) into the
two holes of the Rear Base (2) and secure using 2pcs x Hex Bolt (76) and 2pcs x Washer (90). Slide the
Weight Base Plate (32) down as shown.
2.
Place the Plastic Bushing (36) onto the Weight Selection Rod (29), in line with the 1st hole, and secure
using Pin (34). Slide Top Plate (30) down as shown.
3.
Attach Vertical Post (3) to the Main Base (1) using 2pcs x Hex Bolt (94), 4pcs x Washer (90) and 2pcs x
Lock Nuts (85).
For queries or additional product information, pleas e call our Servi ce Centre on:
087 997 0865
Please have your model name on hand.
www.everlast.com
8
ASSEMBLY INSTRUCTIONS
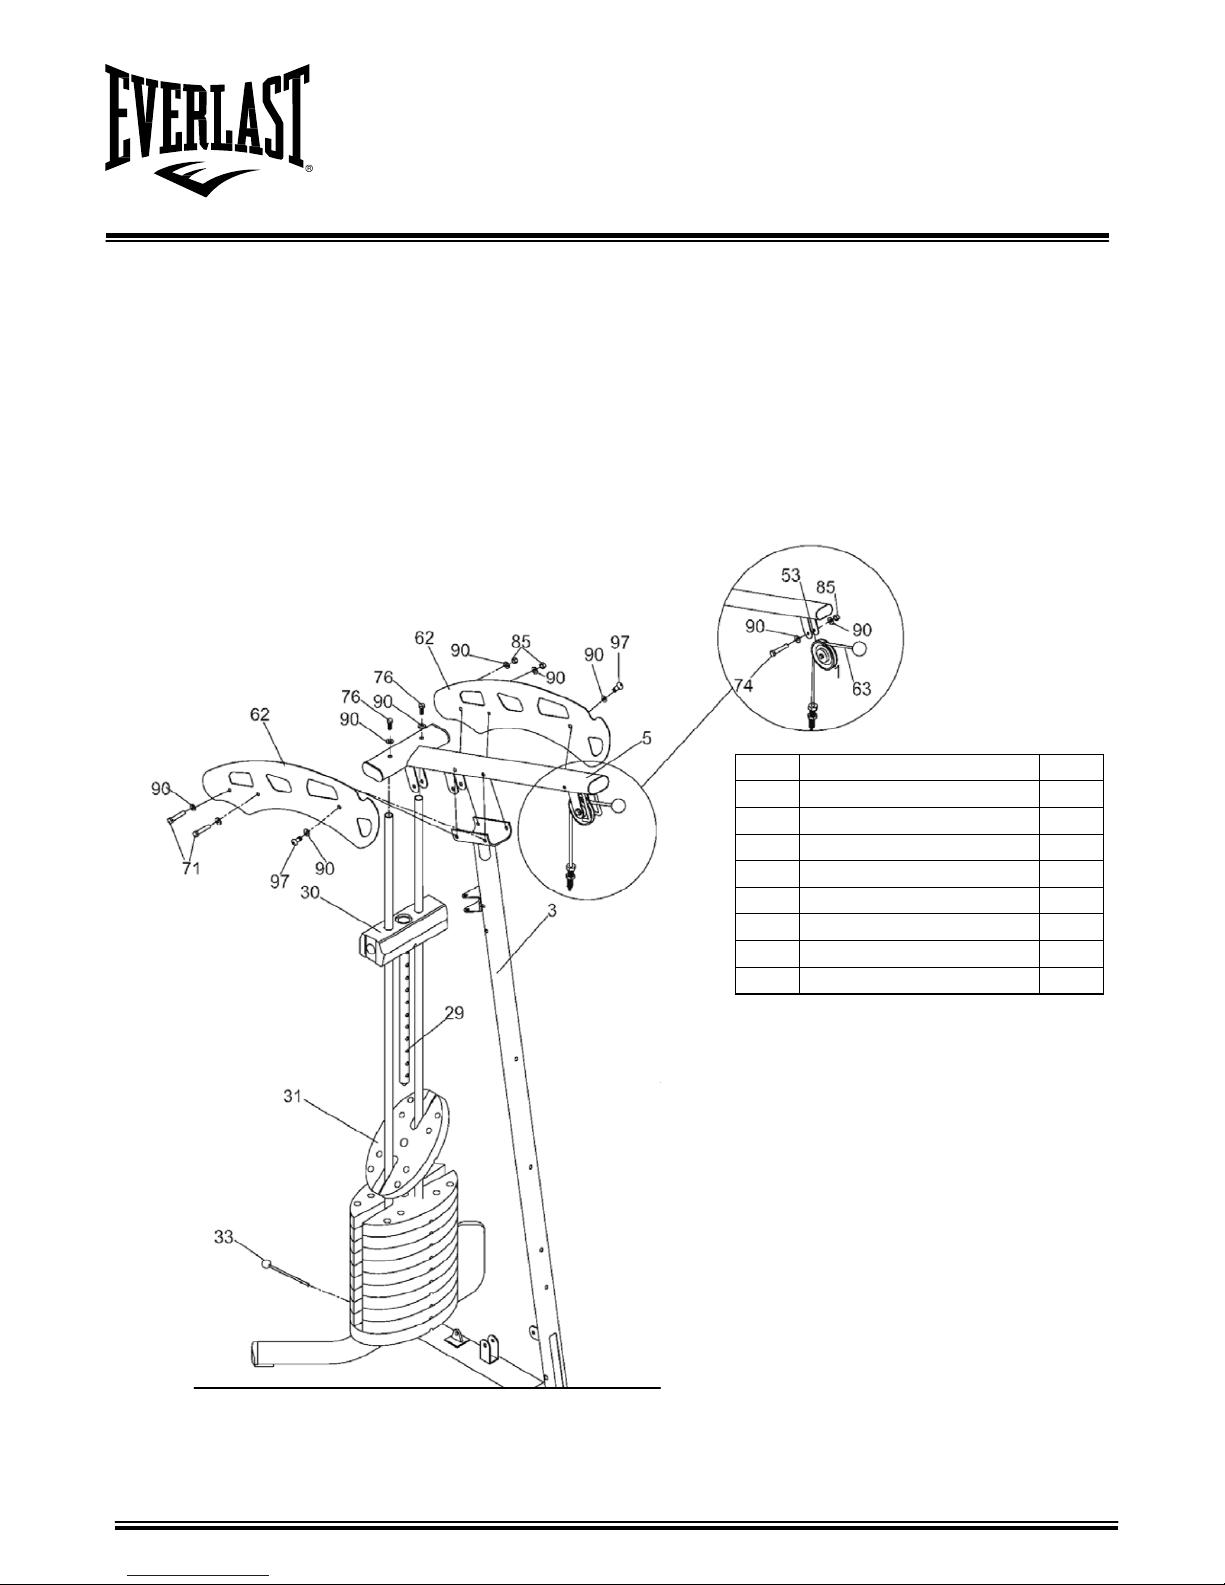
STEP 3
1.
Lift the Top Plate (30) and Weight Selection Rod (29) up, then slide the 10pcs x Weight Plates (31) into
place, one at a time.
2.
Insert the Weight Selection Pin (33) into the desired Weight Plate.
3.
Place the Upper Cable (63) in the groove of the Yellow Pulley (53) and install the Yellow Pulley (53) into
the bracket of the Top Beam (5) using one x Hex Bolt (74), 2pcs x Washer (90) and one x Lock Nut (85).
4.
Attach the Top Beam (5) to the top of the Guide Rods (4) using 2pcs x Hex Bolt (76) and 2pcs x Washer
(90). Place the Top Beam (5) onto the Vertical Post (3). Attach two Plates (62) to the Top Beam (5) using
2pcs x Hex Bolt (71), 2pcs x Allen Bolt (97), 6pcs x Washer (90) and 2pcs x Lock Nut (85).
No.
Description
Qty
33 Weight Selection Pin
1 53 Yellow Pulley
1 71 Hex Bolt (3/8” x 4-1/4”)
2 76 Hex Bolt (3/8” x 1”)
2
74 Hex Bolt (3/8” x 2”)
1
85 Lock Nut (3/8”)
3
90 Washer (3/8”)
10 97 Allen Bolt (3/8” x 3/4”)
2
For queries or additional product information, pleas e call our Servi ce Centre on:
087 997 0865
Please have your model name on hand.
www.everlast.com
9
 Loading...