

EverHot 271 SERIES, 275 SERIES Owner's Manual And Installation Instructions
This water heater must be installed and serviced by a qualified person.
Please leave this guide with the householder.
Owner’s Guide
and
Installation Instructions
Continuous Flow
Gas Water Heater
271, 275 Series
PATENTS
This water heater may be protected by one or more patents or registered designs in the name of
Rheem Australia Pty Ltd or Paloma Co., Ltd.
Rheem Australia Pty Ltd is the supplier of the Everhot range of continuous flow gas water heaters,
manufactured by Paloma Co., Ltd., a world leader in water heater technology and manufacture.
TRADEMARKS
®
Registered trademark of Rheem Australia Pty Ltd.
™ Trademark of Rheem Australia Pty Ltd.
Note: Every care has been taken to ensure accuracy in preparation of this publication.
No liability can be accepted for any consequences, which may arise as a result of its application.
Warning: Upon completion of the installation and commissioning of the water heater, leave this guide
with the householder or a responsible officer. DO NOT
leave this guide inside of the cover of the water
heater, as it may interfere with the safe operation of the water heater or ignite when the water heater is
turned on.

3
CONTENTS
HOUSEHOLDER - We recommend you read pages 4 to 25.
The other pages are intended for the installer but may be of interest.
About Your Water Heater ............................................................................................................ 4
Temperature Control ................................................................................................................. 11
Water Supplies........................................................................................................................... 22
Save A Service Call ................................................................................................................... 23
Installation – Water Heater ....................................................................................................... 26
Connections – Plumbing .......................................................................................................... 37
Connections – Electrical ........................................................................................................... 39
Installation – Controllers .......................................................................................................... 40
Commissioning.......................................................................................................................... 46
Draining The Water Heater ....................................................................................................... 52
Warranty ..................................................................................................................................... 55
4
ABOUT YOUR WATER HEATER
WATER HEATER APPLICATION
This water heater is designed for use in a single family domestic dwelling for the purpose of heating potable
water. Its use in an application other than this may shorten its life.
MODEL TYPE
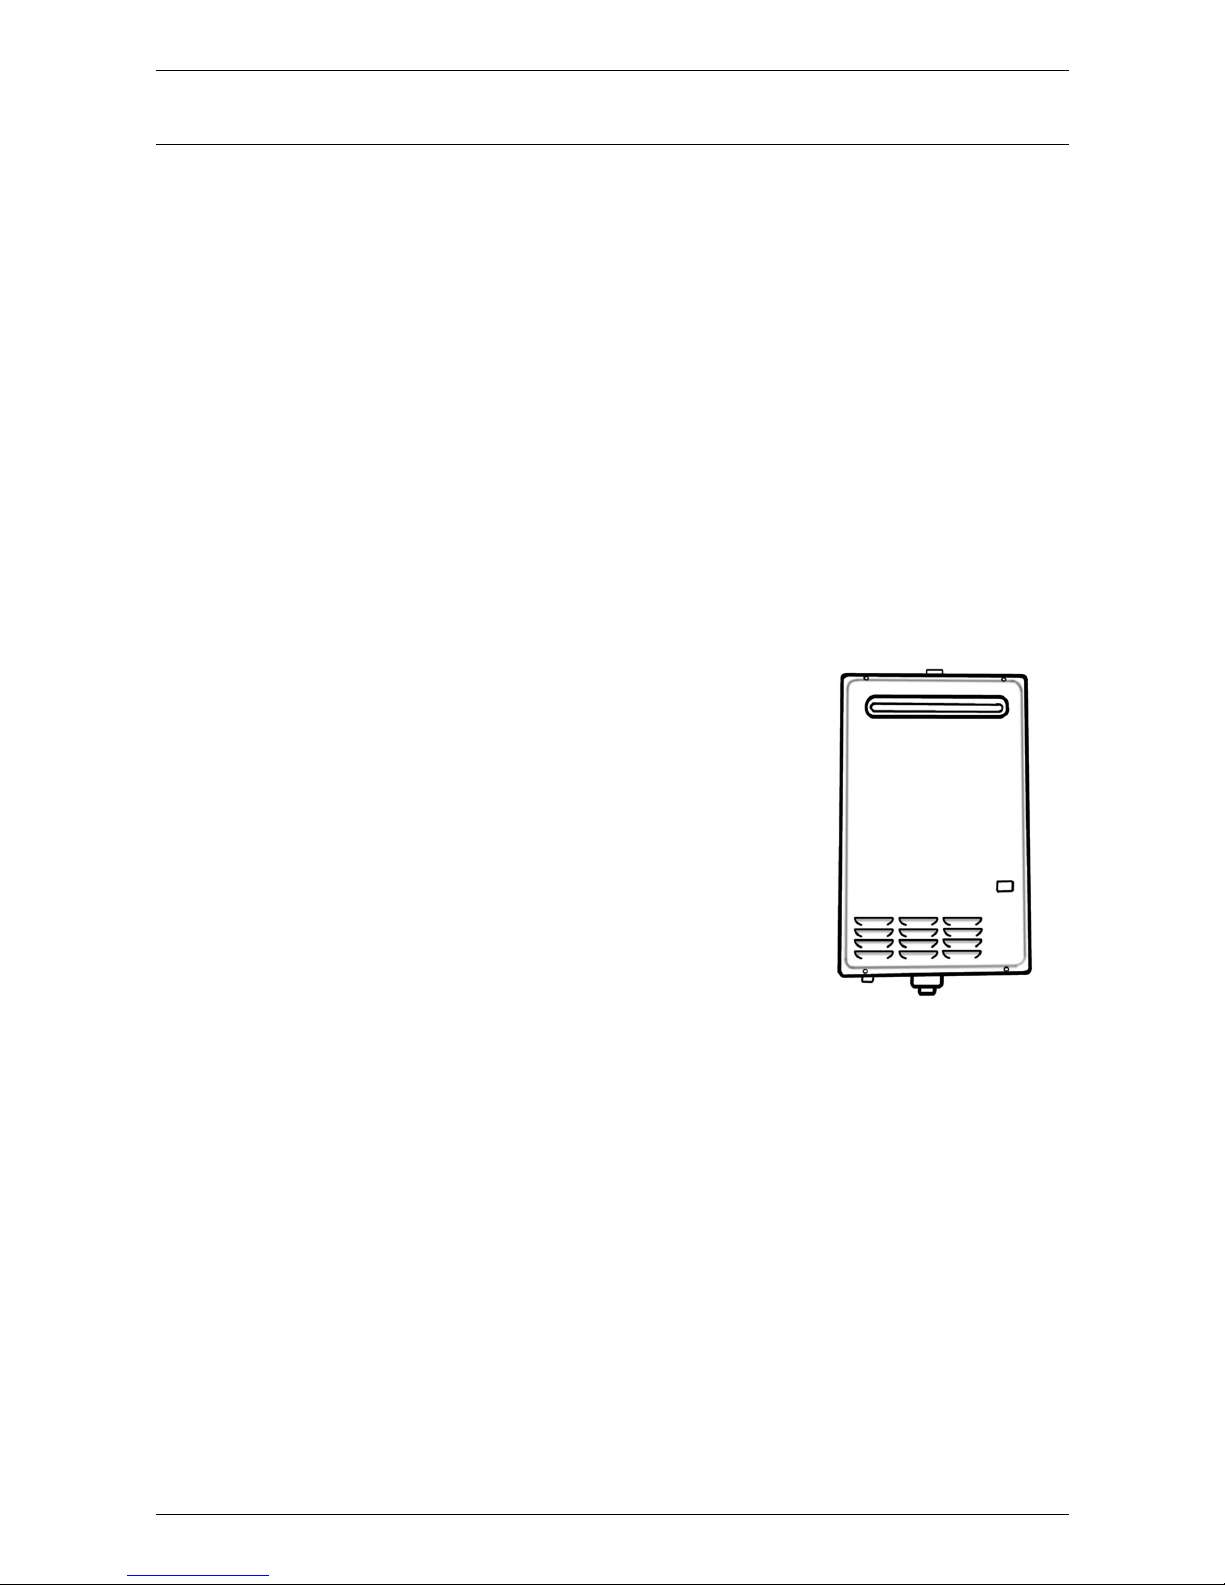
The Everhot® continuous flow gas water heater model you have chosen is for outdoor installation only. This
model has an extended manufacturer’s warranty (refer to the Everhot warranty on page 55).
The water heater has a maximum preset outlet temperature setting of:
• 271 series 70°C
• 275 series 48°C
Notes:
• The 275 series water heater is marked “THIS APPLIANCE DELIVERS WATER NOT EXCEEDING 50°C
IN ACCORDANCE WITH AS 3498” on the front panel. This model;
must not be installed as an in-series gas booster to a solar water heater, as water temperature
greater than 50°C can be delivered from the water heater contravening its compliance to AS 3498.
must not be installed with a Water Star water heater as water
temperature greater than 50°C can be delivered from the system.
• The 271 series of water heater may be installed as an in-series gas
booster to a solar water heater. For information relating to the function
and operation of the solar water heater, refer to the Owner’s Guide
and Installation Instructions supplied with the solar water heater.
• When installed as an in-series gas booster to a solar water heater, the
271 series water heater:
can deliver water at temperatures up to 75°C for an Everhot solar
direct or indirect pumped system and possibly higher for some
other models of solar water heaters.
during periods of low solar energy gain, will boost the water
temperature automatically to its preset outlet temperature setting.
WATER HEATER OPERATION
The water heater operates automatically, heating water as it passes through the water heater. When a hot
tap is opened, the gas burners ignite to provide immediate heating of the water. The heat produced by the
burner is transferred to the water through the heat exchanger. The water is heated to a constant temperature
by the automatic adjustment of the gas supply to the burner to suit the water flow rate (refer to “Temperature
Control” on pages 11 to 21). The gas burners extinguish when the hot tap is closed.
Automatic safety controls are fitted to the water heater to provide safe and efficient operation.
GAS BOOSTING FOR A SOLAR WATER HEATER
Water stored in the solar storage tank passes through the in-series gas booster when a hot tap is opened.
The in-series gas booster is for heating water at times of low solar energy gain, such as during cloudy or
rainy weather, or during colder months.
Solar heated water can reach temperatures up to 75°C for an Everhot solar direct or indirect pumped system
and possibly higher for some other models of solar water heaters. The in-series gas booster operates
automatically. When the solar heated water temperature is 58°C or higher, the flow passes through the inseries gas booster without boosting. When the solar heated water temperature is below 58°C, the in-series
gas booster heats the water to its preset outlet temperature setting.
ABOUT YOUR WATER HEATER
5
MAINS PRESSURE
The water heater is designed for direct connection to the mains water supply. If the mains supply pressure in
your area exceeds that shown on page 28, a pressure limiting valve must be fitted. The supply pressure
should be greater than 140 kPa for the rated flow and performance to be achieved.
HOW HOT SHOULD THE WATER BE?
The water heater may be installed with one or more user
adjustable temperature controllers, which allow you to choose
the most suitable temperature for your hot water needs (refer
to “Temperature Control” on page 11).
If a controller is not installed, the water heater heats the water
to the preset outlet temperature setting. The factory preset
outlet temperature setting is:
• 271 series 60°C
• 275 series 48°C
Note: The preset outlet temperature setting of this water
heater cannot be adjusted by the householder. The setting
can only be adjusted by the installer, Rheem Service or their
nearest Accredited Service Agent.
Note: For 271 series models manufactured before 2007, the
factory preset outlet temperature setting is 50°C.
Note: AS 3498 requires that a water heater provides the means to inhibit the growth of Legionella bacteria in
potable water. When this water heater is used as an in-series booster for a solar water heater it can satisfy
this AS 3498 requirement provided it is energised, the booster preset outlet temperature setting is 70°C, and
that a remote temperature controller is not used.
Warning: Temperature controllers must not be fitted to this water heater if it is installed as an in-series
gas booster (271 series) with a solar water heater system or if a Water Star water heater is installed,
because water at a temperature much higher than the controller setting can be delivered. If a solar or
Water Star water heater is installed to an existing water heater installation, then all controllers must be
disconnected and removed.
If this water heater is installed as part of a solar water heater system, the system can deliver water at
temperatures from 58°C up to 75°C and possibly higher depending upon the model of solar water heater
installed.
HOTTER WATER INCREASES THE RISK OF SCALD INJURY
This water heater can deliver water at temperatures which can cause scalding. Check the water temperature
before use, such as when entering a shower or filling a bath or basin, to ensure it is suitable for the
application and will not cause scald injury.
We recommend and it may be required by regulations that an approved temperature limiting device be fitted
into the hot water piping to the bathroom and ensuite when a 271 series water heater is installed. This will
keep the water temperature below 50°C at the bathroom and ensuite. The risk of scald injury will be reduced
and if no controllers are installed and the preset outlet temperature setting has not been adjusted below
55°C or if a Kitchen controller is installed, still allow hotter water to the kitchen and laundry.
A 275 series water heater will not deliver temperatures exceeding 50°C, in accordance with AS 3498. There
is no requirement in AS/NZS 3500.4 to fit a temperature limiting device if this water heater is installed in
other than an early childhood centre, school, nursing home or a facility for young, aged, sick or disabled
people.
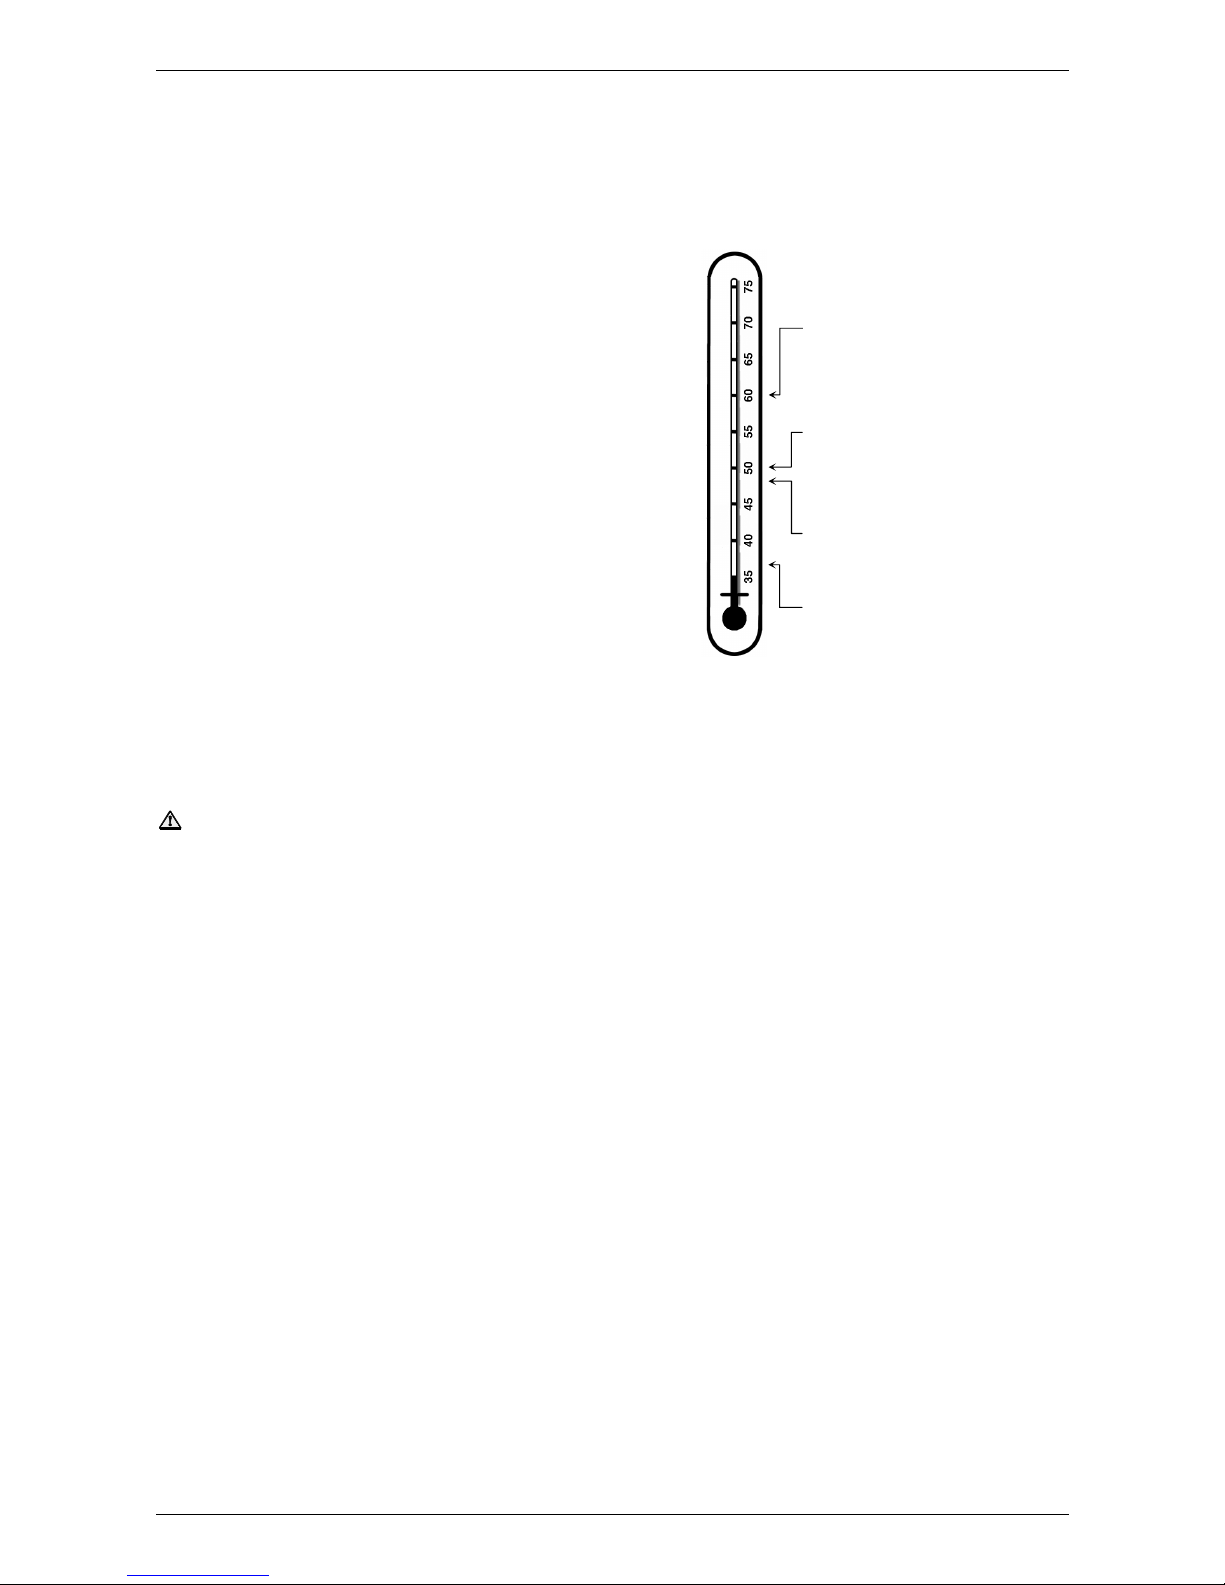
maximum Kitchen controller
temperature setting 271 series
maximum recommended supply
temperature to bathrooms and
ensuites.
maximum Bathroom controller
temperature setting 271 series
minimum Kitchen and Bathroom
controller temperature setting
maximum Kitchen and Bathroom
controller temperature setting
275 series

ABOUT YOUR WATER HEATER
6
WARNING
This water heater is only intended to be operated by persons who have the experience or the knowledge and
the capabilities to do so. This water heater is not intended to be operated by persons with reduced physical,
sensory or mental capabilities i.e. the infirm, or by children. Children should be supervised to ensure they do
not interfere with the water heater.
The water heater uses 240 Volt AC electrical power for operation of the control systems and the combustion
fan. The removal of the front panel will expose 240 V wiring. It must only be removed by a qualified person.
The power lead from the water heater must be plugged into a weatherproof electrical outlet. Take care not to
touch the power plug with wet hands.
SAFETY
This water heater is supplied with temperature sensors, a FlameSafe® protection system and a pressure
relief valve. These devices must not be tampered with or removed. The water heater must not be operated
unless each of these devices is fitted and is in working order.
If the power supply cord or plug is damaged, it must be replaced by a qualified person in order to avoid a
hazard. The power supply cord and plug must be replaced with a genuine replacement part available from
Rheem. Phone Rheem Service or their nearest Accredited Service Agent to arrange for an inspection.
Warning: For continued safety of this water heater it must be installed, operated and maintained in
accordance with the Owner’s Guide and Installation Instructions.
The Everhot warranty may not cover faults if relief valves or other safety devices are tampered with
or if the installation is not in accordance with these instructions.
• Do not store flammable or combustible materials near
the water heater. Flammable liquids (such as petrol),
newspapers and similar articles must be kept well away
from the water heater and the flue terminal.
• Do not use aerosols, stain removers and household
chemicals near the water heater whilst it is working. Gases
from some aerosol sprays, stain removers and household
chemicals become corrosive when drawn into a flame.
• Do not store swimming pool chemicals, household
cleaners, etc., near the water heater.
• Do not place anything on top of the water heater or in
contact with the flue terminal. Ensure the flue terminal is not
obstructed in any way at any time.
• Do not use Propane / Butane gas mixtures in a Propane model. A Propane model is designed to operate
on Propane only. The use of Propane / Butane mixture, such as automotive LPG fuel, in a Propane
model is unsafe and can cause damage to the water heater.

ABOUT YOUR WATER HEATER
7
PRECAUTIONS
Where damage to property can occur in the event of the water heater leaking, the water heater must be
installed over a safe tray. Construction, installation and draining of a safe tray must comply with
AS/NZS 3500.4 and all local codes and regulatory authority requirements.
The water heater must be maintained in accordance with the Owner’s Guide and Installation Instructions.
Refer to “General Maintenance” on page 7, “Minor Six Month Maintenance” on page 7 and “Annual Service”
on page 7.
If this water heater is to be used where an uninterrupted hot water supply is necessary for your application or
business you should ensure that you have back up redundancy within the hot water system design. This
should ensure the continuity of hot water supply in the event that this water heater were to become
inoperable for any reason. We recommend you seek advice from your plumber or specifier about your needs
and building back up redundancy into your hot water supply system.
GENERAL MAINTENANCE
The jacket of the water heater can be cleaned with a soft cloth and warm mild soapy water. Under no
circumstances should abrasive materials or powders be used.
The area around the water heater can be sprayed with insecticide to rid the area of insects. Insects
encroaching into or nesting in the water heater can interfere with the operation of the water heater and also
damage components.
MINOR SIX MONTH MAINTENANCE
It is recommended minor maintenance be performed every six months by the dwelling occupant.
The minor maintenance includes:
• Inspect around the air inlet, flue terminal and the water heater in general for plant growth.
Trim back any shrubs, bushes or other plants which have encroached around the water heater.
Plant growth across the air let and flue terminal can interfere with the performance of the water
heater.
• Inspect around the water heater for insect infestations, such as ants.
Spray insecticide around the water heater if necessary to rid the area of insects. Do not spray the
surface or into the air inlet or flue terminal of the water heater.
Insects encroaching into or nesting in the water heater can interfere with the operation of the water
heater and also damage components.
• Check the drain line from the safe tray (if one is installed) is not blocked.
ANNUAL SERVICE
For safe and efficient operation, it is recommended an annual service be conducted on the water heater.
Only genuine replacement parts should be used on this water heater.
Warning: Servicing of a water heater must only be carried out by qualified personnel. Phone Rheem
Service or their nearest Accredited Service Agent.
The annual service includes the following actions:
• Check and if necessary adjust the gas pressure.
• Check the operation of and clean the burner.
• Visually check the unit for any potential problems.
• Inspect all connections.
• Check the drain line from the safe tray (if one is installed) is not blocked.

ABOUT YOUR WATER HEATER
8
TO TURN OFF THE WATER HEATER
If it is necessary to turn off the water heater:
• Turn off the controllers(s) (if fitted) by pressing the on / off button.
The light in the on / off button will go out and the priority light, if it is on, will go out.
• Switch off the electrical supply at the power outlet to the water heater if there is no risk of freezing
conditions occurring (refer to note below).
• Close the gas isolation valve at the inlet to the water heater.
• Close the cold water isolation valve at the inlet to the water heater.
Note: If there is a risk of freezing conditions, the electrical supply to the water heater should not be switched
off unless the water heater is drained, otherwise damage could result (refer to “Frost Protection” on page 9
and “Draining the Water Heater” on page 9).
TO TURN ON THE WATER HEATER
• Screw in the drain plugs at the cold water inlet and hot water outlet of the water heater if the water
heater has been drained.
• Open all of the hot taps in the house (don’t forget the shower).
• Open the cold water isolation valve fully at the inlet to the water heater.
Air will be forced out of the taps.
• Close each tap as water flows freely from it.
• Open the gas isolation valve fully at the inlet to the water heater.
• Plug in the power supply cord at the power outlet.
• Switch on the electrical supply at the power outlet to the water heater.
• Turn on a controller, if one is fitted, by pressing the on / off button.
The light in the on / off button and the priority light will both glow.
The water heater will operate automatically when you open a hot tap.
GOING ON HOLIDAYS
If you are going on holidays, it is not necessary to turn the water heater off. If it is necessary to turn off the
water heater, refer to “To Turn Off The Water Heater” on page 8.
ABOUT YOUR WATER HEATER
9
FROST PROTECTION
The water heater has a frost protection system. The frost protection system will protect the water heater from
damage, by preventing ice forming in the waterways of the water heater, in the event of freezing conditions
occurring.
Notes:
• The frost protection system will be rendered inoperable if electrical power is not available at the water
heater. Damage caused by freezing due to the unavailability of power at the water heater is not covered
by the Everhot warranty (refer to “Terms of the Everhot Warranty” on page 55).
• If it is necessary to switch the power off to the water heater and there is a risk of freezing, then it is
necessary to drain the water heater (refer to “Draining the Water Heater” on page 9).
• Pipe work to and from the water heater must be adequately insulated to prevent freezing.
• The water heater is not suitable for installation in areas where the ambient temperature falls below -20°C
(including wind chill factor).
• Refer to “Terms of the Everhot Warranty” on page 55.
DRAINING THE WATER HEATER
• Turn off the water heater (refer to “Turn Off The Water Heater” on page 8).
• Open a hot tap (preferably the shower outlet).
• Unscrew the two drain plugs, one each at the cold water inlet and hot water outlet, on the underside of
the water heater.
Water will drain from the water heater.
• When water stops flowing from the water heater, close the hot tap.
Note: It is recommended not to screw the drain plugs back in, until the water heater is to be turned on again.

ABOUT YOUR WATER HEATER
10
HOW DO I KNOW IF THE WATER HEATER IS INSTALLED CORRECTLY?
Installation requirements are shown on pages 26 to 36. The water heater must be installed:
• by a qualified person, and
• in accordance with the installation instructions, and
• in compliance with Standards AS/NZS 3500.4, AS 5601 or AS/NZS 5601.1, as applicable under local
regulations, and all local codes and regulatory authority requirements.
Warning: Temperature controllers must not be fitted to this water heater if it is installed as an in-series
gas booster (271 series) with a solar water heater system or if a Water Star water heater is installed,
because water at a temperature much higher than the controller setting can be delivered. If a solar or
Water Star water heater is installed to an existing water heater installation, then all controllers must be
disconnected and removed.
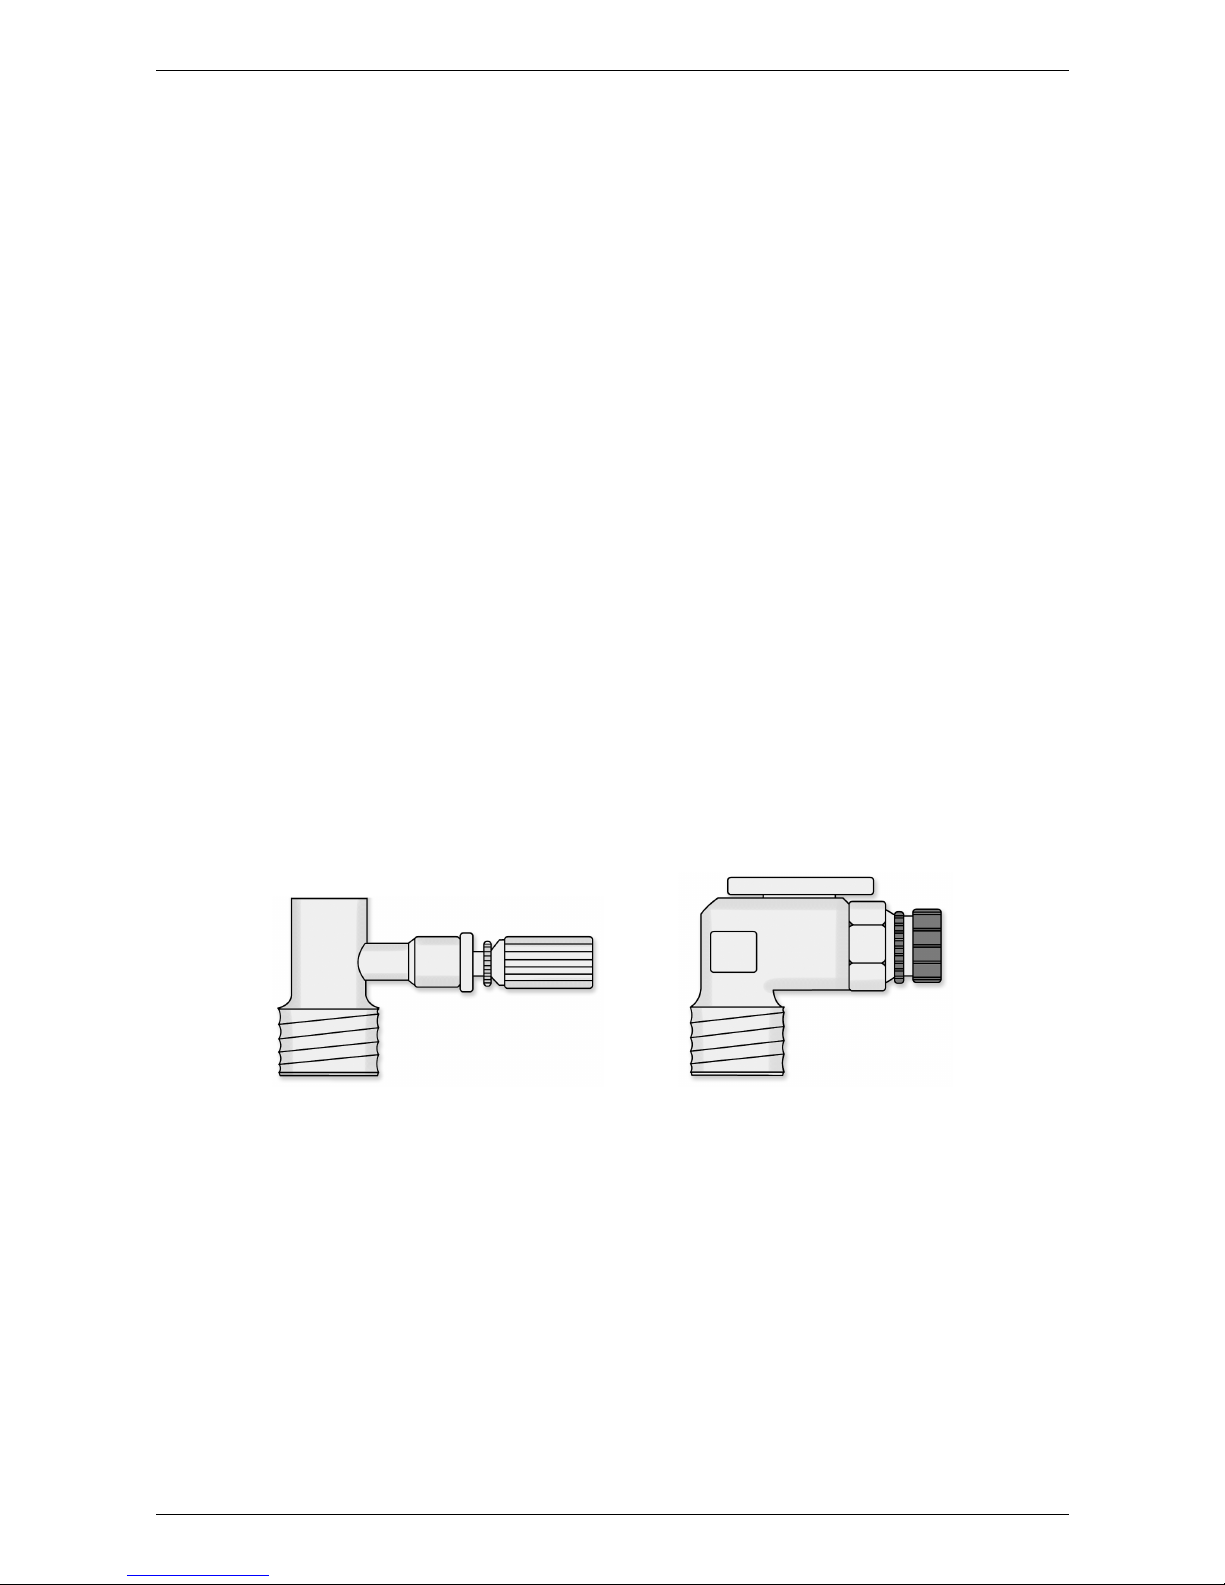
The pipe work between the solar storage tank (if one is installed) and the in-series gas booster has a
minimum recommended pipe size of DN20, MUST BE
of copper and be fully insulated with a closed cell type
insulation or equivalent in accordance with the requirements of AS/NZS 3500.4. The insulation must be
weatherproof and UV resistant if exposed. The insulation must be fitted up to the connections on both the
solar storage tank and the in-series gas booster.
VICTORIAN CUSTOMERS
Notice to Victorian Customers from the Victorian Plumbing Industry Commission. This water heater must be
installed by a licensed person as required by the Victorian Building Act 1993.
Only a licensed person will give you a Compliance Certificate, showing that the work complies with all the
relevant Standards. Only a licensed person will have insurance protecting their workmanship for 6 years.
Make sure you use a licensed person to install this water heater and ask for your Compliance Certificate.
DOES THE WATER CHEMISTRY AFFECT THE WATER HEATER?
The water heater is suitable for most public water supplies, however some water chemistries may have
detrimental effects on the water heater, its components and fittings. Refer to “Water Supplies” on page 22.
If you are in a known harsh water area or you are not sure of your water chemistry, have your water checked
against the conditions described on page 22.
HOW LONG WILL THE WATER HEATER LAST?
The water heater is supported by a manufacturer’s warranty (refer to page 55). There are a number of
factors that will affect the length of service the water heater will provide. These include but are not limited to
the water chemistry, the water pressure, the water temperature (inlet and outlet) and the water usage
pattern. Refer to “Precautions” on page 7.

11
TEMPERATURE CONTROL
CONTROLLERS
The Everhot 271 and 275 series can be installed with Everhot controllers to enable the user to control the
temperature of the delivered water from the outlet of the water heater.
There are three types of controller. They are the Kitchen controller (PN 299900, including cable), Bathroom1
controller (PN 299901, including cable) and the Bathroom2 controller (PN 299902, including cable).
The controllers are identified by a ‘K’ (Kitchen controller), ‘B1’ (Bathroom1 controller) or ‘B2’ (Bathroom2
controller) located on the front bottom left hand corner of the controller.
Warning: Temperature controllers must not be fitted to this water heater if it is installed as an in-series
gas booster (271 series) with a solar water heater system or if a Water Star water heater is installed,
because water at a temperature much higher than the controller setting can be delivered. If a solar or
Water Star water heater is installed to an existing water heater installation, then all controllers must be
disconnected and removed.
Notes:
• Where more than one controller is installed, the second or third controller must be of the same family.
• One, two or three controllers can be installed. Only one of each type of controller can be connected to
the water heater. Therefore, a maximum of three controllers only can be connected to each water
heater.
• A Bathroom2 controller can only be installed if a Bathroom1 controller is installed.
• Other manufacturers’ controllers are not suitable to and cannot be installed with this water heater.

TEMPERATURE CONTROL
12
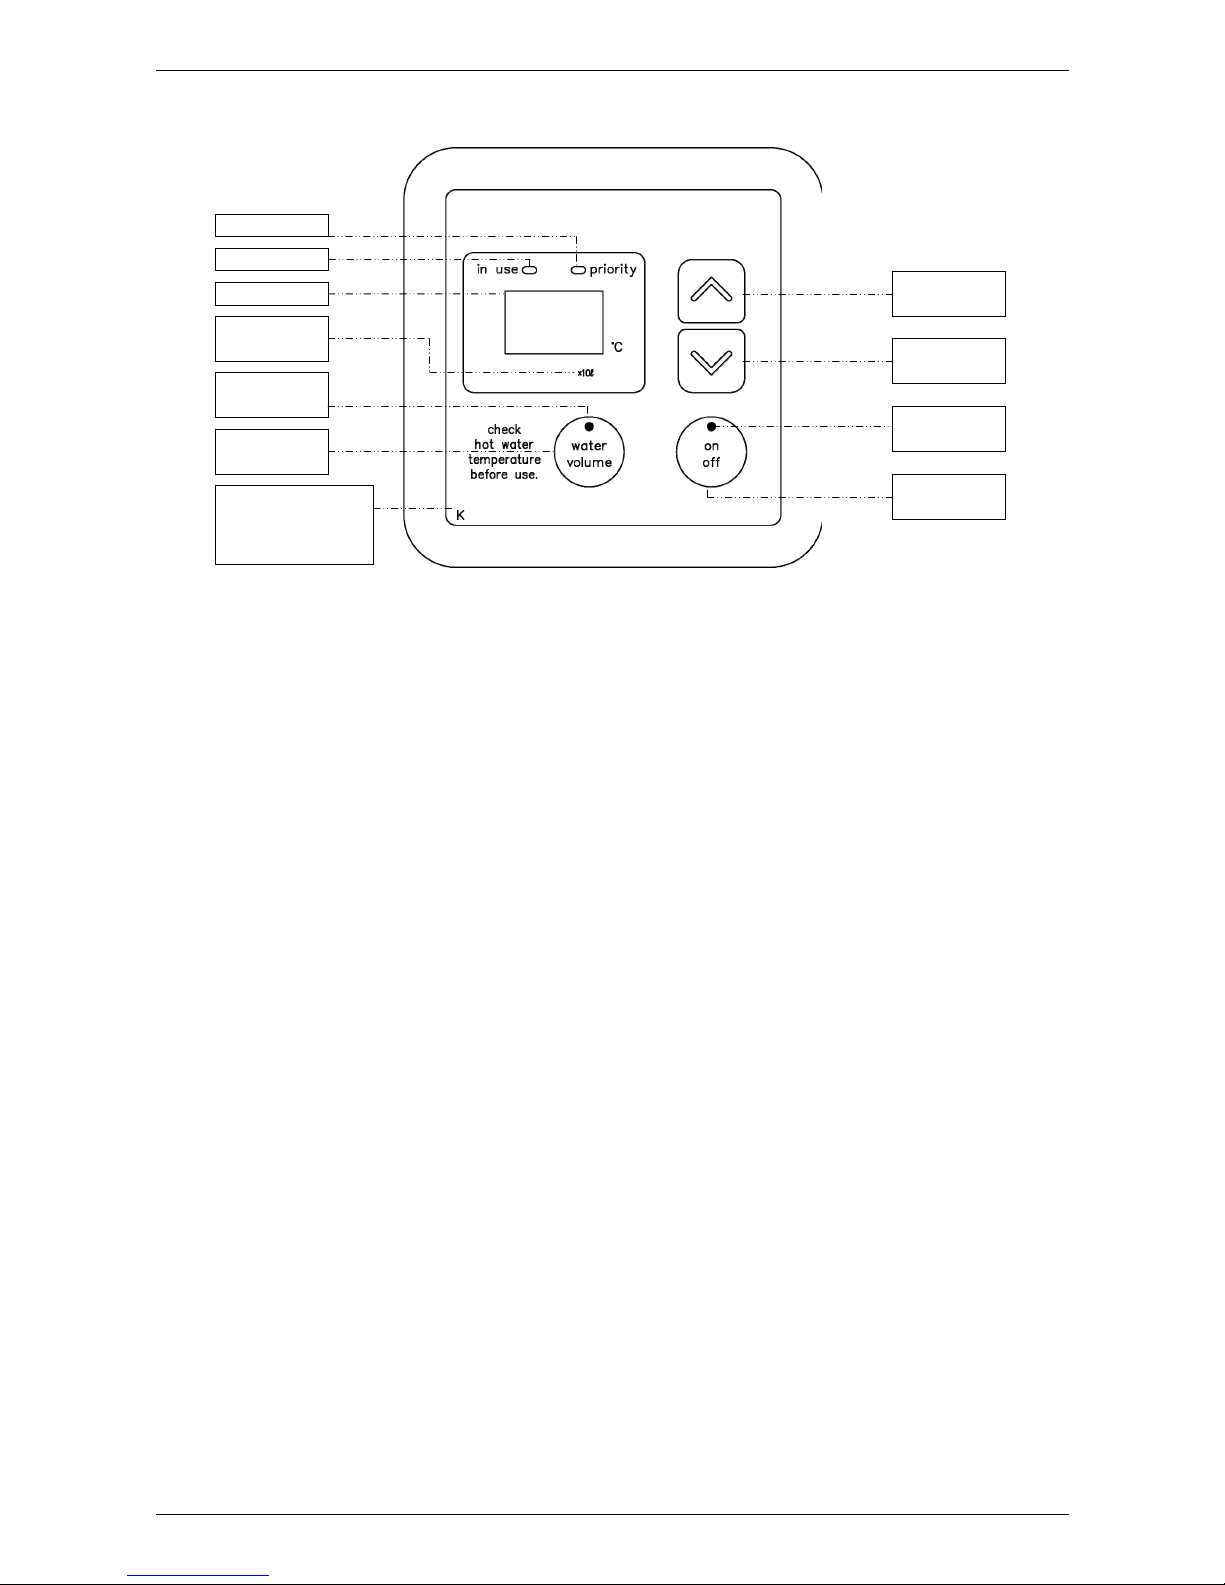
CONTROLLER FUNCTIONS
If one or more controllers are installed, at least one must be on for the water heater to operate. If all
controllers are off, the water heater will only deliver cold water.
on / off button – This button must be pressed once to turn on the controller.
A controller cannot be turned on if water is flowing from a hot tap.
To turn off a controller, press the on / off button once. The light will go out.
A controller can be turned off whilst water is flowing.
on / off operating light – The light in the on / off button will glow when the controller is turned on.
The light will go out when the controller is turned off.
priority light – This light will glow on a controller when that controller has priority.
The Bathroom controller(s), if they are turned on, have priority over the Kitchen
controller.
Priority means that controller has control of the water heater temperature setting.
The water temperature setting can only be adjusted by the controller that has priority.
in use light – This light will glow on all controllers, whether they are on or off, when hot water is
flowing, regardless of which controller has priority.
display panel – The current temperature setting is displayed on all controllers (whether hot water is
flowing or not), when any controller is on.
If all controllers are off, then the display remains blank.
The water volume can also be displayed on the Kitchen controller. The x10l symbol
glows when the water volume is displayed.
i (up button) – The up button increases the temperature setting.
Refer to “Temperature Adjustment” on page 15.
j (down button) – The down button decreases the temperature setting.
Refer to “Temperature Adjustment” on page 15.
water volume button (Kitchen controller only) – This feature enables an alarm to sound when a set volume
of water has flowed through the water heater.
Refer to “Water Volume Function” on page 20.
water volume operating light – The light in the water volume button will glow when the water volume button
is pressed and the water volume mode is turned on.
The light will go out when the water volume button is pressed and the water volume
mode is turned off.
water volume symbol – The x10l symbol below the display panel glows when the water volume mode is
turned on and the water volume is displayed.
TEMPERATURE CONTROL
13
CONTROLLER
Note: water volume button, water volume operating light and water volume symbol are on the Kitchen
controller only.
SILENCING A CONTROLLER
The controller emits a sound whenever a button is pressed. This sound can be turned off to provide silent
operation.
To turn off the sound:
• Press the on / off button, to deactivate the controller (on / off light is off).
• Press and hold the up (i) button.
• Press the on / off button, whilst the up (i) button is pressed.
The sound for the controller is deactivated. Repeat this procedure on the other controllers if you wish to
deactivate their sound. To restore the sound, repeat this procedure.
i up
button
j down
button
on / off
button
controller type
K = Kitchen
B1 = Bathroom1
B2 = Bathroom2
water volume
operating light
display panel
water volume
button
water volume
symbol
in use light
priority light
on / off
operating light

TEMPERATURE CONTROL
14
TEMPERATURE SETTINGS
The temperature settings of each type of controller are:
• Bathroom1 & 2 37°C to 46°C (in 1°C increments), 48°C*, 50°C
• Kitchen 37°C to 46°C (in 1°C increments), 48°C*, 50°C, 55°C, 60°C
* limited to 48°C on a 275 series model.
Temperature settings
37 38 39 40 41 42 43 44 45 46 48 50 55 60
warm average hot shower hot very hot
The installation of a Bathroom controller(s) only (i.e. no Kitchen controller) limits the temperature setting of
the water heater to a maximum of:
• 271 series 50°C
• 275 series 48°C
regardless of the preset outlet temperature setting of the water heater.
The installation of a Kitchen controller will allow a maximum temperature setting of:
• 271 series 60°C
• 275 series 48°C
regardless of the preset outlet temperature setting of the water heater.
If controllers are not installed, the water heater defaults to the preset outlet temperature setting. This may be
up to:
• 271 series 70°C
• 275 series 48°C
Refer to “How Hot Should The Water Be?” on page 5.
On a building fitted with a temperature limiting device such as a tempering valve and where a 271 series
water heater is installed without a separate untempered hot water line to the kitchen, laundry or other nonablution area, although the Kitchen controller will be able to display temperatures above 50°C and the water
leaving the water heater will be at the set temperature, the maximum water temperature which can be
delivered to the hot water outlets in these locations is determined by the temperature setting of the
temperature limiting device. This is usually 50°C.
On a building fitted with a temperature limiting device set to 50°C, enable the delivery of water temperatures
above 50°C to the kitchen, laundry or other non-ablution area, separate untempered pipe work must be
installed from the water heater to the hot water outlets in these locations.

TEMPERATURE CONTROL
15
TEMPERATURE ADJUSTMENT
• A controller must be on and have priority to be able to adjust the temperature setting.
• The temperature adjustment is made by pressing the up (i) button or down (j) button.
• The maximum temperature setting for the controllers are:
Kitchen Bathroom
271 series 60°C 50°C
275 series 48°C 48°C
• Each press of the up (i) button will increase the temperature setting by one increment.
• Pressing and holding the up (i) button will scroll the temperature setting up to a maximum 43°C if there
is hot water flowing or 45°C if there is no hot water flowing.
• From the 45°C setting, the up (i) button must be pressed once for each increase in temperature
increment.
• The temperature setting cannot be increased above 43°C whilst hot water is flowing.
• The minimum temperature setting for each type of controller is 37°C.
• Each press of the down (j) button will decrease the temperature setting by one temperature increment.
• Pressing and holding the down (j) button will scroll down the temperature setting.
• The temperature setting can be decreased from any temperature setting whether the hot water is flowing
or not.
TEMPERATURE CONTROL
16
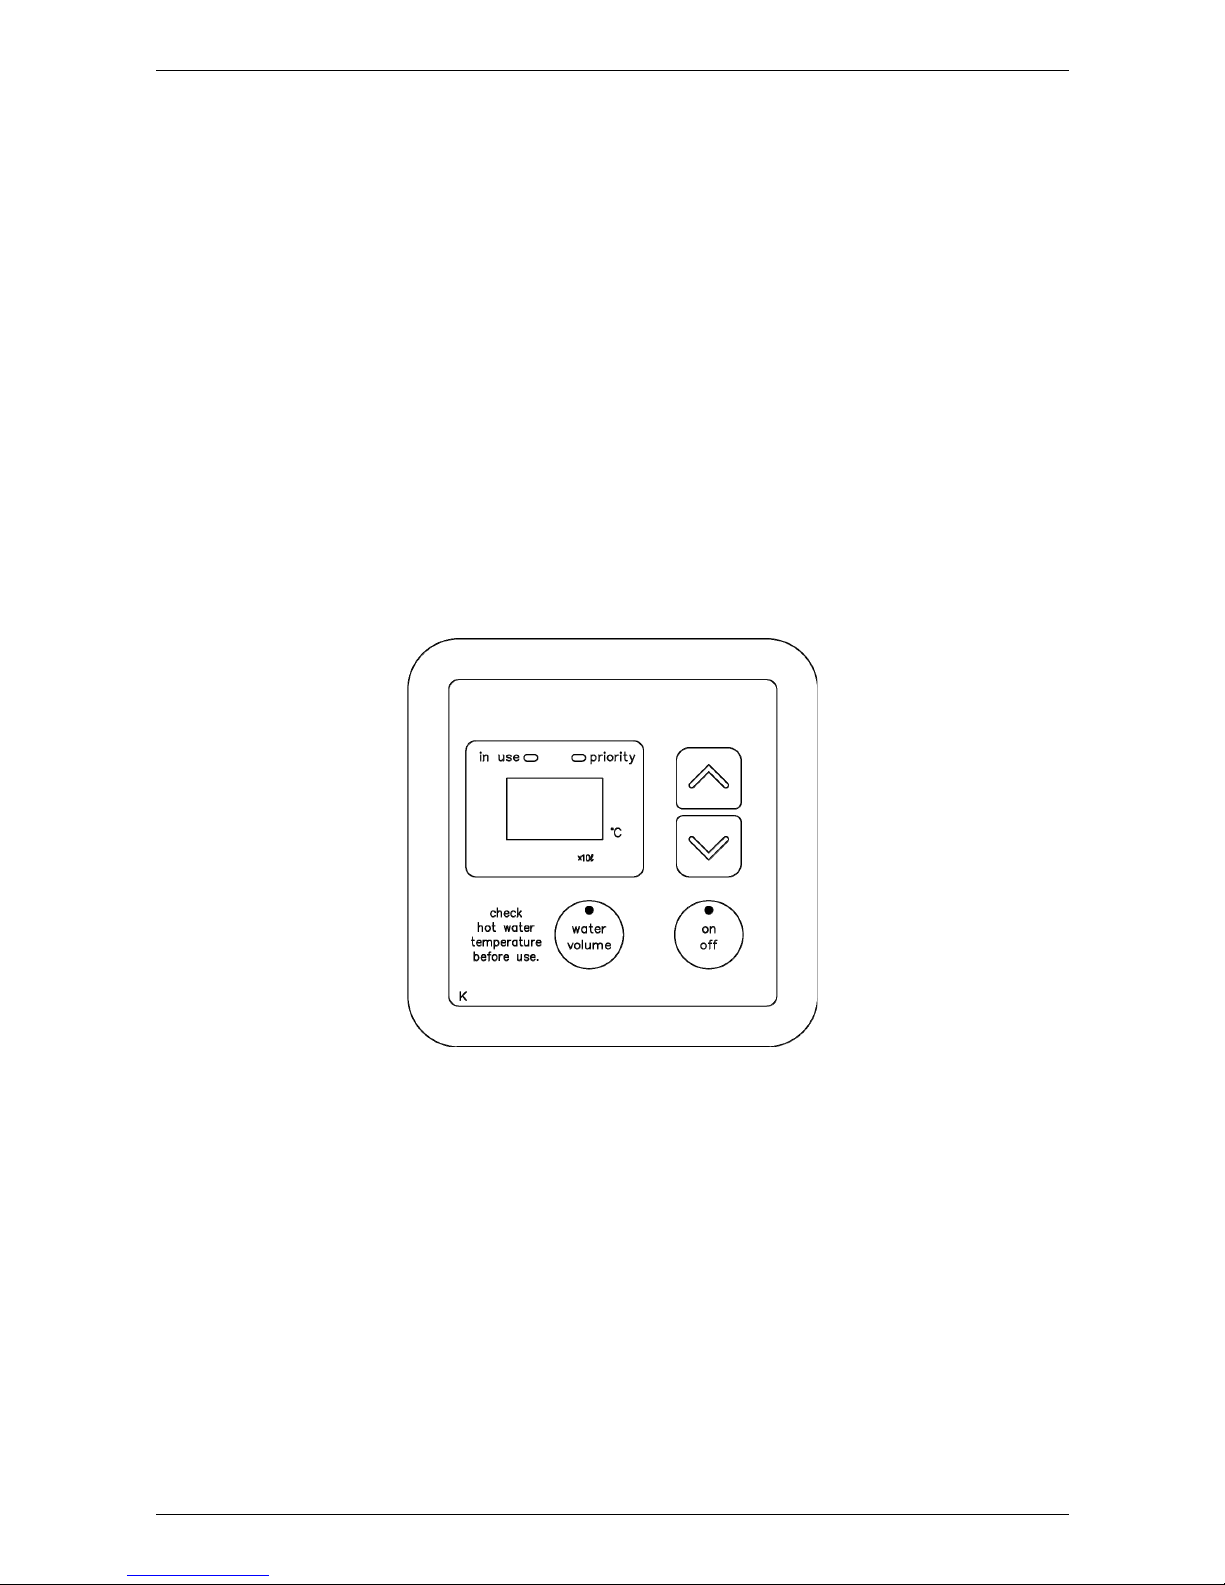
KITCHEN CONTROLLER
The Kitchen controller allows the user to select the temperature setting for the hot water to be used in the
kitchen and laundry. It has a minimum temperature setting of 37°C and a maximum temperature setting of:
• 271 series 60°C
• 275 series 48°C
The Kitchen controller does not have priority if a Bathroom controller is on.
Notes on the Kitchen controller:
• The controller cannot be turned on whilst a hot tap is open.
• The Kitchen controller must be on and have priority in order to adjust the temperature setting on the
Kitchen controller.
• The Bathroom controller(s) can be turned off from the Kitchen controller.
Press and hold the on / off button on the Kitchen controller for three seconds.
This turns off all the controllers and the displays go blank.
If hot water is flowing from a hot tap, it will go cold.
Kitchen Controller
TEMPERATURE CONTROL
17
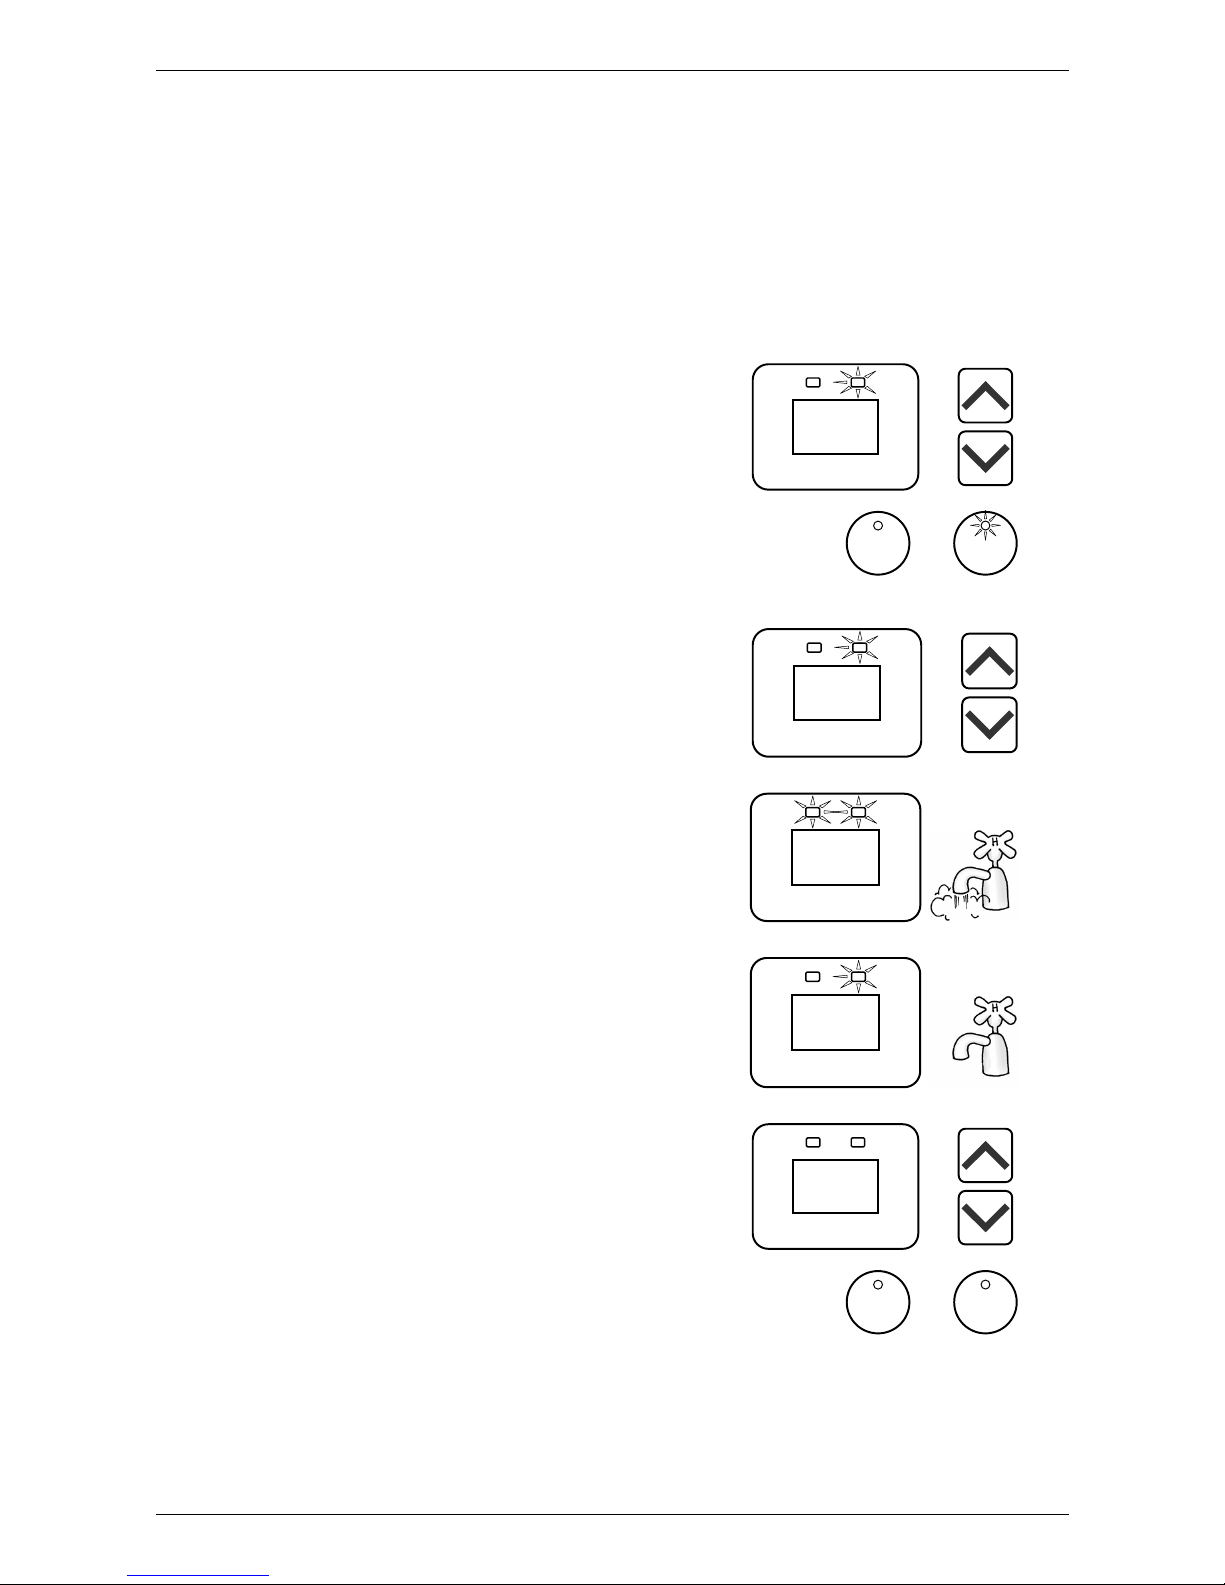
To operate the Kitchen controller:
1. Turn off the Bathroom controller(s)
If a temperature setting is displayed and the priority light is not glowing, it is necessary to turn off the
Bathroom controller(s) to gain priority.
Refer to the notes on the Kitchen controller on page 16.
2. Turn on the Kitchen controller
Press the on / off button.
The on / off operating light and the priority light will both
glow.
The Kitchen controller temperature setting will be
displayed. This is the lower of the previous setting and:
271 series 50°C
275 series 48°C
3. Select the temperature setting
Press the up (i) button or down (j) button.
Refer to “Temperature Adjustment” on page 15.
The selected temperature setting will be displayed on
all controllers.
4. Open the hot tap.
The in use light will glow on all controllers.
5. Close the hot tap.
The in use light will go out on all controllers, if no other
hot tap is open.
6. Turn off the Kitchen controller
Press the on / off button.
The priority light and on / off operating light will go out
and the temperature display will go blank.
Important: Turn off the Kitchen controller after hot water usage
is finished in the kitchen and / or laundry. Refer to Important
note for Bathroom controllers on page 18.
water
volume
on
off
check
hot water
temperature
before use
50
°C
priority
in use
x10l
55
°C
priority
in use
x10l
55
°C
priority
in use
x10l
55
°C
priority
in use
x10l
water
volume
on
off
check
hot water
temperature
before use
°C
priority
in use
x10l
 Loading...