

Page 1
WT060 Programmable Thermostat Heat/Cool/Off
Instruction Manual 130903
Before Installation
Turn off WT060, all electronic source an d electrical devices which
will be connected before installati on and maintenance.
The installer must be a trained serv ice personnel.
Installation Location
The thermostat should be mounted on an inner wall ~5 feet above
the floor in a position where it i s readily affected by changes of the
general room temperature wi th freely circulating air.
Prevent direct exposure to sunli ght, drip or splash. Do not place the
unit at a location where air circulati on is low, or where there are
great temperature changes (e.g. nea r door). Do not place the
thermostat near heat generating sourc es (e.g. radiators, hot air
vents, TV or lights).
Opening
Pull out the battery
drawer.
Then lightly press on
the spot shown
below in order to
detach the front
shell from the base.
Mounting
1. Ensure that the
surface is level.
2. Place the cables at
the hole near the
terminal block.
3. Insert 2 pcs of wall
anchors into the
holes of the wall.
4. Fasten the
thermostat with 2
pcs of long screws
through the 2
mounting holes.
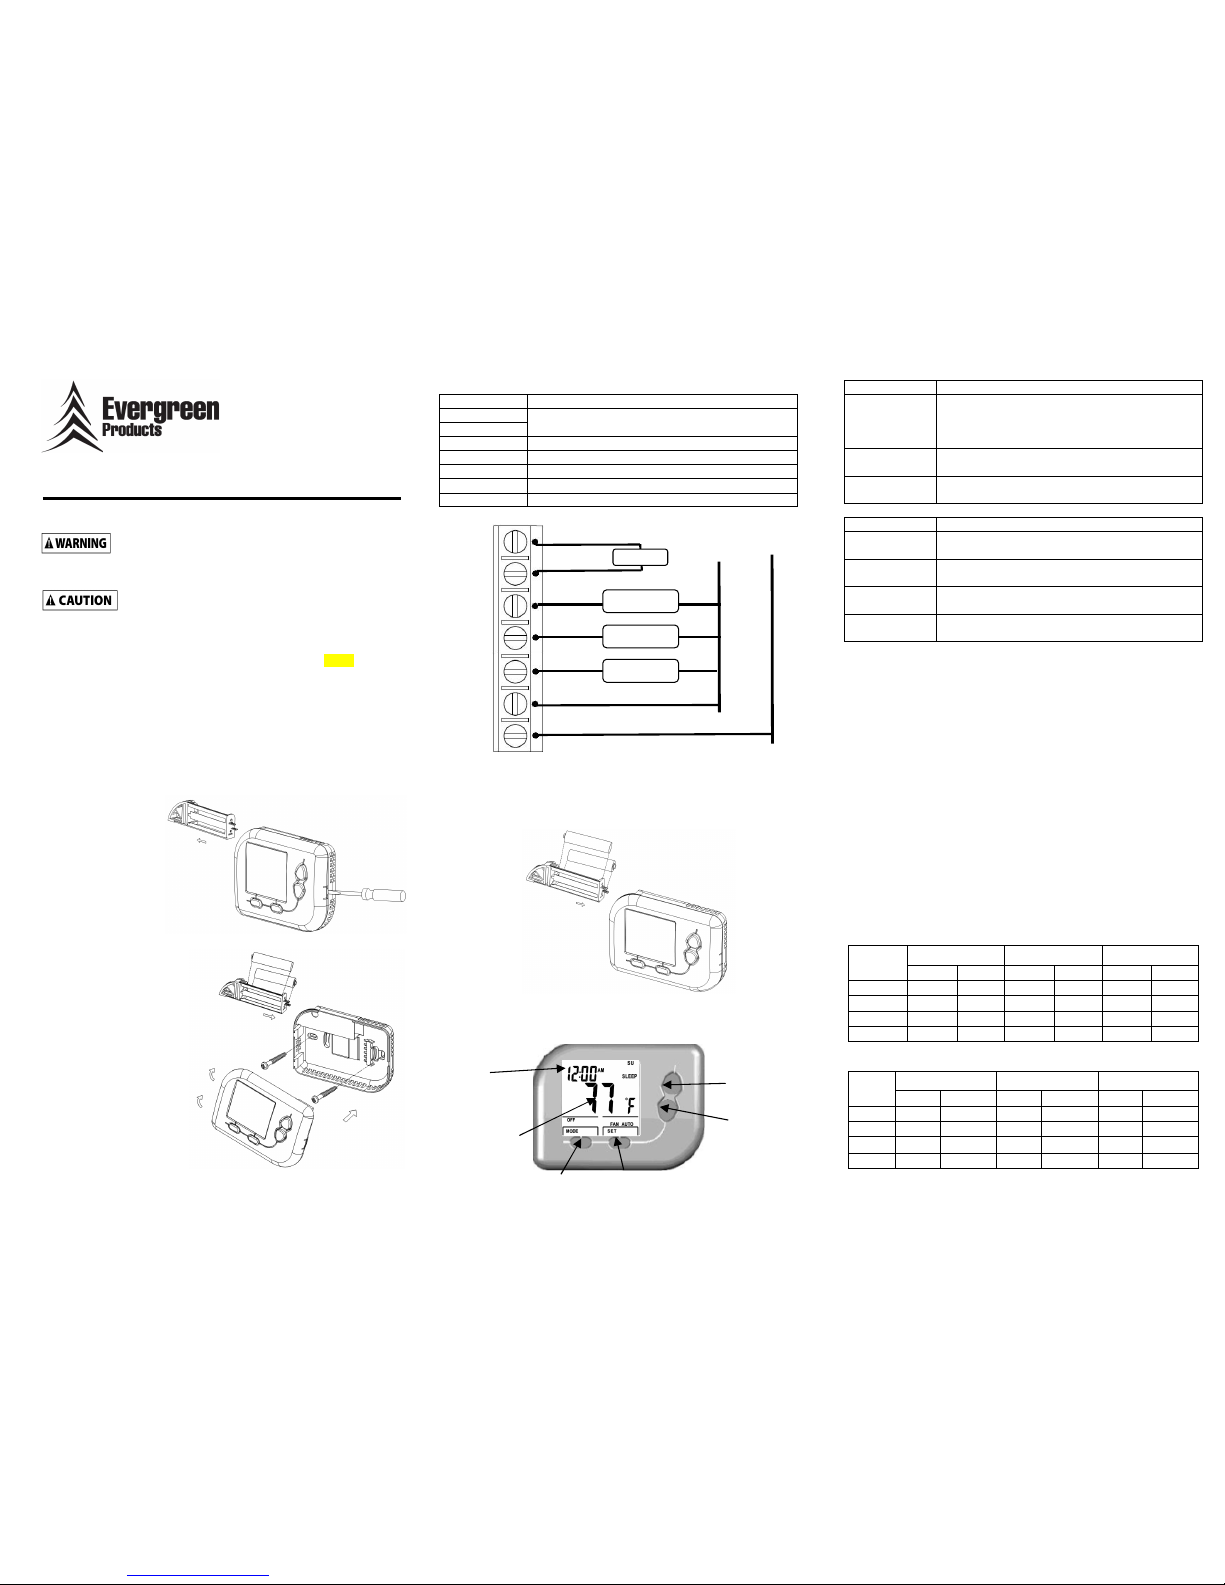
Wiring
There are 7 wiring terminals at the ba ck of the thermostat which are
labeled as “S1”, “S2”, “W”, “Y”, “G” , “C” and “Rc” .
The recommended wire range is (AWG) 14-22.
Batteries Insertion (Optional)
The batteries work as power back-up if 24Vac power supply shuts off.
Pull out the battery drawer and inser t 2 fresh AAA alkaline batteries
into the drawer according to the polari ty marked inside, then slide the
drawer back into place.
Operation
When the unit is powered on, all the L CD segments are ON and then
the first display screen is Normal displ ay mode as below picture.
Button Description
MODE
For changing the system mode:
OFF: system off
HEAT: heating only on
COOL: cooling only on.
SET
For changing the Setting Menu.
(Fan, Time, Program)
UP & DOWN
To adjust temperature setpoint (te mporary
override)
LCD Description
DEFROST
When temperature is below 5°C / 40F, Heater
is on regardless of the setting te mperature.
LO
Below 0°C / 32°F, heating wi ll be activated in
Heat Mode.
HI
Above 40°C/ 99°F. cooling wi ll be activated in
Cool Mode.
- -
External wired temperature sensor i s
disconnected or short.
Time Setting
1. Press SET button to enter Setting M enu.
2. Press NEXT button to display CLOC and p ress ENT button.
3. Press NEXT button to select the item that you want to
change (Day of week, Hour or Min ute).
4. Press UP or DOWN button to adjust th e item.
5. Press MODE button to confirm the set ting and return to
Setting Menu.
6. *** Press NEXT button to return to Normal Di splay Mode.
Temperature Control
This product can work as a si mple setback thermostat or a
programmable thermostat. By defaul t, this product is configured
as a programmable thermostat (Program On).
Program On
When program is on, this thermostat wi ll control the output
according to the programmed time and temperature. The
Default Program Settings are as bel ow:
Heat Mode:
MON~FRI SAT SUN Time
Zone
Time °F/°C Time °F/°C Time °F/°C
WAKE 6AM 70/21 6AM 70/21 6AM 70/21
OUT 8AM 61/16 8AM 61/16 8AM 61/16
BACK 6PM 70/21 6PM 70/21 6PM 70/21
SLEEP 10PM 61/16 11PM 61/16 11PM 61/16
Cool Mode:
MON~FRI SAT SUN Time
Zone
Time °F/°C Time °F/°C Time °F/°C
WAKE 6AM 75/24 6AM 75/24 6AM 75/24
OUT 8AM 85/29.5 8AM 85/29.5 8AM 85/29.5
BACK 6PM 75/24 6PM 75/24 6PM 75/24
SLEEP 10PM 85/29.5 11PM 85/29.5 11PM 85/29.5
Symbols Terminals
S1
S2
External wired temperature sensor 3 6”
W Heat relay (1A Max.)
Y Cool contractor (1A Max.)
G Fan relay (1A Max.)
C Common wi re for power
Rc Power for cooling (24Vac)
UP
Button
DOWN
Button
MODE
Button
SET
Button
Temperature
Setpoint
Time
S1
S2 W
Y
G
C
Rc
24Vac
24Vac
COM
Sensor
Heat relay
Cool relay
Fan relay
Page 2
Program Setting
The above program time and te mperature can be modified.
To adjust Heat/Cool program setti ngs:
1. In Heat/Cool Mode, press SET bu tton to enter Setting Menu.
2. Press NEXT button to display PROG.
3. Press ENT button to enter progra m setting: “ON”/”OFF”.
4. Press UP or DOWN button to select pr ogram on / program off.
5. Make sure “On” is selected, press NEXT bu tton to select the item
that you want to change (Weekday /Weekend, Four Zones,
Hour, Minute or Setting Tempera ture).
6. Press UP or DOWN button to adjust th e item.
7. Press MODE button to return to Weekd ay/Weekend program
8. Press MODE button again, to confi rm the setting and return to
Setting Menu.
9. *** Press NEXT button to return to Normal Di splay Mode.
Temporary Override
When Program is On, this thermostat c ontrols the output according
to the program.
If you want to override the progra mmed temperature temporarily:
1. Press UP or DOWN button to adjust He at / Cool setting
temperature setpoint with displayed.
2. In Heat Mode, only Heat setting te mperature can be adjuste d.
3. In Cool Mode, only Cool setting te mperature can be adjuste d.
4. The Heat / Cool setting temperature will be confirmed and the
thermostat will return to Normal Di splay Mode, if no k ey is
pressed for 10 sec.
Temporary Override Mode wi ll last until the next programme d time
(zone) begins. At that time, the Hea t / Cool setting te mperature will
follow the programmed setting te mperature and will
disappear. Or can be stopped manually by pressing
MODE key.
Program Off
When Program is Off, this thermostat controls the output accor ding
to a single setpoint like a si mple setback thermostat. To set the uni t
to be Program Off, follow the abov e “Program Setting” to select
Program Off. When this thermostat i s Program Off, the Program
Mode will be disabled and the time zon e icons will disappear in
Normal Display Mode.
To adjust the setpoint at Progra m Off:
1. Press UP or DOWN button to adjust th e Heat / Cool setting
temperature. The icon will NOT be shown in Program
Off.
2. In Heat Mode, only Heat setting te mperature can be adjuste d.
3. In Cool Mode, only Cool setting te mperature can be adjuste d.
4. *** The Heat / Cool setting temperatu re will be confirmed.
Fan Operation
If FAN ON is selected, fan runs conti nuously.
If FAN AUTO is selected, fan runs only when the Heating or Cooling
system is on. Fan will be turned off 2 minutes after the Heating /
Cooling system is off.
Fan Mode setting:
1. Press SET button to enter Setting M enu.
2. Press NEXT button to display FAN and press ENT button.
3. Press UP or DOWN button to select FAN ON / FAN AUTO.
4. Press MODE button to confirm the set ting and return to Set ting
Menu.
5. *** Press NEXT button to resume to Normal display mode
Advanced Setting
Advanced Setting contains Functi on Setting Selection, Temperature
Calibration and Room Temperature Di splay.
Function Setting Selection
1. Press and hold SET and DOWN but tons for 2 seconds to enter
Advanced Setting Mode.
2. The left letters represent Function Ty pe; the right letters represent
the settings.
3. Press UP or DOWN button to adjust th e setting.
4. *** Press NEXT button to select Func tion Type or to return to N ormal
Display Mode at the end of Function Setting selection.
Table of the Function Setting Selec tion
Function Type
Description
LCD
Display
Setting
12 (default) 12hr/24hr
Selection
hr
24
°C Temperature
Display Unit
dE
°F (default)
05 (+/- 0.5C )
10 (+/- 1.0C )
10 (+/- 1F) (default)
Temperature
Control Span
SP
20 (+/- 2F)
E (Electrical Heat) (default)
Fan Control FC
O (Gas/Oil Heat)
S (10 seconds) (default) Heater
Minimum-Off
Delay
dL
L (4 minutes off time)
Temperature Control Span
It controls how much the room te mperature can be dev iated from the
setpoint. A smaller degree will resul t in a more accurate con trol. A
larger degree will result in less on/ off cycling and it usually saves more
energy.
Fan Control
It should be set according to the typ e of Heating system used. Select
“E” for Electric Heat, fan wi ll be On when Heat is On. Select “O” for
Gas Heating or Oil Heating, fan w ill NOT be on when Heat is On.
Heater Minimum Off Delay
It should be set according to the hea ter type. Select “L” if compressor
is used for heating. Select “S” when a co mpressor is not used.
Temperature Calibration
This thermostat is calibrated at factory and calibration is
generally not required. Howev er, in the event that a deviation is
found,
1. In Normal Display Mode, press and ho ld UP and DOWN
buttons for 5 seconds to change the temperature calibra tion
display and the current temperatur e will flash,
2. Press UP and DOWN button to calibra te the temperature. The
maximum range to be adjusted is +/- 3.0°C or +/- 6°F, in step
of 0.5°C / 1°F.
3. ***Press MODE key to confirm the set ting and return to Normal
Display Mode.
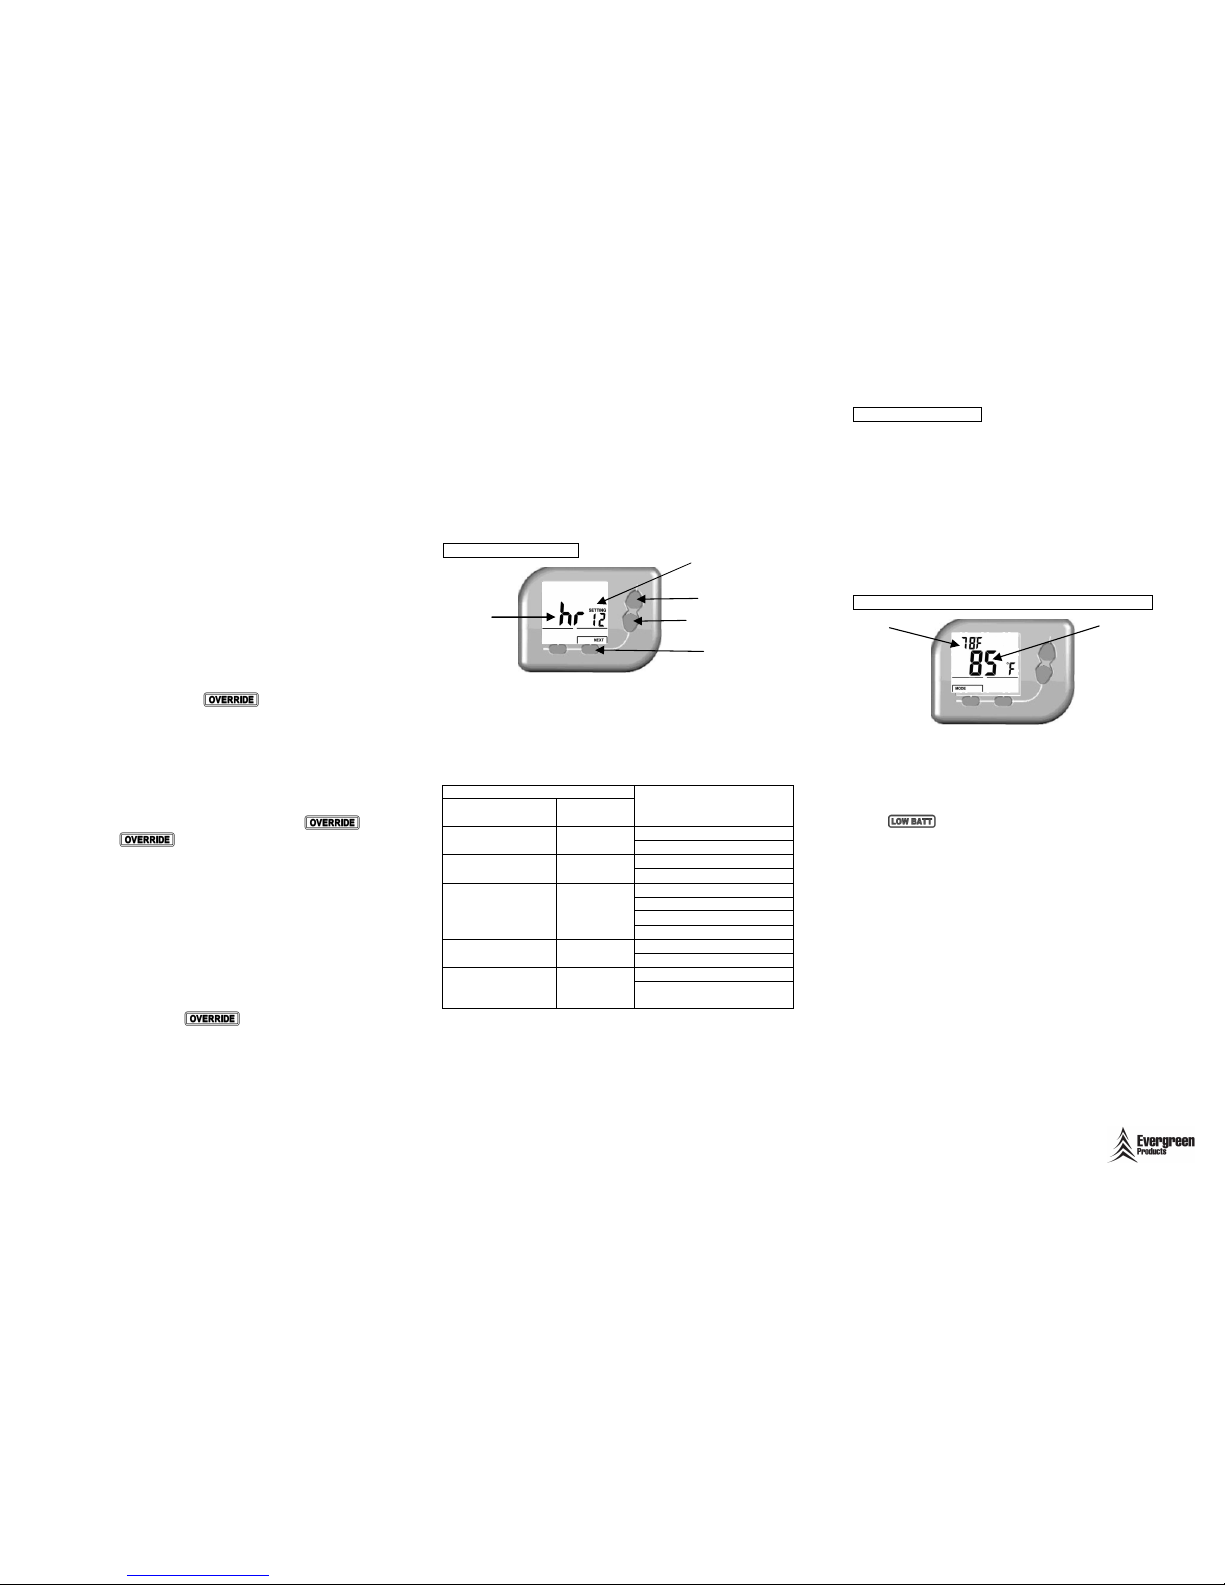
Room Temperature Display (for Ch ecking by Technician)
1. In Normal Display Mode, press and ho ld MODE and SET
buttons for 5 seconds to display the r oom temperature i n
small display.
2. *** Press MODE key to return to N ormal Display Mode.
Replaceable Batteries
When appears on the display, replace the batteries
promptly with 2 fresh AAA alkaline batteries. Batteries should be
installed with proper polarity. Do no t mix old and new bat teries.
Specification
1. Temperature Measurement: 0 - 40C / 32 - 99F
2. Accuracy: ±0.5C / 1°F
3. Resolution: 0.5C /1°F
4. Power Supply: 24Vac or 2 x AAA Alkaline
Batteries
5. Rating: 24Vac 50/ 60Hz 1A Max
6. Relay Contact Voltage: 24Vac Max. 50/60 Hz
7. Relay Contact Current: 1A Max. (I nductive)
8. Sensing Element: NTC Thermistor (with External
Cable 36” )
9. Heat/Cool Setting: 16 - 35C / 60 - 95F
10. Operating Temperature: 0 - 50°C / 32 - 122°F
11. Storage Temperature: -5 - 50°C / 23 -122°F
Remarks:
*** The operation will return to Nor mal Display Mode if no key is
pressed for 10 sec.
Evergreen Products, LLC
www.egreenproducts.com
info@greenproducts.com
<Down> Key
Function
Type
<NEXT> Key
Setting
<Up> Key
Setpoint Room
Temperature
 Loading...