

Page 1
Multi-Function
Cleaning Gun
Instruction Manual
EG - 1003
Clean engines, wheels, tires, vents, trunks, door jams, etc.. Pressurized cleaning
brush easily breaks down stubborn dirt and grease. Green solution-10L/hour water
consumption.Please use the Multi-Function Cleaning Gun in a safe and secure
environment.Read the Direction For Use carefully before using the Multi-Function
Cleaning Gun.
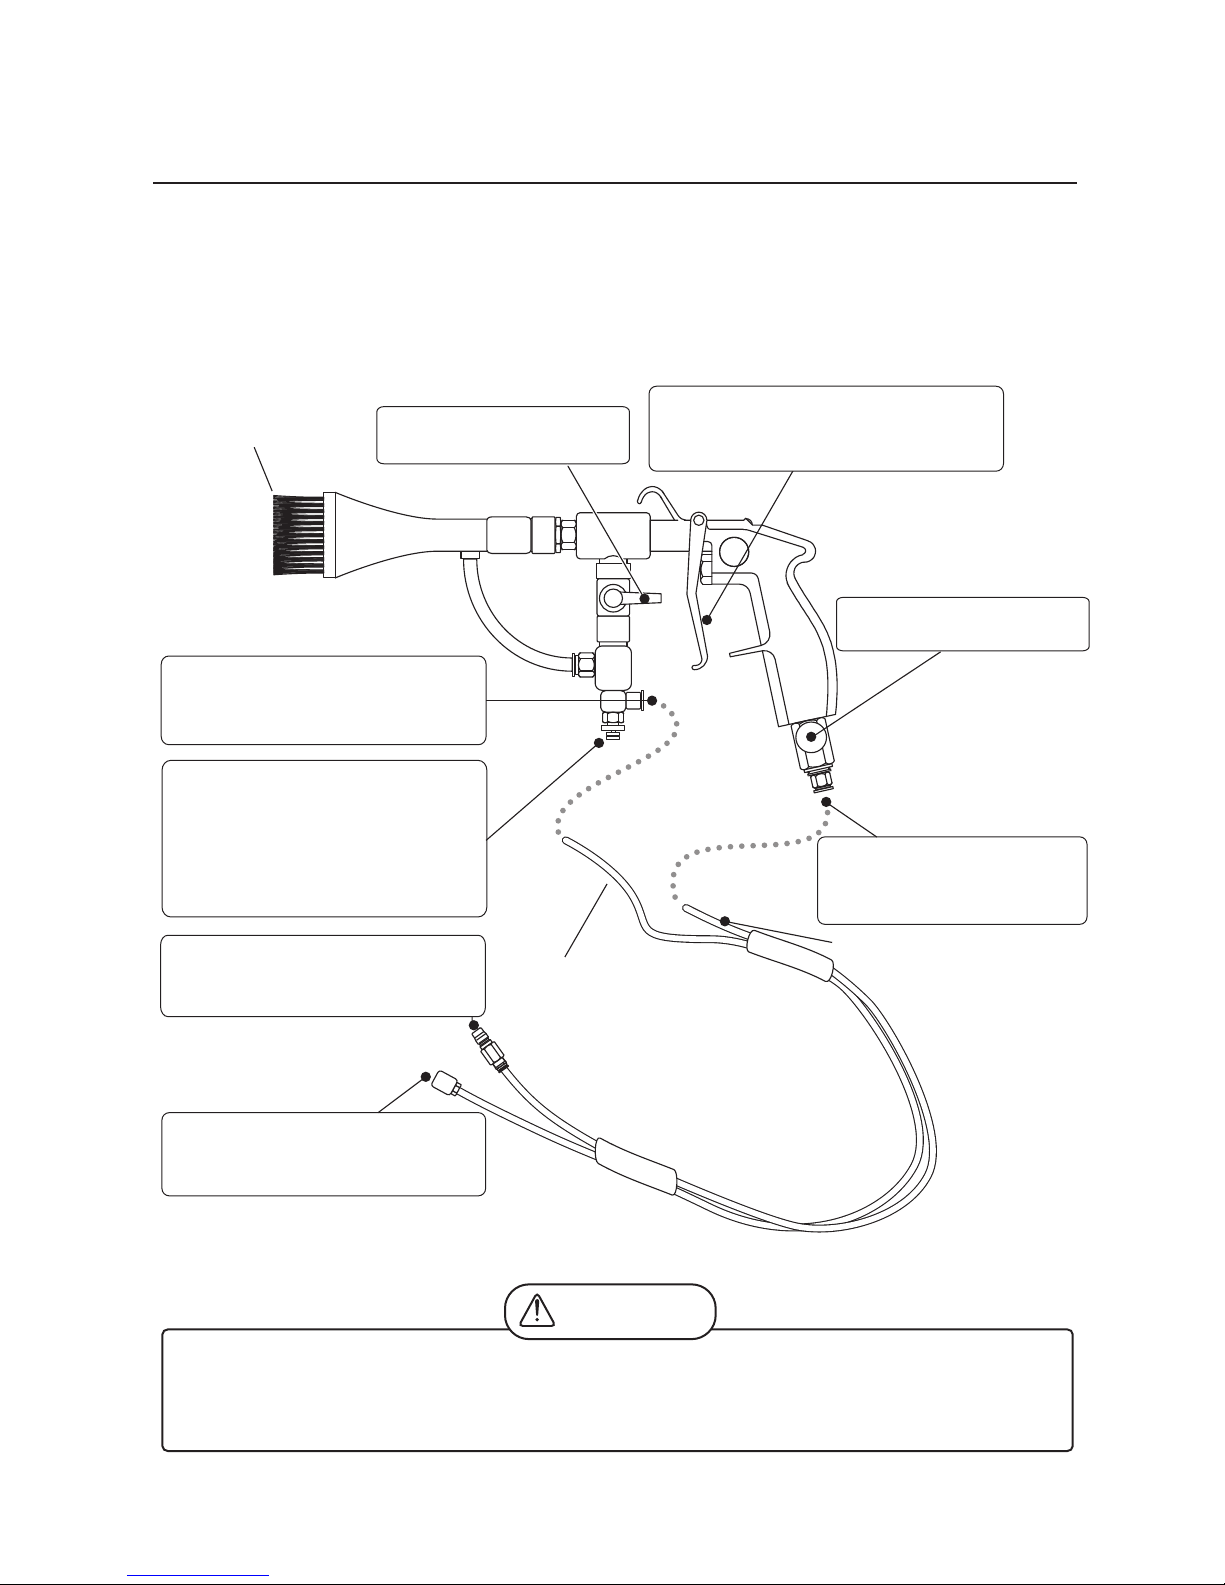
Trigger/Handle
Bursh
Infusion Port
Port to connect the infusion tube
(See Page 2 for installation)
Air Reverse Switch
Switch between Air/Liquid
Hold it, spray the liquid;
Release it, stop spraying the liquid
Air Adjusting Valve
Adjust air pressure.
Liquid Adjusting Valve /
Fixed Valve (See Page 2)
Upper valve is Fixed Valve, please
tight up the valve, then use lower
liquid adjusting valve to control the
liquid flow.
Air Plug (for air tube)
Clicking sound means the tube is
connected correctly.
Liquid Absorbing Tube:
Absorbs liquid. Connect the tube
to water or other solutions.
Infusion Tube(long)
Warning
Air Tube Port
Port to connect the air tube
(See Page 2 for installation)
Air Tube (short)
During operation, please ensure that the equipment has not been damaged.Use of
controls, adjustments, or performance of procedures other than those specified in
instruction manual might result in poor performance, or damage the equipment.
1
Page 2

Maintenance Methods / Tips
First, Turn on the air reverse switch and release pressure by pulling trigger of
the gun, until the brush is totally wet.
Next, completely turn off the air reverse switch, and release pressure by
triggering the gun, letting the reminding water and dust come out from the gun.
If the cleaning brush is still dirty, please repeat step 1 and 2. (Notice: Use an
empty container to clean the gun which would prevent the dirty water and dust
spreading all over the place.)
SPECIFICATION
Model No.
Dimension (mm)
Weight (kg)
Air Pressure (Psi)
Air Consumption (L/min)
Max. Spraying Volume (L/min)
Detergent
Working Temperature ( o C)
Air Inlet
EG-1003
W50 D290 H180
0.6
75~115
200 @72Psi
10
Neutral
10~50
1/4”
Environmental Friendly
NANOSKIN CAR CARE PRODUCTS
Division of Total Import Solutions, Inc.
La Habra, CA 90631
Made in USA
www.nanoskinusa.com
For Chemical Emergency: PERS – Day or Night
NORTH AMERICA : 1-800-633-8253
INTERNATIONAL : 1-801-629-0667
2
Page 3

Annotation
Read and observe the safety notes in the Operating Instructions and the safety labels
located on the system. Failure to observe the safety notes may lead to serious injuries
and to significant damages to the Equipment. Warning instructions in this manual point
out particular dangers to users and equipment and state measures for avoiding the
hazard.
These warning instructions fall into the following categories:
Warning
Caution
Notice
Possible danger. Non-observance can result in death, serious injury and
serious damages of equipments.
The content under this label must be strictly abided by. Improper operation
and use may cause serious damages to the devices and minor injuries.
Provide information on particular characteristics and how to proceed.
Warning
■The pressure must be set below 115 Psi.
Higher than 115 Psi may cause damage to the equipment and create the dangerous events.
■ONLY use guns and nozzle for cleaning work.
It could cause body injuries or create danger.
■NEVER point the cleaning guns in the direction of human body, face or eyes.
Wear safety goggles and respirator during operation.
■Use ONLY neutral liquid / solutions.
Specially note that organic solvent even in neutral feature cannot be used, because it contains
enormous factors might cause deterioration
DO NOT use unoriginal accessories or special consumables, or repair
■
your own parts for replacement.
■DO NOT disassemble or change the cleaning guns.
Adjust Air Compressor Knob
Warning
Higher pressure may cause damages to
the guns, and cause danger.
Please set knob from o and below 4.
Please refer the right graph for using 1- 2MPa.
In case of any abnormity or damage of equipment during the use process, please terminate the
operation immediately.
TISI shall not be responsible for device damage caused by application of unoriginal accessories and
special consumables, or your own repair, parts replacement, and disassembly of the device.
In such case, warranty will be void.
Grip
Outlet
3
Page 4

Adjustment of Liquid Adjusting Valve/
Fixed Valve
Method of Liquid Adjusting Valve / Fixed Valve
Fixed Valve screw allows to adjust the air flow. Once the Air pressure is fixed, please
tighten up the fixed valve.
Liquid Adjusting Valve
The tighter the liquid adjusting valve screw, the thinner and smaller the spray volume is;
the looser the liquid adjusting valve screw, the thicker and larger the spray volume is.
Fixed Valve
Liquid Adjusting Valve
Caution
During the operation, please tighten up the fixed valve.
May cause damage if fixed valve not tight.
Installation and Disassembly of the Air Tube / Infusion Tube
Installation of the tube
Air Tube :
Directly insert the air tube into air port. Pull it lightly to check
whether it is properly installed. (Notice: Do Not pull too hard)
Infusion Tube:
Insert the infusion tube into the infusion port and screw tight.
Pull it lightly to check whether it is properly installed.
Disassembly of the tube
Air Tube :
Press the Joint with one hand, and lightly pull out the air tube
with the other hand.
Infusion Tube:
Loose the screw on the infusion port, and lightly pull out the
infusion tube.
Air Port Joint
Notice
The tubes must be properly installed.
Otherwise, the fluid and air may leak during the operation process.
4
 Loading...