

Page 1

Electrisch Gasfornuis
Cuisiniere au Gaz et a l’Electricite
Gebruiksaanwijzing
Manuel d’instructions
Everglades EVCK021
EVCK022
EVCK023
EVCK023
☆ Lisez et conservez ces instructions pour consultation future
☆ Lees de instructies goed door en bewaar deze handleiding
voor toekomstig gebruik
Page 2

ITDFRGB
Dear User ;
Our objective is to
make this product
provide you with the
best output which
is manufactured in
our modern facilities
in a careful working
environment, in
compliance with total
quality concept
Therefore, we
suggest you to read
the user manual
carefuly before using
the product and keep
it permanently at
your disposal.
Not : This user
manual is prepared
for more than one
model. Some of the
features specied in
the Manual may not
be available in your
appliance.
ATTENTION!
THIS APPLIANCE
SHALL BE
INSTALLED IN
ACCORDANCE
WITH THE
REGULATIONS IN
FORCE AND ONLY
USED IN A WELL
VENTILATED
LOCATION. READ
THE INSTRUCTIONS BEFORE
INSTALLING OR
USING THIS
APPLIANCE.
Cher utilisateur,
Notre objectif est que
ce produit fabriqué
dans nos installations
modernes dans un
excellent environnement de travail, en
conformité avec le
concept de qualité
totale, vous donne
totale satisfaction.
Par conséquent,
nous vous suggérons
de lire attentivement le manuel de
l’utilisateur avant
d’utiliser le produit
et de le garder en
permanence à votre
disposition.
Remarque :
Ce manuel de
l’utilisateur est
préparé pour plus
d’un modèle. Il se
peut que certaines
des caractéristiques
spéciées dans ce
manuel ne soient
pas disponibles dans
votre appareil.
CET APPAREIL
DOIT ETRE INSTALLE SELON LES
REGLEMENTS EN
VIGUEUR ET UTILISE DANS UN ESPACE BIEN AERE.
LIRE LES INSTRUCTIONS AVANT
D’INSTALLER OU
D’UTILISER CET
APPAREIL.
Sehr geehrter
Verbraucher;
Unser Ziel ist es
gemäß dem Gesamtqualitätssinnes Ihnen
ein erfolgreiches
Produkt zu gewährleisten, dass in
einer anspruchsvollen
Atmosphäre und in
modernen Werken
produziert wird.
Daher empfehlen wir
Ihnen vor der Nutzung des Produktes
die Gebrauchsanleitung sorgfältig zu
lesen und aufzubewahren, damit
Sie diese bei Bedarf
wieder verwenden
können.
Bemerkung :
Diese Gebrauchsanleitung wurde für mehrere Ausführungen
vorbereitet. Einige
der in der Anleitung
aufgeführten Eigenschaften können mit
den Eigenschaften
Ihres Gerätes nicht
übereinstimmen.
DIESES GERAET
MUSS NACH DEN
GELTENDEN
BESTIMMUNGEN
INSTALLIERT
WERDEN UND
DARF NUR IN
GELÜFTETEN
RAEUMEN BENUTZT WERDEN.
VOR INSTALLATION
UND INBETRIEBNAHME DES GERAETES SIND DIE
ANLEITUNGEN ZU
BEACHTEN.
Caro utente,
desideriamo
consentirle di
ottenere le migliori
prestazioni da questo
prodotto, fabbricato
nei nostri moderni
impianti, in un
ambiente di lavoro
ordinato e curato, in
conformità al sistema
di qualità totale.
Le consigliamo
pertanto di leggere
attentamente questo
manuale prima di
usare l’apparecchio
e di tenerlo sempre a
portata di mano.
Nota: Questo
manuale si riferisce
a più di un modello.
Alcune delle carat-
teristiche specicate
possono non essere
disponibili nel suo
apparecchio.
ATTENZIONE!
QUESTO APPARECCHIO DEVE ESSERE INSTALLATO
IN CONFORMITÀ
AI REGOLAMENTI
VIGENTI NEL
PAESE D’IMPIEGO
E DEVE ESSERE
UTILIZZATO SOLO
IN UN AMBIENTE
BEN VENTILATO.
LEGGERE LE
ISTRUZIONI PRIMA
DI INSTALLARE O
USARE QUESTO
APPARECCHIO.
2
Page 3

E PO
NL
Muy estimado
cliente,
Estas instrucciones
de uso contienen
indicaciones importantes acerca de la
seguridad, la instalación / montaje, el
empleo y el cuidado
del equipo.
Por este motivo le
recomendamos leerlas cuidadosamente
antes de empezar a
utilizar el producto
y guardarlas para
poderlas volver a
consultar en caso de
necesidad.
Observación:
Estas instrucciones
de uso han sido
creadas para varios
modelos. Algunas
de las propiedades
indicadas en estas
instrucciones pueden
diferir de las del
equipo que usted ha
adquirido.
ESTE EQUIPO SE
HA DE INSTALAR
EN CONFORMIDAD
CON LA NORMATIVA VIGENTE Y
SOLO PUEDE SER
UTILIZADO EN LUGARES BIEN VENTILADOS. LEA LAS
INSTRUCCIONES
ANTES DE INSTALARLO O EMPEZAR
A UTILIZARLO.
Estimado Cliente,
O nosso objectivo
é fazer com que
obtenha os melhores
resultados com o
nosso aparelho. Este
é produzido em instalações modernas,
num ambiente de
trabalho cuidadoso
e tendo sempre presente o conceito de
qualidade máxima.
Assim, recomendamos que leia este
manual de instruções
atentamente antes
de proceder á sua
utilização e guarde-o
para futuras referências.
Note:
Este manual de
instruções serve para
vários modelos, pelo
que algumas das
características, que
aqui se encontram,
podem não existir no
seu aparelho.
ESTE APARELHO
DEVERÁ SER
INSTALADO DE
ACORDO COM
AS NORMAS EM
VIGOR E USADO
EM ESPAÇOS BEM
VENTILADOS.
LEIA ESTAS INSTRUÇÕES ANTES
DE INSTALAR
OU USAR ESTE
APARELHO.
Daarom raden
wij u aan de
gebruiksaanwijzing
nauwkeurig te lezen
voor gebruik van dit
product en voor dat u
de gebruiksaanwijzing verwijderd.
Opmerking: Deze
gebruiksaanwijzing is
bereid voor meer dan
1 model. Sommige
functies gedetailleerd
in deze gebruiksaanwijzing zijn misschien
niet beschikbaar in
uw toestel.
DIT APPARAAT
MOET WORDEN
GEINSTALLEERD
VOLGENS DE
GELDENDE
VOORSCHRIFTEN EN MAG
ALLEEN WORDEN
GEBRUIKT IN
EEN GOED
GEVENTILEERDE
RUIMTE. VOOR DE
INSTALLATIE EN
INGERBRUIKNAME
MOETEN EERST
DE INSTRUCTIES
WORDEN GERAADPLEEGD.
3
Page 4

ITDFRGB
CONTENTS
1.INSTALLATION OF
YOUR OVEN
2. TECHNICAL FEATURES OF YOUR
OVEN
3. IMPORTANT
WARNINGS
4. IF YOUR OVEN
DOES NOT OPERATE
5.DESCRIPTION OF
OVEN & CONTROL
PANELS
6. USING COOKER
SECTION
7. USING OVEN
SECTION
8. USING GRILL
DEFLECTOR PLATE
(50*60-60*60)
9. MAINTENANCE
and CLEANING
10. OPTION LIST
TABLE DES
MATIERES
1. INSTALLATION
DE VOTRE FOUR
2. CARACTERISTIQUES TECHNIQUES DE VOTRE
FOUR
3. MISES EN
GARDE IMPORTANTES
4. SI VOTRE FOUR
NE FONCTIONNE
PAS
5. DESCRIPTION
DU FOUR & DES
PANNEAUX DE
COMMANDE
6. UTILISATION DE
LA TABLE DE CUISSON
7. UTILISATION DU
FOUR
8. UTILISATION
DU BANDEAU DE
PROTECTION DES
BOUTONS
9. MAINTENANCE et
NETTOYAGE
10. LISTE DES OPTIONS
INHALTSVERZEICHNIS
1. GERÄTEAUFBAU
2. TECHNISCHE
DATEN
3. WICHTIGE HINWEISE
4. WENN DER
BACKOFEN NICHT
FUNKTIONIERT
5. BACKOFENDEFINITION & KONTROLLENBLENDE
6. KOCHFELDGEBRAUCHUNG
7. BETRIEB DES
BACKOFENS
8. PFLEGE UND
REINIGUNG
9. NUTZUNG DER
TASTENSCHUTZBLENDE
10. OPTIONSLISTE
INDICE
1. INSTALLAZIONE
DEL FORNO
2. CARATTERISTICHE TECNICHE
DEL FORNO
3. AVVERTENZE
IMPORTANTI
4. COSA FARE SE
IL FORNO NON
FUNZIONA
5. DESCRIZIONE
DEL FORNO E
DEL PANNELLO
COMANDI
6. USO DEL PIANO
DI COTTURA
7. USO DEL FORNO
8. USO DEL DEFLETTORE PER
FUNZIONAMENTO
IN MODALITÀ GRILL
9. MANUTENZIONE
e PULIZIA
10. ELENCO COMPONENTI
4
Page 5

E PO
NL
ÍNDICE DE
CONTENIDOS
3. Indicaciones de
instalación y
seguridad
4. Información técnica de la cocina de
gas
5. Leyenda
6. Tipos de mandos
disponibles
7. Descripción del
equipo
8. Manejo de los
fogones y del horno
9. Indicaciones de
uso para el horno
10. Limpieza y
cuidados
11. Signicado del
símbolo “cubo de
basura”
ÍNDICE:
Instalação do seu
forno;
Características técnicas do seu forno;
Avisos Importantes;
O forno não funciona;
Descrição do forno
e do painel de comandos;
Secção do fogão;
Secção do forno;
Painel de Segurança;
Manutenção e
Limpeza;
Tabela de categorias
de gás;
Lista de opções
INHOUD
1.INSTALLATİE VAN
UW OVEN.
2. TECHNİSCHE
FUNCTİES VAN UW
OVEN.
3. BELANGRİJKE
WAARSCHUWİNGEN.
4. ALS UW OVEN
NİET WERKT.
5. BESCHRİJVİNG
VAN UW OVEN EN
CONTROLEPANELEN.
6. GEBRUİK VAN
KOOKPLAAT.
7. GEBRUİK VAN
OVEN.
8. GEBRUİK
VAN DE KNOP
BESCHERMİNG
PLAAT.
9. ONDERHOUD EN
REİNİGİNG
10. KEUZE LİJST.
5
Page 6

ITDFRGB
INSTALLATION OF
YOUR OVEN
ELECTRICAL
CONNECTION and
SECURITY
1. Your oven requires a
16 A fuse (For England
13A) . If necessary,
installation by a
qualied electrician is
recommended.
2. Your oven is adjusted
in compliance with 230
Vac 50 Hz electric
supply (For Norway
12V DC, for SA 220240V, 60 Hz.). If the
mains is different from
this specied value,
contact your authorized
service.
3.Electrical connection
of the oven should only
be made by the sockets
with earth system
installed in compliance
with the regulations.
If there is no proper
socket with earth system in the place where
the oven will be placed,
immediately contact
a qualied electrician.
Manufacturer shall
never be responsible
from the damages that
will arise because of
the sockets connected
to the appliance with
no earth system. If the
ends of the electrical
connection cable is
open, according to the
appliance type, make a
proper switch installed
in the mains by which
all ends can be disconnected in case of connecting / disconnecting
from / to the mains.
4. If your electric supply
cable gets defective,
it should denitely be
replaced by the author-
ized service or qualied
electricians in order to
avoid from the dangers.
5. Electrical cable
should not touch the
hot parts of the appliance.
INSTALLATION DE
VOTRE FOUR
CONNEXION ELECTRIQUE et SECURITE
1. Votre four fonctionne
avec un fusible de 16
A. Si nécessaire, une
installation par un
électricien qualié est
recommandée.
2. Votre four est réglé
en conformité avec une
alimentation électrique
de 230 V ca 50 Hz. Si le
courant est différent de
cette valeur spéciée,
contactez votre centre de
service autorisé.
3. Le four doit être relié
à la terre et il faut que la
connexion soit installée
en conformité avec les
réglementations (le câble
et les prises devant avoir
un l de terre). S’il n’y a
pas de prise adéquate
avec la terre là où le four
sera installé, contactez
immédiatement un
électricien qualié. Le
fabricant ne sera jamais
responsable des dommages dus au fait que
l’appareil est connecté à
des prises sans la terre.
Si l’extrémité du câble
de connexion électrique
est ouverte, selon le type
d’appareil, installez un
interrupteur de secteur
approprié sur le réseau
par lequel toutes les
extrémités peuvent être
déconnectées en cas de
connexion / déconnexion
du /au réseau.
4. Si votre câble
d’alimentation électrique
est défectueux, il doit
être absolument remplacé par le centre de
service autorisé ou par
des électriciens qualiés
pour éliminer tout risque
potentiel.
5. Le câble électrique ne
doit pas être en contact
avec les pièces chaudes
de l’appareil.
BACKOFENMONTAGE
ELEKTRİKANSCHLUSS
UND SICHERHEIT
1. Der Backofen benötigt
eine Sicherung mit 16
Ampere. Falls notwendig
sollte die Montage von
einem autorisiertem
Elektriker durchgeführt
werden.
2. Ihr Backofen wurde für
230 V, 50 Hz Elektrikversorgung eingestellt. Falls
Ihr Hauptstromnetz nicht
mit diesem Wert übereinstimmt bitte wenden Sie
sich an Ihren autorisierten
Service.
3. Die elektrischen Anschlüsse des Backofens
dürfen nur mit Steckern,
dessen Erdleitungen
gemäß der Vorschriften
verlegt wurden, durchgeführt werden. Falls die
Einbauäche des Backofens nicht über Stecker
mit Erdleitungen verfügt,
bitte wenden Sie sich sofort an einen autorisierten
Elektriker. Der Hersteller
übernimmt keine Haft für
Schäden, die Aufgrund
Stecker ohne Erdleitungen entstehen. Falls
die Abschlüsse der Elektrikleitungen offen sind,
abhängig vom Gerätetyp,
stellen Sie für den Fall,
dass ein Anschluss an
das Hauptstromnetz
erstellt wird oder der Anschluss ausfällt, an dem
Hauptstromnetz einen
Schlüssel her, durch den
alle Abschlussanschlusse
abgebrochen werden
können.
4. Wenn Ihre Elektrikversorgungsleitung
beschädigt ist, muss
die Leitung von einem
autorisierten Service oder
einem Fachelektriker
erneuert werden, um
mögliche Gefahren zu
verhindern.
5. Die Elektrikleitung
darf nicht in Kontakt mit
warmen Geräteteilen
kommen.
INSTALLAZIONE DEL
FORNO
ALLACCIAMENTO
ELETTRICO e
AVVERTENZE DI
SICUREZZA
1. Il forno necessita di un fusibile da 16
ampere. Si consiglia
di rivolgersi a un elet-
tricista qualicato per
l’installazione.
2. Il forno è progettato
per un’alimentazione
elettrica di 230 V AC, 50
Hz. Se l’alimentazione
di rete è diversa dal
valore specicato,
contattare il centro di
assistenza tecnica della
propria zona.
3. L’allacciamento
elettrico del forno
deve essere effettuato
esclusivamente con
prese collegate a terra
in conformità alle direttive in materia. Se nel
luogo in cui deve essere
installato il forno non
esiste una presa elettrica collegata a terra,
contattare un elettricista
qualicato. Il fabbricante
non è responsabile degli
eventuali danni provocati dall’allacciamento
dell’apparecchio a
prese elettriche senza
collegamento a terra.
Se le estremità del cavo
elettrico sono aperte, in
base al tipo di apparecchio, installare nella
rete un interruttore con
il quale si possano scollegare tutte le estremità
in caso di collegamento/
scollegamento alla/dalla
rete elettrica.
4. Se il cavo di
alimentazione elettrica
si rovina, deve essere
sostituito da un tecnico
di un centro assistenza
autorizzato o da un
elettricista qualicato
per evitare situazioni di
pericolo.
5. Il cavo elettrico non
deve toccare le parti
calde dell’apparecchio.
6
Page 7

E PO
NL
Indicaciones de instalación y seguridad
CONEXIÓN
ELÉCTRICA
1. Esta cocina de gas
necesita fusibles de 16
amperios. El enchufe
del equipo solo puede
conectarse a una
toma de corriente que
esté debidamente
conectada a tierra.
2. Este equipo está
diseñado para una
alimentación de tensión
de 230 V, 50 Hz. Si la
red eléctrica principal
del lugar donde se va a
conectar el equipo no
cumple este requisito,
diríjase a un punto de
servicio autorizado.
3. Proporcione una
buena ventilación al
lugar (sin corrientes de
aire). Este equipo solo
puede ser instalado
en espacios que
cumplan las normativas
aplicables.
Efectúe los trabajos de
limpieza y conservación
de los conductos de
aire de forma regular.
4. En caso de resultar
dañada la línea de alimentación, ésta deberá
ser reemplazada por
un técnico de servicio
o un técnico electricista
autorizado para evitar
posibles peligros.
5. Durante la conexión
y el manejo del equipo,
preste atención a que
la línea de alimentación
no entre en contacto
con otras supercies
calientes.
Instalação do seu
forno Ligações
Eléctricas e
Segurança
1. O forno requer um
fusível de 16 A. Se
necessário, recomendase que contacte um
electricista qualicado
para proceder á sua
instalação.
2. O forno requer um
fornecimento de energia
de 230 Vac. - 50Hz.
Se o quadro eléctrico
de sua casa tiver um
valor diferente daquele
mencionado anteriormente, recomendamos
que contacte o seu
fornecedor.
3. A ligação eléctrica do forno deve ser
feita a uma tomada com
ligação-terra de acordo
com a regulamentação.
Se não tiver nenhuma tomada com ligação-terra
no local onde pretende
instalar o aparelho
contacte imediatamente
um técnico qualicado.
O fabricante não será
responsável pelas avarias que podem ocorrer
devido ao aparelho estar
ligado a uma tomada
sem ligação-terra. Se as
pontas dos os eléctricos
da caixa distribuidora
estiverem soltos, de
acordo com o modelo
do aparelho, faça um
interruptor apropriado,
instalado nos os, sendo
que todos os os podem
ser desligados no caso
de ligar/desligar de/para
os os.
4. Se a sua caixa
distribuidora estiver
com defeito, esta deve
ser substituída por um
técnico autorizado ou
electricista qualicado,
para, assim, evitar uma
situação de perigo.
5. Os cabos eléctricos
não devem tocar nas
componentes eléctricas.
INSTALLATİE VAN
UW OVEN.
ELECTRISCHE AANSLUITING en
VEILIGHEID.
1. Uw oven heeft 16
Ampère zekering
nodig. Indien nodig, een
bevoegde elektricien
raadplegen.
2. Uw oven is aangepast
in overeenstemming met
met 230 V 50Hz.Als de
hoofdleiding verschillend
is van de aangegeven
waarde contacteert
u best uw bevoegde
service.
3. Elektrische aansluiting
van uw oven mag alleen
met stopcontacten
met aarding gebeuren,
in overeenstemming
met met de regels.
Als in de plaat waar
de oven geinstalleerd
zal worden geen juist
stopkontakt met aarding is, dient contact
genomen te worden
met een bevoegde
elektricien. Fabrikant zal
nooit verantwoordelijk
zijn voor schade die is
veroorzaakt door
stopcontacten zonder
aarding. Als het einde
van de elektrische
aansluitkabel open is,
volgens toestel type,
maakt u een gepaste
schakelaar, geïnstalleerd
in de hoofdleiding, door
welke alle einden uitgeschakeld kunnen worden
in het geval van aansluit
aan/ uitschakelen van de
hoofdleidingen.
4. Als uw kabel beschadigd is, moet deze
absoluut vervangen
worden door bevoegde
service of bevoegde
elektricien om gevaar te
vermijden.
5. Elektrische kabels
mogen de warme delen
van het toestel niet
raken.
7
Page 8

ITDFRGB
INSTALLATION OF
YOUR OVEN
GAS CONNECTION
and SECURITY
1. Fit the clamp to the
hose. Push one of the
hose until it goes to the
end of the pipe
2. For the sealing control; ensure that the buttons in the control panel
are closed, but the gas
cylinder is open. Apply
some soap bubbles to
the connection. If there
is gas leakage, there
wil be foaming in the
soaped area.
3. The oven should be
using a well ventilation
place and should be
install on at ground.
RE-INSPECT THE
GAS CONNECTION.
When placing your
oven to its location,
ensure that it is at the
counter level. Bring it to
the counter level by adjusting the feet if necessary. Before closing the
lid close all the burners.
Use glove when using
cooker. Do not touch
on hot surfaces. Close
gas and electrical
supply before opening
covers. Do not splash
water onto the cooker.
Do not use cooker in
potentially explosive
atmospheres.
Do not carry cooker to
hold with handle
DO NOT MAKE GAS
HOSE and ELECTRICAL CABLE OF YOUR
OVEN GO THROUGH
THE HEATED
AREAS, SPECIALLY
THROUGH THE REAR
SIDE OF THE OVEN.
DO NOT MOVE GAS
CONNECTED OVEN.
SINCE THE FORCING
SHALL LOOSEN THE
HOSE, GAS LEAKAGE
MAY OCCUR.
INSTALLATION DE
VOTRE FOUR
CONNEXION AU GAZ et
SECURITE
1. Adaptez le collier
de serrage au tuyau.
Poussez un des tuyaux
jusqu’à ce qu’il aille au
bout du conduit.
2. Pour contrôler
l’étanchéité, assurezvous que les boutons
dans le panneau de
commande sont fermés,
mais que la bouteille de
gaz est ouverte. Mettez
quelques bulles de savon
sur la connexion. S’il y a
une fuite de gaz, il y aura
de la mousse.
3. Le four doit être
installé dans un endroit
bien ventilé et sur un
sol plat.
RE-INSPECTION DE LA
CONNEXION DE GAZ.
Lorsque vous installez
votre four dans son
emplacement, assurezvous qu’il est au niveau
du comptoir. Amenez-le
au niveau du comptoir
en réglant les pieds si
nécessaire.
NE FAITES PAS PASSER LE TUYAU DE
GAZ et LE CABLE
ELECTRIQUE DE
VOTRE FOUR PAR DES
ZONES CHAUFFEES,
EN PARTICULIER A
L’ARRIERE DU FOUR.
NE BOUGEZ PAS UN
FOUR CONNECTE AU
GAZ. VOUS DONNEZ
DU JEU A UN TUYAU
EN LE FORÇANT, CE
QUI PEUT PROVOQUER DES FUITES DE
GAZ.
BACKOFENMONTAGE
GASANSCHLUSS UND
SICHERHEIT
1. Schelle an Schlauch
bauen. Ein Ende des
Schlauchs bis zum
Ende der Leitung
schieben und mit einem
Schraubenzieher die
Schelle festziehen.
2. Sorgen Sie dafür dass
die Schalter auf der Kontrollblende geschlossen,
der Gashahn offen ist,
damit die Dichtringkontrolle durchgeführt
werden kann. Anschlusspunkt mit Seife
beschmieren. Wenn ein
Leck vorhanden ist, wird
die eingeseifte Stelle
schäumen.
KONTROLLIEREN SIE
DEN GASANSCHLUSS.
Beim Einbau des Backofens darauf achten,
das dass Gerät auf
Thekenebene liegt. Falls
notwendig die Füße
einstellen, um den Backofen auf Thekenebene
zu bringen.
Sorgen Sie dafür das
der Gasschlauch und
die Elektrikleitung nicht
über warme Flächen wie
die hintere Seite des
Ofens, geführt werden.
Herd mit Gasanschluss
nicht verstellen. Durch
Belastung kann sich der
Schlauch lösen und zu
Gaslecken führen.
INSTALLAZIONE DEL
FORNO
ALLACCIAMENTO
ALL’IMPIANTO DEL GAS
e AVVERTENZE DI SICUREZZA
1. Montare la fascetta sul
tubo essibile. Spingere
il tubo essibile no all’
estremità della tubazione.
2. Per il controllo della
tenuta, assicurarsi che le
manopole nel pannello comandi siano in posizione di
chiusura, ma che la bombola
del gas sia aperta. Introdurre
una soluzione saponosa
nel collegamento. In caso
di perdita di gas, si formerà
della schiuma nell’area in cui
è stato introdotto il sapone.
3. Il forno deve essere installato in un locale ben ventilato
e su un pavimento piano.
CONTROLLARE DI NUOVO
IL COLLEGAMENTO DEL
GAS
Quando si installa il forno,
assicurasi che sia a livello
del piano di lavoro. Se necessario, portarlo al livello del
piano di lavoro regolando i
piedini.Prima di chiudere il
coperchio del piano di cottura, spegnere tutti i bruciatori. Usare un guanto quando
si utilizza l’apparecchio. Non
toccare le superci calde.
Chiudere l’alimentazione
del gas e l’alimentazione
elettrica prima di aprire il
coperchio. Non schizzare
acqua sull’apparecchio. Non
usare l’apparecchio in
atmosfere potenzialmente
esplosive.
Non trasportare
l’apparecchio tirandolo dalla
maniglia.
NON FARE PASSARE IL
TUBO FLESSIBILE DEL
GAS E IL CAVO ELETTRICO DEL FORNO SULLE
AREE RISCALDATE, SPECIALMENTE SUL RETRO
DEL FORNO. NON SPOSTARE L’APPARECCHIO
DOPO CHE È STATO ALLACCIATO ALL’IMPIANTO
DEL GAS PERCHÈ SI PUÒ
ALLENTARE IL TUBO E
PROVOCARE PERICOLO
DI PERDITE DI GAS.
8
Page 9

E PO
NL
Indicaciones de instalación y seguridad
CONEXIÓN DE GAS
Antes de instalar o
cambiar un equipo de
gas se ha de informar a
la empresa suministradora de gas local.
1. La instalación y la
conexión del equipo
solo puede ser efectuada a través de una
empresa registrada en
la lista de instaladores
o de un servicio de
asistencia técnica bajo
contrato.
2. La conexión o el
cambio a otro tipo de
gas se ha de efectuar
conforme a las normas
de conexión aplicables:
Gas natural: Normas
técnicas para instalaciones de gas (TRGI)
Gas licuado de
petróleo: Normas técnicas para gas licuado
de petróleo (TRF)
3. Tenga en cuenta
las prescripciones
aplicables al empleo de
equipos de gas.
En caso de producirse
un escape de gas:
- cierre la válvula de
la instalación o la
bombona de gas
- apague todos los
quemadores y otras
fuentes de encendido.
- ventile la habitación;
abra las ventanas y las
puertas
- no conecte ningún
aparato eléctrico (tampoco la luz)
- informe de la fuga de
gas al servicio técnico
autorizado inmediatamente
Atención: La conexión
incorrecta o realizada
por terceros invalidará
todas las responsabilidades y el derecho a
garantía.
Instalação do seu
forno
Ligação de Gás e
Segurança
1. Encaixe o gancho á
mangueira e de seguida
puxe uma, até que ela
chegue ao m do cano.
2. Para proceder á
soldadura, verique se
os botões do painel de
comandos estão desligados, estando apenas
o cilindro do gás aberto.
Aplique sabão á ligação.
Se existir fuga de gás,
deverá aparecer espuma
na área ensaboada.
3. O forno deve ser
instalado num local bem
ventilado e num chão
plano.
Re-inspecção da ligação
de gás
Ao colocar o forno no
lugar, verique se este
está ao nível do balcão.
Ajuste o mesmo através
dos pés reguláveis.
NÃO PERMITA QUE AS
MANGUEIRAS DE GÁS
E OS FIOS ELÉCTRICOS TOQUEM AS ÁREAS QUENTES, COM
ESPECIAL ATENÇÃO
Á PARTE TRASEIRA
DO APARELHO. NÃO
ARREDE O FORNO,
QUANDO ESTE
ESTIVER LIGADO AO
GÁS, UMA VEZ QUE AS
MANGUEIRAS PODEM
SE SOLTAR E OCURRER A FUGA DE GÁS.
INSTALLATİE VAN
UW OVEN.
GASAANSLUITING EN
VEILIGHEID.
1. Zet de klem op de
slang. Druk een van de
slang tot het aan het
einde van de pijp.
2. Voor de afsluitcontrole; wees zeker dat
de knoppen in het
controlepaneel dicht zijn,
maar dat de gascilinder
open is. Leg wat zeep
aan de verbinding. Indien er bubbels op zeep
komen te staan is dit
teken dat er gaslek is.
3. De oven moet een
moet geïnstalleerd zijn
in goed geventileerde
plaats en op een vlakke
ondergrond.
ONDERZOEK DE GAS
VERBİNDİNG WEER.
Wanneer u uw oven
plaatst, zorg ervoor
dat het bij de toonbank
niveau is. Breng het tot
toonbank niveau met
instelling van de poten
indien het nodig is.
Laat gasslang en de
kabel van uw oven niet
langs de verwarmde
plaatsen gaan, zeker
niet de achterkant van
de oven.
9
Page 10

GB
FR
D IT E
TECHNICAL
FEATURES OF
YOUR OVEN
SPECIFICATIONS
OUTER WIDTH
OUTER DEPTH
OUTER HEIGHT
INNER WIDTH
INNER DEPTH
INNER HEIGHT
CARACTERISTIQUES
TECHNIQUES DE
VOTRE FOUR
SPECIFICATIONS
LARGEUR EXTERIEURE
PROFONDEUR EXTERIEURE
HAUTEUR EXTERIEURE
LARGEUR INTERIEURE
PROFONDEUR INTERIEURE
HAUTEUR INTERIEURE
TECHNİSCHE
DATEN DES
BACKOFENS
EIGENSCHAFTEN
BREITE AUSSEN
TIEFE AUSSEN
HÖHE AUSSEN
BREITE INNEN
TIEFE INNEN
HÖHE INNEN
CARATTERISTICHE
TECNICHE
DEL FORNO
SPECIFICHE
LARGHEZZA ESTERNA
PROFONDITÀ ESTERNA
ALTEZZA ESTERNA
LARGHEZZA INTERNA
PROFONDITÀ INTERNA
ALTEZZA INTERNA
Información
técnica de la
cocina de gas
PROPIEDADES
ANCHURA EXTERIOR
PROFUNDIDAD EXTERIOR
ALTURA EXTERIOR
ANCHURA HORNO
PROFUNDIDAD HORNO
ALTURA HORNO
OVEN VOLUME
LAMP POWER
UPPER BRULOR
BOTTOM BRULOR
SUPPLY VOLTAGE
10
VOLUME DU FOUR
PUISSANCE DE LA LAMPE
BRULEUR DU HAUT
BRULEUR DU BAS
TENSION D’ALIMENTATION
BACKOFENVOLUMEN
LEUCHTENSTÄRKE
BRENNER OBEN
BRENNER UNTEN
VERSORGUNGSS
PANNUNG
VOLUME FORNO
POTENZA LAMPADINA
BRUCIATORE SUPERIORE
BRUCIATORE INFERIORE
TENSIONE DI
ALIMENTAZIONE
VOLUMEN HORNO
LUZ
QUEMADOR INFERIOR
TENSIÓN DE
ALIMENTACIÓN
Page 11

NL PO
Características
técnicas do seu
forno
Especicações
Largura exterior
Profundidade Exterior
Altura exterior
Largura interior
Profundidade interior
Altura exterior
TECHNISCHE
FUNCTIES VAN
UW OVEN
specicaties
Buiten breedte
Buiten diepte
Buiten hoogte
Binnen breedte
Binnen diepte
Binnen hoogte
50 * 55
500 mm
550 mm
855 mm
360 mm
400 mm
350 mm
50*60
500 mm
630 mm
855 mm
360 mm
400 mm
350 mm
60*58 60*60
600 mm
580 mm
855 mm
460 mm
400 mm
350 mm
600 mm
630 mm
855 mm
460 mm
400 mm
350 mm
Volume do forno
Potência da lâmpada
Grill Superior
Grill inferior
Voltagem
Oven capaciteit
Lamp
Bovenste brander
Onderste brander
Leverings voltage
54 lt.
15 W
1,50kW
2,16 kW
230 V, 50 Hz
54 lt.
15 W
1,50 kW
2,16 kW
230 V, 50 Hz
64 lt.
15 W
1,50 kW
2,16 kW
230 V , 50 Hz
64 lt.
15 W
1,50 kW
2,16 kW
230 V , 50 Hz
11
Page 12

GB
FR
D IT E
TECHNICAL
FEATURES OF
YOUR OVEN
BURNER
INJECTOR
VALUES
ACCORDING TO
THE GAS TYPE
Injector
Gas Flow
Power
50x60 / 60x60
Big burner 50*55 &
Injector
Gas Flow
Middle
burner
Power
Injector
CARACTERISTIQUES TECHNIQUES DE
VOTRE FOUR
VALEURS DES
INJECTEURS DE
BRULEUR
SELON LE TYPE
DE GAZ
Injecteur
Débit de gaz
Puissance
50x60-60x60
Grand brûleur
Injecteur
Débit de gaz
Brûleur
moyen
Puissance
Injecteur
TECHNİSCHE
DATEN DES
BACKOFENS
SPRITZEN-
WERTE JE
NACH GASTYP
Spritze
Gaszuuss
Kraft
50x60-60x60
Großer Gasbrenner
Spritze
Gaszuuss
Mittlerer
Gasbrenner
Kraft
Spritze
CARATTERISTICHE TECNICHE
DEL FORNO
INIETTORI
BRUCIATORI IN
BASE AL TIPO DI
GAS
Iniettore
Portata gas
grande
Bruciatore
Potenza
50x60-60x60
Iniettore
Portata gas
medio
Bruciatore
Potenza
Iniettore
Información
técnica de la
cocina de gas
Modelo de tubo
según tipo de gas
Tubo
Línea
50x60 / 60x60
grande 50x55 &
Quemador de gas
Tubo
Línea
gas mediano
Quemador de
Tubo
Gas Flow
Small
burner
Power
Injector
Gas Flow
Power
& 50x60 / 60x60
Top brulor 50x55
Injector
Gas Flow
Power
& 50x60 / 60x60
Bottom brulor 50*55
12
Débit de gaz
Petit
brûleur
Puissance
Injecteur
Débit de gaz
50x60-60x60
Brüleur du haut
Puissance
Injecteur
Débit de gaz
50x60-60x60
Puissance
Brûleur du bas
Gaszuuss
Kleiner
Gasbrenner
Kraft
Spritze
Gaszuuss
Kraft
50x60-60x60
Brenner oben
Spritze
Gaszuuss
50x60-60x60
Kraft
Brenner unten
Portata gas
piccolo
Potenza
Bruciatore
Iniettore
Portata gas
superiore
Bruciatore
Potenza
50x60-60x60
Iniettore
Portata gas
inferiore
Bruciatore
Potenza
50x60-60x60
Línea
gas pequeño
Quemador de
Tubo
Línea
Tubo
60x60
Línea
50x55 & 50x60 /
Calent. inferior horno
Page 13

NL PO
Características
técnicas do seu
forno
Injector de Gás
de acordo com o
tipo de gás
Injector
Saída de Gás
50*60 60*60
Potência
Queimador Grande
Injector
Saída de Gás
Médio
Queimador
Potência
Injector
TECHNISCHE
FUNCTIES VAN
UW OVEN
De waarden van
de branderinjecteur volgens het
gastype
Injector
Gas stroom
50x60-60x60
Grote brander
Kracht
Injector
Gas stroom
Midden
brander
Kracht
Injector
mm
m3/h gr/h
kW
mm
m3/h gr/h
kW
mm
LPG
Gaz de Pétrole liquéé
LPG
GPL
GLP
LPG
LPG
G 30-30 mBar G 20-20 mBar G 25-25 mBar
0,85
0,236
3,00
0,65
0,140
1,78
0,50
Natural Gas
Gaz naturel
Erdgas
Metano
Gas natural
Gás Natural
Aardgas
1,15
0,253
2,77
0,97
0,167
1,78
0,72
Natural Gas
Gaz naturel
Erdgas
Metano
Gas natural
Gás Natural
Aardgas
1,20
0,326
3,00
0,95
0,173
1,61
0,70
Saída de Gás
Pequeno
Queimador
Potência
Injector
Saída de Gás
Potência
50*60 60*60
Grill Superior
Injector
Saída de Gás
Grill Inferior
50*60 60*60
Potência
Gas stroom
Kleine
brander
Kracht
Injector
Gas stroom
Top brander
50x60-60x60
Kracht
Injector
Gas stroom
60x60-50x60
Kracht
Onderste brander
m3/h gr/h
kW
mm
m3/h gr/h
kW
mm
m3/h gr/h
kW
0,069
0,88
0,60 / 0,65
0,118
1,50
0,70
0,170
2,16
0,092
0,99
0,92
0,144
1,55
0,97
0,178
1,83
0,094
0,88
0,92
0,162
1,50
0,95
0,183
1,72
13
Page 14

GB
FR
D IT E
TECHNICAL
FEATURES OF
YOUR OVEN
Before making
the connections
of the appliance
Before starting to
use the appliance,
read the user
manual of the
appliance carefully. In this user
Manual, there are
important information regarding
your, our customers’ security, how
you will use it and
how you will make
its maintenance.
Keep this user
manual in good
shape, by taking
into consideration
that the appliance
shall be used by
others.
Red’d Flame
Gas Cock
Adjustment:
to adjust your
oven acc. to the
gas type, make
the adjust. for
reduced ame
carefully by turning with a small
screwdriver as
shown below on
the screw in the
middle of the gas
cocks as well as
nozzle changes.
CARACTERISTIQUES TECHNIQUES DE
VOTRE FOUR
Avant de faire
les connexions
de l’appareil
Avant de commencer à utiliser
l’appareil, lisez
attentivement
le manuel de
l’utilisateur. Dans
ce Manuel, il y
a des informations importantes
concernant votre
sécurité, celle de
nos clients, comment vous utiliserez l’appareil et
comment vous
effectuerez sa
maintenance.
Conservez ce
manuel en bon
état, en tenant
compte de ce que
l’appareil sera utilisé par d’autres.
Réglage de la
amme – robinet
de gaz :
Il vous faut régler
soigneusement la
amme de votre
four en fonction
du type de gaz,
pour cela vous réduisez la amme
en tournant avec
un petit tournevis,
comme indiqué
ci-dessous, avec
le tournevis au
milieu du robinet
de gaz, avec
changement de
buse si nécessaire.
TECHNİSCHE
DATEN DES
BACKOFENS
Vor dem
Anschließen
Vor Verwendung
des Geräts bitte
die Gebrauchsanleitung sorgfältig
lesen.
Diese Gebrauchsanleitung beinhaltet wichtige
Hinweise bzgl.
der Sicherheit
unserer Kunden,
des Gebrauchs
und der Pege
des Geräts.
Für den Gebrauch
anderer Personen
bitte diese Gebrauchsanleitung
gut aufbewahren.
Geminderte
Flamme Gashahneinstellung
Um den Backofen
gemäß dem Gastyp einzustellen,
müssen außer der
Düsenerneuerung
die Schrauben
in der Mitte des
Gashahns mit
einem kleinen
Schraubenzieher
vorsichtig gedreht
und die geminderte Flamme hierdurch eingestellt
werden.
CARATTERISTICHE TECNICHE
DEL FORNO
Prima di
collegare
l’apparecchio
Prima di iniziare
ad usare
l’apparecchio,
leggere attentamente questo
manuale che
contiene importanti informazioni
per la sicurezza
dell’utente,
nonché le istruzioni per l’uso e la
manutenzione.
Tenere in buone
condizioni questo
manuale, tenendo
presente che
l’apparecchio
potrebbe essere
usato anche da
altre persone.
Regolazione del
rubinetto del
gas:
per impostare il
tipo di gas, effettuare la regolazione del minimo
girando con un
piccolo cacciavite
la vite al centro
dei rubinetti del
gas e sostituire
gli iniettori, come
indicato nelle foto.
Información técnica
de la cocina de gas
FUEGO
PEQUEÑO -
Ajuste
Al cambiar el
tipo o la presión
del gas se ha de
prestar atención a
lo siguiente:
Para ajustar el
horno de acuerdo
con el tipo y
la presión del
gas, además
de cambiar los
tubos también es
necesario ajustar
la cantidad del
caudal de gas
para cada fogón
(tornillo de ajuste
junto al regulador;
accesible al desmontar el mando).
14
Page 15

E PO
1- Respete las medidas
necesarias sobre salud
y seguridad –vigile especialmente a los niños
mientras el horno esté
encendido.
2- Encontrará las
especicaciones de
la cocina de gas y su
equipamiento en la cha
de características que
hay en la parte posterior
de la misma (GLP o gas
natural –GN-).
3- Este equipo está
diseñado para una
alimentación de tensión
de 230 V, 50 Hz.
4- Desde el enchufe
de su horno tiene
puesta a tierra del
sistema,garantizar el uso
con el sistema de toma
de erarth. Si se utiliza
sin el sistema tierra,
nuestra empresa no se
hace responsable por
cualquier pérdida que
pueda surgir.
5- Durante la conexión
y el manejo del equipo,
preste atención a que
la línea de alimentación
no entre en contacto
con otras supercies
calientes.
6- Si el cable de alimentación se daña, deberá
sustituirlo el fabricante,
su representante del
servicio ocial o un
técnico debidamente
cualicado, para evitar
cualquier tipo de riesgo.
7- Recuerde apagar el
electrodoméstico antes
de sustituir la lámpara,
para evitar el riesgo de
descargas eléctricas.
8- El horno se puede
tener la presión de
salida diferentes países
de acuerdo a sus es-
pecicaciones de gas y
presión. Asegúrese de
que la cocina está con-
gurado correctamente a
las necesidades locales
(por ejemplo, los aviones
deben ser adecuados
para el tipo de local de
gas y la presión del gas)
Avisos Importantes
1. Leve em consideração as exigências
mínimas de segurança e
de saúde;
2. A pressão de
saída do seu fogão
varia consoante as
especicações de
pressão de cada país. A
indicação de instalação
de fornecimento de gás
se encontra na matrícula
situada na parte de
trás do aparelho.Nesta
informação poderá saber
qual o tipo de gás a ser
utilizado (LPG ou GN)
3. Deve usar uma corrente de 230V 50Hz;
4. Uma vez que a cha
do forno tem ligaçãoterra, deverá usar,
também, uma tomada
com ligação-terra. O
fornecedor não é
responsável por danos
causados por não usar
uma tomada com estas
características;
5. Mantenha a mangueira d o gás afastada das
componentes quentes e
de superfícies cortantes;
6. Se a mangueira se
encontrar danicada,
deve contactar o seu
fornecedor ou um
técnico qualicado
para proceder á sua
substituição;
7. Verique se o
aparelho está desligado
antes de substituir a
lâmpada, para evitar um
choque eléctrico;
8. Certique-se de que
a sua instalação se
encontra correctamente
congurada de acordo
com os requisitos locais
( por exemplo, a sua
instalação deverá estar
de acordo com o tipo de
gás e pressão)
NL
BELANGRIJKE
WAARSCHUWINGEN
1.Besteed aandacht aan
gezondheid en veiligheid.
2. Het fornuis wordt
geleverd volgends de
kenmerken op het rating
label dat u achteraan het
toestel vind. U kan dus
controleren of het toestel
oorspronkelijk in aardgas
of butaangas werd geleverd (behalve als u de
omschakeling voordien
hebt aangevraagd).
3.Het voltage van uw
oven is 230 Volt 50 Hz.
4.Aangezien de stekker
van uw oven aarding
heeft, moet uw stopcontact ook voorzien zijn van
aarding. Als het zonder
aarding wordt gebruikt, is
zijn wij niet verantwoordelijk voor een of
ander verlies dat zich kan
voordoen.
5.Houd de gasslang en
de kabel van uw oven
weg van warme delen
alsook van scherpe
kanten.
6. Als het snoer beschadigd is, moet het door de
fabrikant of soortgelijk
bevoegde personen
vervangen worden om
gevaar te vermijden.
7.Zorg ervoor dat het
apparaat, alvorens de
lamp te vervangen,
uitgeschakeld is om
elektrische schokken te
vermijden.
8. Uw oven kan verchillende uitvoerdrukken
hebben overeenstemmend met uw land gas
en druk specicaties.
Zorg ervoor dat het
fornuis correct werd
ingesteld volgens de
vereisten van de regio
waarin u zich bevind (vb,
dat de sproeiers voorzien
zijn voor de juiste druk)
19
Page 16

IMPORTANT
WARNINGS
9. Connect your oven
to LPG cock in shortest
way and without any
leakage. Min. 40 cm
Max. 125 cm
10. When making gas
leakage check, never
use any ame type like
those of lighter, matches,
cigarette re or similar
ones.
11. Usage of your appliance creates moisture
and heath in the room it
is placed, make sure that
your kitchen is ventilated
well. Maintain the natural
ventilation ducts properly
You may use a cooker
hood
12. CAUTION! Do not
touch hot parts with bare
hands and keep children
well supervised
13. When the oven is
hot never touch the oven
glass by hand.
14. Before starting to
use your appliance, keep
curtain, tulle, paper or
inammable things away
from your appliance.
Don’t keep combustible
or inammable things in
or on the appliance.
16. Gas tapes are
secured by locks. Do not
turn before pressing the
button.
MISES EN GARDE
IMPORTANTES
9. Connectez votre four
au robinet de gaz de pétrole liquéé de la façon
la plus courte possible
et sans fuite. Min. 40 cm
Max. 125 cm
10. Lorsque vous vériez
s’il y a des fuites de gaz,
évitez toujours de faire
des feux/ammes comme
avec un briquet, des
allumettes, cigarettes ou
autres objets similaires.
11. L’utilisation de
votre appareil crée de
l’humidité et de la chaleur
dans la pièce où il se
trouve, assurez-vous que
votre cuisine est bien
ventilée. Faites en sorte
que les conduits naturels
de ventilation sont bien
entretenus Vous pouvez
utiliser la cuisinière.
12. Attention ! Ne touchez
pas les parties chaudes
aves vos mains et surveillez de très prêt vos enfants, quand la cuisinières
est en fonctionnement.
13. Quand le four est
chaud, ne touchez jamais
le verre du four avec les
mains.
14. Avant de commencer
à utiliser votre appareil,
placez tout ce qui est
rideau, tulle, papier ou
objets inammables
loin de votre appareil.
Ne conservez rien qui
soit combustible ou
inammable dans ou sur
l’appareil.
15. Les rubans de gaz
sont sécurisés par
blocage. Ne tournez pas
avant d’appuyer sur le
bouton.
WICHTIGE
HINWEISE
9. (Wenn Ihr Gerät mit
einem anderen Gaswert
produziert worden ist,
bitte schließen Sie den
richtigen Hahn an.)
10. Schließen Sie das
Hauptgasventil von
kürzestem Wege an den
Ofen, ohne das Lecke
entstehen. Min. 40 cm
Max. 125 cm
11. Verwenden Sie bei
der Gasleckkontrolle kein
Feuerzeug, Streichholz,
Zigarettenamme oder
ähnliche brennbaren
Materialien.
12. Der Gebrauch des
Geräts wird im Einbauzimmer zu Feuchtigkeit
führen, sorgen Sie für
eine sorgfältige Entlüftung. Pegen Sie die
natürlichen Luftkanäle.
13. Bei Funktion des
Backofens erwärmen
sich zugängliche Teile,
daher Kinder von diesen
Teilen fernhalten.
14. Bei erwärmtem Ofen
das Glas nicht ohne
Handschuhe berühren.
16. Gashähne sind durch
Schlösser gesichert.
Nicht drehen, bevor der
Schalter nicht gedrückt
ist.
ITDFRGB
AVVERTENZE
IMPORTANTI
9. Il collegamento del
forno al rubinetto del
GPL deve essere più
corto possibile e non deve
presentare perdite (min.
40 cm, max. 125 cm).
10. Per il controllo della
tenuta del gas non usare
amme come quelle di
accendini, ammiferi,
sigarette o simili.
11. L’uso dell’apparecchio
genera umidità e calore
nel locale in cui è installato, assicurarsi che la
cucina sia ben ventilata.
Sottoporre ad adeguata
manutenzione le tubazioni
di ventilazione. Si può
utilizzare una cappa.
12. ATTENZIONE! Non
toccare le parti calde a
mani nude e tenere sotto
controllo i bambini!
13. Quando il forno è
caldo non toccare il vetro
dello sportello.
14. Prima di mettere in
funzione l’apparecchio,
assicurarsi che non sia
vicino a tende, carta o
oggetti inammabili. Non
tenere sostanze combus-
tibili o oggetti inammabili
all’interno dell’apparecchio
o sopra di esso.
16. I rubinetti del gas vengono bloccati mediante
dispositivi di chiusura.
Non girarli prima di avere
premuto il pulsante.
20
Page 17

E PO
9- Conecte la cocina al
grifo de GPL o gas natural
utilizando el camino más
corto posible y evitando
fugas. Mín. 40 cm; máx.
125 cm.
10- Durante el control de
fugas de gas, no utilice
en ningún caso llamas de
mechero, cerillas, cigarrillos ni similares.
11- a utilización de este
electrodoméstico genera
humedad y calor en la sala
donde esté instalado; asegure una buena ventilación.
Conserve en buenas
condiciones los oricios de
ventilación natural, o utilice
una campana extractora.
12- Durante el uso de la
cocina, las piezas accesibles pueden calentarse;
evite tocarlas sin protección y evite la proximidad
de los niños.
13- Cuando el horno está
caliente nunca tocan el
vidrio del horno con la
mano.
14- Cuando el equipo de
gas esté en funcionamiento, mantenga alejados
todos los materiales
inamables tales como
cortinas, tules, papeles
y otros. No coloque
materiales inamables o
combustibles en el interior
ni encima del aparato. En
el carro solo se pueden
colocar: vajilla o bandejas
para hornos y otros materi-
ales no inamables.
Avisos Importantes
9. Ligue o forno a uma
mangueira LPG e sem
fugas; Min. 40 cm Max.
125 cm
10. Se existir uma fuga
de gás não use esqueiros, fósforos, cigarros ou
outros produtos junto do
aparelho;
11. Ao usar o produto
este causa humidade e
aquecimento, pelo que
recomendamos que
instale o mesmo num local com boa ventilação.
Mantenha os canos bem
ventilados.
12. Aquando da
utilização do forno,
mantenha o aparelho
afastado do alcance das
crianças Poderá usar um
exaustor.
13.Quando o forno estiver quente, não toque
no vidro do mesmo com
as mãos desprotegidas.
14. Antes da primeira
utilização, mantenha
artigos, tais como cortinas, tule, papel ou
outro material inamável,
afastados do aparelho.
Não coloque produtos
combustíveis dentro ou
por cima do mesmo.
16. Os botões encontram-se seguros por um
painel de segurança.
Não os vire antes de
pressionar o botão.
NL
BELANGRIJKE
WAARSCHUWINGEN
9. Verbind uw oven aan
de LPG kraan op de
kortste manier en zonder
enige lekkage. Min. 40
cm Max. 125 cm.
10. Wanneer de controle
van het gas lekkage,
Gebruik nooit een of
ander vlam type zoals
aansteker, lucifers, sigaret vuur of soortgelijken
voor de controle van
gaslek.
11. Het gebruik van
uw apparaat leidt tot
vochtigheid en hitte in de
kamer waar het geplaatst
is; zorg ervoor dat uw
keuken goed geventileerd is onderhoud de
ventilatiebuizen.
12. Wanner de oven
wordt gebruikt, kunnen
de bereikbare delen heet
zijn, de kinderen moeten
op een afstand gehouden
worden U mag het
toestel gebruiken.
13.Wanneer de oven
heet is, mag het ovenglas nooit met blote hand
worden aangeraakt.
14.Voordat u uw apparaat begint te gebruiken,
houdt gordijn, tulle,
papier of ontvlambare
dingen vanaf uw apparaat. Houd geen
brandbare of ontvlambare dingen in of op het
apparaat.
16. De gasbranders zijn
beveiligd met sloten.
Draai niet voor de knop
in te drukken.
21
Page 18
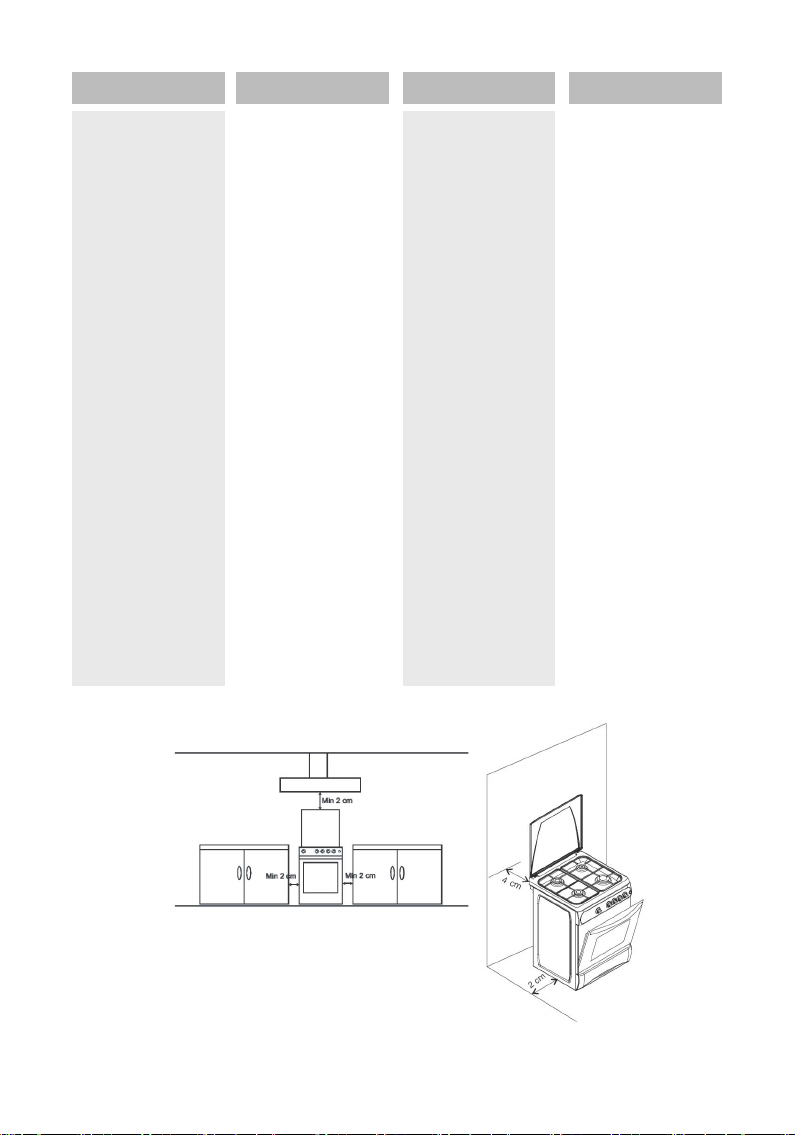
IT DFRGB
IF YOUR OVEN
DOES NOT
OPERATE
1. Please check main
gas valve.
2. Gas hose is can
be broken or bend.
3. Please check the
connection of gas
hose with oven.
4. Please check
noise of gas rate.
5. Please check the
gas valve, suitable or
unsuitable for your
oven.
6. We are recommended per 2 year
chance the your bottle gas tube valve.
7. If you can not to
solve the problem, to
apply manufacturersupplyer services
agent or simulary
qualied persons.
SI VOTRE FOUR NE
FONCTIONNE PAS
1. Veuillez vérier
le robinet principal
de gaz.
2. Le tuyau de gaz
peut être cassé ou
coudé.
3. Veuillez vérier la
connexion du tuyau
de gaz avec le four.
4. Veuillez vérier le
bruit du débit gazeux.
5. Veuillez vérier le
robinet de gaz, est-il
adéquat pour votre
four ?
6. Nous vous recommandons de changer
le robinet de gaz de
votre four tous les
2 ans.
7. Si vous ne pouvez
pas résoudre le
problème, veuillez
contacter le centre
de service du fabricant-fournisseur ou
quelqu’un tout autant
qualié.
WENN DER OFEN
NICHT FUNKTIONIERT
1. Überprüfen ob
das Hauptgasventil
offen ist.
2. Überprüfen ob
der Gasschlauch
gebrochen oder
gebogen ist.
3. Überprüfen ob
der Gasschlauch
richtig an den Ofen
geschlossen ist.
4. Durch Anhörung des Gases
überprüfen ob Gas
zuläuft.
5. Überprüfen ob das
richtige Gasventil
verwendet wurde.
6. Wir empfehlen das
Gasventil alle zwei
Jahre zu erneuern.
7. Wenn Ihr Ofen
nach diesen Kontrollen nicht funktioniert
wenden Sie sich an
den nächsten Service
oder an einen Fachmann.
COSA FARE SE IL
FORNO NON FUNZIONA
1.Controllare la valvola del gas principale.
2. Il tubo essibile del
gas può essere rotto o
piegato.
3. Controllare il collegamento del tubo
essibile del gas con
il forno.
4. Controllare la
rumorosità del usso
del gas.
5. Controllare se la
valvola del gas è del
tipo indicato per il
forno.
6. Si consiglia di
sostituire ogni 2 anni
la valvola del tubo
del gas.
7. Se non si riesce a
risolvere il problema,
contattare un tecnico di un centro assistenza autorizzato o
personale qualicato.
22
Page 19

E PO
NL
Si la cocina de gas
deja de funcionar
1- Compruebe si está
abierta la válvula de
gas principal.
2- Compruebe si la
manguera de gas está
conectada correctamente a la cocina.
3- Compruebe si sale
gas por los fogones
después de abrir la
válvula.
4- Si el horno sigue
sin funcionar después
de efectuar estos
controles, póngase
en contacto con un
técnico o con el punto
de servicio técnico
más cercano
O forno não
funciona
1. Verique a válvula
principal de gás;
2. Verique frequentemente se a
mangueira está em
bom estado;
3. Verique a ligação
das mangueiras de
gás ao forno;
4. Verique o ruído
do gás;
5. Verique se a
válvula de gás é a
adequada;
6. Recomendamos
que substitua as
válvulas do fogão
cada 2 anos.
7. Se surgir algum
problema com o
aparelho, contacte
imediatamente o
seu fornecedor ou
técnico qualicado.
ALS UW OVEN NİET
WERKT.
1. Controleer de
hoofdgasklep.
2. De gasslang kan
gebroken of gekromd
zijn.
3. Controleer de
verbinding van de
gasslang met de
oven.
4. Controleer geluid
van de gassnelheid.
5. Controleer of
gasklep geschikt is
voor uw oven.
6. Wij adviseren u
om de twee jaar de
gasklep van uw oven
te veranderen.
7. Als u het probleem
niet kunt oplossen,
vraag aan uw fabrikant, leverancier of
soortgelijk bevoegde
personen.
23
Page 20
DFRGB
m
a
x
m
i
n
2
4
0
2
0
0
1
6
0
m
a
x
m
in
2
4
0
2
0
0
1
6
0
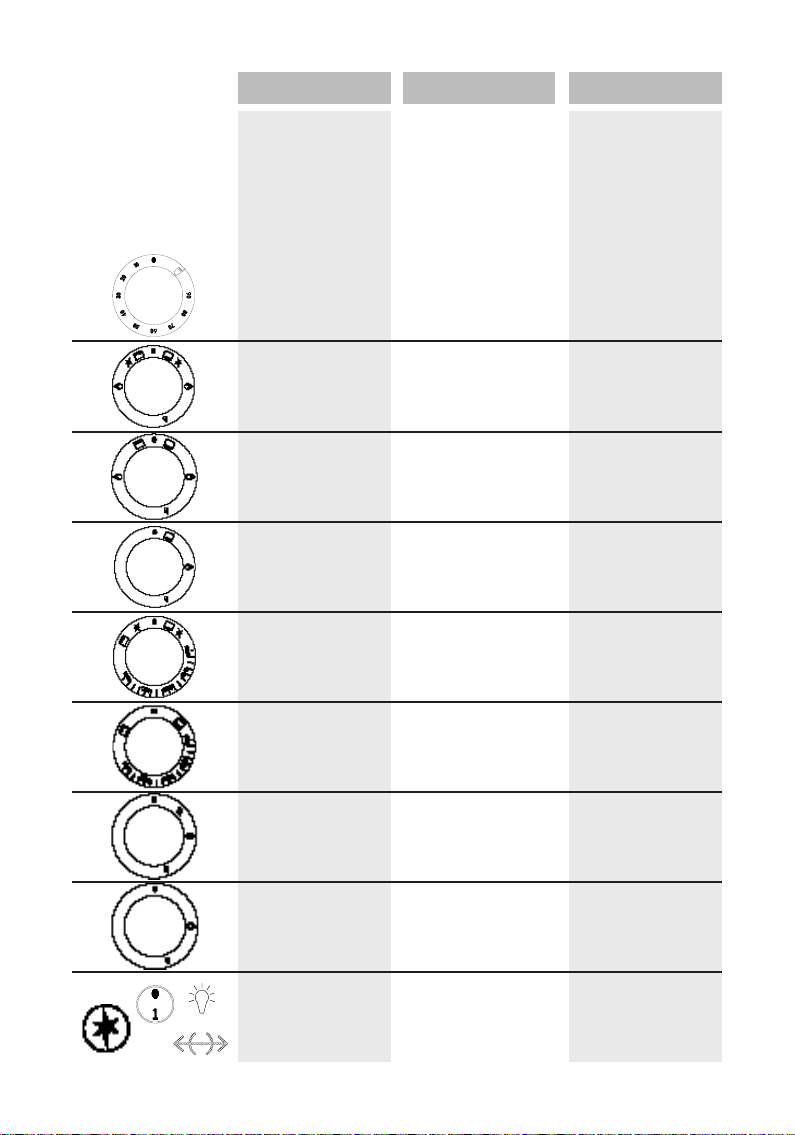
DESCRIPTION OF
OVEN and
CONTROL PANELS
Mechanical timer
knob ( Optional)
Oven control knob
( with ignition -
with grill )
Oven control knob
( with grill - without
ignition)
Oven control knob
(without grill and
without ignition)
Oven thermostatic
control knob
(with ignition)
Oven thermostatic
control knob
(without ignition)
DESCRIPTION
DU FOUR et DES
PANNEAUX DE
COMMANDE
Bouton minuterie
mécanique
Bouton de
commande du four
(avec allumage)
Bouton de
commande du four
(sans allumage)
Bouton de
commande du four
(sans grill)
Bouton de
commande
thermostatique du four
(avec allumage)
Bouton de
commande ther-
mostatique du four
(sans allumage)
BACKOFENDEFINI-
TION UND KON-
TROLLENBLENDE
Mechanischer
Timerschalter
Ofen
Kontrollschalter
( mit Zündung)
Ofen
Kontrollschalter
( ohne Zündung))
Ofen
Kontrollschalter
(ohne Grill)
Ofen Thermostatik
Kontrollschalter
(mit Zündung)
Ofen Thermostatik
Kontrollschalter
(ohne Zündung)
24
Gas cooker knob
( with ignition)
Gas cooker knob
( without ignition)
İgnition + lamp &
Turnspit knobs
Bouton cuisinière
à gaz
(avec allumage)
Bouton cuisinière
à gaz
(sans allumage)
Boutons Allum-
age + lampe &
Tournebroche
Gasherdschalter
( mit Zündung)
Gasherdschalter
( ohne Zündung)
Zünder + Leuchte
& Hähnchendreh-
schalter
Page 21

IT
E PO
NL
DESCRIZIONE DEL
FORNO e DEL
PANNELLO
COMANDI
Manopola timer
meccanico
(optional)
Manopola di comando
del forno (senza
dispositivo di accen-
sione - con grill
Manopola di comando
del forno (con grill
- senza dispositivo di
accensione)
Manopola di comando
del forno (senza grill
e senza dispositivo di
accensione)
Manopola di comando
termostatico del forno
(con dispositivo di ac-
censione)
Manopola di comando
termostatico del forno
(senza dispositivo di
accensione)
Mandos
disponibles para
las distintas
cocinas de gas
Temporizador
mecánico
(bajo petición)
Selector de horno
(con encendido)
Selector de horno
(sin encendido)
Selector de horno
(sin grill)
Horno con selector
de temperatura
(con encendido)
Horno con selector
de temperatura
(sin encendido)
Descrição do
forno e do painel
de comandos
Botão do Relógio
Opcional
Botão do forno
(com ignição)
Botão do forno
(sem ignição)
Botão do forno
(sem Grill)
Botão do termósta-
to do forno
(com ignição)
Botão do
termóstato do forno
(sem ignição)
BESCHRIJVING
VAN OVEN EN
CONTROLEPANEEL
Mechanische
tijdschakelaar
knop (optioneel)
Oven controle
knop
(met ontsteking)
Oven controle knop
(zonder ontsteking)
Oven controle knop
(zonder grill)
Oven thermostatisch
controle knop
(met ontsteking)
Oven thermostatisch
controle knop
(zonder ontsteking)
Manopola piano di
cottura a gas (con
dispositivo di accen-
sione)
Manopola piano di
cottura a gas (senza
dispositivo di accen-
sione)
Pulsante di accen-
sione + lampadina e
pulsante girarrosto
Conmutador de
fogones (con
encendido)
Conmutador
de fogones (sin
encendido)
Pulsador de
encendido +
Interruptor de la luz
Botão de fogão
(com ignição)
Botão de fogão
(sem ignição)
Ignição +
lâmpada e
Gas fornuis knop
(met onsteking
Gas fornuis knop
(zonder onsteking
Ontsteking lamp
& draaispit
knoppen
25
Page 22
DFRGB
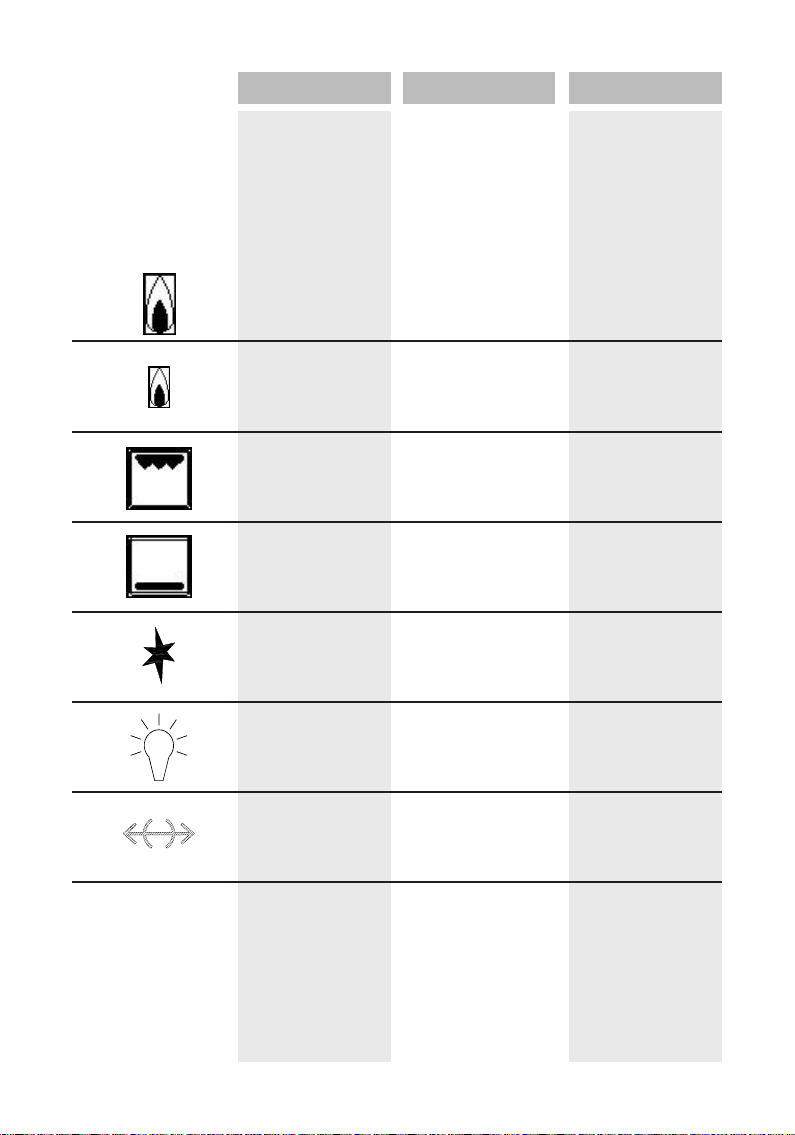
MEANINGS OF THE
SYMBOLS THAT
MIGHT BE ON
YOUR CONTROL
PANEL ARE AS
FOLLOWS
FULL FLAME
REDUCED FLAME
TOP BURNER IS ON
BOTTOM BURNER
IS ON
IGNITION LIGHTER
LES SYMBOLES
QUI PEUVENT
ÊTRE SUR VOTRE
PANNEAU DE
COMMANDE ONT
LA SIGNIFICATION
SUIVANTE
GRANDE FLAMME
PETITE FLAMME
LE BRULEUR DU
HAUT FONCTIONNE
RADI DONJI PLINSKI
PLAMENIK
ALLUMAGE
BEDEUTUNGEN
DER SYMBOLE,
DIE AUF IHRER
KONTROLLBLENDE
ERSCHEINEN
KÖNNEN, WERDEN
UNTEN AUFGEFÜHRT
VOLLE FLAMME
GEMINDERTE
FLAMME
OBERER GRILL EIN
BRENNER
UNTEN EIN
ZÜNDER
26
LAMP
TURNSPIT
( CHICKEN GRILL)
MECHANIC TIMER
KNOB(Optional); In
order to operate the
oven, timer switch
should be adjusted to
desired time.
LAMPE
TOURNEBROCHE
(GRILL POULET)
BOUTON
MINUTERIE
MECANIQUE (en
option) ; Pour faire
marcher votre four,
la minuterie doit être
réglée sur le temps
désiré.
LEUCHTE
Bratspieß (Hähnchen grillen)
MECHANISCHER
TIMERSCHALTER
(auf Wunsch ); Die
bleibende Backzeit
können Sie vom
Timer ablesen.
Page 23

IT
E PO
NL
SIGNIFICATO DEI
SIMBOLI NEL
PANNELLO
COMANDI
FIAMMA GRANDE
FIAMMA RIDOTTA
BRUCIATORE
SUPERIORE
ACCESO
BRUCIATORE
INFERIORE
ACCESO
PULSANTE DI
ACCENSIONE
A continuación se
explica el signicado de los símbolos utilizados en el
marco de manejo:
LLAMA AL
MÁXIMO
LLAMA AL
MÍNIMO
GRILL
CALOR INFERIOR
PULSADOR DE
ENCENDIDO
Signicado dos
símbolos que
poderá encontrar
no painel de
comandos
Chama Completa
Chama Média
Queimador
Superior está ligado
Queimador Inferior
está ligado
Acendedor
De betekenissen
van de symbolen
die op uw controlepaneel zouden
kunnen zijn, zijn als
volgt.
VOLLE VLAM
VERMINDERDE
VLAM
TOP BRANDER
IS AAN
DE BODEM
BRANDER IS AAN
ONSTEKINGS
AANSTEKER
LAMPADINA
GIRARROSTO
(POLLI ALLO SPIEDO)
MANOPOLA TIMER
MECCANICO
(optional); per accendere il forno,
impostare con il timer
il tempo desiderato.
LUZ
GRILL
MECHANISCHE
TIMER KNOP (Optioneel); Om de oven
te laten functioneren,
moet u de timer knop
op de gewenste tijd
afstellen.
Lâmpada
Espeto
LAMP
DRAAISPIT
(KIP GRILL)
MANDO DEL
TEMPORIZADOR
MECÁNICO (opcional); para que el
horno funcione, ajuste
el temporizador en el
tiempo deseado.
27
Page 24

GB
FR
D IT E
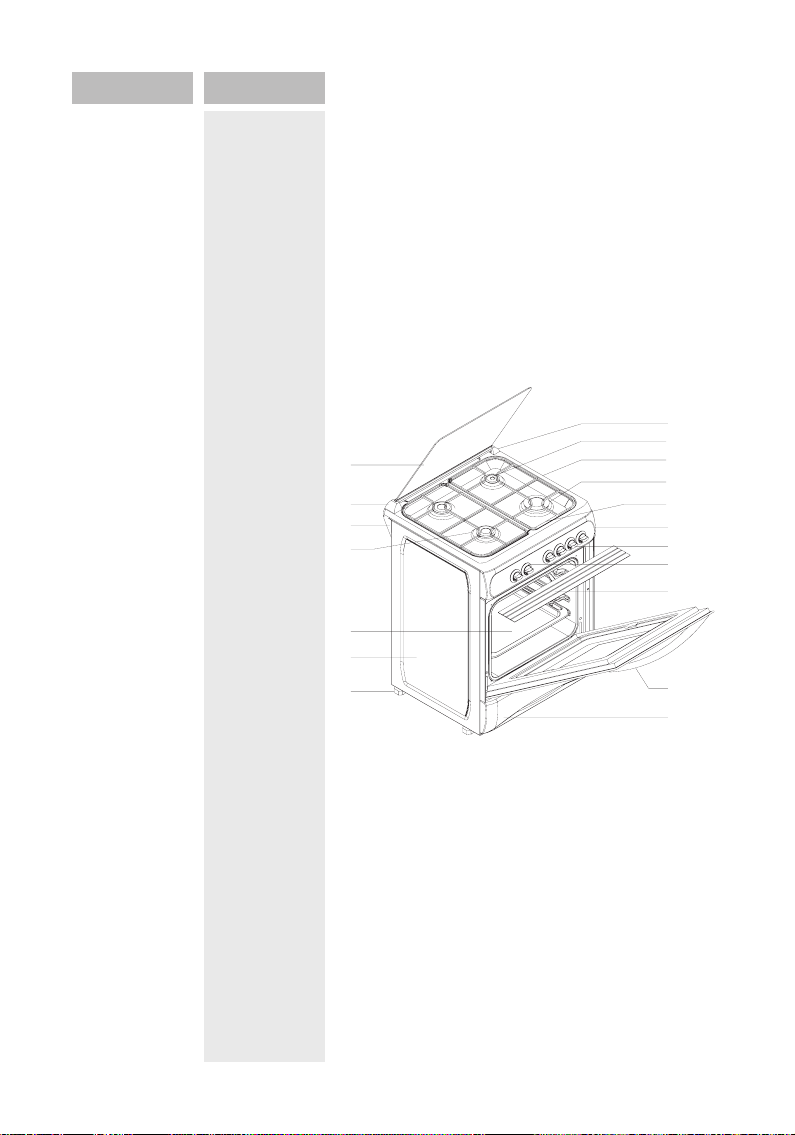
DESCRIPTION
OF THE OVEN
AND CONTROL
PANEL
1. Top lid
2. Top lid hinge
female left
3. Top plate hinge
4. Small burner
5. Oven tray
6. Side panel
7. Plastic foot
8. Top lid hinge
female right
9. Middle burner
10. Top plate
11. Big burner
12. Cooker grid
13. Command
panel
14. Cooker knobs
15. Oven knob
16. Knob
protection sheet
17. Oven handle
18. Dishwarmer
cover
DESCRIPTION
DU FOUR ET DU
PANNEAU DE
COMMANDE
1.Couvercle
supérieur
2. Charnière
du couvercle
supérieur femelle
gauche
3. Charnière table
de cuisson
4. Petit brûleur
5. Plateau du four
6. Paroi latérale
7. Pied en plastique
8. Charnière
du couvercle
supérieur femelle
droit
9. Brûleur moyen
10. Table de
cuisson
11. Grand brûleur
12. Grılle de la
table de cuisson
13. Panneau de
commande
14. Boutons de la
cuisinière
15. Bouton du
four
16. Bandeau de
protection des
boutons
17. Poignée de la
porte du four
18. Chauffe-plats/
couverts
BACKOFENDEFINITION UND
KONTROLLENBLENDE
1.Deckel oben
2.Oberer Deckel
Scharnieraufnahme, links
3.Fahnenblech
4.Kleiner Gasbrenner
5. Ofenbackblech
6. Seitenwand
7. Kunststofffuß
8. Oberer Deckel
Scharnieraufnahme, rechts
9. Mittlerer Gasbrenner
10. Platte oben
11. Großer Gasbrenner
12. Grill
13. Bedienblende
14. Herdschalter
15. Ofenschalter
16. Schalterschutzblende
17. Ofenhalter
18. Deckel,
Schubkasten
unten
DESCRIZIONE
DEL FORNO E
DEL PANNELLO
COMANDI
1. Coperchio
superiore
2. Cerniera femmina sinistra coperchio superiore
3. Cerniera piano
di cottura
4. Bruciatore
piccolo
5. Leccarda forno
6. Pannello laterale
7. Piedino in
plastica
8. Cerniera femmina destra coperchio superiore
9. Bruciatore
medio
10. Piano di cottura
11. Bruciatore
grande
12. Griglia piano di
cottura
13. Pannello
comandi
14. Manopole
piano di cottura
15. Manopole forno
16. Deettore
di protezione
manopole
17. Maniglia
sportello forno
18. Sportello
scaldavivande
Descripción del
equipo
1.Tapa abatible
2.Bisagra de la
tapa, izquierda
3.Soprtes huecos
4.Quemador de
gas mediano
5.Bandeja
para horno
6.Lateral
7.Pie de apoyo
regulable en
altura
8.Bisagra de la
tapa, derecha
9.Quemador de
gas pequeño
10.Espacio de
cocina
11.Quemador de
gas grande
12. Bandeja para
la reja
13. Marco de
manejo
14. Mando de los
quemadores
15. Conmutador
del horno
16. Chapa de
calor (solo con
grill)
17. Empuñadura
de la puerta
18. Carro (si está
equipado)
28
Page 25
NLPO
9
11
15
14
12
10
7
8
16
13
1
6
2
3
4
5
17
18
Descrição do
forno e do painel
de comandos
1.Tampa superior;
2.Dobradiça esquerda da tampa
superior;
3.Dobradiça do
prato superior;
4.Queimador
pequeno;
5.Travessa do
forno;
6.Painel lateral;
7.Pés de plástico;
8.Dobradiça esquerda da tampa
superior;
9.Queimador
médio;
10. Prato Superior;
11.Queimador
Grande;
12.Grelha;
13.Painel de
Comandos;
14.Botões do
fogão;
15.Botões do
forno;
16.Painel de
Protecção;
17.Manípulo do
forno;
18.Tampa
BESCHRIJVING
FORNUIS EN
CONTROLEPANEEL
1. Deksel
2. Top deksel
scharnier links
3. Top plaat
scharnier
4. Kleine brander
5. Oven blad
6. Zijpaneel
7. Plastic poot
8. Top deksel
scharnier rechts
9. Midden
brander
10. Top plaat
11. Grote brander
12. Fornuis
rooster
13. Controlepaneel
14. Fornuis knoppen
15. Oven knop
16. Knop bescherming plaat
17. Oven handvat
18. Plint
29
Page 26

ITDFRGB
USING COOKER
SECTION
Using Gas Burners :
In order to obtain
maximum output,
be careful that the
saucepan which will
be used should be
at bottomed, and
use the saucepans
with dimensions
given herein belove.
The valves controlling the gas cookers
have special security
mechanism. In order
to light the cooker;
Big burner
24 - 28 cm
Middle burner
18 - 22 cm
Aux. burner
12 - 18 cm
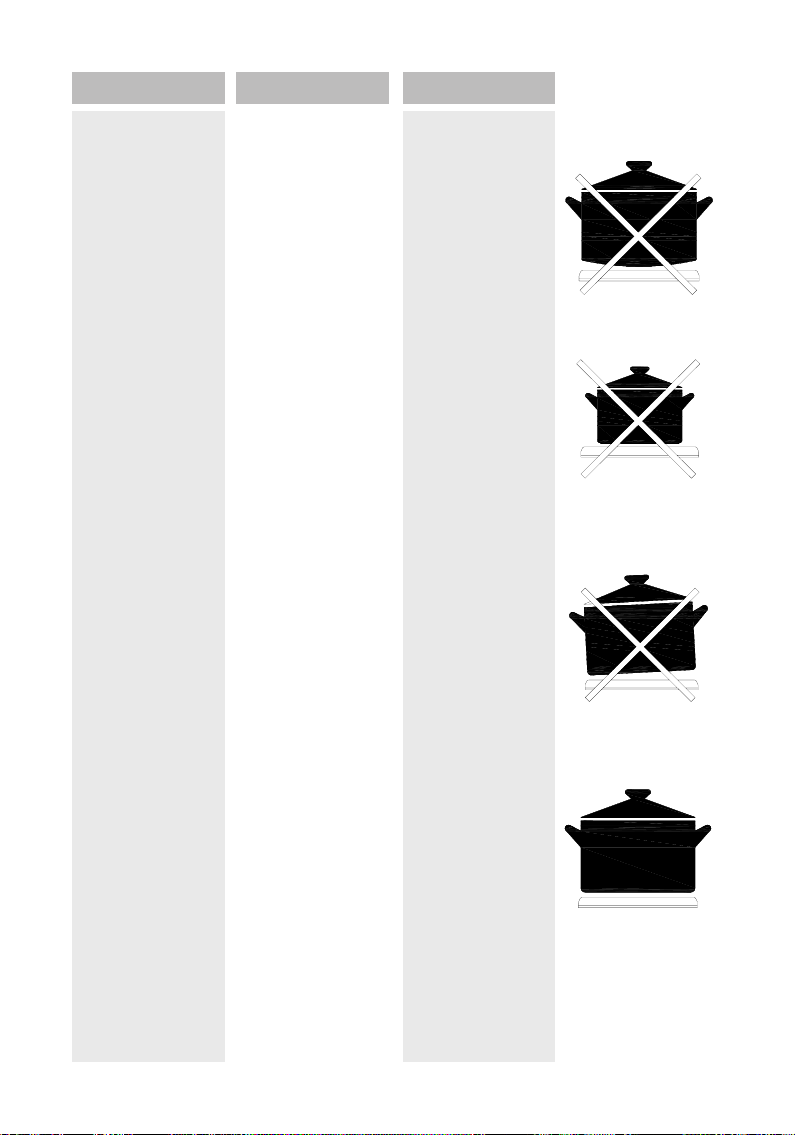
1. Always press on
the switch forward
and bring it to ame
symbol by turning anticlockwise (left).
All of the lighters
shall operate and the
cooker you controlled
shall light only. Keep
the switch pressed
until ignition is performed. (OPTION)
2. Press on the
lighter button by
pressing on the
switch forward and
turning anticlockwise
(left).
UTILISATION DE
LA TABLE DE
CUISSON
Utilisation des brûleurs à gaz :
Pour obtenir les
meilleurs résultats,
utilisez des casseroles à fond plat
ayant les dimensions
indiquées ci-dessous.
Les robinets qui
contrôlent les tables
de cuisson au gaz
ont un mécanisme
spécial de sécurité.
Pour faire marcher la
table de cuisson :
Grand brûleur
24 - 28 cm
Brûleur moyen
18 -22 cm
Brûleur auxiliaire
12 -18 cm
1. Appuyez toujours
sur le bouton et
amenez le vers
le symbole de la
amme en tournant
dans le sens contraire des aiguilles d’une
montre (gauche).
Tous les brûleurs
doivent fonctionner et
seul celui que vous
commandez doit
s’allumer. Appuyez
sur le bouton jusqu’à
ce que le brûleur
s’allume.
(EN OPTION)
2. Appuyez sur le
bouton et tournez
dans le sens contraire des aiguilles d’une
montre (gauche).
BACKFACHVERWENDUNG
Gasherdverwendung:
Um Maximum Ergiebigkeit zu erreichen
müssen Sie darauf
achten, dass die lang
grifgen Töpfe platte
Böden haben und die
langen Griffe in den
unten aufgeführten
längen sind.
Ventile, die Gasherde
kontrollieren, sind
mit einem spezialem
Sicherheitsmechanismus ausgerüstet.
Um den Ofen zu
bedienen ;
Großer Herd
24 - 28 cm
Großer Herd
18 - 22 cm
Hilfsherd
12 - 18 cm
1. Drücken Sie
den Schalter nach
vorn und gegen den
Uhrzeigersinn bis
zum Flammensymbol
drehen. (links)
Alle Zünder müssen
funktionieren und
nur das kontrollierte
Herdfeld darf brennen. Drücken Sie
den Schlüssel bis die
Zündung erfolgt.
(auf Wunsch)
2. Drücken Sie
den Zünder und
gleichzeitig drücken
Sie den Schlüssel
nach vorn und drehen
diesen gegen den
Uhrzeigersinn. ( links)
USO DEL PIANO DI
COTTURA
Uso dei bruciatori a
gas:
Per ottenere i migliori
risultati, utilizzare
pentole e tegami dal
fondo piano e delle
dimensioni indicate di
seguito.
Le valvole di controllo
dei bruciatori a gas
sono dotate di speciali
dispositivi di sicurezza. Per accendere i
bruciatori:
Bruciatore grande
24 - 28 cm
Bruciatore medio
18 -22 cm
Bruciatore ausiliario
12 -18 cm
1. Premere la manopola e girarla in senso
antiorario (verso sinistra) in corrispondenza
del simbolo della
amma desiderata.
Devono attivarsi
tutti i dispositivi di
accensione e si deve
accendere solo il
bruciatore azionato.
Tenere premuta la
manopola nché il
bruciatore non si è acceso. (OPTIONAL)
2. Premere il pulsante
di accensione, premere la manopola e
girarla in senso antiorario (verso sinistra)
30
Page 27
E PO
NL
Manejo de los
fogones
Prestar atención a
los fogones:
Utilice utensilios de
cocina adecuados
para cada quemador.
Todos los quemadores están equipados con válvulas de
seguridad especiales. Para encender
los fogones tenga en
cuenta lo siguiente:
Quemador grande
Ollas de 24 – 28 cm
Quemador mediano
Ollas de 18 – 22 cm
Quemador pequeño
Ollas de 12 – 18 cm
1. Presione el mando
(conmutador) respectivo hacia dentro y
gírelo en sentido
contrario a las agujas
del reloj hasta que
esté seleccionado el
símbolo de llama al
máximo.
2. Presione el pulsador de encendido.
Se activan todos
los quemadores
pero solo se puede
encender el fogón
seleccionado.
Secção do fogão
Usar queimadores
de gás
Para obter os
melhores resultados,
verique se a panela,
a ser usada, tem um
fundo raso e use
apenas panelas com
as dimensões abaixo
indicadas.
As válvulas que
controlam o fogão de
gás têm um mecanismo de segurança
especial.
Queimador Grande:
24-28cm;
Queimador Médio:
18-22cm;
Queimador Auxiliar:
12-18cm;
1. Pressione sempre
o botão para a frente
virando-o no sentido
oposto dos ponteiros
de relógio (esquerda)
até atingir o símbolo
da chama.
O bico que escolheu
deverá acender.
Mantenha o botão
pressionado até
que a ignição entre
em funcionamento
(opcional).
2. Pressione o botão
para a frente virandoo no sentido inverso
aos ponteiros do
relógio (esquerda).
GEBRUİK VAN DE
KOOKPLAAT
Gasbranders
gebruiken:
Om maximaal uitvoer
te krijgen, wees voorzichtig dat de pan die
gebruikt zal worden
platte bodem heeft,
en gebruik de pan
met dimensie hierin
onderaan gegeven.
De kleppen die het
gasfornuis controleren hebben speciale
veiligheidmechanismen. Om het fornuis
aan te steken;
Grote brander
24-28 cm
Midden brander
18-22 cm
Reserve brander
12-18 cm
1. Altijd druk op de
schakelaar vooruit en
breng get op de vlam
symbool met het naar
linksom draaien.
Alle aanstekers zullen
werken en alleen de
fornuis die u controleerd zal branden.
Houd de schakelaar
gedrukt tot het
onsteking uitgevoerd
is.(KEUZE)
2. Druk op de aansteker knop met de
schakelaar vooruit en
het naar linksom te
draaien.
31
Page 28

ITDFRGB
USING COOKER
SECTION
It means Closed
Position. Flame
is extinguished
CLOSED
Fully Open
Half Open
* In models with
Gas Security
System, when ame
of the cooker is
extinguished, control
valve cuts off the
gas automatically.
(OPTION)
For operate the
burners with gas
security system you
must make press the
knob and turn anticlock wise. After the
ignition (with optional
automatic ignition
system or match)
you must wait nearly
5-10 second for gas
security systems
activation.
*Do not continuously operate the
igniter for more than
15 seconds. After
15 seconds, if the
burner does not
ignite, then stop and
if you are trying to
ignite the oven then
open the door and
wait a minimum of
one minute before
trying again.
If the burner is
extinguished for of
the any reason, close
the gas control valve
and wait a minimum
of one minute before
trying again.
UTILISATION DE LA
TABLE DE CUISSON
Signie Fermé. La
amme est éteinte.
FERME
Entièrement ouvert
A moitié ouvert
* Dans les modèles
ayant un Système de
Sécurité pour le gaz,
lorsque la amme est
éteinte, le robinet de
contrôle ferme le gaz
automatiquement.
(EN OPTION)
Pour faire marcher
les brûleurs avec un
système de sécurité
pour le gaz, il faut
appuyer sur le bouton
et tourner dans le sens
contraire des aiguilles
d’une montre. Après
l’allumage (avec le
système d’allumage
automatique en option
ou une allumette), il
vous faut attendre
environ 5-10 secondes
pour que le système de
sécurité soit activé.
* N’utilisez pas pendant plus que 15 sec
l’allumage. Si après ces
15 secondes le brûleur
ne s’allume pas, arrêter
pendant quelques
instants et si vous essayiez d’allumer le four,
ouvrer la porte et attendez au moins 1 minute
avent de réessayer. Si
le bruleur s’est éteint
pour l’une ou l’autre
raison, éteignez celui-ci
et attendez minimum
une minute avant de le
rallumer.
BACKFACHVERWENDUNG
Bedeutet geschlossene Position.
Flamme erlischt
GESCHLOSSEN
GANZ OFFEN
HALB OFFEN
Bei Ausführungen mit
Gassicherheitssystem schaltet das
Kontrollventil das
Gas automatisch aus,
wenn die Flamme erlischt. ( auf Wunsch)
Der obere Herd und
der untere Ofen
werden bei unseren
Gasöfen einzeln
betrieben. Wenn Sie
den Herd verwenden
möchten, müssen
Sie zuerst den Hahnschalter drücken und
ca. 5-10 Sekunden
warten.
USO DEL PIANO
DI COTTURA
Signica “Posizione
di chiusura”. La
amma è spenta.
CHIUSO
Completamente
aperto
Semiaperto
*Nei modelli con
valvola di sicurezza,
quando la amma del
bruciatore si spegne,
la valvola di controllo
interrompe automaticamente l’erogazione
del gas (OPTIONAL).
Per accendere i
bruciatori con valvola
di sicurezza, premere
la manopola e girarla
in senso antiorario.
Dopo l’accensione
(con il dispositivo di
accensione automatica, optional, o un
ammifero) attendere
5-10 secondi per
l’attivazione della
valvola di sicurezza.
*Non tenere premuto
il dispositivo di accensione per più di 15
secondi. Se il bruciatore non si accende
entro 15 secondi, se
si sta cercando di accendere il forno, aprire
lo sportello del forno
e attendere almeno
un minuto prima di
provare di nuovo.
Se il bruciatore si
spegne, chiudere la
valvola di controllo del
gas e attendere almeno un minuto prima
di provare di nuovo
l’accensione.
32
Page 29
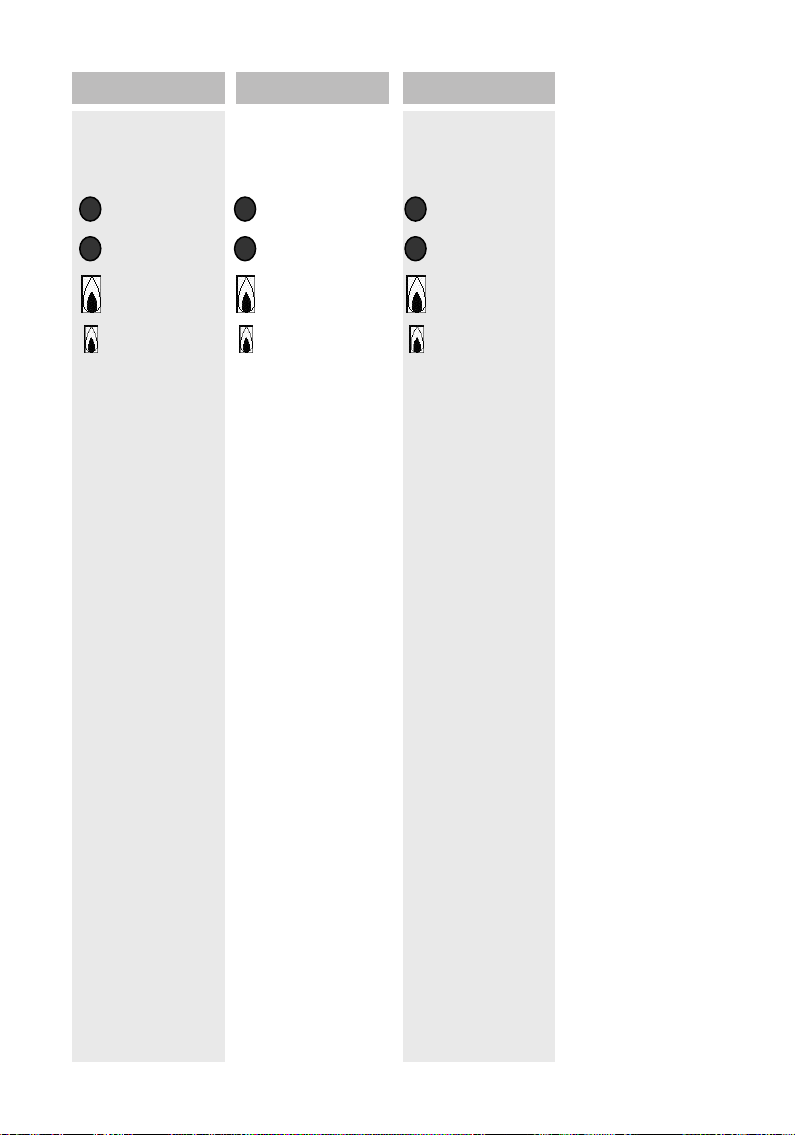
E PO
NL
Manejo de los
fogones
Signica posición
cerrada. La llama
se apaga
CERRADO
TOTALMENTE
ABIERTO
SEMIABIER-TO
Importante: Cuando
la llama se apaga el
sistema de seguridad
del gas desconecta
automáticamente la
alimentación de gas
mediante una válvula
de mando.
Todos los fogones
de la cocina y del
horno funcionan
independientemente.
Para encender un
fogón es necesario
apretar el mando
correspondiente
y esperar durante
5 – 10 segundos
aproximadamente.
Secção do fogã
Desligado
Desligado
Ligado
Semi Ligado
Nos modelos a gás
com sistema de
segurança, quando
a chama dos bicos
está apagada, a a
válvula de controlo
impede a saída de
gás automaticamente
(opcional).
Para fazer uso
dos queimadores
com sistema de
segurança, deve
pressionar o botão
e virá-lo no sentido
inverso aos ponteiros
do relógio. Após a
ignição (através de
um acendedor com
sistema automático
ou um fósforo) deve
aguardar cerca de 5
a 10 segundos para
activar o sistema
de segurança para
fogões a gás.
* Não utilizar a ignição por um período
contínuo superior a
15 segundos. Após
15 segundos, se o
bico não acender,
pare e se tentar
novamente abra a
porta e aguarde pelo
menos um minuto
antes de tentar
novamente.
GEBRUİK VAN DE
KOOKPLAAT
Betekent gesloten
positie. De vlam is
gedoofd.
dicht
totaal open
totaal open
In modellen met gasveiligheidssysteem,
wanneer de vlam van
de fornuis is uitgedooft, zet de controle
klep de gas automatische uit.(KEUZE)
Om de branders met
gasveiligheidssysteem
te laten werken moet
u de knop indrukken
en naar links draaien.
Na de onsteking (met
optioneel automatisch
ontsteking systeem
of lucifer) moet u
ongeveer 5-10 seconden wachten for het
gasveiligheidssysteem
activering.
* Gebruik de aansteking niet langer dan 15
seconden. Indien de
brander niet aangaat
na 15 seconden
dient u de wachten
gedurende enkele
ogenblikken en indien
u de oven probeerde
aan te steken, dient
u de deur te openen
en minimum 1 minuut
te wachten alvorens
opnieuw te proberen.
Indien de brander voor
om het even welke
reden alleen is uitgegaan, moet u deze
uitzetten en minimum
1 minuut wachten alvorens deze opnieuw
aan te zetten.
33
Page 30
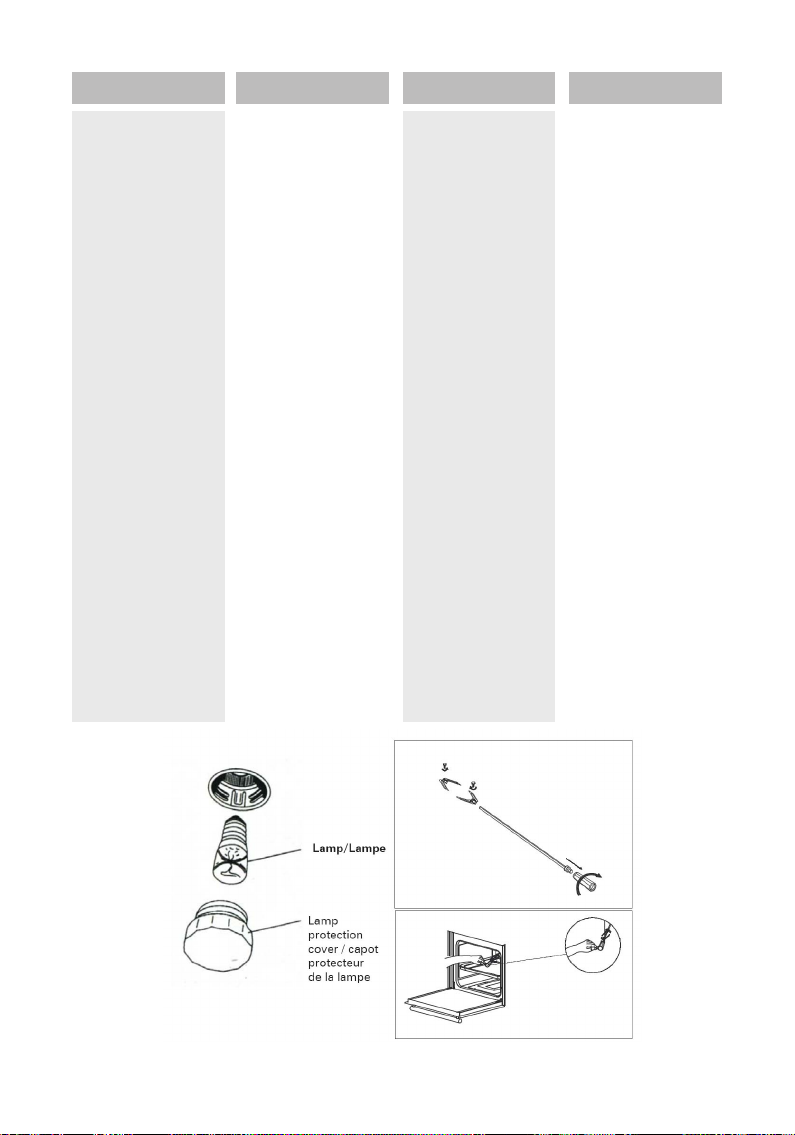
ITDFRGB
USING COOKER
SECTION
Using oven burners
The our gas ovens
top and bottom
burner working
system is one by
one. When you want
use your preference
burner, before you
must make press the
tap knob and wait
nearly 5-10 second.
Then you can to
iname trought with
automoatic ignition
system (optianal) or
match. You must wait
10-15 second after
the iname to have
press by tap knob
and after you can
make allow the knob.
İf you can not made
this operation you
must try again.
When you make the
ignition operation,
then you can close
the oven door 3-4
minute after.
UTILISATION DE LA
TABLE DE CUISSON
Utilisation des brûleurs
du four Les brûleurs
à gaz du four en haut
et en bas fonctionnent
indépendamment l’un
de l’autre. Lorsque
vous voulez utiliser
votre brûleur préféré,
il vous faut d’abord
appuyer sur le bouton
et attendre environ
5-10 secondes. Vous
pouvez alors allumer
les brûleurs avec le
système d’allumage
automatique (en option) ou une allumette.
Il vous faut maintenir la
pression sur le bouton
pendant 10-15 secondes après l’allumage.
Vous pouvez ensuite
relâcher le bouton. Si
ça ne reste pas allumé,
il vous faut recommencer. Une fois
le four allumé, vous
pouvez fermer la porte
du four 3-4 minutes
après.
BACKFACHVERWENDUNG
Danach können
Sie den Herd falls
vorhanden mit dem
automatischen
Ofenzünder, wenn
nicht vorhanden mit
einem Streichholz
anzünden. Nach der
Zündung müssen Sie
einige Sekunden den
Gashahn drücken.
Danach können
Sie den Schalter
loslassen. Wenn Sie
diesen Vorgang nicht
machen können,
müssen Sie es noch
mal versuchen.
Nachdem Sie
im Backfach die
Zündung durchgeführt haben, können
Sie den Ofendeckel
3-4 Minuten später
zuklappen.
USO DEL PIANO
DI COTTURA
Uso dei bruciatori
del fornoI bruciatori
superiore e inferiore
del forno a gas sono
indipendenti. Per accendere il bruciatore
desiderato, premere la
relativa manopola per
5-10 secondi. Quindi
accendere il bruciatore con il dispositivo
di accensione automatica (optional) o
con un ammifero. Attendere 10-15 secondi
dopo l’accensione
prima di rilasciare la
manopola. Se non si
riesce ad accendere il
bruciatore, riprovare.
Dopo avere acceso il
bruciatore, attendere
3-4 minuti prima di
chiudere lo sportello
del forno.
34
Page 31

E PO
NL
Manejo de los
fogones
A continuación podrá
encender el gas
electrónicamente
presionando el pulsador de encendido
o manualmente con
una cerilla. Después
de encender el fuego
mantenga el mando
del gas presionado
durante unos segundos y luego suéltelo.
Si la llama se apaga,
repita el procedimiento.
Para encender los
quemadores del
horno deje la puerta
abierta. Ciérrela
aproximadamente 3
segundos después de
que la llama se haya
encendido y de comprobar que quema
correctamente.
Secção do fogã
Usar os queimadores
do forno
Os queimadores
superiores e inferiores dos fogões
a gás têm um
sistema one-by-one.
Se preferir, pode
usar apenas o seu
queimador preferido,
mas para isso deverá
pressionar o botão
e aguardar cerca de
5 a 10 segundos.
De seguida poderá
acender o bico com
um piloto automático
(opcional) ou um fósforo. Deve aguardar
10 a 15 segundos
após ter acendido
o forno e só depois
largar o botão. Se
não conseguir, repita
novamente o processo. De seguida, 3
a 4 minutos depois,
pode fechar a porta.
GEBRUİK VAN DE
KOOKPLAAT
Ovenbranders
gebruiken:
Wanneer u uw
gewenste brander wil
gebruiken, moet u de
knop indrukken en ongeveer 5-10 seconden
wachten. Daarna kunt
u ontsteken met automatisch ontsteking
systeem(optioneel) of
lucifer. U moet 10-15
seconden wachten
na de ontsteking met
de knop ingedrukt
en daarna kunt u de
knop loslaten. Als dit
niet gelukt is moet
u het nog een keer
proberen. Wanner
de ontsteking werkt,
dan kunt u het deksel
van de oven na 3-4
minuten dicht doen.
35
Page 32

GB
FR
D IT E
USING OVEN
SECTION
When your oven is
operated rst time,
an odor will be
spread out which
will be sourced from
using the heating
elements. In order
to get rid of this,
operate it at 250 °C
for 45 minutes while
it is empty.
In order to make
cooking in your oven;
oven switch must
have been rotated .
Otherwise oven does
not operate.
Kinds of meals you
will cook, cooking
times and Thermostat positions were
given in cooking
table.
The values given in
the cooking table are
characteristic values
and were obtained
as a result of the
tests performed in
our laboratory.
You can nd different
avors suitable for
your taste depending
on your cooking and
using habits.
You can make
chicken revolving in
your oven by means
of the ccessories.
(optional) Cooking
times: The results
may change according to the area
voltage and material having different
quality, amount and
temperatures.
During the time when
cooking is being
performed in the
oven, the lid of the
oven should not be
opened frequently.
Otherwise circulation
of the heat may be
imbalanced and the
results may change.
Using cake forms
while cooking cake
gives better result.
UTILISATION DU
FOUR
Lorsque vous faites
marcher le four pour
la première fois, il y
aura une odeur produite par les éléments
chauffants. Pour vous
en débarrasser, faites
le fonctionner à vide
à 250 °C pendant 45
minutes.
Pour faire cuire dans
votre four, le bouton
du four doit avoir été
tourné .
Sans cela, le four ne
fonctionne pas.
Les types de plats
que vous cuisinez,
les temps de cuisson
et les positions du
Thermostat sont donnés dans le tableau
de cuisson.
Les valeurs dans le
tableau de cuisson
sont des valeurs
caractéristiques
obtenues an cours de
tests dans notre laboratoire.Vous pouvez
trouver des arômes
différents à votre goût
en fonction de votre
façon de cuisiner et
de vos habitudes.
Vous pouvez faire
cuire un poulet dans
votre four avec le
tournebroche en utilisant les accessoires
pour cela. (en option)
Temps de cuisson :
Les résultats peuvent
changer en fonction
de la tension, la
qualité, la quantité et
les températures.
La porte du four ne
doit pas être souvent
ouverte tant que le
four fonctionne pour
cuire un plat.
Autrement, il se peut
que la chaleur ne soit
pas bien distribuée,
ce qui peut modier
les résultats.
L’utilisation de plats
de cakes pour faire
cuire des cakes
donne de meilleurs
résultats.
BETRIEB DES
BACKOFENS
Bei der Erstbedienung des Backofens
entsteht ein Geruch
durch das Nutzen der
Erwärmteile.
Betätigen Sie Ihren
Backofen im leeren
Zustand bei 250 C 45
Minuten, um diesen
Geruch zu beheben.
Um Backen zu
können, muss der
Schlüssel gedreht
werden.
Im Gegenfall funktioniert der Ofen nicht.
In der Back- und
Brattabelle sind Speisensorten, Back- und
Bratzeiten und die
jeweiligen Thermostat
Positionen aufgeführt.
Die in der Backtabelle
aufgeführten Werte
sind typische Werte
und wurden durch
Tests, die in unserem
Labor durchgeführt
wurden, festgelegt.
Je nach Ihren Back-
und Bratmethoden
und Angewohnheiten können Sie
verschiedene Geschmäcke für Ihren
Gaumen gestalten.
Mit Hilfe der Accessoires können
Sie in Ihrem Ofen
Hähnchen drehen
(auf Wunsch)
Back- und Bratzeiten:
Ergebnisse; Feldspannung und Materialien in verschiedener
Qualität können sich
Abhängig von Menge
und Temperatur
ändern.
Beim Braten im Ofen
sollte der Deckel nicht
geöffnet werden.
Im Gegenfall ändern
sich die Temperaturumlaufbalance
im Ofen und die
Ergebnisse.
Beim Kuchen backen
können Sie durch
Verwendung von
Backformen bessere
Ergebnisse erreichen.
USO DEL FORNO
Quando si accende
il forno per la prima
volta, si sentirà un
odore particolare
provocato dagli
elementi riscaldanti.
Per eliminare questo
odore, fare funzionare
il forno (vuoto) a 250
°C per 45 minuti.
Per accendere il forno
si deve ruotare la
relativa manopola,
altrimenti il forno non
entra in funzione.
I tempi di cottura e le posizioni
del termostato per i
diversi alimenti sono
indicati nella tabella di
cottura.
I valori indicati nella
tabella di cottura sono
valori caratteristici
ottenuti da prove eseguite in laboratorio.
Si possono usare gli
aromi preferiti in base
alle proprie abitudini
alimentari.
Si possono cuocere
polli allo spiedo
utilizzando l’apposito
accessorio (optional).
Tempi di cottura: i
tempi possono variare
in base alla tensione
di rete e alle diverse
qualità e quantità
degli alimenti e temperature impiegate
per la cottura.
Non aprire spesso
lo sportello del forno
durante la cottura
per mantenere una
circolazione uniforme
del calore, altrimenti
possono variare i
risultati di cottura.
Per la cottura di torte,
si ottengono risultati
migliori utilizzando
appositi stampi.
Manejo del horno
La primera vez que
utilice el horno es
posible que oiga un
ruido molesto. Preste
atención a que la
habitación esté
sucientemente ventilada y caliente el
horno vacío durante
aproximadamente 30
minutos a 250 ºC.
Encienda el horno
(véase „Manejo de
los fogones“).
En la tabla de
horneado y asado
se indican los tipos
de alimentos, los
tiempos de horneado y asado y la
posición correcta del
termostato para cada
uno de ellos.
Los valores de la
tabla son promedios que han sido
obtenidos en los
ensayos realizados
en nuestros laboratorios.
En función del estilo
de horneado y asado
que utilice y de sus
propias costumbres
podrá preparar
distintos platos.
Tiempos de horneado y asado: Éstos
tiempos sirven solo
como referencia, ya
que los materiales,
las cantidades y los
alimentos utilizados
pueden dar distintos
resultados en
función de la temperatura utilizada.
No abra la puerta
del horno durante
las operaciones de
horneado y asado
(pérdida de calor).
Ello podría perjudicar
el resultado del horneado o el asado
A n de obtener
mejores resultados
cuando haga pasteles, recomendamos utilizar moldes
de horno apropiados
36
Page 33
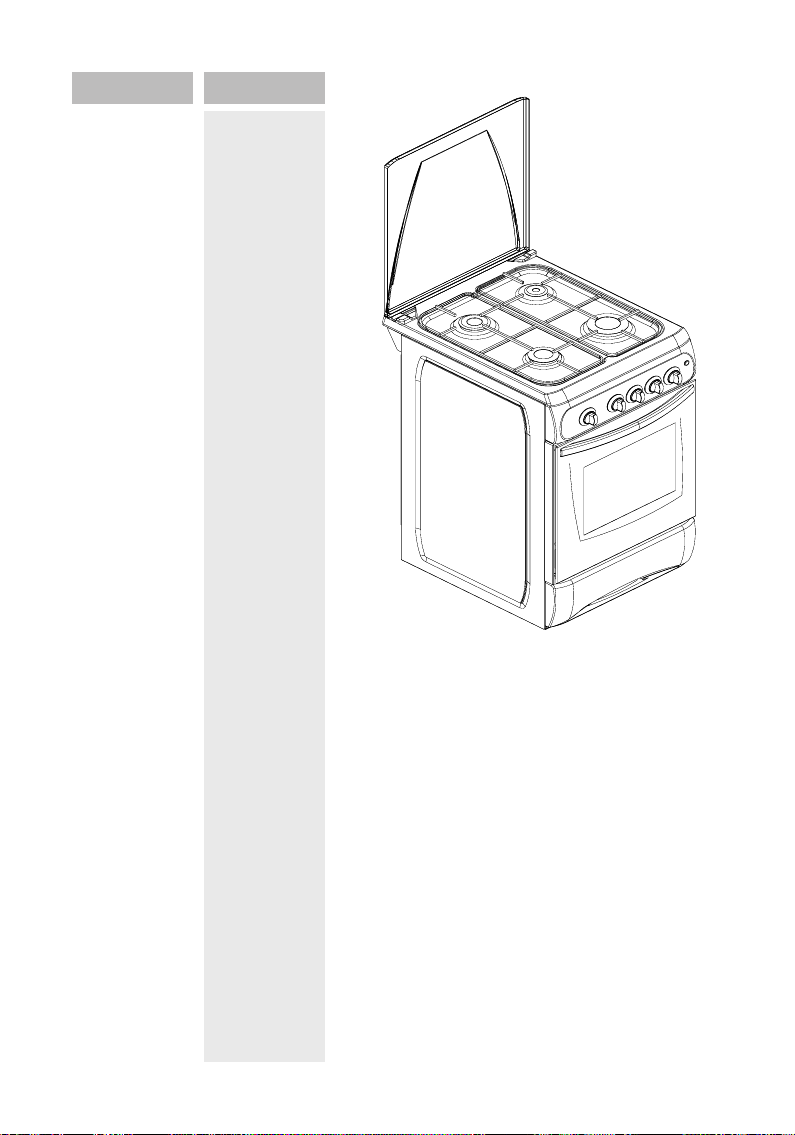
NL PO
USING OVEN
SECTION
Kur furra juaj operon
per here te pare, ju
do te ndjeni ne ere
e cila
Del nga perdorimi i
elementeve ngrohes.
Ne menyre qe te
liroheni prej saj
operoni ne 250 °C
per 45 minuta dhe
ajo te jete bosh.
Ne menyre qe te
gatuani me furren;
celesi i furres duhet
te jete i rrotulluar .
Ne te kundert ajo
nuk operon.
Llojet e ushqimeve
qe ajo do te gatuaj,
oraret e gatimit
dhe pozicionin i
termostatit jane te
dhena ne tabelen e
gatimit.
Vlerat e dhena ne
tabelen e gatimit
jane vlera te marra si
rezultat i testeve te
kryera ne laboratoret
tane.
Ju mund te gjeni
shije te tjera me te
pershtatshme per
shijet tuaja ne varesi
te zakoneve tuaja.
Ju mund te
pergatisni pule te
pjekur ne varesi te
sesoreve.(opsionale)
Koha e gatimit :
rezultatet mund te
jene te ndryshme ne
varesi te tensionit
cilesise se materialit,
sasise dhe temperatures.
Gjate kohes qe ushqimi eshte ne furre,
dera e saj nuk duhet
hapur vazhdimisht.
Ne te kundert qarkullimi i nxehtesise
mund te cbalancohet
dhe rezultatet do te
ndryshojne.
Perdorimi i formave
te kekut do te
ndihmoj edhe me
shume.
GEBRUİK VAN
OVEN
Wanneer uw oven
voor de eerste keer
in werking is gesteld,
zal een geur worden
verspreid die van het
gebruiken van de verwarmende elementen
afkomstig is. Om van
dit af te komen, stelt
u 250 graden in voor
45 minuten terwijl
oven leeg is. Om het
koken in uw oven te
maken; moet de oven
schakelaar geroteerd
te zijn.
Anders werkt de oven
niet.
De soorten maaltijden
die u zal koken, kooktijden en thermostaatposities zijn gegeven
in kooklijst.
De waarden die in de
koken lijst gegeven
zijn karakteristieke
waarden en zijn
verkregen als resultaat van de test
uit gevoerd in de
laboratorium.
U kunt verschillende
aroma’s voor uw
smaak afhankelijk
van uw koken en
gewoonten geschikt
vinden.
U kunt kip draaien in
uw oven door middel
van de accessoires.
(optioneel)
Kooktijden: De
resultaten kunnen
volgens het gebiedvoltage en materiaal
die verschillende
kwaliteit, hoeveelheid
en temperaturen
veranderen.
Tijdens het koken
in de oven, zou het
deksel van de oven
niet vaak geopend
mogen worden.
Anders kan de
omloop van de hitte
ongebalanceerd zijn
en de resultaten kunnen veranderen.
Het gebruik van cake
vorm voor het bakken
van cake is beter.
37
Page 34

GB
FR
D IT E
USING OVEN
SECTION
COOKING
TABLE
MEALS
CREAMED CAKE
PASTRY
BISCUIT
COOKIE
CAKE
BRAIDED COOKIE
FILO PASTRY
SAVORY PASTRY
LAMB MEAT
VEAL
UTILISATION DU
FOUR
TABLEAU DE
CUISSON
PLATS
CAKE A LA CREME
PATISSERIE
BISCUIT
COOKIE
CAKE
COOKIE PANNE
PATISSERIE FILO
PATISSERIE AROMATISEE
VIANDE D’AGNEAU
VEAU
BETRIEB DES
BACKOFENS
BACK- UND
BRATTABELLE
SPEISEN
SAHNEKUCHEN
KUCHEN
BISKUIT
PLÄTZCHEN
KUCHEN
PLÄTZCHEN MIT ZWIEBACK
SÜSSES GEBÄCK
MÜRBETEIGPASTETE
LAMMFLEICH
KALB
USO DEL FORNO
TABELLA DI
COTTURA
ALIMENTI
КЕ TORTE ALLA CREMA
PASTICCINI
CRACKER
BISCOTTI
TORTE
TRECCE (TORTE)
VOL-AU-VENT
PASTA FROLLA
CARNE DI AGNELLO
VITELLO
Indicaciones
de uso para el
horno
TABLA DE
HORNEADO Y
ASADO
ALIMENTOS
PASTELES DE NATA
PASTELES
BIZCOCHOS
GALLETAS
PASTELES
GALLETAS RELLENAS
PASTAS DULCES
VOLOVÁN DE HOJALDRE
CORDERO
TERNERA
MUTTON
CHICKEN (IN PIECES)
FISH
Note: The values in
the Table are the
results obtained in
our laboratories.
You can nd avors
different and suitable to your taste
by experience. 5
- 10 min. preliminary
heating should be
done prior cooking.
38
MOUTON
POULET (EN MORCEAUX)
FISH
Remarque : Les
valeurs dans le
Tableau sont les
résultats obtenus
dans nos laboratoires.
Vous pouvez trouver
des arômes différents
et à votre goût en
fonction de votre
expérience. il convient de préchauffer
votre four pendant 5
- 10 minutes avant la
cuisson.
SCHAF
HÄHNCHEN (STÜCK)
FISCH
Bemerkung: Die
in der Tabelle
aufgeführten Werte
sind Laborergebnisse. Durch
Proben können Sie
verschiedene Geschmäcke nden.
Vor dem Backen
oder Braten 5-10
Minuten vorwärmen.
MONTONE
POLLO (A PEZZI)
PESCE
Nota: i valori nella
tabella sono stati ottenuti in laboratorio.
Si possono usare
gli aromi preferiti in
base ai propri gusti.
Prima della cottura,
preriscaldare il forno
per 5 - 10 min.
OVEJA
POLLO (PIEZA)
PESCADO
Observación: Los
valores indicados en la
tabla son promedios calculados que pueden no
corresponderse con sus
necesidades personales.
Antes de hornear o asar,
caliente el horno durante
5 – 10 minutos.
Page 35

Secção do forno
Refeições
Bolos com cremes
NL PO
GEBRUİK VAN
DE OVEN
KOOK LİJST
MAALTİJD
GEROOMDE CAKE
TEMPERATURE
TEMPERATURA
TEMPERATUR
TEMPERATURA
TEMPERATURA
Temperatura
TEMPERATUUR
150 - 170
RACK POSITION
POSITION DE LA GRILLE
FACHPOSITION
BACK- ODER BACKZEIT (Minute)
POSIZIONE DELLA LECCARDA
POSICIÓN
TIEMPO DE HORNEADO O ASADO
Posição da prateleira
REK POSİTİE
2
COOKING TIME (min.)
TEMPS DE CUISSON (min.)
TEMPO DI COTTURA (min.)
(Tempo (minutos)
KOOK TİJD(MİN.)
30 - 35
Pasteis
Biscoito
Bolacha
Bolos
Bolachas entrelaçadas
Pasteis recheados
Salgadinhos
Carne de cabrito
Carne de vitela
Carne de carneiro
Galinha (aos pedaços)
Peixe
Note: Os valores que
constam na tabela,
são aqueles obtidos
nos nossos laboratórios. Poderá ajustar
os sabores fazendo
alguns testes. Antes
de inserir a comida no
forno, deverá permitir
que este aqueça 5 a
10 minutos.
GEBAKJE
BİSQUIT
KOEKJE
CAKE
GEVLECHT KOEKJE
BESLAG GEBAKJE
PİKANT GEBAKJE
LAMSVLEES
KALFSVLEES
SCHAAPSVLEES
KİP(İN STUKKEN)
VİS
Nota: De waarden in
de lijst zijn resultaten
verkregen in ons
laboratorium. U kunt
aroma’s vinden aan
uw smaak verschillend en geschikt
door ervaring. 5-10
min voorverwarming
moet is nodig voor
het koken.
200 - 220
160 - 170
160 - 170
160 - 180
200 - 220
180 - 200
160 - 180
200 - 230
200 - 230
230 - 250
230 - 240
200 - 220
2
3
3
2
2
2
2
3
3
3
3
3
35 - 45
20 - 25
20 - 35
25 - 35
30 - 40
35 - 45
20 - 30
20 - 25
30 - 40
30 - 40
30 - 40
20 - 30
39
Page 36

GB
FR
D IT E
USING GRILL
DEFLECTOR
PLATE
A safety panel is
designed to protect control panel
and the buttons
when the oven
is in Grill mode
(Figure 1)
Please use this
safety panel in
order to avoid the
heat to damage
control panel and
the buttons when
the oven is Grill
mode.
Place the safety
panel under
control panel by
opening the oven
front cover glass
(Figure 2)
And then secure
the safety panel
in between oven
and front cover by
gently closing the
cover. (Figure 3)
It is important for
cooking to keep
the cover open in
specied distance
when cooking in
grill mode.
Safety panel
will provide an
ideal cooking
circumstance
while protecting
control panel and
buttons.
UTILISATION DU
BANDEAU DE
PROTECTION
DES BOUTONS
Un bandeau de
sécurité est conçu
pour protéger
le panneau de
commande et les
boutons quand le
four est en mode
Grill (Figure 1)
Veuillez utiliser
ce bandeau de
sécurité pour
éviter que la chaleur ne détériore
le panneau de
commande et les
boutons lorsque le
four est en mode
Grill.
Placez le bandeau
de sécurité sous
le panneau de
commande en
ouvrant la porte
vitrée du four
(Figure 2)
Puis sécurisez
le bandeau de
sécurité entre le
four et la porte en
fermant doucement la porte.
(Figure 3)
Il est important
pour la cuisson
que le couvercle
soit ouvert à une
distance spéciée
lorsque vous utilisez le mode grill.
Le bandeau de
sécurité est un
élément idéal
pour protéger
le panneau de
commande et les
boutons.
NUTZUNG DER
TASTENSCHUTZBLENDE
Ist eine Sicherheitsblende,
durch das die
Kontrollblende
und die Schalter
geschützt werden, wenn der
Backofen im Grillmodus bedient
wird. ( Bild 1 )
Bitte verwenden
Sie diese
Blende um die
Kontrollblende
und die Schalter
vor der Hitze zu
schützen, wenn
der Backofen im
Grillmodus ist.
Bringen Sie die
Sicherheitsblende
durch öffnen
des Vorderdeckelglases unter der
Kontrollblende an.
( Bild 2)
Befestigen Sie
die Sicherheitsblende zwischen
Backofen und
Vorderdeckel
durch schließen
des Deckels.
( Bild 3 )
Wichtig ist es,
das der Deckel
beim Grillmodus
im festgesetzten
Abstand offen
bleibt.
Die Sicherheitsblende schützt
die Kontrollblende
und die Schalter
und bietet Ihnen
eine ideale Back/
Bratatmosphäre.
USO DEL DEFLETTORE PER
FUNZIONAMENTO IN MODALITÀ
GRILL
Per proteggere il
pannello comandi
e le manopole è
fornito in dotazione
un pannello di
protezione da
applicare quando
si usa la modalità
grill del forno
(gura 1).
Per impedire che il
calore danneggi il
pannello comandi
e le manopole
quando si usa
la modalità grill
usare sempre
questo pannello di
protezione!
Applicarlo sotto
il pannello comandi aprendo lo
sportello del forno
(gura 2).
Quindi ssarlo fra il
forno e lo sportello
chiudendo delicatamente lo sportello
(gura 3).
Quando si usa la
modalità grill del
forno è importante
tenere aperto lo
sportello alla distanza indicata.
Questo pannello
assicura un ambiente di cottura ideale proteggendo
allo stesso tempo il
pannello comandi
e le manopole.
Utilice la pantalla
térmica para evitar posibles daños
en el panel de
control y los mandos de control
durante el uso del
grill del horno.
La pantalla térmica
(gura 1) es un
elemento diseñado
para proteger el
panel de control y
los mandos durante
el uso del grill del
horno. Coloque la
pantalla térmica
debajo del panel de
control abriendo la
puerta frontal del
horno (gura 2).
Coloque las dos
pestañas salientes
de la pantalla térmica en las ranuras
situadas debajo del
panel de control y
je la pantalla en
su lugar, entre el
horno y la puerta
interior, cerrando
suavemente la
puerta (gura 3).
Es importante
mantener la puerta
abierta en la distancia especicada
mientras se utiliza
el grill.
La pantalla térmica
proporcionará los
mejores resultados
de cocción, protegiendo al mismo
tiempo el panel
de control y los
mandos.
AVISO:
LA PANTALLA
TÉRMICA SE
CALIENTA DURANTE SU USO
~ NO INTENTE
RETIRARLA CON
LAS MANOS
DESPROTEGIDAS
JUSTO DESPUÉS
DE UTILIZARLA
40
Page 37
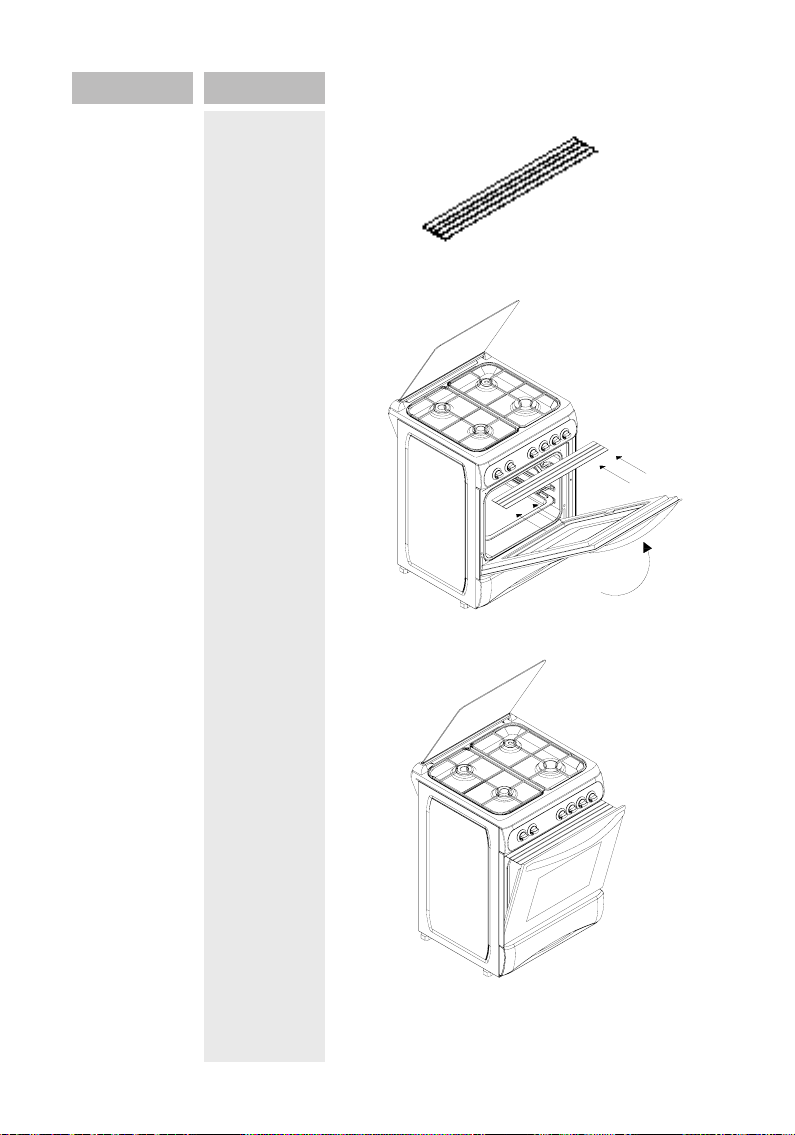
NL PO
Painel de
Segurança
Painel de
segurança foi
desenhado para
proteger o painel
de comandos
e os botões,
quando o forno se
encontra no modo
Grill (Figura 1).
Recomenda-se o
uso do painel de
segurança, para
evitar que o calor
danique o painel
de comandos e
os botões.
1.Coloque o painel de segurança
debaixo do painel
de comandos,
abrindo a tampa
do forno (gura
2). De seguida
posicione este
entre o forno e
a tampa frontal,
fechando a porta
com cuidado
(gura 3). É fulcral manter a
tampa do fogão
levantada, e a
uma distância
considerada,
enquanto cozinha
e no modo Grill.
O painel de segurança oferece
boas condições
de para cozinhar,
protegendo,
ainda, as componentes acima
mencionadas.
GEBRUİK VAN
DE KNOP VAN
BESCHERMINGSPLAAT.
Een
veiligheidspaneel
is ontworpen om
het controlepaneel
en de knoppen
te beschermen
wanneer de oven
op de wijze van de
Grill is (guur1).
Gebruik dit veiligheidspaneel om de
hitte te vermijden
waardoor controlepaneel en de
knoppen beschadigd kunnen raken
wanneer de oven
op Grill staat.
Plaats het veiligheidspaneel onder
controlepaneel
door het glas
van het oven te
openen(guur2)
En beveilig dan het
veiligheidspaneel
tussen oven en
schutblad door de
dekking zachtjes te
sluiten(guur3)
Het is belangrijk
voor het koken
om de dekking in
gespeciceerde
afstand open te
houden wanneer
toestel op Grill
staat.
Het veiligheids
paneel zal een
ideale koken
omstandigheid
verzekeren terwijl
het controlepaneel
en knoppen beschermd zijn.
1
2
3
41
Page 38

ITDFRGB
MAINTENANCE and
CLEANING
1. Disconnect the plug
supplying electricity
for the oven from the
socket.
2. While oven is operating or shortly after it
starts operating, it is exteremely hot. You must
avoid touching heating
elements.
3. Never clean the
interior part, panel, lid,
trays and all other parts
of the oven by the tools
like hard brush, cleaning
mesh or knife. Do not
use abrasive, scratching
agents and detergents.
4. After cleaning the
interior parts of the oven
with a soapy cloth, rinse
it and then dry thoroughly with a soft cloth.
5. Clean the glass surfaces with special glass
cleaning agents.
6. Do not clean your
oven with steame
cleaners.
7. Wash the heads of the
burners sometimes with
soapy water and clean
the gas ducts by means
of a brush.
8. Before opening the
upper lid of the oven,
clean spilled liquid off the
lid. Also, before closing
the lid, ensure that the
cooker table is cooled
enough.
9. Never use inammable agents like acid, thinner and gasoline when
cleaning your oven.
10. Do not wash any
part of your oven in
dishwasher.
11. In order to clean
the front glass lid of the
oven; remove the xing
screws xing the handle
by means of a screwdriver and , remove the
oven door.Than clean
and rinse it thoroughly.
After drying, place the
oven glass properly and
re-install the handle.
ČIŠĆENJE I
ODRŽAVANJE
1. Utikač štednjaka
isključite iz mrežne
utičnice.
2. Neki dijelovi štednjaka
vrlo su vrući tijekom rada
i malo nakon isključenja,
zato ih ne dirajte.
3. Nijedan dio uređaja
ne čistite nagrizajućim ili
grubim čistilima i oštrim
predmetima kao što su
kovinske četke i mrežice,
noževi itd.
4. Kad unutrašnjost
pećnice i dijelove u
njoj očistite krpom
namočenom u sapunicu
obrišite ih još i krpom
namočenom u čistu vodu,
a zatim sve površine
temeljito osušite.
5. Staklene površine
očistite posebnim čistilima
za staklo.
6. Nijedan dio uređaja
ne čistite s uređajima
koji rade s pritiskom ili s
parom.
7. Poklopce plamenika
povremeno operite u
sapunici, a dovode plina
očistite četkicom.
8. Možebitnu razlivenu tekućinu obrišite
s pokrova ploče za
kuhanje prije nego ga
otvorite. Provjerite je li
ploča za kuhanje dovoljno
ohlađena prije nego ga
ponovo zatvorite.
9. Za čišćenje štednjaka
nikad ne upotrebljavajte
zapaljive tvari kao što
su kiseline, razrjeđivači,
aceton, benzin itd.
10. Nijedan dio štednjaka
ne perite u perilici
posuđa.
11. Želite li staklo na
vratima pećnice očistiti
vrlo temeljito, odvijačem
odstranite vijke koji
pričvršćuju ručku i
izvadite staklo. Očistite
ga prvo sapunicom, zatim
čistom vodom i kad je
suho pravilno ga namjestite nazad i ponovo
pričvrstite ručku.
PFLEGE UND
REINIGUNG
1. Ziehen Sie den
Stromversorgungsstecker
aus der Steckdose und
unterbrechen Sie den
Gaszulauf durch schließen
des Gashahns.
2. Der Backofen ist in
Betrieb und kurz nach Inbetriebsetzung sehr heiß. Von
Erwärmteilen fernhalten.
3. Den Innenteil, die
Blende, den Deckel, Backbleche und andere Teile
des Backofens nicht mit
harten Bürsten, Geschirrdrahten oder Messern
reinigen.
Verwenden Sie keine
ätzenden, ritzenden Materialien oder Reinigungsmittel.
4. Die Innenteile des Backofens mit einem seigen
Lappen wischen, abspülen
und mit einem weichen
Tuch trocknen.
5. Glasächen mit spezialem Glasreinigungsmittel
reinigen.
6. Den Backofen nicht mit
dunstigen Reinigungsmitteln reinigen.
7. Herdköpfe mit Seifenwasser reinigen und
Gaskanäle mit einer Bürste
reinigen.
8. Vor Aufklappen des
oberen Backofendeckels,
die Flüssigkeit auf dem
Deckel reinigen. Achten Sie
gleichzeitig darauf dass die
Bratplatte kalt ist, bevor Sie
den Deckel zuklappen.
9. Verwenden Sie bei der
Reinigung des Backofens
keine brennbaren Mittel
wie Säure, Verdünner
oder Gas.
10. Teile des Backofens
nicht in der Spülmaschine
reinigen.
11. Mit einem Schraubenzieher die Halterschrauben
herausdrehen, um das
Außenglas des Backofens
zu reinigen. Vorderglas aus
der Aufnahme herausnehmen und die Außengläser
sorgfältig reinigen und
spülen. Nach dem trocknen
das Vorderglas anbringen
und Halterschrauben
hineindrehen.
MANUTENZIONE e
PULIZIA
1. Disinserire la spina di
alimentazione elettrica
dalla presa.
2. Il forno durante il funzionamento, o subito dopo
lo spegnimento, è molto
caldo. Evitare di toccare gli
elementi riscaldanti.
3. Non pulire mai l’interno
del forno, i pannelli, il coperchio, le leccarde e ogni
altra parte dell’apparecchio
con attrezzi come spazzole
dure, pagliette o coltelli.
Non usare sostanze e
detergenti abrasivi e
grafanti.
4. Dopo aver pulito l’interno
del forno con un panno
insaponato, sciacquarlo e
asciugarlo accuratamente
con un panno morbido.
5. Pulire le superci dello
sportello di vetro con un
detergente apposito per
vetri.
6. Non pulire il forno con
idropulitrici.
7. Ogni tanto lavare le
teste dei bruciatori con
acqua insaponata e pulire
i condotti del gas con una
spazzola.
8. Prima di aprire il
coperchio superiore
dell’apparecchio, rimuovere i liquidi schizzati sopra
ad esso. Prima di chiudere
il coperchio, accertarsi che
il piano di cottura si sia suf-
cientemente raffreddato.
9. Non usare mai sostanze
inammabili, come acidi,
solventi e benzina per
pulire il forno.
10. Non lavare nessuna
parte del forno in lavastoviglie.
11. Per pulire lo sportello di
vetro del forno, rimuovere
le viti di ssaggio della
maniglia con un cacciavite
e smontare lo sportello.
Pulirlo e sciacquarlo accuratamente. Dopo averlo
asciugato, rimontare lo
sportello e riapplicare la
maniglia.
42
Page 39

E PO
NL
Indicaciones de limpieza
No limpie el horno ni los
fogones con productos de
limpieza que produzcan
vapores.
Los mandos, la supercie
de la cocina, las cabezas y
tapas de los quemadores,
el horno y el resto de
supercies esmaltadas se
han de limpiar con un paño
humedecido y a continuación se han de secar;
no utilice objetos alados
ni puntiagudos.
No permita que caiga
agua sobre el cristal de la
puerta del horno cuando
esté caliente. Asimismo,
no lo toque con las manos
desnudas.
Elimine cuidadosamente
los restos de sustancias
ácidas (p.ej. zumo de
limón) y de aceite que
hayan caído sobre el
equipo.
No utilice nunca sustancias
fácilmente inamables
tales como disolvente,
petróleo, gasolina o ácidos
para realizar la limpieza.
No limpie el interior del
horno ni ninguna otra
supercie con materiales
abrasivos, ya que podría
rayarlas. Ello es especialmente importante para la
parte de manejo, ya que
este tipo de materiales
podrían hacer desaparecer
las indicaciones.
A n de evitar que la
puerta del horno resulte
dañada por el vapor que
se genera, límpiela una
vez por semana con un
paño seco.
Manutenção e Limpeza
1. Antes de proceder a
qualquer tipo de limpeza
ou manutenção, desligue
sempre o aparelho do
abastecimento de energia.
2. O fogão encontra-se
quente após ter sido usado, deve, assim, aguardar
que este arrefeça para
proceder á sua limpeza e
manutenção.
3. Não use material
abrasivo ou produtos inadequados.
4. Após ter limpo as
componentes interiores do
forno com um pano ensaboado, enxagúe o pano,
volte a passar o forno e
depois seque-o com um
pano limpo.
5. Limpe o vidro da
porta com um detergente
adequado.
6. Não limpe o seu fogão
com aspiradores mini de
vapor.
7. Limpe os bicos frequentemente com água ensaboada e limpe os tubos do
gás com uma escova.
8. Antes de abrir a tampa
superior do forno, limpe
os líquidos dos bicos.
Verique, também se a
mesa está fria antes de
fechar a tampa.
9. Não use produtos inamáveis, tais como ácido,
diluente ou gasolina, para
limpar o seu forno.
10. Não lave nenhuma das
componentes na máquina
de lavar.
11. Para impar a tampa
frontal de vidro do fogão;
retire os parafusos do
manípulo através de uma
chave de fendas e retire
a porta. De seguida limpe
e enxagúe- -a. Após esta
ter secado, coloque o vidro
no sítio e aparafuse os
parafusos ao manípulo.
ONDERHOUD EN
REINIGING
1.Maak de stekker los die
elektriciteit voor de oven
levert.
2. Terwijl de oven werkt
of kort nadat hij begint te
werken, is deze uiterst
heet. U moet vermijden
verwarmde elementen
te raken.
3.Maak nooit het binnen
deel, paneel, deksel,
blad en alle andere delen
van de oven schoon met
hulpmiddelen zoals harde
borstel, harde schoonmaak middelen. Gebruik
geen schurend, krassende
stoffen en detergenten.
4.Na het schoonmaken
van de binnendelen van
de oven met zeep moet u
spoelen en grondig drogen
met droge vod
5.Maak de glasoppervlakten met speciaal glas
schoonmakende stoffen
schoon.
6.Maak uw oven niet
schoon met stoom
reinigers.
7.Was soms de kop van
de branders met zeepwater en maak de gasbuizen
met een borstel schoon.
8. Voor het bovenste
deksel van de oven te
openen, moet u gemorste
vloeistoffen van het deksel
schoonmaken .Ook ,
alvorens het deksel te
sluiten, zorg ervoor dat
de kookplaat genoeg
gekoeld is.
9. Gebruik nooit ontvlambare stoffen zoals zuur,
verdunner en benzine bij
het schoonmaken van
uw oven.
10. Was geen delen van
uw oven in afwasmachine.
11.Om het glazen deksel
van de oven schoon
te maken; verwijder
de schroeven die het
handvat bevestigen met
een schroevendraaier en
verwijder de ovendeur.
Maak het daarna schoon.
Na het drogen mogen het
ovenglas en het handvat
opnieuw geïnstalleerd
worden.
43
Page 40

GARANTIE BEPALINGEN
U heeft 2 jaar garantie op technische defecten na aankoop datum.
Wat niet onder garantie valt :
∗ Het gebruik; voor niet normaal huishoudelijk gebruik (het apparaat is bedoeld voor
normaal huishoudelijk gebruik)
∗ Een oorzaak die aan het apparaat vreemd is, zoals;
Schade die opgelopen werd bij het transport of ingevolge een verkeerde
behandeling zoals deuken, krassen, afgebroken onderdelen.
Installatie fouten bijv. (verkeerde spanning).
∗ Storingen ten gevolge van o.a. ondeskundig gebruik, stof/pluisvorming in/aan het
apparaat w.o. verstoppingen van o.a.(indien van toepassing) luchtcirculatie, filters,
als mede breuk in kunststof, rubber, glas, wat anders dan bij normaal gebruik
defect is geraakt; zulks ter beoordeling van service monteur of importeur.
U heeft twee jaar garantie op het apparaat na aankoop datum, de garantie is alleen
dan geldig indien een geldig aankoop bewijs kan worden getoond.
Garantie rechten op het apparaat zijn niet overdraagbaar.
Indien apparaten ter reparatie worden aangeboden dienen deze schoon te zijn,
anders kan behandeling voor reparatie worden geweigerd.
Page 41

GARANTIE
Vous avez 2 ans de garanties concernant les défaults techniques après achat des
appareils.
Pas inclus dans la garantie:
∗ Autre qu’une utilisation domestique normale (cet appareil est pour une utilisation seule
domestique).
∗ Les causes qui ne sont pas liées à l’appareil,
Les dommages causés lors du transport ou à cause d’un mauvais usage comme les
bosses, les scratches, les pièces cassées.
Une erreur d’installation (comme les mauvais voltages).
∗ Un mal fonctionnement à cause d’un usage impropre sur l’appareil entre autres en
bloquant la circulation d’air, ou en cassant le plastique, le caoutchouc, le verre qui
autre qu’une utilisation normale, est considéré comme faute. Cela est jugé par un
homme du service.
Vous avez 2 ans de garanties sur les défauts techniques sur un appareil après la date
d’achat, la garantie est seule valide si une facture d’achat peut être montrée.
Les garanties sont strictement personnelles.
Si un appareil est offert pour entretien, cela demande à être clair, autrement le service
peut être refusé.
Page 42

WARRANTY
You have 2 years warranty on technical defects after purchase
Not included in warranty :
∗ Other than normal domestic use (this appliance is for normal domestic use only).
∗ Causes not being related directly to the appliance such as;
Damage occurring during transport or because of wrong usage such as dents,
scratches, broken parts.
Installation errors (such as wrong voltage).
∗ Malfunctioning because of improper usage, dust/fluff in and on the appliance,
amongst others blocking of air circulation, as well as breaking of plastics, rubber, glass
which other than by normal use has gone defect, such to be judged by the service man
and or importer.
You have 2 year warranty on technical defects on the appliance after date of purchase,
warranty is only valid if a valid notice of purchase/invoice can be shown.
Warranty rights are not transferable.
If appliance is offered for servicing it needs to be clean, otherwise service can be refused.
Page 43

GARANTIEBESTIMMUNGEN
Sie haben eine Garantie von 2 Jahren für technische Defekte nach dem Ankaufsdatum.
Ausgeschlossen ist die Garantie:
∗ Bei Gebrauch, der über den normalen Haushaltsgebrauch hinausgeht (das Gerät ist
für den normalen Haushaltsgebrauch gedacht).
∗ Bei einer gerätefremden Ursache, wie z.B.:
Schäden durch den Transport oder durch eine falsche Behandlung, wie Dellen,
Kratzer, abgebrochene Teile.
Oder infolge eines Installationsfehlers, z.B. falsche Netzspannung.
∗ Bei Störungen durch u.a. unsachgemässen Gebrauch, Staub-/Flusenbildung in/am
Gerät, Behinderungen der Luftzirkulation, Verstopfungen des Filters (wenn vorhanden),
sowie ein Bruch im Kunststoff, Gummi, Glas, der anders als beim normalen Gebrauch
entstand; die diesbezügliche Beurteilung beruht beim Monteur oder Importeur.
Sie haben eine Garantie von 2 Jahren für technische Defekte nach dem Ankaufsdatum;
die garantie kann nur in Anspruch genommen werden, wenn eine gültige Kaufquittung
vorgelegt wird.
Garantierechte an dem Gerät sind nicht übertragbar.
Wenn Geräte zur Reparatur angeliefert werden, müssen sie sauber sein, da sonst die
Reparatur verweigert werden kann.
 Loading...