

Page 1
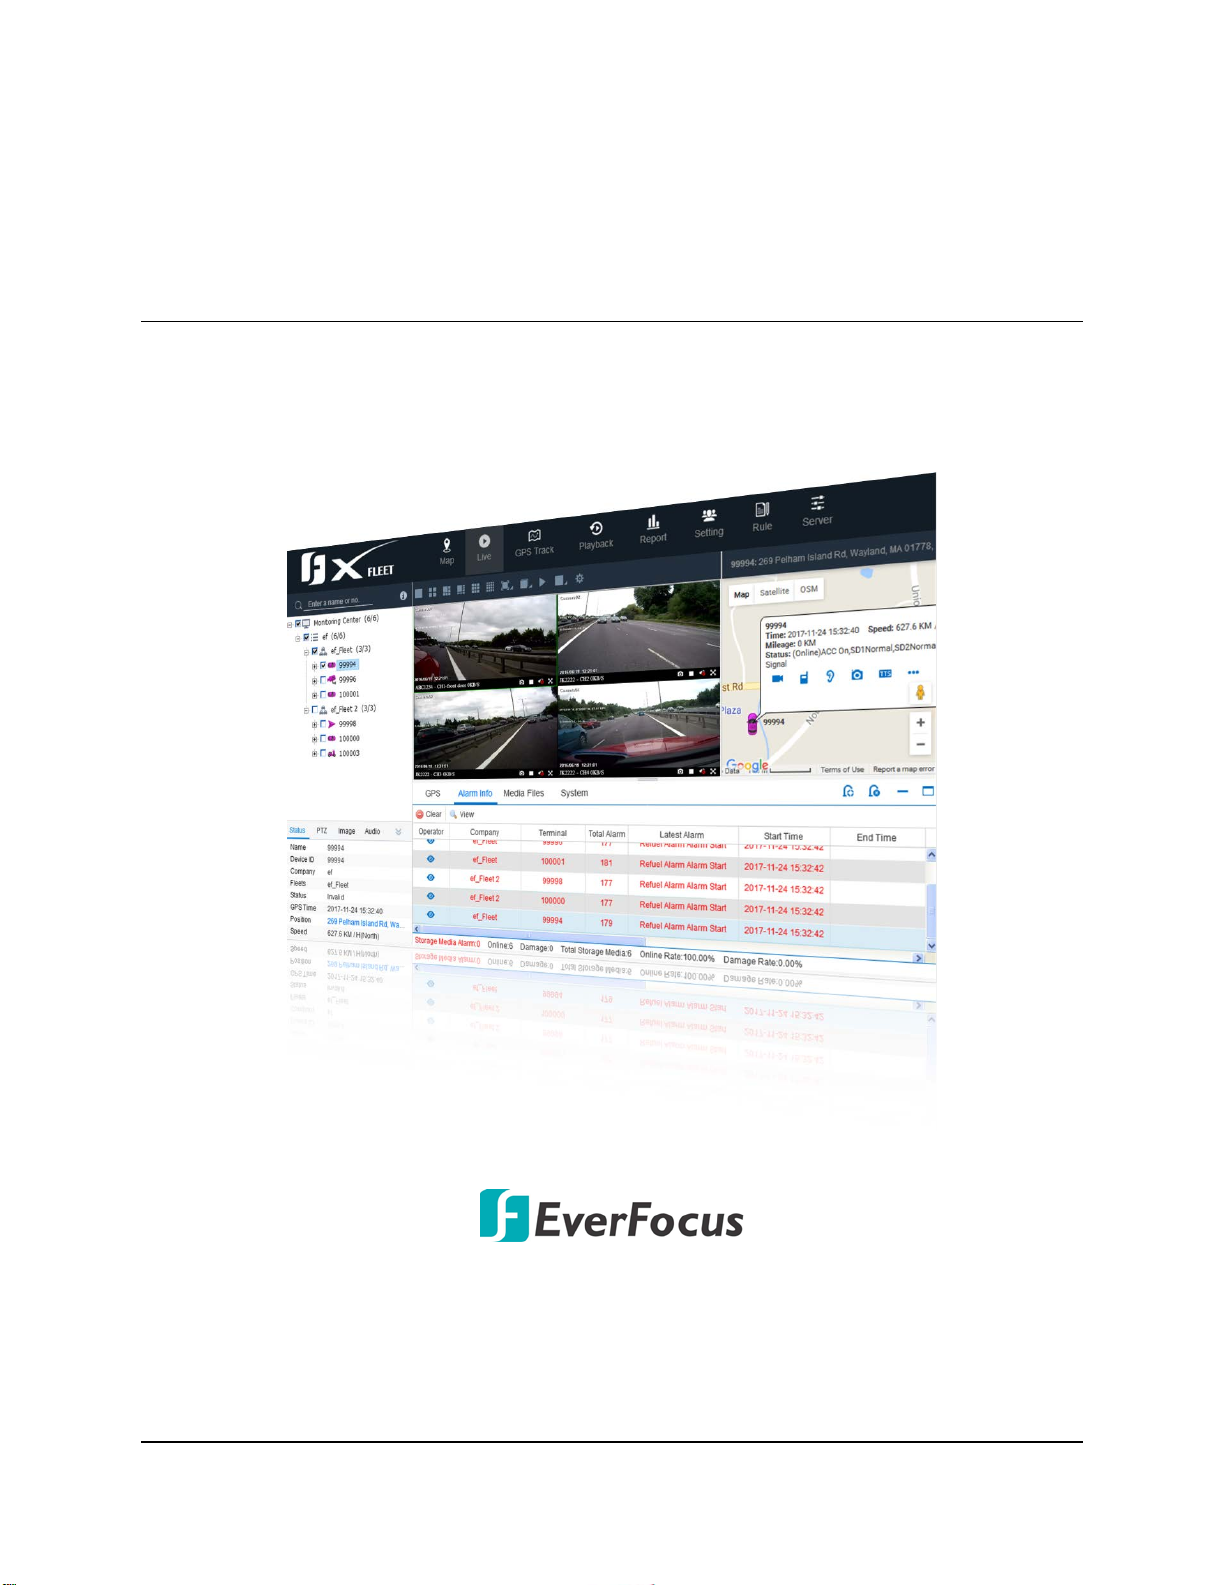
Xfleet 2.0
Fleets Management Platform
User’s Manual
Copyright © EverFocus Electronics Corp.
Release Date: December, 2017
Page 2

Xfleet 2.0 Fleets Management Platform
EVERFOCUS ELECTRONICS CORPORATION
User’s Manual
1995-2017 EverFocus Electronics Corp.
www.everfocus.com.tw
Disclaimer
All the images including product pictures or screen shots in this document are for example only. The
images may vary depending on the product and software version. Information contained in this
document is subject to change without notice.
Copyright
All rights reserved. No part of the contents of this manual may be reproduced or transmitted in any
form or by any means without written permission of the EverFocus Electronics Corporation.
I
Page 3

TABLE OF CONTENTS
1. Introduction ............................................................................................................................. 1
1.1 Features ................................................................................................................................... 2
1.2 System Architecture ................................................................................................................. 3
2. Getting Started ......................................................................................................................... 5
2.1 Minimum System Requirement ............................................................................................... 5
2.2 Installation ............................................................................................................................... 6
2.3 Server Manager ...................................................................................................................... 11
2.3.1 Register .................................................................................................................... 12
2.3.2 Database................................................................................................................... 13
2.3.2.1 DB Parameters ............................................................................................... 13
2.3.2.2 One Key Recovery .......................................................................................... 14
2.3.2.3 Advanced ........................................................................................................ 15
2.3.2.4 History Database ............................................................................................ 16
2.3.2.5 Partition .......................................................................................................... 17
2.3.2.6 Backup Files .................................................................................................... 17
2.3.3 DIY ............................................................................................................................ 18
2.3.4 WAN Address ........................................................................................................... 20
2.3.5 History Backup ......................................................................................................... 20
2.3.6 Data Migration ......................................................................................................... 21
2.3.7 Web Config ............................................................................................................... 21
2.3.8 Maintenance ............................................................................................................ 22
2.3.9 WiFi Config ............................................................................................................... 22
2.4 Establishing Multi-Server ....................................................................................................... 24
2.4.1 Establishing Multiple Gateway Servers .................................................................... 24
2.4.2 Establishing Multiple Storage Servers ...................................................................... 31
2.4.3 Establishing Multiple Download Servers ................................................................. 39
2.4.4 Establishing the Media Server on a Sub Server ....................................................... 48
3. Web Interface ........................................................................................................................ 56
3.1 Login / Logout ........................................................................................................................ 56
3.2 Getting Started on the Web Page .......................................................................................... 58
3.2.1 Fleet Management ................................................................................................... 58
3.2.1.1 Configuring the Mobile DVR Settings............................................................. 58
3.2.1.2 Adding Devices to the Xfleet System ............................................................. 61
3.2.1.3 Adding Fleets to the Xfleet System ................................................................ 64
3.2.2 WiFi Download Configuration .................................................................................. 66
3.3 Web Page ............................................................................................................................... 67
3.3.1 Device List ................................................................................................................ 68
3.3.1.1 Functions on the Device List .......................................................................... 70
3.3.2 Menu Bar .................................................................................................................. 79
3.3.2.1 Live Page......................................................................................................... 80
II
Page 4

3.3.2.2 GPS Track ........................................................................................................ 88
3.3.2.3 Playback ......................................................................................................... 90
3.3.2.4 Report ............................................................................................................. 93
3.3.2.5 Setting ..........................................................................................................123
3.3.2.6 Rule ..............................................................................................................135
3.3.2.1.1 Live Window.................................................................................. 81
3.3.2.1.2 Map Window ................................................................................ 86
3.3.2.3.1 Playback and Download ................................................................ 90
3.3.2.3.2 Download Task .............................................................................. 92
3.3.2.4.1 Vehicle Video Inspection .............................................................. 93
3.3.2.4.2 Driving Behavior Report ................................................................ 95
3.3.2.4.3 Vehicle Online & Offline Report ................................................... 98
3.3.2.4.4 Alarm Report ................................................................................. 99
3.3.2.4.5 Mileage Report ...........................................................................100
3.3.2.4.6 Driving Report .............................................................................101
3.3.2.4.7 Geofence Report .........................................................................104
3.3.2.4.8 Fuel Report ..................................................................................105
3.3.2.4.9 Failure Alarm Report ...................................................................107
3.3.2.4.10 Video Alarm Report ..................................................................108
3.3.2.4.11 IO Alarm Report ........................................................................109
3.3.2.4.12 Storage Report ..........................................................................110
3.3.2.4.13 Device Upgrade Report .............................................................111
3.3.2.4.14 Audio & Video Report ...............................................................112
3.3.2.4.15 Data Query ................................................................................114
3.3.2.4.16 User Behavior Report ................................................................115
3.3.2.4.17 User Behavior Report ................................................................117
3.3.2.4.18 Passenger Statistics Report .......................................................118
3.3.2.4.19 Temperature Report .................................................................119
3.3.2.4.20 Driver Clock-In Records .............................................................121
3.3.2.5.1 Vehicle .........................................................................................123
3.3.2.5.2 Fleets ...........................................................................................124
3.3.2.5.3 User .............................................................................................125
3.3.2.5.4 Role .............................................................................................126
3.3.2.5.5 Company .....................................................................................127
3.3.2.5.6 Device ..........................................................................................128
3.3.2.5.7 SIM Card ......................................................................................129
3.3.2.5.8 Driver...........................................................................................130
3.3.2.5.9 Insurance .....................................................................................131
3.3.2.5.10 Transport Certificate .................................................................132
3.3.2.5.11 Driving License ..........................................................................133
3.3.2.5.12 Expiration Reminder .................................................................134
3.3.2.6.1 Fatigue Driving ............................................................................135
3.3.2.6.2 Entry Prohibited ..........................................................................140
3.3.2.6.3 Exit Prohibited .............................................................................145
3.3.2.6.4 Geofence Speed Limit .................................................................150
III
Page 5

3.3.2.7 Server ...........................................................................................................191
3.3.3 Map Window ..........................................................................................................197
3.3.3.1 My Map ........................................................................................................198
3.3.3.2 Search Vehicle ..............................................................................................217
3.3.3.3 Map Tools .....................................................................................................219
3.3.4 Device Tool Window ..............................................................................................221
3.3.5 Info Table ...............................................................................................................226
3.3.5.1 GPS ...............................................................................................................227
3.3.5.2 Alarm Info .....................................................................................................228
3.3.5.3 Media Files ...................................................................................................232
3.3.5.4 System ..........................................................................................................233
3.3.2.6.5 Route Deviation ..........................................................................155
3.3.2.6.6 Road Section Speed ....................................................................160
3.3.2.6.7 Key Points ....................................................................................165
3.3.2.6.8 Parking Timeout ..........................................................................170
3.3.2.6.9 Night Driving ...............................................................................175
3.3.2.6.10 Schedule Snapshot ....................................................................180
3.3.2.6.11 Schedule Recording ..................................................................182
3.3.2.6.12 WiFi Download ..........................................................................184
3.3.2.6.13 Alarm Linkage ...........................................................................186
3.3.2.7.1 All ................................................................................................191
3.3.2.7.2 Login Server ................................................................................191
3.3.2.7.3 Gateway Server ...........................................................................192
3.3.2.7.4 User Server ..................................................................................192
3.3.2.7.5 Media Server ...............................................................................193
3.3.2.7.6 Storage Server .............................................................................193
3.3.2.7.7 Download Site .............................................................................194
3.3.2.7.8 Download Server .........................................................................195
3.3.2.7.9 One-Click Server IP Configuration ...............................................196
3.3.3.1.1 Setting up a Location (Key Point) ................................................199
3.3.3.1.2 Configuring the Geofence Alarm Function .................................204
3.3.3.1.3 Setting up a Route.......................................................................212
3.3.3.3.1 Drag Map ....................................................................................219
3.3.3.3.2 Measure Distance .......................................................................219
3.3.3.3.3 Zoom In / Zoom Out....................................................................220
IV
Page 6
Xfleet 2.0 Fleets Management Platform
Chapter
1
1. Introduction
Xfleet 2.0 is a centralized management platform which is well designed to not only monitor fleets,
but also to track driver statistics, maintenance records, fuel statistics and plenty of other in-depth
analytics reports that assist you to make decisions and eventually reduce overall costs.
With Xfleet 2.0, making prediction and optimizing business performance will no longer be a burden
as it provides timely response on the demands you need, creating long term value for clients across
industries.
1
Page 7

Xfleet 2.0 Fleets Management Platform
1.1 Features
GPS Positioning
With the GPS positioning function, the moving vehicles can be displayed on the e-map along
with plenty of information such as vehicle location, speed, mileage, driver information, alarm
information and etc.
Geofence / Route
Users can configure Geofence with different shapes for fleets monitoring. When vehicles move
in/out a geofence, or deviate from a route, the alarm will be triggered.
GPS Track Query
Users can query the historical GPS tracking data in a period of time along with the location,
speed and vehicle info. The queried GPS tracking data can be displayed on the e-map.
Alarm Linkage
By configuring the alarm linkage function on the client, the specified alarms will be listed on the
Alarm Info list. Users can also configure alarm actions including video preview, audio sound,
alarm recording and email alert for notification.
Images Snapshot
Users can capture snapshot images from the live view video window or from the vehicle icon
on the map. Users can also configure the alarm snapshot function, which will take snapshot
images when alarms occur.
Real-Time Live Video Monitoring through 3G/4G Network
Users can monitor the live view video from the moving vehicles through 3G/4G network. In
order to keep fluent video streams, users can optionally configure video resolution or video
quality. Live streams can be played on the window with multiple layout options and can be
played in sequence. The Live View monitoring also supports Intercom operation.
Remote Video Playback
Clients can remotely search for recording files and remotely play back the recordings.
Statistical Report Management
Users can query data reports for analysis purpose. The reports can be performed in text or
graph charts; or exported in different file formats (excel, pdf, csv). The statistic reports include
Driving Behavior, Travelling Track, Overspeed, Vehicle Arrival/Departure, Alarm, Mileage,
Parking, ACC Ignition, Geofence, Fuel, Failure Alarm, Video Alarm, IO Alarm, Storage, Device
Upgrade, Audio & Video, User Behavior, Passenger, Driver and Vehicle Temperature.
2
Page 8
Xfleet 2.0 Fleets Management Platform
Main Server
Web BrowsersiOS / Android
Clients
Internet
WiFi
3G/4G
Internet
Vehicle 1
Vehicle N
3G/4G
Vehicle
Connection
3G/4G
Streaming
WiFi
Recording
Download
Login Server
Storage Server
Media Server
User Server
Database Server
Web Server
Download Server
Gateway Server
3G/4G
Streaming
Record
Vehicle 2
Rules Management
Through Rules Management, users are able to assign the desired rules to individual vehicles.
Rules include Fatigue Rules, Entry Prohibited, Exit Prohibited, Geofence Speed Limit, Route
Deviation, Road Speed, Key Points, Parking Timeout, Night Driving, Schedule Snapshot,
Schedule Recording, WiFi Download and Alarm Linkage.
Web Browser Operation (IE, Chrome, Firefox)
The platform supports Web browser viewing and operating. Users are able to monitor live view,
tracking vehicles or configure the desired settings through the desired Web browsers.
Mobile APP (iOS / Android)
Users are able to monitor live view, tracking vehicles through the mobile devices using the
XFleet mobile APP.
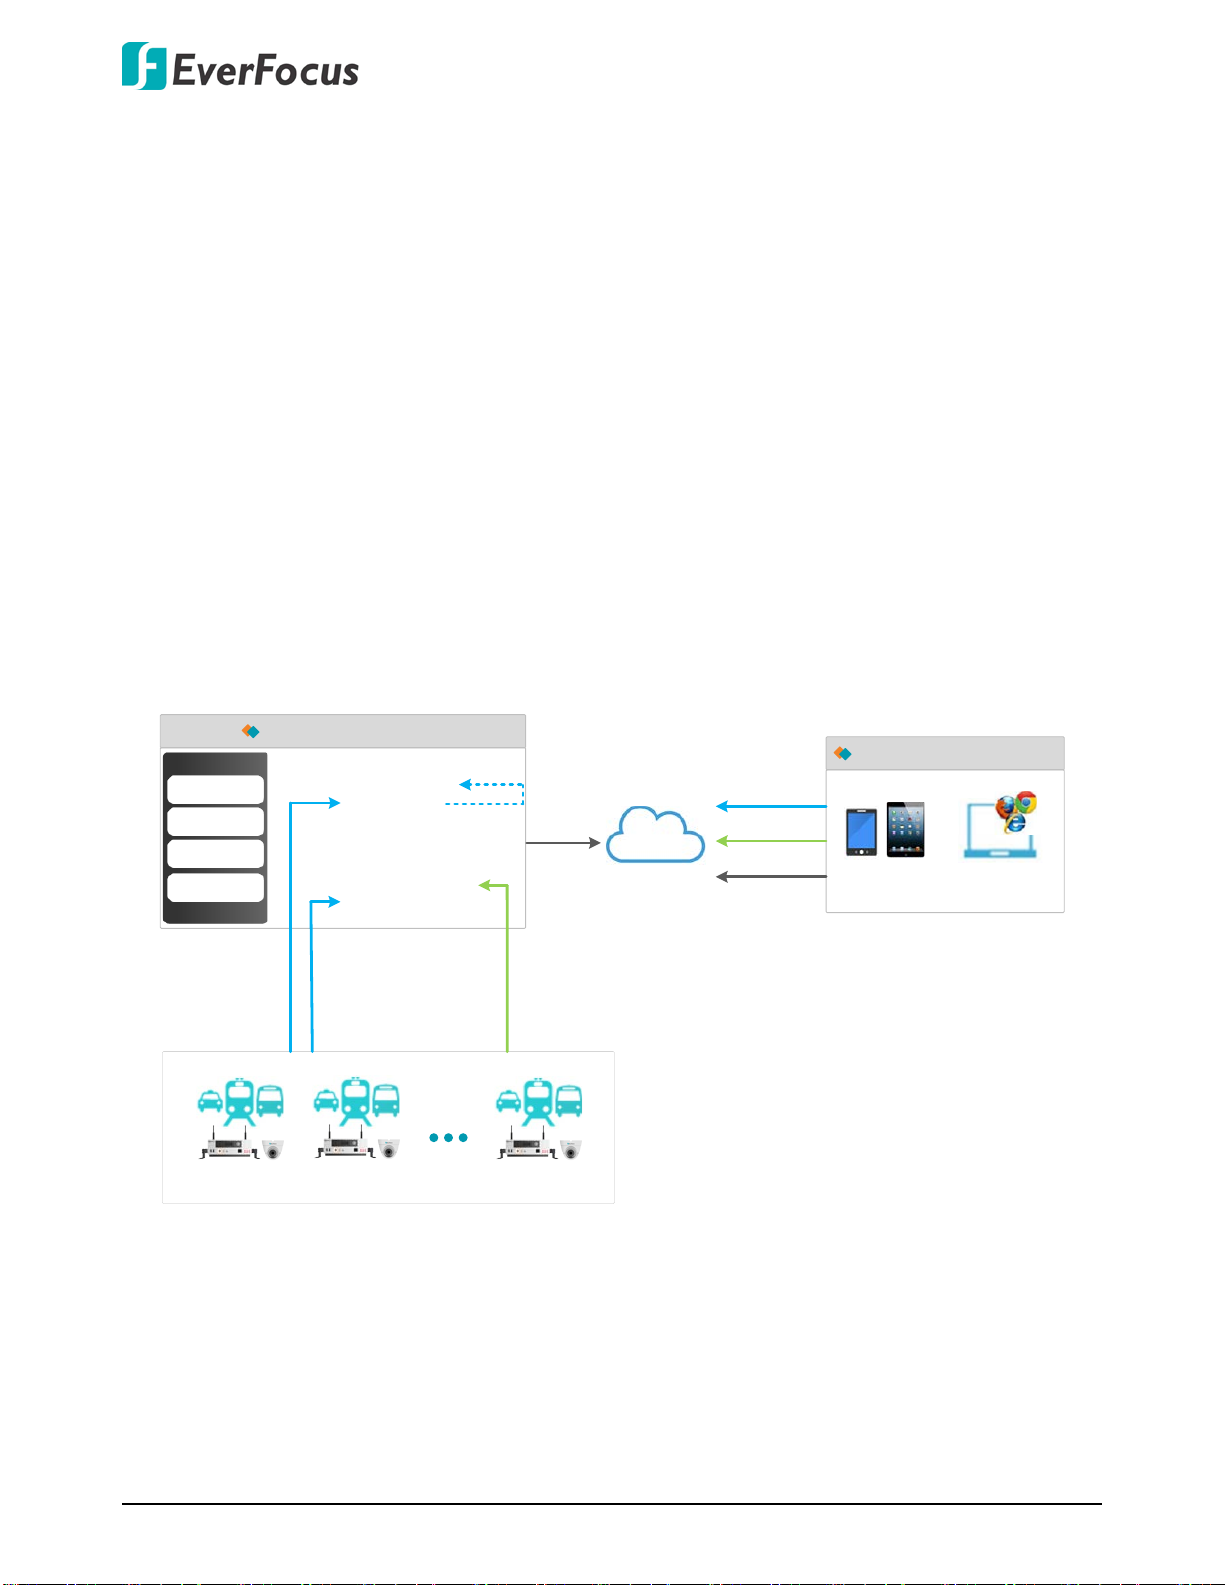
1.2 System Architecture
Single Server
Vehicle Connection: Vehicles can be connected to the system through Gateway Server.
Streaming Data: The Media Server can receive vehicle streaming data and transfer it to the
Storage Server.
WiFi Download: The Download Server can automatically download video files from vehicles
through WiFi network.
3
Page 9
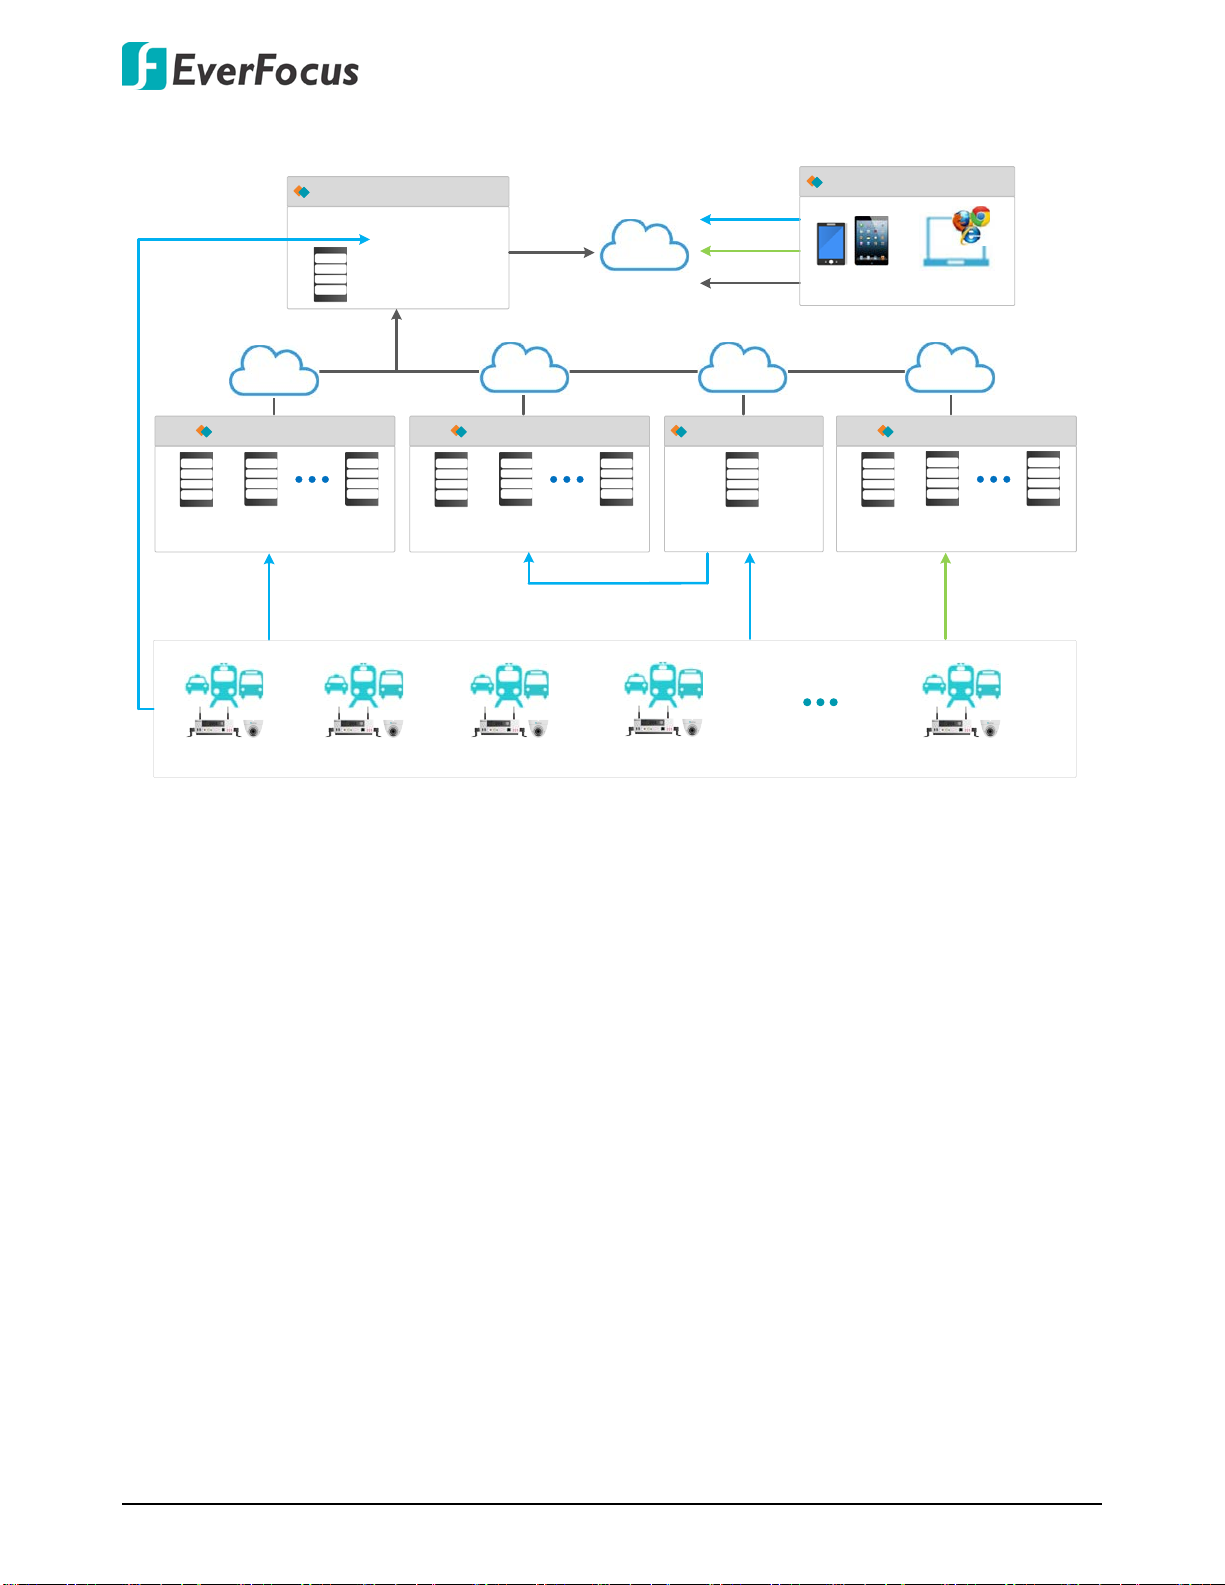
Multi-Server
Main Server
Login Server
Gateway Server1
User Server
Database Server
Web Server
Internet
WiFi
3G/4G
Internet
Internet
Internet Internet
Internet
Download
Server1
Sub Servers
Download
Server2
Download
Server N
Storage
Server1
Sub Servers
Storage
Server2
Storage
Server N
Gateway
Server2
Sub Servers
Gateway
Server3
Gateway
Server N
Media Server
Sub Server
3G/4G
Streaming Record
Vehicle 1 Vehicle 2
Vehicle 3
Vehicle N
Vehicle 4
3G/4G
Vehicle
Connection
WiFi
Recording
Download
3G/4G
Streaming
Web Browsers
iOS / Android
Clients
3G/4G
Vehicle
Connection
Xfleet 2.0 Fleets Management Platform
You can establish multiple Gateway Servers, Storage Servers and Download Servers.
Vehicle Connection: Vehicles can be connected to the system through Gateway Server. You
can establish multiple Gateway servers in order to connect vehicles from different locations.
Store Streaming Data: You can create multiple Storage Servers to store streaming data
transferred from the Media Servers. The Media Server can receive vehicle streaming data and
transfer it to the Storage Server.
WiFi Download: The Download Server can automatically download video files from vehicles
through WiFi network. You can create multiple Download Servers to download video files from
different vehicles.
To establish multiple servers, please refer to 2.4 Establishing Multi-Server.
4
Page 10
Xfleet 2.0 Fleets Management Platform
Minimum System Requirements
OS
Win10 Professional x64
CPU
I7-3770 3.40GHz
Network
2 Gigabit Ethernet
RAM
4G or more
GPU
GeForce GT630
Hard Disk
1TB
CD-play
DVD-ROM
Media Streaming Server
Each distributed Streaming Server can support up to 256 concurrent
Each Video Channel supports up to 6 Clients viewing. Maximum data rate
Gigabit Ethernet ports, 20Mbps output stream rate average forwarding
Using CIF video format per Channel video data rate is 320Kbit/second,
Chapter
2
2. Getting Started
2.1 Minimum System Requirement
Before installing the software, ensure your system meets the requirements below.
Performance
Specifications
Video Bandwidth
Incoming Channels with a bandwidth of 128Mbps
output of each channel is 512Mbps.
delay is less than 5 ms
Gigabit Ethernet ports, 100Mbps output stream rate average forwarding
delay is less than 40ms.
Gigabit Ethernet ports, 512Mbps output stream rate average forwarding
delay is less than 200ms.
256 video channels therefore requires 320 X 256 = 81,920 Kbit bandwidth.
NOTE: As the MDVR device in a 3G network environment has network
bandwidth limitations, the maximum upload is using CIF resolution video
format.
5
Page 11
Xfleet 2.0 Fleets Management Platform
2.2 Installation
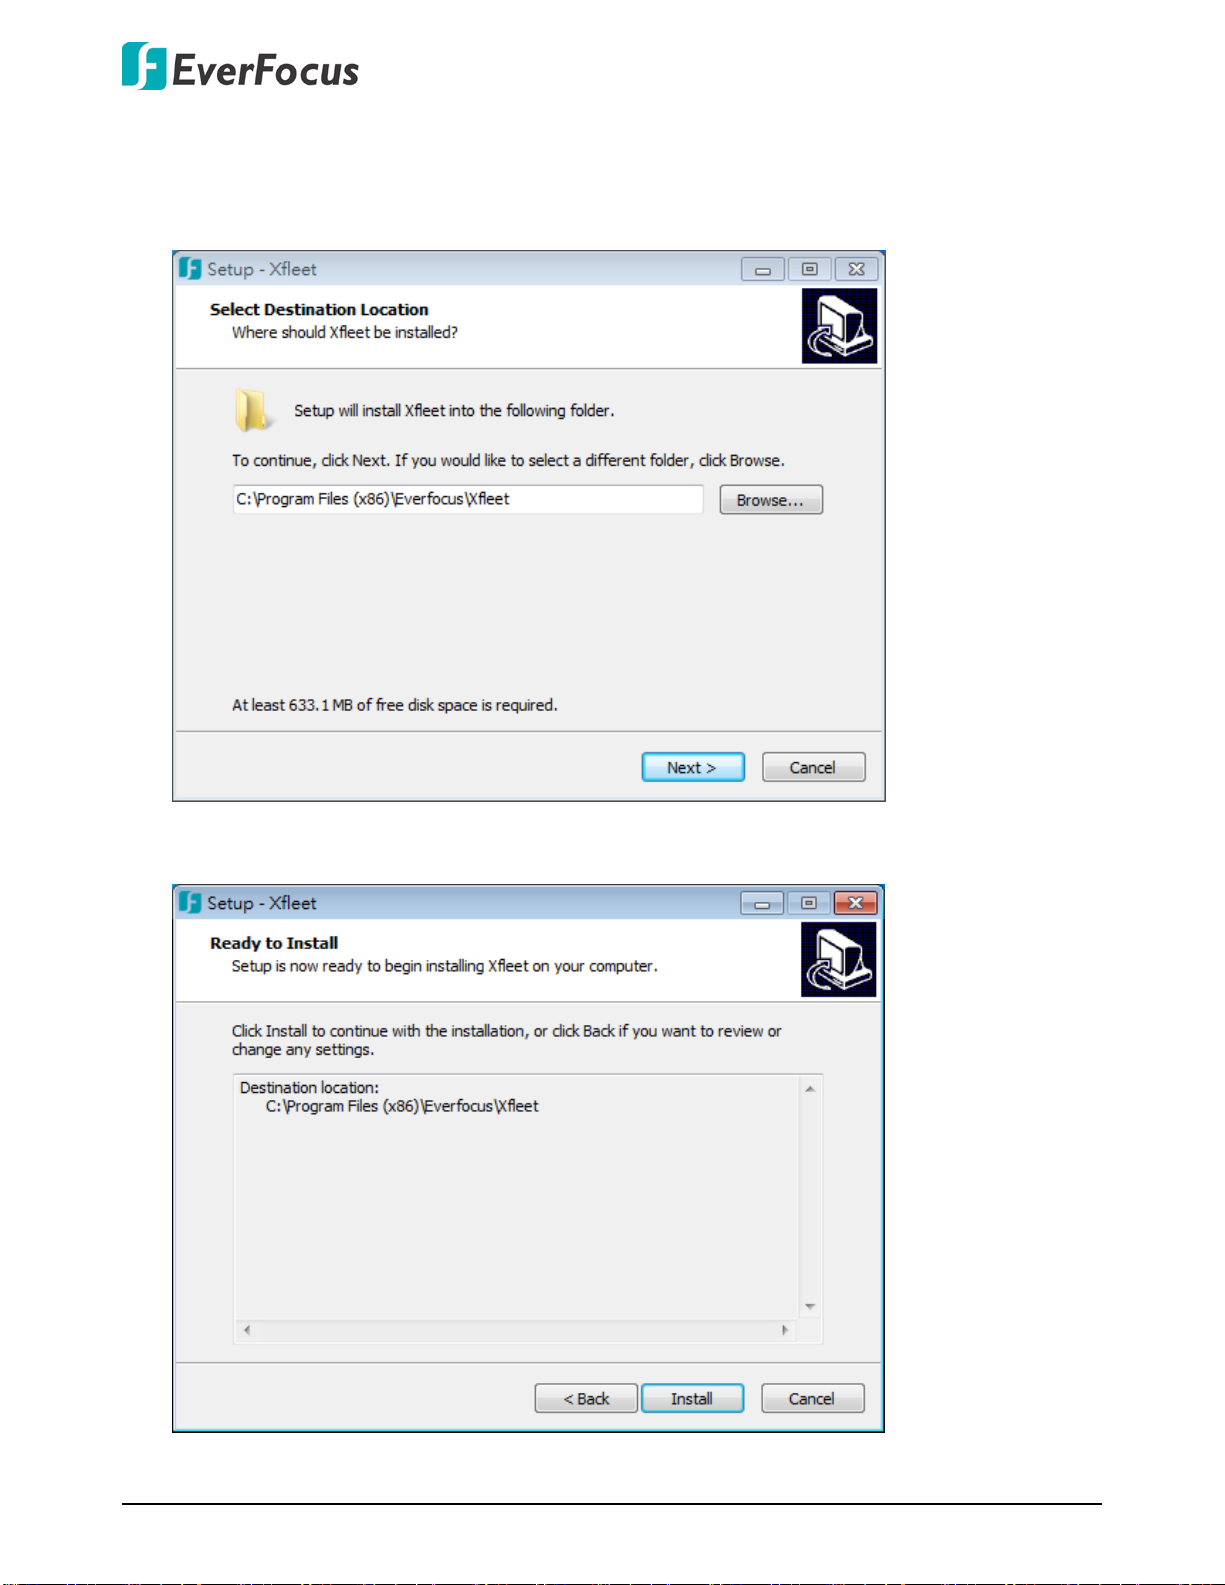
To install the Xfleet software:
1. Double click the Xfleet .exe file to run the installer. Click Next to proceed.
2. Click Install to start installing Xfleet on your computer.
6
Page 12
Xfleet 2.0 Fleets Management Platform
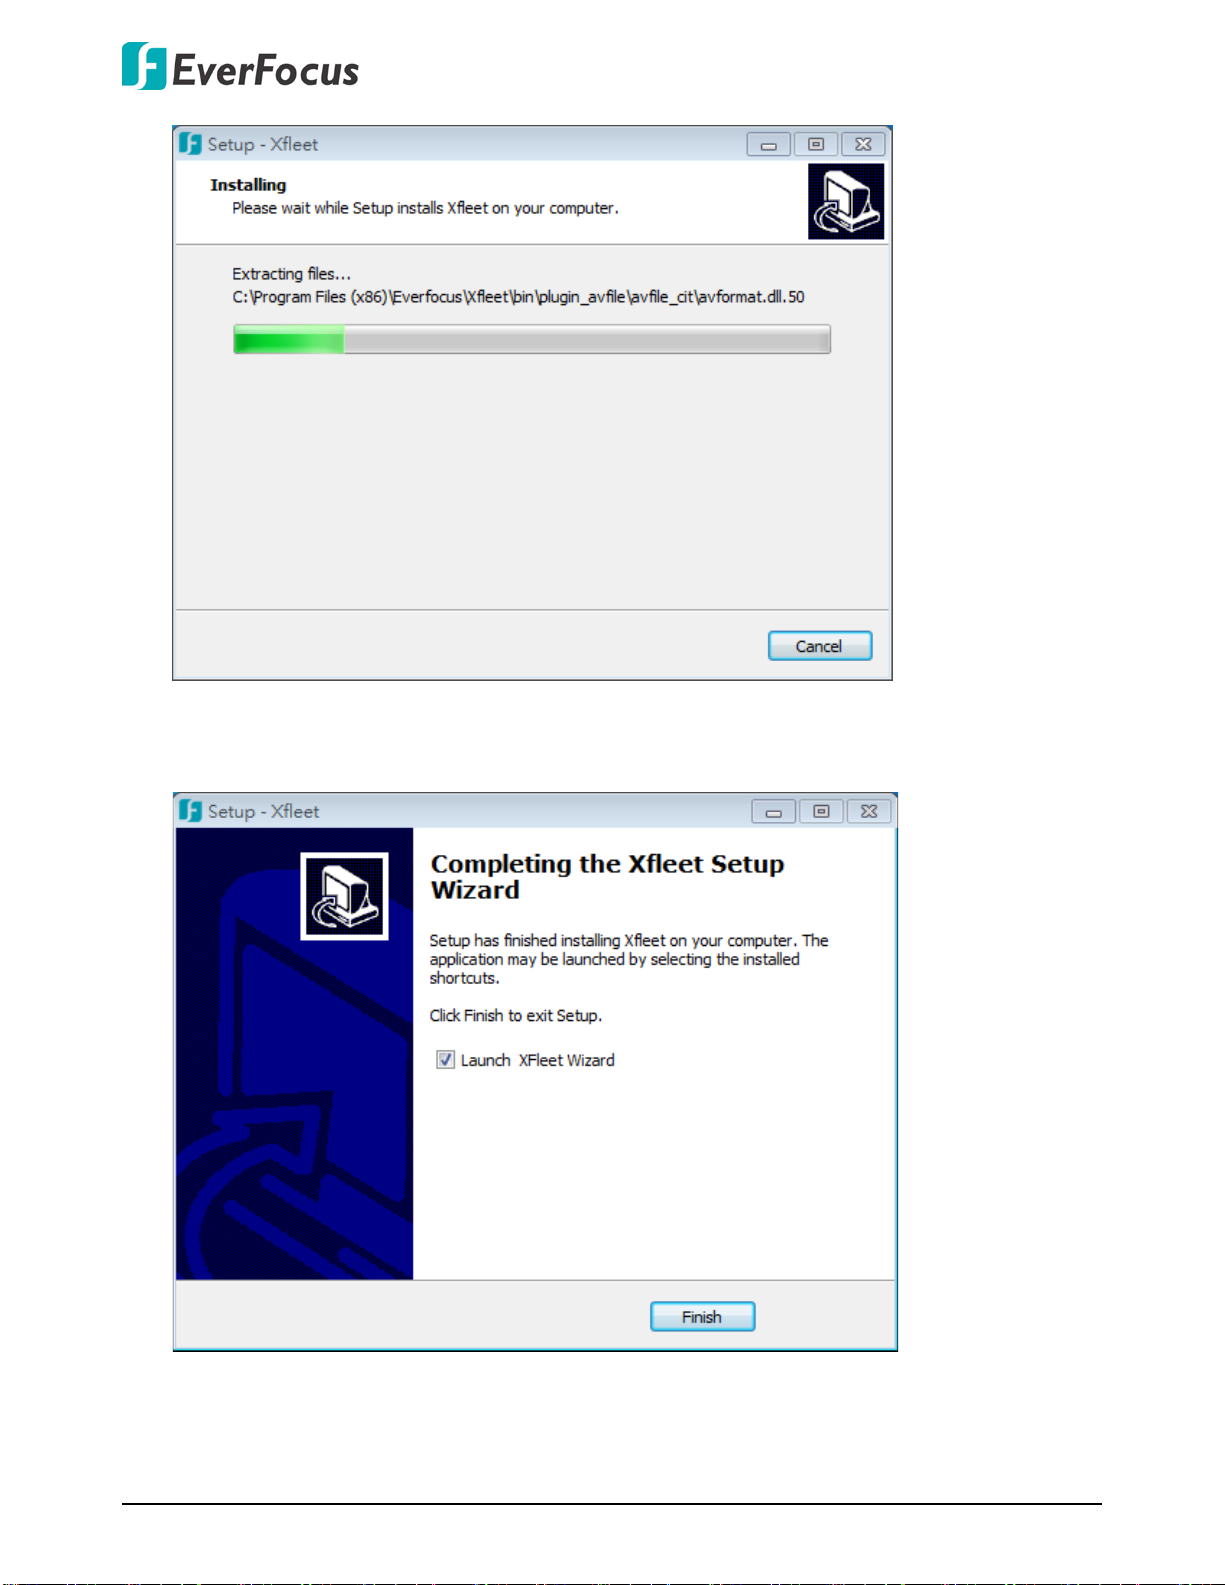
3. Click Finish to complete the Xfleet installation on your computer. And follow the on-screen
instructions to configure other parameters.
7
Page 13
Xfleet 2.0 Fleets Management Platform
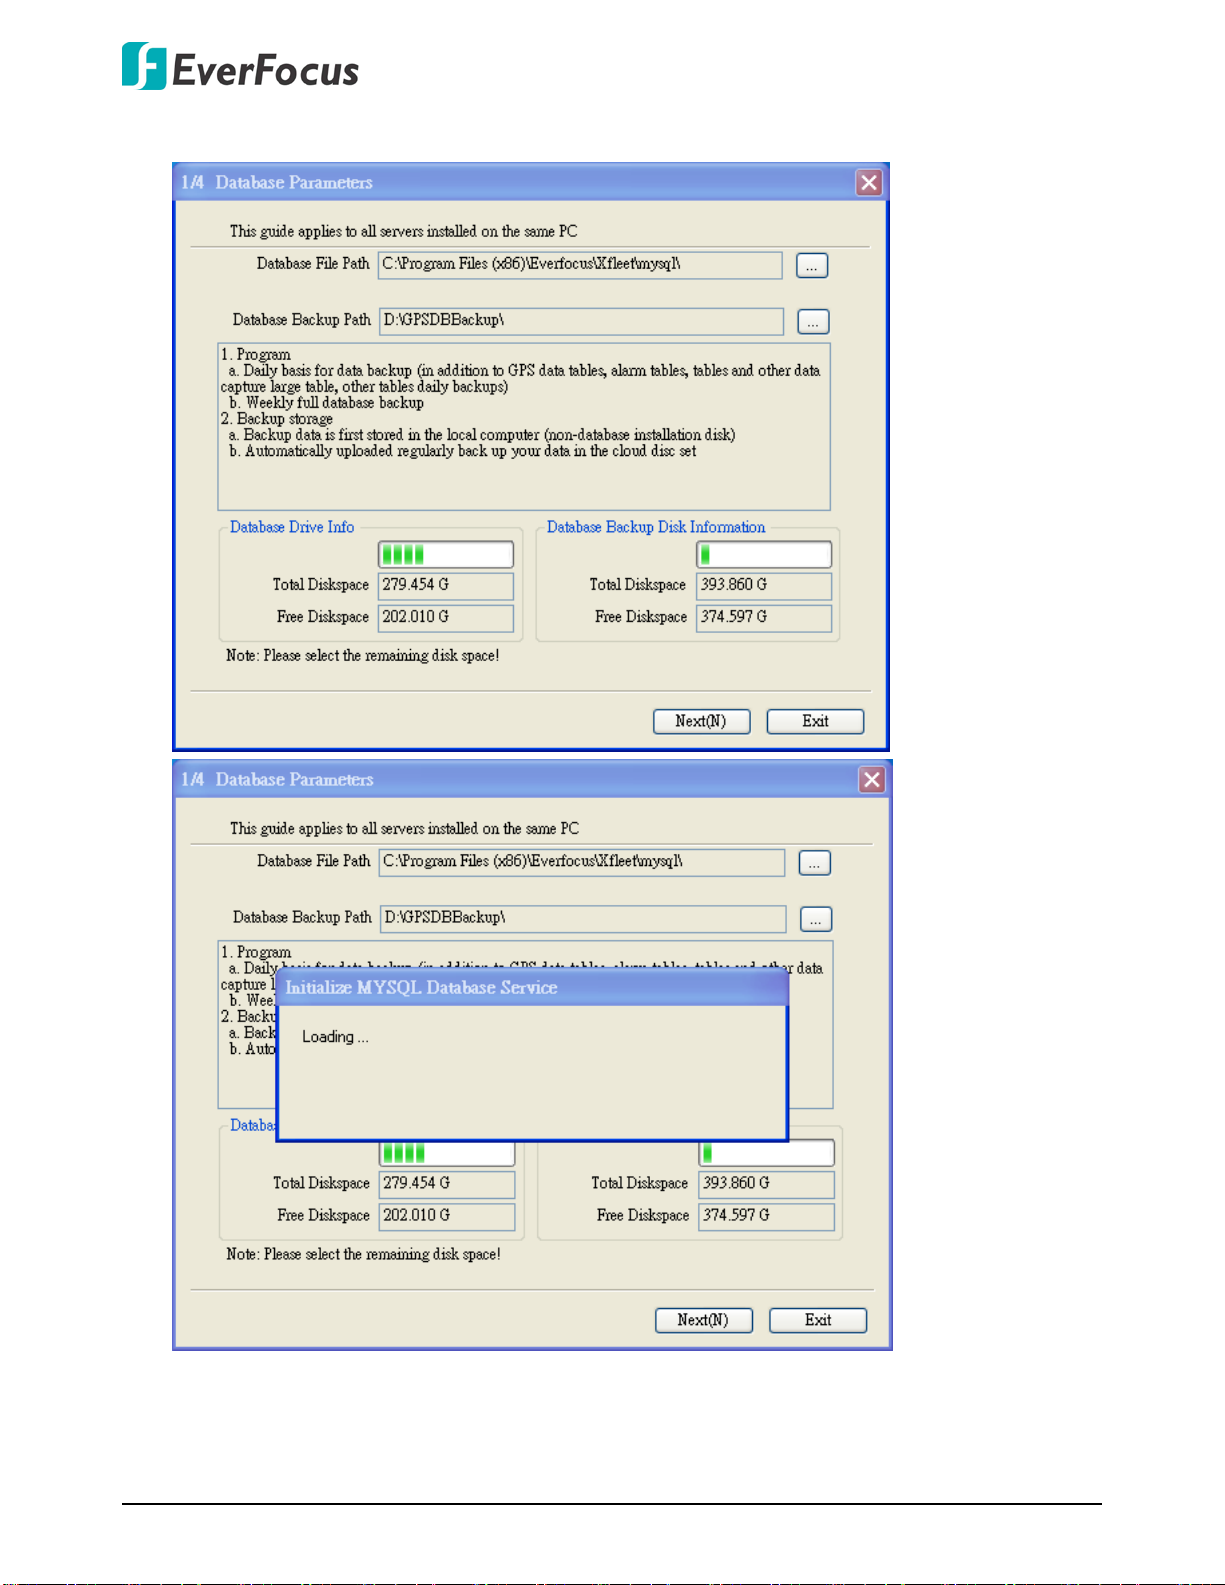
4. Click Next to configure database parameters.
8
Page 14
Xfleet 2.0 Fleets Management Platform
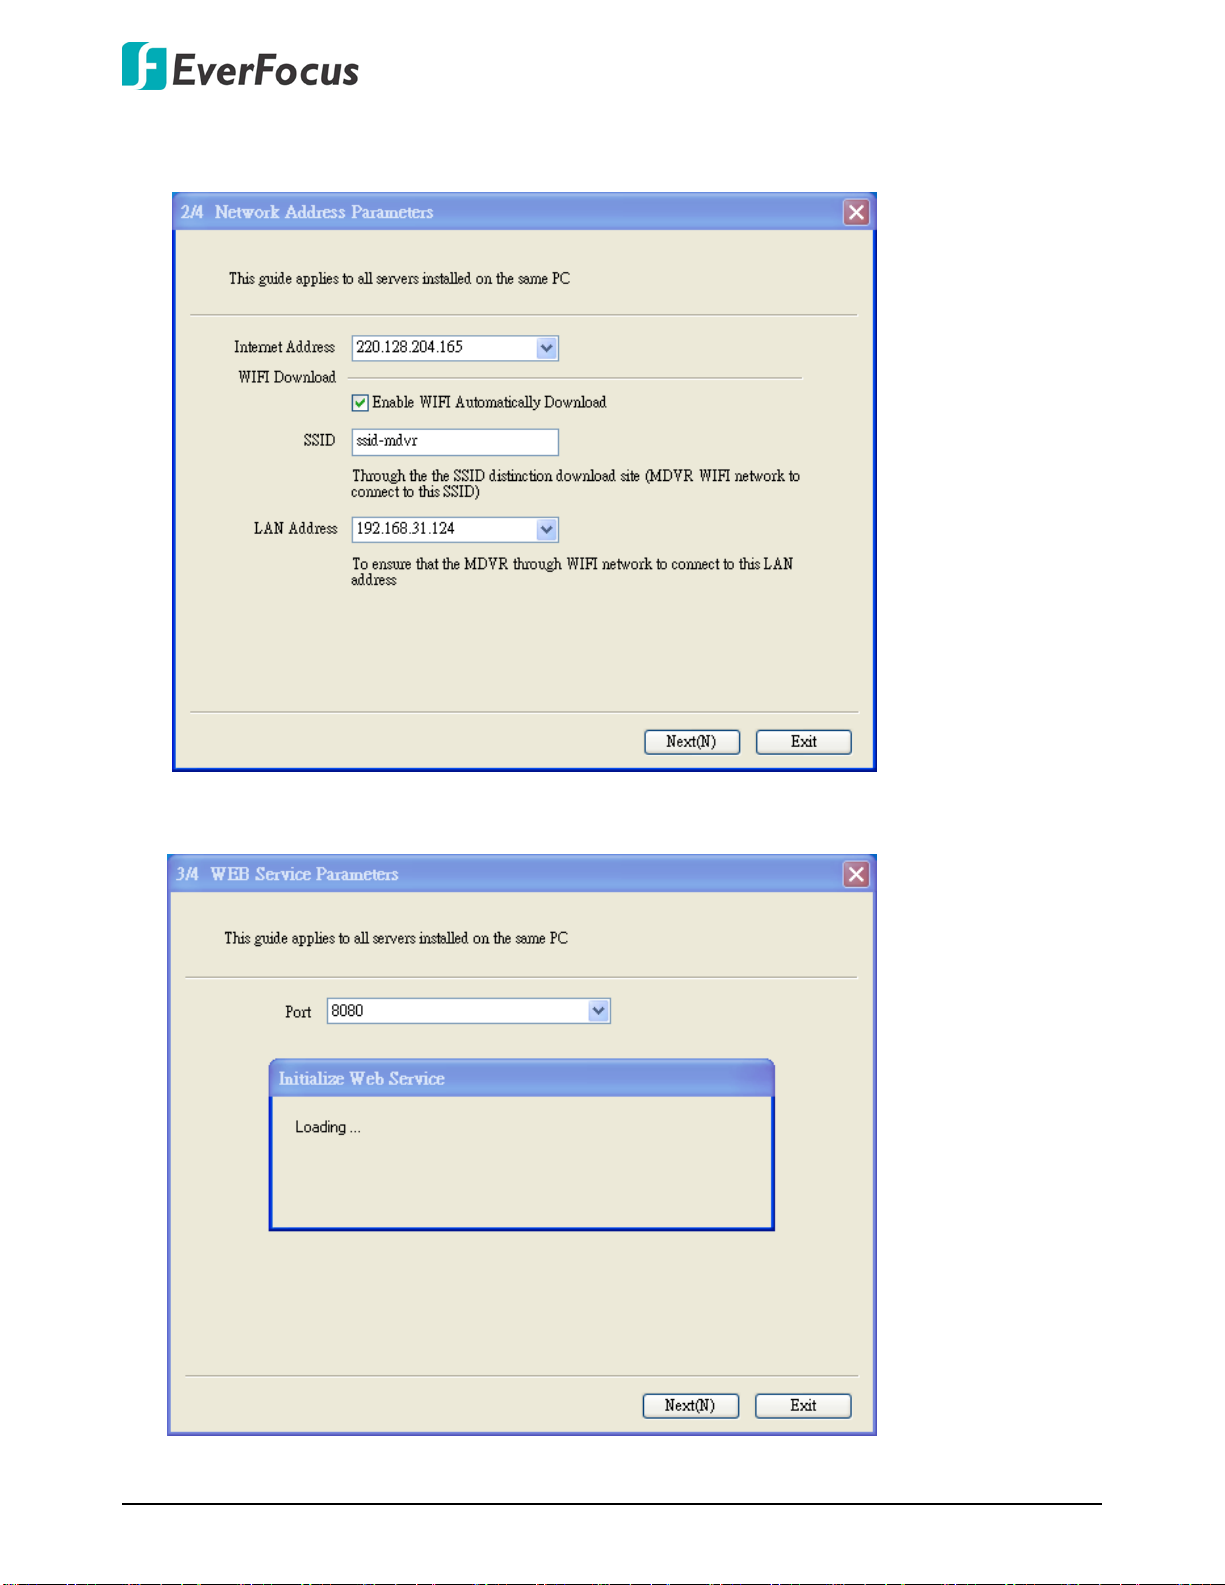
5. Click Next to configure network address parameters, including setting up the IP addresses of
the internet and LAN.
6. Click Next to configure Web service parameters.
9
Page 15
Xfleet 2.0 Fleets Management Platform
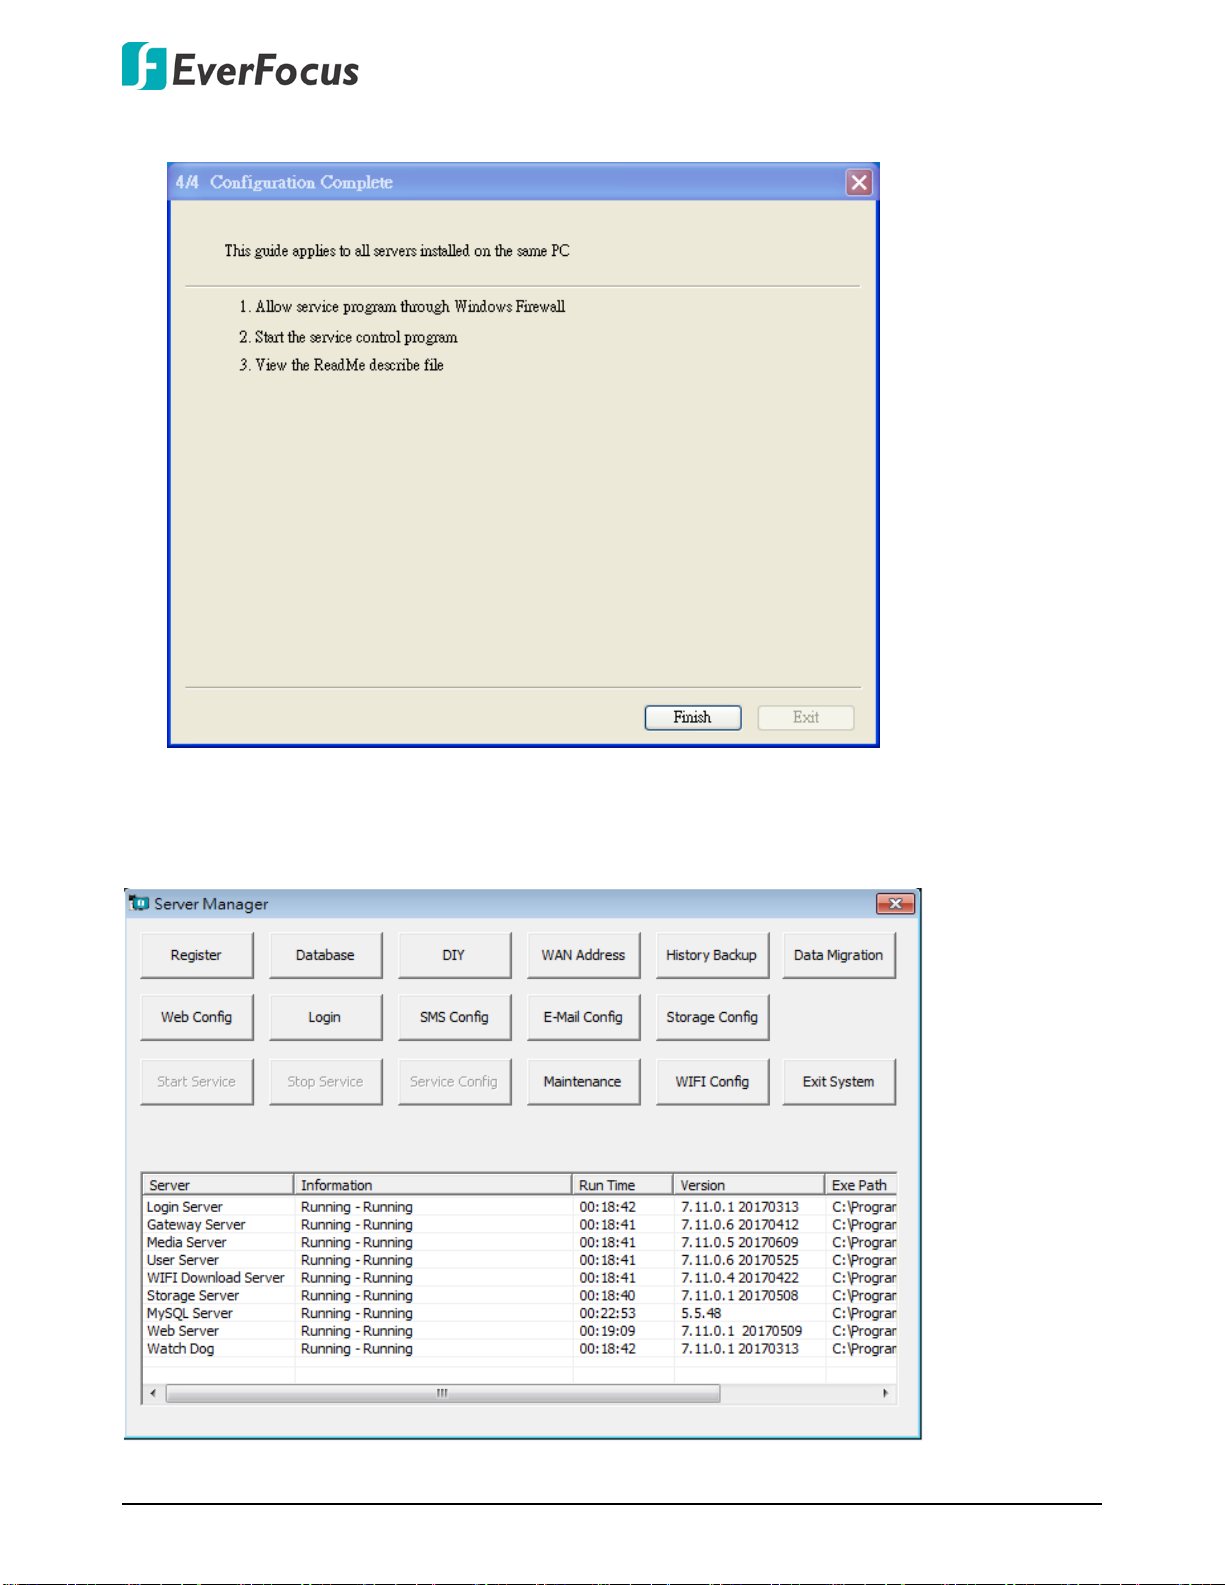
7. Click Finish to complete the configuration.
After the installation and configuration are all complete, the Server Manager window and Xfleet
Web interface (refer to 3. Web Interface) will automatically appear. Please keep the Server
Manager open in the background while using the Xfleet server.
10
Page 16
Xfleet 2.0 Fleets Management Platform
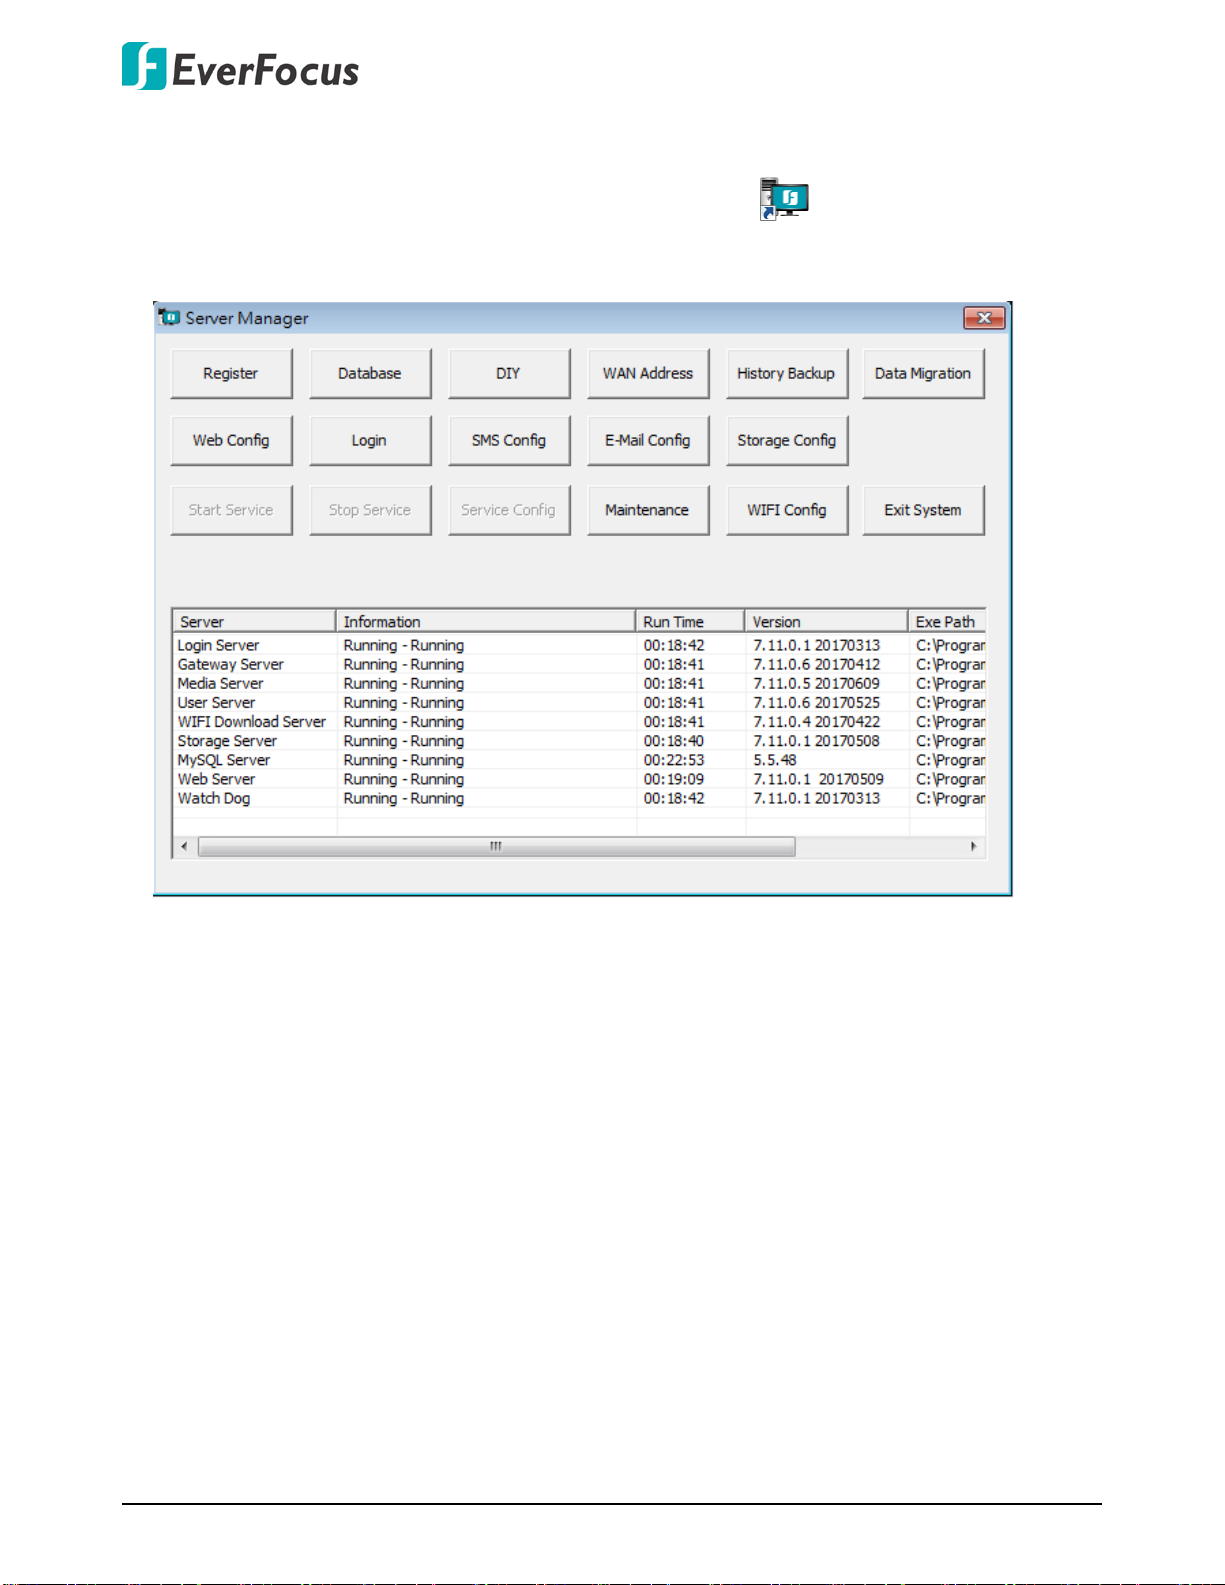
2.3 Server Manager
After installing the Xfleet software, double-click Xfleet Control , the Server Manager
appears. You can manage the servers using Server Manager.
11
Page 17
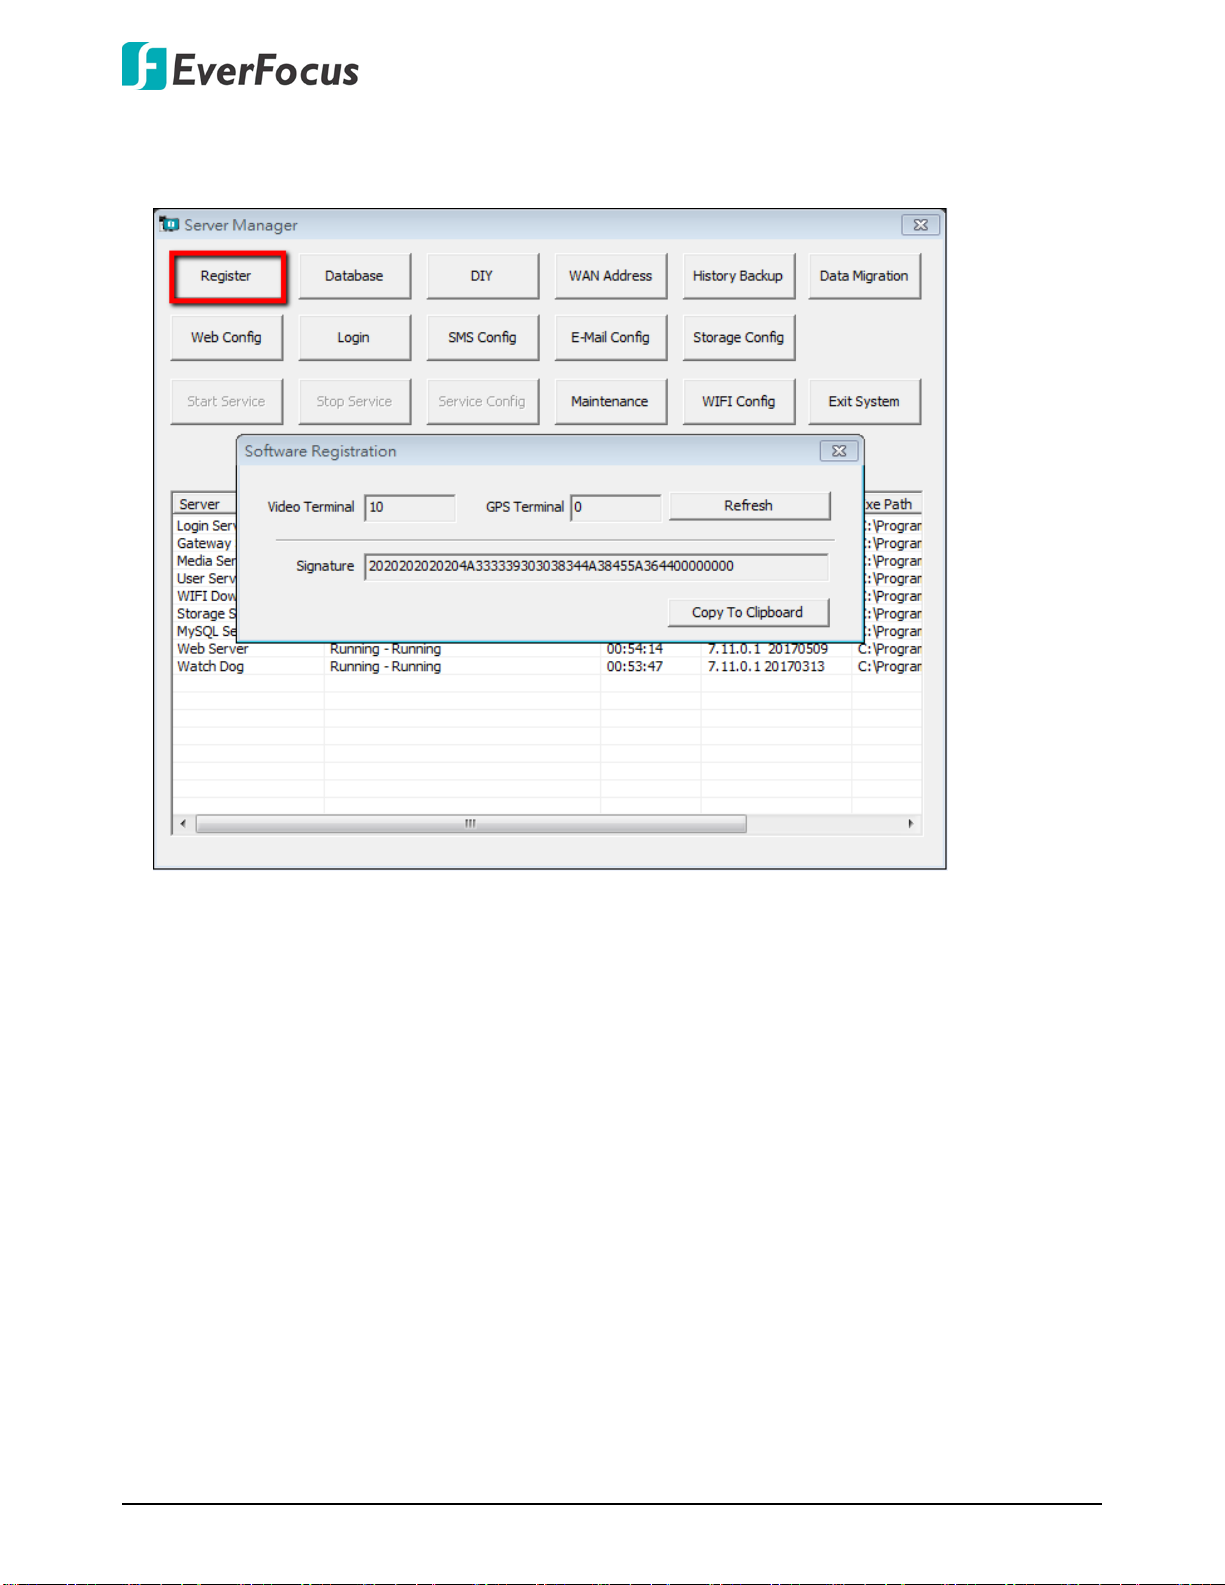
2.3.1 Register
Xfleet 2.0 Fleets Management Platform
12
Page 18

Xfleet 2.0 Fleets Management Platform
2.3.2 Database
You can manage database parameters on this page. On the Server Manager, click Database to
open the Database Configuration window.
2.3.2.1 DB Parameters
You can set up the database configuration here.
13
Page 19
Xfleet 2.0 Fleets Management Platform
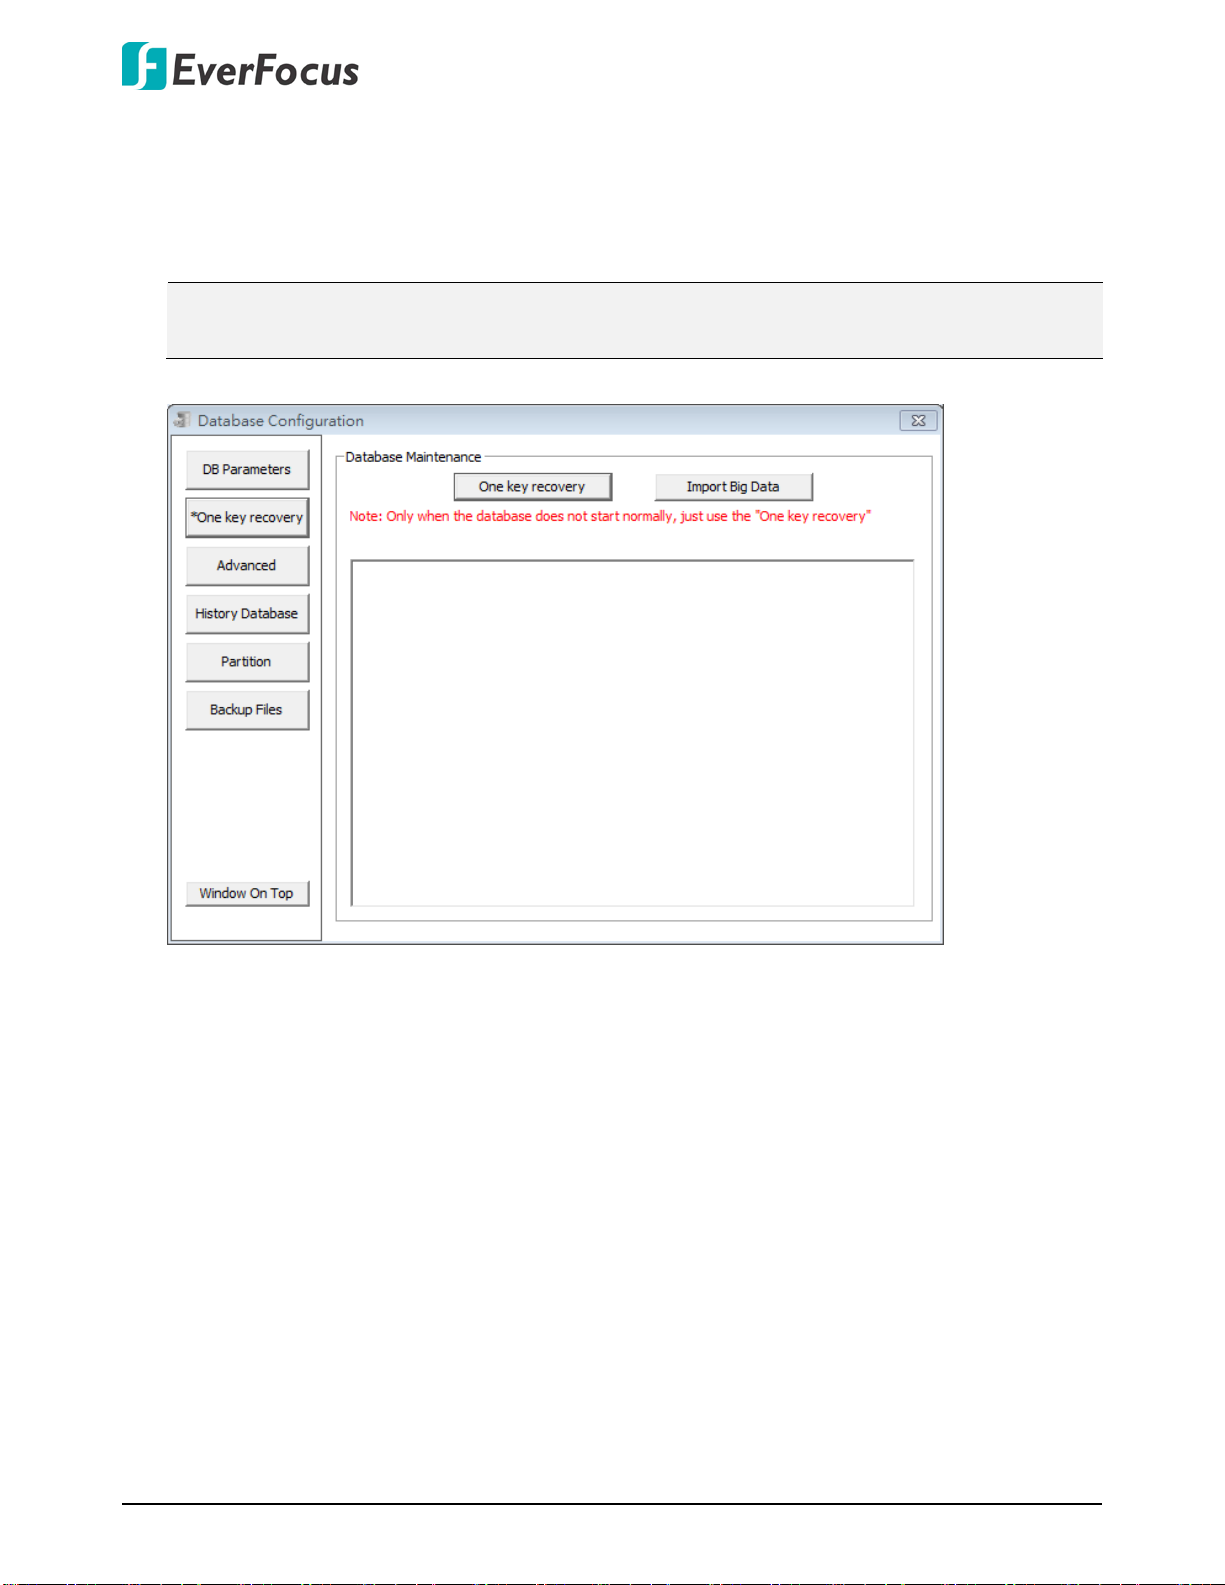
2.3.2.2 One Key Recovery
When MYSQL database is damaged and the service cannot start, you can use one key recovery
to re-establish the database and import data into a new database.
Note: Please use the One Key Recovery function only when the database cannot start
normally.
One key recovery: Click to recover the basic information only.
Import Big Data: Click to import the data, including GPS, alarms and other large data. Users can
decide how much data to be restored back. The more the data, the more time the system need
to restore.
14
Page 20
Xfleet 2.0 Fleets Management Platform
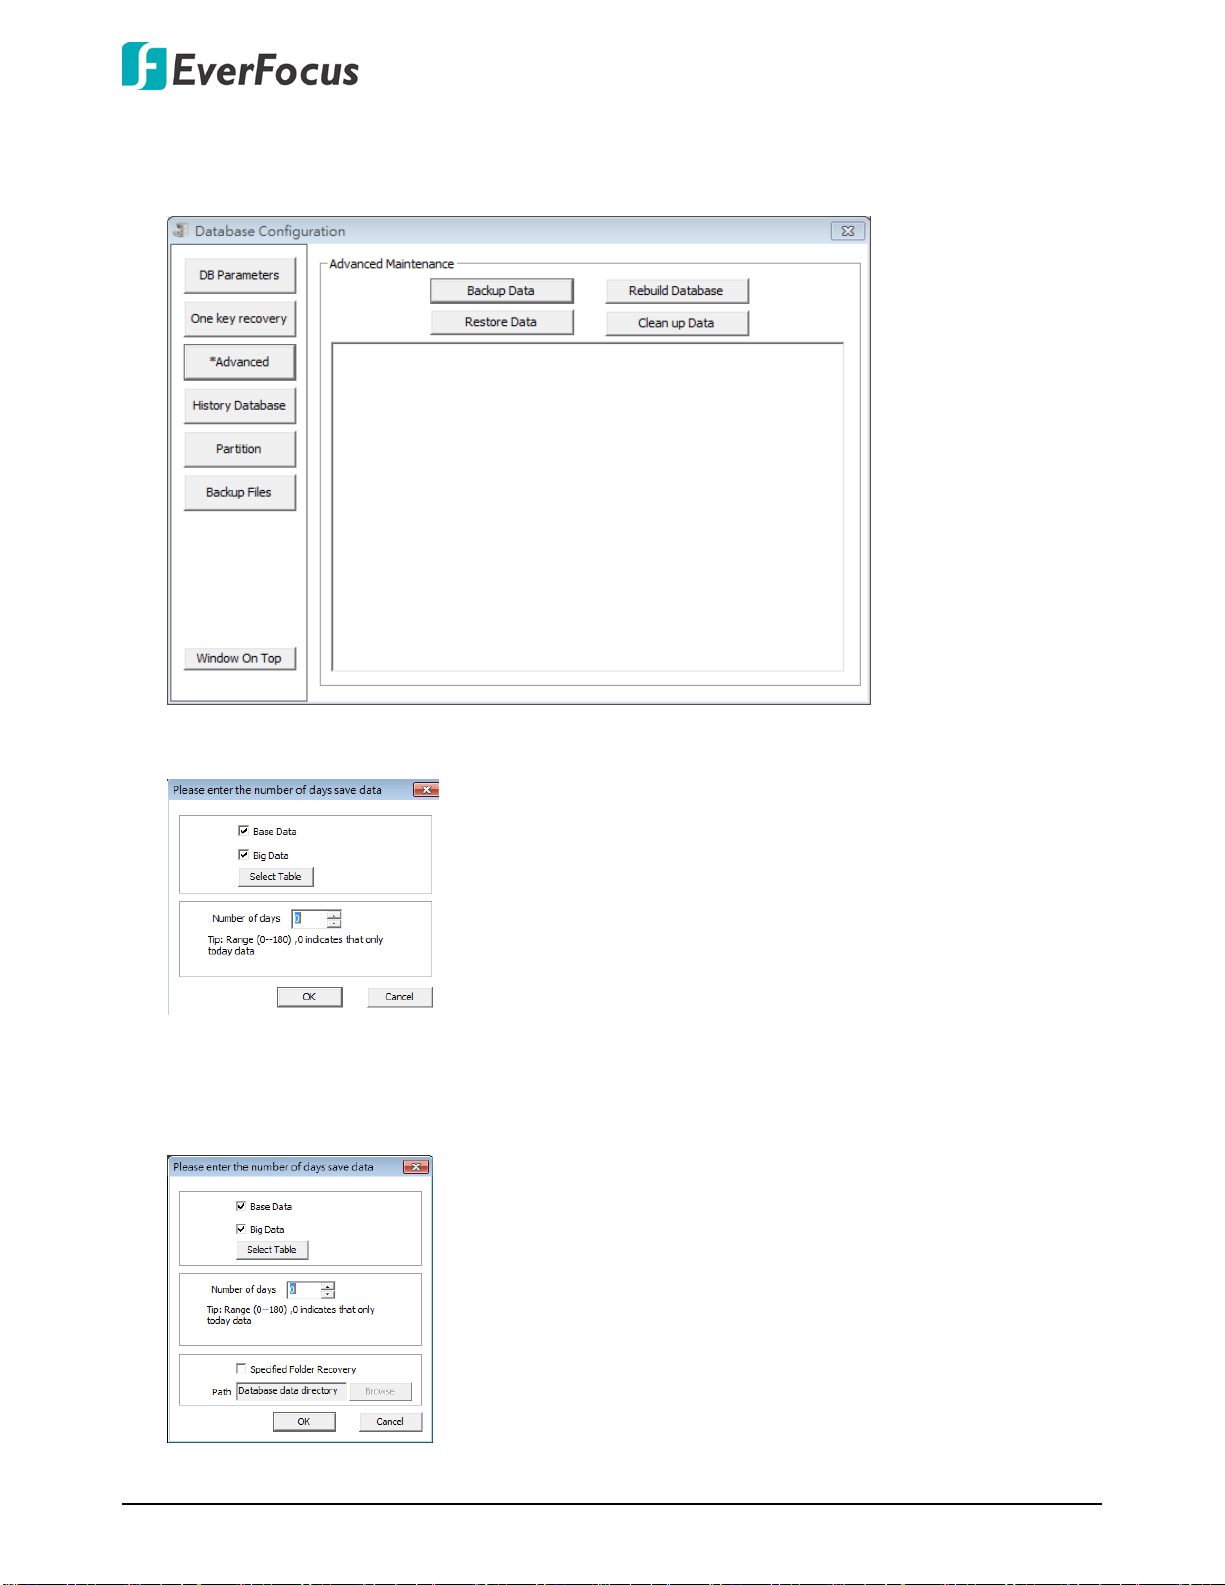
2.3.2.3 Advanced
You can back up, restore or clear data; or rebuild database on this page.
Backup Data: Click to back up the selected data. Note that to perform this function, the
database must be in the normal state.
Rebuild Database: Click to rename the original database and to create a new empty database.
When renaming the database, the database must be closed and the database must be built in
the normal operation state table.
Restore Data: Click to restore the selected backed up data.
15
Page 21
Xfleet 2.0 Fleets Management Platform
Clean up Data: Click to clear the selected backed up data. Note that after clicking OK, the
corresponding data will be deleted from the database and cannot be restored.
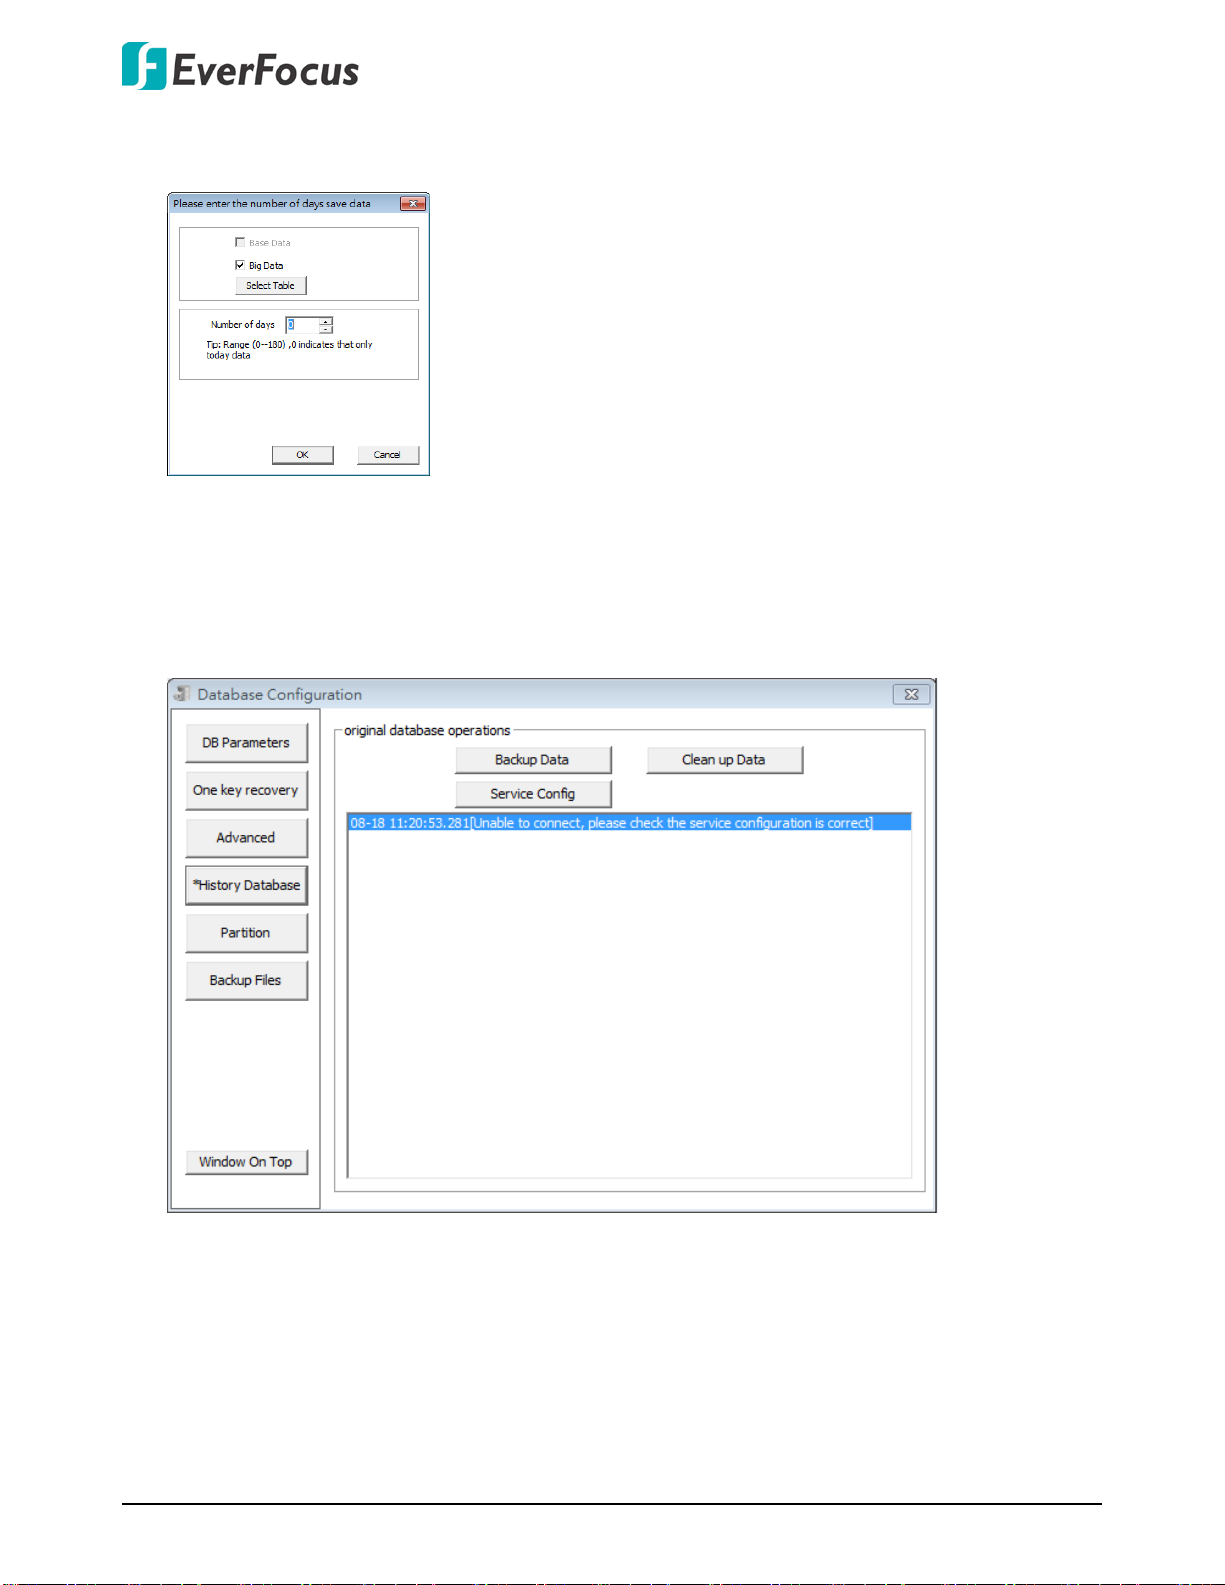
2.3.2.4 History Database
After operating the One Key Recovery function or the Recovery Data in the Advanced page,
there will be historical data where you can find on this page.
16
Page 22
Xfleet 2.0 Fleets Management Platform
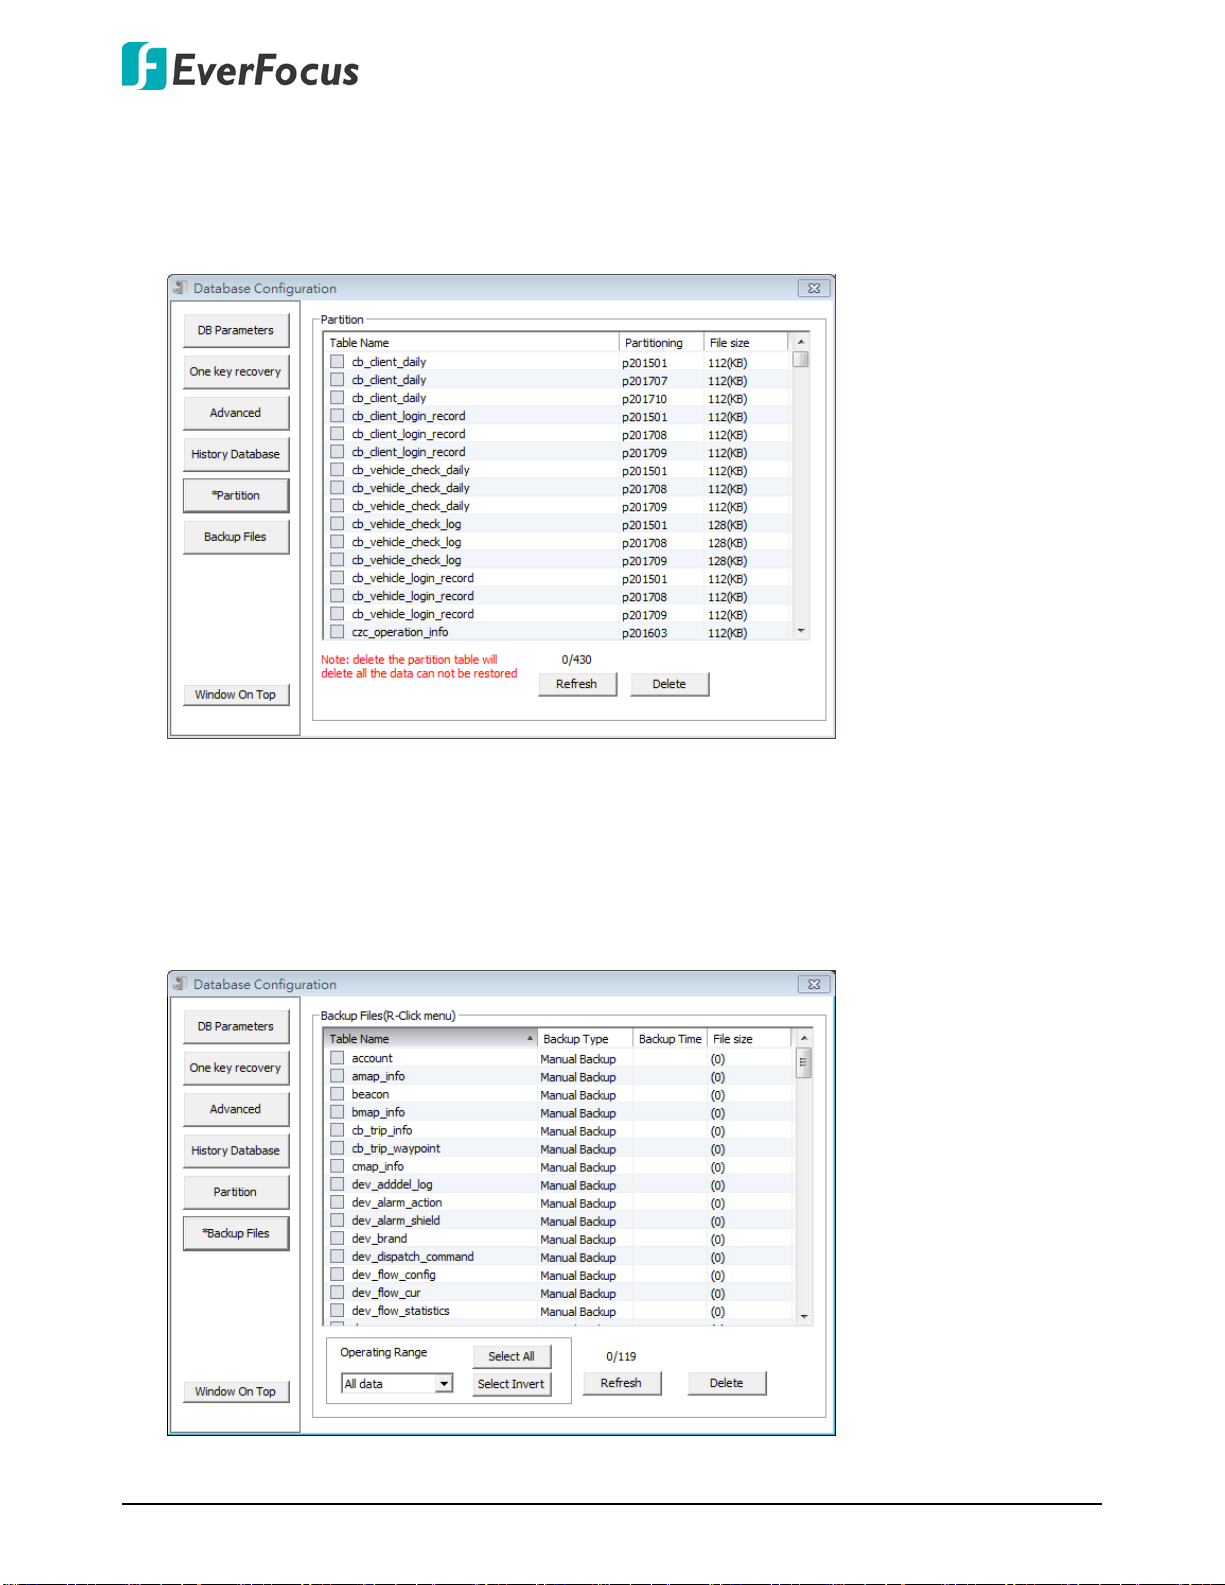
2.3.2.5 Partition
You can delete the partitions on this page. Click Refresh to refresh the page, select the desired
partitions and then click Delete. Note that the whole data in the partition will be deleted and
cannot be restored.
2.3.2.6 Backup Files
You can delete the backup files on this page. Click Refresh to refresh the page, select the
desired data from the Operating Range drop-down list and then click Delete. Note that the
whole data will be deleted and cannot be restored.
17
Page 23
Xfleet 2.0 Fleets Management Platform
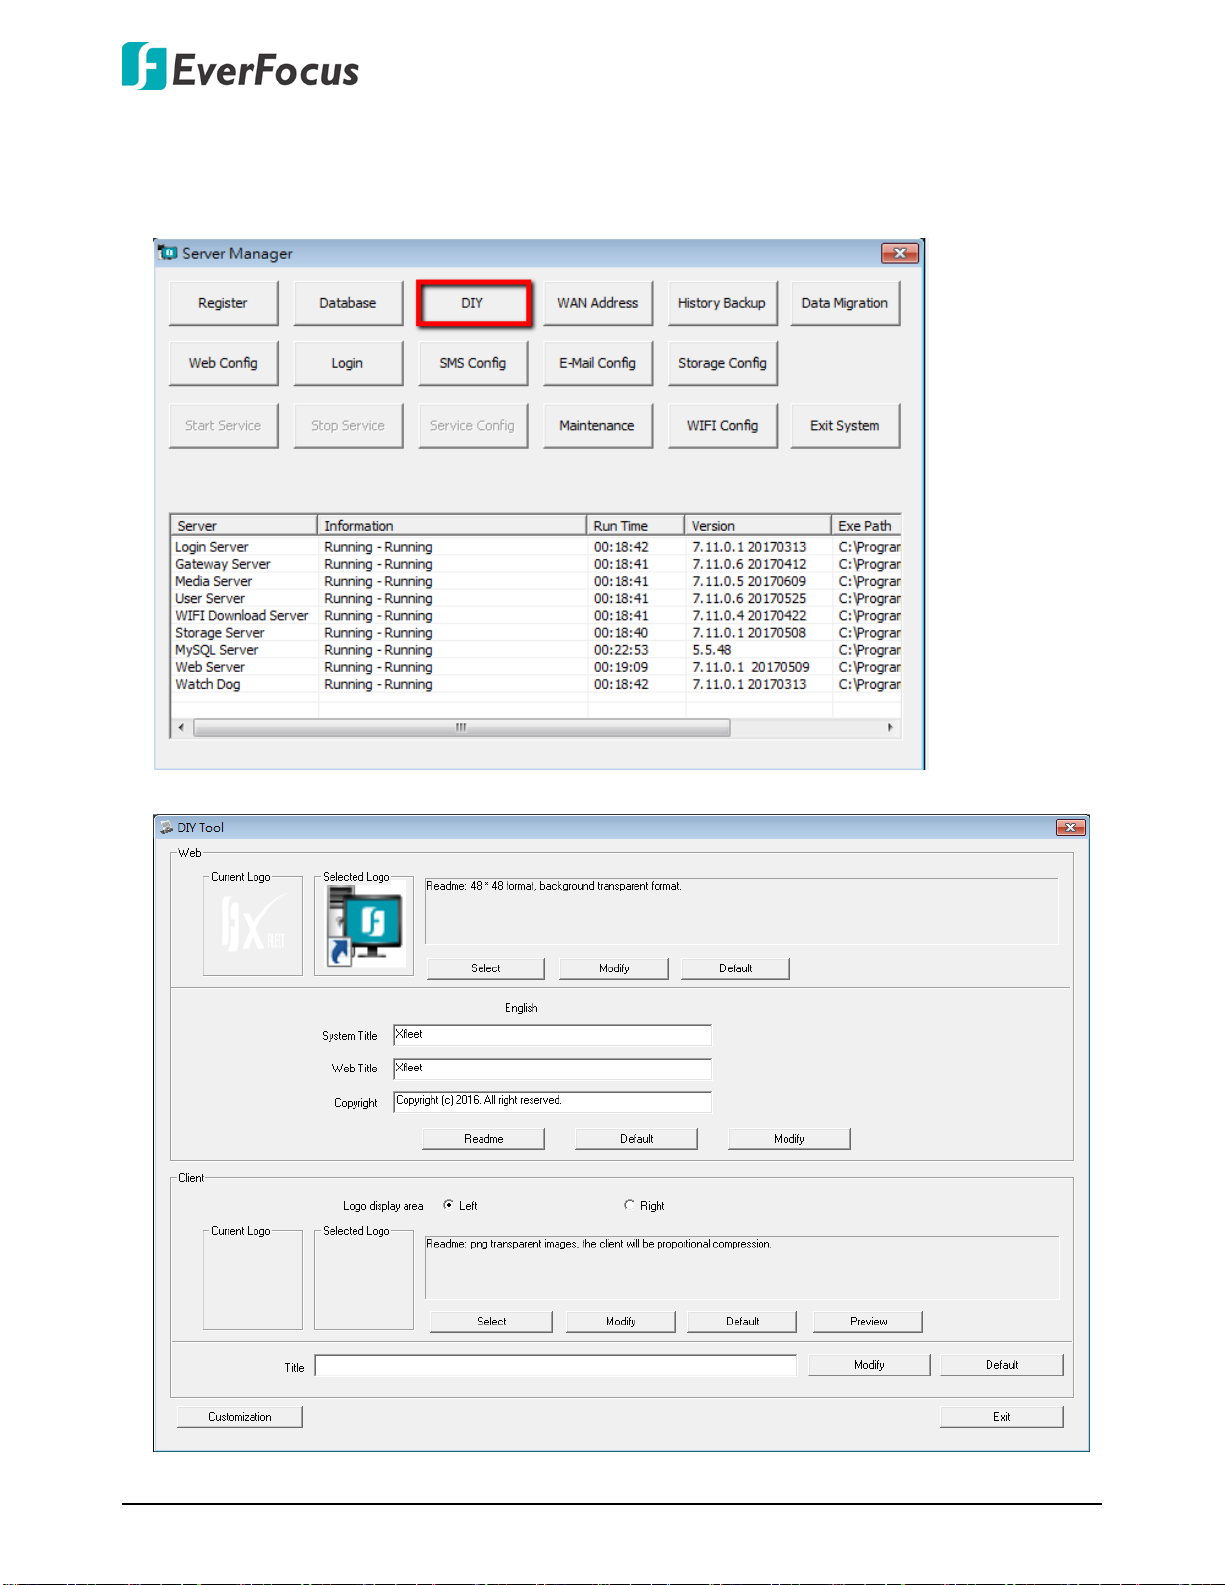
2.3.3 DIY
You can customize company information like LOGO, copyright and the function you don’t need
by yourself on the DIY page. On the Server Manager, click DIY to open the DIY Tool window.
18
Page 24
Xfleet 2.0 Fleets Management Platform
【Web】You can change the Logo, System Title, Web Title and Copyright on the Web interface.
【Client】You can change the Logo and Title on the PC Client interface.
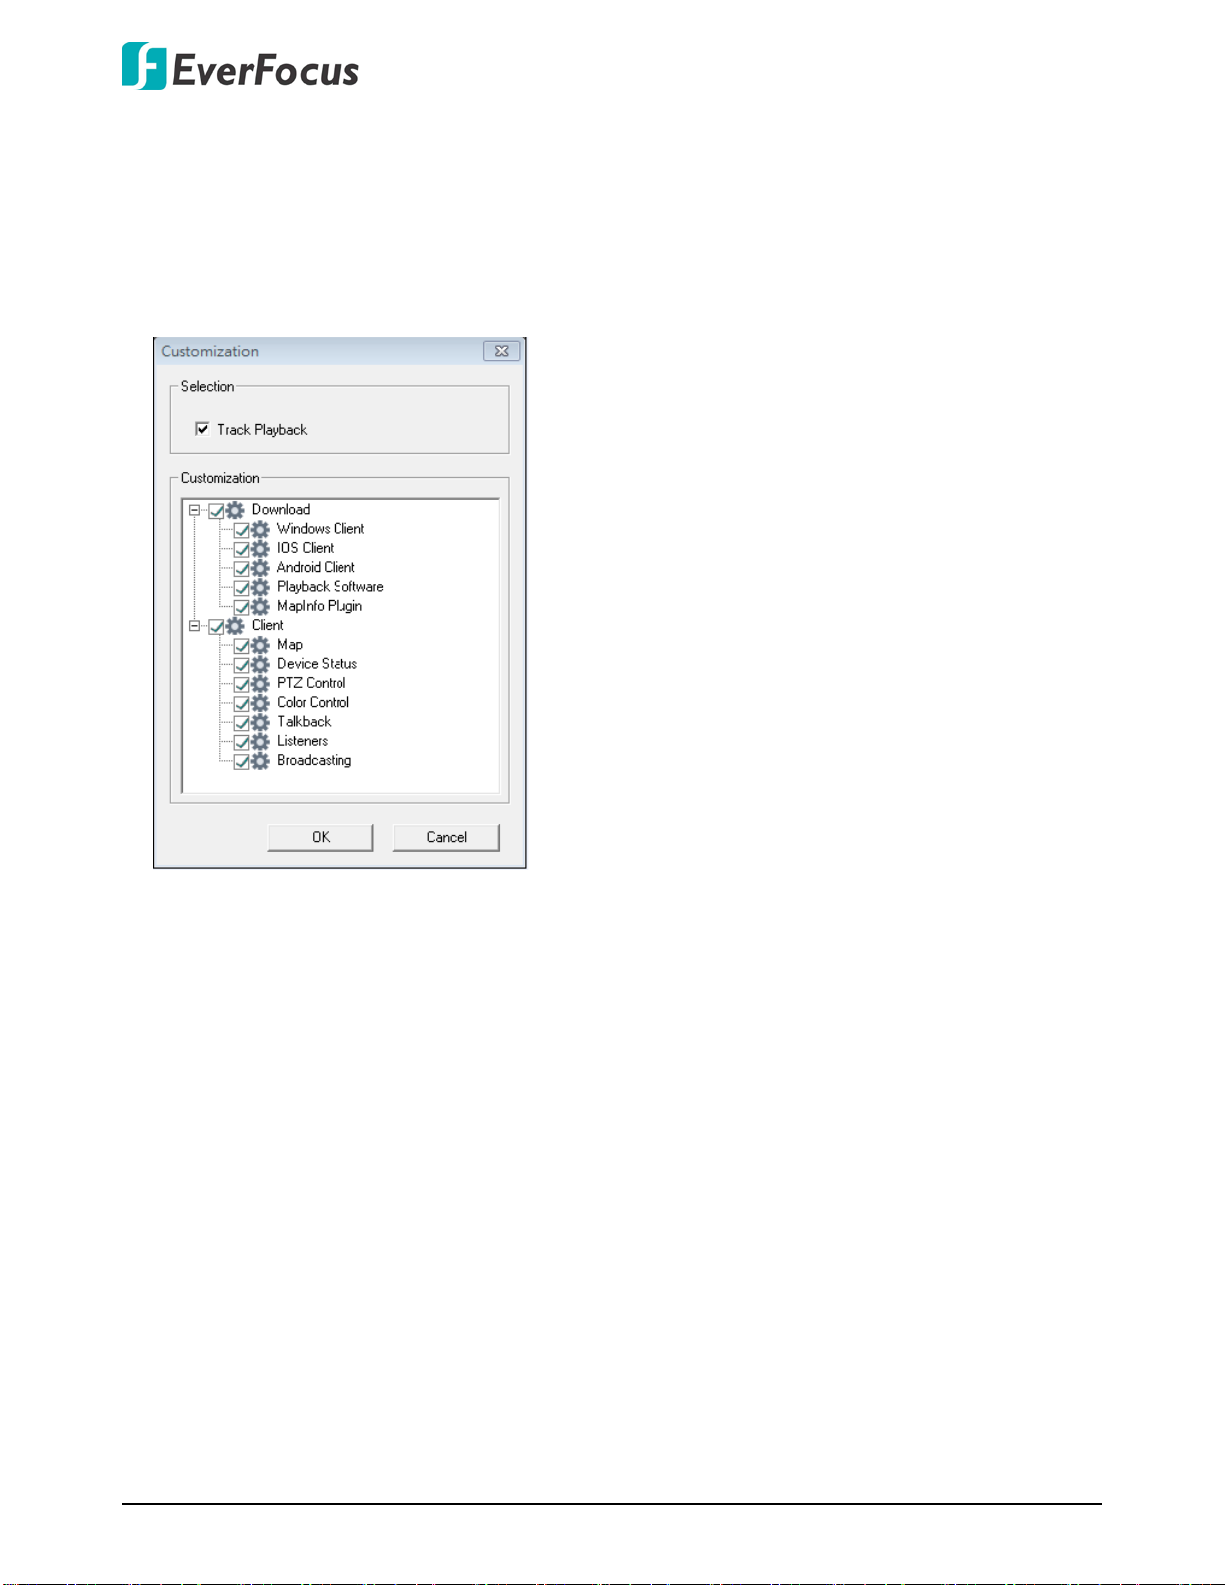
To customize the functions in your server, click the Customization button on the lower-left side
of DIY Tool window, the below Customization window appears. If you don’t need the functions
in your server, uncheck the boxes, and then click OK.
19
Page 25

Xfleet 2.0 Fleets Management Platform
2.3.4 WAN Address
You can configure network address on this page (both IP address or domain name are
supported). On the Server Manager, click WAN Address to open the Network Address
Configuration window.
2.3.5 History Backup
You can configure Email Backup setting on this page. On the Server Manager, click History Backup to open the History Backup Setting window.
20
Page 26
Xfleet 2.0 Fleets Management Platform
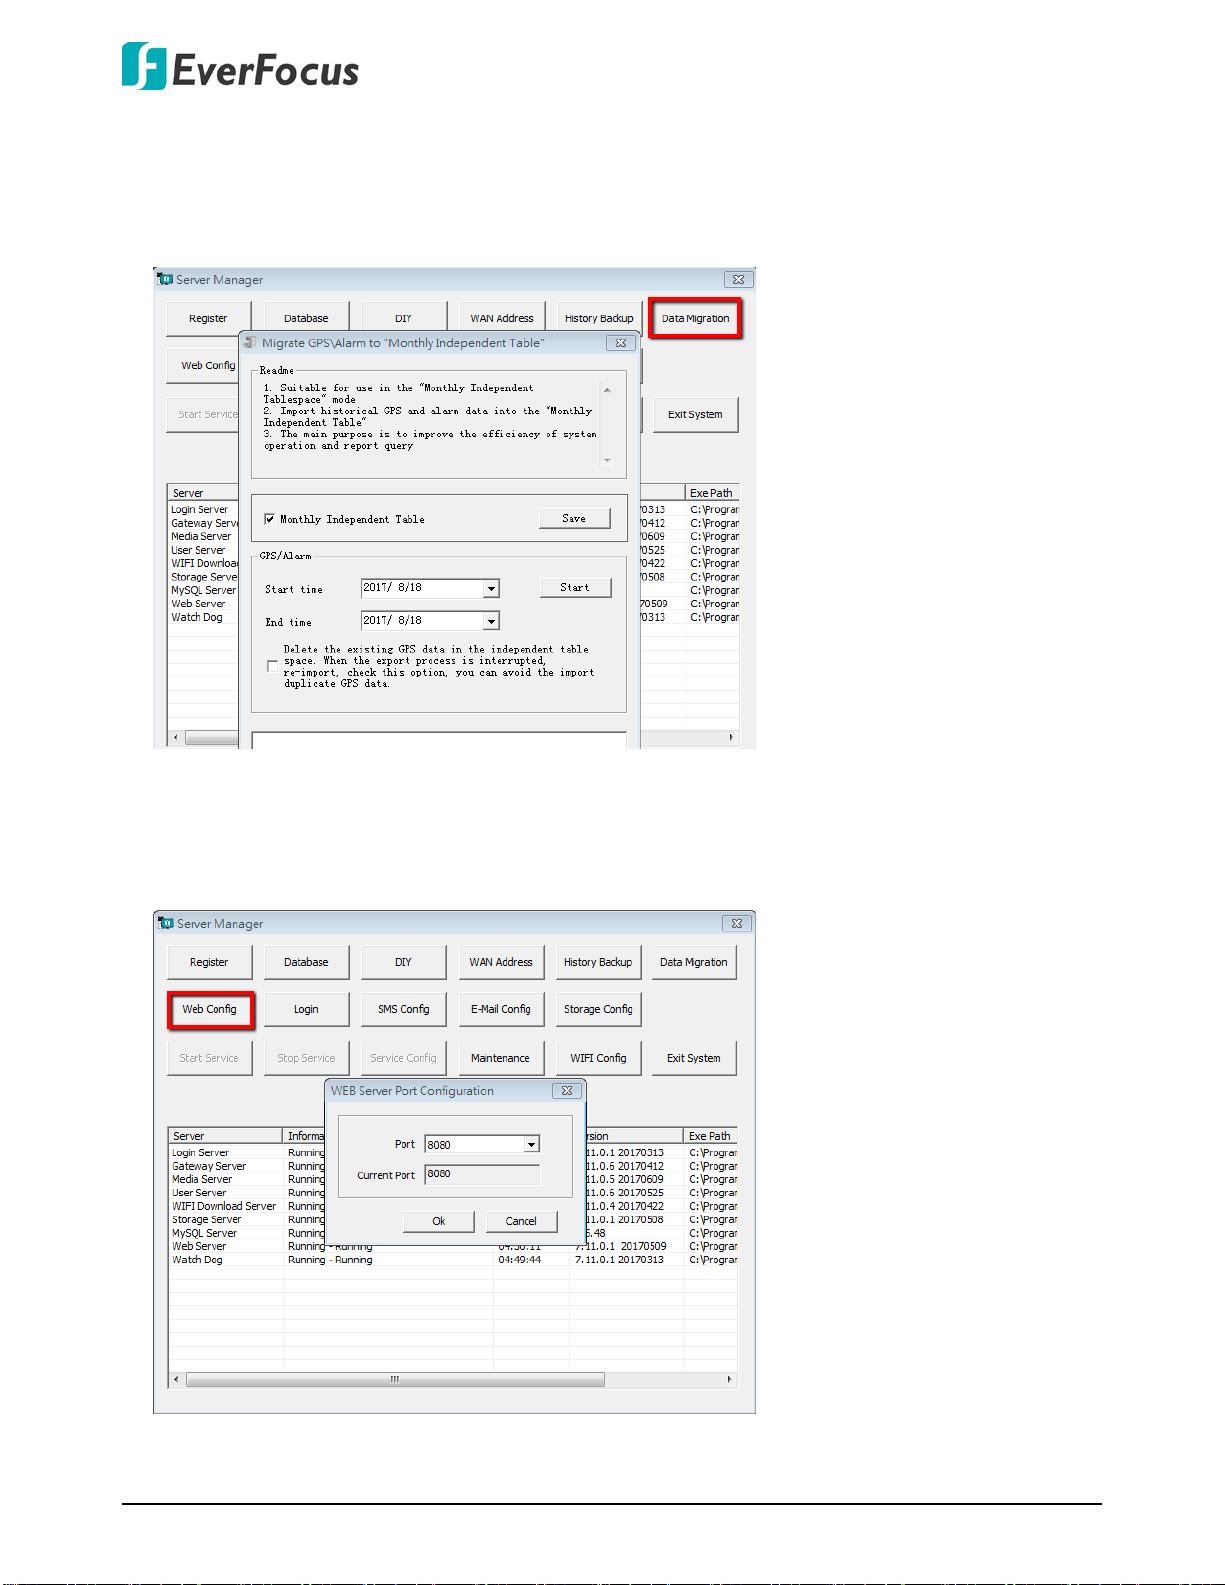
2.3.6 Data Migration
You can migrate GPS/Alarm data to the Monthly Independent Table in order to improve the
efficiency of system operation or the usage of report query function. On the Server Manager,
click Data Migration to open the Migrate GPS/Alarm to “Monthly Independent Table” window.
2.3.7 Web Config
You can set up the Web server port on this page. On the Server Manager, click Web Config to
open the Web Server Port Configuration window.
21
Page 27
Xfleet 2.0 Fleets Management Platform
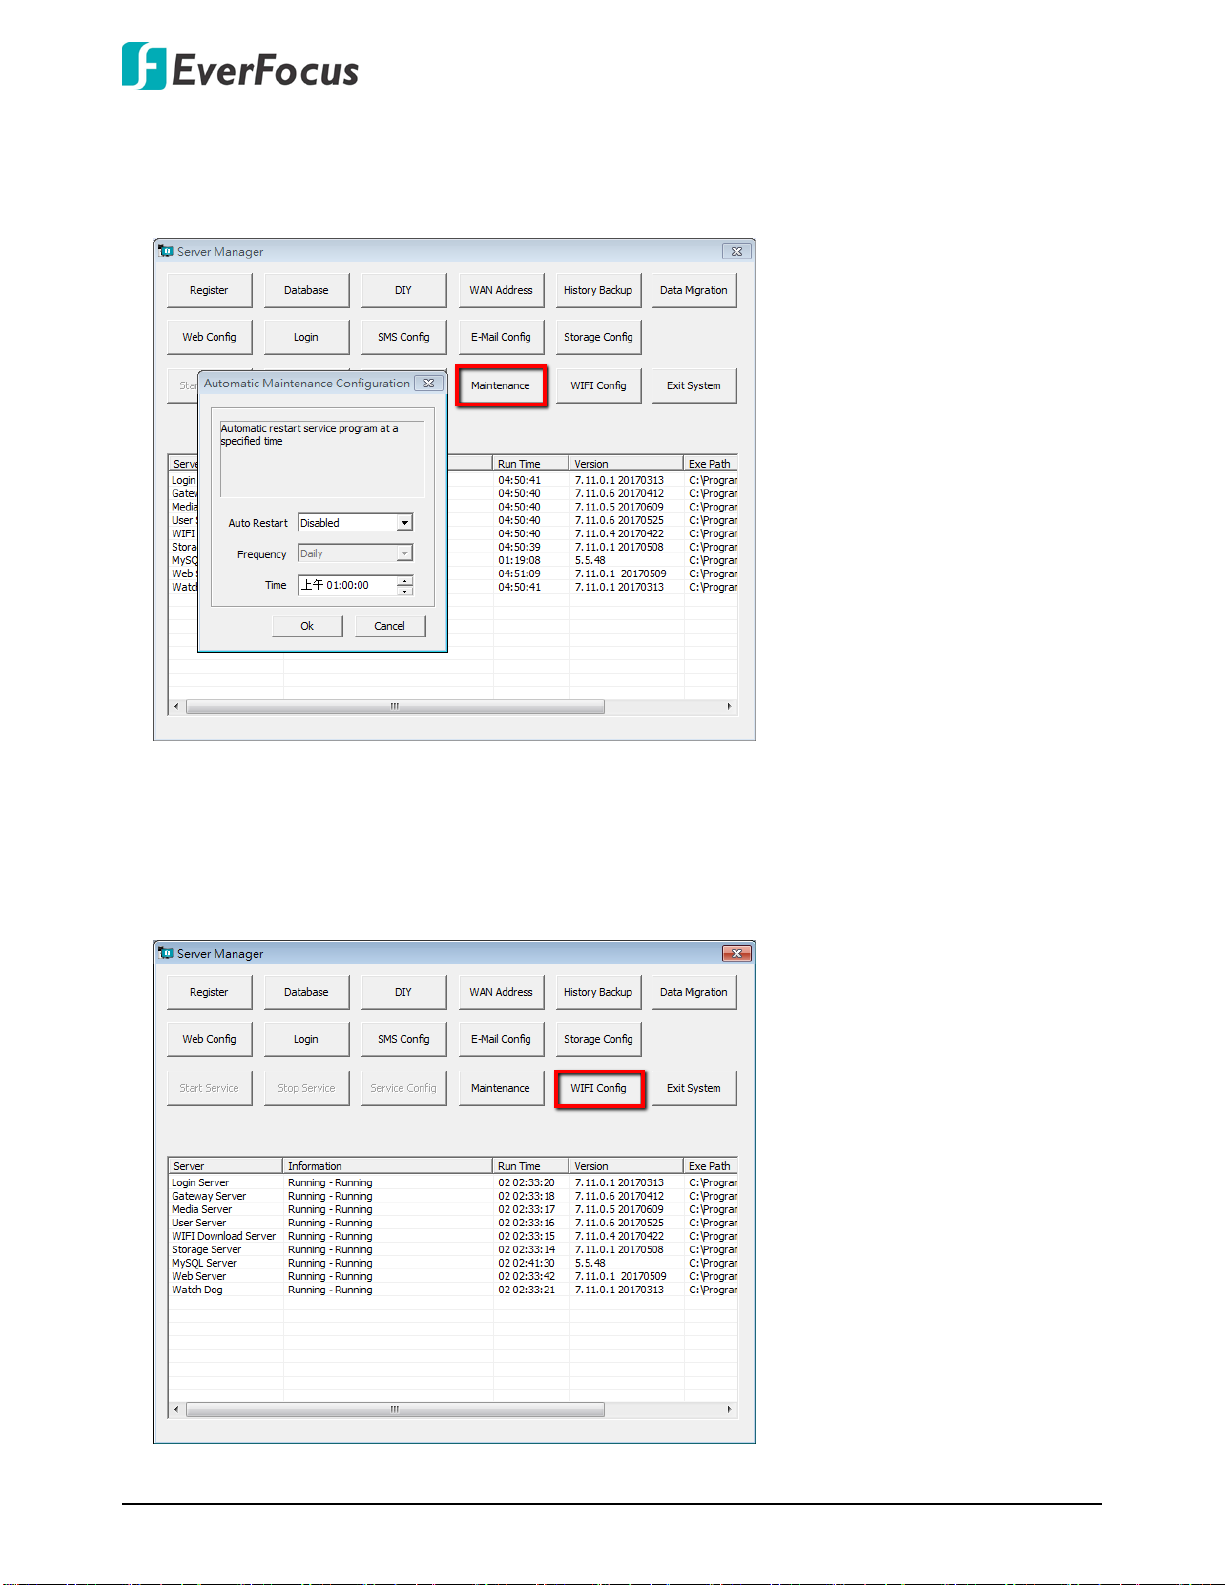
2.3.8 Maintenance
You can set up a specific time for the system to restart service automatically. On the Server Manager, click Maintenance to open the Automatic Maintenance Configuration window.
2.3.9 WiFi Config
You can check up WiFi download status or set up the storage location for the WiFi download
recordings.
22
Page 28
Xfleet 2.0 Fleets Management Platform
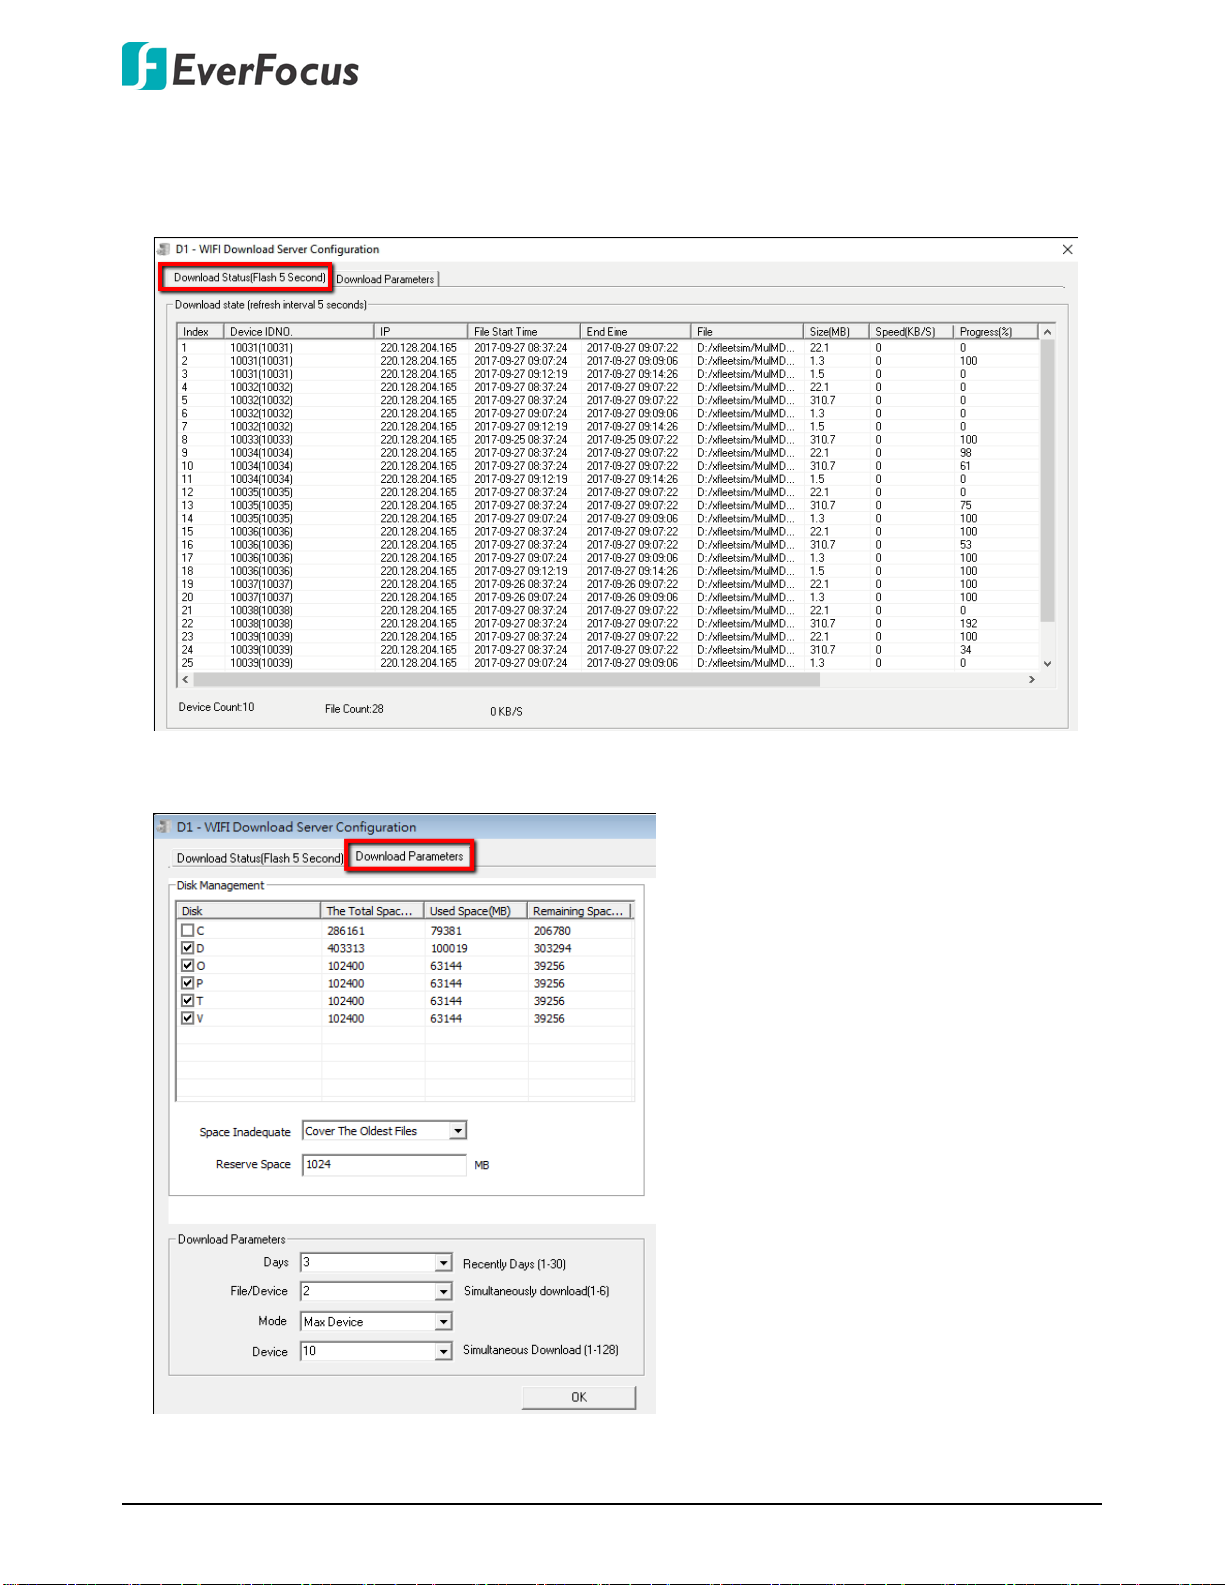
Click WIFI Config, the following window appears.
Click the Download Status tab to check up the WiFi download status.
Click the Download Parameters tab to configure the WiFi download storage location.
23
Page 29
Xfleet 2.0 Fleets Management Platform
Main Server
Gateway Server 1
Fleet B
(Vehicle 1 ~
Vehicle N)
Fleet N
(Vehicle 1
~ Vehicle N)
Internet
3G/4G
Vehicle Connection
Sub Server
Gateway Server 3
Sub Server
Gateway Server N
Sub Server
Gateway Server 2
Fleet A
(Vehicle 1
~ Vehicle N)
3G/4G
Vehicle Connection
2.4 Establishing Multi-Server
You can establish multiple Gateway Servers, Download Servers and Storage Servers.
2.4.1 Establishing Multiple Gateway Servers
Vehicles can be connected to the system through Gateway Server. You can establish multiple
Gateway servers in order to connect vehicles from different locations.
To establish multiple Gateway Servers:
1. Install Xfleet software on all of the servers (Main and Sub servers). Please refer to 2.2
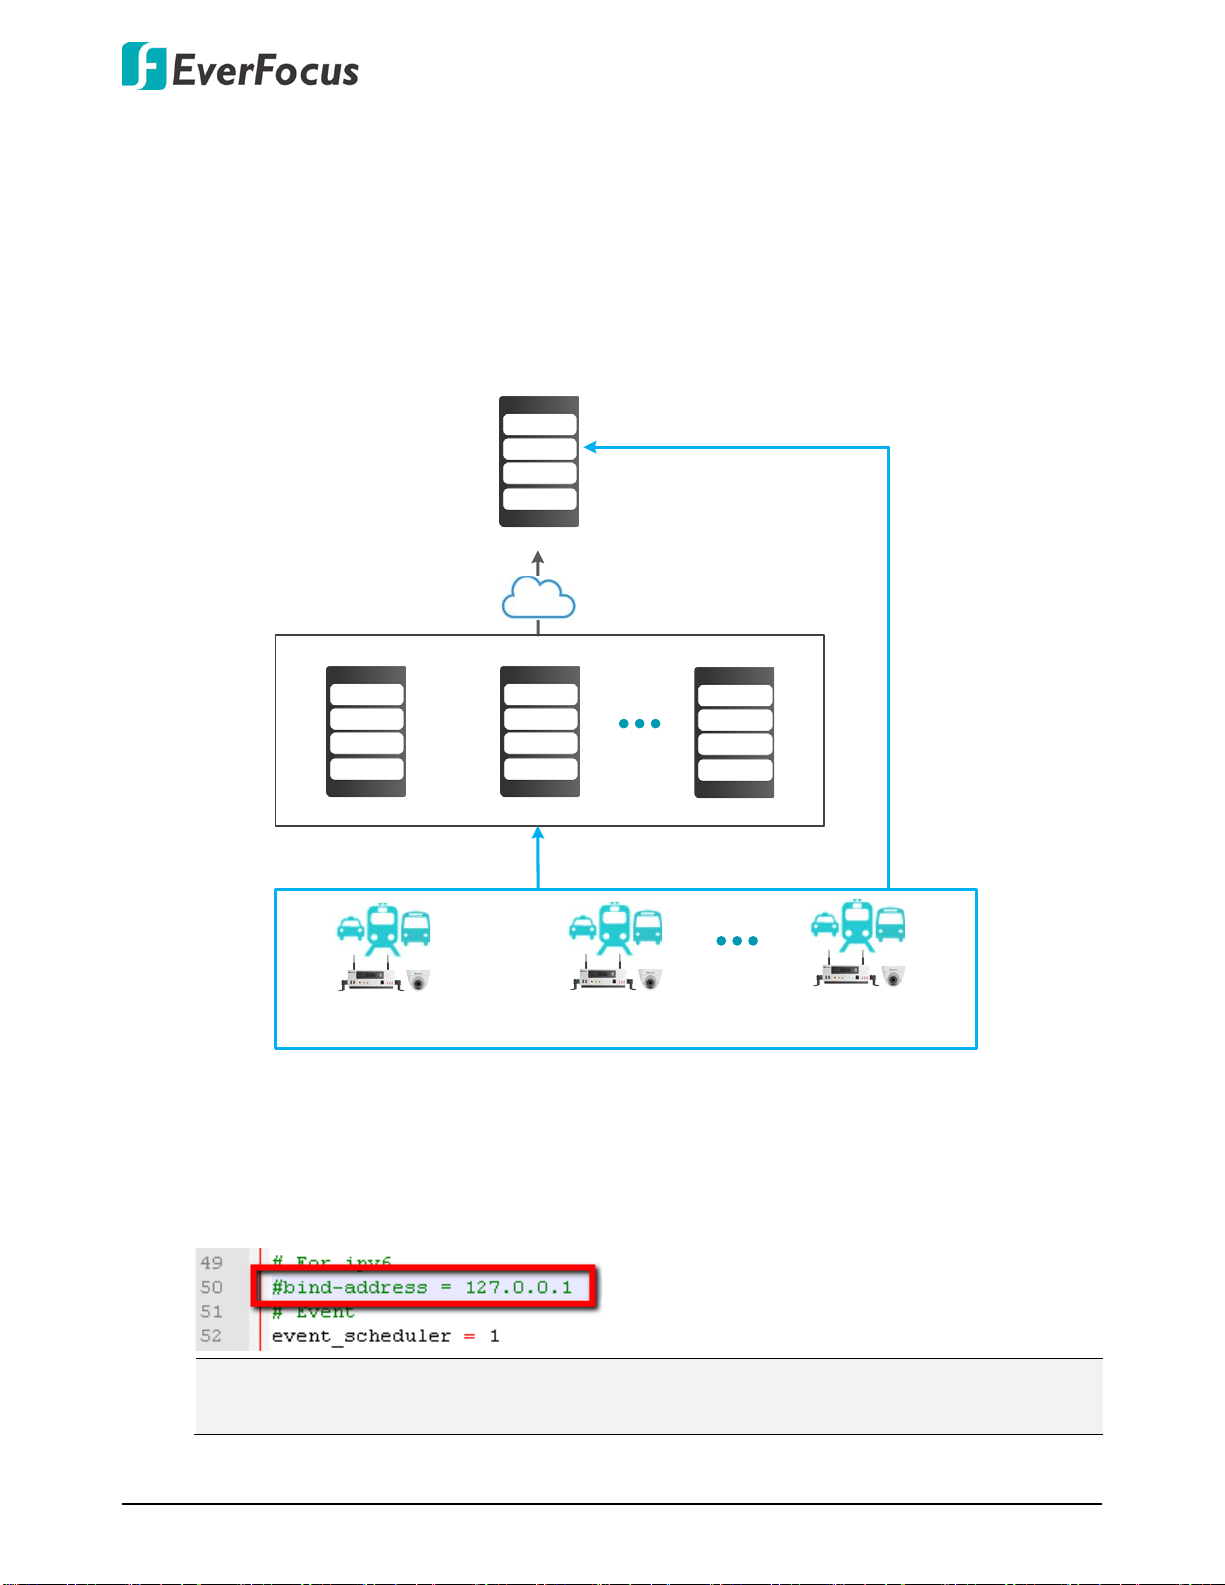
2. On the PC of Main Server, enter C:\Program Files (x86)\Everfocus\Xfleet\mysq. Find "my.ini"
Installation.
and open the file. Modify "bind-address = 127.0.0.1" to "#bind-address = 127.0.0.1".
Note: If the system database is not located at the default path. Find the path where you
located the database. For example: D:\xxxxxx\Everfocus\Xfleet\mysq
24
Page 30
Xfleet 2.0 Fleets Management Platform
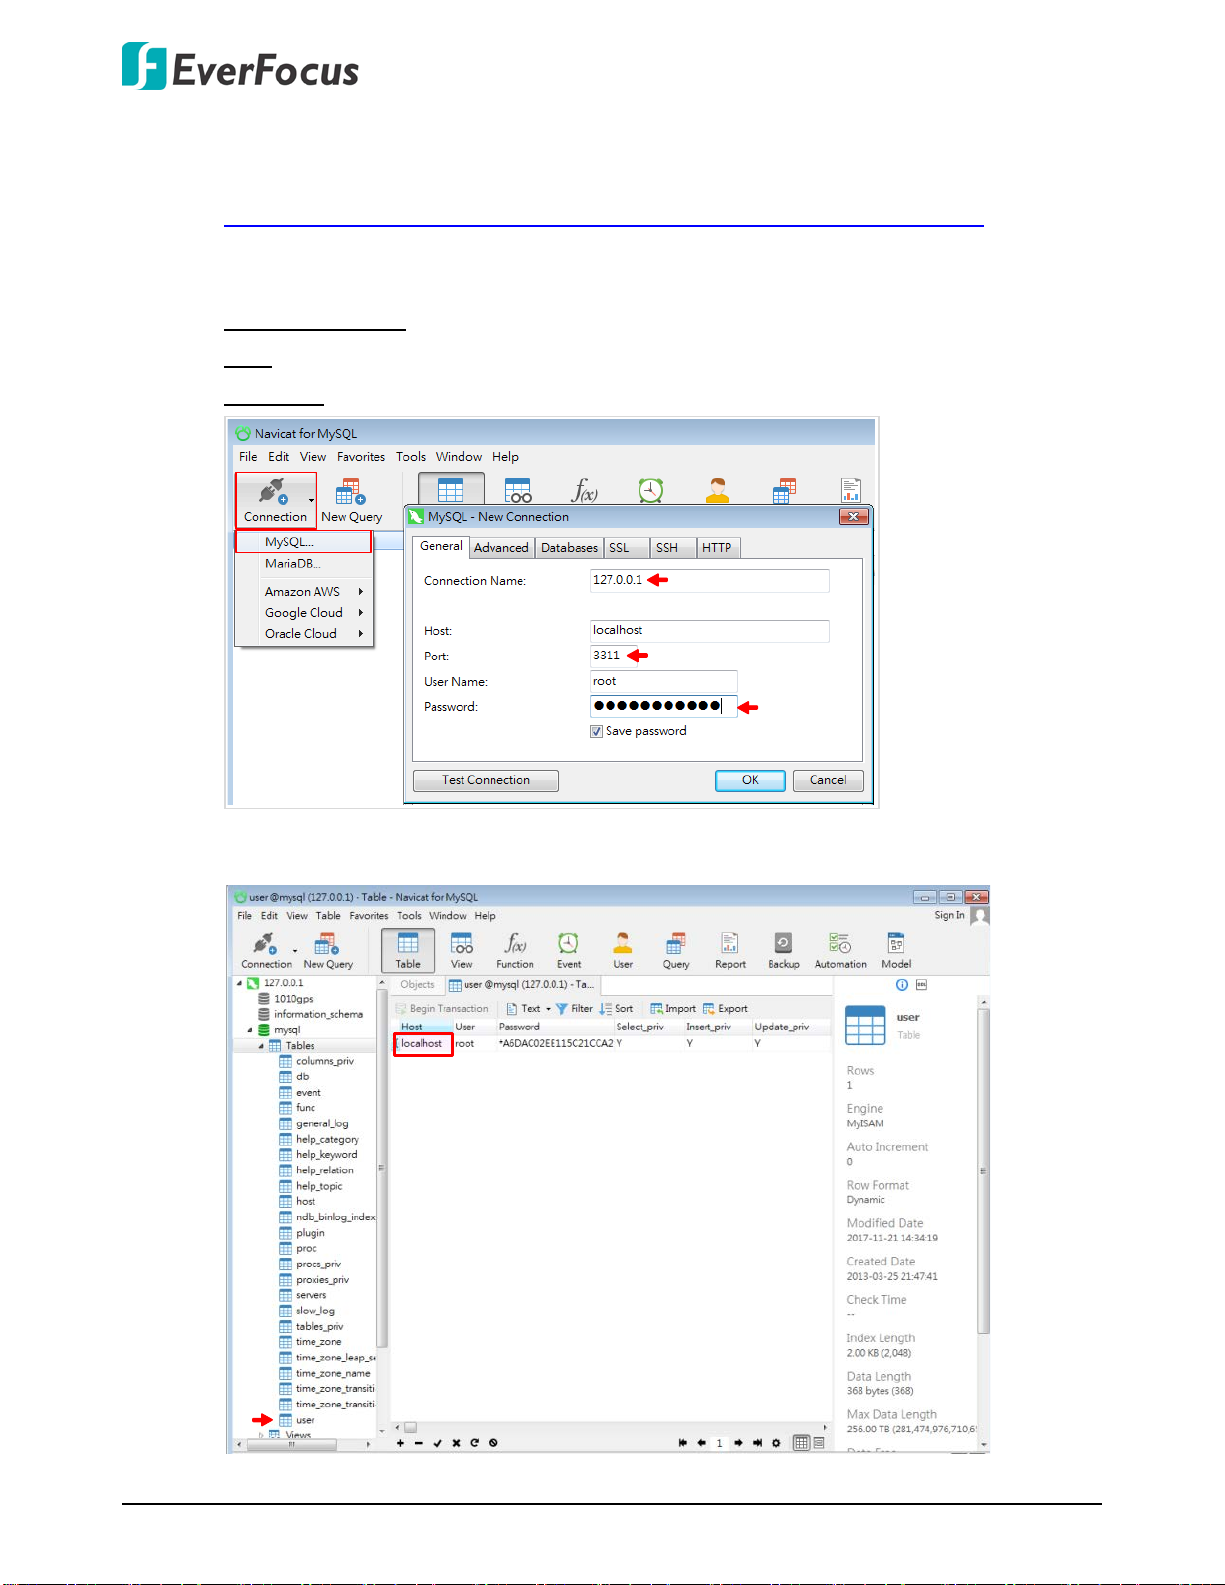
3. On the PC of Main Server, modify “User” table in order to grant remote access for users.
a. Download the following software and then run "navicat110_mysql_ct_x86.exe".
https://drive.google.com/open?id=1rCoqfHeO0q2dNjznopd8MH1kNaghwew-
b. Open the software to establish a connection. Click Connection and then click MySQL, the
MySQL-New Connection window appears. Input the following info and then click OK.
Connection Name: Input the local host IP, which is 127.0.0.1
Port: Input 3311.
Password: Input cmsserverv6
c. On the left-side, find “User” (mysql > Tables > User), and double-click on it. In the Host
column, modify the “localhost” to “%”. The software will save the change automatically.
25
Page 31

Xfleet 2.0 Fleets Management Platform
4. On the PC of Main Server, enter "Control Panel > System Security > Windows Firewall" and
then click "Allow a program or feature through Windows Firewall". Click the "Allow another
program..." button to bring up the "Add a Program" window. In the Path field, input this
path "C:\Program Files (x86)\Everfocus\Xfleet\bin\gpsmysqld.exe", and then click "Add".
Note: If the system database is not located at the default path. Find the path where you
located. For example: D:\xxxxxx\Everfocus\Xfleet\bin\gpsmysqld.exe
26
Page 32

Xfleet 2.0 Fleets Management Platform
5. Turn off the Windows Firewall and Antivirus Software for all of the servers (Main server
and Sub servers).
6. Add Gateway Servers to the system.
a. Enter the Web interface of the Main Server. Click Server > Gateway Server. The Gateway
Server (Number G1) is added to the system (Main Server) by default.
27
Page 33

Xfleet 2.0 Fleets Management Platform
Input IP address of Sub Server
Input IP address of Sub Server
b. To add the Gateway Servers from Sub Servers, click the Add button, the below Add
Server window appears. Input the info and then click the Save button.
ID No.: Input an ID number, for example: G2.
Address: Input the Sub Server’s IP in all the 5 IP address columns.
WAN Port (Device): Keep the port 6608.
WAN Port (Client): keep the port 6607.
c. Follow the above step to add multiple Gateway Servers. Remember to give a specific ID
No. for each Gateway Server. For example: G3, G4…etc.
28
Page 34

Xfleet 2.0 Fleets Management Platform
d. You can see the added Gateway Servers on the list. Each Gateway Server is given with a
specific ID number.
7. On the PC of Sub Server, open Sever Manager, click Gateway Server first and then click
Service Config, the Gateway Server Preferences window appears. Input the Login Server IP
and Server ID and then click the OK button. Follow this step to configure all the other
Gateway Servers.
Login Server IP: Input the IP address of Main Server.
Server ID: Input the ID number added to the system. The Server ID here should match the
ID No. added to the system. Please refer to Step 6-d.
29
Page 35

Xfleet 2.0 Fleets Management Platform
8. On the PC of Sub Server, enter C:\Program Files (x86)\Everfocus\Xfleet. Find "database.ini".
Modify the "DBIP" to Main Server IP. Save the file. After the modification, please restart all
the Server Manager installed on the Main Server and Sub Servers.
Note: If the system database is not located at the default path. Find the path where you
located the database. For example: D:\xxxxxx\Everfocus\Xfleet
9. If you want to access the Xfleet Web interface from WAN, you can optionally configure a
WAN IP to the system.
a. Enter the Web interface of the Main Server. Click Server > One-Click Server IP
Configuration. Click the Get Current Server IP button and then change the Current
Server's Public Network IP to the WAN IP. Click the Configure Server IP button.
b. Configure port forwarding function on your router and enable TCP&UDP. Forward the
Main server IP port 80~6630 to WAN IP.
10. The establishing multiple gateway server process is now complete. Now you can add
vehicles through the Gateway servers on the Main Server and the Sub Servers (refer to
3.2.1.2 Adding Devices to the Xfleet System).
Note: The process of adding vehicles to the Sub servers is the same as how you add vehicles
to the Main Server. Please add vehicles to the Sub servers first and then you can add all the
vehicles from Sub servers to the Main server.
30
Page 36

Xfleet 2.0 Fleets Management Platform
Main Server
3G
/
4G
Streaming
All Vehicles
Media
Server
Internet
Sub Server
Storage Server 1
Sub Server
Storage Server N
Sub Server
Storage Server 2
3
G/
4
G
Streaming Record
1
2
2.4.2 Establishing Multiple Storage Servers
You can create multiple Storage Servers to store streaming data transferred from the Media
Servers. The Media Server can receive vehicle streaming data and transfer it to the Storage
Server.
To establish multiple Storage Servers:
1. Install Xfleet software on all of the servers (Main and Sub servers). Please refer to 2.2
Installation.
2. On the PC of Main Server, open the Server Manager and stop the Storage Server service.
Click Storage Server on the server list first and then click the Stop Service button.
31
Page 37

Xfleet 2.0 Fleets Management Platform
3. On the PC of Main Server, enter C:\Program Files (x86)\Everfocus\Xfleet\mysq. Find "my.ini"
and open the file. Modify "bind-address = 127.0.0.1" to "#bind-address = 127.0.0.1".
Note: If the system database is not located at the default path. Find the path where you
located the database. For example: D:\xxxxxx\Everfocus\Xfleet\mysq
4. On the PC of Main Server, modify “User” table in order to grant remote access for users.
a. Download the following software and then run "navicat110_mysql_ct_x86.exe".
https://drive.google.com/open?id=1rCoqfHeO0q2dNjznopd8MH1kNaghwew-
b. Open the software to establish a connection. Click Connection and then click MySQL, the
MySQL-New Connection window appears. Input the following info and then click OK.
Connection Name: Input the local host IP, which is 127.0.0.1
Input 3311.
Port:
Password:
Input cmsserverv6
32
Page 38

Xfleet 2.0 Fleets Management Platform
c. On the left-side, find “User” (mysql > Tables > User), and double-click on it. In the Host
column, modify the “localhost” to “%”. The software will save the change automatically.
5. On the PC of Main Server, enter "Control Panel > System Security > Windows Firewall" and
then click "Allow a program or feature through Windows Firewall". Click the "Allow another
program..." button to bring up the "Add a Program" window. In the Path field, input this
path "C:\Program Files (x86)\Everfocus\Xfleet\bin\gpsmysqld.exe", and then click "Add".
Note: If the system database is not located at the default path. Find the path where you
located. For example: D:\xxxxxx\Everfocus\Xfleet\bin\gpsmysqld.exe
33
Page 39

Xfleet 2.0 Fleets Management Platform
6. Turn off the Windows Firewall and Antivirus Software for all of the servers (Main server
and Sub servers).
34
Page 40

Xfleet 2.0 Fleets Management Platform
7. Add Storage Servers to the system.
a. Enter the Web interface of the Main Server. Click Server > Storage Server. The Storage
Server (Number S1) is added to the system (Main Server) by default. You will not use the
Storage Server on the Main Server since this Storage server service has been stopped on
Step 2, however, you can just leave it here.
b. To add the Storage Servers from Sub Servers, click the Add button, the below Add Server
window appears. Input the info and then click the Save button.
ID No.: Input an ID number, for example: S2.
LAN Address: Input the Sub Server’s IP address.
WAN Address (Device)1: Input the Sub Server’s WAN IP address.
WAN Address (Device)2: Input the Sub Server’s WAN IP address.
WAN Port (Device): Keep the port 6612.
WAN Address (Client)1: Input the Sub Server’s WAN IP address.
WAN Address (Client)2: Input the Sub Server’s WAN IP address.
WAN Port (Client): keep the port 6611.
35
Page 41

Xfleet 2.0 Fleets Management Platform
Input WAN IP address of Sub Server
Input WAN IP address of Sub Server
c. Follow the above step to add multiple Storage Servers. Remember to give a specific ID
No. for each Storage Server. For example: S3, S4…etc.
d. You can see the added Storage Servers on the list. Each Storage Server is given with a
specific ID number.
36
Page 42

Xfleet 2.0 Fleets Management Platform
1
2
3
4
e. Assign vehicles to the desired Storage Server.
1) Click the Assign button on a storage server.
2) Click the drop-down button and click Unregistered.
3) Select the vehicles you would like to store the streaming data to this Storage Server.
4) Click the Assign button, the selected vehicles will be assigned to this Storage Server.
8. On the PC of Sub Server, open Sever Manager, click Storage Server first and then click
Service Config, the Storage Server Preferences window appears. Input the Login Server IP,
Server ID and then click OK. Follow this step to configure all the other Storage Servers.
Login Server IP: Input the IP address of Main Server.
Server ID: Input the ID number added to the system. The Server ID here should match the
ID No. added to the system. Please refer to Step 7-d.
37
Page 43

Xfleet 2.0 Fleets Management Platform
9. On the PC of Sub Server, enter C:\Program Files (x86)\Everfocus\Xfleet. Find "database.ini".
Modify the "DBIP" to Main Server IP. Save the file. After the modification, please restart all
the Server Manager installed on the Main Server and Sub Servers.
Note: If the system database is not located at the default path. Find the path where you
located the database. For example: D:\xxxxxx\Everfocus\Xfleet
10. If you want to access the Xfleet Web interface from WAN, you can optionally configure a
WAN IP to the system.
a. Enter the Web interface of the Main Server. Click Server > One-Click Server IP
Configuration. Click the Get Current Server IP button and then change the Current
Server's Public Network IP to the WAN IP. Click the Configure Server IP button.
b. Configure port forwarding function on your router and enable TCP&UDP. Forward the
Main server IP port 80~6630 to WAN IP.
c. Forward the Storage server IP port 6611/6612 to WAN IP.
11. The establishing multiple Storage server process is now complete. You can now configure
the Schedule Recording or Schedule Snapshot rules to store vehicle recordings/snapshots to
the assigned Storage Servers (please refer to 3.3.2.6.11 Schedule Recording and 3.3.2.6.10
Schedule Snapshot).
38
Page 44

Xfleet 2.0 Fleets Management Platform
Main Server
WiFi Connection
Vehicle 1 ~ Vehicle N
Vehicle 1 ~ Vehicle N
Download
Site 1
Download
Site 2
Download
Site N
WiFi
Recording Download
WiFi
Recording Download
WiFi WiFi WiFi
Download
Site 1
WiFi
Download
Site 2
WiFi
Download
Site N
WiFi
WiFi Connection
Sub Server
Download Server 1
Sub Server
Download Server N
Internet
2.4.3 Establishing Multiple Download Servers
The Download Server can automatically download video files from vehicles through WiFi
network. You can create multiple Download Servers to download video files from different
vehicles.
To establish multiple Download Servers:
1. Install Xfleet software on all of the servers (Main and Sub servers). Please refer to 2.2
2. On the PC of Main Server, open the Server Manager and stop the Download Server service.
Installation.
Click WIFI Download Server on the server list first and then click the Stop Service button.
39
Page 45

Xfleet 2.0 Fleets Management Platform
1
2
3. On the PC of Main Server, enter C:\Program Files (x86)\Everfocus\Xfleet\mysq. Find "my.ini"
and open the file. Modify "bind-address = 127.0.0.1" to "#bind-address = 127.0.0.1".
Note: If the system database is not located at the default path. Find the path where you
located the database. For example: D:\xxxxxx\Everfocus\Xfleet\mysq
4. On the PC of Main Server, modify “User” table in order to grant remote access for users.
a. Download the following software and then run "navicat110_mysql_ct_x86.exe".
https://drive.google.com/open?id=1rCoqfHeO0q2dNjznopd8MH1kNaghwew-
b. Open the software to establish a connection. Click Connection and then click MySQL, the
MySQL-New Connection window appears. Input the following info and then click OK.
Connection Name: Input the local host IP, which is 127.0.0.1
Port: Input 3311.
Password: Input cmsserverv6
40
Page 46

Xfleet 2.0 Fleets Management Platform
c. On the left-side, find “User” (mysql > Tables > User), and double-click on it. In the Host
column, modify the “localhost” to “%”. The software will save the change automatically.
41
Page 47

Xfleet 2.0 Fleets Management Platform
5. On the PC of Main Server, enter "Control Panel > System Security > Windows Firewall" and
then click "Allow a program or feature through Windows Firewall". Click the "Allow another
program..." button to bring up the "Add a Program" window. In the Path field, input this
path "C:\Program Files (x86)\Everfocus\Xfleet\bin\gpsmysqld.exe", and then click "Add".
Note: If the system database is not located at the default path. Find the path where you
located. For example: D:\xxxxxx\Everfocus\Xfleet\bin\gpsmysqld.exe
42
Page 48

Xfleet 2.0 Fleets Management Platform
6. Turn off the Windows Firewall and Antivirus Software for all of the servers (Main server
and Sub servers).
7. Add Download Servers to the system.
a. Configure the Download Sites in advance (please refer to 3.3.2.7.7 Download Site).
b. Enter the Web interface of the Main Server. Click Server > Download Server. The
Download Server (Number D1) is added to the system (Main Server) by default. You will
not use the Download Server on the Main Server since this Download server service has
been stopped on Step 2, however, you can just leave it here.
43
Page 49

Xfleet 2.0 Fleets Management Platform
Input WAN IP address of Sub Server
Input WAN IP address of Sub Server
c. To add the Download Servers from Sub Servers, click the Add button, the below Add
Server window appears. Input the info and then click the Save button.
ID No.: Input an ID number, for example: D2.
LAN Address: Input the Sub Server’s IP address.
WAN Address (Device)1: Input the Sub Server’s WAN IP address.
WAN Address (Device)2: Input the Sub Server’s WAN IP address.
WAN Port (Device): Keep the port 6610.
WAN Address (Client)1: Input the Sub Server’s WAN IP address.
WAN Address (Client)2: Input the Sub Server’s WAN IP address.
WAN Port (Client): keep the port 6609.
44
Page 50

Xfleet 2.0 Fleets Management Platform
d. Follow the above step to add multiple Download Servers. Remember to give a specific ID
No. for each Download Server. For example: D3, D4…etc.
e. You can see the added Download Servers on the list. Each Download Server is given with
a specific ID number.
8. On the PC of Sub Server, open Sever Manager, click WIFI Download Server first and then
click Service Config, the Download Server Preferences window appears. Input the Login
Server IP, Server ID and then click OK. Follow this step to configure all the other Download
Servers.
Login Server IP: Input the IP address of Main Server.
Server ID: Input the ID number added to the system. The Server ID here should match the
ID No. added to the system. Please refer to Step 7-e.
45
Page 51

Xfleet 2.0 Fleets Management Platform
9. On the PC of Sub Server, enter C:\Program Files (x86)\Everfocus\Xfleet. Find "database.ini".
Modify the "DBIP" to Main Server IP. Save the file. After the modification, please restart all
the Server Manager installed on the Main Server and Sub Servers.
Note: If the system database is not located at the default path. Find the path where you
located the database. For example: D:\xxxxxx\Everfocus\Xfleet
10. If you want to access the Xfleet Web interface from WAN, you can optionally configure a
WAN IP to the system.
a. Enter the Web interface of the Main Server. Click Server > One-Click Server IP
Configuration. Click the Get Current Server IP button and then change the Current
Server's Public Network IP to the WAN IP. Click the Configure Server IP button.
46
Page 52

Xfleet 2.0 Fleets Management Platform
b. Configure port forwarding function on your router and enable TCP&UDP. Forward the
Main server IP port 80~6630 to WAN IP.
c. Forward the Download server IP port 6609/6610 to WAN IP.
11. The establishing multiple Download server process is now complete. When vehicles enter
the WiFi download sites and connected to the WiFi network, the Download Servers will
automatically download recordings from the vehicles.
47
Page 53

Xfleet 2.0 Fleets Management Platform
Main Server
3G
/4G
Streaming
All Vehicles
Sub Server
Media Server
Internet
1
2
2.4.4 Establishing the Media Server on a Sub Server
The system requires one Media Server to receive vehicle streaming data and transfer it to the
Storage Server(s). You can establish the Media Server either on the Main Server or a Sub Server.
Here we will show you how to establish the Media Server on a Sub Server.
To establish the Media Server on a Sub Server:
1. Install Xfleet software on both of the servers (Main and Sub server). Please refer to 2.2
Installation.
2. On the PC of Main Server, open the Server Manager and stop the Media Server service. Click
Media Server on the server list first and then click the Stop Service button.
48
Page 54

Xfleet 2.0 Fleets Management Platform
3. On the PC of Main Server, enter C:\Program Files (x86)\Everfocus\Xfleet\mysq. Find "my.ini"
and open the file. Modify "bind-address = 127.0.0.1" to "#bind-address = 127.0.0.1".
Note: If the system database is not located at the default path. Find the path where you
located the database. For example: D:\xxxxxx\Everfocus\Xfleet\mysq
4. On the PC of Main Server, modify “User” table in order to grant remote access for users.
a. Download the following software and then run "navicat110_mysql_ct_x86.exe".
https://drive.google.com/open?id=1rCoqfHeO0q2dNjznopd8MH1kNaghwew-
b. Open the software to establish a connection. Click Connection and then click MySQL, the
MySQL-New Connection window appears. Input the following info and then click OK.
Connection Name: Input the local host IP, which is 127.0.0.1
Input 3311.
Port:
Password:
Input cmsserverv6
49
Page 55

Xfleet 2.0 Fleets Management Platform
c. On the left-side, find “User” (mysql > Tables > User), and double-click on it. In the Host
column, modify the “localhost” to “%”. The software will save the change automatically.
5. On the PC of Main Server, enter "Control Panel > System Security > Windows Firewall" and
then click "Allow a program or feature through Windows Firewall". Click the "Allow another
program..." button to bring up the "Add a Program" window. In the Path field, input this
path "C:\Program Files (x86)\Everfocus\Xfleet\bin\gpsmysqld.exe", and then click "Add".
Note: If the system database is not located at the default path. Find the path where you
located. For example: D:\xxxxxx\Everfocus\Xfleet\bin\gpsmysqld.exe
50
Page 56

Xfleet 2.0 Fleets Management Platform
6. Turn off the Windows Firewall and Antivirus Software for all of the servers (Main server
and Sub servers).
51
Page 57

Xfleet 2.0 Fleets Management Platform
7. Add a Media Server to the system.
a. Enter the Web interface of the Main Server. Click Server > Media Server. The Media
Server (Number M1) is added to the system (Main Server) by default. You will not use
the Media Server on the Main Server since this Media server service has been stopped
on Step 2, however, you can just leave it here.
b. To add the Media Server from Sub Server, click the Add button, the below Add Server
window appears. Input the info and then click the Save button.
ID No.: Input an ID number, for example: M2.
LAN Address: Input the Sub Server’s IP address.
WAN Address (Device)1: Input the Sub Server’s WAN IP address.
WAN Address (Device)2: Input the Sub Server’s WAN IP address.
WAN Port (Device): Keep the port 6602.
WAN Address (Client)1: Input the Sub Server’s WAN IP address.
WAN Address (Client)2: Input the Sub Server’s WAN IP address.
WAN Port (Client): keep the port 6604.
52
Page 58

Xfleet 2.0 Fleets Management Platform
Input WAN IP address of Sub Server
Input WAN IP address of Sub Server
c. You can see the added Media Server on the list, which is given with a specific ID number
(M2).
8. On the PC of Sub Server, open Sever Manager, click Media Server first and then click Service
Config, the Media Server Preferences window appears. Input the Login Server IP, Server ID
and then click OK.
Login Server IP: Input the IP address of Main Server.
Server ID: Input the ID number added to the system. The Server ID here should match the
ID No. added to the system. Please refer to Step 7-c.
53
Page 59

Xfleet 2.0 Fleets Management Platform
9. On the PC of Sub Server, enter C:\Program Files (x86)\Everfocus\Xfleet. Find "database.ini".
Modify the "DBIP" to Main Server IP. Save the file. After the modification, please restart
both of the Server Manager installed on the Main Server and Sub Server.
Note: If the system database is not located at the default path. Find the path where you
located the database. For example: D:\xxxxxx\Everfocus\Xfleet
10. If you want to access the Xfleet Web interface from WAN, you can optionally configure a
WAN IP to the system.
a. Enter the Web interface of the Main Server. Click Server > One-Click Server IP
Configuration. Click the Get Current Server IP button and then change the Current
Server's Public Network IP to the WAN IP. Click the Configure Server IP button.
54
Page 60

Xfleet 2.0 Fleets Management Platform
b. Configure port forwarding function on your router and enable TCP&UDP. Forward the
Main server IP port 80~6630 to WAN IP.
c. Forward the Media server IP port 6604/6602 to WAN IP.
11. The establishing the Media Server on a Sub Server is now complete. All the connected
vehicle streaming will be transferred to the Media Server.
55
Page 61

Xfleet 2.0 Fleets Management Platform
Chapter
3
3. Web Interface
3.1 Login / Logout
To log in the system, open a Web browser, type the IP address of the system appended with the
port number in the address field (i.e. http://220.135.660.263:8080) and press the Enter key on
the keyboard, the Login window appears. Enter the Username, Password and Verification Code;
select a language and then click Login to login the system.
By default, the username is admin and password is admin
After clicking the Login button, the Client Web page appears.
56
Page 62

Xfleet 2.0 Fleets Management Platform
For the first time user, please go to the Settings page to add devices, vehicles and companies
before you start operating the system. Please refer to 3.2 Getting Started on the Web Page for
more details.
If you want to change the password of the login user account, after logging in the system, click
on the account drop-down list and click Change Password to change the password of this
account.
57
Page 63

Xfleet 2.0 Fleets Management Platform
3.2 Getting Started on the Web Page
You can monitor fleets and operate multiple functions using the Web page.
3.2.1 Fleet Management
To manage your fleets, some settings have to be configured in advance. Please follow the
instructions below.
• Mobile DVR configuration (see 3.2.1.1 Configuring the Mobile DVR Settings).
• Adding Vehicles to the Xfleet system (see 3.2.1.2 Adding Devices to the Xfleet System).
• Adding Fleets to the Xfleet system (see 3.2.1.3 Adding Fleets to the Xfleet System).
3.2.1.1 Configuring the Mobile DVR Settings
On the mobile DVR, users have to configure the mobile DVR settings such as GPS and G-Sensor
and then connect the mobile DVR to the Xfleet system.
1. On the mobile DVR, go to the Xfleet setting page (Network < Xfleet). Configure the settings
and then click Save.
Note:
1. Please input 6608 port and do not change the port number as it is set up by default.
2. To find the IP address of the Xfleet server, go to Server < Login Server on the Client
Web page of Xfleet server. Find the WAN Address(Device)1 column.
58
Page 64

Xfleet 2.0 Fleets Management Platform
Server IP: Input the IP address of the Xfleet system. If multiple Gateway servers have been
added to the system, please input the IP address of the Gateway server, which you want to
add this vehicle to.
Port: Input 6608 port and do not change the port as it is set up by default.
Plate Number: Optionally input the plate number.
Meta Data Interval: Input an interval for mobile DVR to send meta data to the Xfleet system.
2. In order for the Xfleet system to automatically detect the mobile DVR, on the LAN setting
page (Network < LAN), enter a network ID (numeric or alphabetic). To avoid device conflicts,
one network ID can only be assigned to one mobile DVR. Click Save to save the setting.
3. To transfer data like GPS or G-Sensor from the mobile DVR to the Xfleet system, you have to
configure the GPS and G-Sensor settings on the mobile DVR in advance.
• Enabling G-Sensor function:
Select On from G-Sensor Event and check the box of Network Alarm to enable the
G-sensor function. Set up the related G-sensor settings. Click Save to save the setting.
59
Page 65

Xfleet 2.0 Fleets Management Platform
• Enabling GPS function:
Click GPS Event, enable Network Alarm and set up the related GPS settings. Click the Save
button.
Note: The unit of the speed is selectable. If you use imperial units in your region, select
MPH from the Speed Unit drop-down list. If you use metric units in your region, select
KPH.
60
Page 66

Xfleet 2.0 Fleets Management Platform
3.2.1.2 Adding Devices to the Xfleet System
After configuring the mobile DVR settings, users have to add devices (mobile DVR) to the Xfleet
system.
1. On the Xfleet Client Web interface, go to Settings > Device.
2. Click the Unregistered Device button, the following Unregistered Device window appears.
You should see the devices (mobile DVRs) on the list.
Note:
1. The Xfleet system will automatically search for the mobile DVRs on the network. If you
cannot see any mobile DVR on the list, please check whether the mobile DVRs have
been configured properly. Please refer to 3.2.1.1 Configuring the Mobile DVR Settings.
2. If you have configured multiple gateway servers (refer to 2.4.1 Establishing Multiple
Gateway Servers), you will see all the vehicles from all of the Main server and Sub
Servers on the list.
61
Page 67

Xfleet 2.0 Fleets Management Platform
3. Click the Add button in the Operator field, the Add Vehicle window appears.
4. To add the desired mobile DVRs to the Xfleet system, configure the settings on the Add
Vehicle window (items marked with “*” are necessary).
a. The Xfleet system will automatically detect the Device No. from the mobile DVR. The
Device No. is the Network ID setup on the mobile DVR. Please refer to Step2 in 3.2.1.1
Configuring the Mobile DVR Settings.
b. Input a Plate Number, and optionally input the SIM card number and Abbreviation of the
vehicle. Select a Plate Type and Terminal Type of the vehicle.
c. In the Channel field, select a channel number and a Vehicle Icon for this vehicle. You can
edit the channel name in the channel input box.
d. Select a Company/Fleets from the drop-down list by double-clicking. If you haven’t added
a Company to the system, click the Add button to add a company. The main account
of the company has the supreme authority by default. Click Save to save the settings.
62
Page 68

Xfleet 2.0 Fleets Management Platform
e. Optionally select associated user(s) to the company by double-clicking. This can be
regarded as a sub-account of the company. If you haven’t added a user, click the Add
button to add a user. You can add multiple users and assign multiple users to a
company. Click Save to save the settings.
To grant privileges to the sub-account, click the Add button on the right-side of Role
Name (Assign Permissions). Input a name, select the desired privileges and click Save .
f. Click Save to save the settings.
63
Page 69

Xfleet 2.0 Fleets Management Platform
1
2
3.2.1.3 Adding Fleets to the Xfleet System
On the Xfleet system, users have to add fleets to the system and then assign vehicles to the
fleets.
1. To add a fleet to a company, enter the Fleets page (Setting > Fleets). On the
Company/Fleets list, select a company by clicking on it, and then click the Add Fleet button,
the Add Fleets window appears.
2. Input a fleet name for the selected Company. Click Save to save the settings. The fleet
should be added to the list (under the selected company).
64
Page 70

Xfleet 2.0 Fleets Management Platform
1
2
3
3. To assign vehicles to the desired fleets, on the Company/Fleets list, select a fleet by clicking
on it, and then select the desired vehicle(s) from the Unassigned Vehicle list by checking the
boxes. Click the Move to Fleets button, the selected vehicle(s) will be moved to the
Assigned Vehicle list.
4. The fleet is now added to the system. Go to the Map page, you can see the fleet list on the
left-side window. You can start monitoring your fleets.
After the above configuration, you can further set up the desired functions, such as user
information, Geofence, Alarm and etc. by configuring the related function settings. Please refer to
3.3 Web Interface for more details.
65
Page 71

Xfleet 2.0 Fleets Management Platform
3.2.2 WiFi Download Configuration
After adding vehicles to the system, you can set up multiple WiFi download plans for vehicles.
When connected to a WiFi network, the WiFi Download Server will automatically download the
recordings from the vehicles during the setup time range.
To perform the WiFi Download Plan function, please follow the below instructions:
1. Ensure the WiFi function has been enabled on the device end.
2. Add Download Site to the system (refer to 3.3.2.7.7 Download Site).
3. Add Download Server to the system (refer to 3.3.2.7.8 Download Server).
4. Configure WiFi Download Plan and assign it to vehicles (refer to 3.3.2.6.12 WiFi Download).
5. Configure WiFi download storage location (refer to 2.3.9 WiFi Config).
66
Page 72

Xfleet 2.0 Fleets Management Platform
1
2
3
6
7
4
5
3.3 Web Page
The main monitoring page (Map page) on the Web Interface can be divided into 7 areas. Please
read the content below about the introduction of Web Interface.
No Name Description
The added Companies, Vehicles, Devices are listed here. You can also
1 Device List
operate some functions on the Device List. Please refer to 3.3.1 Device
List for more details.
2 Menu Bar
3 Map Window
Click to enter each page for operation. Please refer to 3.3.2 Menu Bar for
more details.
You can monitor your fleets and operate some functions like Geofence
on the Map window. Please refer to 3.3.3 Map Window for more details.
The login user account will be displayed here. You can also click on the
4 Login User
drop-down list and click Change Password to change the password of
this account.
5 Exit Button Click to exit the system and return to the Login window.
6
Device Tool
Window
Click on the Status, Image or Audio tabs to operate the functions of the
device. Please refer to 3.3.4 Device Tool Window for more details.
Displays the current status of the selected device, including the GPS,
7 Info Table
Alarm, Media Files and System. Please refer to 3.3.5 Info Table for more
details.
67
Page 73

Xfleet 2.0 Fleets Management Platform
1
2
3
4
5
6
7
8
3.3.1 Device List
The added Companies, Vehicles, Devices are listed here. You can also operate some functions
through the Device List.
No Name Description
1 Hide / Show Click to hide or show the Device List window.
Type in the search column to search the Companies, Vehicles or
Devices from the list.
2 Search Column
Vehicle Icon
3
Color Info
Click to display the vehicle icon color info. The colors indicate the
status of the vehicles on the list.
68
Page 74

4 Server
The second layer on the Device List is the Company connected to the
Xfleet 2.0 Fleets Management Platform
The first layer on the Device List is the Xfleet server. The number on
the right side (5/5) indicates the total number of the Online /
Connected vehicles on the server.
5 Company
server. The number on the right side (2/2) indicates the total
number of the Online / Connected vehicles of this company.
The third layer on the Device List is the Fleet of the company. The
6 Fleet
number on the right side (2/2) indicates the total number of the
Online / Connected vehicles of this fleet.
7 Vehicle
The forth layer on the Device List is the Vehicle connected to the
Fleet.
8 Device Channel The channel of the device will be displayed under the Vehicle.
69
Page 75

Xfleet 2.0 Fleets Management Platform
3.3.1.1 Functions on the Device List
You can operate the below functions on the Device List.
Centralize Vehicle on Map: Select (check) the Vehicle(s) on the Device List, the selected
vehicle(s) will be displayed on the Map for monitoring. Unselect (uncheck) the vehicle(s) on
the Device List can cancel the Map monitoring function of the unselected vehicle(s). The
selected vehicle’s info will be displayed on the Map.
Switch to Live Window: Double-click a vehicle on the Device List will switch to the Live Page.
Please refer to 3.3.2.1 Live Page for more details.
70
Page 76

Xfleet 2.0 Fleets Management Platform
Online Vehicles
Offline Vehicles
Function Window: On the Device List, right-click on the Server, Company, Vehicle or
Channel to bring up the function window. Functions in the function window may not look
the same among Server, Company, Vehicle or Channel.
Preview Main Stream: Right-click on a Channel and then click Preview Main Videos to
start displaying all video streams with Main stream.
Preview Sub Stream: Right-click on a Channel and then click Preview Sub Videos to start
displaying all video streams with Sub stream.
Front-End Snapshot: Right-click on a Channel and then click Front-End Snapshot to take a
snapshot image. The snapshot info will be listed on the Media Files table (please refer to
3.3.5.3 Media Files).
Preview All Videos: Right-click on a Vehicle and then click Preview All Videos to start
displaying all video streams on the live screen.
71
Page 77

Xfleet 2.0 Fleets Management Platform
Start Intercom: Right-click on a Vehicle and then click Start Intercom to start the
intercom function. To stop the function, click the Stop button on the bottom-left window
(refer to 3.3.4 Device Tool Window).
Start Monitoring: Right-click on a Vehicle and then click Start Monitoring to start the
audio monitoring function. To stop the function, click the Stop button on the bottom-left
window (refer to 3.3.4 Device Tool Window).
Send Messages (TTS): Right-click on a Server, Company or Vehicle, and then click Send
Messages to open the Send Messages window. You can send TTS message (Text to
Speech) to the online vehicles to play back text in a spoken voice.
1. Ensure the TTS function has been enabled. Go to Setting > Vehicle, find a vehicle, click
the Edit button and then check the TTS (TTS voice playback) checkbox. Click Save.
2. On the Device List, right-click on the Server, Company, Fleet or Vehicle, a function
window appears. Click Send Messages, the below Send Messages window appears.
3. On the left-side device tree, select the vehicle(s) you want to send message to.
72
Page 78

Xfleet 2.0 Fleets Management Platform
4. Type a text in the input box, or click Use Fixed Message to select a message. You can
check the checkbox of Send and save to Fixed Message to save this text to the Use
Fixed Message.
Click Add New Fixed Messages to add new messages.
Click X to delete the added message.
5. Click the Send button, the message will be sent and listed on the below Send List.
You can query for the TTS messages on the Issued Info Report page (Report > Data
Query > Issued Info Report).
73
Page 79

Xfleet 2.0 Fleets Management Platform
Give Control Command: Right-click on a Vehicle and then click Give Control Command,
the below window appears. Select an item from the Control Type drop-down list, input
the Password, and then click Send to give the control command.
GPS Reporting Interval Settings: Right-click on a Vehicle and then click GPS Reporting
Interval Settings, the below window appears. Input an interval time, the system will
report the GPS position based on the time setup here. If you don’t want to report GPS,
input 0 in the input box.
To check the GPS status report, click the GPS tab on the Info Table.
Network Traffic Config: You can view network traffic status in the GPRS/3G Status field,
or set up network traffic limit in the Network Traffic Config field. Select Yes in the Enable
Traffic Monitoring column to enable Network Traffic Configuration function and
configure the following settings.
74
Page 80

Xfleet 2.0 Fleets Management Platform
You can click the Save to Other Vehicle button to apply the same configurations to other
vehicles.
Note: If the Traffic Restriction function is enabled, when the network flow reaches
the limit value, the functions of live video, intercom, audio monitoring and download
video will not be functional.
WiFi Download Settings: You can set up a WiFi download task for the vehicle. When
connected to a WiFi network, the vehicle will automatically upload the recordings or
snapshot files during the setup time range to the WiFi server (refer to 3.3.2.7.8 Download
Server). You can also query the WiFi Download tasks using this window.
1. Right-click on a Vehicle and click WiFi Download Settings, the below window appears.
2. Click the Add button, the below window appears.
Optionally input a tag text in the Tags field. Select the date and time. Select a
download file type from the Download Type drop-down list. Optionally input a remark
in the Remarks field. Click Save.
75
Page 81

Xfleet 2.0 Fleets Management Platform
3. The WiFi download task is now listed on the list. You can see the download status in
the Status column.
Device Info: Right-click on a Vehicle and click Device Info to display the device info. Note
that only the TTX protocol supported devices feature this function.
76
Page 82

Xfleet 2.0 Fleets Management Platform
Vehicle Upgrade: You can directly upgrade the devices (TTX protocol or 808 protocol
supported) when the devices are online. To select an upgrade file, click .
You can click Save to Other Vehicles to copy the current upgrade task to other vehicles.
Offline Upgrade: For offline devices, you can upload the files in advance, and when the
devices get online, the upgrade process will automatically begin. To select an upgrade file,
click .
Upload File to Vehicle: You can upload files including image or configuration from server
to vehicles. Right-click on a device and then click Upload File to Vehicle to open the
below window.
File Type: Select Image File or Config File.
File Description: Type a description for this file.
File Name: Click the button to select a file on your PC and then upload it to server.
Files Uploaded: The file uploading time will be recorded.
Task Created: After the file uploading task is done, this task time will be recorded.
Save to Other Vehicles: Click to copy the current configurations to other vehicles.
77
Page 83

Xfleet 2.0 Fleets Management Platform
Parameter Config: Select a vehicle and then click Parameter Config to open the below
Parameter Config window. You can remotely configure the device configurations.
WiFi Configuration and Diagnostics: You can diagnosis the WiFi connection between the
device and the download site through this window. Right click on a device and then click
WiFi Configuration and Diagnostics, select a WiFi download site, and the result appears.
78
Page 84

Xfleet 2.0 Fleets Management Platform
1
2
3
4
5
6
7
8
3.3.2 Menu Bar
Click on each menu to enter its page for operation.
No Name Description
Map page is the main monitoring page on the Web Interface. The Map
1 Map
2 Live
page can be divided into 7 areas. Please refer to 3.3 Web Page for more
details.
The Live page is pretty much the same with the Map page, except the
Live page features a Live Window for real-time video monitoring. Please
refer to 3.3.2.1 Live Page for more details. For other functions on the
Live Page, please refer to 3.3 Web Page.
3 GPS Track
4 Playback
5 Report
6 Setting
8 Rule
8 Server
You can play back the GPS tracks of a vehicle on the map. Please refer
to 3.3.2.2 GPS Track for more details.
On the Playback page, you can play back the recordings of a vehicle
along with the GPS positions on the Map. Please refer to 3.3.2.3
Playback for more details.
You can query the statistic reports for analysis. Please refer to 3.3.2.4
Report for more details.
You can set up the basic settings like Vehicles, Fleets and etc.; or query
for the information of each set up items. Please refer to 3.3.2.5 Setting
for more details.
You can set up the Schedule Recording and WiFi download functions on
this page, please refer to 3.3.2.6 Rule for more details.
On the Server page, you can configure the settings for each server; or
query for server information. Please refer to 3.3.2.7 Server for more
details.
79
Page 85

Xfleet 2.0 Fleets Management Platform
1
2 3
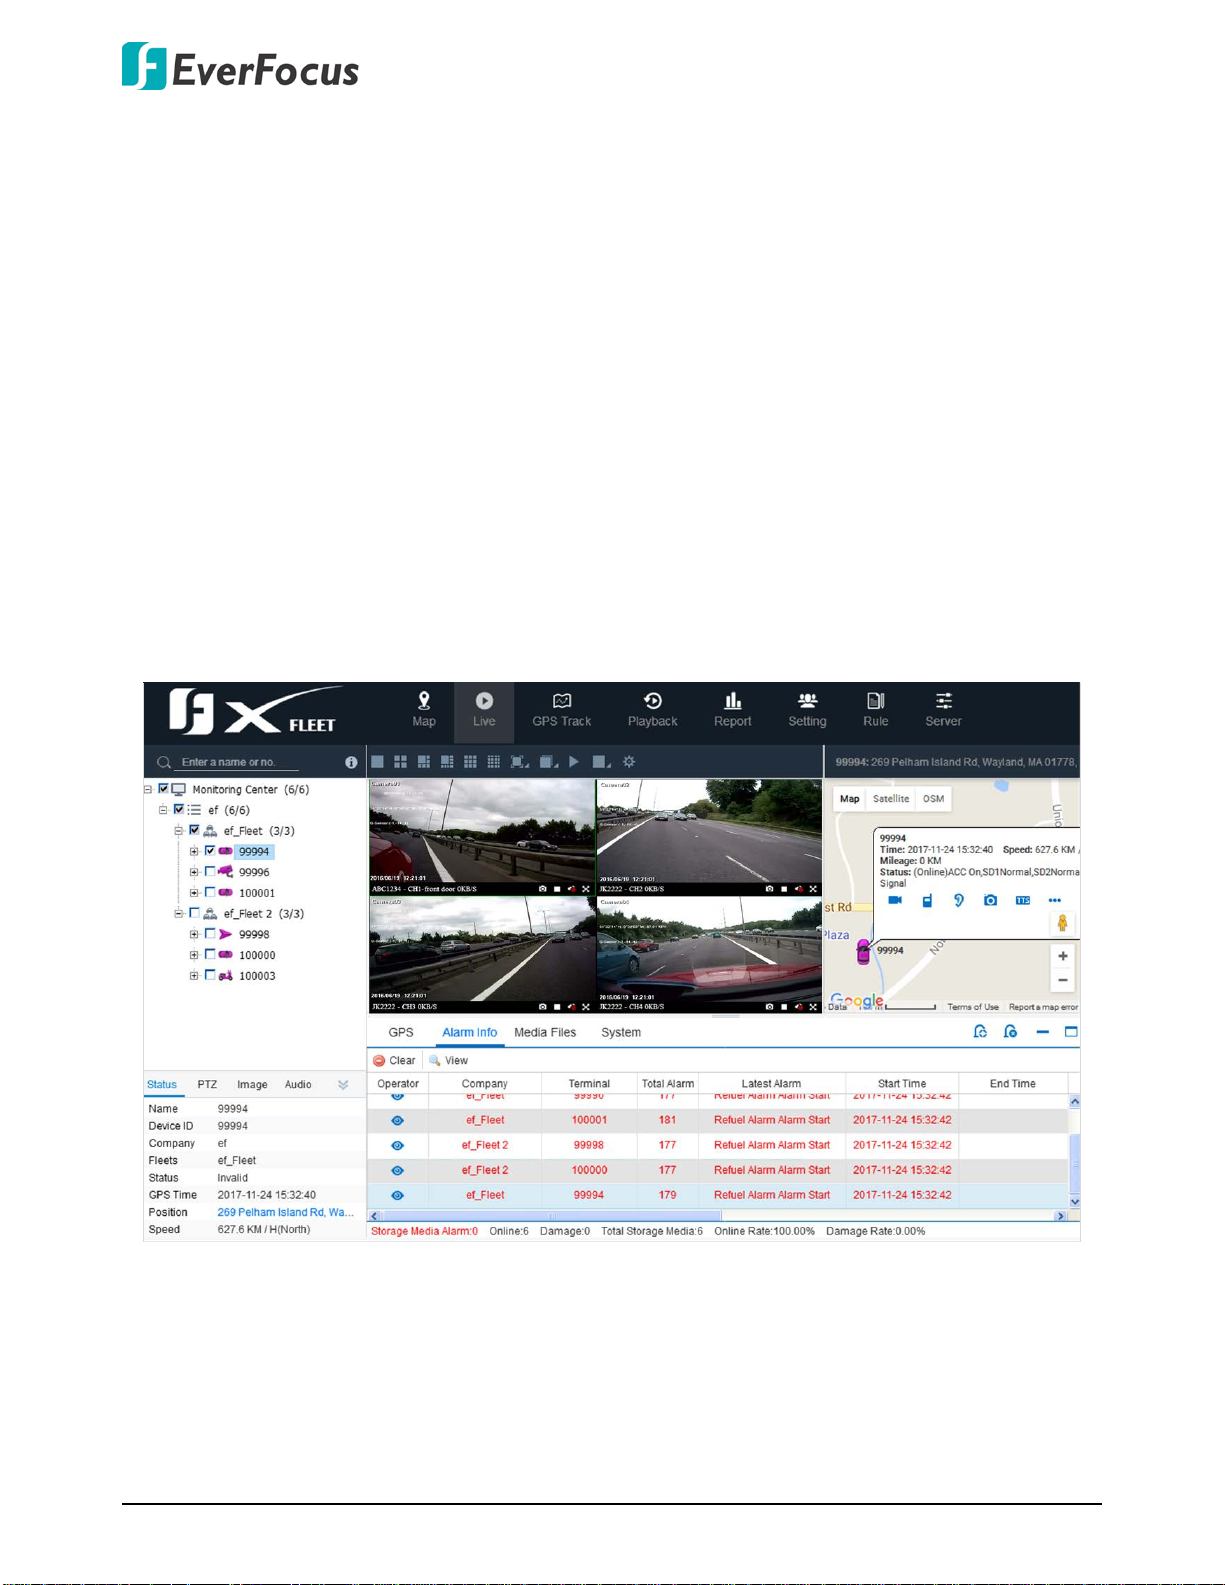
4 5
3.3.2.1 Live Page
The Live page is pretty much the same with the Map page, except that the Live Page features a
Live Window for real-time video monitoring. You can watch the real-time videos from the vehicle
along with the real-time vehicle positions on the Map.
There are two ways to enter the Live Page, 1) Click the Live button on the top Menu Bar, or 2)
Double-click a vehicle on the Device List.
No Name Description
The added Companies, Vehicles, Devices are listed here. You can also
1 Device List
operate some functions on the Device List. Please refer to 3.3.1 Device
List for more details.
On the Live Window, you can monitor real-time videos from a vehicle
2 Live Window
and operate some functions. Please refer to 3.3.2.1.1 Live Window for
more details.
3
4
Map
Window
Device Tool
Window
You can monitor the real-time GPS positions of a vehicle on the Map.
Please refer to 3.3.2.1.2 Map Window for more details.
Click on the Status, Image or Audio tabs to operate the functions of the
device. Please refer to 3.3.4 Device Tool Window for more details.
Displays the current status of the selected device, including the GPS,
5 Info Table
Alarm, Media Files and System. Please refer to 3.3.5 Info Table for more
details.
80
Page 86

Xfleet 2.0 Fleets Management Platform
Live Window Tool Bar
Channel Tool Bar
Right-Click Window
1
2
3
4 5
6
3.3.2.1.1 Live Window
On the Live Window, you can monitor real-time video from a vehicle and operate some
functions. There are two ways to display the Live Window, 1) Click the Live button on the top
Menu Bar, or 2) Double-click a vehicle on the Device List.
Displaying Live Videos:
To display live videos, on the Device List, double-click on a vehicle, the video channels of
the vehicle will automatically display on the Live Window.
To display a vehicle channel on a specific channel window, on the Live Window, select a
channel window by clicking on it, the selected channel window will be highlighted with a
green frame. On the Device List, double-click on a vehicle channel, the vehicle channel
will be displayed on the selected channel window. You can also use this function to
display channels from different vehicles on the Live Window.
Live Window Tool Bar:
1. Layout Option: Click to change different layouts. To enable the 16/25/36 layout, please
refer to No.6 Max. Display Divisions from the content below.
2. Aspect Ratio: Click to change the display ratio.
81
Page 87

Xfleet 2.0 Fleets Management Platform
3. Stream Quality: Select Realtime Quality to ensure a real-time video displaying. Select
Smooth Quality to keep the video streams display smoothly.
4. Preview All Videos: Click to start displaying all of the live streams.
5. Stop / Clear All Videos: Click Stop All Videos to stop displaying all of the live streams. Click
Clear All videos to clear all of the live streams.
6. Para Settings: Click to bring-up the Para Settings window.
Video Param: You can set up the below video parameters. After the configuration, click
Save to save the settings.
• Default Stream: Select Main Stream or Sub Stream for live display.
• Auto Turn-Off Audio: Select a time for the system to automatically turn-off the Audio
function, including Intercom and Audio Monitoring. If you don’t want to use this
function, select “Do not automatically turn-off”.
• Auto Turn-Off Video: Select a time for the system to automatically stop displaying
the live streams. If you don’t want to use this function, select “Do not automatically
turn-off”.
• Max. Display Divisions: Select a maximum layout display division for the Live Window.
The selected layout division button will be displayed on the tool bar. Please refer to
No.1 Layout Option front the content above.
Map Param: You can set up the below map parameters. After the configuration, click Save
to save the settings.
82
Page 88

Xfleet 2.0 Fleets Management Platform
• GPS Refresh Interval: You can set up an interval for refreshing the GPS data
displaying on the system.
• Enable GPS Cluster: You can use this function to cluster GPS points in order to
refresh GPS data efficiently. Select Yes to enable this function and then set up the
below settings. Note that if this function is enabled, the GPS Cluster will also be
displayed on the Map page.
Max. GPS Point Distance: Select a distance. The GPS points can be clustered based
on the setup distance from each other. If you select 100m, all the GPS points within
100m from each other will be clustered. Take a look at the above image, the Yellow
Cluster contains 11 vehicles. GPS points more than 100m away from each other will
not be clustered, and the vehicle icon will be displayed.
Min. GPS Point Quantity: Set up a minimum quantity of GPS point to form a cluster.
If you input 5 in the Min. GPS Point Quantity column, and select 100m for the Max.
GPS Point Distance, there should be at least 5 GPS points within 100m from each
other to form a cluster.
83
Page 89

Xfleet 2.0 Fleets Management Platform
• Display Location Address: Select a map type to convert the GPS coordinates into an
address. The default map type is aMap. The address will be displayed on top of the
Map or in the Device Tool Window on the bottom-left of the window (double click
the GPS coordinates in the Position field to display the address; double click again to
return to GPS coordinates).
Alarm Param: You can set up an interval for refreshing the Alarm Info table. After the
configuration, click Save to save the settings.
84
Page 90

Xfleet 2.0 Fleets Management Platform
1 2
3 4
No
Name
Description
Channel Tool Bar:
1 Snapshot Click to take a snapshot of the channel.
2 Stop / Play
3 Sound Click to turn on sound of the channel. Click again to turn off sound.
4 Full Screen
Right-Click Window:
Right click on the Live window, a function window appears.
Click to stop displaying the channel live streams. Click again to start
displaying the channel live streams.
Click to display the full screen of the current layout. Click again to
exit. You can also double click on a channel to display the channel in
single view. Double click on a channel again to return.
Stop Preview: Click to stop previewing the selected channel streams.
Stop All Channels: Click to stop displaying all channel streams.
Preview All Channels: Click to start previewing all channel streams.
Monitoring: Click to start the Audio Monitoring function of the selected channel. To stop
the function, click the Stop button on the bottom-left window (refer to 3.3.4 Device Tool
Window).
Talkback: Click to start the Intercom function of the selected channel. To stop the function,
click the Stop button on the bottom-left window (refer to 3.3.4 Device Tool Window).
85
Page 91

Xfleet 2.0 Fleets Management Platform
Vehicle Name / Location Address
Map Option
Vehicle Info Window
Vehicle Icon
My Map
3.3.2.1.2 Map Window
Select a vehicle on the Device List, the vehicle icon will be displayed on the map. You can
monitor the real-time GPS positions of a vehicle on the Map.
Vehicle Name / Location Address: By default, the Vehicle Name will be displayed on top of
the map. You can set up whether to display the vehicle location address by enabling the
Display Location Address function. Please refer to 3.3.2.1.1 Live Window.
Map Option: Click on the buttons to display Google Maps, Satellite Map or OSM Maps.
My Map: Click the My Map or Geofence tab can display the Geofence setup window. You
can set up Geofence Alarm using this window. Please refer to 3.3.3.1 My Map.
Vehicle Info Window: Left click on the Vehicle Icon to display the Vehicle Info Window.
You can also click on the icons to perform the functions:
Video : Click the button and select a channel to display the live view. You can then
select a layout, and click to select other channel to display the live view.
Intercom : Click the button to start the Intercom function. To stop the function, click
the Stop button on the Device Tool Window at the bottom-left of the screen.
Monitoring : Click the button to start audio Monitoring. To stop the function, click
the Stop button on the Device Tool Window at the bottom-left of the screen.
Snapshot : Click the button and select a channel to take a snapshot, the Snapshot
window appears and the media file event will be listed on the Media Files table. Please
refer to 3.3.5.3 Media Files.
TTS : Click the icon and the Send Messages window appears. You can send TTS
message (Text to Speech) to the online vehicles to play back text in a spoken voice.
Please refer to 3.3.1.1 Functions on the Device List.
More : For the online vehicles, click to display more function icons including Info
Window , Parameter Config , Vehicle Upgrade , and Upload File to Vehicle
. Please refer to 3.3.1.1 Functions on the Device List.
86
Page 92

Xfleet 2.0 Fleets Management Platform
Map Tools : Click to display the Map Tool icons . You can click on the
icons to add Locations or Geofences on the map. Please refer to 3.3.3 Map Window for
more details.
Track : Click to switch to the GPS Track Page for playing back the GPS tracks of the
vehicle. Please refer to 3.3.2.2 GPS Track for more details.
Vehicle Upgrade : Click to set up a task for upgrading device firmware. Please refer
to 3.3.1.1 Functions on the Device List.
Upload File to Vehicle : Click to upload image files or config files to vehicles. Please
refer to 3.3.1.1 Functions on the Device List.
Vehicle Icon: Left click to display the Vehicle Info Window.
87
Page 93

Xfleet 2.0 Fleets Management Platform
3.3.2.2 GPS Track
You can play back the GPS tracks of a vehicle on the map. On the top Menu Bar, click GPS Track
to enter the GPS Track Page.
1. On the lower-right window, select and input the required data.
Find: Select a vehicle by clicking on the drop-down list or the button.
Start Time: Click to select a start date and time.
End Time: Click to select an end date and time.
Distance: Select a distance to update the GPS data. If you select 1KM, the GPS data will be
updated every 1KM. If you select 0M, the GPS data will be updated every 10 seconds.
88
Page 94

Xfleet 2.0 Fleets Management Platform
Click to start or pause playing back.
Click to stop playing back.
Click to display the playback speed bar. You can
adjust the playback speed using the bar.
Click to hide or display
this setup window.
The mileage at present of the day will
be displayed in the playback mode.
Export in PDF
Export in Excel
Click to add a Route
Idle Time(s):
• Input 0: Display all the idling locations on the below info table.
• Input non-0: If there are multiple idling locations which are all the same, the system
will only get the last data from these idling locations.
Mileage: The total mileage at present of the day. This mileage will only be displayed during
the Track Playback process.
Mileage: This option is selected by default. Select to display the total mileage of the vehicle
on the vehicle info window.
Fast Playback: Select to play back the GPS tracks fast forward.
Show Tracks: Select to display the tracking points (vehicle icon) on the map.
2. Click the Search button, the system should start playing back the GPS tracks. The GPS tracks
will be displayed with a green line.
3. The GPS tracks info will be displayed on the below info table. You can export the info in PDF
or Excel file.
89
Page 95

Xfleet 2.0 Fleets Management Platform
3.3.2.3 Playback
On the Playback page, you can play back the recordings of a vehicle along with the GPS positions
on the Map.
3.3.2.3.1 Playback and Download
Please refer to the steps below to play back or download the recordings.
1. On the left-side bar, select a vehicle from the vehicle list. You can click the button to
display the online vehicles or click to display the whole Device List.
2. Select a date on the calendar, and select the time range.
3. Optionally input a tag. The tags can be pre-configured on the File table. Please refer to Step
8 below.
4. Select a File Location:
• Terminal Device: The recording files restored in the on-vehicle storage device such as
hard disks or SD cards.
• Storage Server: The recording files restored in the Storage Server. Note to enable video
recording on the Storage Server, you will have to configure the Storage Server settings in
advance. Please refer to 3.3.2.7.6 Storage Server for more details.
• Download Server: The recording files restored in the WiFi Download Server. Note to
enable video recording on the Download Server, you will have to pre-configure the
related WiFi Download settings. Please refer to 3.3.2.7.7 Download Site; 3.3.2.7.8
Download Server and 2.3.9 WiFi Config for more details.
90
Page 96

Xfleet 2.0 Fleets Management Platform
Please Select
5. Select a Recording Type. Normal for general recordings; Alarm for alarm recordings; and All
for both of General and Alarm recordings.
6. Click the Search button, the recording bars will be displayed on the Time table as below.
7. To play back a recording, move your mouse cursor over the recording bar to point out a
certain channel and time and then right-click, the recording will start playing back. (Blue bar
for normal recordings; Red bar for alarm recordings).
You can use the icons on the Channel Tool Bar for playing back (please refer
to Channel Tool Bar in 3.3.2.1.1 Live Window).
8. Click the File tab, the searched recordings will be listed on the File table (Black text for
normal recordings; Red text for alarm recordings). You can do the followings:
91
Page 97

Xfleet 2.0 Fleets Management Platform
Please Select
• Playback Recordings: Click the Playback button to start playing back. The video along
with the GPS tracks will be played back. You can use the icons on the Channel Tool Bar
for playing back (please refer to Channel Tool Bar in 3.3.2.1.1 Live Window).
• Download Recording Files: Click the Download button to start downloading the file to
the Download folder of your computer. You can view the download status or query for
the download info using the Download Task window (refer to 3.3.2.3.2 Download Task).
• Download Customized Time-Range of Recording Files: Click to start downloading the
recording file of the configured time-range. This button is only available when Terminal Device is selected in the File Location field above. You can view the download status or query for the download info using the Download Task window (refer to 3.3.2.3.2 Download Task).
• Add Tags: Click the Tags button to add tags to the recording file. You can then use the
tag function to search for the desired recordings. Please refer to Step 3 above.
3.3.2.3.2 Download Task
You can optionally use the Download Task function to query for the download tasks. The
download tasks are those download recordings from the Playback window (refer to 3.3.2.3
Playback).
Click the Download Task button, the Video Download Task window appears. Select the time
range, vehicle, download status and then click the Query button, the corresponding download
tasks will be listed.
92
Page 98

Xfleet 2.0 Fleets Management Platform
3.3.2.4 Report
You can query for the statistic reports using the Report page.
3.3.2.4.1 Vehicle Video Inspection
3.3.2.4.1.1 Enterprise Video Inspection Summary
Time Profile: Select a time profile.
Start Time: Select a start time.
End Time: Select an end time.
Query: Click to query report.
Export File: Click to export the queried report in Excel, CSV or PDF file.
Company: Select the desired companies.
3.3.2.4.1.2 Vehicle Video Inspection Summary
Time Profile: Select a time profile.
Start Time: Select a start time.
End Time: Select an end time.
Query: Click to query report.
Export File: Click to export the queried report in Excel, CSV or PDF file.
Vehicle: Select the desired vehicle(s).
93
Page 99

Xfleet 2.0 Fleets Management Platform
3.3.2.4.1.3 Vehicle Video Inspection Detail
Time Profile: Select a time profile.
Start Time: Select a start time.
End Time: Select an end time.
Query: Click to query report.
Export File: Click to export the queried report in Excel, CSV or PDF file.
Vehicle: Select the desired vehicle(s).
Type: Select an event type or select All.
94
Page 100

Xfleet 2.0 Fleets Management Platform
3.3.2.4.2 Driving Behavior Report
The system will restore the data from vehicles, such as GPS and alarm data, for users to query.
3.3.2.4.2.1 Driving Behavior Statistics Report
Time Profile: Select a time profile.
Start Time: Select a start time.
End Time: Select an end time.
Query: Click to query report.
Export File: Click to export the queried report in Excel, CSV or PDF file.
Vehicle: Select the desired vehicle(s).
Structure: Select Query by Vehicle or Query by Group.
Type: Select a report type.
Duration: Input an alarm duration time in second.
3.3.2.4.2.2 Driving Behavior Query Report
Time Profile: Select a time profile.
Start Time: Select a start time.
End Time: Select an end time.
Query: Click to query report.
95
 Loading...