

Page 1
INSTRUCTION MANUAL
TP-S1016DR
TP-S1 0 9DR
Digital Video Recorder
Page 2

Safety Precautions
CAUTION
DO NOT REMOVE COVER. NO USER SERVICEABLE PARTS INSIDE.
REFER SERVICING TO QUALIFIED SERVICE PERSONNE L.
WARNING
TO REDUCE RISK OF FIRE OR EL EC TRIC SH OCK,
DO NOT EXPOSE THIS APPLIANCE TO RAIN OR MOISTURE
Safety Precautions
Refer all work related to the installation of this product to qualified service
personnel or system installers.
Do not block the ventilation opening or slots on the cover.
Do not drop metallic parts through slots.This could permanently damage
the appliance. Turn the power off immediately and contact qualified service
personnel for service.
.
Do not attempt to disassemble the appliance.To prevent electric shock,
do not remove screws or covers. There are no user-serviceable parts
inside. Contact qualified service personnel for maintenance. Handle the
appliance with care. Do not strike or shake, as this may damage the
appliance.
Do not expose the appliance to water or moisture, nor try to operate it in
wet areas. Do take immediate action if the appliance becomes wet.
Turn the power off and refer servicing to qualified service personnel.
Moisture may damage the appliance and also cause electric shock.
Do not use strong or abrasive detergents when cleaning the appliance
body. Use a dry cloth to clean the appliance when it is dirty. When the
dirt is hard to remove,use a mild detergent and wipe gently.
Do not overload outlets and extension cords as this may result in a risk of
fire or electric shock.
Do not operate the appliance beyond its specified temperature, humidity
or power source ratings. Do not use the appliance in an extreme
environment where high temperature or high humidity exists. Use the
appliance at temperatur e wit hin 0
The input power source for this appliance is AC100~240V
o
C ~ +40oC and a humidity below 90%.
Page 3
Safety Precautions
Safety Precautions
The lightning flash with an arrowhead symbol, within an
equilateral triangle, is intended to alert the user to the
presence of uninsulated ” dangerous voltage” within the
product’s enclosure that may be of sufficient magnitude to
constitute a risk of electric shock to persons
The exclamation point within an equilateral triangle is
intended to alert the user to presence of important
operating and maintenance(servicing)instructions in the
literature accompanying the appliance.
Warning :
To prevent fire or shock hazard, do not expose units not
specifically designed for outdoor use to rain or moisture.
Attention:
Installation should be performed by qualified service personnel
only in accordance with the National Electrical Code or
applicable local codes.
Warning:
Electrostatic-sensitive device. Use proper
CMOS/MOSFET handing precautions to avoid
electrostatic discharge.
UNPACKING
Unpack carefully.
This is electronic equipment and should be
handled carefully.
Check to ensure that the following items are included;
•1. Digital Video Recorder unit
•2. User’s manual
•3. Power Cord
•4. HDD tray key and screws
•5 Alarm I/O board
If an item appears to have been damaged in shipment,
replace it properly in its carton and notify the shipper.
Do not place on uneven or unstable work surfaces.
Seek servicing if the casing.
Power Disconnect:
Units with or without ON-OFF switches have power
supplied to the unit whenever the power code is inserted
into the power source; however, the unit is operational
only when the ON-OFF switch is in the ON position.
The power cord is the main power disconnect for all units.
AC100~240V Power Cords
Note:
This is a class A product. In a domestic environment this product may cause radio interference
In which case the user may be required to take adequate measures.
Note:
Before installing and using this unit, please read this manual carefully. Be sure to keep it handy for later
reference.
The information in this manual was current when published. The manufacturer reserves the right to revise
and improve its products. All specifications are therefore subject to change without notice.
Page 4

Important Safeguards
Important Safeguards
Read Instruction---All the safety and operating instructions should be read before the init is operated
Retain Instructions---The safety and operating instructions should be retained for future reference.
Heed Warnings—All warnings on the unit and in the operating instructions should be adhered to.
Follow Instructions—All operating and use instructions should be followed
Cleaning—Unplug the unit from the outlet before cleaning. Do not use liquid cleaners or aerosol
cleaners. Use a damp cloth for cleaning
Attachments—Do not use attachment not recommended by the product manufacturer as they may
cause hazards.
Water and Moisture—Do not use this unit near water-for example, near a bath tub, wash bowl,
kitchen sink, or laundry tub, in a wet basement, near a swimming pool, in an
unprotected outdoor installation, or any area which is classified as a wet location.
Servicing—Do not attempt to service this unit yourself as opening or removing covers may expose
you to dangerous voltage or other hazards. Refer all servicing to qualified service personnel.
Power Cord Protection—Power supply cords should be routed so that they are not likely to be walked
on or pinched by items placed upon or against them, playing particular
attention to cords and plugs, convenience receptacles, and the point where
they exit from the appliance.
Object and Liquid Entry—Never push objects of any kind into this unit through openings as they may
touch dangerous voltage points or short-out parts that could result in a fire or
electric shock, Never spill liquid of any kind on the unit.
Page 5

Table of Contents
1. Product Overview…………………………………….………………..…..…..Page 1
1.1 Main features………………………………………………………………….....…..….1
1.2 Specifications…………………………………………………………… ….. ……… …. .2
2. Back panel connections……………………………………………......………3~4
3. System connection………………………….………………………………………..5
Before installation……..……………………………………………………………………..5
4. Front panel keypads……………………………………………….…………..…6~7
5. Operation…………………………………………………………..……………………..8
6. Menu flow………………………………………………………..…………………...9~10
6.1 Clock setting menu………………………………………...…………………………..11
6.2 Timer setting menu…………………………………...……………………………..…12
6.3 Sequence setting menu……………………………..………………………………...13
6.4 Title setting menu…………………………………..…………………………………..14
6.5 Covert setting menu………………………………..……………………………….…15
6.6 Alarm record setting menu………………………..…………………………………..16
6.7 Motion setting menu…………………………………………………………………...17
6.8 Record setting menu…………………………………………………………………..19
6.9 Network setting menu……………………………………………………………….…20
6.10 Control setting menu………………………………………………………….………21
6.11 Buzzer setting menu……………………………………………………………….…22
6.12 Archive setting menu…………………………………………………………………23
6.13 Matrix setting menu…………………………………………………………………..24
6.14 Hdisk setting menu…………………………………………………………………...25
6.15 System setting menu…………………………………………………………………26
7. Recording……………………………………………………………………………..…27
7.1 Instant recording……………………………… ……… ………… ……… ……. ……… . 27
7.2 Alarm recording…………………………………………………………………. .. ……. 2 7
8. Playing back…………………………………………………………….………...……28
8.1 Normal playback…………………………………………………….……………...…..28
8.2 Search playback………………………………………………… .… ……. ..… …. ..2 9~3 1
9. Copy………………………………………………………………….…………….……….32
9.1 Still image copy…………………………………………………….………….….…….32
9.2 Copy to movie file………………………………………………….…………...……...33
9.3 Export event log list................ . .. .. .... .. .. .... .. .. .. .... . .. .... .. .. .. .... .. .. .... .. . .. .... .. .. .... .. .. .. ... 3 4
10. Monitor Views / Operation..............................................................35
10.1 Main monitor.......................................................................................................35
10.2 Call / Matrix monitors..........................................................................................36
11. Remote Control.............………………………………………..………….……....37
11.1 RS-485 remote control …………………………………………..………….……….37
11.2 IR – remote control ……………………………………………..……….………..…38
12. View from Internet/Intranet…………………………………………….…....39~42
Appendix-A LAN functional specific ation………..………………………43
Appendix-B Time lapse recording time table………....…….…..….44~45
Appendix-C Serial Interface Specifications ……..……………………...46
1. RS-232 Pin assignment..........................................................................................46
2. Transmission settings.............................................................................................46
3. Remote control protocol...................................................................................47~51
Appendix-D Alarm I/O pin assignment.......……………………………....52
Page 6

Product Overview
1. Product Overview
The TP-S109DR/TP-S1016DR Duplex Digital Video Recorder (DVR) a full-featured DVR designed
specifically for use in security industry.
The DVR incorporates all the benefits of digital video recording, is simple to install, and operates
just like a VCR.
Highly efficient compression technology and superior resolution of recorded images make the DVR
stand out from the competition as the best choice for security surveillance.
The 16 (in) x 5 (out) Matrix Outputs make it powerful for 5 call monitor outputs to be set as you wish.
The real time audio recording at any video recording speed that makes it as perfect as your
security demand.
1.1 Main Features
Easy-to-use control panel with common VCR and Multiplexer functions
Shuttle/Jog dial for picture-by-picture or fast/slow viewing
No tapes to manage, clean or replace
Instant retrieval of stored video
On-screen setup menu and system timer
Ethernet TCP/IP connectivity for remote viewing and controlling
Pre-Alarm recording
Built-in M-JPEG compression/decompression with configurable video quality
Programmed with various time-lapse speeds
Two 3.5” IDE Type Hard Disks for storage , one hot-swappable type, one built-in
type
RS232 and RS485 for Remote Control
IR remote control (optional)
Real-Time Live Display for all cameras
Variable recording speeds up to 60/50 fields per second for NTSC/PAL
Alarm- and motion activated recording
Data export to compact flash card
2 channel real time audio recording capabilities
1
Page 7

Specifications
1.2 Specifications
NTSC/PALVideo Format
Video Input 9 (TP-S109DR) / 16 (TP-SI016DR) camera inputs (BNC),1Vp-p/75ohm
Video Output
Video Compression M-JPEG
Alarm Input
Video Display modes
Video Loss Detection Yes
Ethernet 10BaseT Ethernet, RJ45 connector
Event Log Yes
Hard Disk Storage Two 3.5” IDE type, one-swappable type, on built-in type
Recording Mode Continuous, Timer Schedule, Alarm- or Motion Recording
1 BNC video out (1Vp-p/75 ohm) for Main Monitor
1 S-Video out Mini DIN for Main Monitor
5 BNC video out (1Vp-p/75 ohm) for Matrix / CALL Monitor output
9 (TP-S109DR) / 16 (TP-SI016DR) video out (1Vp-p/ 75 Ohm)for
looping
720x484 (NTSC); 720x576 (PAL) Recording Resolution
built-in Compact Flash card slot Compact Flash Memory
9 (TP-S109DR) / 16 (TP-S1016DR) alarm inputs, 25 pin Sub-D
1 alarm output Alarm Output
TP-S109DR: Full, 4, 6, 7, 8, 9, PIP and 2x zoom for Live and Playback
TP-S1016DR: Full, 4, 6, 7, 9, 10, 13, 16, PIP and 2x zoom for Live and
Playback
Recording Rate Up to 60/50 fields per second for NTSC/PAL
Playback Rate Up to 60/50 fields per second for NTSC/PAL
Playback Search By Date/Time, Event, Seg ment
Setup On screen display setup (OSD)
User Interface Menu Driven
User Input Device Front Panel Keypad
Timer Built-in real time clock
Watch Dog Timer Yes
RS-232 9-pin female D-Sub
RS485 2 x RJ45 Socket
Audio
Dimension
Power Consumption
Power Source
Operating Temperature
2 x Audio In / Out Cinch 500mV max., 10 KOhm impedance
430mm (W) x 88mm (H) x 300 (D)
100W max.
AC100~240V
0°C ~ 40°C
2
Page 8

2. Back Panel Connections
Back Panel Connections
5
7
6
8
9 11
10 12 13
4 3
1
2
ON/OFF: Main on/off switch.
1
2
AC100~240V power socket.
3
VIDEO IN: BNC-sockets for composite signal video inputs, automatic 75 Ohm
termination (TP-S109DR: 1 ~ 9, TP-S1016DR-1600: 1 ~ 16).
4
VIDEO OUT: Loop through video outputs for each input channel.
(TP-S109DR: 1 ~ 9, TP-S1016DR-1600: 1 ~ 16)
5
CALL MONITOR: BNC-socket Call (Spot) Monitor, composite signal. (Full screen display only)
MAIN MONITOR: BNC-socket main monitor, composite signal. Main monitor provides
6
Full screen, Multi-screen, Setup.
7
S-VIDEO: Mini-DIN socket main mo nitor, S-Video signal. Main monitor provides
Full screen, Multi-screen, Setup.
AUDIO8 IN : 2 x Cinch socket audio input 500 mV max., 10 KOhm impedance.
AUDIO OUT: 2 x Cinch socket audio output 500 mV max. at 10 KOhm
3
Page 9

Back Panel Connections
9
ALARM I/O: (Refer pin assignment in Appendix-C, Page 44)
ALM-INPUT : Normally Open (N.O) or Normally Close (N.C) type alarm sensor input.
The Alarm Input can be selected as N.O or N.C input in the setup
menu. When an alarm occurs, alarm recording will automatically start.
ALM-OUTPUT : Two-way contact relay alarm output. In normal condition, this N.C. contact
shorted to ALM-COM. In alarm status, it is open between ALM-NC and
ALM-COM, N.O. is shorted to ALM-COM.
10
RS232 connector : D-Sub 9 pins connector to RS232 ports for remote control.
RS485 connector : 2 x RJ-45 connectors for RS-485 remote control, high impedance
11
Supported are keyboards KS-KBK, KS-KBJ (Optional).
Maximum units in RS-485 network are 32.
12
LAN Connector : RJ-45 LAN connector for internal 10MBit LAN interface.
13
FAN: Cooling fan, do not cover.
4
Page 10
System Connection
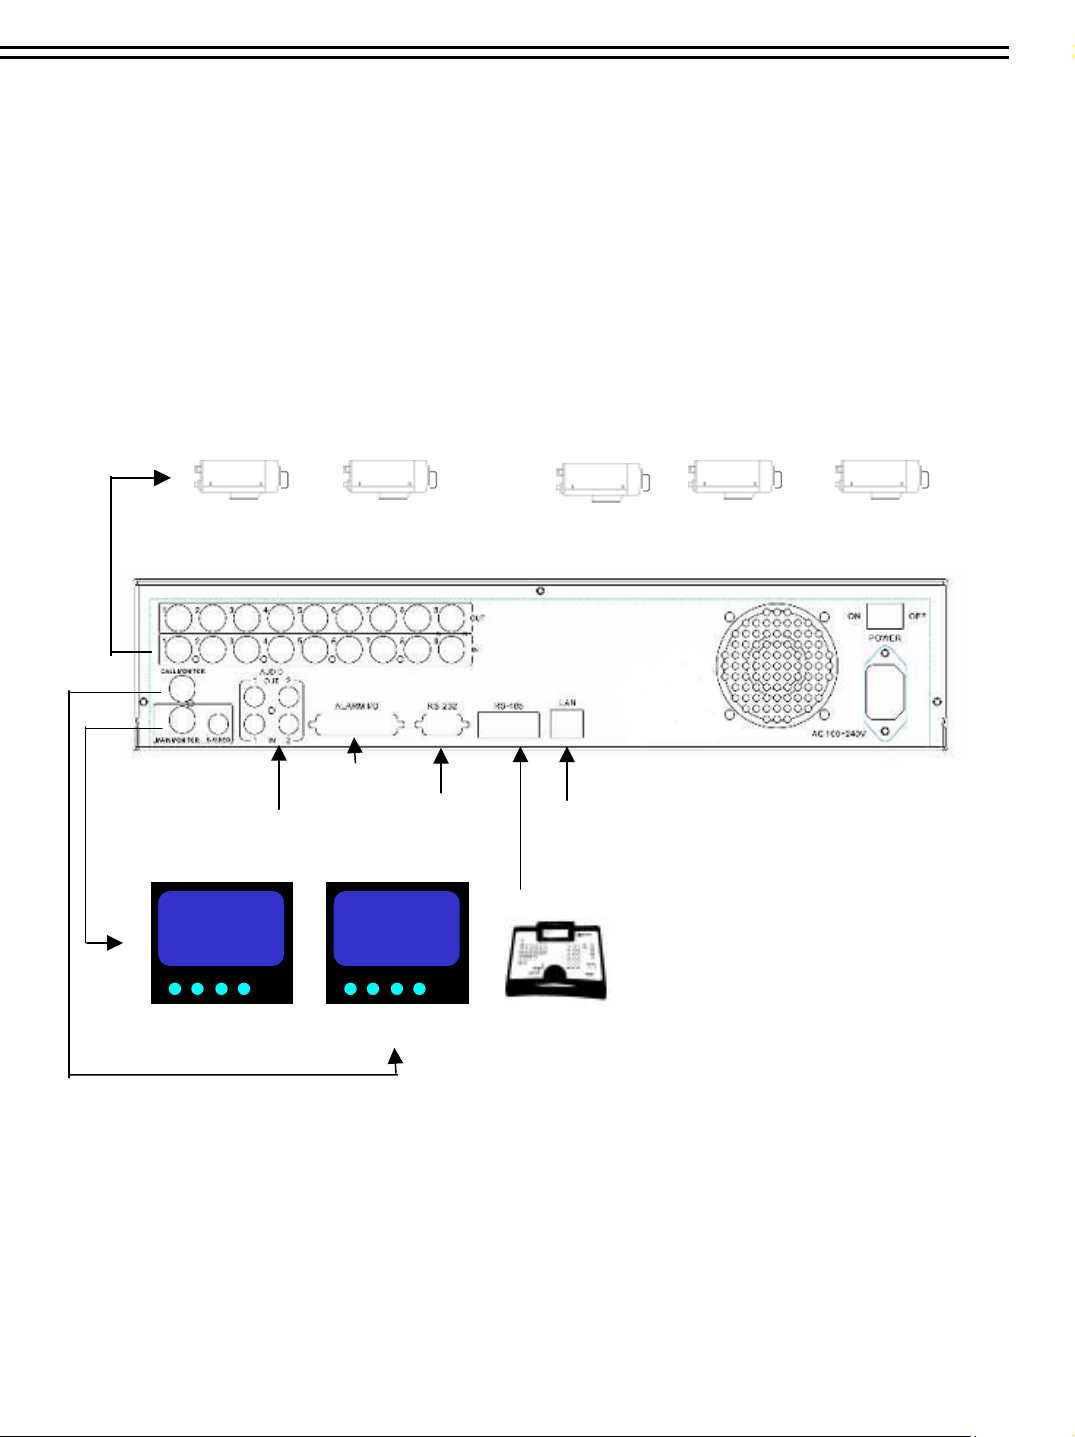
3. System Connection
The installations described below should be made by qualified service personnel or system installers.
Before Installation
Please refer to the following diagram for the system connections.
TP-S109DR: Camera 1~9 / TP-S1016DR: Camera 1 ~ 16
~
Audio Input
(camera Audio Out)
MAIN Monitor
Alarm In/Out
Audio Out
(To Speaker)
CALL Monitor
RS232
Remote Keyboard(s)
KS-KBJ / KS-KBK
(optional)
Ethernet
RS485
5
Page 11
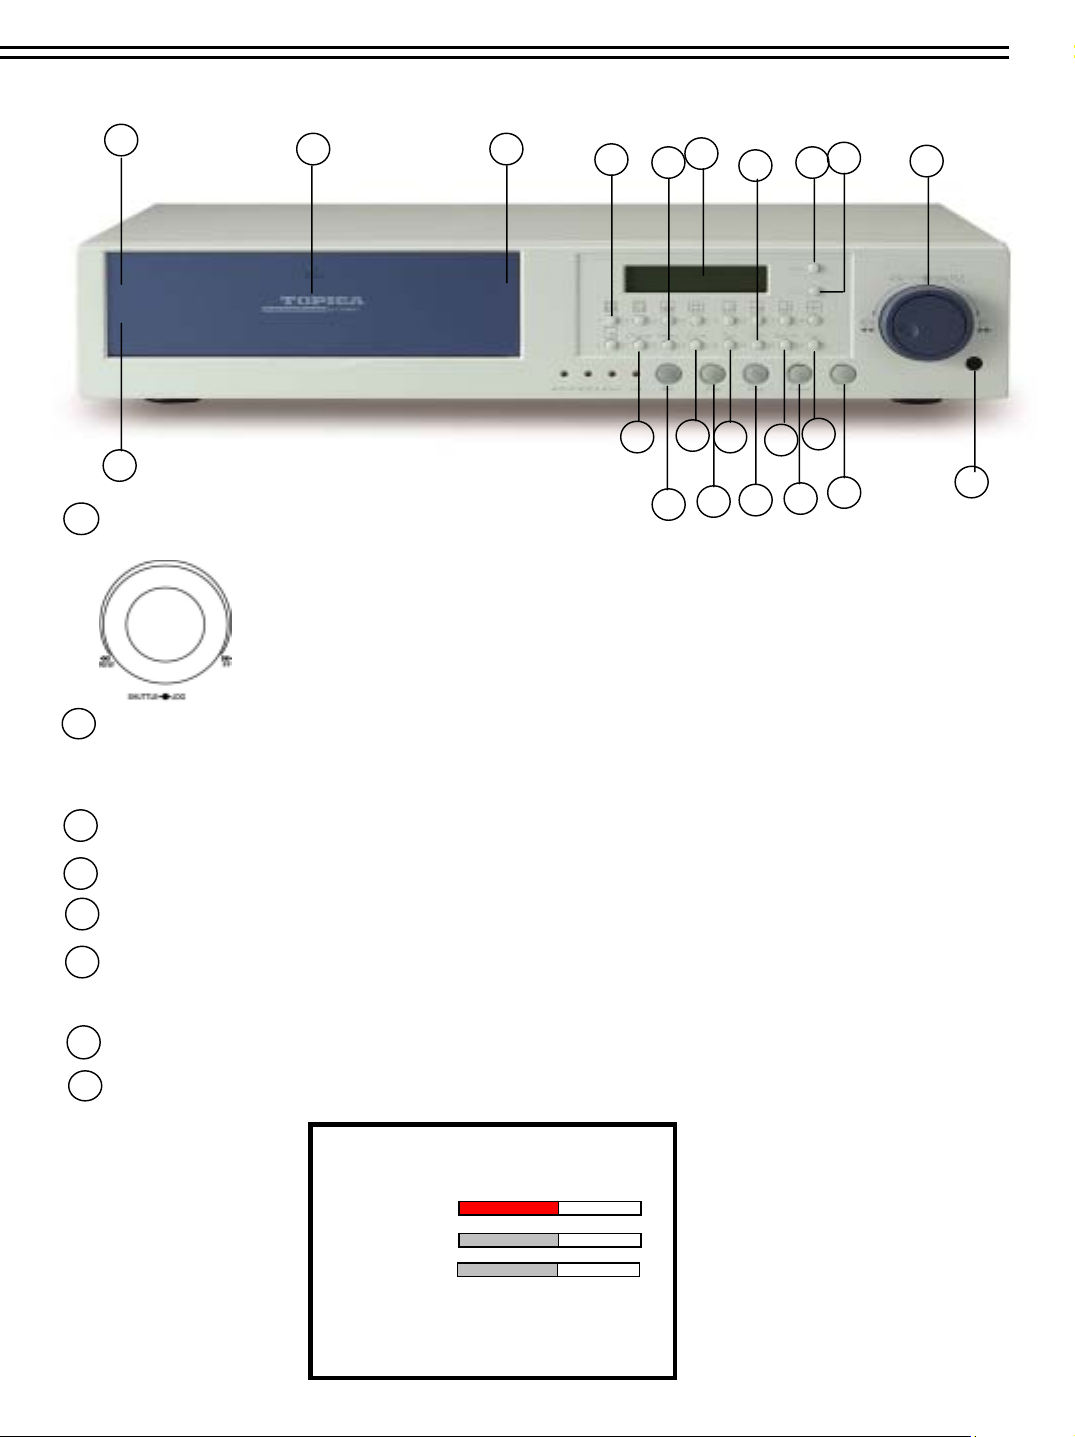
4. Front Panel Keypads
12
12
11
Front Panel Keypads
10
1011
9
8
7
2
22
6
3
5
4
2
22
8
4
1
19
3
1
20
1
SHUTTLE Ring and JOG Dial
15
13 14 16
18
17
19
20 21
6
14
5
15
9
13
17
16
18
7
SHUTTLE : In Playback mode, turn the shuttle ring to fast
forward/rewind the picture (600X maximum).
In Pause mode, turn the shuttle dial to slow forward/rewind
the picture (1/32 maximum).
JOG : In Pause mode, turn the jog dial to step forward/rewind the Picture.
2
CHANEL KEYS:
.
In Menu mode turn the jog dial to select options.
Press these keys (TP-S109DR: 1 ~ 9, TP-S1016DR-1600: 1 ~ 16) to display video image in full
screen
format, the picture of the corresponding camera will fill the whole screen of the monitor display.
3
MENU: Press this key to enter Setup Menu (Please refer to page 9~25 for details).
4
CALL: Press this key to show picture of assigned camera to desired call monitor.
21
5
SEQ : Press this key to enter the auto sequential switching mode for main monitor.
ZOOM: Press this key while viewing the full screen image to display X2 zoom-in picture. To move
6
the zooming area, use JOG to move from left to right. Press ENTER for changing vertical /
horizontal movement.
MODE: Switch Full, 4, 6, 7, 8, 9, (10, 13 and 16 for TP-S1016DR only), PIP (picture in picture)
7
multi-screen for Live and Playback.
8
SELECT: In Full screen mode: press this key to pop-up dialog as below:
DISPLAY SETTING MENU
CHANNEL 01
BRIGHTNESS
CONTRAST
COLOR
HIT SELECT TO DISCARD CHANGE
HIT MENU TO SAVE AND EXIT
6
Page 12

Front Panel Keypads
In Full screen mode this menu allows color adjustment for each video channel, all channels
are separately adjustable.
The selected item will show in red color bar. Use JOG to increase or decrease the value.
Press ENTER to confirm and move to next item. After finished setting, press SELECT key to
discard change or press MENU key to save and exit the dialog.
In Multi-screen mode:
In Multi-screen mode the SELECT key allows to define cameras in all multi-screen views.
Press SELECT. At the upper left camera in multi-screen appears “SELECT”.
Use the numeric camera keys to select a camera.
Press ENTER to switch in the multi-screen.
Press SELECT to exit this setting.
Note: Every camera can be selected only once for a multi-screen view.
Display: Press this key to switch ON/OFF for camera title, date/time and HDD status.
9
Hold this key longer than 2 seconds for displaying the event log list.
10
Compact Flash Card Slot: Insert a Compact Flash Card for archiving video.
11
Hard Disk Trays: 2 x Hard Disk holder one for 3.5”hot-swapable HDD.another for
built-in HDD
12
HDD locks: Turn on HDD power and protection from taking out the HDD without authority.
13
REC: Press this key to start recording.
14
STOP: Press this key to stop recording or playing ba ck.
15
PLAY: Press this key to stat playing back recoded picture (Please refer to page 27 for details).
16
PAUSE: Press this key to pause the playback picture.
17
SEARCH: Press this key to enter the Search Menu (Please refer page 28~30 for details).
18
COPY: Under PAUSE or PLAYBACK, Press this key to start copying still picture or video
stream into Compact Flash card (Please refer page 31~33 for details).
19
ENTER: Press this key to enter sub-menu or confirm setup. When there is Alarm, Motion
or Video Loss occurs, press this key for alarm reset. The Event Log Dialog will show on
the display, then follow the instruction to continue.
20
LEDs: LEDs for HDD1, HDD2 , ALARM and LAN access (from left to right).
21
IR Remote Controller receiver
22
LCD Panel: To display Date/Time, Recording/Playback and HDD status.
7
Page 13

5. Operation
(1) Insert a HDD (IDE) for Video Storag e
Insert one or two HDD (3.5” IDE) for Video Storage.
The HDD should be set as Ca ble S el e ct .
(Normally the default setting of HDD is Master)
Note: After hard disk case is inserted into the hard disk tray, be sure to turn the tray key
in lock position.Otherwise, HDD will not be det ect ed .
ATTENTION: Changing HDD’s and switching on HDD’s is not allowed in record mode!
(2) Connect cable for video/audio input and video/audio out,
The detail connection is described in SYSTEM CONNECTION.
(3) Switch Power On
The LCD panel in the front panel will light when you switch on the power.
(4) Press MENU key to enter SET UP MENU.
Operation
MENU
Once inside the main menu you will find there are 14 set up pages as below:
Selected item will be surrounded by a white block.
MAIN MENU
CLOCK
TIMER
SEQUENCE
TITLE
COVERT
ALARM
MOTION
RECORD
NETWORK
CONTROL
BUZZER
ARCHIVE
MATRIX
DISK
SYSTEM
(5) Turn the JOG dial clockwise or counter-cl ockwise t o sele ct th e item,
press ENTER key for detail set up for each item.
(6) Press MENU again to leave the set up menu.
8
Page 14
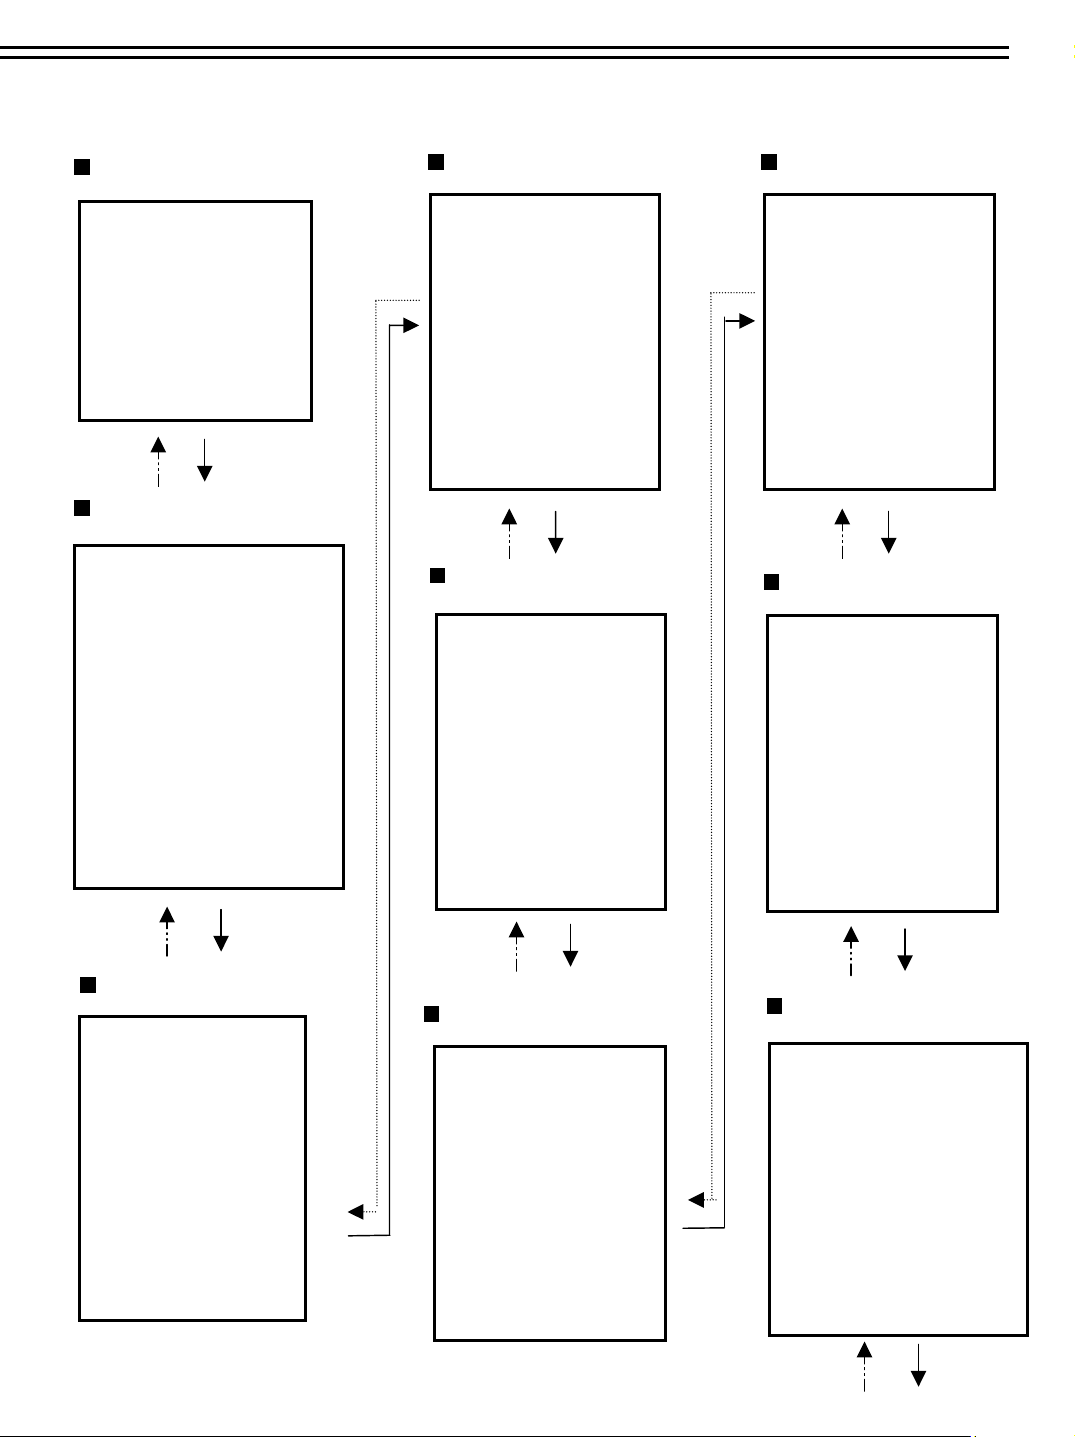
6. MENU FLOW
Columns in brackets () only valid forTP-S1016DR
MENU flow
CLOCK
( See page 11 )
CLOCK SETTING MENU
DATE
TIME
: 2003/07/04 FRI
: 13:01:02
MENU LANGUAGE: ENGLISH
VIDEO SYSTEM: NTSC
VERSION: 0.96 11/23
TIMER
( See page 12 )
TIMER SETTING MENU
WEEK START STOP SPEED SET
SUN 00:00 23:59 60 IPS OFF
SUN 00:00 23:59 60 IPS OFF
SUN 00:00 23:59 60 IPS OFF
SUN 00:00 23:59 60 IPS OFF
SUN 00:00 23:59 60 IPS OFF
SUN 00:00 23:59 60 IPS OFF
SUN 00:00 23:59 60 IPS OFF
SUN 00:00 23:59 60 IPS OFF
SUN 00:00 23:59 60 IPS OFF
SUN 00:00 23:59 60 IPS OFF
SUN 00:00 23:59 60 IPS OFF
SUN 00:00 23:59 60 IPS OFF
SUN 00:00 23:59 60 IPS OFF
SUN 00:00 23:59 60 IPS OFF
SUN 00:00 23:59 60 IPS OFF
SUN 00:00 23:59 60 IPS OFF
TITLE
( See page 14 )
TITLE SETTING MENU
CH TITLE
1 CH01:_ _ _ _ _
2 CH02:_ _ _ _ _
3 CH03:_ _ _ _ _
4 CH04:_ _ _ _ _
5 CH05:_ _ _ _ _
6 CH06:_ _ _ _ _
7 CH07:_ _ _ _ _
8 CH08:_ _ _ _ _
9 CH09:_ _ _ _ _
(10 CH010:_ _ _ _ _ )
(11 CH011:_ _ _ _ _ )
(12 CH012:_ _ _ _ _ )
(13 CH013:_ _ _ _ _ )
(14 CH014:_ _ _ _ _ )
(15 CH015:_ _ _ _ _ )
(16 CH016:_ _ _ _ _ )
COVERT
( See page 15 )
COVER SETTING MENU
CH OP
1 OFF
2 OFF
3 OFF
4 OFF
5 OFF
6 OFF
7 OFF
8 OFF
9 OFF
(10 OFF)
(11 OFF)
(12 OFF)
(13 OFF)
(14 OFF)
(15 OFF)
(16 OFF)
MOTION
( See page 17 )
CH OP SEN DURATION
1 ON HIGH 07 SECS
2 ON HIGH 07 SECS
3 ON HIGH 07 SECS
4 ON HIGH 07 SECS
5 ON HIGH 07 SECS
6 ON HIGH 07 SECS
7 ON HIGH 07 SECS
8 ON HIGH 07 SECS
9 ON HIGH 07 SECS
(10 ON HIGH 07 SECS)
(11 ON HIGH 07 SECS )
(12 ON HIGH 07 SECS)
(13 ON HIGH 07 SECS)
(14 ON HIGH 07 SECS)
(15 ON HIGH 07 SECS)
(16 ON HIGH 07 SECS)
RECORD
( See page 19 )
RECORD SETTING MENU
NORMAL RECORD
SPEED
QUALITY
DISK FULL
ALARM RECORD
OPERATION
SPEED
QUALITY
PRE-ALARM RECORD
OPERATION
: 60 IPS
: STANDARD
: REWRITE
ON
: 60 IPS
: STANDARD
ON
SEQUENCE
( See page 13 )
SEQUENCE SETTING MENU
CH OP DWELL
1 ON 03 SECS
2 ON 03 SECS
3 ON 03 SECS
4 ON 03 SECS
5 ON 03 SECS
6 ON 03 SECS
7 ON 03 SECS
8 ON 03 SECS
9 ON 03 SECS
(10 ON 03 SECS)
(11 ON 03 SECS)
(12 ON 03 SECS)
(13 ON 03 SECS)
(14 ON 03 SECS)
(15 ON 03 SECS)
(16 ON 03 SECS)
ALARM
( See page 16 )
CH OP TYPE DURATION
1 ON N.O 05 SECS
2 ON N.O 05 SECS
3 ON N.O 05 SECS
4 ON N.O 05 SECS
5 ON N.O 05 SECS
6 ON N.O 05 SECS
7 ON N.O 05 SECS
8 ON N.O 05 SECS
9. ON N.O 05 SECS
(10 ON N.O 05 SECS)
(12 ON N.O 05 SECS)
(13 ON N.O 05 SECS)
(14 ON N.O 05 SECS)
(15 ON N.O 05 SECS)
(16 ON N.O 05 SECS)
RST ON N.O
9
NETWORK
( See page 20)
NETWORK SETTING MENU
IP ADDRESS
NET MASK
GATEWAY
USER-MANE PASSWORD LEVEL
GUEST GUEST GUEST
GENERAL GENERAL GENERAL
SUPER SUPER SUPER
:192.168.010.005
:255.255.255.000
:192.168.010.001
Page 15
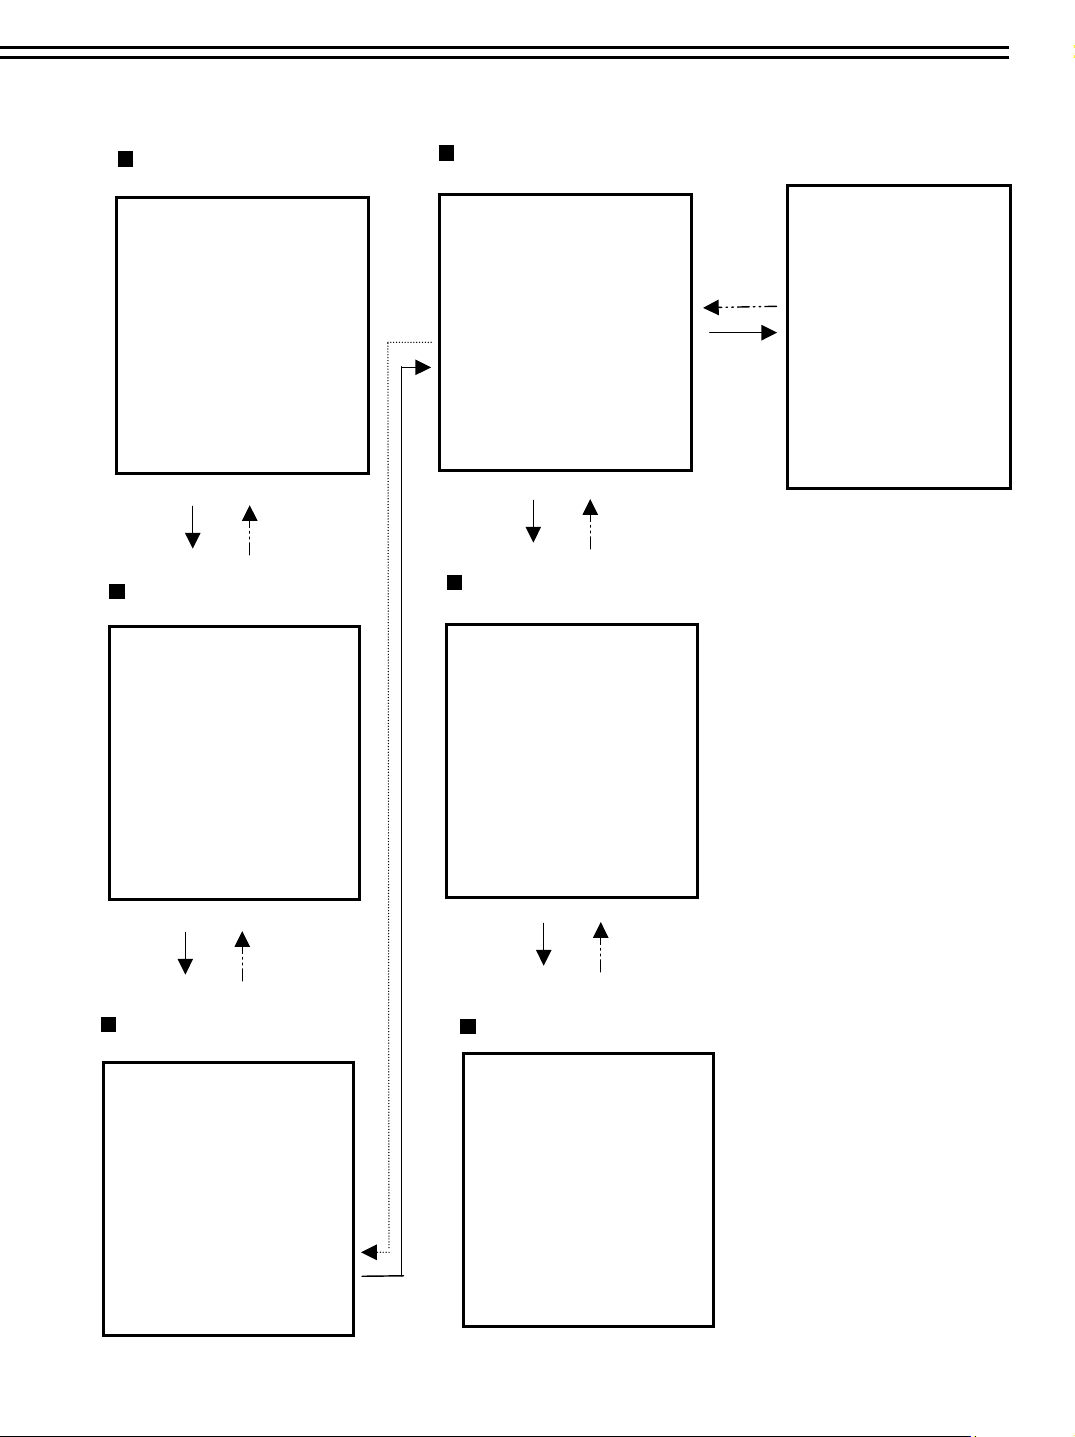
Columns in brackets () only valid forTP-S1016DR
MENU flow
CONTROL
( See page 21)
CONTROL SETTING MENU
RS232 BAUD RATE
RS232 STOP BIT
RS232 PARITY
RS232 DATA BIT
RS485 BAUD RATE
RS485 STOP BIT
RS485 PARITY
RS485 DATA BIT
RS232/RS485 ID
BUZZER
( See page 22 )
BUZZER SETTING MENU
BUZZER : ENABLE
RECORD-IN : ON
ALARM-IN : ON
MOTION-IN : ON
DISK FULL : ON
VIDEO LOSS: ON
TIMER : ON
: 9600 BPS
: 1
: NONE
: 8
: 9600 BPS
: 1
: NONE
: 8
: 1
MATRIX
( See page 24 )
MATRIX SETTING MENU
MONITOR-0
MONITOR-1
MONITOR-2
MONITOR-3
MONITOR-4
DISK
( See page 25 )
DISK SETTING MENU
DISK USAGE HDD-1 HDD-2
SIZE ( GB ) : 80 80
RECORD POS : *0.0% 0.0%
PLAY POS : *0.0% 0.0%
DISK RENEW : NO
DISK COPY : NO
MATRIX
SUB-MENU
MONITOR-3 SETTING MENU
CH DWELL EVENT
1 07 SECS NONE
2 07 SECS NONE
3 07 SECS NONE
4 07 SECS NONE
5 07 SECS NONE
6 07 SECS NONE
7 07 SECS NONE
00 07 SECS NONE
00 07 SECS NONE
(00 07 SECS NONE)
(00 07 SECS NONE)
(00 07 SECS NONE)
(00 07 SECS NONE)
(00 07 SECS NONE)
(00 07 SECS NONE)
(00 07 SECS NONE)
ARCHIVE
( See page 23 )
ARCHIVE SETTING MENU
PICTURE SIZE
TIME STAMP
TIME STAMP POS
WATER MARK
WATER MARK POS
: 720 X 480
: ON
: TOP
: ON
: TOP
SYSTEM
( See page 26)
SYSTEM SETTING MENU
PLAY WITH AUDIO-1: ON
PLAY WITH AUDIO-2: ON
PLAY SPEED : 60 IPS
MULTI-EVENT DWELL: 02 SECS
PASSWORD ENABLE: DISABLE
PASSWORD LEVEL-2 : 222222
PASSWORD LEVEL-3 : 333333
SYSTEM UPDATE: NO
LOAD DEFAULT: NO
10
Page 16

6.1 CLOCK SETTING MENU
CLOCK SETTING MENU
MENU
DATE
TIME
MENU LANGUAGE
VIDEO SYSTEM
VERSION: 0.79 11/23
: 2003/07/04 FRI
: 13:01:02
: ENGLISH
: NTSC
In CLOCK/LANGUAGE SETTING MENU , we define:
(1) DATE : Current date, format: YYYY/MM/DD
Year: 2000 ~ 2099, Month: 01~ 12, Date: 01~31, Week: Sunday~Saturday
(2) TIME : Current time, format: HH:MM:SS
Hour: 00 ~ 23, Minute : 00 ~ 59, Second: 00 ~ 59
(3) MENU LANGUAGE: ENGLISH or Others
(4) VIDEO SYSTEM: Factory default setting depend on machine “NTSC” or “PAL” .
(5) VERSION: Current S/W revision and release date.
Turn the JOG dial clockwise or counter-clockwise to select the options.
Press ENTER key to confirm the option and move to next column.
ENTER
Press MENU key to return to Main Menu, press again to leave Set up Menu.
MENU
11
Page 17

6.2 TIMER SETTING MENU
TIMER SETTING MENU
WEEK START STOP SPEED SET
SUN 00:00 23:59 50 IPS OFF
SUN 00:00 23:59 50 IPS OFF
SUN 00:00 23:59 50 IPS OFF
SUN 00:00 23:59 50 IPS OFF
SUN 00:00 23:59 50 IPS OFF
SUN 00:00 23:59 50 IPS OFF
SUN 00:00 23:59 50 IPS OFF
SUN 00:00 23:59 50 IPS OFF
SUN 00:00 23:59 50 IPS OFF
SUN 00:00 23:59 50 IPS OFF
SUN 00:00 23:59 50 IPS OFF
SUN 00:00 23:59 50 IPS OFF
SUN 00:00 23:59 50 IPS OFF
SUN 00:00 23:59 50 IPS OFF
SUN 00:00 23:59 50 IPS OFF
SUN 00:00 23:59 50 IPS OFF
In TIMER SETTING MENU we define automatic timer controlled records.
MENU
Timer records can be defined for 12 individual start and end times.
(1) WEEK: This select the week day for the timer to record on schedule.
DLY means daily record.
(2) START: Enter the start time for timer recording.
(3) STOP: Enter the end time for timer recording.
NOTE: The recorder records till the end of the minute, which is set here.
EXAMPLE: START 07:00 END 08:00
The recorder records from 07:00:00 till 08:00:59
Each day has to be set separately:
EXAMPLE: Daily record from 20:00 till next day 07:00
WRONG: DLY START 20:00 STOP 07:00
CORRECT: DLY START 20:00 STOP 23:59
DLY START 00:00 STOP 06:59
(4) SPEED : Select recording speed. Maximum 60 (NTSC) / 50 (PAL).
(5) SET: Set “ON” when using timer recording.
Set “OFF” when not using timer recording.
Turn the JOG dial clockwise or counter-clockwise to select the options.
Press ENTER key to confirm the option and move to next column.
ENTER
MENU
Press MENU key to return to Main Menu, press again to leave Set up Menu.
12
Page 18

6.3 SEQUENCE SE TTING MENU
SEQUENCE SETTING MENU
CH OP DWELL
1 ON 03 SECS
2 ON 03 SECS
3 ON 03 SECS
4 ON 03 SECS
5 ON 03 SECS
6 ON 03 SECS
7 ON 03 SECS
8 ON 03 SECS
9 ON 03 SECS
(10 ON 03 SECS)
(11 ON 03 SECS)
(12 ON 03 SECS)
(13 ON 03 SECS)
(14 ON 03 SECS)
(15 ON 03 SECS)
(16 ON 03 SECS)
Columns in brackets () only valid forTP-S1016DR
MENU
In the SEQUENCE SETTING MENU, we define for MAIN Monitor
(1) CH (Channel): Input channels. 1~9 forTP-S109DR, 1~16 forTP-S1016DR.
(2) OP (Operation): ON includes the camera in the sequence, OFF skips the camera in the
sequence.
(3) DWELL (DWELL TIME) : Dwell Time is individual adjustable for each channel. The dwelling
time for the sequencer can be set between 0-99 seconds.
Note: Sequences for Call monitors are defined in MATRIX menu.
Turn the JOG dial clockwise or counter-clockwise to select the options.
Press ENTER key to confirm the option and move to next column.
ENTER
MENU
Press MENU key to return to Main Menu, press again to leave Set up Menu.
13
Page 19

6.4 TITLE SETTING MENU
TITLE SETTING MENU
CH TITLE
1 CH01:_ _ _ _ _
2 CH02:_ _ _ _ _
3 CH03:_ _ _ _ _
4 CH04:_ _ _ _ _
5 CH05:_ _ _ _ _
6 CH06:_ _ _ _ _
7 CH07:_ _ _ _ _
8 CH08:_ _ _ _ _
(9 CH09:_ _ _ _ _
(10 CH010:_ _ _ _ _ )
(11 CH011:_ _ _ _ _ )
(12 CH012:_ _ _ _ _ )
(13 CH013:_ _ _ _ _ )
(14 CH014:_ _ _ _ _ )
(15 CH015:_ _ _ _ _ )
(16 CH016:_ _ _ _ _ )
MENU
ENTER
MENU
Columns in brackets () only valid forTP-S1016DR
In TITLE SETTING MENU , we define:
The Title Setting Menu allows you to assign a title to each camera input.
Title with up to 12 characters is supported in each channel.
The available alphanumeric characters are:
0,1,2,3,4,5,6,7,8,9,
A,B,C,D,…X,Y,Z.
/ ( ) . - * & @ : ”
Default setting is CH01~CH09 for TP-S109DR, CH01~Ch16 forTP-S1016DR.
Turn the JOG dial clockwise or counter-clockwise to select the options.
Press ENTER key to confirm the option and move to next column.
Press MENU key to return to Main Menu, press again to leave Set up Menu.
14
Page 20

6.5 COVERT SETTING MENU
COVERT SETTING MENU
CH OP
1 OFF
2 OFF
3 OFF
4 OFF
5 OFF
6 OFF
7 OFF
8 OFF
9 OFF
(10 OFF)
(11 OFF)
(12 OFF)
(13 OFF)
(14 OFF)
(15 OFF)
(16 OFF)
MENU
ENTER
Columns in brackets () only valid forTP-S1016DR
In COVERT SETTING MENU , we define:
The covert setting menu allows you hide the desired camera on the
display in a blue background. Change setting to ON for covering camera.
Camera is not visible in Live and Playback mode, unless this function is
deactivated in COVERT menu.
Default setting is OFF for all cameras.
Note: With network access a covert camera is only visible for users
with “ADMIN” password level. For users with “GENERAL” and
“GUEST” level the covered camera is not visible.
Turn the JOG dial clockwise or counter-clockwise to select the options.
Press ENTER key to confirm the option and move to next column.
MENU
Press MENU key to return to Main Menu, press again to leave Set up Menu.
15
Page 21

6.6 ALARM RECORD SETTING MENU
ALARM SETTING MENU
CH OP TYPE DURATION
1 ON N.O 05 SECS
2 ON N.O 05 SECS
3 ON N.O 05 SECS
4 ON N.O 05 SECS
5 ON N.O 05 SECS
6 ON N.O 05 SECS
7 ON N.O 05 SECS
8 ON N.O 05 SECS
9 ON N.O 05 SECS
(10 ON N.O 05 SECS)
(12 ON N.O 05 SECS)
(13 ON N.O 05 SECS)
(14 ON N.O 05 SECS)
(15 ON N.O 05 SECS)
(16 ON N.O 05 SECS)
RST ON N.O
MENU
Columns in brackets () only valid forTP-S1016DR
In ALARM RECORDING MENU, we define
(1) CH (Alarm input) : Select alarm input or RST for alarm reset input.
(2) OP (OPERATION) : ON : Records when alarm occurs.
OFF : No reaction when alarm occurs.
(3) TYPE : Select alarm typ e:
N.C. : Normally Closed with time out function counting from alarm start
(set in DURATION)
N.C. + TRANS : Normal Closed, alarm duration as long as contacts is
active + timeout (set in DURATION)
N.O. : Normal Open with time out function counting from alarm start
(set in DURATION)
N.O. + TRANS: Normal Open, alarm duration as long as contact is
active + timeout (set in DURATION)
(4) DURATION : Timeout duration time for each event. 0~99 seconds adjustable.
Turn the JOG dial clockwise or counter-clockwise to select the options.
Press ENTER key to confirm the option and move to next column.
ENTER
MENU
Press MENU key to return to Main Menu, press again to leave Set up Menu.
16
Page 22

6.7 MOTION SETTING MENU
MOTION SETTING MENU
CH OP SEN DURATION
1 ON HIGH 05 SECS
2 ON HIGH 05 SECS
3 ON HIGH 05 SECS
4 ON HIGH 05 SECS
5 ON HIGH 05 SECS
6 ON HIGH 05 SECS
7 ON HIGH 05 SECS
8 ON HIGH 05 SECS
9 ON HIGH 05 SECS
(10 ON HIGH 05 SECS)
(11 ON HIGH 05 SECS)
(12 ON HIGH 05 SECS)
(13 ON HIGH 05 SECS)
(14 ON HIGH 05 SECS)
(15 ON HIGH 05 SECS)
(16 ON HIGH 05 SECS)
MENU
Columns in brackets () only valid forTP-S1016DR
In the MOTION RECORD SETTING MENU, we define
(1) CH (Channel) : Video input channel
(2) OP (Operation) : Default: OFF
ON: The device will respond recording when motion occurs.
OFF: The device will not respond recording when motion occurs.
(3) SEN (Sensitivity) : HIGH, MIDDL E or LOW adjustable. Default: MIDDLE.
(4) DURATION: Duration time for motion record and Alarm Out relay.
0~99 seconds adjustable. Default: 05 seconds.
Turn the JOG dial clockwise or counter-clockwise to select the options.
Press ENTER key to confirm the option and move to next column.
ENTER
MENU
Press MENU key to return to Main Menu, press again to leave Set up Menu.
17
Page 23

(5) HIT 1-9/16 TO MANUAL EDIT:
Use the numeric keys (1~9 for TP-S109DR/ 1~16 forTP-S1016DR) to
select a camera for setting the detection areas.
The selected camera appears with a 16 x 12 grid (detection zones):
HIT ENTER TO SELECT MODE
USE JOG TO TOGGLE ON/OFF
HIT MENU TO EXIT
MENU
ENTER
MENU
ENTER jumps to the next detection field.
JOG wheel switches zone ON – active (area filled) or OFF – inactive (area
empty) for motion detection.
MENU key exits area setting and jumps back to MOTION SETUP MENU.
Turn the JOG dial clockwise or counter-clockwise to select the options.
Press ENTER key to confirm the option and move to next column.
Press MENU key to return to Main Menu, press again to leave Set up Menu.
18
Page 24

6.8 RECORD SETTING MENU
RECORD SETTING MENU
MENU
NORMAL RECORD
SPEED
QUALITY
DISK FULL
ALARM RECORD
OPERATION
SPEED
QUALITY
PRE-ALARM RECORD
OPERATION
: 50 IPS
: STANDARD
: REWRITE
ON
: 50 IPS
: STANDARD
ON
In NORMAL RECORDING MENU, we define
(1) NORMAL RECORD:
SPEED : To set the normal recording speed. Maximum 60 (NTSC) / 50 (PAL).
QUALITY: Video recording quality setup for setting the quality of the video picture by
selecting a compression rate. There are six quality levels for recording
LOWER : 15 KB
LOW : 19 KB
BASIC : 23 KB
STANDARD : 27 KB
HIGH : 31 KB
SUPERIOR : 35 KB
DISK FULL: Set REWRITE or STOP when HDD is full.
(2) ALARM RECORD (for Alarm In and Motion detection):
OP (Operation): Select ON or OFF to activate alarm recording or n ot.
SPEED : To set the alarm and motion recording speed. Maximum 60 (NTSC) / 50
(PAL).
QUALITY: Video recording quality setup, this item lets you set the quality of the video
picture by selecting a compression rate.
NOTE: The record rates are for the total system: The single camera record rate is:
Camera record rate = System record rate / Number of connected cameras
Example: Record Rate 60 IPS, 6 connected cameras: 10 IPS / camera
(3) PRE-ALARM RECORD: (with Alarm In and Motion)
Pre – Alarm duration is depending on record quality (about 8-15 seconds).
OP (Operation): Select ON or OFF to activate pre-alarm recording or not .
Turn the JOG dial clockwise or counter-clockwise to select the options.
Press ENTER key to confirm the option and move to next column.
ENTER
MENU
Press MENU key to return to Main Menu, press again to leave Set up Menu.
19
Page 25

6.9 NETWORK SETTING MENU
NETWORK SETTING MENU
MENU
IP ADDRESS
NET MASK ADDRESS
GATEWAY ADDRESS
MAC ADDRESS
USER-NAME PASSWORD LEVEL
GUEST--- GUEST--- GUEST--GENERAL- GENERAL- GENERALSUPER--- SUPER--- SUPER---
: 192.168.010.005
: 255.255.255.000
: 192.168.010.001
: 00:5A:56:A3:87:1A
In the NETWORK SETTING MENU, we define
(1) IP ADDRESS : Assign an fixed IP address for this unit, for example:192.168.010.005
(2) NET MASK ADDRESS: Assign a subnet mask of the network for this unit, for
example:255.255.255.000
(3) GATEWAY ADDRESS: Assign a default gateway for this unit, for
example:192.168.010.001
(4) MAC ADDRESS:
Hardware address of the network interface. Do not modify without instruction of network
administrator.
Note: After changing network settings, screen will comes up as following:
Network setting……………………………….
Please reboot to effect network setting
After restart of EDSR the new network settings are activated.
(5) USER-NAME PASSWORD LEVEL
The Login name and password are used to establish a network connection to the unit.
The PASSWORD setup allows the administrator to set the new Login name and password
with access level “SUPER”,”GENERA L”or “GU EST”.
The system allows up to four users connected at same time with different access levels.
“ADMIN ” : can view live/playback video, covert cameras and control all operation/setup.
“GENERAL”: can view live and playback video.
“GUEST”:can only view live display.
Turn the JOG dial clockwise or counter-clockwise to select the options.
Press ENTER key to confirm the option and move to next column.
ENTER
MENU
Press MENU key to return to Main Menu, press again to leave Set up Menu.
20
Page 26

6.10 CONTROL SE T T I NG MENU
CONTROL SETTING MENU
MENU
RS232 BAUD RATE
RS232 STOP BIT
RS232 PARITY
RS232 DATA BIT
RS485 BAUD RATE
RS485 STOP BIT
RS485 PARITY
RS485 DATA BIT
RS232/RS485 ID
: 9600 BPS
: 1
: NONE
: 8
: 9600 BPS
: 1
: NONE
: 8
: 1
In the CONTROL SETTING MENU, we define
(1) RS232 BAUD RATE: There are 6 different speeds that can be used to transmit instruction or
information through the RS232 port on the device, 1200 baud,2400 baud,4800 baud,9600 baud,
19200 baud,and 3840 baud. The default setting from the factory is 9600 baud.
(2) RS232 STOP BIT: Select stop bit: 1 or 2
(3) RS232 PARITY: Select parity mode: NONE/ODD/EVEN
(4) RS232 DATA BIT: Select data bit : 8 or 7
(5) RS485 BAUD RATE: There are 6 different speeds that can be used to transmit instruction or
information through the RS485 port on the device, 1200 baud,2400 baud,4800 baud,9600 baud,
19200 baud,and 3840 baud.
(6) RS485 STOP BIT: Select stop bit: 1 or 2
(7) RS485 PARITY:Select parity lever: NONE/ODE/EVEN
(8) RS485 DATA BIT: Select data bit : 8 or 7
(9) RS232/RS485 ID: RS232/RS485 address.The adress range for the DVR: 1~200.
NOTE: Settings for remote keyboards KS-KBK and KS-KBJ:
RS-485 Baud rate: 9600, 1 Stop bit, Parity NONE, ID (device number) range: 1~32
Turn the JOG dial clockwise or counter-clockwise to select the options.
Press ENTER key to confirm the option and move to next column.
ENTER
Press MENU key to return to Main Menu, press again to leave Set up Menu.
MENU
21
Page 27

6.11 BUZZER SETTING MENU
BUZZER SETTING MENU
BUZZER : ENABLE
RECORD-IN : ON
ALARM-IN : ON
MOTION-IN : ON
DISK FULL : ON
VIDEO LOSS : ON
TIMER : ON
In BUZZER SETTING MENU, we define the buzzer
ON/OFF for following event:
MENU
ENTER
MENU
RECORD-IN, ALARM-IN, MOTION-IN, DISK FULL, VIDEO LOSS AND TIMER
Turn the JOG dial clockwise or counter-clockwise to select the options.
Press ENTER key to confirm the option and move to next column.
Press MENU key to return to Main Menu, press again to leave Set up Menu.
22
Page 28

6.12 ARCHIVE SETTING MENU
ARCHIVE SETTING MENU
MENU
PICTURE SIZE
TIME STAMP
TIME STAMP POS
WATER MARK
WATER MARK POS
: 720 X 480
: ON
: TOP
: ON
: TOP
In the ARCHIVE SETTING MENU, we define for pi ct ure and movie export to CF-card:
(1) PICTURE SIZE :
Selects picture size for copying image to CF card:
Big size:720x480 / 720x576 for NTSC / PAL.
Small size:352x240 / 352x288 for NTSC / PAL.
(2) TIME STAMP :
ON: Shows the time stamp on the picture when copying image to CF card.
OFF: This erases the time stamp on the picture when copying image to CF card.
(3) TIME STAMP POS (Position):
BOTTOM: The time stamp will show on the bottom of the image.
TOP: The time stamp will show on the top of the image.
(4) WATER MARK:
ON: Shows a water mark on the picture when copying image to CF card.
OFF: No water mark on the picture when copy image to CF card.
(5) WATER MARK POS (Position):
BOTTOM: Water mark will show on the bottom of the image.
TOP: Water mark will show on the top of the image.
Turn the JOG dial clockwise or counter-clockwise to select the options.
Press ENTER key to confirm the option and move to next column.
ENTER
Press MENU key to return to Main Menu, press again to leave Set up Menu.
MENU
23
Page 29

6.13 MATRIX SETT I NG MENU
MENU
MONITOR-0 SETTING MENU
MATRIX SETTING MENU
CALL MONITOR
MONITOR-0
MONITOR-1
MONITOR-2
MONITOR-3
MONITOR-4
ENTER
CH DWELL EVENT
00 07 SECS NONE
00 07 SECS NONE
00 07 SECS NONE
00 07 SECS NONE
00 07 SECS NONE
00 07 SECS NONE
00 07 SECS NONE
00 07 SECS NONE
00 07 SECS NONE
(Dialog 1)
(Dialog 2)
In the MATRIX SETTING MENU, we define the standard sequences for each matrix monitor
and event, which override these sequences.
Users may set up to 5 call monitors accordingly (Dialog 1).
Note: CALL MONITOR is the regular CALL MONITOR. MONITOR-1~4 are additional 4 call
monitors for video matrix functions.
Select the desired call monitor and then press ENTER key. The SUB-MENU will show as Dialog 2.
CH, DWELL, EVENT:
(1) CH (Channel): Select the camera to be shown in the standard sequence of this call
monitor. With setting “00” the channel will be skipped in the sequence.
(2) DWELL (Dwelling time): Set 0~99 seconds for the dwelling time of each camera.
(3) EVENT: Set the alarm and correspondent motion to the camera.
NONE: no alarm or motion action is assigned to this camera.
MOTION: If MOTION detection is active for this camera, the camera will be
displayed, if motion is detected. After alarm record duration the monitor switches
back to standard sequence or spot camera (depending on operation).
A01 ~ A09: The camera will be displayed, if selected alarm input is active.
Turn the JOG dial clockwise or counter-clockwise to select the options.
Press ENTER key to confirm the option and move to next column.
ENTER
Press MENU key to return to Main Menu, press again to leave Set up Menu.
MENU
24
Page 30

6.14 DISK
DISK SETTING MENU
DISK USAGE HDD-1 HDD-2
SIZE ( GB ) : 80 80
RECORD POS : *0.0% 0.0%
PLAY POS : *0.0% 0.0%
DISK RENEW : NO
DISK COPY : NO
In the DISK SETTING MENU,we defin e
(1) DISK USAGE: HDD-1,HDD-2
(2) SIZE: Applied HDD size
(3) RECORD POS: HDD usage rate, record position, “*” shows the active HDD
(4) PLAY POS: current playback position, “*” shows the active HDD
(5) DISK RENEW : Erase HDD-1, HDD-2.
(6) DISK COPY :To backup data from built-in HDD to hot-swapable HDD
.
Turn the JOG dial clockwise or counter-clockwise to select the options.
Press ENTER key to confirm the option and move to next column.
ENTER
MENU
Press MENU key to return to Main Menu, press again to leave Set up Menu.
Page 31

6.15 SYSTEM SETTING MENU
SYSTEM SETTING MENU
PLAY WITH AUDIO-1 : ON
PLAY WITH AUDIO-2 : ON
PLAY SPEED : 50 PIS
PASSWORD ENABLE : DISABLE
PASSWORD LEVEL-2 : 222222
PASSWORD LEVEL-3 : 333333
MULTI-EVENT DWELL: 02 SEC
UPDATE: NO
LOAD DEFAULT: NO
MENU
In the SYSTEM SETTING MENU, we define
(1) PLAY WITH AUDIO: AUDIO-1, AUDIO-2
ON/OFF: Play back with or without audio.
(2) PLAY SPEED: Set the playback speed. Maximum 60 (NTSC) / 50 (PAL).
(3) PASSWORD ENABLE: Enable/Disable the password protection.
(4) PASSWORD: Set password with 6 digits
(6) SYSTEM UPDATE: Select YES/NO for updating system.
YES: Download the update S/W into C.F card through your PC and insert the CF card
into the slot on the front panel of DVR. Press ENTER key to start.
Notice: After the system is successfully updated, please reboot the system.
(7) LOAD DEFAULT: Select YES/NO to load factory default setting, neccessary after update.
Turn the JOG dial clockwise or counter-clockwise to select the options.
Press ENTER key to confirm the option and move to next column.
ENTER
MENU
Press MENU key to return to Main Menu, press again to leave Set up Menu.
26
Page 32

7.1 INSTANT RECORDING
Press REC key to start continuous recording with setting of “NORMAL RECORD”.
Recording
REC
STOP
The recording rate and recording quality are set in the RECORD SETTING MENU.
The LCD screen on the front panel of DVR will display as follows:
2003/11/23
21:56:47
Display shows operation status, active HDD, record position on active HDD,
record frame rate ant curr ent time.
REC, Maximum 60 (NTSC) / 50 (PAL) fields will also show on the main
monitor display if you press the DISPLAY key to show camera title and
date/time.
Press STOP key to stop recording.
Since the DVR had Duplex feature, STOP key can be activated both in Playing back and
Recording. In Duplex mode first STOP will stop playback, second STOP will stop recording.
When the HDD is full, the machine will Stop recording automatically or Auto Overwrite
from the beginning of the HDD. It de p e n ds on th e s ettin g in RECORD SETTING MENU.
REC HDD1 70%
50 IPS 21:56:52
7.2 ALARM RECORDING
When the ALARM OPERATION setting is “ON”, the DVR will automatically record
when alarm occurs , and will automatically stops recording at the end of the alarm duration period.
As example, we set ALARM RECORDING SPEED on 60 (NTSC) / 50 (PAL) field, the screen
will show as below,
A. REC (50IPS)
A. REC (60 IPS)
DISK: 39 GB
DISK: 39 GB (0)
Instant recording and timer recording will stop when an alarm occurs.
Please refer details in RECORD SETTING MENU (page 19).
27
Page 33

8.1 NORMAL PLAYBACK
(1) Playback
Press the PLAY key to start playing back the stored image/audio
from the last SEGMENT.
PLAY
NOTE: In Duplex mode (simultaneous record and playback) the playback
speed is limited to 25 IPS. For real time display of 50 IPS records stop
recording before starting playback.
(2) Fast Forward/Reverse Playback
During playing back, turn the SHUTTLE ring clockwise to start fast forward
playing back.
The speed will be shown on the screen at the bottom of t h e screen.
>> 2X, 4X, 8X, 16X, 32X, 600X
Turn the SHUTTLE ring counter-clockwise to start fast reverse playing back.
The speed will be shown on the screen.
<< 2X, 4X, 8X, 16X, 32X, 600X
Playing Back
(3) Slow Forward/Reverse Play bac k
During playing back,press PAUSE key to freeze the playing back picture.
PAUSE
Turn the SHUTTLE ring clockwise to start slow forward playing back.
The speed will show at the bottom of the screen.
>> 1/2, 1/4, 1/8, 1/10, 1/16, 1/32
Turn the SHUTTLE ring counter-clockwise and slow reverse playback starts.
The speed will show on the SCREEN at the corner of the screen.
<< 1/2, 1/4, 1/8, 1/10, 1/16, 1/32
(4) Field advance Forward/Reverse
During PAUSE mode, turn the JOG dial clockwise to advance the
still image field by field.
Turn the job dial counterclockwise to rewind the still image field by
field.
(5) Press STOP key to stop playing back.
Notice: Press STOP key again will stop recording. Please check the REC key if it
lights or not after your operation.
28
Page 34

8.2 SEARCH PLAYBACK
(1) Segment List search playback
Press SEARCH key to enter the SEARCH MENU dialog.
Search Playback
SEARCH
SEARCH MENU
BY SEGMENT LIST
BY ALARM LIST
BY DATA TIME
Turn the JOG dial to select BY SEGMENT LIST and press
ENTER key.
A segment is a range on the HDD, beginning with record start
(manual, alarm, motion or after power loss) and ending with
record stop.
NOTE: If the recorder starts to ove rwrite a HDD, al so a n ew
segment will be generated.
The submenu will display as follows:
SEGMENT SEARCH
0001
0002
0003
2003/04/24 19/03/29 HDD1
2003/04/25 12/30/30 HDD1
2003/05/20 12/00/00 HDD2
ENTER
STOP
Turn the JOG dial to select desired items.
Press ENTER key to start playing back selected segment.
Press STOP key to end playing back and return to static display.
29
Page 35

(2) Alarm List search playback
Press SEARCH key to enter the SEARCH MENU dialog.
SEARCH
SEARCH MENU
BY SEGMENT LIST
BY ALARM LIST
BY DATA TIME
Turn the JOG dial to select BY ALARM LIST and press ENTER
key. The submenu will display as follows:
Search Playback
ENTER
STOP
ALARM SEARCH
00001
00002
00003
A01 : Alarm recording by Alarm-in 1.
M03: Motion recording by camera 3.
T : Timer recording.
PL: automatic record restart after end of power loss
: to next page : to previous page.
M01 2003/04/24 19:03:29 HDD 1
A03 2003/04/25 12:30:30 HDD1
M03 2003/05/20 12:00:00 HDD2
Press ENTER key to start playing back selected al arm list.
Press STOP key to end playing back and return to static display.
30
Page 36

(3) Date/Time Search Playback
Press SEARCH key to enter the SEARCH MENU dialog.
SEARCH
SEARCH MENU
BY SEGMENT LIST
BY ALARM LIST
BY DATA TIME
Turn the JOG dial to select BY DATA TIME and press ENTER
key. The submenu and instruction will display as follows:
Search Playback
SEARCH
DATE/TIME SEARCH
YEAR/MM/DD HH:MM:SS HDD
2003 /01 /01 21: 33: 26 1
PRESS SEARCH TO START SEARCH
PRESS MENU TO EXIT
Turn the JOG dial to select desired date/time and stored hard disk.
Press SEARCH key to start playing back by date/time search or
press MENU key to exit..
Notice: If there is no image stored in the date/time specified then the machine
will start playing back from the nearest set time automatically.
STOP
Press STOP key to end playing back and return to static display.
31
Page 37

DATA EXPORT
9. DATA EXPORT
Insert a Compact Flash card into the Compact Flash slot on the front panel of DVR.
When inserting the Compact Flash card, make sure that insert direction is correct.
NOTE: COPY function is not possible during RECORD. Stop recording to enable COPY
function!
9.1 STILL IMAGE COPY
The still image copy function is possible in all playback view modes.
Press the PLAY key to start playing back.
Press the PAUSE key to pause playback.
PAUSE
COPY
Notice:
Copied images are stored as a single picture. Copied files are saved as .JPG file.
The Monitor OSD shows “PAUSE ON (1~9 forTP-S109DR, 1~16
forTP-S1016DR)” . The displayed number shows the active channel for
the COPY function.
Turn the JOG Dial clockwise to choose your desired image.
While displayed as your desired image of choice ,
press the COPY key. The “ Copying …” will be shown on the screen during
the process.
Notice:
Please wait after the message “DONE” about 5 seconds before removing CF-card
for ensure correct finish of write process.
32
Page 38

9.2 COPY TO MO VIE FILE
NOTE: COPY function is not possible during RECORD.
Stop recording to enable COPY function!
Press the PLAY key to start playing back.
PLAY
Press COPY key and then the copy menu and instruction appears.
The main monitor switches to full screen display with following OSD:
COPY
CH01
COPY TO MOVIE FILE
USE JOG TO SELECT PICTURE
PRESS COPY TO START COPY
PRESS PAUSE TO PAUSE COPY
PRESS STOP TO CLOSE FILE
PRESS MENU TO EXIT
DATA EXPORT
2003/11/01 00:08:08
Turn the JOG Dial clockwise to choose your channel for copying.
While displaying as your desired image of choice,
COPY
PAUSE
STOP
MENU
Notice: Please wait after the message “DONE” about 5 seconds before removing CF-
card for ensure correct finish of write process.
Press COPY key to start copying image.
Press PAUSE key to pause copy image.
Press STOP key to finish copy and close file.
Press MENU key to return to playback. Press STOP to stop playing back.
Notice: Copied images are stored as a movie picture. Copied files are saved as .MOV file.
Use QuickTime to play the retrieved .MOV files. You may download QuickTime at
www.apple.com
. The playback version for QuickTime is free.
33
Page 39

MONITOR VIEWS / OPERATION
10. MONITOR VIEW S / OPERATION
The TP-S109DR/TP-1016DR digital recorders provide 1 main monitor and 5 matrix monitors.
These monitors have different functionalities:
Main monitor: - Full screen and multi screen display:
TP-S109DR: Full, 4, 6, 7, 8, 9, PIP, and 2x zoom
TP-S1016DR: Full, 4, 6, 7, 9, 10, 13, 16, PIP, sequence and 2x zoom
- Live- and Playback display
- OSD for camera title, status messages, setup menu
CALL / Matrix monitors: - full screen display
- sequence mode or fixed camera display
- display of motion or alarm cameras
- OSD for camera title and alarm messages
10.1. MAIN MONITOR
The MODE key switches the different multi-screen modes.
MODE
DISPLAY switches the OSD for camera titles and status messages ON/OFF.
DISPLAY
The zoom function is only available in full screen mode. Press ZOOM to activate
the electronically 2 x zoom. Use the JOG dial to move left/right in the picture.
ZOOM
ENTER switches vertical / horizontal movement.
35
Page 40

9.3 EXPORT EVENT LOG LIST
This function allows to export the event log list to CompactFlash – Card.
The generated text file in in *.txt format.
Press „DISPLAY“ key and hold key for about 2 seconds.
DISPLAY
EVENT LOG
TYPE ID TIME
MOTION 2 2004/01/02 12:12:54
VL 1 2004/01/02 12:12:54
VL 3 2003/12/29 12:12:54
VL 1 2003/12/28 12:12:54
USE JOG TO SWITCH PAGE
HIT CALL TO TURN OFF BUZZER
HIT COPY TO SAVE EVENT TO CF CARD
HIT MENU TO EXIT
DATA EXPORT
The event log list will be displayed:
TYPE: event type: MOTION : motion detection
ALARM: alarm in
VL: video loss
PL: restart after Power Loss
ID: video input number for motion and video loss, alarm in contact for Alarm
TIME: start time of event
Turn the JOG Dial to jump to next event list page.
Press CALL to switch off buzzer, if active.
CALL
Press COPY to save the current event list page to Compact Flash Card.
COPY
Press MENU to exit event log list.
MENU
34
Page 41

10.2. CALL / MATRIX MONITORS
Press CALL to change settings for CALL / MATRIX monitors.
The Main monitor shows following dialogue:
CALL
MATRIX NORMAL STATE
SETTING MENU
PRESS CALL TO SET CALL
MONITOR
PRESS 1-4 TO SELECT MATRIX
PRESS MENU TO EXIT
Select the monitor by pressing CALL or the numeric keys 1~4.
The Main monitor shows following dialogue (example with monitor 1):
SETTING MATRIX 1
SEQUENCE
MONITOR VIEWS / OPERATION
The current status of the selected monitor is shown in the second and third column
(Sequence / Spot, OSD ON/OFF).
SEQUENCE
MENU
OSD ON
PRESS 1 – 16 TO SELECT SPOT CAMERA
PRESS SEQUENCE TO SEQUENCE
PRESS DISPLAY TO TURN OSD ON/OFF
PRESS MENU TO EXIT
Press sequence to activate the standard sequence for this monitor (setup for this
sequence in menu MATRIX, page 24)
Press MENU to jump back to monitor selection menu.
NOTE: In menu MATRIX defined events for motion and alarm have
higher priority and will override the manual settings. After end of
any event the monitor switches back to the manual settings.
36
Page 42

11. REMOTE CONTROL
11.1 RS-485 REMOTE CONTROL
The new standard EverFocus EDSR remote protocol allows challenging installations with DVR remote
control at different installation sites.
EDSR remote control is supported by the optional keyboards KS-KBJ (with 3-axis joystick and 2
additional RS-485 – Ports for telemetry control with independent telemetry protocols) and KS-KBK
(no telemetry).
Up to 32 units are allowed in the RS-485 bus. The RS-485 bus requires serial wiring with 2-wire
shielded twisted pair cable(“daisy chain”). Maximum cable length of the bus is 1200 m.
Star wiring is only possible with additional RS-485 distributor. Installation example (2 remote
operators, 1 TP-S109DR, 1 TP-S1016DR) :
DVR1:TP-S109DR
DVR2:TP-S1016DR
CALL 1 CALL 2
Operator 1:
1x Full screen view DVR1
1x Full screen view DVR2
MAIN1 M1-1 M1-2 M1-3 M1-4
MAIN2 M2-1 M2-2 M2-3 M2-4
RS-485 2 wire RS-485 2 wire
Operator 2:
1x Multi screen view DVR1 (MAIN)
4x Full screen view DVR1 (MATRIX)
1x Multi screen view DVR1 (MAIN)
4x Full screen view DVR2 (MATRIX)
Video 1 x
Video 5 x
Video 5 x
Video 1 x
RS-485 2 wire
RJ45 (RS485) pin assignment
There are two RJ-45 (RS-485) connectors on the back panel of the DVR (loop through). Please
refer the following pin assignment for application.
FUNCTIONPIN
1 2 3 4 5 6 7 8
GND1
NC2
RX +3
NC4
NC5
RX -6
NC7
NC8
37
Page 43

IR Remote Controller
11.2 IR Remote Controller (optional)
The remote controller (RC-200, Figure 1) is an accesso ry to enhance the handy operat ions of the
DVR. You can perform all the settings and operations by the remote controller. The effective
distance is up to 10 meters without any obstacle. The keypad functions are same as the front
panel key button of the DVR.
There are some replacement keys for JOG and SHUTTLE, definitions are:
JOG : Same as turnin g the JOG clockwise.
JOG : Same as turning the JOG counter-clockwise.
SHUTTLE
1: fast forward 2X or slow forward 1/2X.
2: fast forward 4X or slow forward 1/4X.
3: fast forward 8X or slow forward 1/8X.
4: fast forward 16X or slow forward 1/10X.
5: fast forward 32X or slow forward 1/16X.
6: fast forward 600X or slow forward 1/32X.
SHUTTLE
1: fast rewind 2X or slow rewind 1/2X.
2: fast rewind 4X or slow rewind 1/4X.
3: fast rewind 8X or slow rewind 1/8X.
4: fast rewind 16X or slow rewind 1/10X.
5: fast rewind 32X or slow rewind 1/16X.
6: fast rewind 600X or slow rewind 1/32X.
Note: The channel keys #10~16 are only active
with TP-S1016DR recorder
38
Figure 1
Page 44

View From Internet/Intranet
12. View From Internet/Intranet
Basic Operations and Login Display:
Go to the Internet Explorer, key in the network IP address, for example,
http://192.168.10.5 (must be the same IP address as the one assigned to the
unit from the Network Setting Menu. You need a FIXED IP Address, please contact your ISP for the IP)
The LOGIN dialog will show on the screen.
User’ must enter the correct user-name and password defined in the Network Setting menu.
For example:
Enter ADMIN for user name and ADMIN for password and then Click On “submit” to enter to system.
39
Page 45

Main Screen
View From Internet/Intranet
10
11
19
12
13
14
1 2 3 4 5 6 7 8 9
15 16 17 18
Above diagram is the main screen display.
The icons on the lower corner of the screen are mainly for control and Configuration, those on
the right corner are for status indication.
If any icon is grayed, it means that the specific function is not accessible in the current mode.
The followings are a brief description for each of the icons.
1. REV. PLAY : Reverse Video Playback.
2. STOP : Press this key to stop Video Playback.
3. PLAY: Play back the Video display.
4. STEP FORWARD the Video Playback display.
5. PAUSE: To pause the Video Playback display.
6. STEP BACKWARD the Video Playback di spl ay
7. CONTROL MODE: To switch to direct remote control mode.
C
Note: Only allows user with access level “ADMIN”..
8. Control for Playback Video Speed
9. Control for Playback Position
40
Page 46

View From Internet/Intranet
10. The system allows up to 3 ways playback video, by SEGMENT, ALARM LIST and DATE TIME.
(Playback by SEGMENT LIST, click Refresh to show list)
(Playback by ALARM LIST, click Refresh to show list)
(Playback by Date time)
40
Page 47

View From Internet/Intranet
11. All available segments are show n in the list. Click to select and highlight.
12. Click to playback selected video segment.
13. Press this icon to show the segment or list.
14. Current connection and playback status is shown along with date and time.
15. Full screen view.
16. Quad screen view.
17. Nine split screen view.
18. Sixteen split screen view (only for 16 CH DVR).
19. A pop-up menu to select camera to view will be shown by pressing right mouse button.
42
Page 48

Appendix-A
LAN Functional Specification
Specifications:
Network Interface: 10Mbits/s Ethernet (10Base T)
LAN controller Chip: RealTek 8019
LAN Connector: RJ-45
Protocol: HTTP,TCP/IP.ICMP,ARP
Remote Access: Standard browser such as internet
Explorer / Netscape with JAVA support
Image Compression: JPEG
Used Ports: 80, 1111, 2222, 3333, 4444, 6666
Max. user numbers: 4
Frame rate: max. 1,5 IPS dep ending on net work c onditions
43
Page 49

Time Lapse Mode Recording Time Table
Appendix-B
Lower
Low
Basic
Standard
High
Superio
r
NTSC
Recording
When Recording with 160GB HDD
(Estimated with typical image-low noise level)
Unit: Hour
PICTURE QUALI T Y ( KB)
system st or age( GB): 160
Speed LOWER LOW BASIC STANDARD HIGH SUPERIOR
(fps) 15 19 23 27 31 35
60 49.4 39 32.2 27.4 23.9 21.2
30 98.8 78 64.4 54.9 47.8 42.3
20 148.1 117 96.6 82.3 71.7 63.5
15 197.5 155.9 128.8 109.7 95.6 84.7
10 296.3 233.9 193.2 164.6 143.4 127
5 592.6 467.8 386.5 329.2 286.7 254
1 2963 2339.2 1932.4 1646.1 1433.7 1269.8
0.5 5925.9 4678.4 3864.7 3292.2 2867.4 2539.7
0.3 9876.5 7797.3 6441.2 5487 4779 4232.8
0.2 14814.8 11695.9 9661.8 8230.5 7168.5 6349.2
: 15 kB
: 19 kB
: 23 kB
: 27
kB
: 31 kB
: 35
kB
PAL
Recording
Unit: Hour
PICTURE QUALI T Y ( KB)
Speed LOWER LOW BASIC STANDARD HIGH SUPERIOR
(fps) 15 19 23 27 31 35
50 59.3 46.8 38.6 32.9 28.7 25.4
25 118.5 93.6 77.3 65.8 57.3 50.8
10 296.3 233.9 193.2 164.6 143.4 127
5 592.6 467.8 386.5 329.2 286.7 254
2 1481.5 1169.6 966.2 823 716.8 634.9
1 2963 2339.2 1932.4 1646.1 1433.7 1269.8
0.5 5925.9 4678.4 3864.7 3292.2 2867.4 2539.7
0.4 7407.4 5848 4830.9 4115.2 3584.2 3174.6
0.2 14814.8 11695.9 9661.8 8230.5 7168.5 6349.2
0.1 29629.6 23391.8 19323.7 16460.9 14336.9 12698.4
Reference:24H=1 day.168H=1 week, 720H=1 month,8760H=1 year
44
Page 50

When Recording with 320GB HDD
(Estimated with typical image-low noise level)
Lower
Low
Basic
Standard
High
Superio
Appendix-B
: 15 kB
: 19 kB
: 23 kB
: 27
kB
: 31 kB
: 35
kB
r
NTSC
Recording
Unit: Hour
system storage( G B): 320
PICT URE Q UAL I T Y ( KB)
Speed LOWER LOW BASIC STANDARD HIGH SUPERIOR
(fps)151923273135
60 98.8 78 64.4 54.9 47.8 42.3
30 197.5 155.9 128.8 109.7 95.6 84.7
20 296.3 233.9 193.2 164.6 143.4 127
15 395.1 311.9 257.6 219.5 191.2 169.3
10 592.6 467.8 386.5 329.2 286.7 254
5 1185.2 935.7 772.9 658.4 573.5 507.9
1 5925.9 4678.4 3864.7 3292.2 2867.4 2539.7
0.5 11851.9 9356.7 7729.5 6584.4 5734.8 5079.4
0.3 19753.1 15594.5 12882.4 10973.9 9557.9 8465.6
0.2 29629.6 23391.8 19323.7 16460.9 14336.9 12698.4
PAL
Recording
Unit: Hour
PICT URE Q UAL I T Y ( KB)
Speed LOWER LOW BASIC STANDARD HIGH SUPERIOR
(fps)151923273135
50 118.5 93.6 77.3 65.8 57.3 50.8
25 237 187.1 154.6 131.7 114.7 101.6
10 592.6 467.8 386.5 329.2 286.7 254
5 1185.2 935.7 772.9 658.4 573.5 507.9
2 2963 2339.2 1932.4 1646.1 1433.7 1269.8
1 5925.9 4678.4 3864.7 3292.2 2867.4 2539.7
0.5 11851.9 9356.7 7729.5 6584.4 5734.8 5079.4
0.4 14814.8 11695.9 9661.8 8230.5 7168.5 6349.2
0.2 29629.6 23391.8 19323.7 16460.9 14336.9 12698.4
0.1 59259.3 46783.6 38647.3 32921.8 28673.8 25396.8
Reference:24H=1 day.168H=1 week, 720H=1 month,8760H=1 year
45
Page 51

Appendix C: Serial Interface Specifications
Serial Interface Specifications
1. RS-232 pin assignment
The DVR may be controlled by a computer or a terminal via the standard
D-SUB 9-pin RS-232 connector.
The pin assignment of the D-SUB 9-pin connector
153
2
4
8
76
9
DVR
HOST
PIN # NAME PIN # NAME
1 NOT CONNECTED 1 NOT CONNECTED
2 TXD 2 RXD
3 RXD 3 TXD
4 NOT CONNECTED 4 NOT CONNECTED
5 GROUND 5 GROUND
6 NOT CONNECTED 6 NOT CONNECTED
7 NOT CONNECTED 7 NOT CONNECTED
8 NOT CONNECTED 8 NOT CONNECTED
9 NOT CONNECTED 9 NOT CONNECTED
2. Transmission setting
There are 6 different speeds that can be used to transmit instruction or information through
the RS232/RS485 port on the device, 1200 baud, 2400 baud, 4800 baud, 9600 baud,
19200 baud and 3840 baud.
The default setting from the factory is 9600 baud.
Please refer to Chart 6.10 (Page21) for details.
46
Page 52

Appendix C: Serial Interface Specifications
3. Remote Control Protocol
A computer or a terminal can be used to control the unit by sending the packet as following.
1-1. Sample control code packets
Example1 : A packet that send "REC" key to DVR (ID=5)
0x85 (length)
0x00 (Receiver ID high byt e)
0x05 (Receiver ID low byte)
0x4B (OPcode = key )
0x08 (DATA1 = "Rec" keycode )
0x5D (checksum)
Example2 : A packet that send "PAUSE" key to DVR (ID=4999)
0x85 (length)
0x27 (Receiver ID high byt e)
0x07 (Receiver ID low byte)
0x4B (OPcode = key )
0x0C (DATA1 = "Pause" keycode )
0x0A (checksum)
Example3 : A packet that send "PLAY" key to all DVR (broadcast)
0x85 (length)
0x7f (Receiver ID high byte)
0x7f (Receiver ID low byte)
0x4B (OPcode = key )
0x0B (DATA1 = "Play" keycode )
0x59 (checksum)
47
Page 53

Appendix C: Serial Interface Specifications
2-1. The format of message packet is as follows:
Length Byte (Prefix: 0x86, 0x87, or 0x88 ..... )
Receiver ID high byte
Receiver ID low byte
Opcode Byte
Data Byte1
Data Byte2
Data Byte3
Checksum Byte
2-2. Length Byte
This Length Byte is also a prefix. Bit7 must be 1.
EX: 0x87 ==> this packets has 7 bytes length. ( not included Length byte itself )
48
Page 54

Appendix C: Serial Interface Specifications
2-3. Receiver ID
2-3. Receiver ID
1). Individual receiver ID
Decimal 14bit binary value Hbyte Lbyte Receiver ID (EDSR)
0 0000000 0000000 00 00 ID = 0
1 0000000 0000001 00 01 ID = 1
2 0000000 0000010 00 02 ID = 2
....
126 0000000 1111110 00 7e ID = 126
127 0000000 1111111 00 7f ID = 127
128 0000001 0000000 01 00 ID = 128
129 0000001 0000001 01 01 ID = 129
255 0000001 1111111 01 7f ID = 255
256 0000010 0000000 02 00 ID = 256
....
511 0000011 1111111 03 7f ID = 511
....
16382 1111111 1111110 7f 7e ID = 16382
2). Broadcast ID
Decimal 14bit binary value Hbyte Lbyte Receiver ID
16383 1111111 1111111 7f 7f all EDSR
connect to RS485/RS232
49
Page 55

Appendix C: Serial Interface Specifications
2-4. Opcode Byte & Data bytes
2-4-1. OPcode
OPcode Data1 Function
0x4B Keycode A remote key pressed
0x4D command Matrix command
2-4-2. Remote keys (OPcode=0x4B)
------------------------------------------------------------------------------------------- --------Data1 Key Data1 Key
0x00 CH1
0x01 CH2
0x02 CH3
0x03 CH4
0x04 MODE
0x05 ZOOM
0x06 SEQ
0x07 MENU
0x08 REC
0x09 REV.PLAY
0x0A STOP
0x0B PLAY
0x0C PAUSE
0x0D SEARCH
0x0E COPY
0x0F DISPALY
0x10 SHUTTLE<<x1
0x11 SHUTTLE<<x2
0x12 SHUTTLE<<x4
0x13 SHUTTLE<<x8
0x14 SHUTTLE<<x16
0x15 SHUTTLE<<x32
0x16 SHUTTLE<<x600
0x17 SHUTTLE>>x1
0x18 SHUTTLE>>x2
0x19 SHUTTLE>>x4
0x1a SHUTTLE>>x8
0x1b SHUTTLE>>x16
0x1c SHUTTLE>>x32
0x1d SHUTTLE>>x600
0x1e JOG<
0x1f JOG>
0x20 CH5
0x21 CH6
0x22 CH7
0x23 CH8
0x24 CH9
0x25 CH10
0x26 CH11
0x27 CH12
0x28 CH13
0x29 CH14
0x2a CH15
0x2b CH16
0x2c SELECT
0x2d CALL
0x2e ENTER
0x2f (reserve)
0x30 (reserve)
0x31 (reserve)
0x32 (reserve)
0x33 (reserve)
0x34 (reserve)
50
Page 56

2-4-3. Matrix command
(OPcode=0x4D)
Appendix C: Serial Interface Specifications
Data1 Matrix function
0x00 Matrix monitor0 -ch01 spot
0x01 Matrix monitor0 -ch02 spot
0x02 Matrix monitor0 -ch03 spot
0x03 Matrix monitor0 -ch04 spot
0x04 Matrix monitor0 -ch05 spot
0x05 Matrix monitor0 -ch06 spot
0x06 Matrix monitor0 -ch07 spot
0x07 Matrix monitor0 -ch08 spot
0x08 Matrix monitor0 -ch09 spot
0x09 Matrix monitor0 -ch10 spot
0x0a Matrix monitor0 -ch11 spot
0x0b Matrix monitor0 -ch12 spot
0x0c Matrix monitor0 - ch13 spot
0x0d Matrix monitor0 -ch14 spot
0x0e Matrix monitor0 -ch15 spot
0x0f Matrix monitor0 - ch16 spot
0x10 Matrix monitor1 -ch01 spot
0x11 Matrix monitor1 -ch02 spot
0x12 Matrix monitor1 -ch03 spot
0x13 Matrix monitor1 -ch04 spot
0x14 Matrix monitor1 -ch05 spot
0x15 Matrix monitor1 -ch06 spot
0x16 Matrix monitor1 -ch07 spot
0x17 Matrix monitor1 -ch08 spot
0x18 Matrix monitor1 -ch09 spot
0x19 Matrix monitor1 -ch10 spot
0x1a Matrix monitor1 -ch11 spot
0x1b Matrix monitor1 -ch12 spot
0x1c Matrix monitor1 - ch13 spot
0x1d Matrix monitor1 -ch14 spot
0x1e Matrix monitor1 -ch15 spot
0x1f Matrix monitor1 - ch16 spoz
0x20 Matrix monitor2 - ch01 spot
Data1 Matrix function
0x21 Matrix monitor2 - ch02 spot
0x22 Matrix monitor2 - ch03 spot
0x23 Matrix monitor2 -ch04 spot
0x24 Matrix monitor2 - ch05 spot
0x25 Matrix monitor2 - ch06 spot
0x26 Matrix monitor2 -ch07 spot
0x27 Matrix monitor2 -ch08 spot
0x28 Matrix monitor2 - ch09 spot
0x29 Matrix monitor2 - ch10 spot
0x2a Matrix monitor2 - ch11 spot
0x2b Matrix monitor2 - ch12 spot
0x2c Matrix monitor2 - ch13 spot
0x2d Matrix monitor2 - ch14 spot
0x2e Matrix monitor2 - ch15 spot
0x2f Matrix monitor2 - ch16 spot
0x30 Matrix monitor3 - ch01 spot
0x31 Matrix monitor3 - ch02 spot
0x32 Matrix monitor3 - ch03 spot
0x33 Matrix monitor3 -ch04 spot
0x34 Matrix monitor3 - ch05 spot
0x35 Matrix monitor3 - ch06 spot
0x36 Matrix monitor3 - ch07 spot
0x37 Matrix monitor3 - ch08 spot
0x38 Matrix monitor3 - ch09 spot
0x39 Matrix monitor3 - ch10 spot
0x3a Matrix monitor3 - ch11 spot
0x3b Matrix monitor3 - ch12 spot
0x3c Matrix monitor3 - ch13 spot
0x3d Matrix monitor3 - ch14 spot
0x3e Matrix monitor3 - ch15 spot
0x3f Matrix monitor3 - ch16 spot
0x40 Matrix monitor4 - ch01 spot
0x41 Matrix monitor4 - ch02 spot
Data1 Matrix function
0x42 Matrix monitor4 - ch03 spot
0x43 Matrix monitor4 -ch04 spot
0x44 Matrix monitor4 - ch05 spot
0x45 Matrix monitor4 - ch06 spot
0x46 Matrix monitor4 - ch07 spot
0x47 Matrix monitor4 -ch08 spot
0x48 Matrix monitor4 - ch09 spot
0x49 Matrix monitor4 - ch10 spot
0x4a Matrix monitor4 - ch11 spot
0x4b Matrix monitor4 - ch12 spot
0x4c Matrix monitor4 - ch13 spot
0x4d Matrix monitor4 -ch14 spot
0x4e Matrix monitor4 -ch15 spot
0x4f Matrix monitor4 -ch16 spot
0x50 Matrix monitor0 - sequence
0x51 Matrix monitor1 - sequence
0x52 Matrix monitor2 - sequence
0x53 Matrix monitor3 - sequence
0x54 Matrix monitor4 - sequence
0x60 Matrix monitor0 - turn OSD on
0x61 Matrix monitor1 - turn OSD on
0x62 Matrix monitor2 - turn OSD on
0x63 Matrix monitor3 - turn OSD on
0x64 Matrix monitor4 - turn OSD on
0x70 Matrix monitor0 - turn OSD off
0x71 Matrix monitor1 - turn OSD off
0x72 Matrix monitor2 - turn OSD off
0x73 Matrix monitor3 - turn OSD off
0x74 Matrix monitor4 – turn OSD off
2-5. Checksum Byte
Checksum is computed as the sum of all previous butye (includeing the length byte), then mask with 0x7f.
51
Page 57

Appendix-D
Alarm I/O pin assignment
The alarm connector, Figure 1, is used to provide one sensor alarm input for each camera input.
For easy operation, an alarm extension board, Figure 2, is provided to connect to the alarm connector.
Each alarm input requires two wires, one wire connects to the desired alarm input pin, the second wire
connects to the ground.The alarm signal assignment is shown at the following.
1
2
13
25
<Figure 1>
D-SUB 25 pin female con nector (DVR)
DVR
PIN # NAME / Function
1 GND Ground
2 ALM 1 Alarm In 1
3 ALM 2 Alarm In 2
4 ALM 3 Alarm In 3
5 ALM 4 Alarm In 4
6 ALM 5 Alarm In 5
7 ALM 6 Alarm In 6
8 ALM 7 Alarm In 7
9 ALM 8 Alarm In 8
10 ALM 9 Alarm In 9
11 ALM 10* Alarm In 10
12 ALM 11* Alarm In 11
13 ALM 12* Alarm In 12
14 ALM 13* Alarm In 13
15 ALM 14* Alarm In 14
16 ALM 15* Alarm In 15
17 ALM 16* Alarm In 16
18 ALMRST Alarm Reset
19 REC Record In
20 GIN10 Reserved
21 DISKFULL Disk Full Out
22 GO1 Reserved
23 ALM-N.C Alarm Out N.C.
24 ALM-N.O Alarm Out N.C.
25 ALM-COM Alarm OUT COM
1 2 3 4 5 6 7 8 9 10 11 12 13 14
28 27 26 25 24 23 22 21 20 19 18 17 16 15
PR16D00400
<Figure 2>
PR16D00400 Alarm extension board
HOST
PIN # NAME
1GND
2ALM 1
3ALM 2
4ALM 3
5ALM 4
6ALM 5
7ALM 6
8GND
9ALM 7
10 ALM 8
11 ALM 9
12 ALM 10*
13 ALM 11*
14 ALM 12*
15 ALM 13*
16 ALM 14*
17 ALM 15*
18 ALM 16*
19 ALMRST
20 REC-IN
21 GND
22 SPARE-IN
23 DISKFULL
24 SPARE-OUT
25 ALM-N.C
26 ALM-N.O
27 ALM-COM
28 GND
* ALM10~ALM16 are active only for TP-S1016DR
52
 Loading...