

EverFocus PowerVideo Plus User Manual

PowerVideo Plus
EverFocus Central Management Software
for Networked Video Devices Management
User’s Manual
Copyright © EverFocus Electronics Corp.
Release Date: January, 2013

Copyright 2012 EverFocus Electronics Corp.
All rights reserved. No part of the contents of this manual may be reproduced or transmitted in
any form or by any means without written permission of the Everfocus Electronics Corporation.
EverFocus
12F, No.79, Sec. 1, Shin-Tai Wu Road,
Hsi-Chih, Taipei, Taiwan
TEL: +886 2 2698 2334
FAX: +886 2 2698 2380
www.everfocus.com.tw
January, 2013

i
Contents
Chapter 1 Introduction ................................................................................................... 1
1.1 System Requirements ..................................................................................... 1
1.2 Installation ...................................................................................................... 2
1.3 Activation ........................................................................................................ 2
Chapter 2 Getting Started ............................................................................................... 4
2.1 Accessing the PowerVideo Plus ...................................................................... 4
2.2 Main Screen .................................................................................................... 5
2.3 Adding an IP Device ........................................................................................ 6
2.4 Device List ....................................................................................................... 9
2.5 Configuring the User Account....................................................................... 12
Chapter 3 Live View ......................................................................................................14
3.1 Matrix View ................................................................................................... 15
3.2 Floating Matrix .............................................................................................. 17
3.2.1 Activating Multiple Monitors ......................................................... 17
3.2.2 Configuring the Floating Matrix ..................................................... 18
3.3 Digital Zoom .................................................................................................. 20
3.4 Default Stream Settings ................................................................................ 20
3.5 OSD Settings ................................................................................................. 21
Chapter 4 Recording ......................................................................................................22
4.1 Changing the Recording Path ....................................................................... 22
Chapter 5 Local Playback ...............................................................................................24
5.1 Remote Archive ............................................................................................ 25
5.2 Playing Back IP Camera Recordings ............................................................. 28
Chapter 6 Remote Playback ...........................................................................................29
Chapter 7 Dynamic E-Maps ...........................................................................................30
7.1 Activating the Dynamic E-Maps ................................................................... 31
7.2 Creating a Group .......................................................................................... 31
7.3 Configuring the Dynamic E-Maps ................................................................ 32
Chapter 8 Recording Schedule (IP Camera) ....................................................................36
Chapter 9 Archiving Schedule (DVR) ..............................................................................38
9.1 Changing the Recording Path of the Auto Archiving Server ........................ 40

ii
Chapter 10 Alarm Settings .............................................................................................41
10.1 Activating the Alarm Function ................................................................... 42
10.2 Configuring the Notification Settings ........................................................ 45
10.2.1 Motion Detection ........................................................................................ 45
10.2.2 Alarm Input ................................................................................................... 47
10.2.3 Video Loss ..................................................................................................... 49
10.2.4 Fan Failure / HD Temperature / HD Full / HD Off .............................. 51
10.2.5 E-Mail Server Settings ................................................................................ 53
10.3 Enabling the Alarm Function on the Main Screen ..................................... 54
Chapter 11 PTZ Control .................................................................................................55
11.1 PTZ Control................................................................................................. 55
11.2 Auto Pan ..................................................................................................... 58
11.3 Set Preset ................................................................................................... 60
11.4 Set Pattern ................................................................................................. 61
11.5 Set Tour ...................................................................................................... 62
11.6 Auto Mode Settings ................................................................................... 64
Chapter 12 GPS Tracking ................................................................................................66
12.1 Activating GPS Tracking Function .............................................................. 67
12.2 Playing Back GPS Tracks ............................................................................. 69
12.3 Configuring the GPS Fences ....................................................................... 70
Chapter 13 Backup Utility ..............................................................................................71
Chapter 14 Bandwidth Monitor .....................................................................................73
Chapter 15 Other Functions ..........................................................................................74
15.1 Applying DVR Settings to Multiple DVRs ................................................... 74
15.2 Temporarily Disconnecting (Mobile) DVR Live Streams ............................ 75

PowerVideo Plus
1
Chapter 1 Introduction
The PowerVideo Plus is a central management system (CMS) that allows you to remotely
manage EverFocus’ DVR, Mobile DVR, NVR and IP cameras connected on the LAN or WAN.
Supported Models:
All EverFocus branded products (few products are still in the integration process).
Key Features:
• Simultaneously access any combination of IP, analog and mobile devices
• Up to 10 pages of 8 x 8 Live View Matrix screens with automatic timer based page
flipping (see 3.1 Matrix View)
• Supports unlimited number of monitors up to Microsoft Windows minimum limit (see 3.2
Floating Matrix)
• Manual, scheduled and event based recording
• Supports multiple recording folders and round-robin over-write schema
• PTZ controls and digital zooming
• Bandwidth monitor
• Time / Event / Smart search
• User access management
• GPS tracking
• Dynamic E-Maps
1.1 System Requirements
Minimum Recommended
OS (32 / 64-bit) Windows XP (Service Pack 3) Windows 7
CPU Intel Core 2 Duo Intel Core i3 or later
RAM 2 GB 4 GB
Graphic Card Intel onboard graphic cards
AMD / NVIDIA DirectX 10 compliant
graphic cards
Ethernet 10 / 100 Base-T Ethernet 1000 Base-T Ethernet
Hard Disk
50 MB for program install
500 GB or more recommended for video storage

PowerVideo Plus
2
1.2 Installation
You have to download the PowerVideo Plus software and then install it in your computer. To
download the PowerVideo Plus software, go to EverFocus’s website (www.everfocus.com.tw)
and follow the steps below.
1. Click Download, select Software and then click PowerVideo Plus.
2. Extract the zip file to your computer.
3. Double-click Setup.exe, and follow the on-screen instructions.
1.3 Activation
The PowerVideo CMS software comes with three versions: Free, Basic and Plus. The Basic
and Plus versions are licensed and require the users to register using a valid key. The table
below shows the supported functions of each PowerVideo version.
Versions and Respective Functions of the PowerVideo
Version MAC
Addresses
DVR Live
View
DVR Auto
Archive
IP Live
View
IP Record Floating
Matrix
Google
E-Map
Device FW
Upgrade
Free 64 No 8 No 1 No No
Basic 3 Unlimited Yes 32 Yes 3 No Ye s
Plus 3 Unlimited Yes Unlimited Yes Unlimited Yes Yes
Please be noted that on the expiration date, the PowerVideo software reverts back to Free
version spec. Each license can activate up to 3 computers, users can deactivate and transfer
the license to another computer. Existing Basic version users can upgrade to Plus version and
get a credit for the remaining months left in Basic version.
PowerVideo Plus
3
To activate the license:
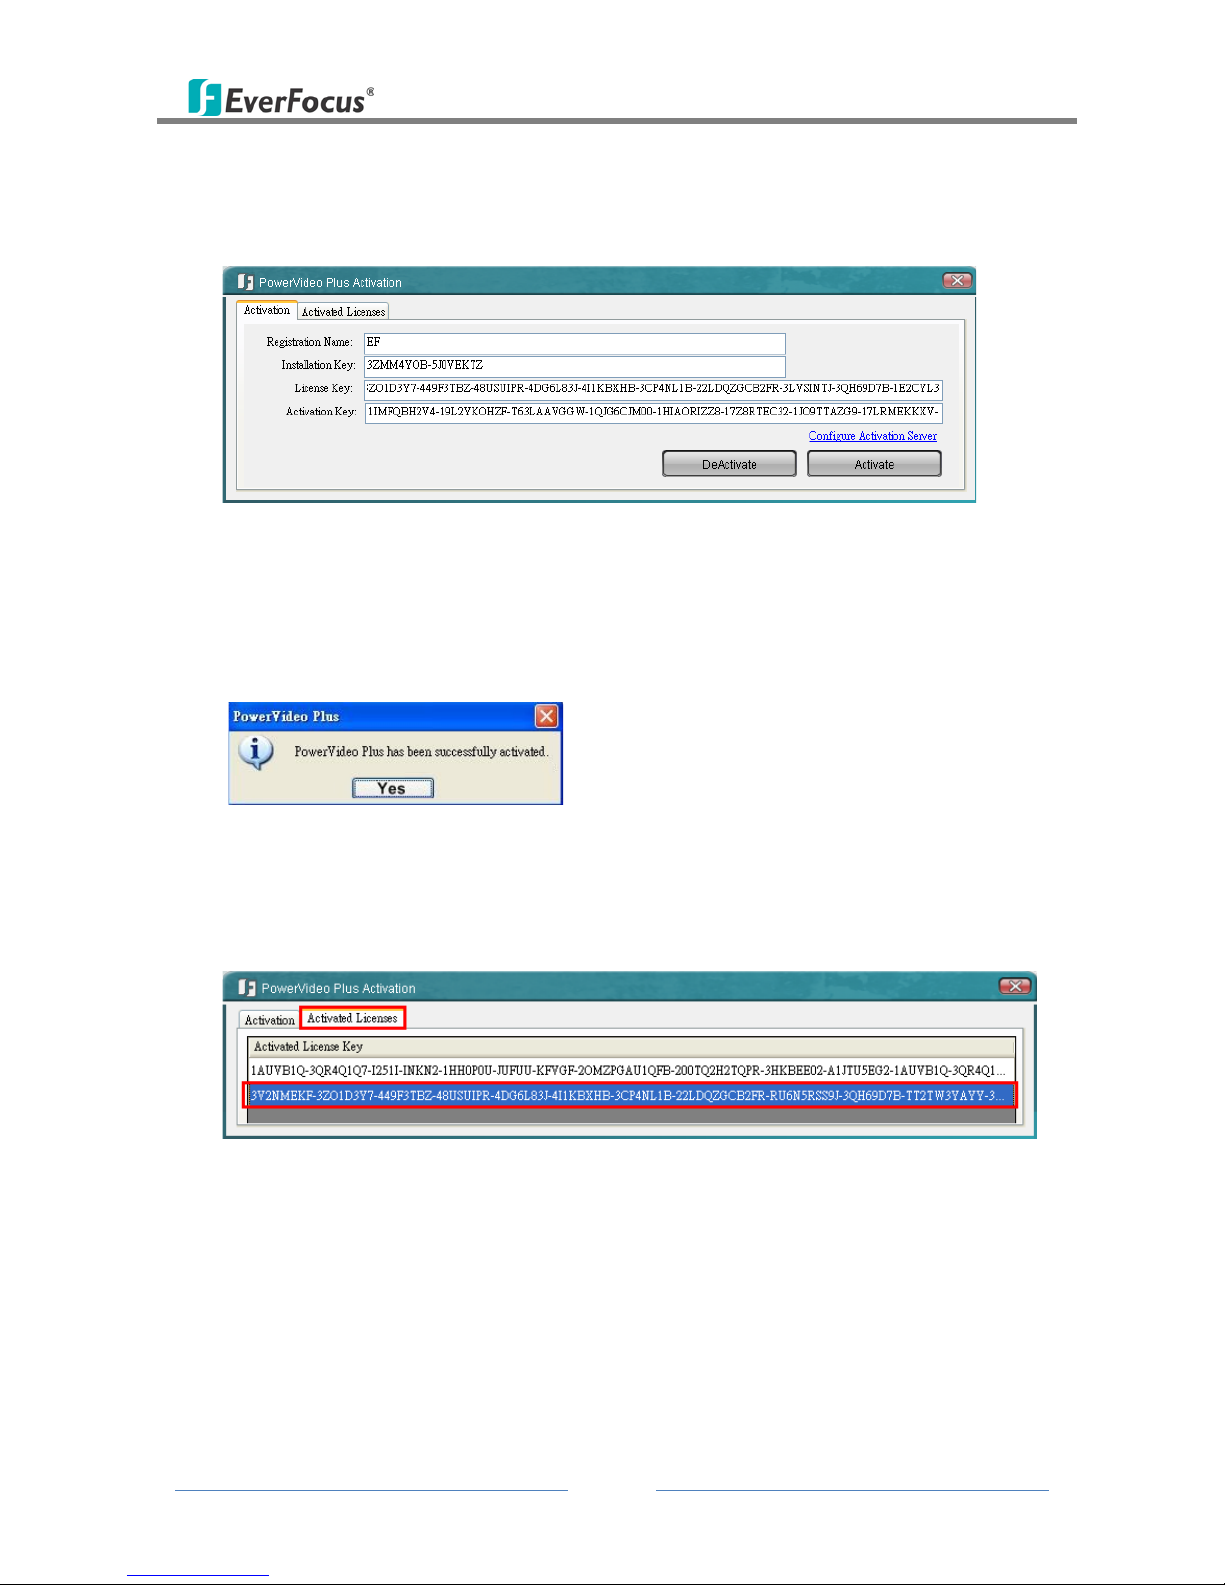
1. On the Main Screen, click About and click License Activation. The following window
appears.
Figure 1-1
2. Type a name in the Registration Name field. Copy your license key and paste it in the
License Key field.
3. Click the Activate button, the PowerVideo software will automatically display the
Activation Key in the Activation Key field. And the below message pops up.
Figure 1-2
4. Click Yes to exit and then restart the PowerVideo software.
5. In Figure 1-1, click the Activated Licenses tab, you will see the added License Key listed in
the Activated License Key field.
Figure 1-3
6. If you want to deactivate the current license key, in Figure 1-1, enter the license key in
the License Key field and then click the Deactivate button.
PowerVideo Plus
4
Chapter 2 Getting Started
2.1 Accessing the PowerVideo Plus
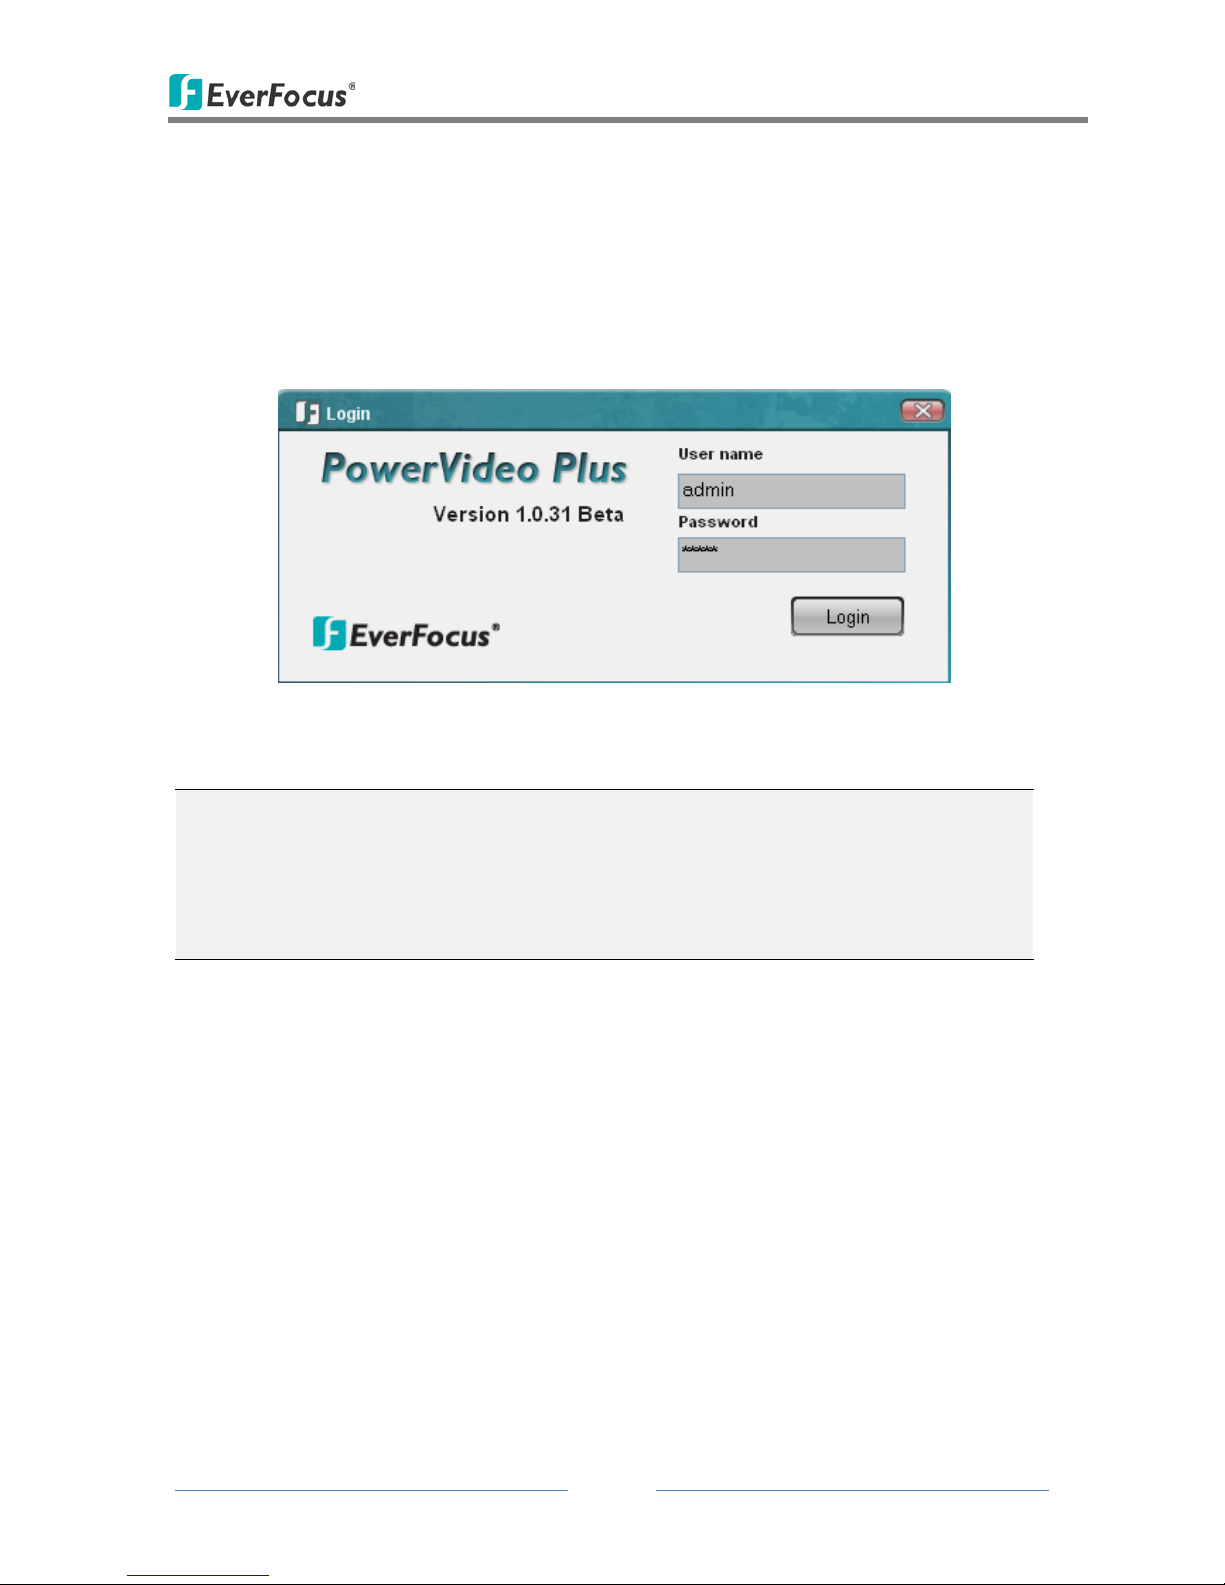
Start the PowerVideo Plus software, the following login dialog box appears. Please type your
user name, password and then click the Login button to enter the system. The default user
name and password are admin.
Figure 2-1
Note:
1. To change the language of the user interface, click Option (No.7, Figure 2-2) and click
Select Language.
2. To change the username or password, click Option (No.7, Figure 2-2) and select User
Management. See 2.4 Configuring the User Account.

PowerVideo Plus
5
2.2 Main Screen
1
2
3
4
5
6
7
8
10
11
9
Figure 2-2
The controls on the Main Screen:
No. Name Description
1 Application Click to log out or exit the system.
2 Live View
Click to modify the display of the Live View Matrixes. By default,
the live view matrix is in single camera view. See 3.1 Matrix
View.
3 Devices
Includes the functions related to Device Management, Remote
Archive, Playback, Snapshot List Search and PTZ Control.
4 GPS Click to start GPS tracking or playing back GPS data.
5 Report Click to print out the alarm report.
6 Dynamic E-Maps
Click to start the Dynamic E-Maps function. See Chapter 7.
Dynamic E-Maps.
7 Option
Click to set up the Storage Path, Recording Schedule, Archiving
Schedule, User’s Privileges Management, and the Language of
the user interface. You may also start the Alarm Server, Event
Action Server, Auto Archive Schedule Server, Record Schedule
Server, Backup Utility and Bandwidth Monitor.
8 About
Click to view the version of the PowerVideo Plus and its list of
supported devices.
9 Full Screen Icon Click to view / exit full screen.
10 Device List
Displays the list of connected IP devices. You can also Group the
connected IP Devices. See 2.4 Device List.
11 Display Window Displays the live view matrix.
PowerVideo Plus
6
2.3 Adding an IP Device
You need to add a DVR, Mobile DVR, NVR or an IP camera before start using the device
related features. You can automatically search for EverFocus’ devices on the network and
then add them to the Device List or add EverFocus’ devices manually.
To automatically search for EverFocus’ devices on the network:
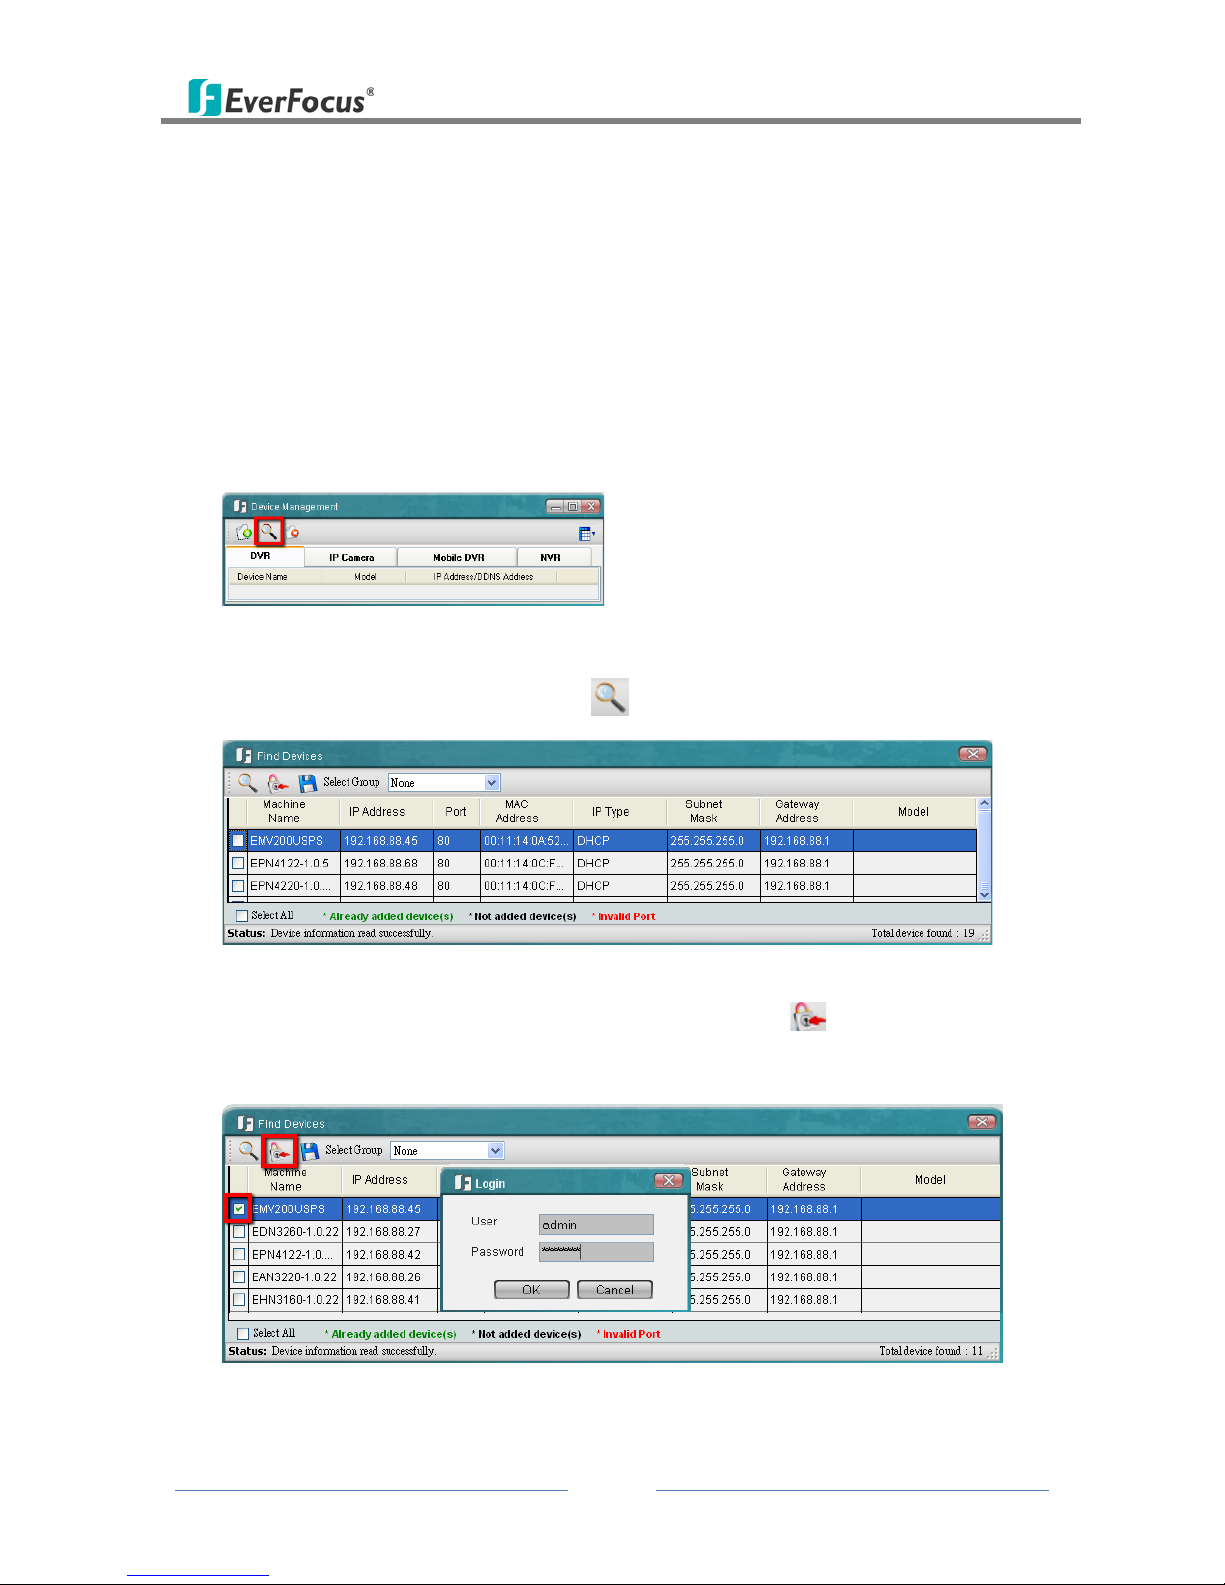
1. Click the Devices button (No.3, Figure 2-2) and click Device Management. The following
dialog box appears.
Figure 2-3
2. Click the Auto Discover Devices button . The connected devices will be listed.
Figure 2-4
3. Check a box to select a desired device. Click the Login button and click OK to
login to the device. The system will detect the selected device automatically.
Figure 2-5

PowerVideo Plus
7
Note:
1. You can login to multiple devices having the same User / Password combination at
the same time by selecting multiple devices.
2. Currently the NVR devices can only be added manually.
4. Type a meaningful name in the Machine Name field to help you identify the device and
then click to save the settings.
Once all of your devices are added, click to close the Find Devices window. The
device list should now contain the list of the devices just added.
To manually add an EverFocus’ device:
1. Click the Add Device Wizard button in Figure 2-3. The following dialog box appears.
Figure 2-6
2. Type the Device Name, IP Address, User Name and the Password of the IP device. Modify
the default port if necessary.
3. Select the device type of the IP device from the Device Type drop-down list.
4. Optionally select a Group from the Select Group drop-down list to apply the device to the
selected group. To use this function, you have to edit a group first (see 2.4 Device List).
PowerVideo Plus
8
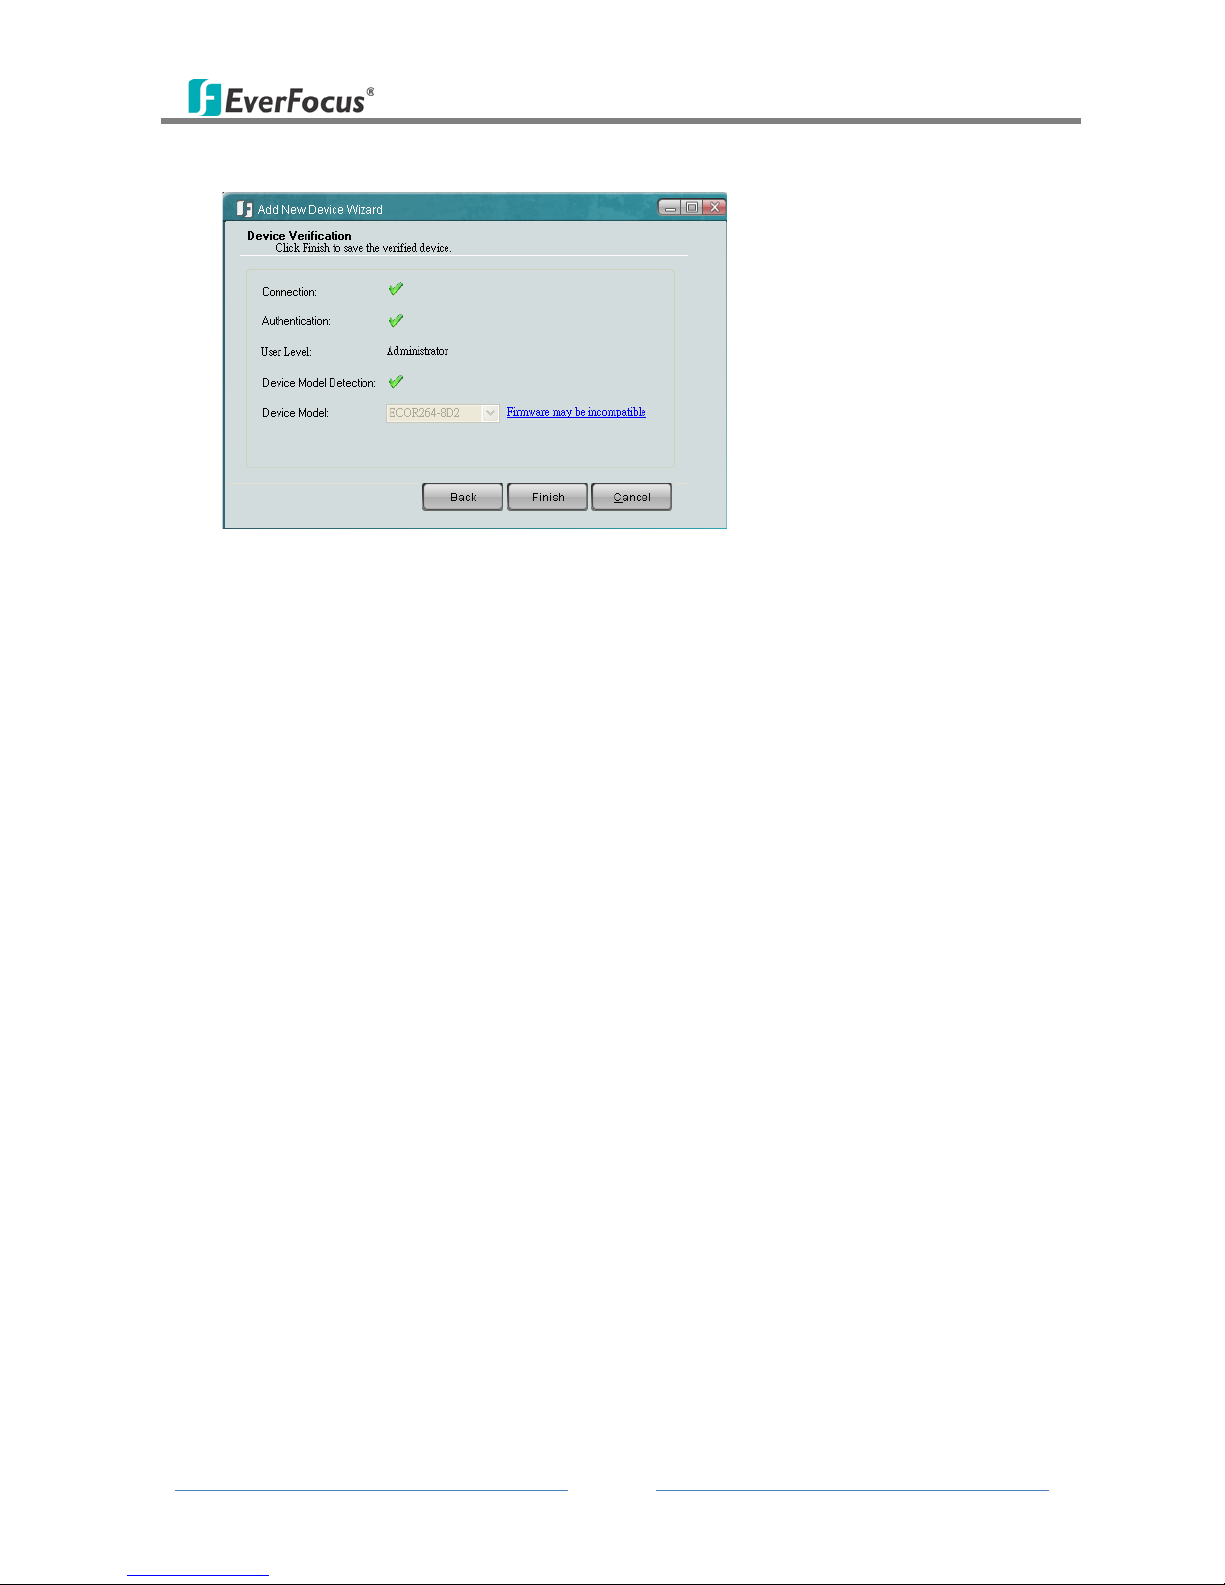
5. Click Next. The wizard will verify the IP device automatically. Click Finish.
Figure 2-7
PowerVideo Plus
9
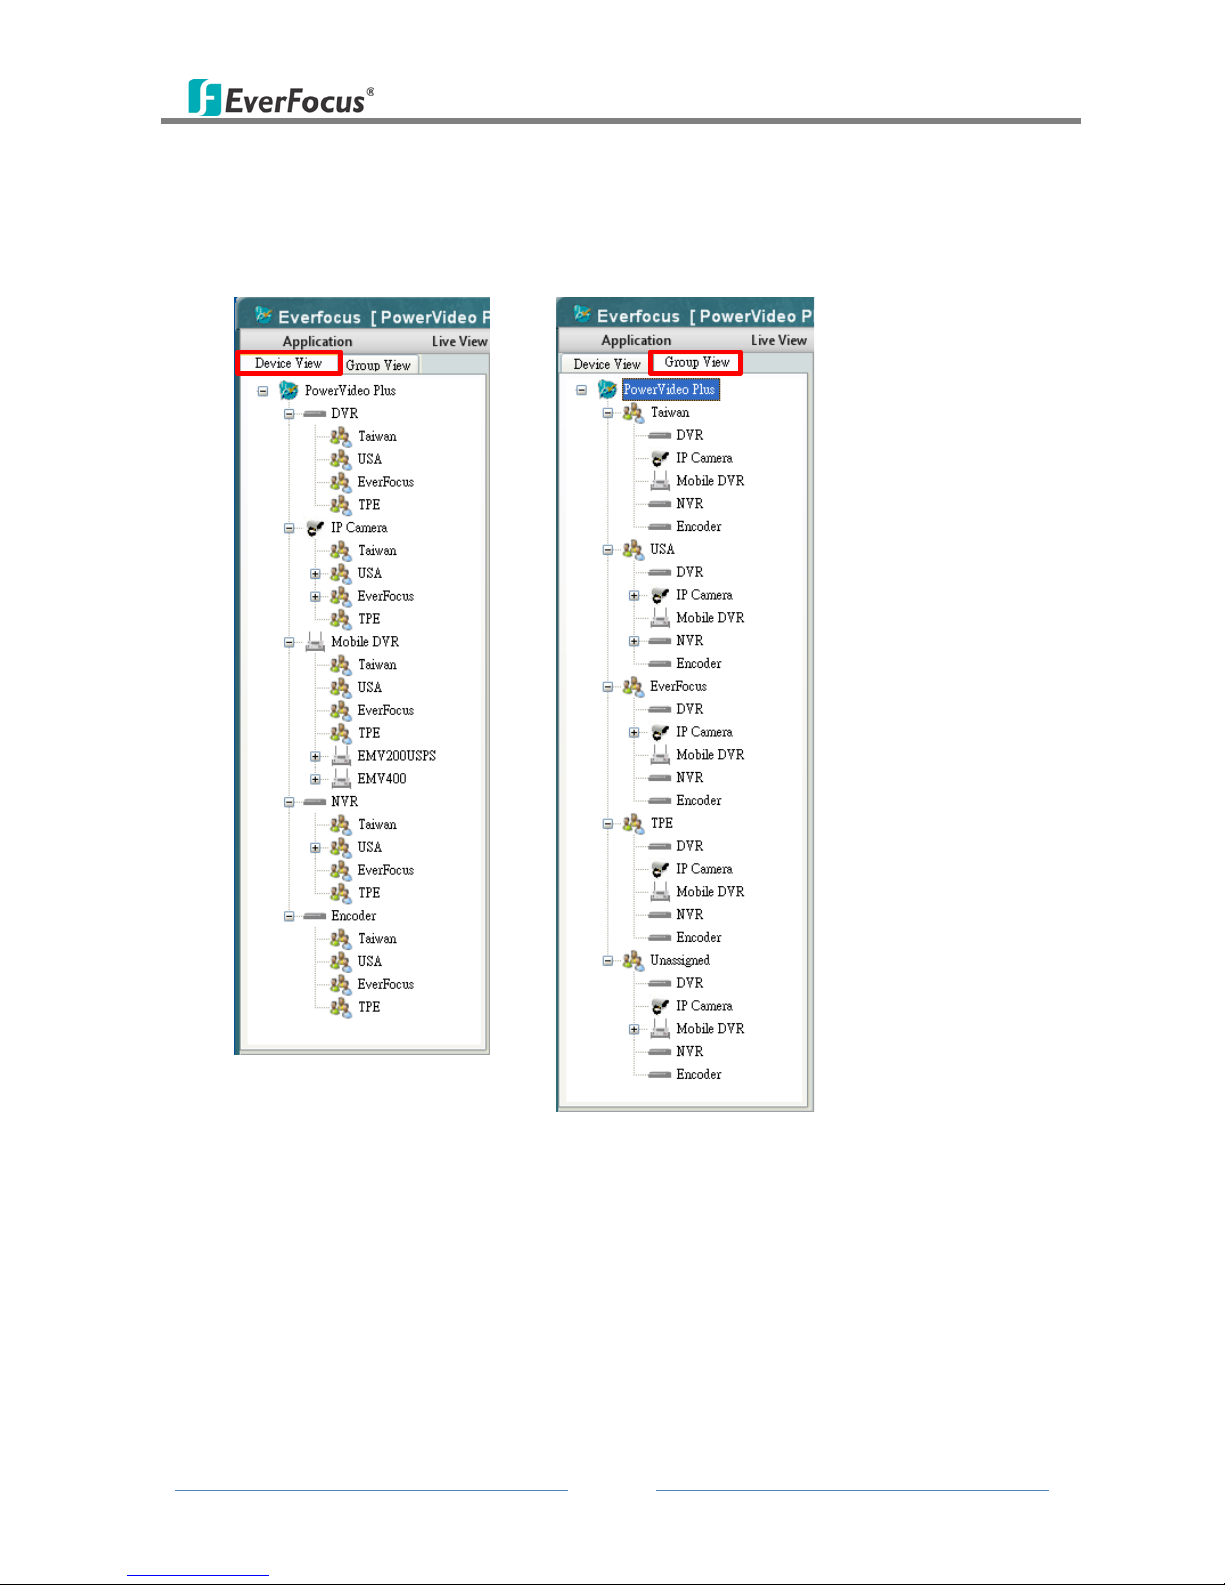
2.4 Device List
The connected IP devices will be listed in the Device List. You can optionally display the
added devices in Device View or Group View.
Device View
Group View
Figure 2-8
PowerVideo Plus
10
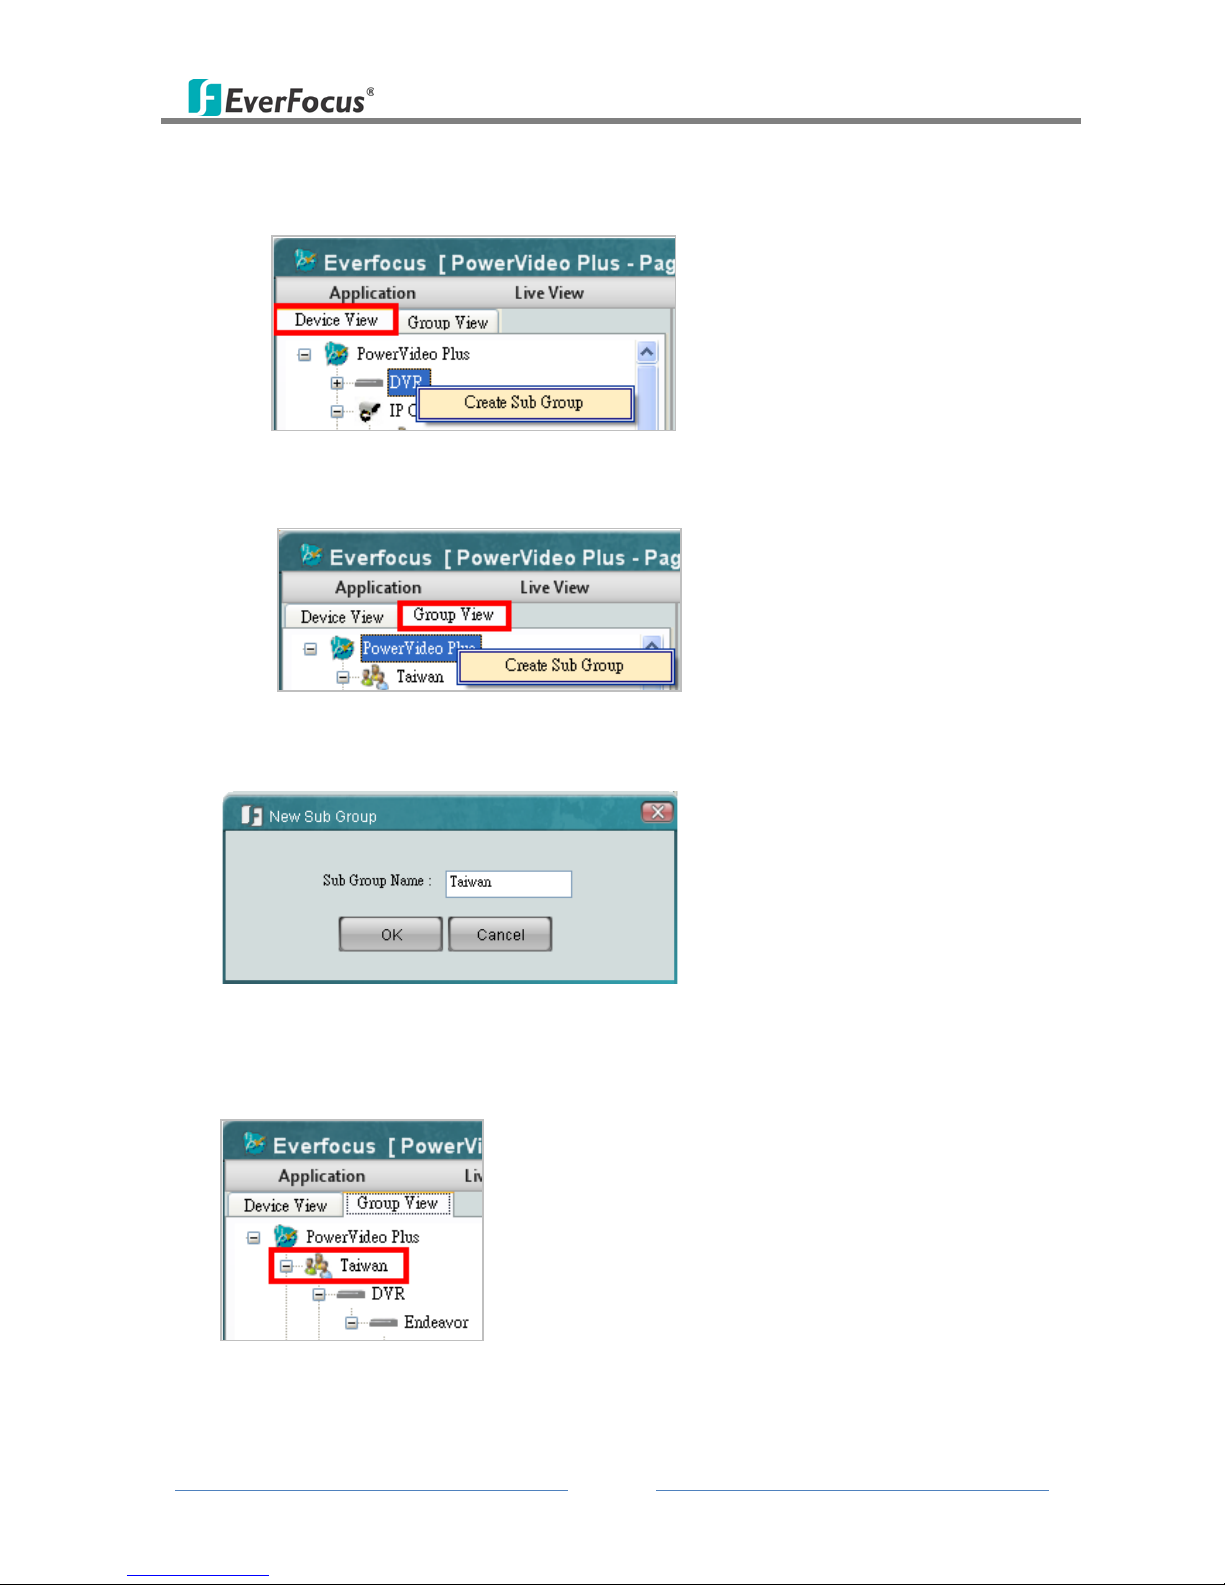
1. To add a Group:
• In the Device View List: Right-click an IP Device and click Create Sub Group.
Figure 2-9
• In the Group View List: Right-click PowerVideo Plus and click Create Sub Group.
Figure 2-10
2. After clicking Create Sub Group, the following window appears.
Figure 2-11
3. Type a meaningful name in the Sub Group Name field and click OK. The group name will
be listed.
Figure 2-12
PowerVideo Plus
11
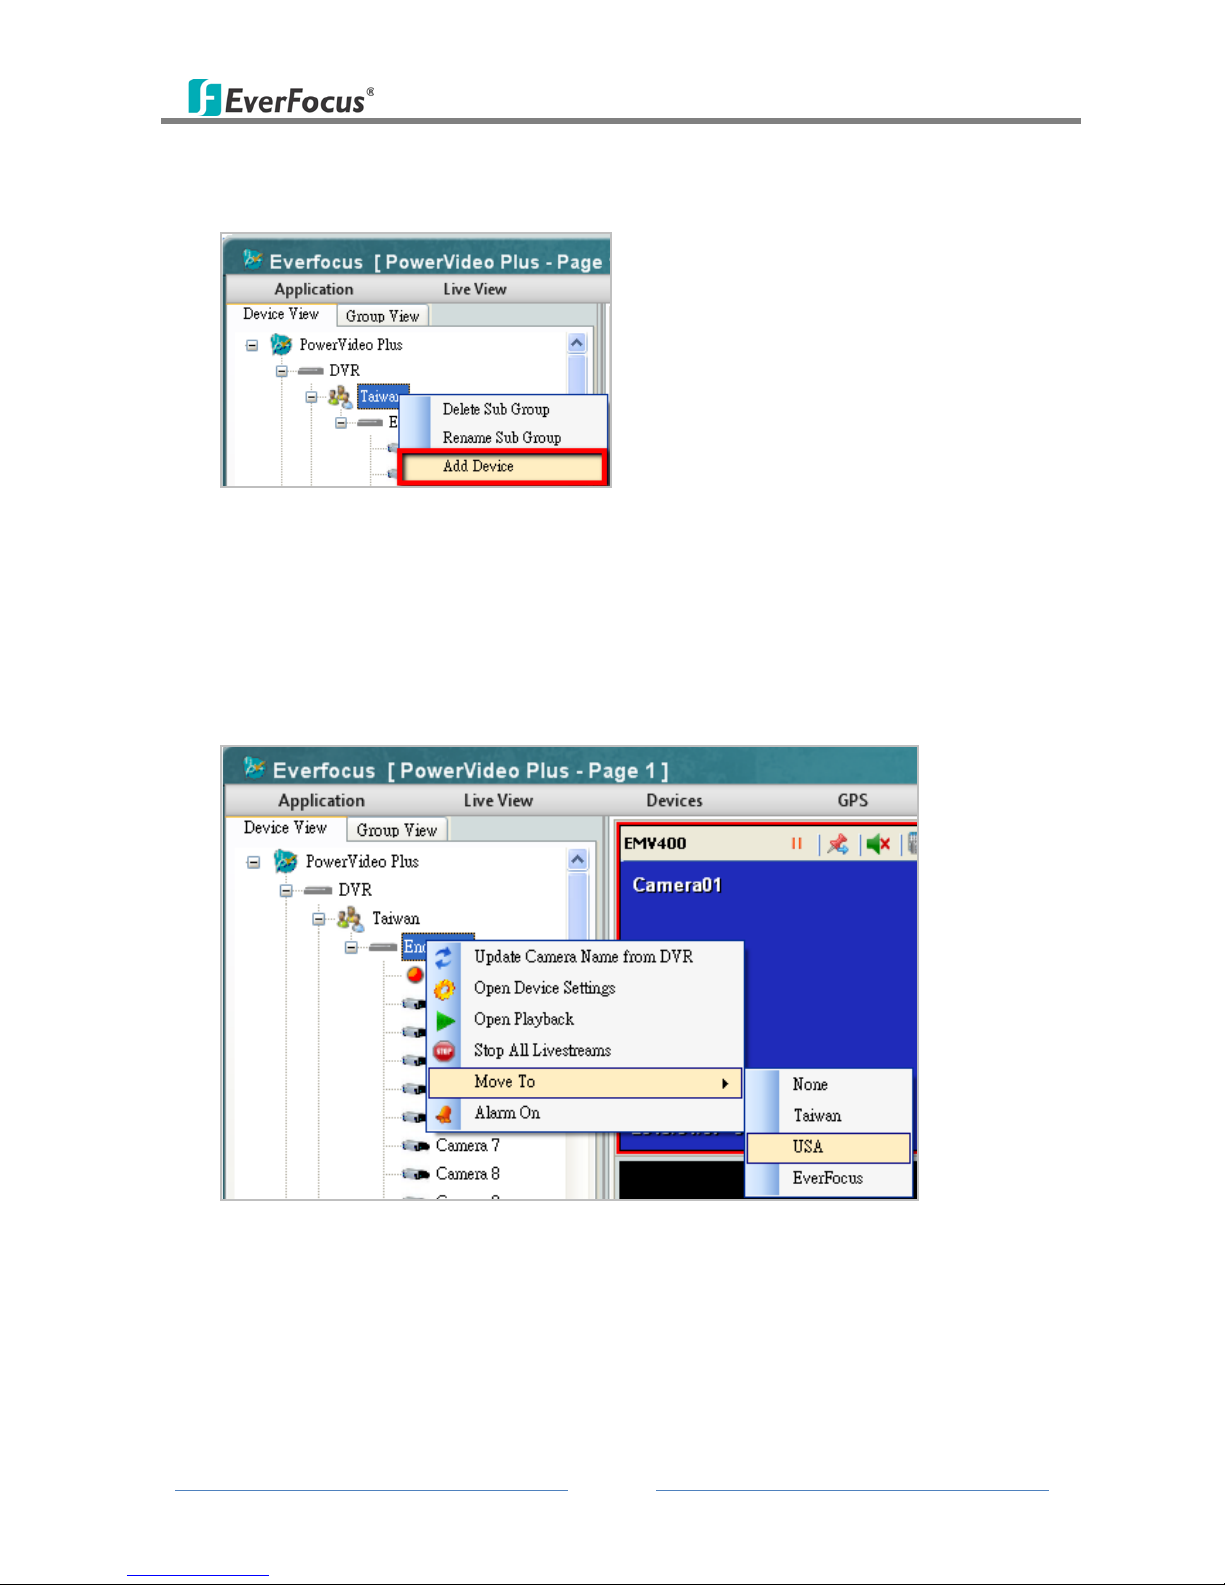
4. To add IP devices to the created Sub Group, right-click the created Sub Group and click
Add Device, the Add Device Wizard appears (Figure 2-5).
Figure 2-13
5. To delete or rename an added Sub Group, click Delete Sub Group / Rename Sub Group in
the above image.
6. Follow Step 1 to Step 4 to optionally add multiple groups.
7. To move an IP advice from one group to another, right-click an IP device, click Move To
and then select a Sub Group.
Figure 2-14

PowerVideo Plus
12
2.5 Configuring the User Account
You can create multiple user accounts with different privileges. Click Option (No.7, Figure 2-2)
and select User Management. The User Privileges dialog box appears.
Figure 2-15
1. To create a group, click the Groups tab and click the Add New Group button .
2. Type a name for the new group and select the privileges for the new group.
3. Click the Save Group button to save the settings.
4. To create a new user, click the Users tab and click the Add New User button .
5. Select the Group the user belongs to and enter the User name and the password in the
Password and Confirm Password fields.
6. Click the Save User button to save the settings.

PowerVideo Plus
13
To change the password:
1. Click the Users tab, select a group and then type the user name and password.
2. Type a new password in the Password and Confirm Password fields.
3. Click the Save User button to save the settings.
To block specific cameras from a Group:
1. Click the Device Privilege tab, select a group and select a device. The related cameras will
be displayed in the Allowed list.
2. Select a camera and use the buttons to add / remove the camera to the Blocked list.
3. Click the Save button to save the settings.
Figure 2-16
PowerVideo Plus
14
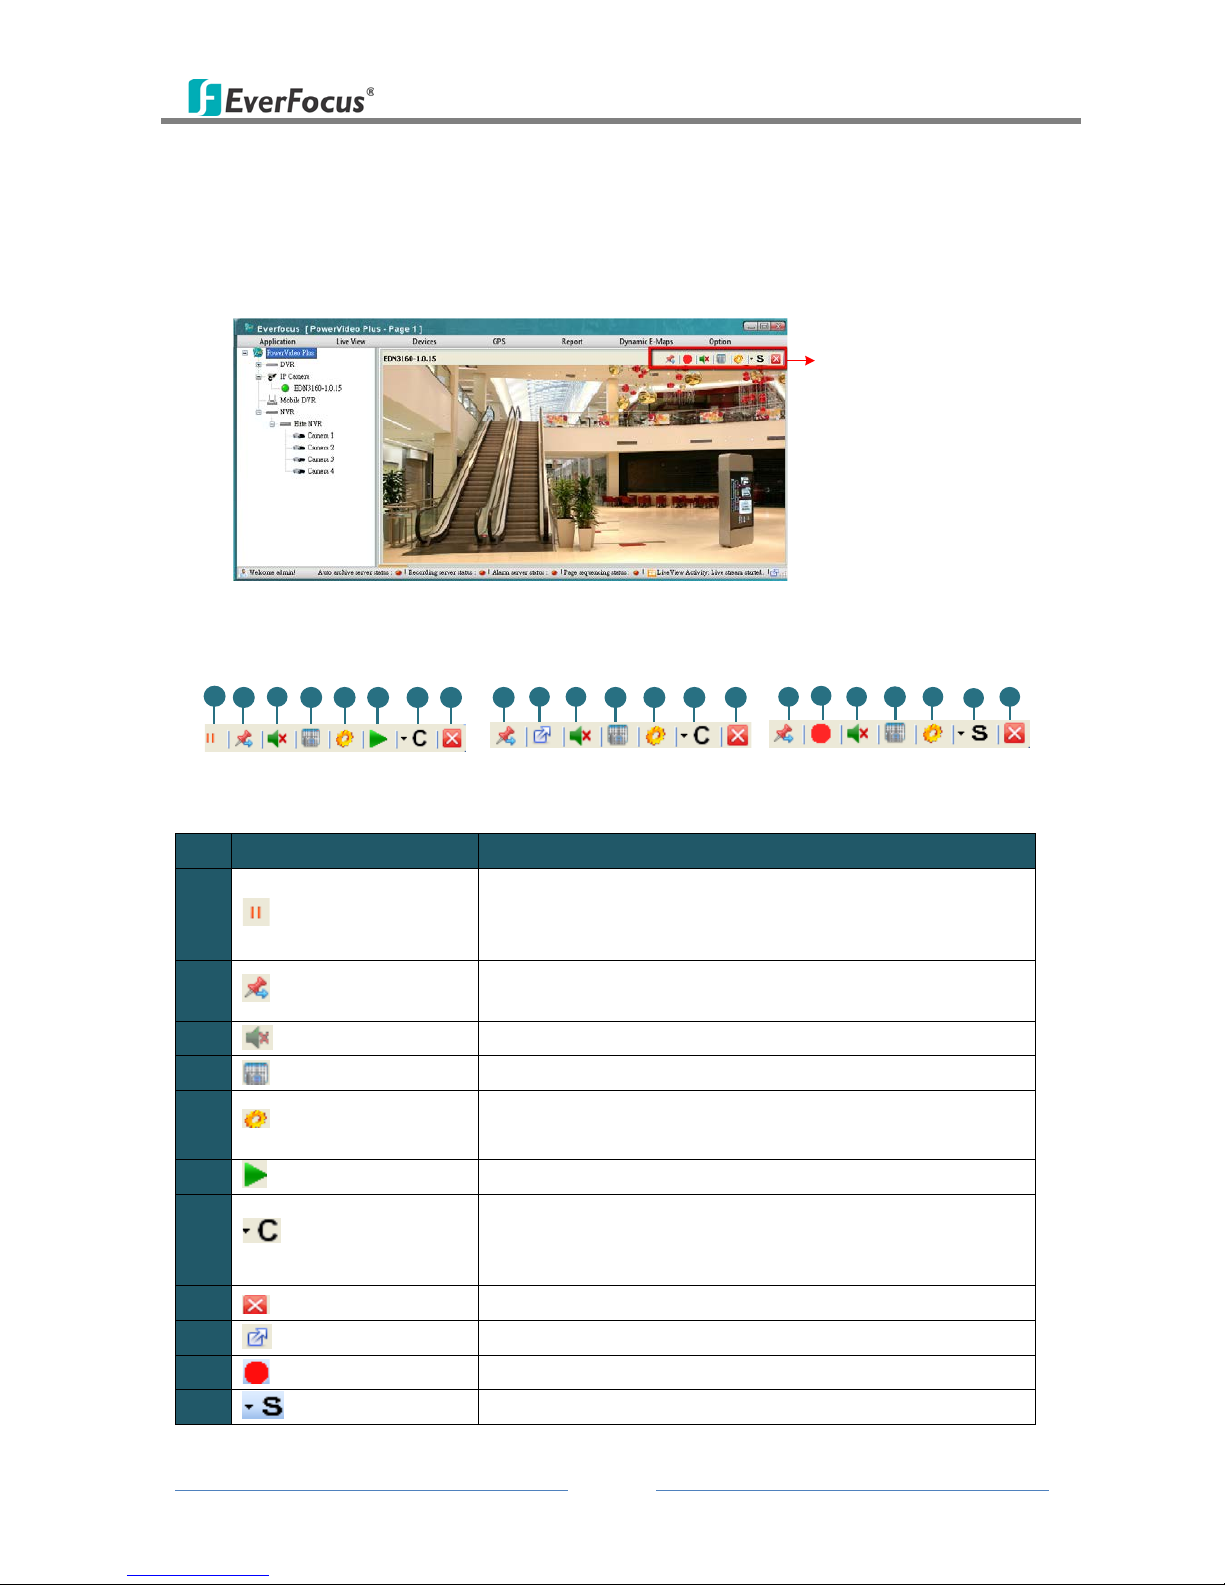
Chapter 3 Live View
You can manage the live video on the display window. Drag a camera from the Device List
and drop it on the display window. Right-click the Live View window, the tool bar appears on
the upper right corner.
Live View Tool Bar
Figure 3-1
The Live View Tool Bar
2 8
Tool Bar on IP camera
Tool Bar on NVR
2 4 5 6 7 8
Tool Bar on DVR / Mobile DVR
11
3
39
2 4 5 7 8
4
3
1
5
10
Figure 3-2
No. Name Description
1 Pause
Click to temporarily disconnect the live stream. Please
refer to 15.2 Temporarily Disconnecting (Mobile) DVR Live
Streams.
2 Unpin
Unpin the live view from the Display Window. Click the
button again to pin back.
3 Audio
Click to enable / disable the audio function.
4 Take a Snapshot Click to take a snapshot to print out.
5
Configure Settings
Click to access the Web interface of the IP device for
configuration.
6 Quick Playback Play back the videos from the predefined interval.
7 Channel
Channels: Switch between channels from the DVR.
Sub-stream: Click to enable / disable sub-stream. By
default, the live view is displayed in sub-stream.
8 Close Stream Click to close the live view window.
9 Full Screen Click to display the live view in full screen.
10 Start Record Click to start / stop recording (IP camera only).
11 Stream Select a stream to display the live view (IP camera only).
PowerVideo Plus
15
3.1 Matrix View
The Matrix View allows you to monitor up to 64 cameras from EverFocus’ DVR, Mobile DVR,
NVR or IP cameras on the same screen. You can edit up to 10 pages of Matrix View in
different matrix sizes.
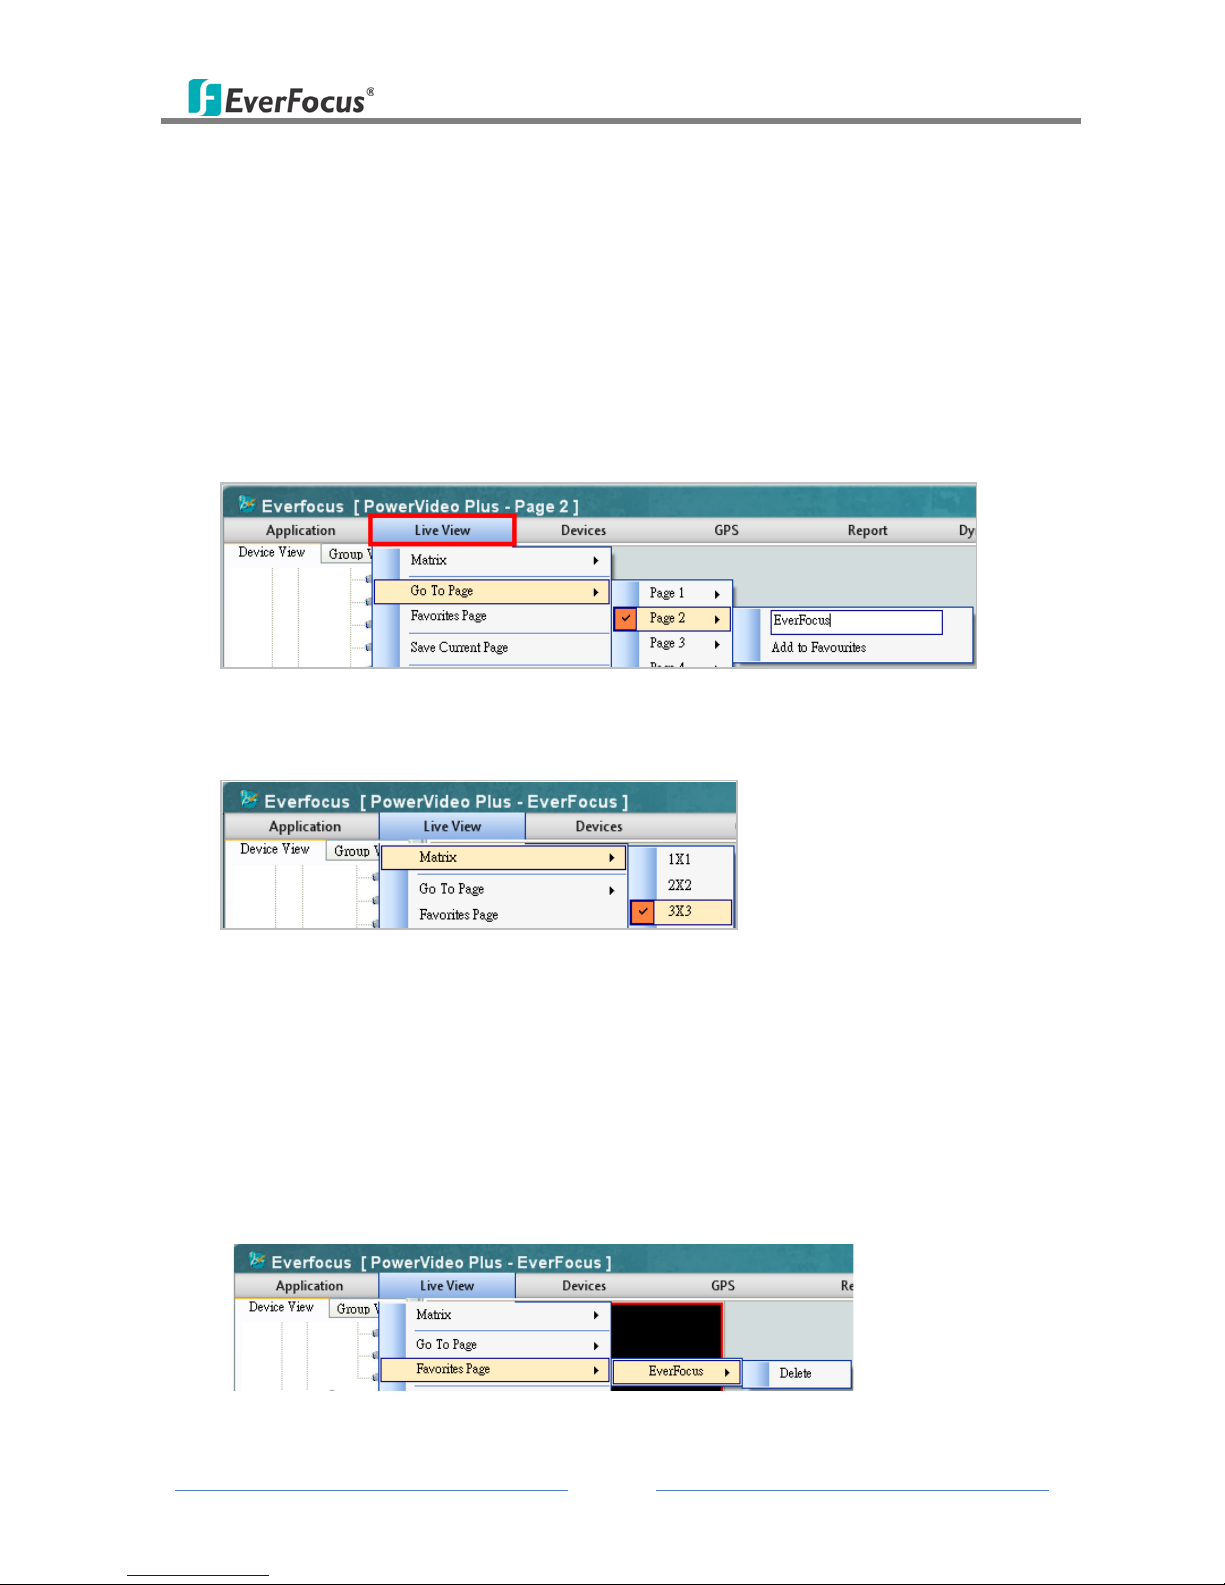
1. On the Main Screen, click Live View, click Go To Page and select a page and then click to
check the selected page. You can optionally edit the name of this page by typing in the
name in the column above Add to Favorites.
Figure 3-3
2. Click Live View, click Matrix and click (check) a matrix size.
Figure 3-4
3. Drag and drop the cameras from the Device List to the desired squares on the Display
Win dow.
4. Click Live View and click Save Current Page to save the settings.
5. Repeat Step 1 to Step 4 to edit another page.
6. To add a certain page to the Favorites Page, on Figure 3-3, select Add to Favorites. The
page will be added to the Favorites Page.
Figure 3-5
PowerVideo Plus
16
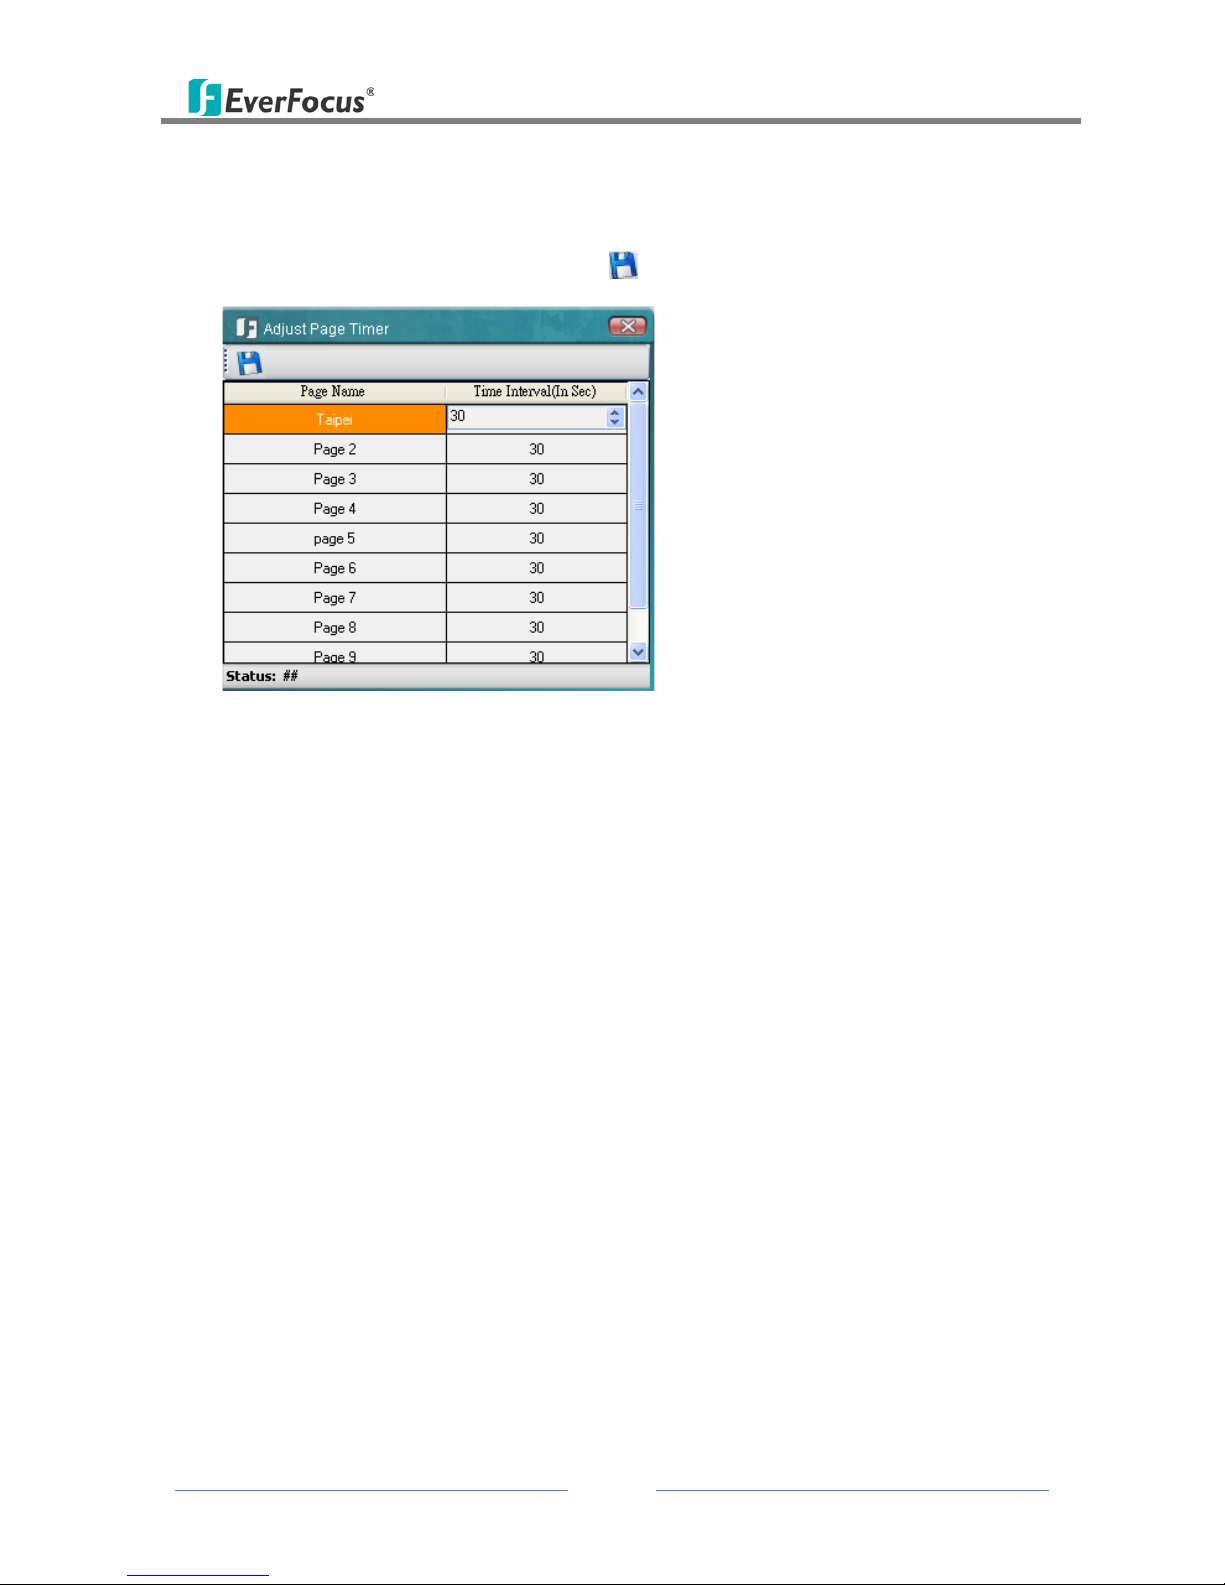
7. To edit the name or the interval time of a page in order to activate the Sequencing
function, click Live View and click Adjust Page Timer. Click on the page name to type a
name or click on the time interval to set up an interval in second. The minimum interval
is 30 seconds. Click the Save Page button to save the settings.
Figure 3-6
To use the Sequencing function, on the Main Screen, click Live View and click Enable
Sequencing. The edited Matrix View pages will be displayed in sequence based on the time
interval.

PowerVideo Plus
17
3.2 Floating Matrix
You can use the Floating Matrix function to create more screen space to display multiple
channels on multiple monitors. The number of monitor is unlimited up to Microsoft
Windows minimum limit. This function is useful for TV wall control.
Figure 3-7
3.2.1 Activating Multiple Monitors
Use Windows Display Properties to activate multiple monitors. Here we use Windows XP for
example to illustrate the steps.
1. Right-click the desktop, click Properties and click the Settings tab. The Display Properties
dialog box appears.
Figure 3-8

PowerVideo Plus
18
2. Click the Display list. If you do not see multiple monitors listed, check if your additional
monitors are connected with the computer properly.
3. Select the primary monitor from the list, and select Use This Device as the Primary
Monitor.
4. Select additional monitors from the list, and select Extend my Windows desktop onto
this monitor for each monitor.
5. Click Identify. Windows XP displays a large number to identify your monitors. Drag and
drop the monitor icons to match the physical arrangement of your monitors.
6. Click OK.
3.2.2 Configuring the Floating Matrix
You can set up multiple Floating Matrix windows to display the matrix live view on additional
monitors. Each Floating Matrix window can be set up with up to 64 channels from Everfocus’
supported IP devices. You can edit up to 10 pages of Matrix View in different matrix sizes for
each Floating Matrix window.
Figure 3-9
PowerVideo Plus
19
1. On the Main Screen, click Live View, click Floating Matrix Window and click Add New
Floating Window. The above window appears.
2. Type a name for the Floating Matrix window in the name field .
3. Click to select a page.
4. Click to select a matrix size for the selected page.
5. Drag and drop the cameras from the Device List on the Main Screen to the desired
squares on the Floating Matrix Window.
6. Click to save the current page.
7. Repeat Step 3 to Step 6 to edit another page.
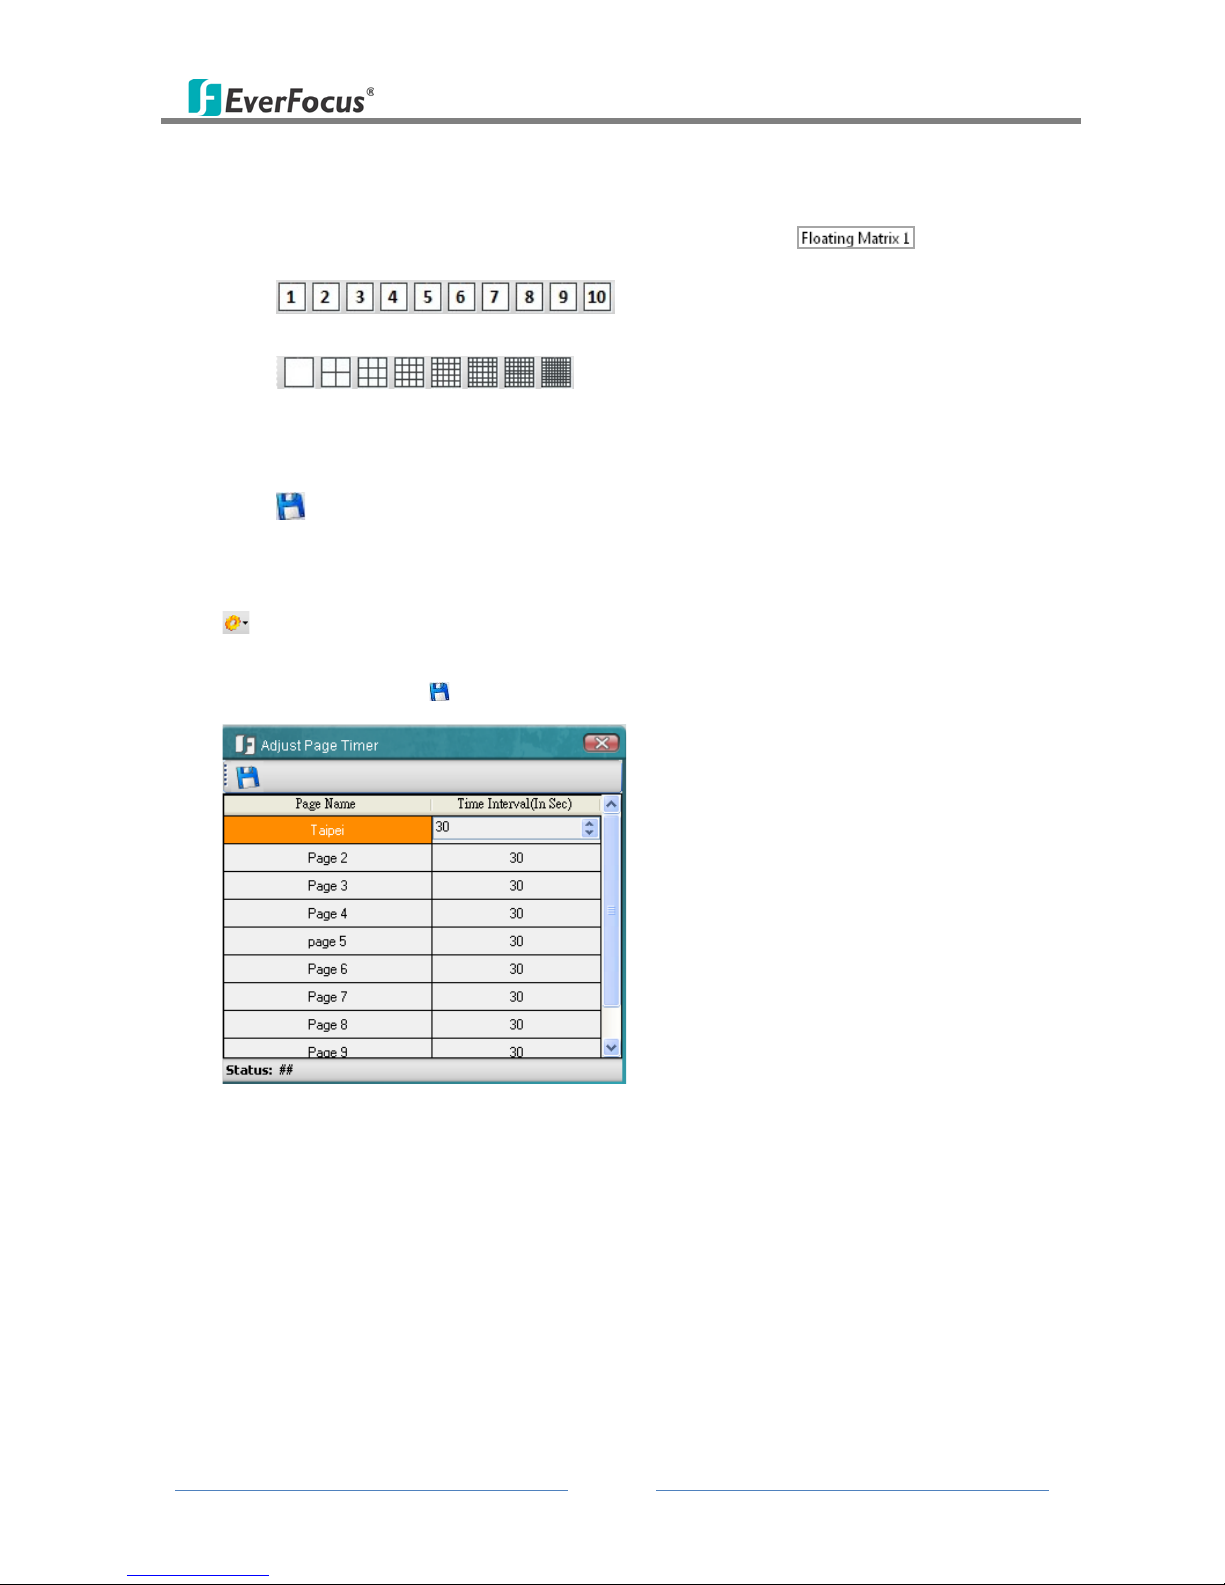
8. To edit the interval time of a page for the Sequencing function, click the Settings button
and select Adjust Page Timer. Click on the page name to type a name or click on the
time interval to set up an interval in second. The minimum interval is 30 seconds. Click
the Save Page button to save the settings.
Figure 3-10
To use the Sequencing function, click the Settings button and click Enable Sequencing.
The edited Matrix View pages will be displayed in sequence based on the time interval.
9. Drag and drop the Floating Matrix on the desired Monitor.
PowerVideo Plus
20
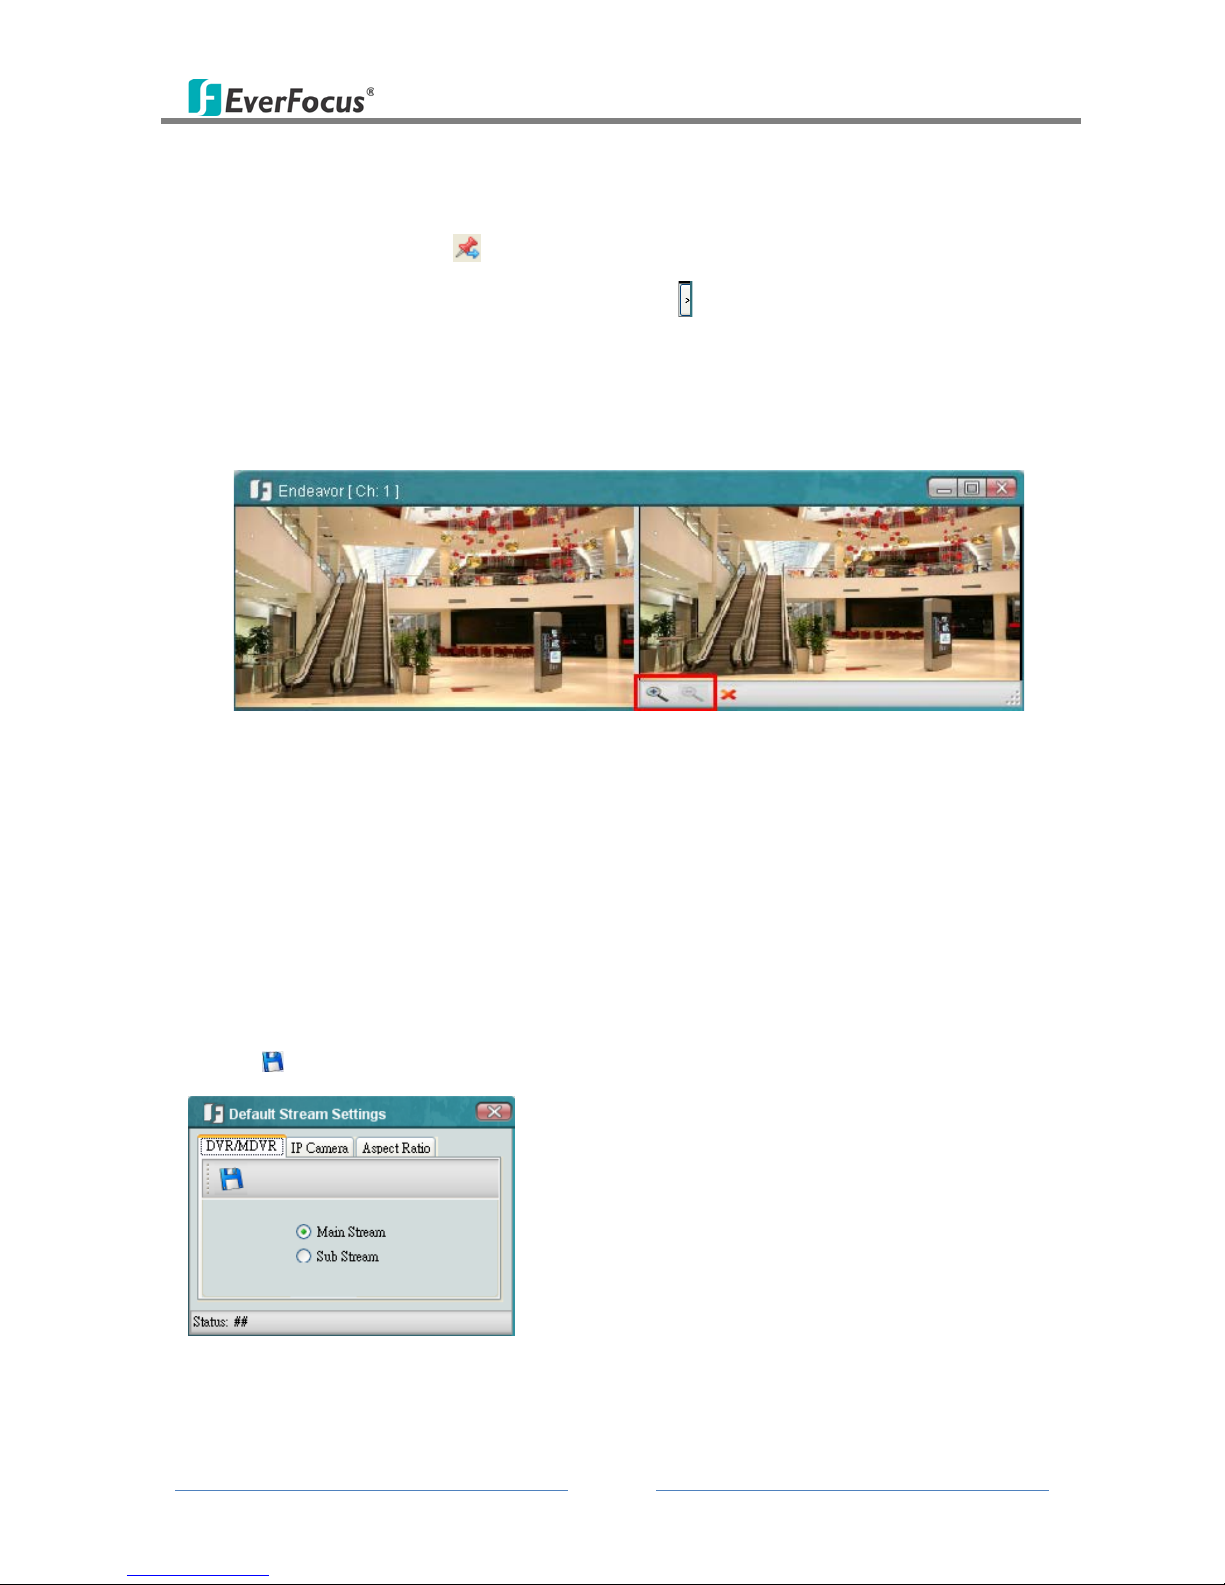
3.3 Digital Zoom
You can zoom in / out the camera live view through the PowerVideo Plus. On the camera live
view, click the Unpin button (No.1, Figure 3-2) to unpin the camera live view from the
Display window. Click the Show Digital Zoom button on the right edge of the camera live
view, a separate live view window with Zoom In and Zoom Out buttons appears. Click the
Zoom In / Zoom Out button to zoom in / out the camera live view. Click and hold the mouse,
and drag the image in the direction you want to view.
Figure 3-11
3.4 Default Stream Settings
You can select Main Stream or Sub Stream for the default Live View Stream. Note that you
have to pre-configure the stream settings on the IP device.
On the Main Screen, click Live View, and then click Default Stream Settings, the following
window appears. Select Main Stream or Sub Stream for the Live View and then click the Save
button to save the settings.
Figure 3-12
 Loading...