

Page 1
IP Sidekick-ESK1000
High-Capacity PoE Power Supply, Wi-Fi Router, Compact Size
User’s Manual
Copyright © EverFocus Electronics Corp,
Release Date: March, 2014
EverFocus Taiwan 12F, No.79, Sec. 1, Shin-Tai Wu Road, Hsi-Chih, Taipei, Taiwan
TEL: +886 2 2698 2334 FAX: +886 2 2698 2380 www.everfocus.com.tw marketing@everfocus.com.tw
Page 2
-1-
USB
DC
WiFi
Smart Device
PoE-Equpped
IP Camera
DC-Powered
IP Camera
Smart Device
Power Adaptor
Network
1. Introduction
EverFocus brings a useful product, IP Sidekick-ESK1000, to market which helps
you to eliminate all the troubles you may go through when installing IP cameras.
Using our IP Sidekick, you don’t need to pre-configure the IP address or to use
an additional monitor to check and adjust all the IP cameras. The IP Sidekick can
assign an IP address to the camera, and then you can connect and check the
camera live view using our mobile app EF Sidekick.
In all, just with this IP Sidekick and a smart mobile device at hand, you can
complete the IP cameras installation as easily and quickly as never before.
Page 3

-2-
• IP Sidekick x 1
• Power Adaptor x 1
• Strap x 1
2. Features
• High Capacity Battery
- Four lithium batteries (18650 type)
• PoE and DC Power Supplies
• A WiFi Router with a built-in DHCP server
• Support Mobile Application: EF Sidekick
• Compact Size and Easy Portable Design
• Multi-function
- Smartphone Charger
- Wireless AP Provider
• LED Indicators for Power, PoE and Charging Status
Packing List
Please check that there is no missing item in the package before installing.
Note:
1. Equipment configurations and supplied accessories vary by country. Please
consult your local EverFocus office or agents for more information. Please
also keep the shipping carton for possible future use.
2. Contact the shipper if any items appear to have been damaged in the
shipping process.
Page 4
-3-
3
4
5
6
7
8
9
10
1
2
Wi-Fi Router
Battery
No.
Item Name
Descriptions
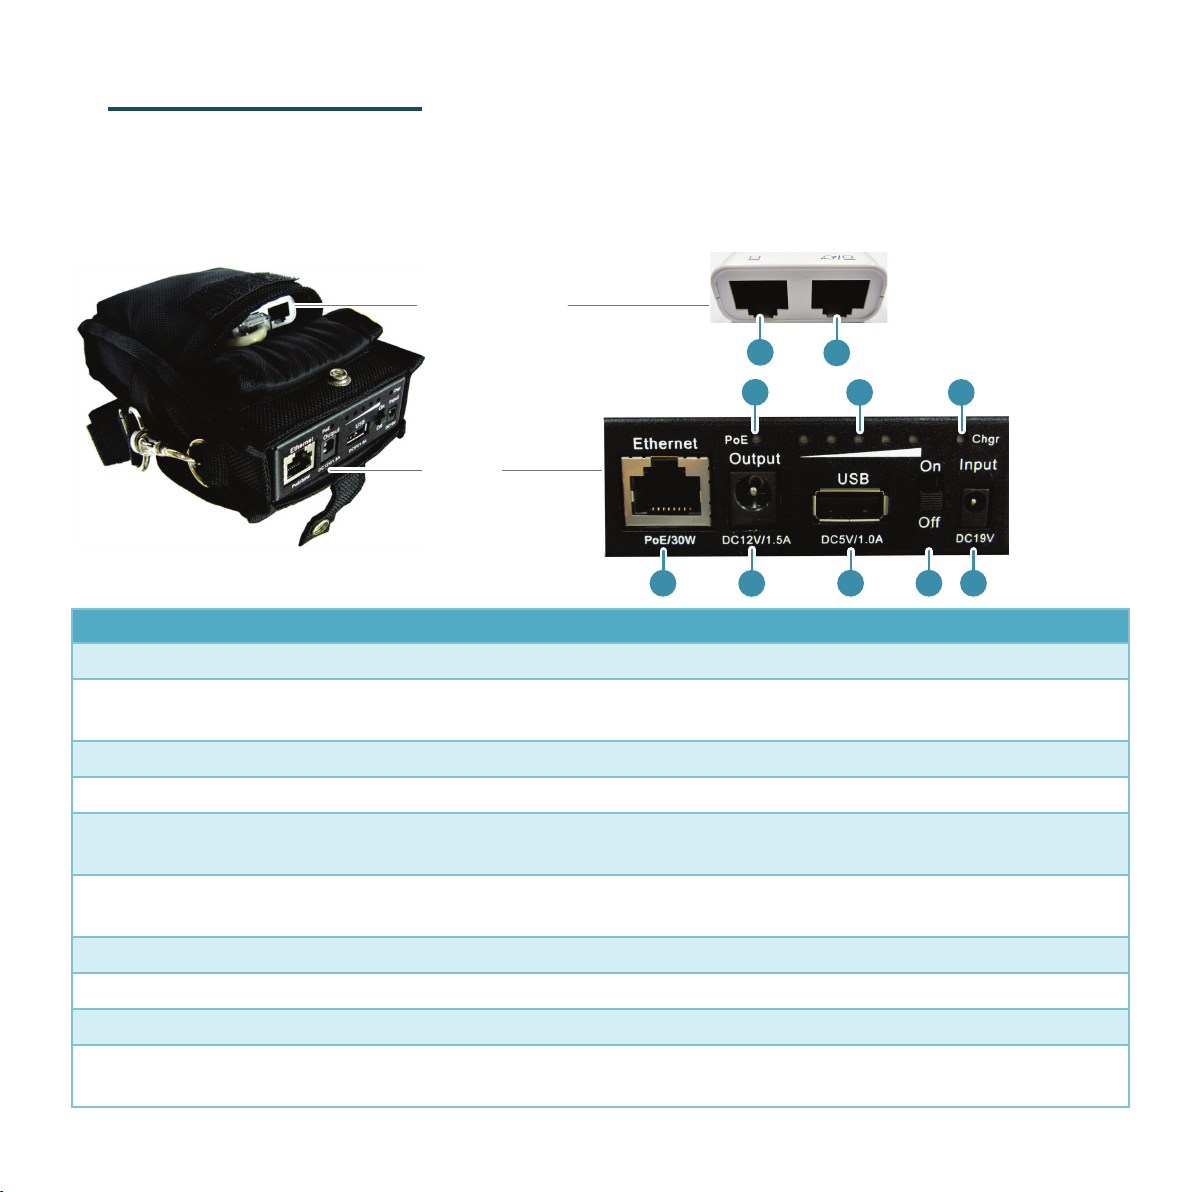
1
LAN
For connecting to the Battery.
For connecting to the Internet. It is not required to
connect to the Internet for IP camera installation.
3
PoE Indicator
Indicates it is providing power for a PoE IP camera.
4
Power Indicator
Indicates the power capacity.
Indicates the Battery is charging. Charging: Red / Full:
Green.
Connects to an IP camera, and it can also provide
power to PoE-equipped IP camera.
7
DC Output
Provides 12 VDC power to a DC-powered IP camera.
8
USB Output
Supplies 5 VDC power for charging a smart phone.
9
Power Switch
Switch it to power on or off.
Connect to a 19 VDC power using the supplied power
adaptor.
3. Physical Descriptions
EverFocus IP Sidekick consists of two parts, the Wi-Fi Router and the Battery,
which are already connected inside the bag through the power cable and LAN
cable, so please do not take them out of the bag if it’s not necessary.
2 WAN
5 Charging Indicator
6 PoE Output
10 DC Input
Page 5

-4-
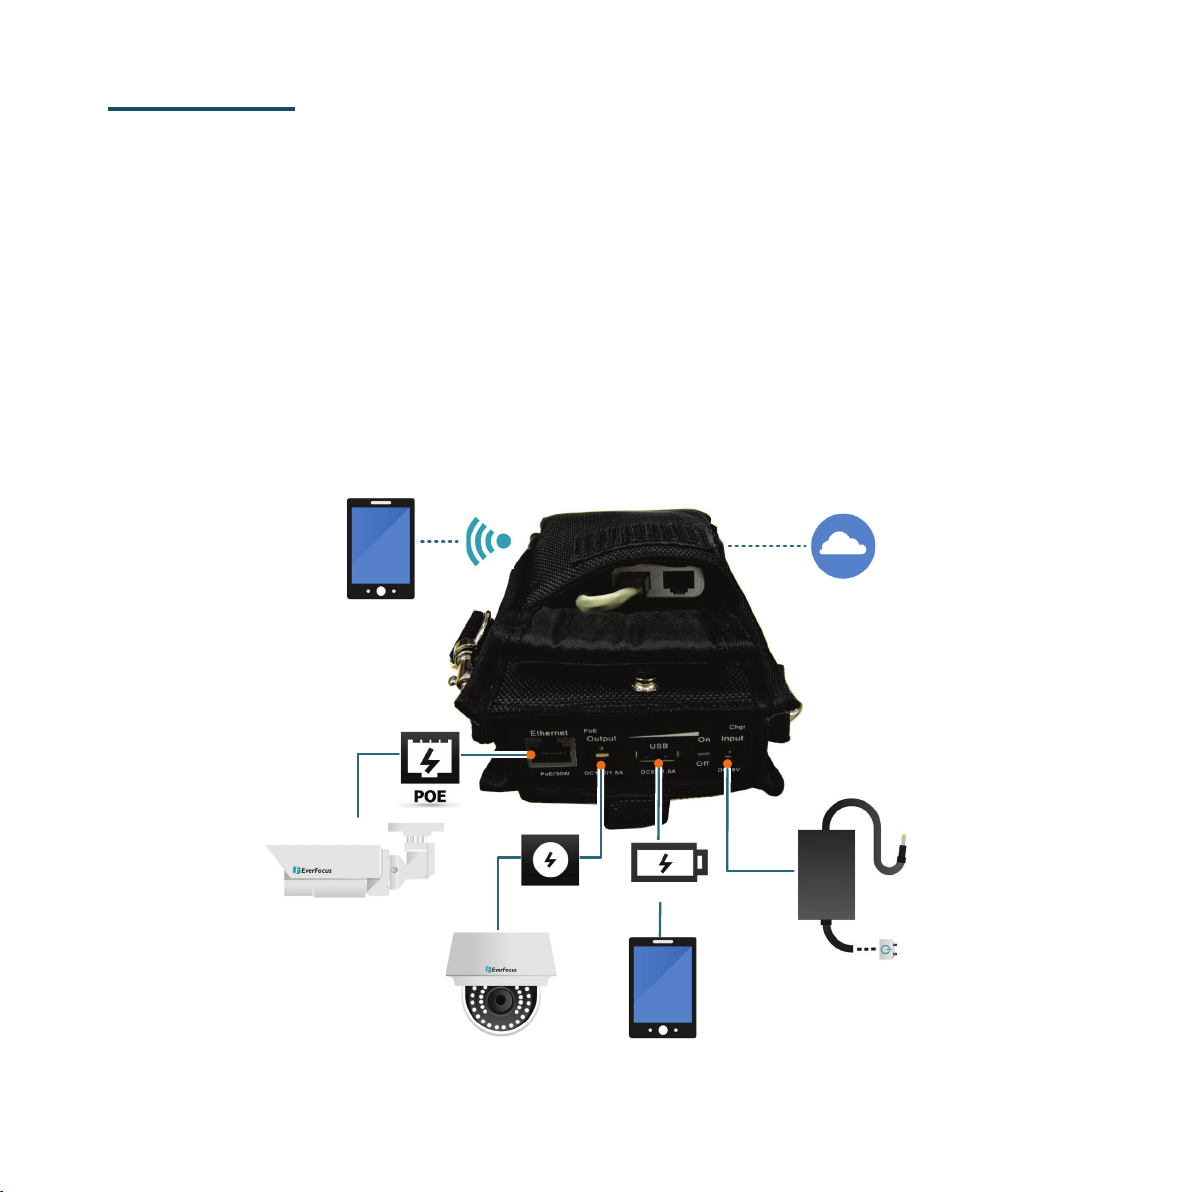
4. Getting Started
1. Turn on the Power Switch of the IP Sidekick.
2. Connect the IP camera to the PoE output of the IP Sidekick, and the IP
Sidekick will automatically assign an IP address (192.168.1.X) to the IP
camera.
3. If your IP camera is DC-powered, connect the power cable to the DC
output of the IP sidekick.
4. Download EverFocus IP Sidekick app, EF Sidekick, from App Store /
Android Market (search EF Sidekick) to your smartphone.
5. Turn on Wi-Fi function of your smart phone, and connect to the IP Sidekick
(Wi-Fi network name: EverFocus_Sidekick).
iOS device: Android device:
6. Enter the Password. The default password is 11111111.
Page 6

-5-
7. Open EF Sidekick, and the app will automatically search the connected IP
camera. Tap the camera to display its setting page.
8. Enter the User account and Password, and tap Connect to enter the live
view page. (The default ID: user1 / Password: 11111111.)
Page 7

-6-
Example: if the static IP address of the IP camera is 192.168.0.10, then
a. iOS device:
b. Android device:
9. If the connected IP camera has been set up with a static IP address before,
you won’t be able to access to its live view page. You need to set a static IP
on your smartphone to make your smartphone and the IP camera
in
the same wireless network.
are
please change the IP address of your smartphone to 192.168.0.12. Keep
the same Subnet Mask, Router and DNS IP as those in DHCP settings.
(1) Go to Setting > Wi-Fi
(2) Tap Static to set up a static
IP address.
(3) Tap <Wi-Fi to save the
settings.
(1) Go to Setting > Wi-Fi.
(2) Tap and hold on the Wi-Fi name to
modify the network.
(3) Check Show Advanced Options, and
change the IP Setting to Static to set up
a static IP address.
(4)Tap Save to save the settings.
Page 8

-7-
Icon
Name
Description
Tap to take a snapshot. The snapshot files will be
saved at your Photos folder of your smartphone.
Tap to bring up the PTZ control panel, if the PTZ
Tap to enable or disable audio output (speaker)
function.
Tap to enable or disable audio input device. The
10. Live view page displays as below:
Snapshot
PTZ
Audio
Microphone
camera is connected, please see 5. PTZ Control.
function is currently reserved for the Android device.
Page 9

-8-
Important Note:
11. After the IP camera installation is completed, you can also use it to change
the IP address of the camera.
Once you change the IP address of the camera, EF Sidekick cannot
connect to that IP camera again unless you change the IP address of your
smartphone, please refer to Step 9.
12. Disable the DHCP function (slide to the left), and tap the IP/URL to change
the IP address.
Page 10

-9-
Swipe
5. PTZ Control
You can remotely control the PTZ cameras or configure the PTZ Preset setting by
this application. Before start using the Auto Pan, Pattern and Tour functions,
please note that you need to pre-configure these settings of the connected PTZ
camera through local OSD or remote web page. Please refer to the User’s
Manual of your PTZ camera. You can also control PTZ camera using gestures.
To control PTZ camera, tap the PTZ icon, and the screen shows as below.
And you can swipe the PTZ setting button field to bring up the next setting page.
Page 11

-10-
Focus: Tap to bring up the slide bar for adjusting the camera focus. Slide to left
to focus near, and slide to right to focus far.
Iris+ / Iris-: Tap to widen or narrow down the IRIS opening.
Preset: The function is used to force camera to turn to the preconfigured preset
position. Tap the Preset button to bring up the Preset setting page. Enter a
Preset number and then tap Go to go to the Preset camera view, tap Set to set
the camera preset position, or tap Delete to delete the camera preset position.
Auto Pan: Tap to force the camera to pan 360°endlessly.
Pattern: Tap to move the camera in a pattern mode (The pattern mode is the
Pattern “1” configured in EverFocus PTZ cameras).
Tour: Tap to move the camera in a tour mode (The tour mode is the Tour “1”
configured in EverFocus PTZ cameras).
Menu: Tap the Menu button on the PTZ panel to bring up the OSD menu on the
screen. You can use the Up and Down arrow icons on the screen to select
among each menu item, tap the Right arrow icon to enter the selected menu
item, and tap Left arrow icon to return to the previous page. (Analog PTZ
camera only).
Gesture Controls: You can swipe to change the directions, pinch to zoom out,
and spread to zoom in on “single” division screen / full screen.
Page 12

-11-
PoE Power Supply
6. Specification
Model ESK1000
Cell type 18650(2950mA) x 4pcs
Input DC19V/3.16A
PoE 30W(Max)
Output
DC12V 12V/1.5A
USB 5V/1A
Overcharge Yes
Overdischarge Yes
Protection
Shortcircuit Yes
Overheating Yes
Excessive Load Yes
Charging Indicator Yes ( Charging: Red/ Full: Green)
Power/
Capacity
Power Indicator
Yes (Green<100%,80%,60%,40%,20%>)
Indicator
Yes ( Green)
Indicator
Dimensions 76.2 x 25.4 x 156 mm
Weight 550g
Operating Temperature 0°C ~40°C
Certificates CE, FCC
P/N: 4605P1ESK1B012A
 Loading...