

EverFocus EQN22 Series, EQN2200W, EQN2200, EQN2230 User Manual
EQN2200
User’s Manual
Copyright © EverFocus Electronics Corp,
Release: Mar. 2010

EQN2200
2
Product Name: EQN2200 EverFocus Network Cameras
Model Number(s): EQN2200
Federal Communication Commission Interference Statement
This equipment has been tested and found to comply with the limits for a Class A digital device,
pursuant to Part 15 of the FCC Rules. These limits are designed to provide reasonable
protection against harmful interference when the equipment is operated in a commercial
environment. This equipment generates, uses, and can radiate radio frequency energy and, if
not installed and used in accordance with the instruction manual, may cause harmful
interference to radio communications. Operation of this equipment in a residential area is likely
to cause harmful interference in which case the user will be required to correct the interference
at his own expense.
FCC Caution: Any changes or modifications not expressly approved by the party responsible
for compliance could void the user's authority to operate this equipment.
This device complies with Part 15 of the FCC Rules. Operation is subject to the following two
conditions: (1) This device may not cause harmful interference, and (2) this device must
accept any interference received, including interference that may cause undesired operation.
This device and its antenna(s) must not be co-located or operating in conjunction with any
other antenna or transmitter.
For product available in the USA/Canada market, only channel 1~11 can be operated.
Selection of other channels is not possible.
IMPORTANT NOTE:
FCC Radiation Exposure Statement:
This equipment complies with FCC radiation exposure limits set forth for an uncontrolled
environment. This equipment should be installed and operated with minimum distance 20cm
between the radiator & your body.

EQN2200
3
EverFocus Electronics Corp.
12F, No. 79, Sec. 1, Shin-Tai Wu Rd., His-Chi,
Taipei Hsien, Taiwan, R.O.C.
EQN2200 complies with CE and FCC rules.

EQN2200
4
About this document
All the safety and operating instructions should be read and followed before the
unit is operated. This manual should be retained for future reference. The
information in this manual was current when published. The manufacturer reserves
the right to revise and improve its products. All specifications are therefore subject
to change without notice.
Safety Notices
-These limits are designed to provide reasonable protection against interference.
This equipment may generate, uses and can radiate radio frequency energy and, if
not installed and used in accordance with the instructions, may cause harmful
interference to radio communications. However, there is no guarantee that
interference will not occur in a particular installation. If this equipment does cause
harmful interference to radio or television reception, which can be determined by
turning the equipment off and on, the user is encouraged to try to correct the
interference by one or more of the following measures:
-Reorient or relocate the receiving antenna.
-Increase these separations between the equipment and receiver.
-Connect the equipment into an outlet on a circuit different from that to which the
receiver is connected.
-Consult the dealer or an experienced radio/TV technician for help.
Any changes or modifications not expressly approved by the party responsible for
compliance could void the user's authority to operate the equipment.
To reduce risk of fire or electric shock, do not expose this camera to rain or
moisture.
Do not attempt to disassemble the camera. To prevent electric shock, do not
remove screws or covers. There are no user-serviceable parts inside. Contact
qualified service personnel for maintenance. Handle the camera with care. Do not
strike or shake, as this may damage the camera.
Do not use strong or abrasive detergents when cleaning the camera body. Use
a dry cloth to clean the camera when it is dirty. When the dirt is hard to remove,

EQN2200
5
use a mild detergent and wipe gently.
Do not operate the camera beyond its specified temperature, humidity or
power source ratings. Do not use the camera in an extreme environment where high
temperature or high humidity exists. Use the camera at temperature within 0℃ ~
+40℃ / 32۫F~ 104۫F and a humidity below 90%. The input power source for this
camera is 12 VDC & 802.3af PoE.
Use only the recommended power supplies. Power supplies must comply
with the requirement of the latest version of IEC60950-1. Substitutions may
damage the unit or cause a fire or shock hazard.
Electrostatic-sensitive device. Use proper CMOS/MOSFET handing
precautions to avoid electrostatic discharge.
Installation should be performed by qualified service personnel only in
accordance with the National Electrical Code or applicable local codes.
Terms and Trademark
Ethernet, Internet Explorer, Linux, Microsoft, Windows, WWW are registered
trademarks of the respective holders. Other product names appearing in this User's
Guide may be trademarks or registered trademarks of their respective holders.
Java™ and all Java-related logos and trademarks are trademarks or registered
trademarks of Sun Microsystems, Inc. in the United States and other countries.
Support
If the unit ever needs repair service, the customer should contact the nearest
EverFocus Electronics Corp. Service Center for return authorization and shipping
instruction.
About this AC Adaptor
Specifications for AC adaptor
Power Supply: 12VDC, 1 A
Power Output: 12VDC, 1 A
Operating Temperature: 0℃ ~ 40℃ / 32۫F ~ 104۫F
External Dimensions: 56 mm x 68 mm x 101 mm / 2.24” x 2.72” x 4.04”

EQN2200
6
TABLE OF CONTENTS
1. INTRODUCTION....................................................................................................7
2. FEATURES..............................................................................................................7
3. SPECIFICATIONS..................................................................................................8
4. ACCESSING THE CAMERA MENU...................................................................9
5. SETTING................................................................................................................12
4.1 SYSTEM INFO ......................................................................................................12
4.1.1 Information Tab...........................................................................................12
4.1.2 Log Tab .......................................................................................................13
4.2 USER CONFIG......................................................................................................14
4.3 NETWORK ...........................................................................................................16
4.3.1 Network.......................................................................................................16
4.3.2 DDNS..........................................................................................................19
4.3.3 Bandwidth...................................................................................................20
4.3.4 SMTP/FTP ..................................................................................................21
4.3.5 Network Alarm (reserved for PowerCon)...................................................23
4.4 VIDEO .................................................................................................................23
4.4.1 Multi Streaming ..........................................................................................24
4.4.2 Camera ........................................................................................................25
4.5 AUDIO .................................................................................................................27
4.6
USER .................................................................................................................28
4.7 EVENT...............................................................................................................29
4.7.1 Event ...........................................................................................................30
4.7.2 Motion......................................................................................................... 32
4.7.3 Alarm...........................................................................................................33
4.7.4 Time Mask ..................................................................................................34
4.8
SYSTEM............................................................................................................36
4.8.1 Date/Time....................................................................................................36
4.8.2 Daylight Saving ..........................................................................................38
4.8.3 SD Card.......................................................................................................39
4.8.4 Maintenance................................................................................................41

EQN2200
7
1. INTRODUCTION
EQN22 series Q-cam is an entry-level network camera which provides competitive
price but superior image quality with up to 30fps in 720p (1280x720) resolution.
For easy and flexible installation, EQN2200 and EQN2200W offer the choice of either
a wireless or a wired connection to the network.
EQN2230 additionally features an integrated PIR sensor for detecting movement
even in the dark, and a white LED for illuminating the scene automatically at an event
or when requested by the user.
EQN22 series provides two-way audio support with built-in microphone and speaker,
allowing remote listening in on an area, as well as communication with individuals
directly or using uploaded or recorded audio clips.
2. FEATURES
Built-in H.264 and MJPEG dual stream output at 720p image size with up to
30fps.
2 mega-pixel 1/3” progressive scan CMOS sensor
Integrated fix focus wide angle lens (3.6 mm), adjustable focus
Built-in PIR sensor and White LED for motion detection (for EQN2230)
Built-in Microphone and Speaker
Digital I/O for external sensor or alarm
Basic intelligence in the camera such as schedule, motion detection, FTP upload,
email... (TBD)
Built-in network interface (10Base-T/100Base-TX) for remote monitoring by PC
Built-in 802.11b/g WLAN (EQN2200W).
Two Way Audio for built-in microphone and speaker

EQN2200
8
3. SPECIFICATIONS
MODEL
EQN2200: wired interface
EQN2200W: wired and wireless interface
EQN2230: wired interface and PIR sensor, White LED
CAMERA
Pickup Device 1/3" progressive scan CMOS sensor, 2 Megapixel
Lens 4.3mm/F=1.8
Sensitivity 0.5Lux /F=1.8
VIDEO STREAMING
Video Compression H.264M-JPEG (Hisilicon platform)
Video Resolution 1600x1200 to 160x120
Frame Rate 1600x1200@10fps, 1280x960@15fps, 720p @ 30fps
AUDIO
Microphone & Speaker Built-in
Operation Mode Two-way audio
NETWORK
Interface 10Base-T/100Base-TX auto-negotiation, RJ-45 socket
Support MDI/MDI-X auto crossover function
Built-in IEEE 802.11b/g WLAN (for EQN910W)
Supported Protocols HTTP, TCP / IP, UDP, RTP, RTSP, FTP, SMTP, DHCP, DNS, DDNS, NTP
Client Limit
32 clients simultaneously (max.)
TERMINAL I/O
Alarm Input/Output 1/1
EVENT MANAGEMENT
Event Trigger Alarm Input, Manual Trigger, Motion Detection and Schedule Recording
Notification Trigger alarm output, Send mail notification, Upload video to FTP, Record
video to PC and Network alarm
BUILT IN LIGHT
Type 1 White LED
Brightness
Directly in front of camera: about 8.5 lux
POWER
Power Supply 5VDC
Power Consumption 5W Max.
PHYSICAL
Weight TBD
Dimension TBD
ENVIRONMENTAL
Operating Temp. 0°C ~ 40°C / 32°F ~ 104°F
Humidity < 90% not condensing

EQN2200
9
4. ACCESSING THE CAMERA MENU
Step 1.Start an Internet Explorer browser session.
Step 2. Enter the IP address or host name of the camera in the Location/Address
field of your Internet Explorer browser in the form http://nn.nn.nn.nn:port, or
http://ddnsname.everfocusddns.com. (Please refer to EQN2200 Installation
Guide for how to find the IP address by using the IP Finder)
Step 3. At the login popup window enter “Username” and “Password”. Default
Username is “user1” and default password is “11111111”.
Step 4. Click “Login” button.
Step 5. You might be required to download Active X files, which are required to
process camera video. Please click "Yes".
Step 6. Congratulations!! You should now be able to see the live image.
Callouts hard to read on figure and in list below!!!
○1 Press button to display the "Live" page.
Double click on the image to show a full screen display, double click again or press
ESC to return to the normal display.
○2 Press button to enter the camera Setting page. In the
Setting page, there are 8 sections: [System Info], [User Config], [Network], [Video],
[Audio], [User], [Event] and [System]. Please refer to “Section 5. SETTING” for
further information.
○1
○2
○
12
○11
○10
○9
○8
○
7
○3
○4
○6
○
13
○5
○
14
EQN2200
10
○3 Press button to close the EQN2200 network page.
○4 Video Stream
Select the desired Video Stream from Stream 1 / Stream 2, Stream 3 and Stream 4
stream must be enabled in camera Setting menu). Please refer to "Section 4.4.1 Multi
Streaming” for further information.
○5 View Size
You can select View size to either reduce or enlarge the image to the appropriate view
size.
Select the view size for live images from:
704*480/640*480/352*240/320*240/176*120
○6 Digital Zoom
Press “+” or “-“ button to magnify / reduce the displayed image. (max. is X10)
Clicking on a magnified image will re-center the image around that point.
○7 Record
The record button is used to record the current video stream. The location where the
image file is saved can be specified in Setting -> User Config. Please refer to “Section
4.2 User Config” for further information.
Note: Record segment is limited to 1-10 min. If you need to do long recordings,
please use schedule recording. For more details about schedule recording, please see
“Section 4.7 Event”.
○8 Snapshot
The Snapshot button saves a .jpg image of the video image currently being displayed.
The location where the snapshot data is saved can be specified in Setting -> User’s
Config. Please refer to “Section 4.2 User Config” for further information.

EQN2200
11
○9 ~ ○10 Play Audio/Transmit Audio
Click the “Play Audio” and “Transmit Audio” buttons to switch the sound off and on
for the audio input and output, respectively.
○11 Manual Control – Trigger Event
Press “Trigger Event” button to trigger an event directly from the live view page, and
event actions will be initiated if they have been set up in the “Event” menu. (Please
refer to “Section 4.7.1 Event”)
○12 Manual Control – Reset Alarm
Press “Reset Alarm” button to reset an alarm condition remotely.
○13 Status Display
The name of the camera currently being viewed, current date/time and current frame
rate will be displayed.
○14 Event signals
When an alarm or motion event is triggered, a signal icon will flash to alert the user.
The first icon is for alarm events and the other 5 icons are for motion events. The
motion event icons, which differ by color, correspond to the motion trigger areas set
in the Motion menu. Please refer to “Section 4.7.2 Motion” for detailed information
about Motion setup.
Motion
Alarm
EQN2200
12
5. SETTING
Click this button to display the camera setup menu.
4.1 System Info
System information and system log events can be accessed on this page via 2 tabs:
[Information] tab and [Log] tab.
4.1.1 Information Tab
System Information: Firmware version, MAC address, Video Type, Model number.
(this data may not be changed in this page and is for reference only)
EQN2200
13
4.1.2 Log Tab
System Log:
Date/Time: displays date and time of the log event.
Log message: all information and event message, including login, user’s IP, reboot,
firmware upgrade, load factory default, configuration reset and event detected.
System will keep the newest 256 records.
EQN2200
14
Press button to export the system log into a “.txt” file and select the
location where the exported log file will be saved.
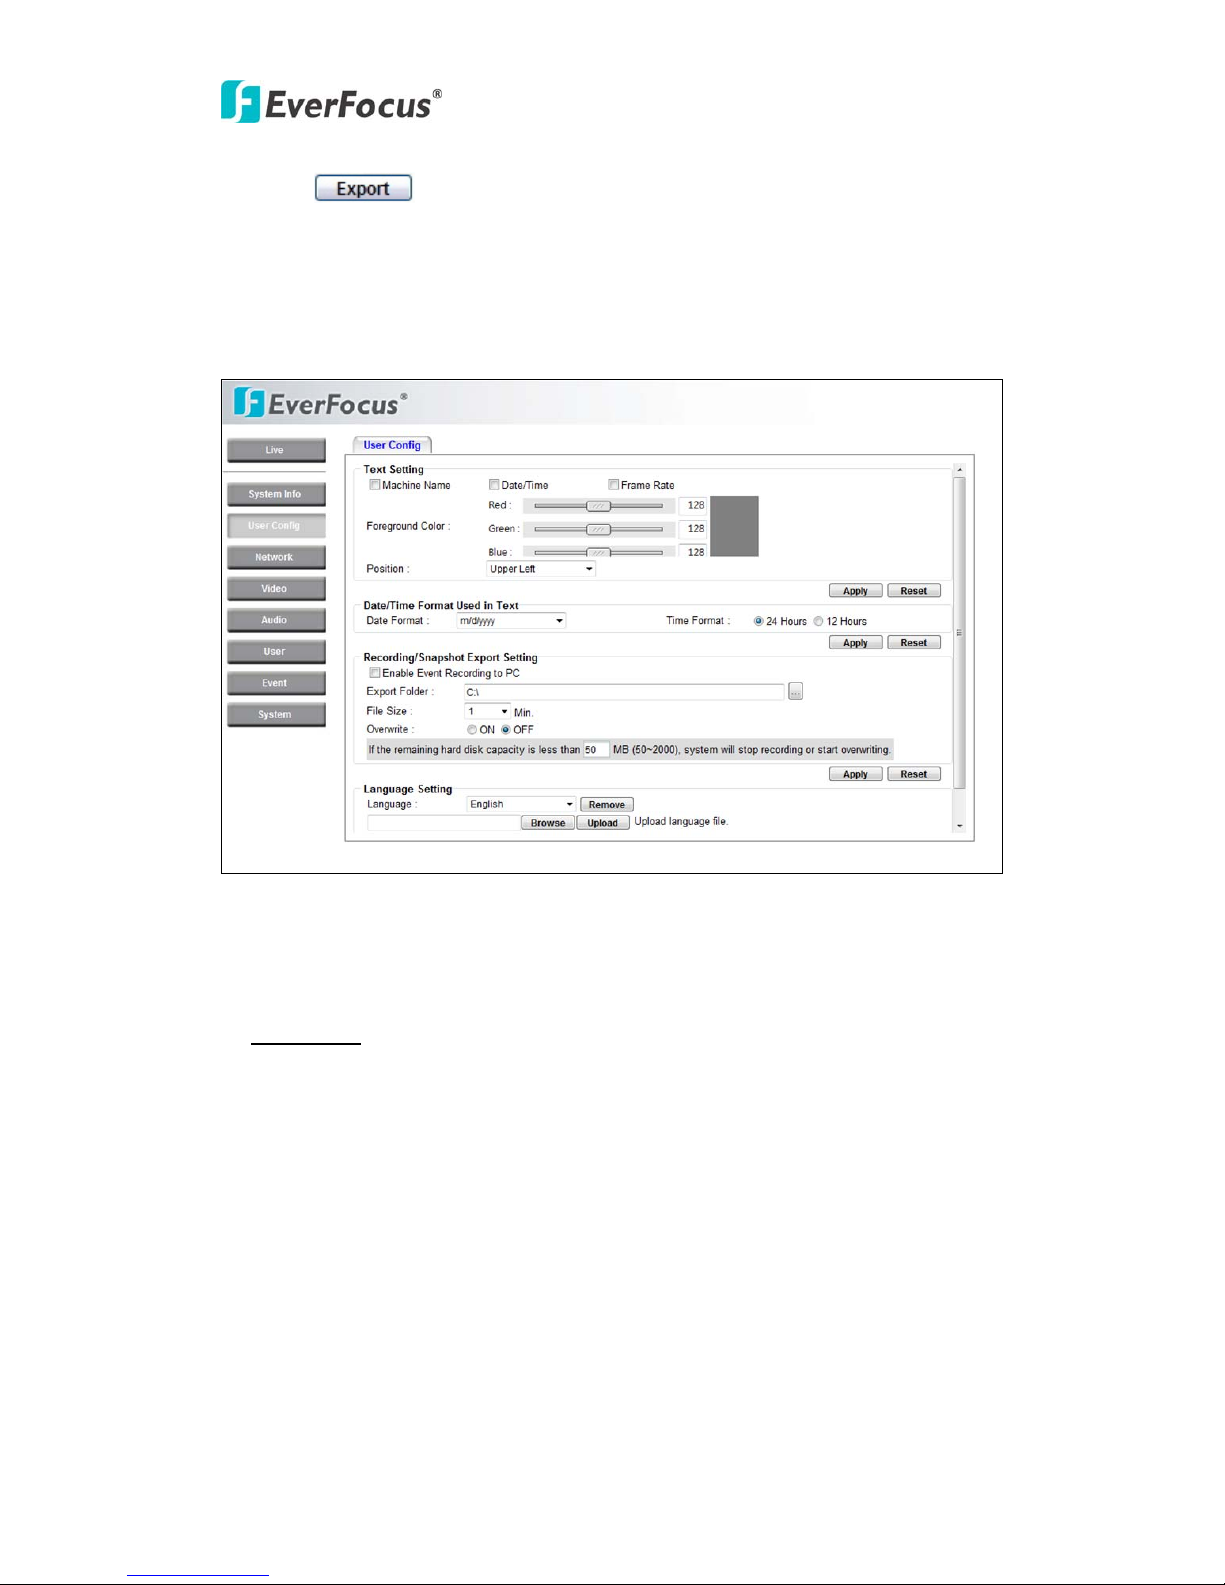
4.2 User Config
The configuration and operation of the Live View screen can be changed based on the
login user ID. The settings which can be customized for each of the 10 possible login
IDs are:
Text Setting
Check the box to enable display of the Machine name, Date/Time or Frame
Rate on the screen.
Text Color
Foreground Color: Select the foreground color of text to be displayed by moving
the slide bar between Red, Green and Blue until the desired color is obtained.
Position: Select the position where the text will be displayed: Upper Left / Lower
Right / Lower Left.
 Loading...