

Page 1
EQN100 Mini Cube IP Camera
Auto White Balance, 3DNR
User’s Manual
Copyright © EverFocus Electronics Corp,
Release Date: August, 2015
Page 2

Copyright 1995-2015 EverFocus Electronics Corp.
All rights reserved. No part of the contents of this manual may be reproduced or transmitted in any
form or by any means without written permission of the EverFocus Electronics Corporation.
EverFocus
12F-1, No.79, Sec. 1, Shin-Tai Wu Road,
Hsi-Chih, New Taipei City, Taiwan
TEL: +886 2 2698 2334
FAX: +886 2 2698 3943
www.everfocus.com.tw
August, 2015
Page 3

About this document
All the safety and operating instructions should be read and followed before the unit is
operated. This manual should be retained for future reference. The information in this manual
was current when published. The manufacturer reserves the right to revise and improve its
products. All specifications are therefore subject to change without notice.
Regulatory Notices
FCC Notice "Declaration of Conformity Information"
This equipment has been tested and found to comply with the limits for a Class
A digital device, pursuant to part 15 of the FCC Rules. These limits are designed to provide
reasonable protection against harmful interference in a residential installation. This
equipment generates, uses and can radiate radio frequency energy and, if not installed and
used in accordance with the instructions, may cause harmful interference to radio
communications. However, there is no guarantee that interference will not occur in a
particular installation. If this equipment does cause harmful interference to radio or television
reception, which can be determined by turning the equipment off and on, the user is
encouraged to try to correct the interference by one or more of the following measures:
- Reorient or relocate the receiving antenna.
- Increase the separation between the equipment and receiver.
- Connect the equipment into an outlet on a circuit different from that to which the receiver is
connected.
- Consult the dealer or an experienced radio/TV technician for help.
Warning: Changes or modifications made to this equipment, not expressly approved by
EverFocus or parties authorized by EverFocus could void the user's authority to operate the
equipment.
This device complies with part 15 of the FCC Rules. Operation is subject to the following two
conditions:
(1) This device may not cause harmful interference, and
(2) This device must accept any interference received, including interference that may cause
undesired operation.
EverFocus Electronics Corp.
12F-1, No. 79, Sec. 1, Shin-Tai Wu Rd.,
Hsi-Chi, New Taipei City, Taiwan
i
Page 4

Precautions
1. Do not install the camera near electric or magnetic fields.
Install the camera away from TV/radio transmitters, magnets, electric motors,
transformers and audio speakers since the electromagnetic fields generated from these
devices may distort the video image or otherwise interfere with camera operation.
2. Never disassemble the camera beyond the recommendations in this manual nor
introduce materials other than those recommended herein.
Improper disassembly or introduction of corrosive materials may result in equipment
failure or other damage.
3. Try to avoid facing the camera toward the sun.
In some circumstances, direct sunlight may cause permanent damage to the sensor
and/or internal circuits, as well as creating unbalanced illumination beyond the capability
of the camera to compensate.
4. Keep the power cord away from water and other liquids and never touch the power cord
with wet hands.
Touching a wet power cord with your hands or touching the power cord with wet hands
may result in electric shock.
5. Never install the camera in areas exposed to oil, gas or solvents.
Oil, gas or solvents may result in equipment failure, electric shock or, in extreme cases,
fire.
6. Cleaning
For cameras with interchangeable lenses, do not touch the surface of the sensor directly
with the hands. Use lens tissue or a cotton tipped applicator and ethanol to clean the
sensor and the camera lens. Use a damp soft cloth to remove any dirt from the camera
body. Please do not use complex solvents, corrosive or abrasive agents for cleaning of any
part of the camera.
7. Do not operate the camera beyond the specified temperature, humidity or power source
ratings. Use the camera at temperatures within 0°C ~ 50°C / 32°F~122°F (12 VDC), and
humidity between 20% and 80%; this device is not rated as submersible. The input power
source is 12 VDC. Be sure to connect the proper + / - polarity and voltage, as incorrect
polarity or too high a voltage will likely cause the camera to fail, and such damage is not
covered by the warranty. The use of properly fused or Class 2 power limited type supplies
is highly recommended.
8. Mounting
Use care in selecting a solid mounting surface which will support the weight of the camera
plus any wind, snow, ice or other loading, and securely attach the camera to the mounting
surface using screws and anchors which will properly support the camera. If necessary (e.g.
when mounting to drop ceilings) use a safety wire to provide additional support for the
camera.
ii
Page 5

Table of Contents
1. Introduction ........................................................................................................... 1
2. Features .................................................................................................................. 1
3. Physical Description .............................................................................................. 2
3.1 Dimensions .................................................................................................................. 2
4. Installation ............................................................................................................. 3
4.1 Packing List .................................................................................................................. 3
4.2 Optional Accessory ...................................................................................................... 3
4.3 Basic Installation.......................................................................................................... 3
5. Accessing the Camera ........................................................................................... 4
5.1 Checking the Dynamic IP Address ............................................................................... 4
5.2 Settings for Microsoft Internet Explorer ..................................................................... 6
5.3 Connecting the Camera to the Network ..................................................................... 8
5.4 Live View Window ..................................................................................................... 10
6. Playback ................................................................................................................ 11
7. System Settings.................................................................................................... 12
7.1 Local Config ............................................................................................................... 12
7.2 Video Settings............................................................................................................ 13
7.2.1 OSD Settings ....................................................................................................... 13
7.2.2 Video Coding ...................................................................................................... 14
7.2.3 Video Mask ......................................................................................................... 16
7.2.4 Video Parameter ................................................................................................ 17
7.3 Network Settings ....................................................................................................... 19
7.3.1 Basic Setting ....................................................................................................... 19
7.3.2 LAN Setting ......................................................................................................... 20
7.3.3 PPPoE Setting ..................................................................................................... 21
7.3.4 UPNP Setting ...................................................................................................... 22
7.3.5 Email Setting ....................................................................................................... 23
7.3.6 FTP Setting .......................................................................................................... 24
7.3.7 DDNS Setting ...................................................................................................... 25
7.3.8 VPN Setting ......................................................................................................... 26
7.3.9 RTSP Setting........................................................................................................ 27
7.3.10 IP Email ........................................................................................................ 28
7.3.11 Connect Setting ........................................................................................... 29
7.4 Alarm Settings ........................................................................................................... 30
7.4.1 Motion Detection ............................................................................................... 30
7.5 System Setting ........................................................................................................... 32
7.5.1 System Info ......................................................................................................... 32
7.5.2 System Time ....................................................................................................... 33
7.5.3 User Manage ...................................................................................................... 34
7.5.4 Upgrade .............................................................................................................. 35
7.5.5 Restore ............................................................................................................... 36
7.5.6 Restart ................................................................................................................ 36
7.5.7 System log .......................................................................................................... 37
8. Alarm Search ........................................................................................................ 38
9. Specifications ....................................................................................................... 39
10. Appendix ............................................................................................................... 40
Appendix 1 Network Interface of IP Camera ..................................................................................... 40
Appendix 2 Default Network Parameters ............................................................................... 40
iii
Page 6

EQN100
1. Introduction
The EQN100 mini cube IP camera comes with 1.3MP image quality, providing up to 30fps at
1280 x 1024 viewing resolution. The camera supports dual streams from H.264 and MJPEG
compression formats. High performance 3DNR noise reduction and auto wide balance functions
are also supported.
Since EQN100 conforms to ONVIF for compatibility with other network video devices, it
interoperates with a wide variety of hardware and software systems. You can also use
EverFocus Mobile Applications to remotely view the live views of the cameras through your
handheld devices.
The camera can be powered by 12VDC power supply. The tiny design makes it is easy to be
installed and operate. The EQN100 is suitable for small and medium-sized environments.
System Requirement
Before installing, please check that your computer supports Microsoft Windows
XP/2003/Win7/Vista.
2. Features
• 1/3” progressive CMOS image sensor delivers 1.3MP resolution
• High performance noise reduction function
• Multi-streaming from H.264 / MJPEG
• Power supply by 12 VDC
• Supports live monitoring of video from mobile devices via MobileFocus / MobileFocus Plus
apps (iOS and Android)
• ONVIF compliant
1
Page 7
EQN100
1
2
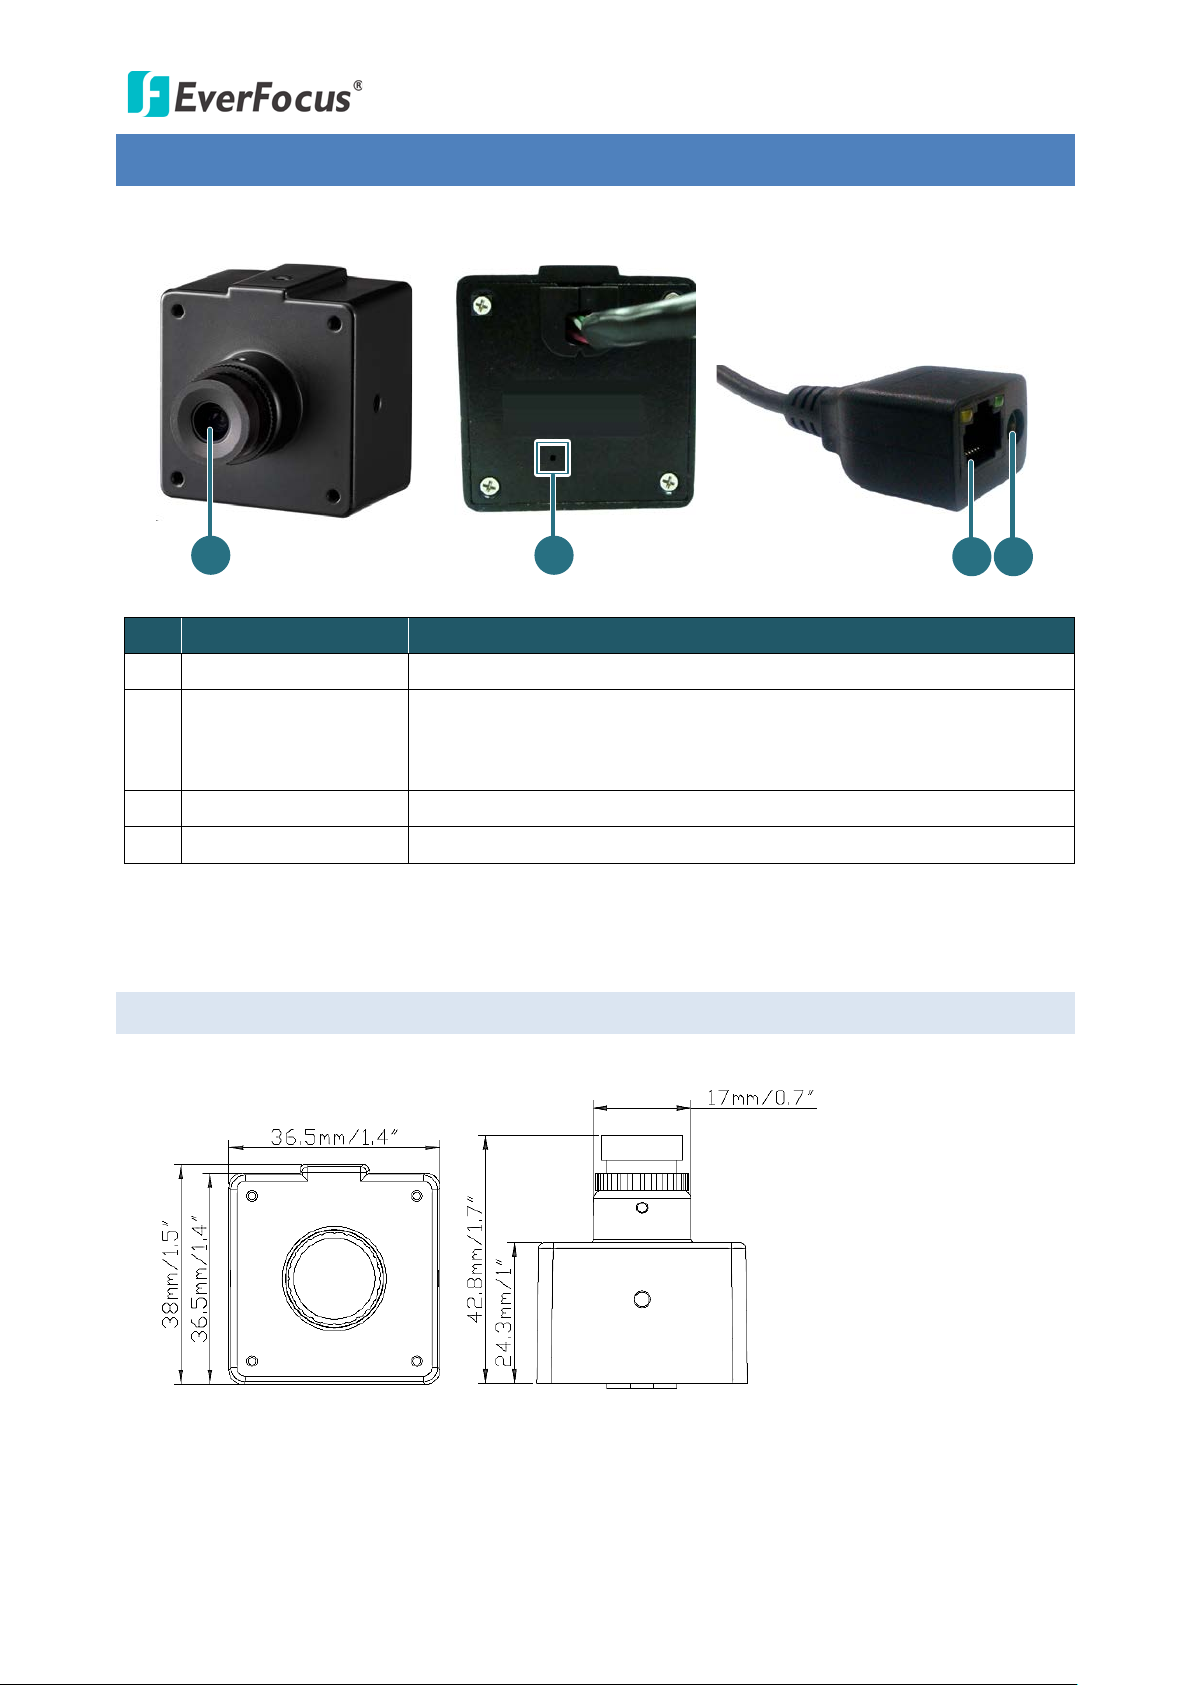
Front View Rear View
3
4
Cable
and then release the button for 2 seconds. Repeat doing
3. Physical Description
No. Item Name Descriptions
1 Lens Fix focal lens 6mm (optional:2.8mm, 3.6mm, 8mm)
Use a paper click to press and hold the Reset Button for 2
2 Reset Button
seconds
this 3 times to reset all configurations to factory default setting.
3 LAN Cable Connects to a router.
4 Power Cable Connects to a 12VDC power source.
3.1 Dimensions
2
Page 8
EQN100
ESK1000 User’s
You can use the bracket to install EQN100
included for screwing the camera to
Top
4. Installation
4.1 Packing List
Please check that there is no missing item in the package before installing.
• Camera x 1 • Quick Installation Guide x 1
Note:
1. Equipment configurations and supplied accessories vary by country. Please consult your
local EverFocus office or agents for more information. Please also keep the shipping carton
for possible future use.
2. Contact the shipper if any items appear to have been damaged in the shipping process.
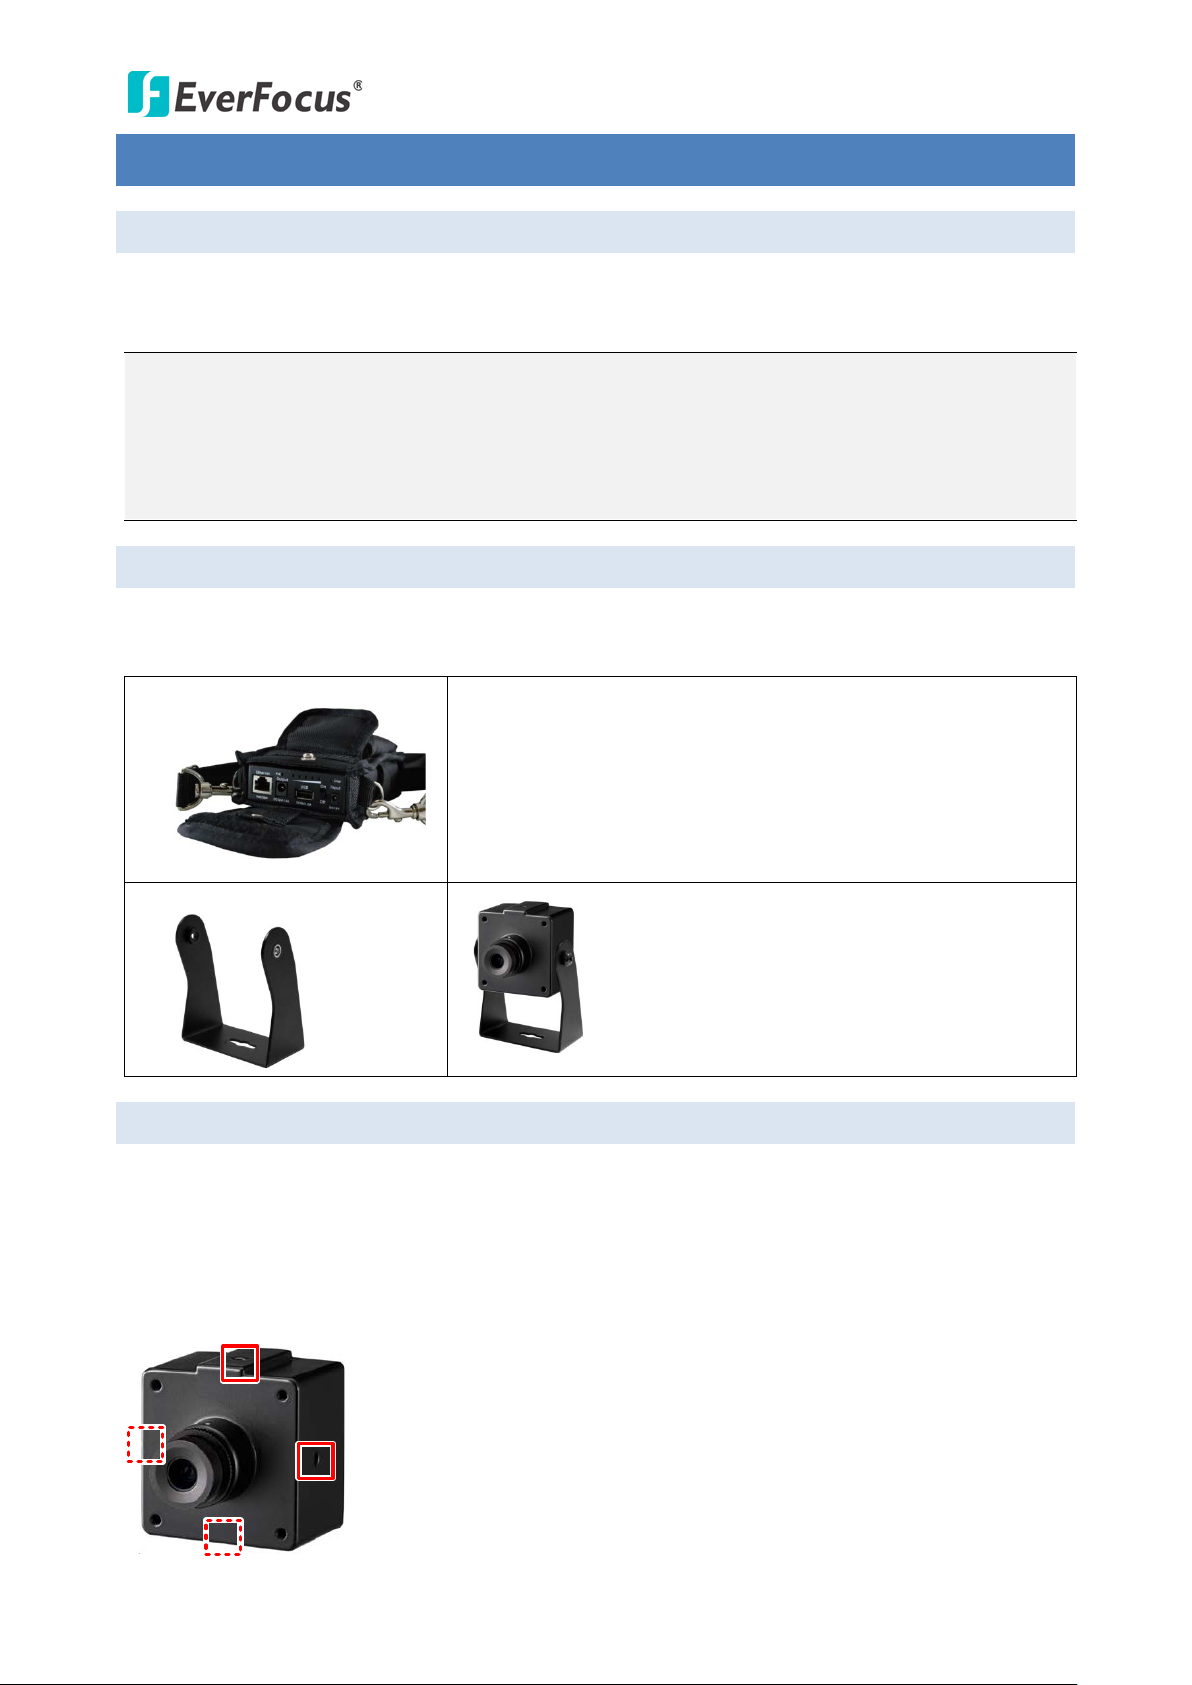
4.2 Optional Accessory
You can use the optional accessory to expand the capabilities and versatility of the camera.
Please contact your dealer for more information.
• IP Sidekick - ESK1000
Using it for installation, you do not need to pre-configure the
IP address or to use an additional monitor to check and adjust
all the IP cameras. The product can assign an IP address to the
camera, and then you can connect and check the camera live
view using our mobile app EF Sidekick. For details about IP
Sidekick, please refer to the IP Sidekick –
Manual.
• Bracket - BA-EQN
onto the desired surface.
*Two M3*5 screws and two washers are
bracket.
4.3 Basic Installation
To install this IP camera, you have to prepare 4 screws (M3 with max length of 2mm) and then
screw the camera to the installation surface. The four screw holes on the camera are illustrated
below (top / bottom / left / right). Please be noted the Top screw hole should face up in order to
display correct camera view position.
3
Page 9
EQN100
5. Accessing the Camera
This section explains how to access the Web interface of the camera for configuration.
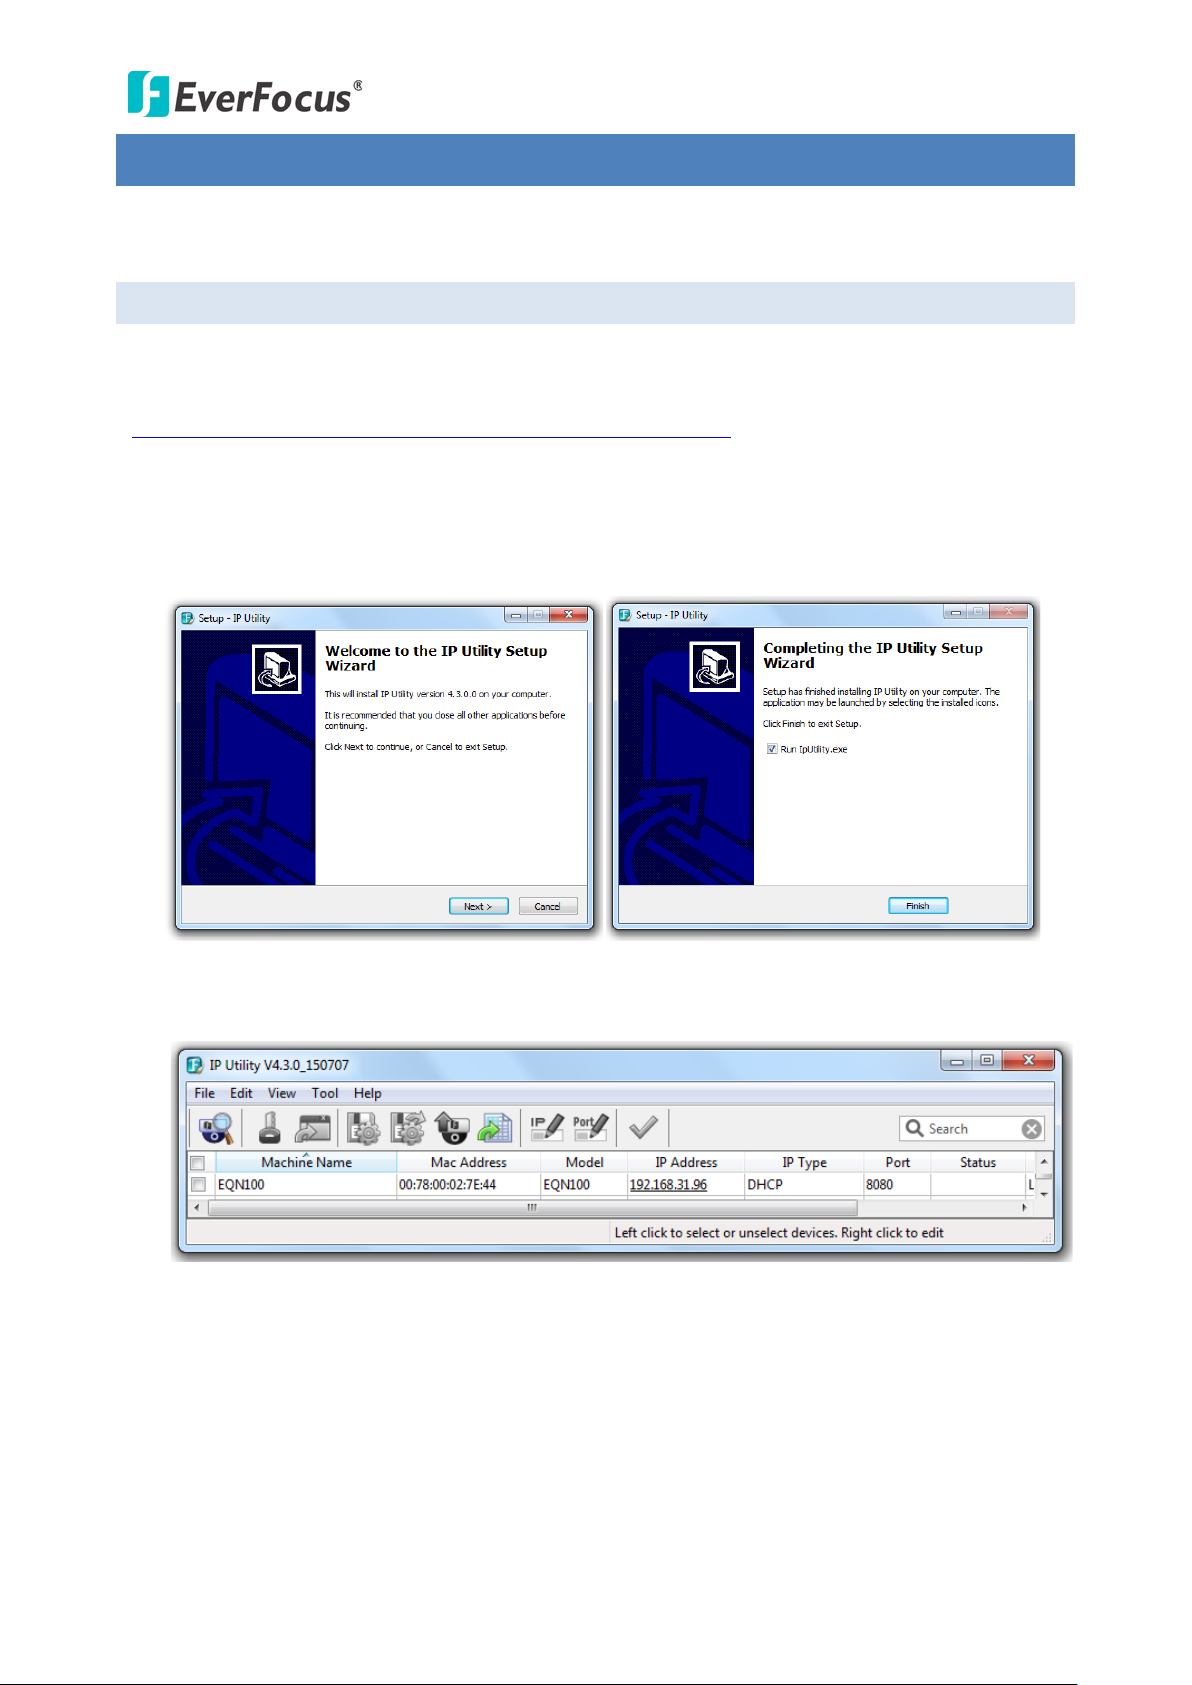
5.1 Checking the Dynamic IP Address
You can look up the IP address and access the Web interface of the camera using the IP Utility
software, which can be downloaded from EverFocus’ Website (Download Center)
(http://www.everfocus.com.tw/HQ/Support/DownloadCenter_p1.aspx). Please connect the IP camera
on the same LAN of your computer.
1. Extract the files after downloading the IP Utility to your computer. Double click the IP Utility
Setup.exe and follow the on-screen instructions to install the IP Utility.
2. Click the Finish button, the IP Utility will be automatically launched to search the IP devices
connected on the same LAN.
4
Page 10
EQN100
Before start operating the IP camera, please make sure the camera date and time are correct. To
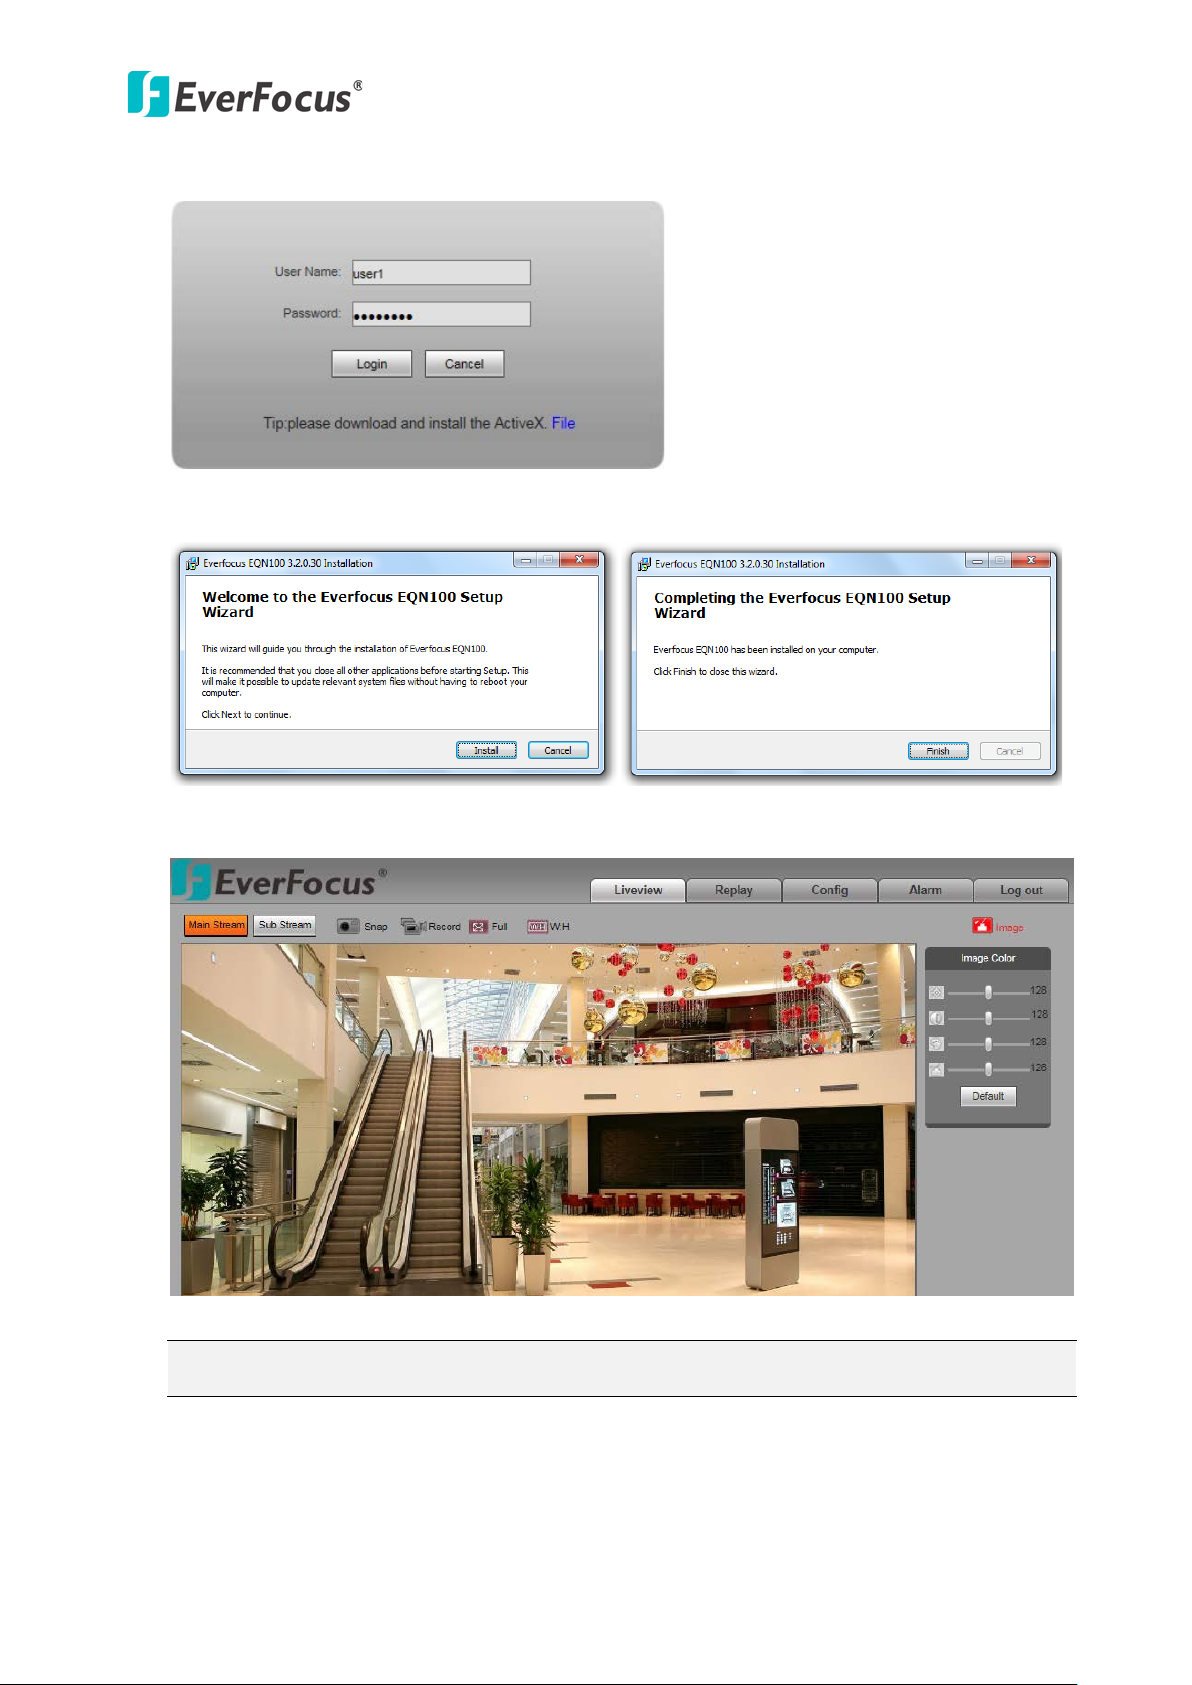
3. To access the Live View window, double click the IP address of the device, the login window
appears.
4. Download and install the ActiveX file by clicking File on the login window. Click Run and
follow the instructions to install the program. Click Finish to complete the process.
5. On the login window, type the user ID and password to log in. By default, the user ID is
user1 and the password is 11111111. Click Login, the Live View window appears.
Note:
configure the camera date/time, go to Config > System > System Time on the Web UI.
5
Page 11
EQN100
5.2 Settings for Microsoft Internet Explorer
To enable Remote Live View, Firmware Upgrade and ActiveX Prompt on Internet Explorer, some
settings have to be complete. Please follow the steps below:
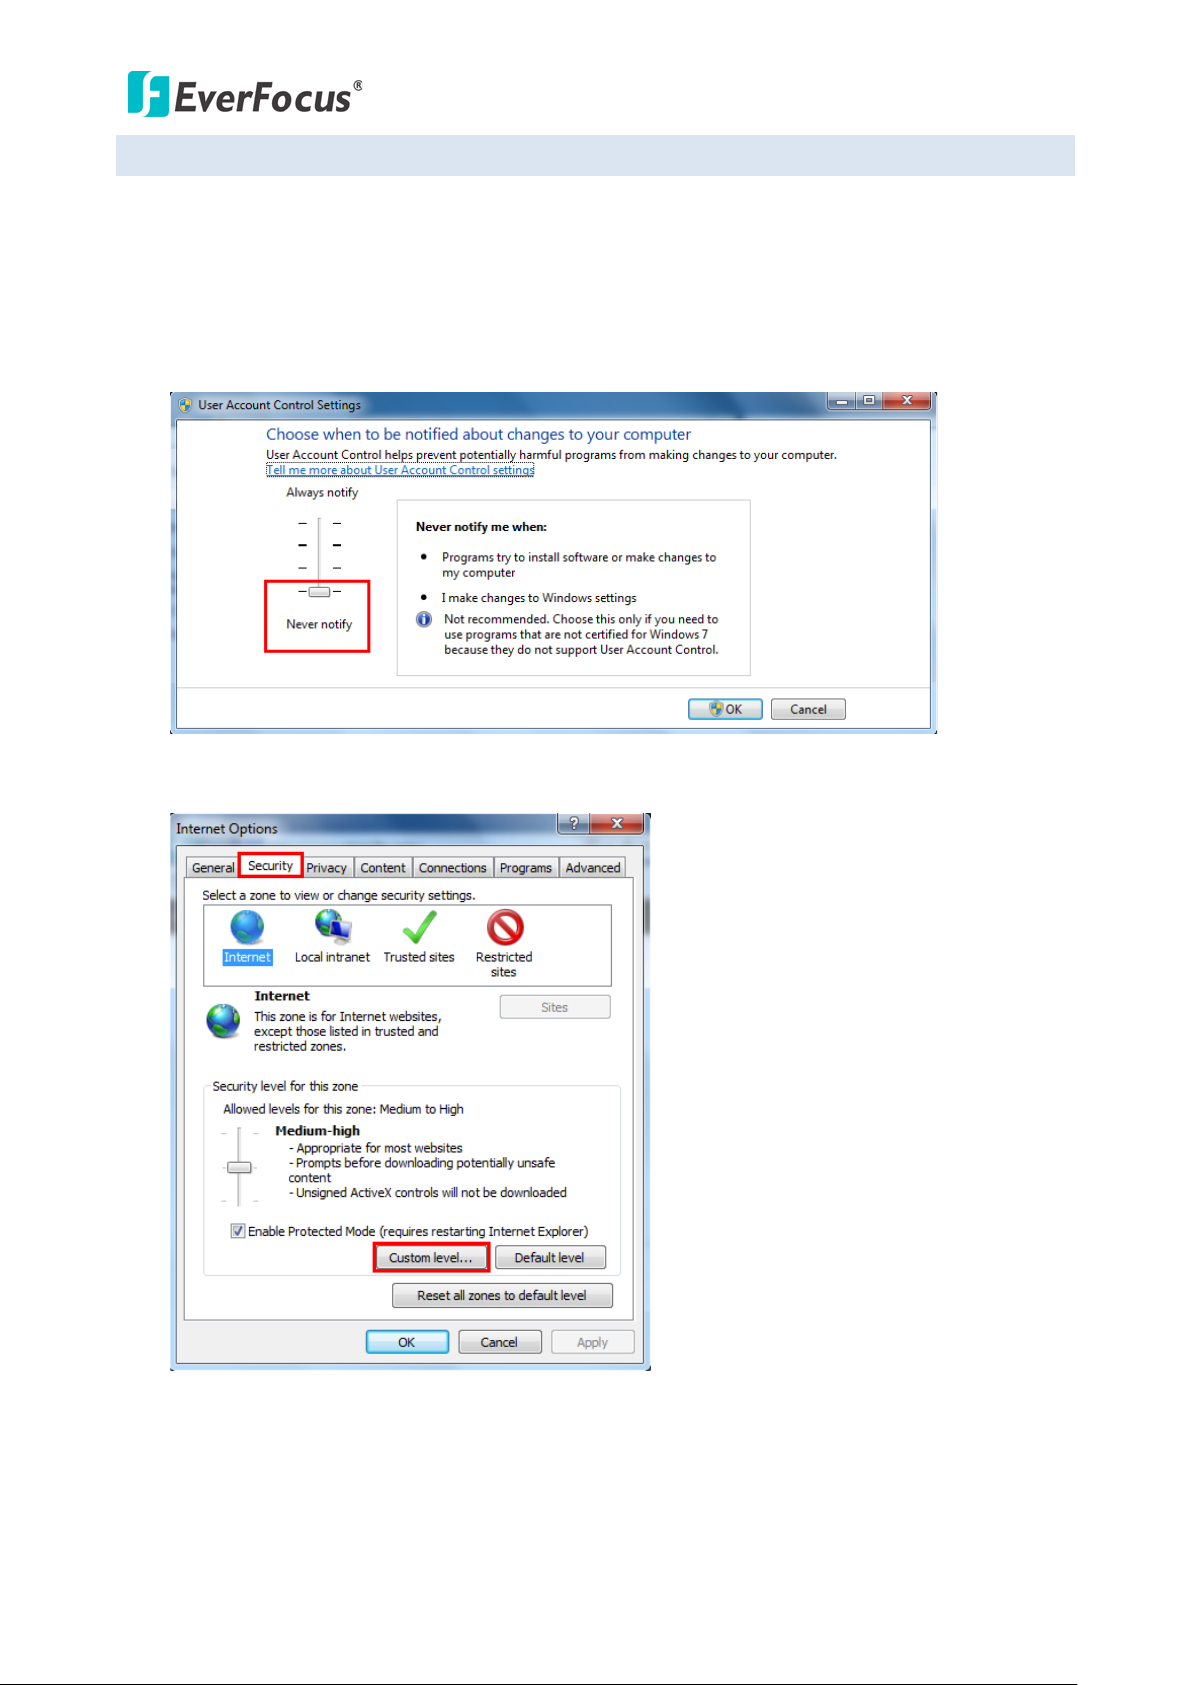
1. On the computer, click Start > Control Panel > System and Security > Action Center (click
Change User Account Control Settings), the User Account Control Settings window appears.
Adjust the slide bar to Never Notify and then click OK. Restart your computer if requested.
2.
Open the Internet Explore, click Tools > Internet Options > Security Tab > Custom Level, the Security
Settings windows appears.
6
Page 12
EQN100
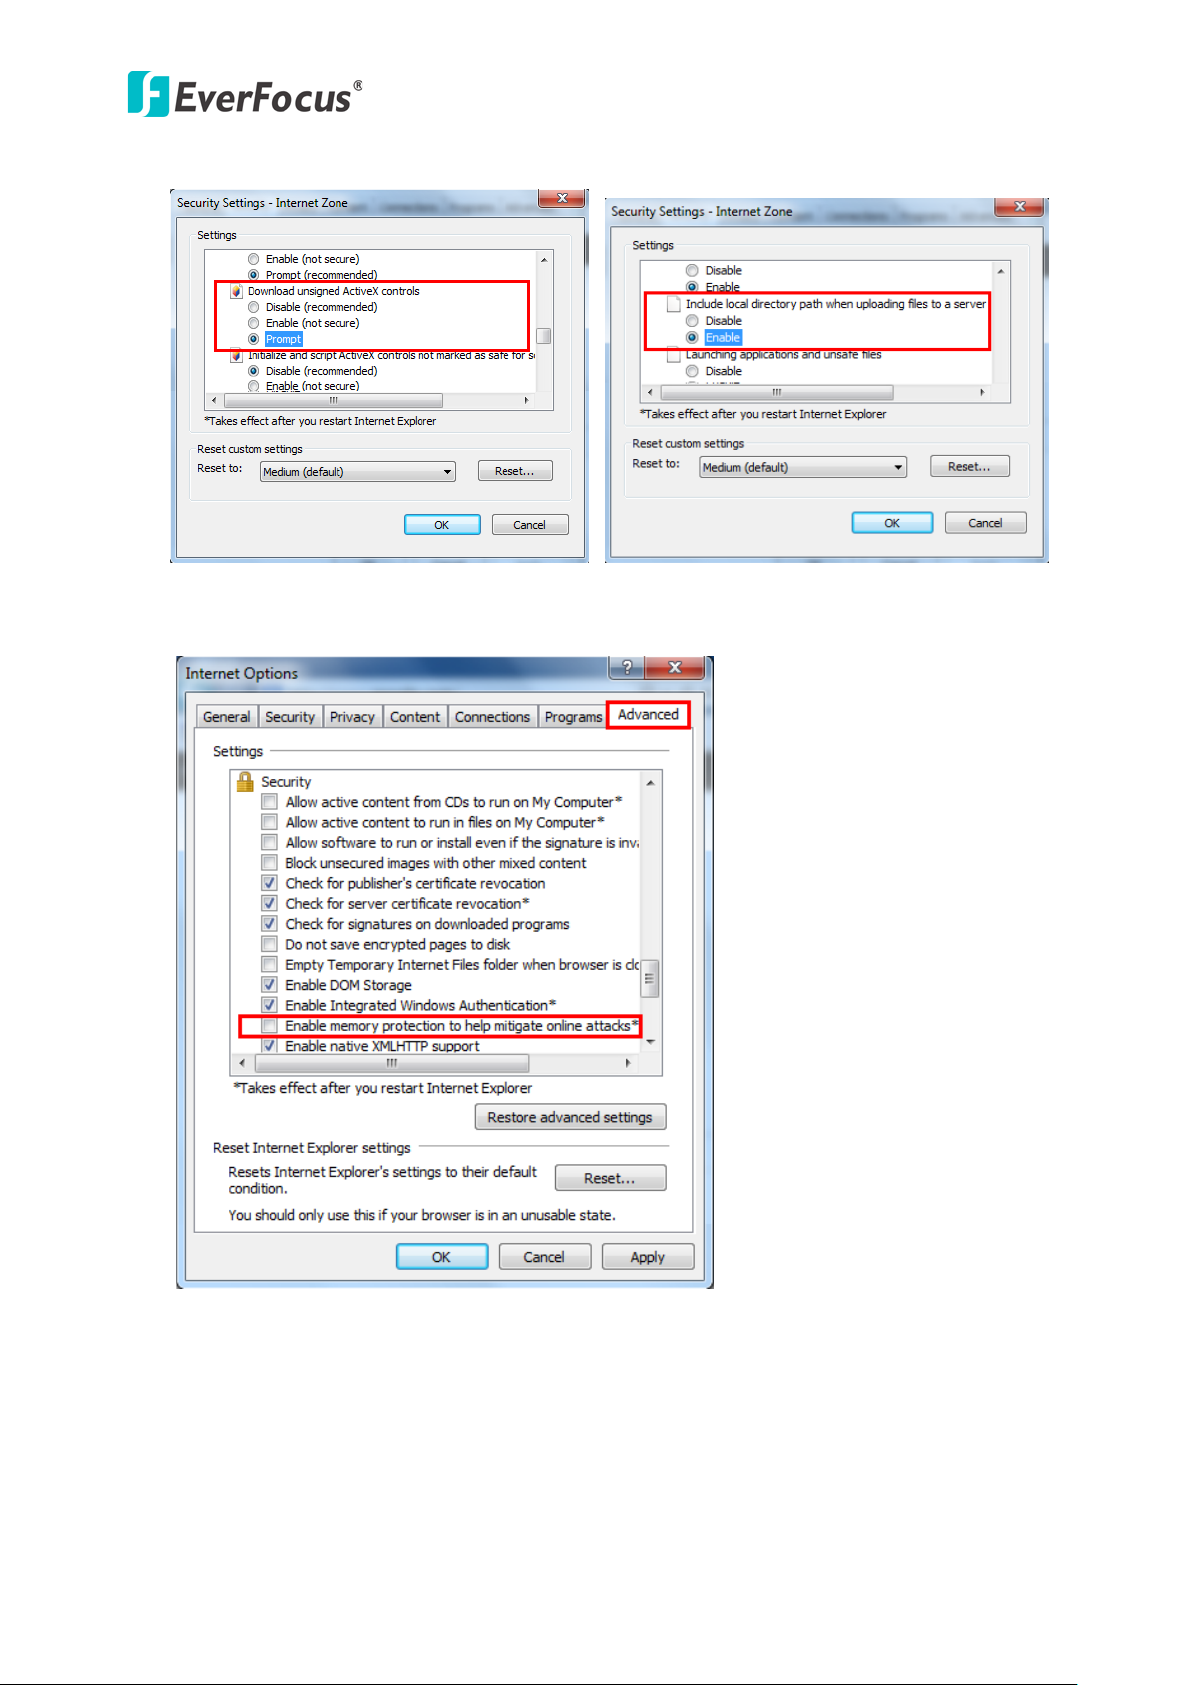
3. In the Download unsigned ActiveX controls field, select Prompt. In the Include local directory path
when uploading files to a server field, select Enable. Click OK.
4. In the Internet Options window, click the Advanced tab and then disable Enable memory protection to
help mitigate online attacks. Click OK.
7
Page 13
EQN100
High-speed modem
Internet
Straight-through LAN patch cable
Router
Cat 5 Straight Through Cable
Left: Pinout of a straight-through cable.
Cat 5
Straight Through Cable
High-speed modem
Internet
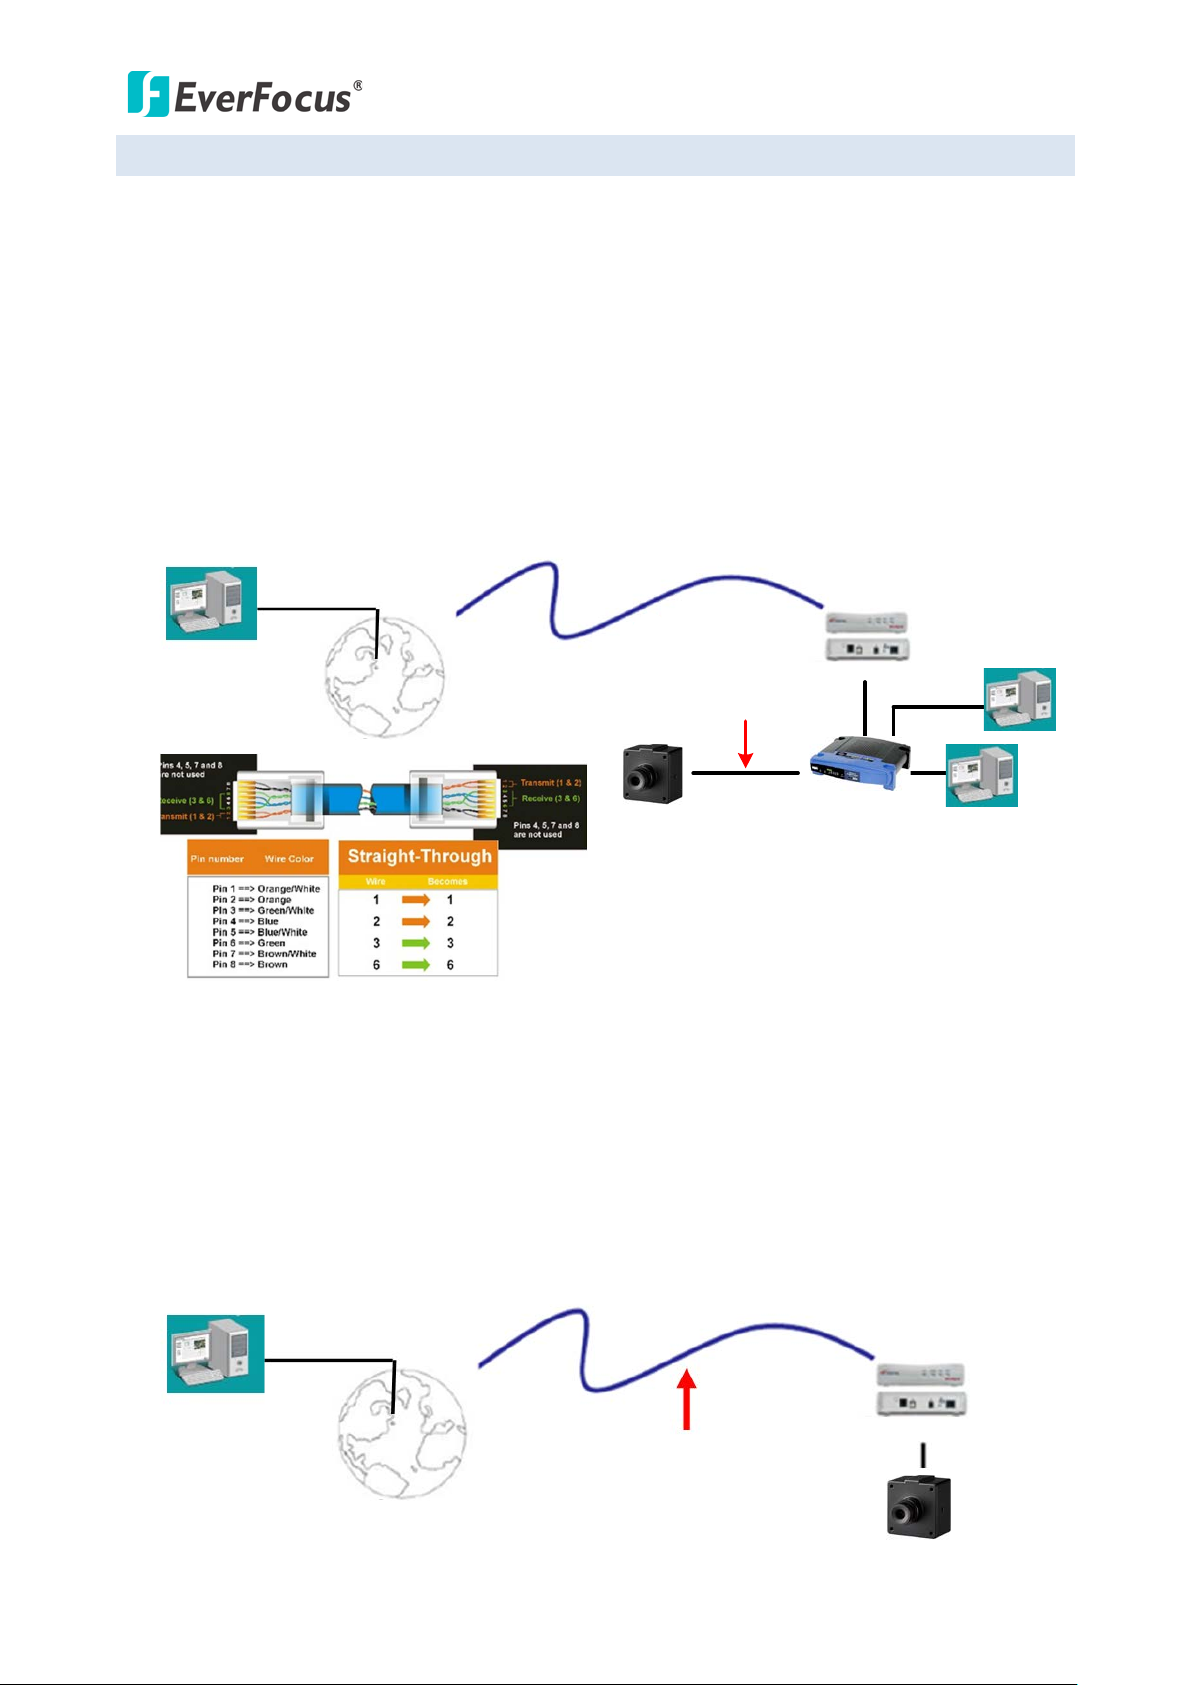
5.3 Connecting the Camera to the Network
There are three methods to connect the IP camera to the network: Router or LAN Connection,
Direct High-Speed Connection and One-to-One Connection.
Router or LAN connection
This is the most common connection in which the IP camera is connected to a router and allows
multiple users on and off site to see the IP camera on a LAN/WAN (Internet). The camera must
be assigned an IP address that is compatible with its LAN. By setting up port forwarding on the
router, you can remotely access the cameras from outside of the LAN via the Internet. To
remotely access the Web interface of the IP camera, please refer to 7.3.7 DDNS Settings. To s et
up port forwarding, please consult the manual of the router.
Direct High-Speed Connection
In a Direct High-Speed Connection, the camera connects directly to a modem without the need
for a router. You need to set the static or dynamic WAN IP address assigned by your ISP (Internet
Service Provider) in the camera’s configuration web pages. To access the camera, just type
“http://xxx.xxx.xxx.xxx”, where xxx.xxx.xxx.xxx is the IP address given by your ISP. If you have a
dynamic IP address, this connection may require that you use DDNS for a reliable connection.
Please refer to 7.3.7 DDNS Settings.
8
Page 14
EQN100
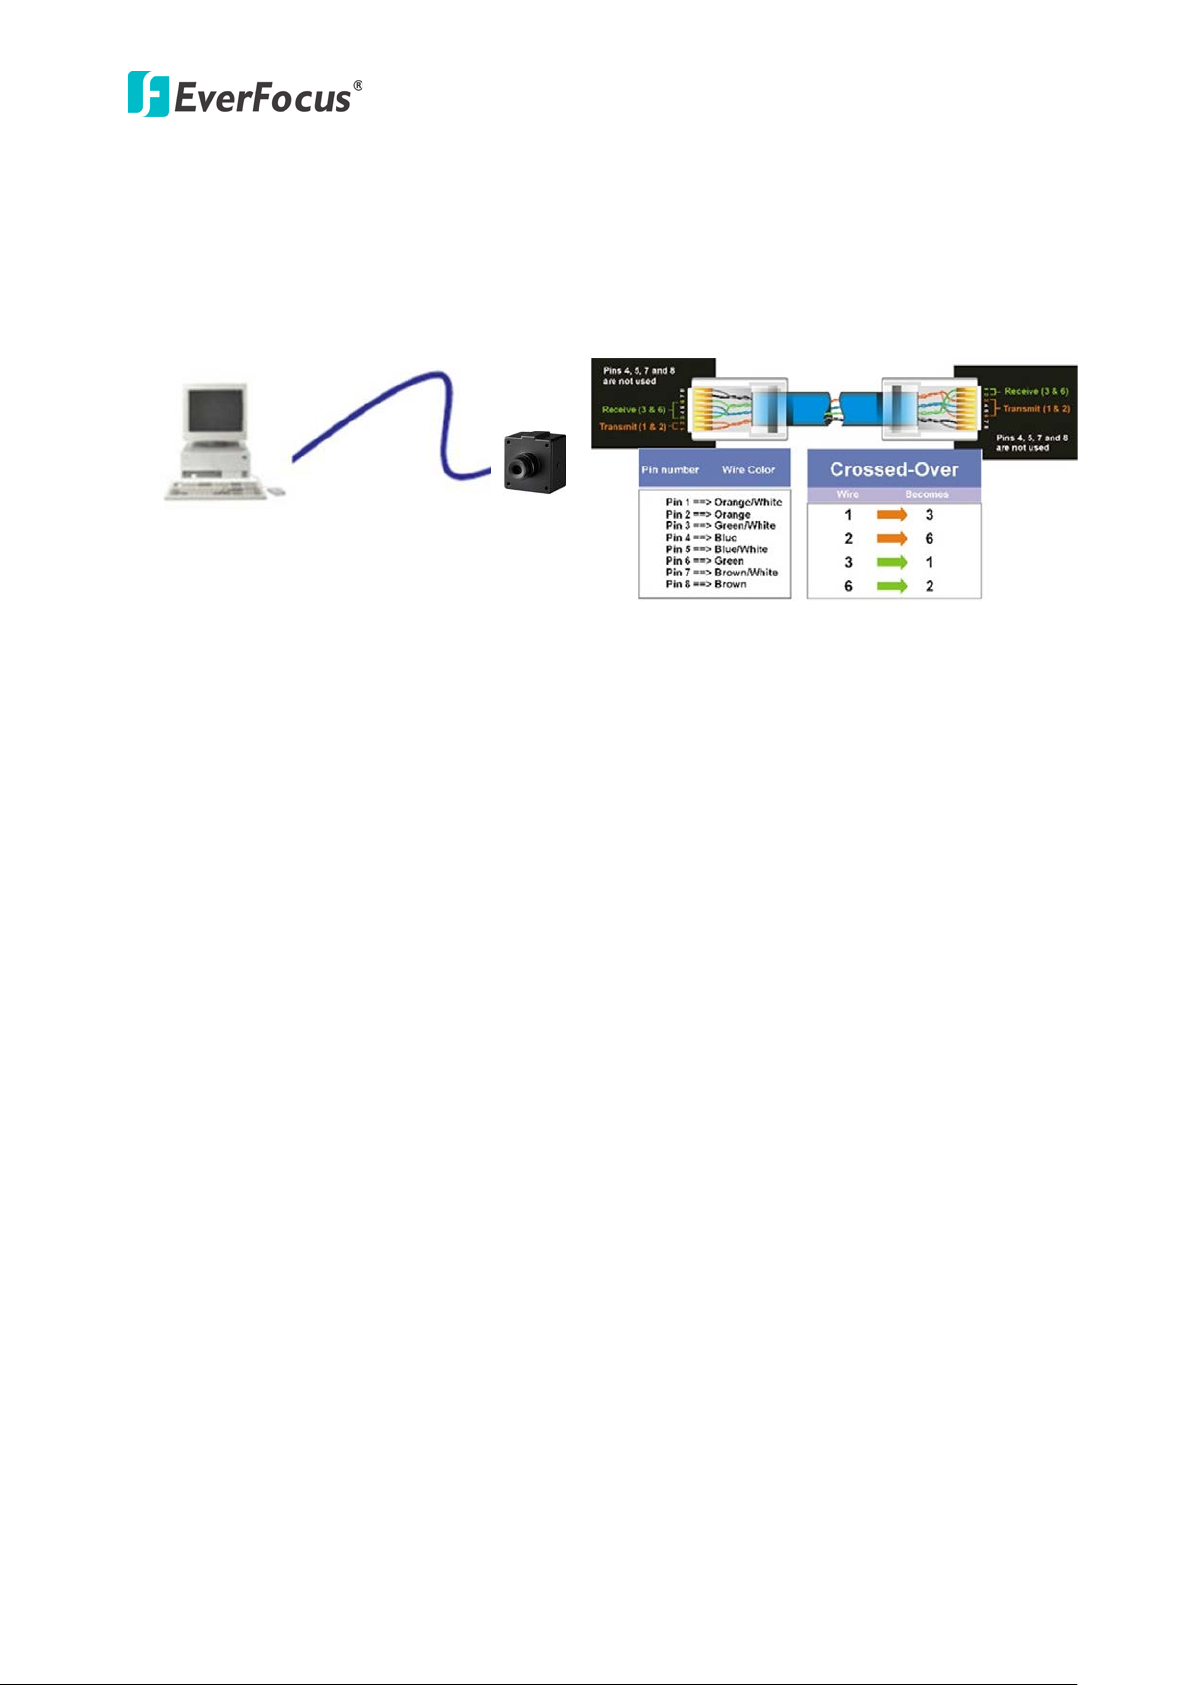
Cat 5
Right: Pinout of a crossed-over cable.
One-to-One Connection (Directly from PC to IP Camera)
You can connect directly without using a switch, router or modem. However, only the PC
connected to the camera will be able to view the IP camera. You will also have to manually
assign a compatible IP address to both the computer and the IP camera. Unless the PC has
another network connection, the IP camera will be the only network device visible to the PC. See
the diagram below:
9
Page 15

EQN100
5.4 Live View Window
After logging in, the Live View window appears. On the Live view window, users can do
operations like taking Snapshot, Recording, Alarm Search, Playback and Full-screen Viewing.
[Liveview] Click to enter the Live View window.
[Replay] Click to enter the Playback page, please refer to 6. Playback.
[Config] Click to enter the System Settings page, please refer to 7. System Settings.
[Alarm] Click to enter the alarm search page, please refer 8. Alarm Search.
[Log out] Click to log out the system.
[Main Stream] Call the main stream of camera to get the best quality. To set up the
main stream parameters, please refer to 7.2.2 Video Coding.
[Sub Stream] Call the sub stream of camera, with low resolution, suit for bad network or
Internet. To set up the sub stream parameters, please refer to 7.2.2 Video Coding.
[Snap]: Click “Snap”, snap the current image and save it in .JPG format automatically
to the storage directory of snapped images. To change the storage path, please refer
to 7.1 Local Config.
[Record]: Click to start recording the current live view videos to your computer in
H.264 format. To change the storage path or set up the packing time of the recordings,
please refer to 7.1 Local Config. You can play back the recordings using the internal
player, please refer to 6. Playback.
Displayed status after recording starts:
[Full]: Display images in full-screen, right click or press the Esc key on the keyboard to
exit full screen mode.
[W:H]: Click “W:H” to get the real W:H ratio of image, avoid image distortion when stretch to
the size of screen.
[Image]: Click Image, allow users to adjust Brightness, Contrast, Hue and Saturation of
image.
10
Page 16

EQN100
6. Playback
After recording the camera live view to the computer, you can use this internal player to play
back the recordings. To record camera live view, click the Record button on the Live View
Window (see 5.4 Live View Window).
Click to enter the video playback page. Users can search for recorded image
files or snapped pictures in local PC or storage device according to date.
[Image]: Select a display ratio from the drop-down.
[Storage]: Select PC to search a snapshot or recording from the computer.
[Type]: Select a recording type from the drop-down. Manual Record: video recordings;
Picture: snapshot images.
[Date]: Select a specific date.
[Search]: Click to start searching for the recordings/snapshot according to the setup
attribute above. The searched data will be listed in the File List below.
[Play]: Select a file in the File List by clicking on it, and the click the Play button to start
displaying the snapshot or playback the recording. You can also use the tool bar above to play
back the recordings.
11
Page 17

EQN100
7. System Settings
On the Live View window, click Config to enter the System Settings page.
7.1 Local Config
[Preview mode]: Users can choose Real time priority or Fluency priority mode according
to their needs.
[Reset Mosaic]: Select this option to make image quality better, but CPU usage rate will
be higher at the same time.
[Record file packing time]: Set packing time of record files for local PC when it is
recording.
[Record file path]: Set the storage directory for local records and snapped files.
After you set these parameters, please click to make them valid.
12
Page 18

EQN100
7.2 Video Settings
7.2.1 OSD Settings
You can configure the texts displaying on the live view streams.
[Title]: The name of video channel, displayed at the bottom left of image (movable), maximum
characters allowed: 32.
[Color]: You can choose different colors for the text.
[Title]: Check the box to enable displaying title on live view stream. You can adjust the
position for the title by using the direction buttons.
[Date/Time/Week]: Check the boxes to enable displaying Date, Time, Week on live view
stream. You can adjust the display position by using the direction buttons.
[Date Format]: Select a date format from the drop-down list.
[Frame/Bitrate]: Check the box to enable displaying frame rate and bit rate on live view
stream.
[Connecting No.]: Check the box to enable displaying the number of connections to this
camera. The number will be displayed at the end of title.
For example, EverFocus EQN100(3). The “(3)” indicates there are 3 connections to this
camera.
After you set these parameters, please click to make them valid.
13
Page 19

EQN100
7.2.2 Video Coding
You can configure Main / Sub stream settings on this page.
[Coding Level]: Baseline and Main profile available, only for H.264 compression format.
Baseline suits for low delay, and the situation have requirement on real time. Main
profile suits for better quality.
[Coding]: H.264 and M-JPEG.
[Resolution]: Set resolution of images.
[Quality]: You can choose the right quality according to your need: Fine, Normal, Basic,
and the parameters can also be user-defined by choosing [Advanced]. When Advanced is
selected, some settings will be grayed-out.
[Advanced]: Check the box to enable advanced settings for Main stream. You can further
setup the following settings.
[Rate control]: This function is only available when Advanced is enabled. CBR adopts
constant encoding bitrate, VBR adopts variable encoding bitrate.
[Bitrate fluctuate]: Under CBR setting: set the bitrate range. You can choose
self-adaption, it means the bitrate controlled by the software, and also can choose
±10%~±50%, ±10% means the bitrate range from -10% to +10% of the value of bitrate.
Under VBR setting: set image quality from best to worst.
[Bitrate]: The range of preferred and alternate stream is 30~16384Kbps. Higher bitrate
setting can generate better image quality, but it occupies more bandwidth, please adjust
the setting according to your actual bandwidth.
Under CBR setting, [Bitrate] is the constant bitrate of encoding.
Under VBR setting, [Bitrate] is the variable bitrate of encoding.
14
Page 20

EQN100
[Frame rate]: Set encoding frame rate per second. Under poor network condition, frame
rate can be reduced to control encoding bitrate to make motion images flow more
smoothly.
[GOP]: Adjustable between 1~200(Preferred Stream), 1~ 200(Alternate Stream).
Smaller I frame interval means higher bitrate and better image quality. It is
recommended to set the I frame interval as above 25.
[LAN default value]: Click to return the LAN settings to factory default.
Main stream:
H.264 Coding, GOP: 75, frame rate: 25, rate control: VBR, image quality: better
720P:2048kps, 1080P:4096kps
MJEPG Coding: GOP: 75, frame rate: 25, rate control: VBR, image quality: better
720P:9216kbps, 1080P:10240kbps
Sub Stream:
H.264 Coding: GOP: 50, frame rate: 25, bitrate: VBR, 512kbps, image quality: Bad
MJPGE Coding: GOP: 50, frame rate: 25, bitrate: VBR, 4096kbps, image quality: Bad
[WAN default value]: Click to return the WAN settings to factory default.
H.264 Coding: GOP: 25, frame rate: 5, bitrate: CBR, 384kbps, image quality: Bad
MJPEG Coding: GOP: 25, frame rate: 5, bitrate: CBR, 4096kbps, image quality: Bad
After you set these parameters, please click to make them valid (After
change the coding level, resolution and coding, device will restart.).
Note: Non-professional users please use “Advanced Settings” with caution.
15
Page 21

EQN100
7.2.3 Video Mask
The Video Mask can block out sensitive areas from view, covering the areas with black boxes in
both live view and recorded clips. This feature is useful when users’ don’t want the sensitive
information visible. Up to four Video Masks can be configured.
To set up a Video Mask:
1. Check the box of Enable Mask and then click the Mask area set button.
2. Use your mouse to draw a rectangle area on the screen. Up to four rectangle areas can be
set up. You can also click All to set up the entire stream for video mask.
3. Click Save, the configured areas will be applied with black masks.
4. To clear mask areas, click Clear and then click the Save button.
16
Page 22

EQN100
7.2.4 Video Parameter
You can adjust video parameter on this page. Click Image, Basic and Advanced to
configure the settings.
[Image]: You can adjust the following image color settings.
Slide the bar to adjust the Brightness, Contrast, Hue, Saturation, Acutance, Gamma of
video.
Image: Select an image mode from Transparent or True Color.
Click to save the settings.
[Basic]
Mirror: Set mirror, horizontally rotate the video.
Flip: Set flip, vertically rotate the video.
LSC: Enable or disable the Lens Shading Correction function.
CTB: Set CTB, IPC will automatically turns on D/N function according to the image’s
situation.
17
Page 23

EQN100
WDR: Set WDR, enhance the image quality in such area: strong light source (sunlight,
lamps or reflectors, etc.), shadow of high-brightness, backlight.
3D-DNR: Set 3D NR to get a clearer picture in low light environment, effectively
eliminate video noise and color noise in low light conditions.
Video Standard: In indoor environment, if the flashing of lamps results in the flickering
of images, please choose 50HZ or 60HZ according to the power frequency. 50HZ suits
for PAL system, 60HZ suits for NTSC system.
Click to save the settings.
[Advanced]
Gain Value: Change the value of AGC can adjust the effect of image in low light-level.
Exposure Time: Set the value of Shutter to control exposure time.
WB: You can choose Manual WB or AWB mode to adjust white balance, AWB is default
open.
AntiFogging: Set anti fogging function, when the density of fog up to a high value, the
ISP will change the brightness and contrast to improve the quality of image.
AntiFalseColor: Set anti false color function, can cancel the Moore profile effect in high
frequency part.
AntiTrembling: Click Close to disable or Open to enable the anti trembling function.
After you set these parameters, please click to make them valid.
18
Page 24

EQN100
7.3 Network Settings
7.3.1 Basic Setting
[Data Port]: Default value is 5000 (users are recommended not to change it).
[Web Port]: Default value is 80 (users are recommended not to change it).
[ONVIF Port]: Default value is 2000 (users are recommended not to change it).
After you set these parameters, please click and the device will reboot to
make the parameters valid.
19
Page 25

EQN100
revise and save parameters, the device will restart. If it is applied in LAN, please
7.3.2 LAN Setting
[DHCP Enable]: If DHCP function of the router is enabled, IP camera will automatically
fetch IP address from the router.
[IP]: Set the camera’s IP address.
[Subnet Mask]: Default value is 255.255.255.0 (users are recommended not to change
it).
[Gateway]: Set the gateway IP of IP camera, for example when the device is connected to
public network via a router, the gateway IP is the router IP.
[Preferred DNS]: Enter the IP address of the DNS server if this is provided by an ISP.
[Alternate DNS]: If your ISP provided you with a secondary DNS address, please enter it
here.
[MAC]: The Physical address of IP camera (users are recommended not to change it).
Note: After you
pay attention to avoid IP collision.
20
Page 26

EQN100
7.3.3 PPPoE Setting
[Enable]: Enable or disable PPPOE dial-up function.
[IP]: After successful setting of device dial-up, it will display the public IP Address.
[Username]: ADSL dial-up account, obtain from the IP service provider.
[Password]: ADSL dial-up password, obtain from the IP service provider.
[Online time]: Start timing after dial-up to see the online duration after successful
dial-up.
After you set these parameters, please click to make them valid.
21
Page 27

EQN100
7.3.4 UPNP Setting
Auto-mapping of port, when IP camera is connected to a router with UPNP function
enabled, the router will automatically map the port in UPNP settings to public network,
manual port mapping by users is not necessary.
[Network Card]: Select the type of NIC connecting UPNP router.
[Mode]: Designate mode and auto mode.
Designate mode means to specify data mapping port and web mapping port to router.
Auto mode means data mapping port and web mapping port are set up by router.
[Server URL]: Enter the IP address of the router with UPNP function.
[Data Port Map No.]: Data mapping port of user-specified device on the router (works
only under specified mode).
[Web Port Map No.]: Web mapping port of user-specified device on the router (works
only under specified mode).
[Data Mapping Status]: When UPNP function runs successfully, the status bar will echo
the data port mapped to the router by the device.
[Web Mapping Status]: When UPNP function runs successfully, the status bar will echo
the web port mapped to the router by the device.
After you set these parameters, please click to make them valid.
22
Page 28

EQN100
7.3.5 Email Setting
To set the mailbox addresses and parameters of alarm mails and public network IP mails.
[SMTP server]: Enter the IP address or the host name of the SMTP server used to send
e-mails.
[From]: Input the sender’s e-mail address, so that the receiver can recognize the sender
when an event message is received.
[To]: Input the e-mail addresses for receiving an e-mail message when events occur.
[SMTP Username]: The login user name of the mailbox that sends mails.
[Password]: The login password of the mailbox that sends mails.
[MAIL Title]: Title of mails.
[SMTP Port]: Port of SMTP port, different mail server has different port. For example, the
server port of Gmail is 465.
Commonly used mail server configuration:
Gmail mail server:
SMTP server: smtp.gmail.com
SMTP user name: username@gmail.com
SMTP port: 465
SSL: enabled
Yahoo mail server:
SMTP server: smtp.mail.yahoo.com
SMTP user name: username@yahoo.com or username@yahoo.com.cn
SMTP port: 465
SSL: enabled
163 mail server:
SMTP server: smtp.163.com
SMTP user name: username
SMTP port: 25
SSL: disabled
[SSL]: Check the box to enable the SSL function. Enable this function means you can access the
camera through the SSL protocol that provides communication security over the Internet.
After you set these parameters, please click to make them valid.
23
Page 29

EQN100
7.3.6 FTP Setting
FTP server sends the record files and snapped images generated after alarm is triggered
in FTP mode to specified FTP server, supports 2 FTP servers, when the preferred one
goes wrong, system will switch to the alternate one.
[Server URL]: The IP address or HTTP address of FTP server.
[Server Port]: Port of FTP server, the default port is 21.
[FTP Catalog]: Path on remote FTP server, if the path does not exist or has not been filled
in, the device will create a file folder under the root directory of FTP server.
[User name] and [Password]: User name and password of FTP server.
Note: If you want to upload the record files and snapped images, you must have the authority
to write on the FTP server.
24
Page 30

EQN100
7.3.7 DDNS Setting
DDNS (Dynamic Domain Name System) is a service used to map a domain name to the dynamic
IP address of a network device. It assigns a domain name (URL) to the IP camera, so that the
user does not need to go through the trouble of checking if the IP address assigned by DHCP
Server has changed. Once the IP is changed, the IP camera will automatically update the
information to the DDNS to ensure it is always available for remote access.
[Enable]: Check the box to enable the DDNS function.
[IP Camera Name]: Enter to register a free host name from EverFocus DDNS Server.
After clicking , the following message pops-up. Click Login to re-login the IP
camera.
Note that EverFocus provides free DDNS host name. If you want to check whether the
host name you desired is available, go to www.everfocusddns.com for a quick check.
1. Enter a host name in the box field.
2. Click the Check button.
3. If the host name is available, the xxx is available text will be displayed above the box
field.
25
Page 31

7.3.8 VPN Setting
EQN100
[Enable]: Enable or disable VPN function.
[Server URL]: IP address or domain of VPN server.
[User Name]: User registered in VPN server.
[Password]: User password registered in VPN server.
[IP]: Display IP after VPN dial-up success.
[Status]: Display the status of dial-up.
After you set these parameters, please click to make them valid.
26
Page 32

7.3.9 RTSP Setting
EQN100
[Enable RTSP]: Check RTSP switch to enable RTSP function, RTSP function enabled as
default.
[Enable Authentication]: Check encryption switch, disabled as default, when enable
encryption, you need the password when using VLC player connect camera.
Open: rtsp://ip/av0_0&user=admin&password=admin;
Close:rtsp://ip/av0_0[&user=admin&password=admin],” [ ]” Optional content;
“av0_0 ”,frist“0” shows channel:0,1,2,3, represent the channel :1,2,3,4;IP camera has only
one channel, fill in“0”;
The second “0” shows main / sub stream, 0: main stream, 1: sub stream;
If the authentication mode is changed, the camera reboots.
RTSP port: Default port is 554.
With RTSP function enabled, users can review the audio and video streams in real time
via players that supports standard RTSP protocol
[Communicate]: Multicast function is enabled as default.
[Multicast Server Address]: When camera support multicast, camera will be the
multicast server, and have the multicast address, 239.0.0.0 as default address.
Multicast port, video of main stream and sub stream using port 5010 and 5020, audio of
main stream and sub stream using port 5012 and 5022.
[Onvif Password Enable]: Check the box to enable Onvif password.
After you set these parameters, please click to make them valid.
27
Page 33

7.3.10 IP Email
EQN100
[Enable Email]: Check this switch to enable public IP mail notification function.
[Update Interval]: Select the interval of public IP mail notifications.
After enable this function, when the device detects public IP changed, it will send
notification mail to the mail address set in [mail setting].
After you set these parameters, please click to make them valid.
28
Page 34

7.3.11 Connect Setting
EQN100
[Enable]: Enable or disable active connection of the device to surveillance center.
[Server URL]: The address of surveillance center (e.g. 192.168.55.99).
[Server Port]: The port of surveillance center (e.g. 6000).
After setting all the network parameters, click to make the parameters valid.
29
Page 35

EQN100
7.4 Alarm Settings
7.4.1 Motion Detection
You can set up motion detection function on this page. When a motion event is detected,
the camera will send E-mail, take a snapshot or record live views. You can then set up to
send Snapshots or Recordings to the pre-configured E-mail or FTP server.
[Motion Detection Area]: Click the button to start configuring motion areas. On the
preview window, draw a rectangle area on the preview window using your mouse. Up to four
rectangle areas can be set up.
[All]: Click to set the whole video as motion detection area.
[Clear]: Click to clear all motion detection areas.
[Sensitivity]: Sensitivity range is 1~5, greater value means higher sensitivity.
[Enable]: Enable or disable motion detection.
[Time]: Set the period of time for motion detection, two periods allowed.
[Linkage Alarm output]: Support sending Email, taking snapshot and record when a
motion event occurs.
E-mail: Send motion detection alarm messages to users via E-mail, details about E-mail
setting please refer to 7.3.5 Email Setting.
Snapshot: When motion alarm is triggered, the camera will automatically send a
snapshot image via E-mail or FTP. For snapping parameters, you can input a number of
snapshot image to send in the box. For example, if you input 10 in the box and 1 in the
Snap __ s box, when there is a motion alarm, 10 snapshot images will be snapped and
send to E-mail or FTP, and the interval between each picture is 1 second. Please refer to
Step 4 below.
Record: When a motion alarm is triggered, the camera will automatically send a
recording via E-mail or FTP with the setup interval. Please refer to Step 4 be lo w.
30
Page 36

EQN100
Record file packet time equals duration of alarm add the record time set in [Linkage
After setting all the parameters, click to make the parameters valid.
Note:
recording].
To set up a Motion Area:
1. Click the Motion area set button.
2. Use your mouse to draw a rectangle area on the screen. Up to four rectangle areas can be
set up. You can also click All to set up the entire stream for motion detection.
3. Select a motion sensitivity level from the drop-down list and check the Enable box to enable
the motion detection function. Set up a period of time for motion detection. Two
periods are allowed.
4. In the Linkage Alarm output field, you can check the event actions boxes of E-mail,
Snapshot or Record to enable these alarm actions when the camera detects motion
events.
a. E-mail: Check the box to send motion detection alarm messages to users via
E-mail. For this function to work, you have to configure E-mail setting in advance.
Please refer to 7.3.5 Email Setting.
b. Snapshot: When motion alarm is triggered, the camera will automatically send a
snapshot image via E-mail or FTP. For snapping parameters, you can input a
number of snapshot image to send in the box. For example, if you input 10 in the
box and 1 in the Snap __ s box, when there is a motion alarm, 10 snapshot
images will be snapped and send to E-mail or FTP, and the interval between each
picture is 1 second.
c. Record: When a motion alarm is triggered, the camera will automatically send a
recording via E-mail or FTP with the setup interval.
5. Click Save, the configured areas will be applied with motion detection.
6. To clear motion areas, click Clear and then click the Save button.
31
Page 37

EQN100
7.5 System Setting
7.5.1 System Info
[Device Name]: Enter a device name.
[VO Standard]: Select NTSC or PAL from the drop-down list.
[Language]: Select a language from the drop-down list. After changing the language, please
reopen the IE browser to login the camera again.
[Device ID]: Displays the device ID.
[Version]: Displays the firmware version.
After setting all the parameters, click to make the parameters valid.
32
Page 38

EQN100
Before start operating the IP camera, please make sure the camera date and time are
7.5.2 System Time
On this page, you can configure camera time from one of the three methods: NTP Server,
Synchronize with Local Computer or Manually configure.
Note:
correct.
[NTP Server]: After starting the function, switch on NTP switch and select time zone, and
click Save, the camera will send the query to NTP server, after getting the message from
NTP server, the camera will upgrade the system time, the system time will be displayed
on live view.
[Synchronize with Local Computer]: After starting the function, the date and time of IP
camera will be synchronized with the local PC.
[Set the Time Manually]: If you select this option, you can modify the time manually.
After setting all the parameters, click to make the parameters valid.
33
Page 39

EQN100
7.5.3 User Manage
You can set three users for every camera, one is Administrator, the others are general
users.
[Select User]: Select a user from the drop-down list.
Administrator: Can operate and set all functions and parameters of IP camera.
User1: Can perform operations like snapping, recording, playback, monitoring, alarm
clearing, log searching and full-screen reviewing.
User2: Can perform operations like visit setting, image lightness and color adjustment,
etc.
Note: Following are the default usernames / passwords for the account users:
Administrator: user1 / 11111111
User1: user11 / user1
User2: user12 / user2
34
Page 40

EQN100
to the unit during the upgrade sequence. The
7.5.4 Upgrade
Click the Browse button to find a previously prepared firmware upgrade file. Click the
Upgrade button to install the new firmware. The upgrading status will be displayed.
When the upgrade process is complete, the IP camera will restart automatically.
Note: Do not disconnect power and the network
unit will reboot automatically after the upgrade has completed.
35
Page 41

EQN100
7.5.5 Restore
Click the Restore factory settings button to restore the camera to the factory default
settings. All device parameters (including network parameters, excluding physical address)
will be recovered as factory setting values.
7.5.6 Restart
You can set up to manually or automatically reboot the camera.
To automatically reboot the camera, select the desired day and time from the drop-down
list.
To manually reboot the camera, click Reboot, a pop-up window displays. Enter the
camera password, the IP camera will restart.
36
Page 42

EQN100
7.5.7 System log
You can search operation log and alarm log on this page. The maximum capacity is 512
entries of message, when the number of entries exceeds 512, the camera will delete
records of the earliest date automatically.
To search log events, select a time period and click the Search button.
37
Page 43

EQN100
8. Alarm Search
When there is an alarm, the alarm status will be displayed on the Alarm tab .
Click [Alarm] to enter the alarm log search page for searching the alarm log data.
The maximum capacity is 512 entries of message, when the number of entries exceeds
512, system will delete records of the earliest date automatically.
To search the alarm log, enter the desired date and click the Search button.
38
Page 44

EQN100
Consumption
9. Specifications
Camera
Megapixel 1.3MP
Pickup Device 1/3” progressive CMOS sensor
Lens Fix focal lens 6mm (optional: 2.8mm, 3.6mm, 6mm, 8mm)
Min. Illumination Color: 0.05 Lux @F1.2 / Black: 0.01 Lux @F1.2
Day/Night Easy Day / Night
Shutter Time 1/25 ~ 1/8000sec.
Video
Video Compression H.264 / M-JPEG
Max. Video Resolution 1280 x 1024
Frame Rate 25fps / 30fps
Video format 50Hz / 60Hz
S/N Ratio > 50dB
Privacy Mask Yes
Region of Interest Yes
DNR 3DNR
Network
Interface 10BASE-T / 100BASE-TX
Supported Protocols
TCP/IP, UDP, ICMP, DHCP, NTP, DNS, DDNS, SMTP, FTP, HTTP,
PPPoE, RTP, RTSP, RTCP, ONVIF
Function
Video Streaming Dual Streams
Compression, Brightness, Sharpness, Saturation, White Balance,
Image Settings
Exposure Control, Backlight Compensation, Mirroring of Images,
Text and Image Overlay, Auto Gain Control, Auto White Balance
Event Trigger Motion Detection
Notification Send mail notification, Upload video to FTP, Record video to PC
General
Power Supply 12VDC
Max. Power
2.18W
Humidity 20% ~ 80% not condensing
Operating Temperature 0°C ~ 50°C / 32°F~122°F
Dimensions (L x W x H) 38 x 36.5 x 42.8mm / 1.5” x 1.4” x 1.7”
Weight 125g / 0.28lb (with cable)
Certificates CE, FCC
39
Page 45

EQN100
Subnet mask: 255.255.255.0 Web Port: 80
10. Appendix
Appendix 1 Network Interface of IP Camera
The default network ports of IP camera are:
80
TCP
UDP 5000
Multi-cast port Multicast original port + channel number
ONVIF 2000
5000
Web port
Communication port, audio/video data
transmission port, talkback data transmission port
Audio/video data transmission port
Appendix 2 Default Network Parameters
Default network parameters
Cabled Network:
IP Address: 192.168.1.88 Data Port: 5000
Gateway: 192.168.1.1 DHCP: Off
40
Page 46

Your EverFocus product is designed and
electronic equipment, at their
your local community waste
Ihr EverFocus Produkt wurde entwickelt
und hergestellt mit qualitativ
hochwertigen Materialien und
EverFocus Electronics Corp.
EverFocus Taiwan:
12F-1, No.79, Sec. 1, Shin-Tai Wu Road,
Hsi-Chih, New Taipei City, Taiwan
TEL: +886 2 2698 2334
FAX: +886 2 2698 3943
www.everfocus.com.tw
marketing@everfocus.com.tw
EverFocus Europe - Germany:
Albert-Einstein-Strasse 1, D-46446
Emmerich, Germany
TEL: +49 2822 93940
FAX: +49 2822 939495
www.everfocus.de
sales@everfocus.de
EverFocus China - Beijing:
Room 609, Technology Trade Building,
Shangdi Information Industry Base,
Haidian District, Beijing 100085, China
TEL: +86 10 6297 3336~39
FAX: +86 10 6297 1423
www.everfocus.com.cn
marketing@everfocus.com.cn
EverFocus USA - California:
1801 Highland Avenue, Unit A, Duarte,
CA 91010, USA
TEL: +1 626 844 8888
FAX: +1 626 844 8838
www.everfocus.com
sales@everfocus.com
EverFocus China - Shenzhen:
4F, No. 2, D4 Building, Wan Yelong
Industrial Park, Tangtou Road, Shiyan,
Baoan, Shenzhen, Guangdong 518101, China
TEL: +86 755 2765 1313
FAX: +86 755 2765 0337
www.everfocus.com.cn
marketing@everfocus.com.cn
EverFocus Japan:
3F, Kuramochi, Building II
2-2-3 Koto-Bashi, Sumida-Ku,
Tok y o, 13 0-0022, Japan
TEL: +81-3-5625-8188
FAX: +81 3 5625 8189
www.everfocus.co.jp
info@everfocus.co.jp
manufactured with high quality
materials and components which can be
recycled and reused.
This symbol means that electrical and
end-of-life, should be disposed of
separately from your household waste.
Please, dispose of this equipment at
collection/recycling centre.
In the European Union there are
separate collection systems for used
electrical and electronic product.
Please, help us to conserve the
environment we live in!
Komponenten, die recycelt und wieder
verwendet werden können.
Dieses Symbol bedeutet, dass elektrische
und elektronische Geräte am Ende ihrer
Nutzungsdauer vom Hausmüll getrennt
entsorgt werden sollen.
Bitte entsorgen Sie dieses Gerät bei Ihrer
örtlichen kommunalen Sammelstelle oder
im Recycling Centre.
Helfen Sie uns bitte, die Umwelt zu
erhalten, in der wir leben
!
 Loading...