

EverFocus EPHD08 HD DVR Quick Reference Manual
2
3
4
7
6
5
8
9
1
13
15
10
11
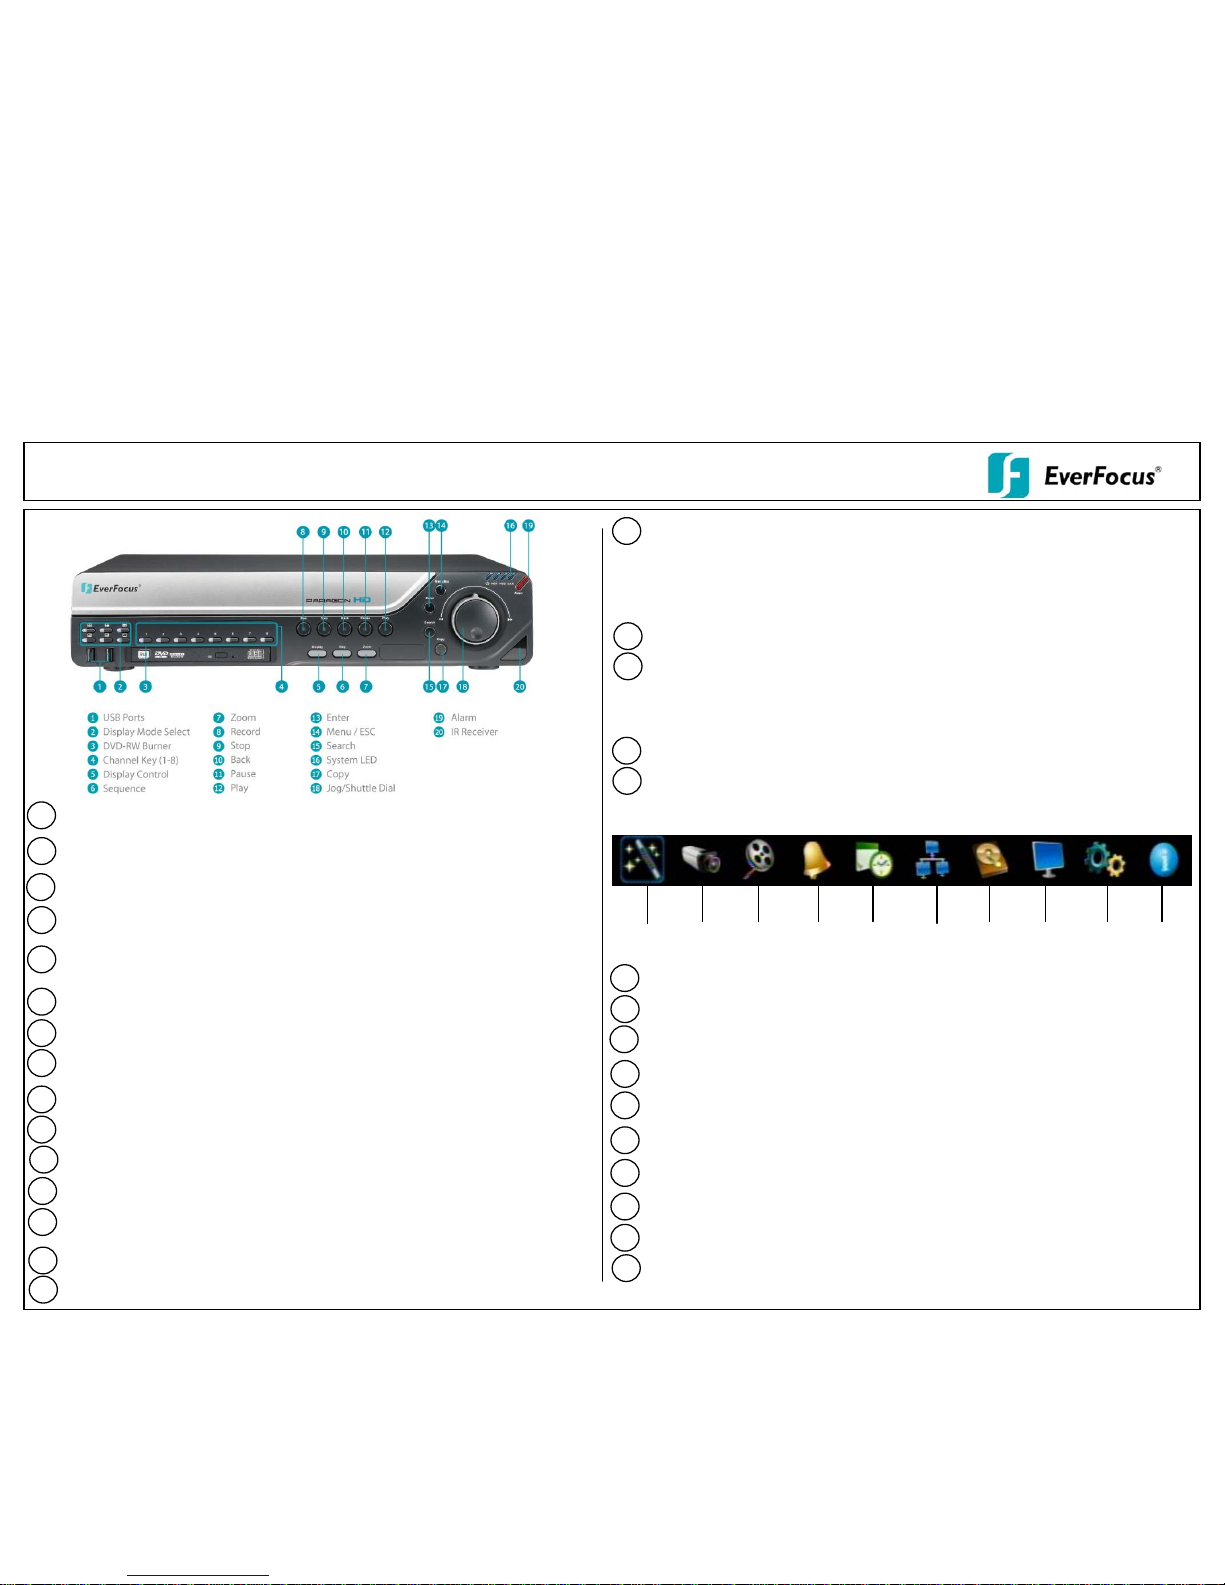
ALARM: L ED f or alarm status
EPHD08 HD DVR Quick Reference Guide
DVD+RW Burner: DVD+RW drive for video data export
Operating elements
2 x USB-2.0 port for USB mouse, USB-Flash-Drive
12
14
System LED
POWER: LED indicating power on.
HDD1/2:LED indicating HDD1 / HDD2 active
HDD1: Internal HDDs in DVR
HDD2: External HDDs connected by eSATA port
LAN: LED for network traffic
Record: RECORD key for manual start of recording / recording standby (event
recording). LED will be ON if DVR is recording or in record standby.
STOP: STOP key for Playback and Record
BACK: Reverse Playback key
PAUSE: Image freeze in playback mode
JOG/SHUTTLE: Shuttle (outer wheel): In playback mode, use the SHUTTLE for fast
forward / fast reverse playback.
JOG (inner wheel): In PAUSE mode, use the jog to move frame by frame. Within
menu functions, use the jog to adjust the values / parameters. Use Jog to highlight
individual cameras. Use either Shuttle or Jog to switch between MENU p aramet ers .
ENTER: Enter Key for menu operation and alarm acknowledge Turn camera
audio ON/OFF when viewing full screen camera.
PLAY: Playback key
Multiview Keys: 4x, 6x, 7x, 8x, 9x and PiP. The LED will show the selected
screen layout
Channel keys 1~8 for full screen display of selected channel. The LED will show
the active channel
2
3
4
7
6
5
8
9
1
10
Express menu (manual chapter 4. 2)
Camera menu (manual chapter 4.3)
Record & Play menu (manual chapter 4.4)
Alarm & event menu (manual chapter 4.5)
Schedule menu (manual chapter 4.6)
Network menu (manual chapter 4.7)
Disk menu (manual chapter 4.8)
Display menu (manual chapter 4.9)
System menu (manual chapter 4.10)
Information menu (manual chapter 4.11 )
1
2
3
4
5
6 7 8 9 10
Description of on-screen main menu (control bar)
MENU/ESC: Used to bring up Main Menu or exit from sub-Menus.
16
17
18
ZOOM: 4x electronical zoom
19
P/N: 4605XEHR08002AR_Ver.A
20
SEARCH: The SEARCH key opens the SEARCH menu
COPY: The COPY key opens the menu for video data export
IR Receiver: Receiver for IR remote control
SEQ: Sequence key for automatic switching of a defined camera sequence
DISPLAY: The DISPLAY key switches titles and status messages on the Screen in
4 steps.
EPHD08 HD DVR Quick Reference GuideOperation
1. Monitor display formats
The monitor allows full screen, 4x, 6x, 7x, 8x, 9x and PiP multiscreen display (PiP in live
mode only) as well as sequence view.
Display format switching
Press the multiview keys to switch between different display formats.
Full screen:
Select one of the channel keys 1 ~ 8.
Sequence (automatic switch, available in live mode only)
Press the SEQ key to start / stop the automatic switching mode.
2. Menu start
Press the MENU key to access the main menu bar. Control the menu either through
mouse or through the jog/shuttle.
3. Recording
Recording starts directly after the recorder has booted; there is no separate LED or
display.
4. Playback
Start the playback at the latest HDD playback position by pressing the PLAY key (Quick
Play function deactivated!).
FAST FORWARD / REVERSE :
Use the SHUTTLE for fast forward / reverse playback with up to 32x and >>>> speed.
PAUSE:
Press the PAUSE key to freeze the current playback position. Use the JOG to switch
single images forward / reverse.
5. ELECTRONIC ZOOM
The electronic zoom enables a 4x magnification in full screen mode.
Press the ZOOM key to activate the zoom function. Use the JOG to move the zoom
screen. Press the ENTER key to switch between horizontal and vertical direction of
movement.
Further ZOOM key actuation switches the zoom off.
6. Playback search
Press the SEARCH key to enter the playback search menu.
From the menu on the left, choose the search method:
- Time search
Enter time and date of the requested recording position and click PLAY.
Upon successful search, the monitor automatically switches to playback mode and
playback starts at the requested position.
- Event search
Select time and date as well as the relevant camera(s). In the “Event“ row, select
the requested event type (alarm, motion, video loss, others) and confirm
your selection by clicking SEARCH. After the search, a list of available events is
displayed. Select the relevant event from the list and click PLAY.
The monitor automatically switches to playback mode and playback starts at the
selected position.
- Smart search
Select time and date as well as the relevant camera(s). Click “Grid Setting“ key to
edit motion grid setup. Confirm your selection by clicking SEARCH. After the search,
a list of available motion is displayed. Select the relevent motions from the list and
click PLAY. The monitor automatically switches to playback mode and playback starts
at the selected position.
7. Archiving video data
To archive to USB, insert a USB stick into the USB socket at the front. To archive to
CD/DVD, insert the CD/DVD into the DVD+RW burner at the front . Press the COPY key
in live mode to display the context menu.
Enter start and end time of the video export as well as the camera number and press
COPY to start the video data export.
If requested, the player software can also be exported to the USB stick or CD/DVD by
activating the checkbox “Player“.
Exit the menu by either pressing the MENU key several times or mouseclick on the cross
in the menu bar (top right corner).
!!Warning!!
Please make sure the resolution of all cameras are the same as the DVR‘s setting.
Otherwise, DVR cannot display video correctly. The default resolution of DVR is
1920x1080. Please change the camera‘s setting to 1920x1080 before connecting to the
DVR. Or both DVR and cameras can be set to 1920x1080 as the resolution configuration.
 Loading...