

Page 1
1
Page 2
Please setup Gmail™ account during initial device setup. If you are going to use a
password or a pattern unlock you must have a valid Gmail™ account setup in the event you
forget either.
Forgot lock pattern? Here's a way to reset it.
Enter wrong pattern 5 times and wait for 30 seconds.
Select “Forgot pattern” and enter your Gmail™ account username and password.
Make sure you use the same account that was used to acti vate the device and double check
the password by logging in to that Google ™ account in a browser on laptop or PC.
If you don't have access to the original Gmail™ account, you will need to do a hard reset
and lose your settings and apps on the device. Data on the memory card will not be
erased.
2
Page 3
3
Page 4
4
Page 5
5
Page 6
This manual contains important safety precautions and informati on for correct usage. Please be
sure to read this manual carefully before use to avoid any dam age to the device.
Do not place the product in hot, wet or dusty environm ents.
Do not place the product in hot environments. Especiall y i n summer, do not place it in a car with
all the windows closed or in the sun.
Avoid dropping or smashing the product and do not shake the TFT screen excessively as it may
cause damage or abnormal display screen.
Select a suitable volume and avoid loud sound while using hea dphone/earphones. Turn down
the volume or stop using the product if your ears start hurting or r inging.
In the following situations, please charge t he product:
A. The device shows on the top of the screen.
B. System automatically shuts down, and it turns off soon after restart.
C. Operation buttons do not work properly.
D. The unit will not turn on.
Note: Chargers of other models cannot be used for t hi s device because they may cause damage to
the device that will void the warranty. Please contact our customer service department if you
need a replacement charger.
Do not disconnect the device while formatting, downl oading and/or uploading; otherwise,
application errors may occur.
We are not responsible for any memory erasure or loss caused by damage or product
maintenance, or other personal reasons.
Do not disassemble the product, and avoid cleaning the product with ethyl alcohol, thinner, or
benzene.
Do not use this product in areas which prohibit the us e of electronic devices, for example, in an
airplane.
Do not use this product while driving or walking i n the street, as it may cause a car accident.
Notes:
This device is not waterproof.
All images in this manual are for reference only. Specifications and appearance of the product
and the screens are subject to change without prior notic e.
6
Page 7
IMPORTANT NOTE
If the device becomes abnormal, halts, freezes. You can do either one of
below two options to recover the device
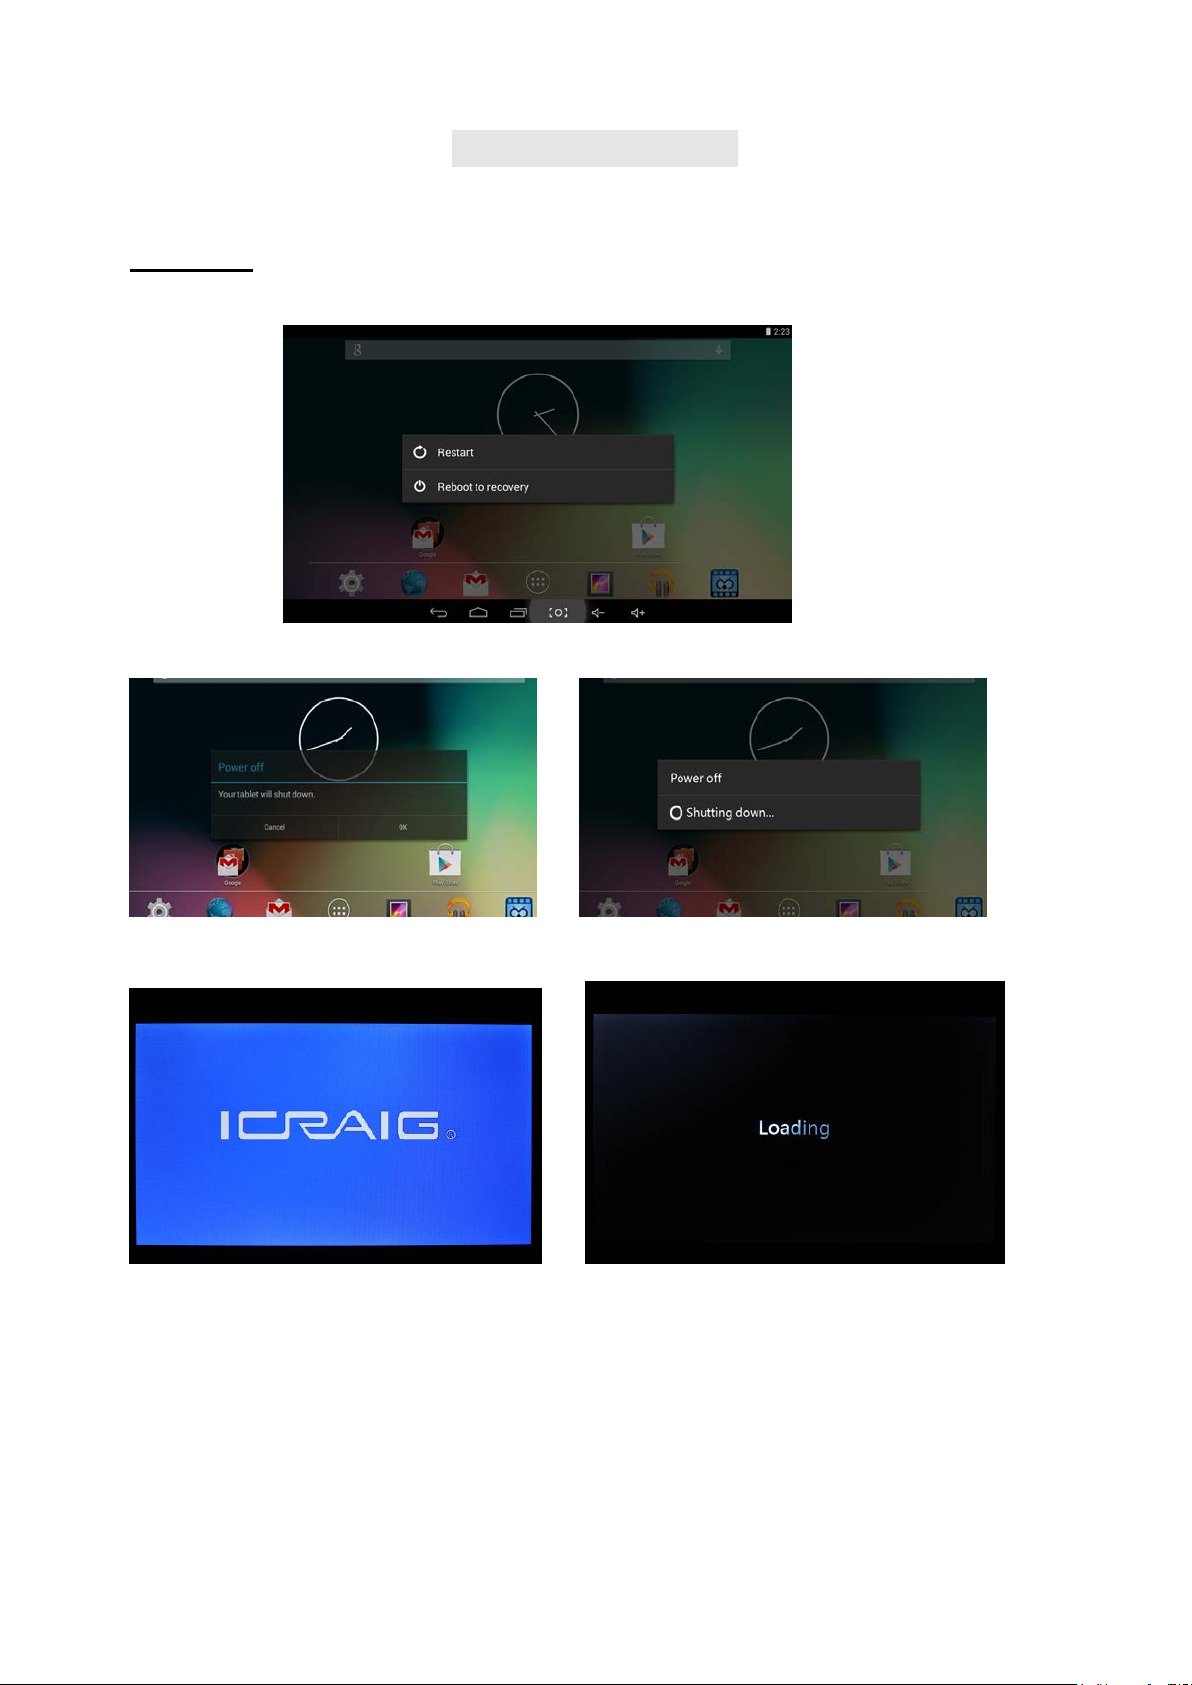
Restart
This option will restart your unit (reboot the system) to resume as normal
1. Press and hold “Power On/Off” button more than 12 seconds, follow screen will appear:
2. Select “Restart” and unit will turn off automatically.
3. Then unit restart and load the software as below:
7
Page 8
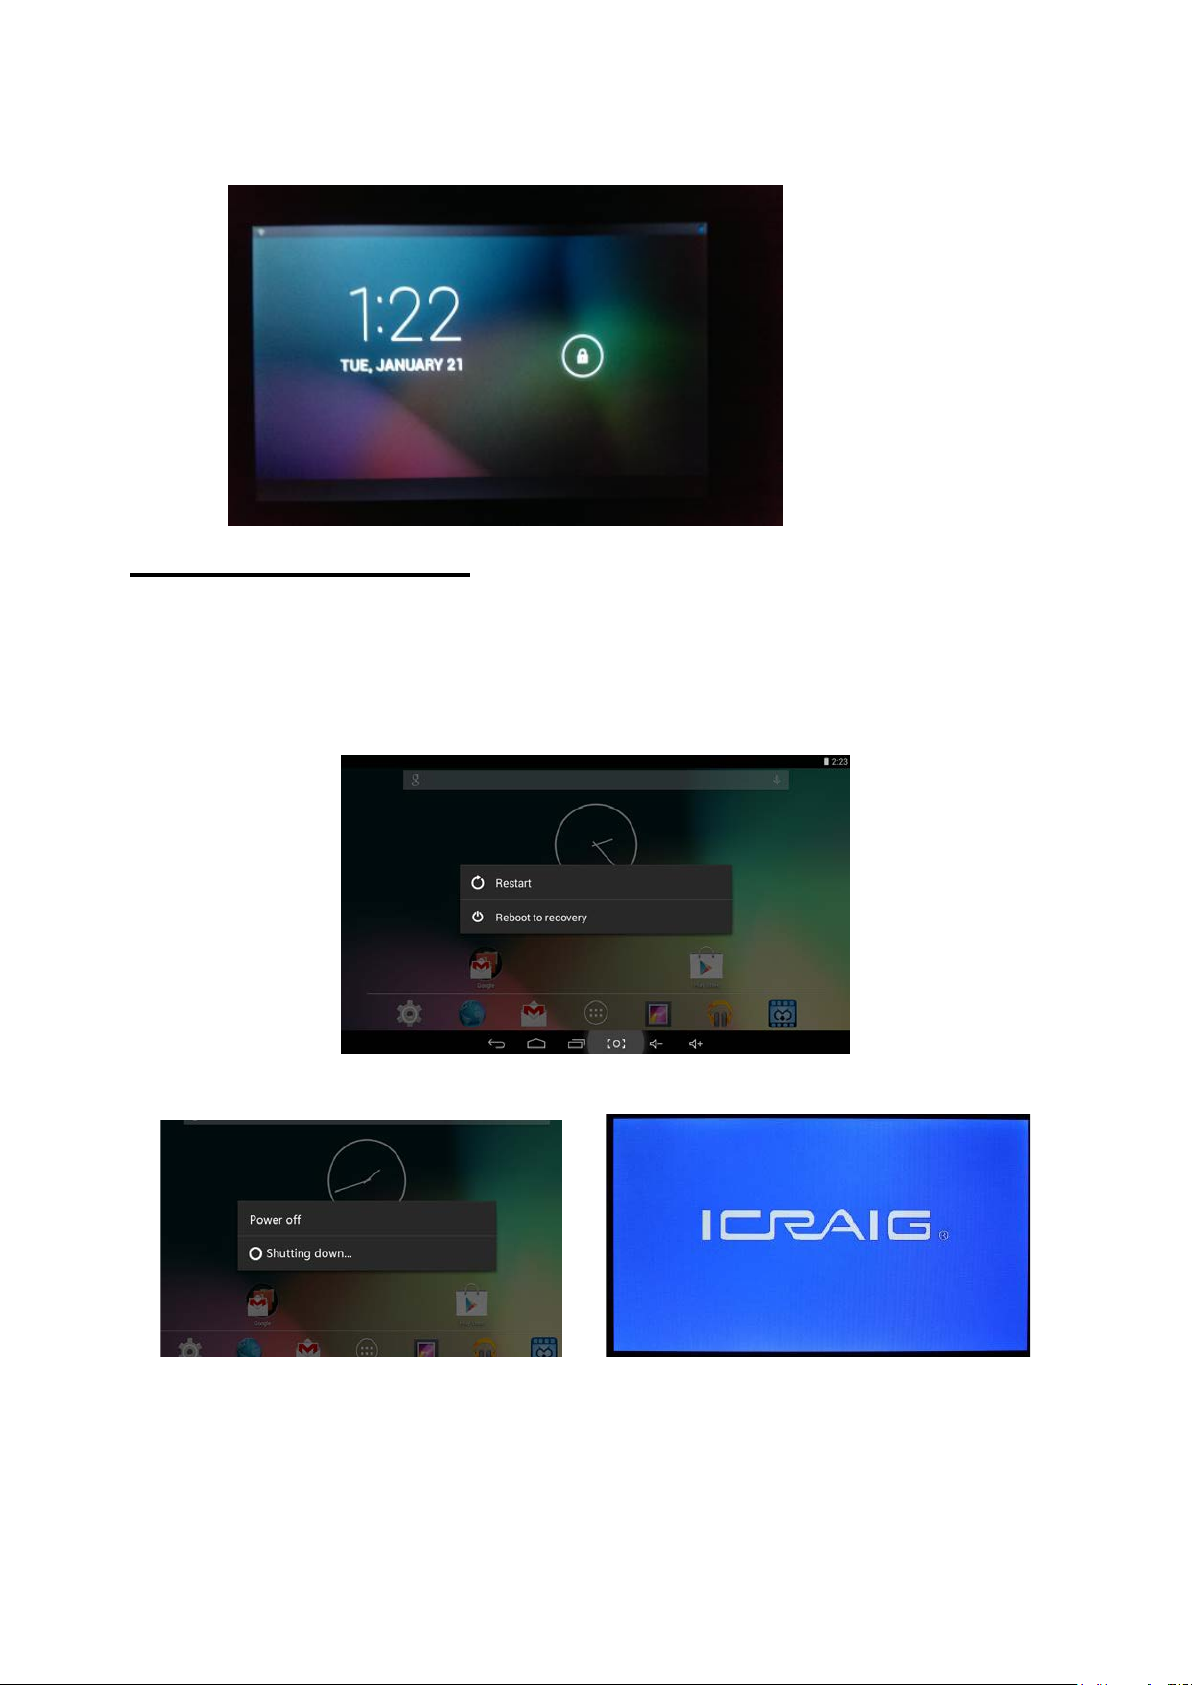
4. Now unit becomes normal
Reboot to Recovery
This option will reload the firmware to resume as “First purchased unit”
WARNING: Reboot to recovery will ERASE all installed data and restore your
tablet to when you first purchased unit. It becomes a “NEW TABLET”.
1. Press and hold “Power On/Off” button more than 12 seconds, follow screen will appear:
2. Select “Reboot to Recovery”, unit will turn off and turn on automatically.
8
Page 9
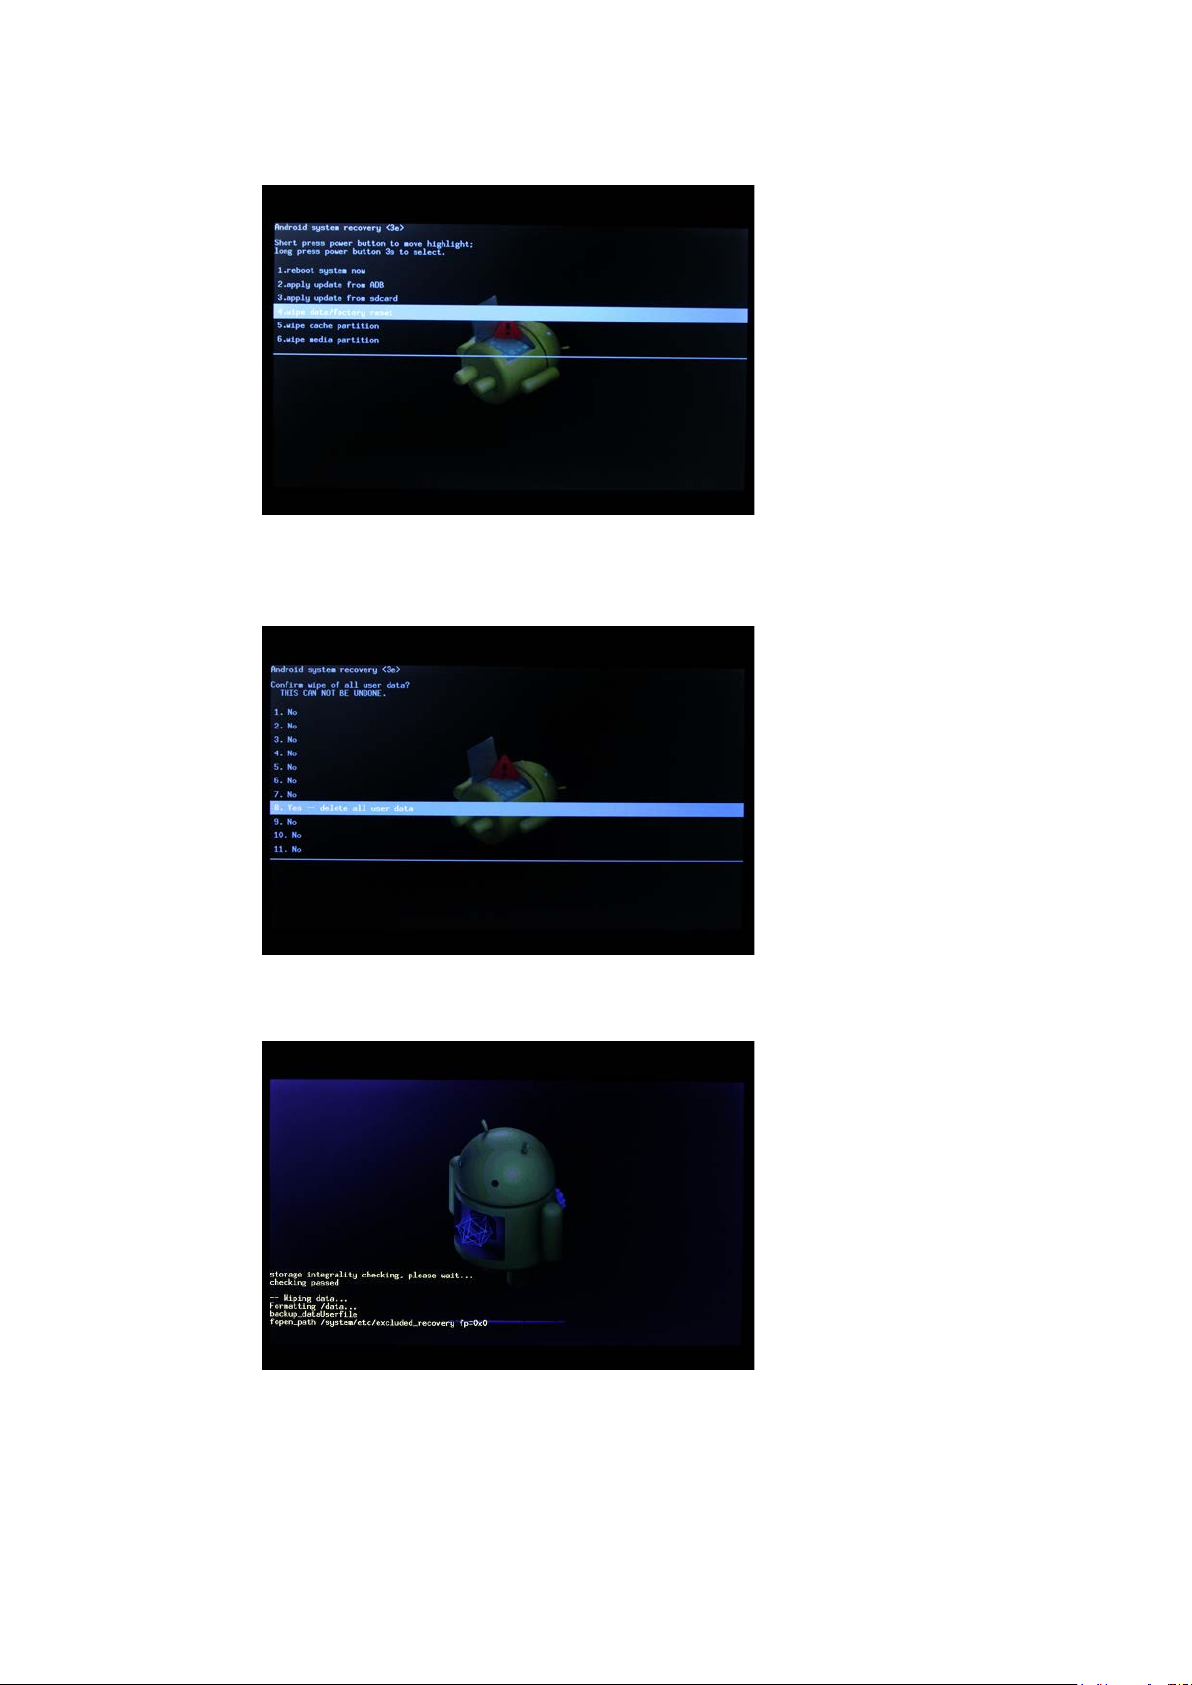
3.) Following screen will appear, select the option “wipe data/factory reset”
4.) Then enter the following screen which shows the message “Confirm wipe of all user data?
THIS CANNOT BE UNDONE.” Select “Yes – delete all user data”
5.) Device will start to reinstall the firmware and wipe out all user data
6.) It takes approximate 5 minutes to finish reinstall process. After finish, it shows below screen,
select “reboot system now”
9
Page 10
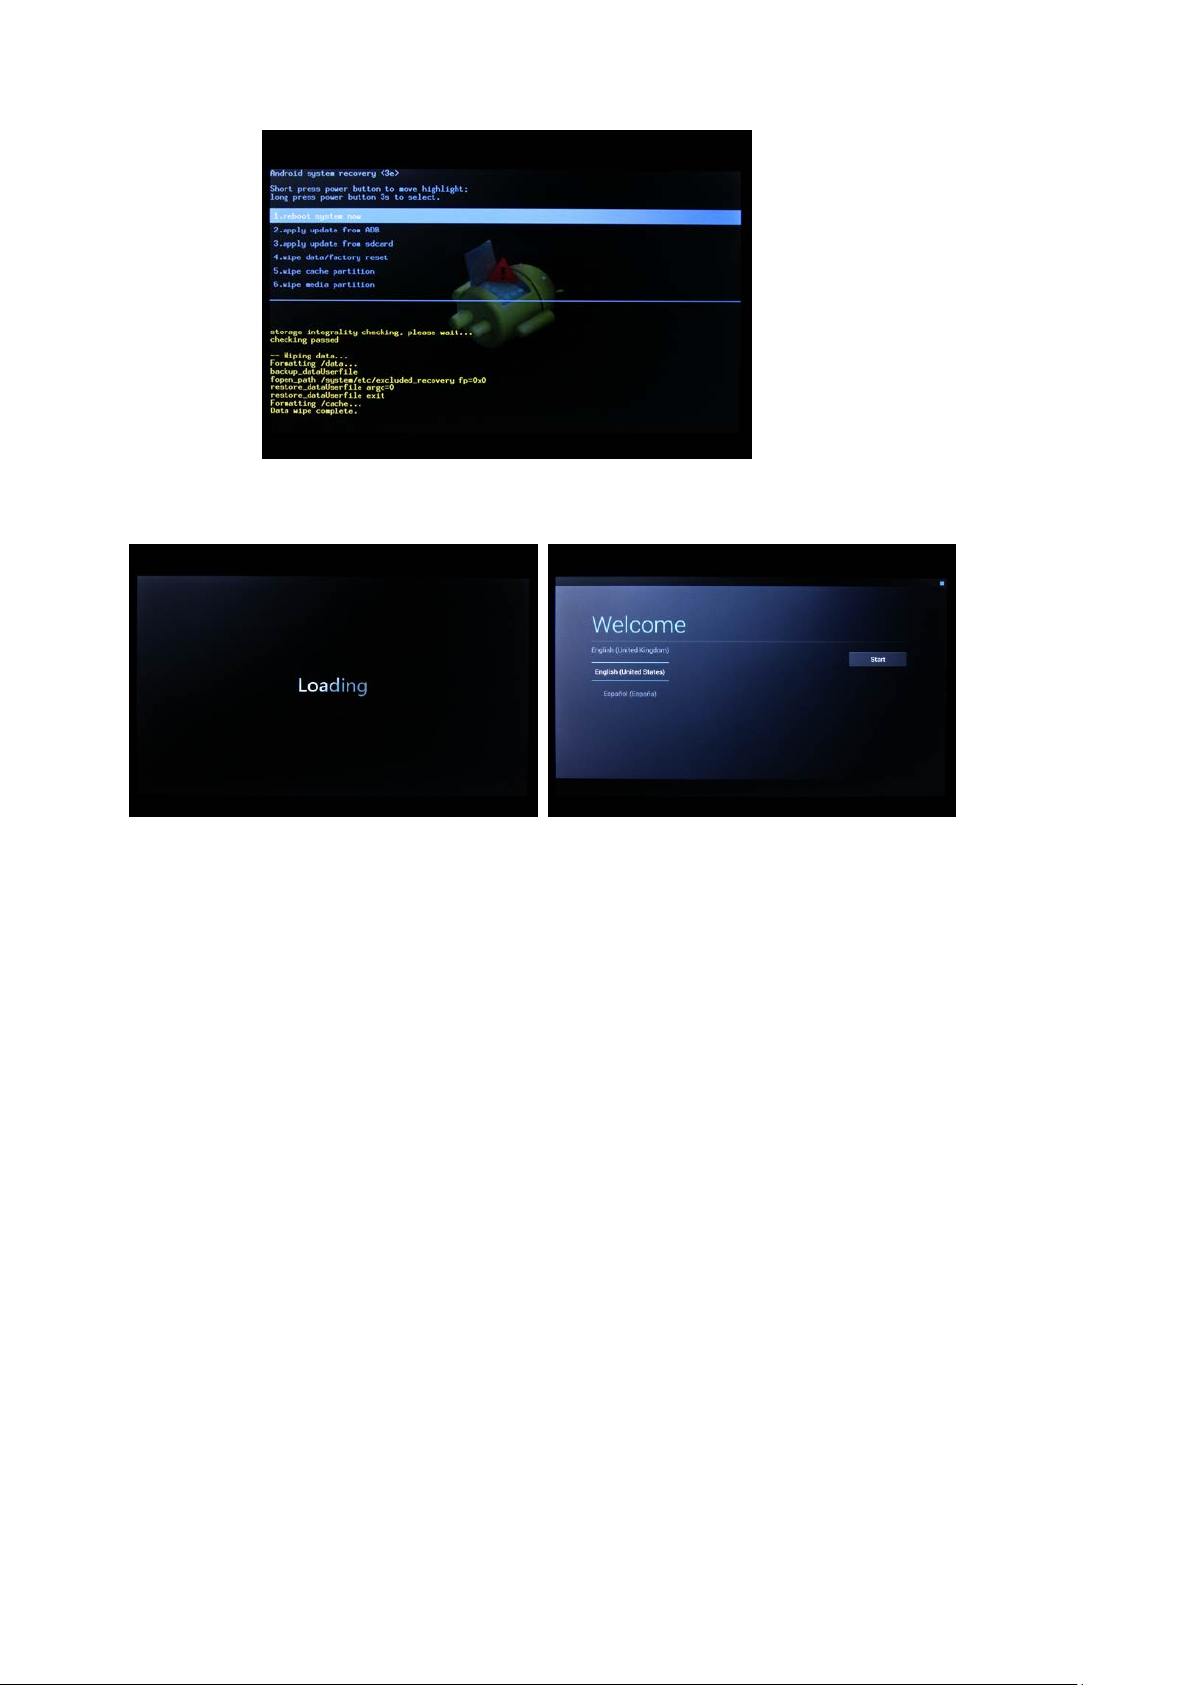
7.) System recovery is finished. Your tablet will reboot and load the firmware
8.) Now, reinstall process is finish, your tablet resume as “First purchased unit”
NOTE: During reinstall process has the unit plugged into wall outlet;
updating.
CAUTION: Reboot to recovery will ERASE all installed data and restore
10
Page 11
UPOWER SOURCE:U
Battery Recharge
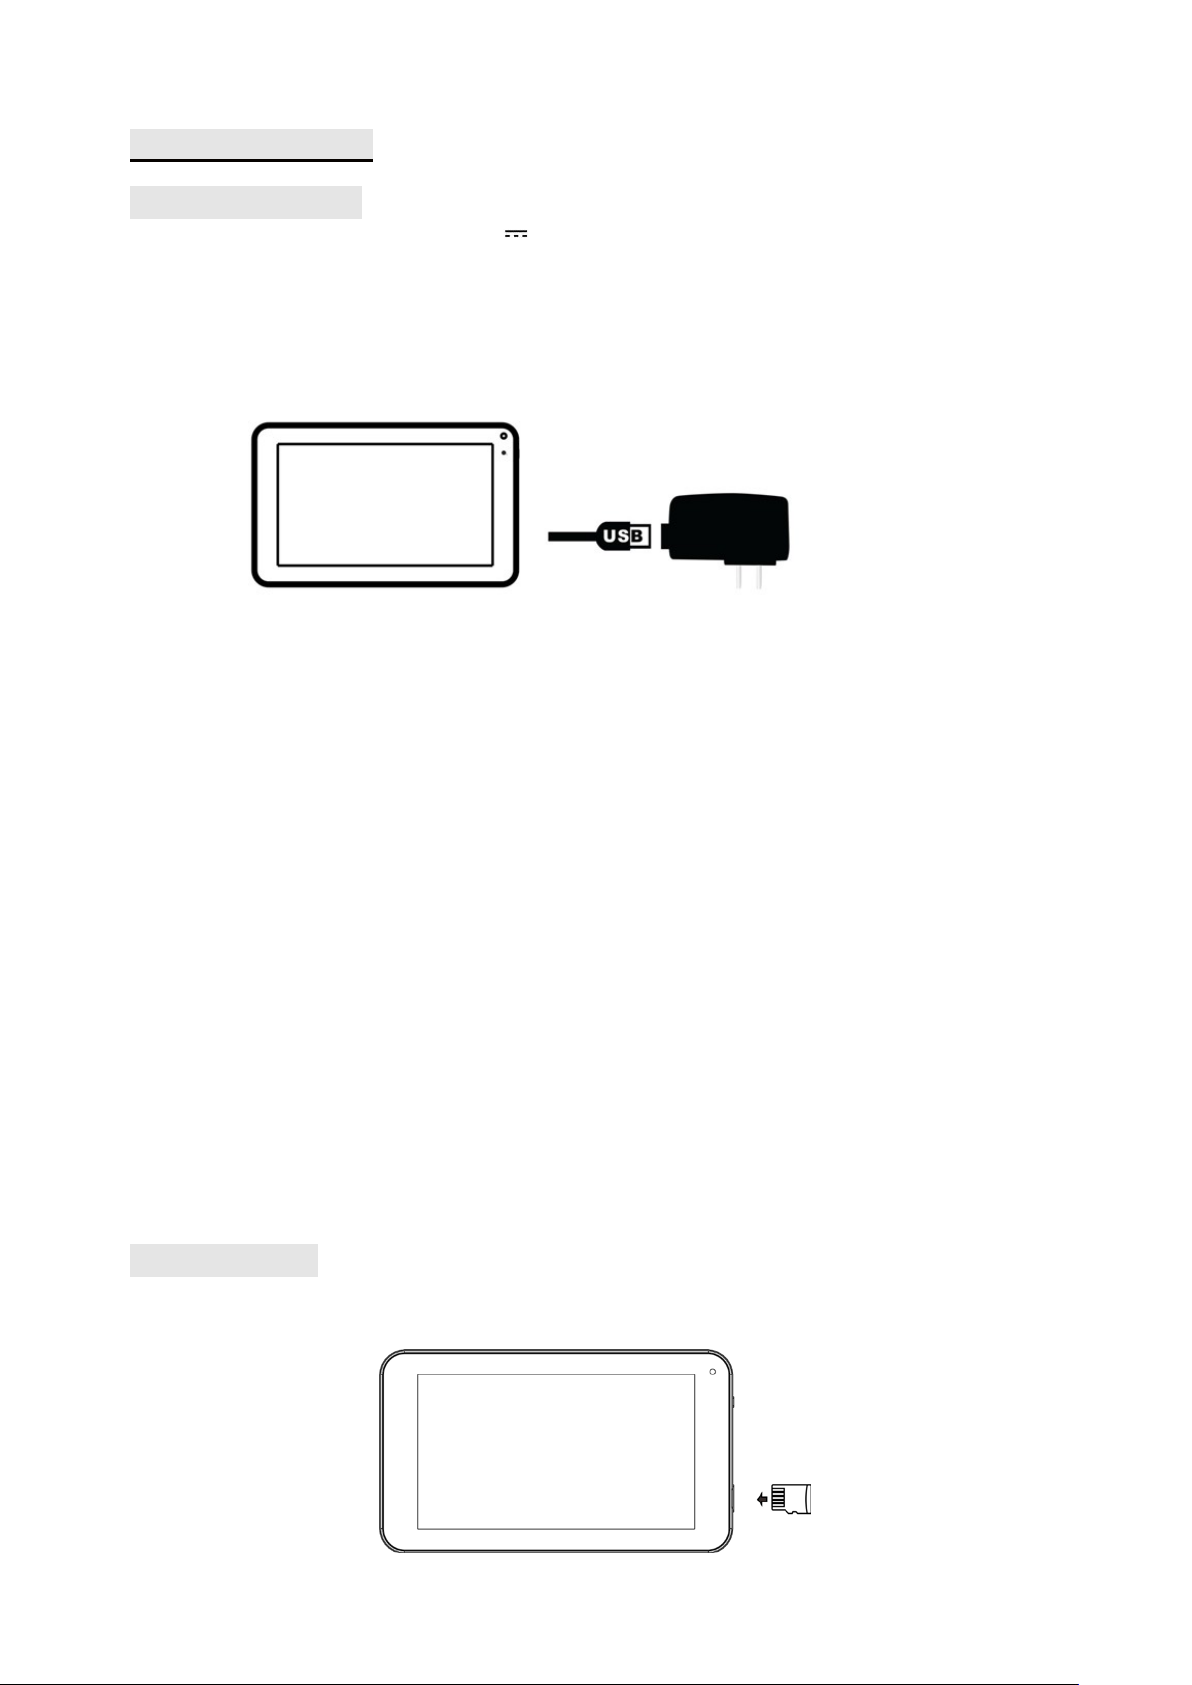
The device has Recharging a built-in DC 3.7V rechargeable Lithium-ion batteries. Recharge as
follows:
Insert the micro USB plug from the supplied USB connection cable to the Micro USB jack on
the device. Plug the full size USB jack of c onnection cable to supplied AC/USB Adaptor to
wall outlet having AC 100-240V~, 50/60 Hz.
During charging, the on screen charging icon will turn on. When finished, it will show fully
charged icon.
This power unit is intended to be in a vertical or floor mount position.
Notes: Your battery will last longer if you follow these simple guidelines for caring for and storing it.
1. Using the supplied AC/USB Adaptor f or charging only. Other models charger may damage the
device.
2. For charging first time, charge it approximately 10 hours. For norm al charging, it needs
approximately 4 hours.
3. Recharge and store the device within the tem perature range of 5°C~35°C (40°F~95°F).
4. Do not overcharge (longer than 24 hours). E xcessive charging or running the unit until batt ery
goes empty will damage battery. Battery life will be extended if you keep the battery fully
charged.
5. Battery life naturally shortens slowly over time.
6. The rechargeable battery incorporated in this product is not user replaceable.
Using the touch screen
− Touch the corresponding button on the touch screen with your finger.
− Touch the screen and swipe from Righ t to Left; Left to Right to scroll the pages.
Notes:
A:.Do not use force when touching the touch screen, as it may damage to the screen.
To avoid damaging the touch screen, do not use any object other than your fingers.
B:Do not touch on the touch screen if your fingers are not cl ean.
C:Do not touch on the touch screen with gloves on.
The touch screen may not function if you use a fingernail or ot her instruments
Micro SD card
This device supports a Micro SD Memory Card (Card not included). To increase memory size, insert
a Micro SD card into the card slot on the side of unit as the figure below:
11
Page 12
RESET
Notes:
A. Insert the card (Up to 32GB, not included) into the card s lot on right side , The card metal chip
for your face
B. To take out the card, press the card until a “click” is heard then pulls out the card.
C. Before replacing t he storage card, make sure the unit has been powered off.
D. When inserting the storage card, make sure the direction you selec t is correct. Never insert
violently to avoid damaging the card or the unit. If the storage card doesn’t work, please chec k
if the direction is correct.
E. When the card is used for the first time, or it has been used in another device, please format it
first through the Computer. You also need to download the desired music, photos and/or movie
onto the card before installing into the unit
Important: Formatting the Micro SD Card will delete all the data on the card. Download the
data to your computer before formatting the card.
Micro USB Port (USB OTG)
This device supports USB device for extending the memory size, or USB Thumb Drive, inserts the
supplied USB cable (micro USB pl ug to F ul l size USB female jack) into the micro USB port on t he
side of unit. Insert USB device into Full size USB female jack, like in the PC.
Notes:
Before replacing a USB drive, make sure the unit has been powered off.
When inserting the US B driver, make sure the direction you selected is correct. Never insert
violently to avoid damaging the USB driver or t he uni t. If it doesn’t work, please make sure if the
direction is correct.
Power on/off the Device
1. Press and hold the button on the right cabinet approximately 5 seconds to power on the
unit. Touch and slide the key bar shown on the screen to from left to right unlock
2. In power on mode, press the button to turn off the screen for saving battery power. Press
again to turn it on.
3. To power off the device, press and hold the button until the “Power off” window pop up,
touch the “Power off” and show ”Your tablet will shut down” message. Then touch the “OK”
button ,the device will to power off
Reset:
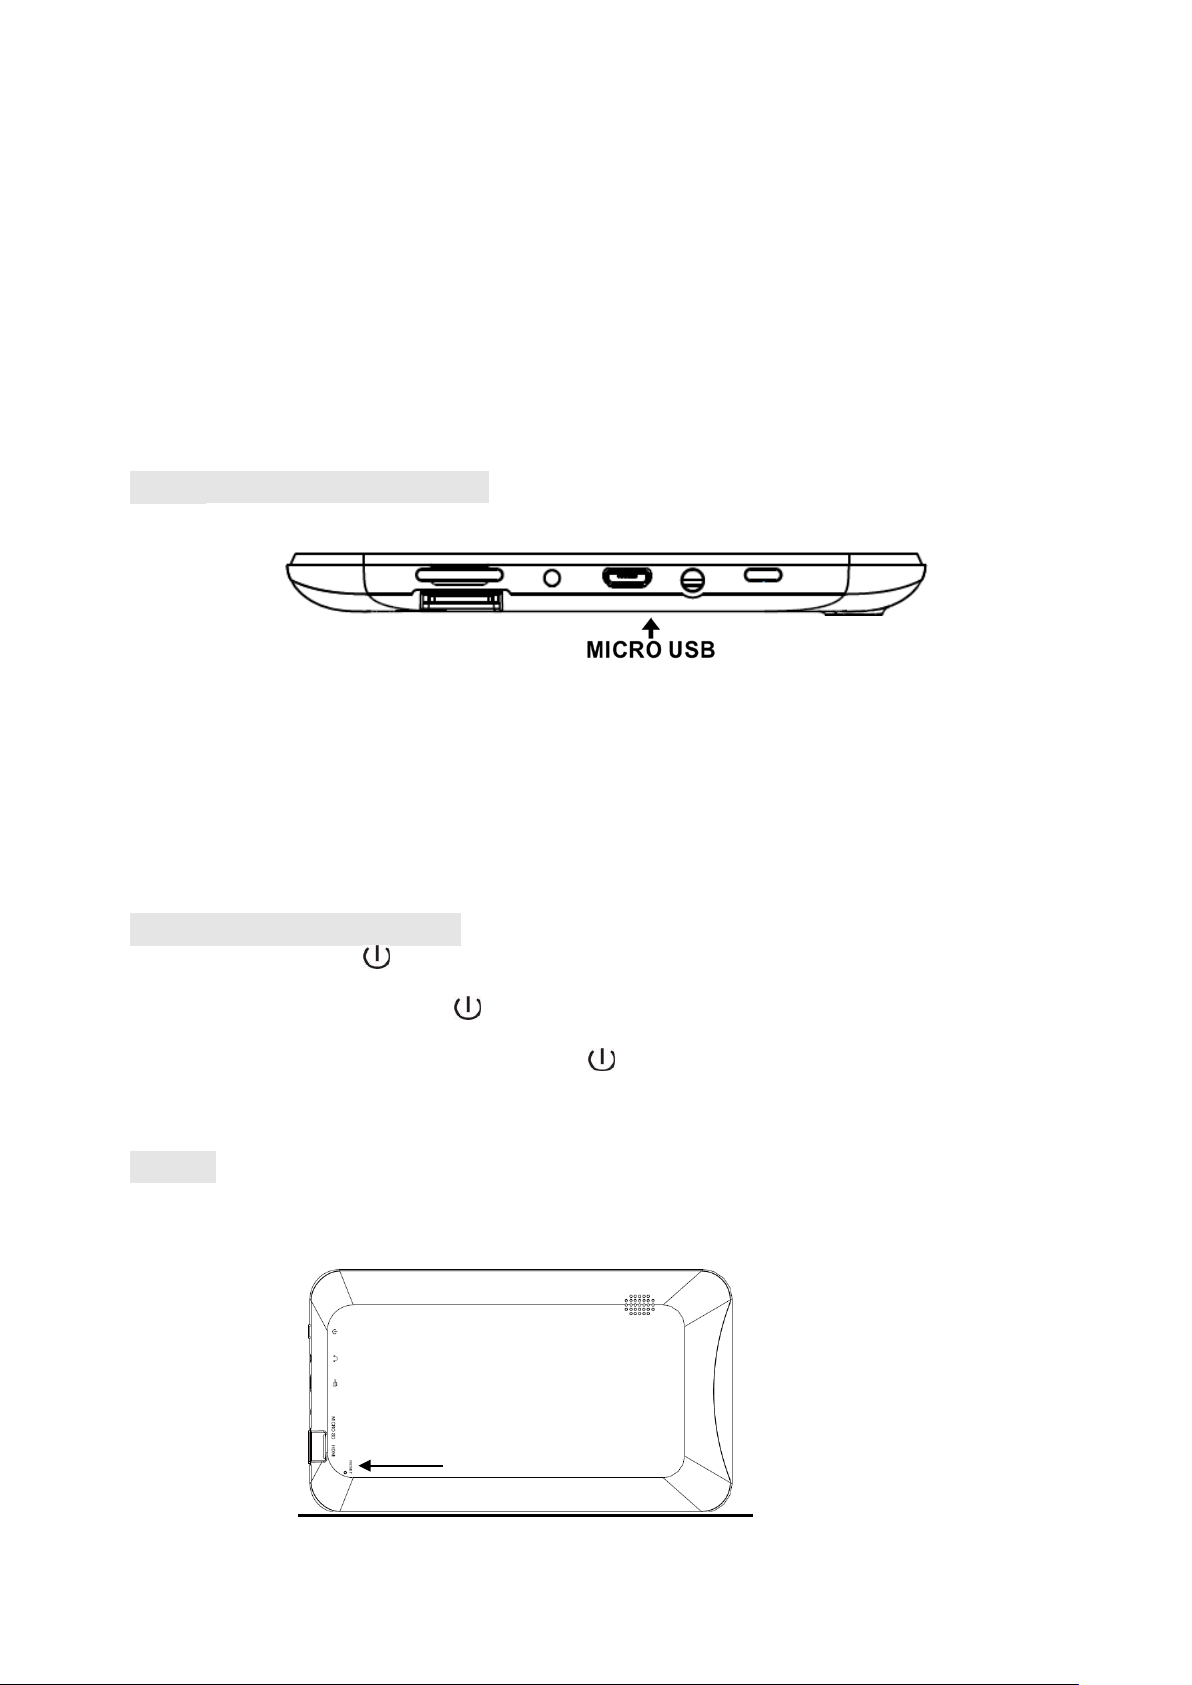
If the device becomes abnormal, halts, freezes. Press the RESE T Button in the reset hole on the
rear of device (see figure as below) with a small screwdri ver (not included) to reset the device.
12
Page 13
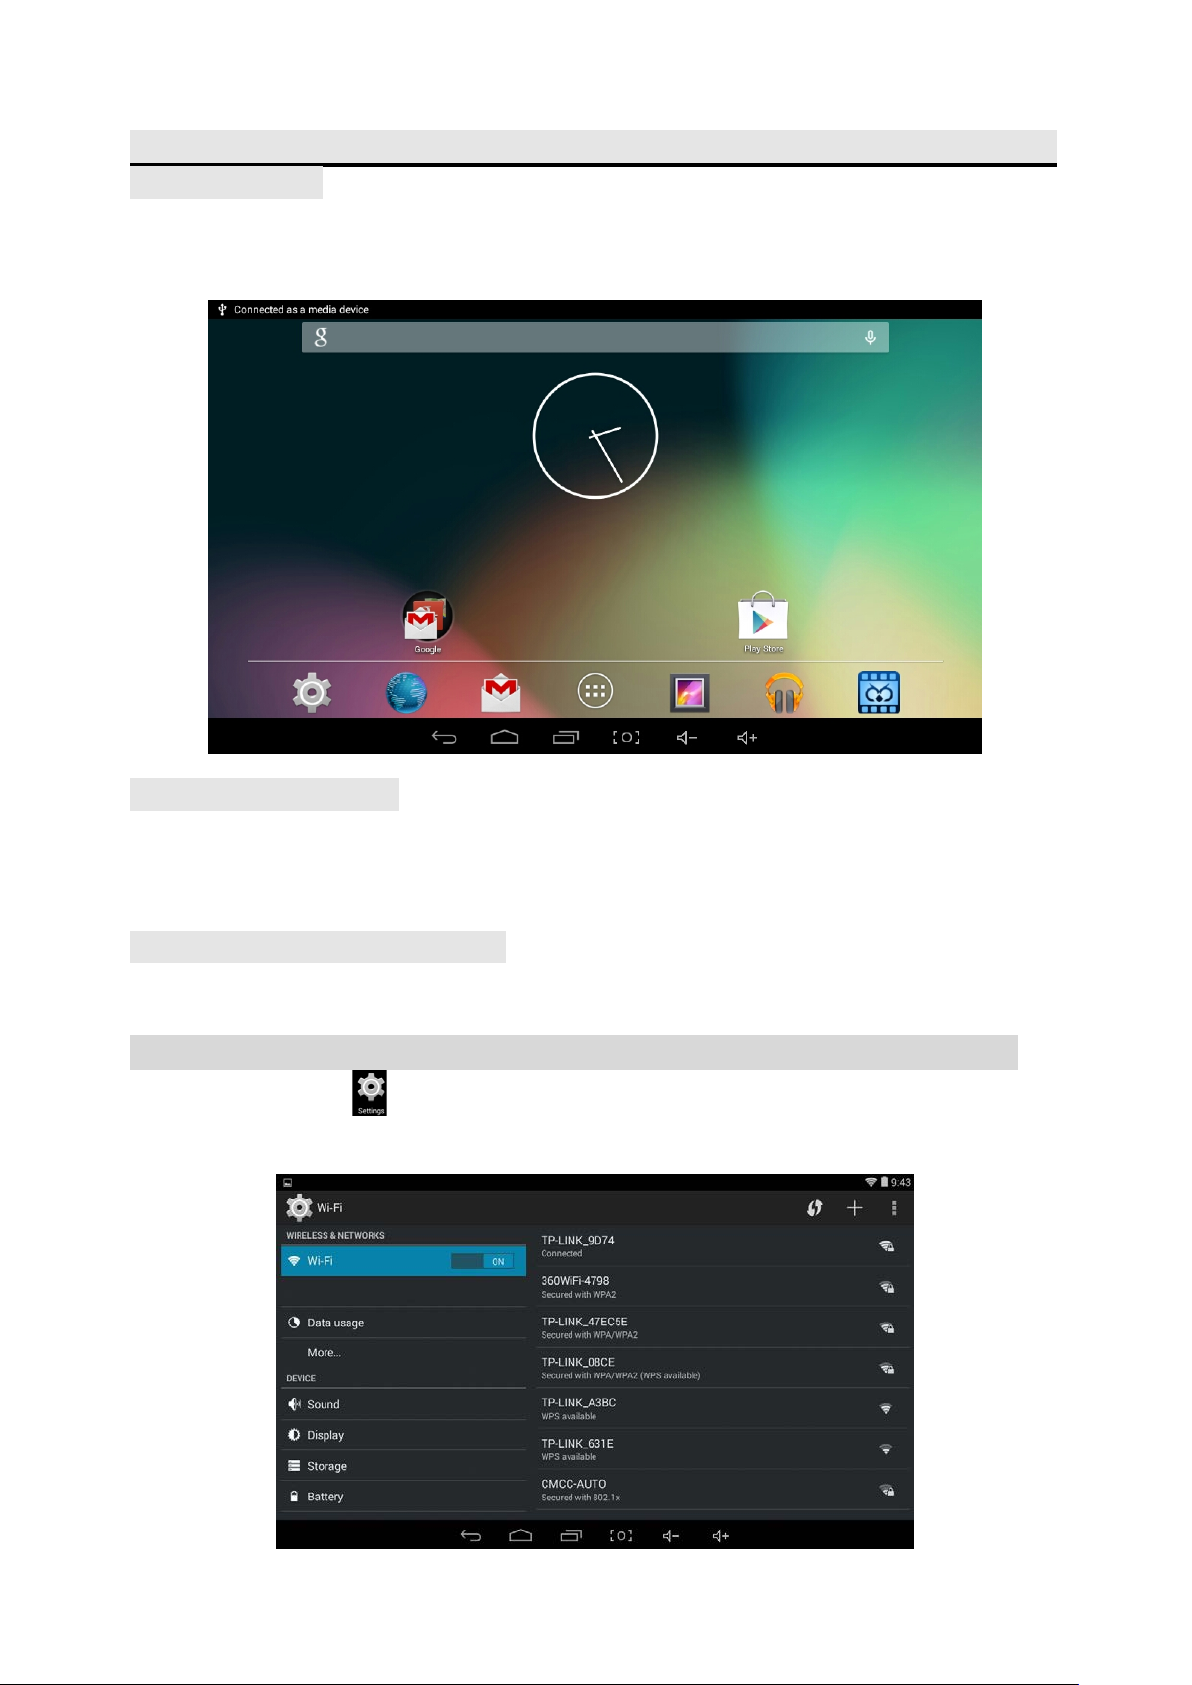
Connections:
Connect to PC
A: Connect the Device to the PC via the Micro USB port on the side of cabinet to the USB port on
your PC by the supplied connection cable.
B: Then the "Connected as a media device” will appear on the top left corner of screen.
C: The name“ICRAIG_CMP_771 “ disk will display on your computer
Connect to HDMI TV
A: Connect the device to a TV (with HDMI port) via the Mini HDMI jack on the side of the unit to
the HDMI port on the TV. (Connection cable not included).
B: The device will activate the HDMI connection automatically.
C: The tablets display content will show on TV.
Earphone / Headphone jack:
For private listening, connect an Earphone/Headphone to t he Headphone j ack on the right side of
cabinet. The speaker will cut off automatically (Earphone/Headphone not included)
Connect to WIFI
A:Tou ch th e Settings ( ) button on the screen, the setting menu will appear on the screen ,
then the fig in below:
13
Page 14
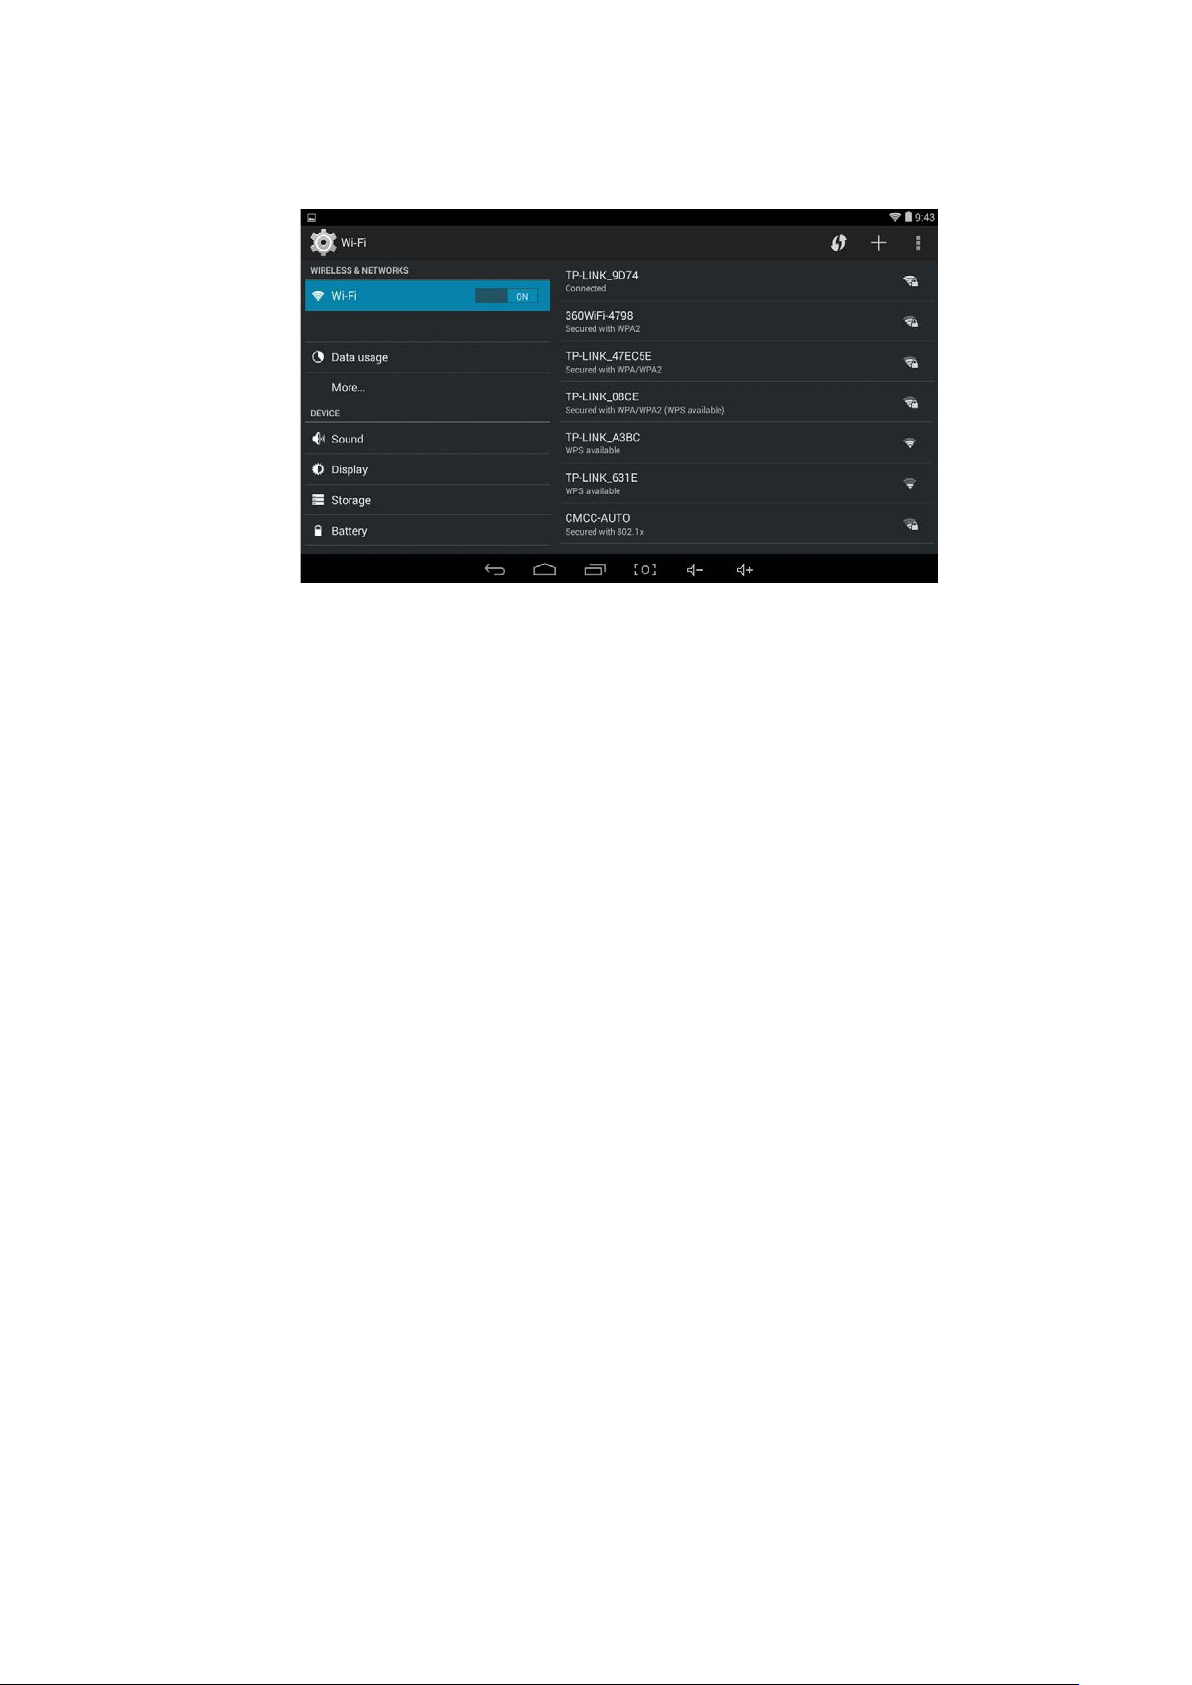
B:Turn on the “wifi” to “ON” position by sliding the “ON/OFF” button to the right,see fig in
below:
14
Page 15
F7- Play Music
F8
F9
F10
F11
F12
Other Button’s assignment:
1.
2.
seconds, The desktop will
1.Keyboard
Keyboard
Operation:
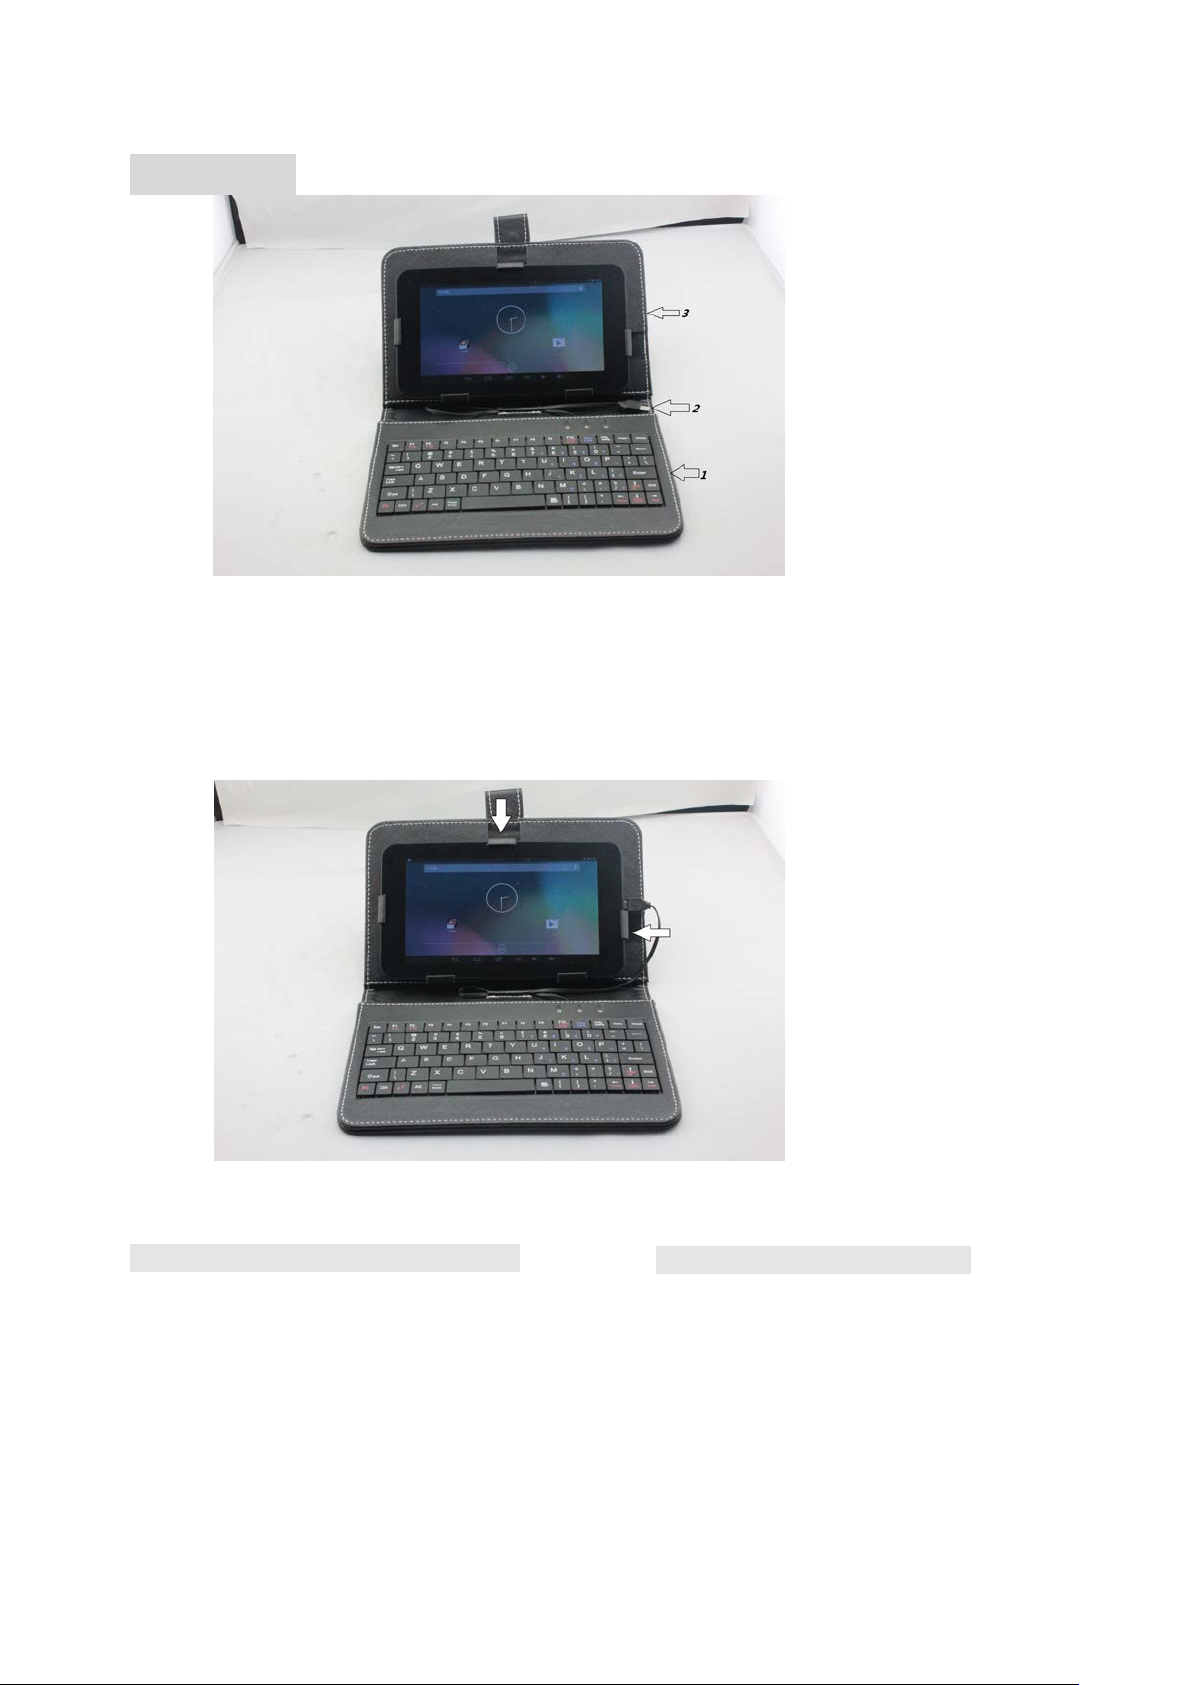
1. Insert your tablet to the clips to hold the tablets, the top and right clips are
moveable.
2. Connect the Micro USB Plug from the Keyboard to Micro USB Port on the
right of Tablet.
3. Connected as the following figure.
2.USB Connection Cable
with Micro USB Plug
3.Case
4. Power on the Tablet, the Keyboard will hook up to the Tablet automatically.
F (Function) Button’s assignment:
F1- Browser/Chrome™
F2- Calculator
F3- Calendar
F4- Camera
F5- Gmail™
F6- File Manager
Notes:
- Photos
- Gallery
-Email
- Clock
- Settings
15
Fn+ ZZZ : screensaver
Press the FN+ZZZ at the same time
approximately 2
display “Power off ”, you can choose
“OK” ,the Device will Power off.
Page 16
For F11 (F12), press the Fn and F1 (F2) buttons at the same time.
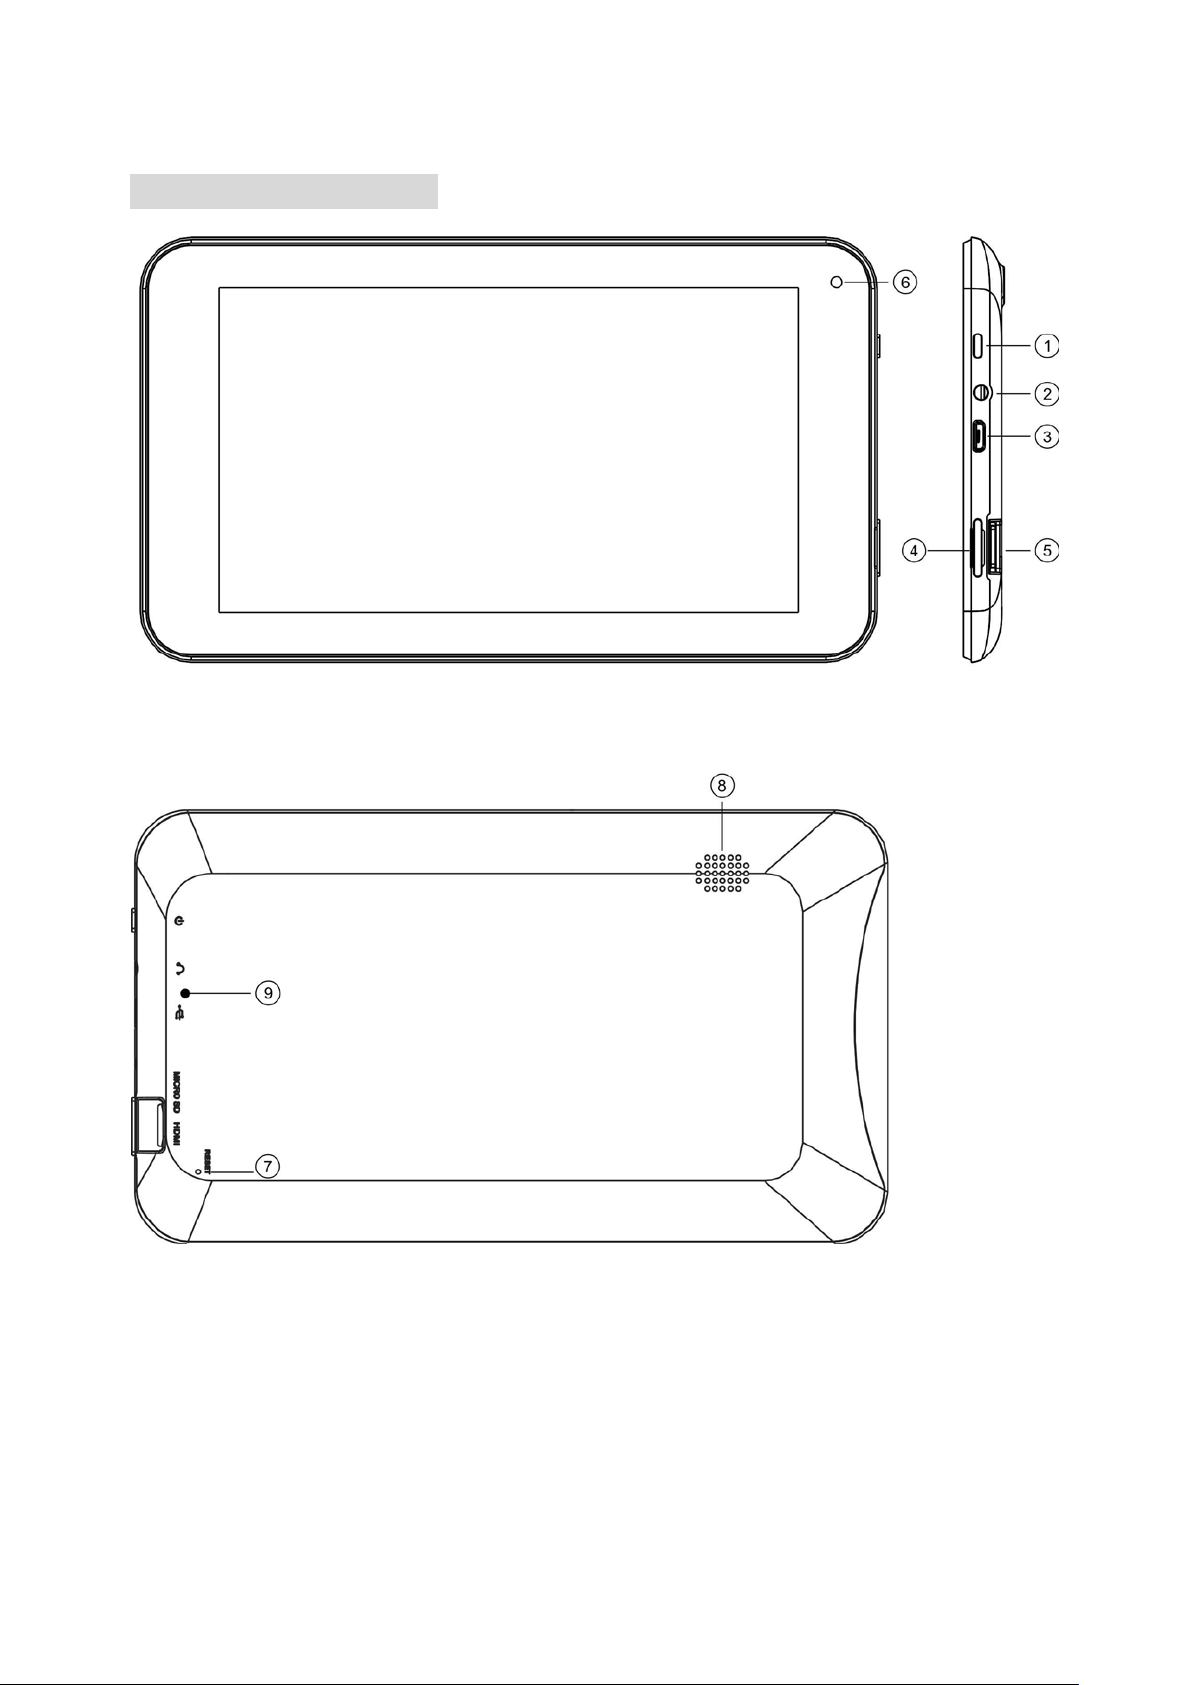
Location of Controls
1) Power
2) Headphone Jack
3) Micro USB Port (For battery charging & OTG)
4) Mini HDMI Port
5) Micro SD Card Slot
6) Camera
7) RESET button (Inside the hole)
8) Speaker
9) Built-in Microphone
16
Page 17
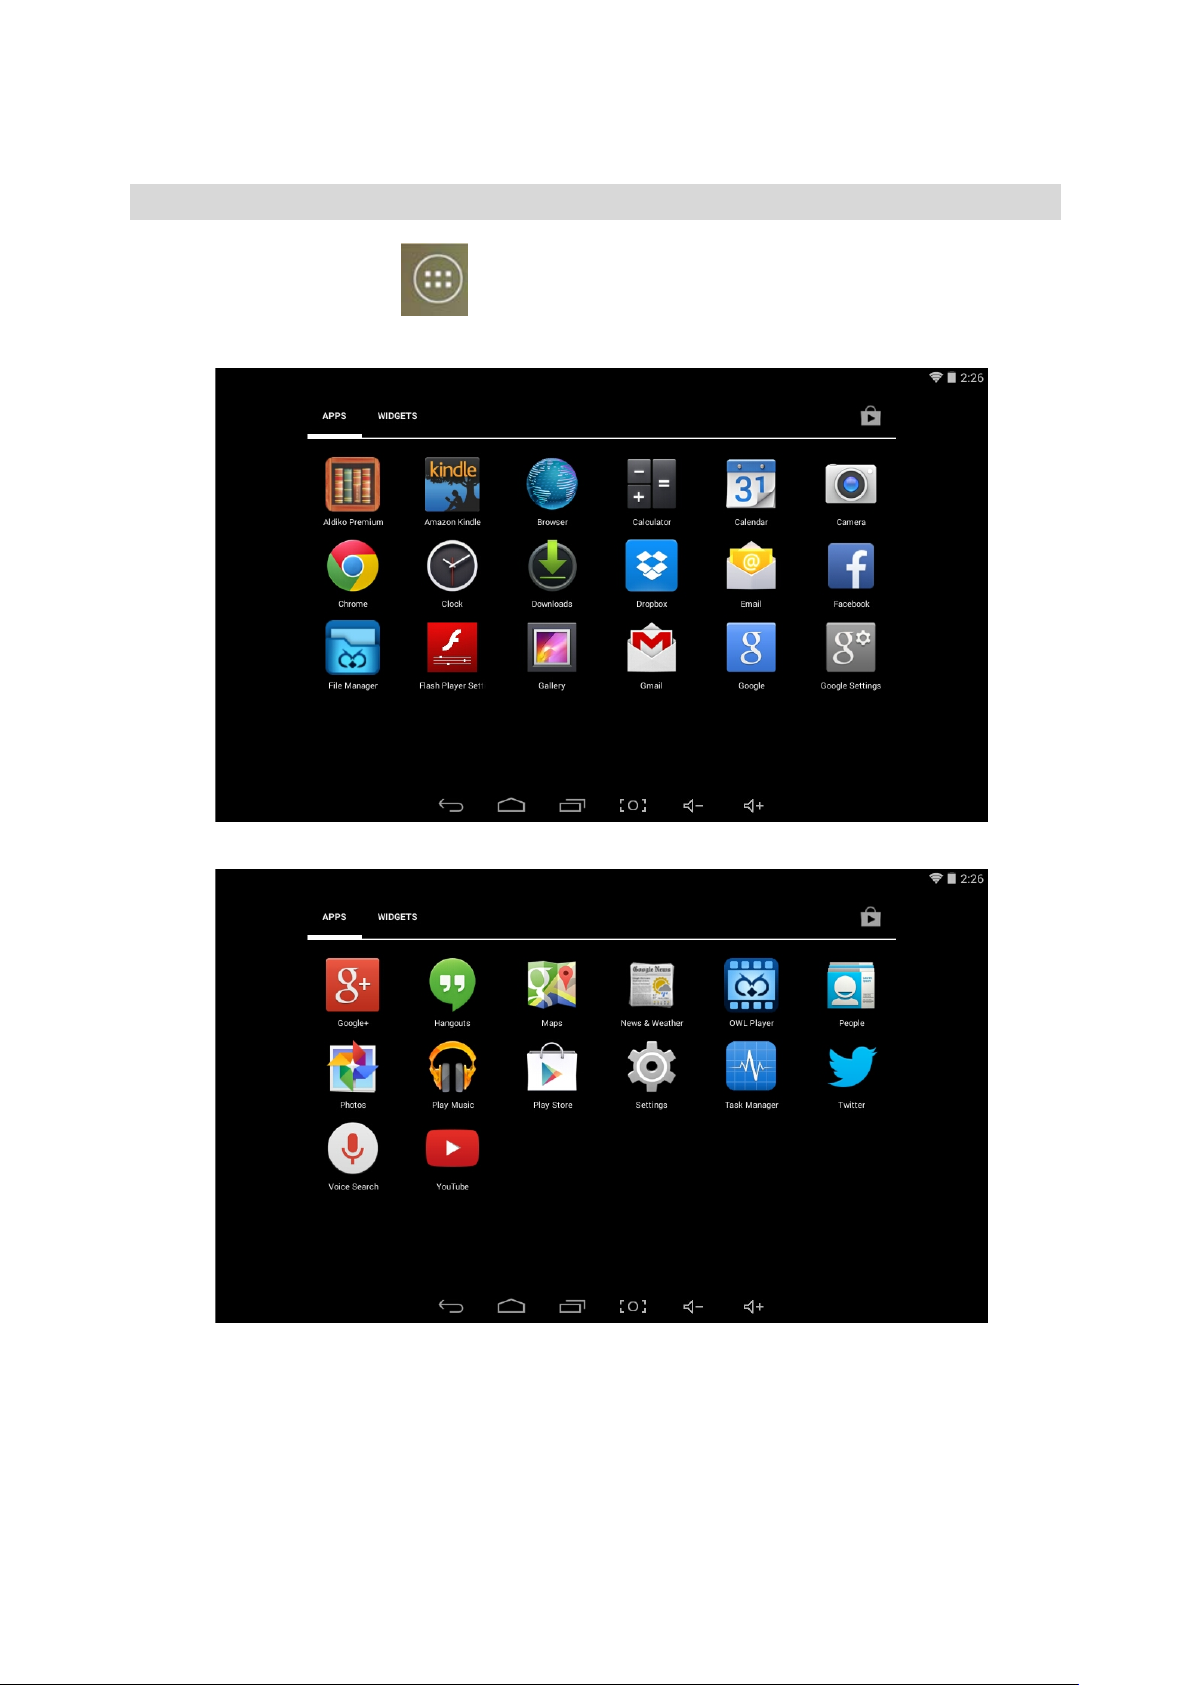
Getting Started
On home page, touch the" " button on the bottom middle, the following picture will
appear on the screen:
17
Page 18
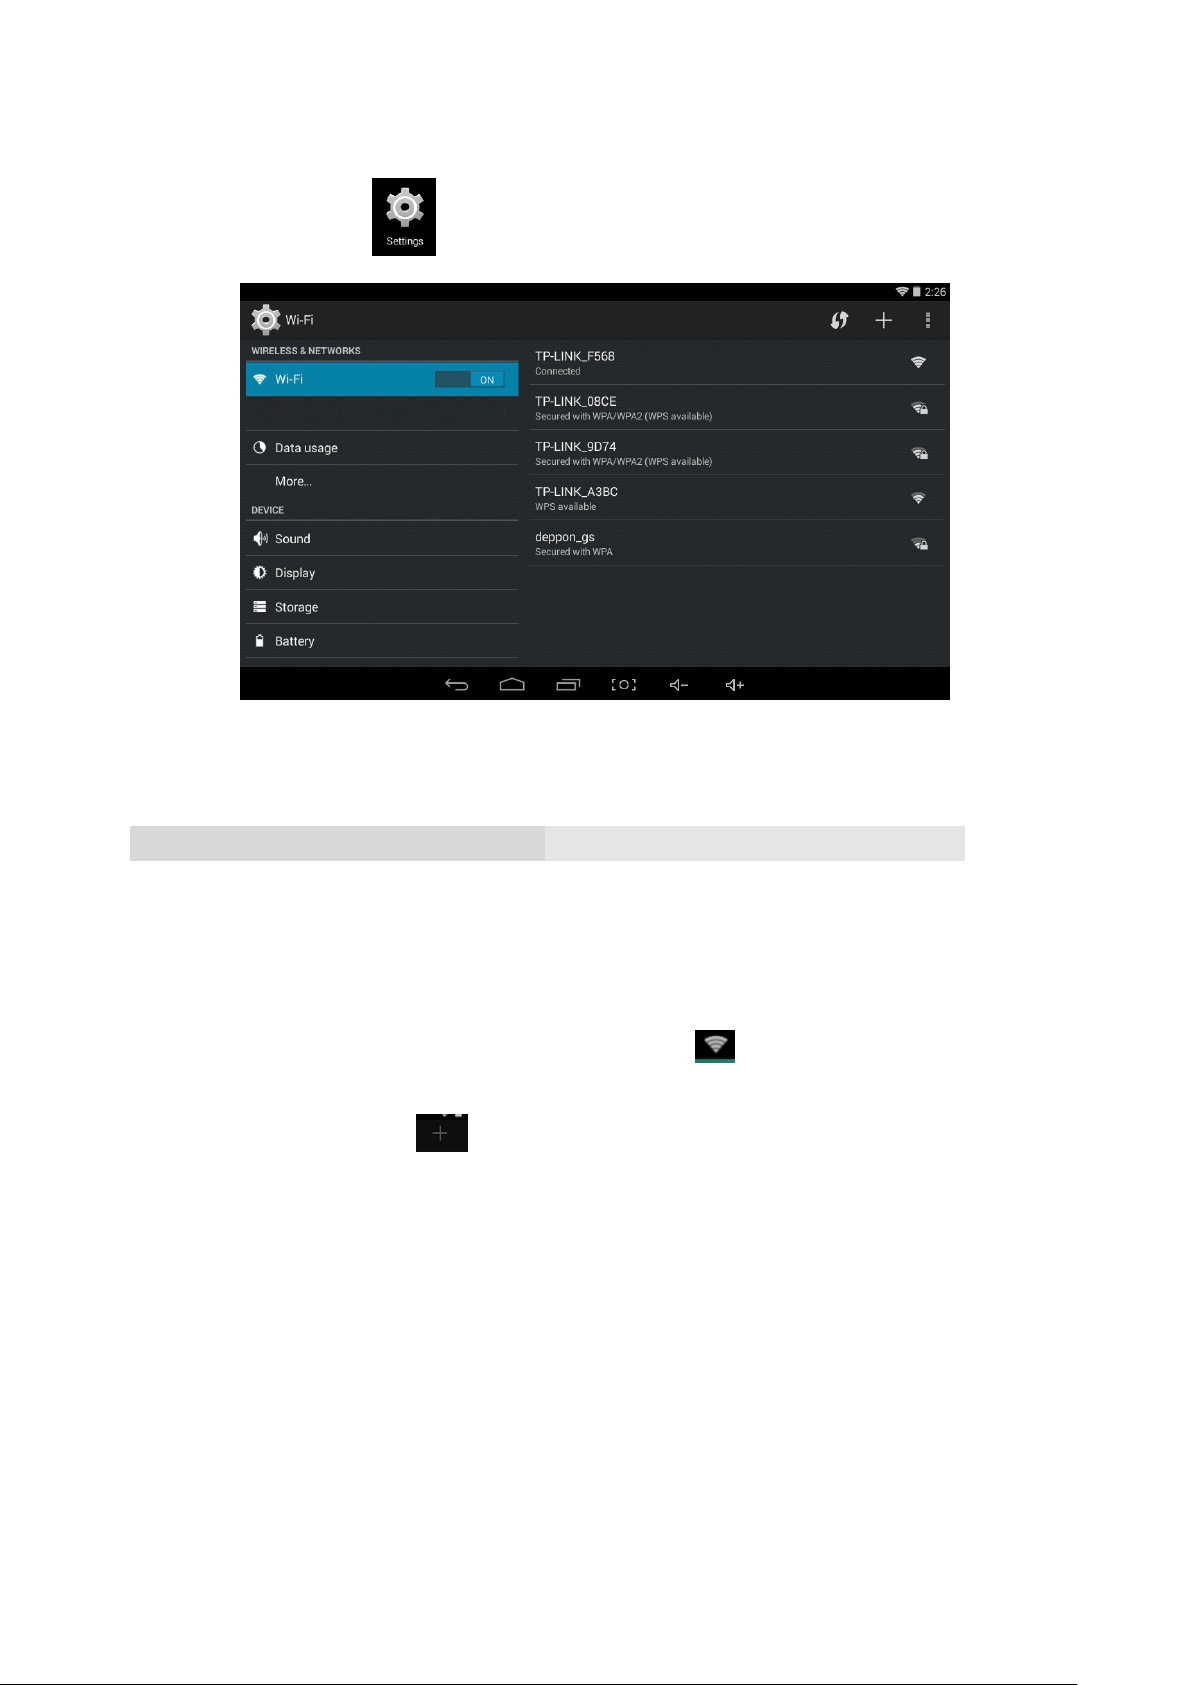
Touch the Settings ( ) button on the screen, the setting menu will appear on th e
screen, then:
Touch on the screen and move Up or down to show more selections.
Choose the corresponding button you need to set . The sub-setting menu will appear on the
screen, follow on screen instructions.
WIRELESS & NETWORKS
To browse the web; connecting to apps store, use E-mail, Facebook™, Twitter™…you must
connect this unit to internet by Wi-Fi as below:
1. Touch on the Wi-Fi “OFF” button then slide it to the right to turn Wi-Fi ON, wait a few seconds, the
available Wi-Fi networks will appear.
2. Touch on the desired network to start connection as on screen i nstructions. (Maybe ask for
password).
NB: After setting, you can turn it ON or OFF by touching the (
☆The device automatically scans and lists all local Wi-Fi Network found.
☆Touch the top-right corner “ ” and follow the prompts to add your network.
) widget on the screen.
18
Page 19
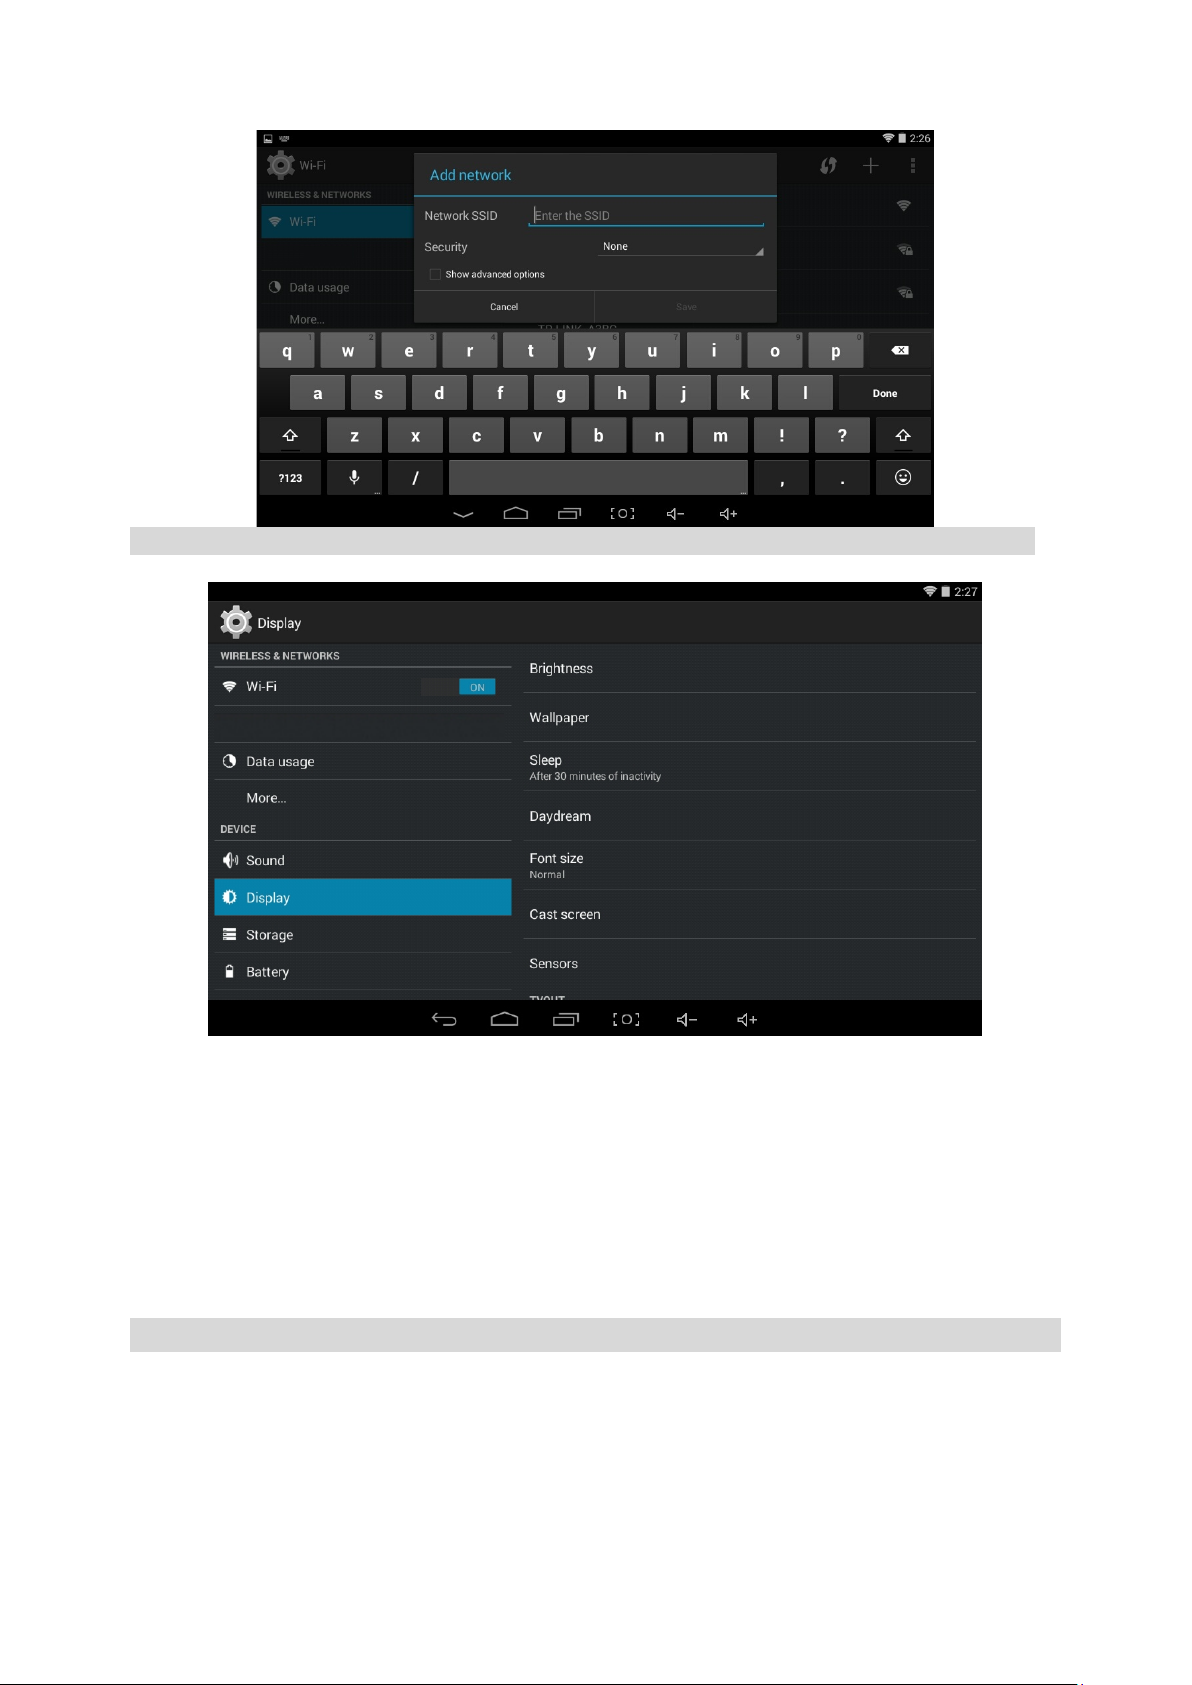
DISPLAY
Brightness: To adjust the screen brightness by moving the scaling bar.
Wallpaper: To choose and set the wallpaper screen.
Sleep: To enable sleep mode and select time to sleep while not in operation.
Font size: To adjust the display Font S ize.
HDMI: To open or close HDMI output, And adjust the output screen resize.
DESKTOP
19
Page 20
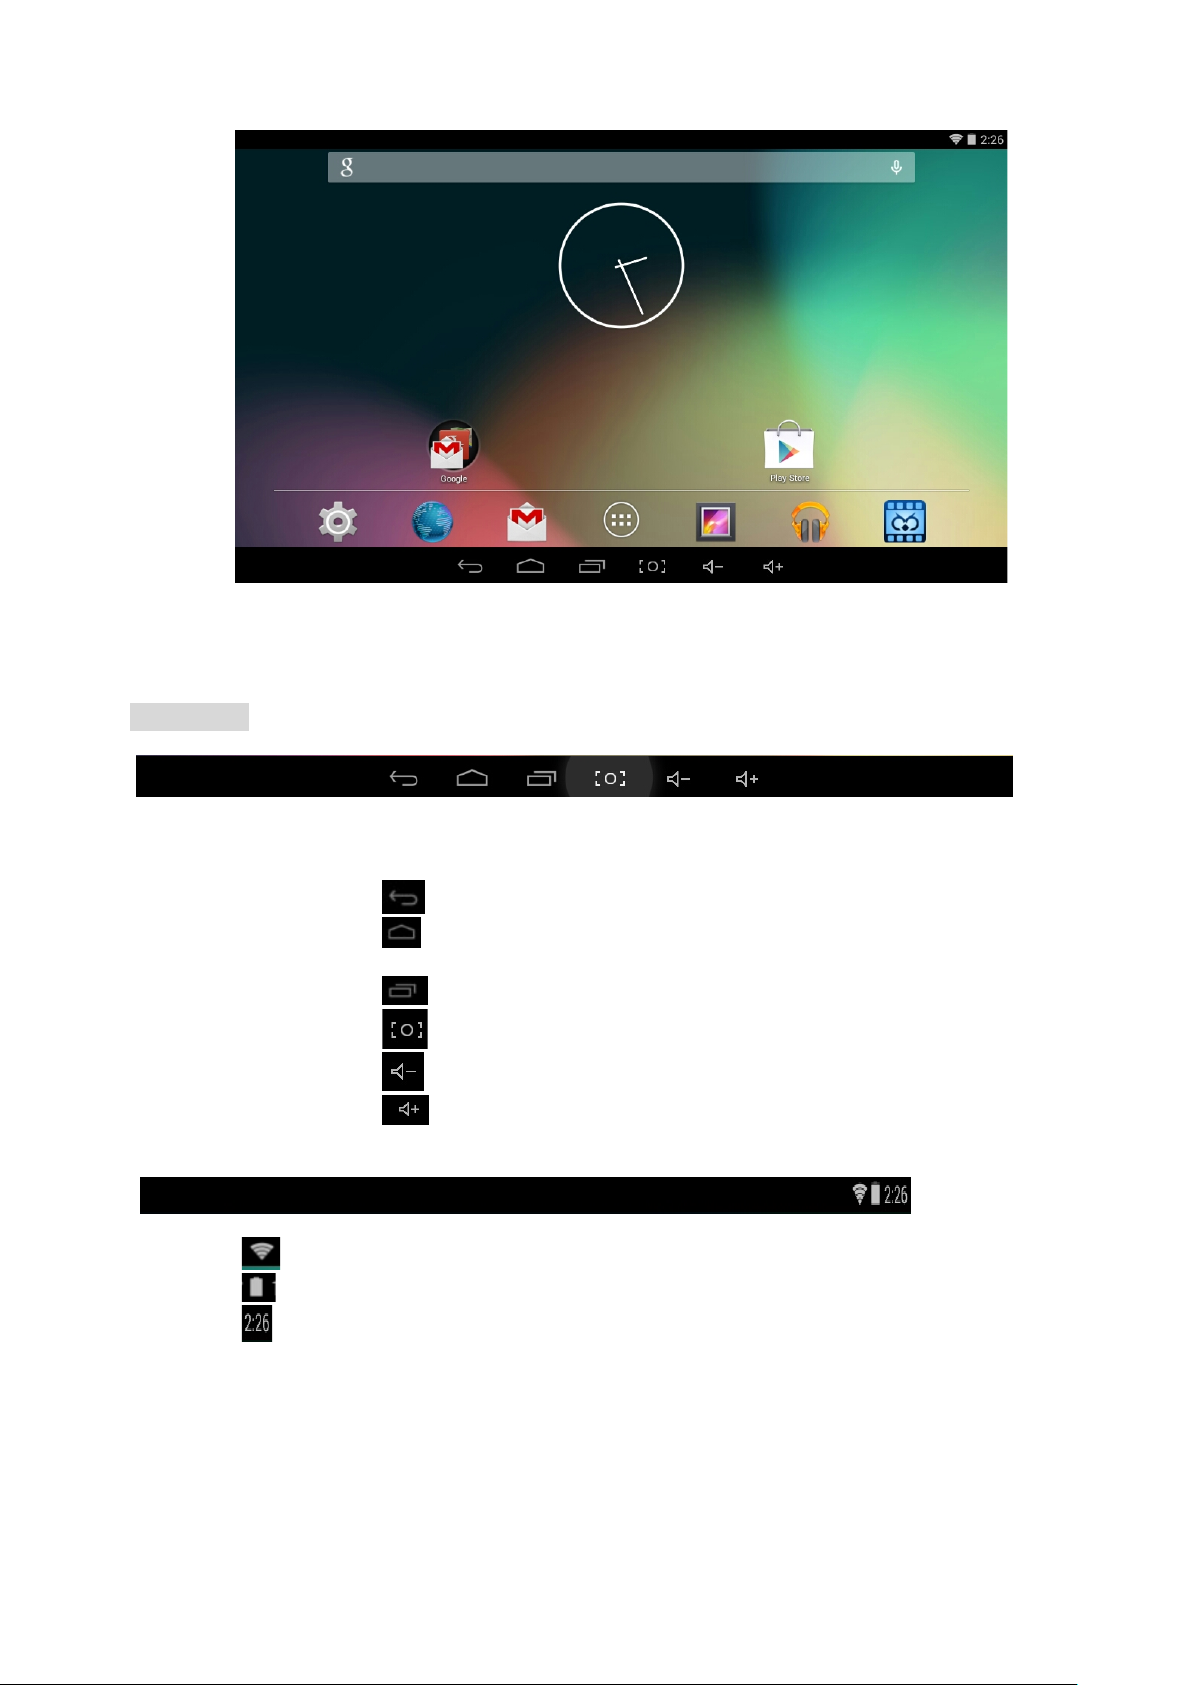
Status Bar
• The Status Bar lies at At the bottom of the screen.
Operation.
R
Below are some advises on how to operate the operation zone:
• By touching the
• By touching the
icon, you can get back to the previous screen.
icon, you can get back to the homepage wherever interface you are
in.
• By touching the icon, a window popup which shows the all apps in operation.
• By touching the icon, you can screen short.
• By touching the
• By touching the
• The Status Bar lies at the top of the screen
icon, you can decrease the sound volume.
icon, you can increase the sound volume.
• The
• The
• The
icon for WIFI
icon for Show battery status
icon for Time
• In the main menu interface, you can open and operate an y app by touching on the icons to run
applications such as File Manager, Browser, Music, OWL player, as well as during web browsing or
PDF viewing, you can drag the menu, by sliding the screen to scrol l ing up and down the page as
well as to enable the page to move different directions respectively.
20
Page 21
Application Management
Downloading Android
TM
Applications:
☆ Pre-loaded App stores such as Google Play
TM
is providing many interesting and free
applications for downloads. Individual ap p sto r e may ask for credit card information and
personal details. Please be caution that some application may require to pay.
Downloading Android
You can download Android
TM
Applications direct from a Website
TM
applications directly from websites, and t hen qui ckly and easily install
them on your device.
Touch the
Browser application icon to launch the internet browser.
Enter the desired website URL, and touch the download link for the application you want to
install on your device.
After the download is complete, touch on the download fi le (in the Ap ps under setting screen),
Touch Open → Install.
Uninstalling Android
You can also quickly and easily uninstall the Android
1. Touch
→ Settings →Apps.
TM
Applications:
TM
applications that you have installed.
2. Touch the application you want to uninstall, → Uninstall.
3. Touch OK to confirm the Uninstall.
Clock
Touch the
Clock application icon. You can see the time and date.
Alarm:R
☆ You can use your device as an alarm clock by set ting multiple alarms.
Touch alarm icon which displayed on the left top of screen, it shows one or more alarms
have been set and are active.
Add Alarm
Touch the
Touch
Clock application icon.
alarm icon → Add alarm.
Set up your alarm as desired (I nput alarm time)
Touch Done.
21
Page 22
Delete Alarm
Touch the
Clock application icon, → touch alarm icon
Select the desired alarm you want to delete.
Touch icon of selected alarm
Alarm Deleted
Video Conferencing
Skype can be downloaded from Google PlayTM..
**This device built-in front camera and microphone that allow video conferencing via Skype
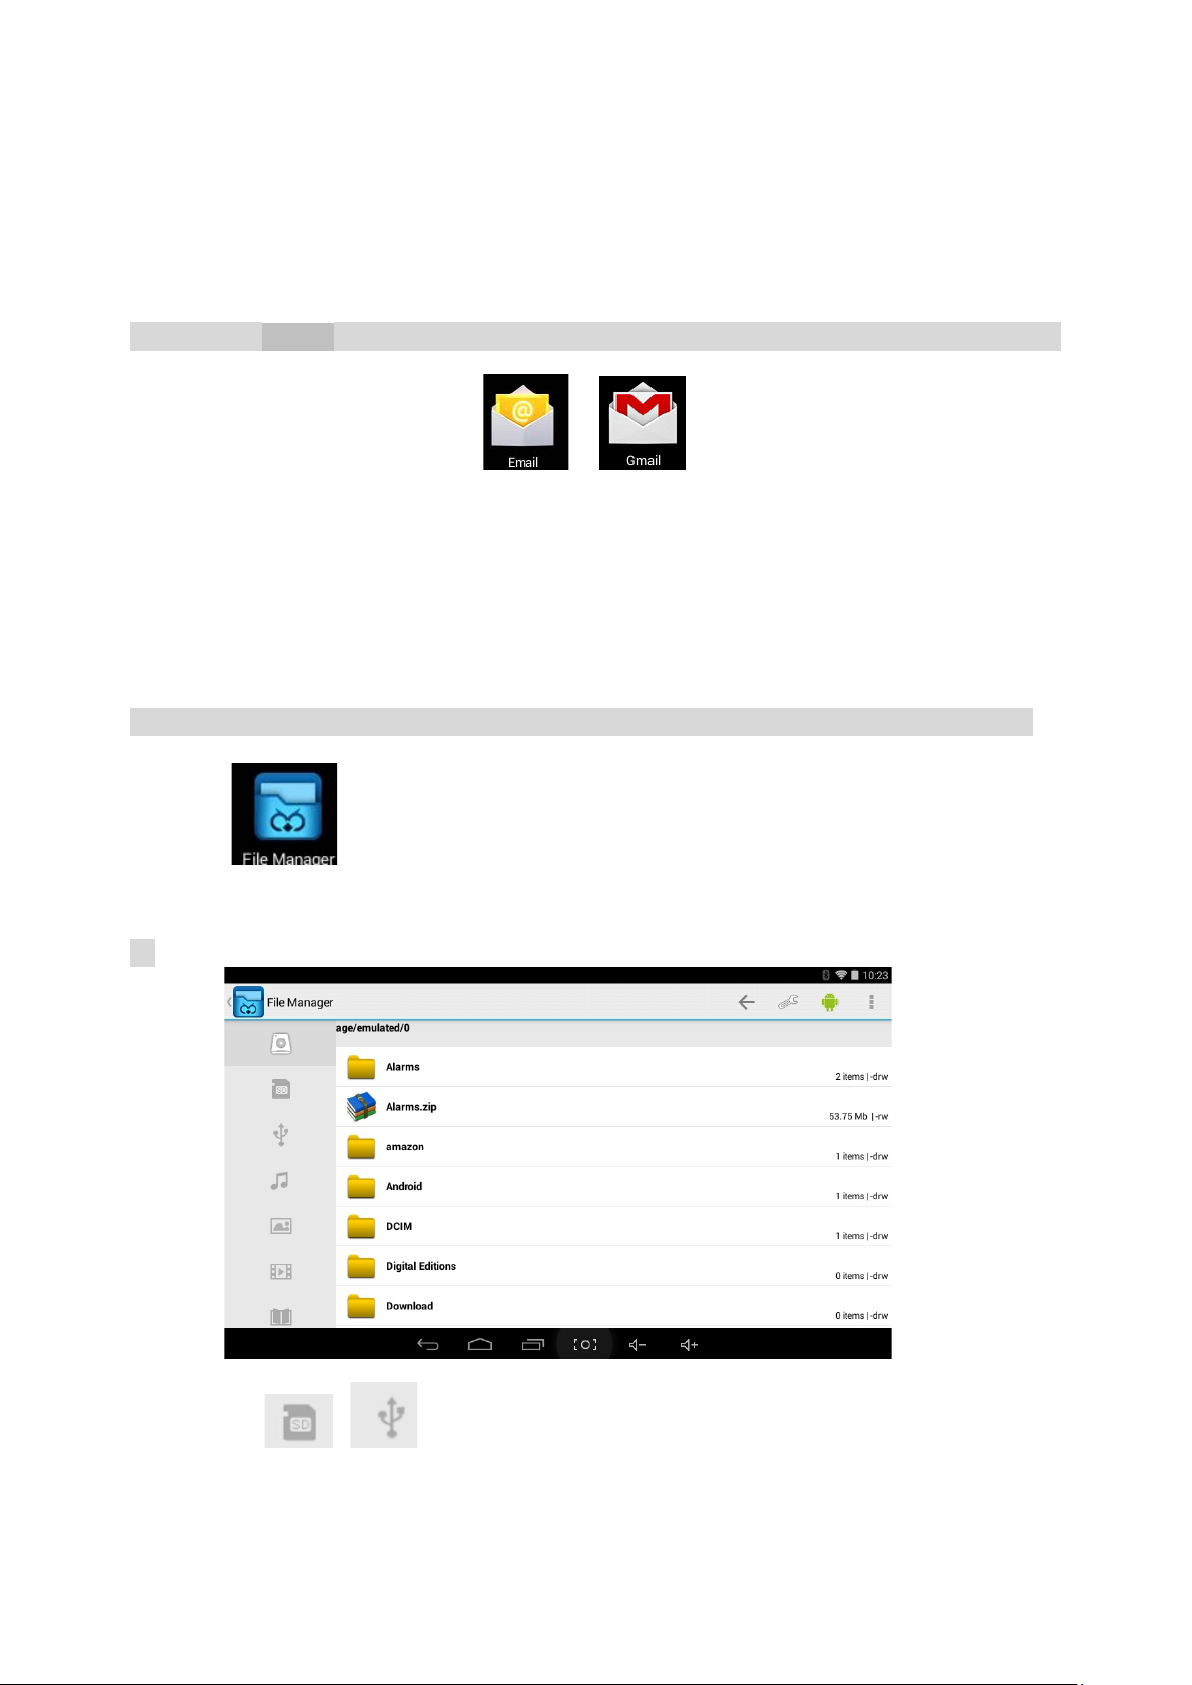
BROWSER
Users can connect to the Internet through a browser.
Touch the browser icon on the apps page
, and then you can open the Web browser.
CALENDAR
Touch the Calendar appli cation icon.
For the first time using the Calendar, you need to add a Gmail
TM
account. Enter GmailTM address
and password. Click “Next” and follow the prompts to complete the ac count configuration. Then you
22
Page 23
can use the Calendar. (Note: In Account Set up screen, manual change the server for www.
google.com)
Add Event
1. On the Calendar screen, touch on the date to which you want to add an event.
2. Touch on the event time, →touch in each entry field to enter the desired event informati on.
3. Touch Done.
Email;GmailTM
Inside the apps menu, touch the icon
required to configure the account information for the first time. Pre-register and set up your email
account is necessary. Please be advised that Gmail
access services provided by Google and Android.
to enter the ‘Email/GmailTM’ client. It’s
TM
account registration is necess ary in order to
File Manager
Touch the Explorer application icon to view the files on all storage devices (sdcard,SDext, USB uhost and Music, Photo, Movies and Ebook), and to quickly & easily install Android
application on your Tablet.
A: Touch the “File Manager” icon on the apps page, will be shown in above pi cture.
B: Touch the “ or ”, will be shown i n above picture. (SD-ext and Uhost)
23
Page 24
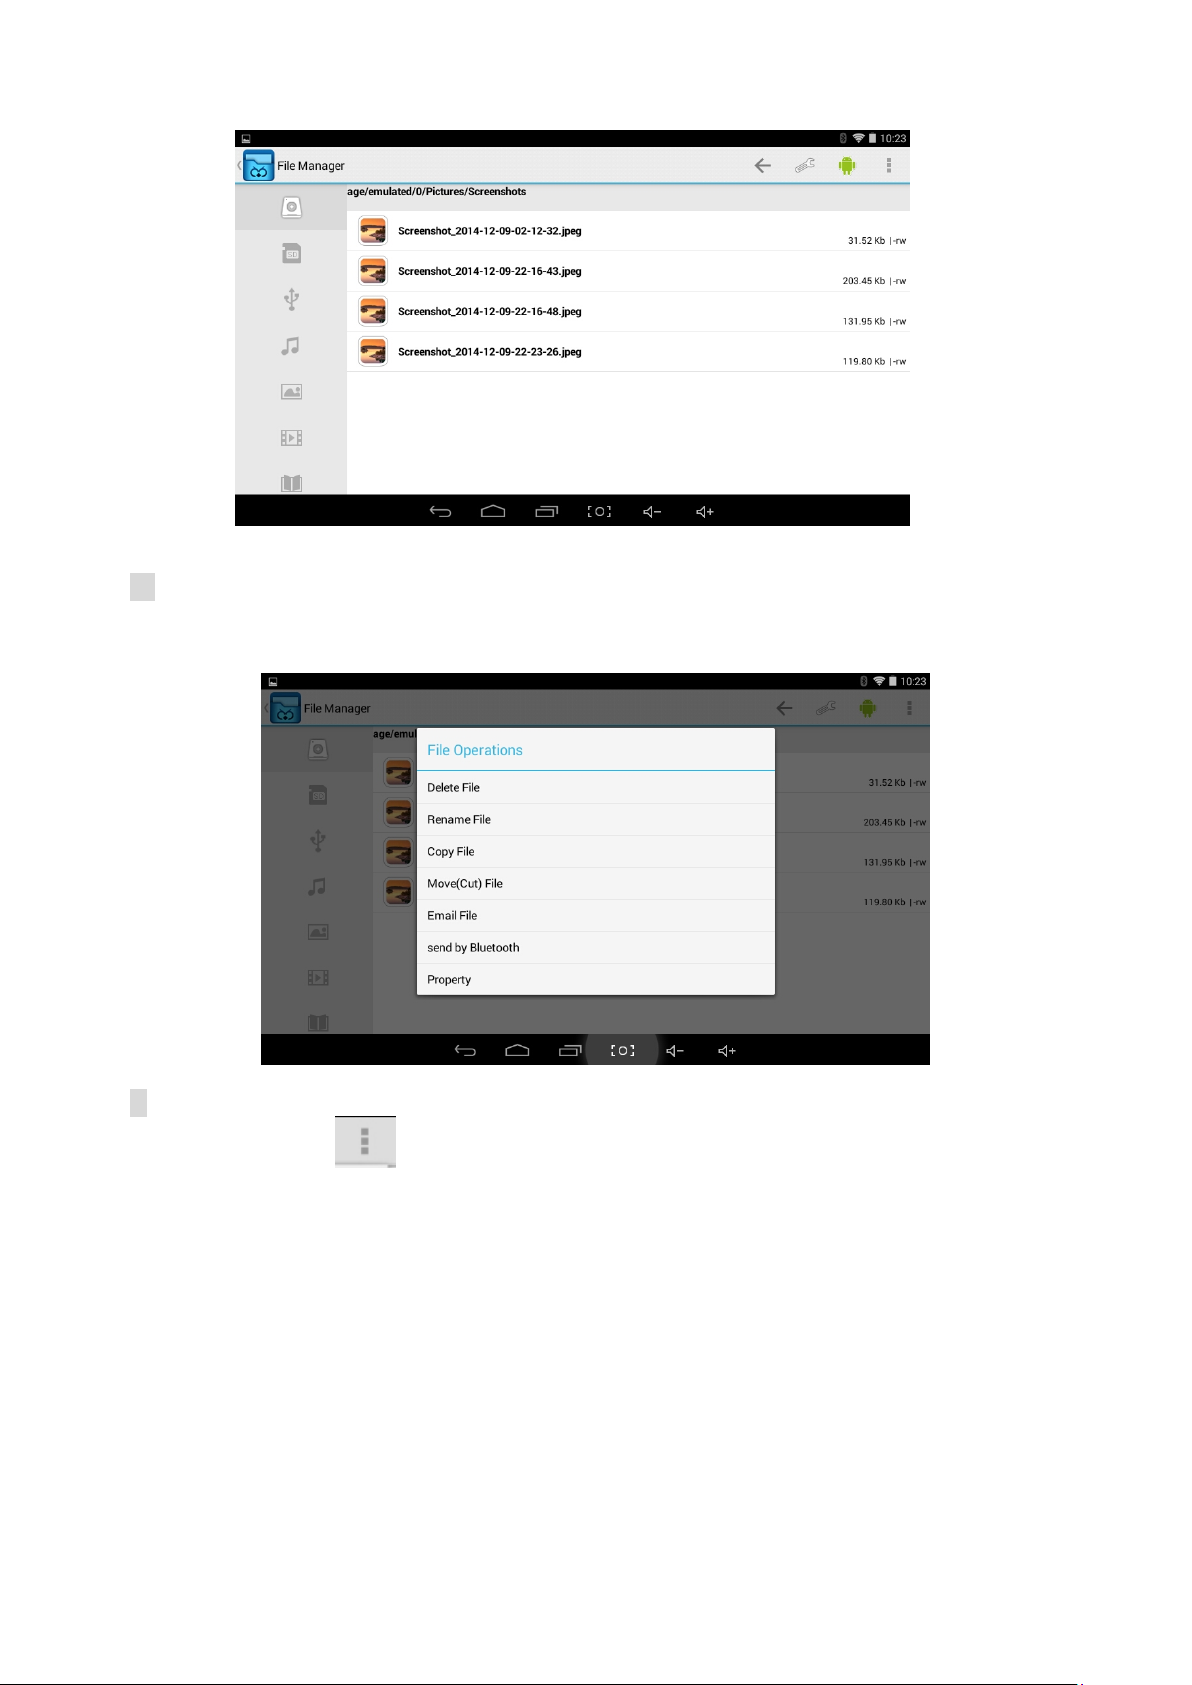
C: Select the file or folder you want to do action as below, touch and hold the file/folder about 2
seconds, Pop-up menu will display different options File operati on or Folder operation as Delete
File/Folder, Rename File/Folder, Copy File/Folder, Move File/Folder, Email File, Zip Folder etc.
D; Touch the “Copy File” and select Local Disk (SD card) or External Storage (SD-ext or
Uhost ),then touch “
” On the top right-hand corner of the screen
24
Page 25
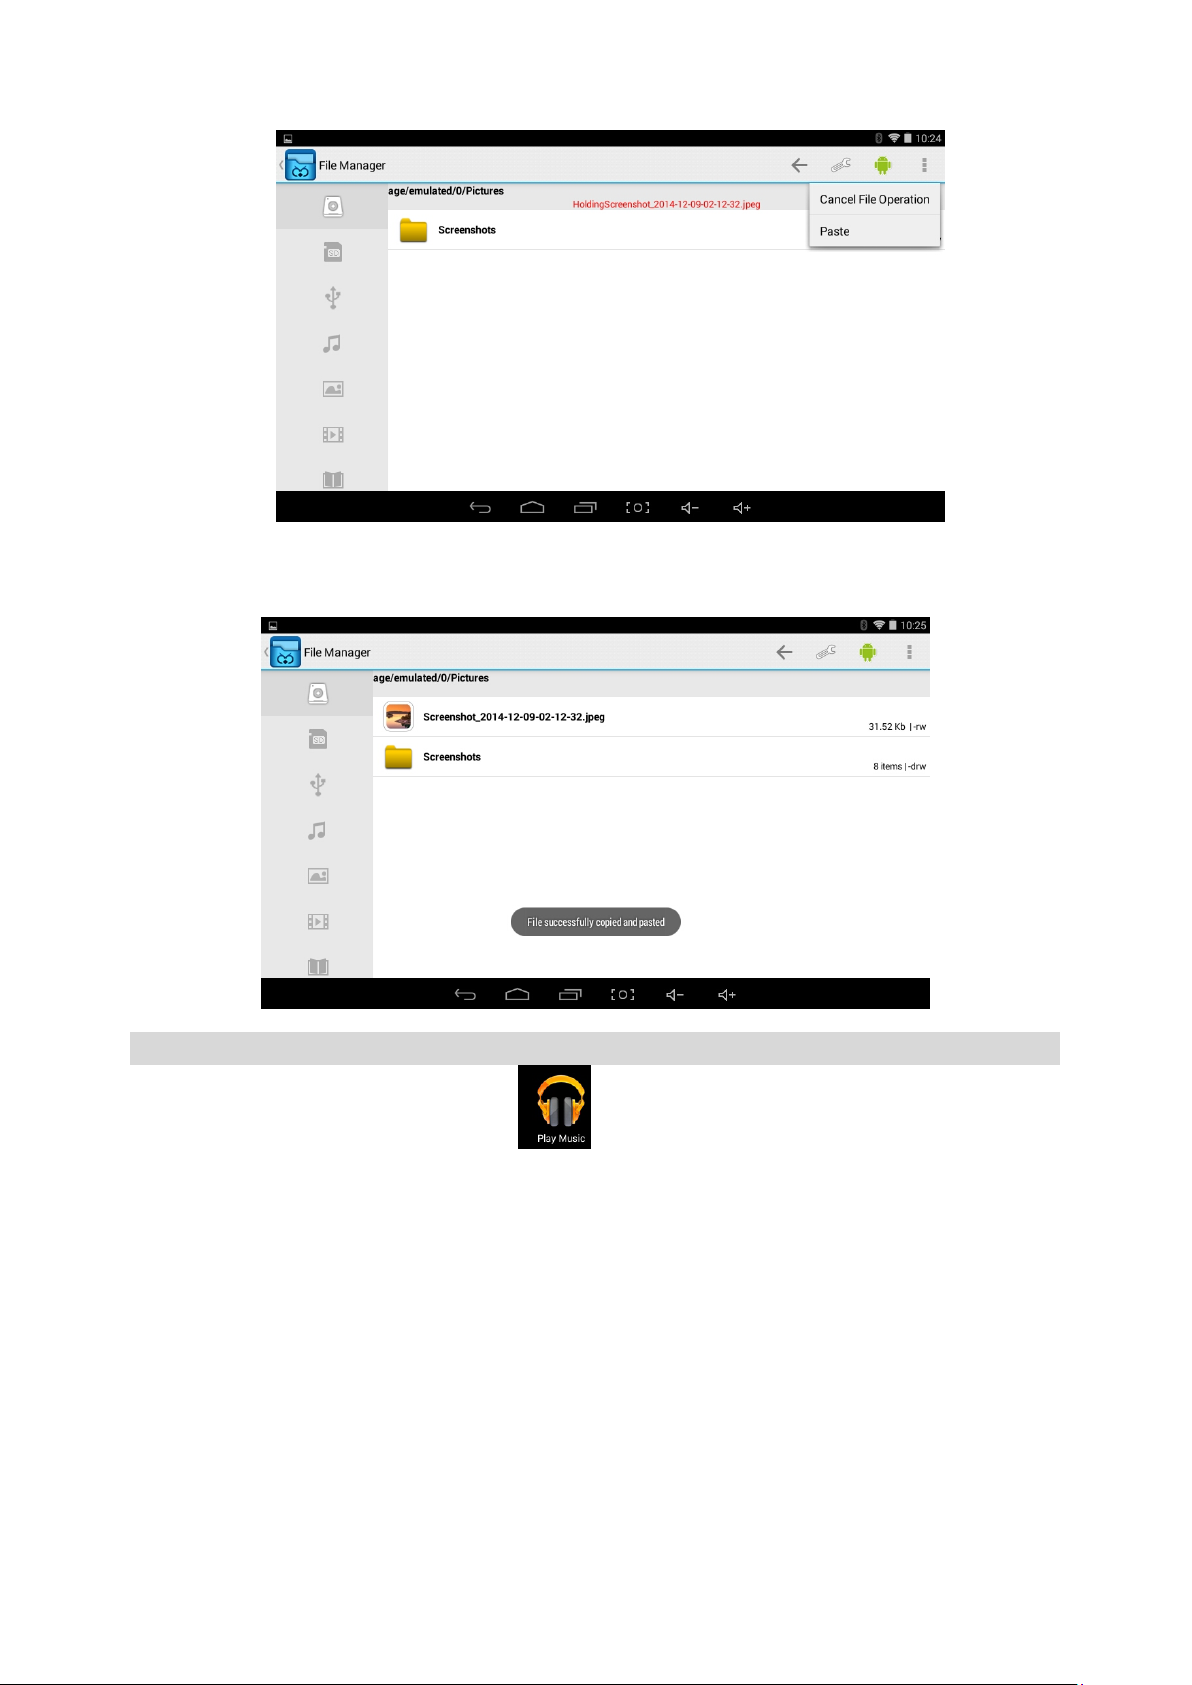
E: Touch the “Paste”, the file will copy and display on the screen.
Google Play™ Music
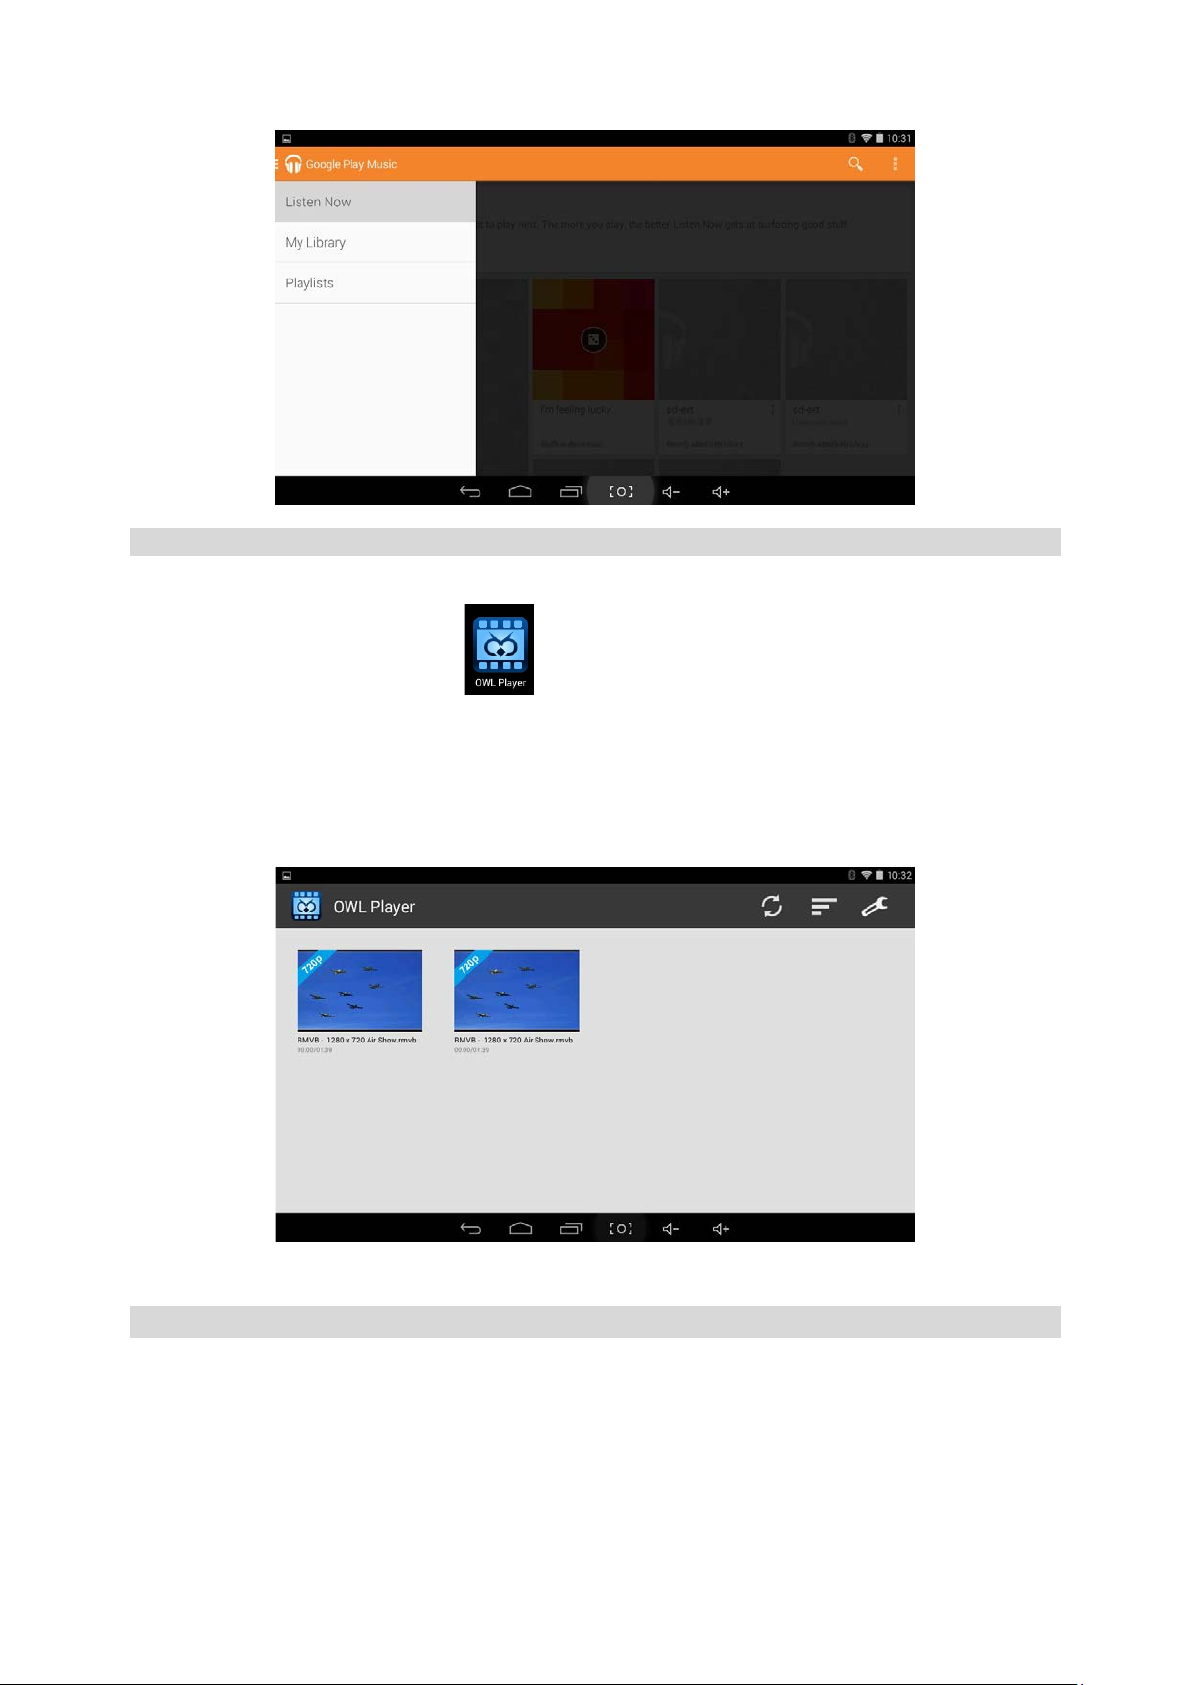
− Using the pre-loaded “Play Music” Player to play audio files:
☆ Audio file formats supported: MP3
The “Play Music” player will automatically load t he music files from the SD/USB/Local Disk to the
playlist after turning on the “Play Music” player .
25
Page 26
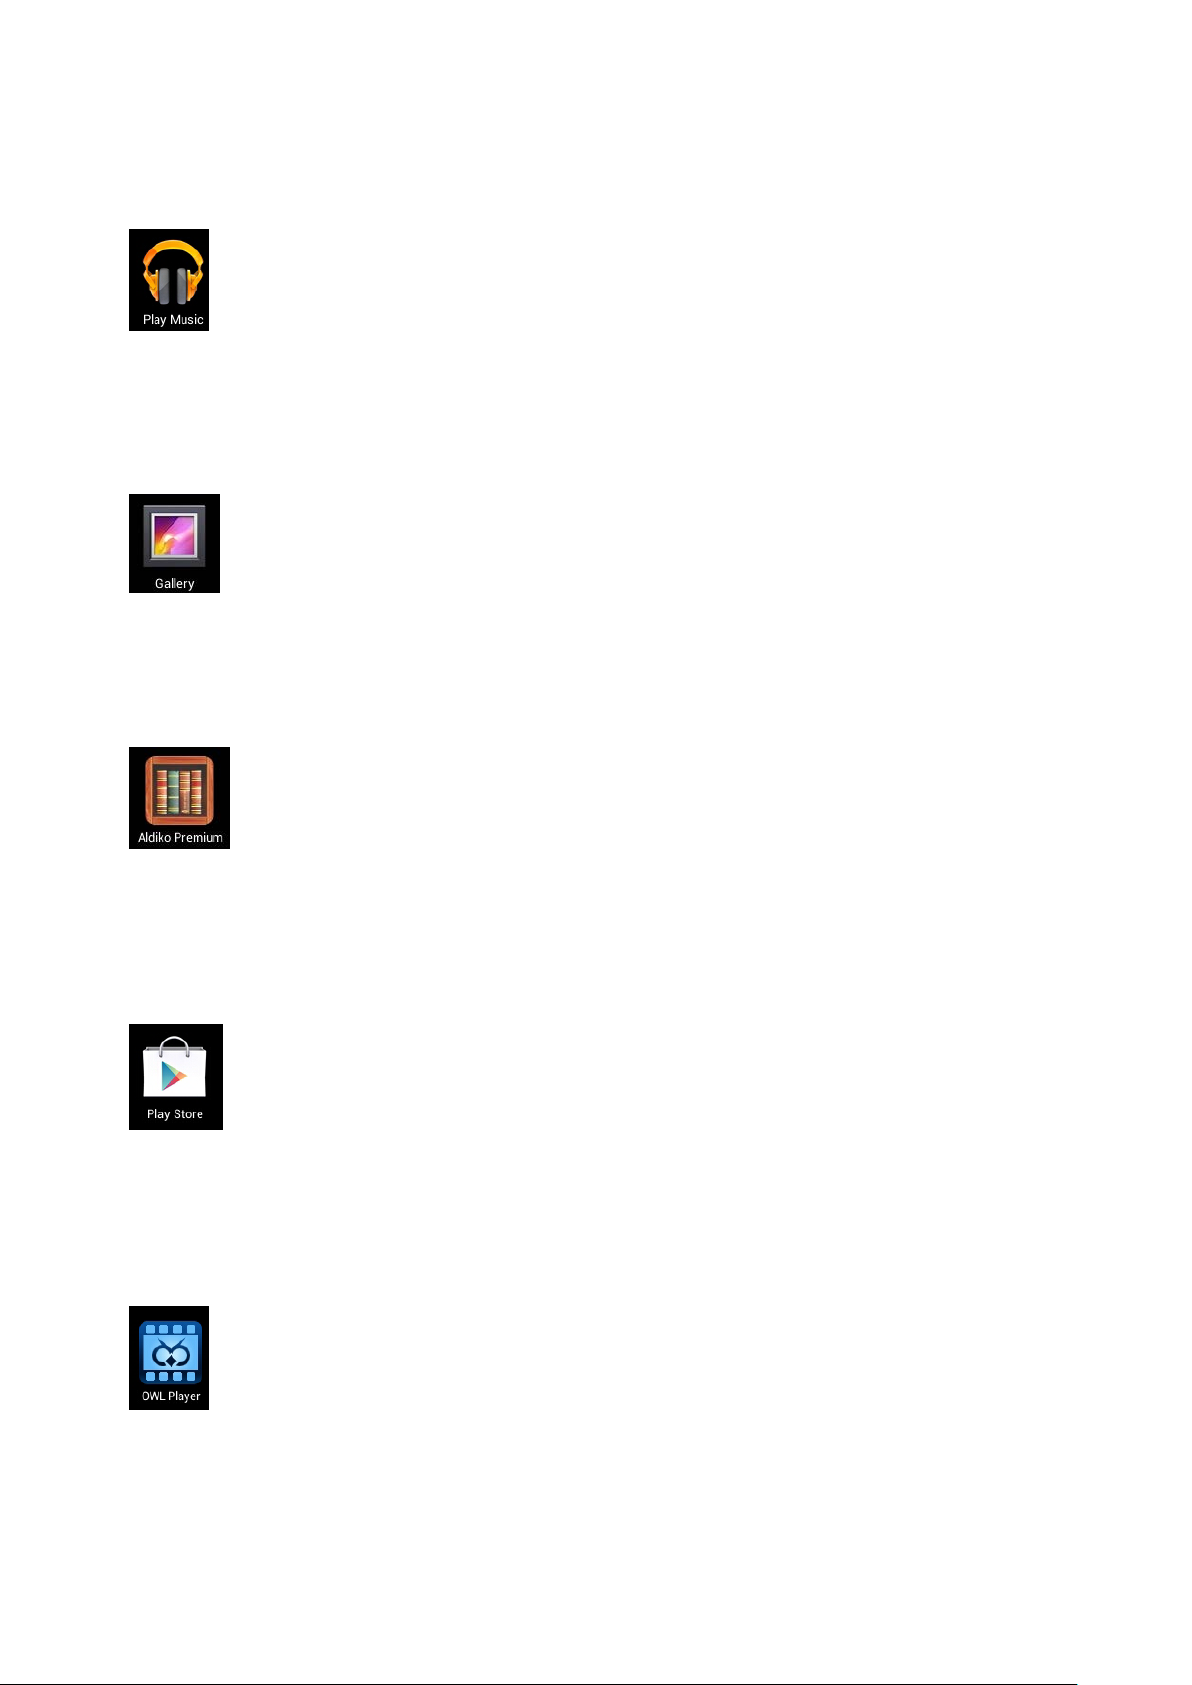
OWL Player
☆ Video file formats supported: H.264, VC-1, AVI and RMVB.
In the main menu, touch the icon
Choose video files from Local Disk or External s torage card in the video player playlist. The
system will automatically load the video file form external storage or local disk to the playlist after
turning on the OWL player.
The playlist as shown in the below figure:
to enter “OWL player”. It will list all the video files
Frequently Asked Questions
Android
Q: What Android OS version is on my Device? A: Android™ 4.4, KitKat®
Basic Device Functionary
Q: Do I have to charge the battery before use?
A: You should charge the battery for at least 4 hours, but you can use the device while it’s
26
Page 27

charging. Use the included power adapter to charge; this device charge via USB cable.
Email
Q: Can I use any of my personal email addresses to send/r eceive email?
A: The device supports POP3 and SMTP accounts. Some free email accounts are not
supported on mobile devices. Check with your email provider to see if your account is
supported.
Media Cards
Q: Which media cards are compatible with my Device?
A: micro SD card.
Music
Q: How do I add music files to my device?
A: Copy the music files from your computer onto a mic ro S D card or USB storage device,
and then use the “File Manager” application to copy the f i les into the device.
Photos
Q: How do I add photo files to my device?
A: Copy the photo files from your computer onto a micro SD card or USB storage device,
and then use the” File Manager “application to copy the f i les into the device.
Video
TM
Q: Can I play YouTube
A: Yes. You can tap the YouTube
videos on my device?
TM
application icon to quick access videos.
Q: How do I add video files to my device?
A: Copy the video files from your computer onto a mi cro SD card or USB storage device,
and then use the “File Manager” to copy the files into the device.
Wi-Fi
Q: Do I need a Wi-Fi adapter to connect to the Internet?
A: No. The Wi-Fi adapter is built-in to the device.=
Storage:
Q: How do I turn the device into a USB storage device?
A: Connect the Device to the PC via the Micro USB port on the side of cabinet to the USB
port on your PC by the supplied connection cable.
B: Then the "Connected as a media device” will appear on the top left corner of screen.
C: The name“ICRAIG_CMP_771 “disk will display on your computer.
Other Applications
Email , GmailTM:
Touch into e-mail settings, after entering t he email address and password; simply follow the on
screen instructions for set up. This application supports IMAP mail (such as Hotmai l , Gmail
27
TM
Page 28
and Yahoo Mail, P O P3 mail and Exchange). Tap Menu button on screen to choose and remove
email account
Google PlayTM Music:
Touch icon to access music. The list of artists, albums, songs, playlist, etc. will appear on the
screen. Click the desired music file to start playing.
Gallery:R
Touch into photo player to play photos.
Aldiko Premium:
Touch into the book shelf to select /manage and/or read ebooks.
To turn to next page, touch on the screen then slide from right to left.
To turn to previous page, touch on the screen then slide from left to right.
Google PlayTM :
Touch on to the App store to choose and download the desired Apps. (Please follow on screen
instructions to register)
OWL Player:
Touch to turn on the video player.
Touch the desired file name to start playing.
Social networking
28
Page 29
This Device has pre-loaded with the most popul ar social applications for usage. Touch the individual
icon to login with pre-registered login name and passwords; otherwise, you may register online by
following the on screen instructions.
Dropbox :
Touch to open and register with 5 GB cloud storage.
Please follow the on screen register instruction s an d g ettin g start.
**
29
Page 30

Troubleshooting:
Cannot power on the Device
Connect the supplied AC/USB Adaptor.
Cannot go online
Earphones do not transmit sound
Screen is flashing after power on is performed
How to buy/download the applications from the internet
Warning: Personal details and Credit Card information may be required, please stay Alert!
Unable to Read EBook
Media files can't be found:
How to enter the Settings menu while applications/programs are running
Cannot hook up with Wi-Fi or the Wi-Fi signal is weak
How to remove personal data/email accounts from the device:
T
Check if your Wi-Fi s etting is correct, proper password may be needed.
Check if your router is working properly.
Check your signal bar on t he Devi ce. It may not be connected due to weak signal.
Earphone volume is poor.
Try another music file.
Short of power, please charge the battery.
Make sure your device is already hooked up to Wi-Fi/ networks.
Press Google Play
Search, Buy, Download and Install the desired applications by following the on screen
instruction.
Application Amazon Kindle already installed in the device. Make sure you are using the
“Amazon Kindle” APP to read the eBooks bought from Amazon.
Some online bookshops require thei r own application to buy, download, read and manage
eBook purchases. Applications can be downloaded from the web searching for a suitable
one.
TM
icon on the home page.
Barnes and Nobles uses its own reader application, called “Nook”. Most other book stores
will use third party applications such as Aldiko, which can be download.
If new files were added ont o the device; click the "File Manager" icon on the APPS menu
to search.
Use correct Apps to open corresponding media files. Click “OWL Player” to play video
files. Click “Gallery” to view photos. Click “Play Music” to play music.
After turning on the application/program, Touch the Option button wher e is normally listed
on the bottom of the screen to enter settings menu. Set each setting as instructed by the
on screen instructions (functions depend on the software of the applications).
Make sure Wi-Fi is available in your location and you are authorized (wi th correct
password) to hook up it.
The device may be too far from the signal source. Move your device cl oser to the signal
source.
In the settings m enu, select and enter “Backup & reset” setting.
Touch “Factory data reset” button to enter.
Touch “Reset tablet” button.
Touch “Erase everything” button to start reset. Then the device will restart,
Touch “Wipe date/factory reset” and touch the “8.Yes—delete all user date”, the device will
automatically reset. (It may need a few minutes ).
Touch “reboot system now” ,the device will restart,
The reset done.
IMPORTANT:
After Factory Data reset, all users’ data (users installed applications, passwords, e-mail
accounts, Gmail
TM
accounts, media files etc...) will be deleted. Backu p this data before
resetting.
30
Page 31
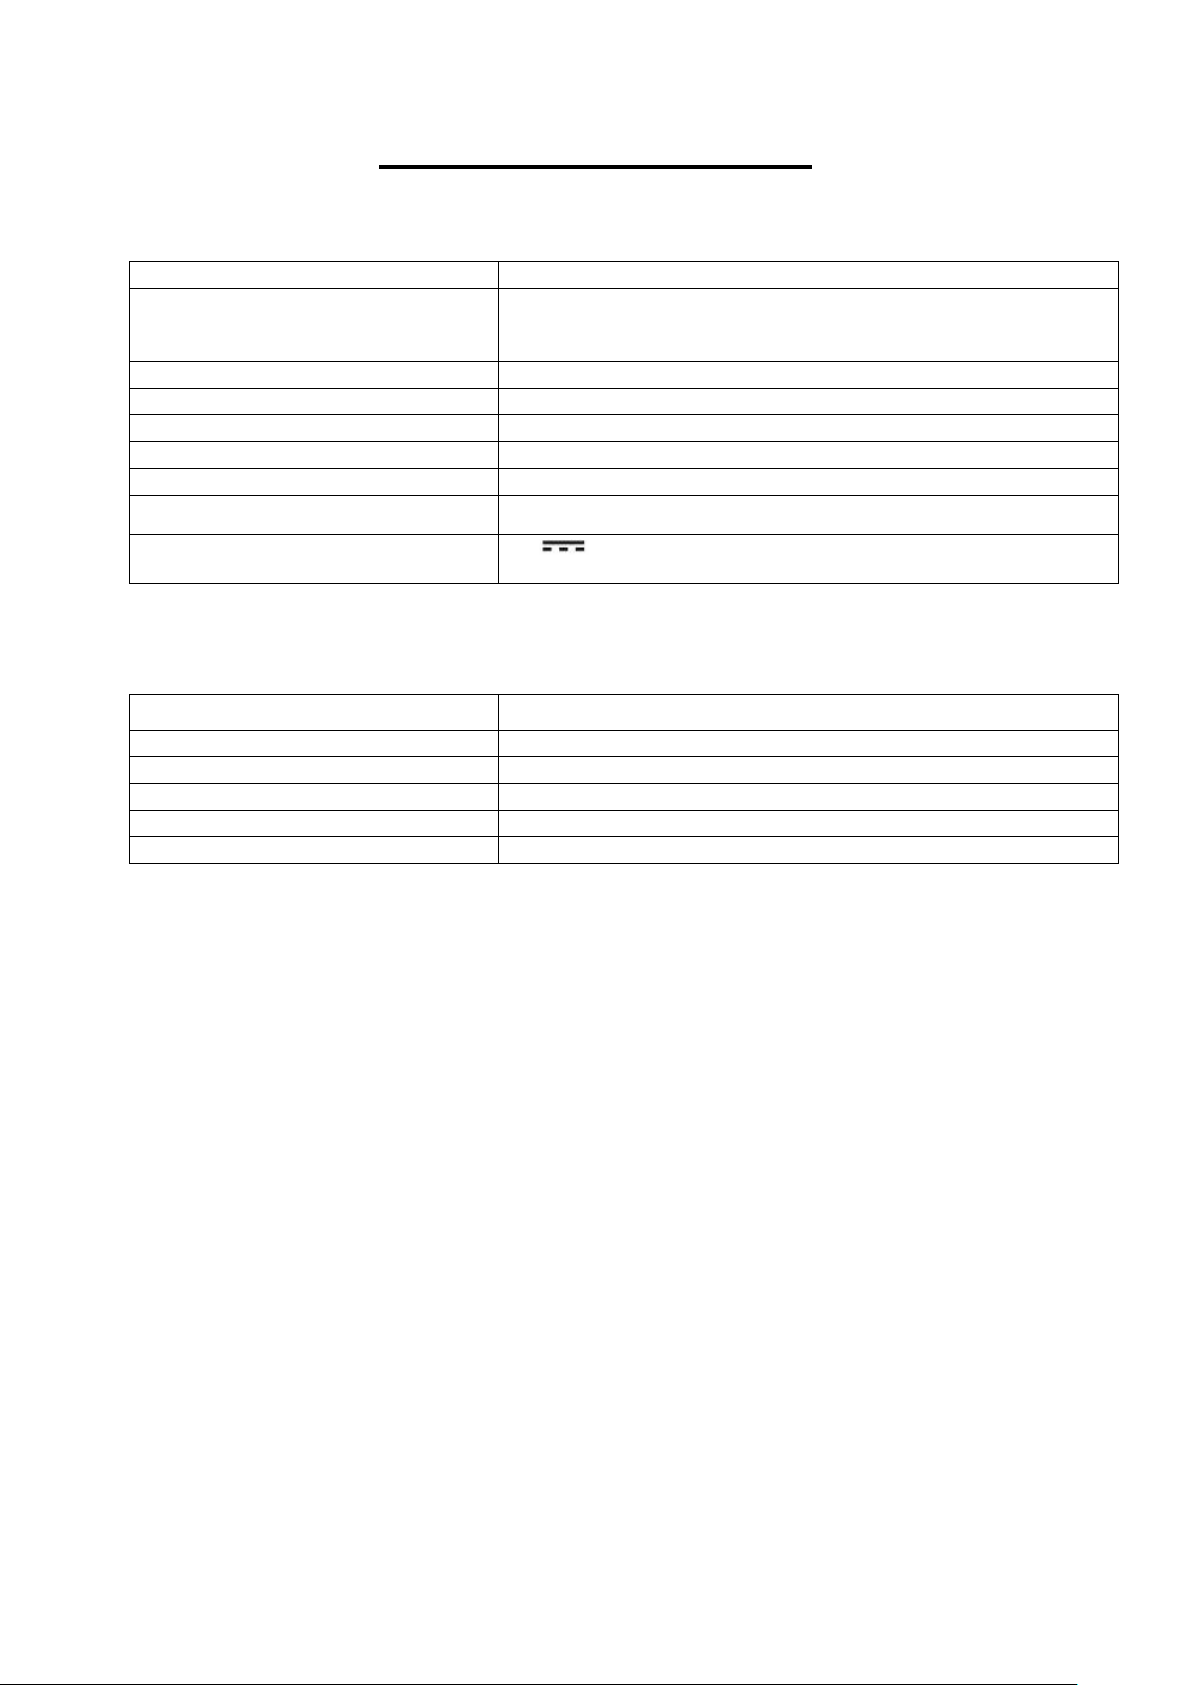
CPU Processing Speed
Cortex A9, 1.3GHz DUAL Core processor
Memory/ROM
8GB (Internal 2.11 GB flash memory has be assigned for
GB flash space is available for further operation needs.)
Memory/RAM DDR III
512MB
Memory Card Slot
Micro SD card(Supports up to 32GB), not included
USB
1x Micro USB port for battery recharge and USB OTG
I/O ports
1x Micro SD Card Slot, 3.5mm Phones Jack, Mi ni HDMI
Wireless Interface
WiFi 802.11b/g/n
Adaptor Power source
AC 100-240V~, 50/60Hz, 0.5A
Output of the supplied AC/USB
Adaptor
DC 5V,2A
Operating System
Android™ 4.4, KitKat®
Browser
Web Browser, ChromeTM
Video file supported
H.264, VC-1, AVI,R MVB
Music file supported
MP3, AC3,
Photo file supported
JPEG, BMP, GIF, PNG
Email
Support Web mail & Pop mail
PRODUCT SPECIFICATIONS
Hardware Configuration:
Software Configuration:
Android operating system and pre-loaded Apps, existing 5.89
SPECIFICATIONS ARE SUBJECT TO CHANGE WITHOUT NOTICE
Accessories:
1 x Instruction booklet
1 x AC/USB Adaptor
1 x USB Connection Cable
1X USB OTG Connection Cable
1X Keyboard and Case
Disclaimer
The Android robot is reproduced or modified from work created and
shared by Google and used according to terms described in the
Creative Commons 3.0 Attribution License.
Android, Google, Google Play and othe r marks are tradmarks of
Google Inc.
31
Page 32

32
Page 33
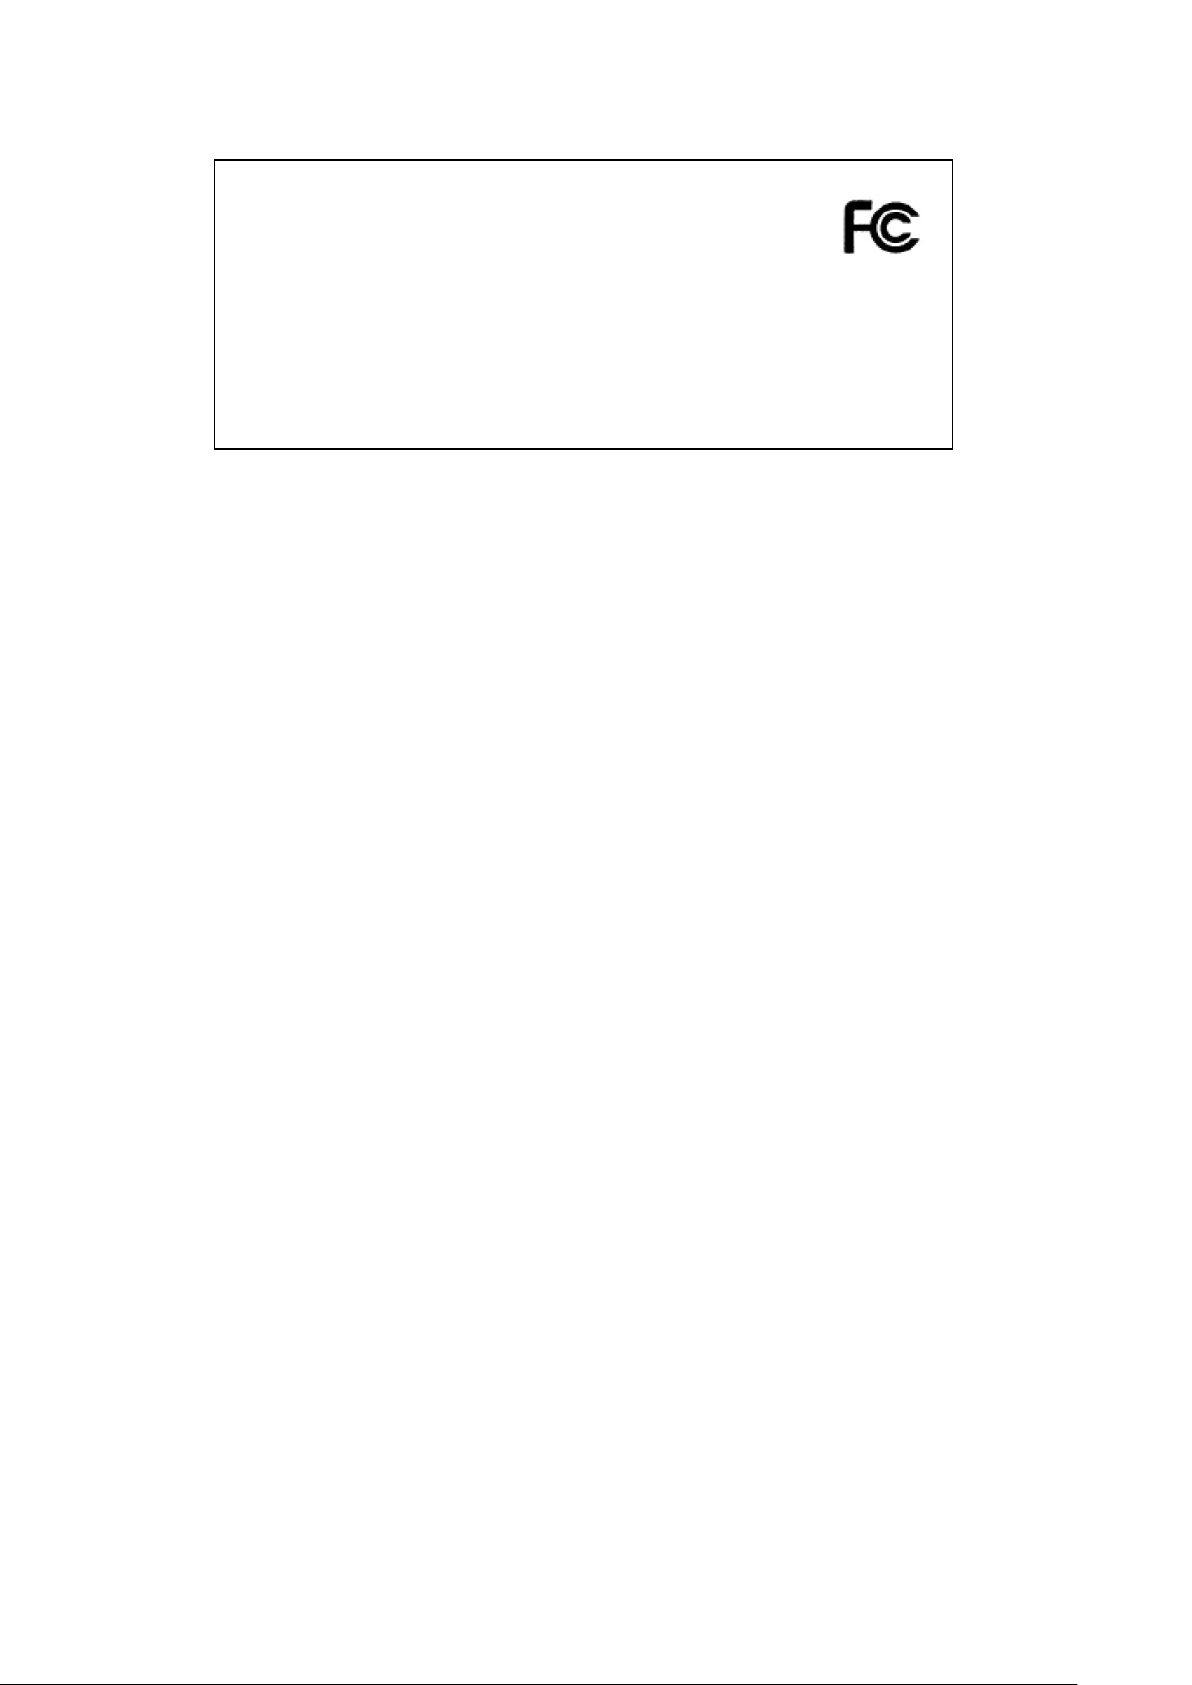
FCC ID: 2ABWOCMP771
Everex Electronics Ltd
Model No.: CMP771
Model name: 7 INCH TOUCH SCREEN DISPLAY
This device complies with Part 15 of the FCC Rules. Operation is subject to the
following two conditions: (1) this device may not cause harmful interference,
and (2) this device must accept any interference received, including interference
that may cause undesired operation.
Changes or modifications not expressly approved by the party responsible for
compliance could void the user's authority to operate the equipment.
The device has been evaluated to meet general RF exposure requirement. The device
can be used in portable exposure condition without restriction.
This device and its antenna(s) must not be co-located or operation in conjunction with
any other antenna or transmitter.
Note: This equipment has been tested and found to comply with the limits for a Class B
digital device, pursuant to part 15 of the FCC Rules. These limits are designed to
provide reasonable protection against harmful interference in a residential ins tallation.
This equipment generates, uses and can radiate radio frequency energy and, if not
installed and used in accordance with the instructions, may cause harmful interference
to radio communications. However, there is no guarantee that interference will not
occur in a particular installation. If this equipment does cause harmful interference to
radio or television reception, which can be determined by turning the equipment off and
on, the user is encouraged to try to correct the interference by one or more of the
following measures:
—Reorient or relocate the receiving antenna.
—Increase the separation between the equipment and receiver.
—Connect the equipment into an outlet on a circuit different from that to which the
receiver is connected.
—Consult the dealer or an experienced radio/TV technician for help.
33
 Loading...