

Page 1

To Suit Everdure Models:
ASSEMBLY, MAINTENANCE AND
SAFETY INSTRUCTIONS
FOR EVERDURE 4 AND 6 BURNER ROTISSERIES
FITZROY
ASHBURTON
STIRLING
KIMBERLEY
DAINTREE
NORFOLK
STYLE, GRILLED TO PERFECTION
Page 2

ASSEMBLY, MAINTENANCE AND SAFETY INSTRUCTIONS
FOR EVERDURE ROTISSERIES
To Suit Everdure Norfolk, Daintree, Kimberley, Ashburton & Stirling Outdoor Barbecues,
And Everdure Outdoor Modular Kitchens Only (Fitzroy).
ASSEMBLY
For assembly instructions, see pages 2 onwards.
USE AND MAINTENANCE
1. Do not use this rotisserie in the rain
2. Do not load the rotisserie with more than 3kgs in weight.
3. Set the barbecue up as follows for cooking. Open the roasting hood. Remove the solid hot plate. Remove the grill
plate/ plates. Remove the vapouriser plate. For a 4 burner barbecue, replace the grill plate over the center burners.
For a 6 burner barbecue, use baking dish positioned over centre burners.
4. Before lighting, ensure that the hood is open. It is recommended that when cooking with the rotisserie on a 4 burner
barbecue, only the 2 outside burners be used on high. For a 6 burner barbecue, the 2 outside burners should be on
high, and the 2 burners adjacent to the baking dish should be on low. The center burners must remain off at all times
during cooking. If left on, severe overheating will occur and spoil the food. Check the meat portion regularly whilst
cooking.
5. After use, remove rotisserie spindle from barbecue and clean the spindle and meat hooks with warm soapy water. Dry
and store in a clean dry place.
6. After use, remove the motor from the bracket and store in a clean, dry place.
WARNING
1. The appliance is not intended for use by young children or infirm persons unless they have been adequately
supervised by a responsible person to ensure that they can use the appliance safely.
2. Young children should be supervised to ensure that they do not play with the appliance.
3. Do not use in the rain or leave outdoors while it is raining.
4. Do not allow the supply cord to become in contact with any hot surface, or be trapped by any moving part, as the
cord may become damaged.
5. If the supply cord is damaged, it must be replaced by manufacturer, its service agent or similar qualified persons in
order to avoid hazards.
WARRANTY
Everdure warrants to the original purchaser of this Everdure rotisserie that it is free from defect in parts, material and
workmanship from the date of purchase for a period of 12 months.
1. Should the rotisserie or any of its parts fail due to faulty parts or defective workmanship within the specified period
from date of purchase, Everdure will, at its discretion, repair or replace the defective part free of charge.
2. This warranty does not cover any defects, operating difficulties or damage due to:
a. abuse or improper usage;
b. assembly and installation other than in accordance with the Everdure assembly and installation instructions
accompanying the rotisserie;
c. improper maintenance or a failure to maintain.
3. Proof of purchase of the Everdure rotisserie must be provided with all warranty claims.
4. To make a claim under this warranty, the purchaser must make it directly to Everdure, or their authorised agent.
STYLE, GRILLED TO PERFECTION
Page 3
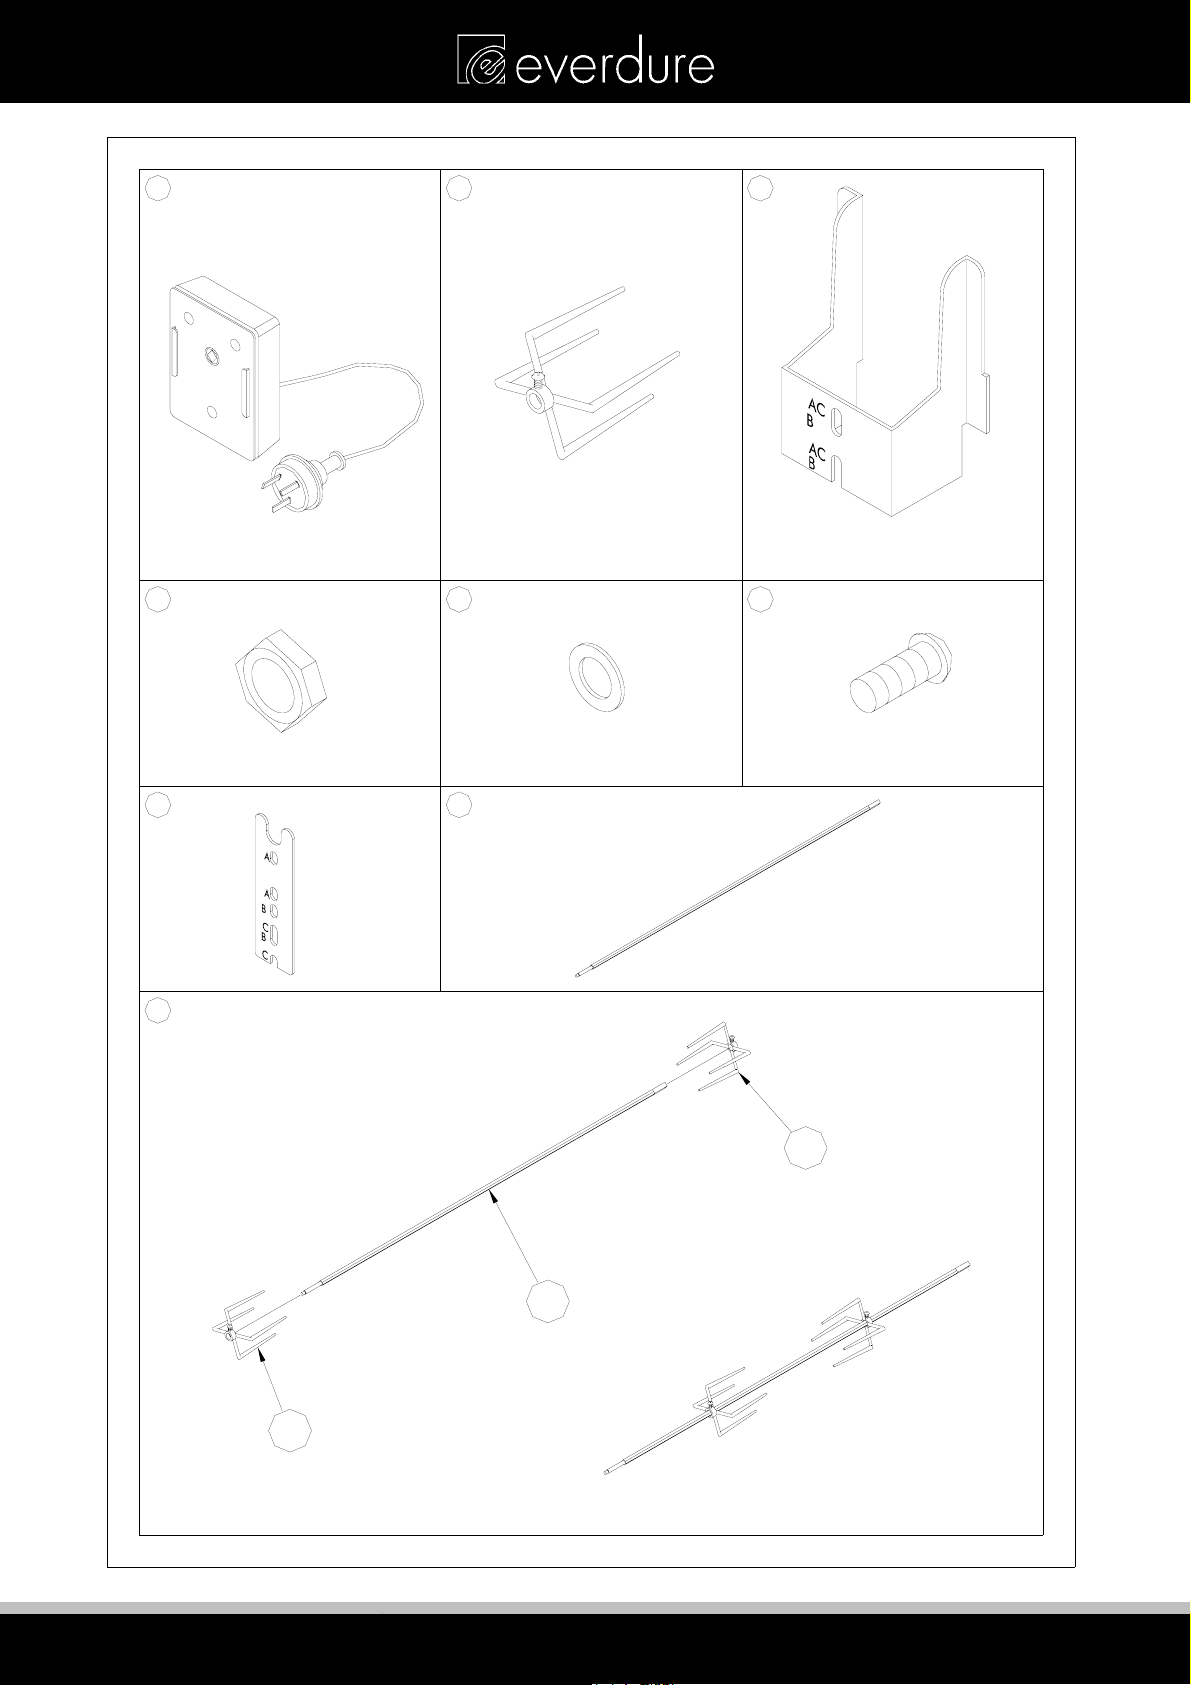
ROTISSERIE COMPONENTS
x1
1
2
x2
3
x1
x4
4
7
A
5
x1
8
x4
6
x4
x1
2
8
2
STYLE, GRILLED TO PERFECTION
Page 4
ROTISSERIE ASSEMBLY AND FITTING
CLASSIC BBQ WITH DISSIMILAR MOUNTING HOLES.
WHEN FITTING PART NUMBER 7,
PLEASE ENSURE THAT THE SLOT IN
THE BRACKET SITS SLIGHTLY HIGHER
THAN THE HOLE IN THE HOOD, TO
PREVENT THE SPINDLE, ASSEMBLY A,
FROM RESTING ON THE HOOD.
BRACKET SITTING
ABOVE HOLE
AFTER FITTING
5
4
5
4
5
6
6
4
5
7
4
6
6
3
HOLE IN HOOD
FOR SPINDLE
SPINDLE
SUPPORT
BRACKET
VIEW FROM OUTSIDE OF HOOD
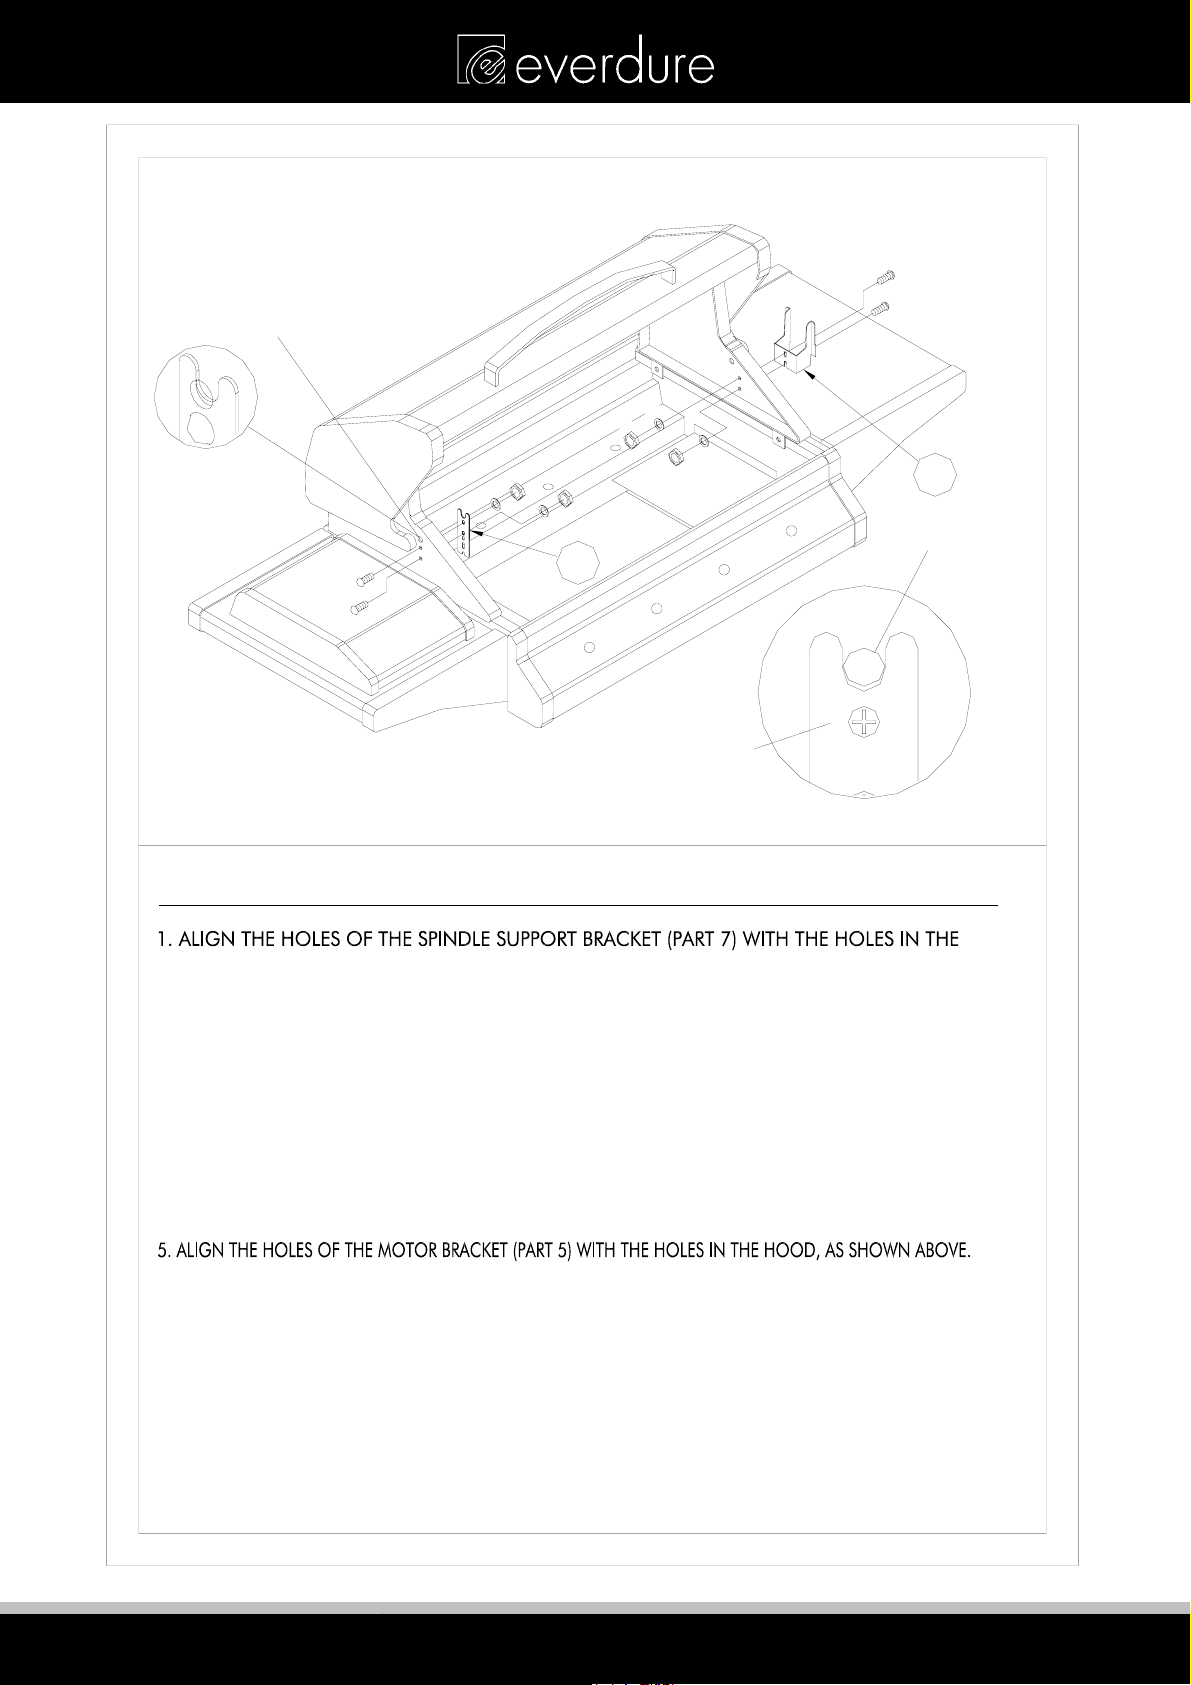
FITTING OF SPINDLE SUPPORT BRACKET AND MOTOR BRACKET TO THE HOOD
HOOD, AS SHOWN IN THE DIAGRAM ABOVE. USE THE HOLES MARKED "A".
2. PLACE 1 x M5 SCREW (PART 6) THROUGH A HOLE OF THE HOOD AND THROUGH THE
CORRESPONDING HOLE OF THE SPINDLE SUPPORT BRACKET (PART 7).
3. PLACE 1 x 5mm DIAMETER WASHER (PART 5) AND 1 x M5 NUT (PART 4) ONTO THE
SCREW AND TIGHTEN.
(NOTE: BEFORE TIGHTENING, ENSURE THAT THE 'U' SHAPE OF THE BRACKET SITS JUST ABOVE THE HOLE OF THE HOOD)
(SEE ABOVE DIAGRAMS FOR DETAILS)
4. REPEAT STEPS 2 & 3 FOR THE OTHER HOLE POSITION.
AGAIN USE THE HOLE POSITIONS MARKED "A".
6. PLACE 1 x M5 SCREW (PART 6) THROUGH A HOLE OF THE MOTOR BRACKET (PART 3)
AND THROUGH THE CORRESPONDING HOLE OF THE HOOD.
7. PLACE 1 x 5mm DIAMETER WASHER (PART 5) AND 1 x M5 NUT (PART 4) ONTO
THE SCREW AND TIGHTEN
8. REPEAT STEPS 6 & 7 FOR THE OTHER HOLE POSITIONS.
STYLE, GRILLED TO PERFECTION
Page 5

ROTISSERIE ASSEMBLY AND FITTING
CLASSIC BBQ WITH SIMILAR MOUNTING HOLES.
WHEN FITTING PART NUMBER 7,
PLEASE ENSURE THAT THE SLOT IN
THE BRACKET SITS SLIGHTLY HIGHER
THAN THE HOLE IN THE HOOD, TO
PREVENT THE SPINDLE, ASSEMBLY A,
FROM RESTING ON THE HOOD.
BRACKET SITTING
ABOVE HOLE
AFTER FITTING
6
6
5
4
5
4
5
4
5
7
6
6
4
SPINDLE
SUPPORT
BRACKET
VIEW FROM OUTSIDE OF HOOD
3
HOLE IN HOOD
FOR SPINDLE
FITTING OF SPINDLE SUPPORT BRACKET AND MOTOR BRACKET TO THE HOOD
HOOD, AS SHOWN IN THE DIAGRAM ABOVE. USE THE HOLES MARKED "C".
2. PLACE 1 x M5 SCREW (PART 6) THROUGH A HOLE OF THE HOOD AND THROUGH THE
CORRESPONDING HOLE OF THE SPINDLE SUPPORT BRACKET (PART 7).
3. PLACE 1 x 5mm DIAMETER WASHER (PART 5) AND 1 x M5 NUT (PART 4) ONTO THE
SCREW AND TIGHTEN.
(NOTE: BEFORE TIGHTENING, ENSURE THAT THE 'U' SHAPE OF THE BRACKET SITS JUST ABOVE THE HOLE OF THE HOOD)
(SEE ABOVE DIAGRAMS FOR DETAILS)
4. REPEAT STEPS 2 & 3 FOR THE OTHER HOLE POSITION.
AGAIN USE THE HOLE POSITIONS MARKED "C".
6. PLACE 1 x M5 SCREW (PART 6) THROUGH A HOLE OF THE MOTOR BRACKET (PART 3)
AND THROUGH THE CORRESPONDING HOLE OF THE HOOD.
7. PLACE 1 x 5mm DIAMETER WASHER (PART 5) AND 1 x M5 NUT (PART 4) ONTO
THE SCREW AND TIGHTEN
8. REPEAT STEPS 6 & 7 FOR THE OTHER HOLE POSITIONS.
STYLE, GRILLED TO PERFECTION
Page 6

ROTISSERIE ASSEMBLY AND FITTING
EVERDURE MODULAR OUTDOOR KITCHEN.
WHEN FITTING PART NUMBER 7,
PLEASE ENSURE THAT THE SLOT IN
THE BRACKET SITS SLIGHTLY HIGHER
THAN THE HOLE IN THE HOOD, TO
PREVENT THE SPINDLE, ASSEMBLY A,
FROM RESTING ON THE HOOD.
6
6
7
5
4
BRACKET SITTING
ABOVE HOLE
AFTER FITTING
4
5
6
6
4
5
5
4
HOLE IN HOOD
FOR SPINDLE
3
SPINDLE
SUPPORT
BRACKET
VIEW FROM OUTSIDE OF HOOD
FITTING OF SPINDLE SUPPORT BRACKET AND MOTOR BRACKET TO THE HOOD
HOOD, AS SHOWN IN THE DIAGRAM ABOVE. USE THE HOLES MARKED "C".
2. PLACE 1 x M5 SCREW (PART 6) THROUGH A HOLE OF THE HOOD AND THROUGH THE
CORRESPONDING HOLE OF THE SPINDLE SUPPORT BRACKET (PART 7).
3. PLACE 1 x 5mm DIAMETER WASHER (PART 5) AND 1 x M5 NUT (PART 4) ONTO THE
SCREW AND TIGHTEN.
(NOTE: BEFORE TIGHTENING, ENSURE THAT THE 'U' SHAPE OF THE BRACKET SITS JUST ABOVE THE HOLE OF THE HOOD)
(SEE ABOVE DIAGRAMS FOR DETAILS)
4. REPEAT STEPS 2 & 3 FOR THE OTHER HOLE POSITION.
AGAIN USE THE HOLE POSITIONS MARKED "C".
6. PLACE 1 x M5 SCREW (PART 6) THROUGH A HOLE OF THE MOTOR BRACKET (PART 3)
AND THROUGH THE CORRESPONDING HOLE OF THE HOOD.
7. PLACE 1 x 5mm DIAMETER WASHER (PART 5) AND 1 x M5 NUT (PART 4) ONTO
THE SCREW AND TIGHTEN
8. REPEAT STEPS 6 & 7 FOR THE OTHER HOLE POSITIONS.
STYLE, GRILLED TO PERFECTION
Page 7

ROTISSERIE ASSEMBLY AND FITTING
1
FITTING OF THE MOTOR TO THE MOTOR BRACKET
STYLE, GRILLED TO PERFECTION
Page 8

ROTISSERIE ASSEMBLY AND FITTING
PLACING THE SPINDLE INTO POSITION FOR COOKING
1. CAREFULLY PLACE THE SPINDLE THROUGH THE HOLE SUPPLIED IN THE HOOD
AT THE SPINDLE SUPPORT BRACKET END.
2. BE SURE THAT THE SPINDLE IS PUSHED THROUGH THE HOLE OF THE HOOD,
AS SHOWN IN THE DIAGRAM ABOVE.
STYLE, GRILLED TO PERFECTION
Page 9

ROTISSERIE ASSEMBLY AND FITTING
PLACING THE SPINDLE INTO POSITION FOR COOKING
1. ALIGN THE SPINDLE WITH THE HOLE IN THE SIDE OF THE HOOD WHICH HAS THE
MOTOR ATTACHED TO IT.
2. PLACE THE SPINDLE THROUGH THE HOLE OF THE HOOD AND INTO THE LOCATION
OF THE MOTOR.
3. BE SURE THAT THE SPINDLE IS RESTING ON THE SPINDLE SUPPORT BRACKET
AND NOT ON THE HOOD. SEE ABOVE DIAGRAM FOR DETAILS.
IF THE SPINDLE IS RESTING ON THE HOOD, TAKE THE SPINDLE OUT AND ADJUST THE
HEIGHT OF THE SPINDLE SUPPORT BRACKET.
STYLE, GRILLED TO PERFECTION
Page 10

ROTISSERIE ASSEMBLY AND FITTING
NOTE: VIEW FROM REAR OF BARBECUE
STORING THE ROTISSERIE SPINDLE
1. PLACE THE ROTISSERIE SPINDLE THROUGH ONE OF THE HOLES IN THE REAR OF
THE BARBECUE CARCASS, AS SHOWN ABOVE.
2. BE SURE THAT THE SPINDLE IS PUSHED THROUGH THE HOLE TO ALLOW THE SPINDLE
TO FIT INSIDE THE CARCASS. SEE ABOVE DIAGRAM.
STYLE, GRILLED TO PERFECTION
Page 11

ROTISSERIE ASSEMBLY AND FITTING
STORING THE ROTISSERIE SPINDLE
1. ALIGN THE SPINDLE WITH THE OTHER HOLE IN THE BARBECUE CARCASS.
2. PLACE THE SPINDLE THROUGH THE HOLE, SO THAT IT IS FITTED AS SHOWN
IN THE DIAGRAM ABOVE.
STYLE, GRILLED TO PERFECTION
Page 12

FOR EVERDURE 6 BURNER GAS BARBECUE RANGE
STYLE. GRILLED TO PERFECTION
A division of Shriro Australia Pty Ltd
23-27 Chaplin Drive Lane Cove NSW 2066
1300 766 066
www.everdure.com
IM Ref: ACRO4/6 15/2007/06FC
FOR OUTDOOR USE ONLY
STYLE, GRILLED TO PERFECTION
 Loading...