

Page 1
0
THE EVOLUTION OF PORTABLE OUTDOOR COOKING
ASSEMBLY, OPERATION
& MAINTENANCE INSTRUCTIONS
FOR EVERDURE ECHURRASCO PORTABLE GAS & CHARCOAL BARBECUES
Models Included:
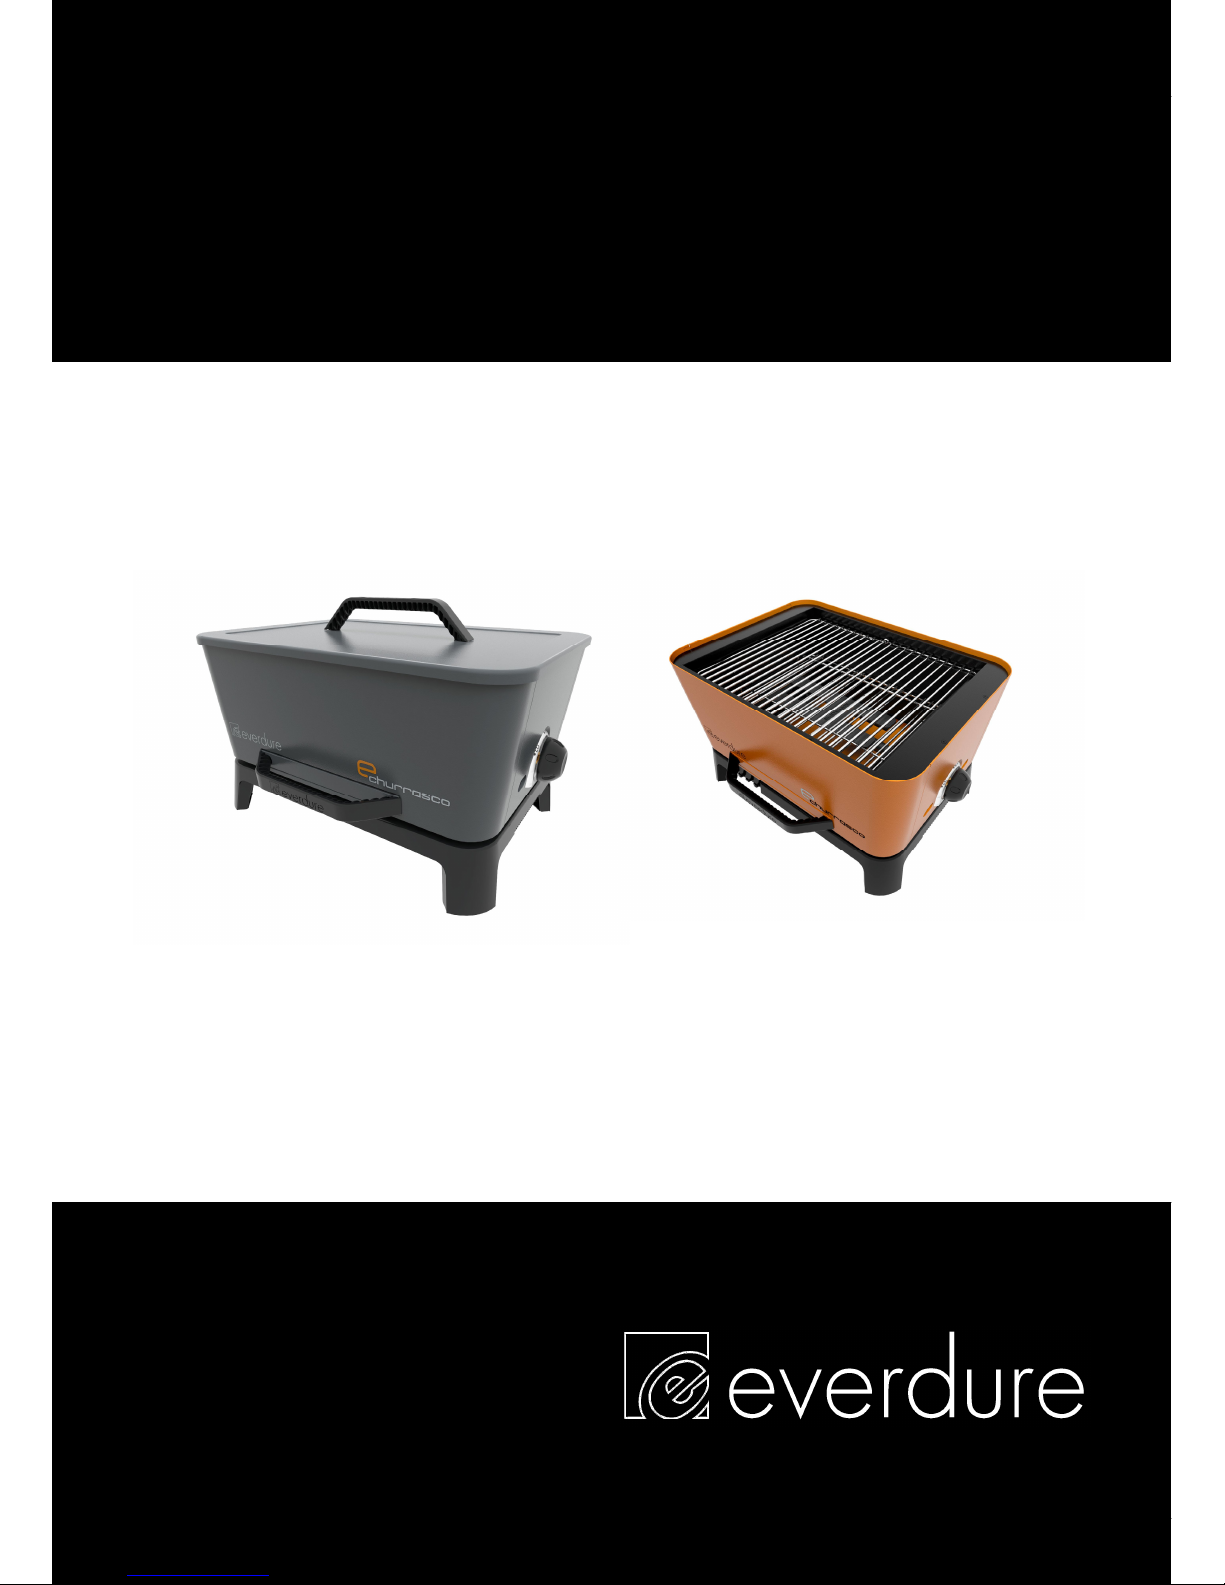
ECHULP12G
ECHULP12O
Page 2
1
THE EVOLUTION OF PORTABLE OUTDOOR COOKING
It is important that you retain these instructions and read them carefully
before using this barbecue. Please read the safety instructions thoroughly
and take care to understand the fundamental differences between cooking
using gas, igniting charcoal with gas and cooking using charcoal.
BURNER: Australian Design No. 342800
Registered New Zealand 415874
Registered New Zealand 415876
Page 3
2
THE EVOLUTION OF PORTABLE OUTDOOR COOKING
OPERATION AND MAINTENANCE INSTRUCTIONS
FOR EVERDURE ECHURRASCO GAS & CHARCOAL BARBECUE RANGE
ECHULP12G & ECHULP12O OUTDOOR PORTABLE BARBECUES
CONTENTS
SECTION PAGE NO.
Important Safety Instructions Gas 3
Appliance Details 5
Gas Connections 5
Outdoor Installation Guide 6
Barbecue Assembly 7
Operating Instructions 9
Gas Lighting Procedure 11
Charcoal Lighting Procedure 11
Cleaning & Storage 13
Troubleshooting 14
Maintenance 15
Parts List: Barbecue Assembly 16
Barbecue Accessories 17
It is important that you retain these instructions, proof of purchase as well as
other important documents about this product for future reference.
Due to continual product development, Everdure reserves the right to alter
specifications or appearances without notice.
Dispose of packaging responsibly – recycle where facilities are available.
ECHURRASCO
2
Page 4

3
THE EVOLUTION OF PORTABLE OUTDOOR COOKING
IMPORTANT SAFETY INSTRUCTIONS
IMPORTANT: Read the safety precautions of this booklet carefully before removing the barbecue from
its carton or connecting the barbecue to its gas supply. If you are unsure about
anything regarding your barbecue, please contact Everdure in Australia on
1300 766 066 or in New Zealand on (09) 415 6000 before operating your appliance.
1. This Portable barbecue is intended for OUTDOOR USE ONLY. This appliance must NOT be used indoors.
2. For your safety and enjoyment, read all operating instructions before lighting the appliance.
3. Ensure that all gas connections are tight before operating this appliance (refer to leak testing procedure in this manual).
Always check for leaks when a gas cylinder is replaced or reconnected.
4. Unsupervised children or pets should not be near a barbecue while cooking or during warm up or cool down. Ensure
children or pets are kept a distance well away from the barbecue whilst it is in use. Ensure that young children do not play
with the appliance. This appliance is not intended for use by young children or infirm persons.
5. Particular care must be taken when removing the fat tray and the disposable foil trays. Mishandling of hot oil and fats can
cause serious injury. Take care when changing plates & grills that parts are not hot & oil or fat does not drop onto the
burner.
6. Turn gas valve/control knob and gas cylinder valve off after use (including after gas assisted charcoal ignition). Do not allow
unburned gas to build.
7. Do not use this appliance for any purpose other than what it is intended for.
8. Do not move this barbecue while in use or directly after use, as accessible parts may be very hot. The barbecue should only
be lifted by the handles under the plastic base at either side. Take care that undue pressure will not be placed on the gas
hose, or turn off the gas supply & remove the hose from the cylinder or gas source (not at the barbecue). Take care that the
fat tray & disposable foil are removed to minimise fat/oil spillage.
9. This barbecue has been designed to be used either on a raised bench or on the optional Universal Stand. When using a
raised surface (table etc.), ensure the surface is level, large enough and strong enough to support the barbecue and will
withstand temperatures of 60°C above ambient temperature. When using a Universal Stand, ensure that your barbecue is in
a level position and the barbecue is secured onto the stand correctly (this is explained in the stand instructions).
10. People with flammable clothing such as nylon etc. should keep well away from the barbecue when it is operating.
11. Never leave the burner on high for more than 10 minutes unless actually cooking.
12. In case of fat fire while cooking with gas, turn cylinder off. Fat trays should be cleaned and checked before using the
barbecue. Disposable foil should be replaced before using the barbecue. Regular cleaning should reduce the build up of
fat and food residues which is combustible and can result in a fat fire. Fat fires can be prevented with diligence in cleaning
your fat tray and regular replacement of foil lining. Do not allow the fat tray to overflow. Damage as a result of fat fire is
not covered by your warranty and voids it. Do not use sand, fat absorbents or kitty litter in the fat tray.
13. Ensure that the product has adequate clearance from combustible materials. The appliance is designed so that heat will not
affect the Stand. All combustible materials must be kept more than 250mm from the sides and rear of the barbecue and
more than 1500mm above the cooking surface of the barbecue.
14. If the burner makes a hissing sound when lit, it may be burning internally. Turn the burner off, allow to cool, and try ignition
again. Keep your barbecue protected against strong wind – if this cannot be avoided, always check that the burner remains
alight if operating the barbecue in windy conditions. The flat lid supplied with the barbecue can be hung from the rear of the
appliance and utilised as a wind break, as well as reduce fat & oil splatter to the rear.
15. Do not carry out any servicing on the gas manifold of the barbecue yourself – this must only be done by authorised
technicians.
16. We recommend that you regularly maintain your barbecue and keep it in good condition. This can be achieved by following
the cleaning and maintenance suggestions in this booklet.
17. The barbecue is designed to be used with either 4kg or 9kg gas cylinders (when using the optional Universal Stand, only use
9kg gas cylinders). When not using a Universal Stand, the cylinder should be placed at a lower level to the barbecue, as far
away as the hose will allow without undue tension on the hose, in a protected spot (so it does not receive any fat splatter
from cooking or can be accidently knocked over). When using a Universal Stand, the gas cylinder should be placed in the
dedicated cylinder mounting at the bottom of the Stand, not beside it, and locked into place.
18. This appliance is not suitable for mounting in a movable vehicle (boat, trailer etc).
19. Do not use or store this appliance in areas of high salt content (a marine environment) or an area with caustic fumes or
liquids (such as a domestic pool), as these chemicals can cause the appliance materials to deteriorate (and void the
warranty). Regular cleaning and covering with an Everdure barbecue cover can help can help to reduce this.
20. Always remove the flat lid before ignition. Do not place flat lid over barbecue until the appliance is cool.
3
Page 5
4
THE EVOLUTION OF PORTABLE OUTDOOR COOKING
21. Charcoal and coal products produce carbon monoxide when burned. When the appliance is being used with solid fuels,
always keep the appliance in a well ventilated area to prevent the gasses produced from building up.
22. Do not use solid fuels impregnated with fire accelerants or use any other type of accelerant on this appliance. This appliance
is designed for gas assisted charcoal ignition only. Using any accelerant could cause serious property damage or personal
injury.
23. During ignition, do not overfill the charcoal support rack with solid fuel, as this will cause problems with aeration to the fuel
and burner, causing an increase in the amount of carbon monoxide produced.
24. Do not run the gas burner for longer than the recommended time (8 minutes) when igniting the solid fuel. Running the gas
burner longer than the recommended time will retard the ignition process of the solid fuels as well as create excess carbon
monoxide. Once the gas burner has run for 8 minutes, turn it off at the control knob and at the gas cylinder.
25. Always allow the solid fuel to burn out naturally after cooking. Do not use any liquids to douse the charcoal. Do not move
the appliance or remove the fat tray while the coals are still burning as hot ash, coal particles, unburned fuel and hot
cooking fats & oils could spill. Never run the appliance without the fat tray in place.
26. Do not disconnect or exchange a gas cylinder around this appliance while solid fuels are burning, as excess gas could ignite
causing property damage or personal injury.
27. Do not use volcanic rock or any type of non-combustible product in the charcoal support rack. If in doubt on what fuels can
be used, check the Everdure website or contact the Service Department.
28. Solid fuels should only be placed in the charcoal support rack. Solid fuel should never be placed directly on the burner or
inside the chassis.
29. Solid fuels differ widely in burning time, heat, size and combustion. Always be aware of your surroundings and potential fire
hazards caused by sparks or spitting fuels. Never dispose of solid fuels or hot ashes in areas where they can be trodden on
or be a fire hazard. Never dispose of unburned solid fuels or ash until it has completely extinguished.
30. The combination of food residue/oils/fats and ash should never be allowed to build up on the cast iron burner. After the
barbecue has cooled down, remove both the cooling grill and charcoal support bracket and scrape away any residue from
the top of the burner. Allowing this to build up can create a fire hazard. Take care not to block any of the burner ports.
31. Always check with your local/state authorities before using this appliance for any fire restrictions regarding the use of an
outdoor barbecue (due to local weather conditions).
32. When using solid fuels, take care that the surrounding environment is clear of combustible materials. Do not cook under
overhanging buildings or close branches of trees.
DO NOT OPERATE THIS APPLIANCE BEFORE READING THE INSTRUCTION BOOKLET
DO NOT PLACE ARTICLES ON OR AGAINST THIS APPLIANCE
DO NOT STORE CHEMICALS OR FLAMMABLE MATERIALS OR SPRAY AEROSOLS NEAR THIS APPLIANCE
DO NOT OPERATE THIS APPLIANCE INDOORS
DO NOT ENCLOSE THIS APPLIANCE. THE MINIMUM CLEARANCE FOR THIS UNIT IS 1500mm ABOVE THE
COOKING SURFACE AND 250mm FROM ANY SIDE
DO NOT LIGHT WITH LID ON APPLIANCE
DO NOT OPERATE THIS APPLIANCE WITH SOLID FUELS IN ENCLOSED AREAS
DO NOT OVERFILL THE CHARCOAL SUPPORT RACK AT IGNITION
DO NOT OPERATE THE GAS BURNER FOR MORE THAN 8 MINUTES WHEN IGNITING THE SOLID FUEL
DO NOT USE ACCELERANTS OR CHARCOAL IMPREGNATED WITH ACCELERANTS
DO NOT REMOVE OR REPLACE A GAS CYLINDER WHILE SOLID FUELS ARE BURNING
DO NOT ALLOW FATS/OILS AND ASH TO BUILD UP INSIDE THE UNIT OR ON THE BURNER.
4
Page 6
5
THE EVOLUTION OF PORTABLE OUTDOOR COOKING
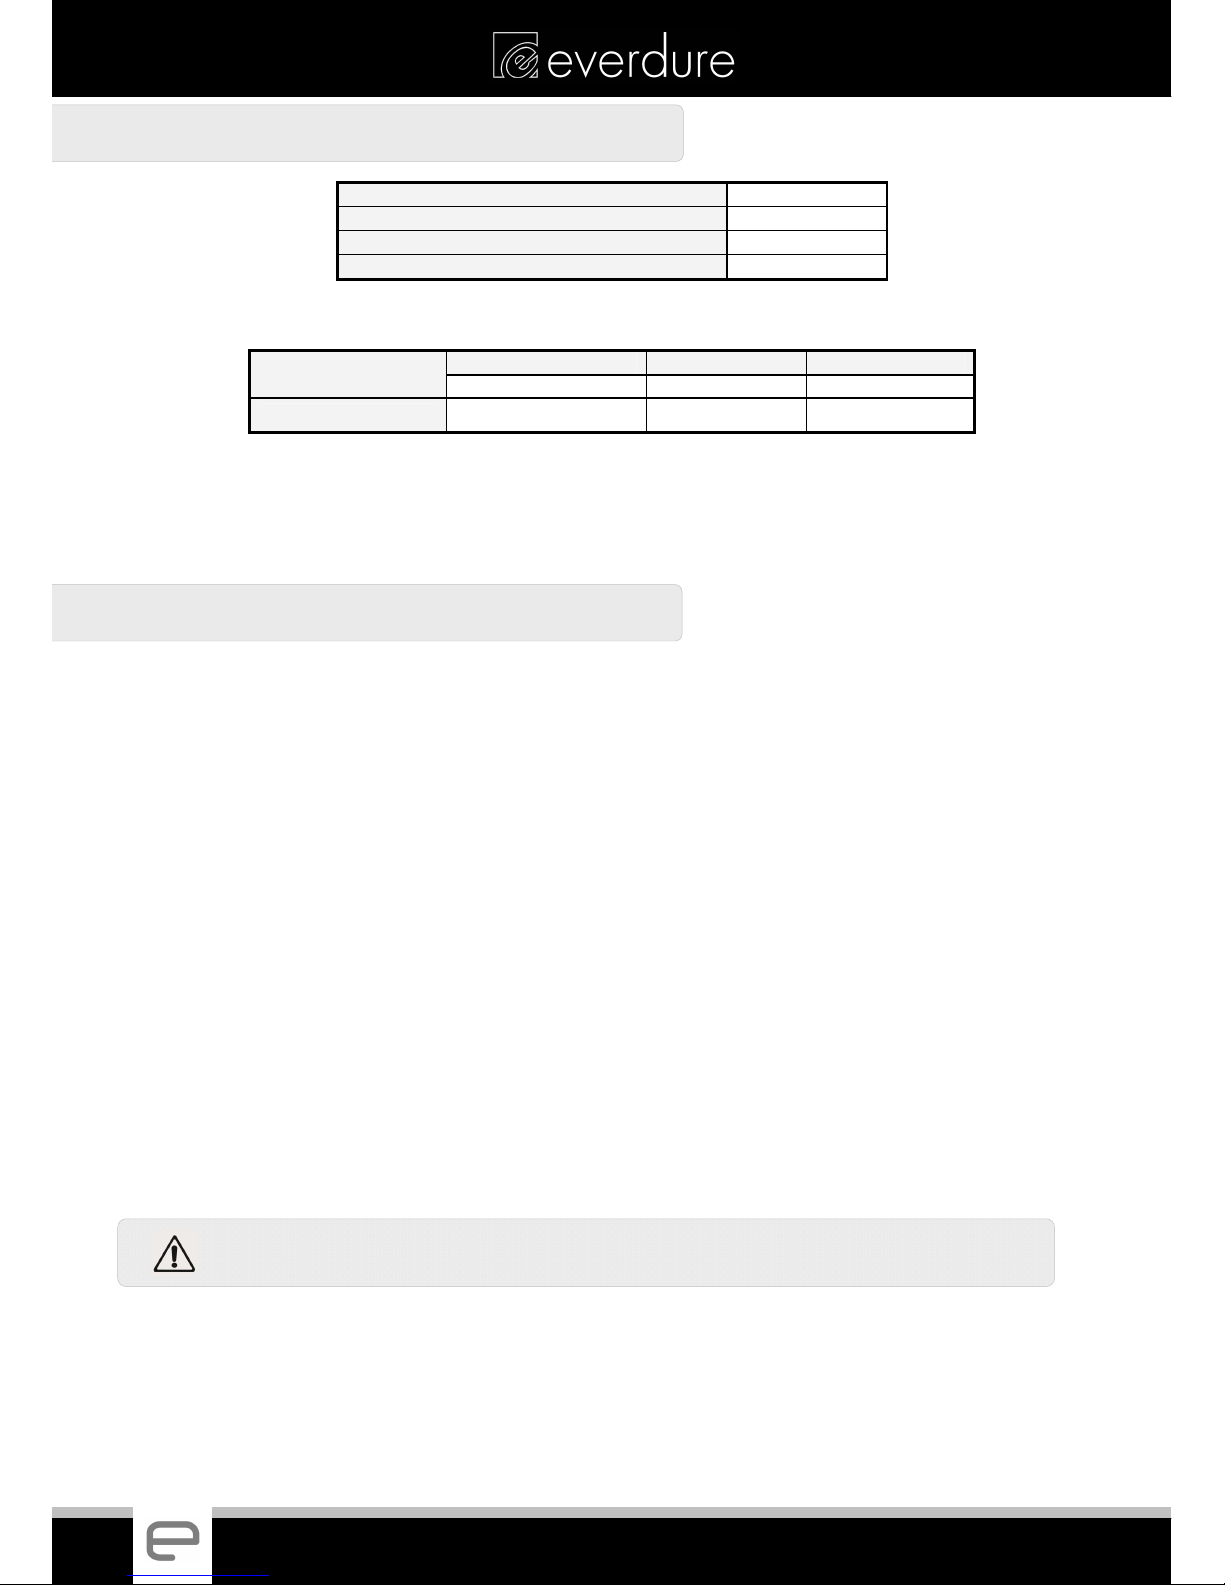
APPLIANCE DETAILS
Gas Type: ULPG
Burner Pressure: 2.75 kPa
Injector Diameter: Ø1.30 mm
Heat Input: 22.5 MJ/ hr
Note: The size of the injector diameter is stamped on one of the hexagon faces (e.g. ‘165’ for Ø1.65mm injector).
*NOTE: the height increases by 60mm when the flat lid is placed on the top of barbecue & 220mm if the lid is hung from
the rear of the barbecue.
Air is admitted at the underside of the combustion chamber (a 30mm gap between the fat tray and the
chamber) through 12 oval holes 35mm x 20mm in size, 2 rectangular 75mm x 150mm holes in the base and 2
270mm x 25mm slots in the base. Exhaust gases are emitted through the slots of the grill.
GAS CONNECTIONS
LOCAL AUTHORITY REQUIREMENTS
Check Gas Type and specifications plate on the inside of the left-hand side trolley door. All gas fitting work,
service and repairs can only be performed by an authorized person in accordance with AS5601 and local gas
regulations.
FOR ULPG CYLINDER CONNECTION
1. To achieve the optimum performance from your Everdure Barbecue, an approved gas cylinder (POL fitting) of
4kg (not for use with the Universal stand) or 9kg capacity must be used.
2. Do not connect gas to a barbecue that is not secured in a Universal Stand or on a stable raised surface. The
cylinder must be placed in the mounts over the wheel axle and secured with the cylinder bracket of the
Universal Stand when one is used. The cylinder should be lower than the barbecue & in a protected place
when not using a Universal Stand.
3. Connect the cylinder to the barbecue, via the hose and regulator. Firmly tighten joints, but do not over-
tighten. Take care not to damage the regulator fitting. Check that the gas control knob/valve is in the Off
position before opening the gas cylinder.
NOTE: Only one gas cylinder should be stored in the Universal Stand at any one time.
LEAK TESTING
1. Make sure the gas control knob is Off and turn the cylinder valve On.
2. Check for leaking joints by brushing with solution of half-liquid detergent and half water. If a leak is present,
bubbles will appear (or you may hear a hissing sound). Retightening connections can generally repair a
leaking joint. You must also check the gas hose and connection at the gas cylinder. If a leak cannot be
resolved, do not proceed.
DO NOT USE NAKED FLAME FOR LOCATING GAS LEAKS.
IF A LEAK PERSISTS CALL AN AUTHORISED GAS FITTER.
LENGTH (mm) WIDTH (mm) HEIGHT (mm)
Barbecue only
620
500 360*
Barbecue and Trolley
750
530 985*
3
4
5
Page 7

6
THE EVOLUTION OF PORTABLE OUTDOOR COOKING
OUTDOOR INSTALLATION GUIDE (GAS COOKING)
This Appliance shall only be used in an above ground open-air situation with natural ventilation, without
stagnant areas, where gas leakage and products of combustion are rapidly dispersed by wind and natural
convection.
This appliance must not
be used indoors. Do not use your barbecue in garages, porches, sheds or other
enclosed areas. The barbecue is not intended to be installed in or used on recreational vehicles (e.g. boats,
camping vans) and should not be placed close to or under any surfaces that will burn or are sensitive to heat.
Do not block/obstruct the flow of air and combustion around the barbecue housing while in use.
Any enclosure in which the appliance is used shall comply with one of the following:
An enclosure with walls on all sides, but at least one permanent opening at ground level and no
overhead cover.
Within a partial enclosure that includes an overhead cover and no more than two walls
Within a partial enclosure that includes an overhead cover and more than two walls, the following shall
apply-
(i) at least 25% of the total wall area is completely open: and
(ii) at least 30% of the remaining wall area is open and unrestricted.
In the case of balconies, at least 20% of the total of the side, back and front wall areas shall be and remain
open and unrestricted.
OUTDOOR AREA – EXAMPLE 1
Both ends open
OUTDOOR AREA – EXAMPLE 2
Open side at
least 25% of
total wall area
30% or more in total of the
remaining wall area is open and
unrestricted.
4
Open side at
least 25% of
total wall area
30% or more in total of the
remaining wall area is open and
unrestricted.
6
Page 8

7
THE EVOLUTION OF PORTABLE OUTDOOR COOKING
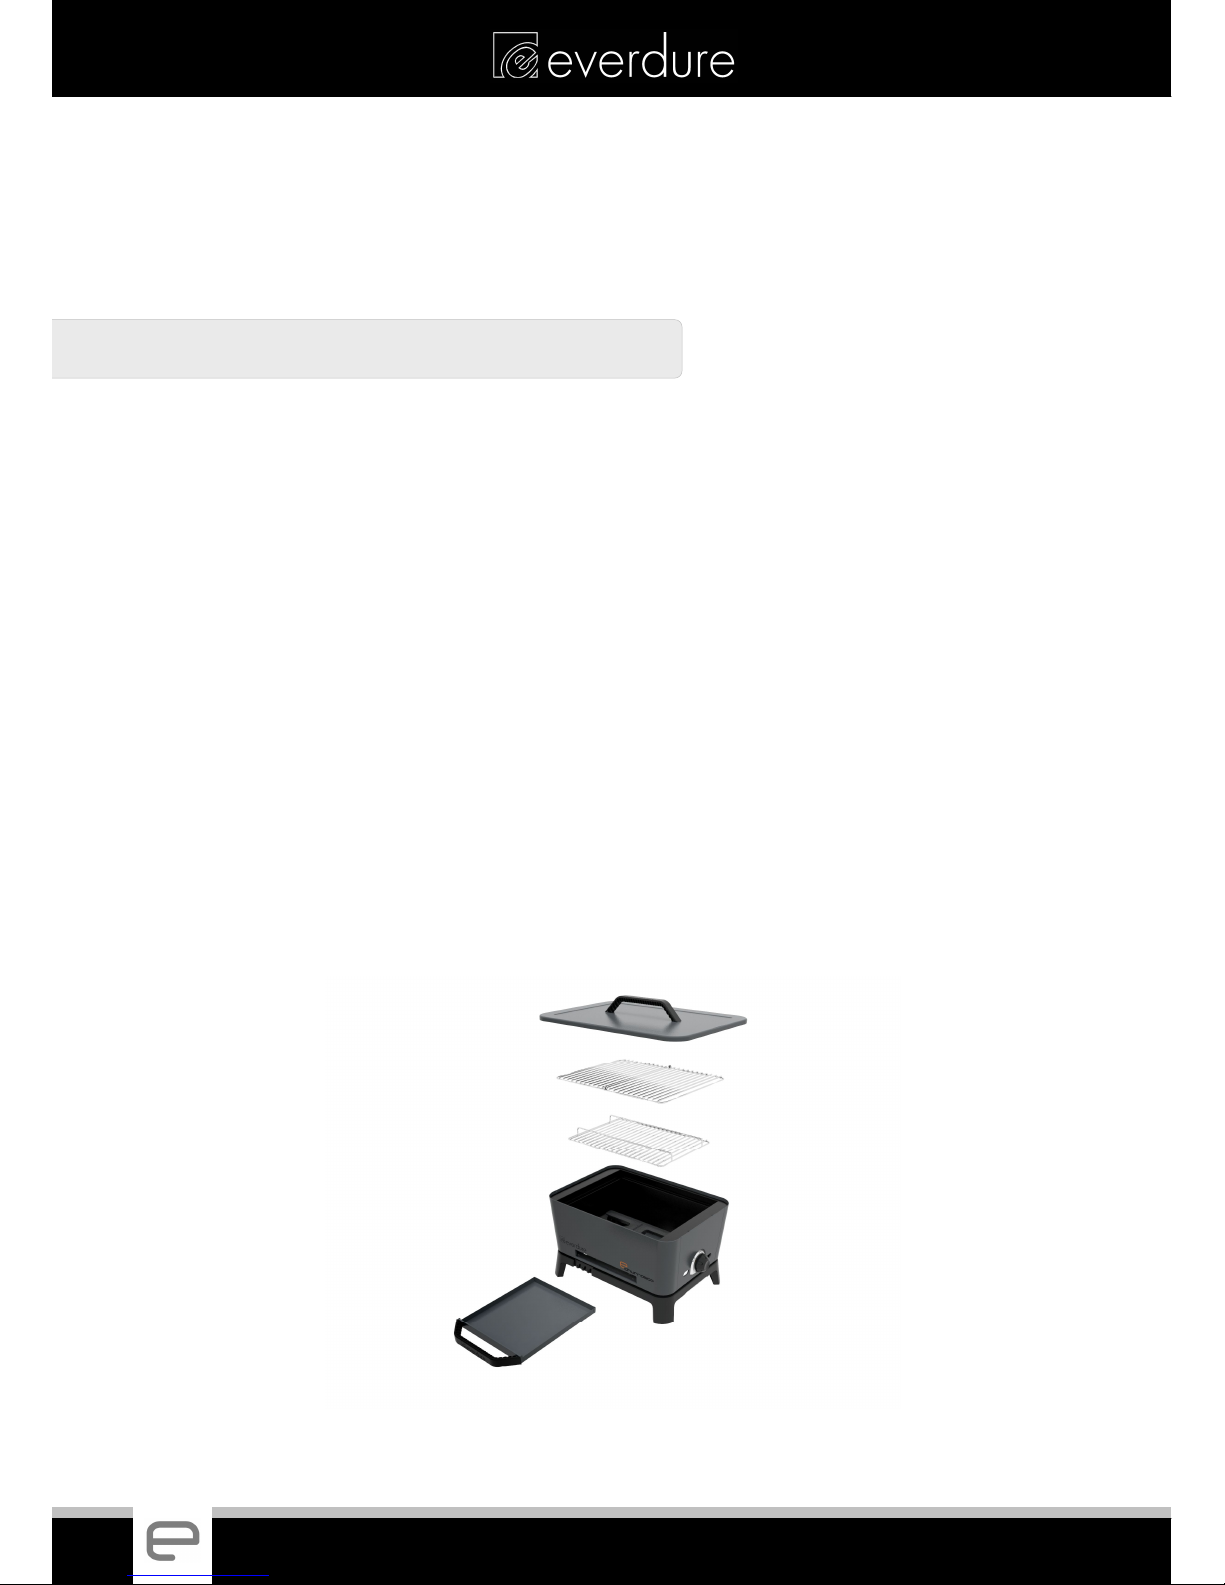
BARBECUE ASSEMBLY
The barbecue and hood comes pre-assembled in a single package, but a number of components need fitting
to their correct position. Only a medium size Philips screwdriver is needed. For pictures of parts see the parts
lists near the end of this booklet.
UNPACKING THE UNIT
Take the foam covered unit out of the carton, and place on a clean, flat surface. Carefully remove the foam
from each end and take off the protective plastic bag (take care not to kink or damage the hose). Take the
hood and lid handles and fixings out. Remove the lid and remove the parts and packing from inside the
appliance. Do not throw any packaging away until the unit has been completely assembled. Place the
appliance on a stable raised surface, ready for assembly.
FITTING THE CHARCOAL SUPPORT RACK
The charcoal support rack must be placed above the cast iron burner. The loading zone is to be to the top,
biased towards the left hand side. It sits on the supports built into the internal firebox (black enamel) at either
side.
FITTING THE LID HANDLE
Take one handle, the lid, the lid hanging bracket, 2 screws and 2 washers. Place a handle on the top of the
top of the lid (make sure the “Everdure” logo on the handle is aligned with the label at the front of the lid), and
place the lid hanging bracket to the bottom of the lid. Fix together using a Philips screwdriver and the supplied
screws and washers, screwing through the hanging bracket & lid into the handle. Hand tighten both screws so
the handle does not wobble.
7
Page 9

8
THE EVOLUTION OF PORTABLE OUTDOOR COOKING
FITTING THE OPEN GRILL
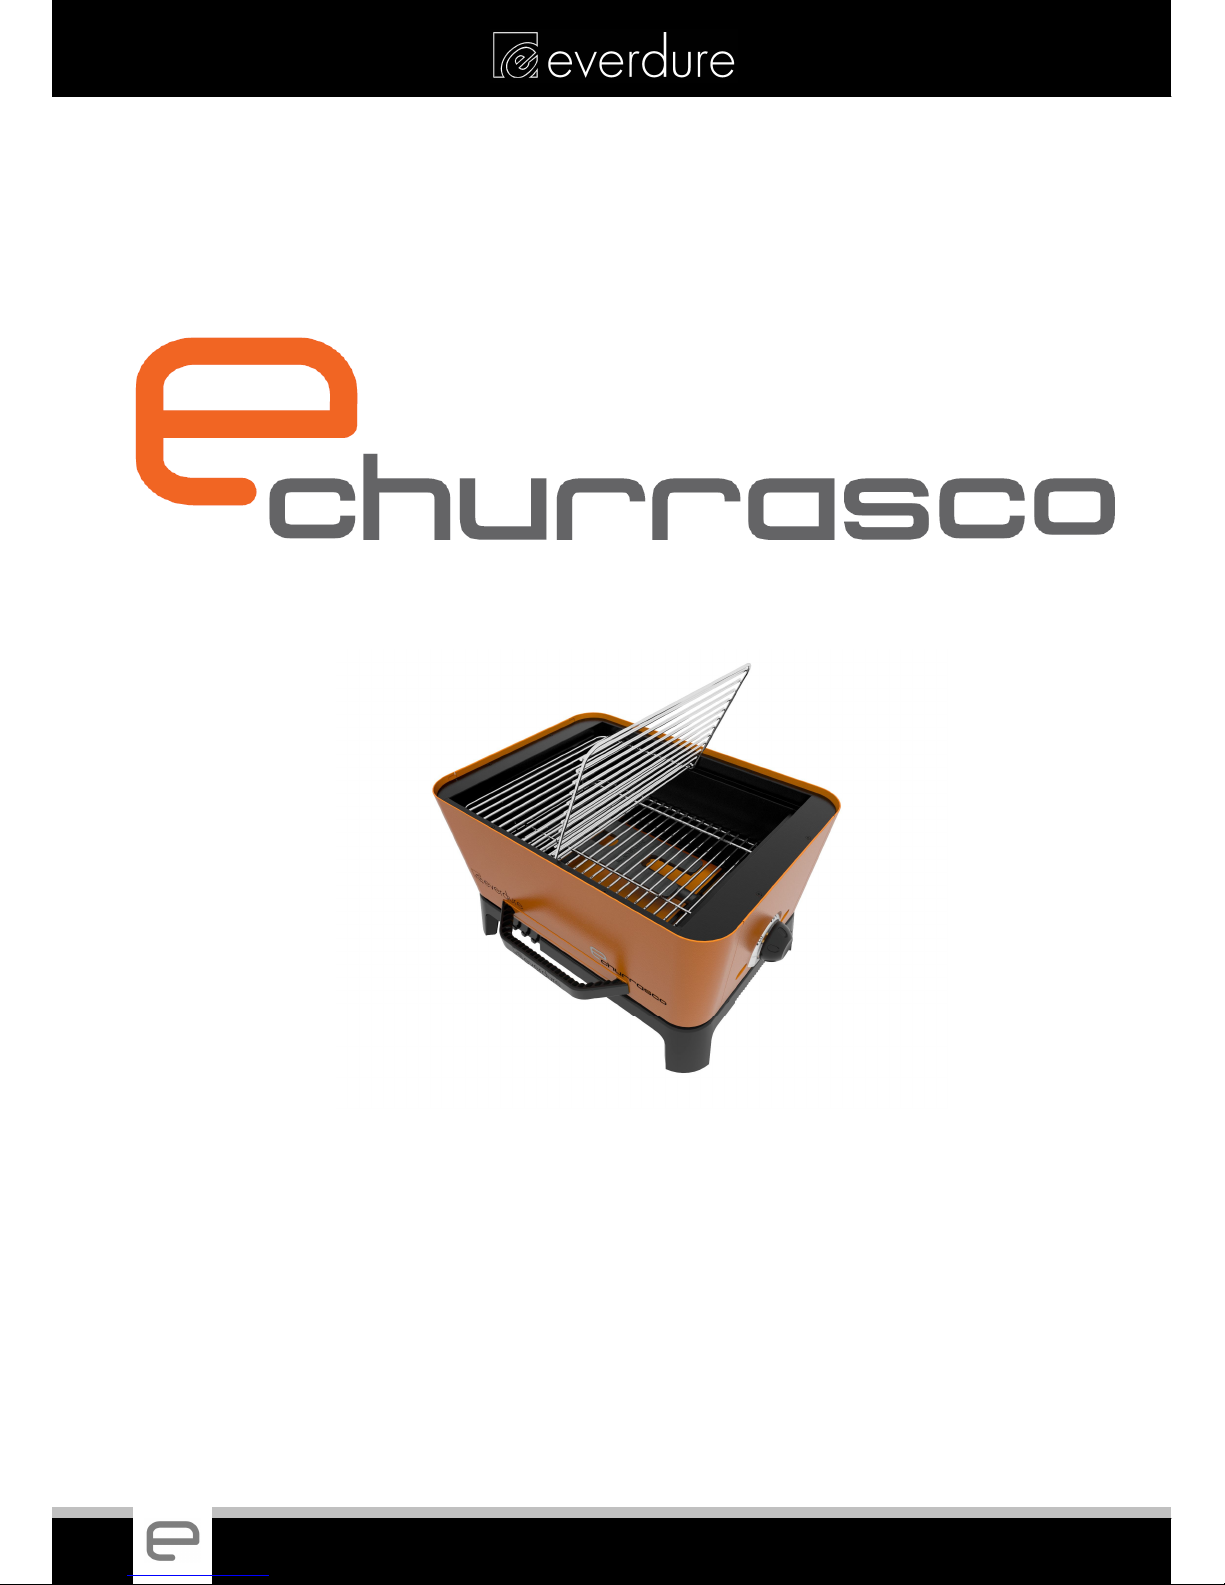
The open grill is placed in the supports at the top of the barbecue, with the hinge in the centre facing upwards.
Either side can be hinged out of the way to add solid fuels.
FITTING THE FAT TRAY HANDLE
Take one handle and place it against the front of the fat tray (with the “Everdure” logo in the correct position).
Take 2 screws, 2 washers and 2 spring washers. Fix together using a Philips screwdriver and the supplied screws
and washers, screwing through the fat tray into the handle. Place a layer of disposable foil in the tray and slide
through the slot at the front of the appliance, under the burner.
PACKAGING
Remove all internal cartons and packaging from within the barbecue/hood assembly. Remove all external
packaging and remove the appliance from the packaging base before operation. Recycle as per your local
government laws.
8
Page 10

9
THE EVOLUTION OF PORTABLE OUTDOOR COOKING
OPERATING INSTRUCTIONS
GENERAL INSTRUCTIONS
A fairly protected location is desirable for pleasant and efficient cooking. Try to keep the barbecue sheltered
from strong winds as this will drastically reduce cooking efficiency. If this is unavoidable, position the length of
the barbecue to be parallel in the direction of the wind. The flat lid supplied with the barbecue can be hung
from the rear of the appliance to give an extra measure of wind protection. Keep the barbecue level. Check
frequently that the burner remains alight when used in conditions of strong wind (through the open grill).
Never leave the barbecue unattended when gas is being used to ignite solid fuels, and always time the
procedure so that the gas is running for 8 minutes only (any longer can create a safety hazard and will only
slow the ignition process down). Note: The hose should always be pulled away from the barbecue to minimise
the chance of it touching a hot surface or hot solid fuel remnants touching the hose. Make sure the minimum
distances of the barbecue to any wall or combustible surface are met, and that when not using a Universal
Stand, the supporting surface can withstand the heat and will not burn if any hot solid fuel remnants drop on
the surface. When using an optional Universal Stand, take care that the barbecue is locked in position & the
hose is not touching any hot surface. For more specific information (including set-up illustrations and
diagrams), recommendations on solid fuels and up to date cooking instructions, please visit the Everdure web
site at www.everdure.com.
GAS TYPE AND CONSUMPTION
The barbecues are designed to operate on Universal LPG only (Propane and/or butane gas) for both gas
barbecuing and the ignition of solid fuels. Gas consumption, Pressure and Injector Orifice size are shown on the
Data Plate found at the rear of the appliance.
GAS CONTROL KNOB
The gas control knob locks in both the Off and High positions. By depressing the knob and turning anticlockwise, gas flow will gradually increase until the High position is reached. Continue turning in this direction
and gas flow will decrease until a simmer level is reached at Low. To turn gas flow off the gas control knob
must be turned clockwise from Low, depressed at High and turned until the Off position is reached.
COOKING GRILL
The open cooking grill is made from chromed wire. Take care not to scratch off the plating as the coating
protects the grill from rusting. The grill is fitted to the top of the appliance and either half can be raised to add
extra fuel etc. The grill can be fully removed to facilitate adding extra fuel or for internal cleaning.
Please note: Never replace the open grill with any solid plate or cooking utensil that blocks off the air flow
through the open grill except those supplied and/or recommended by Everdure. Blocking off the air flow
through the grill can create build ups of poisonous emissions (using gas or solid fuels) which are potentially
dangerous to your health and retard the cooking efficiency.
REMOVABLE SOLID SIZZLING PLATE (OPTIONAL)
The cast iron sizzling plate (optional) is designed to sit in the middle of the open grill, sitting above the gas
burner. When in use, there should be a gap at all sides of the barbecue to allow the heat and emissions to
escape around all sides of the sizzling plate, which allows a faster cooking time and more efficient combustion
of gas. The sizzling plate should not be placed on the grill until after the gas has ignited. The sizzling plate can
be added to or removed from the barbecue using the wire handles at either side (note: these will get hot and
remain so for a long time so heat resistant gloves should be used to move the plate around and caution taken
when setting the plate down after use).
It is recommended that the sizzling plate only be used with the gas burner and not when cooking with solid
fuels.
NOTE: The sizzling plate has a vitreous enamel coating which can chip or crack when mishandled. When
cooking on the coated surfaces, please ensure that metallic or sharp objects are NOT used. Damage to plates
and grills due to the use of metallic or sharp objects will not be covered under warranty. It is recommended to
use silicone cooking utensils as these are both hygienic and withstand high temperatures.
9
Page 11

10
THE EVOLUTION OF PORTABLE OUTDOOR COOKING
FAT TRAY
Prior to use check that the fat tray is clean and lined with disposable foil. Make sure the fat tray is fully installed
under the barbecue before operating the appliance. Always wait until the barbecue is cool and any solid fuels
have fully extinguished before removing the fat tray. See the cleaning section of this instruction for more detailed
information.
UNDER NO CIRCUMSTANCES MUST SAND, KITTY LITTER OR FAT ABSORBENTS BE USED IN THE FAT TRAY.
USE OF SUCH SUBSTANCES CAN CREATE BUILD UPS OF WASTE THAT CAN SPONTANEOUSLY IGNITE AND
WILL VOID YOUR WARRANTY.
CHARCOAL SUPPORT RACK
The purpose of the charcoal support rack is to position the solid fuels at the optimum distance from the food
placed on the open grill, to position the solid fuels correctly over the gas burner for ignition and to keep the
solid fuel central within the barbecue chassis to minimize the heat transferred through the sides of the barbecue.
Incorrectly installing the charcoal support rack, incorrect placement of the solid fuels on the charcoal support
rack or substituting other supports for the solid fuels will compromise any or all of the above, potentially
resulting in damage to the barbecue or other property or personal injury.
The charcoal support rack holds the solid fuels within a set loading zone. The loading zone is defined by a
raised rectangle built into the top of the charcoal support rack, but biased to one side. When using solid fuels,
the charcoal support rack should be fitted on the support ledges on either side of the inside of the barbecue,
with the loading zone to the top, and the loading zone biased to the left hand side (the extra gap on the right
hand side of the charcoal support rack is due to the internal protection of the gas valve). The charcoal support
rack should sit just clear of the gas burner (approximately 10mm above the burner – if they touch at any point
either one could be misaligned).
When using the gas burner to cook food, the charcoal support rack should be empty and cleaned, or removed
completely.
FLAT LID
The flat lid is designed as a top cover for the barbecue, to help protect the appliance
from material dropping into it. It must be removed before lighting the barbecue and
should not be replaced until after any fuel has extinguished and the appliance is
cool. It can be hung from the rear of the barbecue (using the bracket at the
underside of the lid) for storage when the appliance is in use, or for added
protection from strong winds.
AFTER COOKING
1. When finished, make sure burner control knob is turned OFF (this should already be off if cooking with
solid fuels).
2. TURN OFF THE GAS SUPPLY AT THE CYLINDER.
3. After cooking and whilst the barbecue is still warm, remove scraps from the grill with a scraper.
4. Excess fat and meat scraps can be scraped off the inside of the chassis by removing the open grill and
charcoal support rack to gain access.
WARNING: Some surfaces may still be hot – please use protective gloves.
5. Clean the fat tray and replace the aluminium foil after or before each use of the appliance. Take care in
disposal of ash and unburned solid fuels.
6. Once the barbecue is cool replace the flat lid and wipe off any fat splatter from the outside surfaces and
stand with a clean cloth.
10
Page 12

11
THE EVOLUTION OF PORTABLE OUTDOOR COOKING
GAS LIGHTING PROCEDURE
Read all operating instructions before lighting the appliance.
Remove the lid before lighting.
Make sure the gas control knob is in the ‘Off’ position and open cylinder valve.
Make sure the open grill is in its correct position for cooking.
Make sure the fat tray is secure and in position.
LIGHTING THE GAS BARBECUE USING THE BUILT IN IGNITION ON THE CONTROL KNOBS
The Everdure echurrasco barbecue has a rotary ignition system built into the gas valve, accessed by using the
control knob built onto the right hand side of the barbecue. To ignite the burner, push the control knob in
(towards the chassis) and slowly rotate anti clockwise. This starts releasing the gas into the burner. As the knob
reaches the ignition symbol on the control panel (the pointer indicates to the top), a spark will ignite the gas in
the burner. The knob can then be rotated the rest of the way to “HIGH” and released, or adjusted to the
appropriate temperature setting.
If the burner does not ignite, return the control knob to the “OFF” position and retry. If there is still no ignition
after 5 attempts, leave the barbecue off and retry again in 5 minutes time.
MANUAL IGNITION
A match holder is attached to the barbecue at the rear of the left hand size. Turn on the gas, lift up the left
hand side of the open grill and light the rear left hand corner of the burner with a lit match in the match holder.
For more detailed information on the operation of your appliance, log onto www.everdure.com.
CHARCOAL LIGHTING PROCEDURE
Read all operating instructions before lighting the appliance, including the section above.
Do not overfill the charcoal support rack.
Do not run the gas for more than 8 minutes when igniting the charcoal.
Do not use accelerants or charcoal impregnated with accelerants.
Only burn solid fuels like charcoal in open, well ventilated areas.
LIGHTING THE CHARCOAL BARBECUE USING THE BUILT IN IGNITION ON THE CONTROL KNOBS
The Everdure echurrasco barbecue is designed to be used as a charcoal barbecue, as well as a gas barbecue.
The recommended type of solid fuel to use in this appliance is good quality charcoal briquettes. Charcoal
briquettes are made from compressed charcoal, and are well suited for this appliance because they are solid,
evenly sized and tend to burn in a predictable manner, which means they are much easier to ignite. Other types
of coal & charcoal can be used, but the odd shapes and sizes, and varying consistencies can make fitting the
fuel into the charcoal support rack and ignition with the gas burner a lot harder. If non-standard solid fuels are
to be used, try using similarly sized pieces (roughly 50mm in diameter) and test their usefulness at least once
before attempting to cook with them. Alternately, if a particular fuel is preferred because of the taste, start the
appliance with standard fuel, wait until the fuel is completely ignited and then add some of the new solid fuel
before cooking.
NOTE: Do not use accelerants (such as petrol, ethanol or kerosene), or solid fuels impregnated with accelerants
in this appliance. Igniting the charcoal briquettes with the gas burner is the only method allowed. Using such
substances is dangerous, can cause flame flare-ups and damage the appliance, the surrounding materials and
cause serious personal injury. Damage or injury caused by using such materials is not covered under warranty.
11
Page 13

12
THE EVOLUTION OF PORTABLE OUTDOOR COOKING
To start, make sure both the gas cylinder and control knobs are in the off position. Take care there is enough
gas in the cylinder to run the barbecue on high for at least 8 minutes (if the cylinder is getting low, the reduced
pressure will cause the flames to be of a reduced size, which will adversely effect the charcoal ignition – change
the gas cylinder before starting). Remove the open grill and check that the charcoal support rack is in its correct
position (just above the gas burner, with the loading zone biased towards the left hand side). With the appliance
still cold, place the charcoal briquettes (or other solid fuel) neatly within the loading zone. The optimum method
is to place the charcoal briquettes in four rows of 6 or 7 briquettes. This places each briquette over one of the
rows of burner ports (and in turn the gas flames) for the fastest possible ignition time. Once the solid fuel is in
position, replace the open grill and follow the procedure for gas lighting the barbecue (see the gas lighting
procedure section). Do not overfill the loading zone by layering solid fuel up over the first layer. This smothers
the flames and reduces the effectiveness of the gas burner in lighting the solid fuel, as well as creates more
carbon monoxide.
Once the gas has ignited, start a timer for 8 minutes. Do not leave the barbecue unattended during this time.
After 8 minutes has elapsed, turn off the control knob and turn off the gas at the cylinder. The charcoal
briquettes would have started to smoulder or burn on the bottom edges. Leave the charcoal to smoulder (ash)
for another 7-10 minutes, at which point the barbecue will be hot enough to cook on. Depending on the solid
fuel used, cooking before the solid fuel has completely ignited can add a slightly burned flavour to the food. Do
not be tempted to try and hurry this process along at any point by reigniting the gas. After the solid has reached
a certain point in its ignition process, the flames need oxygen to work efficiently – running the gas burner at the
same time starves the flames you want to propagate on the solid fuel, slowing the ignition process, as well as
creating more carbon monoxide. Let the charcoal burning progress naturally, and use the time to prepare the
food for cooking.
NOTE: Full ignition and cooking times will vary with the types of solid fuels used and the ambient temperature
and weather conditions at the time of cooking.
MANUAL IGNITION
A match holder is attached to the barbecue at the rear of the left hand size. Take out the charcoal briquette
from the rear left hand corner of the loading zone of the charcoal support bracket. Turn on the gas, lift up the
left hand side of the open grill and light the rear left hand corner of the burner with a lit match in the match
holder.
For more detailed information on the operation of your appliance, log onto www.everdure.com.
12
Page 14

13
THE EVOLUTION OF PORTABLE OUTDOOR COOKING
CLEANING & STORAGE
EXTERNAL CLEANING
Before cleaning the barbecue exterior, ensure the appliance has cooled and is safe to touch. Painted and plastic surfaces
can be cleaned using a mild household detergent or cleaner and a clean cloth (do not use scourers or harsh detergents).
It is advisable to test cleaners on a small section of the appliance first. NEVER use paint thinners or similar solvents for
cleaning and NEVER pour cold water over hot surfaces. Dry the surface afterwards.
INTERNAL CLEANING
Before cleaning the internal parts of your barbecue, ensure the appliance has cooled and is safe to touch. The open grill
and charcoal support rack can be removed and cleaned by using some water, mild detergent and a sponge or mild
scouring pad. Let them dry before replacing them in the barbecue.
The black enamelled interior surfaces should be cleaned using a damp sponge or mild non-metallic scouring pad, and
some mild detergent. The majority of the oil and ash should be scraped away from the top of the burner, and the
remainder cleaned using a damp sponge or mild scouring pad, and some mild detergent. For hard to clean areas, use a
little baking soda on a wet sponge. Do not use abrasive cleaners. Clean the fat tray and replace the foil lining
STORAGE
When the appliance is not in use, the cylinder valve must be turned OFF, the appliance and the cylinder together must be
stored outdoors in a well ventilated area. However it is permissible to store the appliance (but not the cylinder) indoors.
Ensure the hot plate is clean before storing away.
WARNING: STORE CYLINDER IN A WELL VENTILATED AREA OUT OF REACH OF CHILDREN
When the gas cylinder is disconnected, replace the plug or cap on the valve outlet.
For extended storage it is suggested that the primary air port of the burner be covered against the penetration of insects
or vermin. Spiders and small insects can spin webs or nest in the burner, which could lead to obstruction in the gas and
air flow, resulting in a fire in an around the burner. This type of fire is called a flash-back and can cause serious damage
to your barbecue and create an unsafe operating condition. To prevent this, regularly inspect and clean the burner. An
Everdure barbecue cover can be placed over the appliance for extra protection, and to reduce this.
Solid fuels should be stored as recommended by the manufacturers. Keep dry and do not store indoors.
7
13
Page 15

14
THE EVOLUTION OF PORTABLE OUTDOOR COOKING
TROUBLESHOOTING
Burner will not ignite when turning the control knob:
Cylinder valve is not on Turn cylinder valve on
Cylinder is empty Replace with a full cylinder
Pilot flame is not
working
Remove grill and charcoal support rack and visually check for a spark at the end of
the flame thrower. Check that the cables to ignition point, or from the valve to the
chassis have not broken or disconnected (accessed from beneath the appliance). Also
check the alignment of the flame thrower. If there is no spark, contact Everdure
Service.
Injector is blocked Clean injector with a toothbrush. Do not drill out or use wire. Do not remove
injector. Contact Everdure Service.
Inlet gas hose is kinked Check that gas can freely flow through the inlet hose by straightening any sharp beds
(kinks).
Burner flame is erratic:
Burner is blocked Remove burner and check for obstruction. Clean ports.
Flame is burning inside
burner (hissing sound)
Turn off burner, allow to cool and re-ignite. If continues, remove burner and check for
blockages at the inlet.
Regulator is faulty Contact Everdure Service.
Injector is partially
blocked
Clean injector with a toothbrush. Do not drill out or use wire. Do not remove
injector. Contact Everdure Service.
Gas is leaking from connections:
Connections are loose Tighten loose connections (do not over-tighten) and leak test under pressure with
soapy water solution.
Hose has deteriorated Contact Everdure Service.
Gas valve is faulty Contact Everdure Service.
Threads are damaged Contact Everdure Service.
Solid fuel is not igniting or taking longer than expected to ignite:
Gas burner is not
igniting
Check gas supply and ignition as in sections above. If gas cylinder is low in gas, the
flames may be too small to ignite fuel, so replace.
Gas is running at low
setting.
Adjust the control knob to high.
Poor type of solid fuel
used
Fuel may be wrong size, or will not work on appliance. Test with charcoal briquettes
and check Everdure website for recommended fuels before retrying.
Solid fuel is damp Solid fuels can become damp over time, which retards ignition. Store in a dryer place
& repurchase fresh solid fuel.
Solid fuel incorrectly
distributed in loading
zone
Follow the instructions on placing the solid fuel in the loading zone. Take care that
solid fuel is over the flames. Remove some solid fuel so air can flow freely through
and assist in ignition.
Running gas at ignition
period more than 8
minutes
Running gas at ignition for more than 8 minutes will starve the solid fuel of oxygen
and retard the ignition. Keep the gas running for 8 minutes only.
W
eather conditions and
ambient temperature
Cold, windy and wet conditions will retard the ignition and combustion process. Move
barbecue to a more suitable location.
14
Page 16

15
THE EVOLUTION OF PORTABLE OUTDOOR COOKING
MAINTENANCE
It is recommended that, at the commencement of each barbecue season or at least once a year, the following
maintenance be conducted.
BURNER
1. Brush the outside of the burner with a stiff brush to remove rust and dirt. Make sure all ports are clear &
clean.
GAS SUPPLY
1. Inspect the gas supply hose for any deterioration and replace it if necessary.
2. Test the gas circuit for leaks and remedy any found.
BARBECUE
1. Wipe over the barbecue and lid with a clean cloth.
WARRANTY
IMPORTANT
Please keep your receipt, as this must be presented if making a claim under the terms of the Everdure
warranty.
All Service and Assembly Enquiries:
IN AUSTRALIA: Telephone 1300 766 066
IN NEW ZEALAND: Telephone (09) 415 6000
OR VISIT:
www.everdure.com
9
15
Page 17

16
THE EVOLUTION OF PORTABLE OUTDOOR COOKING
PARTS LIST: ECHURRASCO BARBECUE
NOTE: The Universal Stands, sizzling plates and rotisserie kits are optional extras.
REF PART NAME QTY
01 Handle (Lid) 1
02 Flat Lid 1
03 Lid Hanging Bracket 1
04 M4 x 10mm Screws & Washers 2
05 Open Grill 1
06 Charcoal Support Rack 1
07 Gas Burner 1
08 Burner Support 2
09 Firebox (internal) 1
10 Barbecue Chassis (external) 1
11 Gas Valve & Manifold 1
REF PART NAME QTY
12 Control Knob Bezel 1
13 Control Knob 1
14 Hose & Regulator (LPG Only) 1
15 Manifold Bracket 1
16 Chassis Bottom Plate 1
17 Insulating Spacer 4
18 Base 1
19 M4 x 10mm Screws & Washers 2
20 Match Holder & Chain 1
21 Fat Tray 1
22 Handle (Fat Tray) 1
16
Page 18

17
THE EVOLUTION OF PORTABLE OUTDOOR COOKING
EVERDURE BARBECUE ACCESSORIES (OPTIONAL)
Everdure also offers a comprehensive range of essential barbecue accessories - everything that you need
to turn your barbecue into a complete outdoor cooking system and also to prolong the use of your
product. Visit www.everdure.com for regular product updates.
OPTIONAL ACCESSORY: UNIVERSAL STANDS
The Universal Stand is a must have accessory for those on the move. Easy to set up and fold down to
transport and for storage, the stand is as good as a static stand as it is a mobile trolley.
17
Page 19

18
THE EVOLUTION OF PORTABLE OUTDOOR COOKING
OPTIONAL ACCESSORY: COVERS
Protect your echurrasco (and Stand) with a purpose made barbecue weather proof cover. There are two
models available:
ECHUCOVERS
Just need a cover for your echurrasco barbecue? The small echurrasco cover fits snugly around the
barbecue so it will never blow away.
ECHUCOVERL
Have an echurrasco and Stand, and want to protect them both? The large echurrasco cover fits over the
barbecue and trolley together.
OPTIONAL ACCESSORY: COOKING ACCESSORIES
KEBAB SKEWERS
Open grills are just great for getting that distinctive smokey flavour in your food, and are fantastic for
kebabs. Why not use a specially designed kebab rack to take the hard work out of cooking? These are
available as optional accessories and are a great addition to your barbecue.
13
18
Page 20

19
THE EVOLUTION OF PORTABLE OUTDOOR COOKING
A division of Shriro Australia Pty Ltd
104 Vanessa Street, Kingsgrove NSW 2208
In Australia:1300 766 066
In New Zealand: (09) 415 6000
www.everdure.com
IM Ref: ECURR 11/2012/07
FOR OUTDOOR USE ONLY
THE EVOLUTION OF
HEALTHY OUTDOOR COOKING
 Loading...