

SW1505 User manual
Congratulations on your new ownership of a Polaroid smart watch. Please
read the manual carefully for full understanding of all operations and functions
of your new smart watch.
It is able to be synchronized with your smartphone’s phonebook, messaging
and other functions. It is manufactured for your work, active and lifestyle.
1 What’
s Included
The following components are included with your purchased product:
Polaroid Smart Watch
USB Cable
Instruction Manual
Quick Start Guide
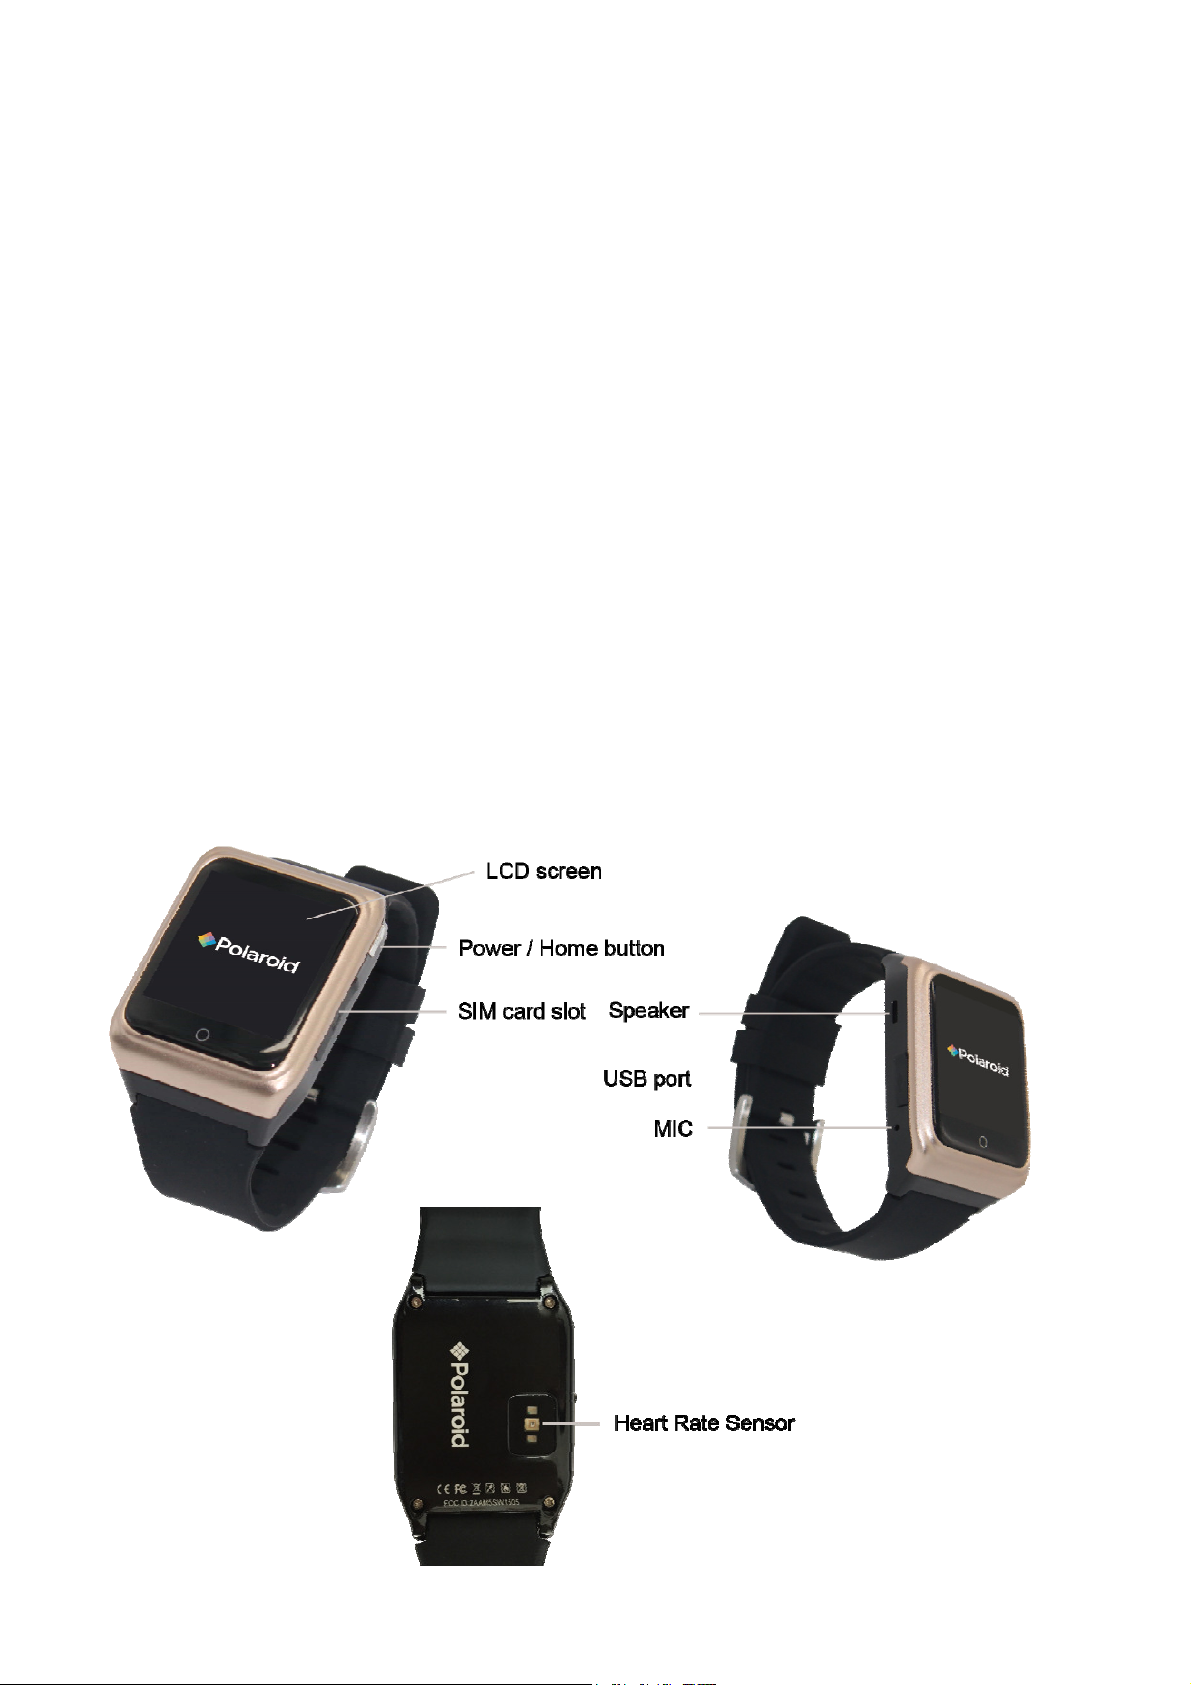
2 Appearance and buttons
1

3 Battery Charging
The Polaroid smart watch is equipped with a built-in rechargeable Li-ion battery
It is suggested to fully charge the battery before use.
Charging Process:
Connect one end of the USB cable with PC or your Smartphone charger,
and then connect the other end of USB cable with your smart watch to
charge.
Users can still use the smart watch while it is being charged.
Warning: power adapter requirements: output current must be within
0.15-0.5A, using power adapter with other specs may damage the watch.
4 Install
SIM Card
.
This Polaroid Smart Watch support
s a Micro GSM SIM card
(850/900/1800/1900MHZ).
5
Turn ON/OFF Smart Watch
1. T
urn On: after the battery has been fully charged, press & hold the power
switch for around 3 seconds to turn the watch on.
2. Turn Off: when the watch is ON, press & hold the power switch for around 3
second to turn the watch off.
3. Sleep mode: your smart watch will automatically go into sleep mode when the
smart watch is left in idle after a certain period of time. To wake up the smart
watch from sleep mode, just briefly press the POWER button to wake it up.
Remarks:
When the battery power has been used up, the watch will automatically shut
2

down.
6 Touch
Tap
: quick tap an icon on the screen to enter that application.
Operations
Swipe or slide: slide right or left to go to next page or last page. Slide right to
return to previous menu, slide left to enter current menu.
7 Personalize Y
our Smart watch
Language
Go to “language”, and select your desired language.
Set T
ime and Date
Go to “Time Date” on screen, then tap to enter and set your desired time.
Display Settings
Go to “Settings” and find “LCD backlight”, then tap to enter, you can then set
your desired backlight standby time.
8 Smart W
atch Applications
After st
art up, you will be on main home watch screen with applications
described as below:
First page: Bluetooth, Call logs, Dialer, Music, Message, Phonebook, Alarm,
Settings,
Second page: Time/Date, Anti-lost, Pedometer, Sleep monitor, Remote Notifier,
Remote Camera, Heart Rate, Sedentary reminder, Find phone
Third page: Menu style, Unit Setup, Calculator, Calendar, Language, Ring tone,
Compass, Stopwatch
8.1 Anti
Lost
After connecting with smartphone by Bluetooth, turn on the alarm function, your
smart watch will alarm when your smartphone is a cert
ain distance away from
the watch.
8.2 Call
logs
You can check all calls and all call records on local list and connected Bluetooth
device will be dis
played automatically.
3

8.3 Dialer
You may make a phone call through SIM card or Bluetooth device. During the
call, you can adjust the volume by pressing volume icon.
To end the call, tap on
the back/end key.
8.4 Phonebook
You can check your cont
card, after connecting the smart watch with your smartphone by Bluetooth. The
smart watch will automatically synchronize the contacts with your smartphone.
Run it and check your contact list from Smart Watch when it’s paired with
smartphone (The sync maximum limit is 500 contacts).
act list which is saved on the SIM card and micro SD
8.5 Pedometer
To
calculate your STEPS, MILES and KCAL, run this function and you will see
the following menu.
1. “
2. Step setting (Inch): tap to setup your running/step length.
” to st
art calculating your STEPS, MILES and KCAL.
3. Weight setting (Pound): tap to setup your own weight.
4. Clear History: clear records of history.
8.6 Music
After p
control the music player from your Smartphone on your watch. This function
does not require you to install the App on your paired smartphone
airing with Smartphone, the watch will synchronize and enable you to
8.7 Message
1. Local SIM message: af
message inbox / draft / outbox and reply to messages just like a phone.
2. BT message: this function requires you to install the “smartwatch” App on
your paired Android smartphone, for iPhone, please download the App
“SmartBluePlus” from Apple store.
Below is the way to download the BT3.0 App, the App only works with Android
ter installing the SIM card, you can check your
devices.
4

Scan the below QR code and select the BT3.0 App to download and
install it on your smartphone. You can also search the App
“SmartWatchBT3.0” in Google Play and download it from there.
After installing the App on your smartphone, please go to “Settings” →
“ Accessibility”, please tap on “smartwatch ” to make sure it is ON.
For iPhone: please download “SmartBluePlus” in APP Store. After installing
"SmartBluePlus" on iPhone, run the App and the login screen will pop up, click the
registration, fill in the phone number, password and other relevant information to
complete the registration, tap the Bluetooth icon and search for available
Bluetooth device. Find “SMART WATCH” on the list, tap to connect, it will pop up
"Bluetooth pairing request", confirm the pairing, then the Bluetooth icon at the
top of the watch’s main screen will turn green, representing the BLE connection is
successful.
Note: Please register in SmartBluePlus first, you can also use iPhone BT
search to find your smart watch and connect it.
After above steps are complete, you can run the messaging application and
check all the messages received on your smartphone and tap on “sent
messages” to see all the messages which have been sent.
8.8 Settings
1.
Clock type: to change clock options on main screen.
2. Power save: select “Enable” to enable power save for the smart watch.
Select “Disable” to disable the power save for the smart watch.
3. LCD backlight: to set the backlight standby time.
4. Units Setup: to set the pedometer units to metric units or imperial units.
5. Pref. input method: to set the input method for built-in keyboard.
6. About watch: to display the smart watch software version information.
5

7.
Restore settings: restore the watch to the factory default settings.
8.9 Calendar
Users can use the Calendar to check date, time. Slide right to exit
8.10
Alarm
Run this application to use the alarm function.
Calculator
8.11
Run this application to use the calculator function.
8.12 Bluetooth
1.
BT dialer: search new Bluetooth device and connect.
2. Bluetooth settings: turn on/off Bluetooth, Bluetooth visibility and check
Bluetooth name.
3. Anti lost: turn on the alarm function, your smart watch will alarm when your
smartphone is a certain distance away from the watch.
4. Clear all SmartBluePlus information.
Important Notice: once your smart watch is connected with your iPhone and
you want to disconnect it and connect it with another iPhone, please disconnect
it and clear all SmartBluePlus information before connecting it with the other
iPhone. If you do not clear the SmartBluePlus information, your new connection
will not be successful.
8.13 Remote notifier
This function also requires you to install the “smartwatch” App on your p
Android smartphone or “SmartBluePlus on your paired iPhone, for more details
of how to obtain the App, how to install the App and how to change the settings
on your smartphone, please refer to the instructions under “Message” of this
user manual.
After installing the App and changes are made for the right settings on your
paired smartphone, you can run the remote notifier application to see the
instant messages received by your paired smartphone.
aired
6

8.14 Remote camera
For Android Smartphone:
This function also requires you to install the
“smartwatch” App on your paired smartphone, for more details of how to obtain
the App, how to install the App and how to change the settings on your
smartphone, please refer to the instructions under “Message” of this user
manual.
After installing the App and changes are made for the right settings on your
paired smartphone, you can run the camera application on the smart watch to
remotely control photo taking with your smartphone.
For iPhone: this function can work well even without the installation of
“SmartBluePlus” App.
Important procedures: please disconnect all Bluetooth connections on your
iPhone, and use iPhone’s Bluetooth to search available Bluetooth devices, find
“SW1505” on the list, tap on it to connect, it will pop up "Bluetooth pairing
request", confirm the pairing, run your iPhone’s camera first, and go back to the
smart watch and run the camera icon on the smartwatch to remotely control
photo taking with your iPhone.
8.15 Sleep
Run this application to monitor your sleeping quality.
Monitor
8.16 Sedent
This function is to reminder you not to sit at your desk for too long time. Tu
ary reminder
rn on
the sedentary reminder function and set reminder time, then smart watch will
alarm after certain time.
8.17 Compass
Run this application to use the smart watch as an e-compass.
8.18 Find
Phone
For Android smartphone: This function also requires you to install the
“smartw
atch” App on your paired smartphone. After running the “Find Phone”
function on your smart watch, your smartphone will alarm for you to find it
7

easily.
Remarks: this function does not apply to iPhone or any iOS devices.
8.19 S
Run this application to use the smart watch as a St
top watch
opwatch.
8.20 Heart
Rate
Run this application to monitor your heart rate.
9 Common Troubleshooting
If any problems appear when using the watch phone, please see the below
solutions. If the problems still exist, please contact your local distributor or
appointed rep
found at the last page of the warranty.
9.1
Smart watch cannot power on
1. Press and hold the power button till screen reboots.
2. Check the battery power
air centers for more assistance. The Toll free number can be
.
9.2 Smart watch cannot connect the network when installing a SIM
card
1. Please make sure your SIM card is installed correctly
2. Please confirm the effective locations of SIM network with your network
supplier.
3. Please make sure your SIM card is still valid.
4. Try to select the network by hand.
5. Please try it later if the network is busy.
9.3
Smart watch cannot dial a phone call
1. Please make sure the telephone number is correct and press the call button.
2. For international calling, please check the country code and area code.
3. Please make sure the phone is in network and not in busy status.
4. Please make sure your SIM card has available funds for calling.
.
5. Inquire with your network supplier (such as limit, SIM card validity and so on)
6. Please make sure you did not set the call limit in settings.
8

7. Please make sure you did not set the fixed dialing.
9.4 Unable to pair my smartphone with smart watch
1. Please make sure you have turned on the Bluetooth on your smartphone.
2. Please ensure you have turned on the Bluetooth power and visibility on your
smart watch(Go to the watch interface and select the Bluetooth icon →
Bluetooth settings, then turn on the Bluetooth power and visibility)
9.5 Smart watch can not sync SMS
1. Please make sure you have download the App in your phone
2. Please check that you have activated the Bluetooth notification function in
your Android phone after installing the App.
SAR tests are conducted using standard operating positions accepted by the
FCC with the device transmitting at its highest certified power level in
all tested frequency bands, although the SAR is determined at the highest
certified power level, the actual SAR level of the device while operating
can be well below the maximum value, in general, the closer you are to
a wireless base station antenna, the lower the power output.
Before a new model device is a available for sale to the public, it must be
tested and certified to the FCC that it does not exceed the exposure limit
established by the FCC, Tests for each device are performed in positions and
locations as required by the FCC.
For wrist operation, this model device has been tested and meets the FCC
RF exposure guidelines when used with the accessory designated for this
product. For hand free operating condition, always keep the device face up
with 10 mm away from the mouth. Non-compliance with the above restrictions
may result in violation of RF exposure guidelines.
9

10 Important maintenances
precautions
In order to keep your Polaroid smart watch in good maintenances, always
fo
llow the below basic precautions:
Keep
Keep it away from water
Keep it and it
Prevent the device from falling or imp
it a safe distance from any strong magnetic field.
.
s accessories away from children.
act during usage, as this may cause
damage to the smart watch.
Do not use the device in a extremely humid environment, because
moisture penetrates inside and may damage the smart watch without the
possibility of repa
Do not cl
chemicals that can and may dissolve the plastic.
ean your smart watch using harsh chemicals, detergents and
ir.
Do not place other objects on LCD screen, as it may crush and damage the
LCD screen.
Do not use any sharp object
s to touch the LCD screen, as this will scratch
the screen.
Do not attempt to dismantle the smart watch by yourself to do any rep
this will damage the smart watch and void the warranty.
Do not use the w
atch while driving! Keep your eyes focused on the road.
Please request from the qualified seller the proper SIM cards w
compati
A
vailability and network speed depend on user's 2G network, and fees may
apply.
Please turn of
table with the watch.
f the watch in aircraft and follow any restrictions. Wireless
hich is
devices can cause interference in aircraft.
air,
10

11 Battery Management
The battery is not fully charged from factory, so it is recommended that you
charge the battery for at least 1 hour before you start to use the device.
The rechargeable battery is designed and manufactured to be used and
recharged frequently. As with all lithium batteries, the capacity of the battery
reduces each time it is charged. Howe
ver, you can still try to prolong the
battery’s lifetime by following the suggestions below:
Use your Polaroid smart watch at least once a week.
Fully charge the battery regularly.
Never leave the battery fully discharged for a long period of time.
Always keep the device and the battery away from heat and moisture
11

12 Regulatory Information
FCC Notice
This device complies with Part 15 of FCC Rules. Operation is subject to the
following two conditions: (1) This device may not cause harmful interference,
and (2) This device must accept any interference received, including
interference that may cause undesired operation.
Warning: Changes or modifications to this unit not expressly approved by the
party responsible for compliance could void the user’s authority to operate the
equipment.
NOTE: This equipment has been tested and found to comply with the limits for
Class B digital device, pursuant to Part 15 of the FCC Rules. These limits are
designed to provide reasonable protection against harmful interference in a
residential installation. This equipment generates, uses and can radi
ate radio
frequency energy and, if not installed and used in accordance with the
instructions, may cause harmful interference to radio communications.
However, there is no guarantee that interference will not occur in a particular
installation. If this equipment does cause harmful interference to radio or
television reception, which can be determined by turning the equipment off and
on, the user is encouraged to try to correct the interference by one or more of
the following measures:
Reorient or relocate the receiving antenna.
Increase the separation between the equipment and receiver.
Connect the equipment into an outlet on a circuit different from that to which
the receiver is needed.
Consult the dealer or an experienced radio/TV technician for help.
12

13 Warranty
Warning: products may contain compone
nts that are small enough to be
swallowed. Please keep out of reach of children.
Subject to the terms and conditions herein. We warrant to the original
purchaser of the product that for the applicable warranty period listed below.
The product will be free from defects in material or workmanship under normal,
non-commercial use.
Warranty period encompasses, as listed below, separate “coverage periods”
for parts and labor, each coverage period for one year, to begin from the
original date of customer purchase.
If customer returns a defective product (or any components thereof) during the
applicable warranty period, we will, at its option, during the specified coverage
periods for parts and labor(as applicable) either:
1. Repair the product (or as applicable, any component thereof)
2. Or replace the product (or as applicable, any component thereof) with a new
or refurbished product (or as applicable, any component thereof), in either case
free of charge to customer for parts and/or labor(as applicable) during the
specified coverage period only, and excluding applicable shipping charges
(noted below), for which the customer is responsible.
The foregoing states the customer’s exclusive remedy and our sole liability for
breach of the limited warranty contained herein.
This warranty specifically excludes any product(or, as applicable, any
component thereof) that has been subject to or defects resulting from below:
( a ) any neglect or misuse by a customer, an accident, improper application,
violation of operating instructions for the product, any other customer-induced
damage, or the alteration or removal of any product serial number.
( b ) any modification or repair to product( or, as applicable any component
thereof) by any party other that us or a party authorized in writing by us.
( c ) any damage to product ( or, applicable, any component thereof ) due to
power surges, incorrect electrical voltage, misconnection to any device, or
malfunction of any device used with the product ( of, as applicable, any
component thereof).
( d ) cosmetic damage to the product ( or, as applicable, any component thereof)
caused by normal wear and tear.
13

( e ) shipping damage that occurs while the product is in transit.
( f ) damages caused by heat sources, sunlight, electromagnetic conditions, or
other climatic conditions. Or
(g) any acts of God, product is sold to customer for personal, non-commercial
use only. Product is not warranted for customer’s commercial or rental use. In
addition, product is not warranted against failure, and should not be used by
customer for any application where
( i ) there is a risk that any data stored on product will be breached or otherwise
compromised.
( ii ) the data stored on product is relied upon for medical of lifesaving
applications.
We disclaim any warranty for any of the foregoing uses to the fullest extent
permitted by law. Customer assumes any and all risks associated with such
uses of product, and agrees to indemnify us for any damages claimed against
us for such uses.
EXCEPT FOR EXPRESS WARRANTIES STATED ABOVE AND TO THE
MAXIMUM EXTENT PERMITTED BY LAW. THE PRODUCTS ARE
PROVIDED “AS IS”, AND WE DISCLAIM ALL OTHER WARRANTIES,
INCLUDING WITHOUT LIMITATION ANY IMPLIED WARRANTY.
( I ) OF MERCHANTABILITY. ( II ) OF FITNESS FOR A PARTICULAR
PURPOSE. ( III ) OF NON-INFRINGEMENT OF THIRD PARTY RIGHTS. TO
THE MAXIMUM EXTENT PERMITTED BY APPLICABLE LAW, IN NO EVENT
WE WILL LIABLE TO CUSTOMER OR ANY THIRD PARTY FOR ANY
INDIRECT, SPECIAL, INCIDENTAL, CONSEQUENTIAL EXEMPLARY OR
PUNITIVE DAMAGES. INCLUDING, WITHOUT LIMITATION, ANY LOST
PROFITS OR REVENUES, LOSS OR INACCURACY OF ANY DATA OR
COST OF SUBSTITUTE GOODS, REGARDLESS OF THE THEORY OF
LIABILITY (INCLUDING NEGLIGENCE) AND EVEN IF WE HAVE BEEN
ADVISED OF THE POSSIBILITY OF SUCH DAMAGES, OUR AGGREGATE
LIABILITY TO CUSTOMER FOR ACTUAL DIRECT DAMAGES. FOR ANY
CAUSE WHATSOEVER SHALL BE LIMITED TO THE CUMULATIVE
PRODUCT FEES PAID BY THAT CUSTOMER FOR THE PRODUCT
CAUSING THE DAMAGES. IF ANY, this warranty gives customer specific
rights, and customer may also have other rights that vary from jurisdiction to
jurisdiction. To obtain warranty service, customer must email to our technical
14

support prior to making a product return. Customer must include with produc
t
return the following items ( failure to enclosed any of these items may result in
delay in the processing of your warranty claim ). ( i )a dated sales receipt that
indicates the place of purchase, model number of product , and amount paid.
( ii ) a detailed description of customer’s problem with product . ( iii ) customer’s
full name, phone number, and return address. ( iv )a money order made to us to
cover return shipping charges to US destinations only, for the applicable collar
amount shown for the product in the table above. We will not make return
shipment to a P. O box. For shipping international addresses, actual freight will
be charged to customer. Return your product freight-prepaid in its original
packaging. Or packaging that affords an equal measure of protection. Please
allow 4 to 6 weeks for the processing of your claim (6 to 8 weeks from
November to February).
Polaroid, Polaroid & Pixel, Polaroid Color Spectrum, and Polaroid Classic
Border Logo are trademarks of PLR IP Holdings, LLC, used under license. PLR
IP Holdings, LLC does not manufacture this product or provide any
Manufacturer's Warranty or support.
www.Polaroid.com
© 2016 All Right
s Reserved.
Country of origin: China
Distributed by INTP, Inc. as Importer
2323 North State Street, Suite 101, Bunnell, FL 32110
Toll free number: 844-979-2824 - For warranty information and instruction.
15
 Loading...