

Page 1
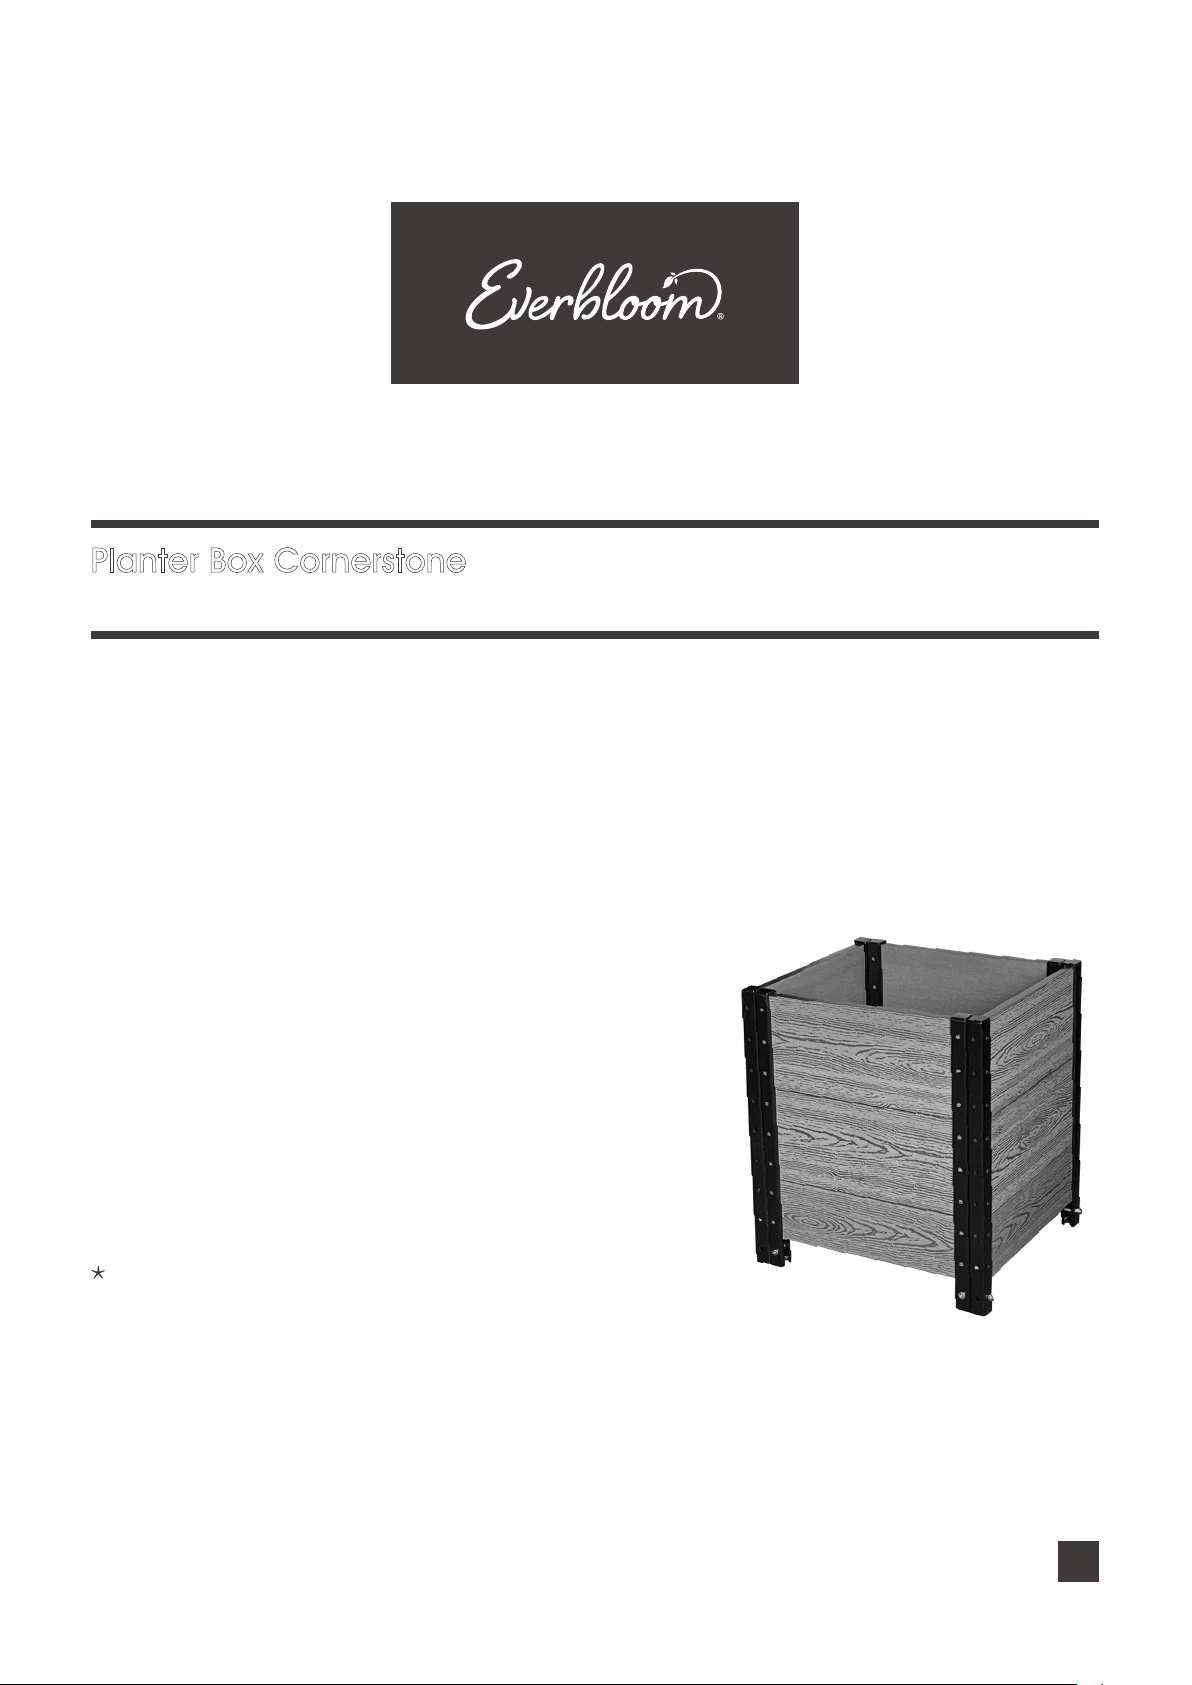
Planter Box Cornerstone
Installation Guide
Thank You!
You’re only a few steps away from your perfect vegetable
garden or elevated planter. We hope you enjoy!
Before You Start
Please read the instructions carefully to familiarize
yourself with every detail and step involved. Keep this
manual for future reference. Find a suitable space to
assemble your new Planter Box.
You need at least 18” x 20” (46 x 51cm) for the finished
product. A flat and firm area (like a garage floor or flat
yard space) is perfect! The only tool you may need is a
rubber mallet.
Important Notes
Small parts are included; we advise you to keep
them away from children and pets.
We also suggest having another person help you
assemble. Maximum Load Capacity: approximately
4 cu. ft. of soil
Subscribe at www.everbloom-garden.com
for extra savings and upgrading information!
Model# E211719 / E211719G
Dimensions 17" L x 19" W x 21" H
Everbloom-Garden.com
Questions or Comments?
Email us at [email protected]
1
Page 2
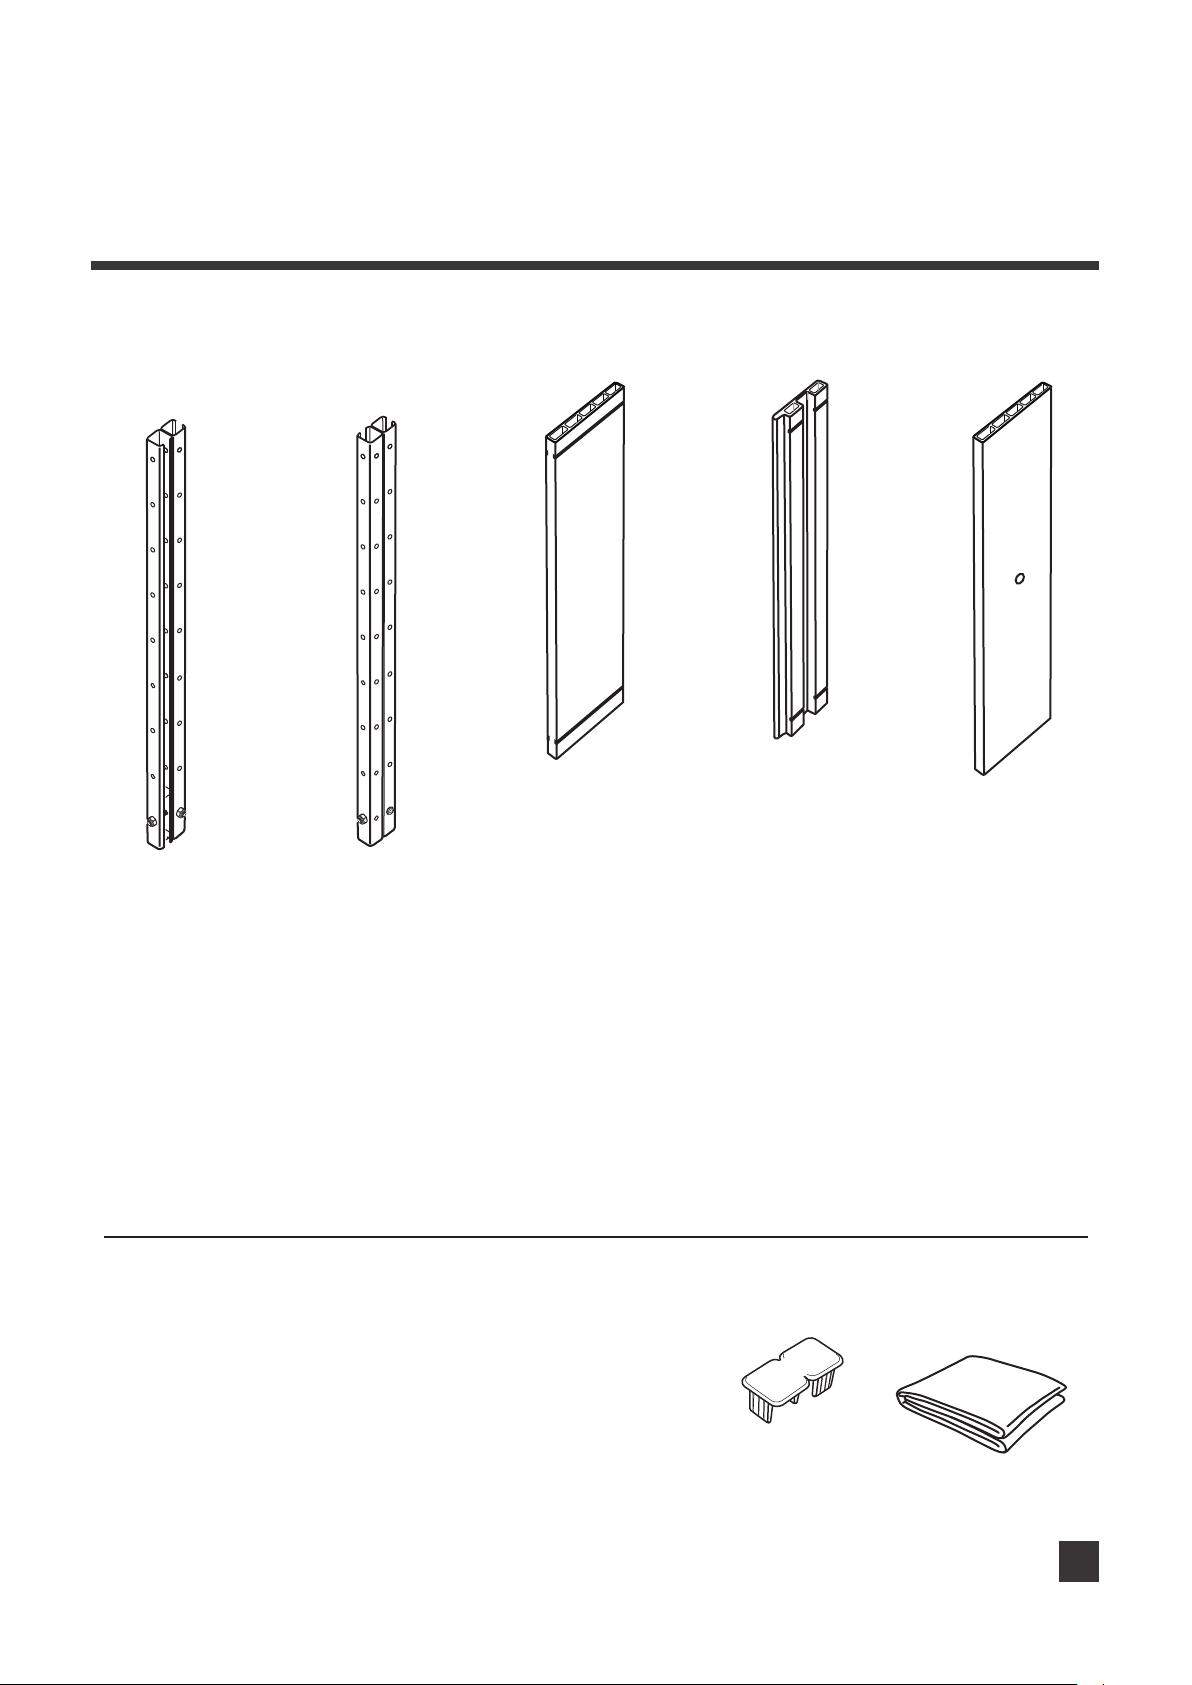
Parts List
Planter Box Cornerstone - 17" L x 19" W x 21" H
Left Corner
Post
X 2
Top
Right Corner
Post
X 2
Top
Short
Board A
X 8
420mm
Short
Board B
X 4
420mm
Bottom
Board
X 2
460mm
Bottom
Bottom
Post Cap
X 4
+ 2pc
replacement
Garden Bed
Liner
X 1
2
Page 3
Assembly
Planter Box Cornerstone - 17" L x 19" W x 21" H
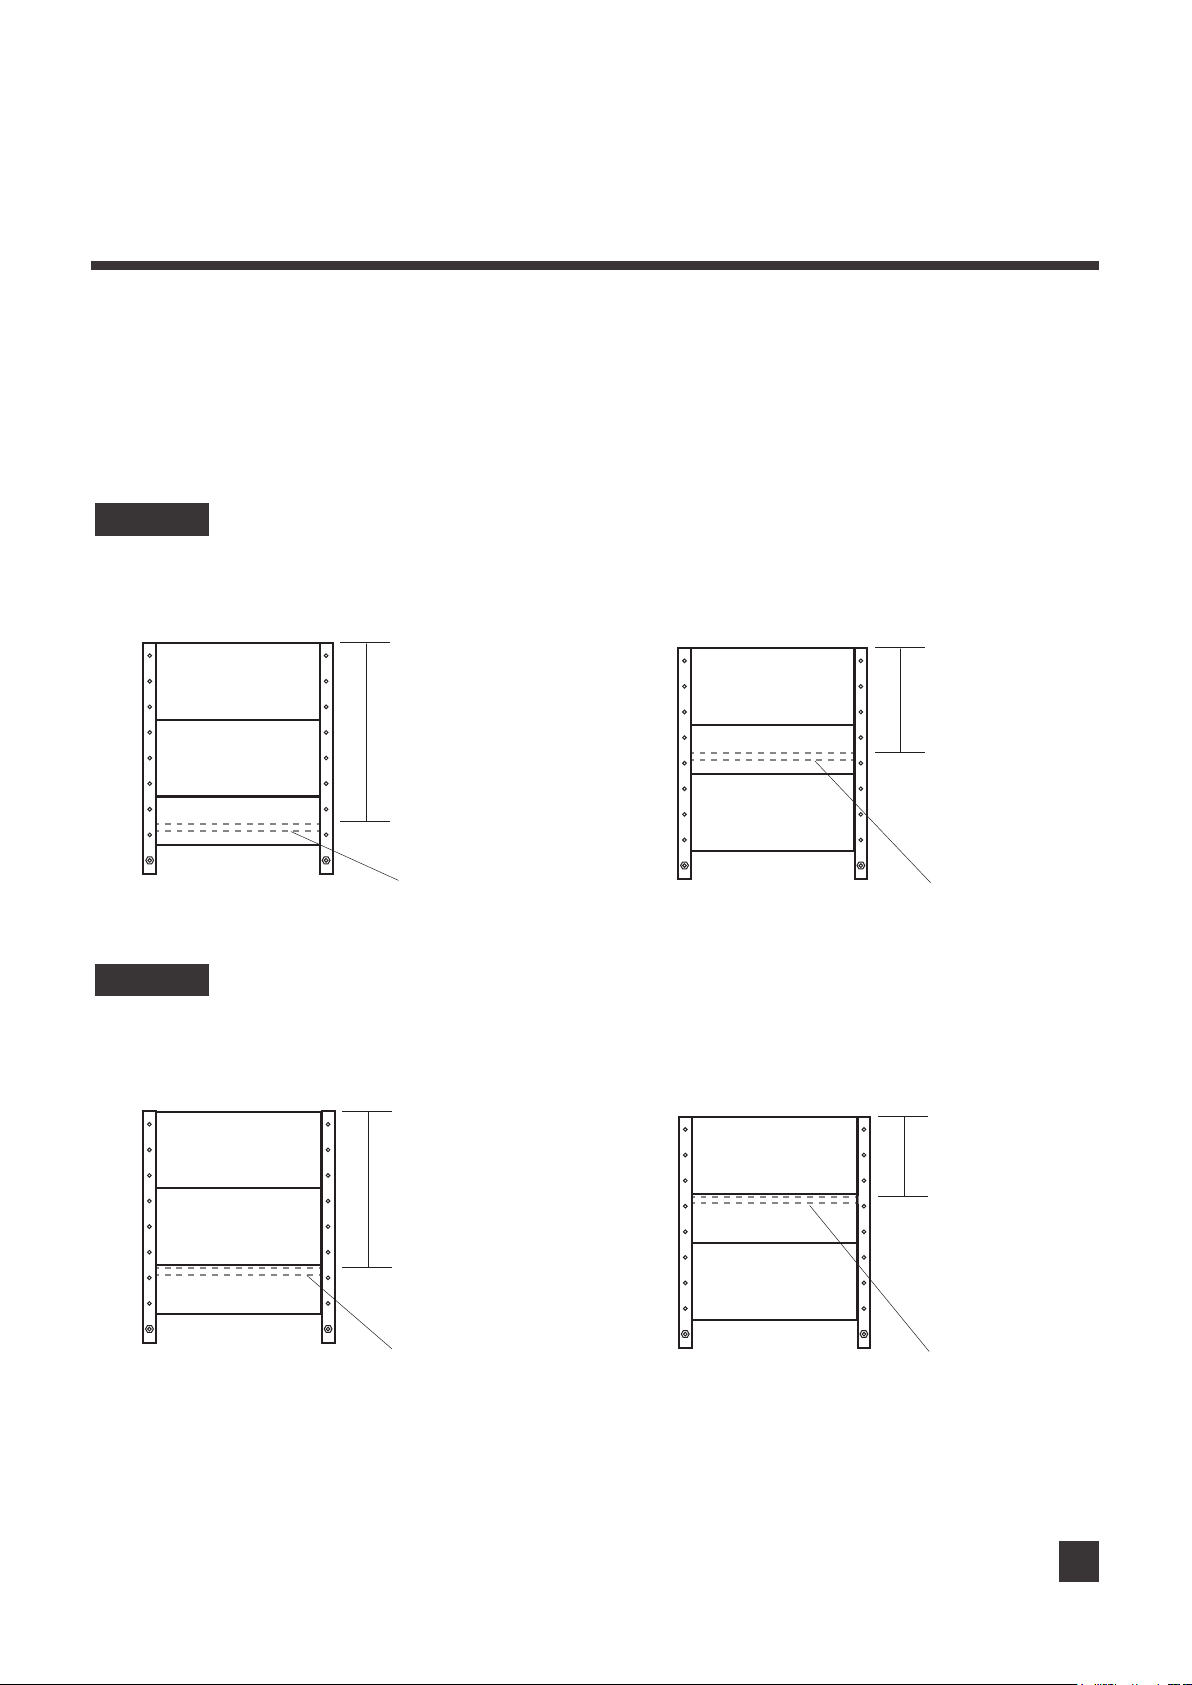
Four depths are available by changing the sequence of the boards and position of the bottom
boards, as shown in below images. You can choose according to different needs first.
* For depth of 16.9” and 10” as shown in Image 1, please refer to steps from page 4.
* For depth of 14.4” and 7.5” as shown in Image 2, please refer to steps from page 10.
IMAGE 1
Depth 1 - 16.9” from page 4
Long Board
Long Board
Long Support Board
IMAGE 2
Depth 4 - 14.4” from page 10
Long Board
Long Board
16.9”
(43cm)
Bottom Board
14.4”
(36.7cm)
Depth 2 - 10” from page 4
Long Board
Long Support Board
Long Board
10”
(25cm)
Depth 5 - 7.3” from page 10
Long Board
Long Support Board
7.5”
(19cm)
Bottom Board
Long Support Board
Bottom Board
Long Board
Bottom Board
3
Page 4
Assembly
Planter Box Cornerstone - 17" L x 19" W x 21" H
For the deepest planting depth of 16.9”, please follow steps below.
For depth of 10”, the assembly methods are similar, just pay attention to the sequence of the
boards and position of the bottom boards, please refer to page 3.
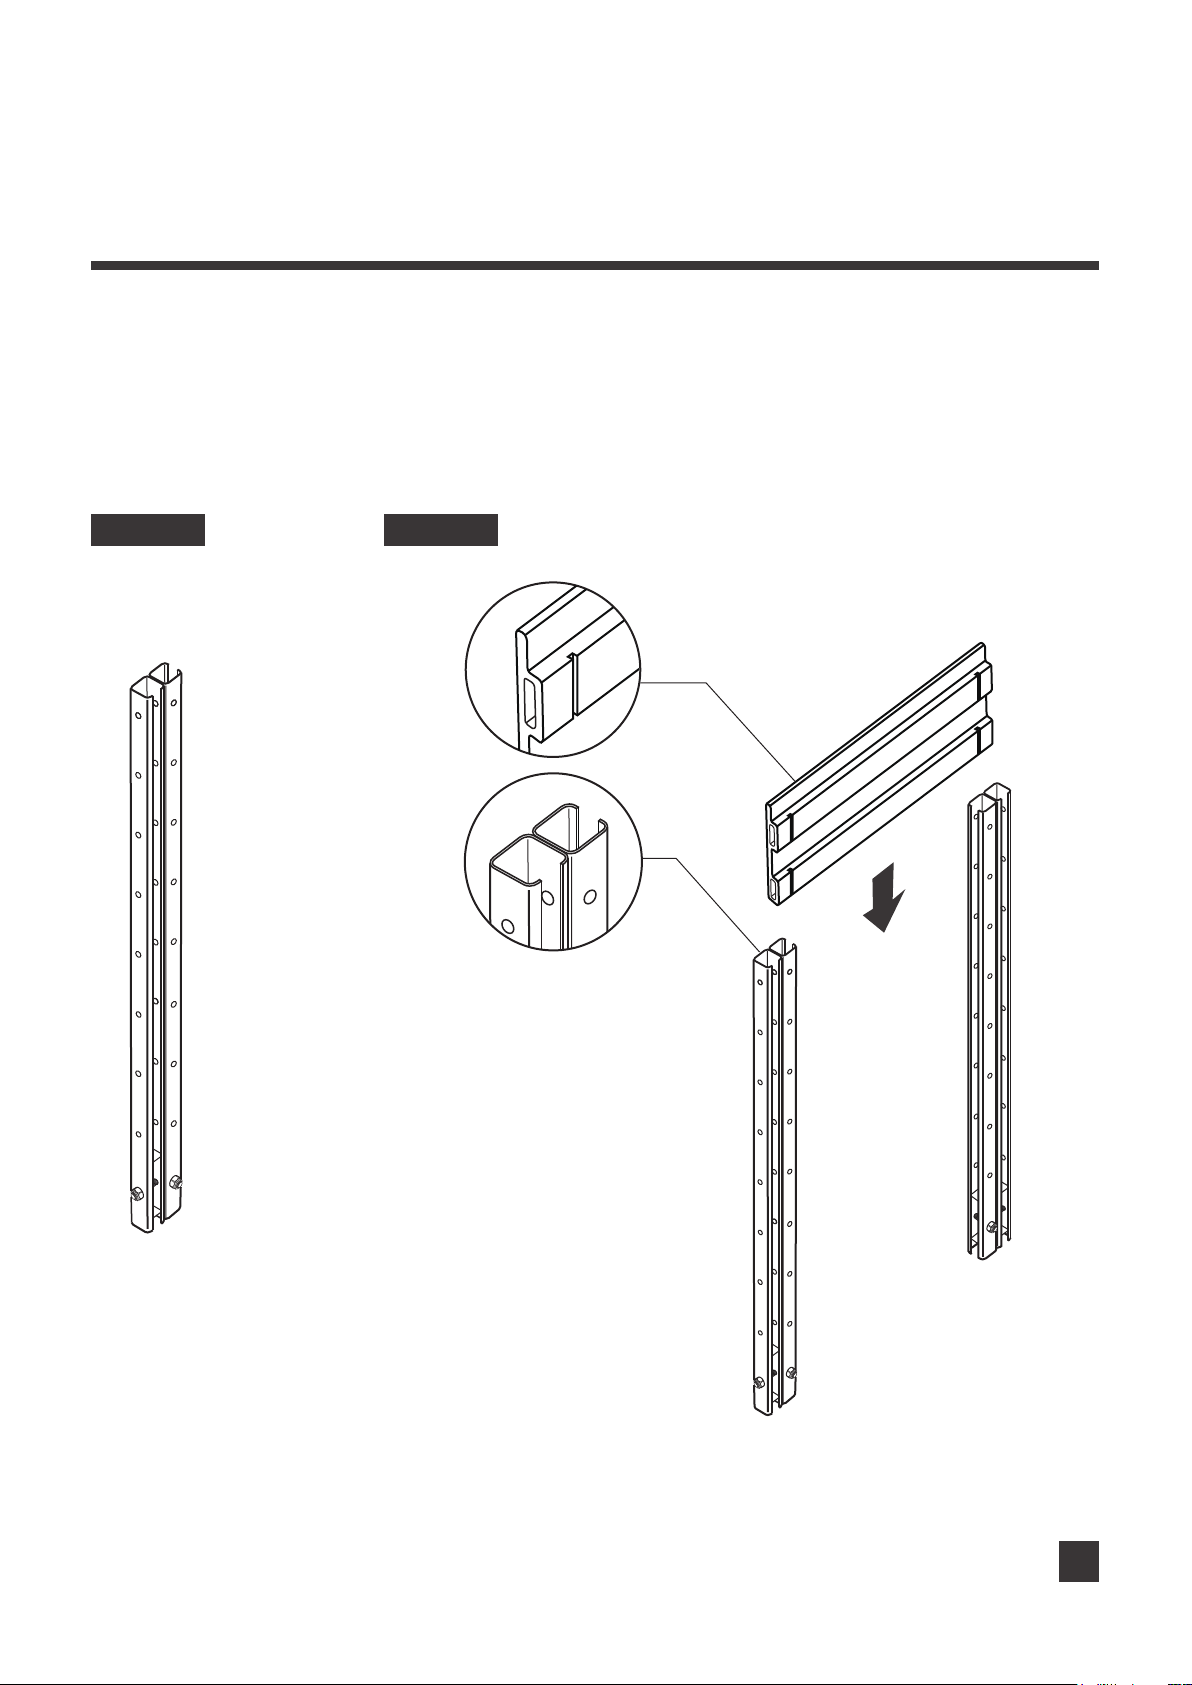
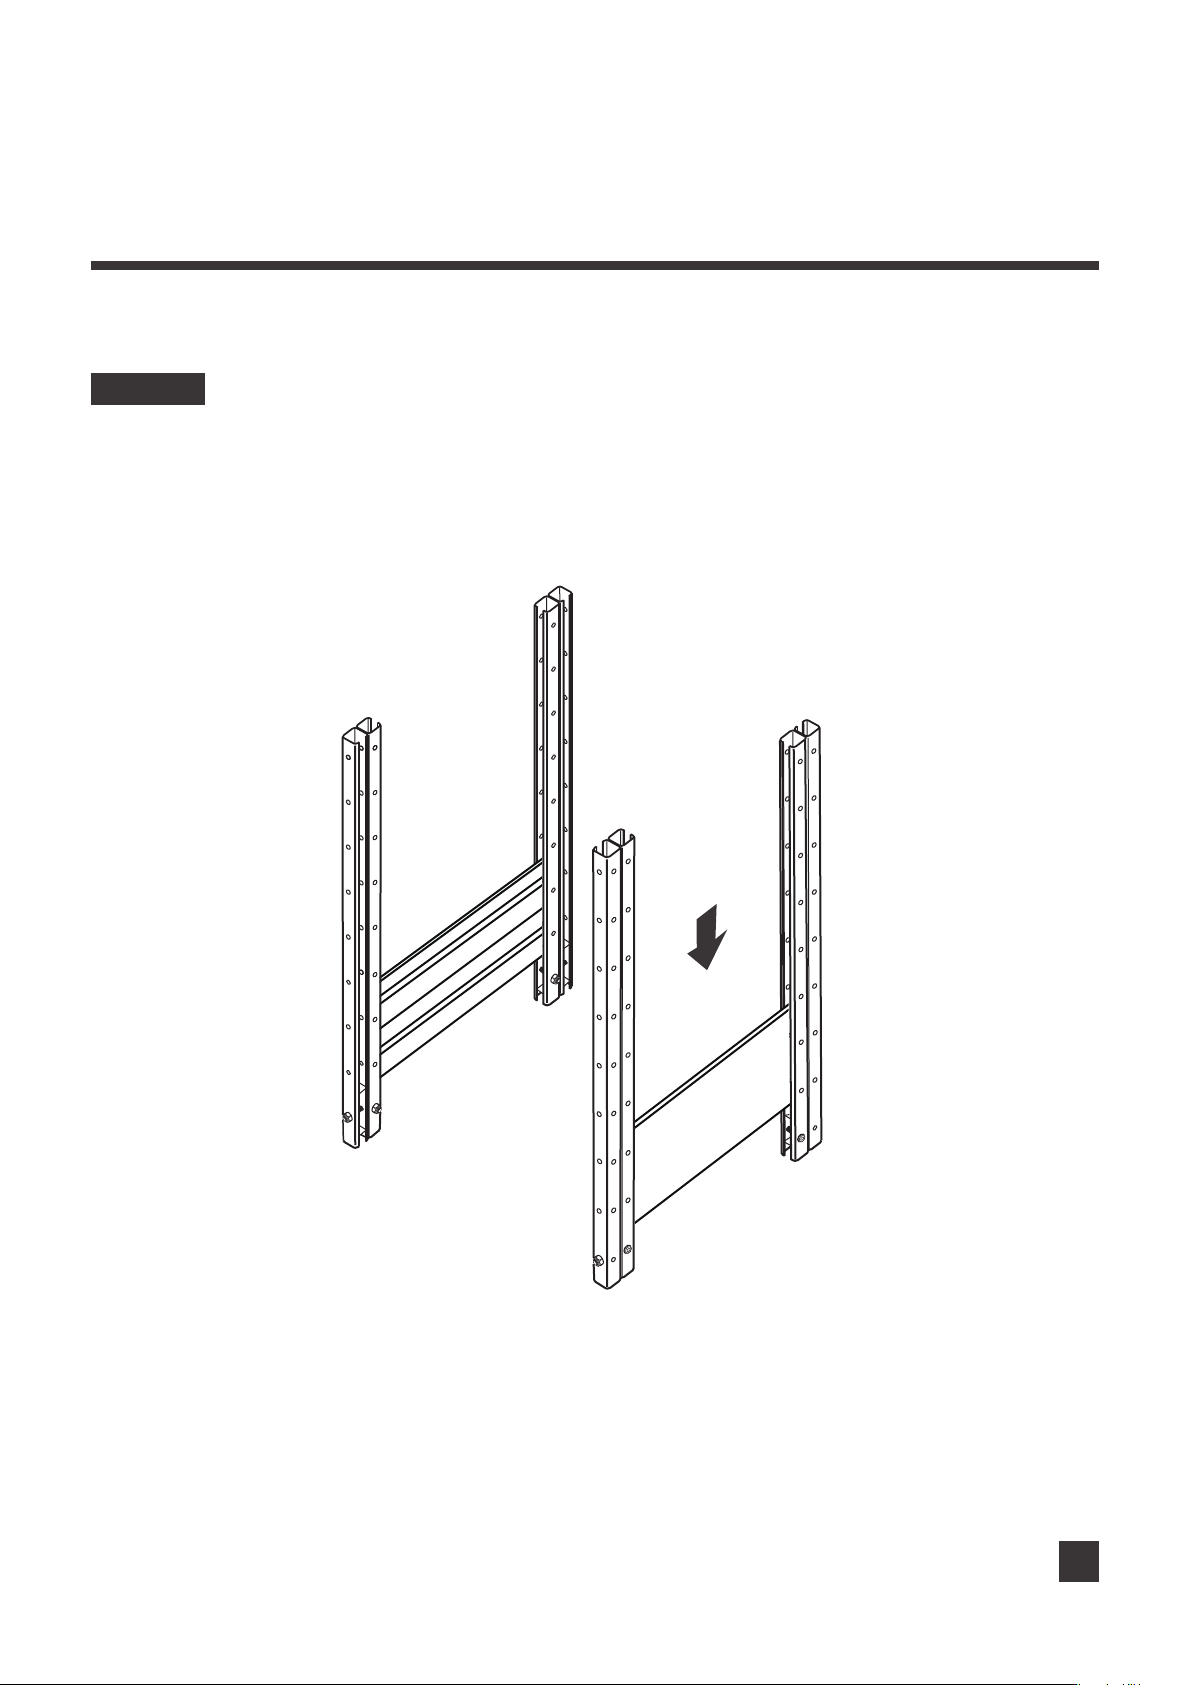
Start by making sure each corner post is oriented correctly, as shown in Image 3. Slide one short board B
into the corner brackets from above.
Note: The short boards need to be placed in the inward “U” shape of the brackets, as shown in Image 4.
IMAGE 3 IMAGE 4
Top
Short
Board B
Bottom
Right
Corner
Post
Left
Corner
Post
4
Page 5
Assembly
Planter Box Cornerstone - 17" L x 19" W x 21" H
Slide another short board B into the other two corner brackets from above, as shown in Image 5.
IMAGE 5
Right
Corner
Post
Left
Corner
Post
Left
Corner
Post
Right
Corner
Post
Short
Board B
Short
Board B
5
Page 6
Assembly
Planter Box Cornerstone - 17" L x 19" W x 21" H
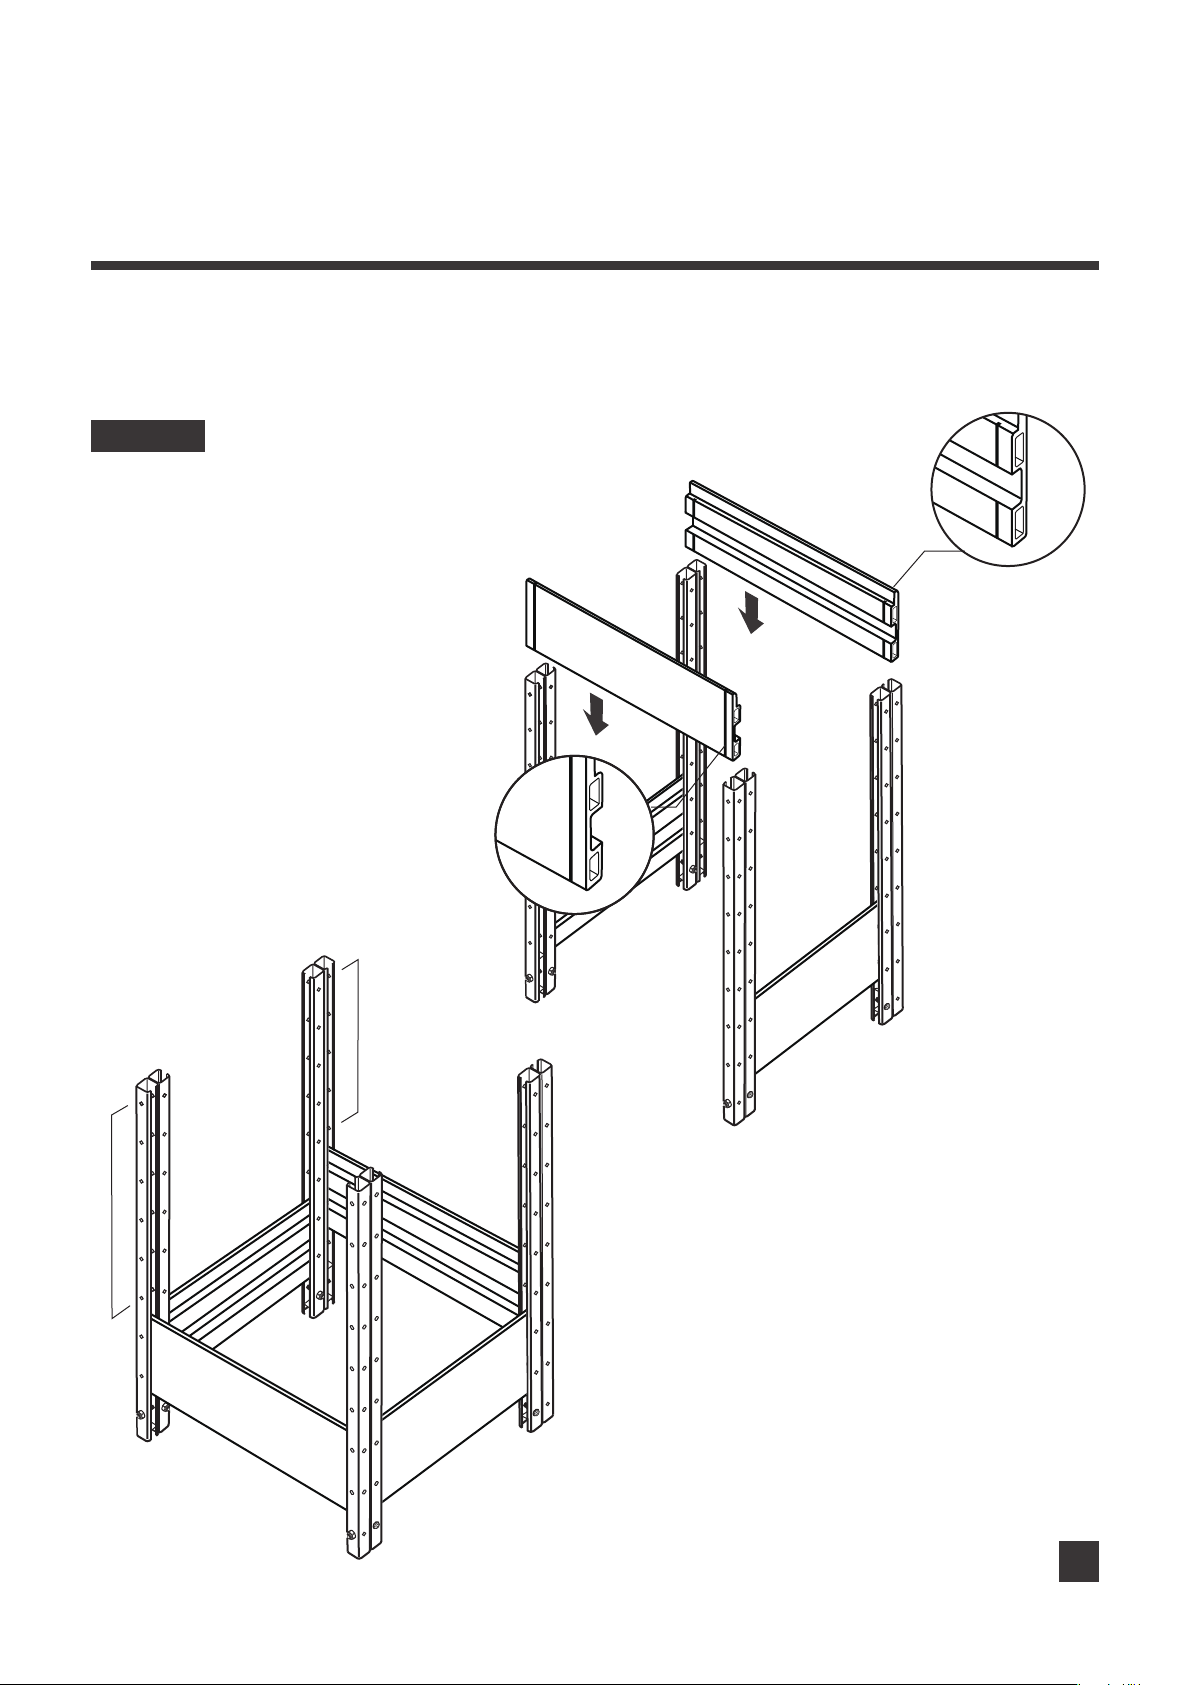
With the help of another person holding the 2 assembled parts, slide another short boards B into the brackets
from above. Make sure that one board goes straight to the bottom, while the other one stays in the middle of
the way (don’t push it to the bottom), with the top edge between the 5th and 6th holes of the post.
IMAGE 6
Short
Board B
Short
Board B
to the
bottom
5 holes
in the
middle of
the way
6
Page 7
Assembly
Planter Box Cornerstone - 17" L x 19" W x 21" H
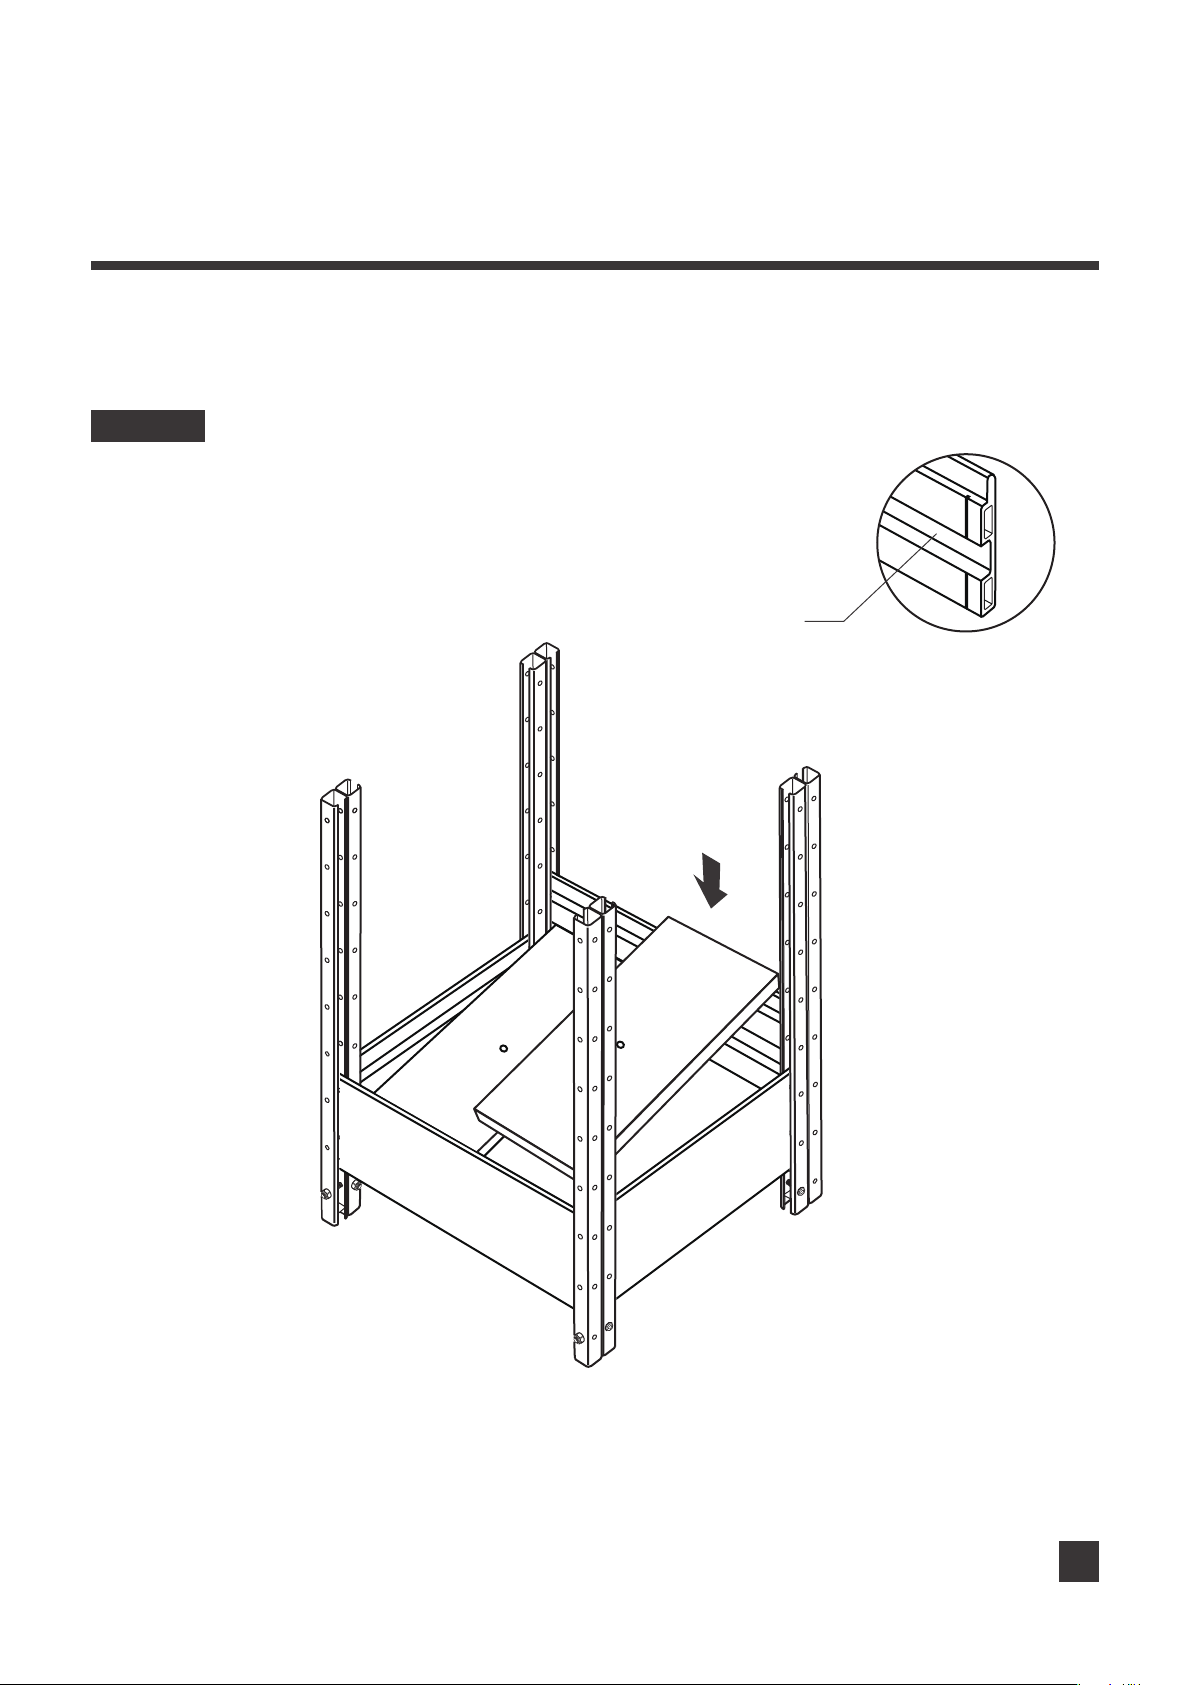
Put the bottom boards on lower slots of short boards B. Make sure the 2 ends of these bottom boards go
into the lower slots and rest in them with enough contact as shown in Image 7. Adjust the height of the
higher short board B slightly to hold these bottom boards if necessary.
IMAGE 7
lower slot
Short
Board B
Bottom
Board x 2
7
Page 8
Assembly
Planter Box Cornerstone - 17" L x 19" W x 21" H
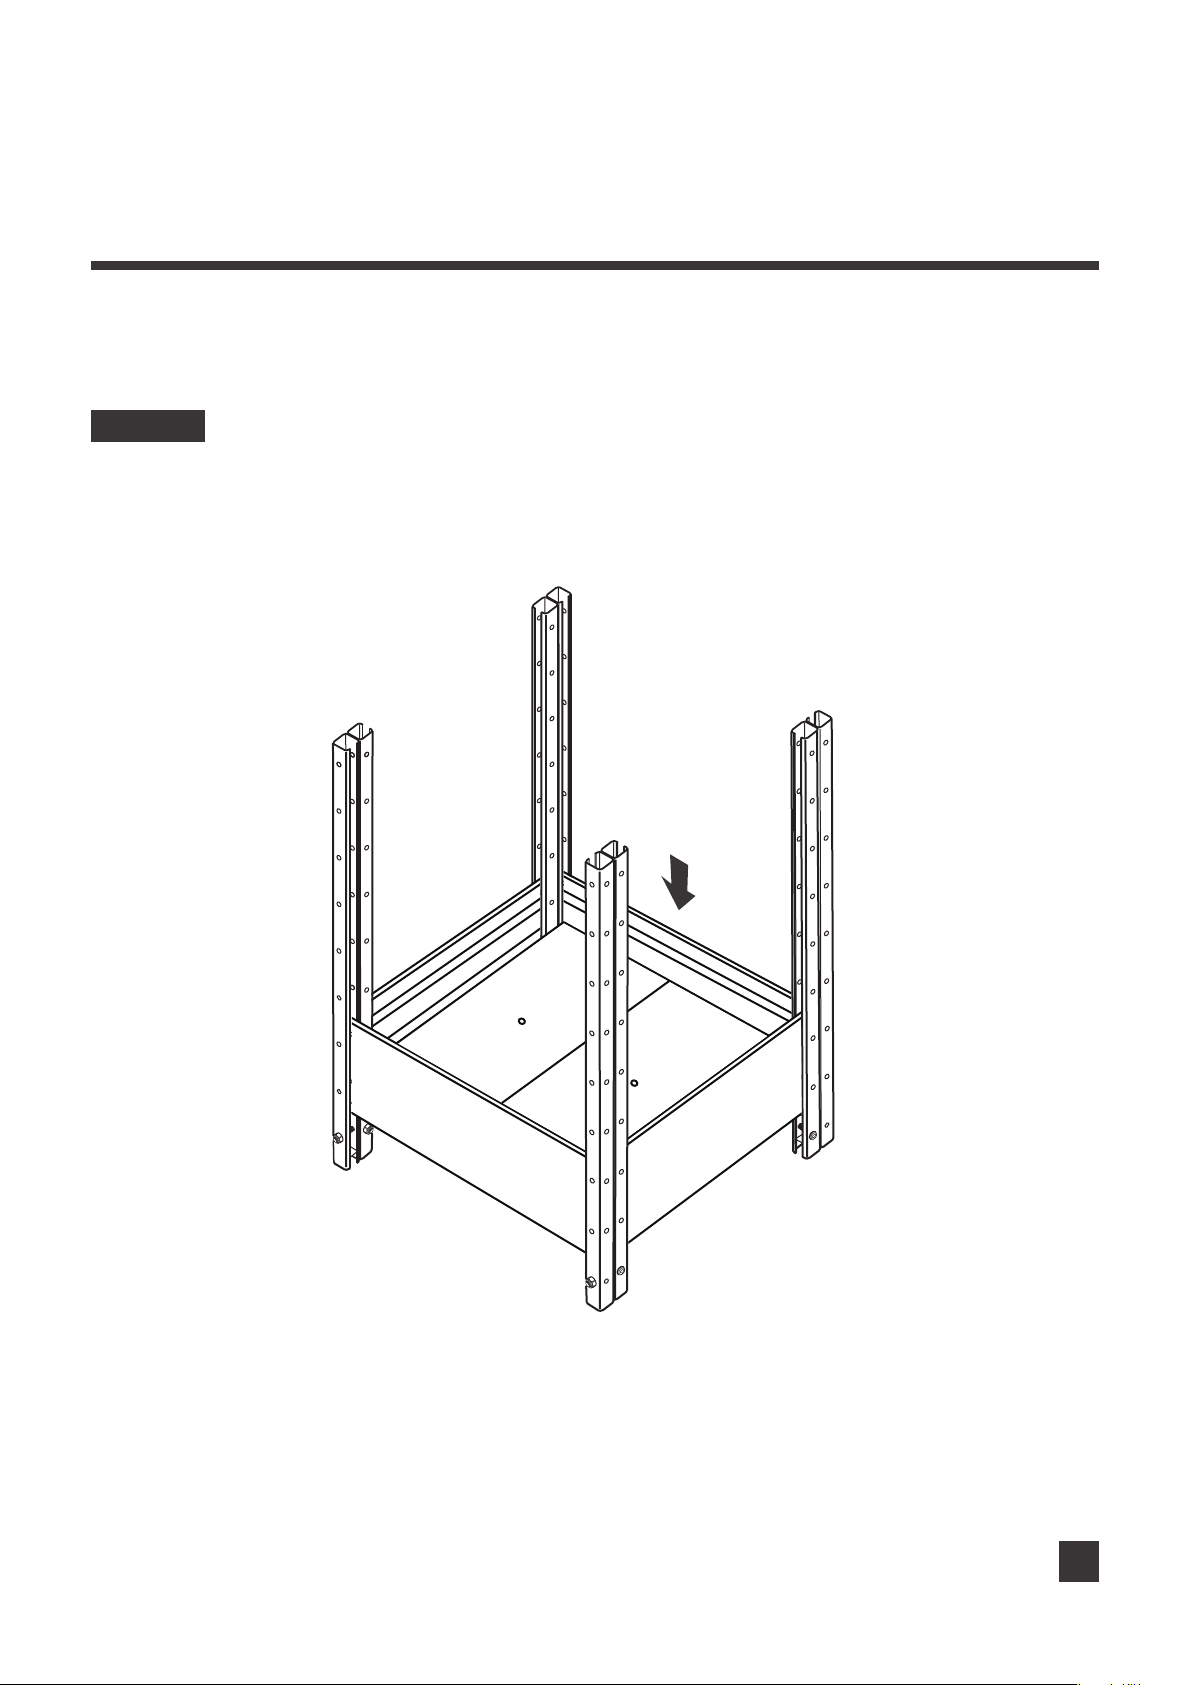
Push down the higher short board B to the bottom, as shown in Image 8.
IMAGE 8
Short
Board B
Short
Board B
8
Page 9
Assembly
Elevated Planter Box - 17" L x 19" W x 28" H
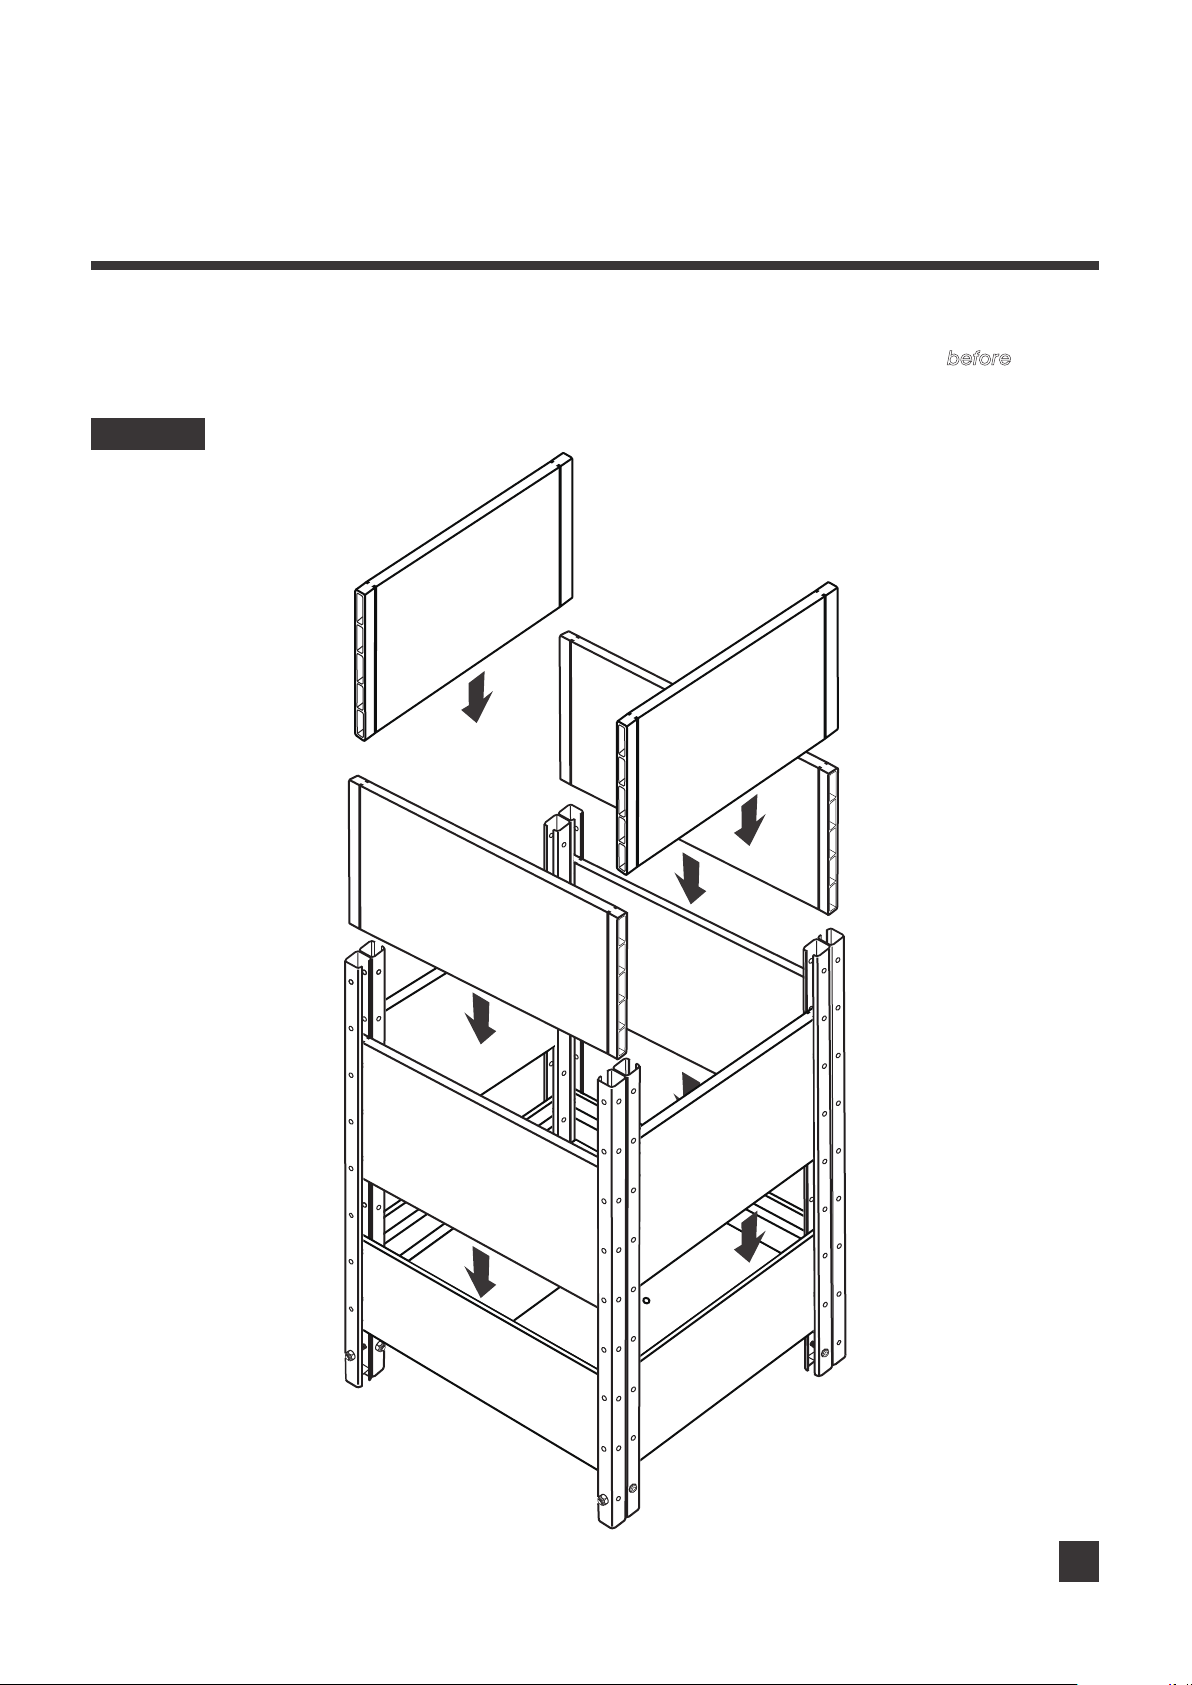
Slide the remaining boards into place, as shown in Image 9. Now you get an planter box cornerstone with 10”
planting depth. Then, go to page 15, and follow the steps afterwards.
Note: If you want to add trellis kit onto this bed, please assemble the extension connectors before this step,
to avoid disassembling the boards later.
IMAGE 9
Short
Board A
x 8
Short
Board B
Short
Board B
9
Page 10
Assembly
Planter Box Cornerstone - 17" L x 19" W x 21" H
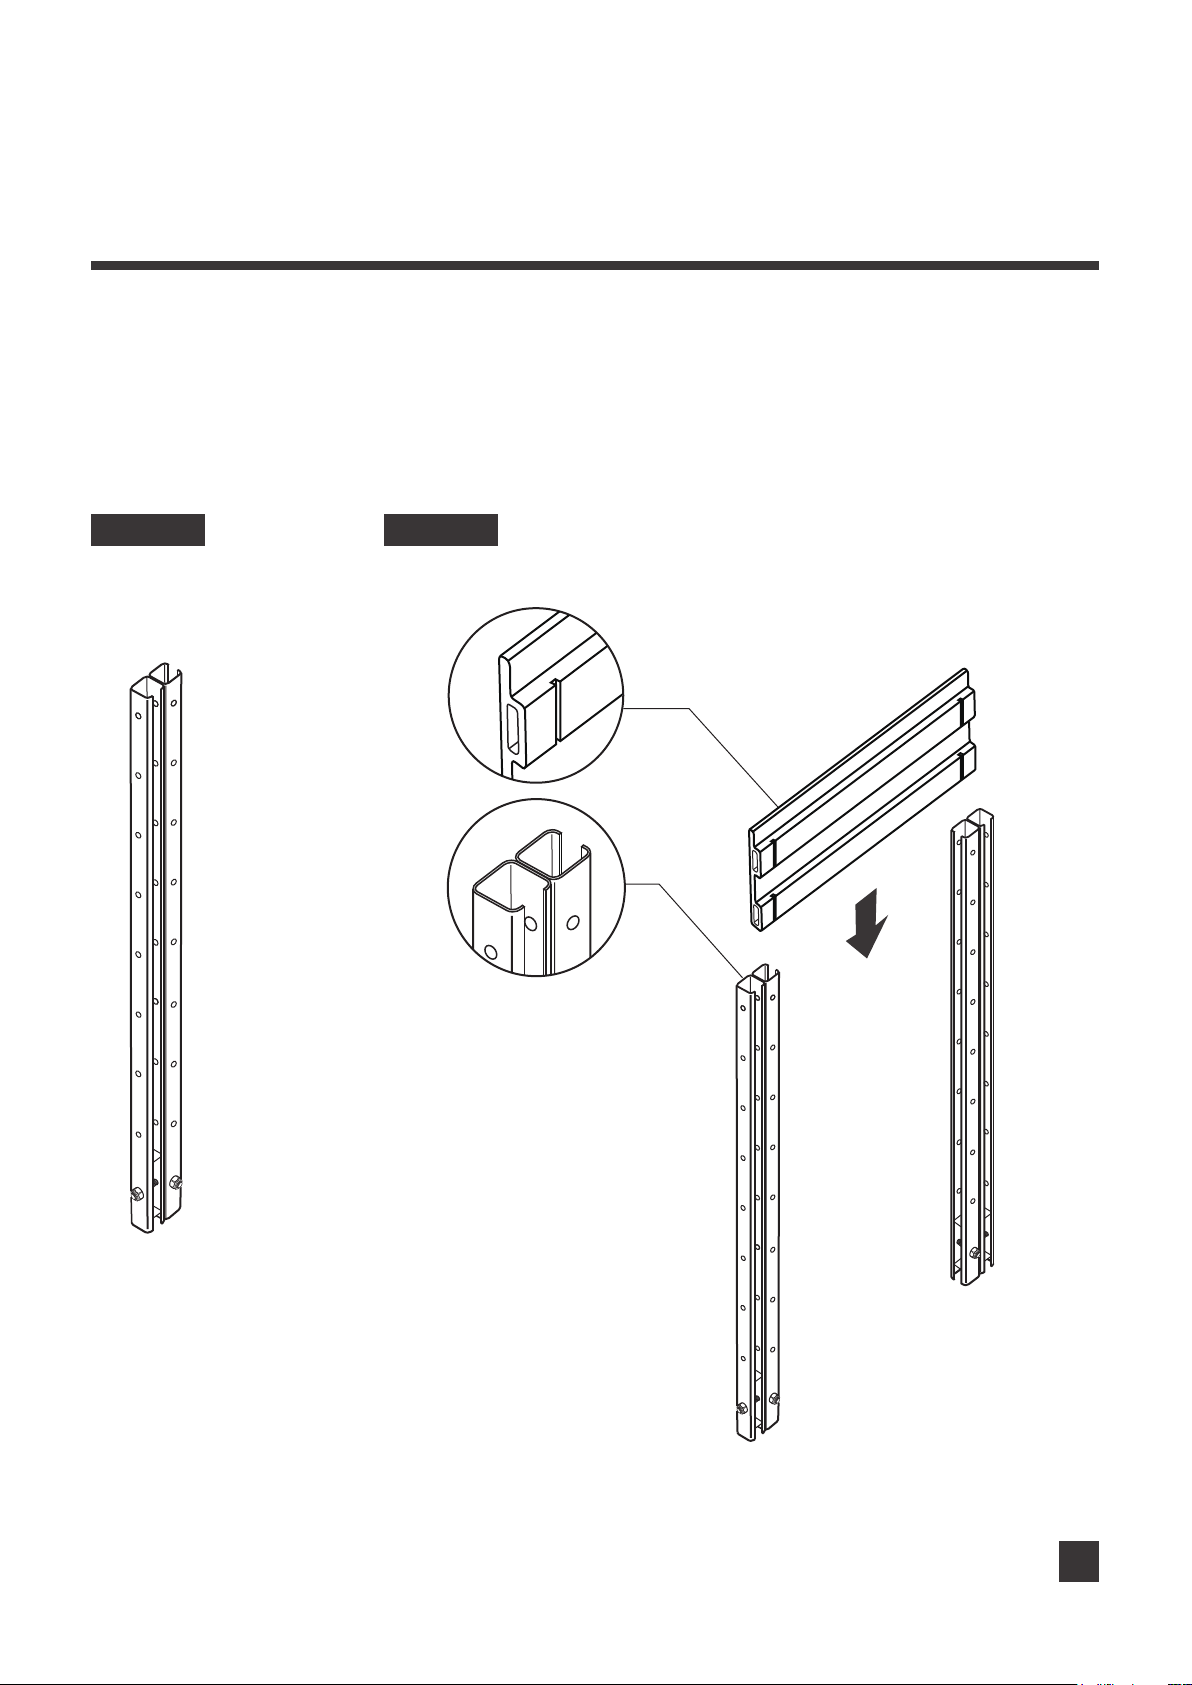
For the planting depth of 14.4”, please follow steps below.
For depth of 7.5”, the assembly methods are similar, just pay attention to the sequence of the
boards and position of the bottom boards, please refer to page 3.
Start by making sure each corner post is oriented correctly, as shown in Image 3a. Slide one short board
B into the corner brackets from above.
Note: The short boards need to be placed in the inward “U” shape of the brackets, as shown in Image 4a.
IMAGE 3a IMAGE 4a
Top
Short
Short
Board B
Board B
Bottom
Right
Corner
Post
Left
Corner
Post
10
Page 11
Assembly
Planter Box Cornerstone - 17" L x 19" W x 21" H
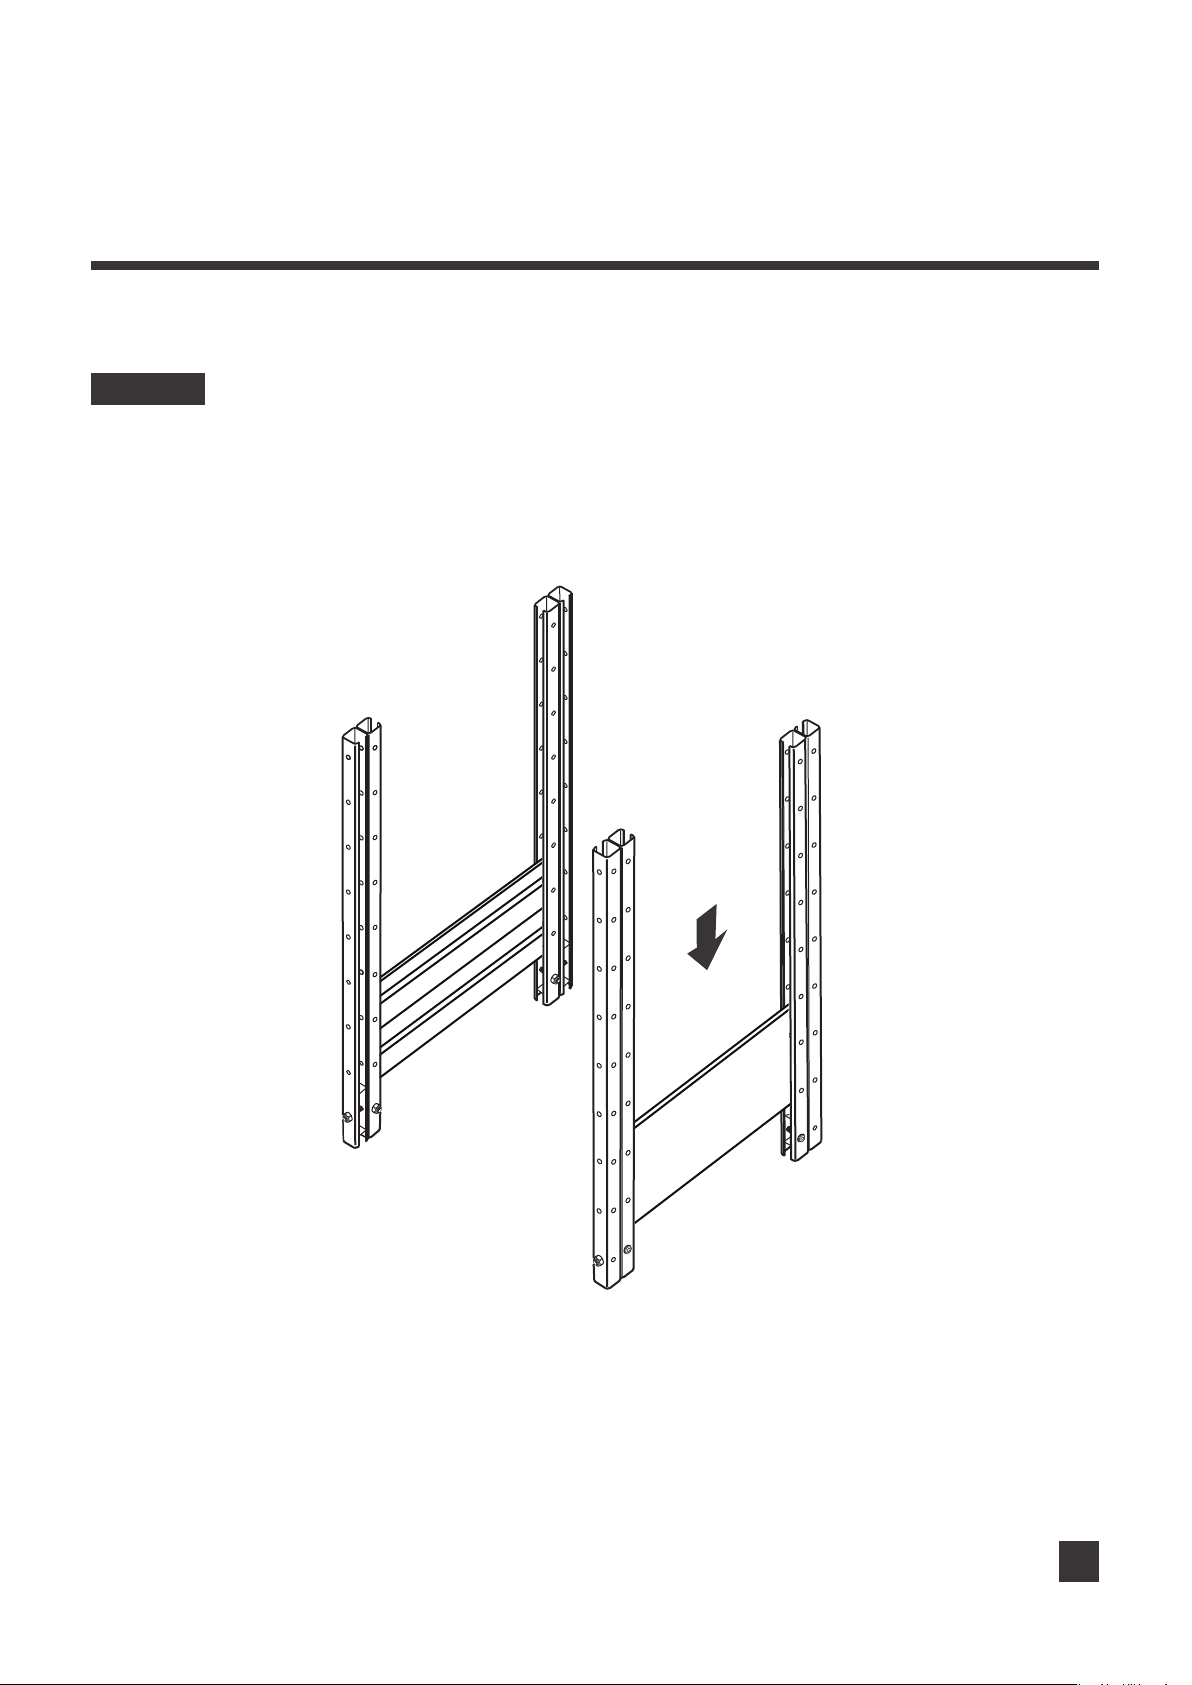
Slide another short board B into the other two corner brackets from above, as shown in Image 5a.
IMAGE 5a
Right
Corner
Post
Left
Corner
Post
Left
Corner
Post
Right
Corner
Post
Short
Board B
Short
Board B
11
Page 12
Assembly
Planter Box Cornerstone - 17" L x 19" W x 21" H
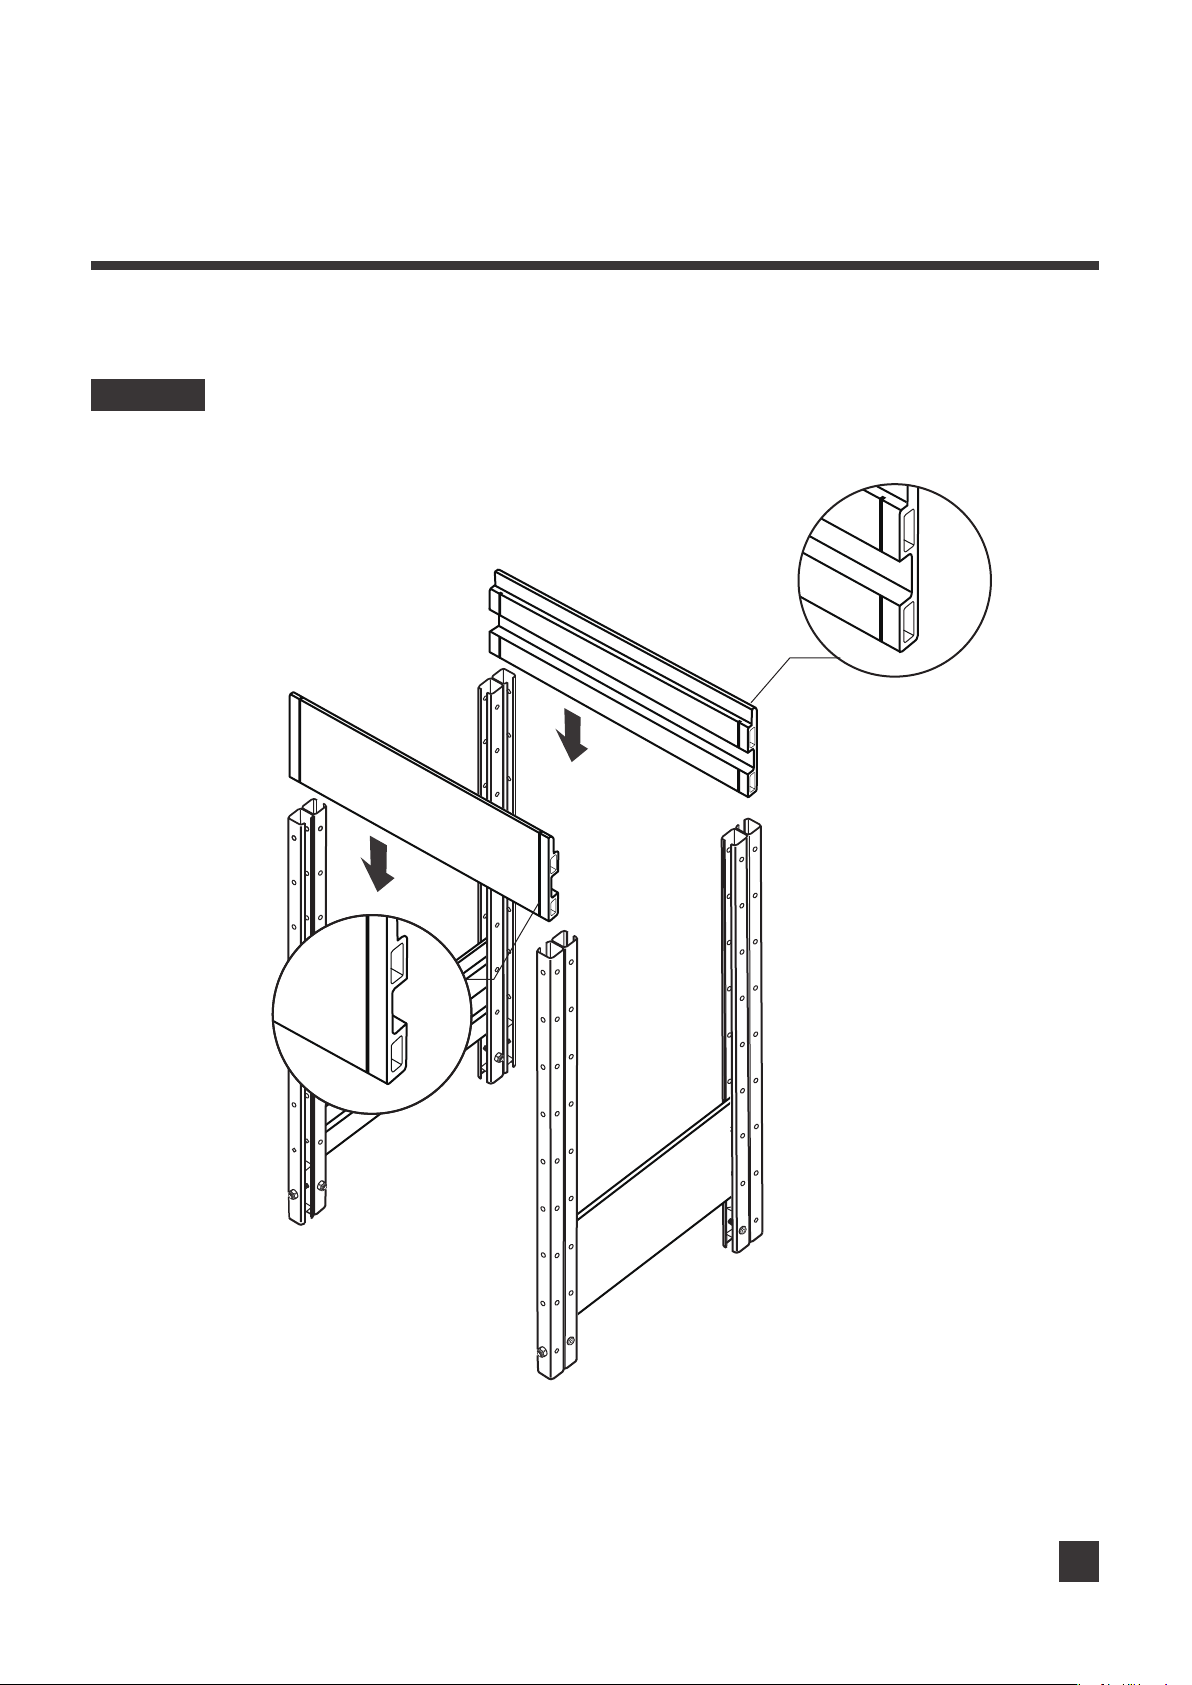
With the help of another person holding the 2 assembled parts, slide another two short boards B into the brackets
from above to the bottom, as shown in Image 6a.
IMAGE 6a
Short
Board B
Short
Board B
12
Page 13
Assembly
Planter Box Cornerstone - 17" L x 19" W x 21" H
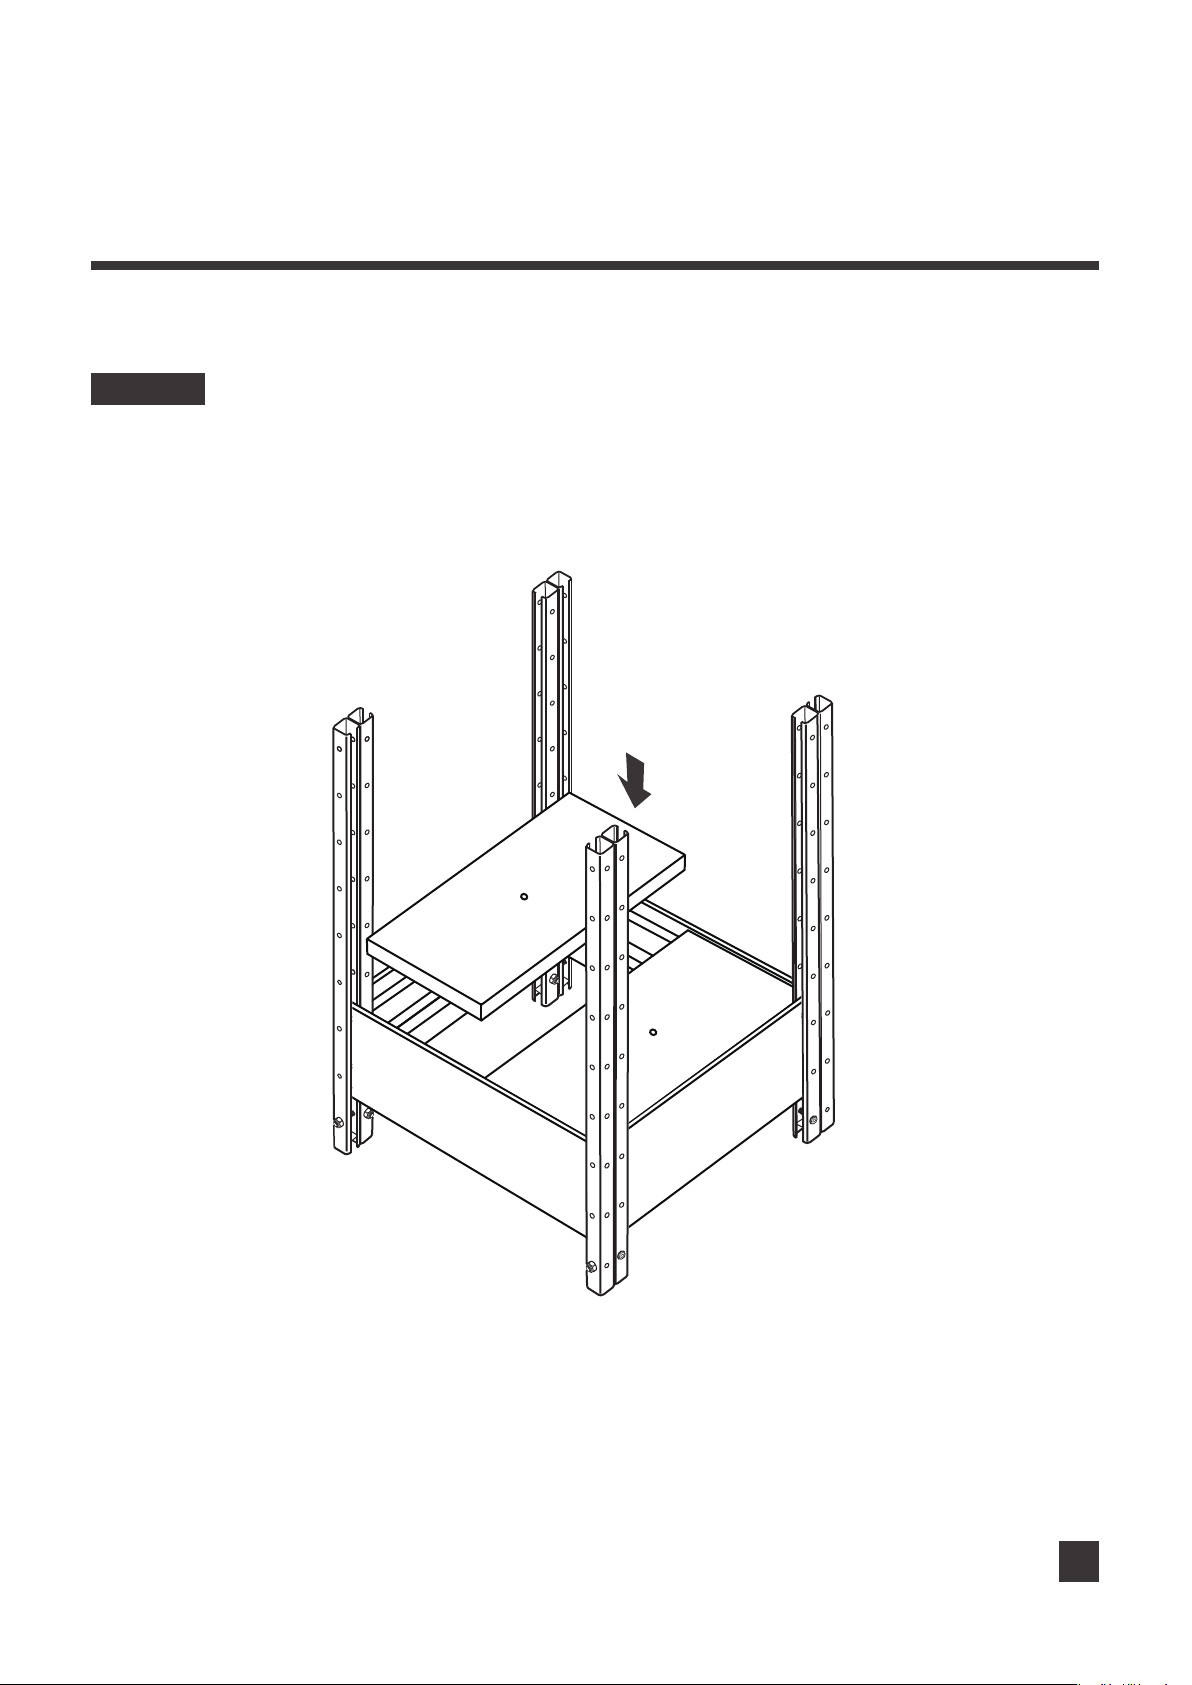
Put the bottom boards on the short boards B, as shown in Image 7a.
IMAGE 7a
Bottom
Board
X 2
Short
Board B
13
Page 14
Assembly
Planter Box Cornerstone - 17" L x 19" W x 21" H
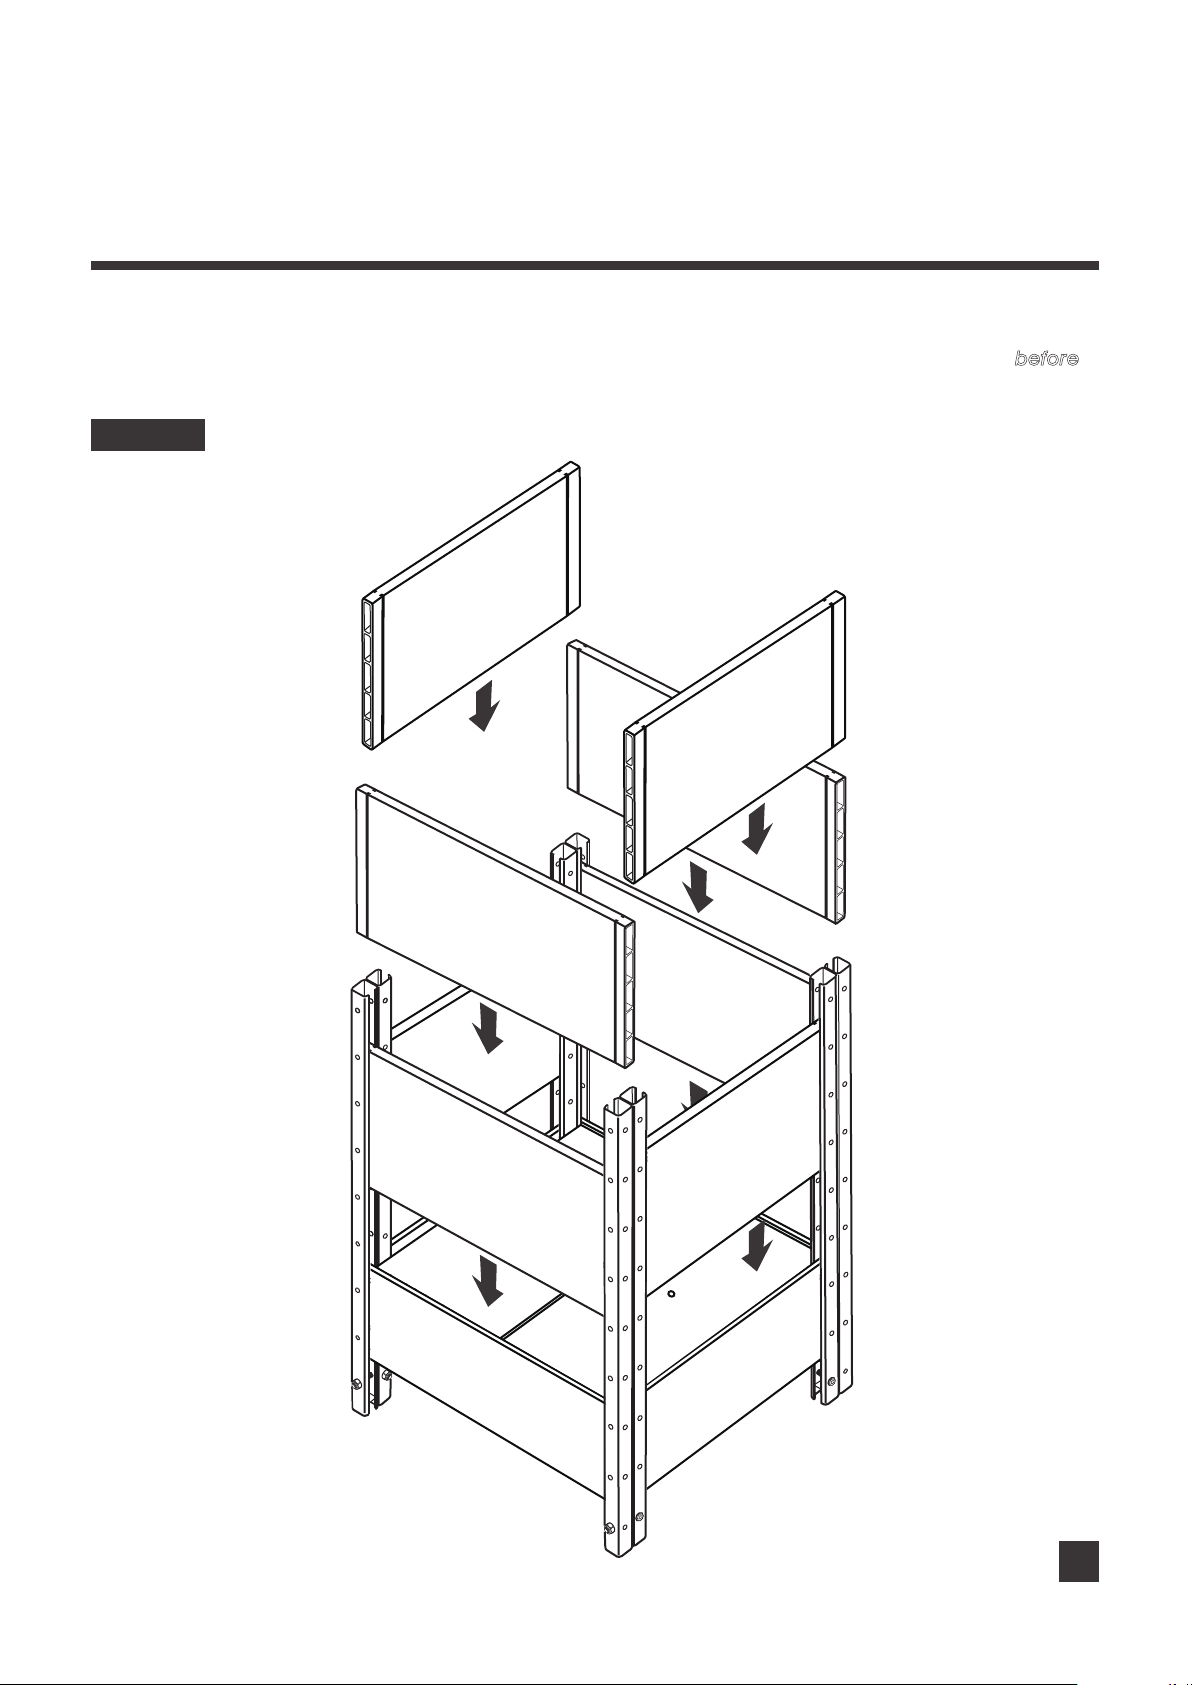
Slide the remaining boards into place, as shown in Image 8a. Now you get a planter box cornerstone with
7.5” planting depth.
Note: If you want to add trellis kit onto this planter box, please assemble the extension connectors before
this step, to avoid disassembling the boards later.
IMAGE 8a
Short
Board A
x 8
Short
Board B
14
Page 15
Assembly
Planter Box Cornerstone - 17" L x 19" W x 21" H
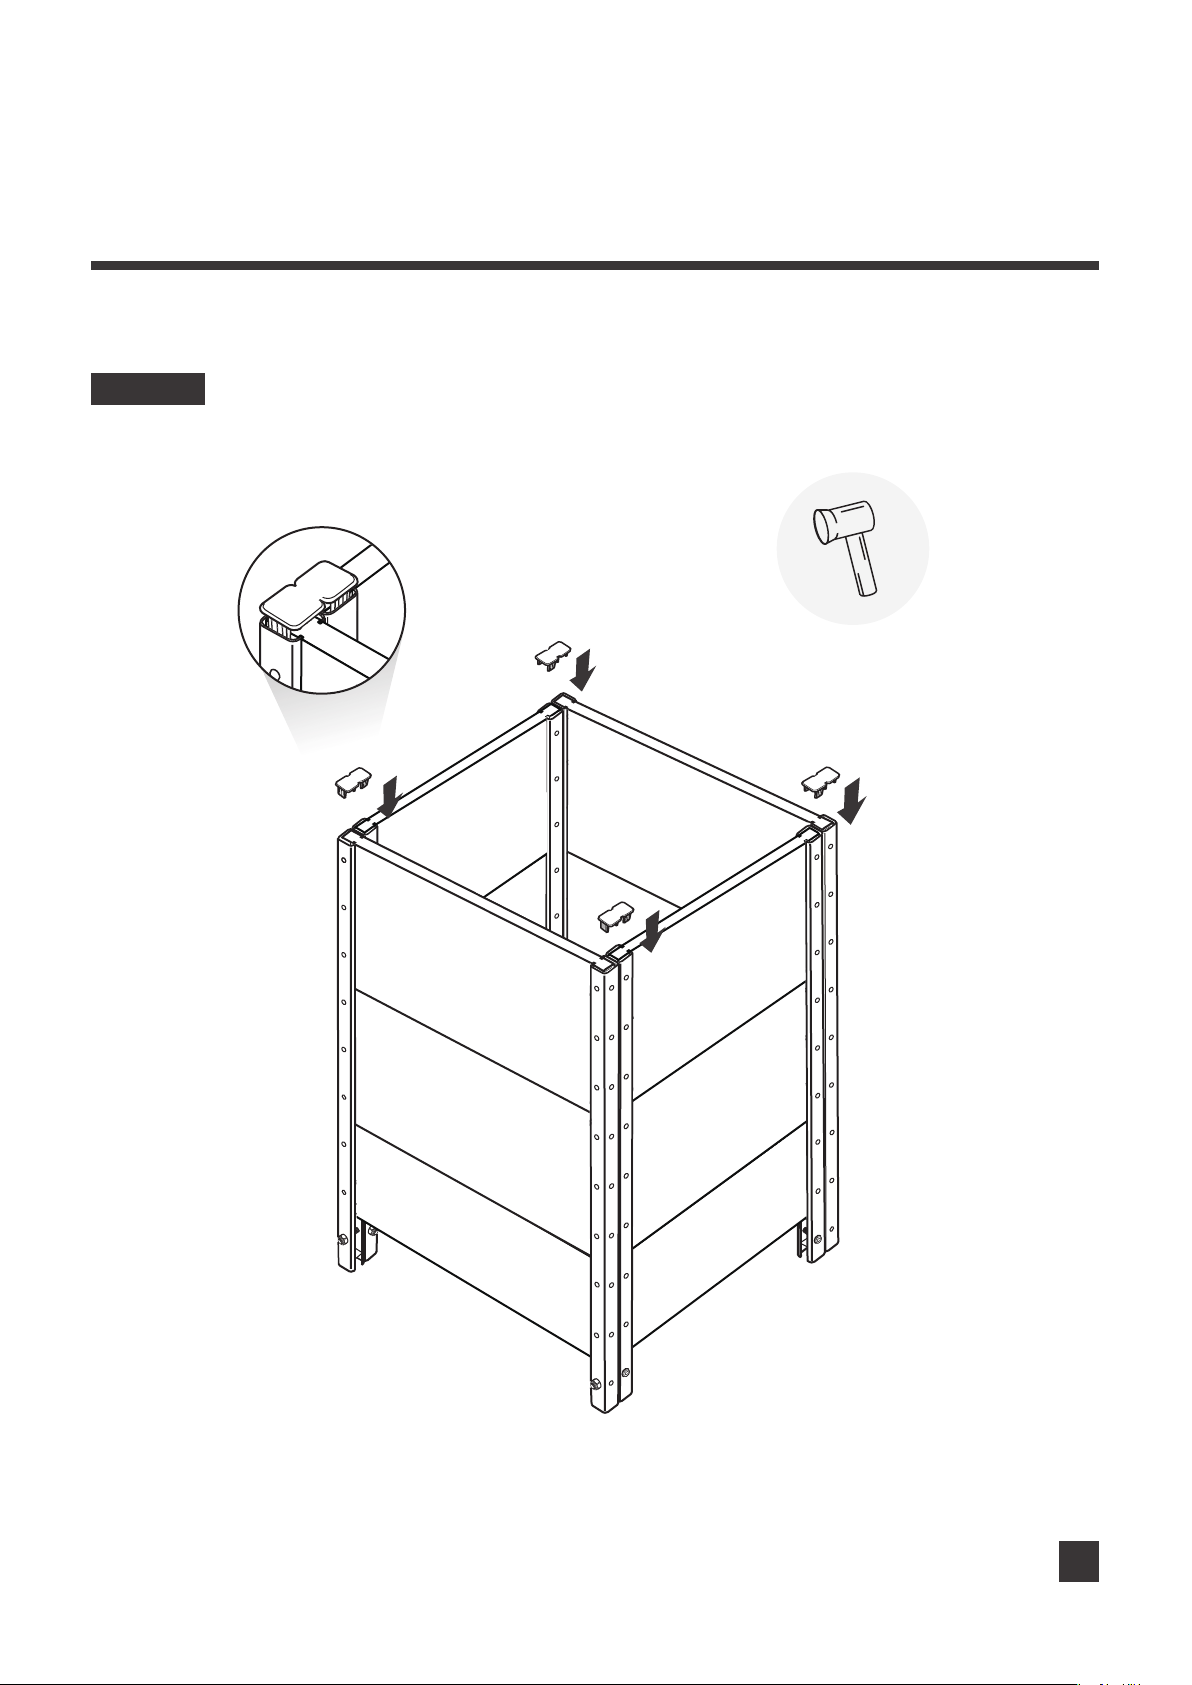
If necessary, use your rubber mallet to ensure the boards are tightly in place. Cover the brackets with the 4
end caps, as shown in Image 10.
IMAGE 10
Rubber
Mallet
Post Cap
X 1
Post Cap
X 1
Post Cap
X 1
Post Cap
X 1
15
Page 16
Assembly
Planter Box Cornerstone - 17" L x 19" W x 21" H
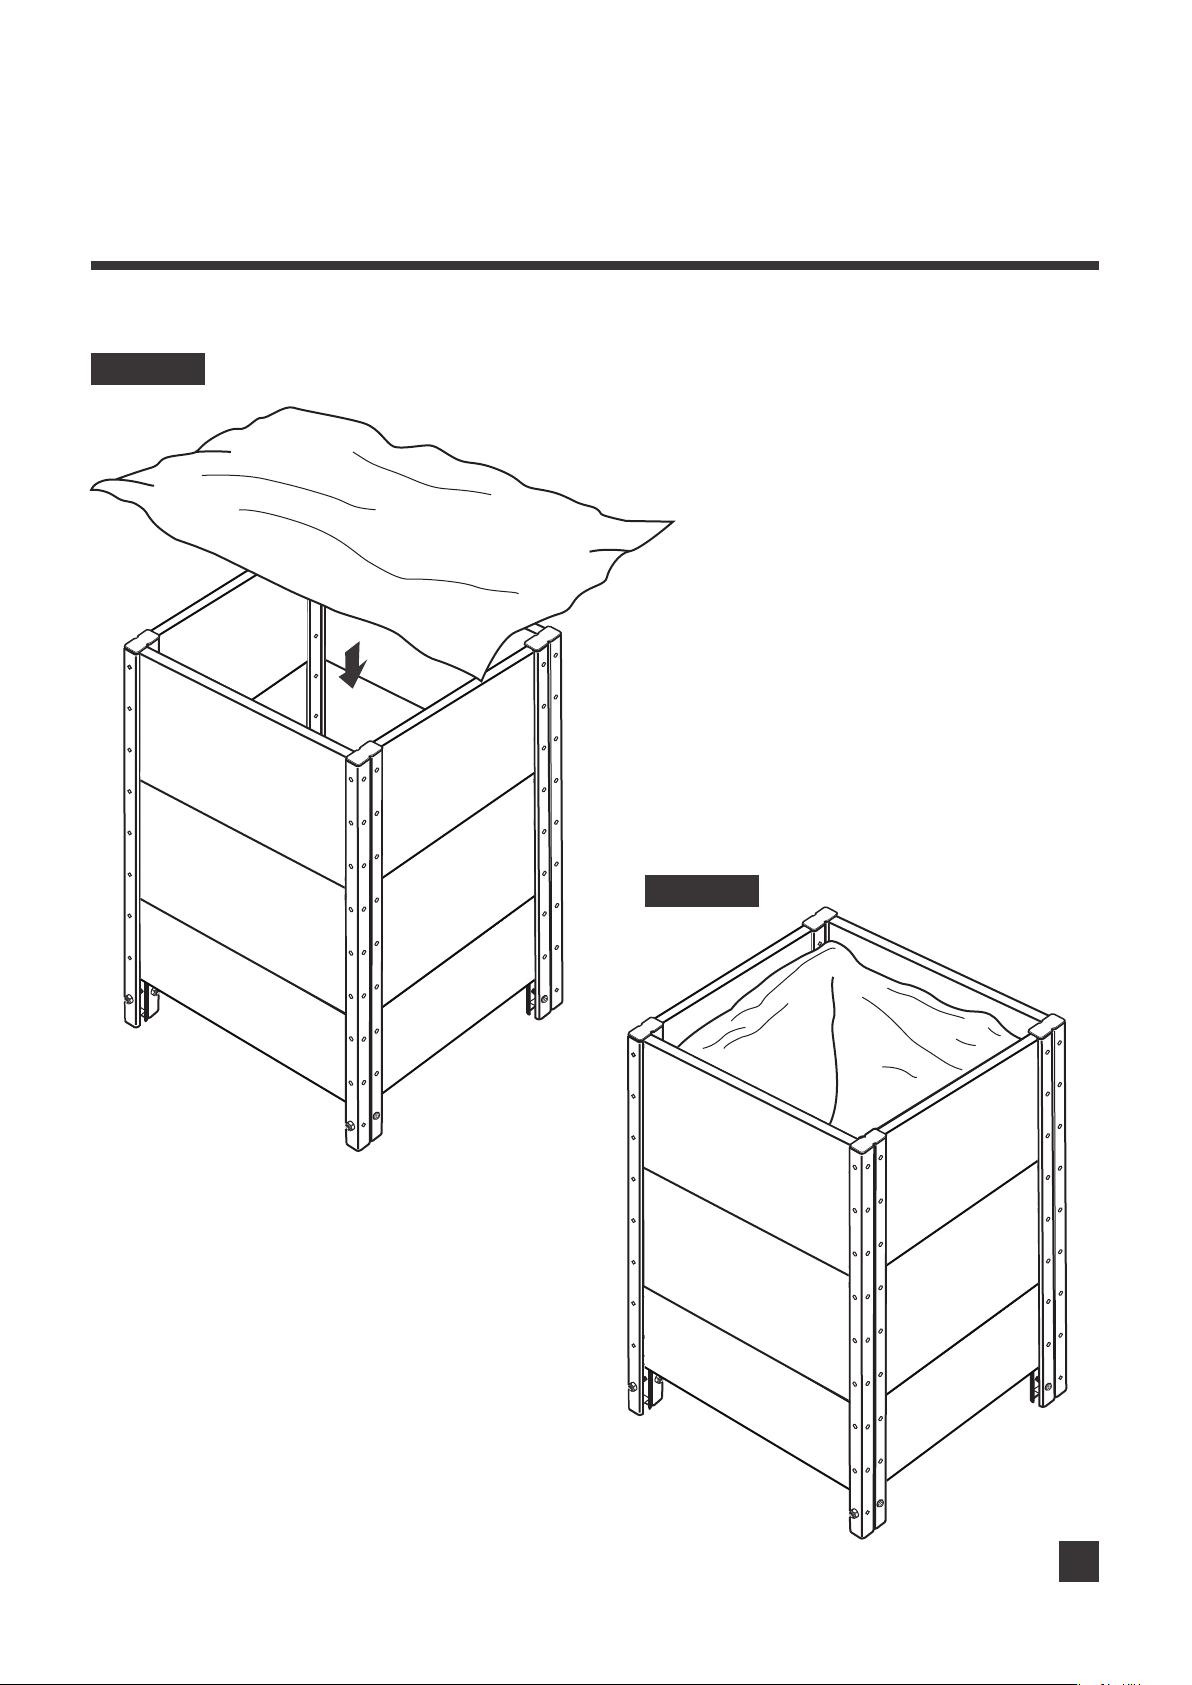
Unfold the liner and cover the bottom of the garden bed, as shown in Image 11 and Image 12.
IMAGE 11
Garden Bed
Liner
IMAGE 12
16
Page 17
Note
Planter Box Cornerstone - 17" L x 19" W x 21" H
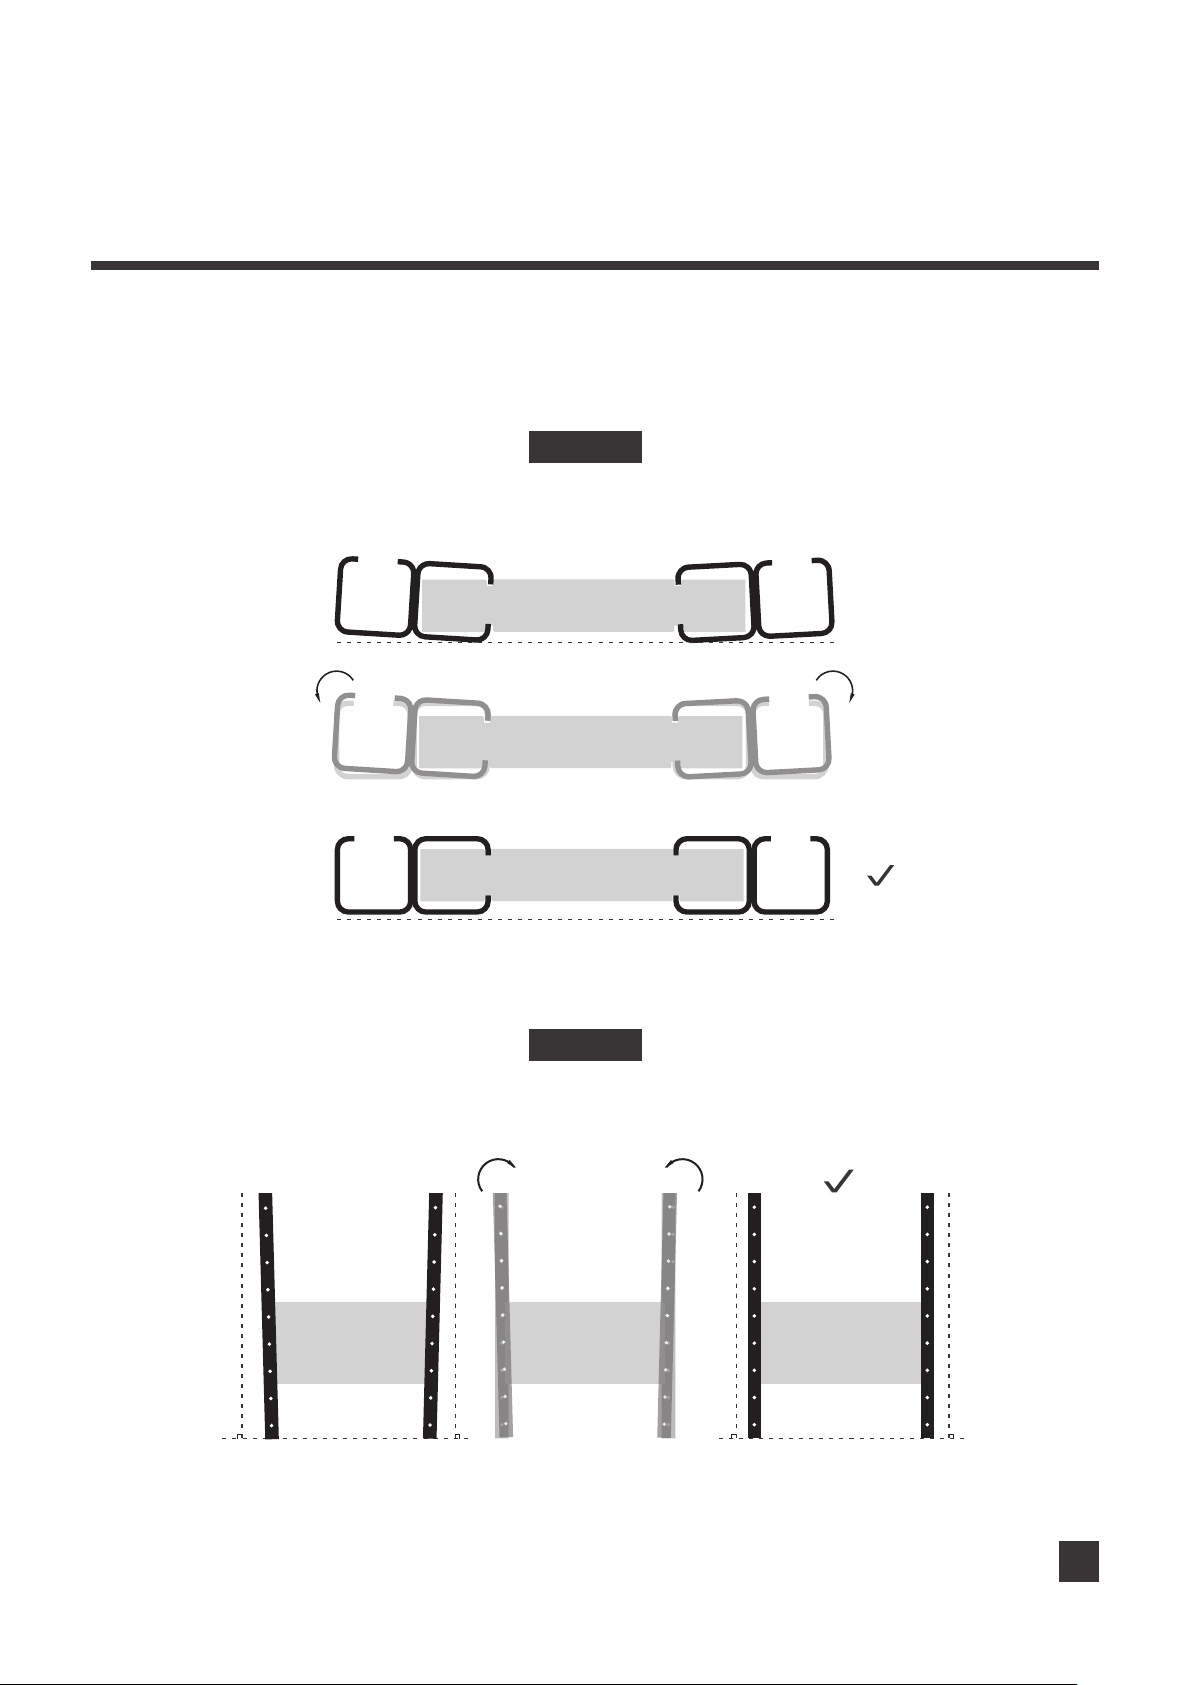
Sometimes there might be a misalignment of the Corner Posts as shown in Image 13 and Image 14, which
may result in difficulty of sliding boards into the brackets. Please adjust them to the right position so that they
are parallel to each other, and perpendicular to the ground.
IMAGE 13
Assembling Problem 1
X
X
IMAGE 14
Assembling Problem 2
17
Page 18

Bloom On.
Everbloom-Garden.com
US Patent Pending
Subscribe at www.everbloom-garden.com for
extra savings and upgrading information!
Distributed by:
Dynaforge Trading LLC
St. Paul, MN55101
Email: [email protected]
Page 19
 Loading...