

Page 1
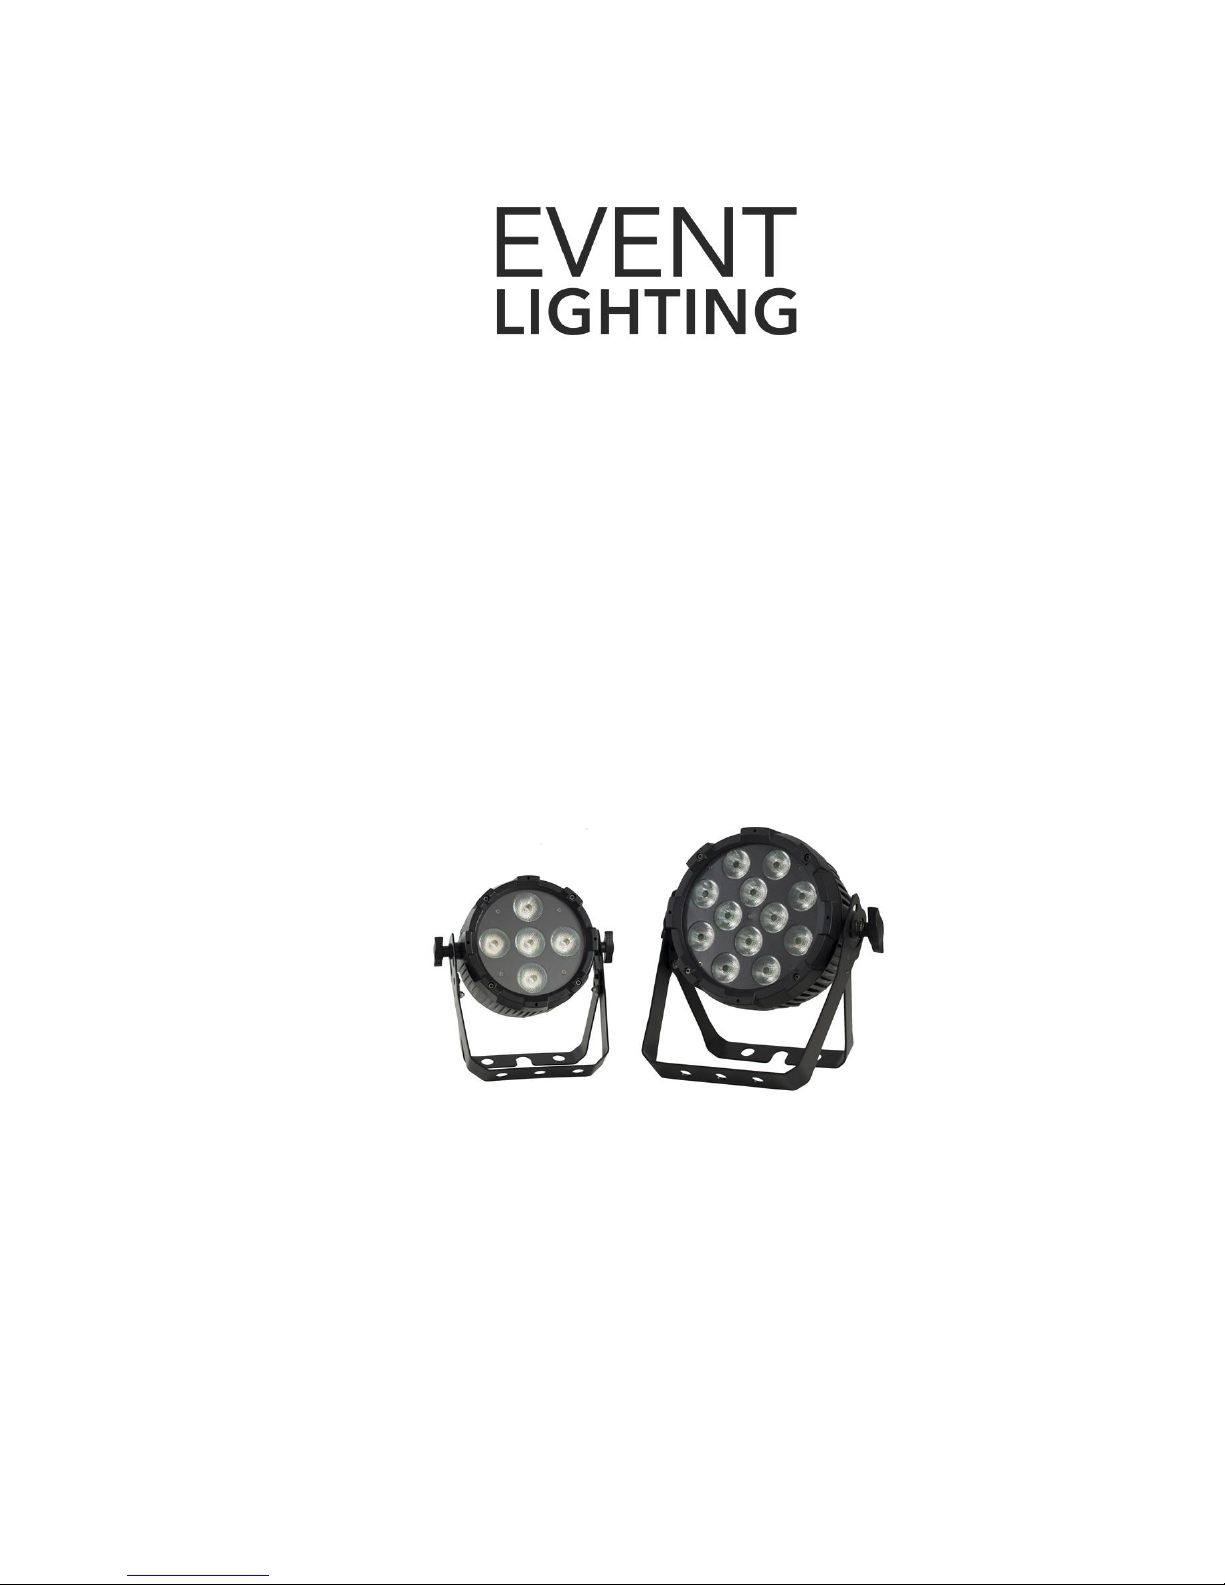
PRO PAR
Model No. PARRGBW12x8, PAR12x8A
PARRGBW5x8, PAR5x8A
USER MANUAL
For safety, please read this user manual carefully before initial use.
Event Lighting reserves the right to revise the manual at any time. Information and specifications within this
manual are subject to change without notice. Event Lighting assumes no liability or responsibility for any
errors or omissions. Please consult Event Lighting for any clarification or information regarding this item.
www.event-lighting.com.au
Ver 2.0
Page 2

www.event-lighting.com.au
1
CONTENTS
Safety Instructions
- Power input & power Linking
Product Installation
- Fuse replacement
Diagrams
- Lux chart
- Dimensions
Control Board Operation
- DMX address setting
- DMX modes setting
- Dimmer Speed Setting
- Static colour setting
- Manual colour setting
- Auto run and sound active setting
- Master/slave setting
DMX chart
Technical specifications
Warranty
Page 3

www.event-lighting.com.au
2
Safety Instructions
WARNING
• Do not open this device, there is no user-serviceable parts inside. Risk of electric shock.
• Do not look at the light source when the device is on.
• CAUTION: This unit's housing may be hot during and after operation.
• Install this device in a location with adequate ventilation, at least 20 inch (50 cm) from adjacent surfaces.
• Do not leave any flammable material within 50 cm of this unit while operating or connected to power.
• Use a safety chain when mounting this device overhead.
• Do not operate this device outdoors or in any location where dust, excessive heat, water, or humidity may affect it.
• Do not operate this device if the housing, lenses, or cables appear damaged.
• Do not connect this device to a dimmer or rheostat.
• ONLY connect this device to a grounded and protected circuit.
• ONLY use the hanging bracket to carry this device.
• In case of a serious operating problem, stop using immediately.
• The maximum ambient temperature is 104° F (40° C). Do not operate this device at higher temperatures.
Power Input & Power Linking
This device has an auto-switching power supply work with input voltage range of 100~240 VAC, 50/60 Hz.
Link up to the maximum 8A. DO NOT exceed this number.
Product Installation
This device can be mounted in many orientations provided each individual device is secured by the use of correct
mounting bracket.
Use a safety chain when mounting this device overhead.
Fuse Replacement
If the fine-wire fuse of the device fuses, only replace the fuse by a fuse of same type and rating.
Before replacing the fuse, unplug mains lead.
Procedure:
Step 1: Unscrew the fuse holder on the rear panel with a fitting screwdriver from the housing (anticlockwise).
Step 2: Remove the old fuse from the fuse holder.
Step 3: Install the new fuse in the fuse holder.
Step 4: Replace the fuse holder in the housing and fix it.
Page 4
www.event-lighting.com.au
3
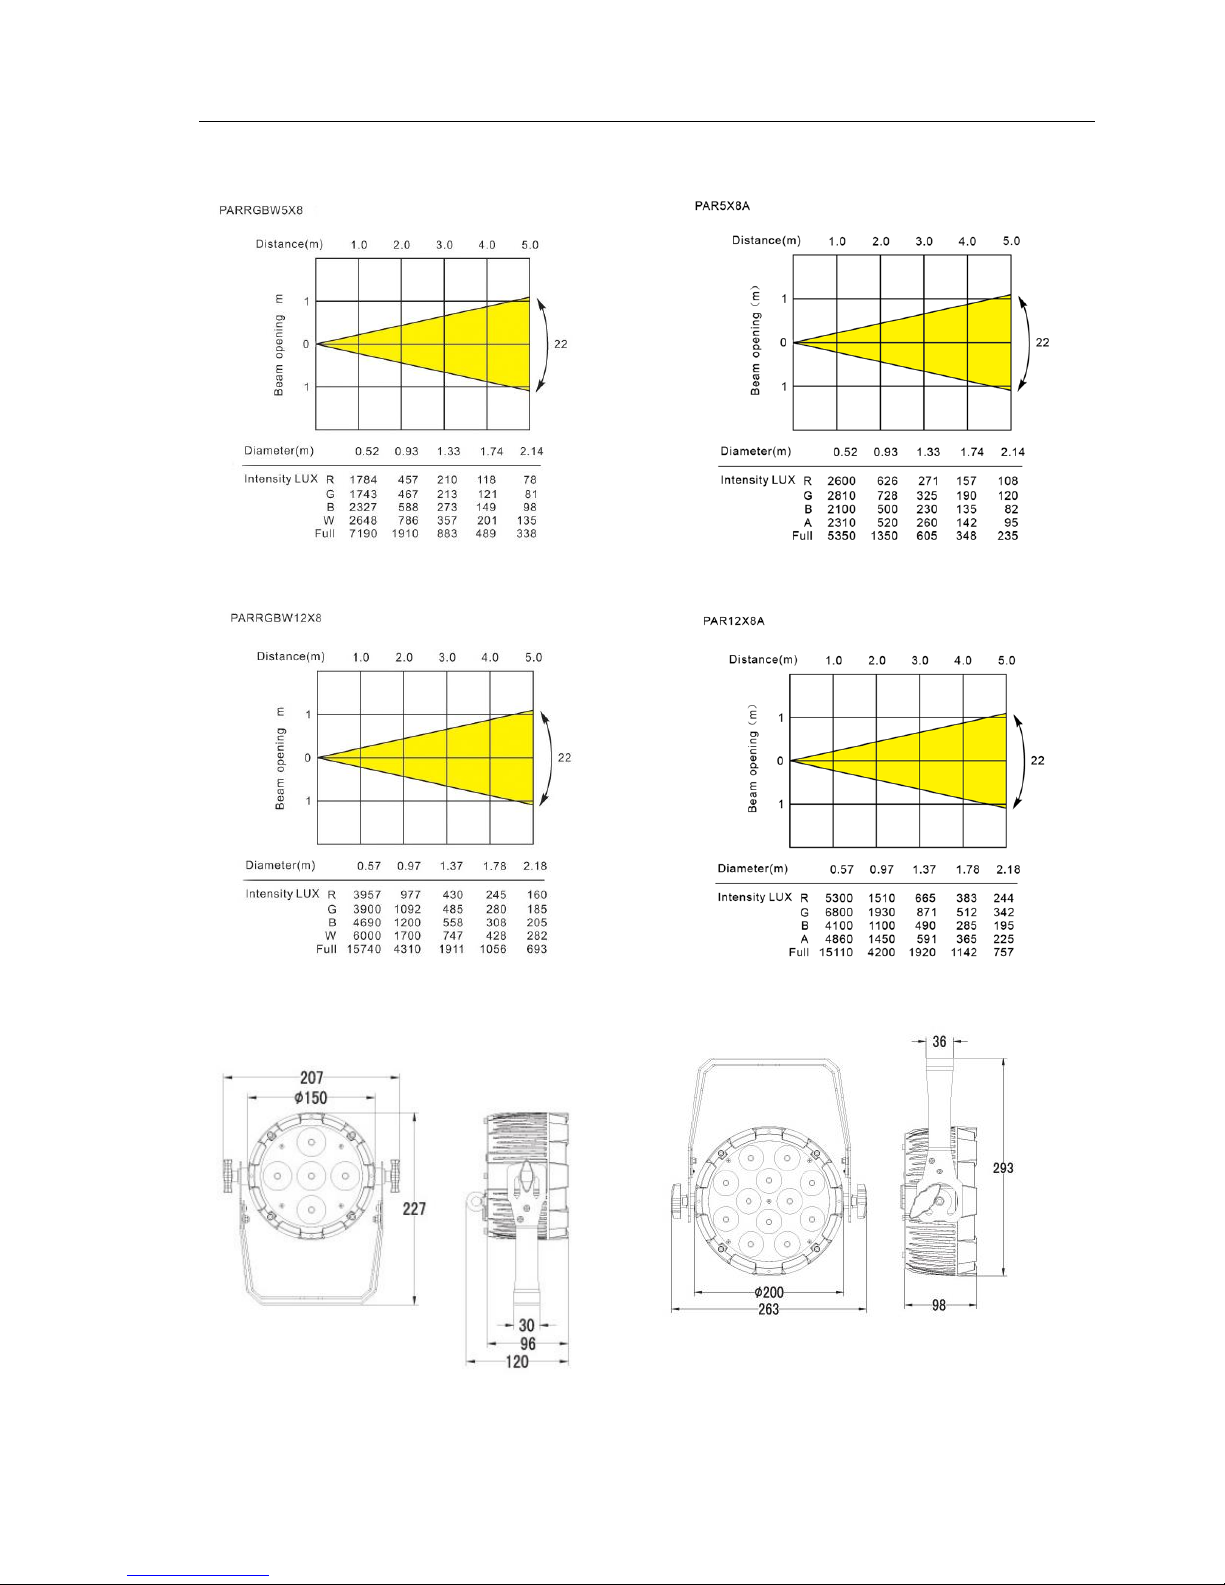
Lux Chart
Dimensions
PAR5 PAR12
Page 5
www.event-lighting.com.au
4
CONTROL BOARD OPERATION
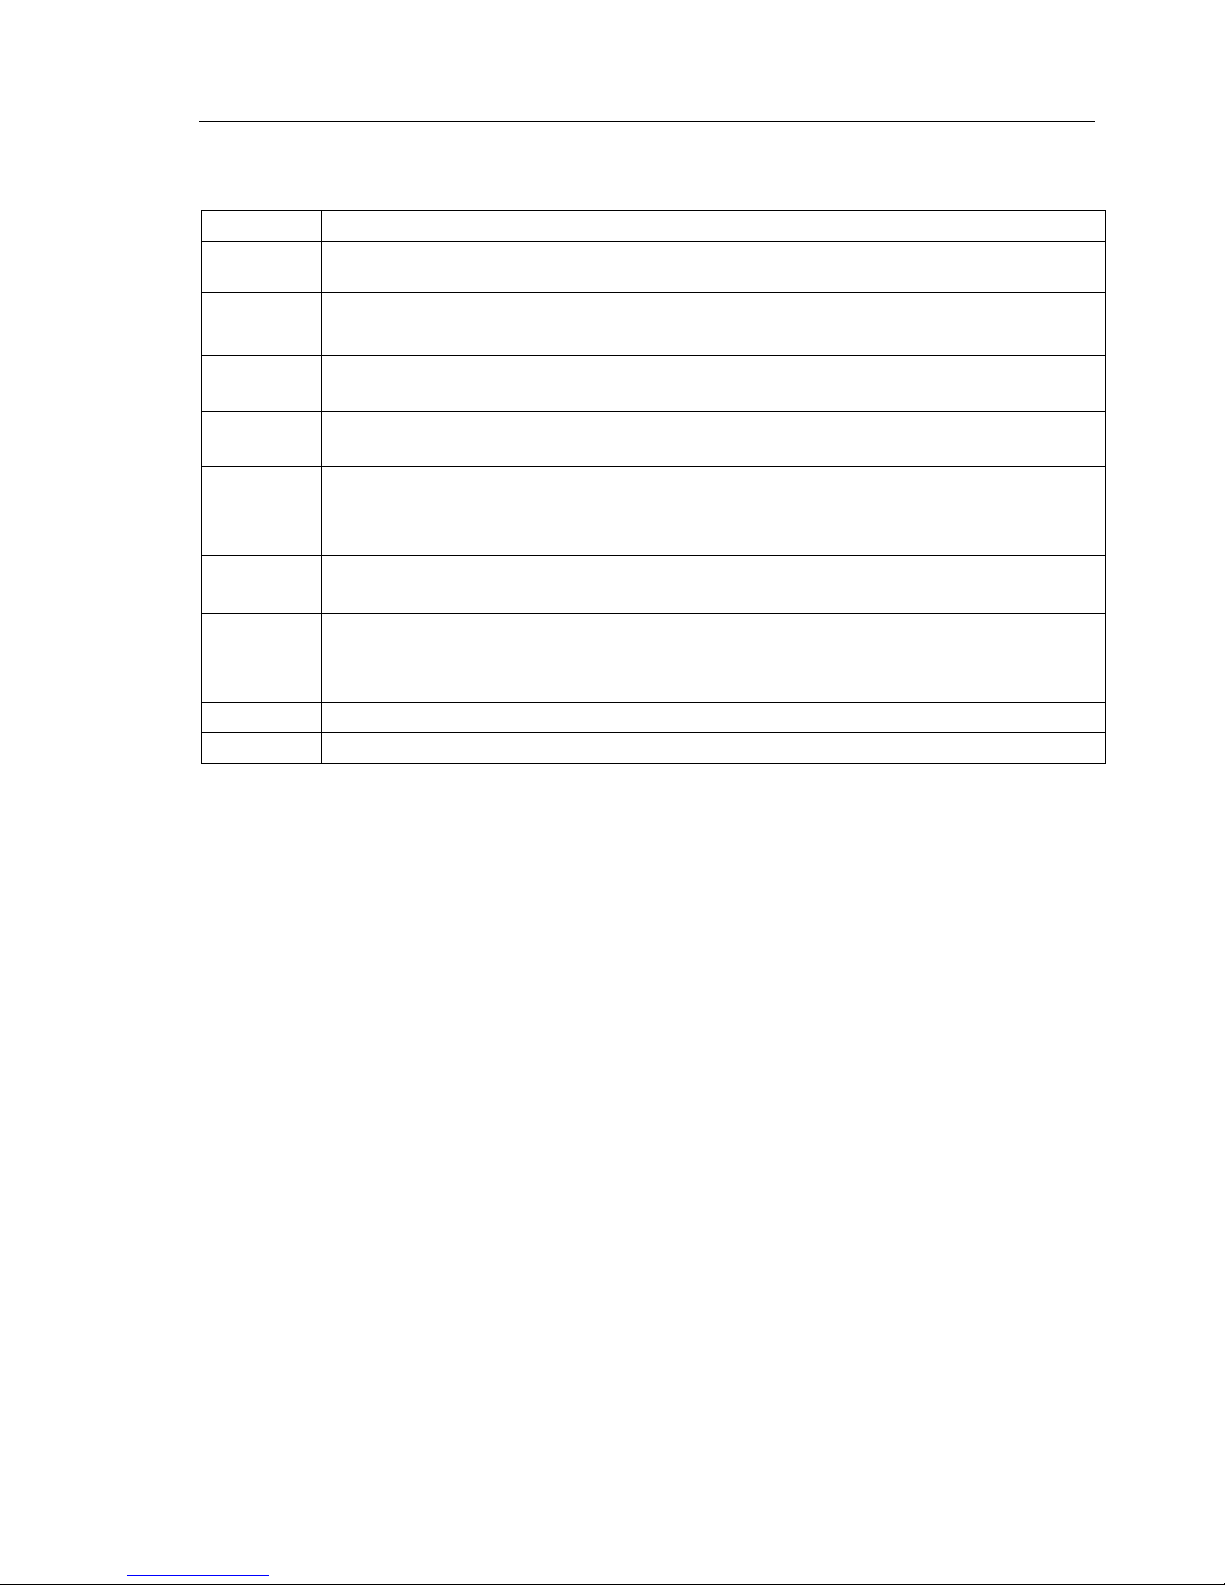
Display
Function
DMX Add
To set DMX address
DMX Cha
To set DMX channel modes: CH10, CH06, CH04, CH03, CH02
Dimmer
To set dimmer curve: 01, 02, 03, 04, 05
Sound
To set sound active mode and the sensitivity (Sen000 ~ Sen100)
Static C
To set static colors: Static Color
RGBW Models - R, G, B, W, GB, RB, RG, RGB, RW, GW, BW, RGW, RBW, GBW, RGBW
RGBA Models - R, G, B, A, GB, RB, RG, RGB, RA, GA, BA, RGA, RBA, GBA, RGBA
Manual C
To set user mode intensity of each colour separately for color mixing and strobe rate
Auto Pro
To set built-in automatic programs (Pr 01 ~ Pr 05) and speed from Sp000 to Sp100
To set sound active mode (Pr 06) and sound sensitivity from Sen000 to Sen100
To set multi fixture chases (Pr 07)
Mas/Sla
To set Master/Slave modes
Reset
To reset factory default setting
DMX Addressing:
After select the "DMX Add" and press “Enter”, use “Up” and “Down” button to select the desired DMX address
press “Enter" to save new setting
DMX Modes
After select the "DMX Cha" and press “Enter”, use “Up” and “Down” button to select the desired DMX mode,
press “Enter" to save new setting
Dimmer Speed Setting:
After select the "Dimmer" and press “Enter”, use “Up” and “Down” button to select the desired dimmer curves,
Sound Mode
Entered “sound” mode, use “Up” and “Down” button to select the sensitivity Sen000-Sen100, press “Enter” to
save new setting
Manual Color Mode
Set intensity of each colour separately to get endless color mixing from the control panel with strobe function.
Entered "Manual C" mode, use “Up” and “Down” button to select the each color (RGBW or RGBA) intensity
from 000 to 255 and strobe (S) speed from S000 to S100. (S000 is freeze and S001 to 100 is from slow to fast)
press “Enter" to save new setting
Page 6
www.event-lighting.com.au
5
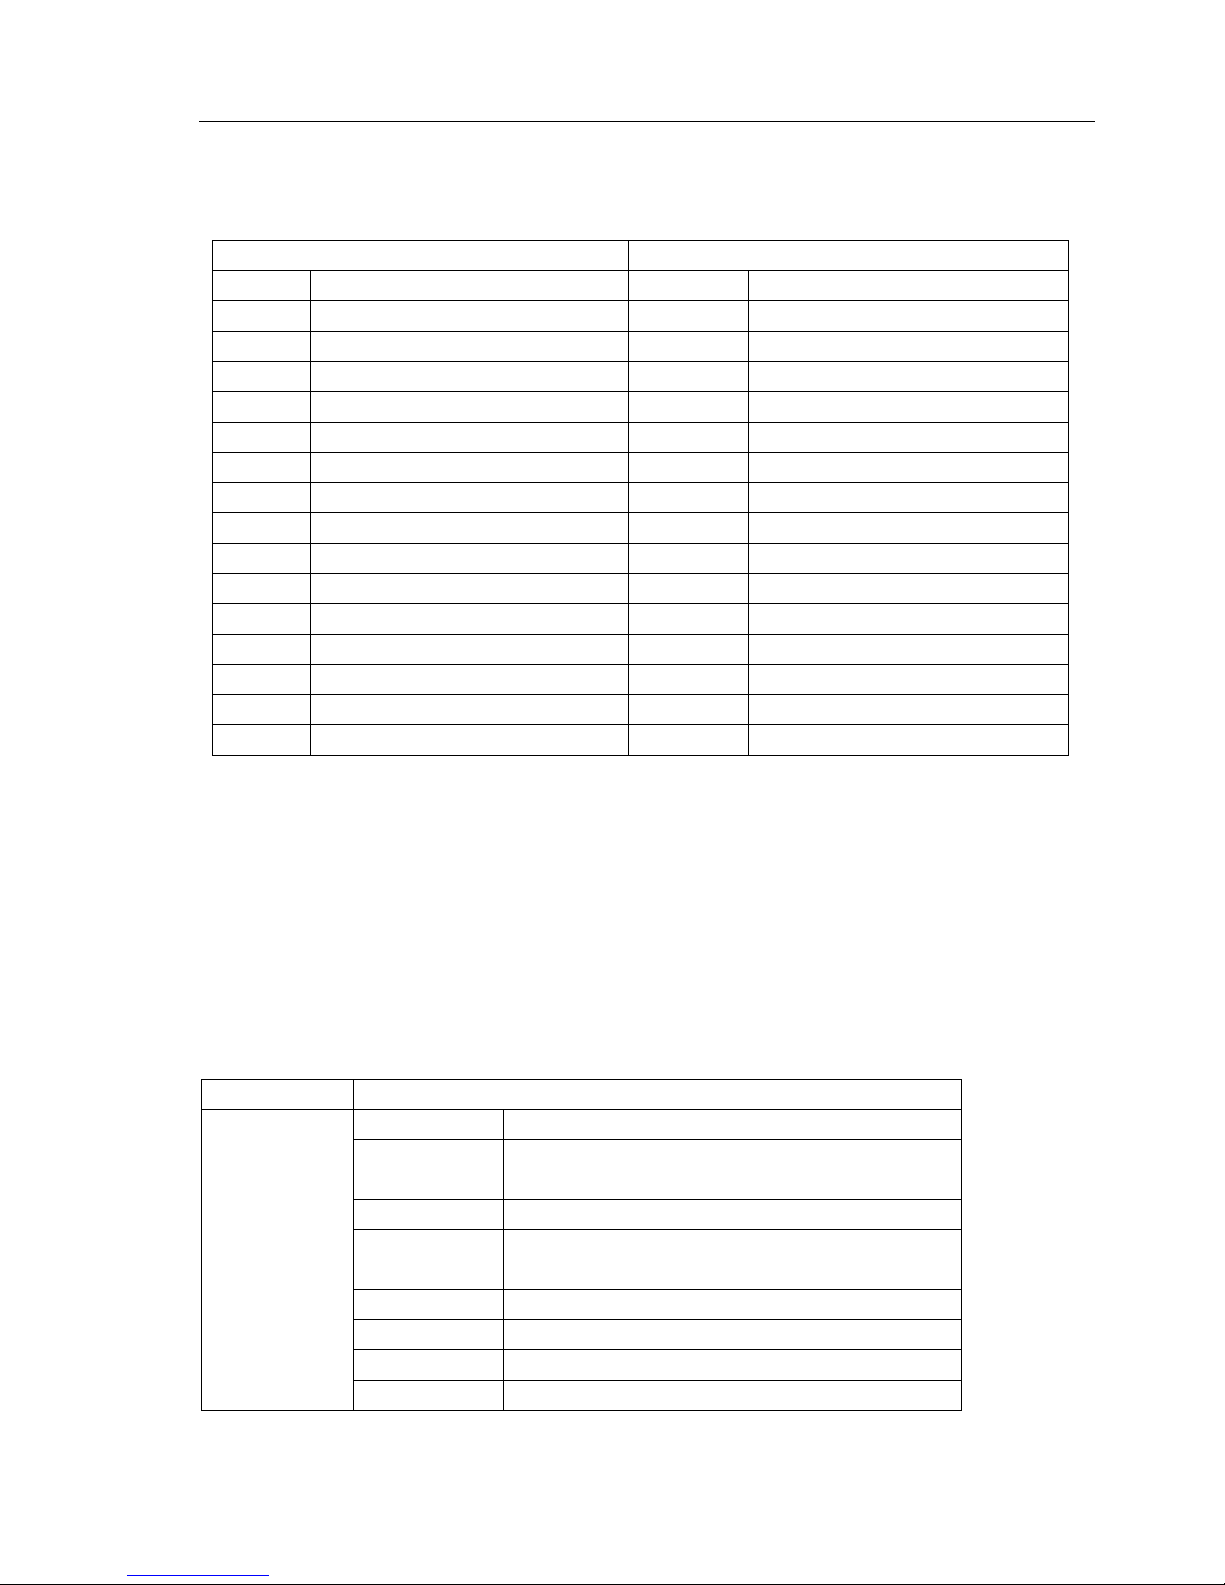
Setting Static Colour
Entered "Static C" mode, you can select the desired solid color via the “UP” or “DOWN” buttons, press “Enter" to
save new setting
8W RGBW LED
8W RGBA LED
Value:
Function:
Value:
Function:
R
Red R Red G Green
G
Green
B
Blue B Blue W White
A
Amber
GB
Green + Blue
GB
Green + Blue
RB
Red + Blue
RB
Red + Blue
RG
Red + Green
RG
Red + Green
RGB
Red + Green + Blue
RGB
Red + Green + Blue
RW
Red + White
RA
Red + Amber
GW
Green + White
GA
Green + Amber
BW
Blue + White
BA
Blue + Amber
RGW
Red + Green + White
RGA
Red + Green + Amber
RBW
Red + Blue + White
RBA
Red + Blue + Amber
GBW
Green + Blue + White
GBA
Green + Blue + Amber
RGBW
Red + Green + Blue + White
RGBA
Red + Green + Blue + Amber
Automatic & Sound Mode
This fixture has 7 built-in programs.
Entered "Auto Pro" mode, use “Up” and “Down” button to select the built-in programs "Pr 01 ~ Pr 07"
then press the "Enter" to confirm.
Use “Up” and “Down” button to select the operating speed of the program (Value:S000 ~ S100, Freeze, Slow ~ Fast),
press “Enter" to save new setting.
Mode:
Auto Program
Value:
Function:
Pr 01
RGBW Model : R G B W colour switching
RGBA Model : R G B A colour switching
Pr 02
15 colour switching
Pr 03
RGBW Model : R G B W colour fading
RGBA Model : R G B A colour fading
Pr 04
15 colour fading
Pr 05
Color Macros Fading
Pr 06
Sound active mode
Pr 07
Multi fixture chases
Page 7
www.event-lighting.com.au
6
To setup sound active mode Pr 06
1. Entered “Auto Pro” mode, use “Up” and “Down” button to select the built-in program “Pr 06”, press “Enter” to
confirm.
2. Use “Up” and “Down” button to select the sensitivity Sen000 ~ Sen100, press “Enter" to save new setting
To setup multi fixture chases Pr 07
Before starting, go to each fixture and reset the menu to fixture defaults.
1. On the master unit, setup the DMX address to the total number of fixtures in the string. For example, you may have
a total of 20 par cans including the master, so the DMX address should be set to “20”.
2. On the master unit, go to master/slave menu setting and set the unit to master
3. On the master unit, set the unit to “Auto Mode” “Pr 07” which supports multi fixture chases.
4. On each slave unit, setup the DMX address to the fixture position in the string. For example, if this unit is the 2nd
unit in the string including the master, then set the DMX address to 2. If this the last unit of 20, then the DMX address
should be set to 20. It is possible to double up fixture positions as well as fixture 1.
5. On each slave, go to the master/slave menu setting and set it to slave.
Master/Slave Operation
1. Set the master fixture to one of the standalone operating modes: automatic, sound, static color or manual color modes
2. Set the slaves, entered "Mas/Sla" mode, set to “S”, press “Enter”
DMX Chart
2 channels Mode
Channel
Value
Function
1
000-255
Warm white to cool white
2
000-255
dimmer 0% ~ 100%
3 channels Mode
Channel
Value
Function
1
000-255
Red: 0% ~ 100%
2
000-255
Green: 0% ~ 100%
3
000-255
Blue: 0% ~ 100%
4 channels Mode
RGBW
Channel
Value
Function
1
000-255
Red: 0% ~ 100%
2
000-255
Green: 0% ~ 100%
3
000-255
Blue: 0% ~ 100%
4
000-255
RGBW Model : White: 0% ~ 100%
RGBA Model : Amber: 0% ~ 100%
Page 8
www.event-lighting.com.au
7
6 channels Mode
RGBW
Channel
Value
Function
1
000-255
Red: 0% ~ 100%
2
000-255
Green: 0% ~ 100%
3
000-255
Blue: 0% ~ 100%
4
000-255
RGBW Model : White: 0% ~ 100%
RGBA Model : Amber: 0% ~ 100%
5
000-255
Master DIMMER 0% ~ 100%
6
000-009
No function
010-019
Sound Active
020-255
Strobe : Slow ~ Fast (1~30Hz)
10 channels Mode
RGBW
Channel
Value
Function
1
000-255
Red: 0% ~ 100%
2
000-255
Green: 0% ~ 100%
3
000-255
Blue: 0% ~ 100%
4
000-255
RGBW Model : White: 0% ~ 100%
RGBA Model : Amber: 0% ~ 100%
5
000-255
Master DIMMER 0% ~ 100%
6
000-009
Strobe OFF
010-255
Strobe (slow-fast 1-30Hz)
7
000-019
No Function
020-039
RED 100% / GREEN 0% ~ 100% / BLUE 0%
040-059
RED 100% ~ 0% / GREEN 100% / BLUE 0%
060-079
RED 0% / GREEN 100% / BLUE 0% ~ 100%
080-099
RED 0% / GREEN 100% ~ 0% / BLUE 100%
100-119
RED 0% ~ 100% / GREEN 0% / BLUE 100%
120-139
RED 100% / GREEN 0% / BLUE 100% ~ 0%
140-159
RED 100% / GREEN 0% ~100% / BLUE 0% ~ 100%
160-179
RED 100%~ 0% / GREEN 100% ~ 0% / BLUE 100%
180-200
RGBW Model :
RED 100% / GREEN 100% / BLUE 100% /WHITE 100%
RGBA Model :
RED 100% / GREEN 100% / BLUE 100% /AMBER 100%
201-204
Color Temperature 1
Warm
205-209
Color Temperature 2
210-214
Color Temperature 3
215-219
Color Temperature 4
220-224
Color Temperature 5
225-229
Color Temperature 6
230-234
Color Temperature 7
Page 9
www.event-lighting.com.au
8
235-239
Color Temperature 8
Cool
240-244
Color Temperature 9
245-249
Color Temperature 10
250-255
Color Temperature 11
8
000-009
No Function
010-049
RGBW Model : R G B W colour switching
RGBA Model : R G B A colour switching
050-090
15 colour switching
091-131
RGBW Model : R G B W colour fading
RGBA Model : R G B A colour fading
132-172
15 colour fading
173-213
Color Macros Fading
214-255
Sound active mode
9
000-255
Speed of auto programs (slow ~ fast) or sound sensitivity
10
000-009
Use dimmer curve from setting of control board
010-057
16 bits Linear dimmer 1
058-106
16 bits Non-linear dimmer 2
107-155
16 bits Non-linear dimmer 3
156-204
16 bits Non-linear dimmer 4
205-255
8 bits Linear dimmer 5
TECHNICAL SPECIFICATIONS
Model
PARRGBW5X8
PAR5X8A
PARRGBW12X8
PAR12X8A
Dimensions and Weight
Overall size LxWxH (mm)
207x227x120
263x293x98
Weight (kg)
1.9
3.2
Power
Power Supply
100~240V AC, 50/60 Hz
Power Consumption (w)
40
98
Fuse
T 1 A, 250 V
T 2 A, 250 V
LED
5pcs 8W RGBW
5pcs 8W RGBA
12pcs 8W RGBW
12pcs 8W RGBA
Operation Modes
DMX, auto run, sound active, master/slave, manual colour control, static colour control
Beam Angle
22°
Refresh Rate
2940Hz
DMX Channel mode
2, 3, 4, 6, 10
Power Input
IEC
Power Output
No
IEC
WARRANTY
Please refer to your local dealer or please contact Event Lighting Pty Ltd
Website: www.event-lighting.com.au
 Loading...