

Page 1
1
SPOT MOVING HEAD
M1B60W
USER MANUAL
For safety, please read this user manual carefully before initial use.
Event Lighting reserves the right to revise the manual at any time. Information and specifications within this manual are subject to
change without notice. Event Lighting assumes no liability or responsibility for any errors or omissions. Please consult Event Lighting
for any clarification or information regarding this item.
www.event-lighting.com.au
V1.1
Page 2

2
Safety Instructions
WARNING
• Do not open this device, there is no user-serviceable parts inside. Risk of electric shock.
• Do not look at the light source when the device is on.
• CAUTION: This unit's housing may be hot during and after operation.
• Install this device in a location with adequate ventilation, at least 20 inch (50 cm) from adjacent surfaces.
• Do not leave any flammable material within 50 cm of this unit while operating or connected to power.
• Use a safety chain when mounting this device overhead.
• Do not operate this device outdoors or in any location where dust, excessive heat, water, or humidity may affect it.
• Do not operate this device if the housing, lenses, or cables appear damaged.
• Do not connect this device to a dimmer or rheostat.
• ONLY connect this device to a grounded and protected circuit.
• ONLY use the hanging bracket to carry this device.
• In case of a serious operating problem, stop using immediately.
• The maximum ambient temperature is 104° F (40° C). Do not operate this device at higher temperatures.
Power Input & Power Linking
This device has an auto-switching power supply work with input voltage range of 100~240 VAC, 50/60 Hz.
Link up to the maximum 8A. DO NOT exceed this.
Fuse Replacement
If the fine-wire fuse of the device fuses, only replace the fuse by a fuse of same type and rating.
Before replacing the fuse, unplug mains lead.
Procedure:
Step 1: Unscrew the fuse holder on the rear panel with a fitting screwdriver from the housing (anticlockwise).
Step 2: Remove the old fuse from the fuse holder.
Step 3: Install the new fuse in the fuse holder.
Step 4: Replace the fuse holder in the housing and fix it.
Product Installation
This device can be mounted in many orientations provided each
individual device is secured by the use of correct mounting bracket.
Use a safety chain when mounting this device overhead.
Page 3

3
Product appearance, LUX chart, Dimensions
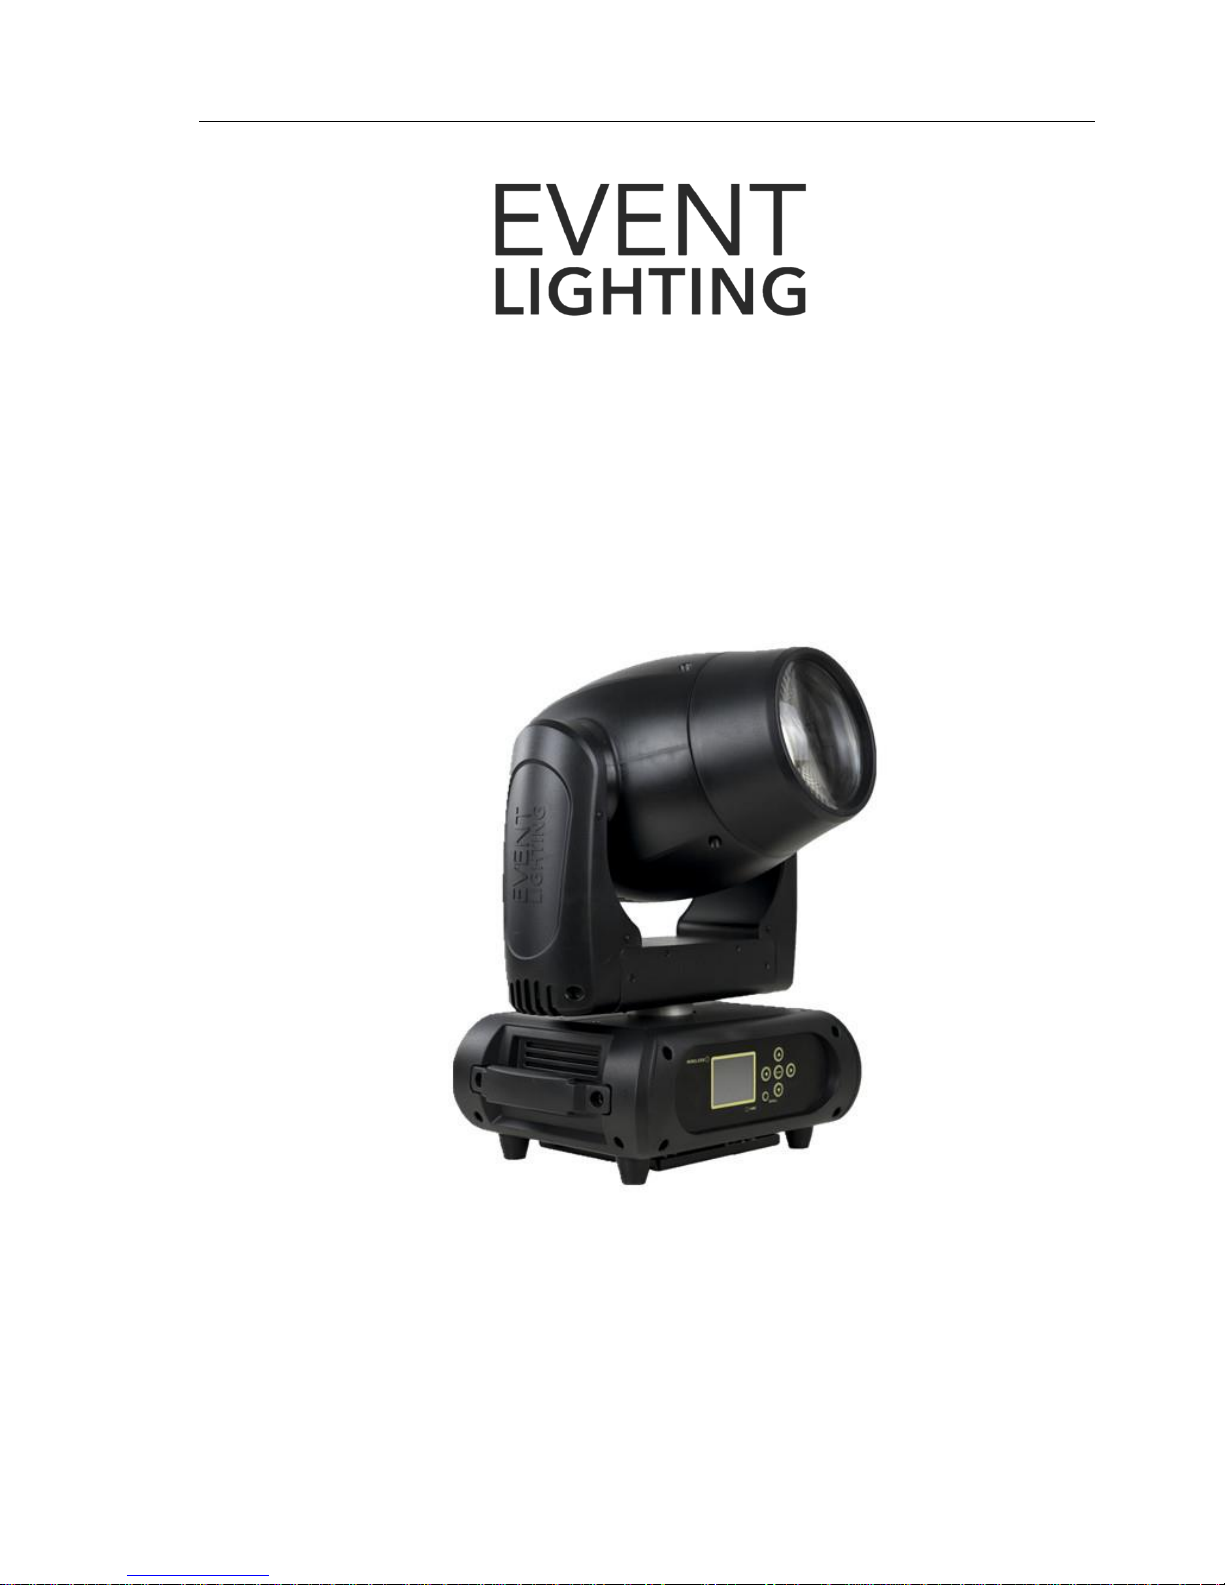
1. Project lens
2. Head
3. Arm
4. Base
5. Display
6. Foot stand
7. Operation button
8. Handle
9. Wireless indicator
10. Mic
11. Left button
12. Battery indicator
13. Up button
14. Down button
15. Enter button
16. Right button
17. 3-pin DMX in
18. 3-pin DMX out
19. Powercon in
20. Powercon out
21. Fuse
22. Power switch
Page 4
4
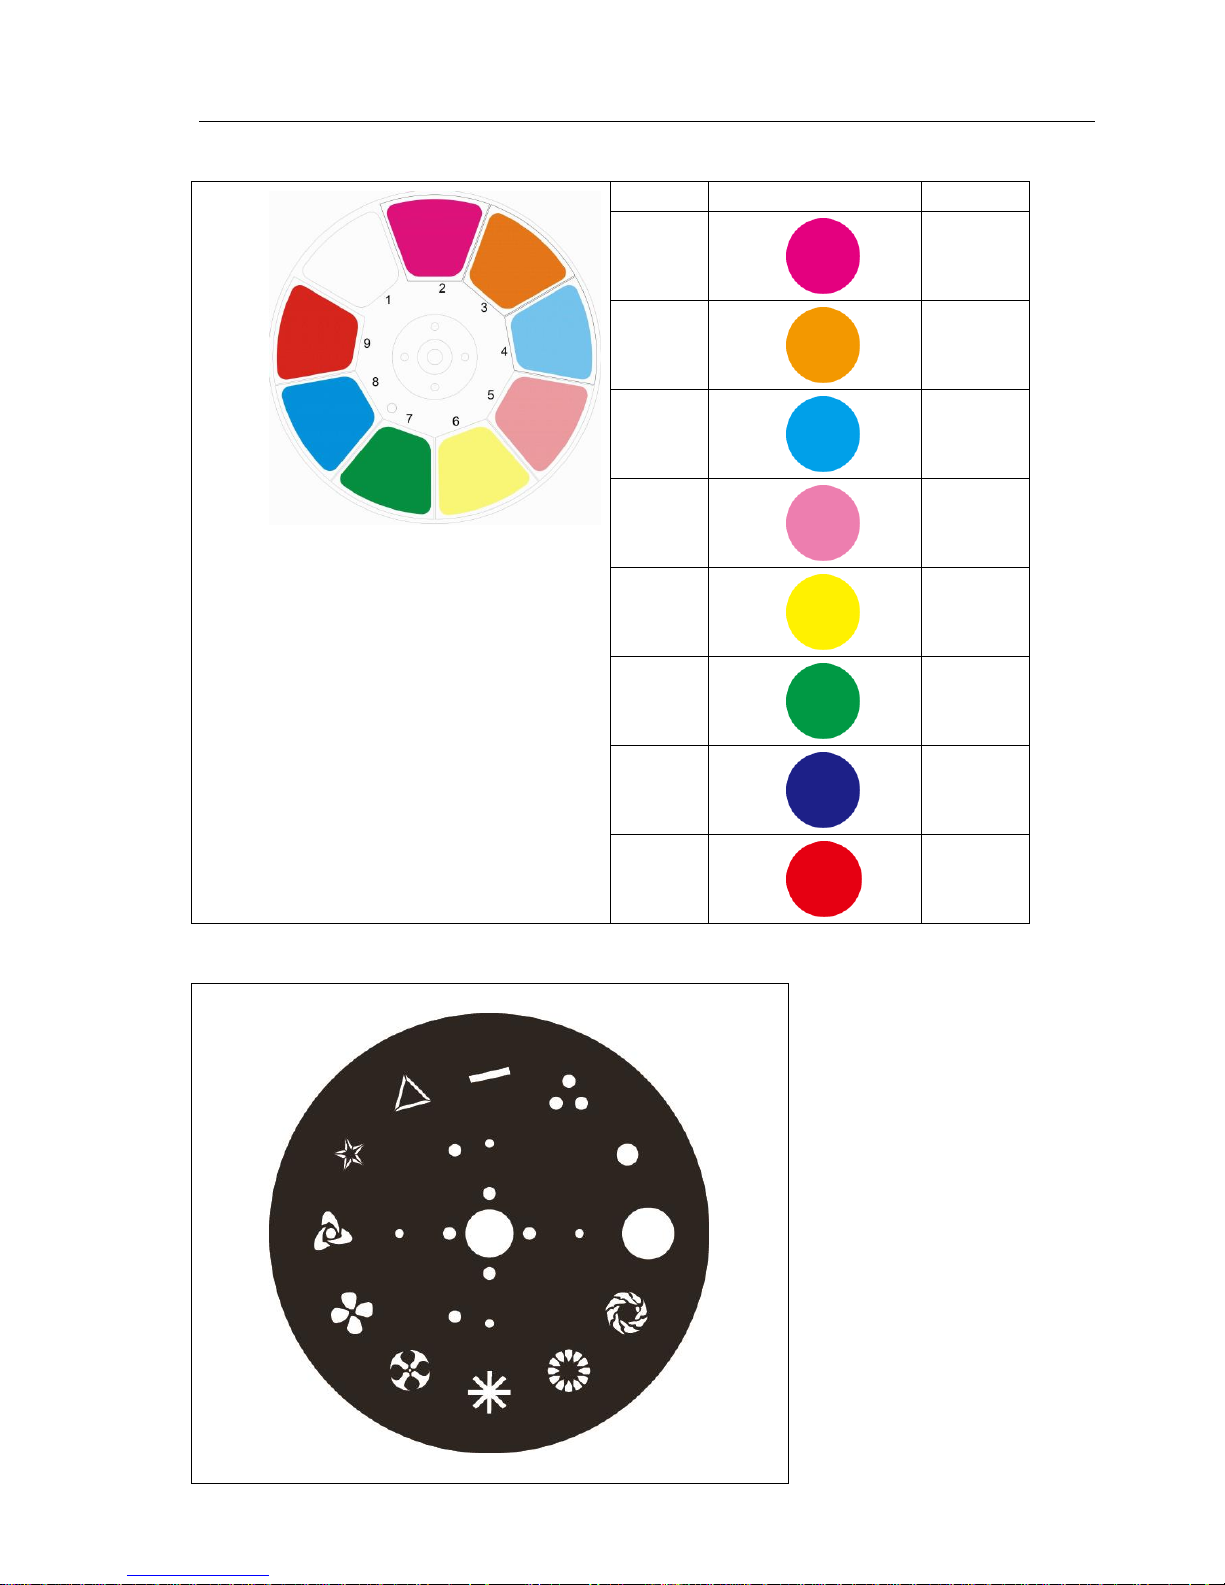
Colour wheel
1
Open
2
Magenta
3
Orange
4
Sky blue
5
Pink
6
Yellow
7
Green
8
Blue
9
Red
Gobo wheel
Page 5
5
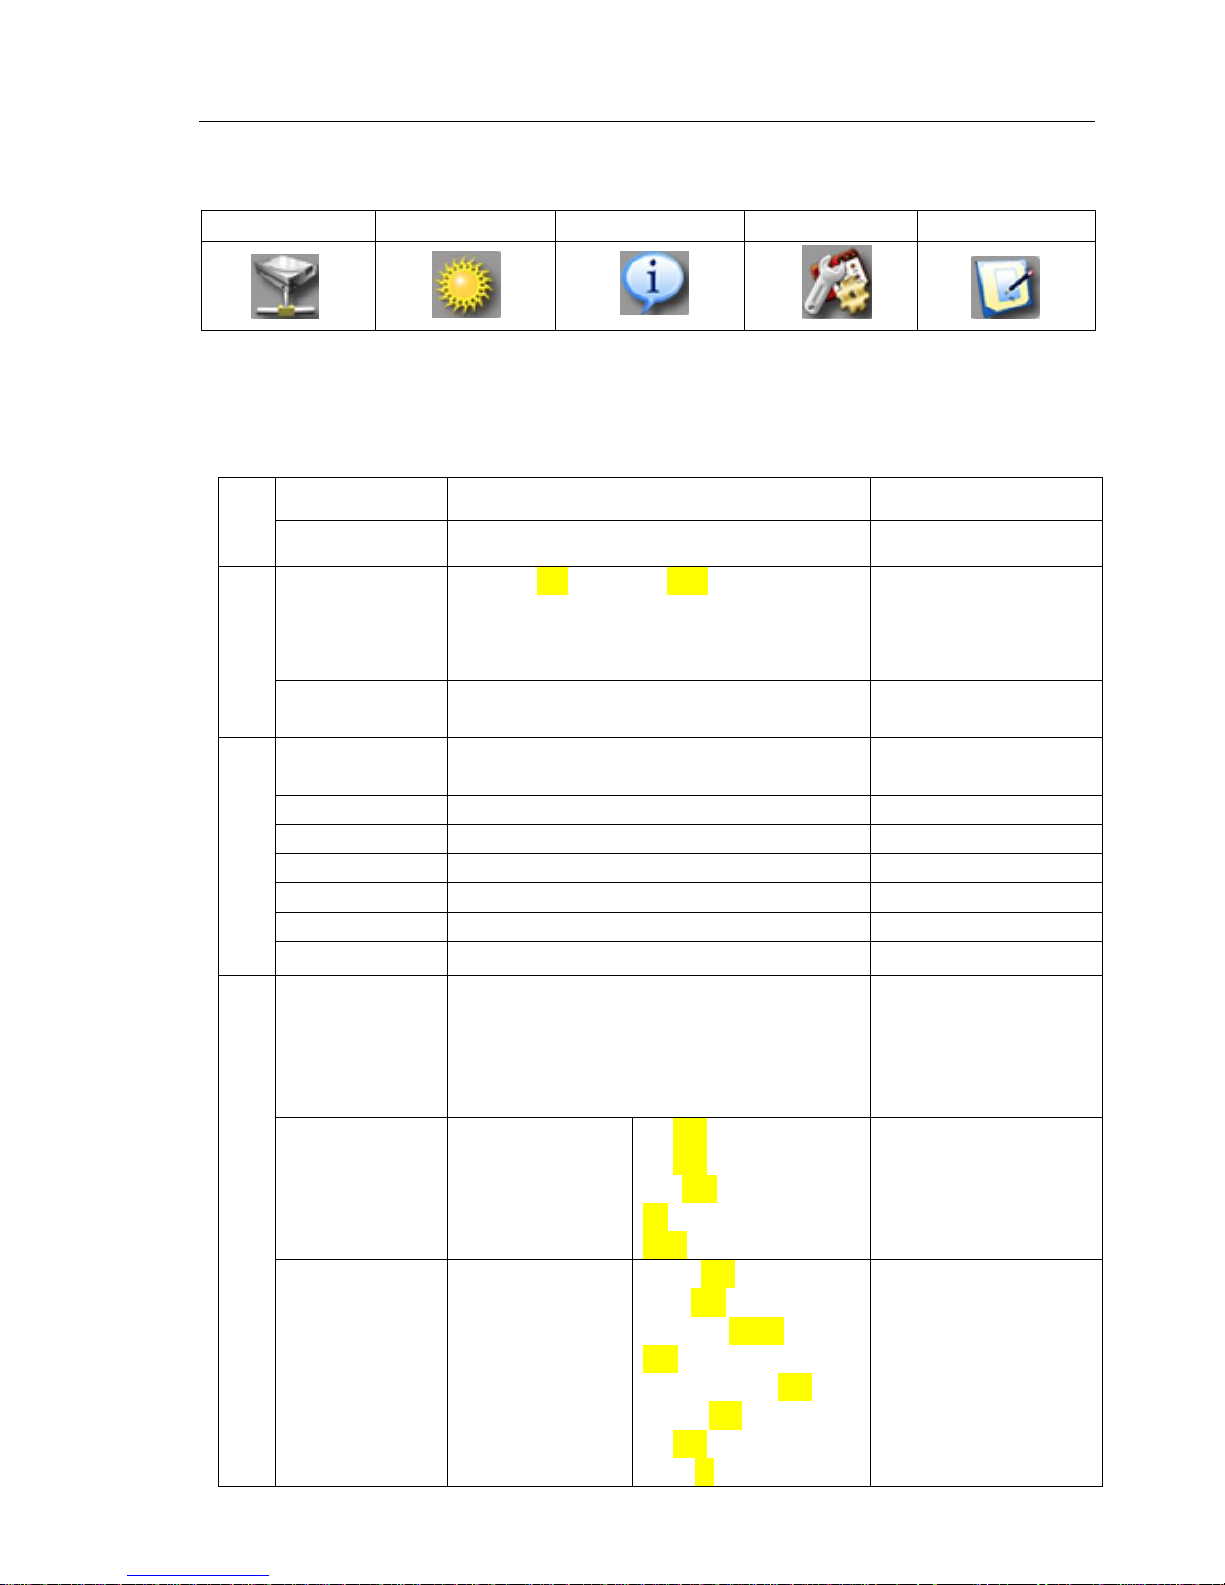
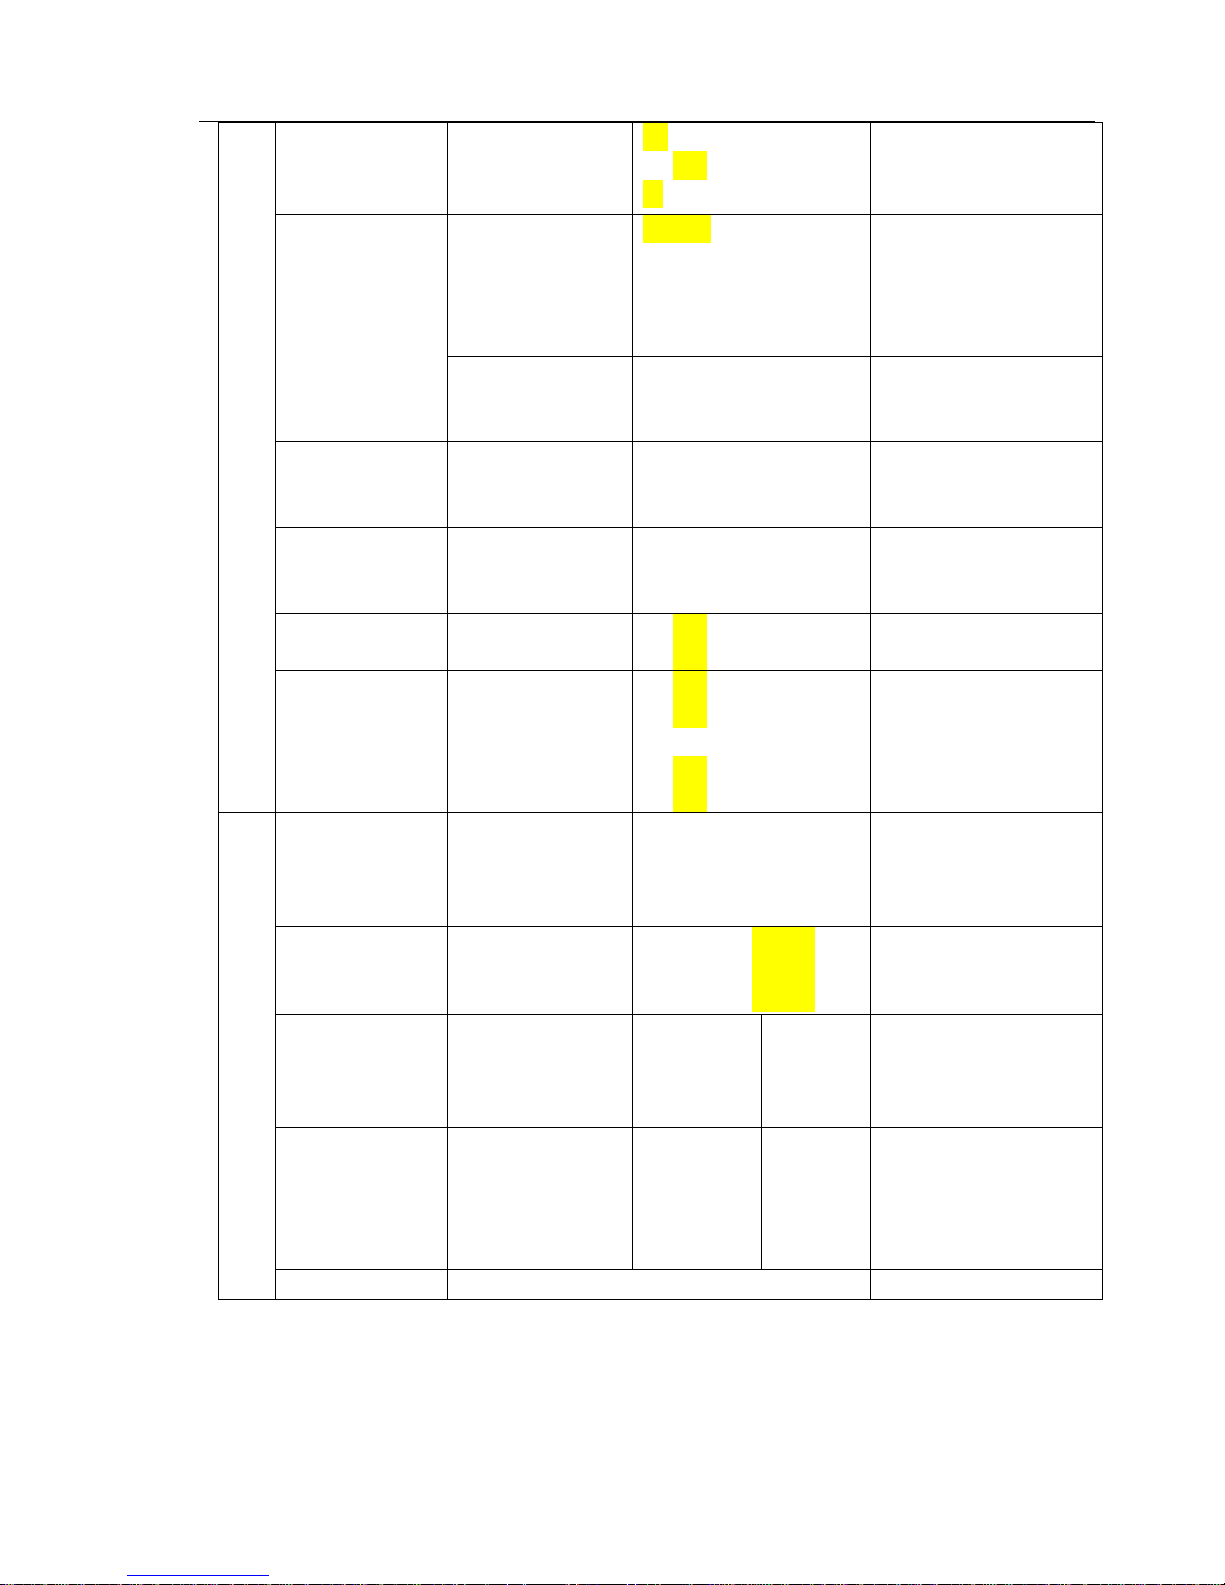
Menu operation
Description of icons in the menu
CONNECT
LIGHT
INFOMATION
SET
PROGRAM
Menu
Default setting shadowed. Mark with ①can be basic reloaded, ② be program reloaded, ③can be private reloaded.
CONNECT
DMX Address①
XXX
DMX address setting
Wireless①
Wireless Enabled
LIGHT
Max Temperature①
80~139℃, 80℃ (176~282℉, 176℉)
Lamp will switch off when
temperature continuously
over max temperature for
5 minutes
Lamp Adjust①
Adjust value of each
channels
INFORMATION
Time Info.
Current XXXX(Hours)
Fixture Life XXXX(Hours)
Fixture boot time
Fixture total run time
Temperature
Near Lamp Temp (depends on fixture)
Temperature Sensors
Fans Speed
Near Lamp Fan (depends on fixture)
Fan speed Sensors
Channel Value
Display value of channel
Error Message
Error channels
Fixture Model
M1S150W
Display brand and model
Software Ver
1U01 V1.0.00
Version of each IC
SET
Reset
All
Pan&Tilt
Colors
Gobos
Others
Reset all
Reset Pan&Tilt
Reset Colors
Reset Gobos
Reset Others
Movement
Pan Reverse①
Tilt Reverse①
Pan Degree①
Encoders①
Pan/Tilt Mode①
ON/OFF
ON/OFF
630°/540°
ON/OFF
Stand/Smooth
Pan Reverse
Tilt Reverse
Choose Pan Degree
Encoder wheel on/off
Choose pan/tilt mode
UI Set
Mic Sens. ③
No Signal①
Temperature. C/F①
Fans Mode①
Hibernation①
Backlight①
Flip Display①
Display Bright③
0~99%,60%
Close/Hold/Auto/Music
Fahrenheit/Celsius
Auto / High Speed
OFF, 01M~99M,15M
02~60m 02m
ON/OFF
00~31 10
Sensitivity of Mic
Mode when no signal
Temperature at ℃/℉
Fans mode
Sleeping mode
Show backlight time
Display 180°reverse
Display Brightness
Page 6
6
Brand Show①
Key Lock①
Language①
ON/OFF
ON/OFF
En/简/繁/Fr/Sp
Show brand or not
Key lock on/off
Language Select
Users
User Mode①
Standard
Extended
Basic-8bit
Basic-16bit
User
Standard mode
Extended mode
Basic mode-8bit
Basic mode-16bit
User program mode
Edit User③
Max Channel = XX
PAN = CH01
:
Edit users mode
Calibration③
-PasswordColor
:
=XXX
=XXX
:
Password: 050
Calibrate channel value
Fixture ID③
Name
-PasswordPID Code
Name
Password: 050
Set PID of RDM
Wireless Set①
DMX On Cable
Reset Connect
ON/OFF
ON/OFF
DMX Send Out
Reset Connect
Reload Default
Basic Reload(①)
Program Reload(②)
---Password--Private Reload(③)
All Reload
ON/OFF
ON/OFF
XXX
ON/OFF
ON/OFF
Basic Reload
Program Reload
Password: 050
Private Reload
All Reload
PROGRAM
Play①
DMX Receive
Slave Receive
Sequence
Music
Slave Receive 1,2,3
Master / Alone
Master / Alone
DMX Receive
Choose slave position
Run Sequence
Music mode
Select Chase②
Chase Part 1
Chase Part 2
Chase Part 3
Chase 1 ~ 8 Chase 1
Chase 1 ~ 8 Chase 2
Chase 1 ~ 8 Chase 3
Select and run auto
program
Edit Chase②
Chase 1
:
:
Chase 8
Chase Test
Step 01
:
Step 64
=SCxxx
:
=SCxxx
Test
Beginning scene
:
Ending scene
Edit Scenes②
Edit Scene 001
~ Edit Scene 250
Pan,Tilt,……
Fade Time-Secne Time-DMX Input
=xxx
=xxx
=xxx
Input manual scene
Modify manually fading time
Modify manually scene time
Input scene from exterior
controller
Scenes Record
ScXX=>ScXX
Auto Input scenes
Page 7
7
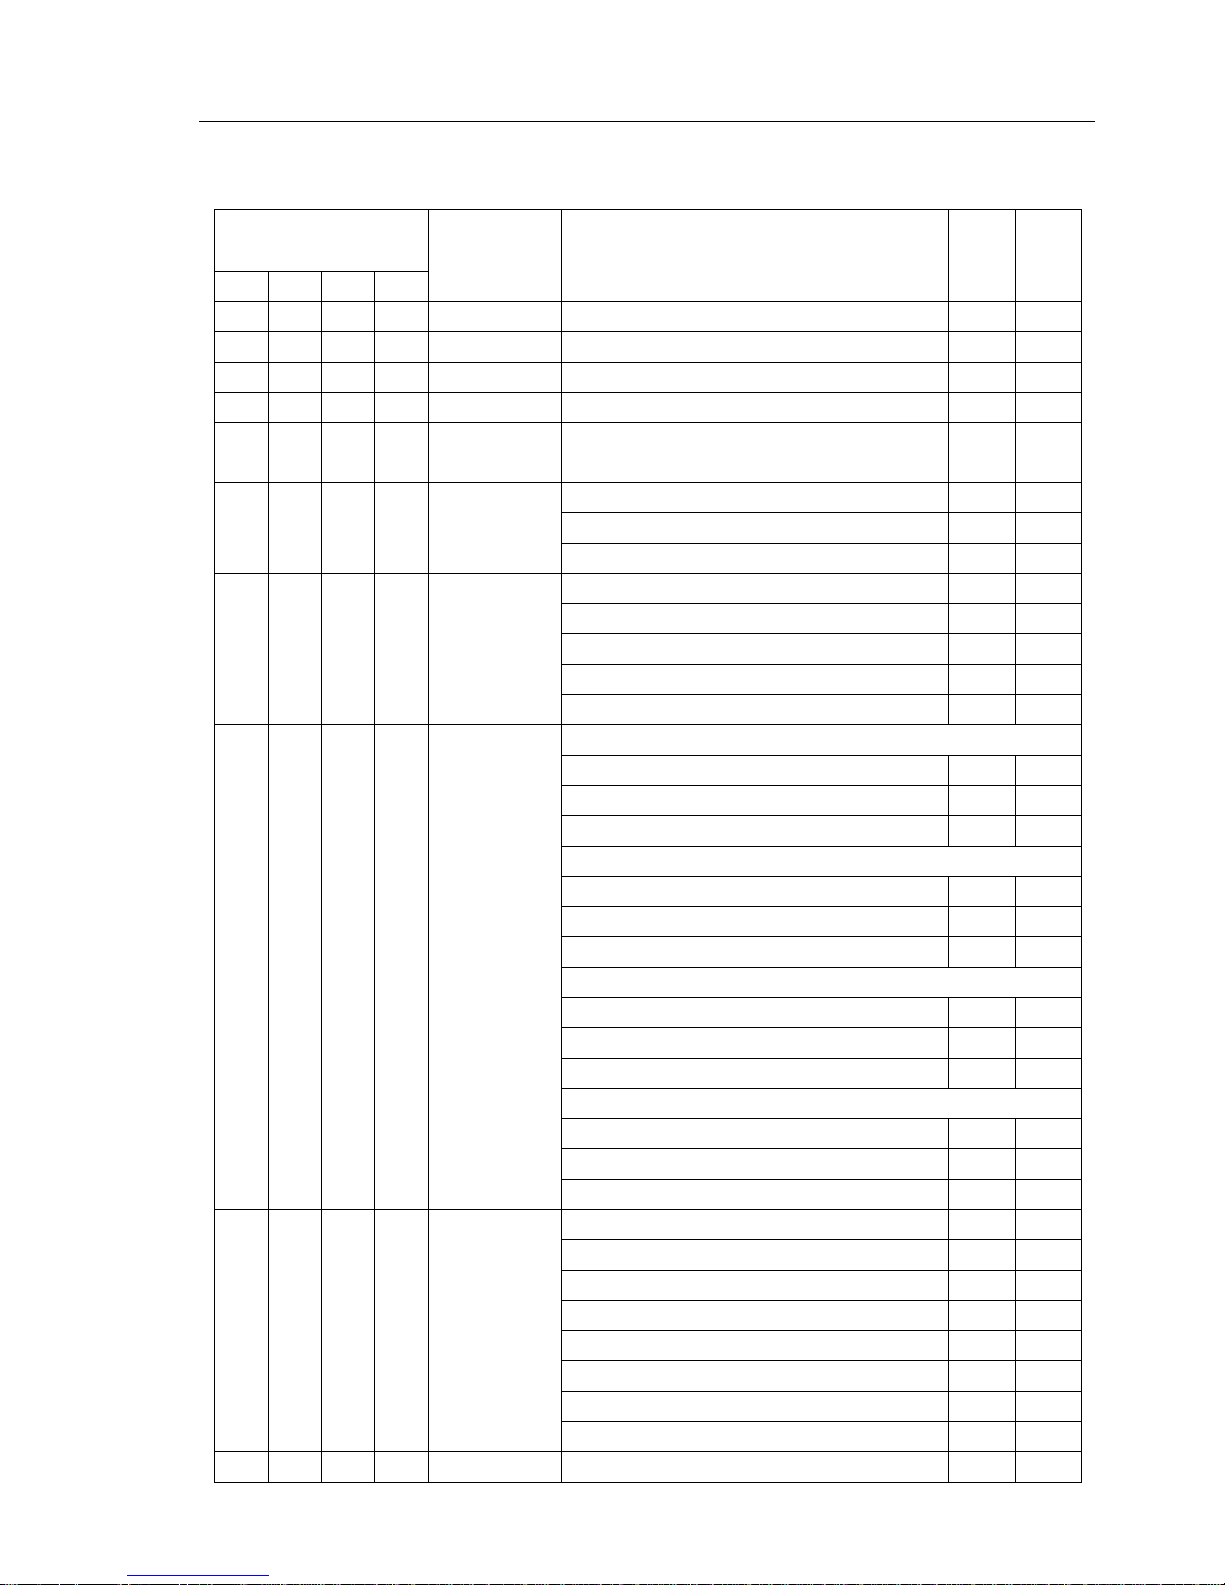
DMX Chart
Channel
name
function
Min
DMX
Max
DMX
St
Ex
Ba1
Ba2 1 1 1 1
Pan
Pan Coarse
0
255
2 2 Pan fine
Pan Fine
0
255 2 3 2 3
Tilt
Tilt Coarse
0
255
4 4 Tilt fine
Tilt Fine
0
255
3 5 3
5
Movement
Speed
fastest to Slowest
0
255
6
Movement
Function
Normal
0
15
Movement With Blackout
16
31
TBD
32
255
4 7
Shutter
Function
Normal Shutter Functions
0
15
Pulse-effect Forward
16
31
Pulse-effect Reverse
32
47
Random Strobe
48
63
TBD
64
255
5 8
Shutter
Normal Shutter Functions
Close 0 31
Strobe Rate (slow to fast)
32
223
Open
224
255
Pulse-effect Forward
Close 0 31
Strobe Rate (slow to fast)
32
223
Open
224
255
Pulse-effect Reverse
Close 0 31
Strobe Rate (slow to fast)
32
223
Open
224
255
Random Strobe
Close 0 31
Strobe Rate (slow to fast)
32
223
Open
224
255
4 6
Shutter
Shutter closed
0
31
No function (shutter open)
32
63
Strobe effect slow to fast
64
95
No function (shutter open)
96
127
Pulse-effect in sequences
128
159
No function (shutter open)
160
191
Random strobe effect slow to fast
192
223
No function (shutter open)
224
255 6 9 5 7
Dimmer
Dimmer(Close to Open)
0
255
Page 8
8
7
10
Color Function
Indexed
0
15
Indexed With Blackout
16
31
Forward Spin
32
47
Reverse Spin
48
63
Continuous
64
79
Color Bounce
80
111
TBD
112
255
8
11
Color
Indexed & Indexed With Blackout
Position 1 (Open)
0
28
Position 2 ~ Position 9
29
255
Forward Spin Stop to fastest
0
255
Reverse Spin Stop to fastest
0
255
Continuous Positioning from 0-360 degrees
0
255
Color Bounce
Position 1 (Open)
0
13
Position 2 ~ Position 18
14
255
6 8
Color
Indexed
Position 1 (Open)
0 5 Position 2 ~ Position 9
6
53
Indexed With Blackout
Position 1 (Open)
54
59
Position 2 ~ Position 9
60
107
Indexed With Bounce
Position 1
107
119
Position 2 ~ Position 9
120
223
Forward Wheel Spin
Stop to fastest
224
239
Reverse Wheel Spin
Stop to fastest
240
255
9
12
Gobo Function
Indexed
0
15
Indexed With Blackout
16
31
Forward Spin
32
47
Reverse Spin
48
63
Continuous
64
79
Shake
80
95
TBD
96
255
10
13
Gobo
Indexed & Indexed With Blackout & Shake
Position 1 (Open)
0
21
Position 2 ~ Position 12
22
255
Forward Wheel Spin
Stop to fastest
0
255
Reverse Wheel Spin
Stop to fastest
0
255
Continuous
Positioning from 0-360 degrees
0
255
Page 9
9
7 9
Gobo
Indexed
Position 1 (Open)
0
10
Position 2 ~ Position 12
11
54
Indexed With Blackout
Position 1 (Open)
55
58
Position 2 ~ Position 12
59
102
Indexed With Shake
Position 2
103
113
Position 3 ~ Position 12
114
223
Forward Wheel Spin
Stop to fastest
224
239
Reverse Wheel Spin
Stop to fastest
240
255
11
14 8 10
Prism
Indexed & Indexed With Blackout
Position 1 (Open)
0
63
Position 2
64
127
Position 3
128
191
Position 4
192
255
12
15 9 11
Prism Rot
Forward Spin
Stop to fastest
0
127
Reverse Spin
Stop to fastest
128
255
13
16
10
12
Control
Normal
0 7 Reset All
8
15
Pan & Tilt Reset
16
23
Color Reset
24
31
Gobo Reset
32
39
TBD
40
47
Other Reset
48
55
Display Off
56
63
Display On
64
71
TBD
72
79
TBD
80
87
Hibernation
88
95
TBD
96
255
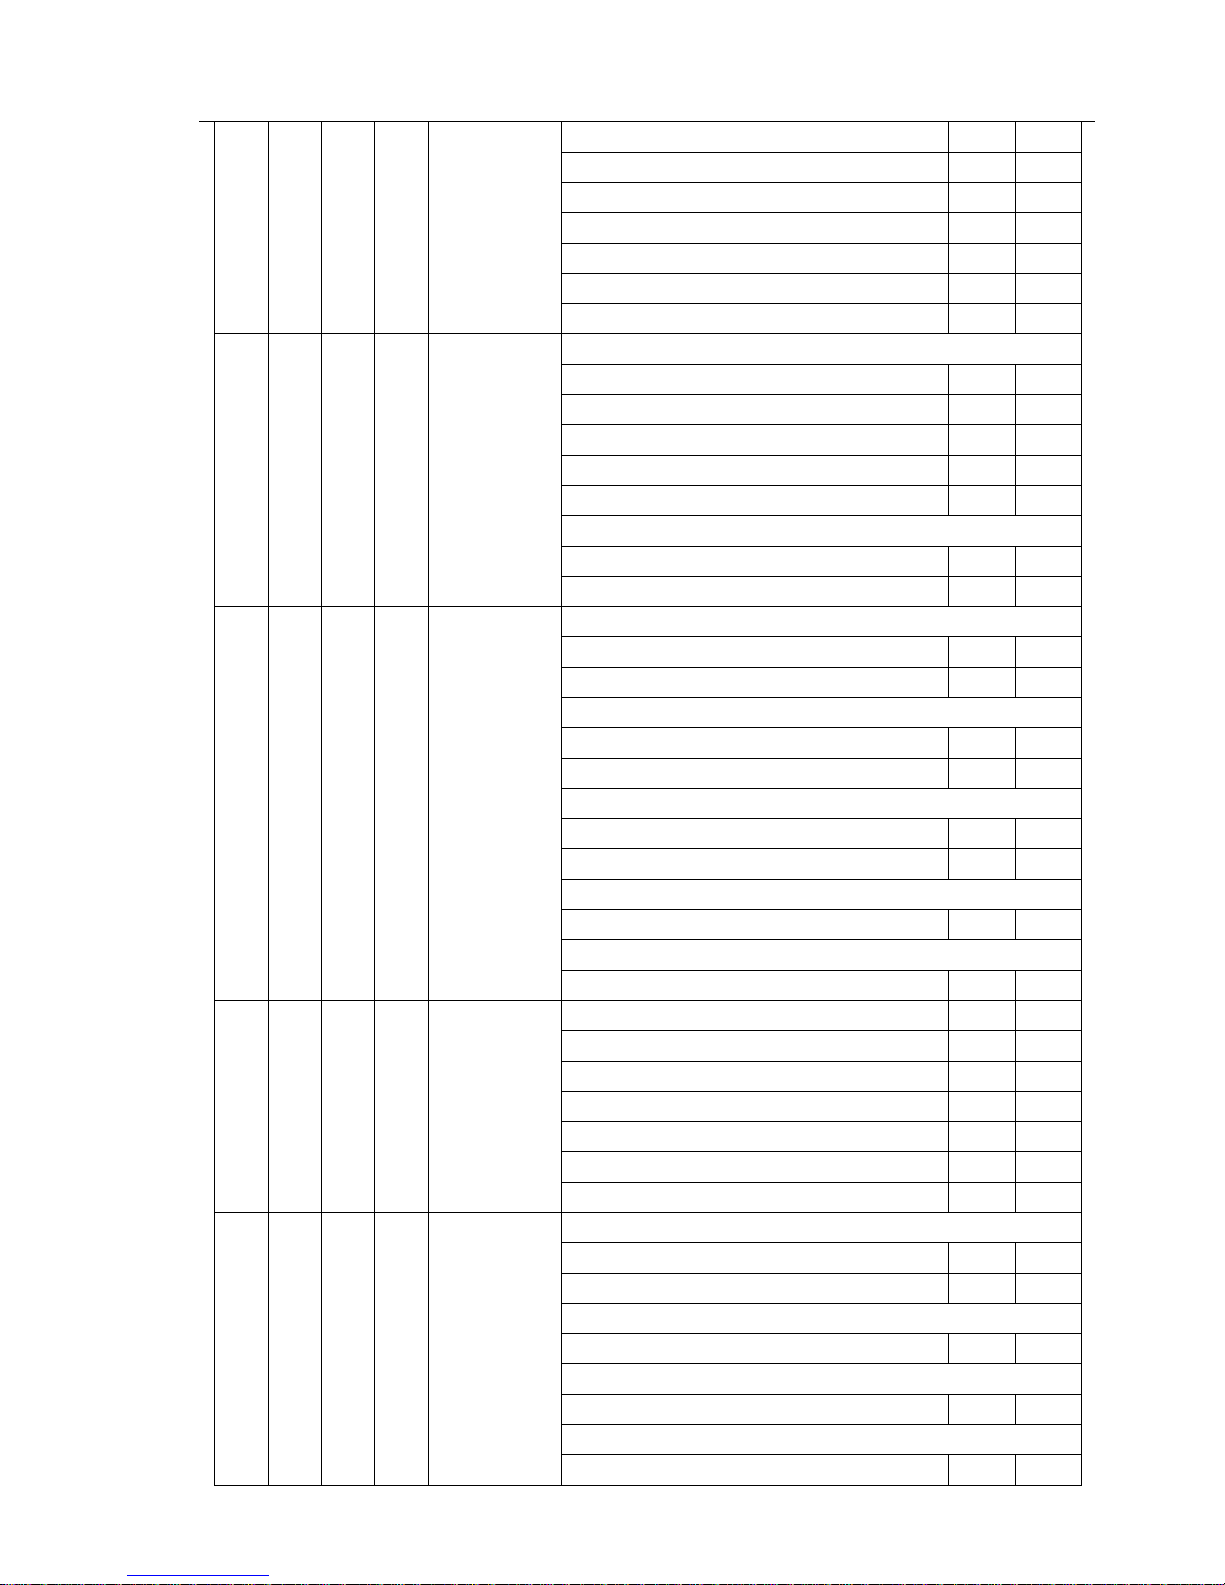
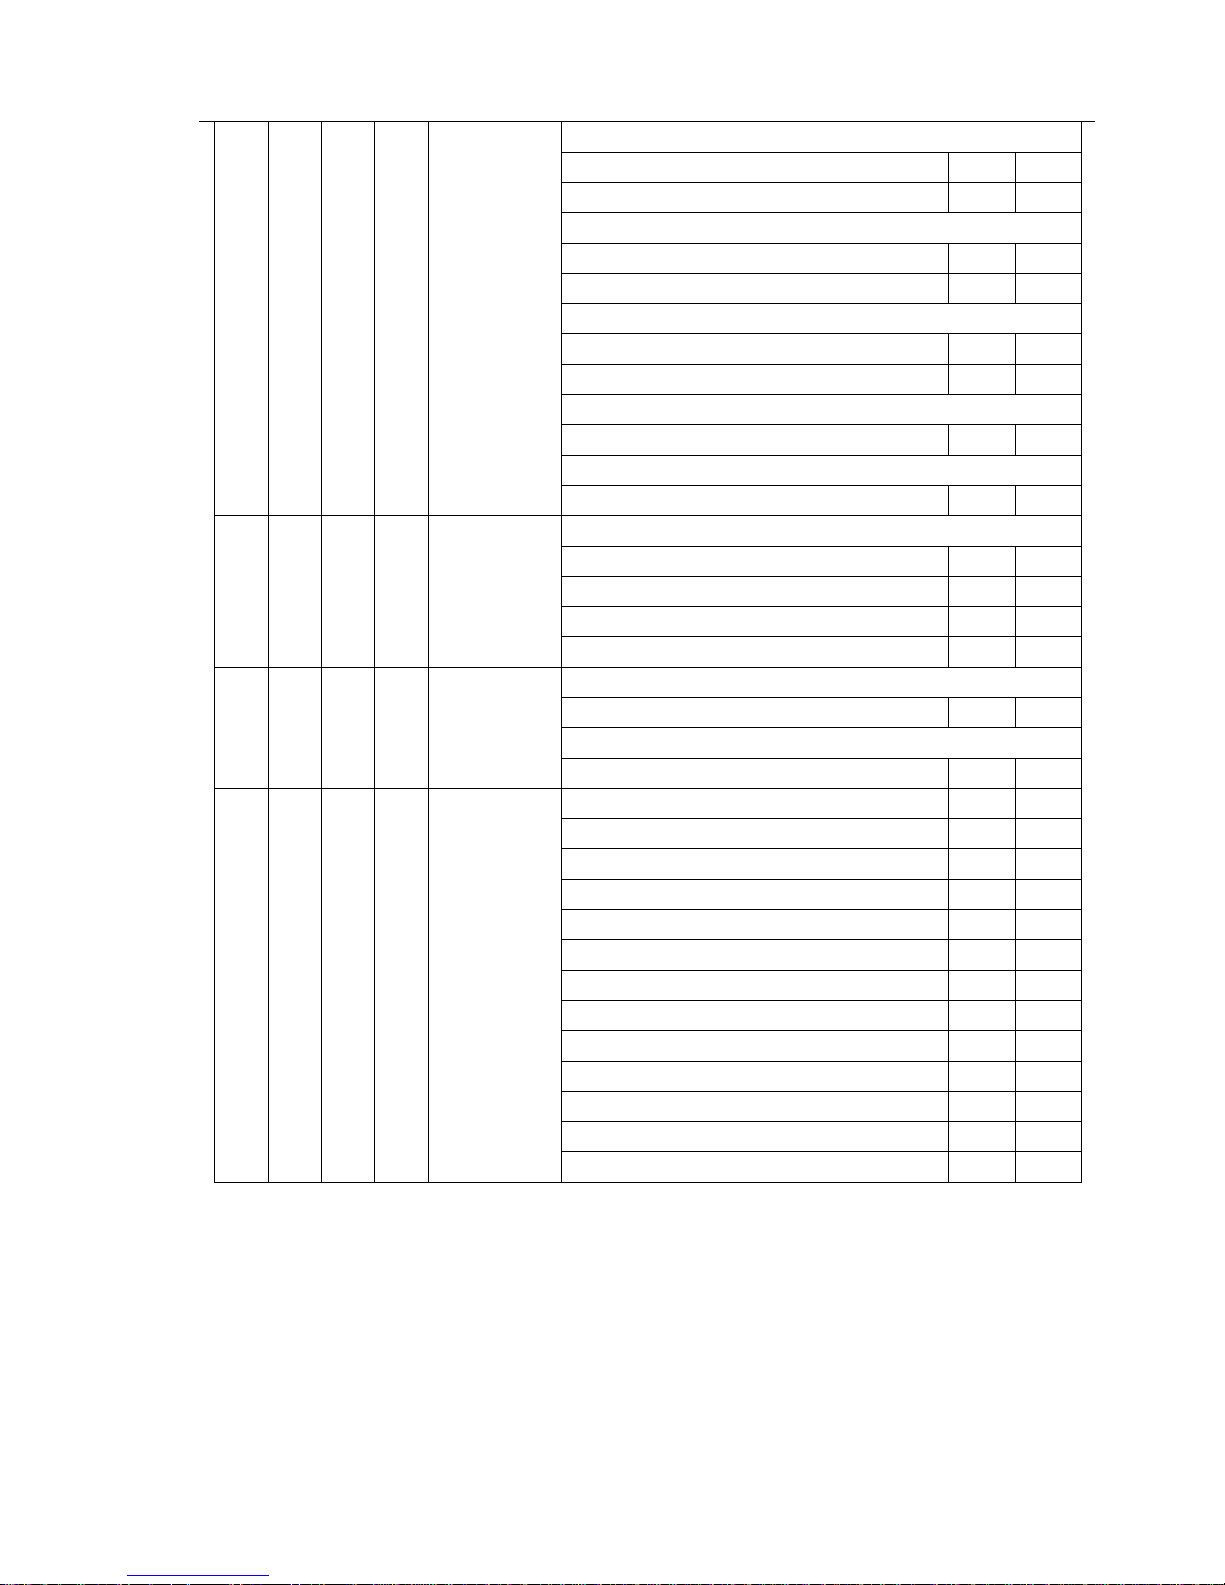
- The device is controlled by universal DMX 512 protocol, DMX address is the start channel used to receive
instructions from the external controller. For independent control, each fixture must be assigned its unique address
control channels. For example, this device has four channel modes: 21/24/14/16, if we set the mode at standard 21
channels mode, and there are several models need to be independently controlled, we just simply address first
fixture at 1, and second fixture at 22, third one at 43, etc.
- If the devices have the same address, they will behave synchronically.
- Display is flashing when no DMX signal is received.
Page 10

10
More functions
- RDM. RDM stands for “Remote Device Management”, with this function, users can realize remote control of the
device, such as remotely changing DMX address, reverse pan/tilt setting, check a lot of useful information such as
temperature, power consumption, fan speed. Etc. Every single device has a unique RDM code programmed at
manufacture to distinguish from each other. It is not recommended for users to change this code.
- Software upgrade function via DMX cable. If there is any new firmware for this device, it can be upgraded simply via
a software upgrade box, no need to change any mechanical parts. The upgrade box is not included in the package,
if need any further assistance please just contact your authorized dealer.
- Hibernation. The device will enter sleeping mode if activated after a period of disconnecting DMX signal to save the
power consumption, and will return immediately as soon as the DMX signal is sent again.
- Display back-up communication IC. There is a back-up communication IC installed in the display PCB, so users
could replace at once if the original one is broken.
- Display flip. By press up and down button for more than 3 seconds, the display will flip automatically, this function is
useful to read menu conveniently when device is hanged.
Technical Specifications
- Input Voltages: 100V~240V AC, 50/60Hz
- Power Consumption: 145W
- Light source:CBT-90 60W white LED module
- Power Connection: Neutrik® Powercon input and output connection
- LED life: 60,000 hours
- Lux: 6,500 lumen, 11,540 lux on @5M
- Beam angle: 5°
- PWM: 1,200Hz
- Colors: 1 color wheel with 8 colors + open
- Gobos: 1pc 11 + open fixed gobo wheel
- Effect: 3 facets, 8 facets prism, frost
- Dimmer: 0-100% dimmer
- Strobe: 0.5 - 26 Hz
- Focus: linearly focusing controlled by DMX
- Head movement: Pan: 630°(4.0 sec)or 540°(3.58 sec), Tile 265°(2.8 sec).16-bit resolution, auto repositioning
- Control: DMX512, 3-pin XLR interfaces, 21/24/14/16 channel mode
- Other function: wireless DMX is available
- 2.4 inch colour LCD display with back-up power.
- Thermostat Controlled, variable speed fan
- RDM and software upgrade via DMX.
- Net weight: 11.5Kg
- Overall Size: 343x319x513mm
- Rigging: 1pc omega brackets with 1/4 – turn quick locks
- Road case available
 Loading...