

Page 1
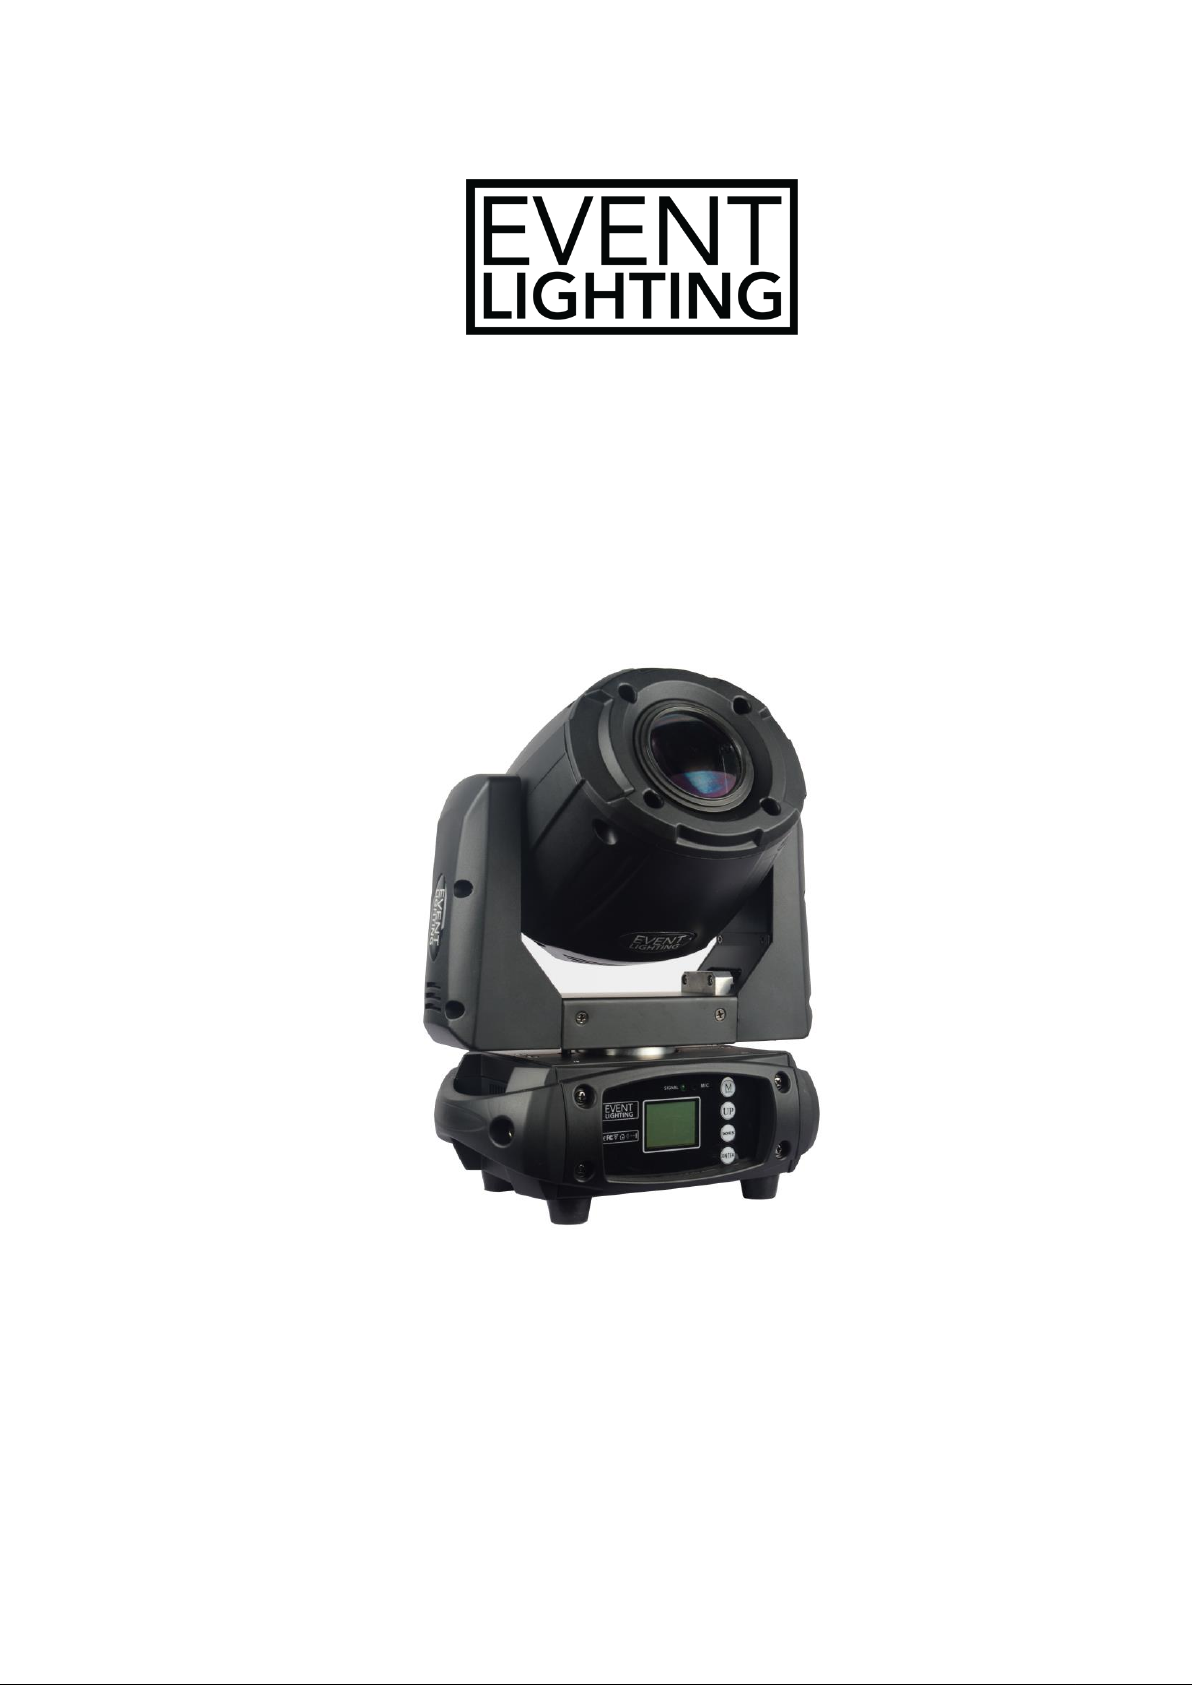
LM75
75W LED WASH ZOOM HEAD
USER MANUAL
For safety, please read this user manual carefully before initial use.
Event Lighting reserves the right to revise the manual at any time. Information and specifications within this manual are subject to
change without notice. Event Lighting assumes no liability or responsibility for any errors or omissions. Please consult Event Lighting
for any clarification or information regarding this item.
www.event-lighting.com.au
V1.0
Page 2

2
Safety Instructions
WARNING
• Do not open this device, there is no user-serviceable parts inside. Risk of electric shock.
• Do not look at the light source when the device is on.
• CAUTION: This unit's housing may be hot during and after operation.
• Install this device in a location with adequate ventilation, at least 20 inch (50 cm) from adjacent surfaces.
• Do not leave any flammable material within 50 cm of this unit while operating or connected to power.
• Use a safety chain when mounting this device overhead.
• Do not operate this device outdoors or in any location where dust, excessive heat, water, or humidity may affect it.
• Do not operate this device if the housing, lenses, or cables appear damaged.
• Do not connect this device to a dimmer or rheostat.
• ONLY connect this device to a grounded and protected circuit.
• ONLY use the hanging bracket to carry this device.
• In case of a serious operating problem, stop using immediately.
• The maximum ambient temperature is 104° F (40° C). Do not operate this device at higher temperatures.
Power Input & Power Linking
This device has an auto-switching power supply work with input voltage range of 100~240 VAC, 50/60 Hz.
Link up to the maximum 8A. DO NOT exceed this.
Fuse Replacement
If the fine-wire fuse of the device fuses, only replace the fuse by a fuse of same type and rating.
Before replacing the fuse, unplug mains lead.
Procedure:
Step 1: Unscrew the fuse holder on the rear panel with a fitting screwdriver from the housing (anticlockwise).
Step 2: Remove the old fuse from the fuse holder.
Step 3: Install the new fuse in the fuse holder.
Step 4: Replace the fuse holder in the housing and fix it.
www.event-lighting.com.au
Page 3
3
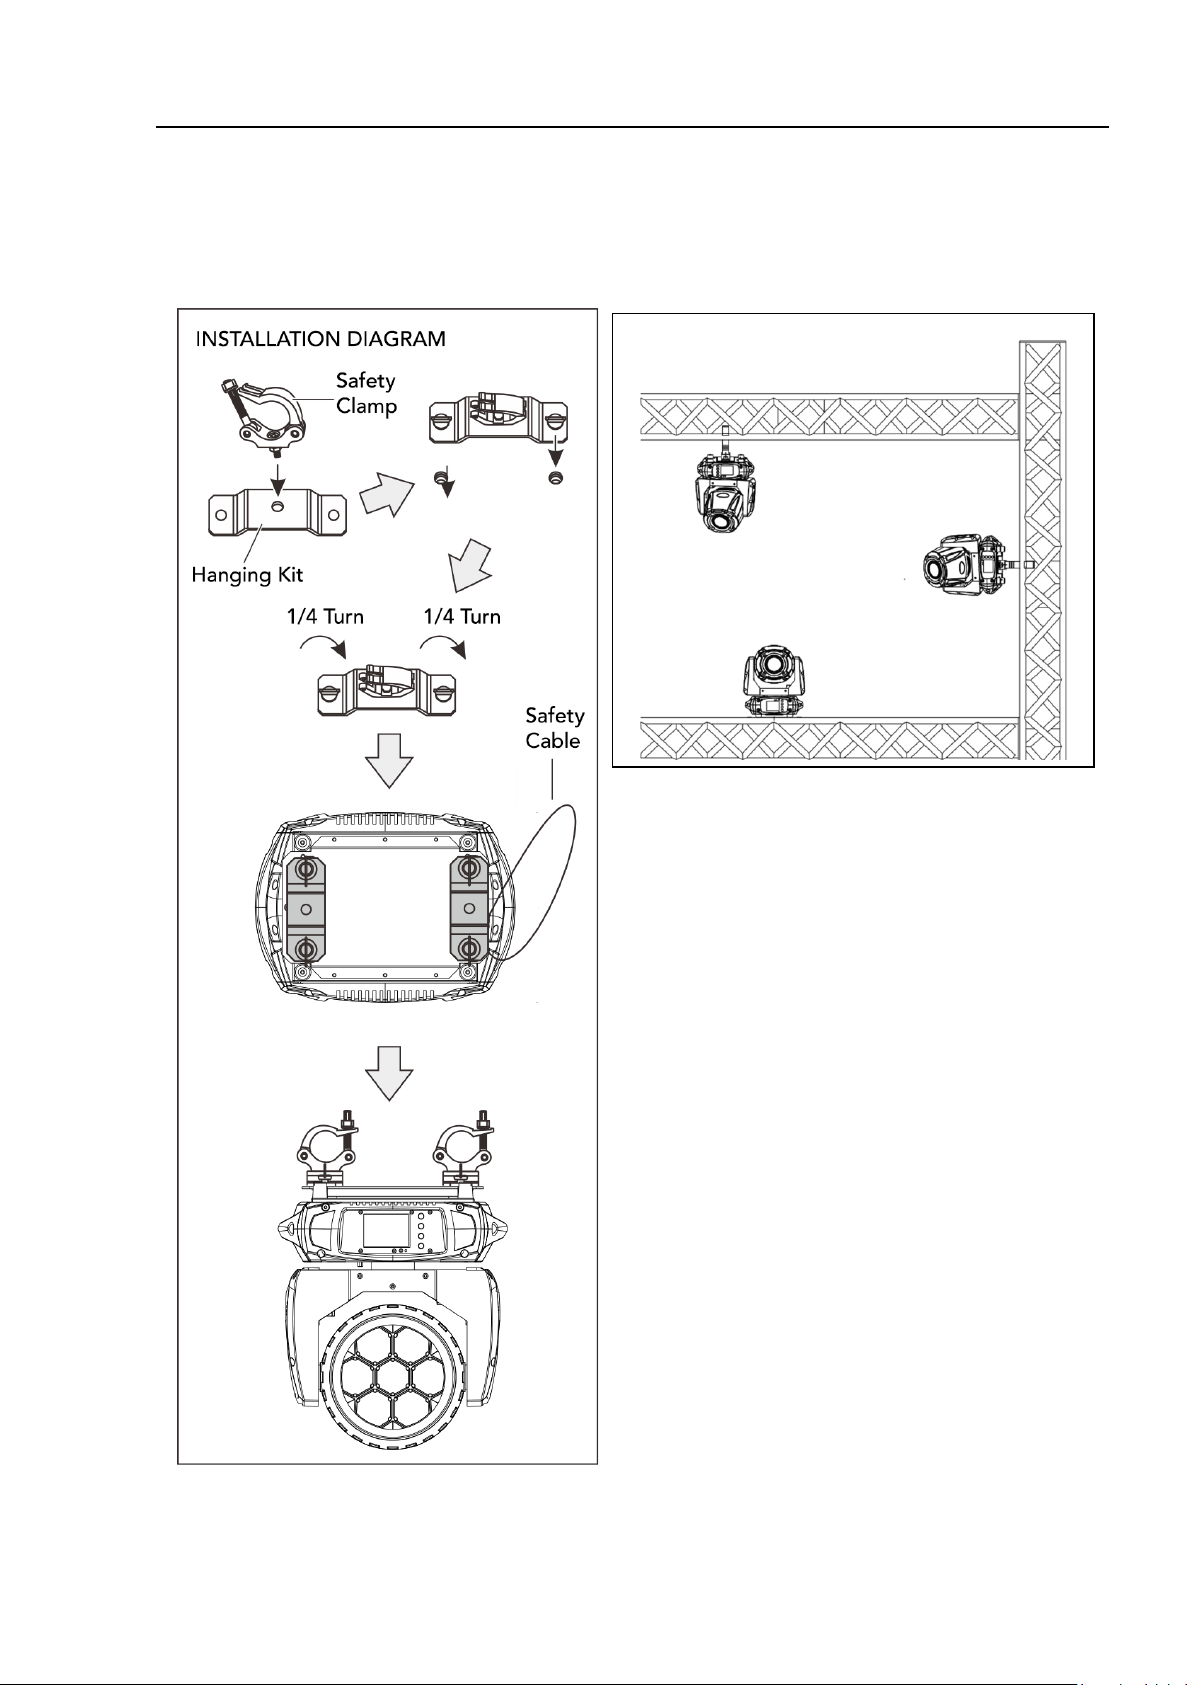
Product Installation
This device can be mounted in many orientations provided each
individual device is secured by the use of correct mounting bracket.
Use a safety chain when mounting this device overhead.
www.event-lighting.com.au
Page 4
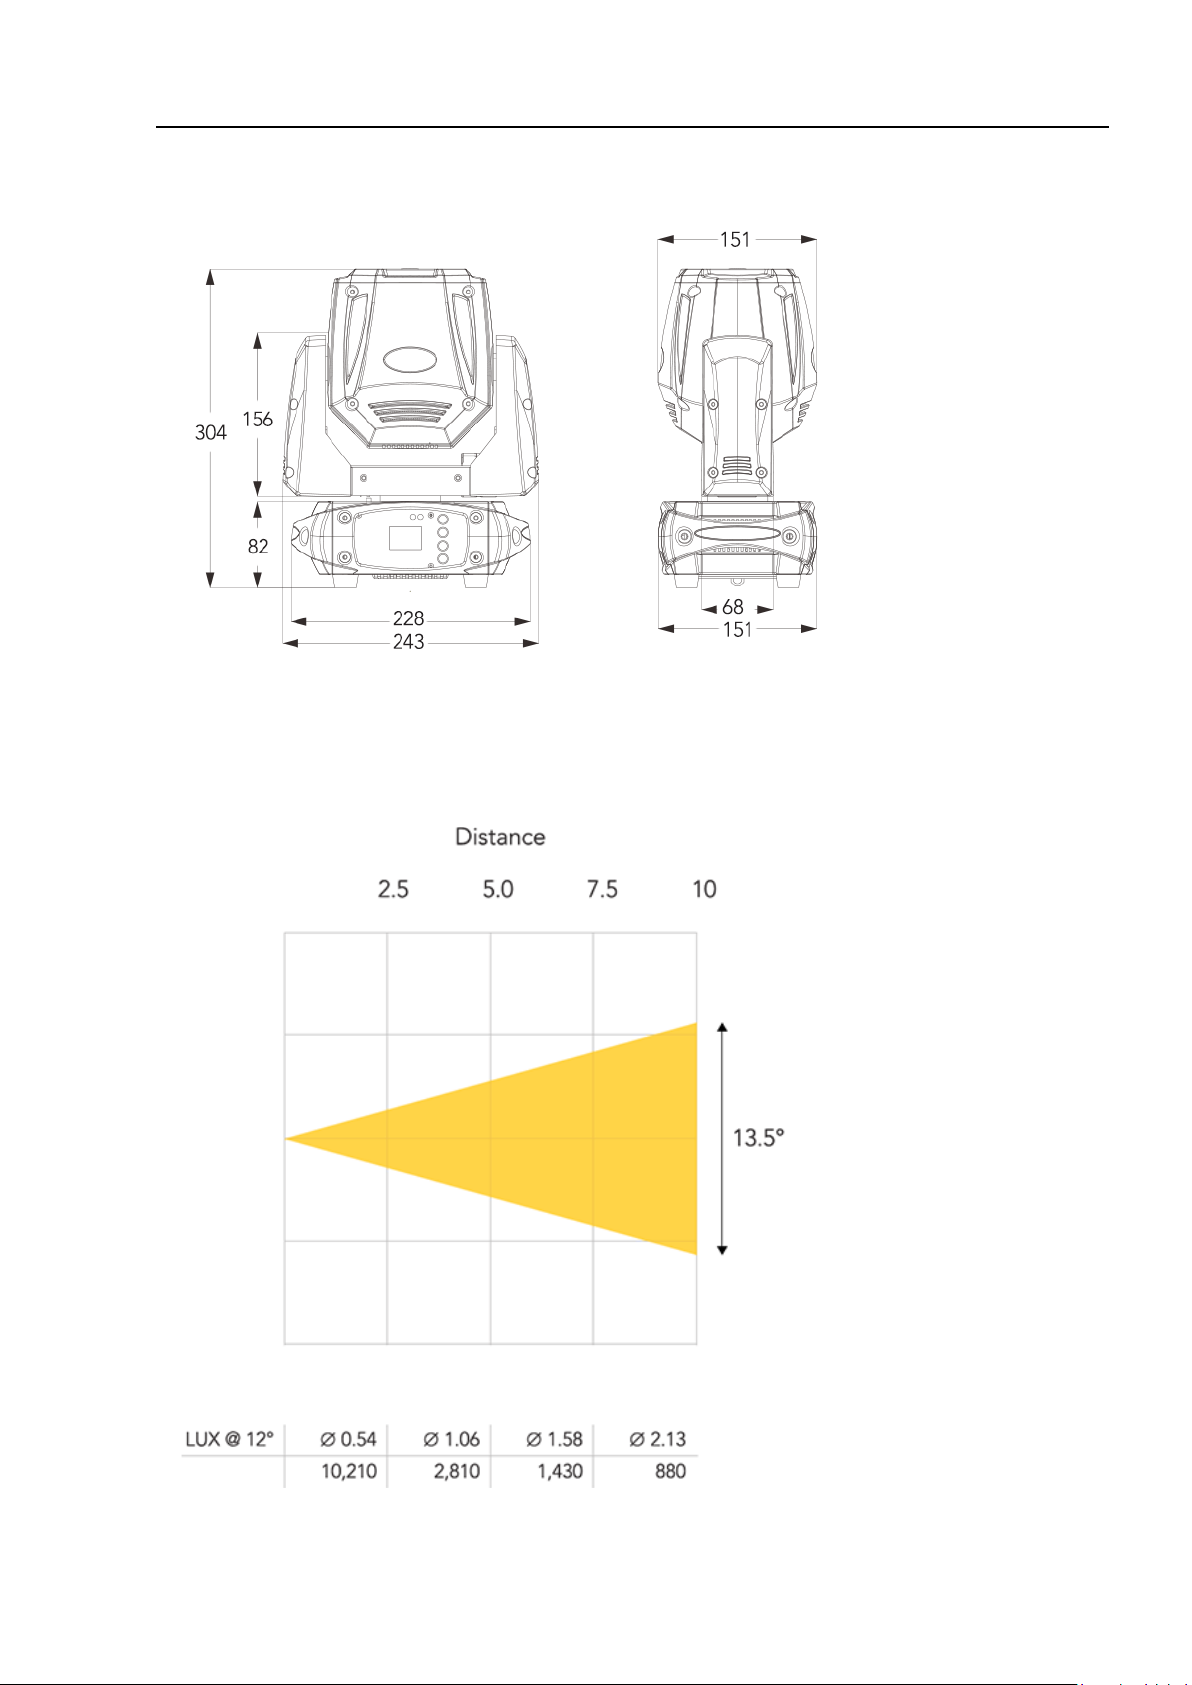
Dimensions
4
Lux Chart
www.event-lighting.com.au
Page 5
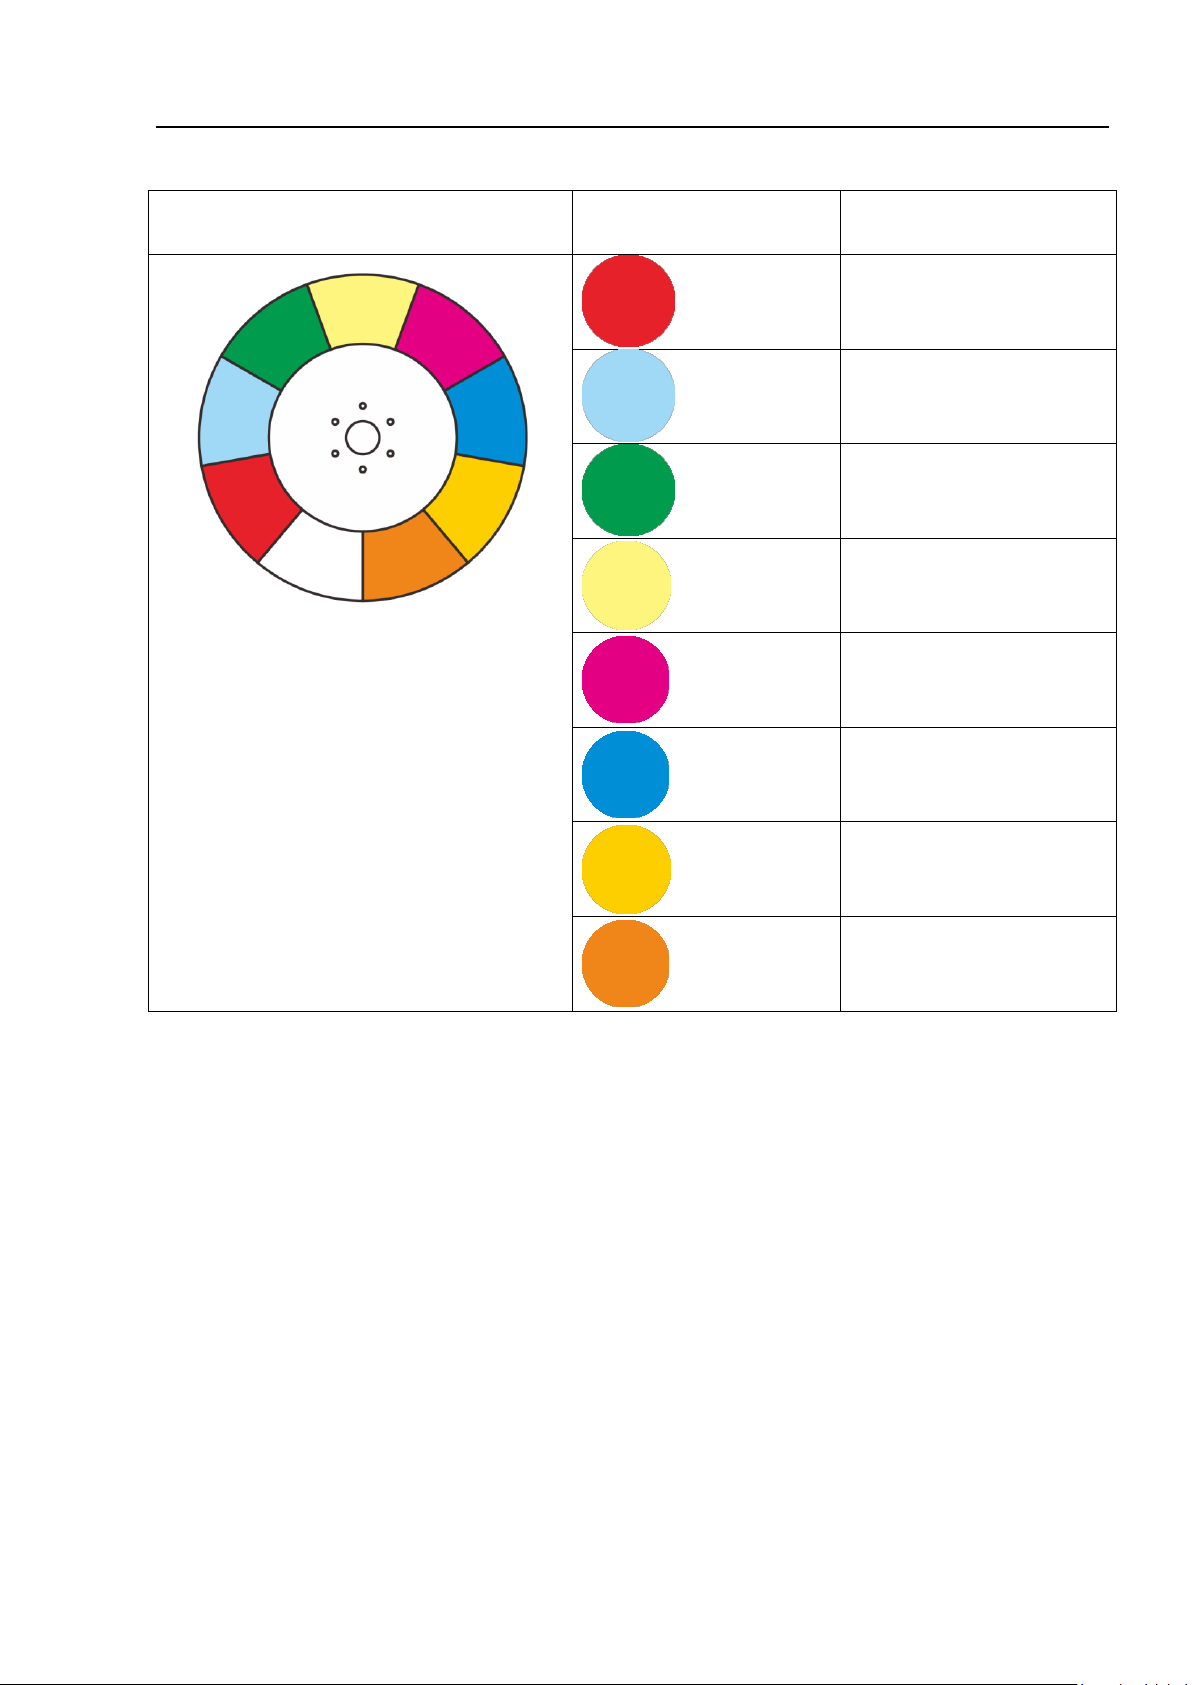
Colour Wheel
Open
Red
Blue
Green
Yellow
Magenta
Dark Blue
Orange
Orange-red
5
www.event-lighting.com.au
Page 6
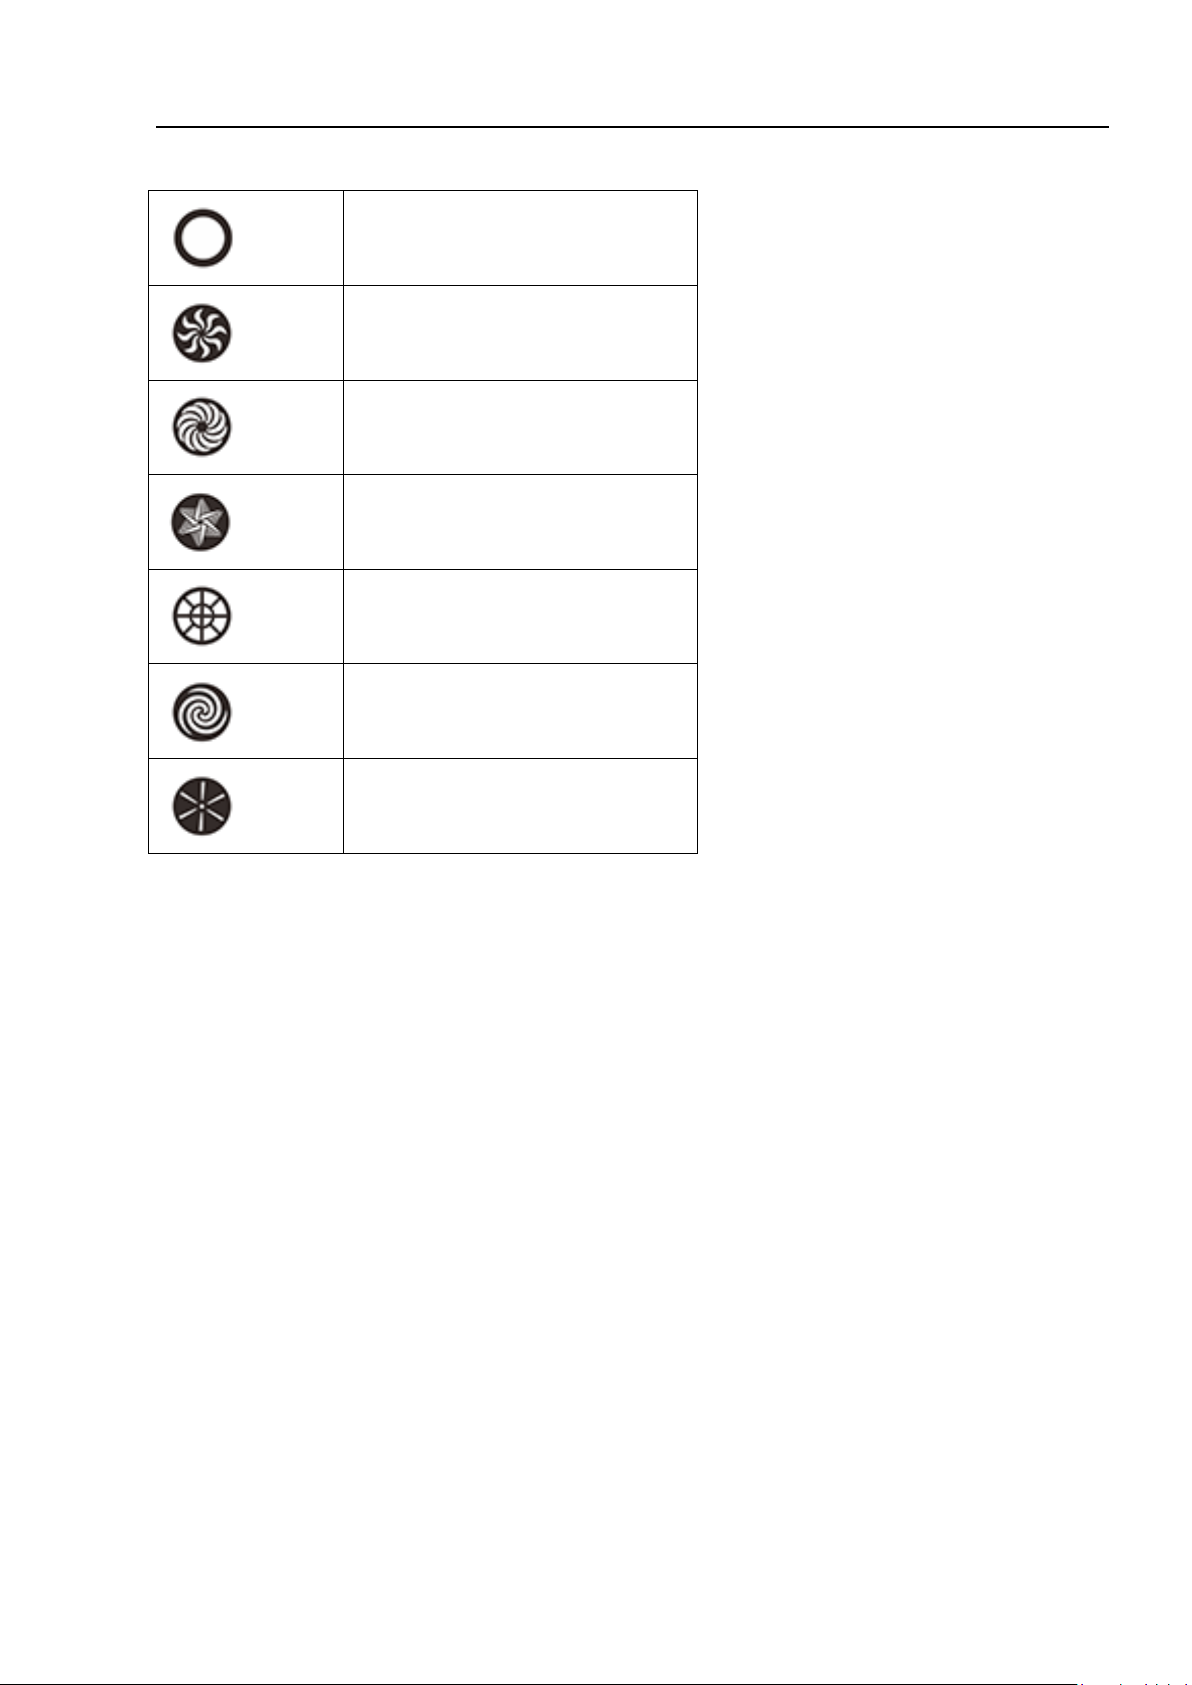
Gobo Wheel
Position 1
Position 2
Position 3
Position 4
Position 5
Position 6
Position 7
6
www.event-lighting.com.au
Page 7
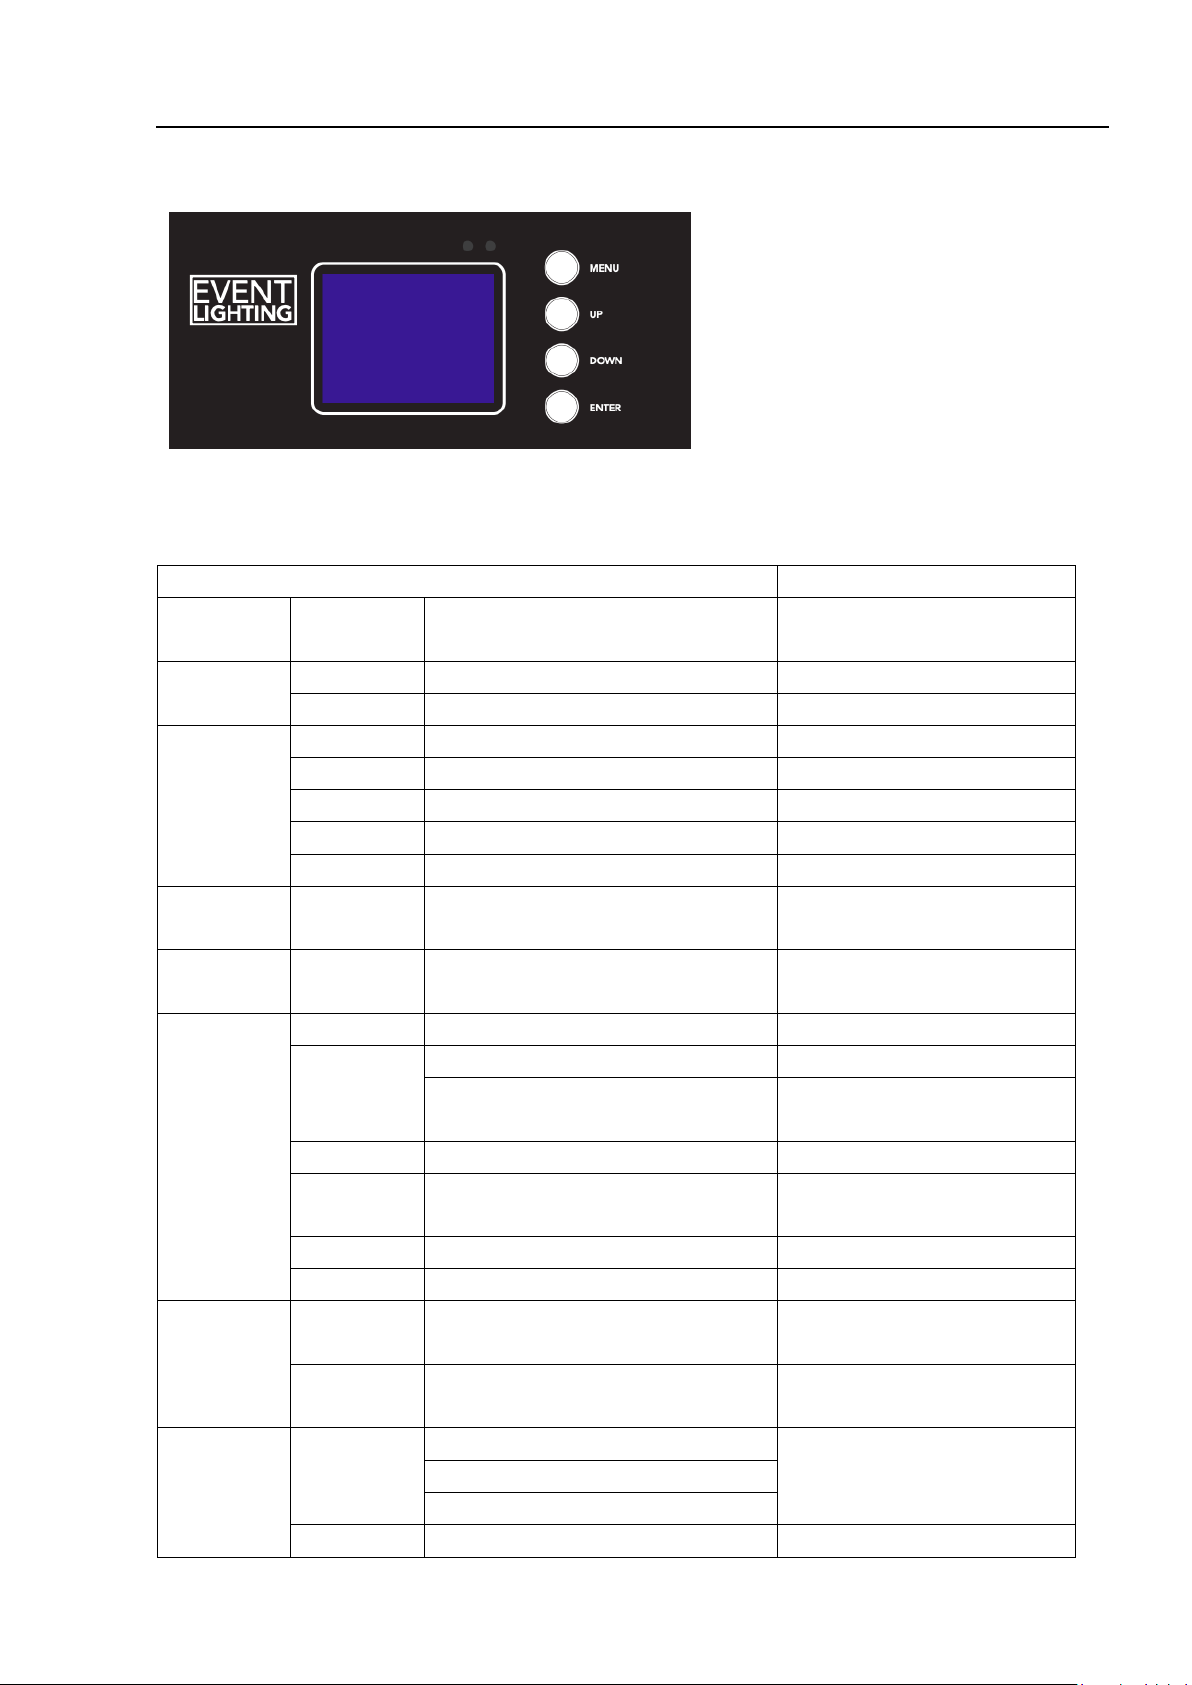
Menu operation
MENU
DESCRIPTION
DMX
Address
DMX
Address
A001~AXXX
DMX Address Setting
Auto Run
Auto Run
Program 1-8 | Master/Alone
Auto Run State
Music Run
Program 1-8 | Master/Alone
Music Control State
Reset
ALL
On/Off
Reset all motors
Pan/Tilt
On/Off
Reset pan/tilt motor
Colour
On/Off
Reset colour motor
Gobo
On/Off
Reset gobo motor
Other
On/Off
Reset other
Reverse
Pan
On/Off
Reverse pan
Reverse
Tilt
On/Off
Reverse tilt
Special
R Default
On/Off
Reset to default settings
Cal
Code (Password: 088)
Calibration code
Pan, Tilt, Colour, Gobo, Focus,
Prism
Calibrate the selected
channel
Temp.
XXX °C/°F
Current temperature
Manual
Ctrl.
Pan = XXX…
Manual control
Mic Sens.
0-99%
Microphone sensitivity
Limit Mode
Limit Mode Off/Centre/Right/Left
Select Edge or Corner range
DMX Mode
CH13
Mode
13 channel mode
CH11
Mode
11 channel mode
Scan
Degree
Pan
Degree
Pan 630°
Select Pan degree
(default 540°)
Pan 540°
Pan 360°
Tilt Degree
Tilt 270°
Select Tilt degree
Menu
7
Menu – Move up a level.
Up – Move selection up one item.
Down – Move selection down one item.
Enter – Select / Move down a level.
www.event-lighting.com.au
Page 8
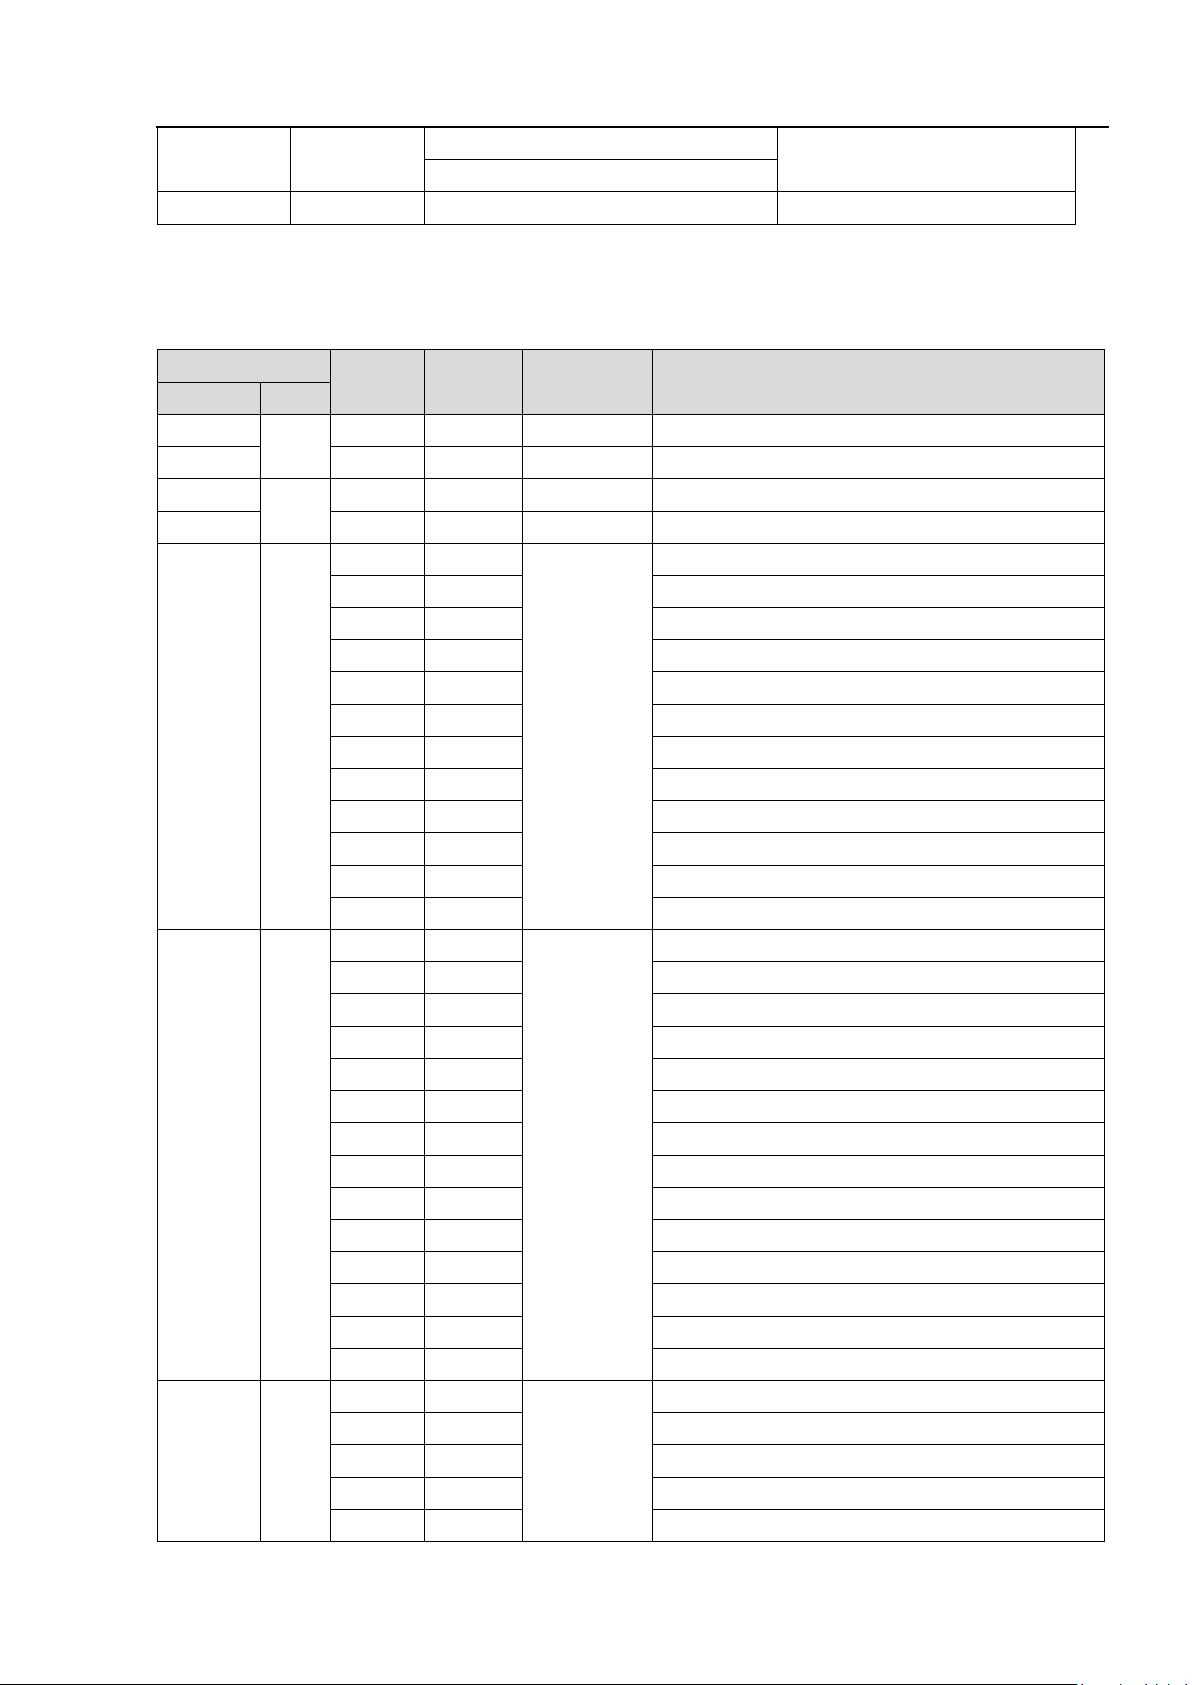
Tilt 180°
(default 270°)
Tilt 90°
Version
V1.0 - vX.X
Software version
Channel Mode
Min
DMX
Max
DMX
Name
Function
Standard
Basic
1 1 0
255
Pan
Pan movement
2 0 255
Pan-fine
Fine control of pan movement
3 2 0
255
Tilt
Tilt movement
4 0 255
Tilt-fine
Fine control of tilt movement
5
3
0
14
Colour
Open/white
15
29
Colour 1
30
44
Colour 2
45
59
Colour 3
60
74
Colour 4
75
89
Colour 5
90
104
Colour 6
105
119
Colour 7
120
127
Colour 8
128
189
Forward rainbow effect, fast to slow
190
193
Stop rainbow effect
194
255
Backward rainbow effect, slow to fast
6
4
0
9
Gobo
Open
10
19
Gobo 1
20
29
Gobo 2
30
39
Gobo 3
40
49
Gobo 4
50
59
Gobo 5
60
69
Gobo 6
70
89
Gobo 1 shake slow to fast
90
109
Gobo 2 shake slow to fast
110
129
Gobo 3 shake slow to fast
130
149
Gobo 4 shake slow to fast
150
169
Gobo 5 shake slow to fast
170
189
Gobo 6 shake slow to fast
190
255
Forward wheel spin, slow to fast
7
5
0
31
Shutter
Shutter closed
32
63
Shutter open
64
95
Strobe effect, slow to fast
96
127
Shutter open
128
159
Pulse effect, slow to fast
DMX Chart
8
www.event-lighting.com.au
Page 9
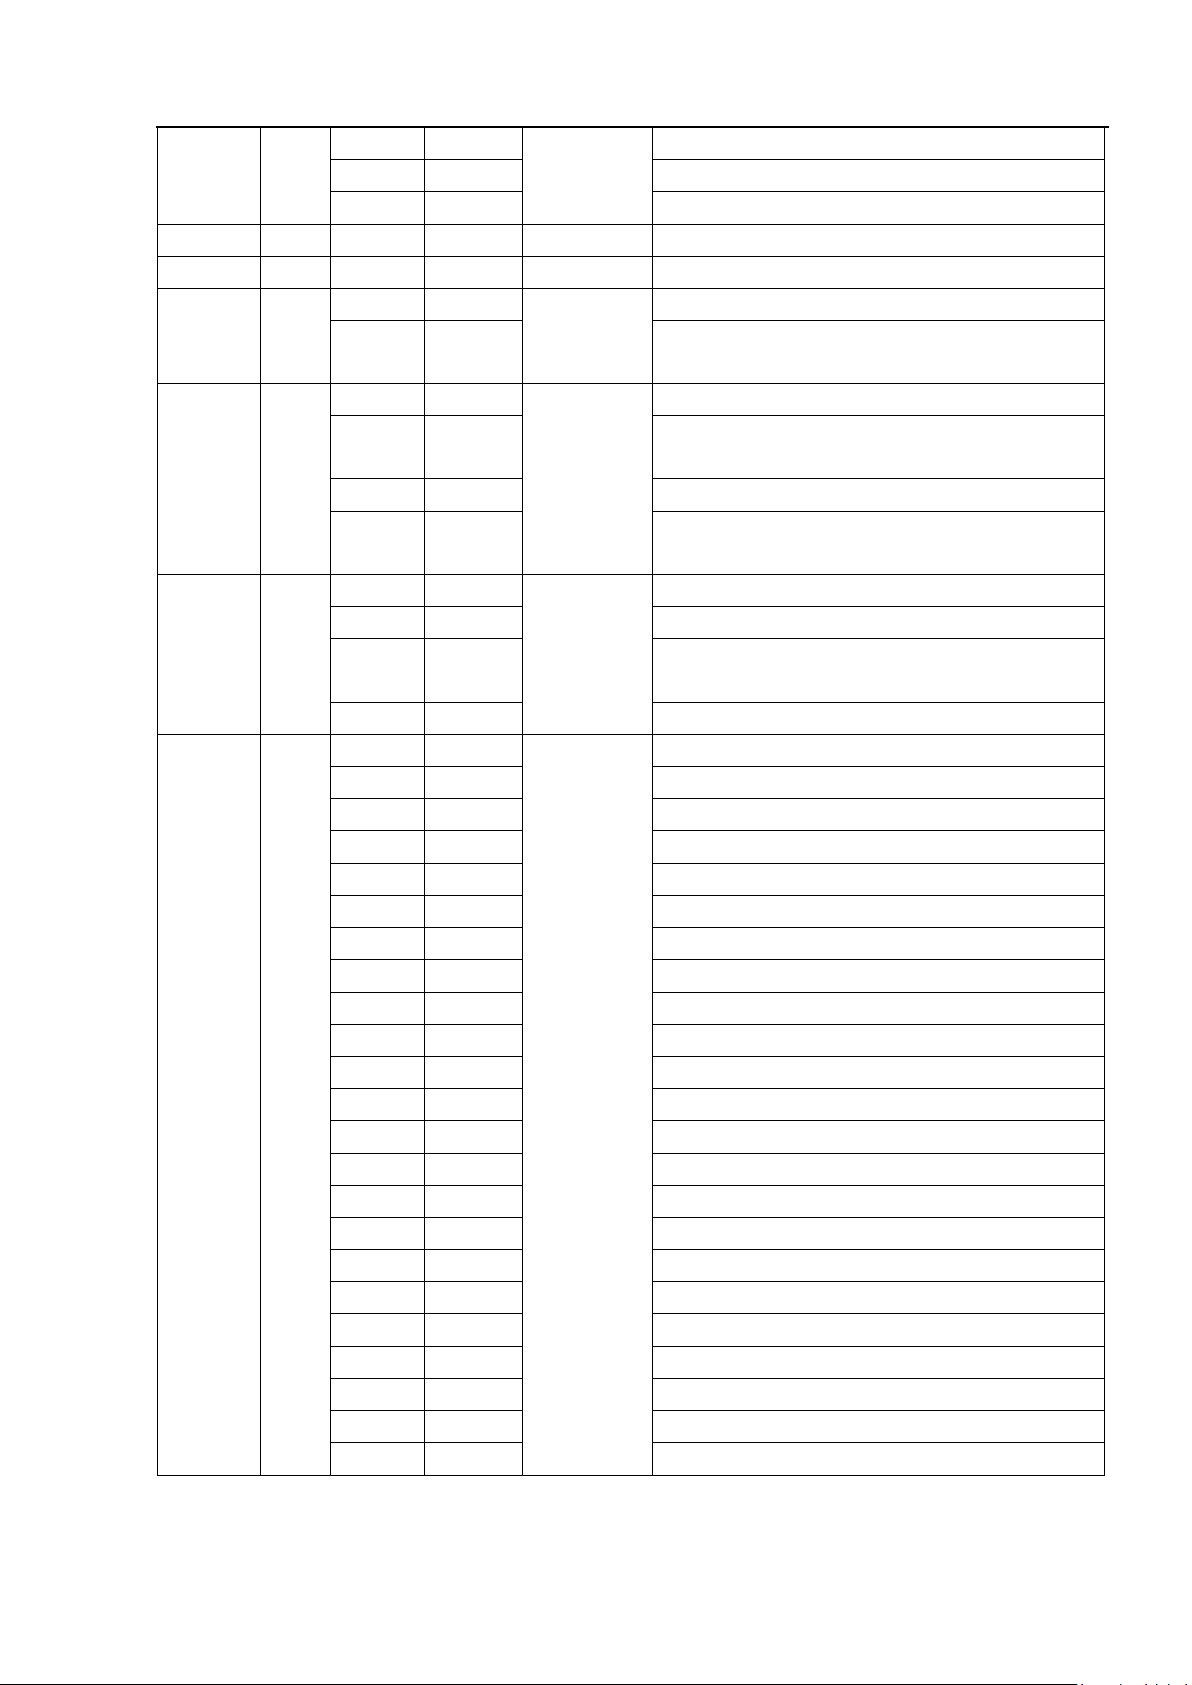
9
160
191
Shutter open
192
223
Random strobe effect, slow to fast
224
255
Shutter open
8 6 0
255
Dimmer
Dimmer 0..100%
9 7 0
255
Focus
In (near) to out (far)
10
8
0
5
Rotating
Prism,
Prism
Off
6
255
On
11
9
0
3
Gobo &
Prism
rotation
TBD
4
127
Forwards gobo and prism rotation, fast to
slow
128
131
Stop gobo and prism rotation
132
255
Backwards gobo and prism rotation, slow to
fast
12
10
0
225
Speed
pan/tilt
Pan/tilt speed, fast to slow
226
235
Blackout during pan/tilt movement
236
245
Blackout when colour and gobo wheel
switching
246
255
TBD
13
11
0
79
Special
function
TBD
80
84
Reset all
85
87
Reset pan/tilt
88
90
Reset colour
91
93
Reset gobo
94
96
TBD
97
99
Reset other
100
109
Internal program 1
110
119
Internal program 2
120
129
Internal program 3
130
139
Internal program 4
140
149
Internal program 5
150
159
Internal program 6
160
169
Internal program 7
170
179
Internal program 8
180
189
Internal sound program 1
190
199
Internal sound program 2
200
209
Internal sound program 3
210
219
Internal sound program 4
220
229
Internal sound program 5
230
239
Internal sound program 6
240
249
Internal sound program 7
250
255
Internal sound program 8
The device is controlled by universal DMX 512 protocol, DMX address is the start channel used to receive instructions
from the external controller. For independent control, each fixture must be assigned its unique address control channels.
www.event-lighting.com.au
Page 10

10
For example, this device has two channel modes: 13/11, if we set the mode at standard 13 channels mode, and there
are several models need to be independently controlled, we just simply address first fixture at 1, and second fixture at
14, third one at 27, etc.
- If the devices have the same address, they will behave synchronically.
- Display is flashing when no DMX signal is received.
www.event-lighting.com.au
Page 11

11
More Functions
- Software upgrade function via DMX cable. If there is any new firmware for this device, it can be upgraded simply via
a software upgrade box, without the need to change any mechanical parts. The upgrade box is not included in the
package, if you need any further assistance please contact your authorized dealer.
- Hibernation. The device will enter sleeping mode if activated after a period of disconnecting DMX signal to save
power and will wake immediately when the DMX signal is sent or received again.
- Display flip. By pressing the up and down buttons for more than 3 seconds, the display will flip automatically, this
function is useful to read menu conveniently when device is hanged upside down.
Technical Specifications
Power
Input Voltage: 100~240V AC, 50/60 Hz
Power Consumption: 110W
Connection: Powercon in
Fuse: T2A, 250V
Photometrics
Light Source: 75W White LED
Beam Angle: 13.5°
Output: 10215lux @ 2.5M
PWM: 3000Hz
LED Lifespan: 50,000 hours
Colour 1 colour wheel (8 colours + open)
Gobo 1pc 6 patterns + open rotating wheel (outside Ø18mm, inside Ø14mm).
Effects
3-facet prism
Dimming: 0~100%
Strobe: 0.6~25 Hz
Focus: Linear via DMX
Movement 8 / 16 – bit, Auto-reposition
Pan: 360°/540°/630°
Tilt: 90°/180°/270°
www.event-lighting.com.au
Page 12

12
Control
Protocol: DMX512
DMX Channels: 13 / 11
Interface: 3-pin XLR in & out
Built-in Programming: Yes
Sound Active: Yes
Display: 4-button 1 inch OLED display control panel
Cooling: Fan
Housing
Materials: Metal & Flame retardant ABS
Finishing: Matte black
IP rating: IP20
Net Weight: 4 kg
WARRANTY
Please refer to your local dealer or please contact Event Lighting Pty Ltd
Website: www.event-lighting.com.au.
www.event-lighting.com.au
 Loading...