

Page 1

Page 2

Copyright 2017, Eventide Inc.
P/N: 141237, Rev 4
Eventide is a registered trademark of Eventide Inc.
AAX and Pro Tools are trademarks of Avid Technology. Names and logos are used with permission.
Audio Units is a trademark of Apple, Inc.
VST is a trademark of Steinberg Media Technologies GmbH.
All other trademarks contained herein are the property of their respective owners.
Eventide Inc.
One Alsan Way
Little Ferry, NJ 07643
201-641-1200
www.eventide.com
I
Page 3

Contents
1 Introduction 1
1.1 About This Product . . . . . . . . . . . . . . . . . . . . . . . . . . . . . . . . . . . . . . . 1
1.2 About This Manual . . . . . . . . . . . . . . . . . . . . . . . . . . . . . . . . . . . . . . . 2
2 Registration, Activation, and Installation 3
2.1 Registering Your Plug-in . . . . . . . . . . . . . . . . . . . . . . . . . . . . . . . . . . . . . 3
2.2 Activating Your License . . . . . . . . . . . . . . . . . . . . . . . . . . . . . . . . . . . . . 3
2.3 Installing Your Plug-In . . . . . . . . . . . . . . . . . . . . . . . . . . . . . . . . . . . . . . 4
2.4 Moving or Removing an Activation . . . . . . . . . . . . . . . . . . . . . . . . . . . . . . . 4
3 UltraReverb 5
3.1 Signal Flow Diagram . . . . . . . . . . . . . . . . . . . . . . . . . . . . . . . . . . . . . . . 5
3.2 Reverb Controls . . . . . . . . . . . . . . . . . . . . . . . . . . . . . . . . . . . . . . . . . 5
3.2.1 Reverb Type . . . . . . . . . . . . . . . . . . . . . . . . . . . . . . . . . . . . . . . 6
3.2.2 Decay Time . . . . . . . . . . . . . . . . . . . . . . . . . . . . . . . . . . . . . . . . 6
3.2.3 Room Size . . . . . . . . . . . . . . . . . . . . . . . . . . . . . . . . . . . . . . . . . 6
3.2.4 Glide Rate . . . . . . . . . . . . . . . . . . . . . . . . . . . . . . . . . . . . . . . . 6
3.2.5 Mod Depth . . . . . . . . . . . . . . . . . . . . . . . . . . . . . . . . . . . . . . . . 7
3.2.6 Mod Rate . . . . . . . . . . . . . . . . . . . . . . . . . . . . . . . . . . . . . . . . . 7
3.2.7 Lo-fi . . . . . . . . . . . . . . . . . . . . . . . . . . . . . . . . . . . . . . . . . . . . 7
3.2.8 Pre-delay . . . . . . . . . . . . . . . . . . . . . . . . . . . . . . . . . . . . . . . . . 7
3.2.9 Pre-delay On/Off . . . . . . . . . . . . . . . . . . . . . . . . . . . . . . . . . . . . . 7
3.2.10 Diffusion . . . . . . . . . . . . . . . . . . . . . . . . . . . . . . . . . . . . . . . . . 7
3.2.11 Diffusion On/Off . . . . . . . . . . . . . . . . . . . . . . . . . . . . . . . . . . . . . 7
3.2.12 Early Ref Level . . . . . . . . . . . . . . . . . . . . . . . . . . . . . . . . . . . . . . 7
3.2.13 Early Ref On/Off . . . . . . . . . . . . . . . . . . . . . . . . . . . . . . . . . . . . . 7
3.2.14 Tail Level . . . . . . . . . . . . . . . . . . . . . . . . . . . . . . . . . . . . . . . . . 8
3.2.15 Tail On/Off . . . . . . . . . . . . . . . . . . . . . . . . . . . . . . . . . . . . . . . . 8
3.3 EQ Controls . . . . . . . . . . . . . . . . . . . . . . . . . . . . . . . . . . . . . . . . . . . . 8
3.3.1 Graph Shows . . . . . . . . . . . . . . . . . . . . . . . . . . . . . . . . . . . . . . . 8
3.3.2 EQ Positions . . . . . . . . . . . . . . . . . . . . . . . . . . . . . . . . . . . . . . . 8
3.3.3 High . . . . . . . . . . . . . . . . . . . . . . . . . . . . . . . . . . . . . . . . . . . . 9
3.3.4 Mid . . . . . . . . . . . . . . . . . . . . . . . . . . . . . . . . . . . . . . . . . . . . 9
3.3.5 Low . . . . . . . . . . . . . . . . . . . . . . . . . . . . . . . . . . . . . . . . . . . . 9
3.3.6 Frequency . . . . . . . . . . . . . . . . . . . . . . . . . . . . . . . . . . . . . . . . . 9
3.3.7 Gain . . . . . . . . . . . . . . . . . . . . . . . . . . . . . . . . . . . . . . . . . . . . 9
3.3.8 Bandwidth (Q) . . . . . . . . . . . . . . . . . . . . . . . . . . . . . . . . . . . . . . 9
3.4 Levels Section . . . . . . . . . . . . . . . . . . . . . . . . . . . . . . . . . . . . . . . . . . . 9
3.4.1 Input . . . . . . . . . . . . . . . . . . . . . . . . . . . . . . . . . . . . . . . . . . . 10
3.4.2 Output . . . . . . . . . . . . . . . . . . . . . . . . . . . . . . . . . . . . . . . . . . 10
3.4.3 Mix . . . . . . . . . . . . . . . . . . . . . . . . . . . . . . . . . . . . . . . . . . . . 10
3.5 Delay Section . . . . . . . . . . . . . . . . . . . . . . . . . . . . . . . . . . . . . . . . . . . 10
3.5.1 Delay Pre/Post/Off . . . . . . . . . . . . . . . . . . . . . . . . . . . . . . . . . . . 10
3.5.2 Left/Right Time . . . . . . . . . . . . . . . . . . . . . . . . . . . . . . . . . . . . . 10
3.5.3 Left/Right Level . . . . . . . . . . . . . . . . . . . . . . . . . . . . . . . . . . . . . 10
3.5.4 Left/Right Feedback . . . . . . . . . . . . . . . . . . . . . . . . . . . . . . . . . . . 11
3.5.5 Tempo . . . . . . . . . . . . . . . . . . . . . . . . . . . . . . . . . . . . . . . . . . . 11
3.6 Compressor Section . . . . . . . . . . . . . . . . . . . . . . . . . . . . . . . . . . . . . . . . 11
3.6.1 Compressor Pre/Post/Off . . . . . . . . . . . . . . . . . . . . . . . . . . . . . . . . 11
II
Page 4

3.6.2 Threshold . . . . . . . . . . . . . . . . . . . . . . . . . . . . . . . . . . . . . . . . . 12
3.6.3 Ratio . . . . . . . . . . . . . . . . . . . . . . . . . . . . . . . . . . . . . . . . . . . 12
3.6.4 Gain . . . . . . . . . . . . . . . . . . . . . . . . . . . . . . . . . . . . . . . . . . . . 12
3.6.5 Attack . . . . . . . . . . . . . . . . . . . . . . . . . . . . . . . . . . . . . . . . . . . 12
3.6.6 Release . . . . . . . . . . . . . . . . . . . . . . . . . . . . . . . . . . . . . . . . . . 12
3.6.7 Knee . . . . . . . . . . . . . . . . . . . . . . . . . . . . . . . . . . . . . . . . . . . . 12
3.6.8 Key . . . . . . . . . . . . . . . . . . . . . . . . . . . . . . . . . . . . . . . . . . . . 12
3.7 Snapshots . . . . . . . . . . . . . . . . . . . . . . . . . . . . . . . . . . . . . . . . . . . . . 12
3.7.1 Loading . . . . . . . . . . . . . . . . . . . . . . . . . . . . . . . . . . . . . . . . . . 13
3.7.2 Saving . . . . . . . . . . . . . . . . . . . . . . . . . . . . . . . . . . . . . . . . . . . 13
3.7.3 Renaming . . . . . . . . . . . . . . . . . . . . . . . . . . . . . . . . . . . . . . . . . 13
3.7.4 Revert . . . . . . . . . . . . . . . . . . . . . . . . . . . . . . . . . . . . . . . . . . . 13
3.7.5 Global vs. Current . . . . . . . . . . . . . . . . . . . . . . . . . . . . . . . . . . . . 13
3.7.6 Proper Snapshot Hygiene . . . . . . . . . . . . . . . . . . . . . . . . . . . . . . . . 14
3.7.7 Restoring Global Defaults . . . . . . . . . . . . . . . . . . . . . . . . . . . . . . . . 14
3.8 Preset Bar . . . . . . . . . . . . . . . . . . . . . . . . . . . . . . . . . . . . . . . . . . . . . 14
3.8.1 Saving and Recalling Plug-In settings . . . . . . . . . . . . . . . . . . . . . . . . . 14
3.8.2 Mix Lock . . . . . . . . . . . . . . . . . . . . . . . . . . . . . . . . . . . . . . . . . 14
4 Conclusion 15
III
Page 5
Chapter 1
Introduction
1.1 About This Product
UltraReverb plug-in is a powerful audio engineering plug-in for Avid AAX, Apple Audio Units, and
Steinberg VST formats. Just like the original Pro Tools TDM version, UltraReverb brings you our best
reverb effects from our most prestigious hardware products and combines these with full multi-effect
capabilities all within a single plug-in. UltraReverb features:
• Nine Reverb effects: Hall 1 & 2, Chamber 1 & 2, Room 1 & 2, Plate 1 & 2 and Ambience
• Dual delays for echo effects that can be moved before or after the reverb
• Pre-EQ and post-EQ – Independent, three band parametric equalizers for shaping the audio before
and after the reverb and delays
• Movable Compressor provides dynamics before or after the reverb
• Lo-fi effect
• Unique Snapshots allow you to quickly store, recall, and automate up to 32 presets
1
Page 6

• Graphical EQ interface for intuitive tone shaping
• Complete automation support
1.2 About This Manual
While we’re very confident you’ll be able to use your new plug-in without reading this manual, we urge you
to have a quick look. There are several unique features and interesting options presented in UltraReverb
and a cursory glance will illuminate any features you may overlook. We’ll try to keep it all relevant and
highlight any tips or cool tricks for you. We also won’t cover much at all about the operation of your
plug-in host or the Macintosh or Windows environments, as their owner’s manuals or online help should
provide you with the answers you need. We’ve made every attempt to integrate the standard controls
and features from the major plug-in hosts into our UltraReverb plug-in so that you don’t have to learn
anything new. If you find the need to get more information from us than this manual can provide, please
visit our support forum available via our website (http://www.eventideaudio.com).
2
Page 7

Chapter 2
Registration, Activation, and Installation
Eventide uses PACE’s ilok.com licensing system, with or without an iLok hardware dongle, to license
our plug-in products. Each license provides two activations which can reside on either your computer or
on an iLok license dongle. Once you’ve purchased your plug-in, you’ll need to register it on Eventide’s
website, activate your license, and install the plug-in on to your computer.
2.1 Registering Your Plug-in
When you purchase an Eventide Native plug-in, you’ll receive a Serial Number and License Key. The
Serial Number will be two letters followed by 6 numbers. If you have an individual UltraReverb license,
the Serial Number will start with UR (i.e. UR-######). If you purchased a group license, the
Serial Number will be in the same format, but correspond to that group license (e.g. AX-###### for
Anthology X). The License Key will be 3 sets of 4 characters, a letter or a number, each; like XXXXXXXX-XXXX.
Once you’ve received these codes, you can register your plug-in on the Eventide website. To do so, please
log in to http://www.eventideaudio.com, navigate to My Account in the top right corner, and select
Register a New Product. Then, fill out the form by selecting Native Plug-in (VST, AU, AAX) in the
Product Category field, select UltraReverb or the applicable group license in the Product list, and enter
your Serial Number, License Key, and iLok.com account name. If you don’t yet have an ilok.com account,
you can create one for free at http://www.ilok.com. Once you’ve done so, press Register.
Once you’ve entered this information and pressed the Register button, Eventide will send the applicable
plug-in license to your ilok.com account, which you will need to activate to your computer or iLok
dongle.
2.2 Activating Your License
To activate and manage your plug-in licenses you’ll need to install PACE’s iLok License Manager software
which you can download from http://www.ilok.com. If you don’t have this software installed, please
download and install it now.
Once you have installed and launched iLok License Manager you should be able to log in to your account
by clicking the large Sign In button in the upper left hand corner of the application. Once you have,
you should be able to see available licenses by choosing the Available tab at the top of the iLok License
Manager application. If you have successfully registered your plugin, your UltraReverb Native license
will be available in this list. Please activate this license by dragging it to either your computer or iLok
dongle listed on the left. When you do so, you will be asked to confirm the activation, and you will be
able to see it by clicking on the location you have chosen. At this point your license is activated.
3
Page 8

2.3 Installing Your Plug-In
You should have been given a link to the Eventide Native plug-in installer when you purchased your plugin, but if you haven’t, you can find downloads for all of Eventide’s Native Plug-Ins at http://https:
//www.eventideaudio.com/products/plugins. Please download and launch the correct installer for
your system.
Once you’ve launched the plug-in installer, it will take you through several pages of options. We have
tried to choose defaults for these options which will best serve the majority of users, but it is worth a
minute to make sure you understand these options before clicking through to the next page. Once you
have followed through the installer, your plug-ins and presets should be in your chosen locations, and
you can hit finish to end the installer application.
At this point, you should be ready to use your Eventide UltraReverb Plug-In.
2.4 Moving or Removing an Activation
If at any point, you decide to move your plug-in activation, you can do so in iLok license manager. To
move an activation between an iLok dongle and your computer, simply plug in the iLok, locate the license
in its current location, and drag it to its new location. To deactivate a license, find it in its location,
right click on it, and choose deactivate.
Remember that each Eventide Native Plug-In License comes with two activations, which can be used
on either a computer or iLok dongle, meaning you can use UltraReverb in two locations at the same
time.
4
Page 9

Chapter 3
UltraReverb
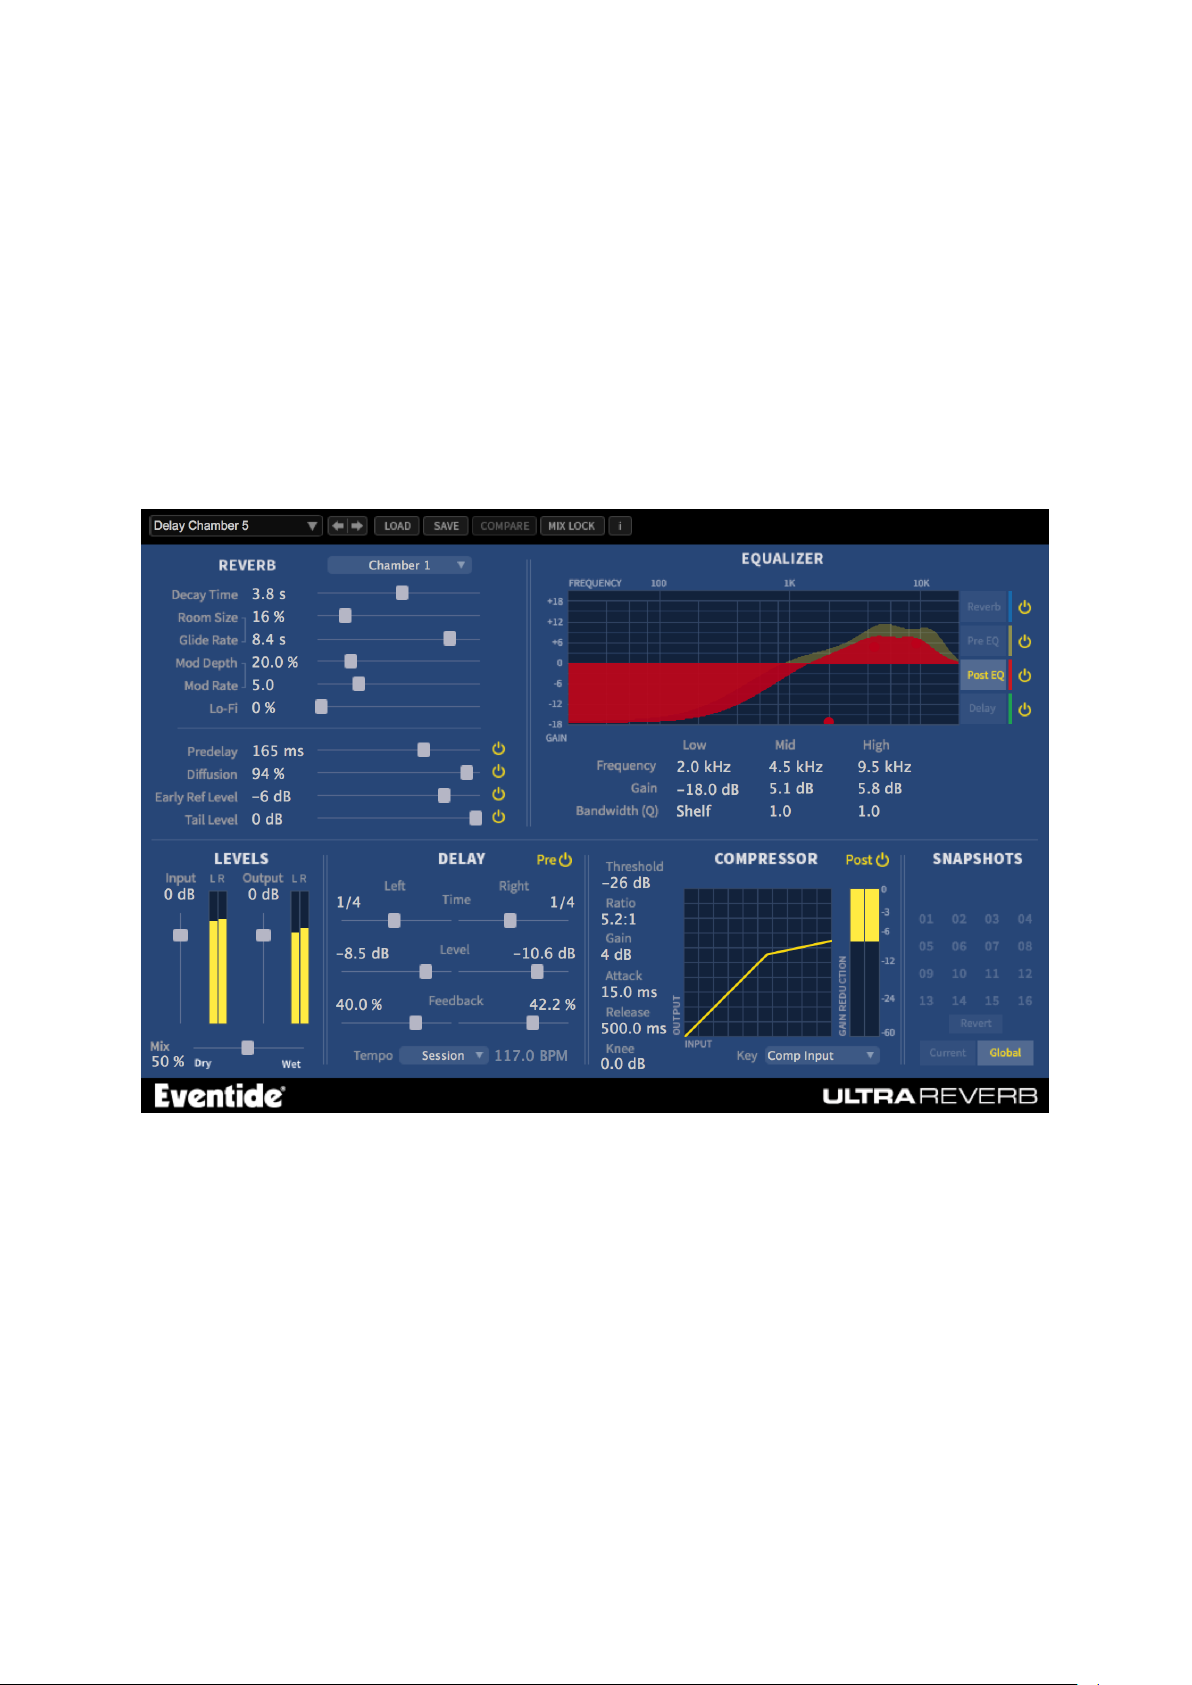
The UltraReverb user interface is a compact yet intuitive environment that uses consistent conventions
throughout. It should take you no time at all to effortlessly navigate through each part of the plug-in.
UltraReverb is comprised of the following discrete components, which collectively or individually provide
you a robust and precise tone-shaping and frequency-manipulation environment.
• Reverb Controls
• EQ Controls
• Lo-Fi
• Levels
• Delay Section
• Compressor Section
• Snapshots
3.1 Signal Flow Diagram
Below are block diagrams depicting the signal flow of UltraReverb. Figure 3.2 shows the overall plug-in
structure whereas Figure 3.3 shows the inner workings of the Reverb block. Dotted lines signify that the
presence of the block is dependent on a parameter being On/Off or Pre/Post.
Figure 3.1: Full Block Diagram
3.2 Reverb Controls
Derived from such flagship effects processors as the OrvilleTMand Eclipse, UltraReverb produces the
highest quality reverb effects available from Eventide. An extensive set of useful parameters is offered
to give you the freedom to create the sound you need, quickly. Each of these parameters is detailed
below.
5
Page 10

Figure 3.2: Close-up of the Reverb Block
Figure 3.3: UltraReverb Controls Section
3.2.1 Reverb Type
This pull down menu allows you to select among the various types of reverb algorithms. Each Type has a
unique flavor of Diffusion, Early Reflections, and Reverb Tail. These internal settings are automatically
applied upon loading a Type.
3.2.2 Decay Time
The overall reverb decay time can be set using this slider. Also referred to as RT60, the decay time is
the time it takes the reverberated sound to decay to a level 60dB down from its original level.
3.2.3 Room Size
The perceived size of the reverberant space is determined by this parameter. It affects both the Diffusion
and the Reverb Tail (see Figure 3.3). Due to the structure of our reverb algorithms, a pitch change can
be heard when manipulating this control. The amount of shift is determined by how long the Decay
Time is as well as the setting of the Glide Rate control. You can use this control as a special effect by
automating it and varying its values swiftly.
3.2.4 Glide Rate
This is the time it takes the Room Size to glide to its new setting. When used with Room Size, a pitch
gliding effect can be created, and even automated as part of the music.
6
Page 11

3.2.5 Mod Depth
This parameter controls the amount, or level, of reverb modulation that is present in the reverb. The
modulation is applied to the Reverb Tails module in the signal flow diagram (see Figure 3.3).
3.2.6 Mod Rate
When used in conjunction with Mod Depth, Mod Rate sets the speed of reverb modulation. Reverb
modulation effectively adds a slight detuning to the sound, causing it to sound different every time a
sound is passed through.
3.2.7 Lo-fi
The Bit Reducer is provided as a special effect, offering that sought-after ”vintage digital” sound. The
higher the value, the grungier it gets. As Figure 3.2 illustrates, Lo-fi occurs after the Post EQ but before
the Post Compressor.
3.2.8 Pre-delay
Pre-delay provides additional delay before the Diffusion, Early Reflections, and Reverb Tail. When Predelay is set to 0ms, you may still notice an audible delay before the onset of reverb. This is because both
Diffusion and Reverb Tails have a slight built-in delay. Consider turning both Pre-delay and Diffusion
Off if you desire instantaneous Reverb.
3.2.9 Pre-delay On/Off
Turning Pre-delay Off is not exactly the same as turning Pre-delay to 0ms. The Reverb Tails block (see
Figure 3.3) has built-in delay whose value depends on the selected Reverb Type. Turning Pre-delay off
will elliminate this built-in Tail delay in addition to bypassing the Pre-delay module.
3.2.10 Diffusion
The Diffusion parameter sets the overall reflectivity of the chosen space. Higher Diffusion settings will
cause the reverb to sound more dense and lower settings will give the perception of more discrete reflections. When Pre-delay is turned off, you may still notice a slight delay before the onset of reverb. This is
a result of the Diffusion. The larger the Size, the more delay will result from Diffusion. Consider turning
Diffusion Off for instantaneous reverb.
3.2.11 Diffusion On/Off
Turning Diffusion off is not the same as setting Diffusion to 0. Setting Diffusion to 0 will result in more
discrete reflections, whereas turning Diffusion off will bypass the diffusor altogether. This is an important
tool for crafting custom reverb environments. Since Diffusion adds an increasing amount of delay as Size
increases, consider turning Diffusion off if you desire an instantaneous reverb despite a large Reverb
Size.
3.2.12 Early Ref Level
This sets the overall level of the Early Reflections path of the reverb algorithm (see Figure 3.3).
3.2.13 Early Ref On/Off
Turning Early Reflections off is equivalent to setting Early Ref Level to -infinity.
7
Page 12

3.2.14 Tail Level
This sets the level of the Reverb Tails path of the reverb algorithm (see Figure 3.3).
3.2.15 Tail On/Off
Turning Tail off is equivalent to setting Tail Level to -infinity.
3.3 EQ Controls
UltraReverb comes complete with two independent and fully parametric equalizers, referred to as Pre-EQ
and Post-EQ. There are also shelving filters available for the reverb tail as well as the dual delay lines.
All four of these filters have their controls conveniently grouped within a single graphical interface with
editable parameters as described below.
Figure 3.4: UltraReverb EQ Section
Because these four groups of equalizers are available simultaneously, they are also displayed together in
the EQ Controls section. To edit one of these groups of EQ, simply select it for editing by clicking the
button next to the text under the Graph shows area. As each is selected, its EQ curve is given focus by
highlighting the associated colored line, bringing it to the foreground. To change the filter settings, use
the number boxes below the graph. Note that some EQ parameters are not available all the time. The
Reverb EQ does not offer a Mid filter section, nor does it have adjustments for bandwidth as they are high
and low shelving filters. The delay EQ does offer a Mid filter section with an adjustable bandwidth.
3.3.1 Graph Shows
Use these four buttons to select one of the four EQ sections for editing. On/off buttons are located on
the right of each EQ section, allowing you to completely bypass any of the different EQ sections.
3.3.2 EQ Positions
Pre EQ is located after the pre compressor but before the delay and reverb.
Delay EQ is located in the delay lines.
Reverb EQ is located in the Reverb Tail.
Post EQ is located after the delay and reverb but before Lo-fi and post compressor.
(See Figure 3.3)
8
Page 13

3.3.3 High
This row of parameters affects the high band filter section.
3.3.4 Mid
This row of parameters affects the mid band filter section. Not available for the reverb filter.
3.3.5 Low
This row of parameters affects the low band filter section.
3.3.6 Frequency
Use these parameters to set each band’s center frequency.
3.3.7 Gain
Use these parameters to set the gain or attenuation that occurs at each band’s center frequency.
3.3.8 Bandwidth (Q)
These parameters determine the range of frequencies that are affected by each band, effectively setting
the shape of the filter. The bandwidth is equal to the frequency setting divided by Q. Therefore, higher
values create a more ”notched” filter while lower values affect a broader range of frequencies. To set
the Pre- and Post-EQ’s Low and High bands to a shelving function, set the parameter to its minimum
value.
3.4 Levels Section
This section offers the necessary wet/dry balance controls as well as the ability to add up to 24 dB of
gain through the product.
Figure 3.5: UltraReverb Levels Section
9
Page 14

3.4.1 Input
This parameter allows you to adjust the signal level into this plug-in. The mark in the meter display
indicates -12dBfs of signal while the clip indicators will come on at -0.2dBfs. Up to 12 dB of gain is
provided to recover low-level signals.
3.4.2 Output
This parameter sets the final output level of the plug-in. The mark in the meter display indicates -12dBfs
of signal while the clip indicators will come on at -0.2dBfs. Up to 12 dB of gain is available.
3.4.3 Mix
This parameter sets the overall balance of wet (effected) signal to dry (original) signal.
3.5 Delay Section
As mentioned previously, this plug-in offers two independent delay lines with filtering. Use them as
straight delays or add filtering for use as echo effects. Delays can be routed pre-reverb, post-reverb, or
completely bypassed using the on/off switch in the top right corner of the delay section. The 6 parameters
are defined below in groups of two (left and right) to reduce redundancy.
Figure 3.6: UltraReverb Delay Section
3.5.1 Delay Pre/Post/Off
Pre or Post determines whether the delayed signal is added to the signal path before or after the reverb
algorithm. It is never in series with the reverb, only added in parallel before or after (See Figure 3.2).
Turning delay off is equivalent to setting Delay Level to -infinity.
3.5.2 Left/Right Time
These two parameters set the amount of delay time in each channel of delay. If Tempo is off, this time
will be displayed in milliseconds. If Tempo is set to Sync or Manual, the Time parameters are displayed
as note values. Maximum delay time is 1 second regardless of Tempo mode.
3.5.3 Left/Right Level
These parameters adjust the overall level of each delay.
10
Page 15

3.5.4 Left/Right Feedback
These parameters set the amount of audio that is fed back into each delay. Also known as regeneration,
feedback controls the number of repeats that heard when a signal is fed into it. This parameter offers
a range of -100% to 100%. Zero percent results in no feedback (only one repeat), while higher numbers
produce increasing amount of feedback. Negative numbers produce a feedback signal that is 180 degrees
out of phase.
3.5.5 Tempo
This drop-down menu allows you to sync the delays to a tempo. Setting Tempo to Off disables tempo
sync and delay time is controlled in milliseconds. Setting Tempo to Sync sets the delay tempo equal to
the plug-in host’s tempo. Setting Tempo to Manual allows you to manually set the tempo for the delays
by changing the BPM value to the right of the drop-down menu.
3.6 Compressor Section
A fully parametric and movable compressor is offered via the Compressor section. Compression can be
routed pre-reverb, post-reverb, or completely bypassed using the on/off switch in the top right corner of
the Compressor section.
Figure 3.7: UltraReverb Compressor Section
3.6.1 Compressor Pre/Post/Off
Pre or Post determines the compressor’s position in the signal path. Pre places the compressor immediately after Input Level. Post places the compressor immediately before Output Level (See Figure 3.2).
11
Page 16

Off bypasses the compressor.
3.6.2 Threshold
Threshold sets the level at which gain reduction begins to take place. Signals that pass above the
Threshold value will begin to have their gain reduced by the amount set via the Ratio parameter.
3.6.3 Ratio
The Ratio parameter sets how much gain reduction will occur for every dB of signal level above the
Threshold. The range is from 1:1 (no compression) up to 100:1. To create a hard limiter, set the Ratio
to 100:1 and the Knee parameter to 0dB.
3.6.4 Gain
This parameter allows you increase the compressor’s output level in order to make up for the level lost
due to gain reduction.
3.6.5 Attack
This parameter determines how fast the compressor will react to signals above the Threshold.
3.6.6 Release
This parameter determines how fast the compressor will react to decreasing signal levels.
3.6.7 Knee
The Knee determines a region above the Threshold where the gain reduction transitions from 1:1 to
the Ratio setting. As the input signal crosses the Threshold and moves through this window, it’s gain
reduction is increased up to the Ratio value
3.6.8 Key
The Key allows you to select the audio signal that controls the amount of compression. Selecting Comp
Input uses the input to the compressor as the key. Plug-In Input uses the dry input to the plug-in as the
key. Sidechain Input uses an external source as the key.
3.7 Snapshots
UltraReverb incorporates our unique Snapshots feature that allows you to quickly and easily load, save
and even automate up to 32 of your favorite Reverb ”scenes.” They’re very much like presets, but you can
load them directly from the plug-in panel. This means that you get the live performance functionality
offered from our high-end hardware processors directly in your DAW.
12
Page 17

Figure 3.8: UltraReverb Snapshots Section
3.7.1 Loading
To load a Snapshot, simply click on any of the numbered buttons at any time. The entire Reverb plug-in
panel will change to reflect the settings stored in the chosen Snapshot. The name of the loaded Snapshot
will be displayed in the text box above the number pad. And, so you know what you’re loading before
you click, move the mouse over any of the 16 numbered buttons to reveal its name. You can choose from
the bank of 16 Current or 16 Global Snapshots by first clicking on the tab at the bottom of the Snapshots
area.
3.7.2 Saving
To write or overwrite one of the Snapshots, simply command-click on any of the numbered Snapshot
buttons and it will instantly be stored. Note that Current Snapshots are associated with a specific preset,
so while command-click will write your settings to a specific Snapshot location, you must additionally
save the preset in the preset menu to permanently store your changes. This extra step is not required for
Global Snapshots since they aren’t tied to any specific presets. Command-Click will add that Snapshot
to your UltraReverb/Presets/Snapshots/ directory and it will instantaneously be available from any
UltraReverb preset. There’s no undo, so be very sure before you overwrite a Global Snapshot.
3.7.3 Renaming
Click once on the name in the entry box, and it will be selected for editing. Type up to 16 characters,
hit return and the Snapshot has a new name. In the case of Current Snapshots, remember to save your
preset as well.
3.7.4 Revert
Revert gives you the freedom to return to the effect settings you were working on before you loaded one
or more Snapshots. It’s very much like compare, except that you can load a gajillion Snapshots, and still
get back the same parameter values that you had been editing prior to loading Snapshots. You’ll notice
that as soon as you click on a Snapshot button, the Revert button glows to indicate that you can press
it. Click on some other Snapshots. It’s still lit. If you click on Revert, it goes out and you’re back to
the original edits you’d just been working on. You’ll also notice that the selected Snapshot button goes
out as soon as you change a parameter’s value. This is to indicate that you are no longer listening to a
Snapshot.
3.7.5 Global vs. Current
There are two kinds of Snapshots, Global and Current. Both are grouped in banks of 16. Global Snapshots
are accessible from any preset in any instance of the UltraReverb plug-in in any DAW session on your hard-
13
Page 18

drive. Use these to keep your 16 favorite reverb effects readily available. The Global Snapshots are stored
in a directory at the same location as your Preset directory. (<user>/Documents/Eventide/UltraReverb/Snapshots).
Any change to Global Snapshots will be effective immediately. Remember, there’s no undo for Global
Snapshots, so be very sure before you overwrite one. The Current Snapshots are a little different because
they are saved within the currently loaded preset. If you make a change to the Current Snapshots you’ll
need to save the Preset in order for you changes to be permanently stored within the preset.
3.7.6 Proper Snapshot Hygiene
Snapshots can be very powerful in use, but knowing how they work will help ensure that your UltraReverb
Snapshots load and sound right every time. So, if you want to load a Snapshot specific to that preset,
load it from the Current bank. If you want to build yourself your favorite 16 and use them everywhere,
use the Global Snapshots. If you want to copy a cool Current Snapshot into the Global bank, simply
load it from the Current tab first, then command-click on the desired Snapshot button from the Global
tab.
3.7.7 Restoring Global Defaults
If you need to restore the factory Global Snapshots at any time, simply run the plug-in installer again,
as it will place the default Global Snapshots back into the Snapshots folder.
3.8 Preset Bar
Figure 3.9: UltraReverb Preset Bar
3.8.1 Saving and Recalling Plug-In settings
When UltraReverb is installed, a library of settings is placed into the
<user>/Documents/Eventide/UltraReverb/Presets folder. These presets have a .tide extension and can
be saved or loaded from the UltraReverb preset bar in any supported DAW. In Pro Tools there is an
additional generic preset bar that saves .tfx presets to a separate location. This is a Pro Tools format
that can only be loaded from a Pro Tools session. We recommend saving your presets using the Eventide
preset bar to ensure that your presets will be accessible from any type of session.
3.8.2 Mix Lock
Starting in version 2.0.5 UltraReverb includes a Mix Lock button for flexible preset browsing. When
Mix Lock is illuminated, the current Mix value will remain unchanged as new presets are loaded. This is
especially useful on an effect return track where the mix should always be set to 100.
14
Page 19

Chapter 4
Conclusion
We hope you enjoy the UltraReverb plug-in and put it to good use in all of your mixes. Please be sure
to check over Eventide’s other Native Plug-In offerings for more unique and interesting effects.
15
 Loading...