

Page 1
USER MANUAL
ENGLISH
EvenMidi
®
www.evenmidi.com
H9
MIDI CONTROLLER
1.2
Page 2
2
CAUTION
RISK OF ELECTRIC SHOCK
DO NOT OPEN
EvenMidi
®
H9 MIDI CONTROLLER
www.evenmidi.com
Thank you for purchasing our Midi controller. We work on it since the Eventide® H9 release. First it was a DIY project and now it’s a professional tool. This is the second version of our controller. We added a lot of new features
thanks to your suggestions and in order to open the controller to any Midi device. You’ll be very happy to control
4 devices at the same time. This controller is already set for Eventide® and Strymon® devices. You can also create
4 generic controllers to control for example your Digitech® Whammy® or your amp...9 banks of 3 presets are now
customizable.
This equipment has been tested and found to comply with the limits for a Class B digital
device pursuant to Part 15 of FCC rules. Operation is subject to the following two conditions: (1)
This device may not cause harmful interference, and (2) this device must accept any interference
received, including interference that may cause undesired operation.
MADE IN FRANCE
Specications
1.2
■ 1 - EVENTIDE® SETTINGS AND MIDI WIRING
You have to set your Eventide® H9 to work properly
with the controller. Use the H9 control app/software to
easily set parameters in Pedal
►
MIDI Settings. You can
also hold down Hotknob and Tap footswich for 2sec.
then scroll with encoder to access MIDI settings.
Press the encoder switch to enter menu and presets
switch to return. Hold down Hotknob and Tap
footswitch for 2sec. to save & exit.
1) MIDI Channel -
RCV CH
Set your 1st H9 on Midi channel receive 1.
Set your other devices on next channels (2, 3, 4).
Eventide® H9 Settings
version 1.2 - 2017
AVERTISSEMENTS
Use only with 9V DC 200mA 2,1mm negative
center power supply. Avoid spilling liquids onto/
into the unit. Do not open – there are no user
serviceable parts inside.
WARNING
TO REDUCE THE RISK OF FIRE OR
ELECTRIC SHOCK DO NOT EXPOSE THIS
EQUIPMENT TO RAIN OR MOISTURE.
Page 3
3
■ 2A - ACCESS TO ALL SETTINGS
■ 2B - MIDI SETTINGS -
Mi
We have centralized access to all settings.
ACCESS | hold down «PSW + DOWN» for 2 s.
The controller displays «
Mi or Li or CA or GE ».
Mi ► MIDI Settings
Li ► Live Mode Settings
CA ► Calibration Settings
GE ► Generic Device Settings
Return ► Press PSW
Enter
►
Press Active
Store
►
Hold Active for 2s.
Navigation footswitches
If your Eventide® H9 is connected with H9 app :
- via Bluetooth, you must turn on MIDI over Bluetooth in MIDI settings to make MIDI works.
- via USB, you can’t use MIDI IN Eventide® H9 port to make MIDI works but you can use your MIDI IN
soundcard. Check Settings>Connect MIDI Device to Eventide® Device in H9 control app.
2) MIDI Output Mode - OUTPUT
Set Midi Output THRU.
3) Assign MIDI CC messages -
RCV.CTL
Press Tap or Active and use encoder to set.
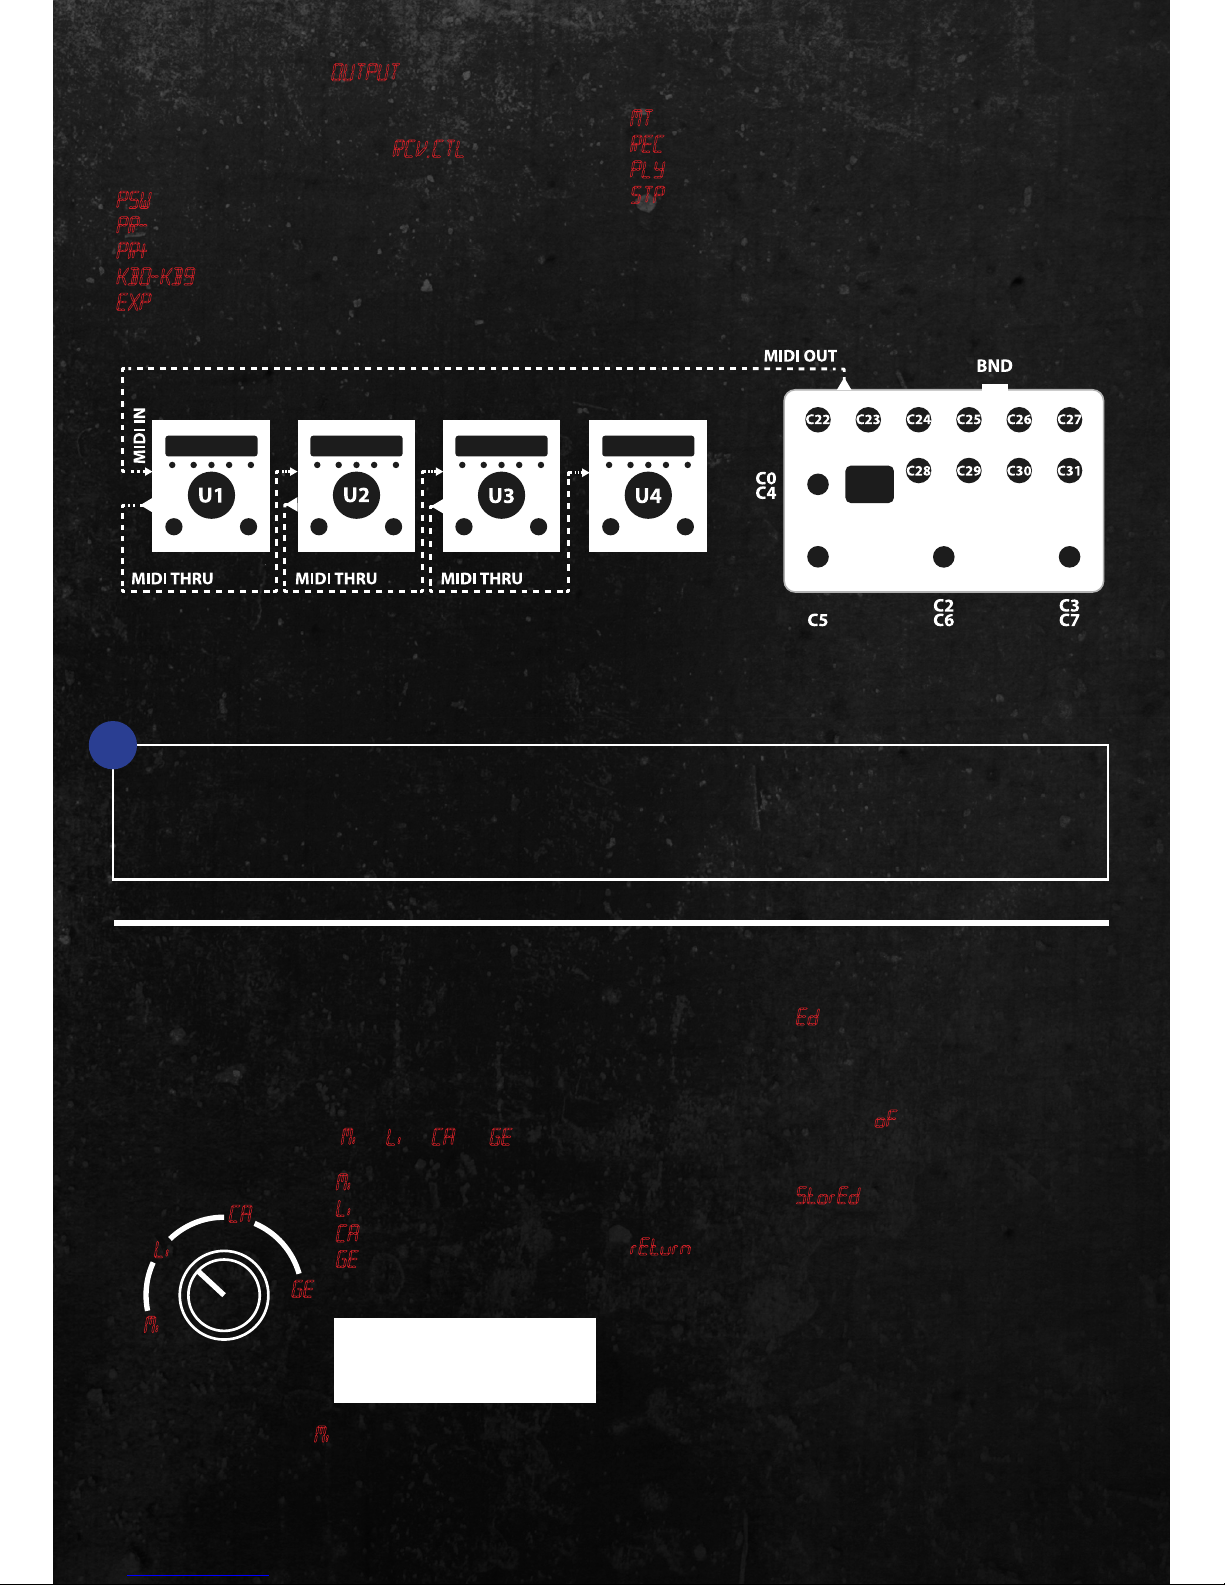
PSW Performance switch (Middle) ► C0
PR- Decrement preset ► C2 (Optional)
PR+ Increment preset ► C3 (Optional)
KB0-KB9 Set parameter 1-10 ► C22-C31
EXP Set expression pedal value ► BND (PitchBend)
EvenMidi® H9 Settings
Instead of Eventide® H9 you can wire any Midi device supporting program Change. Check Annex Generic Settings to custom your device if needed.
Looper CC
MT Looper - Empty ► C4
REC Looper - Record ► C5
PLY Looper - Play ► C6
STP Looper - Stop ► C7 (double Tap = Empty)
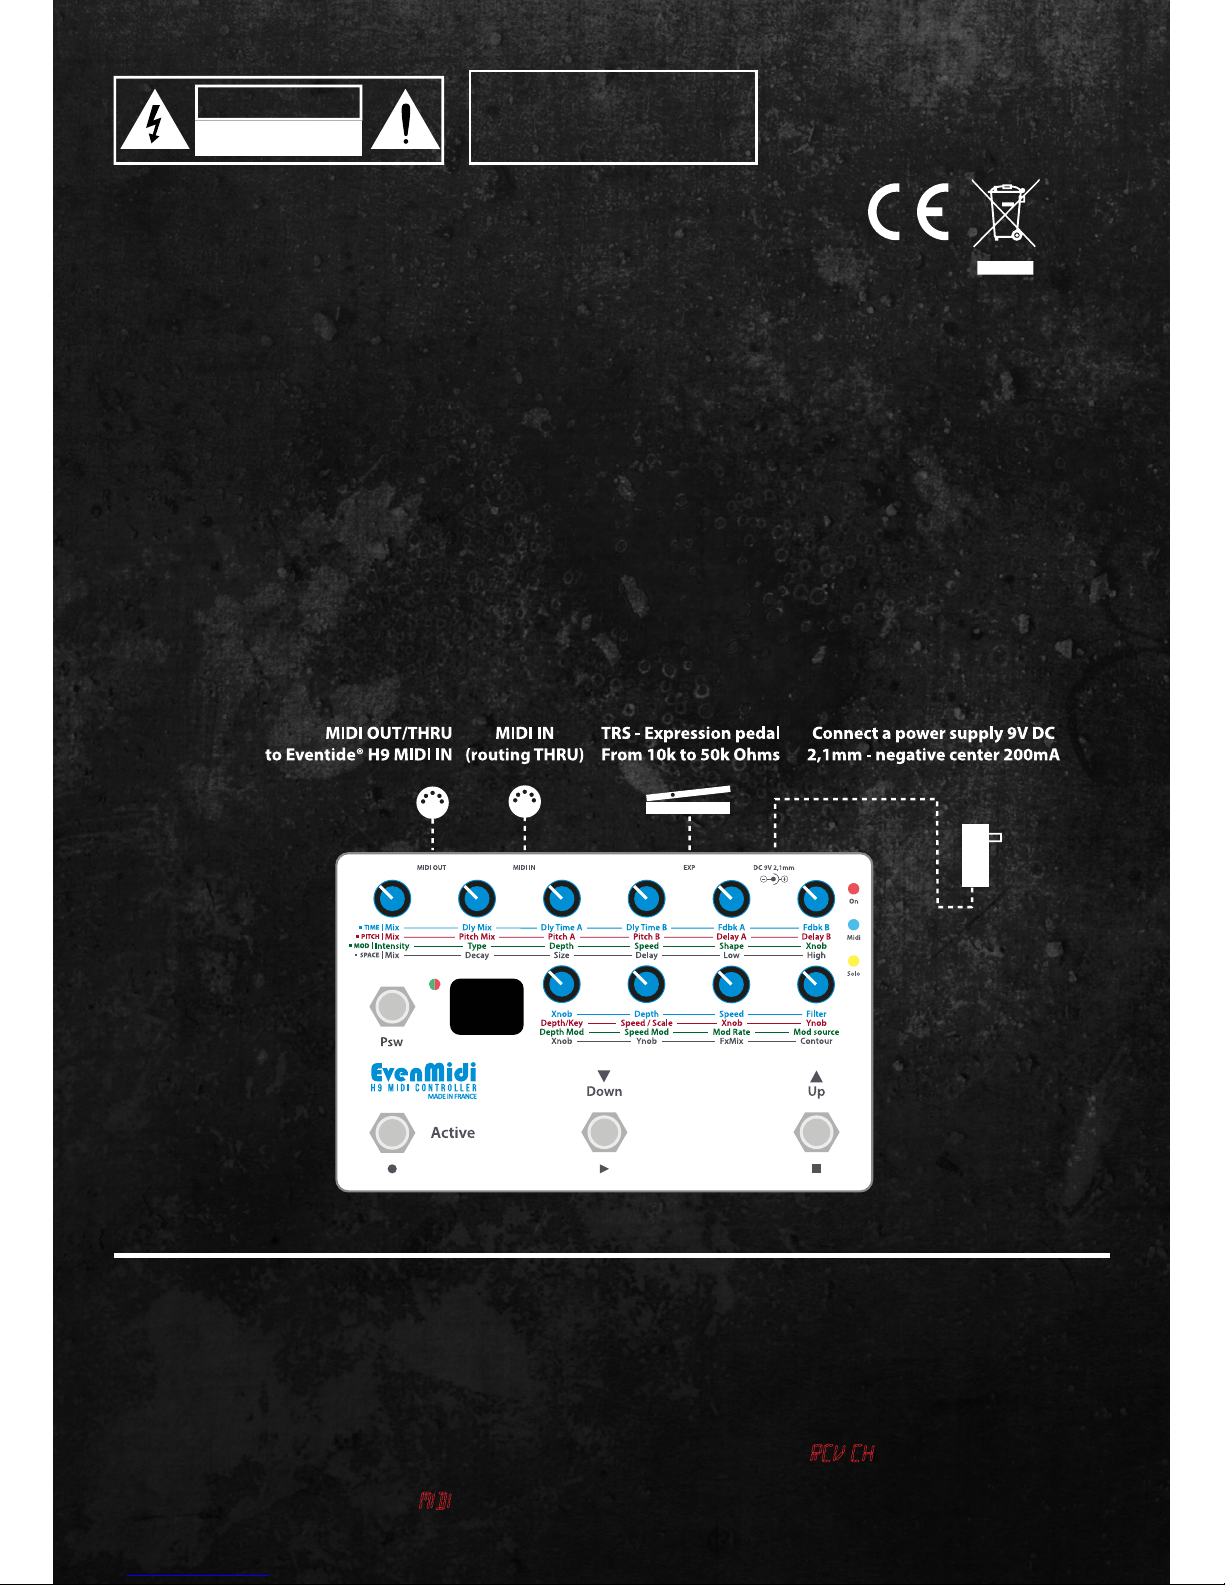
Use MIDI cable(s) (5DIN) to connect the MIDI controller
to the Eventide® H9(s).
Mix knob
Mi
Li
CA
GE
EvenMidi H9 can control four MIDI units on dierent
channels. When you enter in Midi Settings the
controller displays
Ed for Edit.
Here, you can set Midi Channels, Devices Type and
Preset number limit for Solo Mode (or Full Live
Mode). Set Midi Channel to oF to disable a device.
SAVE
► Hold Down «ACTIVE» for 2 sec. The
controller displays
StorEd.
EXIT
► Press «PSW». The controller displays
rEturn.
PRESET LIMIT : 01~99
MIDI CHANNELS : OFF - 01~16
DEVICES :
01 : H9 or TimeFactor (Looper)
02 : PitchFactor ModFactor or Space (no Looper)
03 : Strymon® Timeline (Looper)
04 : Strymon® Mobius
05 : Strymon® Space
06 to 09 : Generic 1, 2, 3, 4
Page 4
4
Midi Settings Diagram
■ 2C - HARD RESET
■ 2E - CALIBRATION SETTINGS -
CA
■ 2D - LIVE MODE SETTINGS -
Li
Press «UP» for 10s. in the Midi settings Menu:
The
controller displays Hr. MIDI channels, devices,
calibration, presets Stored and anything saved will
be reset by default.
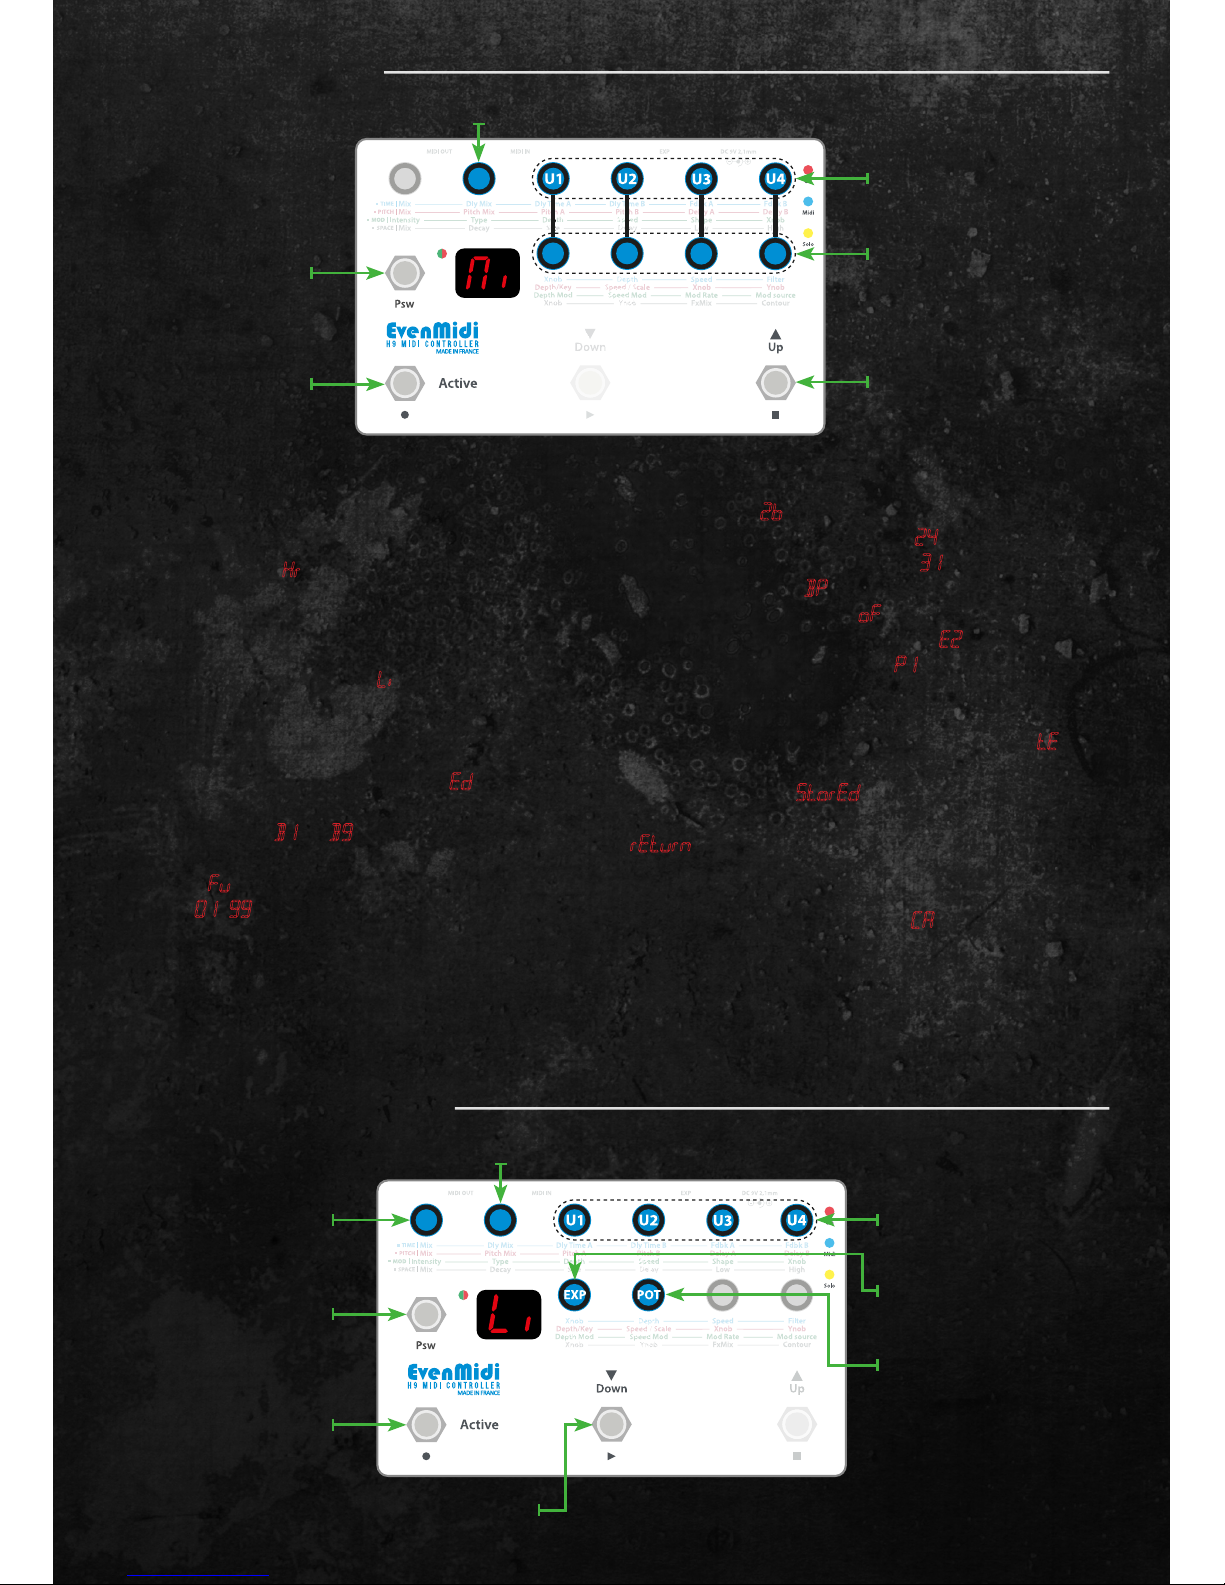
You can edit Live Mode presets and bank number
limitation or Full presets. When you enter in Live
Mode Settings the controller displays
Ed for Edit.
If bank number is
B1 to B9, it means you will have
up to 9 banks of 3 presets called A,B,C: 27 presets. If
you set to
Fu (full), the presets will be displayed
normaly 01 -99 and you will scroll to presets
normally.
To edit a preset, rst turn the « Preset to edit » knob
and select the preset. Then change the program
change, exp and pots before storing.
Connect a 10kOhms expression pedal with a stereo
cable 6.35mm (50kOhms max). When you enter in
Calibration Settings the controller displays your
expression pot value.
Preset edition example with 4 midi devices :
Preset to Edit : 2b
U1 ► Send ProgramChange 24 ► 24
U2 ► Send Program Change 31 ► 31
U3 ► Send Bypass ► BP
U4 ► O (Send nothing) ► oF
EXP ► Expression active on unit 2 ► E2
POTS ► Pots active on unit 1 ► P1
You can test your preset before storing.
TEST ► Press «DOWN». The controller displays tE.
SAVE ► Hold Down «ACTIVE» for 2s. The
controller displays StorEd.
EXIT ► Press «PSW». The controller displays
rEturn.
Live Mode Settings Diagram
PRESET TO EDIT 1A~9C
NUMBER
OF BANKS
B1~B9 - Full
PRESET LIMIT 01~99
RETURN
MIDI CHANNELS
OFF/ 01~16
DEVICES 01~09
HARD RESET
(hold 10s.)
STORE (hold 2s.)
RETURN
STORE (hold 2s.)
TEST Your Preset
POTS
OFF/P1~P4
EXP
OFF/E1~E4
PROGRAM CHANGE
BP/0~127
U1, U2, U3, U4 = Midi devices
Page 5
5
■ 3 - SOLO MODE | LIVE MODE
■ 5 - TRICKS
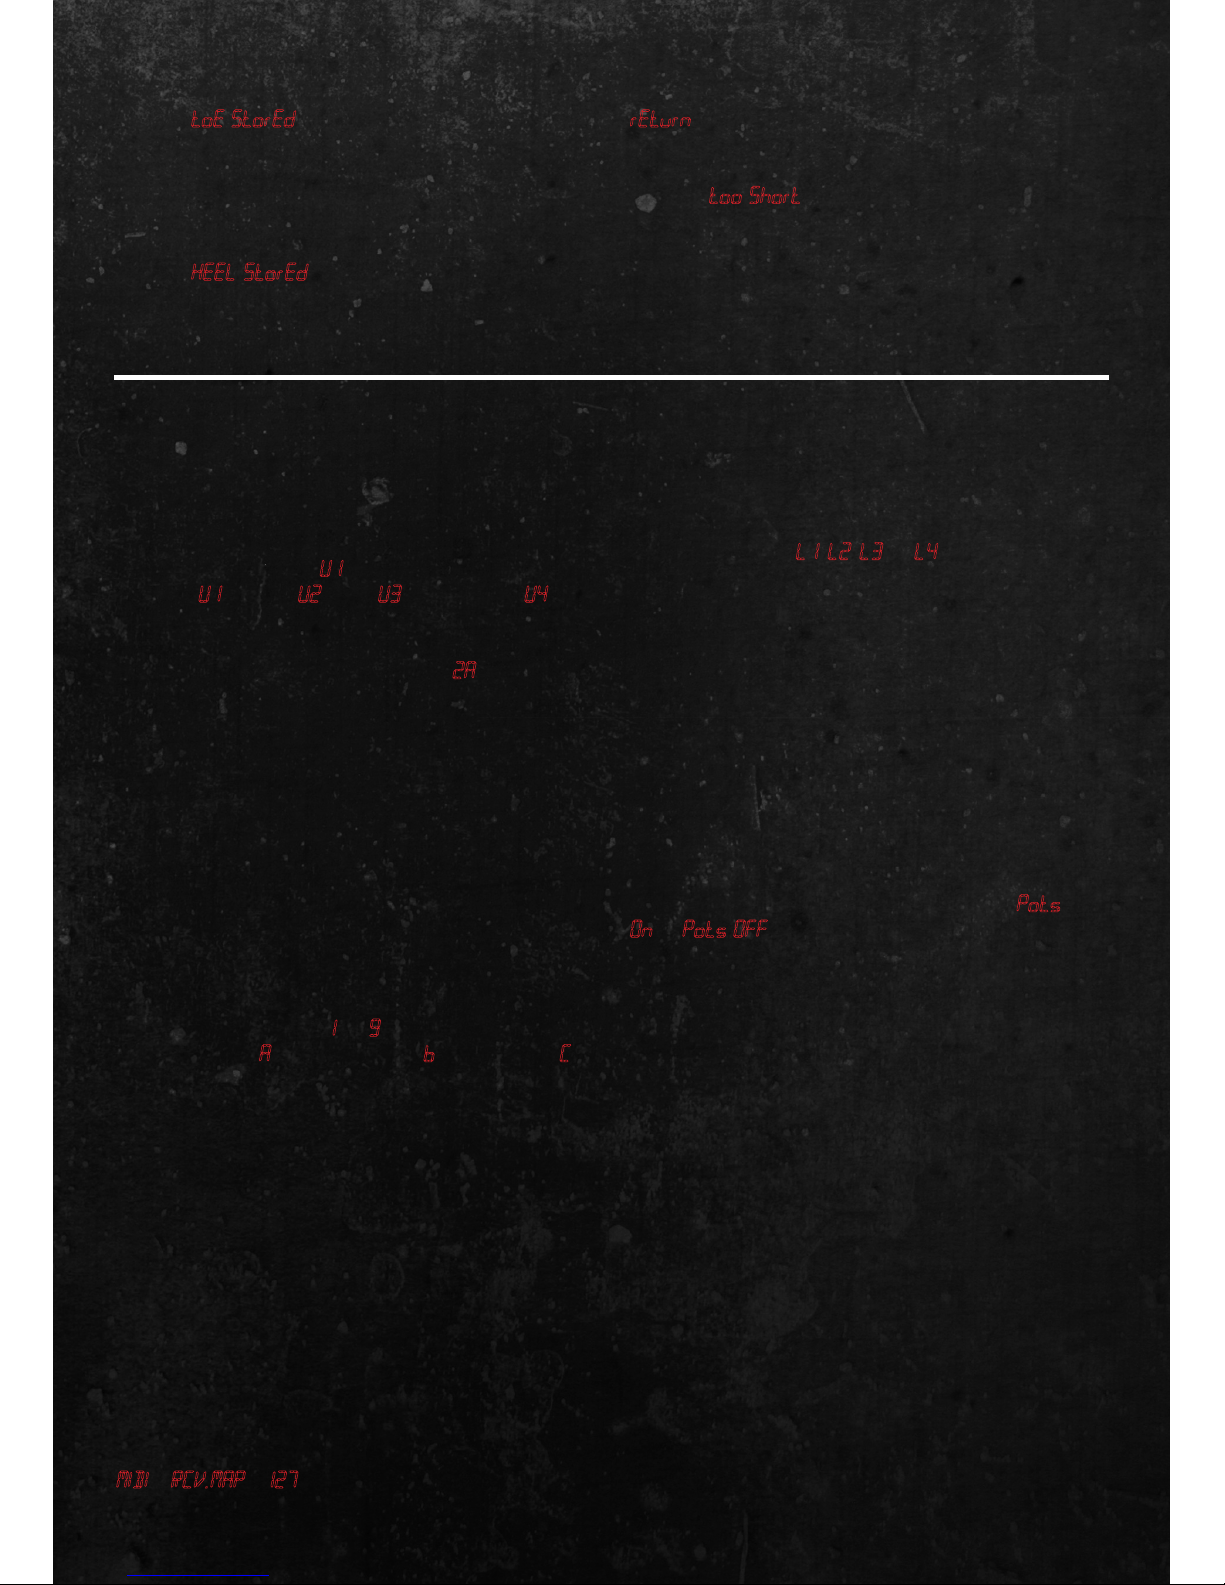
- Left led is Green: Push the pedal to your max toe.
SAVE ► Hold Down «ACTIVE» for 2s. The controller
displays
toE StorEd.
- Left led turn to red: Now push the pedal to your
min heel
SAVE ► Hold Down «ACTIVE» for 2s. The controller
displays
HEEL StorEd.
The pedal max (toe) should not go to 99 during
ACCESS | Hold down «PSW + ACTIVE» for 2 seconds.
- If the yellow Solo Led is On, you’re in Solo Mode.
The controller displays
U1. Left Led state devices:
Nothing: U1 | Green: U2 | Red: U3 | Green+Red: U4
- If the yellow Solo Led is O you’re in Live Mode. The
controller displays preset number like
2A.
In Solo Mode, you can control 4 devices separately
by switching between the 4 devices with «PSW»
Footswitch. «PSW» footswitch doesn’t send any Midi
messages in Solo Mode if you control more than 1
device. If you have only one device, PSW send Control
Change CC0.
In Live Mode, you can control 4 devices at the same
time. There is a full mode with all presets scrolling (1
to 99) and bank mode with 9 banks of 3 presets (1A
to 9C). The 27 presets can be fully customised, check
2B-Live mode Settings.
«PSW» = Bank up (from1 to 9 )
«Active» Preset A | «Down» Preset b | «Up» Preset C
By re-pressing on the same footswitch the eect is
bypassed (EvenMidi® send ProgramChange125 on
Eventide® corresponding to Bypass).
You can’t access to Looper Mode in Live Mode.
You can access to Looper if if the controller is in Solo
Mode and if you set your device to H9(& TimeFactor)
or Strymon Timeline. Check 2A-Midi Settings.
Set your Eventide H9 to load Looper Preset on
Program Change 127:
- For H9: Press Hotknob+Right Footswitch:
MIDI ► RCV.MAP ►127 . YourLooperPresetNumber.
- In H9 control App Pedal ► Midi Settings ► Program
calibration. Don’t worry it’s a normal behavior.
EXIT
►
Press «PSW». The controller displays
rEturn.
Note: To prevent incorrect calibration, if the gap
between the 2 values is too short, the controller
displays too Short. Retry again.
Check Generic Device Settings on Annex page.
■ 2F- GENERIC DEVICE SETTINGS
MODES
1 - In Solo Mode hold down «DOWN» or «UP» for 1s.
to quickly scroll presets.
2 - You can quicky enable/disable Pots : hold down
«UP+DOWN» for 2s. The controller displays Pots
On or Pots OFF.
■ 4 - LOOPER MODE
Change Receive map
►
Program Change 127
►
YourLooperPresetNumber.
ACCESS | Hold down «ACTIVE» for 2 seconds. The
controller displays L1, L2, L3, or L4.
EXIT | Hold down «UP» for 2 seconds.
You can switch to other device by pressing «PSW»
Footswitch. Looper Mode is Stored. Check
1 - EVENTIDE® SETTINGS AND MIDI WIRING to set the
MIDI CC on the Eventide ® H9.
You can’t access to any settings in Looper mode.
■ 6 - WARRANTY
One year warranty for a normal usage. Don’t put it on
the water and do not apply an excessive voltage
(max 12V). If the warranty time is over we can x your
controller at your charge.
■ 7 - MAINTENANCE
You normally don’t have any maintenance. Clean the
controller with a damp cloth.
■ 8 - CONCLUSION
Well it’s time to play! Hope EvenMidi controller will t
perfectly on your pedal board. Have fun!
Franck Graziano - EvenMidi
EvenMidi® is a trademark by Webrox. Eventide® is a trademark by Eventide inc. Strymon® is a trademark by Damage control inc and Digitech®
is a trademark by Harman inc . EvenMidi has no connection or aliation
with Eventide® inc. The TimeFactor PitchFactor ModFactor and Space
products are eects created by Eventide®. The Timeline, Mobius and
BigSky are Strymon® products. The Whammy® is a Digitech® product.
Page 6
6
ANNEX
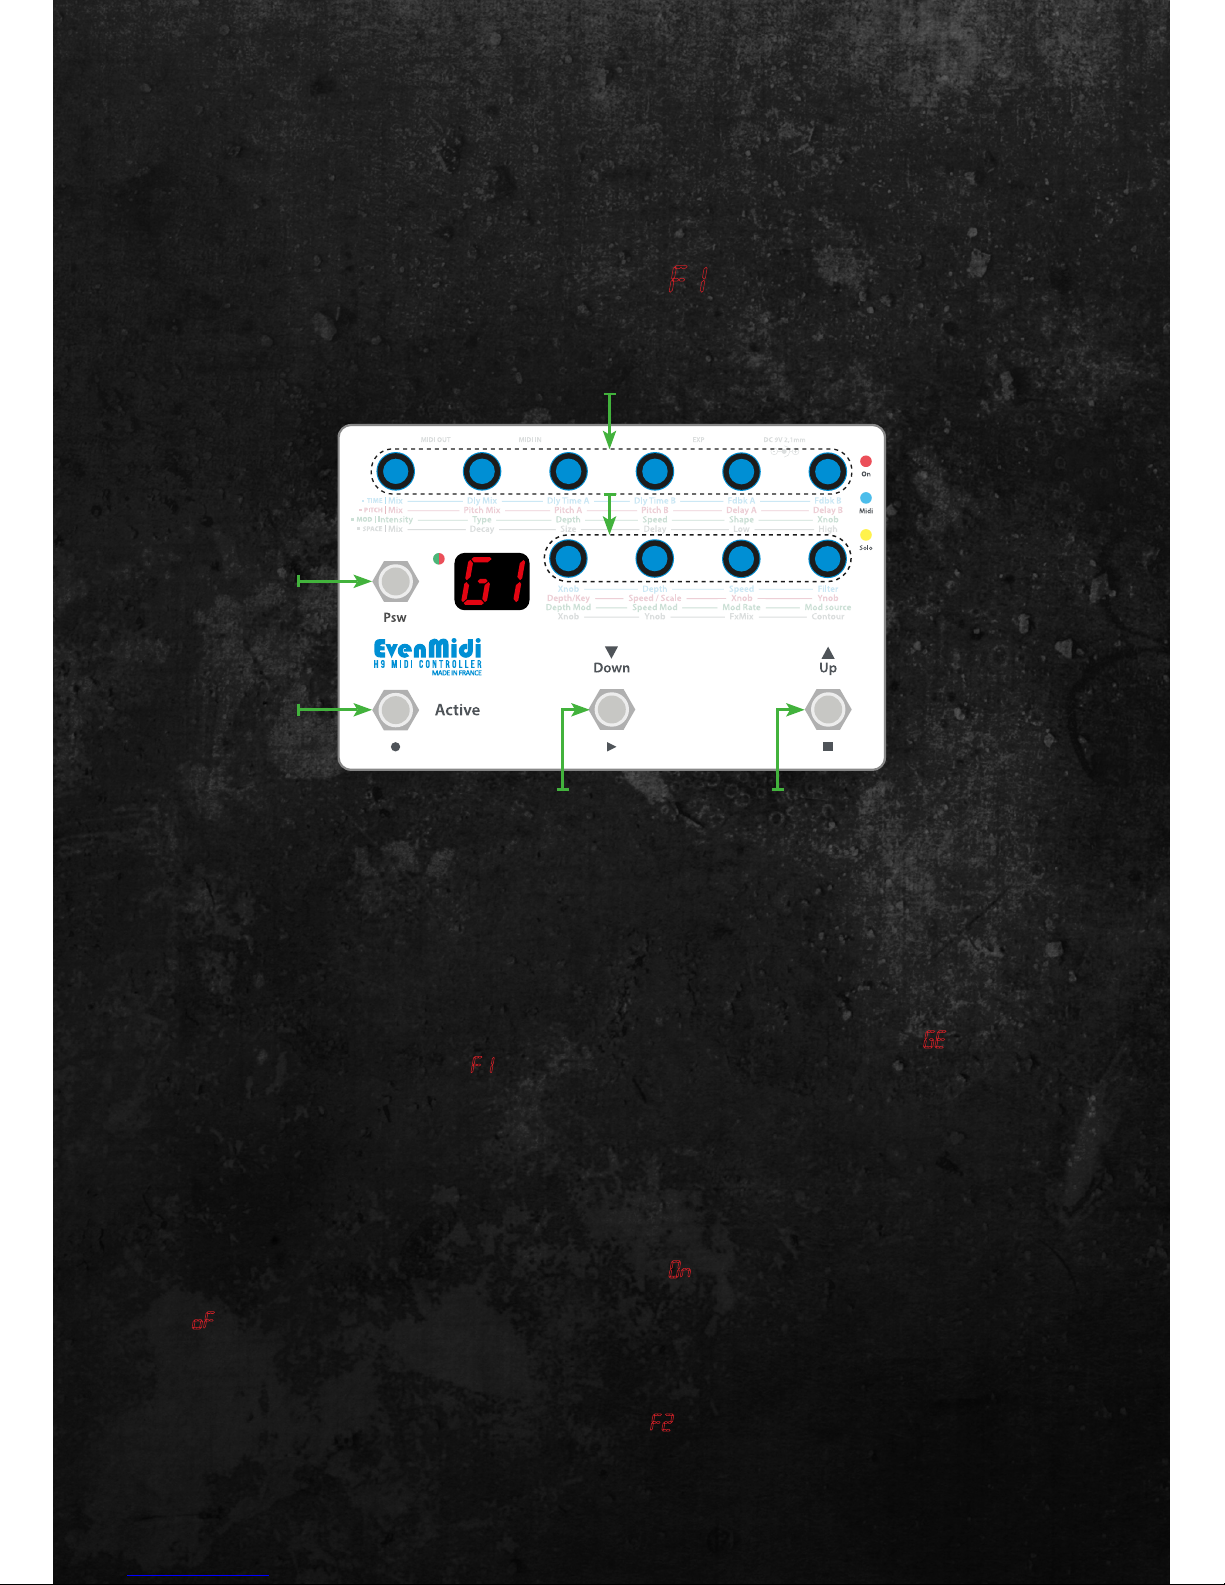
This controller can store 4 generic devices. You can set Pots (Control Change), Bypass and Expression.
It must be ok with most parts of your material such as you Midi amplier, Digitech® Whammy® etc.
Go in EvenMidi MIDI SETTINGS and assign a device Generic to a Midi Channel (not O) then Store.
ACCESS | hold down «PSW + DOWN» for 2 s. Turn the Mix knob until the controller displays GE.
Press «ACTIVE»: the controller displays F1 for sheet 1.
Step by step edit :
01 - Press «UP» to Select the Generic device you want to edit
02 - Assign each knob to the good control change (CC) or O.
03 - Press «ACTIVE» to test your knobs. The controller displays On : you can move your pots and check that
your generic device receive Midi messages. Press «ACTIVE» again to return to CC settings. The controller
displays oF.
04 - Hold Down «ACTIVE» for 2 seconds to Store
05 - Press «DOWN» to go on Sheet 2. The controller displays F2
GENERIC DEVICES SETTINGS
SHEET1 -
F1
10 POTS CONTROL CHANGE
OFF/0~99
RETURN
TEST or
STORE (hold 2s.)
SHEET CHANGING
F1~F2
TEST BYPASS
Page 7
7
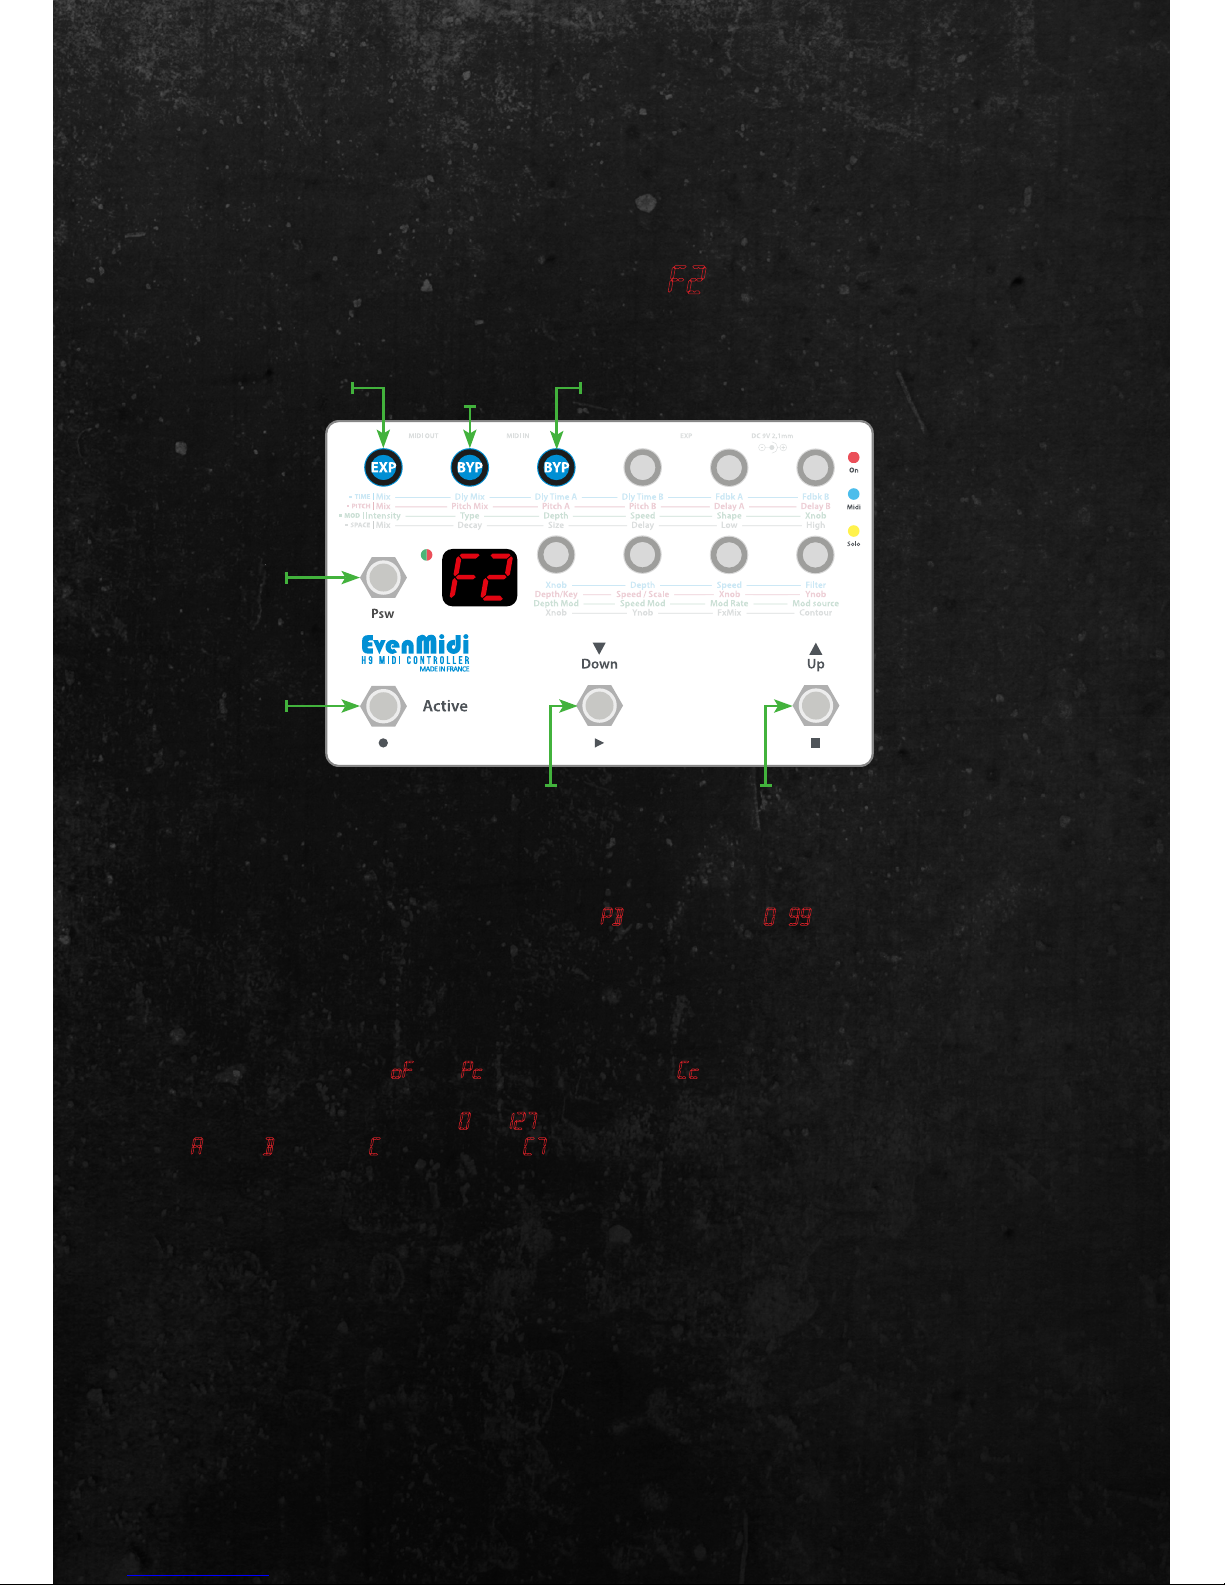
06 - Select the way you control your expression pedal :
PB = Pitchbend or 0 -99 for Control Change CC0-CC99
07 - Press «ACTIVE» to Test your expression pedal
08 - Press «ACTIVE» to return from Test
09 - Choose your Bypass Type : oF(o), Pc (Program Change) or Cc (Control Change)
10 - Choose your number bypass from 0 to 127 (Because the display is only 2 digits when you go over 99 it
displays A =100, B =110 and C =120. So 127 is C7.
11 - Press «UP» to test your bypass
12 - Hold Down «ACTIVE» for 2s. to Store
13 - Press «PSW» to Exit Generic settings
14 - Press «PSW» to Exit Menu Settings
SHEET2 -
F2
EXPRESSION
PB/0~99
RETURN
TEST EXP or
STORE (hold 2s.)
SHEET CHANGING
F1~F2
TEST BYPASS
Bypass Type
OFF/PC/CC
CC or PC Number
OFF/0~127
ANNEX
Page 8
8
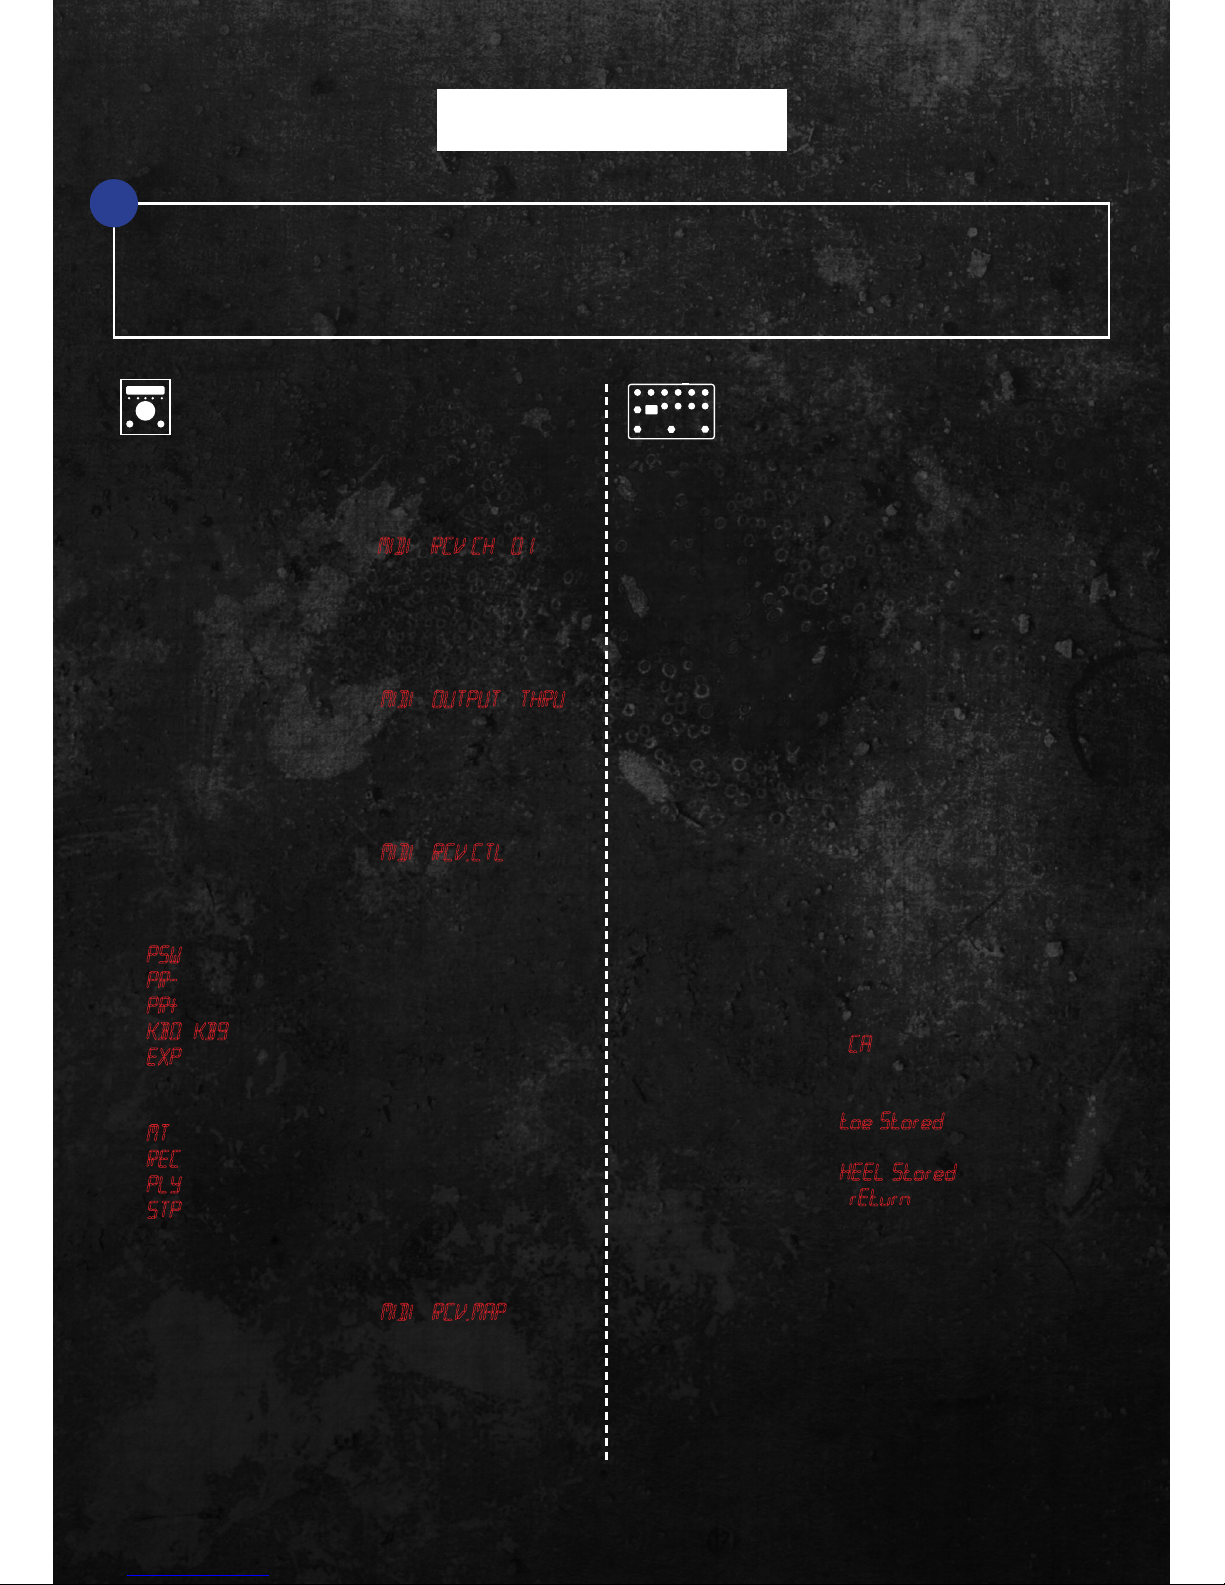
Eventide® H9 EvenMidi® H9 Midi Controller
QUICK SETTINGS
MIDI CHANNEL RECEIVE
- H9 ► Hold Hotknob+Tap ►MIDI ► RCV CH ►01
- H9App ► PEDAL ► MIDI Settings ► MIDI Receive
Channel ► Channel 1
MIDI THRU (if you use several H9 or Midi devices)
- H9 ► Hold Hotknob+Tap ► MIDI ► OUTPUT ► THRU
- H9App ► PEDAL ► MIDI Settings ► MIDI Output
Mode ► Thru
MIDI CC
- H9 ► Hold Hotknob+Tap ► MIDI ► RCV.CTL
- H9App ► PEDAL ► MIDI Settings ► Assign MIDI CC
messages to pedal functions
PSW Performance switch (Middle) ► C0
PR- Decrement preset ► C2 (Optional)
PR+ Increment preset ► C3 (Optional)
KB0 -KB9 Set parameter 1-10 ► C22-C31
EXP Set expression pedal value ► BND (PitchBend)
Looper CC
MT Looper - Empty ► C4
REC Looper - Record ► C5
PLY Looper - Play ► C6
STP Looper - Stop ► C7 (double Tap = Empty)
MIDI PC Program MAP
- H9 ► Hold Hotknob+Tap ► MIDI ► RCV.MAP
- H9App ► PEDAL ► MIDI Settings ► Program Change
receive map
PC127 -> YourLooperPresetNumber
PC125 -> Bypass (Default)
ACCESS TO ALL SETTINGS
Hold Down «PSW+DOWN» for 2s.
SOLO MODE / LIVE MODE
Factory default is Solo Mode. Hold Down
«PSW+ACTIVE» for 2s. to switch.
ACCESS LOOPER MODE
Hold Down «ACTIVE ●(rec)» for 2 s. in Solo Mode
EXIT LOOPER MODE
Hold Down «UP ■(stop)» for 2s.
EXPRESSION PEDAL CALIBRATION
1. Hold Down «PSW+DOWN» for 2s. to access
settings
2. Turn Mix knob until CA is displayed
3. Press «ACTIVE» to Enter
4. Push the pedal with your toe feet
5. Hold «ACTIVE» 2s. toe Stored is displayed
6. Bring the pedal to heel
7. Hold «ACTIVE» 2s. HEEL Stored is displayed
8. Press «PSW» to exit rEturn is displayed
9. Press «PSW» to exit settings.
POTS ON/OFF
Hold Down «DOWN+UP» for 2 s.
QUICK SCROLL PRESETS
Hold Down «UP» or «DOWN» for 1s.
If your Eventide® H9 is connected with H9 app :
- via Bluetooth, you must turn on MIDI over Bluetooth in MIDI settings to make MIDI works.
- via USB, you can’t use MIDI IN Eventide® H9 port to make MIDI works but you can use your MIDI IN
soundcard. Check Settings>Connect MIDI Device to Eventide® Device in H9 control app.
 Loading...